

Braemar FUSIONMCT User Manual
Braemar, Inc.
Fusion
Wireless
Recorder

Braemar Limited Warranty
Braemar products are warranted to be free from manufacturing and
material defects for a period of one (1) year from the date of shipment
from Braemar to the original purchaser.
Excluded from this warranty are expendable supply items including, but
not limited to, electrodes, lead wires, patient cables and batteries. This
warranty does not apply to any product which Braemar determines has
been modified or damaged by the customer.
Except for the express warranties stated above, Braemar disclaims
all warranties including implied warranties of merchantability and
fitness. The stated express warranties are in lieu of all obligations
of liabilities on the part of Braemar for damages, including but not
limited to, special indirect or consequential, arising out of or in
connection with the use or performance of Braemar products.
Any action for breach of warranty shall be commenced within one (1)
year of said breach or be forever barred. Any repairs made to the
product which are not covered by the warranty shall be billed to the
customer.
Document Number: 600-0645-00
Revision: 21
Date: June 2010

Fusion Wireless Recorder
1
2
Fusion Wireless Recorder
Table of Contents
Overview...................................................................................................2
Precautions...............................................................................................2
Disclaimer.................................................................................................3
Recorder Components..............................................................................4
Setup Steps ..............................................................................................5
Electrode Application and Placement .......................................................7
1/2/3 Channel Electrode Placement .........................................................8
3 Channel (5 lead) Electrode Placement (1st option)………………9
3 Channel (5 lead) Electrode Placement (2nd
option)………………10
Recorder Preparation ............................... Error! Bookmark not defined.
Establishing the Home Link ....................................................................14
Troubleshooting (page 1 of 2).................................................................19
Service and Maintenance .......................................................................21
Service Items and Accessories...............................................................21
Equipment Symbols................................................................................22
Overview
The Fusion Wireless recorder is a battery operated, solid state recorder
designed to record symptomatic heart arrhythmias.
The Fusion recorder provides up to xx days of total recording time for 3
channels, xx days of total recording time for 1 or 2 channels.
The Fusion recorder is enhanced with Arrhythmia Detection firmware
which will capture and automatically record asymptomatic, infrequent, or
elusive heart arrhythmia events such as Bradycardia, Tachycardia, Pause,
and Atrial Fibrillation.
Once an event is recorded, the event ECG is automatically transferred via
a digital cellular link. If a digital cellular link is not available, the event
ECG can be transferred by Bluetooth to a phone line via a Home Link
Bluetooth modem.
Precautions
A. Patient leads must be removed from electrodes before defibrillation.
B. Observe local laws for disposal of batteries.
C. Do not leave the batteries in the recorder when it is not in use.
Damage from corrosion could result.
D. Patient should be instructed to avoid close proximity to heavy
electrical equipment or other sources of electromagnetic
interference.
E. Use only the provided battery pack. Observe polarity when inserting
F. Recorder is not for infant use.
G. No automatic analysis algorithm can replace data review by a
qualified physician. Review and confirmation of analysis results is
required.
H. Patients should seek immediate medical attention if they experience
symptoms that concern them.
Specifications .........................................................................................23
Electromagnetic Emissions.....................................................................24
Electromagnetic Immunity ......................................................................24
Recommended Separation Distances ....................................................27
Fusion Wireless Recorder
3
4
Fusion Wireless Recorder
Disclaimer
Operation of the Fusion recorder may be subject to governmental and
business restrictions, including but not limited to air travel and hospital
visitations.
This device is approved for use only in the United States of America
Additional equipment classification information as required in EN 60601-1
A. EQUIPMENT not suitable for use in the presence of a
FLAMMABLE ANAESTHETIC MIXTURE WITH AIR OR WITH
OXYGEN OR NITROUS OXIDE
B. IPX0 Ordinary Equipment (enclosed equipment without protection
against ingress of water)
C. Internally Powered Equipment
D. Mode of Operation - Continuous Operation
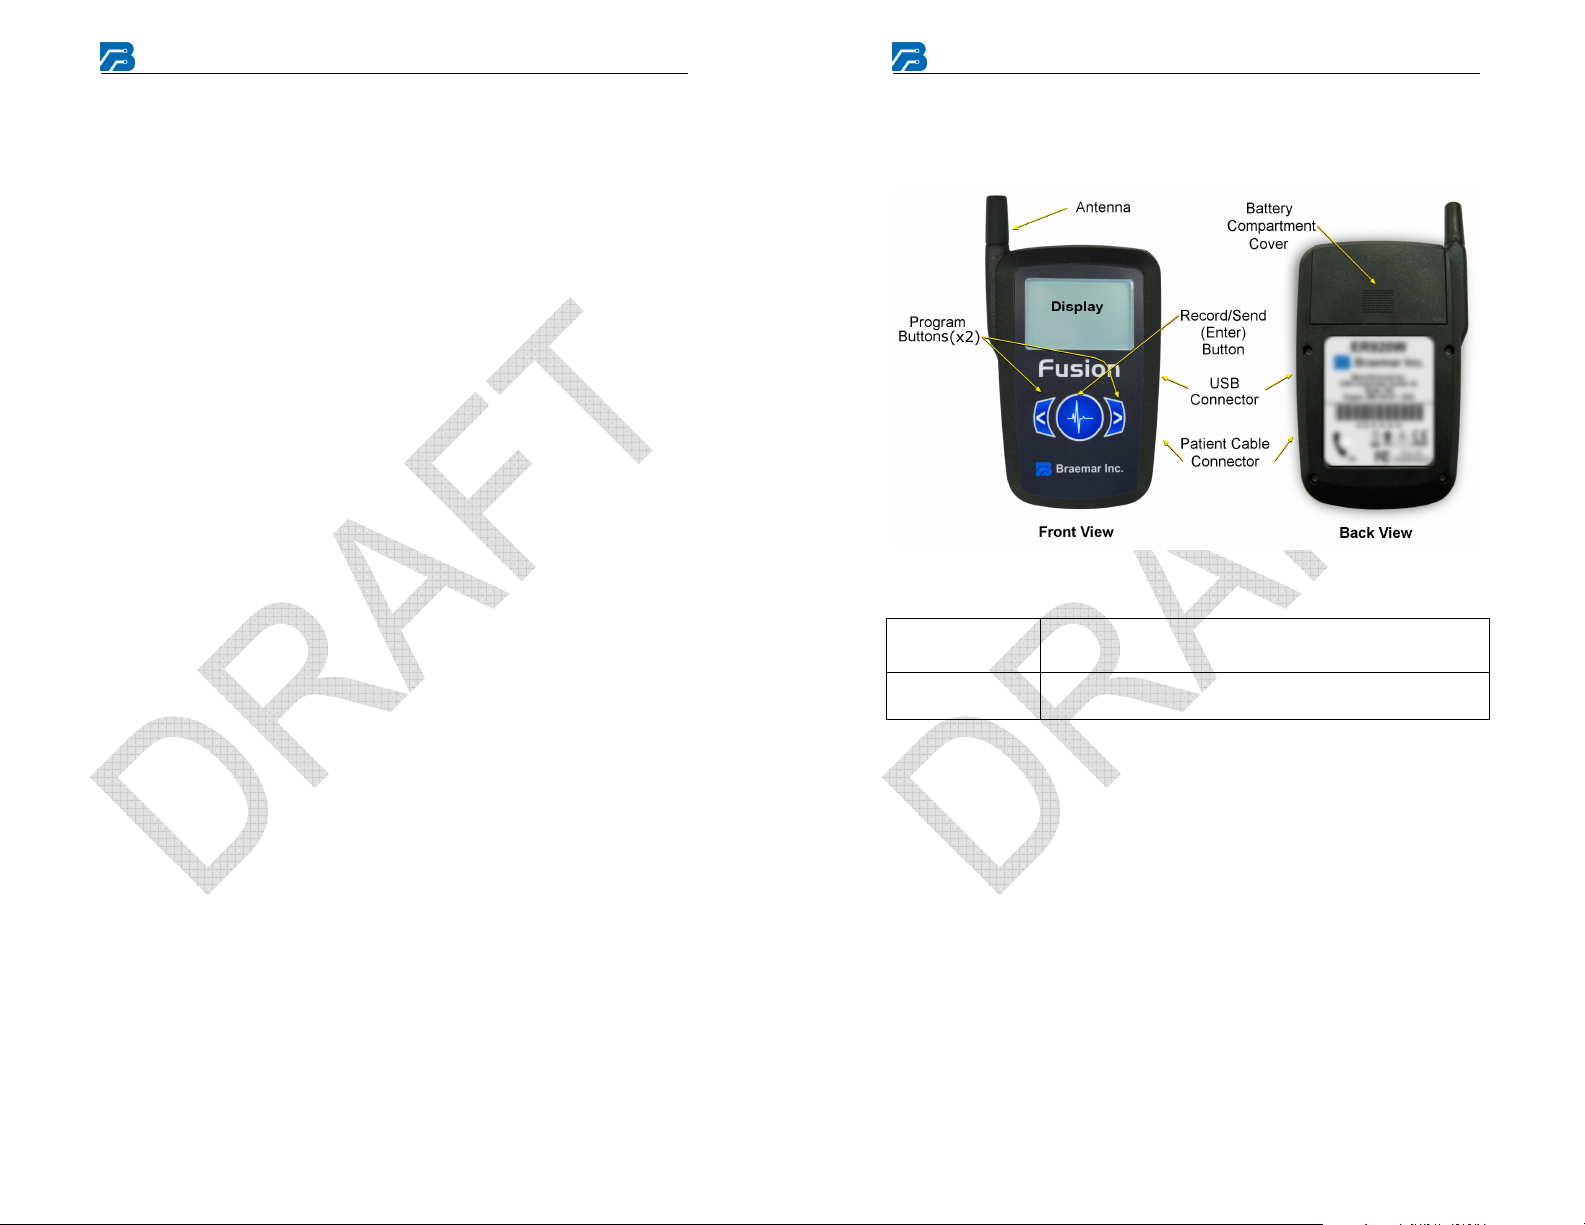
Recorder Components
Batteries
Patient Cable
Caution: U.S. Federal law restricts this device to sale by or on the
order of a physician.
3.6V AA Lithium battery pack. Insert into battery
compartment observing polarity symbols.
To adjust, move plastic slip rings up or down to keep
leads together. To lengthen, pull leads apart.

Fusion Wireless Recorder
5
6
Fusion Wireless Recorder
Setup Steps
DO NOT ENROLL PATIENT IN SOFTWARE UNTIL INSTRUCED
TO DO SO
This manual is designed to allow a technician to follow the instructions
page by page to setup the Fusion recorder. Here is the general layout:
The Fusion recorder is preprogrammed from the factory for default
settings. The device is fully programmable through the Fusion Wireless
Monitoring System Software. Please refer to the Fusion Wireless
Monitoring System Software for programming capabilities and options
1. If the recorder contains batteries, and/or a cable remove them and
insure the screen is blank before proceeding
2. Install fresh batteries into recorder. Install only AA Lithium battery
packs provided by Braemar. Observe proper battery polarity when
installing. The battery indicator resets to indicate a full capacity
battery each time the batteries are inserted. For an accurate
indication you must install fresh unused batteries.
3. Inspect LCD Screen. There are several screens that you may be
greeted with when powering on a recorder. This section covers each
of those screens.
“No cable” screen: The recorder does not have any previous
patient data and you can proceed to step 4.
“Recording…” screen: The recorder is still recording data, you
must stop the recording and erase all the data before setting up
the recorder for the next patient.
Press the left and right buttons together and it will
prompt you if you want to stop the recording.
Press the Enter button to stop recording the data and
the “Recording Complete” screen will appear.
Continue to erase the data by following the “Recording
Complete” screen steps.
“Recording Complete” screen: The recorder still has data in it,
you must erase all the data before setting up for the next patient.
Press the left and right buttons together and it will
prompt you to “Erase Data”.
Press the Enter button to erase the data. The display
will have the message “Recorder Empty”.
Continue setting up the recorder by following to the
“Recorder Empty” screen steps.
“Recorder Empty” screen: The recorder is ready to be reset.
Remove the batteries
Return to step 2
4. Apply electrodes to patient
5. Connect snaps to electrodes
6. Plug cable into recorder
7. Observe LCD main menu screen
8. Verify lead status to be OK as described below
9. Verify ECG signal is OK as described below
10. Remove Batteries
11. Enroll patient on software via Enrollment Tab using the Fusion
Wireless Monitoring System Software
12. Verify Enrollment by looking for yellow dot in the Patients Tab
using the Fusion Wireless Monitoring System Software
13. Insert Batteries into the Fusion recorder
14. Verify the recording starts automatically by inspecting the LCD for
the Recording…. screen
15. Verify yellow dot has been changed to two green dots in the Patients
tab using the Fusion Wireless Monitoring System Software
16. Set up is complete and the recoding has been successfully started
Fusion Wireless Recorder
7
8
Fusion Wireless Recorder
Electrode Application and Placement
For each electrode lead wire:
1. Snap the electrode onto the lead wire.
2. Remove the protective backing from the adhesive side of the
electrode.
3. Apply the electrode to the patient’s skin per Electrode Placement
diagram in this manual or as instructed by the physician.
Notes:
A. It is recommended that trained medical personnel instruct the
patient in the proper application of electrodes.
B. Use good quality long term electrodes. Braemar recommends
the use of low impedance Holter electrodes. Instruct patient to
apply fresh electrodes regularly. (Usually on a daily basis.)
C. Proper preparation of the patient's skin is absolutely essential
for obtaining a quality ECG recording. The skin surface where
the electrodes will be placed should be cleaned with alcohol,
allowed to dry, and abraeded.
D. Any loose electrode needs to be replaced.
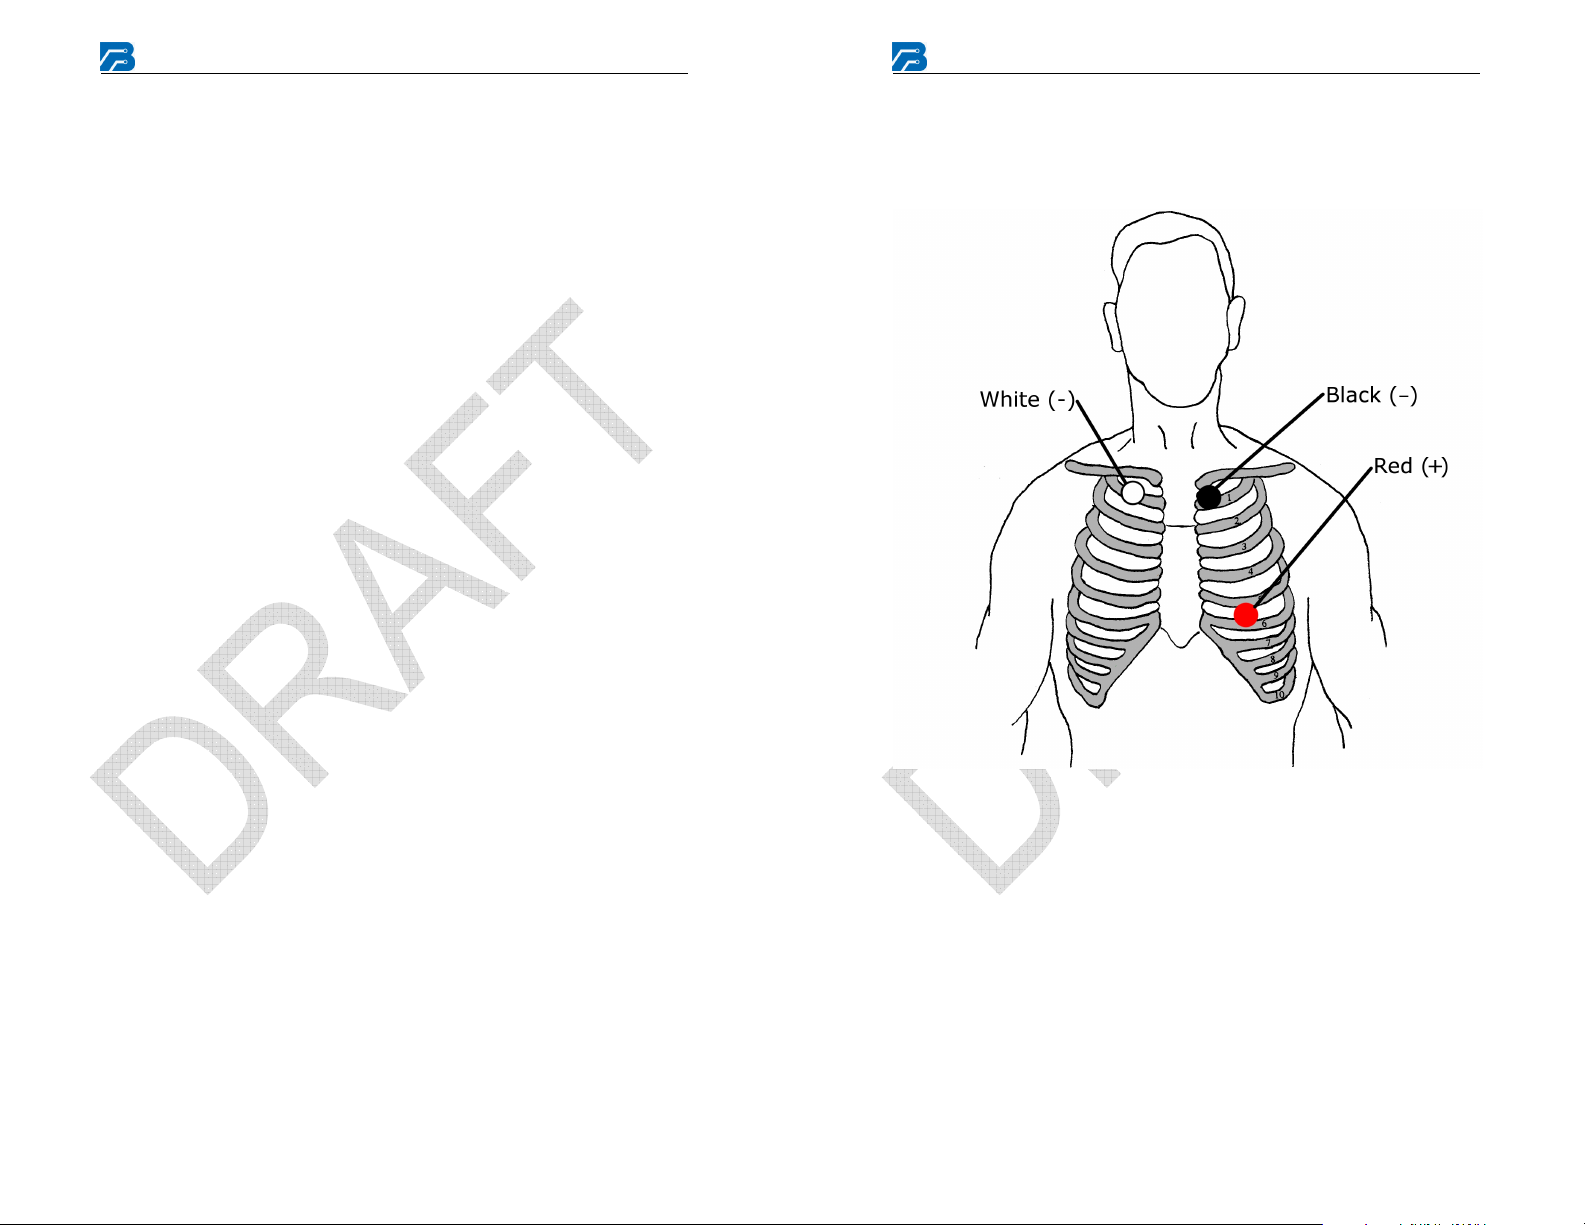
3 Lead 2 Channel Electrode Placement
This is a typical electrode placement for a 3 lead 2 channel patient cable.
Channel 1 = Red (1+), White (1-),
Channel 2 = Black (2+), White (1-)
 Loading...