

Page 1

Helpful Tips
for Using the
ProImage
Plus3000/ProImage
PosterPrinter Interface
XL3000
Page 2

Welcome
Congratulations on your purchase of the ProImage
Installing the interface board in your printer gives you the ability to print high-quality posters and banners directly
from your PC to your ProImage
Plus3000 or ProImage XL3000 PosterPrinter system.
This document provides useful information about creating posters and banners on the ProImage
ProImage
XL3000 PosterPrinter systems. It contains instructions for setting up and printing banners and for
using the system with a variety of popular Windows
The ProImage
ProImage
Plus3000 PosterPrinter system is also referred to as the FujiFilm PP3000 and the
XL3000 PosterPrinter system is also referred to as the FujiFilm PP3000WIDE PosterPrinter.
Plus3000/XL3000 PosterPrinter System Interface Kit!
Plus3000 and the
applications, including the GalaRio T emplate Gallery.
ProImage
Plus3000/XL3000 PosterPrinter Helpful Tips Page 1
Page 3

Creating Banners with the ProImage
Plus3000/XL3000 PosterPrinter
System
You can create banners with your PosterPrinter using a variety of software, such as the GalaRio™ Template
Gallery application. To print a banner of a specific size, you need to first set up that size in the Plus3000/XL3000
print driver. Once you set up a size, it is stored in the custom size list—when you want to use the size in the future,
you just need to select it from the list in the driver before printing.
Banner Sizes
When you set up the banner size in the driver, the length you select needs to be shorter than the actual length of the
banner you’re going to print. The following chart lists some typical banner sizes and the corresponding length you
should choose in the Plus3000/XL3000 driver when using the GalaRio™ Template Gallery application.
GalaRio™ Banner Sizes Compatible Banner Length
Setting in the Driver
17" x 4 ft. 45.5 inches
17" x 5 ft. 57.5 inches
17" x 6 ft. 69.5 inches
17" x 8 ft. 93.5 inches
23" x 5 ft. 57.5 inches
23" x 6 ft. 69.5 inches
23" x 8 ft. 93.5 inches
29" x 6 ft. 69.5 inches
29" x 8 ft. 93.5 inches
36" x 6 ft. 69.5 inches
36" x 8 ft. 93.5 inches
Note: These sizes have been tested and verified with the GalaRio™ application. You can try using these lengths in
the driver when printing with other applications, but you may have to make some adjustments.
Setting the Banner Size in the Driver
Follow these steps to set up a banner size in the Plus3000/XL3000 printer driver. Keep in mind that you only need
to do this once for each banner size you want to use:
1. Click the Start button on the Windows taskbar, highlight Settings and select Printers.
2. Right click the FujiFilm PP3000/PP3000WIDE printer icon, and choose Properties from the menu that
appears.
ProImage
Plus3000/XL3000 PosterPrinter Helpful Tips Page 2
Page 4
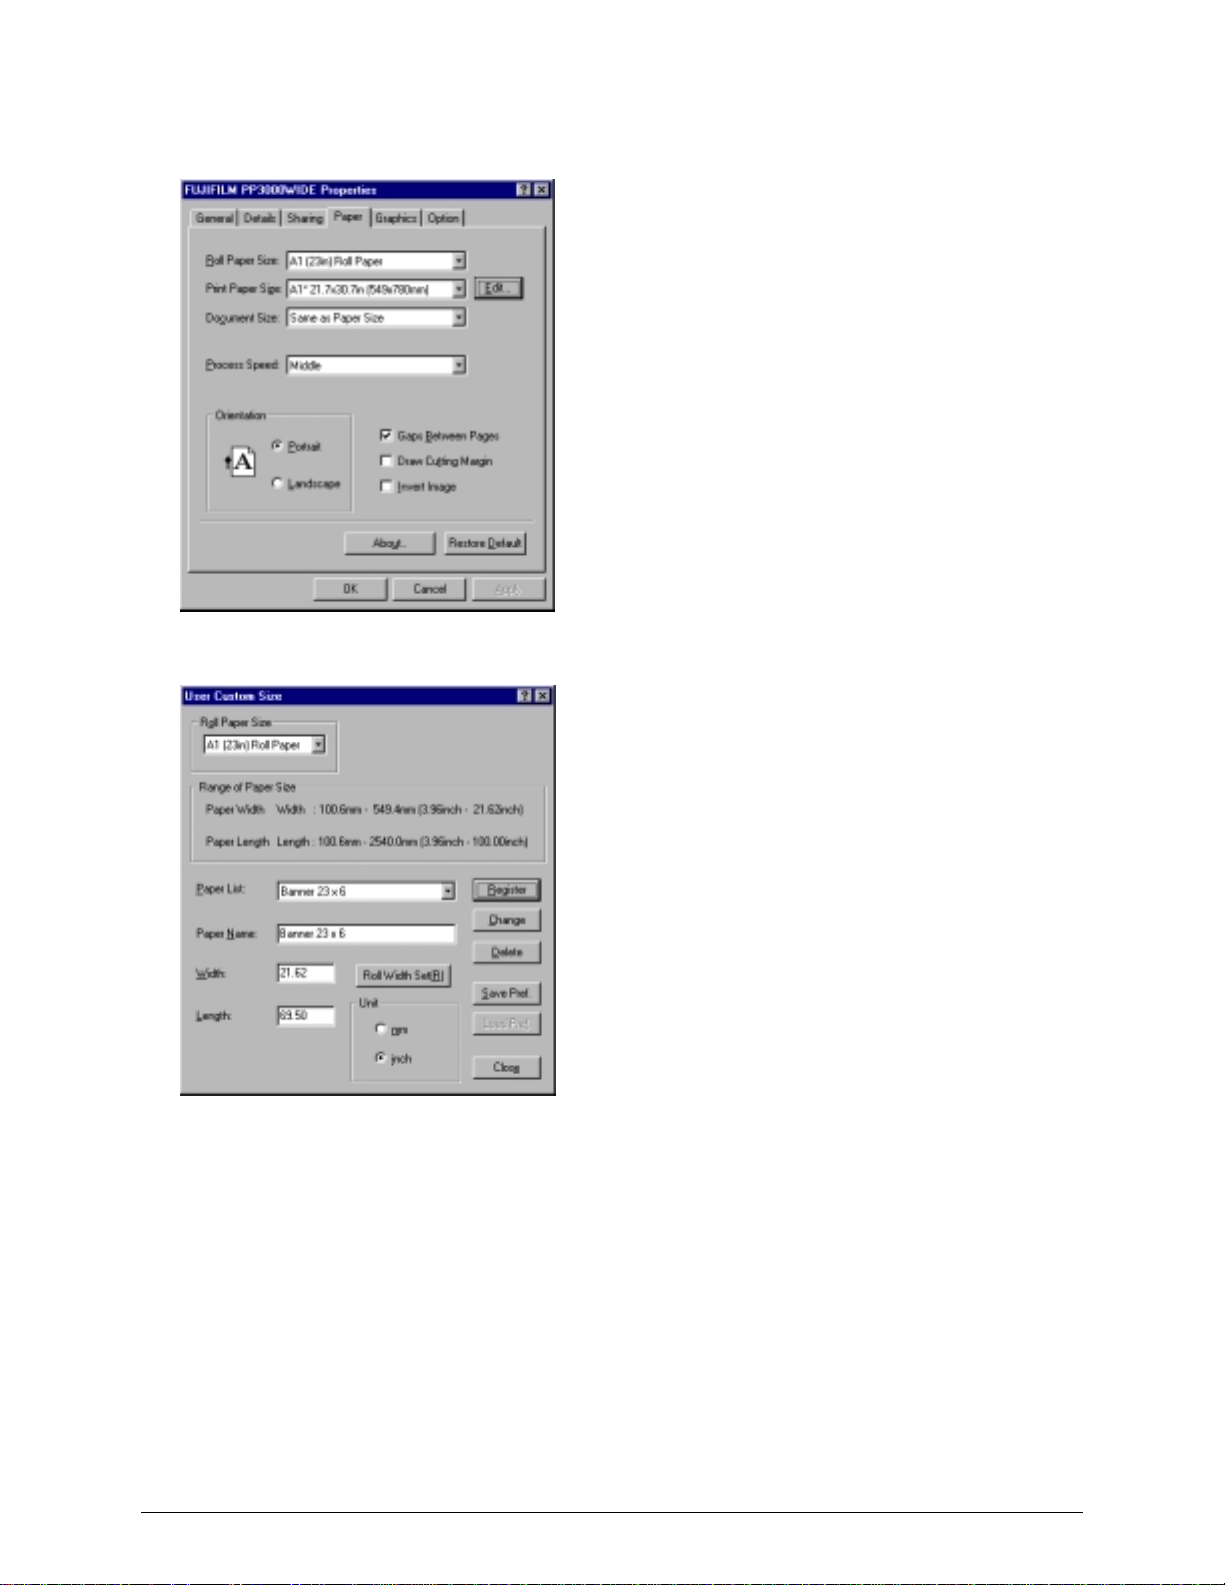
3. On the FujiFilm PP3000/PP3000WIDE properties sheet, select the Paper tab.
4. Click the Edit button next to the Print Paper Size field. In the Edit Print Paper Size List dialog box that
appears, click the User Custom Size button to display the dialog box shown below.
5. Select options as follows:
• Choose the paper width from the Roll Paper Size list.
• Type a name for the banner size in the Paper Name field. You can enter any name you’d like. This is the
name that will appear in the print driver dialog box to represent this banner size.
• Enter the banner’s dimensions in the Width and Length fields. Note that the length must be entered in
inches, rather than in feet (as in the table shown on the previous page).
6. Click the Register button to save the setting.
7. Repeat steps 5 and 6 for each banner size you want to set up. Then click the Close button to close the User
Custom Size dialog box.
ProImage
Plus3000/XL3000 PosterPrinter Helpful Tips Page 3
Page 5

8. In the Edit Print Paper Size List dialog box, select the name of the banner size you set up in the User Custom
Size List. Click the Add button next to the list to move the entry to the Paper Size list area.
9. Click OK to close the two open dialog boxes.
Printing a Banner from a Windows
To print a banner, first be sure the Plus3000/XL3000 is selected as your system’s printer. Choose Print from the
File menu and click the Properties button. From the Print Paper Size list, choose the size of the banner you want
to print.
Application
Using the GalaRio Template Gallery with Your PosterPrinter
The GalaRio™ Template Gallery application, packaged with your ProImagePlus3000/XL3000 System Interface
Kit, can be used to create any type of poster or banner that you need. The application provides pre-designed
templates for the posters and banners you need to create most often, which you can then print on your
PosterPrinter. All you need to do is choose a template, type your text and print!
The GalaRio™ application comes with a Quick Start guide, that covers the basics of creating posters and banners.
A complete online help system within the application provides additional information. Refer to the previous section
in this document for details on setting up banners and printing the m with your PosterPrinter.
Using Common Windows
or the ProImage
This section describes how to use some common Windows® applications to create effective, eye-catching posters
and banners with your Po ster Pr inte r . We’ve developed these tips to help you get the best possible output from
your system.
XL3000 PosterPrinter System
Applications with the ProImage
Plus3000
ProImage
Plus3000/XL3000 PosterPrinter Helpful Tips Page 4
Page 6

Before You Begin
We recommend that you change the Document Size option for your printer before using the printer with a Windows
application. Some unusual print errors may occur if you do not make this change. Follow these steps:
1. Click the Start button on the Windows taskbar, highlight Settings and select Printers.
2. Right click the FujiFilm PP3000 or the PP3000WIDE printer icon and choose Properties from the menu that
appears. The FujiFilm PP3000 or the PP3000WIDE properties sheet displays.
3. Select the Paper tab. In the Document Size field, select the US Letter option.
4. Click OK to close the properties sheet.
Printing with Microsoft
1. Select Print from the File menu. The Print dialog box appears.
2. Select FujiFilm PP3000 or the PP3000WIDE and click Properties. The FujiFilm PP3000 or PP3000WIDE
properties sheet appears.
3. Configure the Paper tab as follows:
• Roll Paper Size: Select the roll width that matches the installed pape r.
• Print Paper Size: Select the standard page size or create a custom page size.
• Gaps Between Pages: Check this option.
Note: Standard pages are indicated by an asterisk (*) following the page size.
page sizes, see the FujiFilm PosterPrinter 3000/3000Wide Interface Kit User’s Guide.
• Document Size: Select US Letter.
• Processor Speed: Select Middle.
• Orientation: Select Portrait or Landscape.
See “Print Driver Reference” in Chapter 3 of the
more details on selecting options.
4. Click OK. The Print dialog box reappears.
5. Click Close.
Note: Clicking OK will send the job to the printer.
6. Select Page Setup from the File menu. The Page Setup dialog box appears.
7. Click the Margins tab, if necessary. To use the full printable area, set the bottom margin at 0.6 and set all other
margins to 0 (zero).
8. In the Page Setup dialog box, click the Paper Size tab.
9. Select the Document size you selected in Step 3, and click OK.
10. Select Print from the File menu. The Print dialog box appears.
11. Click OK to begin printing.
Tips
• If you are creating multiple pages, make sure that all pages have the same document size se lected before
printing.
• The maximum document size is 22
• This application is not well suited for making banners.
Word 95, 97 and 2000
FujiFilm PosterPrinter 3000/3000Wide Interface Kit User’s Guide for
" x 22" (558.7 x 558.7mm).
For instructions on creating custom
ProImage
Plus3000/XL3000 PosterPrinter Helpful Tips Page 5
Page 7

Printing with CorelDRAW 7.0
1. Select Print from the File menu. The Print dialog box appears.
2. Select the FujiFilm PP3000 or the PP3000WIDE print driver and click Properties. The FujiFilm PP3000 or
the PP3000WIDE properties sheet appears.
3. Configure the Paper tab as follows:
• Roll Paper Size: Select the roll width that matches the installed paper.
• Print Paper Size: Select the standard page size or create a custom page size.
• Gaps Between Pages: Check this option.
Note: Standard pages are indicated by an asterisk (*) following the page size. For instructions on creating
custom page sizes, see the
• Document Size: Select US Letter.
• Processor Speed: Select Middle.
• Orientation: Select Portrait or Landscape.
4. Click OK. The Print dialog box reappears.
5. Click Options. The Print Options dialog box appears.
6. Select the Fit to page option. A check mark appears in the check box when you select the option.
7. Click OK to redisplay the Print dialog box.
8. Click OK to begin printing.
Tip
• For non-standard page sizes, select the Set From Printer option in the Layout, Page Setup dialog box. You
may also need to toggle between Portrait and Landscape to get CorelDRAW to update page sizes.
FujiFilm PosterPrinter 3000/3000Wide Interface Kit User’s Guide.
ProImage
Plus3000/XL3000 PosterPrinter Helpful Tips Page 6
Page 8

Printing with CorelDRAW 8.0
1. Select Print Setup from the File menu. The Print Setup dialog box appears.
2. Select FujiFilm PP3000 or the PP3000Wide and click Properties. The FujiFilm PP3000 or the PP3000Wide
properties sheet appears.
3. Configure the Paper tab as follows:
• Roll Paper Size: Select the roll width that matches the installed pape r.
• Print Paper Size: Select the standard page size or create a custom page size.
• Gaps Between Pages: Check this option.
Note: Standard pages are indicated by an asterisk (*) following the page size. For instructions on creating
custom pages, see the
• Document Size: Select US Letter.
• Processor Speed: Select Middle.
• Orientation: Select Portrait or Landscape.
4. Click OK. The print setup dialog box reappears.
5. Click OK to close the printer setup dialog box.
6. Select Print from the File menu. The print dialog box appears.
7. Click the Layout tab and choose Fit to Page.
8. Click Print to begin printing.
Tips
• The margins cannot be altered.
• Using the Same as Paper Size or Custom Page Sizes option: For non-standard page sizes, you need to select the
Set From Printer option in the Layout, Page Setup dialog box and you may need to toggle between Portrait
and Landscape to get CorelDRAW to update the non-standard page size change.
FujiFilm PosterPr inter 3000/3000Wide Interface Kit User’s Guide.
ProImage
Plus3000/XL3000 PosterPrinter Helpful Tips Page 7
Page 9

Printing with Microsoft
PowerPoint
95, 97 and 2000
1. Select Print from the File menu. The Print dialog box appears.
2. Select FujiFilm PP3000 or the PP3000WIDE and click Properties. The FujiFilm PP3000 or the
PP3000WIDE properties sheet appears.
3. Configure the Paper tab.
• Roll Paper Size: Select the roll width that matches the installed pape r.
• Print Paper Size: Select the standard page size or create a custom page size.
• Gaps Between Pages: Check this option.
Note: Standard pages are indicated by an asterisk (*) following the page size. For instructions on creating
custom pages, see the
FujiFilm PosterPr inter 3000/3000Wide Interface Kit User’s Guide.
• Document Size: Select US Letter.
• Processor Speed: Select Middle.
• Orientation: Select Portrait or Landscape.
4. Click OK. The Print dialog box reappears.
5. In the Print dialog box click Cancel.
6. Select Slide Setup or Page Setup from the File menu. The Slide or Page Setup dialog box appears.
7. Select Custom in the Slides Sized For field. The Width and Height fields adjust automatically.
8. Select the orientation you selected in Step 3.
9. Click OK.
10. Select Print from the File menu. The Print dialog box appears.
11. Select Scale to Fit Paper. A check mark appears in the check box when you select the option.
12. Deselect Black and White, Pure Black and White, and Grayscale in PowerPoint
2000. No check mark appears
in the check boxes when you deselect the option.
13. Click OK to begin printing.
Tips
• The margins cannot be altered.
• The maximum document size is 56
" x 56" (1420 x 1420 mm).
ProImage
Plus3000/XL3000 PosterPrinter Helpful Tips Page 8
Page 10

Printing with Microsoft
Excel 95, 97 and 2000
1. Select Print from the File menu. The Print dialog box appears.
2. Select FujiFilm PP3000 or the PP3000WIDE and click Properties. The FujiFilm PP3000 or the
PP3000WIDE properties sheet appears.
3. Configure the Paper tab:
• Roll Paper Size: Select the roll width that matches the installed pape r.
• Print Paper Size: Select the standard page size or create a custom page size.
• Gaps Between Pages: Check this option.
Note: Standard pages are indicated by an asterisk (*) following the page size. For instructions on creating
custom page sizes, see the
FujiFilm PosterPrinter 3000/3000Wide Interface Kit User’s Guide.
Document Size: Select US Letter.
• Processor Speed: Select Middle.
• Orientation: Select Portrait or Landscape.
4. Click OK. The Print dialog box reappears.
5. Click Cancel.
6. Select Page Setup from the File menu. The Page Setup dialog box appears.
7. Click the Page tab (if necessary) and select the correct orientation, paper size, and print quality. Match the
orientation and paper size selections you made in Step 3.
8. If necessary, click the Margins tab. To use the full printable area set the bottom margin at 0.6 and set all other
margins to zero.
9. Click Print Preview to make sure everything fits in the printable area.
10. Click Print. The Print dialog box reappears.
11. Click OK to begin printing.
Tips
• If you are creating multiple pages, make sure that all pages have the same document size when printing.
• This application is not well suited for making banners.
ProImage
Plus3000/XL3000 PosterPrinter Helpful Tips Page 9
Page 11

Printing with Print Artist
The Print Artist application has its own detailed user’s guide that explains how to create output on a standard
printer. The following section provides additional information about optimizing printing on your ProImage
Plus3000 or ProImage
XL3000 PosterPrinter System. Any questions regarding the operation of Print Artist
should be directed to the Technical Support Department at Sierra On-Line. Call 425.644.4343 or visit this Web site:
http://www.sierra.com.
Important tips
• Always print in portrait mode even if you have created your poster or banner in landscape. Your poster or
banner will print faster because it requires less temporary space on your hard drive.
• If your system crashes during printing, Windows
creates temporary files in your \Windows\Syste m\Temp
directory with file names such as ~pXXXX.tmp. You must delete these files before using Print Artist again.
(An easy way to find these files is to search for *.tmp.)
Creating and printing a poster using Print Artist
You can choose from any of the Print Artist provided document types to print to your PosterPr inter (although
Signs and Banners are the best suited for printing in a large size). Because it is a specialty printer, none of these
document types are correctly sized for the ProImage
Plus3000 or ProImage XL3000 PosterPrinter System, so
you may need to modify the settings slightly to achieve the results you want.
Basic steps for creating a poster in Print Artist
Follow these basic steps to create and print a poster from Print Artist to your PosterPrinter system.
1. Select the Signs document type, click on the desired category, select the desired layout, and click OK to open it.
2. Modify the layout as needed.
3. Select Print Setup from the File menu.
4. Select the FujiFilm PP3000 or the PP3000Wide print driver from the Specific Printer drop down list, click on
Options, ensure that the correct paper is selected and click OK.
5. Click OK again to exit Print Setup.
6. Select Print from the File menu, ensure that the preview shows the poster is fitting on one page, then click OK
to print.
The following sections offer more detail on each of the above steps:
Selecting a Standard Layout
Print Artist comes complete with pre -designed signs, templates or si mply blank pages wit h which you can design
from scratch. These are referred to as standard layouts because they are designed in standard page sizes, such as
8½” x 11”. Later in this document, you will learn how to use custom (non-standard) sizes to create banners. Some
users may choose to modify existing layouts, while others may decide to create their own from scratch. Follow
these steps to open a layout:
1. Select the Signs document type from the opening Print Artist screen or use the Select Document Type from
the File menu and click New. The Select New Sign dialog box appears.
2. Select your desired category from the Categories list. The associated layouts appear in the Layouts list.
3. Select the desired layout. A preview of the poster or template appears.
4. Click OK.
ProImage
Plus3000/XL3000 PosterPrinter Helpful Tips Page 10
Page 12

Editing a Standard Layout
Modify the text, graphics or shapes that are on the selected poster or add text, graphics and shapes yourself. Refer to
the Print Artist user’s guide or on-line help for complete instructions.
Setting Up the Printer
You need to set up the printer correctly before you select print. Do the following:
1. Check your printer to ensure that the roll width of the installed paper matches that of the file you intend to print
and that the printer is powered on.
2. Select Print Setup from the File menu. The Print Setup dialog box appears.
3. Select the FujiFilm PP3000 or the PP3000Wide print driver from the Specific Printer drop down list and click
Options. The FujiFilm PP3000 or the PP3000Wide properties sheet appears.
4. Ensure that the following settings are selected:
• Roll Paper Size: The roll width should match that of the installed paper
• Print Paper Size: Select the standard page size, if necessary. Standard pages are indicated by an asterisk
following the page size. Example: A1*21.7
" x 30.7" (549 x 780mm)
• Document Size: Same as Paper Size
• Processor Speed: Middle
• Orientation: Portrait, Print Artist will automatically rotate the image to fit the page.
5. Click OK. The Print Setup dialog box reappears.
6. Click OK to close the Print Setup dialog box.
Printing the Poster or Banner
1. Select Print from the File menu. The Print Control Panel/Preview dialog box appears.
Note: Lines going through your poster in the Print Preview dialog box, indicate that the poster is too large for
the paper and will be split onto separate pages. Click the up or down arrow in the Percent Size field until the
lines disappear indicating that the poster will fit on a single page.
2. Type in the number of copies you wish to print.
Note: If you print more than one copy, the margins on the second, third, fourth, etc., copies may shift slightly.
3. Click OK. Your post er should begin printing on your PosterPrinter system.
Creating and Printing a Banner Using a Blank Print Artist Layout
Follow these steps to select a blank Print Artist layout that can be modified for use with your Custom page sizes:
Selecting and Modifying a Blank Print Artist Layout
1. Select the Banners document type from the opening Print Artist screen or use the Select Document Type
dialog box from the File menu and click New. The Select New Banner dialog box appears.
2. Select Blank from the Categories list. The associated layouts appear in the Layouts list.
3. Select a layout that matches the desired orientation of the banner you wish to create. The size of the blank
layout is not important at this step.
4. Click OK.
5. Select Change Dimensions from the Edit menu. The Change Dimensions dialog box appears.
6. Type in the width and height of your banner. Whether the paper width corresponds to the width or the height
will be determined by the orientation that you choose. For example, if you want to print a horizontal banner
that is 96
" (8 feet) usi ng 23" paper, the 23" dimension would be the height and the 96" dimension would refer to
ProImage
Plus3000/XL3000 PosterPrinter Helpful Tips Page 11
Page 13

the width. The opposite would hold true if you were printing a vertically-oriented banner. Additionally, the
width and height should match the Custom Page Size (excluding the margins) that will be selected in the printer
setup.
Example: For a Custom Page Size of 23
length should be reduced by 2.5
" and height by 1.5".
" x 96" you would enter a length of 93.5" and a width of 21.5". The
7. Click OK to close the printer setup dialog box.
Design or Create Your Banner
Create your banner by placing text, graphics and shapes onto the banner layout. Refer to Print Artist user’s guide
for complete instructions. Once completed, proceed to the next section, “Selecting a User Custom Page Size”.
Selecting a User Custom Page Size
Custom Page Sizes must be defined and registered in the FujiFilm PP3000 or the FujiFilm PP3000WIDE print
driver. If Custom Page Sizes have not been created, see Chapters 3 and 4 in the
Interface Kit User’s Guide, for more information on how to create them.
FujiFilm PosterPrinter 3000/30 00W ide
1. Select Print Setup from the File menu. The Print Setup dialog box appears.
2. Select FujiFilm PP3000 or PP3000Wide and click Options. The FujiFilm PP3000 or PP3000Wide properties
sheet appears.
3. Ensure that the following settings are selected:
• Roll Paper Size: The roll width should match that of the installed paper.
• Print Paper Size: Select one of the User Custom Page Sizes.
• Document Size: Same as Paper Size
• Processor Speed: Middle
• Orientation: Portrait, Print Artist will automatically rotate the image to fit the page.
4. Click OK. The print setup dialog box reappears.
5. Click OK to close the printer setup dialog box.
Printing a User Custom Page Size
Follow these steps to print your banner:
1. Select Print from the File menu. The Print Control Panel/Preview dialog box appears.
Note: Lines going through your poster in the Print Preview dialog box, indicate that the poster is too large for
the paper and will be split onto separate pages. Click the up or down arrow in the Percent Size field until the
lines disappear indicating that the poster will fit on a single page.
2. Type the number of copies you want to print.
Note: If you print more than one copy, the margins on the second, third, fourth, etc., copies may shift slightly.
3. Click OK. Your post er should begin printing on your PosterPrinter system.
ProImage
Plus3000/XL3000 PosterPrinter Helpful Tips Page 12
Page 14

Recommended Print Option Settings
Print Artist allows you to modify numerous options when setting up your poster or banner. While you may want to
experiment to find the settings that suit your particular needs, we recommend you use the following Print Option
settings:
Print Artist Recommended Poster
Layouts
Print Options
• Miscellaneous
• Margins
• Rotate
Other
• Change dimensions
• Percent size
None selected
Symmetrical
Automatically
N/A
Set percentage to fit contents on one page
Print Artist Recommended Banner
Layouts
Stretch to page
Minimal
Automatically
N/A
Set percentage to fit contents on one page
Tips
• The margins cannot be altered.
• The maximum document size is 127
" x 127" (3225.8 x 3225.8 mm).
• In the Print Control Panel/Preview dialog box, do not select the “Use Values as Margins” function of Print
Size. Selecting this option can cause Print Artist to fail.
ProImage
Plus3000/XL3000 PosterPrinter Helpful Tips Page 13
Page 15

ProImage
Plus3000/XL3000 PosterPrinter Helpful Tips Page 14
Page 16

Page 17

2001 Brady Worldwide, Inc. All Rights Reserved www.varitronicsystems.com 15138-01 Rev. B 9/01
 Loading...