

Page 1

Database Manager
User manual
DMAN-US- 08/11/05
Page 2

The information in this manual is not binding and may be modified
without prior notice.
Supply of the software described in this manual is subject to a user
license. The software may not be used, copied or reproduced on any
medium whatsoever, except in accordance with this license.
No portion of this manual may be copied, reproduced or transmitted
by any means whatsoever, for purposes other than the personal use
of the buyer, unless written permission is obtained from Braton
Groupe sarl.
©2005 Braton Groupe sarl ,
All rights reserved.
TEKLYNX and its products are registered trademarks of Braton
Group Sarl or its subsidiaries. All other trademarks and product
names are the property of their respective owners.
Page 3

Table of Contents
Chapter 1: Connecting to database files . . . . . . . . . . . . . . . . . . . . . . . . . 1-3
Database Connections window . . . . . . . . . . . . . . . . . . . . . . . . . . . . . . . . . . 1-3
Connect the Database Manager module to the database . . . . . . . . . . . . . . 1-4
Modify the database connection parameters . . . . . . . . . . . . . . . . . . . . . . . . 1-7
Remove a connection . . . . . . . . . . . . . . . . . . . . . . . . . . . . . . . . . . . . . . . . . . 1-8
Chapter 2: Database file structure . . . . . . . . . . . . . . . . . . . . . . . . . . . . . 2-9
Choose a database from the list of connections. . . . . . . . . . . . . . . . . . . . . 2-10
Choose a table in a database . . . . . . . . . . . . . . . . . . . . . . . . . . . . . . . . . . . 2-10
Add a table to the active database. . . . . . . . . . . . . . . . . . . . . . . . . . . . . . . 2-11
Delete a table in the active database. . . . . . . . . . . . . . . . . . . . . . . . . . . . . 2-12
View/hide active table’s data . . . . . . . . . . . . . . . . . . . . . . . . . . . . . . . . . . . 2-12
Define a key field . . . . . . . . . . . . . . . . . . . . . . . . . . . . . . . . . . . . . . . . . . . . 2-12
Define a field’s type of content. . . . . . . . . . . . . . . . . . . . . . . . . . . . . . . . . . 2-13
Define a field’s maximum size . . . . . . . . . . . . . . . . . . . . . . . . . . . . . . . . . . 2-13
Allow an empty field . . . . . . . . . . . . . . . . . . . . . . . . . . . . . . . . . . . . . . . . . . 2-14
Chapter 3: Database contents . . . . . . . . . . . . . . . . . . . . . . . . . . . . . . . . 3-15
Select records according to their content. . . . . . . . . . . . . . . . . . . . . . . . . . 3-16
Use the content of a field to find a record. . . . . . . . . . . . . . . . . . . . . . . 3-16
Select all identical records. . . . . . . . . . . . . . . . . . . . . . . . . . . . . . . . . . 3-17
Select an identical record. . . . . . . . . . . . . . . . . . . . . . . . . . . . . . . . . . . 3-18
Find a record according to its row in the table . . . . . . . . . . . . . . . . . . . . . . 3-18
Create a new record. . . . . . . . . . . . . . . . . . . . . . . . . . . . . . . . . . . . . . . . . . 3-19
Modify a record. . . . . . . . . . . . . . . . . . . . . . . . . . . . . . . . . . . . . . . . . . . . . . 3-19
Sort a series of records by alphanumerical order . . . . . . . . . . . . . . . . . . . . 3-20
Delete a record. . . . . . . . . . . . . . . . . . . . . . . . . . . . . . . . . . . . . . . . . . . . . . 3-21
Chapter 4: Database queries . . . . . . . . . . . . . . . . . . . . . . . . . . . . . . . . . 4-22
Add a query . . . . . . . . . . . . . . . . . . . . . . . . . . . . . . . . . . . . . . . . . . . . . . . . 4-23
Select/deselect one or more fields. . . . . . . . . . . . . . . . . . . . . . . . . . . . . . . 4-23
Modify the order of fields selected . . . . . . . . . . . . . . . . . . . . . . . . . . . . . . . 4-24
Page 4

Create a filter using predefined data . . . . . . . . . . . . . . . . . . . . . . . . . . . . . 4-25
Apply a logical operator to several filters . . . . . . . . . . . . . . . . . . . . . . . . . . 4-27
Sort the list of filters . . . . . . . . . . . . . . . . . . . . . . . . . . . . . . . . . . . . . . . . . . 4-28
Remove a filter. . . . . . . . . . . . . . . . . . . . . . . . . . . . . . . . . . . . . . . . . . . . . . 4-28
Modify a filter in SQL . . . . . . . . . . . . . . . . . . . . . . . . . . . . . . . . . . . . . . . . . 4-29
Choose an existing query in a database . . . . . . . . . . . . . . . . . . . . . . . . . . 4-29
Chapter 5: Printing . . . . . . . . . . . . . . . . . . . . . . . . . . . . . . . . . . . . . . . . . 5-31
Display options. . . . . . . . . . . . . . . . . . . . . . . . . . . . . . . . . . . . . . . . . . . . . . 5-32
Preview the document . . . . . . . . . . . . . . . . . . . . . . . . . . . . . . . . . . . . . . . . 5-32
Display the label design software. . . . . . . . . . . . . . . . . . . . . . . . . . . . . . . . 5-32
Select a document to be printed . . . . . . . . . . . . . . . . . . . . . . . . . . . . . . . . . 5-33
Create a new label template for printing. . . . . . . . . . . . . . . . . . . . . . . . 5-33
Select an existing label template. . . . . . . . . . . . . . . . . . . . . . . . . . . . . 5-33
Select a printer. . . . . . . . . . . . . . . . . . . . . . . . . . . . . . . . . . . . . . . . . . . . . . 5-34
Configure the selected printer . . . . . . . . . . . . . . . . . . . . . . . . . . . . . . . . . . 5-34
Select records to be printed . . . . . . . . . . . . . . . . . . . . . . . . . . . . . . . . . . . . 5-35
Selecting records manually. . . . . . . . . . . . . . . . . . . . . . . . . . . . . . . . . . 5-35
Selecting records automatically. . . . . . . . . . . . . . . . . . . . . . . . . . . . . . 5-36
Configure the print media. . . . . . . . . . . . . . . . . . . . . . . . . . . . . . . . . . . . . . 5-36
Display the selected printer’s properties. . . . . . . . . . . . . . . . . . . . . . . . . . . 5-37
Define the number of printed pages according to a field . . . . . . . . . . . . . . 5-37
Launch printing. . . . . . . . . . . . . . . . . . . . . . . . . . . . . . . . . . . . . . . . . . . . . . 5-38
Launch printing manually each time . . . . . . . . . . . . . . . . . . . . . . . . . . 5-38
Update variable with database. . . . . . . . . . . . . . . . . . . . . . . . . . . . . . . . . . 5-38
Merge Database attached to document . . . . . . . . . . . . . . . . . . . . . . . . 5-38
Allow the database to be edited . . . . . . . . . . . . . . . . . . . . . . . . . . . . . . 5-39
Stop printing. . . . . . . . . . . . . . . . . . . . . . . . . . . . . . . . . . . . . . . . . . . . . . . . 5-39
Refresh database view. . . . . . . . . . . . . . . . . . . . . . . . . . . . . . . . . . . . . . . . 5-39
Close a document . . . . . . . . . . . . . . . . . . . . . . . . . . . . . . . . . . . . . . . . . . . 5-40
Chapter 6: Index. . . . . . . . . . . . . . . . . . . . . . . . . . . . . . . . . . . . . . . . . . . . 6-41
Page 5
CHAPTER 1
CONNECTING TO DATABASE FILES
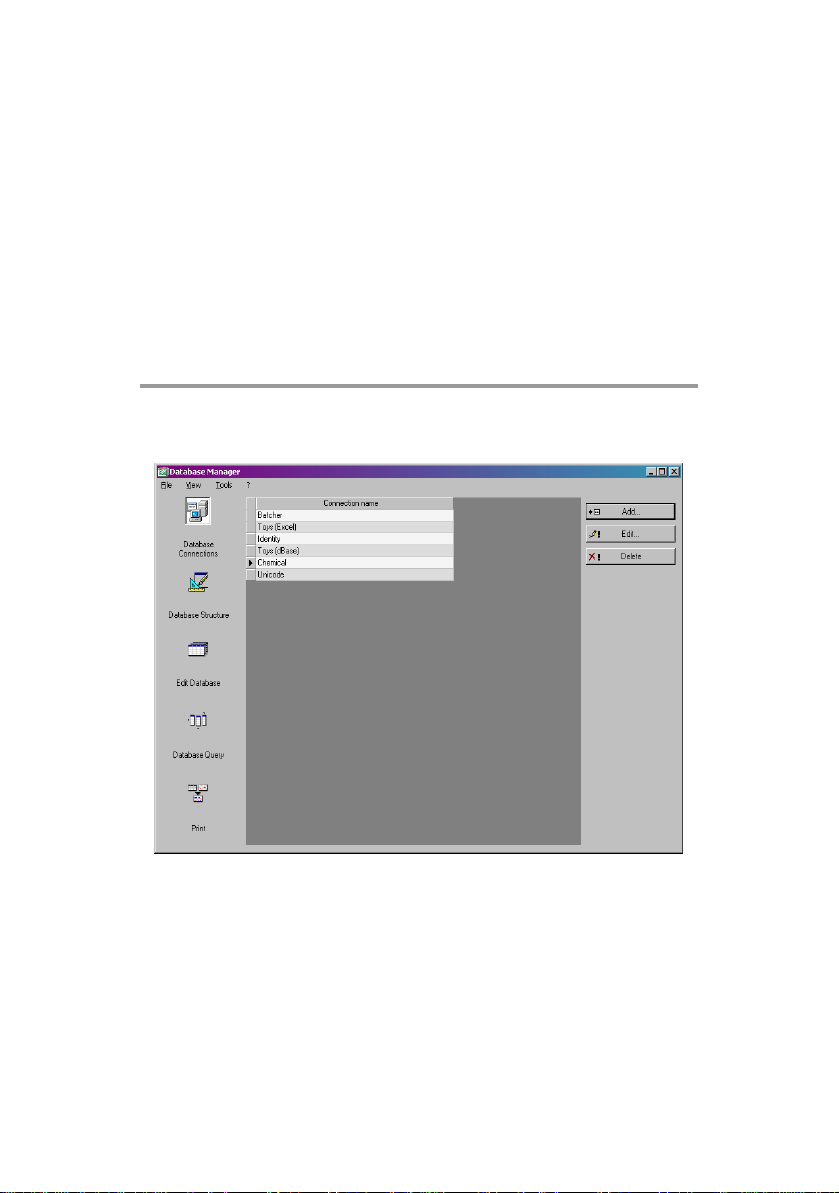
Database Connections window
The Database Connections window is used to connect the software to
the various database files that are to be used.
3
Page 6
Connect the Database Manager module to the
Note
database
Database Manager must be open in the Database Connections
window.
A wizard is available to help you connect the software to the
most frequently used databases. Choose the format option
that matches your database format. If the format required is
not available, do the following:
Click Add...
Select a database type from the list
- or Select Others
Click Connection Setup
Click the Provider tab of the dialog box
Select the required provider
4
Page 7
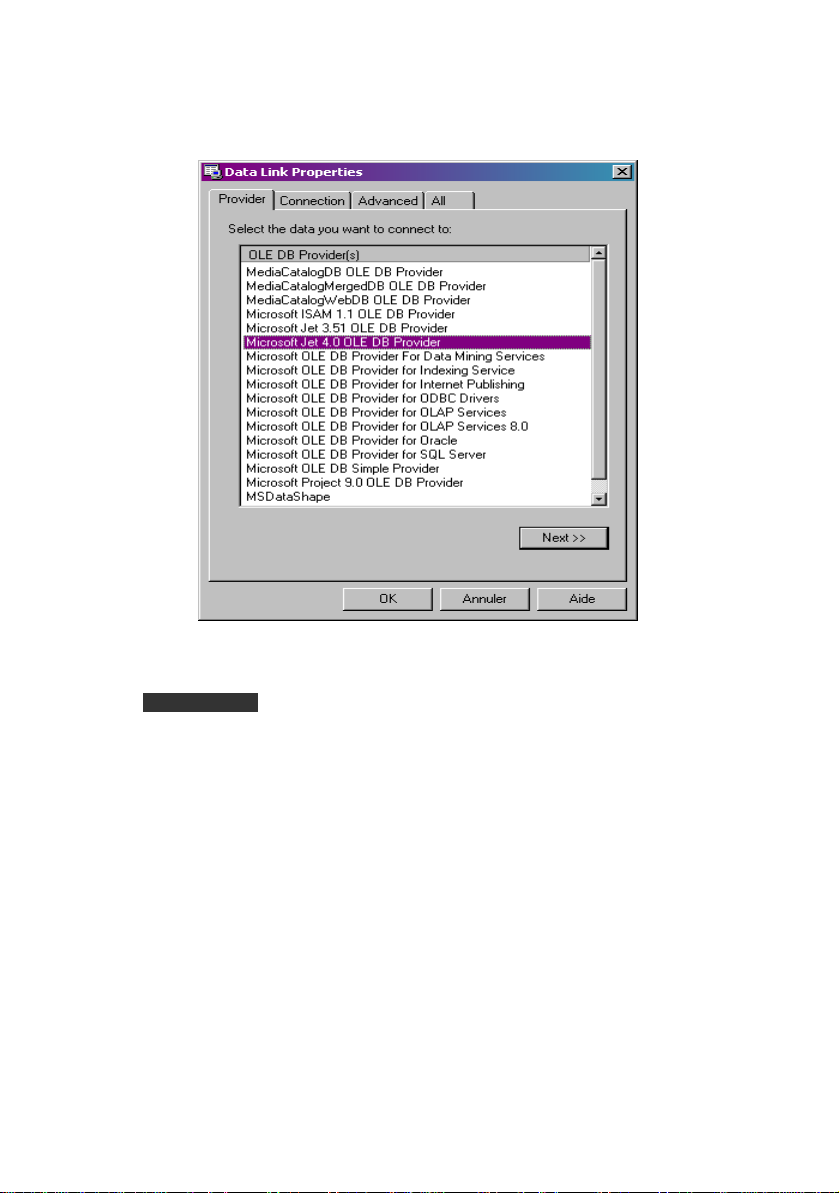
Click Next >>
Note
The choice of provider changes according to the system’s type
of database.
Click the ’...’ search button
Select a file
Click Open
5
Page 8

Click OK
Click Next
Enter a name for the connection
Click Finish
6
Page 9

Note
You can repeat this procedure as often as necessary to obtain
the required number of connections.
Modify the database connection parameters
Database Manager must be open in the Database Connections
window. The required connection must be selected.
Click Edit
Make the required changes
7
Page 10

Remove a connection
Database Manager must be open in the Database Connections
window. The required connection must be selected.
Click Remove
8
Page 11
CHAPTER 2
DATABASE FILE STRUCTURE
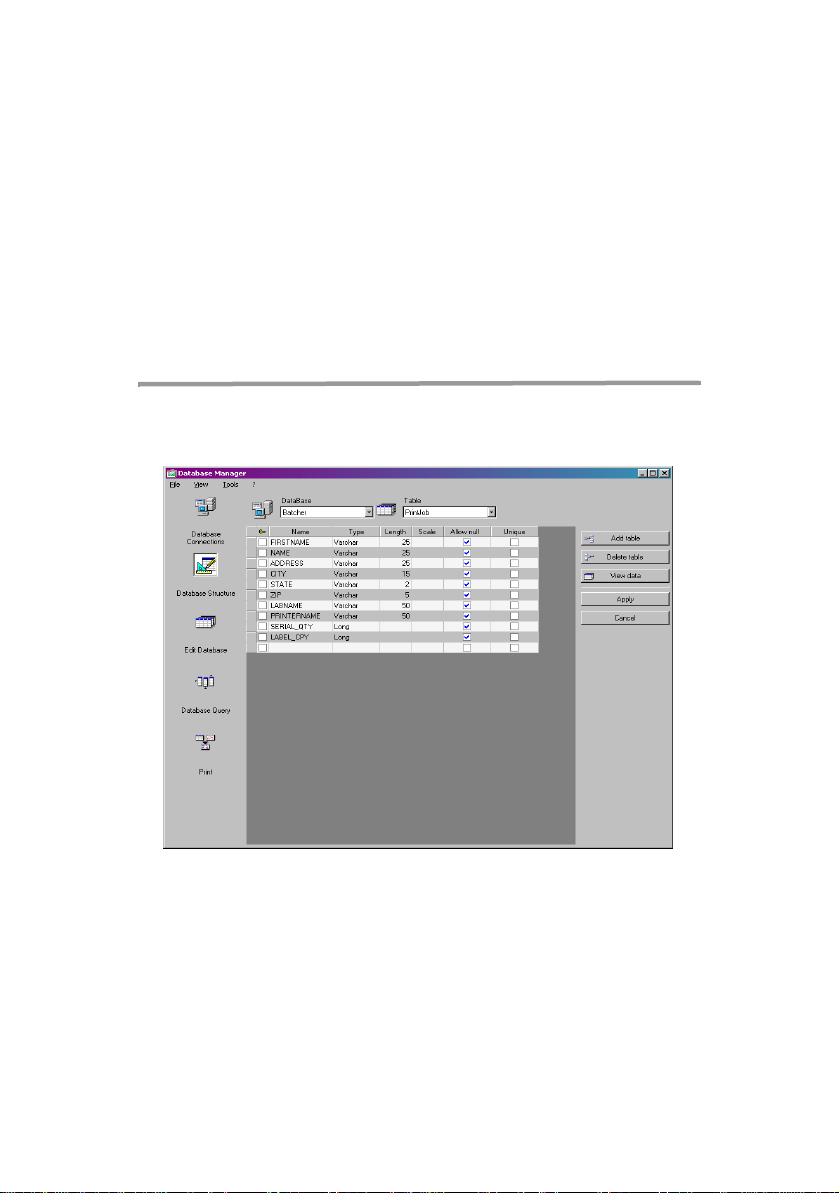
Database Structure window
The Database Structure window is used to manage the structure of
the database file: to add, modify or delete tables/fields etc.
9
Page 12
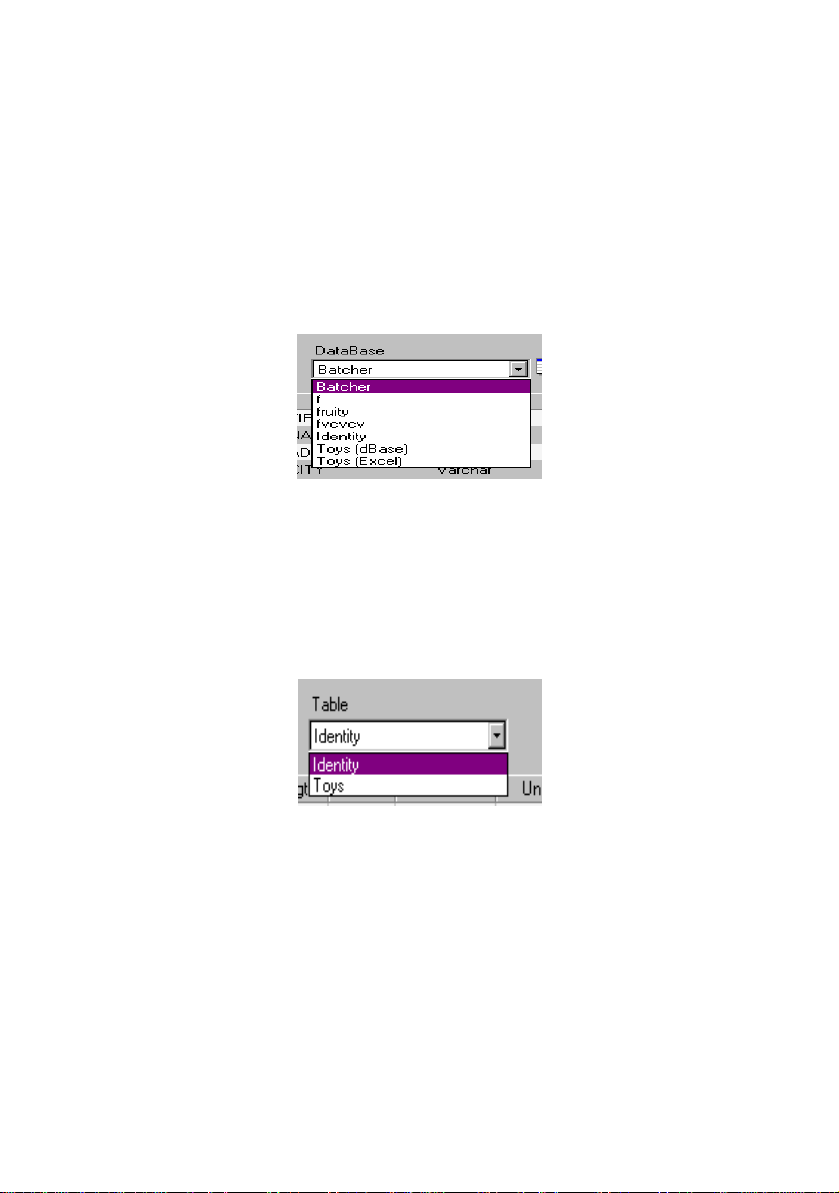
Choose a database from the list of
connections
Database Manager must be open in the Database Structure
window.
Click on the Database drop-down list
Click on the data required
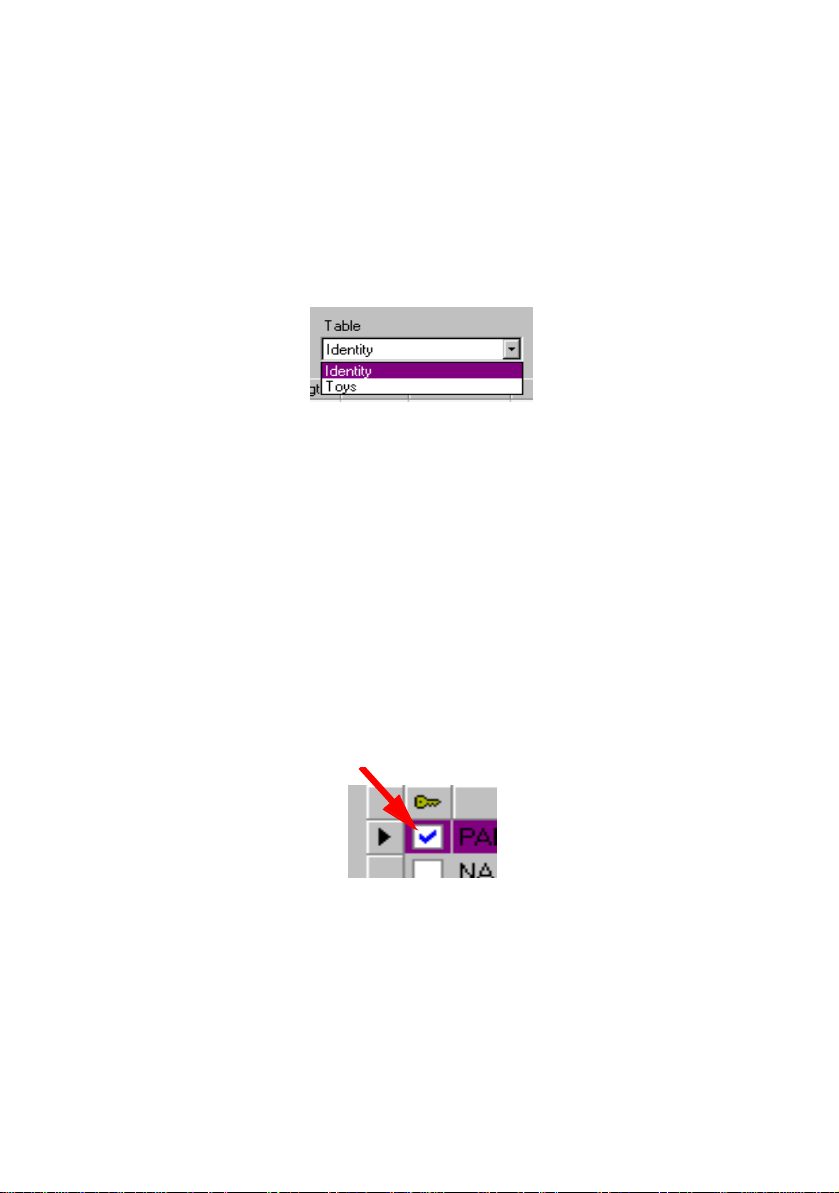
Choose a table in a database
Database Manager must be open in the Database Structure
window.
Click on the Table drop-down list
Click on the data required
10
Page 13
Add a table to the active database
Database Manager must be open in the Database Structure
window.
Click Add table
Enter the name of the new table
Click OK
You can also copy the structure of the table from a table that already
exists in the selected database. To do so:
Tick the box next to Duplicate with
Click on the drop-down list
Click on the data required
Click OK
11
Page 14
Delete a table in the active database
Database Manager must be open in the Database Structure
window.
Click on the Table drop-down list
Click on the data required
Click Delete table
View/hide active table’s data
Database Manager must be open in the Database Structure
window.
Click View data
Define a key field
Database Manager must be open in the Database Structure
window.
Tick the box next to the required field
Click Apply
12
Page 15

Define a field’s type of content
Database Manager must be open in the Database Structure
window.
Click on the required field in the Type column
Click the drop-down list button
Click on the data required
Click Apply
Define a field’s maximum size
Database Manager must be open in the Database Structure
window.
Click on the required field in the Length column
Enter the value required
Click Apply
13
Page 16

Allow an empty field
Database Manager must be open in the Database Structure
window.
Tick the Allow Null box for the required field
Click Apply
14
Page 17

CHAPTER 3
DATABASE CONTENTS
Edit Database window
The Edit Database window is used to manage the contents of the
database file: to add, modify or delete data.
15
Page 18

These actions depend on the type of database. Thus, Excel file
records cannot be modified.
Select records according to their content
Use the content of a field to find a record.
Database Manager must be open in the Edit Database window.
Click the drop-down list button
Click on the data required
Click the data input field
Enter the value required in the data input field
16
Page 19

Select all identical records.
Database Manager must be open in the Edit Database window and
at least one record must have been found.
Click the drop-down list button
Click on the data required
Click the data input field
Enter the data required in the data input field
Click on the Select all button
Note
You can also specify the filter by clicking on the ’Check case’
button.
17
Page 20

Select an identical record.
Database Manager must be open in the Edit Database window and
at least one record must have been found. There must be several
identical contents in the search field.
To select a record, use the search tool: click on 1 (First), 2
(Previous), 3 (Next) or 4 (Following).
1 2 3 4
Find a record according to its row in the table
Database Manager must be open in the Edit Database window.
Click the search tool’s data input field
Enter the data required
18
Page 21

Create a new record
Database Manager must be open in the Edit Database window.
Click on a field in the row marked with an asterisk
Enter the values required in the corresponding fields
Click Apply
Modify a record
Database Manager must be open in the Edit Database window.
Click on the data you want to modifiy
Enter the data required
Click Apply
19
Page 22

Sort a series of records by alphanumerical
Note
order
Database Manager must be open in the Edit Database window.
There must be at least two records in the table.
Click on the name of the field required
To sort records in descending order, click on the same field
again.
20
Page 23

Delete a record
Database Manager must be open in the Edit Database window.
Click the database cursor for the required field
Right click the database cursor for the required field
Click on ’Delete Record’ in the context menu
21
Page 24

CHAPTER 4
DATABASE QUERIES
Database Query window
The Database Query window is used to create and apply various
filters.
22
Page 25

Add a query
Database Manager must be open at the Fields tab in the Database
Query window.
Click Add query
Enter a name for the query
Click OK
Select/deselect one or more fields
Database Manager must be open at the Fields tab in the Database
Query window.
To select or deselect one or more fields, click on the button next
to 1, 2, 3 or 4 in the navigation tool.
1
2
3
4
Click Query
23
Page 26

Modify the order of fields selected
Note
Database Manager must be open at the Fields tab in the Database
Query window.
Click on the required field in the Ordered fields window
Click on the Up or Down arrow to reach the data required
Click Query
For a better view of the query application, you can increase the
size of the data display area by reducing the height of the
Fields, Filter and SQL Query tabs.
24
Page 27

Create a filter using predefined data
Database Manager must be open at the Filter tab in the Database
Query window.
Click on the Add row button
Click in the Field field
Click the drop-down list button
Click on the data required
Click in the Operator field
Click the drop-down list button
25
Page 28

Click on the value required
Tableau 1: Description of operator functions
Operator Lookup
= Equal to
<> Different from
> Greater than
>= Greater than or equal to
< Less than
<= Less than or equal to
NOT
IN
LIKE
NOT LIKE
BETWEEN
NOT BETWEEN
26
Page 29

Click in the Value field
Enter the value required
Click Query
Apply a logical operator to several filters
Database Manager must be open at the Filter tab in the Database
Query window. Several filters must exist.
Click in the Logical field
Click the drop-down list button
Click on the data required
Click Query to apply and view the changes.
27
Page 30

Sort the list of filters
Database Manager must be open at the Filter tab in the Database
Query window. Several filters must exist.
Click on the database cursor for the required field
Click on the Up or Down arrow to reach the data required
Remove a filter
Database Manager must be open at the Filter tab in the Database
Query window. At least one filter must exist.
Click on the database cursor for the required field
Click on the Remove row button
28
Page 31

Modify a filter in SQL
Database Manager must be open at the SQL Query tab in the
Database Query window. At least one filter must exist.
Tick the box next to Modify the query in SQL language to
activate the SQL Query and make manual changes.
Click Query
Note
The filter can be created directly in SQL without having to use
the Filter tab first.
Choose an existing query in a database
Database Manager must be open in the Database Query window.
Click on the Query drop-down list
Click on the data required
29
Page 32

Note
The query selected can be modified later.
30
Page 33

CHAPTER 5
PRINTING
The Print window
The Print window is used to select files for printing, to assign printers
and to define various parameters before printing is launched.
31
Page 34

Display options
Database Manager must be open in the Print window.
Click Options
Preview the document
Database Manager must be open in the Print window.
Click Preview
Display the label design software
Database Manager must be open in the Print window.
Click Designer
32
Page 35

Select a document to be printed
Note
Note
Create a new label template for printing.
Database Manager must be open in the Print window.
Click on the Create labels wizard button
Follow the wizard’s instructions
Creating a label in relation to the database allows you to
define exactly which elements are required to position each
database field.
Select an existing label template.
Database Manager must be open in the Print window.
Click on the Open an existing document button
Select a .lab file
Click OK
The ’Field’ radio buttons in the ’Label name’ and ’Printer name’
groups of options allow you to choose the label or printer
required, when the latter are defined in one of the fields of the
active database.
33
Page 36

Select a printer
Database Manager must be open in the Print window. A label
template must be selected.
Click on the Add or remove a printer button
Select the printer required
Click Validate
Note
The last printer used is selected by default.
Configure the selected printer
Database Manager must be open in the Print window. A label
template and printer must be selected.
Click on the Printer settings button
Adjust the required settings
Click OK
34
Page 37

Select records to be printed
Selecting records manually.
Database Manager must be open in the Print window.
Tick the boxes next to the records required
Note
The height of the data display grid can be modified by dragging
the top of the window.
35
Page 38

Selecting records automatically.
Database Manager must be open in the Print window.
Click the drop-down list button
Click on the data required
Click on the data input field
Enter the data required
Click on the Select all button
Click on the Verify button
Configure the print media
Database Manager must be open in the Print window. A document
must be selected.
Click on the Page setup button
36
Page 39

Display the selected printer’s properties
Database Manager must be open in the Print window.
Click on the Page setup button
Click Settings...
Define the number of printed pages
according to a field
Database Manager must be open in the Print window and a printer
must be selected. Records to be printed must also be selected.
Click on the Quantity column drop-down list
Select the data required
Click the selected data’s drop-down list button
Select the required value or enter a whole numeric value
Note
This option allows a selection of labels to be printed according
to numeric values defined in specific fields. Different criteria
can be set:
• SERIALQTY: defines the number of times the label series will
be printed
• LABELCPY: defines the number of times the label selected will
be printed
• PAGECPY: defines the number of times the page of labels will
be printed
37
Page 40

Launch printing
Database Manager must be open in the Print window. A label
template and printer must be selected. The records to be printed
must also be selected.
Click the Print records button
Launch printing manually each time
Database Manager must be open in the Print window. A label
template and printer must be selected. The records to be printed
must also be selected.
Tick the box next to Display the print dialog box between
each record
Click the Print records button
Update variable with database
Database Manager must be open in the Print window. A label
template and printer must be selected. The records to be printed
must also be selected.
Tick the box next to Update variable with database
Click the Print records button
Merge Database attached to document
Database Manager must be open in the Print window. A label
template and printer must be selected. The records to be printed
must also be selected.
Tick the box next to Merge Database attached to document
Click the Print records button
38
Page 41

Allow the database to be edited
Database Manager must be open in the Print window. A label
template and printer must be selected. The records to be printed
must also be selected.
Tick the box next to Allow the database to be edited
Click the Print records button
Stop printing
Database Manager must be open in the Print window. A label
template and printer must be selected. The records to be printed
must also be selected. Printing must have already been launched.
Click the Stop printing button
Refresh database view
Database Manager must be open in the Print window. A label
template and printer must be selected. At least one record must also
be selected.
Click the Refresh database button
39
Page 42

Close a document
Database Manager must be open in the Print window. A label
template must be selected.
Click on the Documents drop-down list
Click on the data required
Click the Close current document button
40
Page 43

Index
A
Add a query 23
Add a table 11
automatically 36
C
Choose a database 10
Connect 4
Create 19
D
database 10
Database Connections 3
Database Query 22
Database Structure 9
Delete 21
Deselect 23
document to be printed 33
Duplicate with 11
E
Edit Database 15
empty field 14
existing query 29
F
field’s maximum size 13
filter 25
Find 18
Find a record 16
H
hide 12
Hide table 12
I
identical records 17
41
Page 44

K
R
key field 12
L
label design software 32
label template 33
M
manually 35
Merge Database 38
Modify 19
Modify a connection 7
Modify filter 29
N
new record 19
null field 14
O
options 32
Ordered fields 24
P
Page setup 36
Preview 32
preview 32
Print 31
print media 36
printer 34
printer properties 37
Printer settings 34
Printing 31
printing 38
Remove 8
Remove a connection 8
Remove filters 28
S
search tool 18
Select 16, 23
Select records 16, 35
Select/deselect 23
selecting a provider 5
software 32
Sort 20
Sort filters 28
SQL 29
T
table 10
Type 13
type of content 13
V
View table 12
 Loading...