

Page 1
ADA Compliant HN200
Recess-Mounted
Shower with
• Equa Flo™
• Accu-Zone™ Infrared
Control
• Thermostatic Control
• Single Valve
• Air Metering Valve
• Touch-Time™ or
• Touch Time™ w/Battery
215-1189 Rev. F; EN 02-342
Page 1 of 8
P.O. Box 309, Menomonee Falls, Wi 53052-0309
TEL. 1-800-BRADLEY FAX (262) 251-5817
http://www.bradleycorp.com
Read the entire installation manual to ensure proper
installation of your HN200 shower.
This manual covers all of the HN200 variations and
options available, including shower seat and curtain
installation. Simply omit the steps which do not apply
to the unit you are installing.
Valve Left/Seat Right version is shown throughout
this manual. Valve Right/Seat Left is opposite.
Plumbing contractor shall be responsible for
installing shower face plate at the correct height to
meet accessibility requirements.
This installation manual and parts list should be filed
by the owner’s maintenance department.
IMPORTANT
Table of Contents
Pre-Installation Information . . . . . . . . . . . . 2
HN200 Components . . . . . . . . . . . . . . . . . . .3
HN200 Shower Stall Dimensions . . . . . . . .3
Installation Instructions . . . . . . . . . . . . . . 4-7
Cleaning Instructions . . . . . . . . . . . . . . . . . .7
Shower Seat Repair Parts . . . . . . . . . . . . . . .8
Shower Curtain Repair Parts . . . . . . . . . . . .8
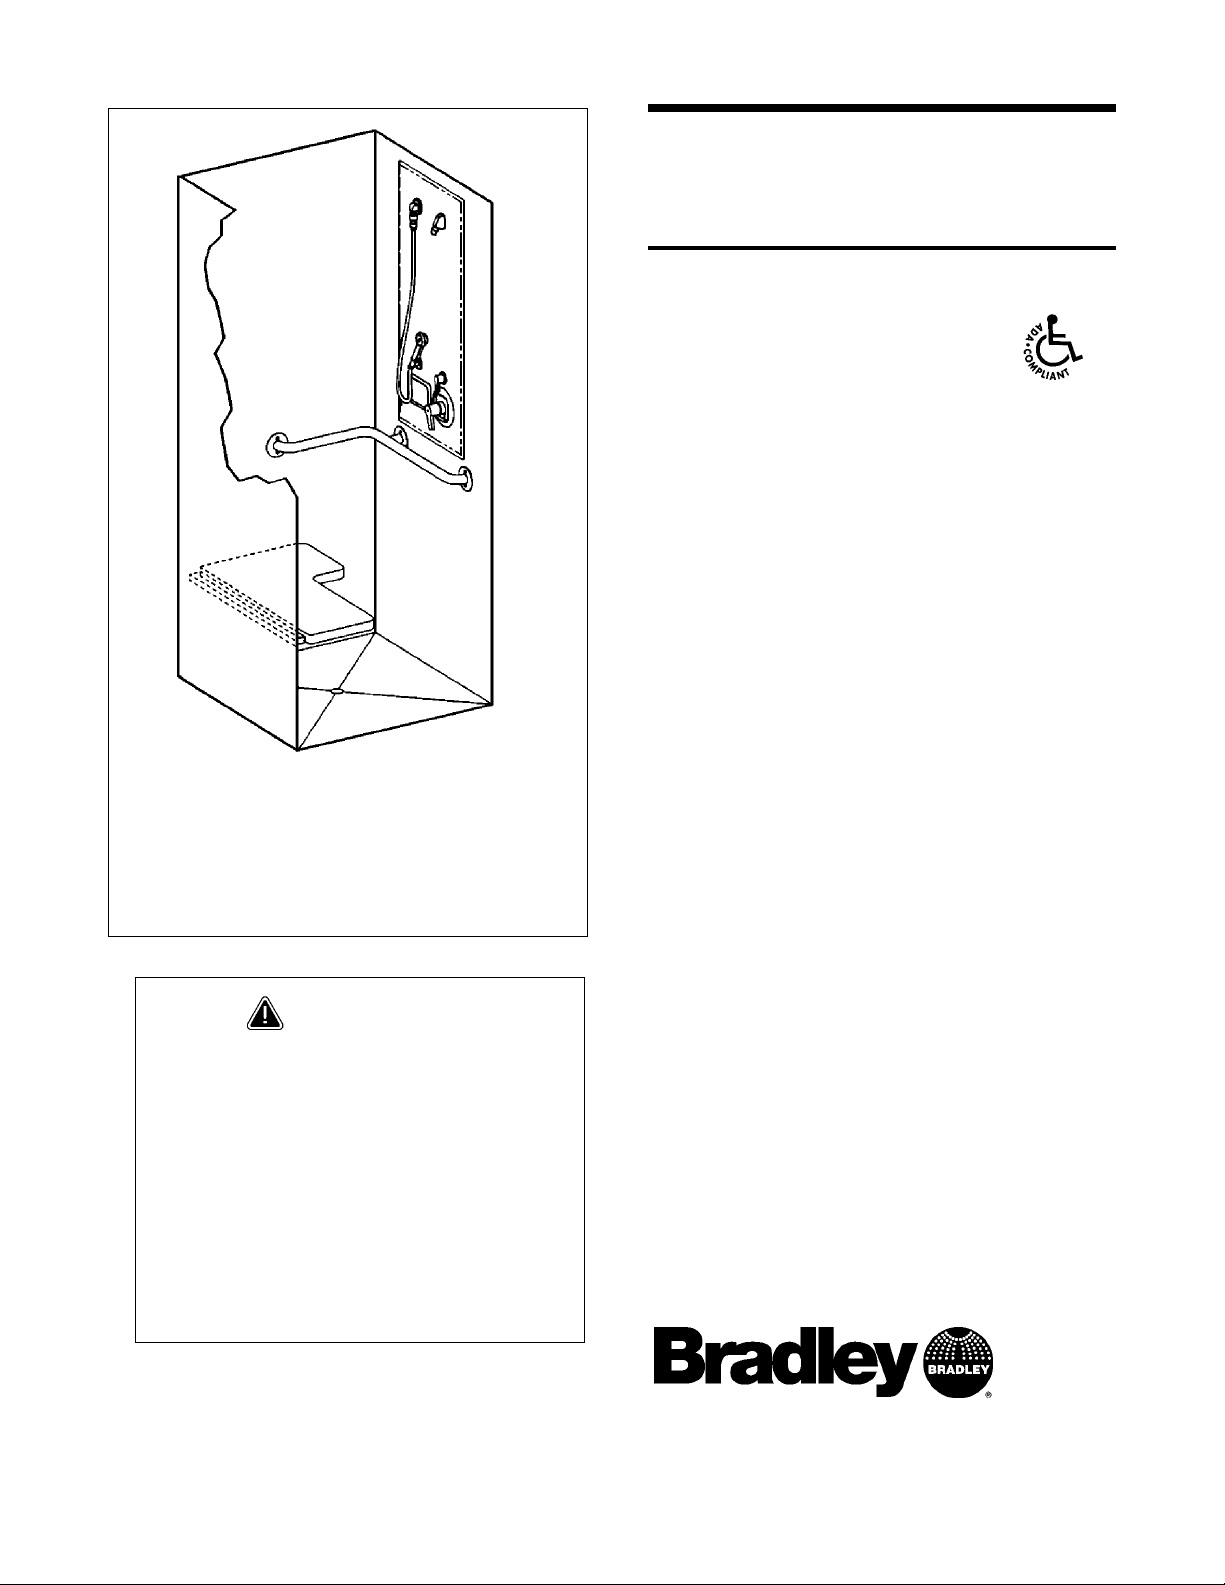
HN200
(Valve Right/Seat Left shown,
Valve Left/Seat Right is opposite)
36" x 36" enclosure is not
provided as standard equipment
Installation
Instructions
Page 2
HN200 Recess-Mounted Shower Warranty
Bradley Corporation warrants to commercial and institutional purchasers only each unit free from defects in
material and workmanship under normal use and service upon the following terms and conditions:
1. This warranty is limited to replacing or repairing, at our option, transportation charges prepaid by the
purchaser, any Bradley unit or part thereof which our inspection shall show to have been defective within
the limitations of this warranty.
2. The period during which HN200 Shower components are warranted is one (1) year, measured from the
date of our invoice.
3. This warranty does not cover installation or any other labor charges and does not apply to any units
which have been damaged by accident, abuse, improper installation or improper maintenance.
4. The replacement or repair of defective units as stated in this warranty shall constitute the sole remedy of
the purchaser and the sole liability of Bradley Corporation under this warranty. Bradley Corporation
shall not otherwise be liable under any circumstances for incidental, consequential or indirect damages
caused by defects in the repair or replacement thereof.
5. This warranty extends only to commercial and institutional purchasers and does not extend to any others,
including consumer customers of commercial and institutional purchasers.
6. This warranty is in lieu of all other warranties, express or implied, including any implied warranty of
merchantability or fitness for a particular purpose or otherwise.
ADA Compliant Recess-Mounted Shower
HN200 Installation Instructions
Bradley Corporation • 215-1189 Rev. F; EN 02-342
2
Pre-Installation Information
CAUTION: This shower system may not protect the user from scalding if other
temperature controlling devices in the plumbing system should fail.
CAUTION: Excessive heat to the Equa-Flo™ valve body will damage its internal
part s.
Overview
The Bradley ADAcompliant HN200 comes assembled for job site installation. When installed in a
36" x 36" stall, the HN200 provides a shower which meets ADAaccessibility codes. Check local
codes for dimensional compliance.
Components
Face Plate Material: The shower control panel is constructed of stainless steel.
Valve and Component Material: All exposed parts (except seat cover) are stainless steel or
polished chrome-plated brass. Valve bodies are brass casting.
Barrier-Free Seat: Folding shower seat is constructed of molded plastic with a load capacity of
250 lbs.
Shower Curtain: Vinyl shower curtain comes with stainless steel curtain rod and hooks.
Supplies required for installation:
• 1/2" NPT hot and cold or 1/2" NPT tempered water supplies
• (12) 1/4" wall anchors and 1/4”-20 x 3/4” screws to install shower face plate
assembly to wall
• (6) wall anchors for 1/4-20" x 1-1/4" hex socket screws to install grab bar (grab
bar is designed to sustain a concentrated load of 300 pounds)
• (7) wall anchors for 1/4 x 1/2" Type AB sheet metal screws to mount shower seat
Page 3
ADA Compliant Recess-Mounted Shower
Installation Instructions HN200
Bradley Corporation • 215-1189 Rev. F; EN 02-342
3
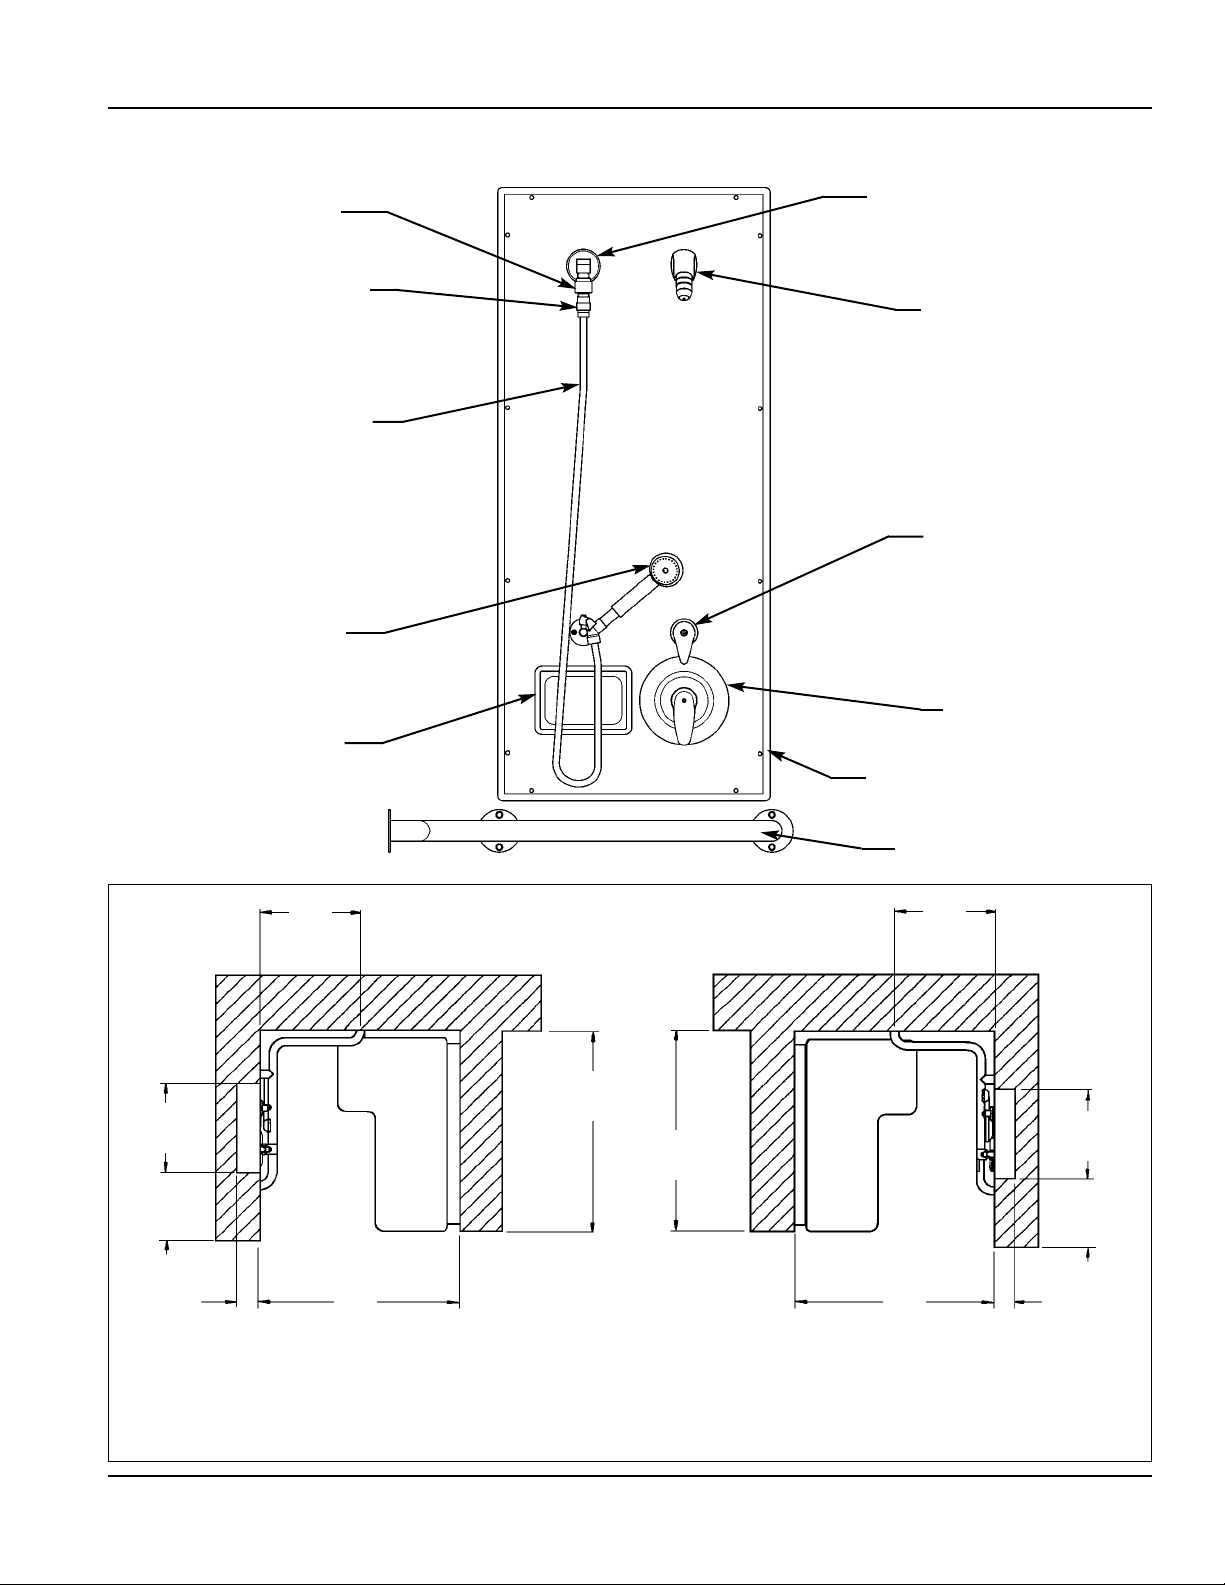
HN200 Components and Shower Stall Dimensions
VALVE LEFT/SEAT RIGHT VALVE RIGHT/SEAT LEFT
Recessed Soap Dish
Hand-Held Hose Spray
with Post-Style Bracket
Stainless Steel Hose
Quick Disconnect
Inline Backflow
Preventer
Showerhead
Diverter Valve
Shower Valve
(Equa-Flo™ shown)
Shower Face Plate Assembly
Grab Bar (S53-184)
Elbow with Flange
NOTE: Compliance and conformity to local codes and ordinance is the responsibility of the installer.
18"
(457mm)
18"
(457mm)
36"
(914mm)
36"
(914mm)
36"
(914mm)
36"
(914mm)
15"
(381mm)
15"
(381mm)
14-1/4"
(362mm)
max.
14-1/4"
(362mm)
max.
4"
(102mm)
min.
4"
(102mm)
min.
Page 4

ADA Compliant Recess-Mounted Shower
HN200 Installation Instructions
Bradley Corporation • 215-1189 Rev. F; EN 02-342
4
Installation Instructions
NOTE: Flush the supply lines before making connections.
NOTE: Install the supply inlets no lower than 48" and no higher than 60" off of finished floor.
Step 1: Rough in piping for shower
NOTE: When facing the wall, the supply pipe to the left of the centerline is HOT.
1. Rough in 1/2" NPT hot and cold water supply piping for valve at the dimension shown in Figure
1 (piping supplied by installer).
2"
(51mm)
1/2" NPT
SUPPLIES
40"
(1015mm)
2-1/2"
(64mm)
TYP.
45"
(1143mm)
7-1/2"
(191mm)
NOTE: WALL OPENING RECESS
TO BE 4" (102mm) DEEP
C
L
3-3/4"
(95mm)
2"
(51mm)
NOTE: Due to differing state codes, if the
valve height is different from the indicated
43" (1091 mm), all dimensions within the
symbol must be changed by the same amount.
Example: If the code approved height is 40",
then 43" (1091mm) - 40" (1015mm) = 3"
(76mm). Result: Subtract 3" (76mm) from all
dimensions within the symbol.
15"
(381mm)
48"
(1219mm)
A.F.F.
18"
(457mm)
WALL
OPENING
OUTLINE
Figure 1
20"
(508mm)
38-1/8"
(968mm)
A.F.F.
72"
(1829mm)
A.F.F.
48"
(1219mm)
to 60"
(1524mm)
A.F.F.
BACK
WALL
FRONT OF
SHOWER
Page 5

ADA Compliant Recess-Mounted Shower
Installation Instructions HN200
Bradley Corporation • 215-1189 Rev. F; EN 02-342
5
Installation Instructions continued…
Step 2: Make plumbing connections
NOTE: Hoses need to be connected to 1/2" NPT pipe supply
before the shower is fastened to the wall.
1. Make water supply connections to the stainless steel hoses
(see Figure 2). Equa-Flo™ and Thermostatic= 1/2" NPT
Hot and Cold supplies. Single Valve, Accu-Zone™ Infrared
Control, Air Valve and Touch Time™ = 1/2" tempered
supply.
Step 3: Install face plate and grab bar
1. Position the face plate on the wall. Mark the wall and install
twelve wall anchors suitable for use with 1/4"-20 x 3/4"
button head Allen key screws (see Figure 3).
2. Attach the face plate to the wall with twelve 1/4"-20 x 3/4"
button head Allen key screws provided (see Figure 3).
3. Attach the grab bar to the wall.
• Position the “L” of the grab bar to fit the back wall of the
shower stall.
4. Use the flange as a template and mark the six screw hole
locations and install six anchors supplied by installer for
1/4"-20 x 1-1/4" flat head Allen key
screws (see Figure 3).
5. Secure the grab bar to the six wall
anchors using six 1/4”-20 x 1-1/4"
flat head Allen key screws (provided
by installer) (see Figure 3).
Figure 3
NOTE: ALL WALL
ANCHORS SUPPLIED
BY INSTALLER.
GRAB BAR
(S53-184)
1/4"-20 x 3/4"
BUTTON HEAD
ALLEN KEY SCREW
(12) PLACES
(160-143)
1/4"-20 x 1-1/4"
FLAT HEAD ALLEN
KEY SCREW
FACE PLATE
VALVE LEFT - SEAT RIGHT
Figure 2
VALVE LEFT
SEAT RIGHT
Page 6

ADA Compliant Recess-Mounted Shower
HN200 Installation Instructions
Bradley Corporation • 215-1189 Rev. F; EN 02-342
6
Installation Instructions continued…
Step 4: Mount shower seat
NOTE: All anchoring devices (supplied by installer)
must be carefully selected to insure adequate support for
the shower seat, given the type of wall construction.
1. Measure and scribe a horizontal line 16-1/16" above
the finished floor (see Figure 4).
2. Position the folding shower seat against the wall
with the three mounting holes on the seat centered
on the scribed line.
• Using the mounting holes as a template, mark the
three mounting locations on the wall.
3. Install appropriate anchors (supplied by installer) for
1/4" sheet metal screws in the wall at the three
mounting locations.
4. Mount the shower seat to the wall with the
three 1/4" sheet metal screws (supplied) at
the anchored mounting locations.
• Position the seat support tube in the
support bracket as shown in Figure 5. The
tube should rest on the bottom of the front
plate.
NOTE: When seat is properly installed, it should
decline downward from back to front 2° to 3° for
water drainage.
5. Place the support bracket against the wall
and adjust the bracket vertically until the
shower seat is level in down position.
• Using the mounting holes on the support
bracket as a template, mark the four
mounting locations on the wall.
6. Install appropriate anchors (supplied by installer) for
1/4" sheet metal screws in the wall at the four
mounting locations.
7. Mount the support bracket to the wall with the four
1/4" sheet metal screws (supplied) at the anchored
mounting locations.
Step 5: Install curtain rod
1. Measure and cut the stainless steel curtain rod to fit
the shower stall opening.
2. Mount one shower rod flange 80" (2032mm) from the floor as close to the opening of shower stall as
possible with two #10-13 x 2" Phillips-head screws provided (see Figure 6).
• Insert one end of the shower rod into the flange.
• Slide the other shower rod flange onto the shower rod.
3. Position the shower rod and flange at the same dimensions as the first flange but on the opposite side
of the shower stall opening.
4. Secure the flange to the wall with two #10-13 x 2" Phillips-head screws provided.
5. Install the ten hooks onto the curtain rod and hang the curtain onto the rod.
Figure 4
Figure 5
Figure 6
Page 7

ADA Compliant Recess-Mounted Shower
Installation Instructions HN200
Bradley Corporation • 215-1189 Rev. F; EN 02-342
7
Cleaning and Maintenance Instructions for Stainless Steel
Material Description: Stainless steel is extremely durable, and maintenance is simple and inexpensive.
Proper care, particularly under corrosive conditions, is essential. Always start with the simplest solution and
work your way toward the more complicated.
Routine cleaning: Daily or as often as needed use a solution of warm water and soap, detergent, or ammonia.
Apply the cleaning solution per the manufactures instructions and always use a soft cloth or sponge to avoid
damaging the finish.
Stubborn Stains: To remove stains from stainless steel use a stainless steel cleaner and polish such as Ball
®
stainless steel cleaner or a soft abrasive. Always follow the manufactures instructions and apply in the same
direction as the polish lines.
IMPORTANT: NEVER USE ORDINARY STEEL WOOL OR STEEL BRUSHES ON
STAINLESS STEEL. ALWAYS USE STAINLESS STEEL WOOL OR
STAINLESS STEEL BRUSHES.
Special Situations for Material
Fingerprints and Smears: To remove fingerprints or smears use a high quality stainless steel cleaner and
polish in accordance with the manufactures instructions. Many of these products leave a protective coating
the helps prevent future smears and fingerprints.
Grease and Oil : To remove grease and oil use a quality commercial detergent or caustic cleaner. Apply in
accordance to the manufactures instructions and in the direction of the polish lines.
Precautions: Avoid prolonged contact with chlorides (bleaches, salts), bromides (sanitizing agents),
thiocyanates (pesticides, photography chemicals, and some foods), and iodides on stainless steel equipment,
especially if acid conditions exist.
IMPORTANT: DO NOT PERMIT SALTY SOLUTIONS TO EVAPORATE AND DRY ON
STAINLESS STEEL.
The appearance of rust streaks on stainless steel leads to the belief that the stainless steel is rusting. Look for the
actual source of the rust in some iron or steel particles which may be touching, but not actually a part of the
stainless steel structure.
NOTE: Strongly acidic or caustic cleaners may attack the steel causing a reddish film to appear. The use of
these cleaners should be avoided.
Brand Names: Use of brand names is intended only to indicate a type of cleaner. This does not constitute an
endorsement, nor does the omission of any brand name cleaner imply its inadequacy. Many products named are
regional in distribution, and can be found in local supermarkets, department and hardware stores, or through your
cleaning service. It is emphasized that all products should be used in strict accordance with package instructions.
Page 8

1 170-006 Vinyl Shower Curtain 1
170-006D Duck Shower Curtain
170-006E Herculite Shower Curtain
2 151-001 Curtain Hook 10
3 269-367 Curtain Rod 1
4 150-157 Shower Rod Flange 2
5 P10-412 #10-13 x 2” Phillips-Head Screw 1 Bag (4 Screws)
ADA Compliant Recess-Mounted Shower
HN200 Installation Instructions
Bradley Corporation • 215-1189 Rev. F; EN 02-342
8
Shower Seat Repair Parts
158-010 Left Hand Plastic Seat (Valve Right)
158-011 Right Hand Plastic Seat (Valve Left)
Shower Curtain Repair Parts
Curtain Pre-pack S30-068
ITEM PART NO. DESCRIPTION QUANTITY
 Loading...