


BTDS108CE-EU
Bradley Smoker BTDS108CE-EU, BTDS108P, BTDS76CE-EU, BTDS108CE-UK, BTDS76CE-UK User Manual
...
Owners Manual
Digital Food Smoker
BTDS76P BTDS108P BTDS76CE-EU BTDS108CE-EU
BTDS76CE-UK BTDS108CE-UK
Bradley 4 Rack Bradley 6 Rack Bradley 4 Rack Bradley 6 Rack
Digital Smoker Digital Smoker Digital Smoker Digital Smoker
120 v 120 v 240 v 240 v
572 sq. in 858 sq. in 572 sq. in 858 sq. in
Wt 42.5 lbs Wt 62.5 lbs Wt 42.5 lbs Wt 62.5 lbs
Bradley Technologies Canada Inc.
1609 Derwent Way, Delta, BC V3M 6K8 Canada
Toll Free Telephone 1‑800‑665‑4188
Tel: 604‑524‑3848 Fax: 604‑524‑3839
Email: info@bradleysmoker.com
www.bradleysmoker.com
Printed in China

Dear Sir or Madam,
Welcome to the wonderful experience of backyard smoking and slow
roast cooking. The Bradley Smoker is an insulated smoker oven designed
to automatically generate a continuous flow of clean smoke. It is an
outdoor electrical appliance that enables one to cook, roast, hot smoke, as
well as cold smoke food with consistently superior results using minimal
effort.
The Bradley Smoker is unique in that it produces smoke which is four
times cleaner than traditional burn-box chips*. Because it automatically
extinguishes the spent Bisquette, it prevents the formation of high
temperature gases and acids. In addition, the Bradley Smoker meets both
North American and European appliance standards.
There are nine different woods of the Bradley Flavor Bisquettes that
are made especially for your smoker - Alder, Apple, Cherry, Hickory,
Maple, Mesquite, Oak, Pecan and Special Blend. There are a number
of recipe cards that come packaged with the Bradley Flavor Bisquettes
which are also available in the Bradley Recipe Collection, Volume One.
Other items of interest are the Bradley Jerky Racks, Bradley Original
Racks, Weather Guard Covers, Bradley Cooking Video, Caps, Aprons,
and the Bradley Digital Thermometer with meat probe that takes all the
guesswork out of roasting and smoking meat.
We wish you great cooking and smoking for the years to come.
Sincerely,
The Bradley Group
*Based on studies and tests preformed at The British Columbia Institute of Technology.
2 43

Important Safety Warnings
When using electrical appliances, basic safety precautions should always be
followed including the following:
SAVE THESE INSTRUCTIONS
1. Please read all instructions.
2. Do not touch hot surfaces. Use handles or knobs.
3. Do not use aluminum foil inside the smoker oven.
4. To protect against electrical shock do not immerse cords, plugs, generator,
or smoker oven in water or other liquid.
5. Close supervision is necessary when any appliance is used by or near
children.
6. Unplug from outlet when not in use and before cleaning. Allow to cool
before putting on or taking off parts.
7. The use of accessory attachments not recommended by the appliance
manufacturer may cause injuries.
8. Do not use appliance for other than intended use.
9. Fuel, such as charcoal briquettes, are not to be used with appliance.
10. Extreme caution must be used when moving an appliance containing
hot oil or other hot liquids.
11. Do not let cord hang over edge of table or counter, or touch hot
surfaces.
12. Do not place on or near a hot gas or electric burner, or in a heated oven.
13. Be cautious of sharp edges when assembling and operating appliance.
14. If an extension cord is required, the cord must be an approved 3 prong
(grounded) heavy duty cord for outdoor use not over 6 feet long.
15. Do not operate any appliance with a damaged cord or plug, or after an
appliance malfunctions or has been damaged in any manner. Return
appliance to the nearest authorized service facility for examination,
repair, or adjustment. For assistance call toll free 1‑800‑665‑4188.
16. Always attach plug to appliance first, then plug cord into wall outlet.
To disconnect, turn all controls to “OFF”, then remove plug from wall
outlet.
17. Use only on properly grounded outlet.
18. Save these Instructions.
342

When in Use
• For outdoor use only. Do not operate in an enclosed area.
• Do not leave unattended when in use.
• Do not plug in smoker until fully assembled.
• Do not cover or seal racks or trays with aluminum foil. This can cause
damage to your smoker.
• Do not move smoker when in use.
• Do not exceed a temperature of 320° F.
• Always wear oven mitts to protect hands from burns.
• Do not use packaging box to cover smoker when in use.
• Use only approved grounded electrical outlet.
• Do not allow rain water to come in contact with smoker. Do not use in
extreme weather conditions.
• Do not immerse in water.
• Keep out of reach of pets and children.
• Do not clean this appliance with water spray or the like.
• When not in use – store indoors out of reach of children.
• Care should be exercised in the use of detachable power‑supply cord and
extension cords to reduce the risk resulting from becoming entangled in
or tripping over a long cord.
• Outdoor extension cords should be used with outdoor products and are
marked with suffix letters “W‑A” and with a tag stating “Suitable for Use
with Outdoor Appliances”
• Keep the connection to extension cords dry and off the ground
Nota: La temperatura normal de cocinado es entre 200ºF - 250ºF. Tenga en
mente que la Temperatura mostrada en la Pantalla es para referencia solamente
y no intenta dar temperaturas internas exactas de los alimentos. La temperatura
interna será mas alta cerca del Elemento de Calentamiento.
Si estos consejos no funcionan, por favor llame a nuestro Servicio al Cliente
al 1-800-665-4188
After Each Use
• Unplug smoker when not in use.
• Remove grease and residue left in smoker. Clean smoker thoroughly.
Place extinguished Bradley Flavor Bisquettes at a safe distance from all
structures and combustible materials. Store smoker in a dry covered place.
Assembling Instructions
Refer to Part Numbers in Exterior Part List & Interior Component
List Diagrams.
How to Assemble the Bradley Digital Smoker
• Remove smoker from box.
• Take all packaged parts out of the smoker.
• Remove all protective packaging.
4
41
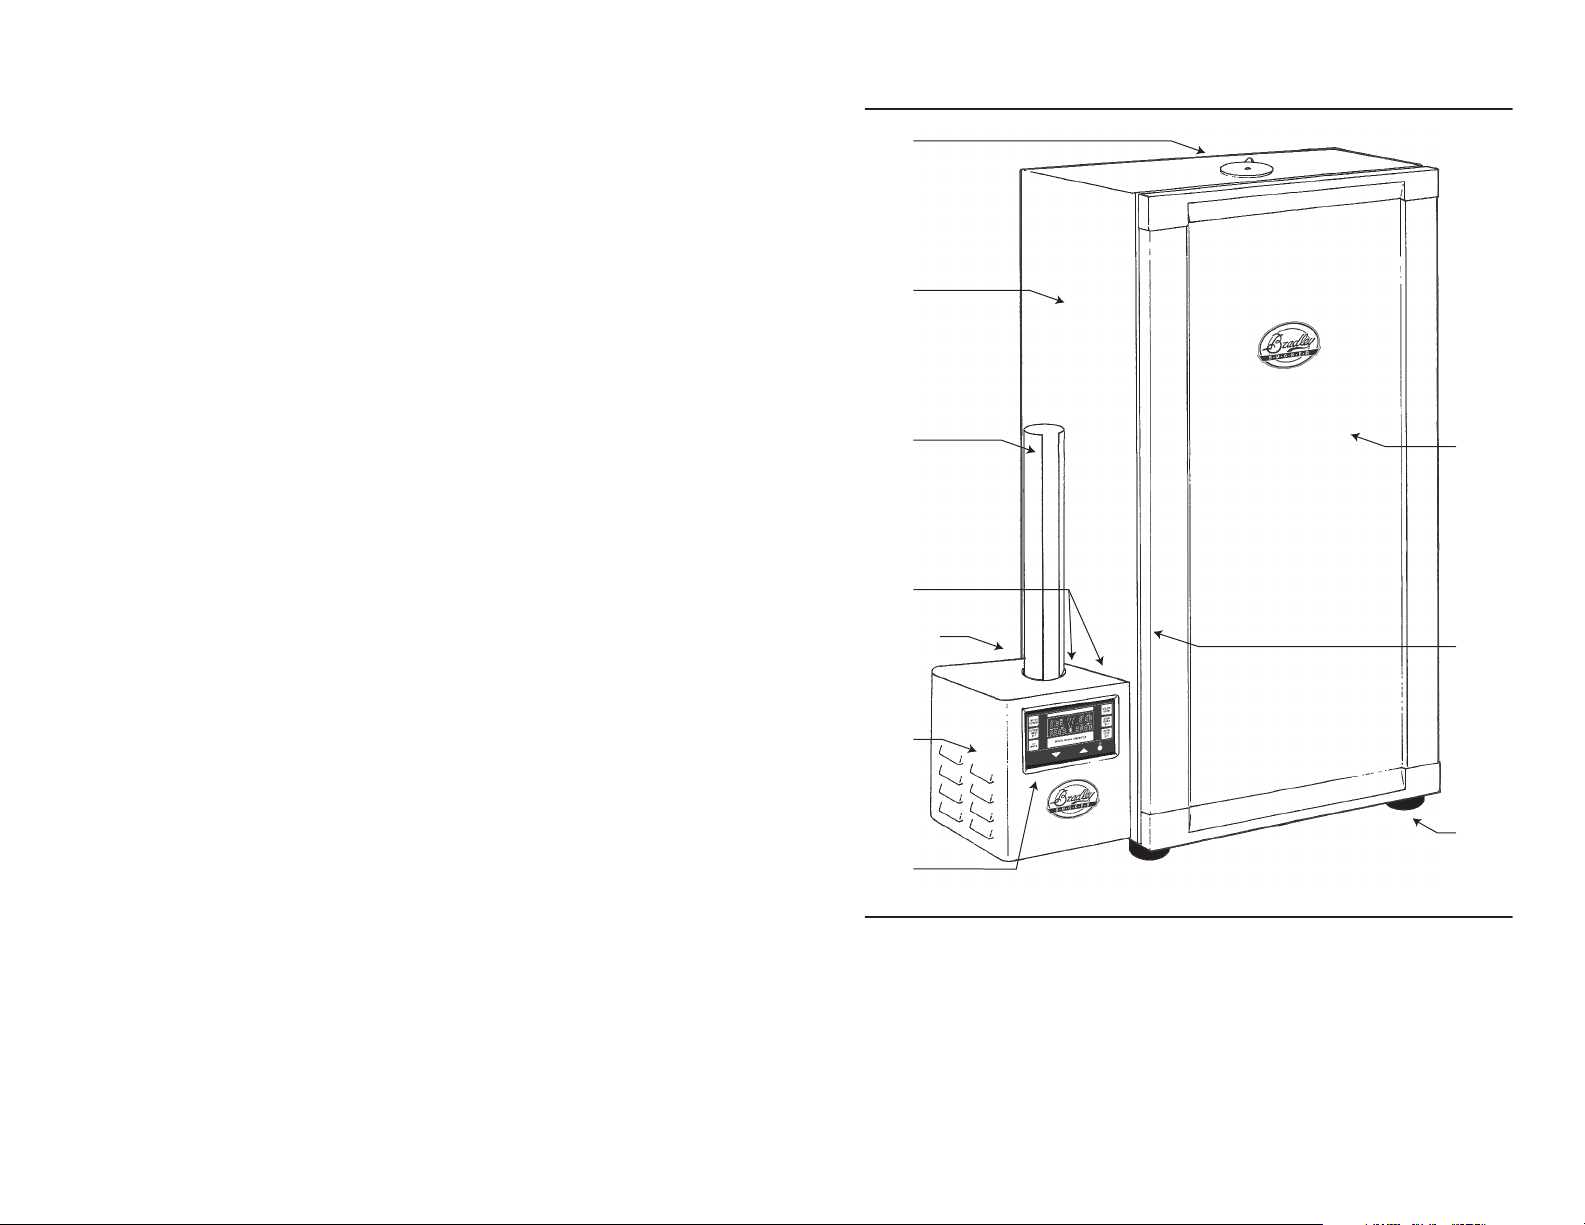
Exterior Parts List
1 - Digital Smoke Generator
2 - Smoke Tower
3 - Generator Supports (not shown)
4 - Feeder Tube
5 - Digital Display Panel (see page 10)
6 - Damper
7 - Door
8 - Door Seal
9 - Rubber Feet
10 - Sensor Cable,
Jumper Cord &
Power Supply Cord
(not Shown, see page 8)
Bradley Digital Smoker
®
Exterior
9
3
8
5
2
1
4
6
10
7
cepillo de alambre o un raspador para remover cualquier residuo dejado
por el proceso de quemado.
* Limpie la Tapa de la Ventila (arriba del ahumador) para asegurarse que no
está atorada.
* Frote el Sello de la Puerta con agua tibia para remover residuos y partículas
de comida.
Despues de la Limpieza
* Vuelva a colocar las Parrillas, Bandeja de Goteo, Bandeja Rectangular del
Fondo y el Tazón de Goteo dentro del ahumador, asegurandose que todas
las partes están limpias secas.
* Inserte de nuevo el Generador de Humo dentro de la torre del ahumador.
* Asegurese de que el Cordón de Abastecimiento de Electricidad (3) está
desenchufado.
Como Solucionar Problemas
No electricidad en el Ahumador:
Verifique que todos los enchufes estan insertados correctamente en los
contactos. Verifique el fusible (localizado en el generador de humo).
Verifique para asegurarse que la toma de corriente, Interruptor de
Circuitos Conectados a Tierra (GFCI) no ha sido descuidado.
Los Bisquettes no Avanzan:
Verifique la guía del transmisor y quite las virutas de madera sueltas. Al
limpiar el generador de humo, se evita que los bisquettes se atoren y el
desgaste puede ser evitado.
Un Bisquette que no está Completamente Quemado:
Verifique que no está enchufado al circuito algún otro equipo eléctrico. El
ahumador deberá estar enchufado a su propio circuito de pared. Verifique
para asegurarse que el quemador de bisquettes está libre de acumulación
de residuos.
El Horno Ahumador no Alcanza las Temperaturas:
Dele tiempo al ahumador para que se precaliente. Recuerde, una vez que
la comida es puesta en el horno la temperatura descenderá, y subirá
lentamente de nuevo. Trate de cerrar ligeramente la cubierta de la ventila
y mantener el ahumador alejado del viento. Despues, trate de usar un
termómetro por separado adentro del ahumador para asegurar que la
temperatura numérica está indicando correctamente.
540
Bradley Digital Smoker
®
Interior
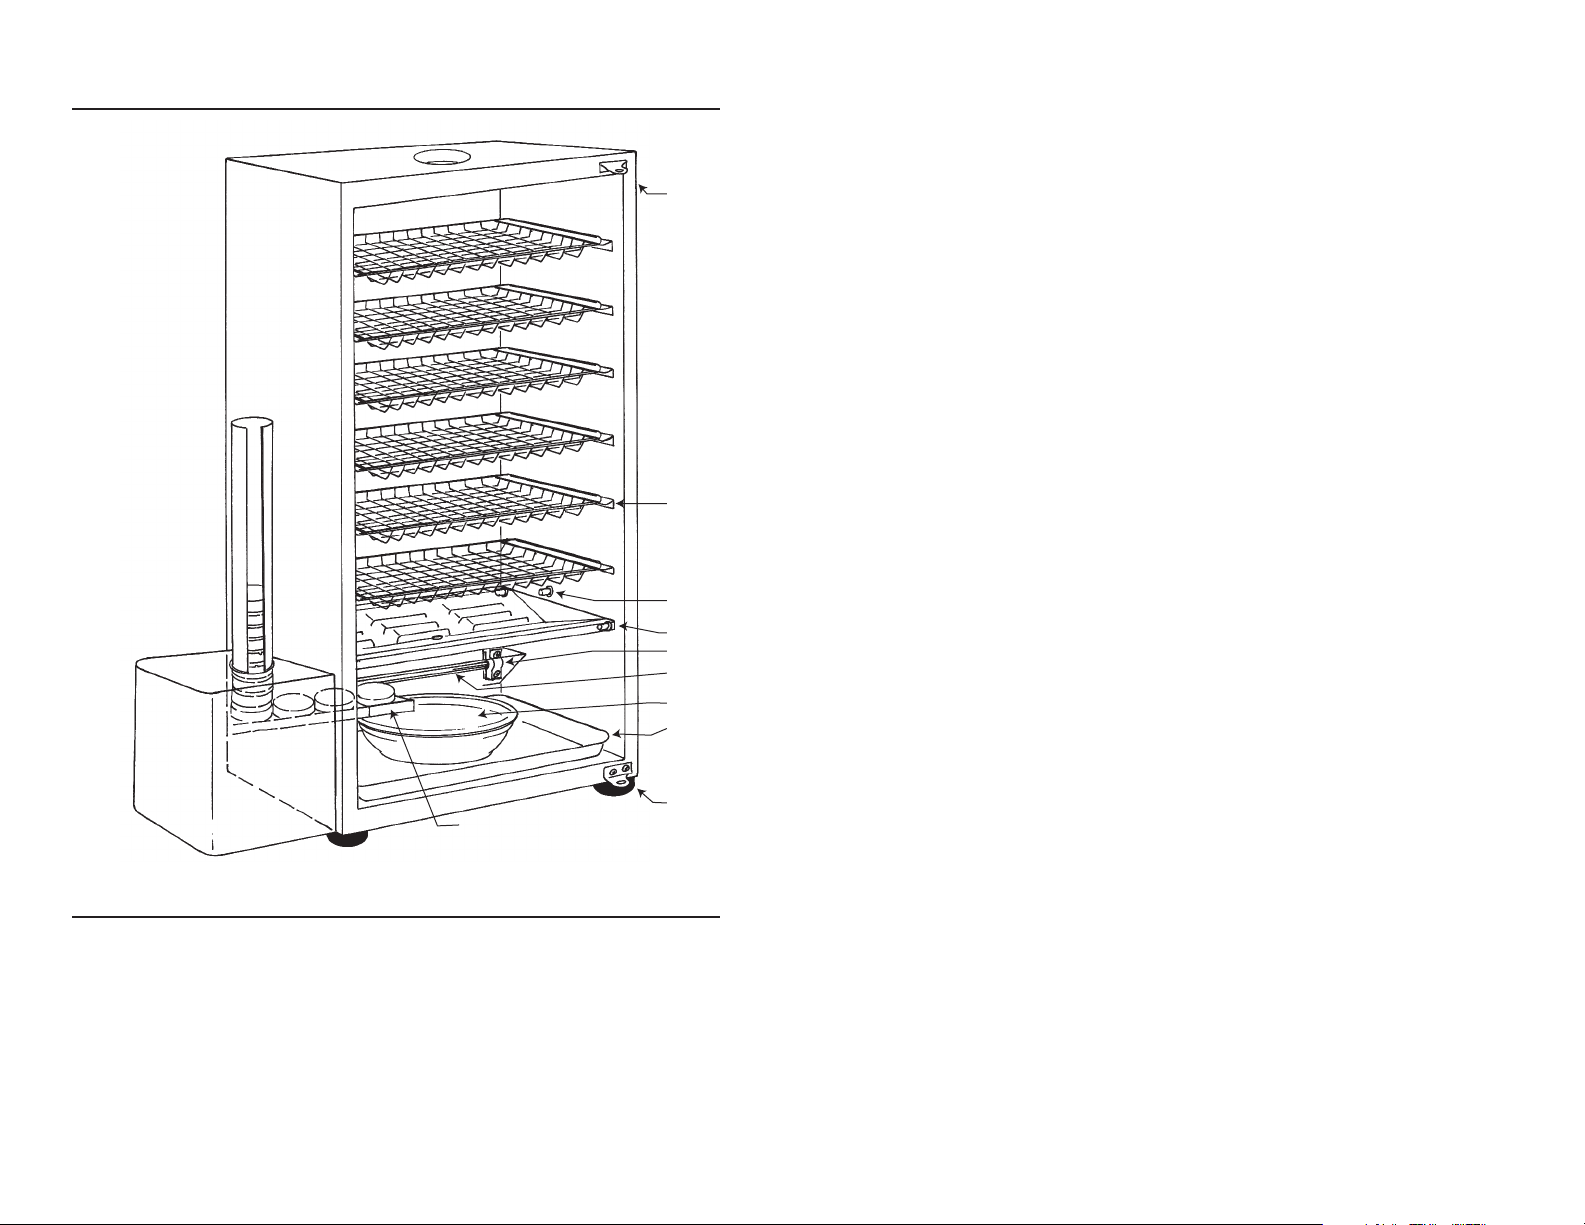
Interior Parts List
H
E
A
C
F
J
D
B
G
I
A - Drip Tray
B - Cooking Racks (4 or 6)
C - Drip Bowl
D - Bottom Rectangular Tray
E - Bisquette Burner
(Bisquettes not included)
F - Heating Element
G - Top Door Hinge
H - Lower Door Hinge
I - Brass Pin
J - Porcelain Insulator
la temperatura interna inmediatamente. Una vez que el botón “On/Off
Oven” ha sido oprimido para encender el horno, el Oven Timer se prenderá
intermitentemente hasta que el deseado tiempo de cocinado ha sido fijado.
El Temp Setting tambien se prenderá intermitentemente hasta que la
temperatura deseada ha sido fijada.
Mantenimiento General
Precauciones Importantes de Seguridad
* El Ahumador Bradley debera ser mantenido y limpiado despues de cada
uso.
* Desconecte el Cordón de Abastecimiento de Electricidad (3) antes de
comenzar cualquier mantenimiento o limpieza.
* No sumerja el ahumador en agua.
* No rocie el interior del ahumador con cualquier tipo de limpiador de
aparatos.
* No use papel de aluminio adentro del ahumador.
* No lo deje desatendido cuando esté en uso.
* No rocie o limpie el ahumador con cantidades excesivas de agua.
Procedimientos de Mantenimiento
* Limpie el Tazón de Goteo. Deshagase cuidadosamente de todos los
Bisquettes quemados pues pueden estar aún calientes.
* Lave la Bandeja de Goteo, Parrillas, Bandeja Rectangular del Fondo y el
Tazón de Goteo con agua caliente y detergente o póngalos en la lavadora
de platos.
* Remueva las partículas de comida y residuos de grasa del ahumador. Si el
interior necesita limpieza, frótelo con un trapo húmedo.
Nota: La torre deberá tener humo o residuo negro en su interior. Entre mas
residuo, mejor sabrá el producto.
* El Generador Numérico de Humo deberá ser mantenido limpio y libre
de virutas de madera y grasa todo el tiempo. Si virutas de madera sueltas
se han acumulado en el Generador de Humo, simplemente sóplelas
6 39
o aspírelas. Desconecte el Cordón de Abastecimiento de Electricidad
(3), Cordón de Cierre (2), y el Cable Sensor (1) antes de remover el
Generador de Humo de la Torre del Ahumador. Refierase a ”Remover
Generador de Humo” en “Instrucciones de Ensamblado”.
* El Quemador de Bisquettes deberá ser ligeramente raspado usando un

Guía de Función de la Pantalla
Generador Numérico de Humo
* El Generador de Humo es operado por los botones de control del lado
izquierdo.
* Oprima “On/Off Smoker” para encender el Generador de Humo.
* Oprima “>>>Wood” para avanzar los Bisquettes dentro del quemador.
* Oprima “Smoker Timer Set” y despues “v ^” para fijar la deseada duración
del tiempo de ahumado.
* Oprima “Smoker Timer Set” de nuevo para empezar 20 minutos de
avance automático.
* Oprima “On/Off Smoker” para apagar el Generador de Humo.
Horno Ahumador
* El Horno Ahumador es operado por los botones de control del lado
derecho.
* Oprima “On/Off Oven” para encender el Horno Ahumador.
* Oprima “Oven Temp Set” y despues use los botones “v ^” para fijar la
temperatura deseada.
* Oprima “Oven Temp Set” de nuevo para fijar la temperatura.
* Oprima “Oven Timer Set” y luego use “v ^” para fijar la deseada
duración del tiempo de cocinado
* Oprima “Oven Timer Set” de nuevo para fijar el tiempo de cocinado.
* Oprima “On/Off Oven” para apagar en Horno Ahumador.
Install Digital Smoke Generator (see page 5)
• Attach digital smoke generator (1) to the smoker tower (2) by placing the
Bisquette Burner (G) through the left side opening of the tower. Align the
generator keyholes to the two supports (3) on the side and push down to
secure in position.
• Insert the Feeder Tube (4) into the top of the smoke generator. Push
down firmly. Load with desired amount of Bradley Flavor Bisquettes.
• Plug the Sensor Cable (1) into the back of the smoke generator (A) and
smoker (B). (see page 8)
• Plug the Jumper Cord (2) into the back of the smoke generator (D) and
then into the back of the smoke tower (C). (see page 8)
• Plug the Power Supply Cord (3) into the power receptacle (E).
Set Up Smoker Tower (see page 6)
•
Place Racks, either four or six, (C) onto side supports above the Drip Tray (B).
• Place Drip Tray (B) “V” facing down beneath the Racks on the
brass side pins.
• Place the Rectangular Tray (E) on the bottom of the smoker.
• Fill the Drip Bowl (D) half full with water and place in the center of
Rectangular Tray to catch burnt Bisquettes. During a long smoking
period, the Drip Bowl may require changing the water.
• Plug the Power Supply Cord (3) from the smoke generator into an
approved grounded electrical outlet (4). (see page 8)
Función de la Pantalla
Una vez que el botón “On/Off Smoker” ha sido oprimido para encender el
generador de humo, el Smoker Timer se prenderá intermitentemente hasta
que el tiempo deseado ha sido fijado. El Oven Meat Temp empezará a leer
38
To Remove Smoke Generator
• Make sure the smoke generator has had time to cool down. Unplug
the Power Supply Cord from the wall outlet (4) and from the smoke
generator (3). Detach Sensor Cable (1) and Jumper Cord (2) and then
remove smoke generator from the smoker tower by raising it gently
upward and pulling it outward.
Operation Guideline
Seasoning & Preparation For Use
• Seasoning the Bradley Digital Smoker is an ongoing process, the more
you use it, the better tasting the foods will be.
• The Seasoning Process is mainly to remove the impartial smells and
flavors from your smoker. The smell of your new Bradley Digital Smoker
is not necessarily how you want your food to taste.
7
 Loading...