

Page 1
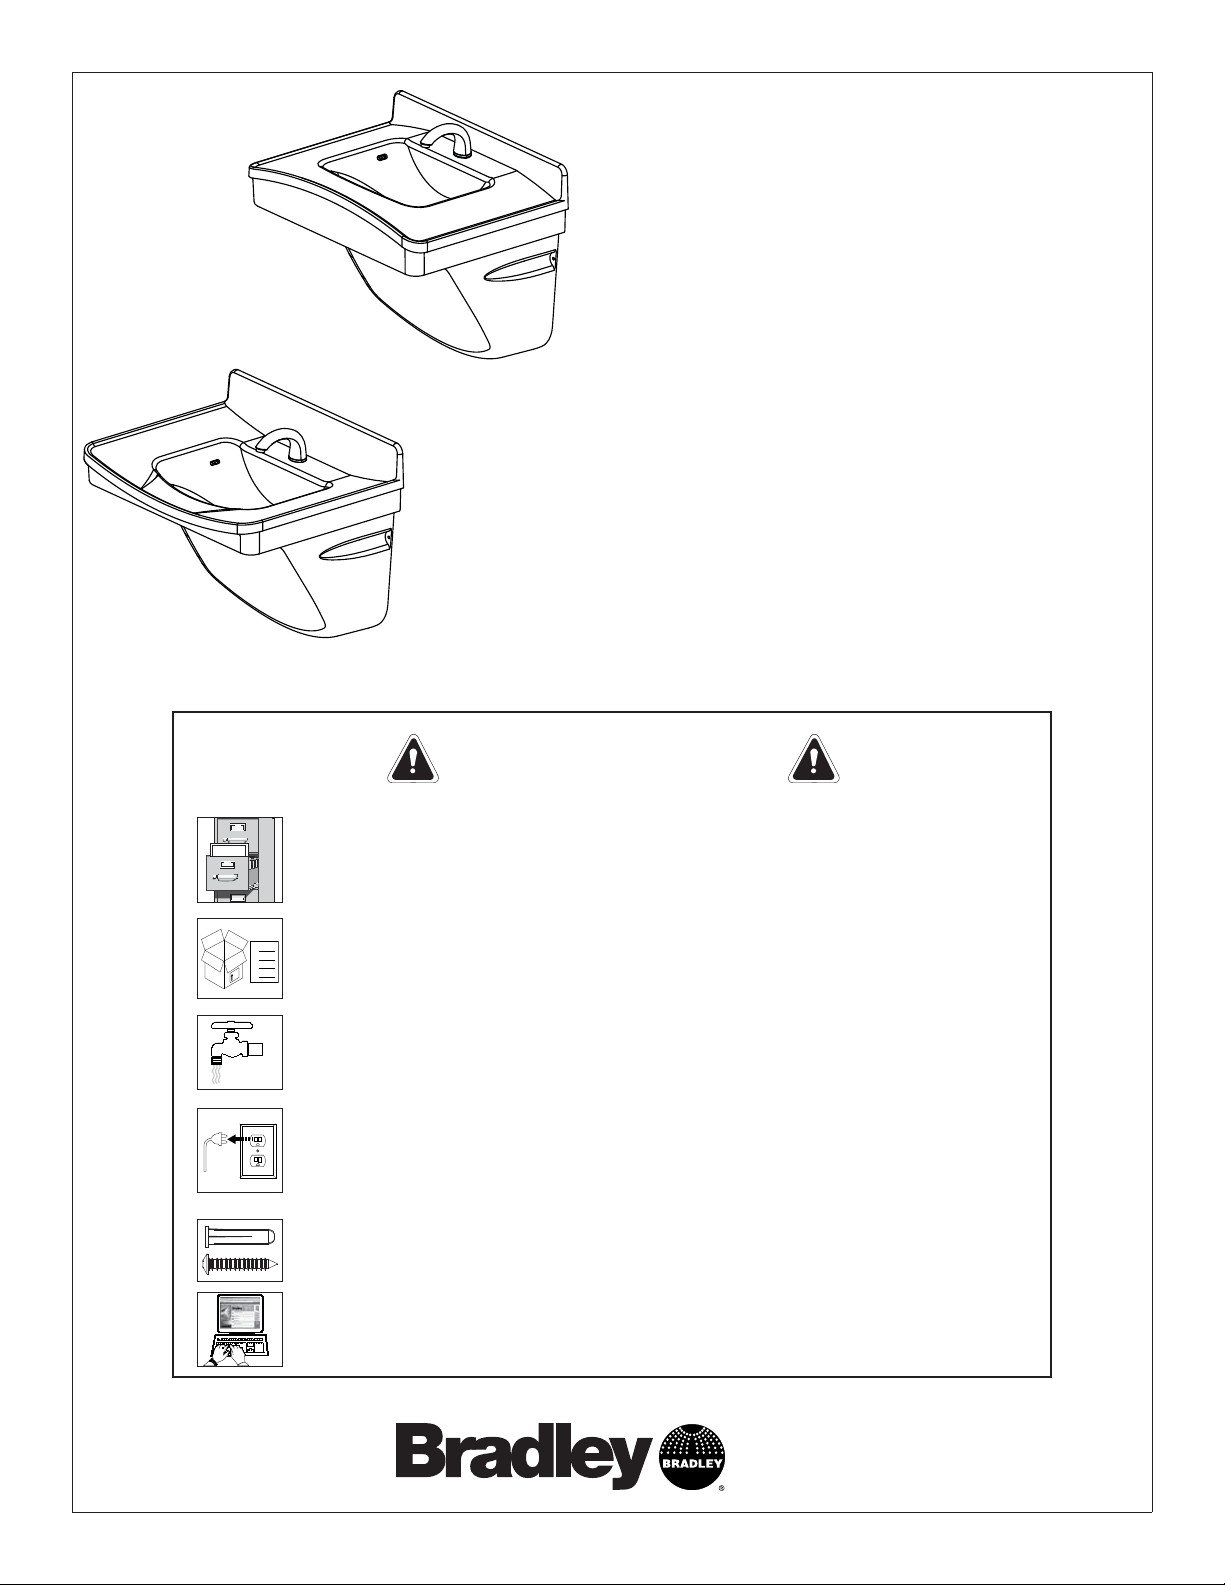
FL-1L
Installation
FL-1H
FL-1H, FL-1L
Frequency® Lavatory System
U.S. Pat. No. Des. 507,634
Table of Contents
Components . . . . . . . . . . . . . . . . . . . . . . . . . . . . .2
Supplies Required . . . . . . . . . . . . . . . . . . . . . . . .2
Cleaning and Maintenance for Terreon® . . . . . . .3
Dimensions - Front and Top Views .............3
Dimensions - Side Views .....................4
Rough-Ins ...................................5
Installation . . . . . . . . . . . . . . . . . . . . . . . . . . . .6–8
Installation
IMPORTANT!
Read this entire installation manual to ensure proper installation.
When fi nished with the installation, fi le this manual with the owner or
maintenance department. Compliance and conformity to local codes
and ordinances is the responsibility of the installer.
Separate parts from packaging and make sure all parts are accounted
Packing List
for before discarding any packaging material. If any parts are missing,
IS
H
T
E
ID
S
P
U
do not begin installation until you obtain the missing parts.
Make sure that all water supply lines have been fl ushed and then
completely turned off before beginning installation. Debris in supply
lines can cause valves to malfunction.
Turn OFF electrical power to the electrical outlets, then unplug all
electrical units prior to installation. Electrical power MUST remain off
until installation is completed. After installation is complete, turn on
the water supply fi rst, then turn on the electrical power.
Hardware supplied by installer must be appropriate for wall
construction. Wall anchors used must have a minimum pull-out rating
of 1,000 lbs.
Product warranties may be found under “Product Information” on our
web site at www.bradleycorp.com.
215-1511 Rev. D; EN 07-808
© 2007 Bradley Corporation
Page 1 of 8 5/30/07
P.O. Box 309, Menomonee Falls, WI 53052-0309
Phone: 1-800-BRADLEY Fax: 262-253-4161
www.bradleycorp.com
Page 2
FL-1H, FL-1L Installation
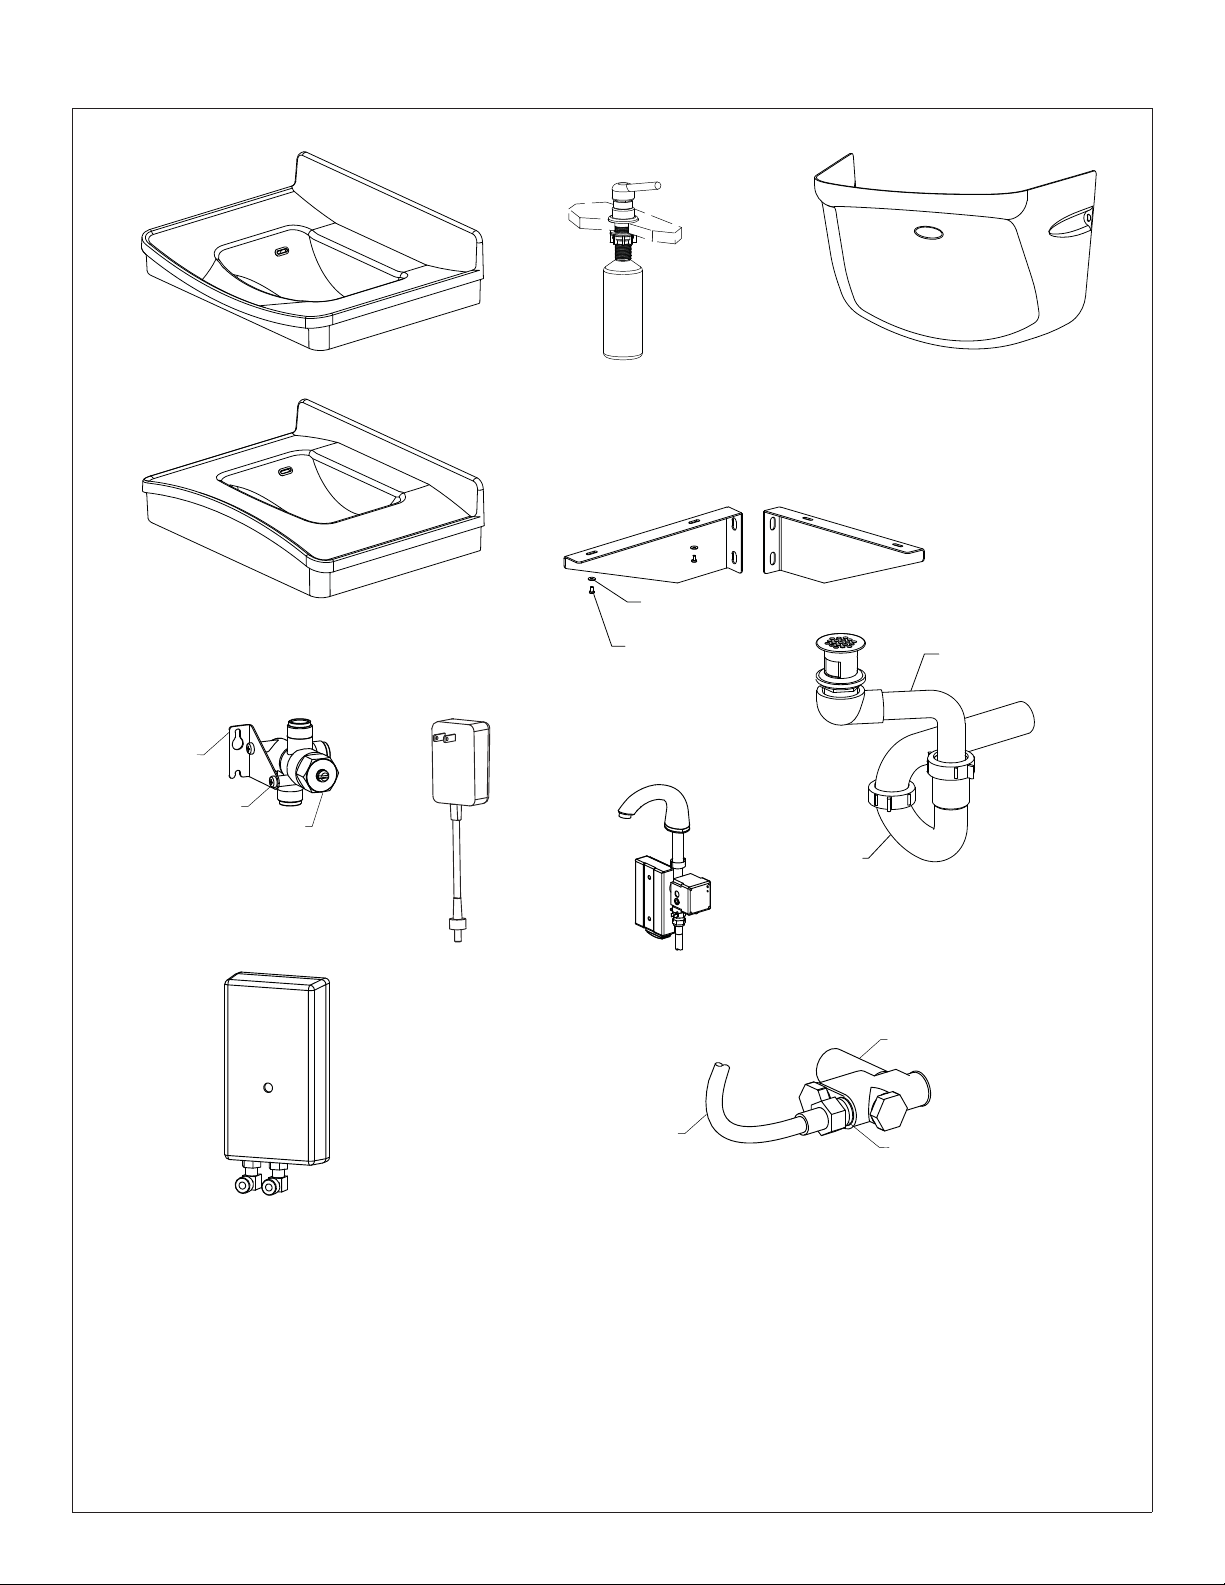
Components
Bowl FL-1L (187-273)
Contact Bradley for
color options
Bowl FL-1H (187-274)
Contact Bradley for
color options
Vernatherm™
TMV Assembly
Bracket
(140-934)
Screw
(P18-054)
Valve
(S01-524)
Optional Tankless Water Heater
(269-1765 - EX55TMLB, 240/208 volts)
(269-1766 - EX60TMLB, 277 volts)
Optional
Single-Unit
Adapter
(153-443)
Soap
Dispenser
Model 6334
Support Bracket
(140-823L)
#10 Washer
(142-002AT)
#10-24 Screw
(P18-054)
Aerada™ 1200 Series
CS Faucet
Model S53-315
Prepack Trap Cover FL-1
(S45-2108 - Gray)
(S45-2108A - Putty)
(S45-2108B - Coal)
Support Bracket
(140-823R)
Offset Strainer
(269-1751)
P-Trap
(269-1697)
Optional
Tempered Line
1/2" Flex
Hose
(269-653)
Stop/Strainer/Check
Valve (S60-003)
1/2" Nipple
(113-006DH)
Supplies Required:
• (4) 3/8" wall anchors, bolts and 1" min. O.D. washers to mount main frame and bowl to wall (minimum pull-out rating
of 1,000 lbs.)
• (2) #10 wall anchors (for optional mixing valve/bracket mounting)
• 1/2" NPT hot/cold or tempered supply piping
• 1-1/2" NPT drain piping
• OPTIONAL: 110 volt GFCI protected electrical outlet for 100–120 VAC plug-in transformer (for Bradley Faucets)
• OPTIONAL: 240/208 or 277 volts for electric tankless water heater
2 5/30/07 Bradley Corporation • 215-1511 Rev. D; EN 07-808
Page 3
Installation FL-1H, FL-1L
Cleaning and Maintenance for Terreon
®
Material Description: Terreon® is an NAHB Certifi ed densifi ed solid surface material composed of polyester resin and is
resistant to chemicals, stains, burns and impact. Surface damage can be easily repaired with everyday cleansers or fi ne grit
abrasives.
Routine Cleaning: Clean daily or as often as conditions require using a standard commercial or household cleaner such as
Formula 409
Stubborn Stains: Remove tough stains with Ajax
a circular motion with 240 grit wet/dry sandpaper. The fi nish can be renewed with a maroon Scotch-Brite
®
or Windex®.
®
, Comet®, or Soft-Scrub® and a green Scotch-Brite® pad or lightly sand in
®
pad.
Special Situations for Material
Scratches: Remove scratches with a green Scotch-Brite® pad. The fi nish can then be renewed with a maroon Scotch-Brite®
pad, followed by a white Scotch-Brite
Hard Water Deposits: Remove hard water deposits with a mild solution of vinegar and water. Always rinse the unit
thoroughly after cleaning.
Restoring the surface: Use Hope’s
material. Bradley recommends additional care and maintenance for the darker colored Terreon
this additional maintenance refer to Bradley technical document #1505.
Do not use strong acid or alkaline chemicals and cleansers to clean Terreon
contact with the surface, wipe them off immediately and rinse with soapy water. Avoid contact with harsh
chemicals such as paint remover, bleach, acetone, etc. Avoid contact with hot pans and objects.
Repair Kits: Terreon
®
repair kits are available. Contact your Bradley representative or distributor for part numbers and pricing
Repair kits are made to order and have a shelf life of 30 days.
Terreon
®
is a unique, cast solid surface material. Aggregate fl ow and distribution as well as shades of color can vary from
product to product creating natural characteristics.
Brand Names: Use of brand names is intended only to indicate a type of cleaner. This does not constitute an endorsement,
nor does the omission of any brand name cleaner imply inadequacy. Many products named are regional in distribution, and
can be found in local supermarkets, department and hardware stores, or through your cleaning service. It is emphasized that
all products should be used in strict accordance with package instructions.
®
pad or 30-micron sandpaper.
®
Solid Surface cleaner and polish to refresh and protect the Terreon® Solid Surface
®
®
, for complete instructions on
. If these chemicals come in
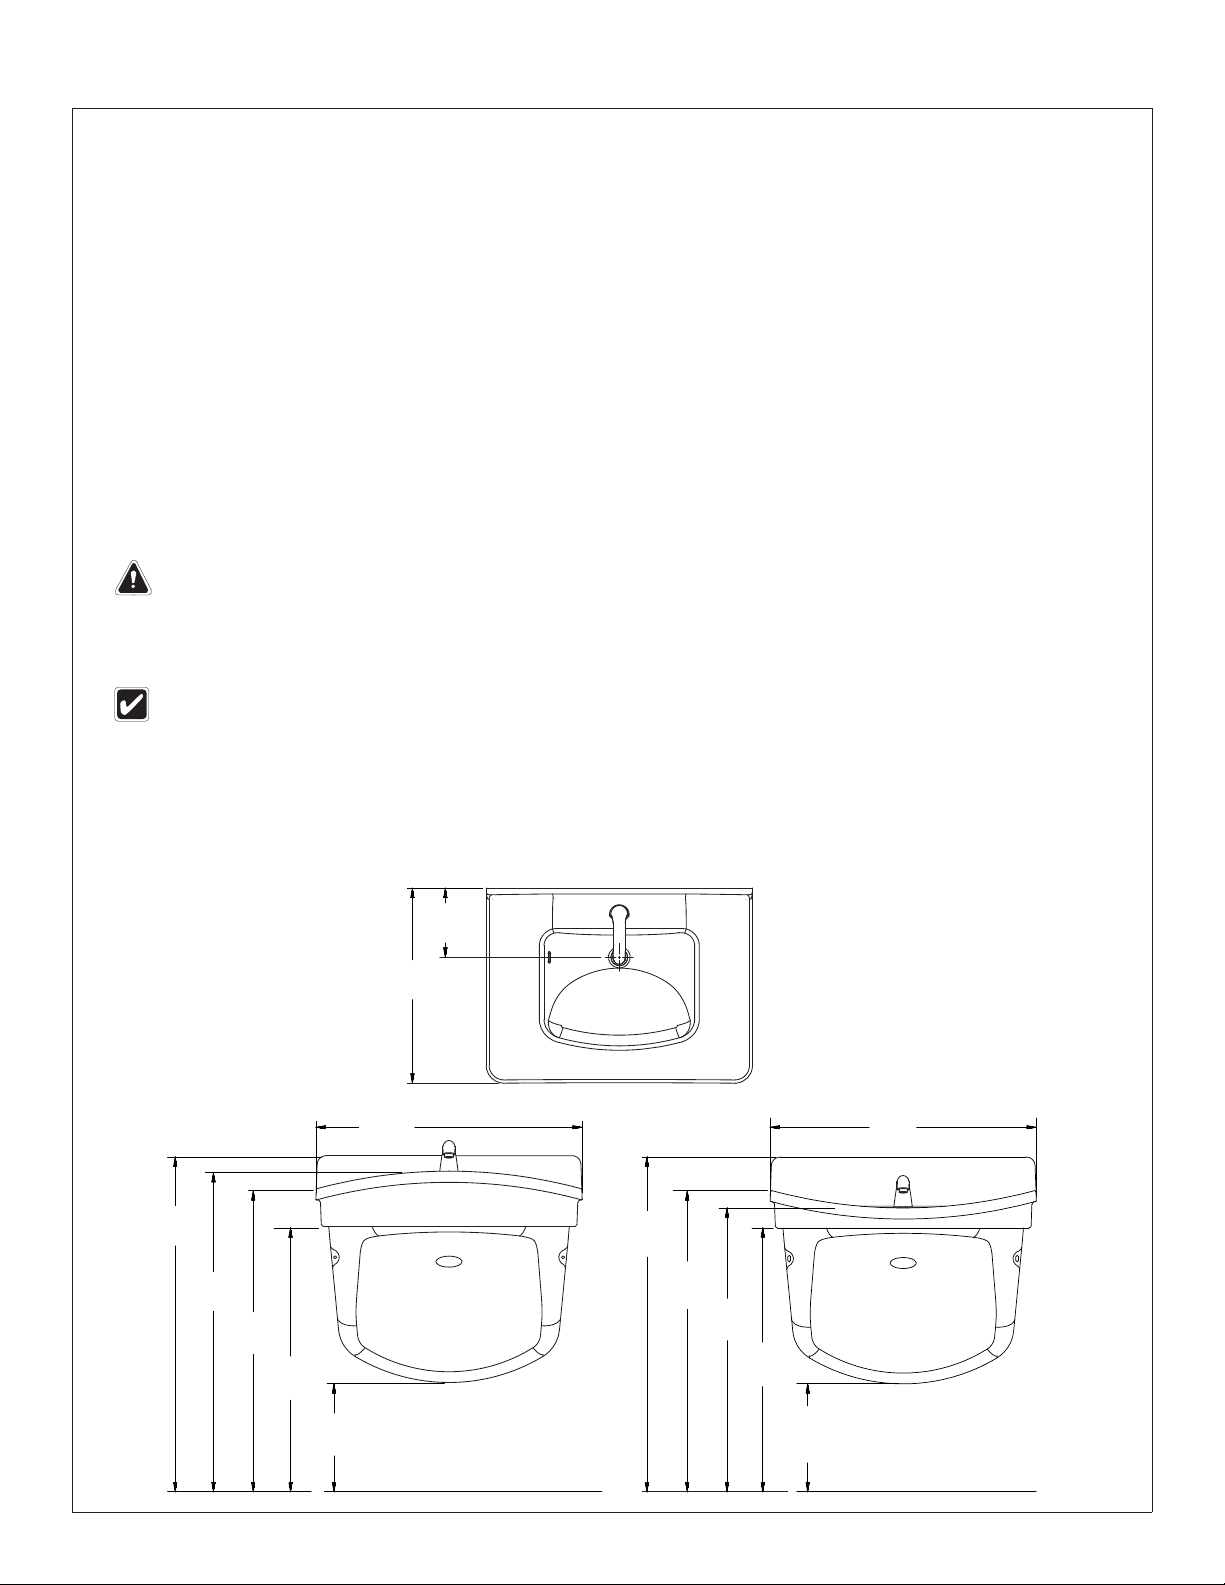
Dimensions - Front and Top Views
FL-1H shown
FL-1L is similar
FL-1H
37-3/4"
(959mm)
36"
(914mm)
34"
(864mm)
30"
(762mm)
12-1/4"
(311mm)
(559mm)
30"
(762mm)
22"
7-3/4"
(197mm)
37-3/4"
(959mm)
FL-1L
34" ADA
(864mm)
32"
(813mm)
30" ADA
(762mm)
12-1/4" ADA
(311mm)
30"
(762mm)
ADA
COMPLIANT
Bradley Corporation • 215-1511 Rev. D; EN 07-808 5/30/07 3
Page 4
FL-1H, FL-1L Installation
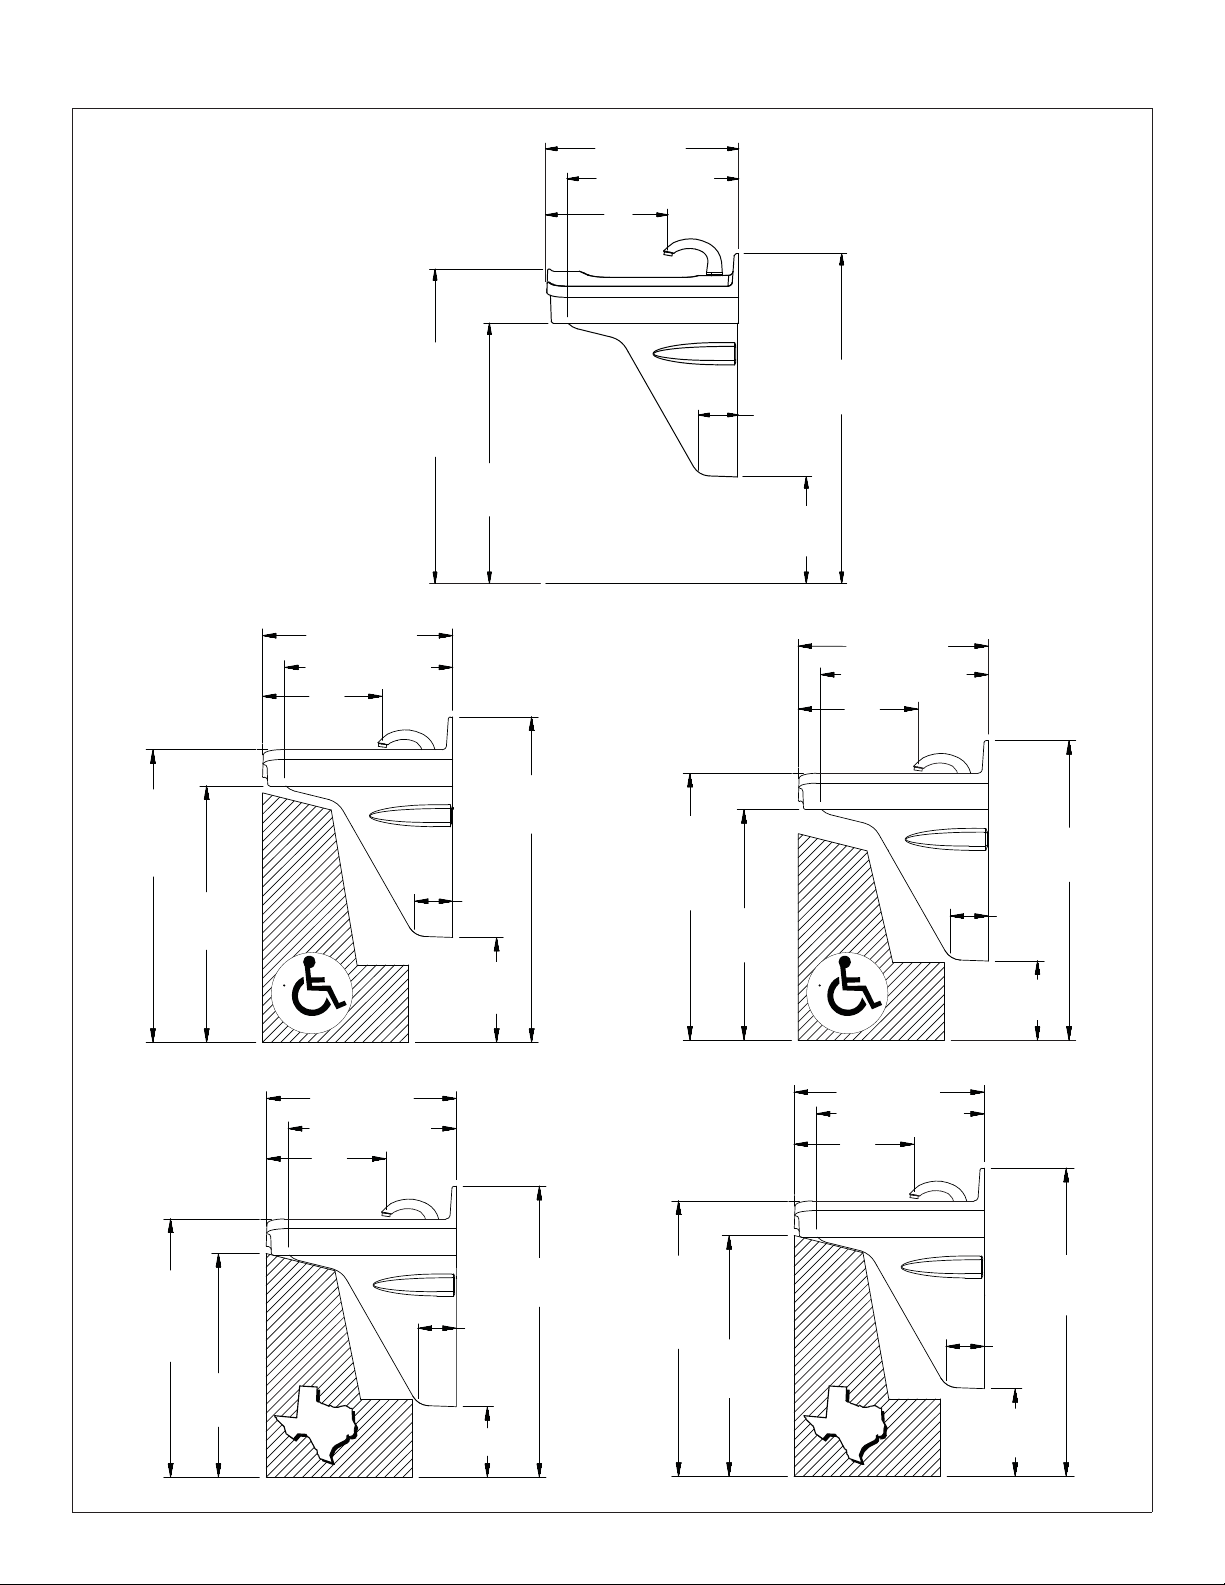
Dimensions - Side Views
FL-1L
Standard
Height
22" (559mm)
19-3/4" (502mm)
14"
(356mm)
FL-1H
36"
(914mm)
Rim Height
Not ADA
Compliant
30"
(762mm)
22" (559mm)
19-3/4" (502mm)
14"
(356mm)
Juvenile
Height
Ages 6–12
37-3/4"
(959mm)
4-5/8"
(117mm)
12-1/4"
(311mm)
22" (559mm)
19-3/4" (502mm)
14"
(356mm)
34"
(864mm)
Rim
Height
TAS Height
Grades Pre-K
through 5 or 6
30"
(762mm)
Rim
Height
30"
(762mm)
26"
(660mm)
A
D
A
C
O
M
P
L
I
A
N
T
22" (559mm)
19-3/4" (502mm)
14"
(356mm)
TAS
37-3/4"
(959mm)
4-5/8"
(117mm)
12-1/4"
(311mm)
33-3/4"
(857mm)
4-5/8"
(117mm)
8-1/4" (210mm)
31"
(787mm)
Rim
Height
(686mm)
TAS Height
Grades 6 through
8 or 9
32"
(813mm)
Rim
Height
28"
(711mm)
27"
A
D
A
C
O
M
P
L
I
A
N
T
22" (559mm)
19-3/4" (502mm)
14"
(356mm)
TAS
34-3/4"
(883mm)
4-5/8"
(117mm)
9-1/4"
(235mm)
35-3/4"
(908mm)
4-5/8"
(117mm)
10-1/4"
(260mm)
4 5/30/07 Bradley Corporation • 215-1511 Rev. D; EN 07-808
Page 5
Installation FL-1H, FL-1L
1
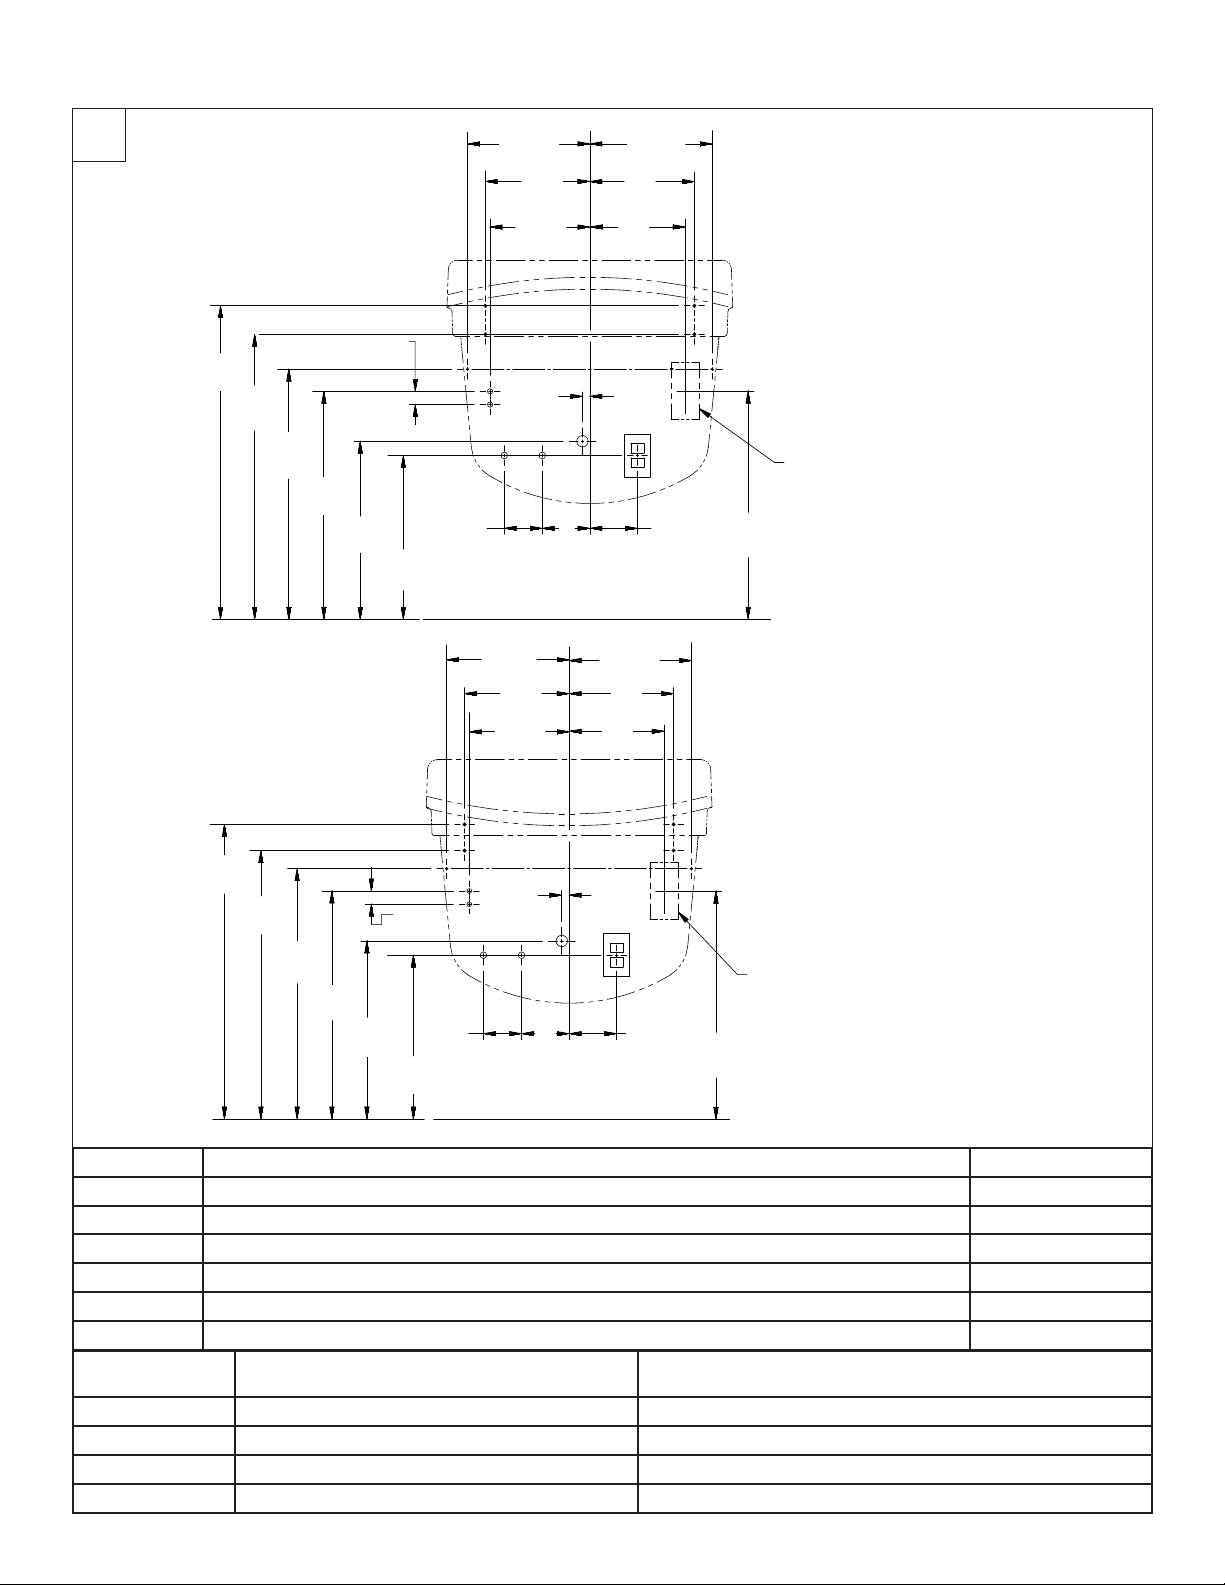
Rough-Ins
FL-1H
33"
(838mm)
(762mm)
FL-1L
30"
26-3/8"
(670mm)
24"
(610mm)
(476mm)
1-3/8"
(35mm)
18-3/4"
17"
(432mm)
A
A
B
4"
(102mm)
12-7/8"
(327mm)
12-7/8"
(327mm)
11"
(279mm)
10-1/2"
(267mm)
D
D
HC
(127mm)
11"
(279mm)
10-1/2"
(267mm)
W
5"
(327mm)
11"
(279mm)
10"
(254mm)
3/4"
(19mm)
12-7/8"
(327mm)
11"
(279mm)
10"
(254mm)
12-7/8"
E
5"
(127mm)
A
A
B
24"
(610mm)
Recommended 240v/208v
or 277v electrical rough-in
location (approx. 3" x 6")
A
A
B
E
Recommended 240v/208v
or 277v electrical rough-in
"
location (approx. 3
5"
24"
(610mm)
x 6")
31"
(787mm)
(711mm)
28"
(670mm)
26-3/8"
(610mm)
24"
18-3/4"
(476mm)
1-3/8"
(35mm)
(102mm)
17"
(432mm)
A
A
B
D
D
C
H
4"
(127mm)
3/4"
(19mm)
W
5"
(127mm)
CODE DESCRIPTION QTY.
A 3/8" Lav Deck Anchors with a Minimum Pull-Out Force of 1,000 lbs. 4
B #10 Wall Anchors/Fasteners for Mounting Trap/Transition Covers 2
H, C 1/2" NPT Hot/Cold Supplies, Stub-Out 2" From Wall 1
D #10 Wall Anchors/Fasteners for Valve Mounting 2
E 110v GFI Protected Electrical Outlet 1
W 1-1/2" NPT Drain, Stub-Out 2" from Wall 1
RIM HEIGHT
VERTICAL HEIGHT ADJUSTMENTS FOR CODES
A–E, H, C and W
FIXTURE STYLE
34" None Standard Height
32" Subtract 2" TAS, Grades 6 through 8 or 9
31" Subtract 3" TAS, Pre-K through Grades 5 or 6
30" Subtract 4" Juvenile Height
Bradley Corporation • 215-1511 Rev. D; EN 07-808 5/30/07 5
Page 6
FL-1H, FL-1L Installation
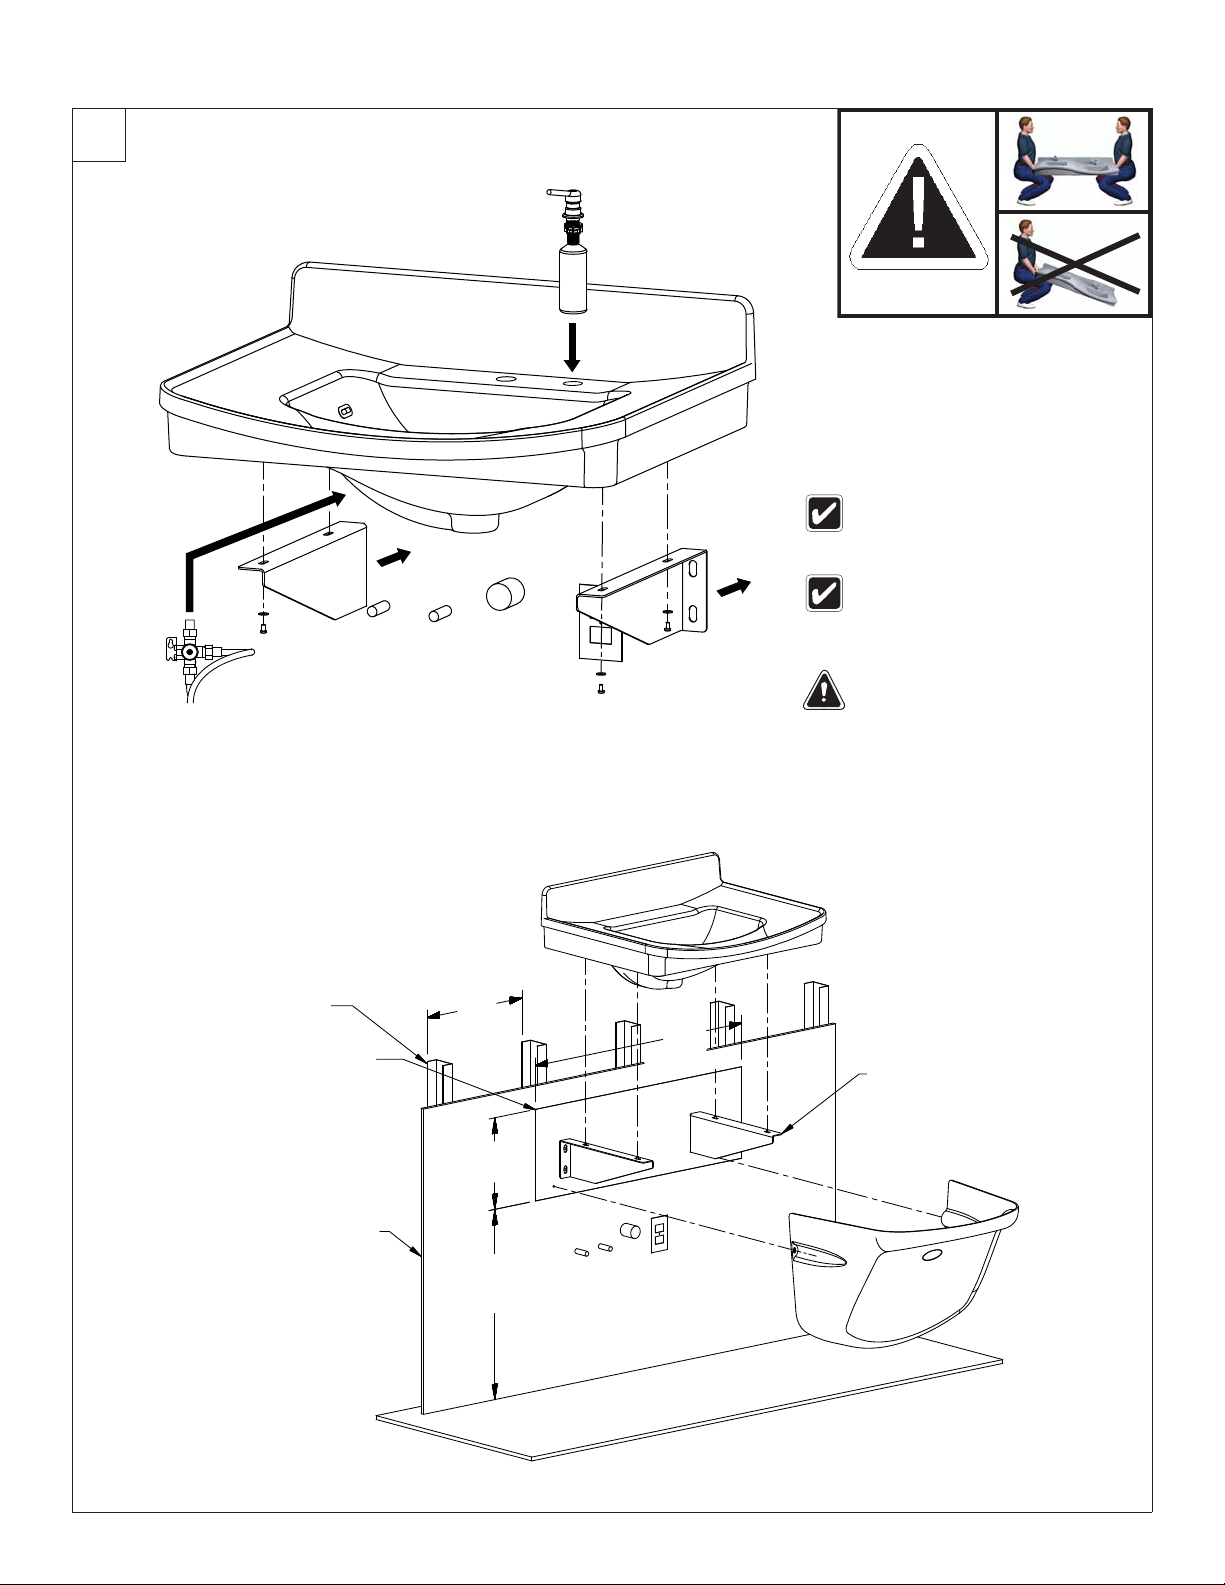
2
Lavatory Deck
FL-1L shown
FL-1H is similar
Refer to the rough-ins to determine
wall-mounting location for optional
mixing valve.
Installer may prefer to install the
faucet before mounting the fixture
to the wall. Refer to page 8 for
faucet installation details.
Backing Information
Metal Studs
Securely fasten plywood
to at least (3) metal studs
(plywood to equal
thickness of drywall, 1/2"
minimum
Drywall
16"
(406mm)
12"
(305mm)
35"
(889mm)
If necessary, adjust the fixture
height before securing to the
support brackets.
Use 3/8" toggle bolts
and washers to secure
the support brackets to
plywood (2) places.
25"
(635mm)
6 5/30/07 Bradley Corporation • 215-1511 Rev. D; EN 07-808
Page 7
Installation FL-1H, FL-1L
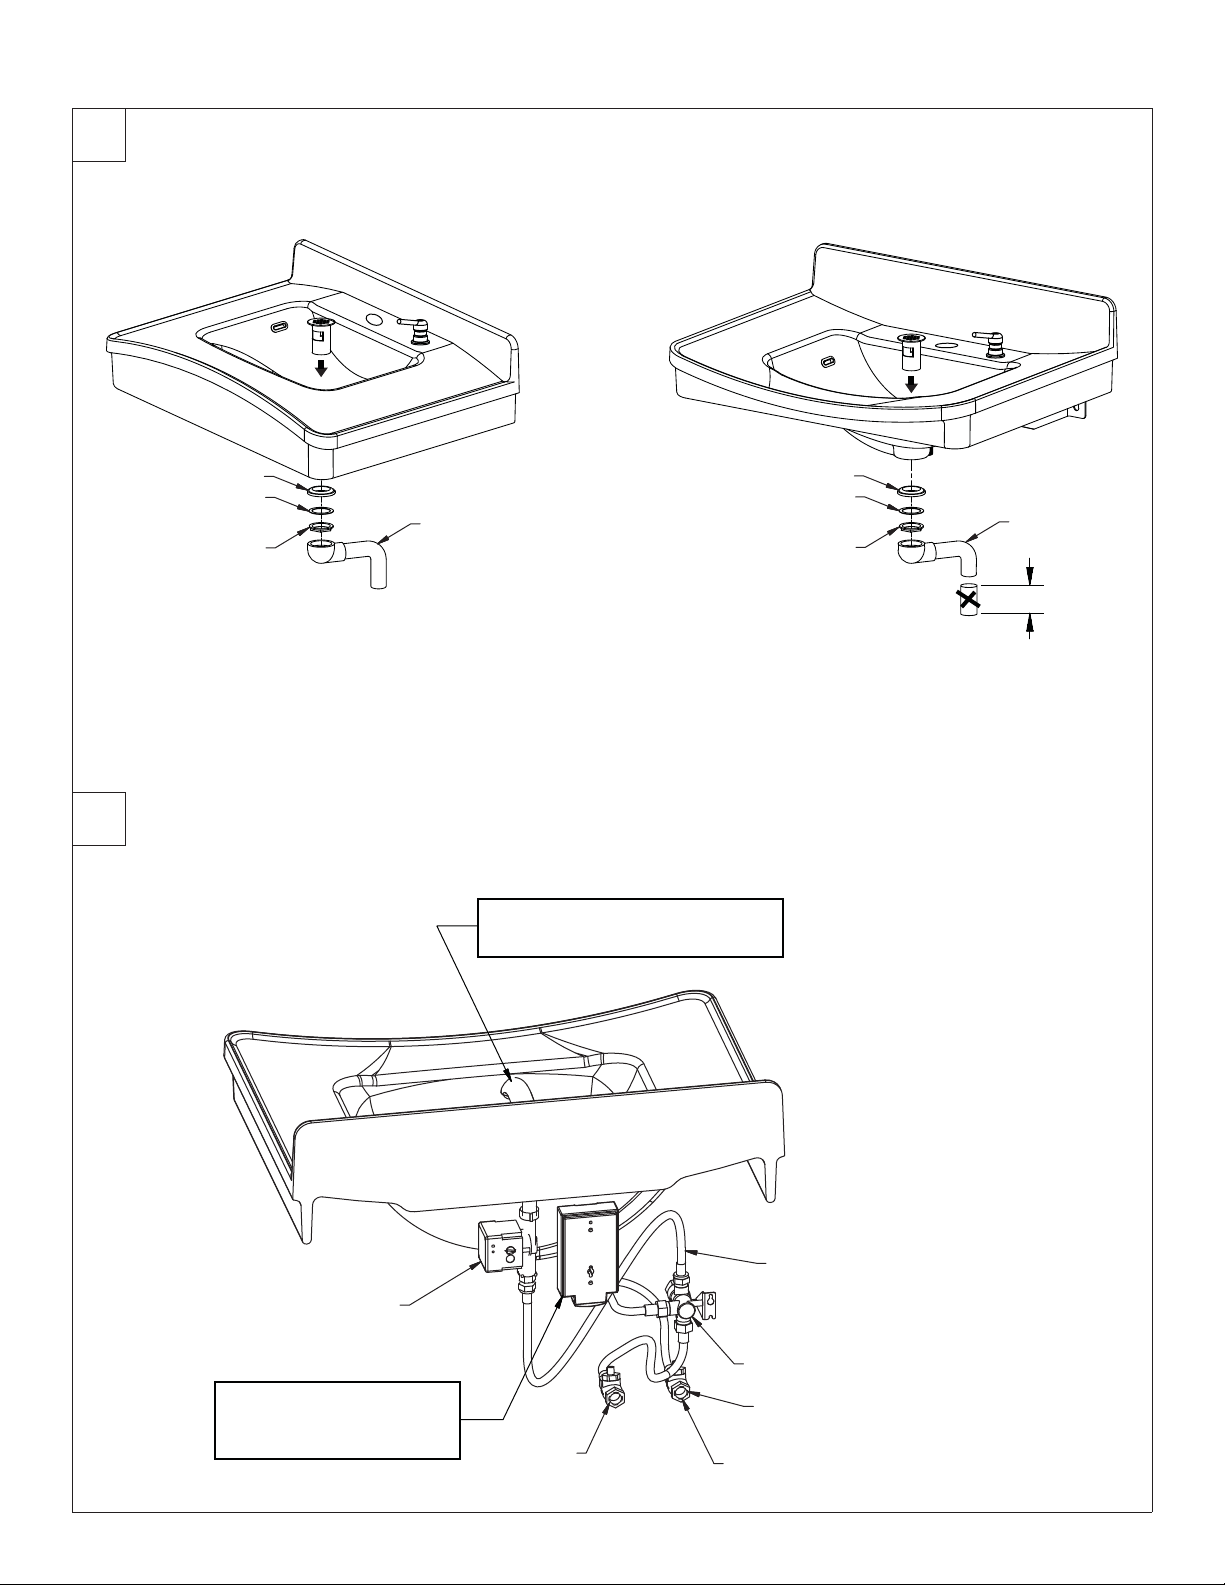
3
Drain and Tailpiece
FL-1H
Rubber
Friction
Nut
Tailpiece
FL-1L
Rubber
Friction
Tailpiece
Nut
4" (102mm)
4
Faucet Battery Box
FL-1L shown
FL-1H is similar
A
Faucet Valve
Control Module
Mount the Faucet
Battery Box to the wall
at desired location.
Install the faucet according to
manufacturer’s instructions
B
Cold
1/2" Flexible Hose (qty. 3)
(269-1735)
Mixing Valve
Hot
Stop/Check Valve
Bradley Corporation • 215-1511 Rev. D; EN 07-808 5/30/07 7
Page 8

FL-1H, FL-1L Installation
5
Optional Tankless Water Heater
FL-1L shown
FL-1H is similar
Model FL-1L shown,
Model FL-1H is similar
3/4" (19mm)
Electric Tankless
Water Heater
Outlet
Inlet
Faucet Inlet
20"
(508mm)
Stop/Check Valve,
Cold Supply Outlet
Finished Floor
6
P-Trap and Trap Cover
FL-1L shown
FL-1H is similar
8 5/30/07 Bradley Corporation • 215-1511 Rev. D; EN 07-808
 Loading...