

Page 1

POINT I/O
EtherNet/IP
Adapter Module
1734-AENT
User Manual
Page 2
Important User Information
SHOCK HAZARD
Solid state equipment has operational characteristics differing from those of
electromechanical equipment. Safety Guidelines for the Application,
Installation and Maintenance of Solid State Controls (Publication SGI-1.1
available from your local Rockwell Automation sales office or online at
http://literature.rockwellautomation.com/) describes some important
differences between solid state equipment and hard-wired electromechanical
devices. Because of this difference, and also because of the wide variety of
uses for solid state equipment, all persons responsible for applying this
equipment must satisfy themselves that each intended application of this
equipment is acceptable.
In no event will Rockwell Automation, Inc. be responsible or liable for
indirect or consequential damages resulting from the use or application of
this equipment.
The examples and diagrams in this manual are included solely for illustrative
purposes. Because of the many variables and requirements associated with
any particular installation, Rockwell Automation, Inc. cannot assume
responsibility or liability for actual use based on the examples and diagrams.
No patent liability is assumed by Rockwell Automation, Inc. with respect to
use of information, circuits, equipment, or software described in this manual.
Reproduction of the contents of this manual, in whole or in part, without
written permission of Rockwell Automation, Inc. is prohibited.
Throughout this manual, when necessary we use notes to make you aware of
safety considerations.
WARNING
IMPORTANT
ATTENTION
BURN HAZARD
Identifies information about practices or circumstances
that can cause an explosion in a hazardous environment,
which may lead to personal injury or death, property
damage, or economic loss.
Identifies information that is critical for successful
application and understanding of the product.
Identifies information about practices or circumstances
that can lead to personal injury or death, property
damage, or economic loss. Attentions help you identify a
hazard, avoid a hazard, and recognize the consequence.
Labels may be located on or inside the equipment (for
example, drive or motor) to alert people that dangerous
voltage may be present.
Labels may be located on or inside the equipment (for
example, drive or motor) to alert people that surfaces may
be dangerous temperatures.
Allen-Bradley, ControlLogix, Logix5555, POINT I/O, POINTBus, RSLinx, RSLogix 5000, and RSNetWorx are trademarks of
Rockwell Automation, Inc. Trademarks not belonging to Rockwell Automation are property of their respective companies.
Page 3

Summary of Changes
This publication contains new and revised information not in the last
release.
New and Revised Information
See the table for a summary of the major changes in this manual.
Chapter Revised to include
Chapter 6 - LED Status Indicators New column on recommended actions
Appendix A - Adapter Web Pages Latest adapter Web pages
Change Bars
Change bars (as shown with this paragraph) show the areas in this
manual that are different from previous editions and indicate the
addition of new or revised information.
1 Publication 1734-UM011C-EN-P - January 2006
Page 4

2 Summary of Changes
Notes:
Publication 1734-UM011C-EN-P - January 2006
Page 5

Table of Contents
Preface
About the Adapter
What This Preface Contains. . . . . . . . . . . . . . . . . . . . . . . . P-1
Who Should Use This Manual . . . . . . . . . . . . . . . . . . . . . . P-1
Common Techniques Used in This Manual. . . . . . . . . . . . . P-1
How To Use This Manual . . . . . . . . . . . . . . . . . . . . . . . . . P-2
About the Example Applications. . . . . . . . . . . . . . . . . . P-2
System Components. . . . . . . . . . . . . . . . . . . . . . . . . . . P-3
Where to Find More Information . . . . . . . . . . . . . . . . . . . . P-4
Terminology. . . . . . . . . . . . . . . . . . . . . . . . . . . . . . . . . . . P-5
Chapter 1
What This Chapter Contains . . . . . . . . . . . . . . . . . . . . . . . 1-1
Important Adapter Considerations . . . . . . . . . . . . . . . . . . . 1-1
Set the Chassis Size . . . . . . . . . . . . . . . . . . . . . . . . . . . 1-1
Adapter Replacement. . . . . . . . . . . . . . . . . . . . . . . . . . 1-2
Empty Slots and RIUP Situations. . . . . . . . . . . . . . . . . . 1-2
Cycle Power To a System For the First Time . . . . . . . . . 1-4
Adapter Features. . . . . . . . . . . . . . . . . . . . . . . . . . . . . . . . 1-4
Hardware/Software Compatibility . . . . . . . . . . . . . . . . . . . 1-5
What the Adapter Does. . . . . . . . . . . . . . . . . . . . . . . . . . . 1-5
Use of the Common Industrial Protocol (CIP). . . . . . . . . . . 1-5
Understand the Producer/Consumer Model . . . . . . . . . . . . 1-6
Specify the Requested Packet Interval (RPI) . . . . . . . . . . . . 1-6
Support of Rack-optimized and Direct Connections . . . . . . 1-7
Mix Rack-optimized and Direct Connections . . . . . . . . . 1-7
Before You Begin . . . . . . . . . . . . . . . . . . . . . . . . . . . . . . . 1-8
Determine Compatibility . . . . . . . . . . . . . . . . . . . . . . . 1-8
Understand Messaging . . . . . . . . . . . . . . . . . . . . . . . . . 1-8
Establish I/O Connections . . . . . . . . . . . . . . . . . . . . . . 1-8
Configure Autobaud. . . . . . . . . . . . . . . . . . . . . . . . . . . 1-8
Chapter 2
Install the Adapter
i Publication 1734-UM011C-EN-P - January 2006
What This Chapter Contains . . . . . . . . . . . . . . . . . . . . . . . 2-1
Identify Adapter Components. . . . . . . . . . . . . . . . . . . . . . 2-1
Mount the Adapter on a DIN Rail Before Installing Modules 2-2
Mount (or Replace) the Adapter to an Existing System. . . . 2-3
Wiring . . . . . . . . . . . . . . . . . . . . . . . . . . . . . . . . . . . . . . . 2-4
Mounting Dimensions . . . . . . . . . . . . . . . . . . . . . . . . . . . . 2-5
Page 6

Table of Contents ii
Configure the Adapter for Your
EtherNet/IP Network
Configure the Adapter for Direct
Connection in RSLogix 5000
Software
Chapter 3
What This Chapter Contains . . . . . . . . . . . . . . . . . . . . . . . 3-1
Configuration Requirements . . . . . . . . . . . . . . . . . . . . . . . 3-2
IP Address. . . . . . . . . . . . . . . . . . . . . . . . . . . . . . . . . . 3-3
Gateway Address. . . . . . . . . . . . . . . . . . . . . . . . . . . . . 3-4
Subnet Mask . . . . . . . . . . . . . . . . . . . . . . . . . . . . . . . . 3-5
Set the Network Address . . . . . . . . . . . . . . . . . . . . . . . . . . 3-7
Use the Rockwell BootP/DHCP Utility . . . . . . . . . . . . . . . . 3-8
Save the Relation List . . . . . . . . . . . . . . . . . . . . . . . . . . 3-10
Use DHCP Software to Configure Your Adapter . . . . . . . . . 3-11
Chapter 4
What This Chapter Contains . . . . . . . . . . . . . . . . . . . . . . . 4-1
Set Up the Hardware. . . . . . . . . . . . . . . . . . . . . . . . . . . . . 4-1
Create the Example Application. . . . . . . . . . . . . . . . . . . . . 4-2
Configure the I/O . . . . . . . . . . . . . . . . . . . . . . . . . . . . . . . 4-4
Add the Local EtherNet/IP Bridge to the
I/O Configuration . . . . . . . . . . . . . . . . . . . . . . . . . . . . 4-4
Add the POINT I/O Adapter to the I/O Configuration . . 4-7
Add the POINT I/O Modules to the I/O Configuration. . 4-10
Edit the Controller Tags. . . . . . . . . . . . . . . . . . . . . . . . . . . 4-16
Create the Ladder Program . . . . . . . . . . . . . . . . . . . . . . . . 4-18
Download the Program to the Controller . . . . . . . . . . . . . . 4-18
Verify the Module Chassis Size . . . . . . . . . . . . . . . . . . . . . 4-20
Configure the Adapter with Fixed IP Address . . . . . . . . . . . 4-22
Recover From an Overloaded Adapter . . . . . . . . . . . . . . . . 4-24
Configure the Adapter for Direct
Connection and Rack Optimization
in RSLogix 5000 Software
Publication 1734-UM011C-EN-P - Januar y 2006
Chapter 5
What This Chapter Contains . . . . . . . . . . . . . . . . . . . . . . . 5-1
Set Up the Hardware. . . . . . . . . . . . . . . . . . . . . . . . . . . . . 5-2
Create the Example Application. . . . . . . . . . . . . . . . . . . . . 5-3
Configure the I/O Modules . . . . . . . . . . . . . . . . . . . . . . . . 5-4
Add the Local EtherNet/IP Bridge to the
I/O Configuration . . . . . . . . . . . . . . . . . . . . . . . . . . . . 5-4
Add the POINT I/O Adapter to the I/O Configuration . . 5-7
Add the POINT I/O Module and Configure for Direction
Connection . . . . . . . . . . . . . . . . . . . . . . . . . . . . . . . . . 5-11
Add the POINT I/O Module and Configure For Rack
Optimization . . . . . . . . . . . . . . . . . . . . . . . . . . . . . . . . 5-14
Download the Program to the Controller . . . . . . . . . . . . . . 5-17
Verify the Module Chassis Size . . . . . . . . . . . . . . . . . . . . . 5-18
Access Module Data . . . . . . . . . . . . . . . . . . . . . . . . . . . . . 5-21
Page 7

LED Status Indicators
Adapter Web Pages
Table of Contents iii
Chapter 6
What This Chapter Contains . . . . . . . . . . . . . . . . . . . . . . . 6-1
Interpret the Status Indicators . . . . . . . . . . . . . . . . . . . . . . 6-1
Appendix A
What This Appendix Contains . . . . . . . . . . . . . . . . . . . . . . A-1
Work with the Home Page . . . . . . . . . . . . . . . . . . . . . . . . A-1
Work with the Diagnostics Pages. . . . . . . . . . . . . . . . . . . . A-3
Use the Diagnostic Overview Page . . . . . . . . . . . . . . . . A-4
Use the Network Settings Page. . . . . . . . . . . . . . . . . . . A-5
Use the Ethernet Statistics Page . . . . . . . . . . . . . . . . . . A-6
Use the I/O Connections Page . . . . . . . . . . . . . . . . . . . A-8
Use the Diagnostic Messaging Page . . . . . . . . . . . . . . . A-9
Work with the Configuration Pages . . . . . . . . . . . . . . . . . A-10
Use the Identity Page. . . . . . . . . . . . . . . . . . . . . . . . . A-11
Use the Network Configuration Page . . . . . . . . . . . . . A-12
Use the Services Page . . . . . . . . . . . . . . . . . . . . . . . . A-14
Work with the Browse Chassis Page . . . . . . . . . . . . . . . . A-15
Configure the RSLinx Ethernet
Communication Driver
1734 POINT I/O Module/RSLogix
5000 Controller Tag Reference
Appendix B
What This Appendix Contains . . . . . . . . . . . . . . . . . . . . . . B-1
Install the RSLinx Software . . . . . . . . . . . . . . . . . . . . . . . . B-1
Configure the AB_ETH Driver . . . . . . . . . . . . . . . . . . . . . . B-2
Configure the AB_ETH/IP Driver . . . . . . . . . . . . . . . . . . . . B-4
Appendix C
What This Appendix Contains . . . . . . . . . . . . . . . . . . . . . . C-1
1734 POINT I/O Catalog Numbers. . . . . . . . . . . . . . . . . . . C-1
Valid Number Ranges for RSLogix 5000 Data Types . . . . . . C-2
Digital 2 POINT Input . . . . . . . . . . . . . . . . . . . . . . . . . . . . C-3
Digital 4 POINT Input . . . . . . . . . . . . . . . . . . . . . . . . . . . . C-4
Digital 2 POINT Output – Without Diagnostic Status. . . . . . C-5
Digital 2 POINT Output – With Over Load and Open Load
Diagnostic Status. . . . . . . . . . . . . . . . . . . . . . . . . . . . . . . . C-6
Digital 2 POINT Output – With Over Load Diagnostic Status C-7
Digital 4 POINT Output – With Over Load and Open Load
Diagnostic Status. . . . . . . . . . . . . . . . . . . . . . . . . . . . . . . . C-8
Digital 4 POINT Output – With Over Load Diagnostic Status C-9
Analog 2 Channel Input . . . . . . . . . . . . . . . . . . . . . . . . . C-10
Analog 2 Channel Output . . . . . . . . . . . . . . . . . . . . . . . . C-19
Specialty I/O. . . . . . . . . . . . . . . . . . . . . . . . . . . . . . . . . . C-23
Publication 1734-UM011C-EN-P - January 2006
Page 8

Table of Contents iv
Quick Start
Index
Appendix D
What This Appendix Contains . . . . . . . . . . . . . . . . . . . . . . D-1
Necessary Prerequisites . . . . . . . . . . . . . . . . . . . . . . . . D-1
Configure the Adapter. . . . . . . . . . . . . . . . . . . . . . . . . . . . D-2
Enter Adapter Properties . . . . . . . . . . . . . . . . . . . . . . . D-3
Add Another Module Under the Adapter. . . . . . . . . . . . D-4
Configure 1734 POINT I/O Modules . . . . . . . . . . . . . . . . . D-5
Configure an Ethernet Driver in RSLinx Software . . . . . . . . D-8
Launch RSLinx Software . . . . . . . . . . . . . . . . . . . . . . . . D-8
Add the AB_ETHIP-1 (EtherNet/IP) Driver . . . . . . . . . D-10
Publication 1734-UM011C-EN-P - Januar y 2006
Page 9
Preface
What This Preface Contains
Who Should Use This Manual
This preface describes how to use this manual. See the table for a list
of where to find specific information within this chapter.
For Information About See Page
Who Should Use This Manual Preface 1
Common Techniques Used in This Manual Preface 1
How To Use This Manual Preface 2
About the Example Applications Preface 2
System Components Preface 3
Where to Find More Information Preface 4
Terminology Preface 5
We wrote this manual for control engineers and technicians who are
installing, configuring, and maintaining an EtherNet/IP control system
that communicates with POINT I/O modules through a 1734-AENT
adapter. We assume you have a good understanding of Ethernet
networks and the TCP/IP protocol.
Common Techniques Used in This Manual
ATTENTION
We use the following conventions throughout this manual.
• Numbered lists provide sequential steps.
• Bulleted lists provide information, not procedural steps.
TIP
You must use series C POINT I/O modules with
the 1734-AENT adapter. Series A or B POINT I/O
modules will not work with this adapter.
The screen captures shown in this manual are
pictures of the software’s actual screens.
This symbol identifies helpful tips.
1 Publication 1734-UM011C-EN-P - January 2006
Page 10
2 Preface
How To Use This Manual
This manual contains an overview of the 1734-AENT adapter. It
describes how to install and configure the adapter and provides
examples showing how to use the adapter to communicate with
POINT I/O modules over an EtherNet/IP network.
About the Example Applications
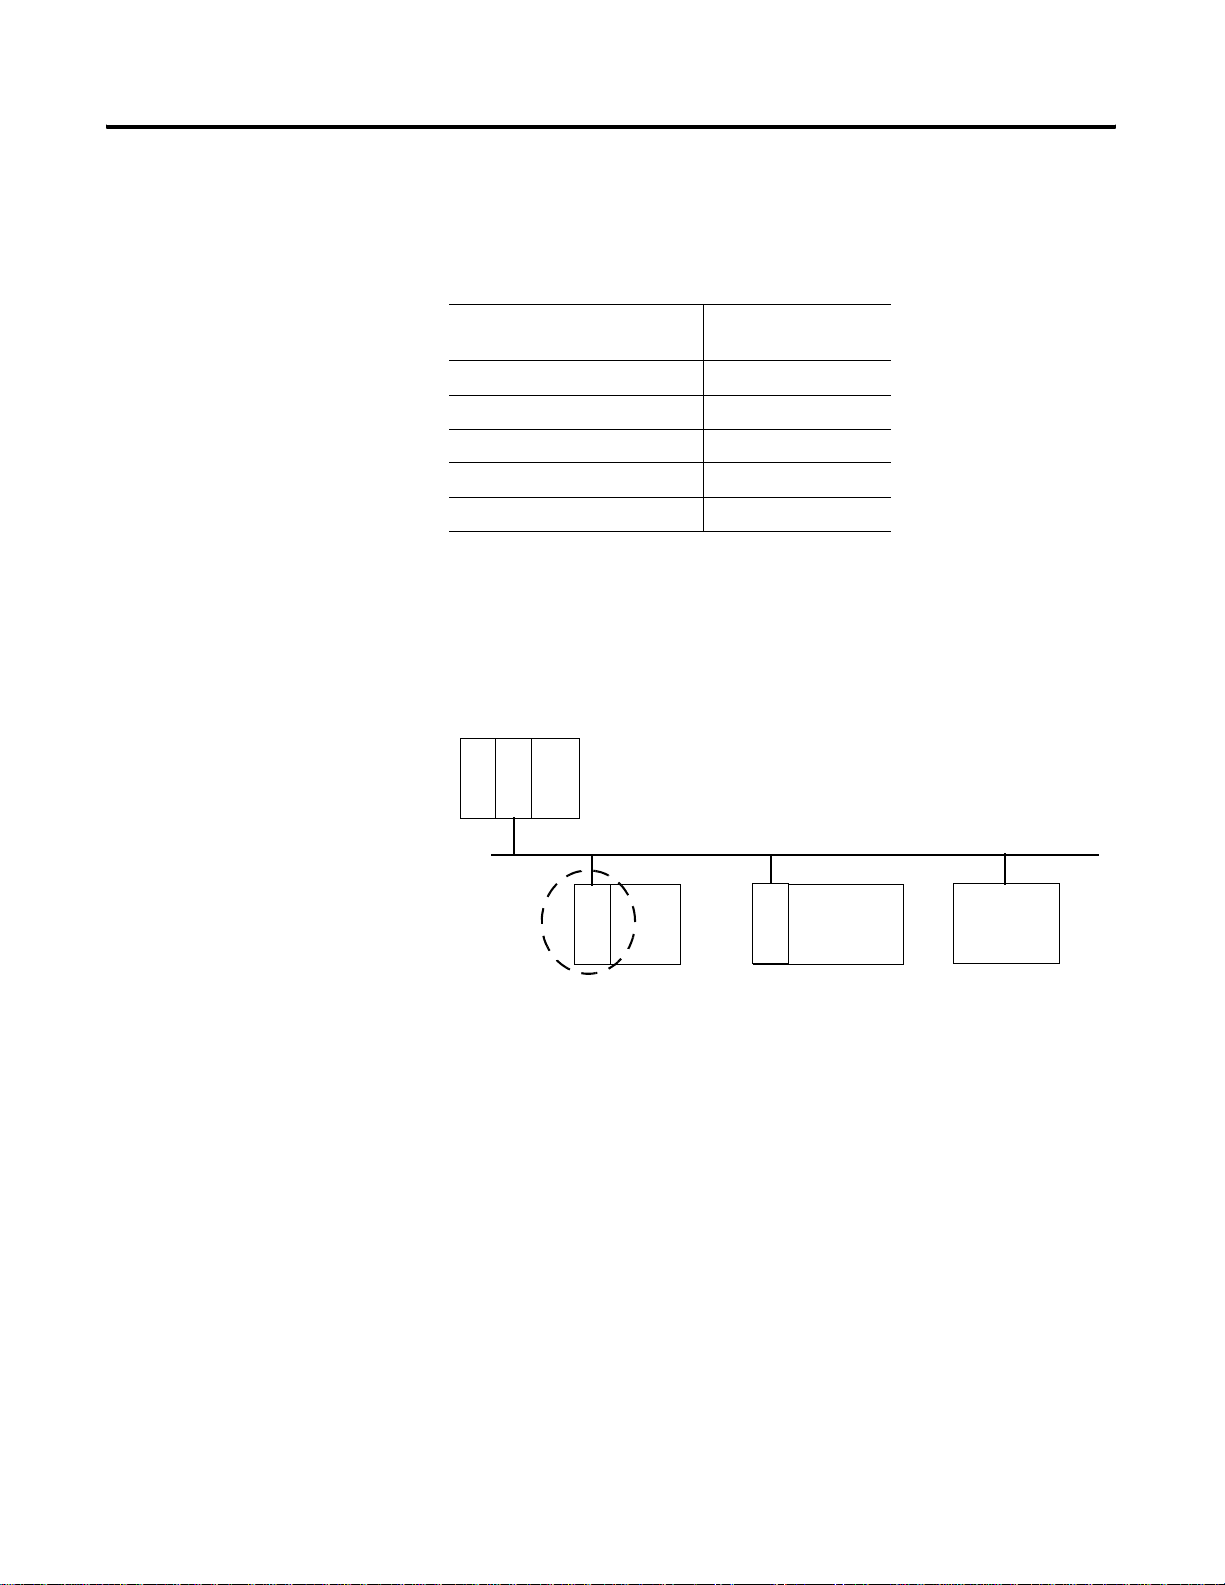
This manual presents two example applications that demonstrate the
procedures for configuring and communicating with POINT I/O
modules using the 1734-AENT adapter. We intend the example
applications as building blocks to help you get your own system up
and running. We recommend that you set up and run the example
applications and use them as guides.
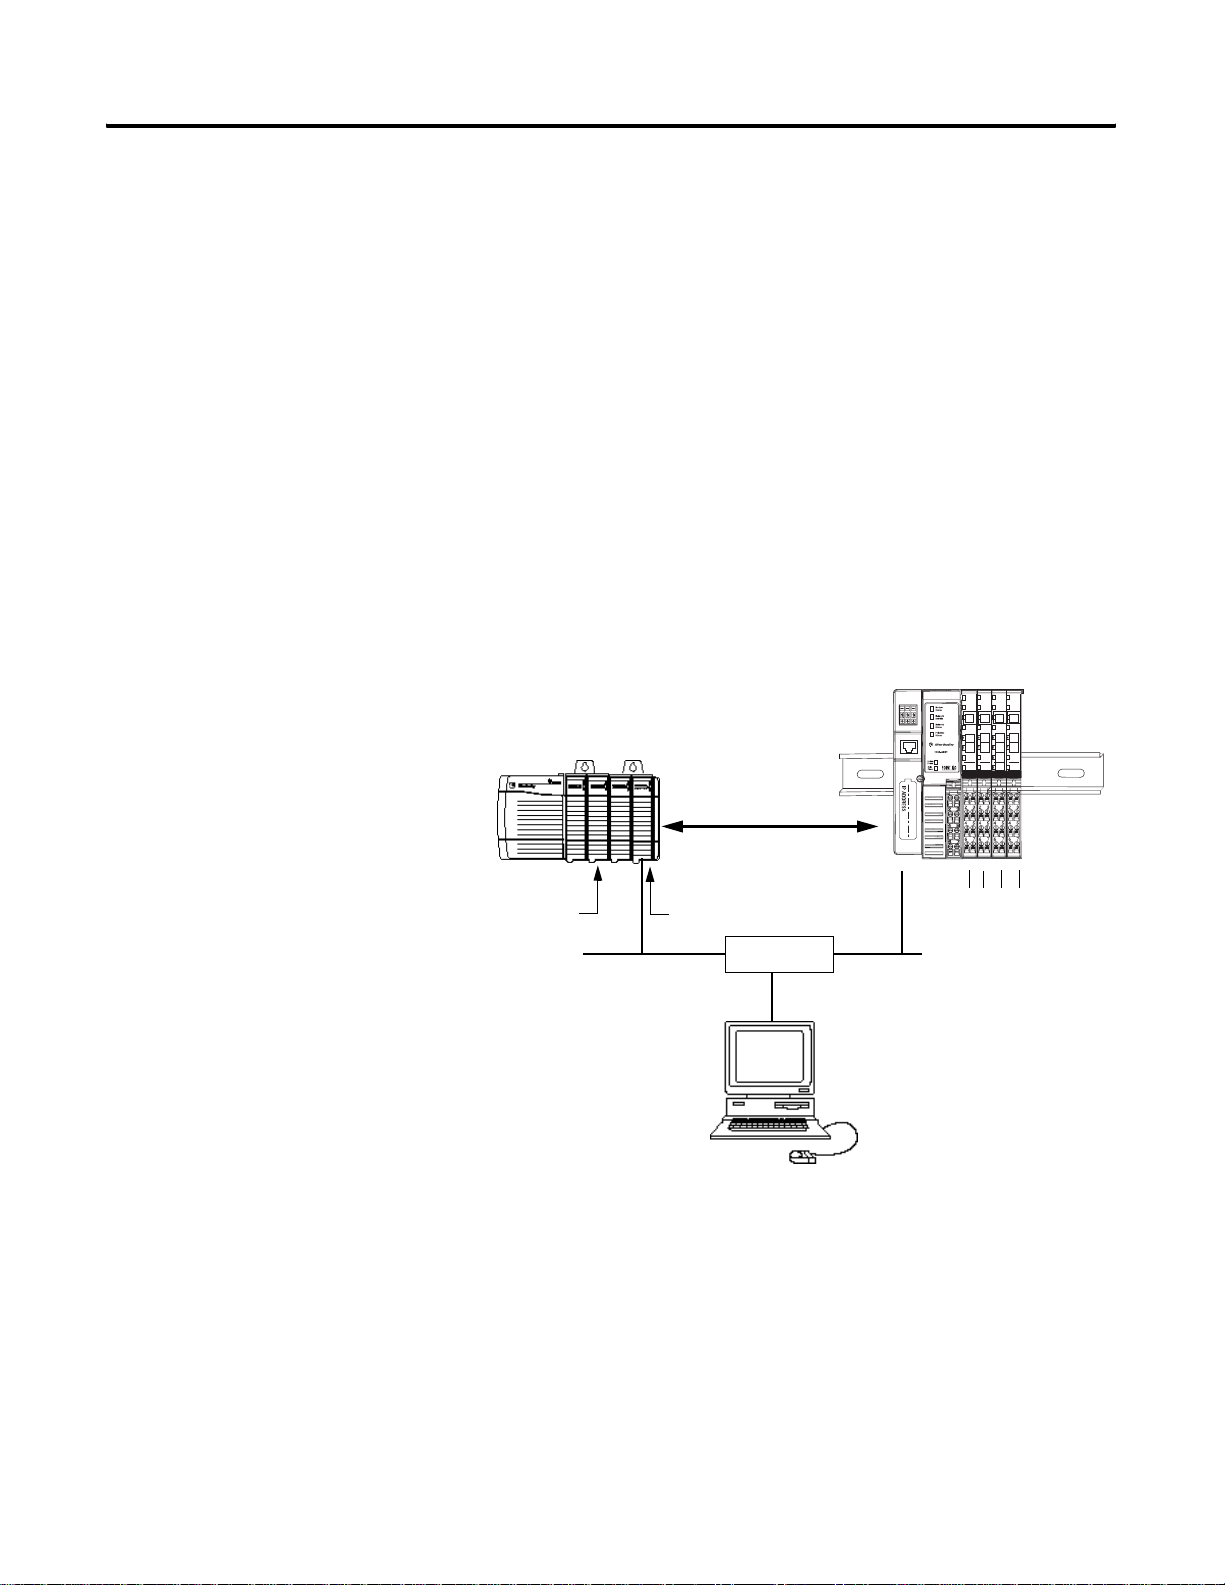
Here is the type of system you’ll be setting up.
1734-AENT
10.88.70.2
Slot 0 1 2 3
POINT I/O
Local
Chassis
Logix5555
Controller (slot 1)
Data
1756-ENBT
10.88.70.4 (slot 3)
10.88.70.26
Slot 0 1 2 3 4
Switch
Programming
Terminal
31393-M
Publication 1734-UM011C-EN-P - Januar y 2006
Page 11

Preface 3
System Components
W e used the following components for the example applications. Y ou
need the same or similar components to set up your own control
system using POINT I/O modules on an EtherNet/IP network.
Quantity Product Name Catalog Number
Hardware
1 POINT I/O EtherNet/IP adapter 1734-AENT
1 POINT I/O 24V dc sink output module 1734-OV4E/C
1 POINT I/O relay output module 1734-OW2/C
1 DIN rail 199-DR1 or equivalent
1 ControlLogix chassis 1756-A4, (or 1756-A7, 1756-A13,1756-A17)
1 ControlLogix power supply 1756-PA72, (or 1756-PB72)
1 Logix5555 controller 1756-L55
1 ControlLogix EtherNet/IP bridge module 1756-ENBT
1 Personal computer that supports RSLogix 5000 software Any appropriate model running Windows NT 4.0, Service Pack 6A
or higher
1 Ethernet switch Refer to manufacturer’s specifications
1 24V dc power supply 1734-EP24DC
Associated media and connectors as needed
Software
1 RSLinx communications software,
version 2.31.00 or later
1 RSLogix 5000 programming software,
version 11.11 or later
9355-WAB, 9355-WABOEM, 9355-WABC
9324-RLD300ENE
Publication 1734-UM011C-EN-P - January 2006
Page 12

4 Preface
Where to Find More
Refer to the following Rockwell publications as needed for additional
help when setting up and using your EtherNet/IP network.
Information
For Information About See This Publication Publication Number
Using EtherNet/IP for industrial control EtherNet/IP Performance and Application Guide ENET-AP001
EtherNet/IP media EtherNet/IP Media Planning and Installation Guide ENET-IN001
Ethernet communication interface
modules
ControlLogix chassis ControlLogix Chassis Installation Instructions 1756-IN080 (series B)
ControlLogix power supplies ControlLogix Power Supplies Installation Instructions 1756-5.67 (PA72/PB72)
Logix5555 programmable controllers Logix5555 Controller User Manual 1756-UM523
SoftLogix5800 Controller SoftLogix5800 User Manual 1789-UM002 (L10, L30, L60)
ControlLogix EtherNet/IP bridge module
with firmware revision 2.3 or later
RSLogix 5000 programming software Getting Results with RSLogix 5000, version 3.2.1 or later 9399-RLD300GR
1734-AENT adapter POINT I/O EtherNet/IP Adapter Installation Instructions 1734-IN590
POINT I/O digital and analog modules
and PointBLOCK I/O modules
Ethernet Communication Interface Module Installation
Instructions
Ethernet Communication Interface Module User Manual 1756-UM051
Ethernet Communication Interface Module Release Notes 1756-RN053
ControlLogix EtherNet/IP Bridge Module Installation Instructions 1756-IN019
POINT I/O Digital and Analog Modules and PointBLOCK I/O
Modules User Manual
1756-IN053
1734-UM001
POINT I/O interface modules POINT I/O RS-232 ASCII Module User Manual 1734-UM009
POINT I/O RS-232 ASCII Module Installation Instructions 1734-IN588
POINT I/O expansion power supply POINT I/O 24V dc Expansion Power Supply Installation
Instructions
POINT I/O field potential distributor POINT I/O Field Potential Distributor Installation Instructions 1734-IN059
POINT I/O input modules POINT I/O 120V ac Input Module Installation Instructions 1734-IN010
POINT I/O Input Module Installation Instructions 1734-IN051
POINT I/O encoders/counter modules POINT I/O Encoders/Counter Module User Manual 1734-UM006
POINT I/O Encoders/Counter Module Installation Instructions 1734-IN005
POINT I/O 22V ac input module POINT I/O 220V ac Input Module Installation Instructions 1734-IN008
POINT I/O RTD and isolated
thermocouple input module
POINT I/O thermocouple and RTD input
module
POINT I/O IV2 and IV4 input module POINT I/O Input Module Installation Instructions 1734-IN052
POINT I/O 120/220V ac Output module POINT I/O 120/220V ac Output Module Installation Instructions 1734-IN009
POINT I/O protected output module POINT I/O Protected Output Module Installation Instructions 1734-IN056
POINT I/O voltage output analog
module
POINT I/O RTD and Isolated Thermocouple Input Module
Installation Instructions
Thermocouple and RTD Input Module User Manual 1734-UM004
POINT I/O Protected Output Module Installation Instructions
(OB2EP)
POINT I/O 2 Voltage Output Analog Module Installation
Instructions
1734-IN058
1734-IN011
1734-IN586
1734-IN002
Publication 1734-UM011C-EN-P - Januar y 2006
Page 13

Preface 5
For Information About See This Publication Publication Number
POINT I/O protected sink output module POINT I/O Protected Sink Output Module Installation Instructions 1734-IN585
POINT I/O 2 relay output module POINT I/O 2 Relay Output Module Installation Instructions (OX2) 1734-IN587
POINT I/O 2 Relay Output Module Installation Instructions (OW2) 1734-IN055
POINT I/O synchronous serial interface
absolute encoder module
POINT I/O cold junction compensation
wiring base assembly
POINT I/O wiring base assembly POINT I/O Wiring Base Assembly Installation Instructions 1734-IN013
Very high speed-counter module POINT I/O Very High-speed Counter Module Installation
RSLinx RSLinx Getting Results Guide LNXENT-GR001
POINT I/O Synchronous Serial Interface Absolute Encoder
Module Installation Instructions
POINT I/O Cold Junction Compensation Wiring Base Assembly
Installation Instructions
Instructions
Very High-speed Counter Module User Manual 1734-UM003
TIP
Many of these publications are available online from:
1734-UM007
1734-IN583
1734-IN003
http://literature.rockwellautomation.com/
TIP
Rockwell Software products contain extensive
tutorials and help screens. We recommend that you
use the tutorials and help screens to learn about
these products.
For more information about Rockwell Software
products, visit the Rockwell Software internet site:
Terminology
http://www.software.rockwell.com
Refer to the table for the meaning of common terms.
This Term Means
BootP BootP (Bootstrap Protocol) is a low-level protocol that provides
configurations to other nodes on a TCP/IP network. BootP
configuration files let you automatically assign IP addresses to an
Ethernet module (you can also obtain subnet masks and gateway
addresses from BootP).
Bridge A node between two similar communication subnets where protocol
translation is minimal.
CIP Control and information protocol, the EtherNet/IP application layer
uses the producer/consumer networking model. In this model one
producer broadcasts (multicasts) the data once to all the consumers.
All consumers see the data simultaneously and may choose whether
to consume (receive) the data or not. Delivery time is consistent, no
matter how many consumers there are.
Connection The communication mechanism from the controller to another
module in the control system, usually used to exchange I/O data.
Publication 1734-UM011C-EN-P - January 2006
Page 14

6 Preface
This Term Means
consumer A destination device in the CIP networking model. See CIP.
CSMA/CD Carrier sense multiple access/collision detection is the access
method used in Ethernet. When a device wants to gain access to the
network, it checks to see if the network is quiet (senses the carrier).
If it is not, it waits a random amount of time before retrying. If the
network is quiet and two devices access the line at exactly the same
time, their signals collide. When the collision is detected, they both
back off and each waits a random amount of time before retrying.
Determinism The ability to predict when information will be delivered. Important in
time-critical applications.
DHCP The dynamic host configuration protocol is an Internet protocol,
similar to BootP, for automating the configuration of computers that
use TCP/IP. DHCP can be used to automatically assign IP addresses,
to deliver IP stack configuration parameters, such as the subnet mask
and default router, and to provide other configuration information,
such as the addresses for printer, time, and news servers.
The 1734-AENT factory default is DHCP enabled. When you apply
power , the module sends a message containing its hardware address
to any DHCP server on the network. The server(s) replies by sending a
message with an appropriate IP address for the adapter. The adapter
responds by acknowledging to a server that it will use the offered IP
address.
DNS The domain name system is a hierarchical, distributed method of
organizing the name space of the Internet. The DNS administratively
groups hosts into a hierarchy of authority that allows addressing and
other information to be widely distributed and maintained. A big
advantage to the DNS is that using it eliminates dependence on a
centrally-maintained file that maps host names to addresses.
Ethernet A physical layer standard using carrier sense multiple access with
collision detection (CSMA/CD) methods.
EtherNet/IP Ethernet industrial protocol applies a common application layer (CIP)
over Ethernet by encapsulating messages in TCP/UDP/IP.
Ethernet network A local area network designed for the high-speed exchange of
information between computers and related devices.
Publication 1734-UM011C-EN-P - Januar y 2006
Explicit messaging Non-time critical messaging used for device configuration and data
collection, such as downloading programs or peer -to-peer messaging
between two PLC units.
Full duplex A mode of communication that allows a device to send and receive
information at the same time, effectively doubling the bandwidth.
Fully qualified
domain name
A fully qualified domain name (FQDN) is a domain name that includes
all higher level domains relevant to the entity named. If you think of
the DNS as a tree-structure with each node having its own label, a
fully qualified domain name for a specific node would be its label
followed by the labels of all the other nodes between it and the root
of the tree. For example, for a host, a FQDN would include the string
that identifies the particular host, plus all domains of which the host
is a part, up to and including the top-level domain (the root domain is
always null). For example, PARIS.NISC.SRI.COM is a fully qualified
domain name for the host at 192.33.33.109.
Page 15

Preface 7
This Term Means
Gateway A module or set of modules that allows communications between
nodes on dissimilar networks.
Hardware address
Each Ethernet device has a unique hardware address (sometimes
called a MAC address) that is 48 bits. The address appears as six
digits separated by colons (such as, xx:xx:xx:xx:xx:xx). Each digit has a
value between 0 and 255 (0x00 to 0xFF). This address is assigned in
the hardware and cannot be changed. The hardware address is
required to identify the device if you are using a BOOTP utility.
Host name The host name is the unique name for a computer within its domain.
It's always the first element of a full name, and, with its domain and
top-level domain suffix, creates the unique name of that computer on
the Internet. For example, let's say a trading website is
www.trading.com. The host name is www, which is not unique on
the web, but is unique within the trading domain.
The host name can also refer to the fully qualified domain name
(FQDN), or in this example, www.trading.com. Both naming methods
seem to be used interchangeably in various documents. For the
purposes of this document, the host name will refer to the FQDN, or
as in this example, www.trading.com.
Hub A central connecting device that joins devices together in a star
configuration. Hubs are generally not suitable for use in I/O control
systems, since they are time-critical applications that cannot tolerate
lost packets.
Implicit messaging Real-time messaging of I/O data.
IP Internet protocol that provides the routing mechanism for messages.
All messages contain not only the address of the destination station,
but the address of a destination network, which allows messages to
be sent to multiple networks within an organization or around the
world.
IP address A 32-bit identification number for each node on an Internet Protocol
network. These addresses are represented as four sets of 8-bit
numbers (numbers from 0 to 255), with decimals between them. Each
node on the network must have a unique IP address.
Latency The time between initiating a request for data and the beginning of
the actual data transfer.
Multicast In the CIP producer/consumer model, one producer multicasts
(broadcasts) the data once to all the consumers.
Producer The source of information in the CIP networking model. See CIP.
Rack-optimized A physical and logical collection of application modules.
Subnet mask An extension of the IP address that allows a site to use a single net
ID for multiple networks.
Switch A network device that cross connects devices or network segments.
A switch provides each sender/receiver the full network bandwidth
(2x in full duplex mode), reduces collisions, and increases
determinism.
TCP The transport control protocol is a more reliable but slower transport
protocol than UDP. It is used for explicit (not time critical) messaging
in EtherNet/IP.
Publication 1734-UM011C-EN-P - January 2006
Page 16

8 Preface
This Term Means
TCP/IP The transmission control protocol/internet protocol is a
transport-layer protocol (TCP) and a network-layer protocol (IP)
commonly used for communication within networks and across
internetworks.
Transaction An exchange of request and data and response and data
.
UDP The user datagram protocol (UDP) is a transport protocol that
provides a very simple but fast capability to send datagrams between
two devices. It is used for I/O (implicit) messaging in EtherNet/IP.
Publication 1734-UM011C-EN-P - Januar y 2006
Page 17

About the Adapter
Chapter
1
What This Chapter Contains
This chapter provides an overview of the 1734-AENT POINT I/O
EtherNet/IP adapter , its prima ry features, and how to use it. You need
to understand the concepts discussed in this chapter to configure your
adapter and use it in an EtherNet/IP control system. S ee the table for a
list of where to find specific information in this chapter.
For Information About See Page
Important Adapter Considerations 1-1 Set the Chassis Size 1-1 Adapter Replacement 1-2 Empty Slots and RIUP Situations 1-2 Cycle Power To a System For the First Time 1-4 Adapter Features 1-4 Hardware/Software Compatibility 1-5 What the Adapter Does 1-5 Use of the Common Industrial Protocol (CIP) 1-5 Understand the Producer/Consumer Model 1-6 Specify the Requested Packet Interval (RPI) 1-6 Support of Rack-optimized and Direct Connections 1-7 Mix Rack-optimized and Direct Connections 1-7
You must use series C POINT I/O modules with
the 1734-AENT adapter. Series A or B POINT I/O
modules will not work with this adapter.
Important Adapter
ATTENTION
Before you begin using your adapter, note the following important
considerations.
Considerations
Set the Chassis Size
The 1734-AENT POINT I/O adapter for EtherNet/IP requires
configuration of its chassis size before you can make any I/O
connections. The default setting for the chassis size is 1 slot, which
represents the adapter by itself.
1 Publication 1734-UM011C-EN-P - January 2006
Page 18
1-2 About the Adapter
You must set the chassis size to a number equ a ling 1 slot for the
adapter plus 1 slot for each I/O module present in the adapter’s
backplane. For example, the adapter plus 4 I/O modules uses a
chassis size of 5. The adapter stores this chassis size setting in
non-volatile storage.
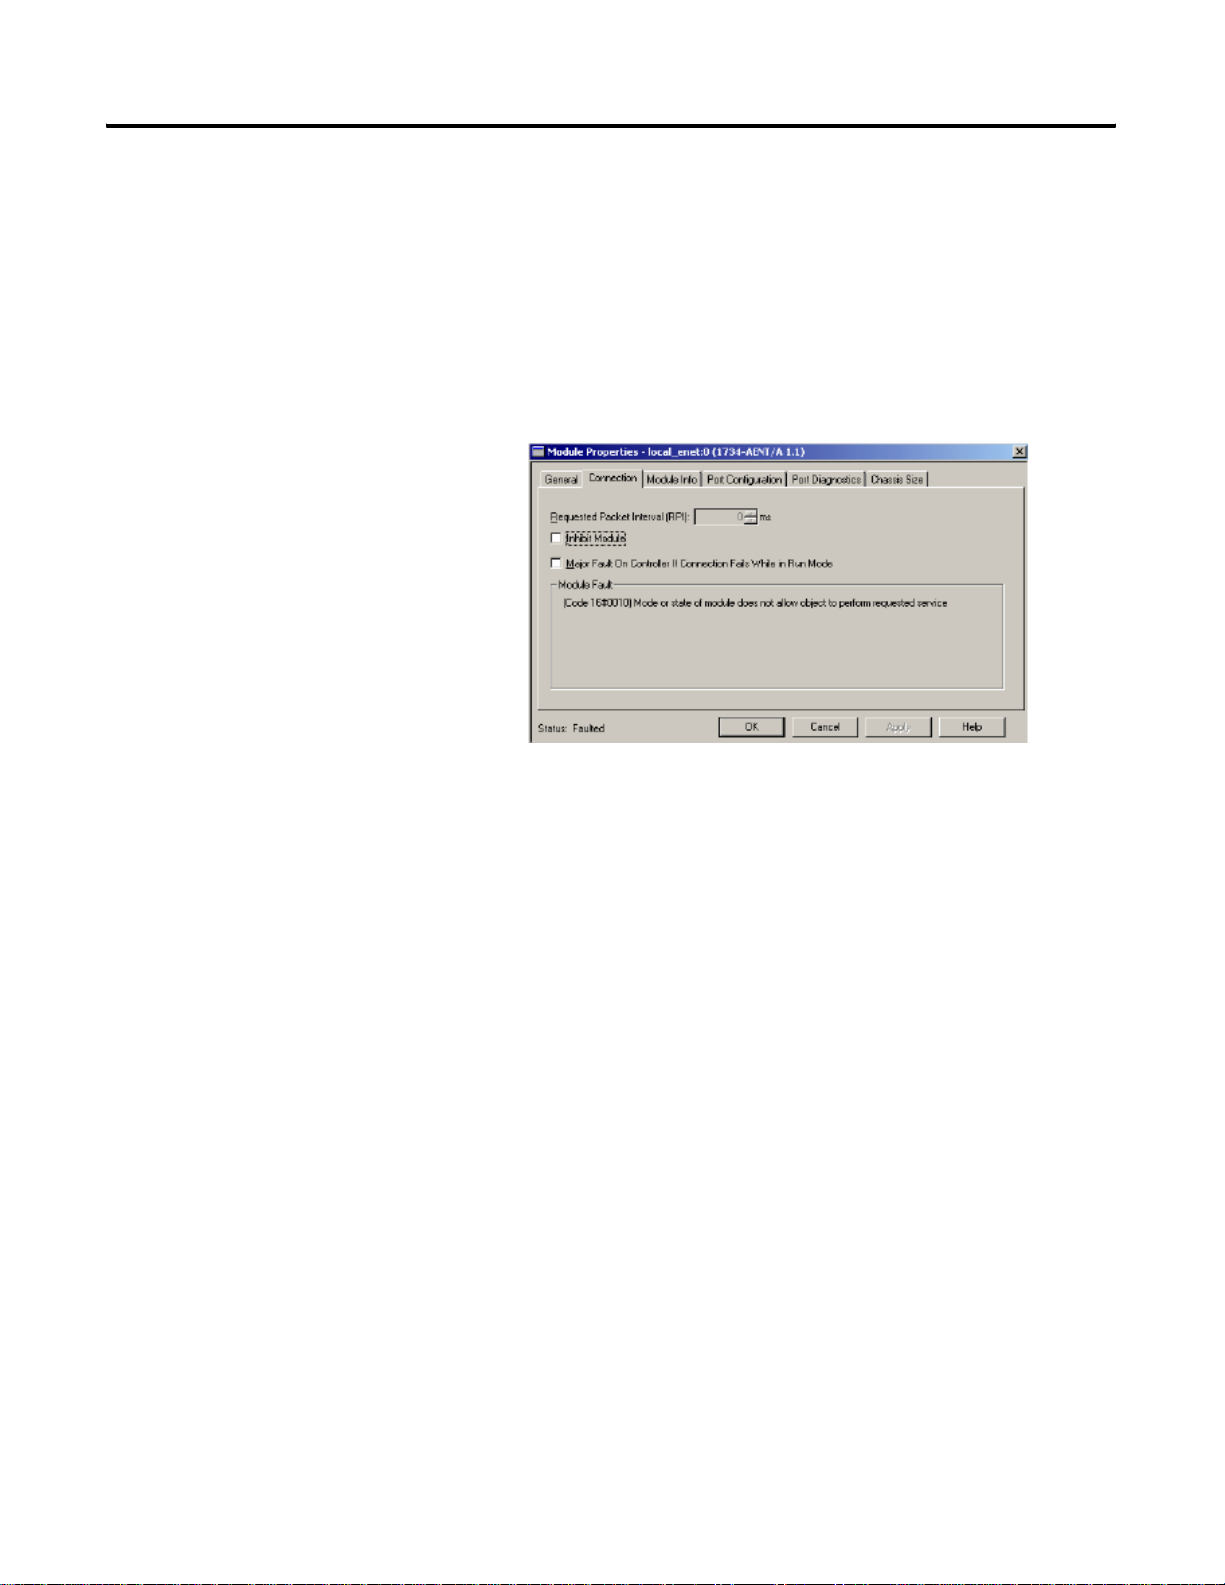
When the adapter’s non-volatile chassis size does not match the actual
number of modules present on its backplane, the adapter does not
make any I/O connections and an error occurs, as shown in the
Module Properties dialog.
Adapter Replacement
It is important to note that during a connection request from the
controller, the chassis size setting for a 1734-AENT adapter is not
communicated to the adapter. You must always set this chassis size
using a separate operation. This includes situations when you are
replacing an adapter. The adapter does not make any I/O connections
until it is configured with the appropriate chassis size.
Empty Slots and RIUP Situations
The POINT I/O system does not have the ability to detect an empty
terminal base. Because of this, there are numerous si tuations in which
you can potentially configure a system that is unusable or one that
exercises unintended control.
In an attempt to address these situations, you must observe the
following rules for POINT I/O system construction and the removal
and reinsertion of modules.
Publication 1734-UM011C-EN-P - Januar y 2006
Page 19

About the Adapter 1-3
• A correct POINT I/O system does not have any empty terminal
bases.
• After you cycle power , the ad apter will not run any I/O un til the
number of modules comprising the chassis equals the stored
chassis size.
– Because the adapter cannot detect empty terminal bases, it
cannot assume any safe operation until there is a match
between the number of modules indicating their prese nce in
the chassis and what the adapter has saved in non-volatile
memory.
– Actual module identification (such as, electronic keying) is
done when connection establishment requests are received
from the controller or controllers.
• A module removed under power does not disrupt operation of
the other I/O modules.
– When you remove a module, the adapter determines what
changed.
– Whenever you remove a module with an active connection
from the POINT I/O system, the adapter indicates this by
flashing the POINTBus Status LED red and reports a minor
recoverable fault.
• If more than one contiguous module is removed under power,
connections to all modules in the contiguous missing module set
are disallowed until all modules are replaced. Because the
adapter cannot detect an empty base, it does not know the
physical positioning of the modules until all the missing
modules are replaced.
• If a module separating two sets of contiguous missing modules
is removed, the two sets merge into a single set. All the modules
must be replaced before connections are permitted to any
module in the set.
• If modules of different types are removed and returned to the
wrong locations, attempts to connect to these modules will fail
during verification of the electronic ID (providing that keying
has not been disabled).
• If modules of the same type are removed and returned to the
wrong locations, they accept connections from the controller or
controllers and reconfigure with the co rrect data o nce the y pass
their electronic keying check.
• These removal and return situations exist whether the system is
under power or not. If the system is under power, the situation
arises immediately. If the system is not under power, the
situation arises in the next power cycle.
Publication 1734-UM011C-EN-P - January 2006
Page 20

1-4 About the Adapter
Cycle Power To a System For the First Time
When you power POINT I/O for the first time, the adapter must assign
addresses to every module in the backplane. POINT I/O modules all
ship configured at the same address.
When you first apply power, we expect that all but one module on
the backplane exhibits a solid red Module Status LED.
One by one the adapter resets these modules and addr esses them
appropriately. The amount of time that this operation takes is
proportional to the size of your POINT I/O system.
Adapter Features
The 1734-AENT adapter’s features include:
• EtherNet/IP messages encapsulated within standard
TCP/UDP/IP protocol
• Common application layer with ControlNet and DeviceNet
networks
• Interfacing via Category 5 rated twisted pair cable
• Half/full duplex 10 Mbit or 100 Mbit operation
• DIN rail mounting
• Communication to and from other POINT I/O modules on the
same DIN rail
• Communication supported by RSLinx software
• IP address assigned via standard BootP or DHCP tools
• I/O configuration via RSLogix 5000 software
• No network scheduling required
• No routing tables required
• Support of connections from multiple controllers simultaneously
Publication 1734-UM011C-EN-P - Januar y 2006
Page 21
About the Adapter 1-5
Hardware/Software Compatibility
What the Adapter Does
The 1734-AENT adapter and the applications described in this manual
are compatible with the following firmware revisions and software
releases. Contact Rockwell Automation if you need software or
firmware upgrades to use this equipment.
Product Firmware Revision/
Software Release
1734-AENT adapter 1.xx or later
1756-ENBT module 2.3 or later
Logix 5555 controller 11 or later
RSLogix 5000 software 11.11 or later
RSLinx software 2.3.1 or later
The 1734-AENT adapter performs the following primary tasks:
• Control of real-time I/O data (also kno wn as implicit messaging)
- the 1734-AENT adapter serves as a bridge between POINT I/O
modules and the network
L
E
5
N
5
B
5
T
5
EtherNet/IP Network
Use of the Common Industrial Protocol (CIP)
A
POINT
E
I/O
N
T
E
N
B
T
ControlLogix
I/O
Other
Network
Devices
• Support of messaging data for configuration and programming
information (also known as explicit messaging)
The 1734-AENT adapter uses the Common Industrial Protocol (CIP).
CIP is the application layer protocol specified for EtherNet/IP, the
Ethernet Industrial Protocol, as well as for ControlNet and DeviceNet
networks. It is a message-based protocol that implements a relative
path to send a message from the producing device in a system to the
consuming devices.
The producing device contains the path information that steers the
message along the proper route to reach its consumers. Since the
producing device holds this information, other devices along the path
simply pass this information; they do not need to store it.
Publication 1734-UM011C-EN-P - January 2006
Page 22

1-6 About the Adapter
This has the following significant benefits.
• You do not need to configure routing tables in the bridging
modules, which greatly simplifies maintenance and module
replacement.
• Y ou maintai n full control over the route taken by each message,
which enables you to select alternative paths for the same end
device.
Understand the Producer/Consumer Model
Specify the Requested Packet Interval (RPI)
The CIP producer/consumer networking model replaces the old
source/destination (master/slave) model. The producer/consumer
model reduces network traffic and increases speed of transmission. In
traditional I/O systems, controllers poll input modules to obtain their
input status. In the CIP system, input modules are not polled by a
controller. Instead, they produce (multicast) their data either upon a
change of state (COS) or periodically.
The frequency of update depends upon the options chosen during
configuration and where on the network the input module resides.
The input module, therefore, is a producer of input data, and the
controller is a consumer of the data.
The controller can also produce data for other controllers to consume.
The produced and consumed data is accessible by multiple controllers
and other devices over the EtherNet/IP network. This data exchange
conforms to the producer/consumer model.
The RPI is the update rate specified for a particular piece of data on
the network. The RPI can be specified for the adapter and include all
of the I/O modules communicating through it (using a rack-optimized
connection) or specified for a particular module (using direct
connection).
Publication 1734-UM011C-EN-P - Januar y 2006
When you add a module or an adapter to the I/O configuration of a
controller, you must enter the RPI as a parameter. This value specifies
how often to produce the data for that device. For example, if you
specify an RPI of 50 ms, it means that every 50 ms the device should
send its data to the controller or the controller should send its data to
the device.
Use RPIs only for devices that exchange data. For example, a
ControlLogix EtherNet/IP bridge module in the same chassis as the
controller does not require an RPI, because it is not a data-produ cin g
member of the system. Its use is only as a bridge to remote racks.
Page 23

About the Adapter 1-7
Support of Rack-optimized and Direct Connections
The 1734-AENT adapter supports both direct and rack-optimized
connections. A direct connection is a real-time data transfer link
between the controller and whatever module occupies the slot that
the configuration data references. Direct co nnection messaging occurs
at a cyclic rate specified by the RPI during configuration. A
rack-optimized connection is a grouping of data from more than one
I/O module into a single block of data sent over a single connection
at the same data rate.
Rack-optimized connectio ns reduce the total number of connections
needed to transfer data when using many I/O modules in a system.
The following example illustrates the benefit of rack-optimized
connections.
Assume you set up a system that contains 8 digital I/O modules
interfaced to a 1734-AENT adapter . If you use direct connections to
transfer data to each of the these I/O modules, you need 8
connections to transfer all of the data, one to each of the 8 I/O
modules. If you use a rack-optimized connection to transfer the data,
you only need a single connection – the connection to the 1734-AENT
adapter.
IMPORTANT
See the EtherNet/IP Performance and Application Guide, publication
number ENET-AP001, for more information on connections.
Although rack-optimized connections offer an
efficient way to use resources, there are a few
limitations on their use:
• You can us e on ly rack-optimized connections
to send data to and from digital I/O modules.
Analog or speciality I/O requires direct
connections.
• All data is sent at the same time as the RPI rate
of the 1734-AENT adapter.
Mix Rack-optimized and Direct Connections
You can mix communication formats for different I/O modules
communicating through the same adapter. I/O modules set up to use
rack optimization communicate at the rate of the RPI configured for
the 1734-AENT adapter. I/O modules configured for direct
communication communicate at their own set RPIs and ignore the
1734-AENT adapter’s RPI.
Publication 1734-UM011C-EN-P - January 2006
Page 24

1-8 About the Adapter
Before You Begin
To effectively use your adapter, note the following considerations.
Determine Compatibility
If using the adapter with a 1756-ENBT module or 1788-ENBT module,
use the following required firmware revisions for these bridge
modules:
• 1756-ENBT firmware revision 2.3 or later
• 1788-ENBT firmware revision 1.33 or later
If you use the BootP Utility to assign IP addresses to the adapter, use
revision 2.3.2 or later.
Understand Messaging
Class 3 (Explicit Message) requests through the 1734-AENT adapter to
a specific POINT I/O module may not always receive a response from
the I/O modules. In the case where the I /O module d oes no t reply to
the request, the adapter responds with an error code indicating a
timout.
Establish I/O Connections
When you apply power to a POINT I/O system and establish I/O
connections, the outputs transition to the Idle state, applying Idle state
data before going to RUN mode. This occurs even when the controller
making the connection is already in RUN mode.
Configure Autobaud
The adapter cannot reconfigure an I/O module that you previously
configured to operate at a fixed communication rate. When you reuse
a POINT I/O module from another POINT I/O system, configure the
module to autobaud before using it with the adapter.
Publication 1734-UM011C-EN-P - Januar y 2006
Page 25
Install the Adapter
Chapter
2
What This Chapter Contains
This chapter describes how to physically install the adapter on the
DIN rail and connect it to the EtherNet/IP network. The following
table lists where to find specific information.
Topic See Page
Identify Adapter Components 2-1 Mount the Adapter on a DIN Rail Before Installing Modules 2-2 Mount (or Replace) the Adapter to an Existing System 2-3 Wiring 2-4 Mounting Dimensions 2-5
ATTENTION
You must use series C POINT I/O modules with
the 1734-AENT adapter. Series A or B POINT I/O
modules will not work with this adapter.
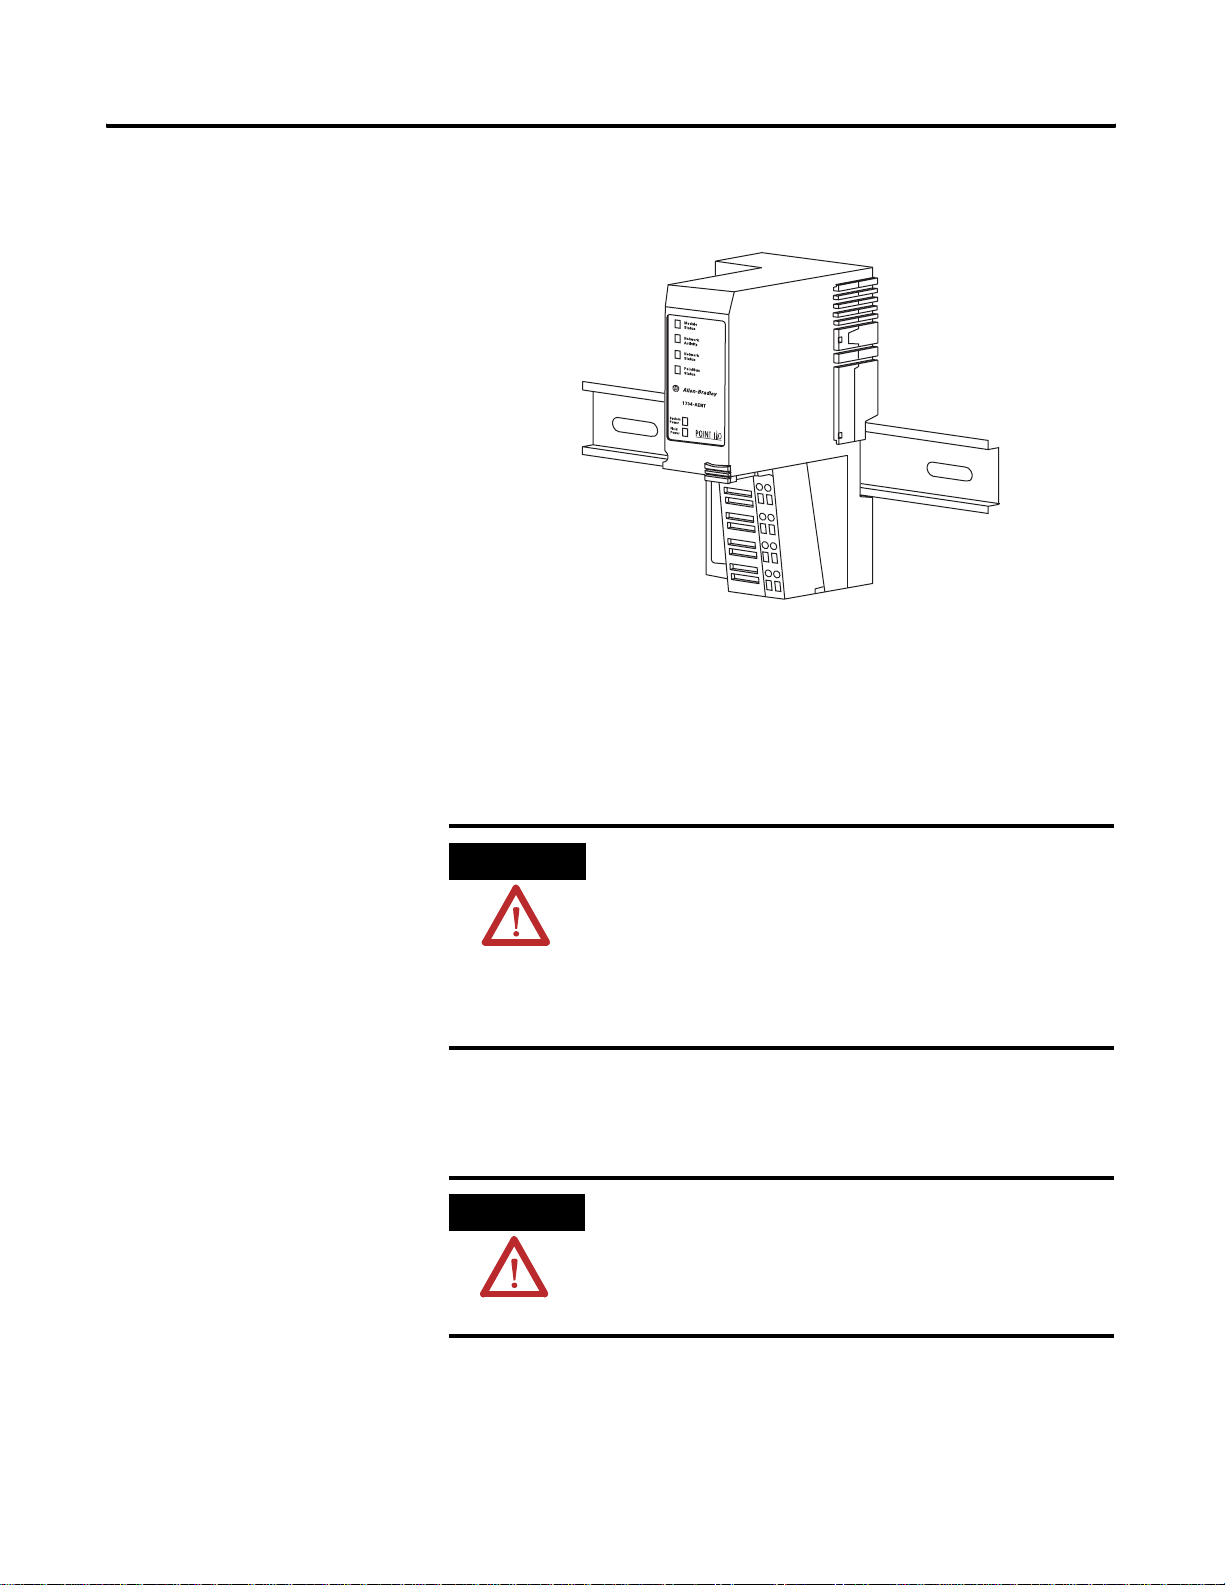
Identify Adapter
Use the figure to identify the external features of the adapter.
Components
LED Indicators
Node Address
Thumbwheel
EtherNet
Network
RJ45
Connector
1 Publication 1734-UM011C-EN-P - January 2006
DIN Rail
Locking
Screw (orange)
Safety End Cap
RTB
Removal Handle
Removable
Terminal
Block (RTB)
31533-M
Page 26
2-2 Install the Adapter
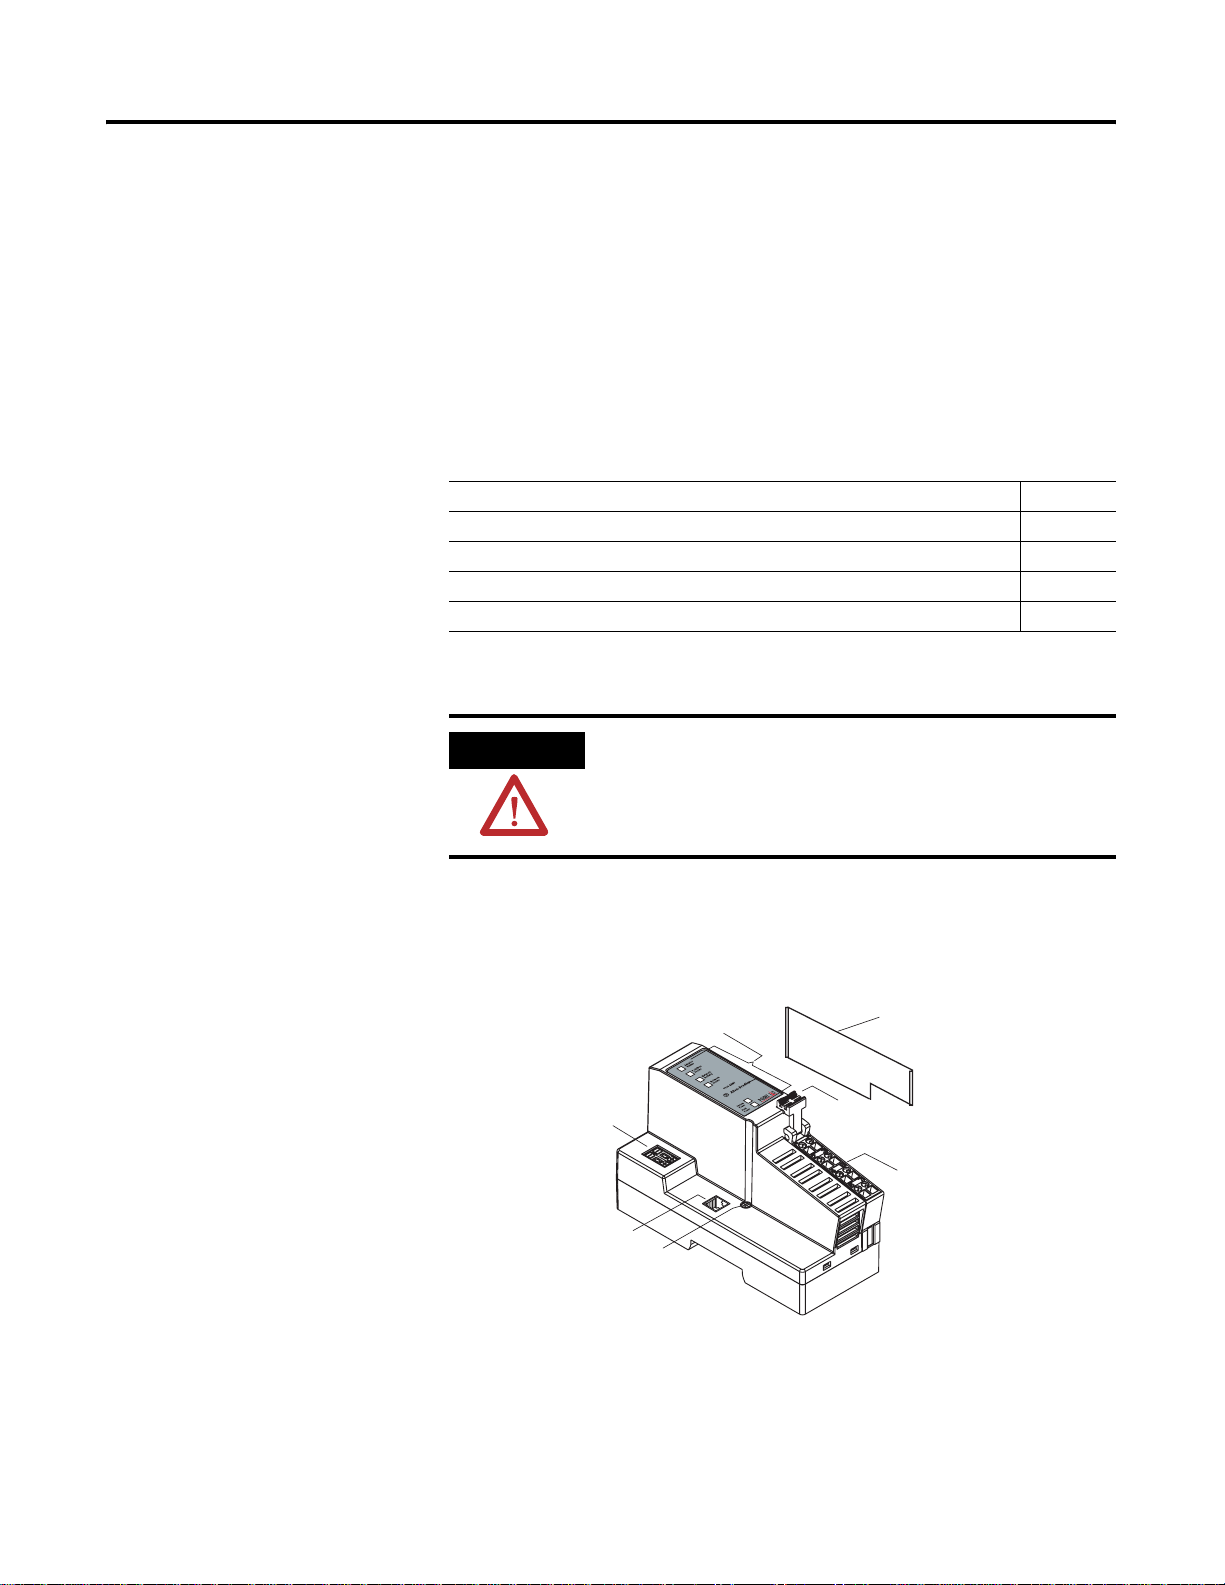
Mount the Adapter on a DIN
Use the following procedure to mount the adapter on a new system
before you install any I/O modules.
Rail Before Installing
Modules
43520
1. Position the adapter vertically above the DIN rail.
2. Press down firmly to install the adapter on the DIN rail, noting
that the locking mechanism locks the adapter to the DIN rail.
3. Set the network address thumbwheel switches to the desired
value (see Set the Network Address section in this manual).
WARNING
4. Slide the safety end cap up to remove it.
This exposes the backplane and power interconnections.
ATTENTION
If you connect or disconnect the Ethernet cable with
power applied to this module or any device on the
network, an electrical arc can occur. This could
cause an explosion in hazardous location
installations.
Be sure that power is removed or the area is
nonhazardous before proceeding.
Do not discard the adapter’s end cap. Use this end
cap to cover the exposed interconnections on the
last mounting base on the DIN rail. Failure to do
so could result in equipment damage or injury
from electric shock.
Publication 1734-UM011C-EN-P - December 2006
Page 27

Install the Adapter 2-3
Mount (or Replace) the Adapter to an Existing System
Follow these steps to mount (or replace) an adapter.
1. Remove the existing adapter (if there is one) from the DIN rail
as follows:
a. Pull up on the RTB removal handle to remove the terminal
block.
b. Disconnect the Ethernet connector from the adapter.
c. Remove the adjacent module from its base.
d. Use a small-bladed screwdriver to rotate the DIN-RAIL locking
screw to a vertical position.
This releases the locking mechanism.
e. Lift straight up to remove.
2. For the replacement adapter, slide the safety end cap up to
remove.
This exposes the backplane and power connections.
3. Position the replacement adapter vertically above the DIN rail.
4. Make certain the DIN rail lock is in the horizontal position.
5. Slide the adapter down, allowing the interlocking side pieces to
engage the adjacent module.
6. Press firmly to seat the adapter on the DIN rail.
The adapter locking mechanism snaps into place.
7. Replace the adjacent module in its base.
8. Reconnec t the Ethernet cable to the adapter.
9. Set the network address thumbwheel switches to the value used
on the replaced module (see Set the Network Address in this
manual).
10. Insert the end of the terminal block (RTB) opposite the handle
into the base unit.
This end has a curved section that engages with the wiring base.
11. Rotate the terminal block into the wiring base until it locks itself
into place.
Publication 1734-UM011C-EN-P - December 2006
Page 28
2-4 Install the Adapter
G
N
C
C
V
12/24V dc
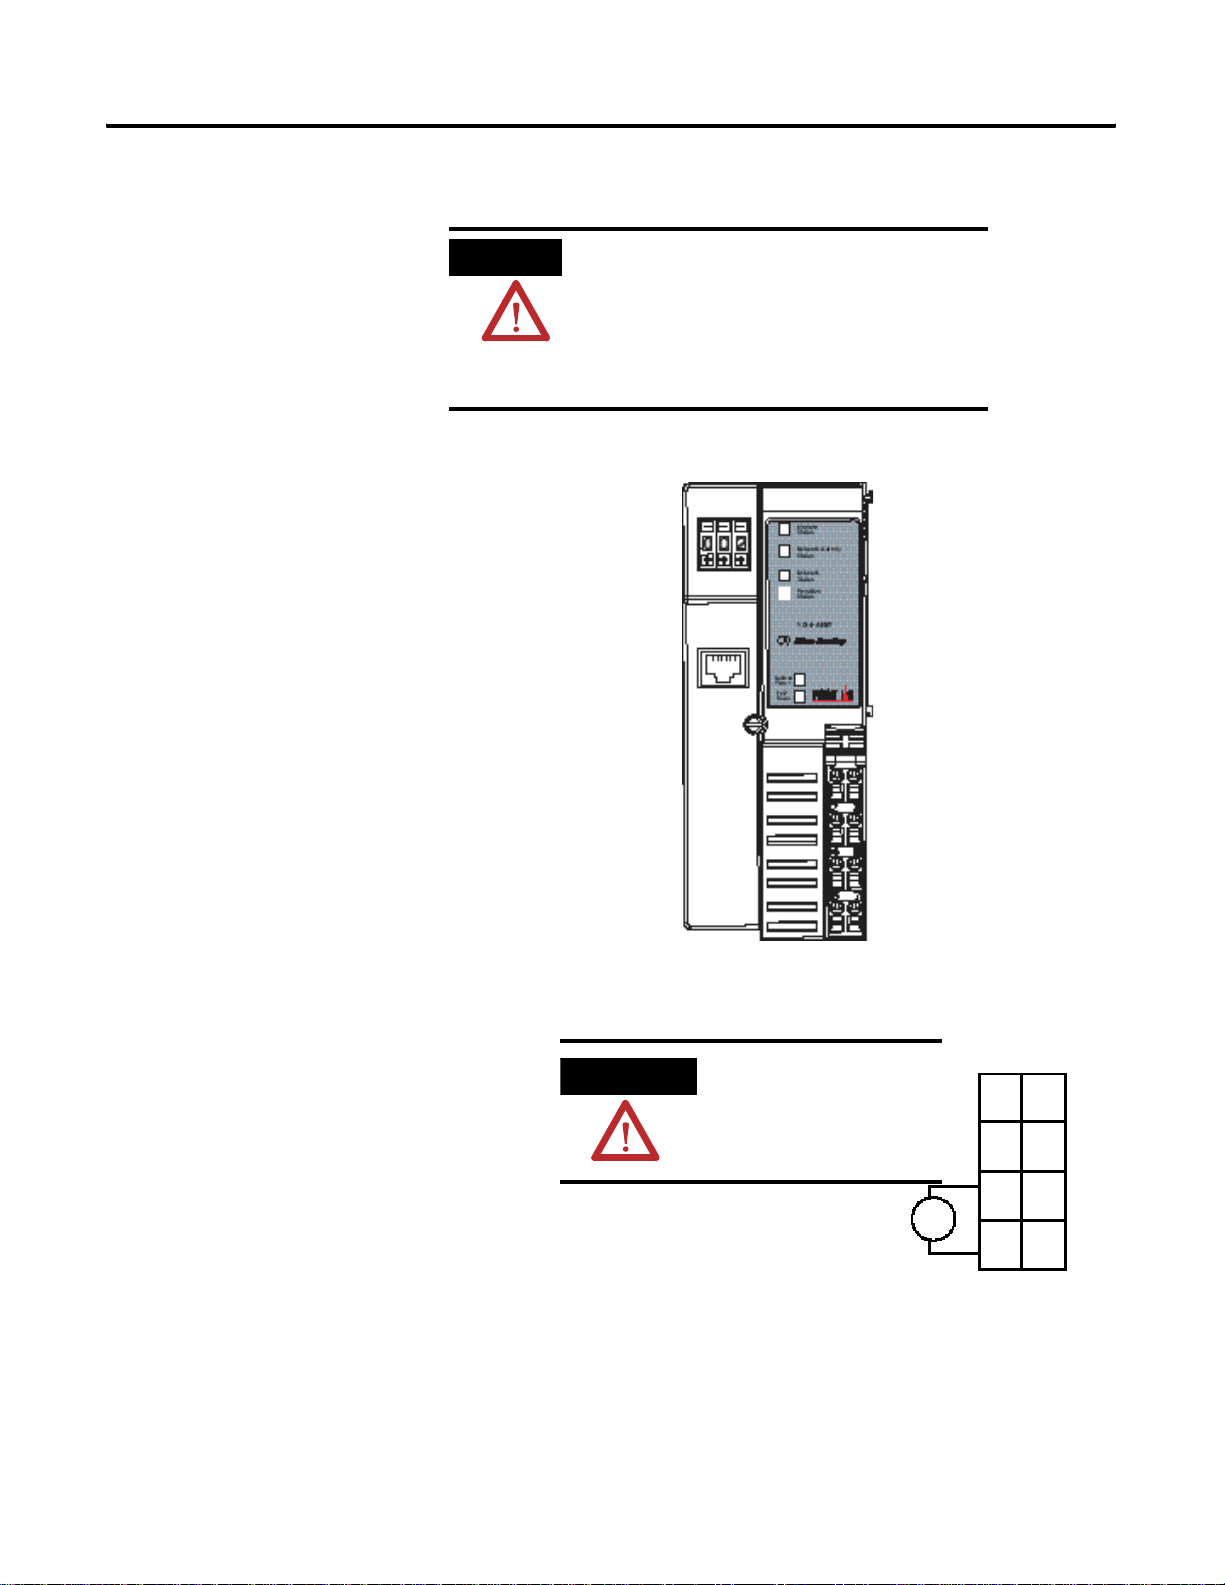
Wiring
Refer to the illustration to wire the adapter.
WARNIN
If you connect or disconnect wiring while
the field-side power is on, an electrical a rc
can occur. This could cause an explosion
in hazardous location installations.
Be sure that power is removed or the area
is nonhazardous before proceeding.
Network Address
Thumbwheels
Ethernet RJ-45 Connector
Module Status
Network Activity Status
Network Status
POIN T B us St a tus
System Power
Field Power
C = No Connection
HAS GND = Chassis Ground
= Common
= Supply
ATTENTION
NC
CHAS GND
C
V
Do not connect
120/240V ac power to
this supply.
0
NC
2
Chas
Gnd
4
This dc supply will be
connected to the
V dc
6
internal power bus.
NC = No Connection C = Common
Chas GND = Chassis Ground V = Supply
43264
C
V
NC
Chas
Gnd
C
V
1
3
5
7
Publication 1734-UM011C-EN-P - December 2006
Page 29
Install the Adapter 2-5
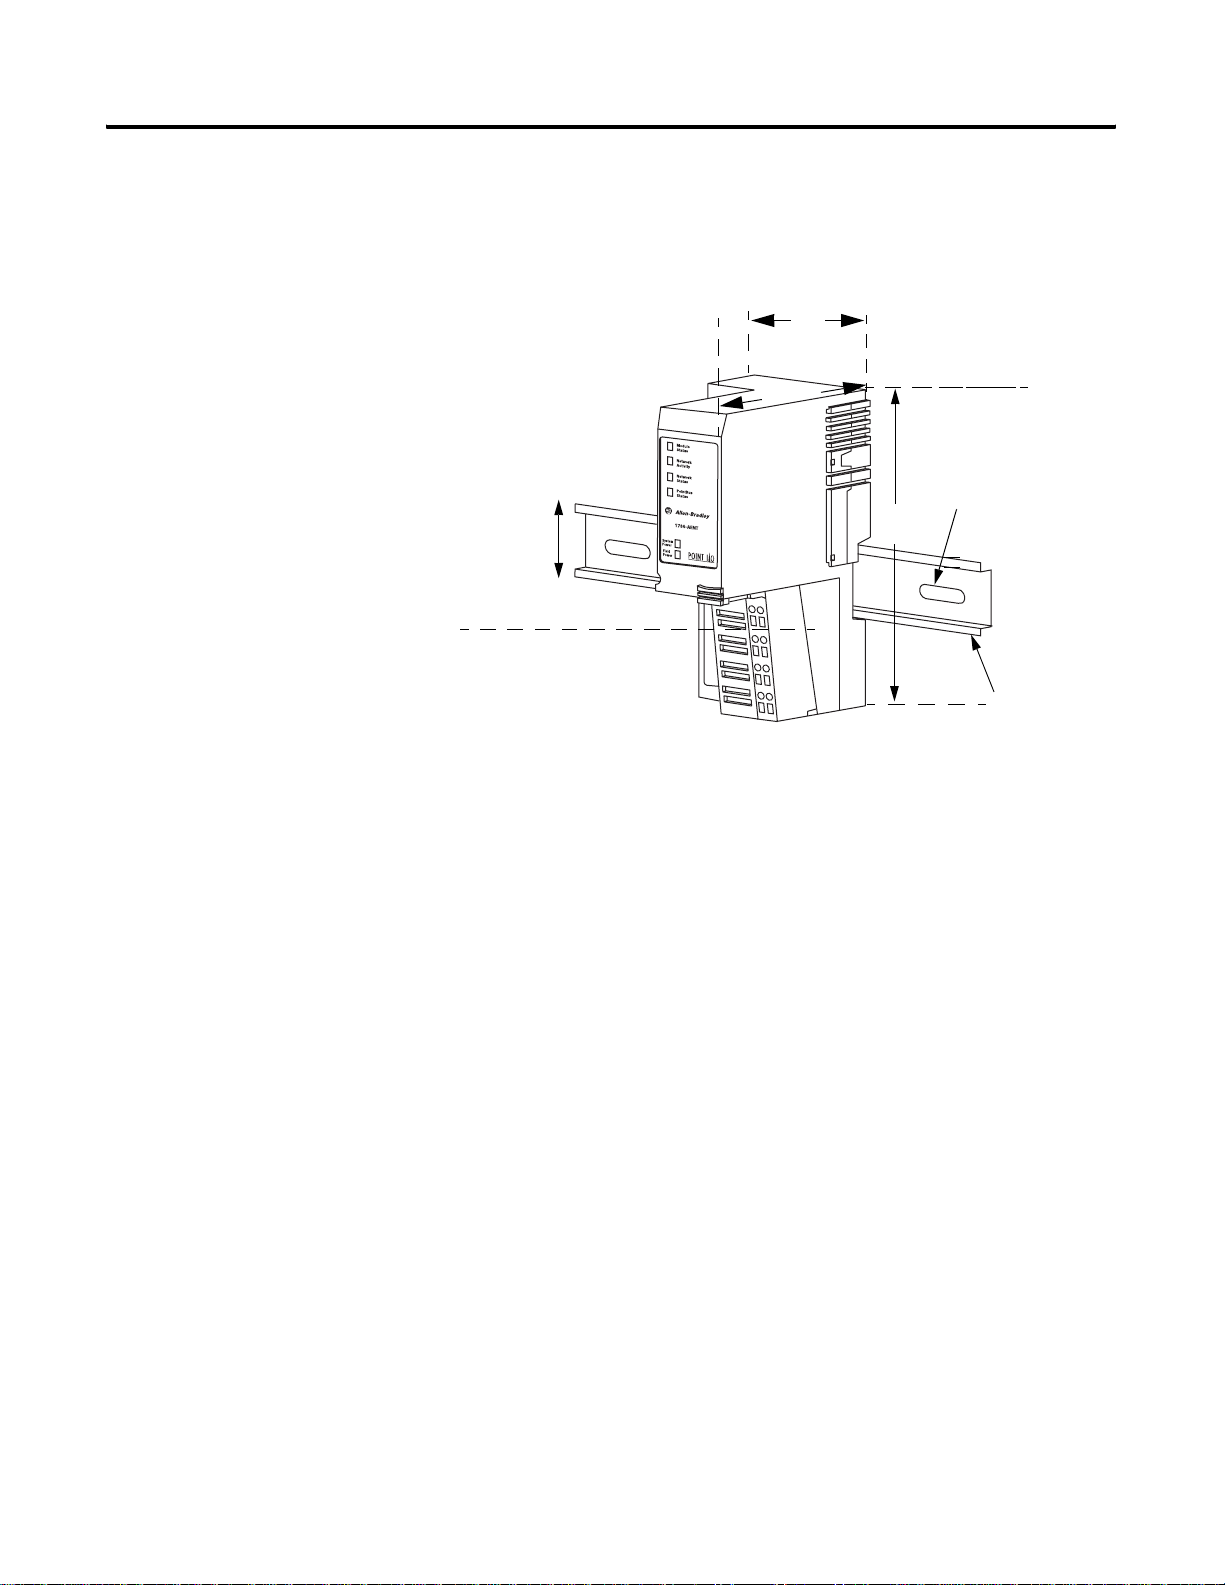
Mounting Dimensions
Refer to the figure for mounting dimensions.
millimeters
(inches)
36.51
(1.44)
54.9
(2.16)
76.5
(3.0)
133.4
(5.25)
B
A
43520
A = DIN rail
B = Secure DIN rail approximately every 200 mm (7.8 in.)
1734-AENT
76.2H x 54.9W x 133.4D
(3.0H x 2.16W x 5.25D)
Publication 1734-UM011C-EN-P - December 2006
Page 30

2-6 Install the Adapter
Notes:
Publication 1734-UM011C-EN-P - December 2006
Page 31

Chapter
3
Configure the Adapter for Your EtherNet/IP
Network
What This Chapter Contains
Before using your adapter in an EtherNet/IP network, configure it
with an IP address, subnet mask, and optional Gateway address. This
chapter describes these configuration requirements and the
procedures for providing them. Here are ways you can do this:
• Use the Rockwell BootP utility, version 2.3 or later, that ships
with RSLogix 5000 or RSLinx software.
– You can also use this utility to re configure a device with an IP
address you must change.
• Use a third party DHCP server.
• Use the Network Address thumbwheel switch.
• Have your network administrator configure the adapter via the
network server.
See the table for a list of where to find information in this chapter.
For Information About See Page
Configuration Requirements 3-2
IP Address 3-3
Gateway Address 3-4
Subnet Mask 3-5
Set the Network Address 3-7
Use the Rockwell BootP/DHCP Utility 3-8
Save the Relation List 3-10
Use DHCP Software to Configure Your Adapter 3-11
ATTENTION
1 Publication 1734-UM011C-EN-P - January 2006
You must use series C POINT I/O modules with
the 1734-AENT adapter. Series A or B POINT I/O
modules will not work with this adapter.
Page 32

3-2 Configure the Adapter for Your EtherNet/IP Network
Configuration Requirements
Before you can use your adapter, you must configure its IP address,
its subnet mask, and, optionally, gateway address. You can use the
Rockwell BootP utility, version 2.3 or later, to perform the
configuration. You can also use a DHCP server or the network
address switches to configure these parameter s .
If you need to reset the adapter to factory defaults, see the Important
note about setting thumbwheels to the value 888.
9
9
9
IP Address
Ethernet Address (MAC)
IMPORTANT
If you set the thumbwheels on the adapter to the
value 888 and then power cycle the module, the
following will occur.
• The DHCP Enabled function is enabled (set to
True).
• The Ethernet link is negotiated automatically
(the Auto Negotiate function will be set to
True).
• The web server is enabled (the Disabled Web
Server function is disabled).
• The password for this page resets to the
factory default (the word password is the
factory default password).
Note the value of the switches before you enter
the 888 value, because you return the adapter to
those values once this process is comp lete.
Publication 1734-UM011C-EN-P - Januar y 2006
Page 33

Configure the Adapter for Your EtherNet/IP Network 3-3
IMPORTANT
If using the BootP/DHCP utility, you need to
know the Ethernet hardware address of your
adapter. Rockwell assigns each 1734-AENT
adapter a unique 48-bit hardware address at the
factory. The address is printed on a label on the
side of your 1734-AENT adapter as shown in the
figure. It consists of six hexadecimal digits
separated by colons. This address is fixed by the
hardware and cannot be changed.
If you change or replace the 1734-AENT adapter, you
must enter the new Ethernet hardware address of the
adapter when you configure the new adapter .
IP Address
The IP address identifies each node on the IP network (or system of
connected networks). Each TCP/IP node on a network (including the
1734-AENT adapter) must have a unique IP address.
The IP address is 32 bits long and has a net ID part and Host ID part.
Networks are classified A, B, C, (or other). The class of the network
determines how an IP address is formatted.
Class A
Class B
Class C
7
Net ID
8
Net ID
15
16
Host ID
23
Host ID
24
31
31
31
Host ID
0
0
0
1 0
0
1 1 0
Net ID
Y ou can di stinguish the class of the IP address from the first integer in
its dotted-decimal IP address as follows:
Range of first integer Class Range of first integer Class
0 …127 A 192 … 223 C
128 …191 B 224 … 255 other
Each node on the same physical network must have an IP address of
the same class and must have the same net ID. Each node on the
same network must have a different Host ID thus giving it a unique IP
address.
Publication 1734-UM011C-EN-P - January 2006
Page 34

3-4 Configure the Adapter for Your EtherNet/IP Network
IP addresses are written as four decimal integers (0 to 255) separated
by periods where each integer gives the value of one byte of the IP
address.
EXAMPLE
For example, the 32-bit IP address:
10000000 00000001 00000000 00000001 is written as
128.1.0.1
Gateway Address
This section applies to multi-network systems. If you have a single
network system, refer to the next section.
The Gateway Address is the default address of a network. It provides
a single domain name and point of entry to the site. Gateways
connect individual physical networks into a system of networks.
When a node needs to communicate with a node on another network,
a gateway transfers the data between the two networks. The figure
shows gateway G connecting Network 1 with Network 2.
A
128.1.0.1
Network 1
B
128.2.0.1 128.2.0.2
C
128.1.0.2
G
128.2.0.3
Network 2
When host B with IP address 128.2.0.1 communicates with host C, it
knows from C’s IP address that C is on the same network. In an
Ethernet environment, B can then resolve C’s IP address into a
hardware address (MAC address) and communicate with C directly.
When host B communicates with host A, it knows from A’s IP address
that A is on another network (the net IDs are different). In order to
send data to A, B must have the IP address of the gateway connecting
the two networks. In this example, the gateway’s IP address on
Network 2 is 128.2.0.3.
Publication 1734-UM011C-EN-P - Januar y 2006
Page 35

Configure the Adapter for Your EtherNet/IP Network 3-5
extend the net ID.
The gateway has two IP addresses (128.1.0.2 and 128.2.0.3). Th e first
must be used by hosts on Network 1 and the second must be used by
hosts on Network 2. To be usable, a host’s gateway must be
addressed using a net ID matching its own.
Subnet Mask
The subnet mask is used for splitting IP networks into a series of
subgroups, or subnets. The mask is a binary pattern that is matched
up with the IP address to turn part of the Host ID address field into a
field for subnets.
EXAMPLE
Take Network 2 (a Class B network) in the
previous example and add another physical
network. Selecting the following subnet mask
would add two additional net ID bits, allowing
for four physical networks:
11111111 11111111 11
000000 00000000 =
255.255.192.0
These two bits of the Host ID are used to
Two bits of the Class B host ID are used to extend the net ID. Each
unique combination of bits in the part of the Host ID where subnet
mask bits are 1 specifies a different physical netw or k.
Publication 1734-UM011C-EN-P - January 2006
Page 36

3-6 Configure the Adapter for Your EtherNet/IP Network
The new configuration is:
A
128.1.0.1
Network 1
B
128.2.64.1 128.2.64.2
D
128.2.128.1 128.2.128.2
C
Network 2.1
E
Network 2.2
128.1.0.2
G
128.2.64.3
G2
128.2.128.3
A second network with Hosts D and E was added. Gateway G2
connects Network 2.1 with Network 2.2.
Hosts D and E will use Gateway G2 to communicate with hosts not on
Network 2.2.
Hosts B and C will use Gateway G to communicate with hosts not on
Network 2.1.
When B is communicating with D, G (the configured Gateway for B)
will route the data from B to D through G2.
Publication 1734-UM011C-EN-P - Januar y 2006
Page 37

Configure the Adapter for Your EtherNet/IP Network 3-7
Set the Network Address
The adapter ships with the thumbwheel switches set to 999 and DHCP
enabled. You can set the network Internet Protocol (IP) address in
these ways:
• Use the thumbwheel switches located on the module.
• Use a Dynamic Host Configuration Protocol (DHCP) server, such
as Rockwell Automation BootP/DHCP.
• Retrieve the IP address from nonvolatile memory.
Network Address
Thumbwheel
Press either the + or buttons to change the
number.
43248
The adapter reads the thumbwheel switches only when you cycle
power to determine if the switches are set to a valid num ber. Press
either the + or - buttons to change the number.
Valid settings range from 001 to 254. When the switches are set to a
valid number, the adapter’s IP address will be 192.168.1.xxx (where
xxx represents the number set on the switches). The adapter’s subnet
mask will be 255.255.255.0 and the gateway address is set to 0.0.0.0.
The adapter will not have a host name assigned, or use any Domain
Name System when using the thumbwheel settings.
If the switches are set to an invalid number (such as 000 or a value
greater than 254), the adapter checks to see if DHCP is enabled. If
DHCP is enabled, the adapter requests an address from a DHCP
server. The DHCP server will also assign other Transport Control
Protocol (TCP) parameters.
If DHCP is not enabled, the adapter will use the IP address (along
with other TCP configurable parameters) stored in nonvolatile
memory. The factory default switch setting is 999, and DHCP is
enabled.
Publication 1734-UM011C-EN-P - January 2006
Page 38

3-8 Configure the Adapter for Your EtherNet/IP Network
Use the Rockwell BootP/DHCP Utility
The Rockwell BootP/DHCP utility is a stand alone program that
incorporates the functionality of standard BootP software with a user
friendly graphical interface. It is located in the Utils directory on the
RSLogix5000 installation CD. The 1734-AENT adapter must have
DHCP enabled (factory default and the network address switches set
to an illegal value) to use the utility.
To configure your adapter using the BootP utility, perform the
following steps:
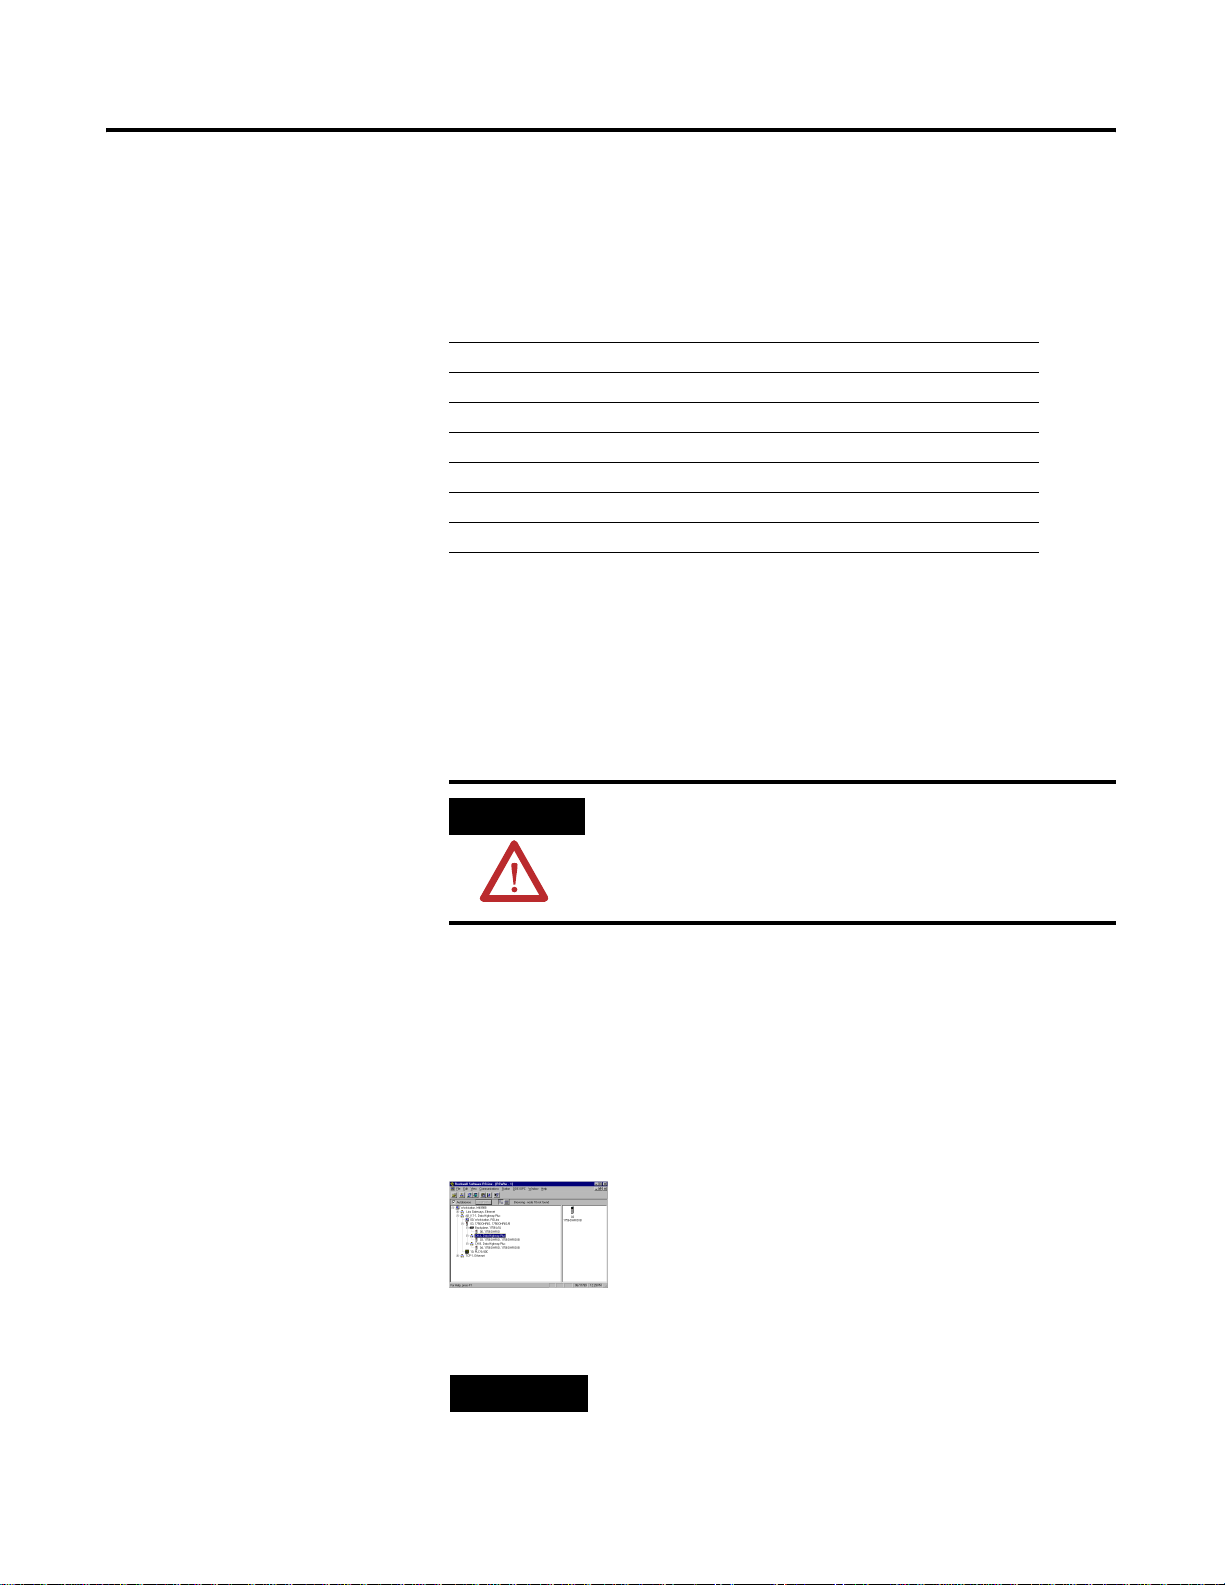
1. Run the BootP software.
In the BOOTP Request History panel you see the hardware
addresses of devices issuing BootP requests.
Publication 1734-UM011C-EN-P - Januar y 2006
2. Dou ble-click the hardware address of the device you want to
configure.
You see the New Entry dialog with the device’s Ethernet
Address (MAC).
Page 39

Configure the Adapter for Your EtherNet/IP Network 3-9
3. Enter the IP Address you want to assign to the device, and click
OK.
The device is added to the Relation List, displaying the Ethernet
Address (MAC) and corresponding IP Address, Hostname, and
Description (if applicable).
When the address displays in the IP Address column in the
Request History section, it signifies that the IP address
assignment has been made.
4. To assign this configuration to the device, highlight the device in
the Relation List panel, and click the Disable BOOTP/DHCP
button.
When power is cycled to the device, it uses the configuration
you assigned and not issue a DHCP request.
Publication 1734-UM011C-EN-P - January 2006
Page 40

3-10 Configure the Adapter for Your EtherNet/IP Network
5. To enable DHCP for a device with DHCP disabled, highlight the
device in the Relation List, and click the Enable DHCP button.
You must have an entry for the device in the Relation List panel
to re-enable DHCP.
Save the Relation List
You can save the Relation List to use later. To save the Relation List
perform the following steps:
1. Select Save As... from the File menu.
Publication 1734-UM011C-EN-P - Januar y 2006
Page 41

Configure the Adapter for Your EtherNet/IP Network 3-11
You see the Save As dialog.
2. Sele ct the folder you want to Save in.
3. Enter a File name for the Relation List (for example, control
system configuration), and clickclick Save.
You can leave the Save as type at the default setting: Bootp
Config Files (*.bpc).
Use DHCP Software to Configure Your Adapter
You can then open the file containing the Relation List at a later
session.
DHCP (Dynamic Host Configuration Protocol) software automatically
assigns IP addresses to client stations logging onto a TCP/IP network.
DHCP is based on BootP and maintains some backward compatibility.
The main difference is that BootP was designed for manual
configuration, while DHCP allows for dynamic allocation of network
addresses and configurations to newly attached devices.
Be cautious about using DHCP software to configure your adapter. A
DHCP server typically assigns a finite lease time to the offered IP
address.
When 50% of the leased time has expired, the 1734-AENT adapter
attempts to renew its IP address with the DHCP server.
The possibility exists that the adapter will be assigned a different IP
address, which would cause the adapter to cease communicating with
the ControlLogix controller.
Publication 1734-UM011C-EN-P - January 2006
Page 42

3-12 Configure the Adapter for Your EtherNet/IP Network
Refer to the section Configure the 1734-AENT Adapter with Fixed IP
Address in this manual to configure the adapter with a fixed IP
address.
ATTENTION
To avoid unintended control, the 1734-AENT adapter
must be assigned a fixed IP address. The IP address
of this adapter should not be dynamically provided.
If a DHCP server is used, it must be configured to
assign a fixed IP address for your adapter.
Failure to observe this precaution may result in
unintended machine motion or loss of process
control.
Publication 1734-UM011C-EN-P - Januar y 2006
Page 43

Chapter
4
Configure the Adapter for Direct Connection
in RSLogix 5000 Software
What This Chapter Contains
In this example, a ControlLogix controller communicates with POINT
I/O modules via the 1734-AENT adapter using a direct connection.
The adapter makes a direct connection to each of the modules
referenced by the data. The modules presented in this chapter use
RSLogix 5000 software, version 11.
What You Do See Page
Set Up the Hardware 4-1
Create the Example Application 4-2
Configure the I/O 4-4
Add the Local EtherNet/IP Bridge to the I/O Configuration 4-4
Add the POINT I/O Adapter to the I/O Configuration 4-7
Add the POINT I/O Modules to the I/O Configuration 4-10
Add the Relay Output Module 4-10
Add the Digital Output Module 4-13
Edit the Controller Tags 4-16
Create the Ladder Program 4-18
Download the Program to the Controller 4-18
Verify the Module Chassis Size 4-20
Configure the Adapter with Fixed IP Address 4-16
Recover From an Overloaded Adapter 4-24
ATTENTION
Set Up the Hardware
1 Publication 1734-UM011C-EN-P - January 2006
In this example, a ControlLogix chassis contains the Logix5555
processor in slot 1 and a 1756-ENBT bridge module in slot 3.
You must use series C POINT I/O modules with
the 1734-AENT adapter. Series A or B POINT I/O
modules will not work with this adapter.
Page 44

4-2 Configure the Adapter for Direct Connection in RSLogix 5000 Software
We mounted the 1734-AENT adapter on a DIN rail in slot 0, with a
1734-OW2/C relay output module in slot 1, a 1734-OV4E/C sink
output module in slot 2, and a power supply (not shown).
Slot 0 1 2 3
1734-AENT
10.88.70.2
POINT I/O
Local
Chassis
Logix5555
Controller (slot 1)
10.88.70.26
Data
1756-ENBT
10.88.70.4 (slot 3)
Switch
Slot 0 1 2 3 4
Programming
Terminal
31393-M
To work along with this example, set up your system as shown in the
figure.
• In the example application, we assume that the Logix5555
controller and 1756-ENBT module (firmware revision 2.3, or
later) are in the slots shown in the figure.
Create the Example Application
Publication 1734-UM011C-EN-P - January 2006
• Verify the IP addresses for your programming terminal,
1756-ENBT module, and 1734-AENT adapter.
• Verify the position (slot) of the I/O modules on the DIN rail.
• Verify that you connected all wiring and cabling properly.
• Be sure you configured your communication driver (for
example, AB_ETH-1 or AB-ETHIP-1) in RSLinx software, as
described in the Configure the RSLinx Ethernet Communication
Driver appendix of this manual.
Perform the following steps to create the example application:
1. Start RSLogix 5000 Enterprise Series software to open the
RSLogix 5000 Main dialog.
Page 45

Configure the Adapter for Direct Connection in RSLogix 5000 Software 4-3
2. F rom the File menu, select New.
The New Controller dialog opens.
3. Enter an approp riate Name for the Controller, for example,
POINT_IO_Controller.
4. Select the correct Version, Chassis Type, and Sl ot numb er of the
Logix5555 controller , and th e folder where you want to sa ve the
RSLogix 5000 file (Create In). The Description is optional.
RSLogix 5000 software version 11 or later lets you choose to
enable redundancy. This example does not use redundancy. To
use redundancy in your system, check the Redundancy Enabled
checkbox so that a checkmark appears.
5. Click OK.
Publication 1734-UM011C-EN-P - January 2006
Page 46

4-4 Configure the Adapter for Direct Connection in RSLogix 5000 Software
Configure the I/O
You now add the POINT I/O modules to the controller’s I/O
configuration perfor ming these procedures.
• Add the local 1756-ENBT module to the I/O configuration.
• Add the 1734-AENT adapter as a child of the 1756-ENBT
module.
• Add the I/O modules as children of the 1734-AENT adapter.
IMPORTANT
Click the Help buttons on the configuration
dialogs shown in this section if you need
assistance in selecting and setting the parameters.
Add the Local EtherNet/IP Bridge to the I/O Configuration
1. Select the I/O Configuration folder in the project dialog, and
click the right mouse button.
A dialog opens.
Publication 1734-UM011C-EN-P - January 2006
2. Click New Mod ule.
Page 47

Configure the Adapter for Direct Connection in RSLogix 5000 Software 4-5
The Select Module dialog opens.
3. Click + ne xt to Communications to expand, as in the following
dialog.
4. Select the 1756-ENBT EtherNet/IP Bridge, and click OK.
The Select Major Revision dialog opens.
5. Select the number for Major Revision, and click OK.
Publication 1734-UM011C-EN-P - January 2006
Page 48

4-6 Configure the Adapter for Direct Connection in RSLogix 5000 Software
The New Module dialog opens.
6. Enter values for Name, IP Address, Slot, Electronic Keying, and
Revision, noting that we used the following values:
Name Local_ENB
IP Address 10.88.70.4
Slot 3
Electronic Keying Compatible Keying
Revision 3.1
7. Click OK to accept the configuration.
The Module Properties dialog opens.
Publication 1734-UM011C-EN-P - January 2006
Page 49

Configure the Adapter for Direct Connection in RSLogix 5000 Software 4-7
Add the POINT I/O Adapter to the I/O Configuration
Next, you must add the 1734-AENT adapter as a child of the local
1756-ENBT module.
1. In the Project dialog, right-click the local 1756-ENBT module
under the I/O Configuration folder, and select New Module from
the dialog.
The Select Module dialog opens.
Publication 1734-UM011C-EN-P - January 2006
Page 50

4-8 Configure the Adapter for Direct Connection in RSLogix 5000 Software
2. Click + next to Communications to expand.
3. Select the 1734-AENT/A Ethernet adapter from the list, and click
OK, noting that we used these values.
Name POINT_IO_Adapter
IP Address 10.88.70.2
Comm Format None
Chassis Size 3
Electronic Keying Compatible Keying
Revision 1.1
The Slot field appears grey because the slot is automatically 0 for the
1734-AENT adapter.
IMPORTANT
The chassis size equals 1 for the adapter plus the
number of POINT I/O modules installed (physically
present on the POINT I/O backplane).
Publication 1734-UM011C-EN-P - January 2006
Page 51

Configure the Adapter for Direct Connection in RSLogix 5000 Software 4-9
The New Module dialog opens.
Comm Format choices are the following.
• None = the adapter makes a direct connection to each of the
modules referenced by the data.
• Rack optimization = digital I/O data is collected into a rack
image. This does not include analog or specialty I/O
modules.
• Listen only - rack optimization = read or verify data only, but
does not control the modules (when you have multiple
controllers - one controller is used to control and the other
controllers are used to monitor).
4. Choose None as Comm Format, because we are making a direct
connection, and click OK.
Because you entered None as the Comm Format, the requested
packet interval (RPI) is disabled.
The 1734-AENT adapter appears in the Ethernet folder.
Publication 1734-UM011C-EN-P - January 2006
Page 52

4-10 Configure the Adapter for Direct Connection in RSLogix 5000 Sof tware
Add the POINT I/O Modules to the I/O Configuration
Y ou now add POINT I/O modu les to the I/O Con figuration List under
the 1734-AENT adapter.
In this example, you add a 1734-OW2 relay output and a 1734-OV4E
sink output module with standard configurations. Use these steps as a
guide when configuring different I/O modules for your system.
TIP
This example application uses the I/O modules
default configurations. For more information, see the
POINT I/O Selection Guide, publication no.
1734-SG001.
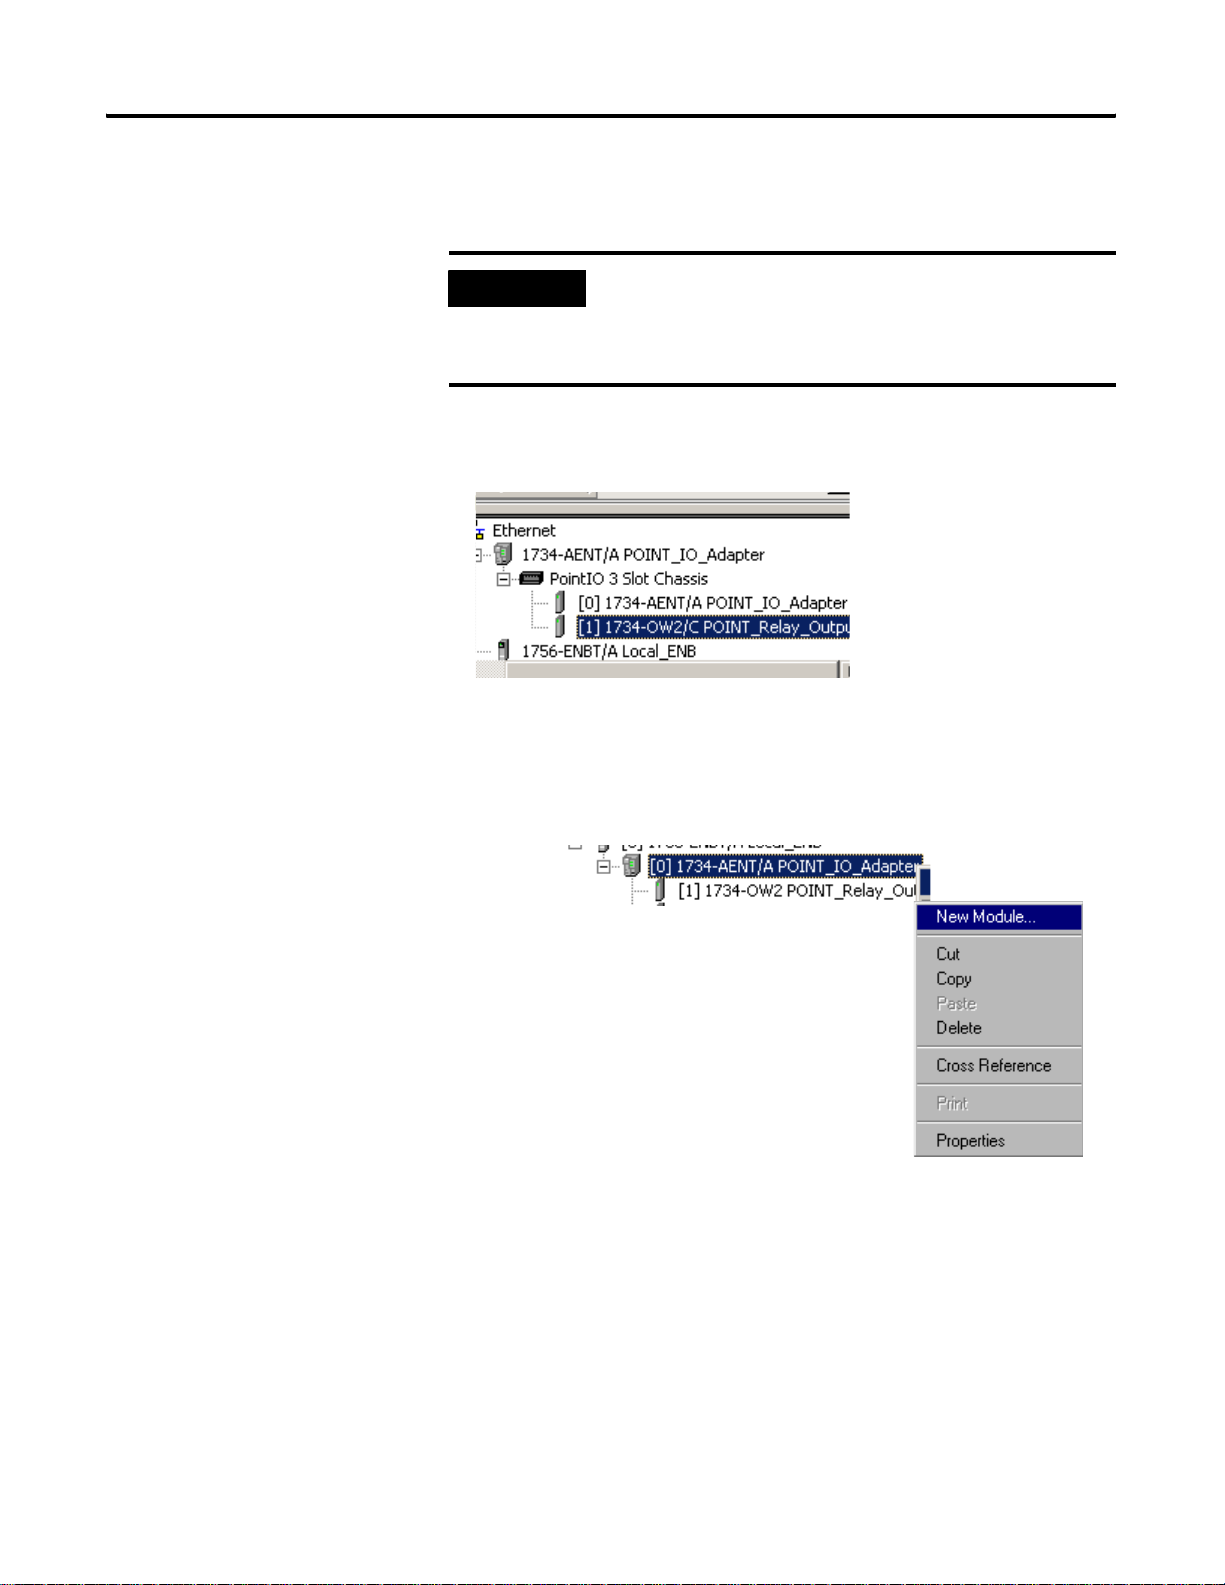
Add the Relay Output Module
1. Right-click the remote 1734-AENT adapter under the I/O
Configuration folder and select New Module.
Publication 1734-UM011C-EN-P - January 2006
Page 53

Configure the Adapter for Direct Connection in RSLogix 5000 Software 4-11
The Select Module dialog opens.
2. Click the + next to Digital to expand.
3. Select the 1734-OW2 relay output module from the list, and click
OK.
Publication 1734-UM011C-EN-P - January 2006
Page 54

4-12 Configure the Adapter for Direct Connection in RSLogix 5000 Sof tware
The New Module dialog opens.
4. Enter values for Name and Slot, noting that we used the
following values.
Name POINT_Relay_Output
Slot 1
5. Choose Connection.
The RPI is selectable since it is a direct connection.
Publication 1734-UM011C-EN-P - January 2006
Page 55
Configure the Adapter for Direct Connection in RSLogix 5000 Software 4-13
6. Enter 50 for requested packet interval (RPI) to set how often you
exchange data with the 1734-AENT adapter.
IMPORTANT
To avoid overlo adi ng the 17 34 -AENT adapter, we
recommend that RPI be no less than 10 ms for
rack connections and 50 ms for direct
connections.
7. Click OK save the configuration.
The relay output module appears under Ethernet.
Add the Digital Output Module
1. Right-click the 1734-AEN T adapter, and select New Module.
Publication 1734-UM011C-EN-P - January 2006
Page 56

4-14 Configure the Adapter for Direct Connection in RSLogix 5000 Sof tware
The Select Module dialog opens.
2. Click + next to Digital to expand.
3. Select the 1734-OV4E digital output module from the list.
Publication 1734-UM011C-EN-P - January 2006
4. Click OK.
Page 57

Configure the Adapter for Direct Connection in RSLogix 5000 Software 4-15
The New Module dialog opens.
5. Enter values for Name and Slot, noting we used the following.
Name POINT_Digital_Output
Slot 2
6. Click Co nn ection at the top of the screen.
7. Enter 10 ms as the RPI for the 1734-OV4E module.
8. Click OK.
Publication 1734-UM011C-EN-P - January 2006
Page 58

4-16 Configure the Adapter for Direct Connection in RSLogix 5000 Sof tware
The I/O Configuration in the Project dialog should look similar
to the following.
Edit the Controller Tags
When you add modules to the I/O configuration the system creates
tags for those modules to use in the application program.
For the example application you need to add one more controller
tags.
1. Double-click the Controller Tags folder in the project dialog.
Publication 1734-UM011C-EN-P - January 2006
Page 59

Tags created by the
system
Enter the new tag here
Configure the Adapter for Direct Connection in RSLogix 5000 Software 4-17
The Controller Tags dialog opens. You see the tags created for
the 1734-AENT adapter and digital I/O modules.
2. Click the Edit Tags tab at the bottom of the Controller Tags
dialog.
3. Create the following tag :
Tag Type
Parts_Count Counter
4. Close the Controller Tags dialog.
Publication 1734-UM011C-EN-P - January 2006
Page 60

4-18 Configure the Adapter for Direct Connection in RSLogix 5000 Sof tware
Create the Ladder Program
Next create the example ladder program to test the I/O.
1. Double -click Main Routine under the Main Program folder.
2. Enter the following ladder program using the tags previously
created.
Download the Program to the Controller
Publication 1734-UM011C-EN-P - January 2006
3. Save th e program.
Follow this procedure to download the program you just saved to the
ControlLogix controller.
Page 61

Configure the Adapter for Direct Connection in RSLogix 5000 Software 4-19
1. From the main menu, choose Communications>Who-Active.
You see the Who Active dialog.
2. Navigate to select the slot where the controller is located in the
chassis.
3. Choose Set Project Path.
4. Choose Download.
You see the Download dialog with a reminder of the following.
• The controller is in Remote Run mode.
• The mode changes to Remote Program prior to download.
Publication 1734-UM011C-EN-P - January 2006
Page 62

4-20 Configure the Adapter for Direct Connection in RSLogix 5000 Sof tware
5. From the Download dialog, choose Download to see the
RSLogix5000 software dialog.
6. Notice that the 1756-ENBT Bridge is now online.
If yellow triangles are present, see the following section.
Verify the Module Chassis Size
You have now built the I/O tree in RSLogix 5000 software, and the
RSLogix 5000 software used the chassis size from the 1734-AENT
General tab.
Now you need to download this new chassis size value into the
1734-AENT adapter hardware. This pr ocedure synchronizes the
chassis size value from the RSLogix 5000 software into the 1734-AENT
adapter hardware.
1. Verify that RSLogix 5000 is online.
2. Right-cl ick the 1734-AENT adapter under I/O Configuration in
the Project dialog.
3. Select Properties.
4. Click the Connection tab.
Publication 1734-UM011C-EN-P - January 2006
Page 63

Configure the Adapter for Direct Connection in RSLogix 5000 Software 4-21
You see the Module Fault error code.
5. Click the Chassis Size tab.
Value from
RSLogix 5000
software
Value stored
in 1734-AENT
adapter
6. Click Set Chassis Size in Module.
7. Read and acknowledge the warning dialog.
Publication 1734-UM011C-EN-P - January 2006
Page 64

4-22 Configure the Adapter for Direct Connection in RSLogix 5000 Sof tware
8. Click OK to continue.
Notice the chassis size in the module is modified to 3.
9. Click OK.
Configure the Adapter with Fixed IP Address
At this point, your POINTBus status LED should be solid green.
All the yellow triangles in your I/O configuration should be
gone.
To configure the 1734-AENT adapter with a fixed IP address to
prevent the adapter from ceasing to communicate with the
ControlLogix controller:
1. Clic k the Port Configuration tab in the 1734-AENT adapter
properties dialog.
Publication 1734-UM011C-EN-P - January 2006
Page 65

Configure the Adapter for Direct Connection in RSLogix 5000 Software 4-23
2. Click the Enable DHCP box so that there is not a checkmark in
the box.
3. Click the Set button.
4. Read and acknowledge the warning.
5. Click OK.
6. Click th e Refresh button to verify the changes.
Publication 1734-UM011C-EN-P - January 2006
Page 66

4-24 Configure the Adapter for Direct Connection in RSLogix 5000 Sof tware
Recover From an Overloaded Adapter
Each POINT I/O connection established with the 1734-AENT adapter
consumes a portion of the microprocessor’s bandwidth. The amount
of bandwidth used by a connection depends on a number of
variables, including the requested packet i nterval (RPI), the number of
POINT I/O modules involved in the connection, and the rate of
change of the I/O.
The 1734-AENT adapter continuously monitors this bandwidth and
rejects requests for new connections when there is insufficient
bandwidth available to support the new connection.
The condition where the 1734-AENT adapter cannot support the
connection due to a limit of the microprocessor’s bandwidth is shown
in the following dialog.
Publication 1734-UM011C-EN-P - January 2006
If you encounter this condition, the only action you can take is to alter
the existing connections to reduce the amount of microprocessor
bandwidth consumed. The most likely fixes for this condition in clud e
the following.
• Increase the RPI.
• Decrease the number of connections.
Page 67

Chapter
5
Configure the Adapter for Direct Connection
and Rack Optimization in RSLogix 5000
Software
What This Chapter Contains
This chapter guides you through the steps required to configure your
1734 POINT I/O Ethernet adapter for both direct connection and rack
optimization using RSLogix 5000 software.
You can mix communication formats for different I/O modules
communicating through the same adapter. I/O modules set up to use
rack optimization communicate at the rate of the RPI configured for
the 1734-AENT adapter.
I/O modules configured for direct communication communicate at
their own set RPI and ignore the 1734-AENT adapter RPI. The
modules presented in this chapter have a configuration using RSLogix
5000 software, version 15. The chapter contains the following main
sections:
What You Do See Page
Set Up the Hardware 5-2
Create the Example Application 5-3
Configure the I/O Modules 5-4
Add the Local EtherNet/IP Bridge to the I/O Configuration 5-4
Add the POINT I/O Adapter to the I/O Configuration 5-7
Add the POINT I/O Module and Configure for Direction
Connection
Add the POINT I/O Module and Configure For Rack Optimization 5-14
Download the Program to the Controller 5-17
Verify the Module Chassis Size 5-18
Access Module Data 5-21
5-11
ATTENTION
1 Publication 1734-UM011C-EN-P - January 2006
You must use series C POINT I/O modules with
the 1734-AENT adapter. Series A or B POINT I/O
modules will not work with this adapter.
Page 68

5-2 Configure the Adapter for Direct Connection and Rack Optimization in RSLogix 5000 Software
Set Up the Hardware
In this example, a ControlLogix chassis contains the Logix 5555
controller in slot 1 and a 1756-ENBT bridge module in slot 3. We
mounted the 1734-AENT adapter on a DIN rail in slot 0, with a
1734-OW2/C relay output module in slot 1, a 1734-OV4E/C sink
output module in slot 2, and a power supply (not shown).
1734-AENT
Local
Chassis
Slot 0 1 2 3
Logix5555
Controller (slot 1)
Data
1756-ENBT
10.88.70.4 (slot 3)
10.88.70.26
10.88.70.2
Slot 0 1 2 3 4
Switch
Programming
Terminal
POINT I/O
31393-M
To work along with this example, set up your system as shown in the
figure.
• Note that in the example application, the Logix5555 contr oller
and 1756-ENBT module (firmware revision 2.3 or later) we
assume are in the slots shown in the figure.
• Verify the IP addresses for your programming terminal,
1756-ENBT module, and 1734-AENT adapter.
• Verify the position (slot) of the I/O modules on the DIN rail.
• Verify that you properly connected all wiring and cabling.
• Be sure you configured your communication d river (such as
AB_ETH-1 or AB-ETHIP-1) in RSLinx software as described in
the Configure the RSLinx Ethernet Communication Driver
appendix of this manual.
Publication 1734-UM011C-EN-P - January 2006
Page 69

Configure the Adapter for Direct Connection and Rack Optimization in RSLogix 5000 Software 5-3
Create the Example Application
Perform the following steps to create the example application:
1. Start RSLogix 5000 Enterprise Series software.
You see the RSLogix 5000 main dialog.
2. F rom the File menu, select New.
The New Controller dialog opens
3. Enter an approp riate Name for the Controller, for example,
POINT_IO_Controller.
4. Select the following.
• Revision
• Chassis Type
• Slot number
• Description (optional)
Publication 1734-UM011C-EN-P - January 2006
Page 70

5-4 Configure the Adapter for Direct Connection and Rack Optimization in RSLogix 5000 Software
5. Complete the Create In entry by selecting the folder where you
want to save the RSLogix 5000 file.
6. To use redundancy in your system, check the Redundancy
Enabled checkbox so that a checkmark appears.
RSLogix 5000 software, version 11 and later, includes enable
redundancy. This example does not use redundancy.
7. Click OK .
Configure the I/O Modules
You now add the POINT I/O modules to the controller I/O
configuration. To do this, first add the local 1756-ENBT module to the
I/O configuration. Next add the 1734-AENT adapter as a child of the
1756-ENBT module. Then add the I/O modules as children of the
1734-AENT adapter.
IMPORTANT
Click the Help buttons on the configuration dialog
shown in this section if you need assistance in
selecting and setting the parameters.
Add the Local EtherNet/IP Bridge to the I/O Configuration
1. Select the I/O Configuration folder in the project dialog, and
click the right mouse button.
Publication 1734-UM011C-EN-P - January 2006
A dialog opens.
Page 71

Configure the Adapter for Direct Connection and Rack Optimization in RSLogix 5000 Software 5-5
2. Click New Module.
The Select Module dialog opens.
3. Click + ne xt to Communications to expand, as in the following
dialog.
4. Select the 1756-ENBT EtherNet/IP Bridge, and click OK.
Publication 1734-UM011C-EN-P - January 2006
Page 72

5-6 Configure the Adapter for Direct Connection and Rack Optimization in RSLogix 5000 Software
The Select Major Revision dialog opens.
5. Select the value for Major Revision, and click OK.
The Module Properties dialog opens.
6. Enter value for Name, IP Address, Slot, Electronic Keying, and
Revision, noting we used the following values:
Name Local_ENB
IP Address 10.88.70.4
Slot 3
Electronic Keying Compatible Module
Revision 1.1
Publication 1734-UM011C-EN-P - January 2006
7. Click Finish to acce pt th e configuration.
Page 73

Configure the Adapter for Direct Connection and Rack Optimization in RSLogix 5000 Software 5-7
Add the POINT I/O Adapter to the I/O Configuration
Next, you must add the 1734-AENT adapter as a child of the local
1756-ENBT module.
1. In the Project dialog, right-click the local 1756-ENBT module
under the I/O Configuration folder , and select New Module from
the dialog.
The Select Module dialog opens.
Publication 1734-UM011C-EN-P - January 2006
Page 74

5-8 Configure the Adapter for Direct Connection and Rack Optimization in RSLogix 5000 Software
2. Click + next to Communications to expand.
3. Select the 1734-AENT/A Ethernet adapter from the list, and click
OK.
The New Module dialog opens.
Publication 1734-UM011C-EN-P - January 2006
Page 75

Configure the Adapter for Direct Connection and Rack Optimization in RSLogix 5000 Software 5-9
4. Enter values for Name, IP Address, Comm Format, Chassis Size,
Electronic Keying, and Revision, noting we used the following
values.
Name POINT_IO_Adapter
IP Address 10.88.70.2
Comm Format Rack Optimization
Chassis Size 4
Electronic Keying Compatible Keying
Revision 1.1
The Slot field appears grey because the slot is automatically
0 for the 1734-AENT adapter.
IMPORTANT
The chassis size equals 1 for the adapter plus the
number of POINT I/O modules installed (physically
present on the POINT I/O backplane).
Comm Format choices include:
• None = the adapter makes a direct connection to each of the
modules referenced by the data.
• Rack optimization = digital I/O data is collected into a rack
image. This does not include analog or specialty I/O modules.
• Listen only - rack optimization = read or verify data only, but
does not control the modules (when you have multiple
controllers - one controller is used to control and th e other
controllers are used to monitor).
5. Choose Rack Optimization as Comm Format, because we are
making a mixed connection that includes both a direct
connection and rack-optimized connection.
6. Click OK.
Publication 1734-UM011C-EN-P - January 2006
Page 76

5-10 Configure the Adapter for Direct Connection and Rack Optimization in RSLogix 5000 Software
The Module Properties dialog opens.
7. Verify that the requested packet interval (RPI) is appropriate for
your system.
You use this value for the rack-optimized connection to the I/O
modules.
IMPORTANT
To avoid overloading the 1734-AENT adapter, we
recommend that you set RPI no less than 10 ms for
rack connections and 50 ms for direct connections.
8. Click OK.
The 1734-AENT adapter appears in the Ethernet folder.
Publication 1734-UM011C-EN-P - January 2006
Page 77

Configure the Adapter for Direct Connection an d Rack Optimization in RSLogix 5000 Software 5-11
Add the POINT I/O Module and Configure for Direction
Connection
1. Highlight the 1734-AENT adapter under the I/O Configuration
folder, and select New Module.
The Select Module dialog opens.
2. Click + ne xt to Digital to expand.
3. Select the 1734-OW2 relay output module from the list, and click
OK.
Publication 1734-UM011C-EN-P - January 2006
Page 78

5-12 Configure the Adapter for Direct Connection and Rack Optimization in RSLogix 5000 Software
The New Module dialog opens.
Publication 1734-UM011C-EN-P - January 2006
4. Enter values for Name and Slot,noting we used the following
values.
Name POINT_Relay_Output
Slot 1
5. Choose Connection.
The RPI is selectable, since it is a direct connection.
Page 79

Configure the Adapter for Direct Connection an d Rack Optimization in RSLogix 5000 Software 5-13
6. Verify that the reques ted packet interval (RPI) is appropriate for
your system (10 ms for this example). You use this value for the
rack-optimized connection to the I/O modules.
IMPORTANT
To avoid overloading the 1734-AENT adapter, we
recommend that the RPI be no less than 10 ms for
rack connections and 50 ms for direct connections.
7. Click OK to accept the configuration.
The 1734-AENT adapter appears indented under the local
1734-ENBT in the I/O Configuration folder.
Publication 1734-UM011C-EN-P - January 2006
Page 80

5-14 Configure the Adapter for Direct Connection and Rack Optimization in RSLogix 5000 Software
Add the POINT I/O Module and Configure For Rack Optimization
1. Right-click the 1734-AENT adapter under the I/O Configuration
folder , and select New Module.
IMPORTANT
If you exceed the 1734-AENT chassis size, trying to
add more modules than you configured, the New
Module selection appears dim and is disabled.
Increase the 1734-AENT chassis size to add more
POINT I/O modules.
The Select Module dialog opens.
.
Publication 1734-UM011C-EN-P - January 2006
Page 81

Configure the Adapter for Direct Connection an d Rack Optimization in RSLogix 5000 Software 5-15
2. Click the + next to Digital to expand.
3. Cho ose the 1734-OV4E/C module, and click OK.
The New Module dialog opens.
4. From the New Module dialog, complete the following.
• Enter a value for Name.
• Enter a value for Slot.
• Click Change.
Publication 1734-UM011C-EN-P - January 2006
Page 82

5-16 Configure the Adapter for Direct Connection and Rack Optimization in RSLogix 5000 Software
You see the Module Definition screen.
5. From the Module Definition dialog, for Connection, select Rack
Optimization.
6. From the Module Definition dialog, click OK.
You see the New Module dialog.
7. From the New Module dialog, click Connection.
You see this New Module dialog.
Publication 1734-UM011C-EN-P - January 2006
8. From the New Module dialog, enter 50 for the requested packet
interval (RPI).
Page 83

Configure the Adapter for Direct Connection an d Rack Optimization in RSLogix 5000 Software 5-17
9. Keep th e following unchecked.
• Inhibit Module
• Major Fault on Controller If Connection fails While in Run Mode
10. Click OK.
11. Choose File>Save and enter the name and location of the
RSLogix 5000 file.
Download the Program to the Controller
Follow this procedure to download the program we just saved to the
ControlLogix controller.
1. From the main menu, choose Communications>Who-Active.
2. From the Who Active dialog, navigate to select the slot where
the controller is located in the chassis.
3. Choose Set Project Path.
4. Choose Download.
Publication 1734-UM011C-EN-P - January 2006
Page 84

5-18 Configure the Adapter for Direct Connection and Rack Optimization in RSLogix 5000 Software
You see the Download dialog.
5. From the Download dialog, click Download.
You see this RSLogix 5000 dialog.
Verify the Module Chassis Size
6. Notice that the 1756-ENBT Bridge is now online.
7. If yellow tr ian gles are present, see the following section.
You have now built the I/O tr ee in RSLogix 5000, and the RSLogix
5000 software used the chassis size from the 1734-AENT General tab .
Now you need to download this new chassis size value into the
1734-AENT adapter hardware. This pr ocedure synchronizes the
chassis size value from the RSLogix 5000 software into the 1734-AENT
hardware. You must be online to perform this procedure.
1. Verify that RSLogix 5000 software is online.
Publication 1734-UM011C-EN-P - January 2006
2. Right-cl ick the 1734-AENT adapter under I/O Configuration in
the Project dialog.
3. Select Properties.
4. Click the Connection tab.
Page 85

Configure the Adapter for Direct Connection an d Rack Optimization in RSLogix 5000 Software 5-19
You see the Module Fault error code.
5. Click the Chassis Size tab.
6. Click Set Chassis Size in Modu le.
Value from
RSLogix 5000
software
Value stored
in 1734-AENT
adapter
7. Read and acknowledge the warning dialog.
Publication 1734-UM011C-EN-P - January 2006
Page 86

5-20 Configure the Adapter for Direct Connection and Rack Optimization in RSLogix 5000 Software
8. Click OK to continue.
9. Notice the chassis size in the module is modified to 3.
10. Click OK.
At this point, your POINTBus status LED should be solid green.
All the yellow triangles in your I/O configuration should be
gone.
11. Click OK to close the dialog.
12. Click File>Save to save the project.
Publication 1734-UM011C-EN-P - January 2006
Page 87

Configure the Adapter for Direct Connection an d Rack Optimization in RSLogix 5000 Software 5-21
Access Module Data
Use the following information to use the 1734 POINT I/O Ethernet
adapter data in the ladder logic program.
• POINT_IO_Adapter = the name you gave to your Eth ernet
adapter
• # = slot number of POINT I/O module
• C = configuration, I = input, O = output
This value indicates that slot 2 is
the only module participating in
the rack-optimized connection
with no errors.
Publication 1734-UM011C-EN-P - January 2006
Page 88

5-22 Configure the Adapter for Direct Connection and Rack Optimization in RSLogix 5000 Software
Use the controller tags in your ladder program to re ad in put data or
write output data.
• For RSLogix 5000 programming instructions, refer to RSLogix
5000 Getting Results, publication 9399-RLD300GR.
• For ControlLogix controller information, refer to ControlLogix
System User Manual, publication 1756-UM001.
• Slot Status Bits: The Slot Status bits display the connection status
for each of the POINT I/O modules that use a rack-optimized
connection.
– Bit 0 is reserved for the adapter and always reports a value of
1.
– Each of the other bits (1 to 63) correspond to a POINT I/O
module that you install in the POINT I/O backplane.
– In this example, we configured the 1734-AENT adapter for
both rack-optimized and direct connections.
The slot status bits indicate that we installed the module in
slot 2 with it operating correctly:
• 0=module participating with no errors and
• 1=module not participating or connection error (typically,
module removed/missing)
Publication 1734-UM011C-EN-P - January 2006
Page 89

LED Status Indicators
Chapter
6
What This Chapter Contains
Read this chapter for information about LED status indicators.
Interpret the Status Indicators
ATTENTION
Module Status
Network Activity
Network Status
POINTBus Status
System Power
Field Power
43248aent
You must use series C POINT I/O modules with
the 1734-AENT adapter. Series A or B POINT I/O
modules will not work with this adapter.
Indication Probable Cause Recommended Action
Module Status
Off No power applied to device Apply power to the device.
Flashing
Red/Green
Solid Green Device is operating normally. None
Flashing Red Recoverable fault has occurred:
Solid Red Unrecoverable fault has occurred:
1 Publication 1734-UM011C-EN-P - January 2006
LED cycle power test (module self-test) present. None
Firmware (NVS) update present.
Address switches changed.
Self-test failure present (checksum failure, or
ramtest failure at cycle power).
Firmware fatal error present.
Complete firmware update.
Verify address switches.
Replace adapter.
Page 90

6-2 LED Status Indicators
Indication Probable Cause Recommended Action
Network Activity
Off No link established. Verify network cabling, and correct, as needed.
Flashing
Transmit or receive activity present. None
Green/Off
Steady Green Link established. None
Network Status
Off Device not initialized. The module does not have an
IP address.
Flashing Green No CIP connections present. Device has an IP
Apply power to device, verify IP address, and correct, as
needed.
None
address, but no CIP connections are established.
Solid Green CIP connections present. Device online and has an
None
IP address, and CIP connections are established.
Flashing Red One or more CIP connections has timed-out. Check for I/O module failure and controller operation, and
correct, as needed.
Solid Red Duplicate IP address detected. Verify IP address setting and correct, as needed.
Flashing
Red/Green
The module is performing a self-test (only occurs
during cycle power test).
None
POINTBus Status
Off Device not powered - check module status
Apply power to device.
indicator.
Flashing
LED cycle power test present. None
Red/Green
Flashing Red Recoverable fault occurred:
• At cycle power the number of expected
• Configure chassis size.
modules does not equal the number of
modules present
• A module is missing
• Node fault (I/O connection timeout)
• Check for missing module and reinstall as needed.
• Check for I/O module failure and correct as needed.
occurred.
Solid Red Unrecoverable fault occurred - the adapter is bus
off.
1. Cycle power to device.
2. If condition persists, replace device.
Flashing Green Firmw a re (NVS) update in progress. None
Solid Green Adapter online with connections established
None
(normal operation, Run mode).
System Power
Off Not active; field power is off or dc-dc converter
problem present.
1. Verify power is on, and apply power if needed.
2. Verify backplane power not exceeded, and correct.
3. Replace 1734-AENT module.
Green System power is on; dc-dc converter is active (5V). None
Field Power
Off Not active; field power is off. Apply field power.
Green Power is on; 24V is present. None
Publication 1734-UM011C-EN-P - January 2006
Page 91

Adapter Web Pages
Appendix
A
What This Appendix Contains
Work with the Home Page
Read this appendix for information about the adapter Web page
diagnostics that offer extensive internal and network diagnostics.
For Information About How to See Page
Work with the Home Page A-1
Work with the Diagnostics Pages A-3
Work with the Configuration Pages A-10
Work with the Browse Chassis Page A-15
Use the adapter diagnostics Home page to access other adapter
diagnostics Web pages and see the following information.
• Host Name
• Module Description
• Module Location
• IP Address
• Ethernet Address (MAC)
• DHCP Enabled
• Product Revision
• Serial Number
• Status
• Auto Negotiate
• Media Speed
• Half or Full Duplex
To display and work w ith the adapter diagnostics Home page, follow
these procedures.
IMPORTANT
1 Publication 1734-UM011C-EN-P - January 2006
Make sure that your PC Internet LAN setting and your
TCP/IP settings are configured to access the subnet on
which your adapter communicates.
Page 92

A-2 Adapter Web Pages
Enter the adapter IP
address to see the
Home page.
ATTENTION
You must use Series C POINT I/O modules with
the 1734-AENT adapter. Series A or B POINT I/O
modules will not work with this adapter.
1. From a browser such as Netscape or Microsoft Internet Explorer,
enter the adapter IP address to see the Home page.
Click Expand to
expand options.
2. From the Home page, click Expand to expand options, as in the
figure, or Minimize to see Diagnostics, Configuration, and
Browse Chassis options without the expansion.
Publication 1734-UM011C-EN-P - January 2006
Page 93

Adapter Web Pages A-3
3. From the Home page, complete one of these, as desired.
• Click one of these to go to http://www.ab.com/.
– Allen-Bradley logo at the top of the page
– Visit AB.com for additional information statement under
Resources
• Click Rockwell Automation at the top right to go to
http://www.rockwellautomation.com/.
• Click these to see additional diagnostics Web pages.
– Diagnostics - Diagnostic overview, Network Settings,
Ethernet Statistics, I/O Connections, Diagnostic messaging
– Configuration - Identity, Network, Services
– Browse chassis
Work with the Diagnostics Pages
Click tabs to see the
corresponding page.
To work with the Diagnostics options, follow these procedures.
1. F rom the Home page, click Diagnostics or Expand to see the
following diagnostics options from the panel at the left.
• Diagnostic overview
• Network settings
• Ethernet statistics
• I/O connections
• Diagnostic messaging
2. From from the top of the page, as shown in the figure, if
desired, type a refresh rate, noting that the default is 15 seconds.
3. From the panel at the left or tabs at the top of the page, as
shown in the figure, click one of the diagnostics options to see
the corresponding page.
Click from this panel
to see the
corresponding page.
Type a
refresh
rate.
Publication 1734-UM011C-EN-P - January 2006
Page 94

A-4 Adapter Web Pages
Use the Diagnostic Overview Page
To use the Diagnostic Overview page to view general diagnostics
information, follow this procedure.
1. From the Web page, click Diagnostic Overview from the tab at
the top of the page or panel on the left.
You see the Diagnostic Overview page.
Publication 1734-UM011C-EN-P - January 2006
2. From the Diagnostic Overview page, view the following.
• Ethernet Link Status
– Media Speed
– Half or Full Duplex
– Autonegotiate Status
• System Resource Utilitization
– CPU Utilization
– Module Uptime
• CIP Connection Statics
– Current CIP MSG Con nections
– CIP MSG Connection Limit
– Max Msg Connections Observed
– Current CIP I/O Connections
– CIP I/O Connection Limit
– Max I/O Connections Observed
– Conn Opens
Page 95

Adapter Web Pages A-5
– Open Errors
– Conn Closes
– Close Errors
– Conn Timeout
– Status
• Module Settings
– Chassis Size
– Switches
Use the Network Settings Page
To use the Network Settings page to view network related
information, follow this procedure.
1. From the Web page, clic k Netw ork Settings from the tab at the
top of the page or panel on the left.
You see the Network Settings page.
Publication 1734-UM011C-EN-P - January 2006
Page 96

A-6 Adapter Web Pages
2. From the Network Settings page, view the following.
• Network Interface
– Ethernet Address (MAC)
– IP Address
– Subnet Mask
– Default Gateway
– Primary Name Server
– Secondary Name Server
– Default Domain Name
– Host Name
– Name Resolution
• Ethernet Interface Configuration
– How the Network Configuration was obtained -
Static or Dynamic
• Ethernet Link
– Media Speed
– Half or Full Duplex
– Autonegotiate Status
Use the Ethernet Statistics Page
To use the Ethernet Statistics page to view information about the
Ethernet link and interface and media counters, use this procedure.
1. From the Web page, click Ethernet Statistics from the tab at the
top of the page or panel on the left.
Publication 1734-UM011C-EN-P - January 2006
Page 97

You see the Ethernet Statistics page.
Adapter Web Pages A-7
2. From the Ethernet Statistics page, view the following.
• Ethernet Link
– Media Speed, Half or Full Duplex, Autonegotiate Status
• Interface Counters
– In Octets, In UCast Packets, In NUcast Packets,
In Discards, In Errors, In Unknown Protos,
Out Octets, Out Ucast Packets, Out NUcast Packets,
Out Discards, Out Errors
• Media Counters
– Alignment Errors
– FCS Errors
– Single Collisions
– Multiple Collisions
– SQE Test Errors
– Deferred Transmissions
– Late Collisions
– Excessive Collisions
– MAC Transmit Errors
– Carrier Sense Errors
– Frame Too Long
– Mac Receive Errors
Publication 1734-UM011C-EN-P - January 2006
Page 98

A-8 Adapter Web Pages
Use the I/O Connections Page
To use the I/O Connections page to view CIP I/O (Class 1)
connection information, follow this procedure.
1. From the Web page, click I/O Connections from the tab at the
top of the page or panel on the left.
You see th e I/O Connections page.
The top value
in this column
representing
Lost shows
the number of
packets from
the source
missing.
The value for
Slot shows the
slot number of
the I/O module
this connection
is controlling.
2. From the I/O Connections page, view the following.
• Connection Number
• Uptime
• Receive and Transmit (Rcv/Xmt)
• Connection ID
• Source IP Address with an indication of the following
– (O) for originator
– (T) for target
• Destination IP Address
• Multicast Address
• Requested Packet Interval (RPI)
• Lost/Slot that shows the number of lost packets and the slot
number for the connection, with a slot value of 0 i ndicating that
this is a rack-optimized connection
• Size of data in bytes
Publication 1734-UM011C-EN-P - January 2006
Page 99

Adapter Web Pages A-9
Use the Diagnostic Messaging Page
To use the Diagnostic Messaging page to execute explicit,
unconnected message services, use this procedure.
1. From the Web page , click Diagnostic Messaging from the tab at
the top of the page or panel on the left.
You see the Diagnostic Messaging page.
2. From the Diagnostic Messaging page, enter the following.
• Service - choose either Get Attribute Single or Get Attributes All
• I/O Module Slot Position (0 to 63 decimal)
• Class (decimal)
• Instance (decimal)
• Attribute (decimal)
• Timeout
Publication 1734-UM011C-EN-P - January 2006
Page 100

A-10 Adapter Web Pages
3. From the Diagnostic Messaging page, click Submit to see values
similar to that in the figure.
Work with the Configuration Pages
To work with the Configuration pages, follow these procedures,
noting that values on these pages are stored in and retrieved from
non-volatile memory.
IMPORTANT
IMPORTANT
The values on these pages are in non-volatile memory.
Changes to these parameters do not take effect until
you reset or cycle power th the 1734-AENT adapter.
If you set the thumbwheels on the 1734-AENT adapter
to the value 888 and then power cycle the module, the
following occurs:
• The DHCP Enabled function is enabled (set to
True).
• The Ethernet link is negotiated automatically. The
Auto Negotiate function is set to True.
• The Web server is enabled. The Disabled Web
Server function is disabled.
• The password for this page resets to the factory
default. The word password is the factory default
password.
Note the value of the switches before you enter the 888
value because you return the adapter to those values
once this process is complete.
Publication 1734-UM011C-EN-P - January 2006
 Loading...