

Page 1
WARNING
Installations may be performed at different times of construction by different individuals.
For this reason, this manual should be left on-site with the facility or maintenance manager.
Read this entire installation manual to ensure proper installation, then file these
instructions with the owner or maintenance department.
Flush all the water supply lines before making connections, then make sure the water
supply is turned off before beginning installation.
Do not use pipe dope on faucet and supply connections. Possible solenoid contamination
could occur and will void any warranty. Teflon tape is the recommended sealant.
The installation site should have access to an electrical box with 120 volt AC, 60 Hz cycle
for input to a transformer. When installing the transformer, the electrical box should be
located within six feet of the sink.
The DC faucet is powered by one factory-installed 6-volt lithium battery.
Pressurized plumbing fixtures must be installed in accordance with manufacturer’s
recommendations. The supply piping to these devices must be securely anchored to the
building structure to prevent the installed device from unnecessary movement when
operated by the user. Use extreme caution when installing the device to prevent damage to
the exposed significant surface.
Compliance and conformity to local codes and ordinances is the responsibility of the
installer.
Product warranties may be found under “Product Information” on our web site at
www.bradleycorp.com.
Aerada 1100 Series
High Arc Faucet
Installation
Instructions
215-1558 Rev. A; EN 07-202
© 2007 Bradley Corporation
Page 1 of 8 3/8/07
P.O. Box 309, Menomonee Falls, WI 53052-0309
Phone: 1-800-BRADLEY FAX: (262) 251-5817
http://www.bradleycorp.com
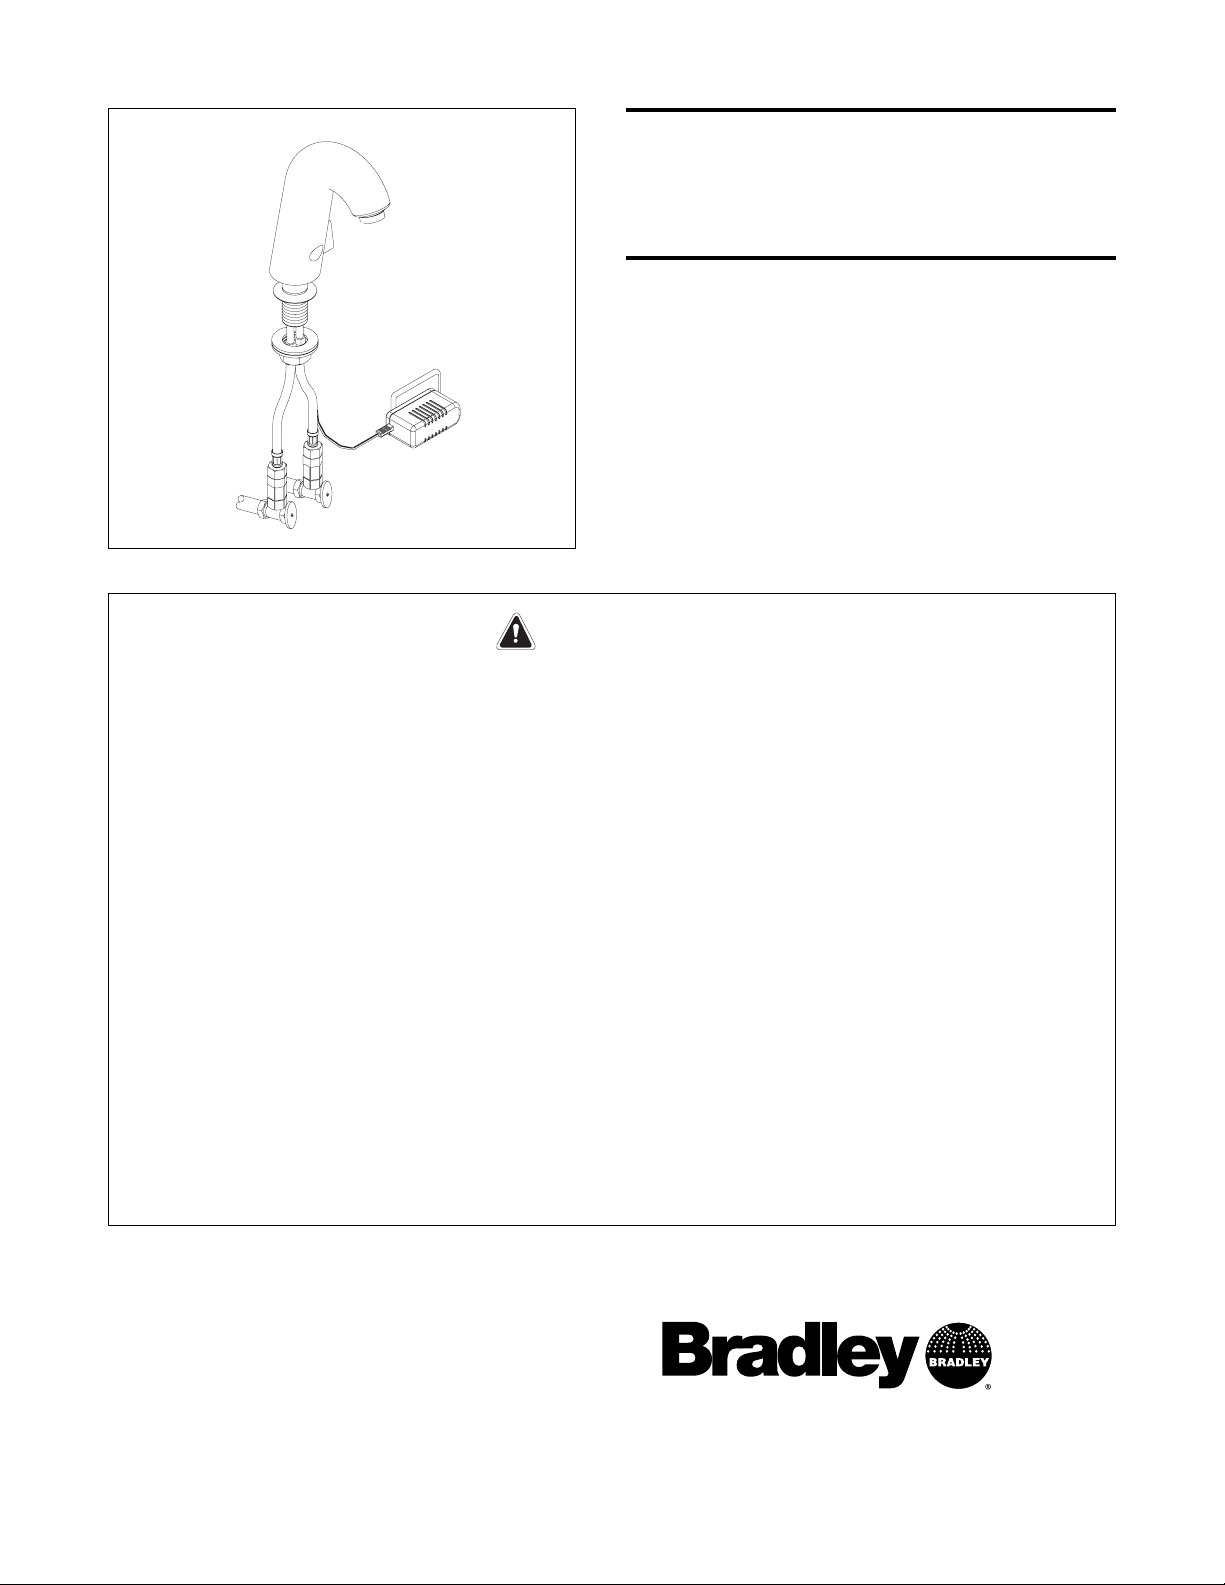
S53-304 DC High Arc Infrared Faucet
S53-305 AC High Arc Infrared Faucet
232-006 115-volt AC Plug-In Adapter
232-005 Multi-use AC Adapter (maximum
8 faucets)
232-007 4" chrome-plated Trimplate
Page 2
Aerada 1100 Series High Arc Faucet Installation Instructions
2 3/8/07 Bradley Corporation • 215-1558 Rev. A; EN 07-202
Table of Contents
Faucet Dimensions . . . . . . . . . . . . . . . . . . . . . . . . . . . . . . . . . . . . . . . . . .2
Supplies Required for Installation . . . . . . . . . . . . . . . . . . . . . . . . . . . . . .2
Faucet Components . . . . . . . . . . . . . . . . . . . . . . . . . . . . . . . . . . . . . . . . .3
Installation Information . . . . . . . . . . . . . . . . . . . . . . . . . . . . . . . . . . . . . .4
Cleaning and Maintenance . . . . . . . . . . . . . . . . . . . . . . . . . . . . . . . . . . .5
Changing the Battery . . . . . . . . . . . . . . . . . . . . . . . . . . . . . . . . . . . . . . . .6
Changing the Sensor Detection . . . . . . . . . . . . . . . . . . . . . . . . . . . . . . . .6
Faucet Troubleshooting . . . . . . . . . . . . . . . . . . . . . . . . . . . . . . . . . . . . . .7
Transformer Connection Detail . . . . . . . . . . . . . . . . . . . . . . . . . . . . . . . .8
Supplies Required for Installation:
• Teflon Tape
• 1/2" NPT water inlet supply
• Pipe fittings
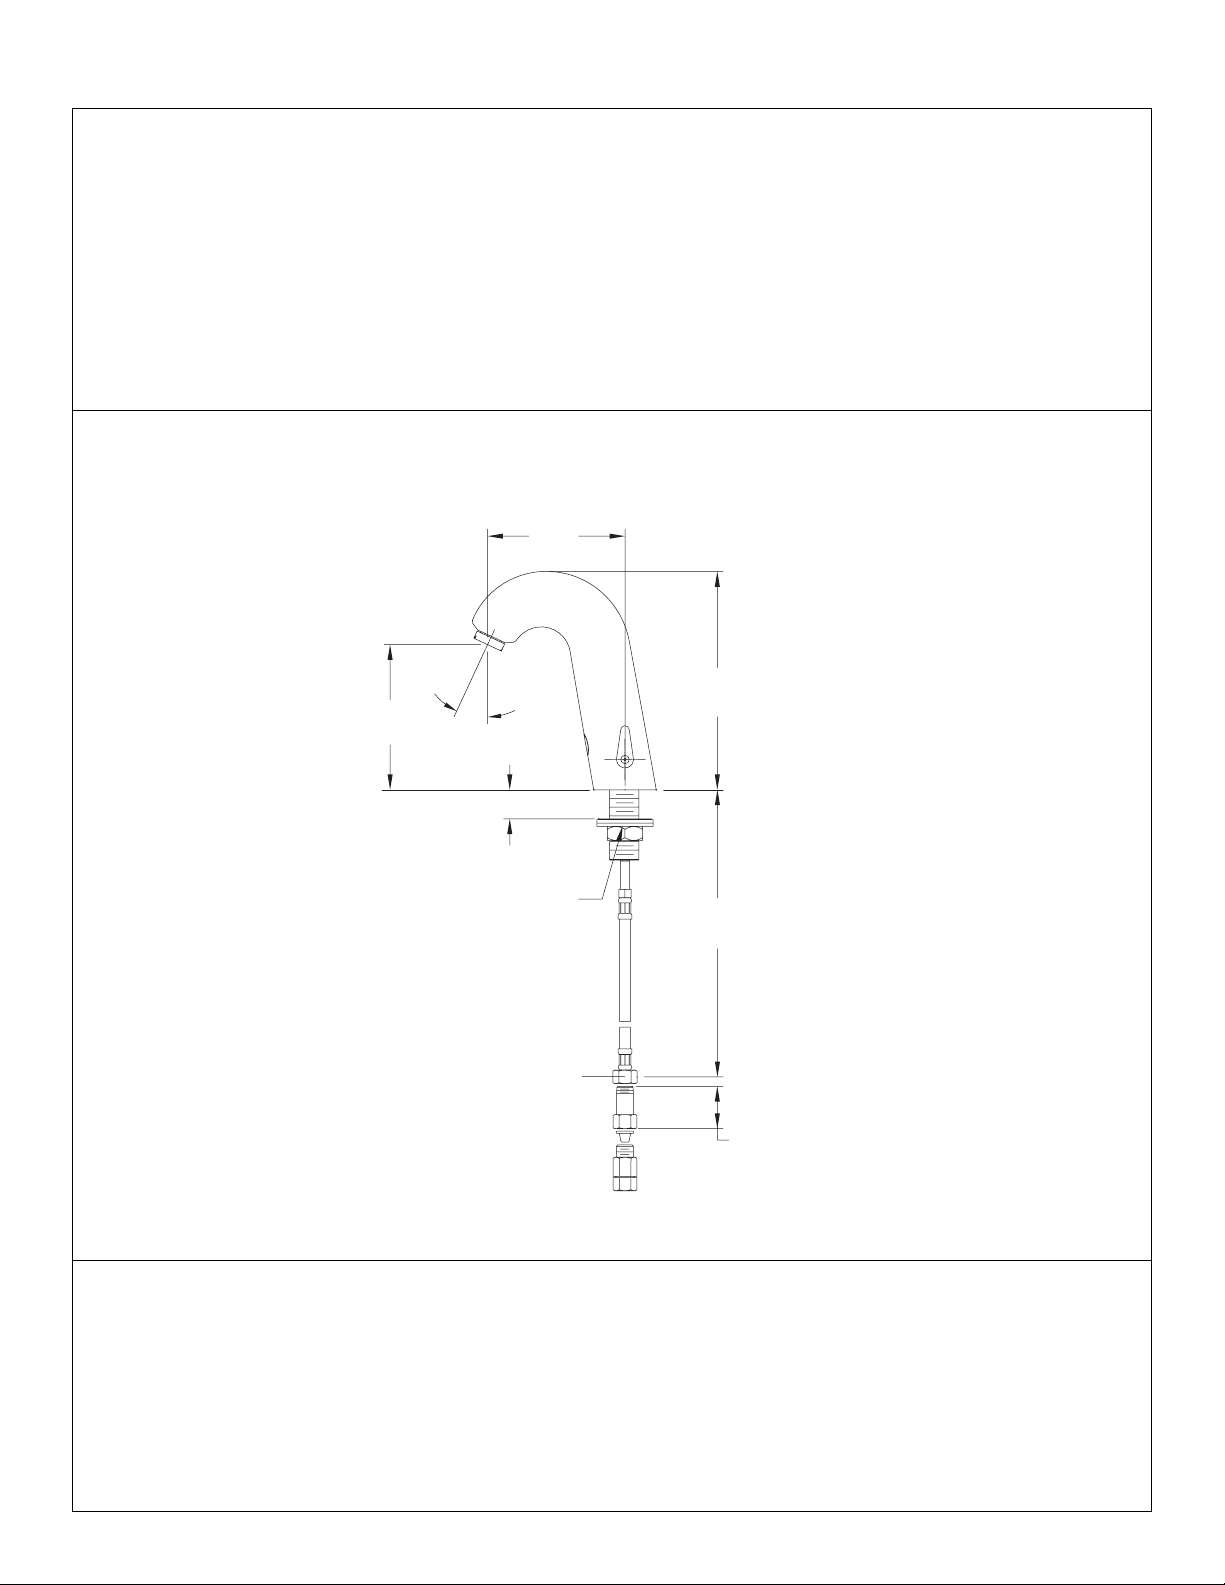
Faucet Dimensions
4.8"
(122mm)
5.3"
(135mm)
25˚
0.2"-1.2"
SW 1.5" (38mm)
SW 0.75" (19mm)
G 3/8" (10mm)
7.6"
(193mm)
14"
(356mm)
0.9"
(23mm)
Page 3
3
Installation Instructions Aerada 1100 Series High Arc Faucet
Bradley Corporation • 215-1558 Rev. A; EN 07-202 3/8/07
Components for Aerada 1100 Series Faucet
Model S53-305 shown, model S53-304 is similar
Carefully separate all parts from packaging and check each part with the illustrations below. Make sure
all parts are accounted for before discarding any packaging material. If any parts are missing, do not
attempt to install your Bradley Faucet until you obtain the missing parts.
VANDAL-RESISTANT
FIXING SCREW
WITH WIRE
SOLENOID VALVE
(269-1806)
AERATOR
(S05-176)
O-RING
SETSCREW
EXTERNAL
TEMPERATURE
CONTROL KNOB
AC ADAPTER
MODULE
(AC model
only)
ELECTRONIC MODULE
(269-1807)
115V AC PLUG-IN
ADAPTER
(232-006)
BRAIDED
SUPPLY
HOSE
BACKFLOW
PREVENTER
AND FILTER
BRAIDED
SUPPLY
HOSE
SCREEN FILTER
ADAPTER FOR
ANGLE STOP VALVE
Page 4

Aerada 1100 Series High Arc Faucet Installation Instructions
4 3/8/07 Bradley Corporation • 215-1558 Rev. A; EN 07-202
Installation Instructions
1. Turn off water supply to the existing faucet and
remove the faucet.
2. Mount the spout and rubber washer to top of base
as shown in the illustration. Install the second
rubber washer, steel washer and spout nut
underneath the base. Securely tighten the spout
nut.
3. Tighten the spout nut securely to prevent the spout
from rotating. If necessary, support the spout from
above to prevent twisting. Do not overtighten.
IMPORTANT: Do not use a wrench on
spout or inlet tubes.
4. AC Only: Plug the power supply into the
appropriate 110/115V wall outlet. Connect the
power supply female plug into the faucet male
plug.
NOTE: Power supply is equipped with an 11.8"
(30cm) cord. For multiple faucet installation, an
additional extension cord is provided. Refer to the
wiring diagram packaged with the faucet.
5. Connect the hot and cold water lines to the supply
pipes. Use Teflon tape on the threads to ensure a
leak-free joint. Tighten connections securely.
6. Turn the water supply on.
7. Remove the protective covering from the sensor.
8. Place a hand in front of the sensor for 15 seconds
to activate for the first time.
AC High Arc Faucet shown; DC model is similar.
SPOUT
RUBBER
WASHER
RUBBER WASHER,
STEEL WASHER,
SPOUT NUT
HOT AND COLD
WATER SUPPLY
Page 5

5
Installation Instructions Aerada 1100 Series High Arc Faucet
Bradley Corporation • 215-1558 Rev. A; EN 07-202 3/8/07
Cleaning the Aerator
Cleaning the Inline Filter
Cleaning and Maintenance
1. Shut off the hot and cold water supply.
2. Disconnect the hot and cold water lines from the
supply lines.
3. Remove the filters from the connections and clean
them thoroughly of any debris.
4. Reinstall filters and connect the hot and cold water
lines to the supply pipes. Use Teflon tape on the
threads to ensure a leak-free joint. Tighten
connections securely.
5. Turn water supply on.
1. Shut off the hot and cold water supply.
2. Remove the aerator with the spanner wrench and
thoroughly clean out any debris.
3. Reinstall the aerator using the spanner wrench
supplied with the faucet.
4. Turn the water supply on.
It is not necessary to shut off water supply to
clean the sink.
To shut off water flow, cover the infrared window
with your hand (as shown) for 5 seconds.
Remove your hand. Water flow will be halted for
90 seconds.
FILTER
AERATOR
Page 6

Aerada 1100 Series High Arc Faucet Installation Instructions
6 3/8/07 Bradley Corporation • 215-1558 Rev. A; EN 07-202
Changing the Sensor Detection Range
Changing the Battery
NOTE: The detection distance setting can be used to change
the detection distance.
1. Cover the infrared window as shown below. Water will
switch off after 5 seconds. Keep the window covered and
the water will come back on after another 5 seconds.
Uncover the window. The detection distance function is now
active.
NOTE: When the battery is low, the sensor will display a
continuous signal until the battery is completely dead.
1. Remove the fixing screw with wire from the back of the
spout and the setscrew from the side of the spout. Remove
the external temperature control knob and the spout.
2. Remove the old battery and replace with a new 6volt lithium battery.
3. Reinstall the spout, fixing screw with wire,
temperature control knob and setscrew.
2. Hold your hand in the current detection area (under
the water flow) until the LED flashes.
3. Move your hand to the desired detection range.
When the LED stays lit for 2 seconds, detection
range is set.
Page 7

7
Installation Instructions Aerada 1100 Series High Arc Faucet
Bradley Corporation • 215-1558 Rev. A; EN 07-202 3/8/07
Open supply valves.
Wait for cleaning mode to end.
- Clean inlet line filter
- Eliminate braided supply hose kink.
- Eliminate problem at BFP.
- Check water pressure.
Clean aerator, replace if necessary.
Check sensor detection distance adjustment.
(see Changing the Sensor Detection Range, page 6)
- Replace fixing screw with wire.
- Replace fixing screw with wire.
- Contact local Bradley representative
Replace solenoid valve.
- Replace battery.
- Clean contacts.
- Clean window, replace if necessary.
- Check external water supply.
- Replace solenoid valve.
.
Change sensor detection distance
Clean LED.
Install appropriate line pressure regulators.
- Tighten gently to prevent damage.
- Check for rubber washers, tighten securely.
- Ensure that solenoid O-rings are not damaged.
Carefully reinstall solenoid and tighten. Do not
overtighten.
Clean or replace solenoid valve.
Open supply valves fully.
- Clean inlet line filter
- Eliminate braided supply hose kink.
- Eliminate problem at BFP.
- Check water pressure.
Inspect boiler.
Correct the connections.
Supply valves are closed.
Faucet is in cleaning mode (approx. 90 secs).
Water inlet lines are interrupted or are
not in order.
- Inlet water line filter is dirty or blocked.
- Braided supply hose is kinked.
- Backflow preventer (BFP) is blocked.
- No external water pressure.
Aerator is blocked or dirty.
Sensor distance (detection) is not
adjusted properly.
Solenoid valve does not open.
- Fixing screw with wire is missing.
- Wire on fixing screw too short or broken off
- Electronics inoperable.
Solenoid valve does not open (is inoperable).
No electric power from battery to electronics.
- Battery is drained.
- Battery contacts are corroded.
- Connecting cable is kinked or broken.
Infrared does not detect any object.
- IR window is not transparent (scratched or
water condensation)
- Interfering reflections from the room
Solenoid valve does not close or closes late.
- External water pressure is high.
- Solenoid valve is inoperable.
Sensor detection is not adjusted properly.
LED is dirty or has water condensation.
Input line pressure fluctuates.
Faucet is not leak tight.
- Connections between housing and
braided supply hose.
- Braided supply hose to inlet supply.
- Connection between valve block and
solenoid valve.
Faucet drips, solenoid valve does not close.
Not enough hot or cold water. Supply valves
are closed or not open fully.
Individual inlet lines (hot and cold) are
blocked or kinked.
- Inlet water line filter is dirty or blocked.
- Braided supply hose is kinked.
- Backflow preventer (BFP) is blocked.
- No external water pressure.
Temperature of hot water is too low.
Braided supply hoses are connected
improperly (hot water braided supply hose on
cold water connection or vice versa).
No water flow.
Water runs continuously.
Faucet turns on by itself.
Faucet is leaking water.
Temperature cannot be
adjusted.
Troubleshooting
Problem Possible Cause Possible Solution
Page 8

Transformer Connection Detail (232-005)
Aerada 1100 Series High Arc Faucet Installation Instructions
8 3/8/07 Bradley Corporation • 215-1558 Rev. A; EN 07-202
NOTE: For bank installation only.
 Loading...