

Page 1

B&R Linux 9
User's manual
Version: 2.03 (November 2020)
Order no.: B&R Linux 9
All values in this manual are current as of its creation. We reserve the right to change the contents of this manual
without notice. B&R Industrial Automation GmbH is not liable for technical or editorial errors and defects in this
manual. In addition, B&R Industrial Automation GmbH assumes no liability for damages that are directly or indirectly
attributable to the delivery, performance or use of this material. We point out that the software and hardware
designations and brand names of the respective companies used in this document are subject to general trademark,
brand or patent protection.
Page 2

Table of contents
1 Introduction................................................................................................................4
1.1 Manual history.................................................................................................................................................4
1.2 Information about this document.................................................................................................................... 4
1.2.1 Organization of notices..............................................................................................................................4
1.2.2 Software specifications.............................................................................................................................. 5
2 System overview....................................................................................................... 6
2.1 Function overview........................................................................................................................................... 6
2.2 Compatibility.................................................................................................................................................... 6
2.3 Model numbers............................................................................................................................................... 6
2.4 Features.......................................................................................................................................................... 7
2.5 System requirements...................................................................................................................................... 7
3 Installation..................................................................................................................8
3.1 Preinstalled B&R Linux................................................................................................................................... 8
3.2 Standard Debian installation...........................................................................................................................8
3.3 Installing additional components..................................................................................................................... 8
3.4 Adjusting the partition..................................................................................................................................... 8
3.5 Cloning an installed image............................................................................................................................. 9
3.6 B&R Linux installer......................................................................................................................................... 9
3.6.1 Preparing the installer data storage medium............................................................................................ 9
3.6.2 Structure of folder IMAGES.....................................................................................................................11
3.6.3 Installation procedure.............................................................................................................................. 11
4 Initial startup............................................................................................................13
4.1 B&R First Config........................................................................................................................................... 13
5 Configuration...........................................................................................................15
5.1 B&R Config Utils........................................................................................................................................... 15
5.1.1 App Launcher.......................................................................................................................................... 15
5.1.2 Autostart Manager................................................................................................................................... 15
5.1.3 File System Write Protection................................................................................................................... 16
5.2 B&R Touch Screen....................................................................................................................................... 17
5.2.1 Registering single-touch devices.............................................................................................................17
5.2.2 Assigning a touch screen........................................................................................................................ 17
5.2.3 Calibration................................................................................................................................................ 18
5.2.4 Setting rotation and alignment................................................................................................................ 18
5.3 mapp View client...........................................................................................................................................19
5.4 Editing system files in the terminal...............................................................................................................20
5.5 Disabling the screensaver............................................................................................................................ 21
5.5.1 Display power management.................................................................................................................... 21
6 Operation..................................................................................................................22
6.1 Touch screens............................................................................................................................................... 22
6.2 MTCX/ADI functions......................................................................................................................................23
6.3 HMI Report....................................................................................................................................................23
6.4 Changing the display brightness.................................................................................................................. 25
6.5 B&R License Viewer..................................................................................................................................... 25
6.6 B&R UPS Manager....................................................................................................................................... 26
6.7 Virtual keyboard............................................................................................................................................ 29
6.8 Language switching...................................................................................................................................... 29
6.9 Multiple monitors...........................................................................................................................................30
6.10 Display resolutions...................................................................................................................................... 30
6.11 Accessing Linux file systems in Windows.................................................................................................. 30
6.12 TRIM support.............................................................................................................................................. 30
6.13 Real-time support........................................................................................................................................30
2 B&R Linux 9 User's manual V2.03
Page 3

Table of contents
6.14 Installing local packages.............................................................................................................................31
6.15 Installing operating system updates........................................................................................................... 31
6.16 Hibernation support..................................................................................................................................... 31
6.17 Browser update...........................................................................................................................................32
6.18 Font support................................................................................................................................................32
6.19 Executing privileged processes in the terminal.......................................................................................... 32
6.20 CAN............................................................................................................................................................. 32
7 Troubleshooting...................................................................................................... 35
8 Downloads............................................................................................................... 36
B&R Linux 9 User's manual V2.03 3
Page 4

Introduction
1 Introduction
Information:
B&R makes every effort to keep documents as current possible. The most current versions can be
downloaded from the B&R website (www.br-automation.com).
1.1 Manual history
Version Date Comment
2.03 November 2020
2.02 September 2020
2.01 October 2019 Updated the following chapters:
2.00 September 2019 Applied data to SMC (including editorial revision).
1.06 August 2019 Adapted to the editorial guide.
1.05 August 2019 Updated model numbers for xPC2200 legacy versions.
July 2019 B&R Linux 9.1.1.0 updates:
1.04 September 2018 Updated model numbers.
1.03 July 2018 Corrections
1.02 May 2018 Revised description for B&R Touch Screen.
1.01 March 2018 Updates and corrections for B&R Linux 9 and Debian references.
1.00 March 2018 First edition
•
Editorial revisions.
•
Updated chapter B&R Linux installer.
•
Editorial revisions.
•
HMI Report
•
CAN
Added browser update and font support.
Added use of MTCX in B&R Hypervisor operation.
Updated note in Automation Help for fsprotect.
Updated "Configuration as mapp View client".
Updated "Disable screensaver".
Updated "Installation of operating system updates".
Removed sentence about "First Config" with Panel PCs and resistive touch screen.
Updated information about ADI, ADI Development Kit and "B&R ADI samples".
Updated "B&R First Config".
Replaced B&R Service Tool with "B&R Config Utils".
Added instructions for su/sudo: "Executing privileged processes in the terminal", "Editing system files in the terminal".
Updated note about fsprotect in hypervisor operation.
Integrated appendix in application notes.
Removed HMI Diagnostics.
Corrections and text adjustments.
Updated B&R Hypervisor in chapter "ADI".
Update for B&R UPS Manager.
1.2 Information about this document
This document is not intended for end customers! The safety guidelines required for end customers
must be incorporated into the operating instructions for end customers in the respective national language by the machine manufacturer or system provider.
1.2.1 Organization of notices
Safety notices
Contain only information that warns of dangerous functions or situations.
Signal word Description
Danger! Failure to observe these safety guidelines and notices will result in death, severe injury or substantial damage to property.
Warning! Failure to observe these safety guidelines and notices can result in death, severe injury or substantial damage to property.
Caution! Failure to observe these safety guidelines and notices can result in minor injury or damage to property.
Notice! Failure to observe these safety guidelines and notices can result in damage to property.
General notices
Contain useful information for users and instructions for avoiding malfunctions.
Signal word Description
Information: Useful information, application tips and instructions for avoiding malfunctions.
4 B&R Linux 9 User's manual V2.03
Page 5

Introduction
1.2.2 Software specifications
Within this document, the following conventions must be observed:
•
Commands that should/must be executed by normal unprivileged users are identified by prefix $.
•
Commands that must be executed by the privileged root user are identified by prefix #.
•
Command without a prefix not specifically noted otherwise in the text should be executed by a normal user.
For more details about handling, see chapters "Executing privileged processes in the terminal" on page 32 and
"Editing system files in the terminal" on page 20. The principle of least privilege (POLP) should also always
be applied.
B&R Linux 9 User's manual V2.03 5
Page 6

System overview
2 System overview
2.1 Function overview
B&R supports Linux in the form of modified images based on Debian GNU/Linux 9 ("Stretch").
With B&R Linux, B&R offers a variant of Debian optimized for B&R industrial PCs that already includes all B&Rspecific modifications and offers the broadest possible basis for various applications.
Reasons for Debian:
•
High stability
•
Large package selection
•
Wide distribution of Debian and various derivatives (e.g. Ubuntu, Linux Mint)
For more information, see the Debian website (https://www.debian.org/).
2.2 Compatibility
B&R supports B&R Linux 9 on the following devices:
•
Automation PC 910 (APC910)
•
Automation PC 2100 (APC2100)
•
Automation PC 2200 (APC2200)
•
Automation PC 3100 (APC3100)
•
Panel PC 900 (PPC900)(only QM77/HM76)
•
Panel PC 2100 (PPC2100)
•
Panel PC 2200 (PPC2200)
•
Panel PC 3100 (PPC3100)
2.3 Model numbers
Model number Short description
5SWLIN.0740-MUL B&R Linux 9 64b APC910 QM77/HM76
5SWLIN.0741-MUL B&R Linux 9 64b PPC900 QM77/HM76
5SWLIN.0742-MUL B&R Linux 9 64b APC2100 BYT
5SWLIN.0743-MUL B&R Linux 9 64b PPC2100 BYT
5SWLIN.0744-MUL B&R Linux 9 64b APC2200 APL
5SWLIN.0745-MUL B&R Linux 9 64b PPC2200 APL
5SWLIN.0749-MUL B&R Linux 9 64b APC910 QM170/HM170/CM236
5SWLIN.0753-MUL B&R Linux 9 64b APC3100 KBU
5SWLIN.0754-MUL B&R Linux 9 64b PPC3100 KBU
5SWLIN.0755-MUL B&R Linux 9 64b APC3100 KBU legacy
5SWLIN.0756-MUL B&R Linux 9 64b PPC3100 KBU legacy
5SWLIN.0758-MUL B&R Linux 9 64b APC2200 APL legacy
5SWLIN.0759-MUL B&R Linux 9 64b PPC2200 APL legacy
6 B&R Linux 9 User's manual V2.03
Page 7

System overview
2.4 Features
B&R Linux 9 contains a selection of predefined software package groups. Additional packages can be installed
later with an existing Internet connection.
# apt update
# apt search [KEYWORD]...
# apt install [PACKAGE_NAME]...
A list of installed packages can be displayed in a terminal using command dpkg --list (more than 1000 packages
are installed by default).
LXDE is used as the default desktop, and Chromium is included as the web browser.
B&R has modified and provided certain features using their own packages for the use of Debian on B&R Automation
and Panel PCs. Most of these packages are already included in B&R Linux and/or available for download on the
B&R website (www.br-automation.com) (see chapter "Downloads" on page 36).
2.5 System requirements
The following requirements must be met in order to execute B&R Linux 9 on a supported B&R device:
•
4 GB mass storage device
•
1 GB RAM
Installing additional applications, saving data and general use of the system can result in changes to these values
and the system load. The exact resource consumption and requirements therefore depend on the configuration
and use of the system and cannot be guaranteed by B&R.
Additional requirements must be met in order to use certain functions. For example:
•
Internet access (fees may apply).
•
DVD/CD creation requires a compatible optical drive.
•
An audio output device is required for music and sound playback.
B&R Linux 9 User's manual V2.03 7
Page 8

Installation
3 Installation
3.1 Preinstalled B&R Linux
The Debian 9-based B&R Linux 9 can be obtained from B&R as part of a PC configuration on a suitable storage
medium (min. of 4 GB).
3.2 Standard Debian installation
Debian installation images can be downloaded from Getting Debian (https://www.debian.org/distrib/) and installed
by the user. For corresponding instructions, see the documentation (https://www.debian.org/doc/).
In a Debian standard installation, the customizations made specifically for B&R Linux are missing.
3.3 Installing additional components
Additional Debian software packages can be installed at any time. A list of available packages is available on
the Debian website. It is also advisable to keep the software packages up to date and update installed packages
accordingly (see chapter Installing local packages).
3.4 Adjusting the partition
Information:
If a user with high privileges (root privileges) is working on the system, it is easily possible to perform
destructive operations on the system. This is especially true when manipulating data storage media
directly. Executing these types of commands requires great care.
This procedure must not be used in combination with Intel RAID software. Partition adjustment tools
do not recognize the metadata partitions on each data storage medium and may overwrite them. This
will corrupt the RAID configuration and can result in data loss.
A B&R Linux 9 installation uses approximately 2.5 GB of disk space on a drive. Additional free disk space is required
for normal use of the operating system. Using 4 GB storage media (CFast card) is therefore possible. The exact
dimensioning of the data storage medium depends on the specific application, however.
GParted can be used to adjust the partitions and file systems. The program is controlled via an easy-to-use GUI.
Some operations can only be performed when the affected file system is not in use (e.g. shrinking ext4 file systems).
GParted Live, which can be booted from a USB flash drive, for example, can be used for this purpose.
It is recommended to make these adjustments offline when the data storage medium is not in use (file system(s)
are not mounted). Using ext4 also makes it possible to extend the file system during use but not to shrink it.
In principle, two steps are necessary:
•
Adjust the partition with tools like fdisk (https://manpages.debian.org/buster/fdisk/fdisk.8.html) or GNU parted (https://manpages.debian.org/buster/parted/parted.8.html).
•
Adjust the file system, with resize2fs for ext2/3/4 (https://manpages.debian.org/buster/e2fsprogs/resize2f-
s.8.en.html) and e2fsck (https://manpages.debian.org/buster/e2fsprogs/e2fsck.8.html).
8 B&R Linux 9 User's manual V2.03
Page 9
Installation
If other abstractions such as Device Mapper (LVM, LUKS/dm-crypt, MD/RAID) are used, additional steps are nec-
essary; these will not be explained here. An example would be extending the main partition (second and last partition) of a B&R Linux UEFI installation on data storage medium /dev/sdc while the system is not booted. This
extends the partition to the end of the data storage medium.
# echo ',+' | sfdisk /dev/sdc -N 2
# e2fsck -f -p /dev/sdc2
# resize2fs /dev/sdc2
3.5 Cloning an installed image
The user can clone an installed B&R Linux 9 or Debian using tools such as Clonezilla (https://clonezilla.org/) or
alternative software solutions.
Information:
If a data storage medium is copied 1:1, TRIM should be executed for flash memory based data storage
media to make unallocated memory blocks available again. For additional information, see section
"TRIM support " on page 30.
3.6 B&R Linux installer
The B&R Linux installer makes it possible to easily install B&R Linux images (.img) on supported devices. This
makes it possible to return to the original factory state, for example.
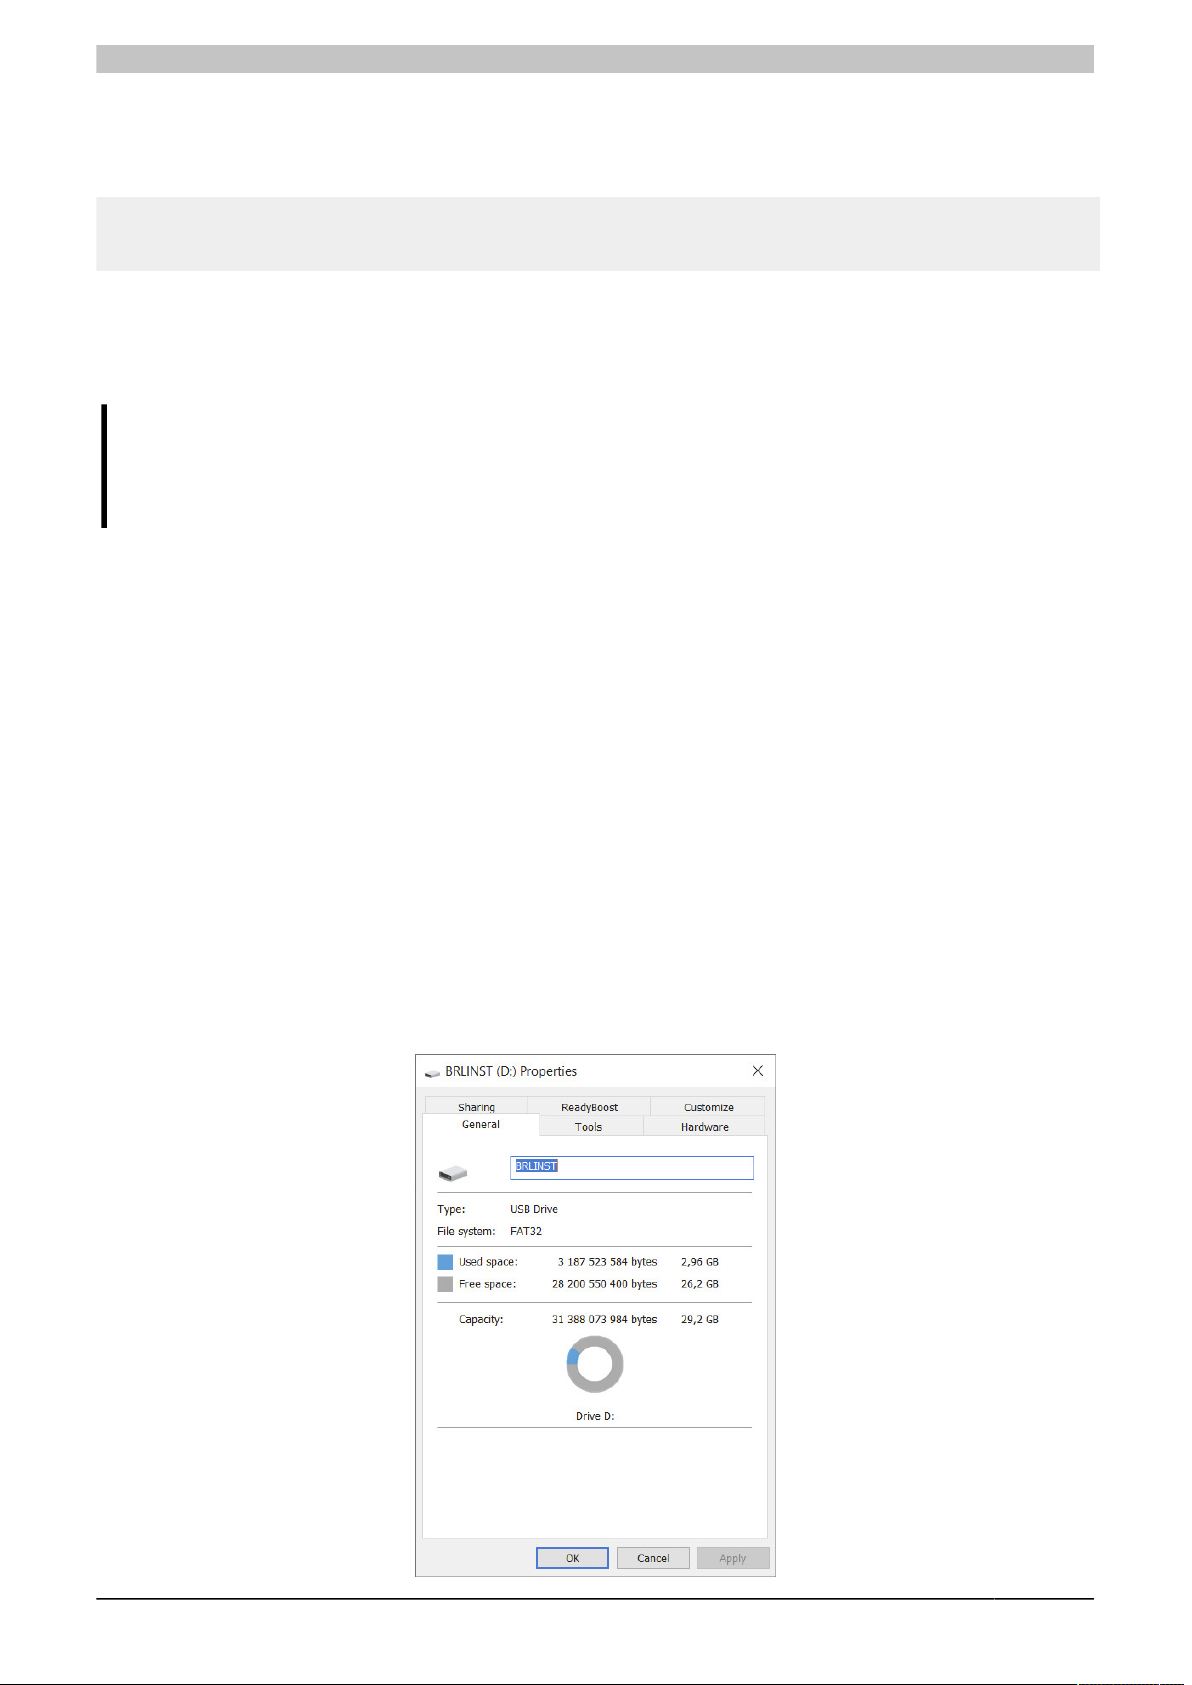
1. Create a USB flash drive with the FAT32 file system and name "BRLINST".
2. Extract the contents of brl-installer.zip to the empty USB flash drive.
3. Copy the desired B&R Linux image (complete folder containing the .img.gz file and other files) to folder
IMAGES on the USB flash drive.
4. Start it on the target PC using the boot menu ([F11], [F5], [ESC], etc.) from the UEFI entry of the USB flash
drive.
5. Follow the installer dialog box.
Compatible OS images can be requested via B&R Support.
3.6.1 Preparing the installer data storage medium
The installer can be applied to USB flash drives or other conventional data storage media. To do this, it is necessary
to format the data storage medium as a FAT32 file system and give it the label "BRLINST". This is possible in
Microsoft Windows using Disk Management or File Explorer.
B&R Linux 9 User's manual V2.03 9
Page 10

Installation
Information:
In Microsoft Windows, it is not possible to format a partition larger than 32 GB as FAT32. In addition,
it is only possible to interact with multiple partitions on removable storage devices using Microsoft
Windows 10 version 1703 or later.
The data storage medium must contain an MBR or GPT partition table. The partition for the FAT32 file system
should be of type W95 FAT32 (LBA) (0Ch) or Microsoft basic data (EBD0A0A2-B9E5-4433-87C0-68B6B72699C7).
Both requirements are met when formatting in Microsoft Windows.
Ideally, the file system should still be completely empty. The files from brl-installer.zip must be transferred to the
root of the file system. One or more images that should be available for installation can then be placed on the file
system in folder IMAGES.
On a Linux system, a data storage medium such as /dev/sdb could be overwritten and formatted as follows:
#> sfdisk --wipe always --wipe-partitions always /dev/sdb <<EOF
label: gpt
type=EBD0A0A2-B9E5-4433-87C0-68B6B72699C7
EOF
#> mkfs.fat -n BRLINST /dev/sdb1
#> mount /dev/sdb1 /mnt
$> unzip brl-installer.zip -d /mnt
#> umount /mnt
Hierarchical representation of a correctly sized B&R Linux installer file system with three B&R Linux images in
folder IMAGES:
BRLINST
├── EFI
│ └── BOOT
│ └── BOOTX64.EFI
├── IMAGES
│ ├── brl-10_1.0.0-alpha.1_2020-05-13_uefi_desktop
│ │ ├── B2SUMS
│ │ ├── dpkg-list.txt
│ │ ├── image-size.txt
│ │ ├── partition-md5sums.txt
│ │ ├── raw.img.gz
│ │ ├── SHA256SUMS
│ │ └── SHA512SUMS
│ └── V1.1.0 (R) PPC2200
│ ├── bios-raw
│ │ ├── dpkg.list
│ │ └── stretch.img.gz
│ └── uefi-raw
│ ├── dpkg.list
│ └── stretch.img.gz
├── Liesmich.txt
├── LiveOS
│ └── squashfs.img
├── NEWS.md
├── options.txt
├── Readme.txt
└── startup.nsh
Information:
The case (upper- and lowercase letters) shown is mandatory and not permitted to be changed.
BRLINST is only the name (label) of the file system and not a separate folder in the file system. In
Microsoft Windows, the correct path to the installer's bootloader would be D:\EFI\BOOT\BOOTX64.EFI
for the D: drive.
Certain settings can be made for the installer in file options.txt. These are already described in the file. It is possible
to run through the entire installation automatically. The installer is interactive by default and data storage media
are not overwritten or changed until selected by the user.
10 B&R Linux 9 User's manual V2.03
Page 11

Installation
Notice!
A fully automated configured installer should be handled very carefully. Starting it on an incorrect
system will most likely result in data loss. The B&R Linux installer can also be booted on many nonB&R PCs.
3.6.2 Structure of folder IMAGES
In general, the images available from B&R can be used directly with the B&R Linux installer.
•
Only file .img.gz is required for the recovery. However, the entire folder should be considered as part of
the image and copied to folder IMAGES.
•
The installer only supports B&R Linux images. Other files that also use the .img file extension are not
supported. The content of the files is a raw image of a data storage medium with a partition table, file
systems, etc. The installer makes some assumptions about the contents of the image file. For example,
a valid partition table must be available (MBR or GPT) and the last partition must be occupied by an
ext2/3/4 file system, which is then adapted to the data storage medium. In addition, the partition can only
be extended, not shrunk.
•
The data storage medium image is already compressed with gzip (.img.gz) in the image download. The
installer supports the recovery of the compressed file. It is also possible to decompress the file and save
it as .img. Zstandard compressed images (.img.zst) are also supported.
•
The images must be located in subfolders of IMAGES.
•
If a SHA256SUMS, SHA512SUMS or B2SUMS file exists in the respective image folder, it will be used to
validate the checksums of the files before recovery. If a full match cannot be determined with any of the
checksum files, the installer aborts. If there is no *SUMS file available, the check is simply skipped.
•
If file partition-md5sums.txt exists in the image folder, it is used to validate that the data storage medium
image was written correctly. If this file does not exist, this step is skipped. The file must contain MD5
checksums of the partitions present in the image.
3.6.3 Installation procedure
As long as no other operating system has been installed, the PC will automatically boot from the removable storage
device with the installer using the default settings of the firmware (BIOS). If this is not the case, it is possible to
boot either from the UEFI shell or the installer boot menu. The default UEFI boot entry of the specific data storage
medium must be selected in the boot menu. Script startup.nsh script must be executed in the UEFI shell. This will
start automatically if it is not aborted within a short timeout. Using the UEFI shell for booting is only necessary for
the APC2100 and PPC2100; the boot procedure via the boot menu should be preferred for other PC series.
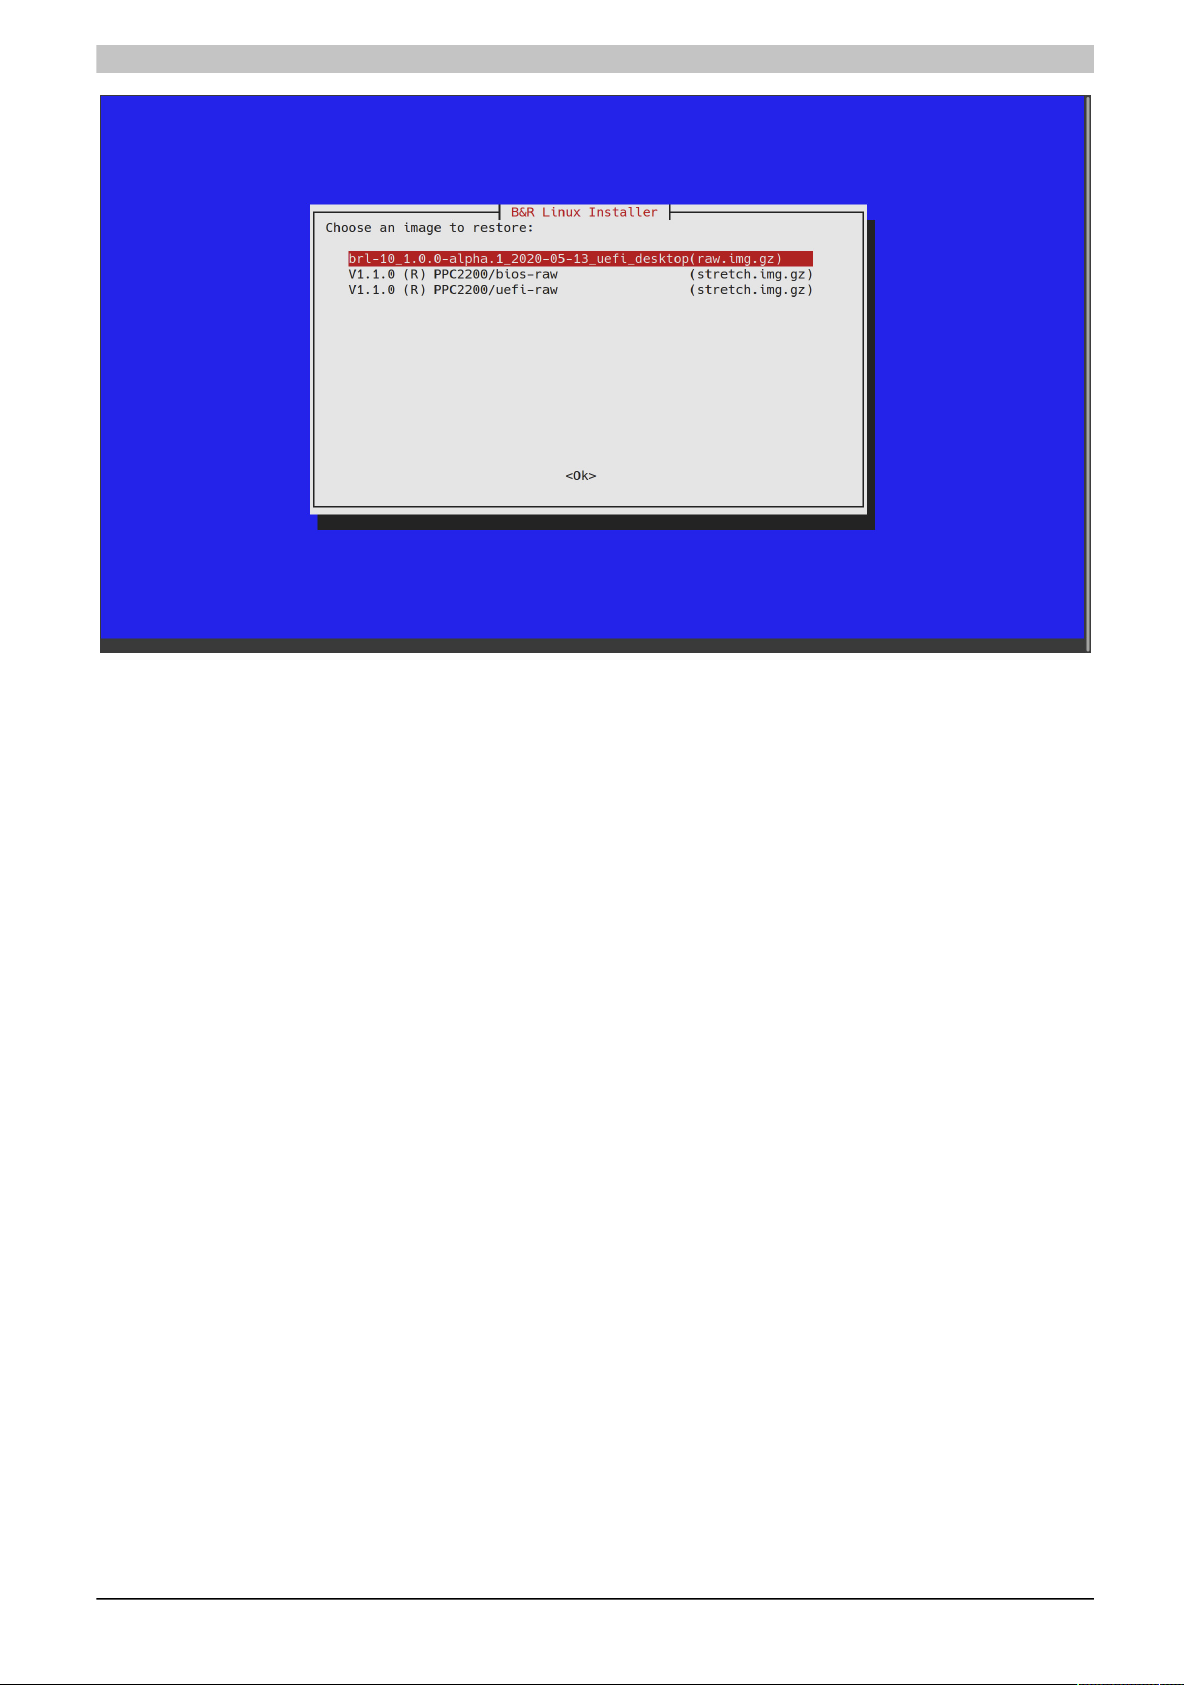
If no other settings are made in options.txt, the installation process occurs interactively. Control is possible via the
keyboard (arrow keys, return, tab, space bar, etc.):
B&R Linux 9 User's manual V2.03 11
Page 12
Installation
1. First, one of the images placed in folder IMAGES can be selected.
2. This is followed by the selection of the target data storage medium on which the operating system will be
installed.
3. Optionally, space can also be left free for installing the B&R Hypervisor.
4. The installation process is performed and the selected data storage medium is permanently overwritten.
5. After the installation is completed, the installer allows the following options by keyboard input:
°
Reboot (r, R or any)
°
Power off (p or P)
°
Opening a shell (s or S)
In the shell, the system can be shut down with command reboot or poweroff or with keyboard shortcut [Ctrl]
+ [Alt] + [Del].
After the system has shut down, the installer data storage medium should be removed.
The newly installed image will boot at the next startup of the system. If this is not the case, check that the installer
has run successfully and that the firmware settings and boot sequence are configured correctly.
12 B&R Linux 9 User's manual V2.03
Page 13
Initial startup
4 Initial startup
When switched on for the first time, B&R Linux 9 performs one-time automatic detection and configuration.
The automatic first boot configuration is now integrated into the new "First Config" program in B&R Linux 9. This
makes it possible to customize the settings in various ways during commissioning.
Information:
The first boot mechanism is not permitted to be interrupted. If the process is interrupted, the image
may no longer be bootable.
The following applies to APC2100 and PPC2100 devices: After the first complete boot procedure, it
is important to ensure that no USB devices are connected since the restart may not work properly
otherwise.
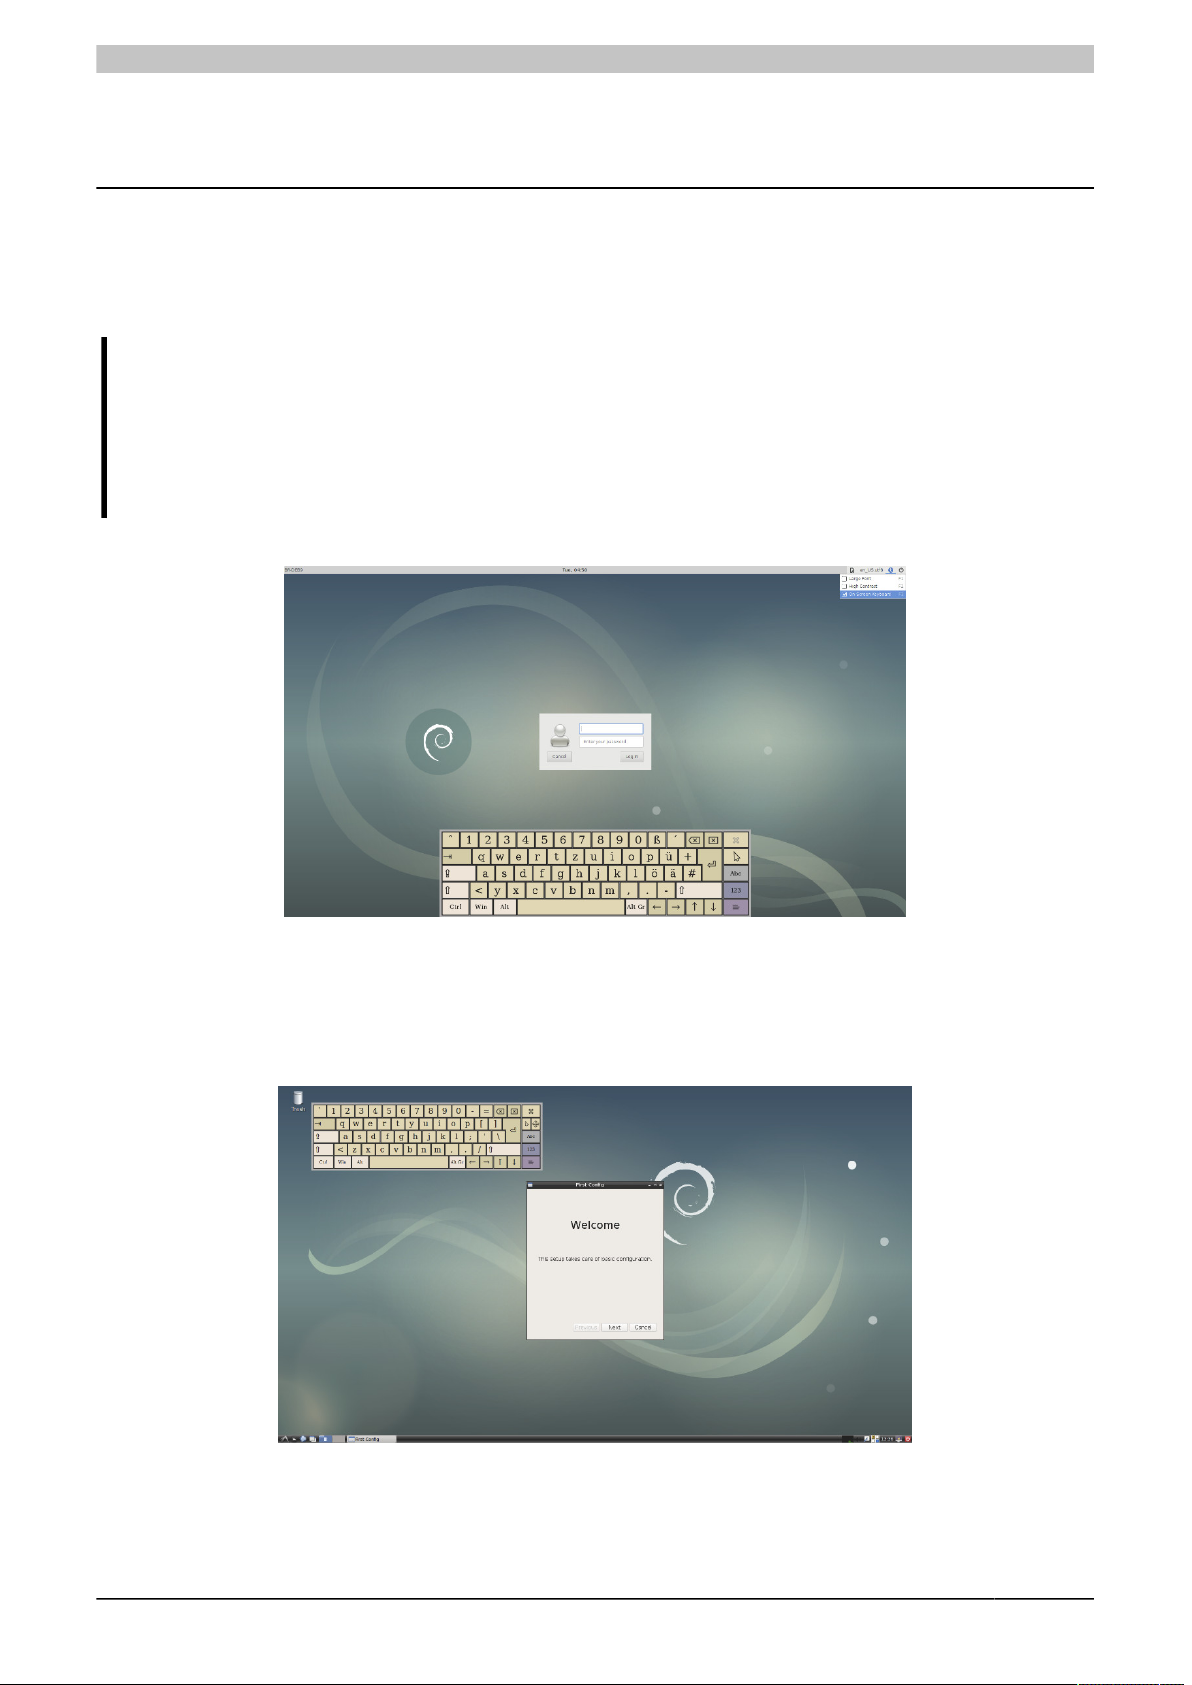
After restarting, B&R Linux 9 is ready for operation and the login screen is displayed:
4.1 B&R First Config
When B&R Linux 9 is started for the first time, it automatically logs in and starts B&R program First Config. A onetime automatic detection and configuration is carried out. A USB driver configuration is performed on all Automation
PC 2100 and Panel PC 2100 devices.
B&R Linux 9 User's manual V2.03 13
Page 14
Initial startup
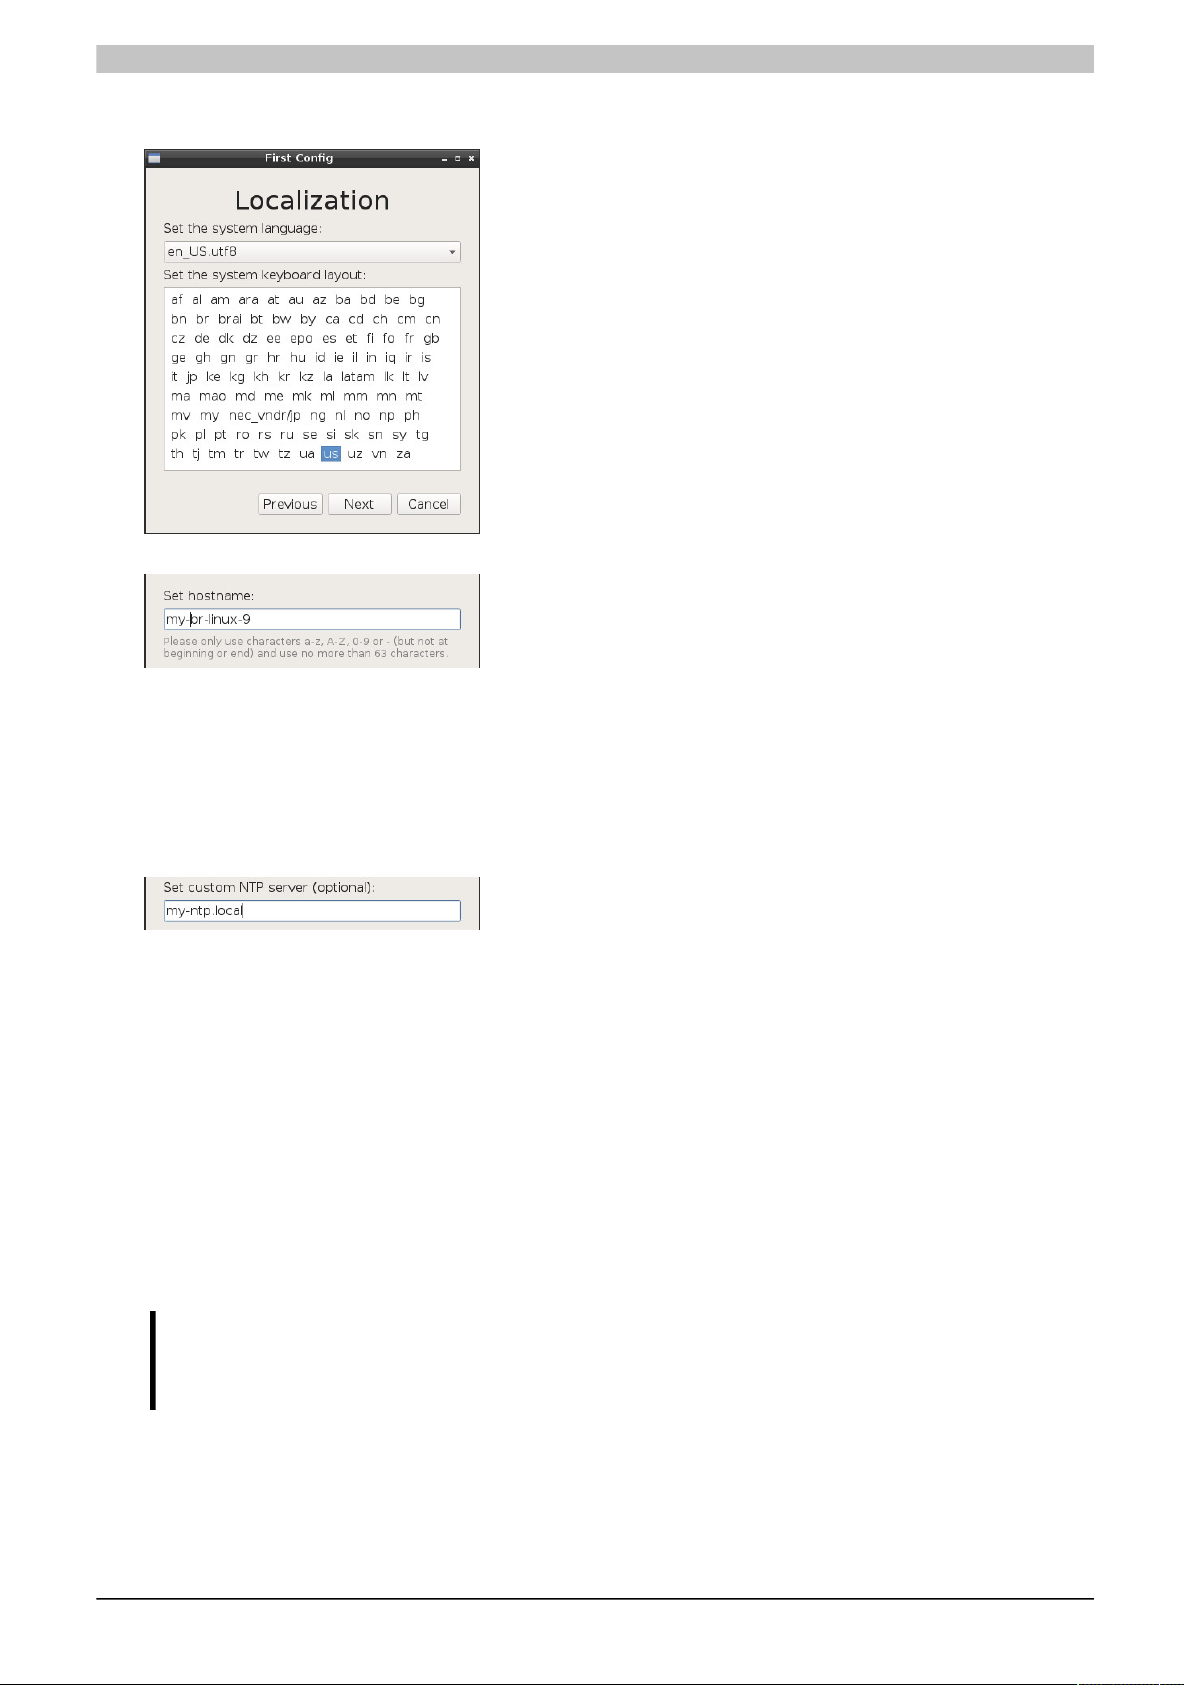
1. The system language and keyboard layout can be selected.
The settings are only active after the configuration has been completed.
2. Assign a hostname. This should be unique in the LAN network.
3. Optionally, the firewall can be enabled/disabled (B&R Linux 9 1.1.0 or later).
The firewall is disabled until First Config has been completed and is enabled afterwards by default. More
detailed settings, such as opening ports, can be performed in the normal desktop environment afterwards.
4. Set the time and time zone. Optional: Define your own NTP server (B&R Linux 9 1.1.0 or later).
The Debian NTP server pool is used by default. If these servers cannot be reached due to the local network
configuration, it is possible to use a local NTP server (e.g. local domain controller). The NTP client in B&R
Linux is systemd-timesyncd by default, and the entry is made in "/etc/systemd/timesyncd.conf".
5. Create a user.
It is optional to add the created user to group "sudo". This user is then made an administrator and can perform
privileged tasks with his password (sudo, polkit). At the same time, the root user is locked for easier password
management. This configuration offers the advantage that in case of administrative, possibly destructive
procedures, a password must always be entered. This password is stored in the system log.
If the root account is not locked, a password must be specified. This means that only this user is defined as
the administrator; the newly created user cannot use his or her password to authorize privileged commands.
This configuration is similar to the one in B&R Linux 8. The root user has all system rights and should only
be used for administrative purposes. A normal user must therefore be created.
For additional information about su and sudo, see chapters "Executing privileged processes in the terminal"
on page 32 and "Editing system files in the terminal" on page 20.
6. After the configuration has been completed, the settings become active and the system restarts.
7. The new user can log in after the restart.
Information:
At this point, it is necessary for Automation PC 2100 and Panel PC 2100 devices to disconnect all
USB devices in order to shut down successfully after applying the settings.
14 B&R Linux 9 User's manual V2.03
Page 15
Configuration
5 Configuration
5.1 B&R Config Utils
B&R Linux 9 1.1.0 replaces the B&R Service Tool with package B&R Config Utils. This package offers all config-
uration options of the Service Tool but is structured differently. The Service Tool is divided into two separate tools:
Autostart Manager and File System Write Protection. App Launcher is also available; this starts automatically
after completion of First Config and the first login.
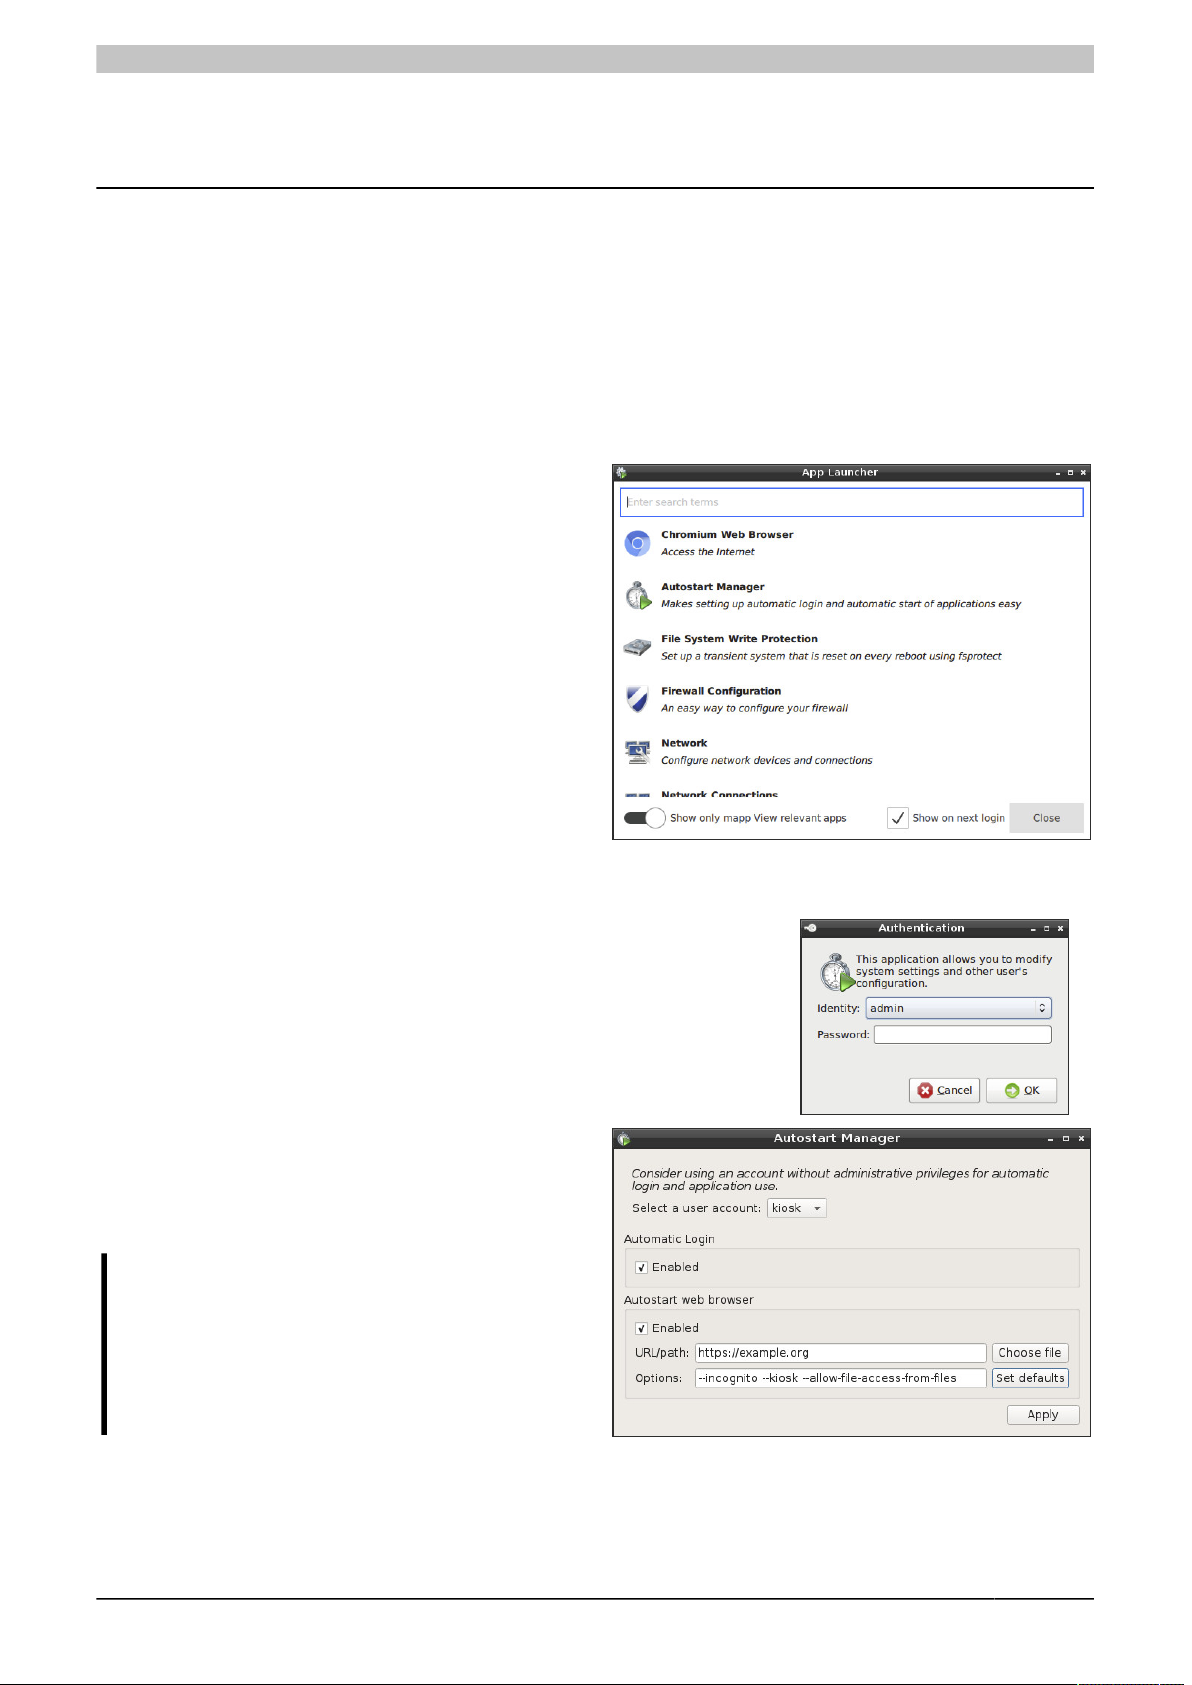
5.1.1 App Launcher
App Launcher makes it easier to find and execute installed programs. It displays a preselection of applications to configure a mapp View client by default.
App Launcher also has a search function that searches
for suggestions as you type.
5.1.2 Autostart Manager
This can be used to make settings for working with mapp View. Before
Autostart Manager can start, an authentication with administrator rights is
required:
First, a user must be selected to which the configuration should apply.
Automatic login can be used to enable the following option: The selected
user is immediately active. In addition, Autostart web browser can be
used to automatically start the browser.
With Autostart web browser, Set defaults is used to
preset the usual options for a mapp View suitable browser mode (e.g. kiosk mode). These can be adjusted in input field Options and supplemented with your own parameters.
Information:
Even if started in kiosk mode, Chromium can be
closed via the usual keyboard shortcuts: [Ctrl]
+ [W], [Ctrl] + [Q] or [Alt] + [F4].
The normal desktop can then be accessed again
in order to modify system and access data.
B&R Linux 9 User's manual V2.03 15
Page 16

Configuration
5.1.3 File System Write Protection
Can be used to make settings for operating with fsprotect. The actual file
system is added to the physical drive without write access, and all write
operations are intercepted by a virtual drive in RAM. After each restart, the
system restores the state that was set before enabling fsprotect.
1. Since no permanent changes can be made when the write filter is
active, all other settings should be made first (the write filter can be
disabled at any time).
2. Enable Enable fsprotect.
3. Optional: Set the user-defined RAM size.
4. Apply changes via Apply.
This requires administrative rights.
5. Button Reboot is now highlighted.
Changes are only active after a restart.
Information:
These settings make it possible to write to the data storage medium. Write protection can be avoided
with administrative rights. Protection is only in effect during normal use.
Write procedures are limited to the size of the RAM file system. It is therefore recommended to allocate
enough disk space.
Enabling fsprotect in hypervisor operation requires further steps or adjustments. These are described
in Automation Help.
16 B&R Linux 9 User's manual V2.03
Page 17
Configuration
5.2 B&R Touch Screen
In B&R Linux 9, driver evdev, which is already contained in Debian, is used for communication with the touch
screen of a Panel PC display or connected Automation Panels. evdev is the actual driver for mice, keyboards
and all other input devices.
Program B&R Touch Screen is available for setting up (calibrating and configuring) resistive and capacitive touch
screens. This can be started via Preferences.
A specific procedure must be observed when setting up touch screens with this program. If an already saved
configuration has changed, the configuration must be deleted and created again by clicking on "Reset".
5.2.1 Registering single-touch devices
Information:
This step must only be performed if resistive touch screens are
used. If capacitive touch screens are used, this step should be
omitted.
If at least one resistive touch screen is used, it must be registered first.
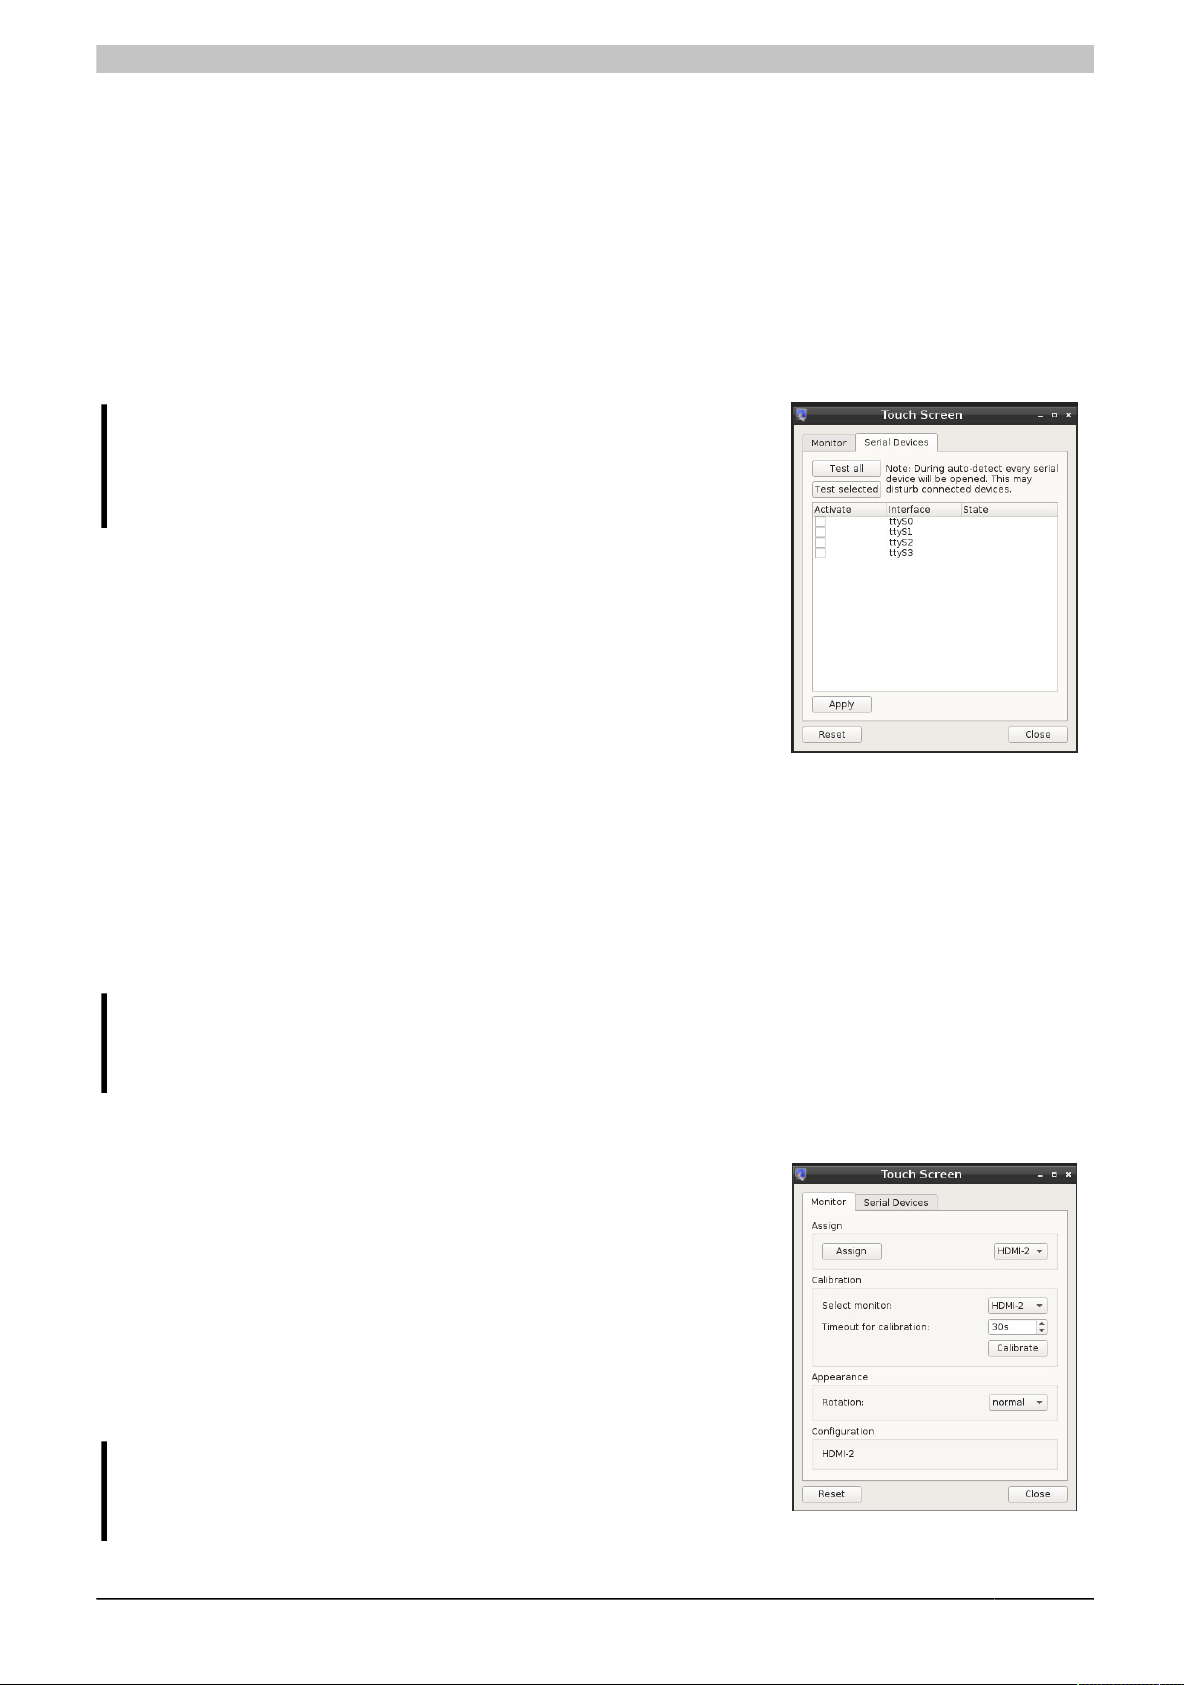
Resistive touch screens communicate with the PC via a serial interface. It
is required to switch to the second tab for this.
1. Open program B&R Touch Screen.
2. Change to tab "Serial devices".
Serial interfaces can be tested and enabled for touch operation.
3. Select an entry from the list to test whether a touch screen is connected to an interface.
4. Click on Test selected. The selected interface is tested.
As an alternative, all interfaces can be tested with Test all.
5. The test may take some time. If a touch screen is found on an interface, this is indicated via a check mark.
6. Select a suitable interface and enable it by clicking on Apply.
7. Although it is possible at this point to make entries via the touch screen, it is still not calibrated or assigned
to the screen.
Information:
This test involves communication via the serial interfaces. The test may affect other devices that are
connected to the interfaces.
5.2.2 Assigning a touch screen
All touch input devices must be assigned to the screen. This applies to all
touch screens.
1. Open program B&R Touch Screen.
2. Change to tab "Monitor".
3. Assign a touch screen to the respective panel or monitor in section
"Assign".
4. Confirm with Assign.
5. A gray window opens.
6. The touch screen is assigned by confirming.
Information:
It is difficult to assign multiple screens if they are in clone mode
since the assignment window is displayed on both screens.
B&R Linux 9 User's manual V2.03 17
Page 18

Configuration
In multi-screen operation, i.e. when using two monitors on different graphics lines, the display for assigning the
touch screen is only available on one monitor. The touch screen is assigned to the respective panel or monitor
simply by touching the panel (and triggering the touch screen).
5.2.3 Calibration
It is recommended to perform calibration.
1. Open program B&R Touch Screen.
2. Change to tab "Monitor".
3. Click on Calibrate in section "Calibration".
4. A gray window opens in full screen.
5. Touch the four calibration points one after another as precisely as possible.
5.2.4 Setting rotation and alignment
Screen rotation and the monitor relationship in multi-screen configurations can be defined in the last step.
1. Open program B&R Touch Screen.
2. Change to tab "Monitor".
3. The arrangement of the panels can be set up for multi-screen operation in section "Configuration".
Two panels are supported. These can be arranged on top of or next to each other. Alternatively, clone mode
is also possible.
4. Screen rotation can be set in section "Appearance". This setting applies to all screens.
18 B&R Linux 9 User's manual V2.03
Page 19

Configuration
5.3 mapp View client
Various settings must be made for the configuration as a mapp View client. These are primarily made using the
standard dialog boxes available in B&R Linux 9 and the B&R-specific applications. All settings can be opened via
App Launcher(see chapter "B&R Config Utils" on page 15):
•
Configuration of the network (with standard dialog boxes).
It only makes sense to make the network settings in hypervisor operation after installing the hypervisor
driver and the hypervisor system or its configuration. The network interfaces are then assigned to the
respective OS (Linux or AR) and the virtual network interface becomes visible.
•
It is recommended to create a user for starting the web browser (with standard dialog boxes).
Multiple users should be configured for different purposes. For example, a user for kiosk mode should be
created separately from a user with administrative rights. An administrator is necessary since some system
settings require corresponding rights.
•
Configure an automatic login and start the browser in kiosk mode (see chapter "B&R Config Utils" on
page 15).
•
Optional: Enable MTCX access synchronization in hypervisor operation (see "MTCX/ADI functions" on
page 23).
•
Optional: Configure the touch screen (see chapter "Calibration" on page 18).
For single-touch devices (analog resistive) or multi-screen operation, the touch devices must be assigned
to the monitor.
•
Optional: Configure the write protection for the file system (see chapter "B&R Config Utils" on page 15).
•
Optional: Configure the firewall (with standard dialog boxes).
•
Optional: Configure the screensaver (using standard dialog boxes, see chapter "Disabling the screen-
saver" on page 21).
The screensaver is disabled by default for B&R Linux 9 1.1.0 or later.
•
Optional: Update the browser if required (see chapter "Browser update" on page 32).
•
Optional: Install fonts if required (see chapter "Font support" on page 32).
B&R Linux 9 User's manual V2.03 19
Page 20

Configuration
5.4 Editing system files in the terminal
Information:
GNU nano is used for the editor in these instructions. GNU nano is defined as the default editor for
B&R Linux via the Debian alternatives system and therefore also opened with sudoedit. GNU nano is
generally recommended for inexperienced users.
GNU nano makes it possible to navigate with the arrow keys and write without using any additional
keyboard shortcuts. [Ctrl] + [X] saves the written text. Other combinations are also described directly
in the editor.
Modifying system files requires administrative rights. These rights are not always easy to manage in normal GUI
programs and require corresponding knowledge of the system. It is recommended to perform these activities in
a terminal.
These examples are used to describe the options available for editing a system file interactively (see "Executing
privileged processes in the terminal" on page 32).
The following applies if the user was configured as a member of the sudo group in First Config:
► These three commands are effectively synonymous and open the selected file with read/write permissions
in GNU nano.
$ sudoedit /etc/br/adi.conf
$ sudo editor /etc/br/adi.conf
$ sudo nano /etc/br/adi.conf
If a root user has been configured with a password:
► Enter the following command chain:
$ su # nano /etc/br/adi.conf
# exit
► Alternatively, the following command can also be entered:
$ su -lc 'nano /etc/br/adi.conf'
20 B&R Linux 9 User's manual V2.03
Page 21
5.5 Disabling the screensaver
XScreenSaver is set as the default screensaver in B&R
Linux. This runs as a separate process in the background and has several interfaces that can change its
behavior. It can be started automatically via different
mechanisms during login.
As long as the process is running, a timeout must be
defined; after this timeout, it is enabled. To prevent the
screensaver from ever being started, the background
process must also be prevented from being started.
To completely disable the screensaver, the process
must be stopped. Every restart causes the process to
restart too, however. In B&R Linux, this is done via
LXSession for each user.
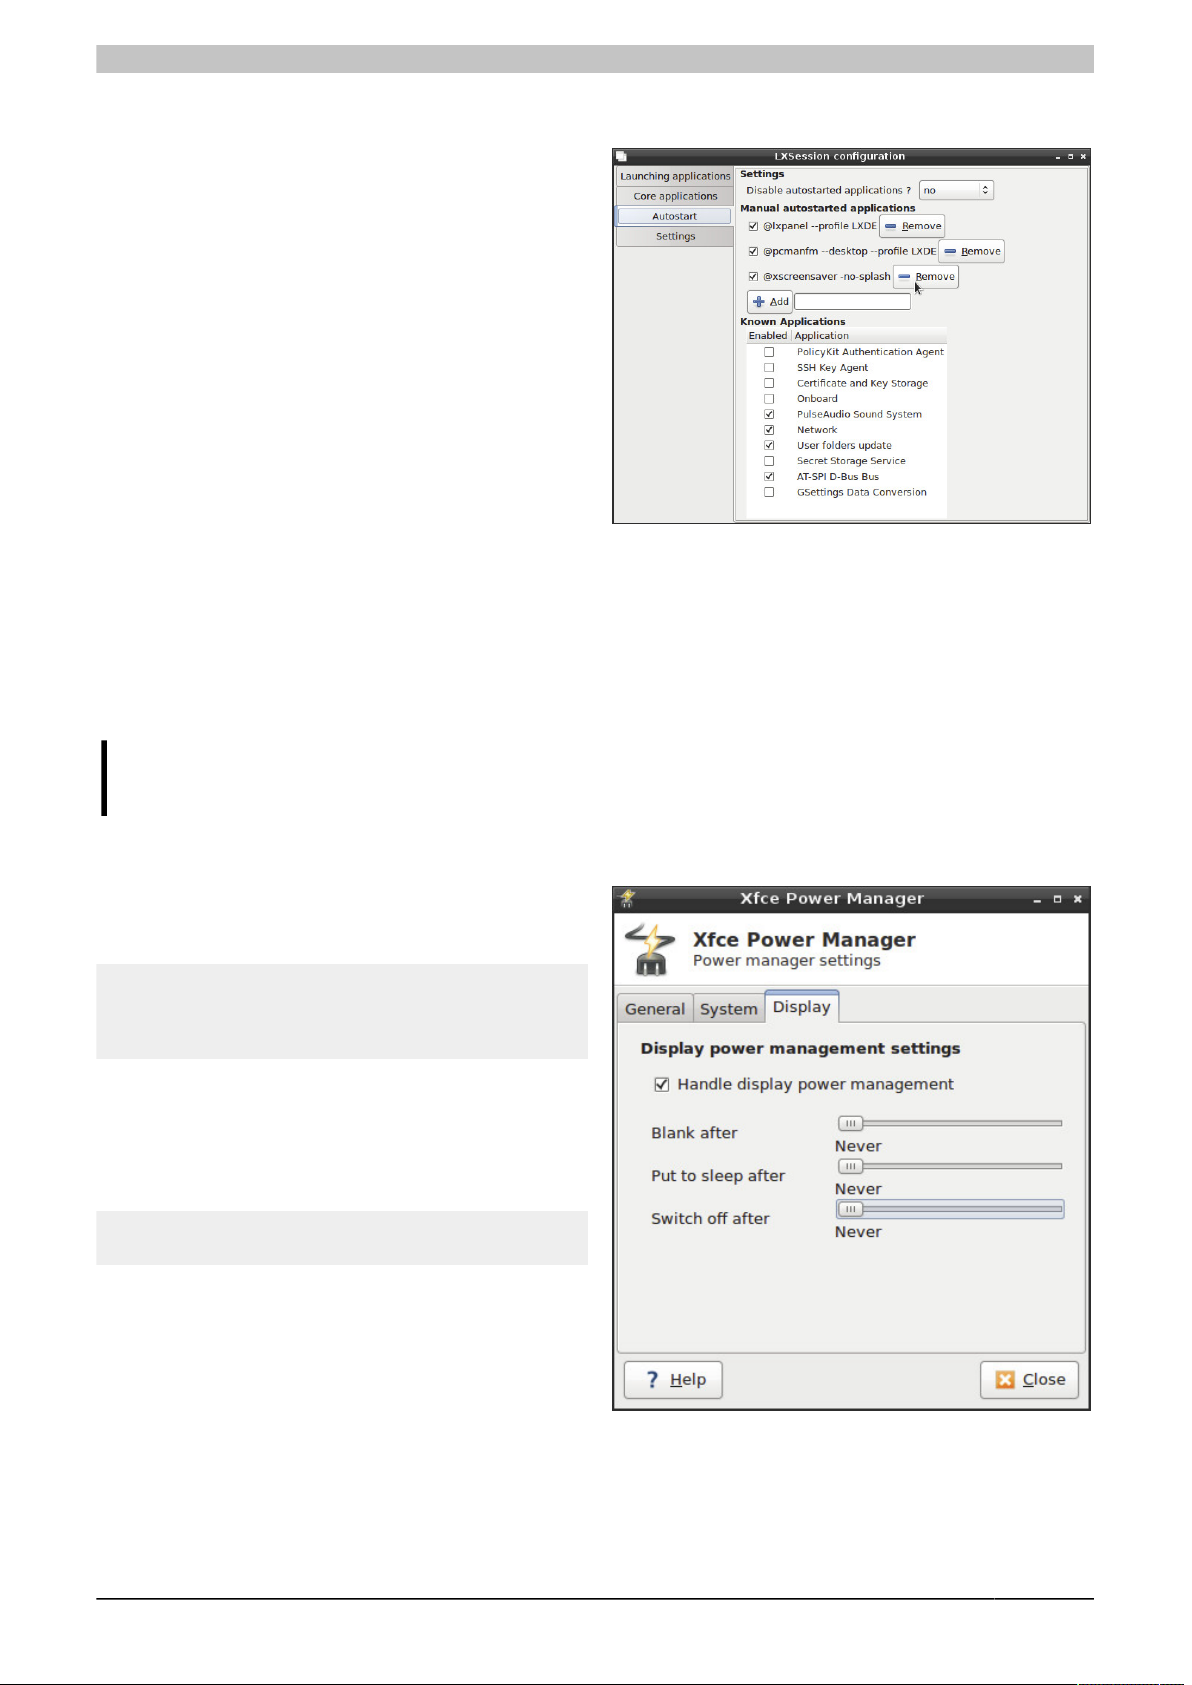
1. Open the Start menu.
2. Open GUI tool Default applications for LXSession in folder Preferences.
3. Select tab "Autostart".
4. Remove entry "xscreensaver".
5. Automatic startup is avoided.
6. An already running process can be stopped via configuration tool XScreenSaver.
Configuration
Information:
This behavior has been modified in B&R Linux 9 1.1.0, i.e. the screensaver is disabled for each user.
5.5.1 Display power management
To additionally prevent the display from being switched
off (screen blanking), it is necessary to execute the following command for the respective user:
$> cat >> ~/.xsessionrc <<EOF
xset s off
xset -dpms
EOF
This setting only becomes active after a new login. The
commands can also be called directly to change this setting for the current session.
Alternatively, a program can be installed to configure
display power management:
#> apt update
#> apt install xfce4-power-manager
Display power management can be customized in the
newly installed GUI as shown in the screenshot. This
setting also only applies to the current user.
B&R Linux 9 User's manual V2.03 21
Page 22
Operation
6 Operation
6.1 Touch screens
B&R Touch Click (right-click)
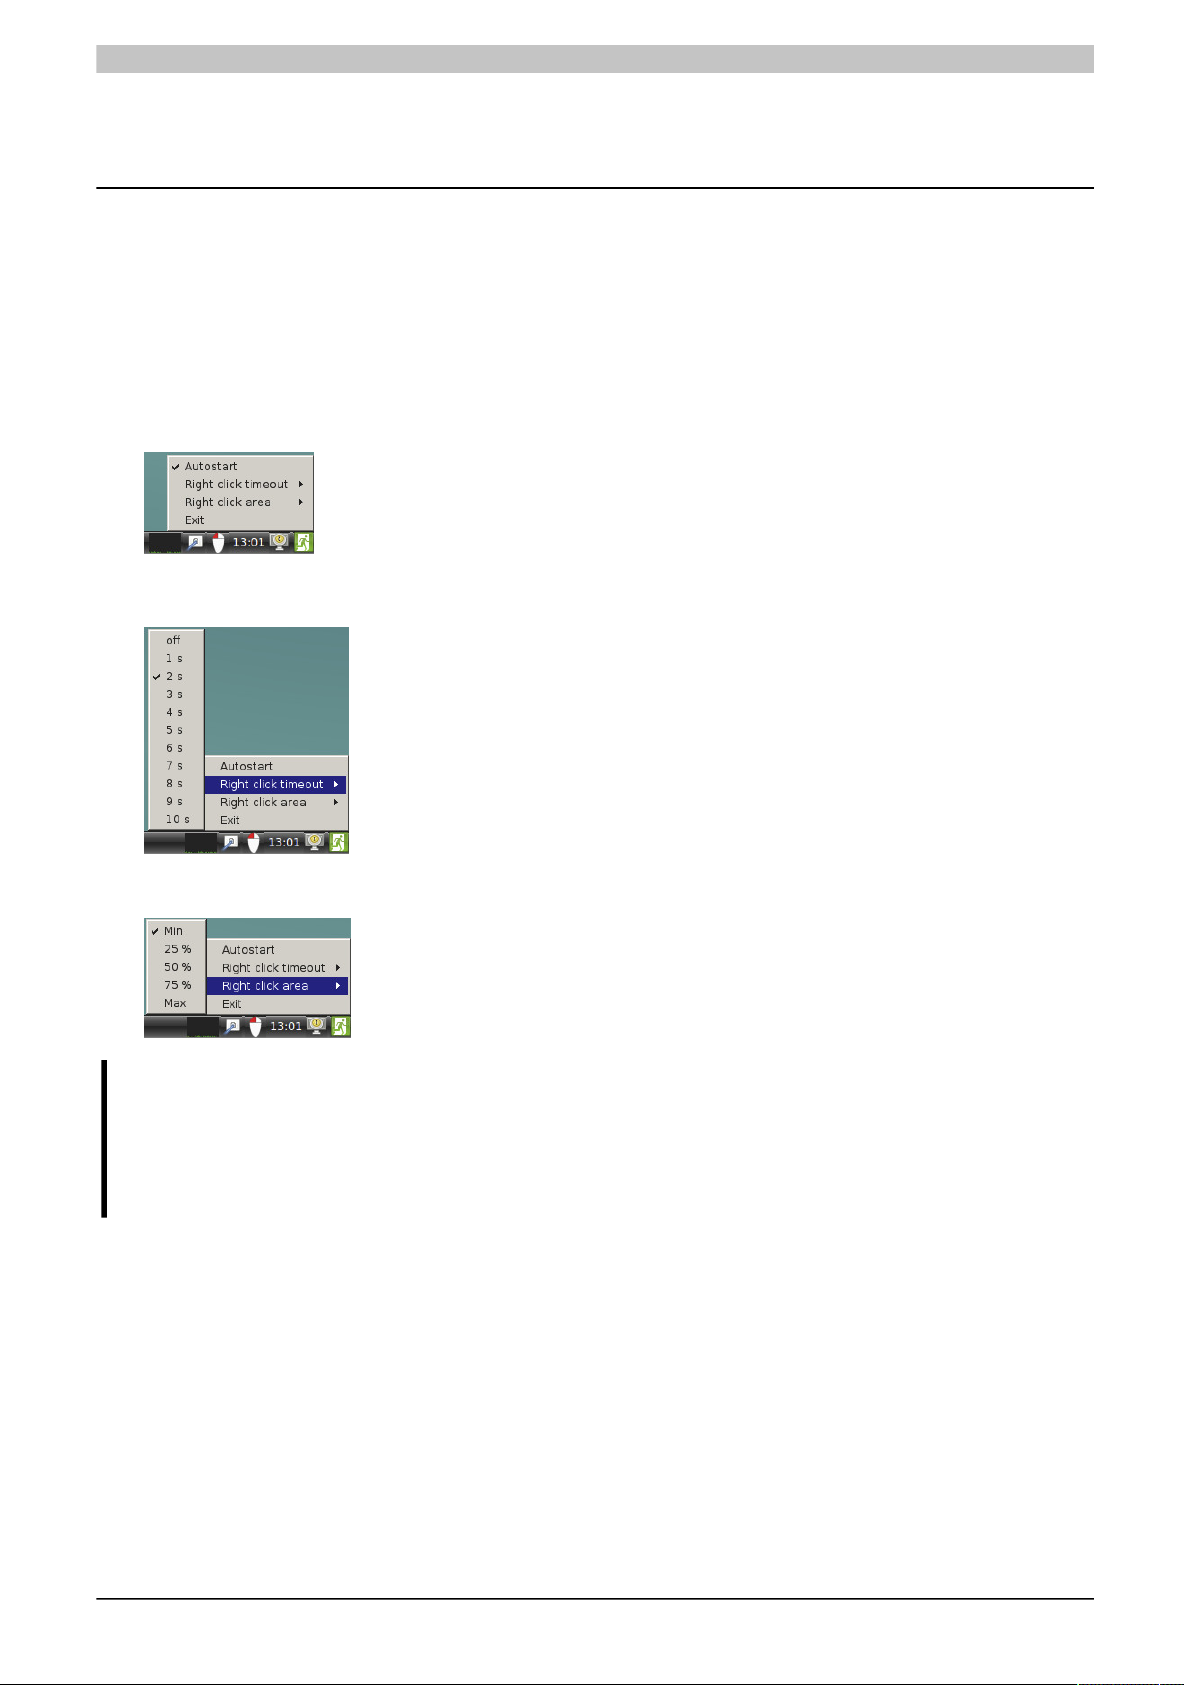
B&R Touch Click can be used to perform right-clicks on resistive and capacitive touch screens. The program is
available in the Start menu under Accessories.
1. Click on the mouse icon in the tray to configure the right-click behavior.
2. Click on "Autostart" to enable or disable the program.
This setting is user-specific.
3. Use menu Right-click timeout to set the interval for the right-click.
4. In order not to trigger an unwanted right-click when moving windows, the right-click is suppressed when
moving over longer distances. This behavior must be configured in menu Right-click area.
Information:
The size of the active area heavily depends on the touch screen used (resolution and geometry) and
the user behavior.
If right-clicking is enabled, the clicking behavior only changes after the timeout has expired. After the
timeout has expired, no further events are sent except a single right-click.
Clicking behavior
B&R touch devices (single- and multi-touch) have the same clicking behavior as a standard computer mouse.
Touch screen functionality when the monitor is off
Touch operations are also evaluated by the system when the monitor is in sleep mode. This will "wake up" the
monitor. It is important to note that this may also affect a previously invisible dialog box. This can cause unintentional
operation!
Touch screen functionality with extended desktop
In the extended desktop, the touch screens must first be assigned to the panels using the B&R Touch Screen
program (see chapter "B&R Config Utils" on page 15).
22 B&R Linux 9 User's manual V2.03
Page 23
Operation
6.2 MTCX/ADI functions
B&R MTCX driver
The B&R MTCX driver communicates with the B&R Maintenance Controller Extended (MTCX) and provides the
functions of MTCX for ADI.
The MTCX is a standalone processor that provides a B&R industrial PC with additional functions that are not
available on a "normal" PC.
B&R ADI library
The Automation Device Interface (ADI) makes it possible to access specific functions of B&R devices, e.g. setting
the display brightness or reading temperatures.
The B&R ADI library is preinstalled with B&R Linux because it is required by certain B&R tools.
B&R ADI Development Kit
The B&R ADI Development Kit for Linux is available for download on the B&R website (www.br-automation.com) to
develop applications that use the library (see chapter Downloads). It is not preinstalled and not required at runtime.
B&R ADI samples
In addition to the library documentation, the B&R ADI Development Kit also contains the source code for some
samples that demonstrate parts of ADI functionality. These samples can either be built and tested via CMake or
installed as finished programs.
$ adi-samples --help
$ adi-samples Versions
B&R ADI samples are not pre-installed by default and can be downloaded from B&R.
B&R Hypervisor operation
To enable synchronized access to the MTCX in a virtual environment, a special setting must be made.
The following must be entered in configuration file /etc/br/adi.conf:
[Hypervisor]
enabled=true
The system must then be restarted for the changes to take effect.
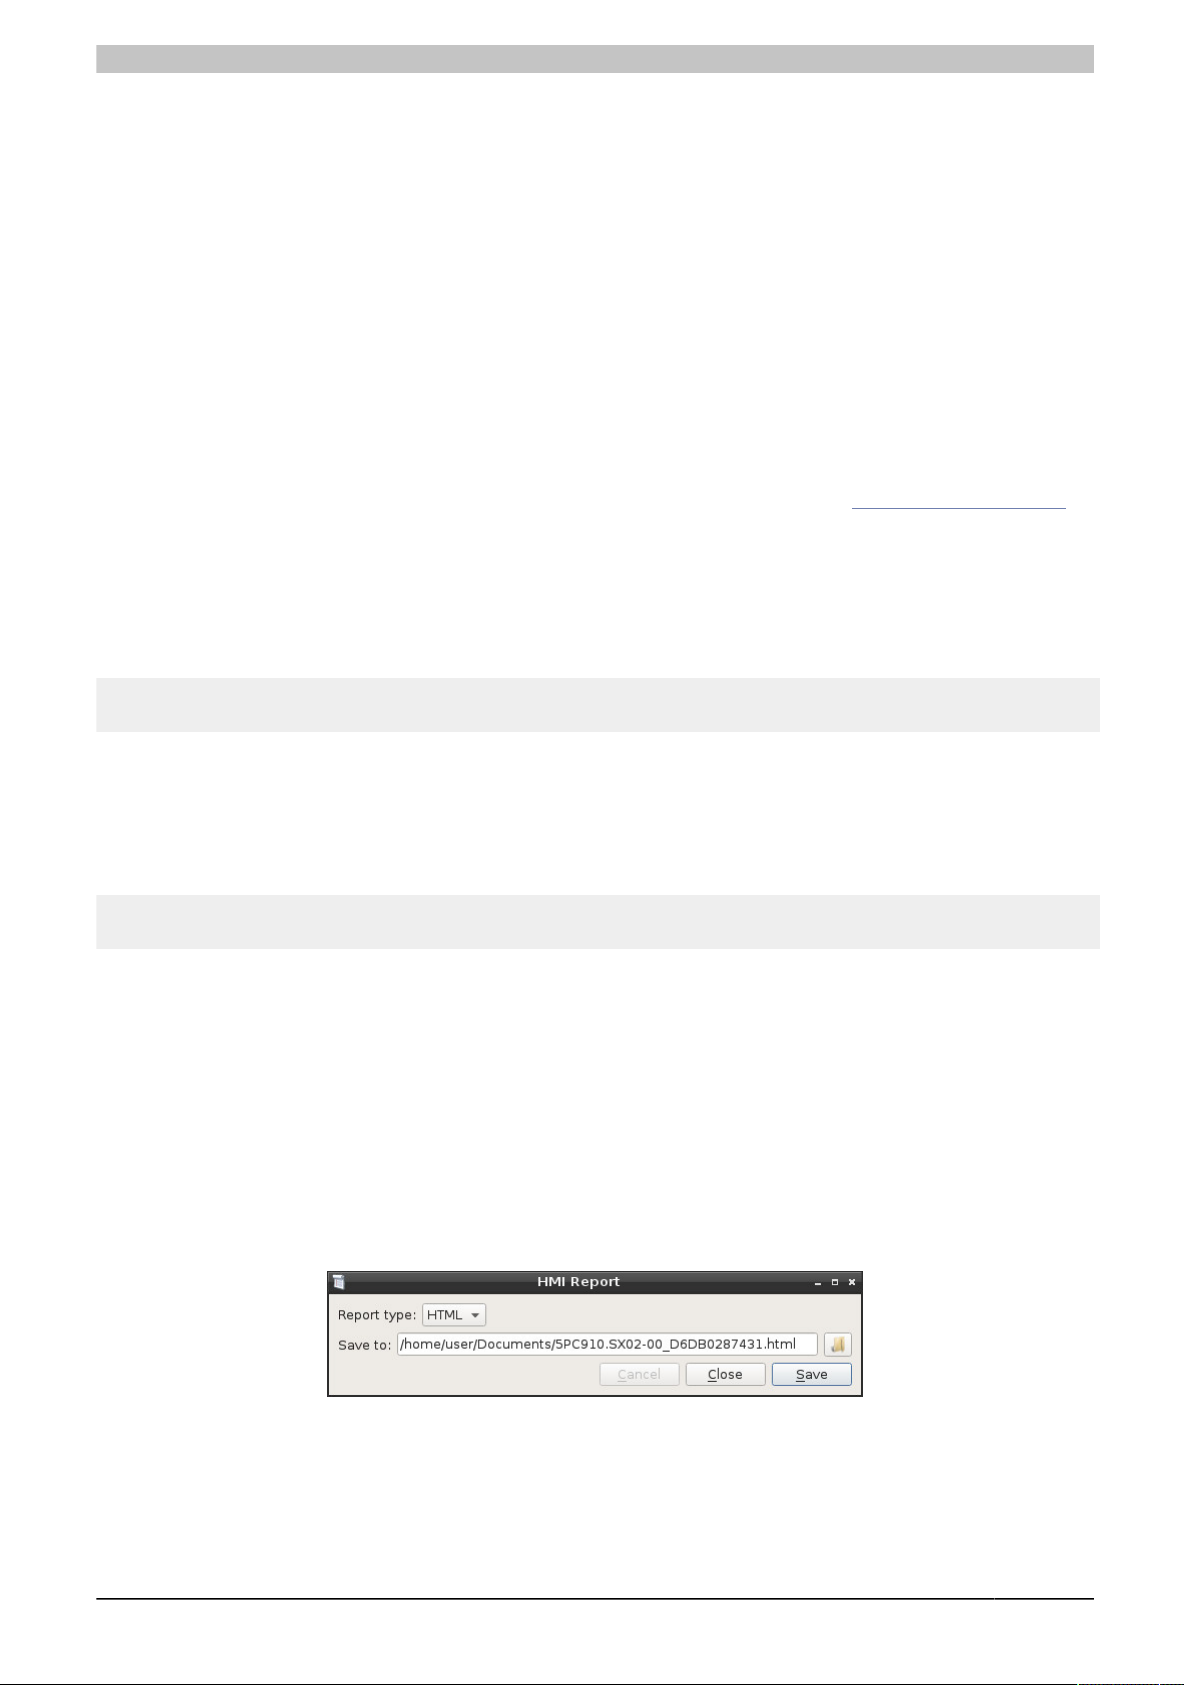
6.3 HMI Report
This creates a report of device-specific information. This report can then be used for support purposes or system
documentation. The tool can be called by a terminal. The GUI, a wrapper for the command line interface of HMI
Report, can be launched from the Start menu.
Splitting the tool into two packages
•
hmi-report-gui
•
hmi-report
This can be installed without the GUI component and its dependencies.
B&R Linux 9 User's manual V2.03 23
Page 24
Operation
Supported output formats
•
HTML
Report in HTML format for display in a browser.
•
Text
Report in simple text format for display in a text editor, which is especially useful for direct comparisons
of multiple reports.
•
XML
Report in XML format with corresponding XSL file for display in a browser.
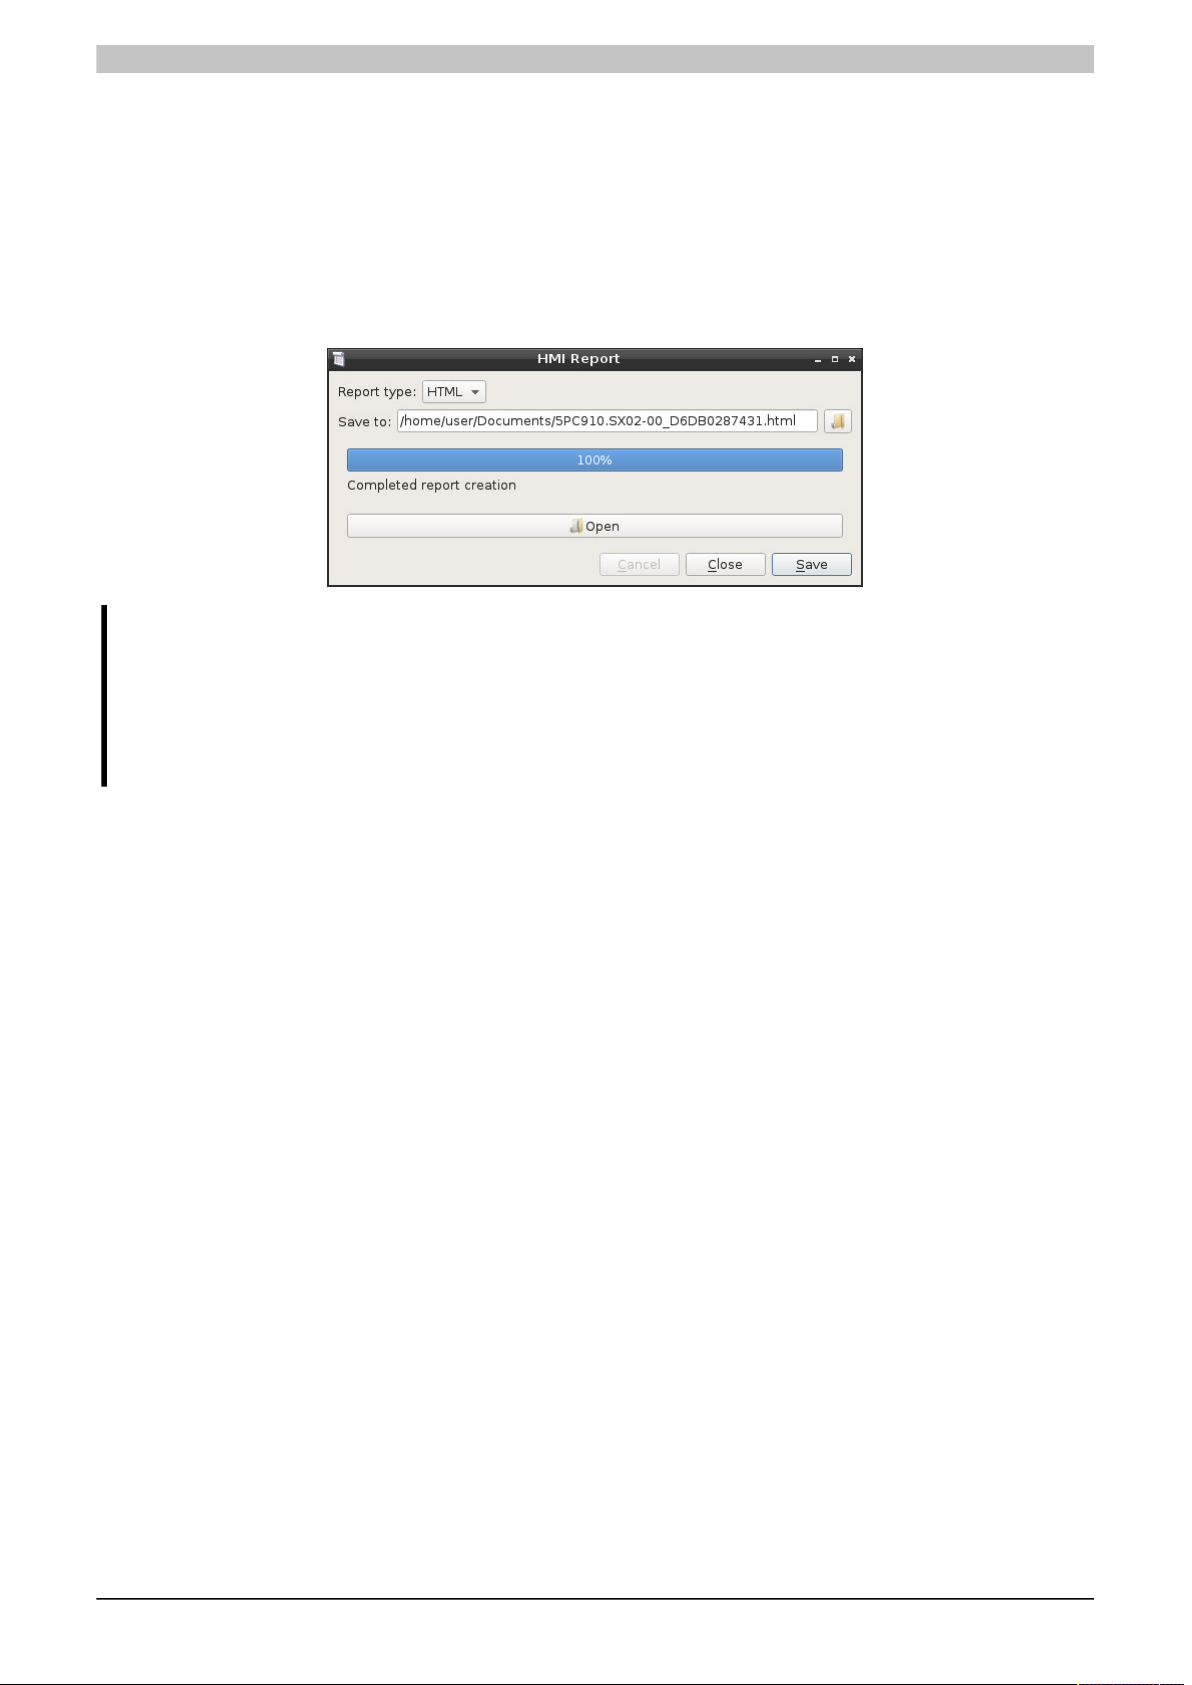
After the report has been created, it can be opened directly from the GUI in the respective application.
Information:
XML reports can no longer be displayed in modern browsers by default due to security policies. This
is because local files are not permitted to load other local files (XML loads the style sheet file).
Chromium/Chrome must be started with option --allow-file-access-from-files.
Firefox has setting security.fileuri.strict_origin_policy in about:config, which is applied
permanently.
If a report cannot be successfully created due to problems during creation, it is recommended to create a text report
in the terminal and query detailed process information.
$ hmi-report --verbose 3 --format text --output report.txt
Due to its simple format, the report in text format is more robust in relation to possible errors or early process
termination.
24 B&R Linux 9 User's manual V2.03
Page 25
Operation
6.4 Changing the display brightness
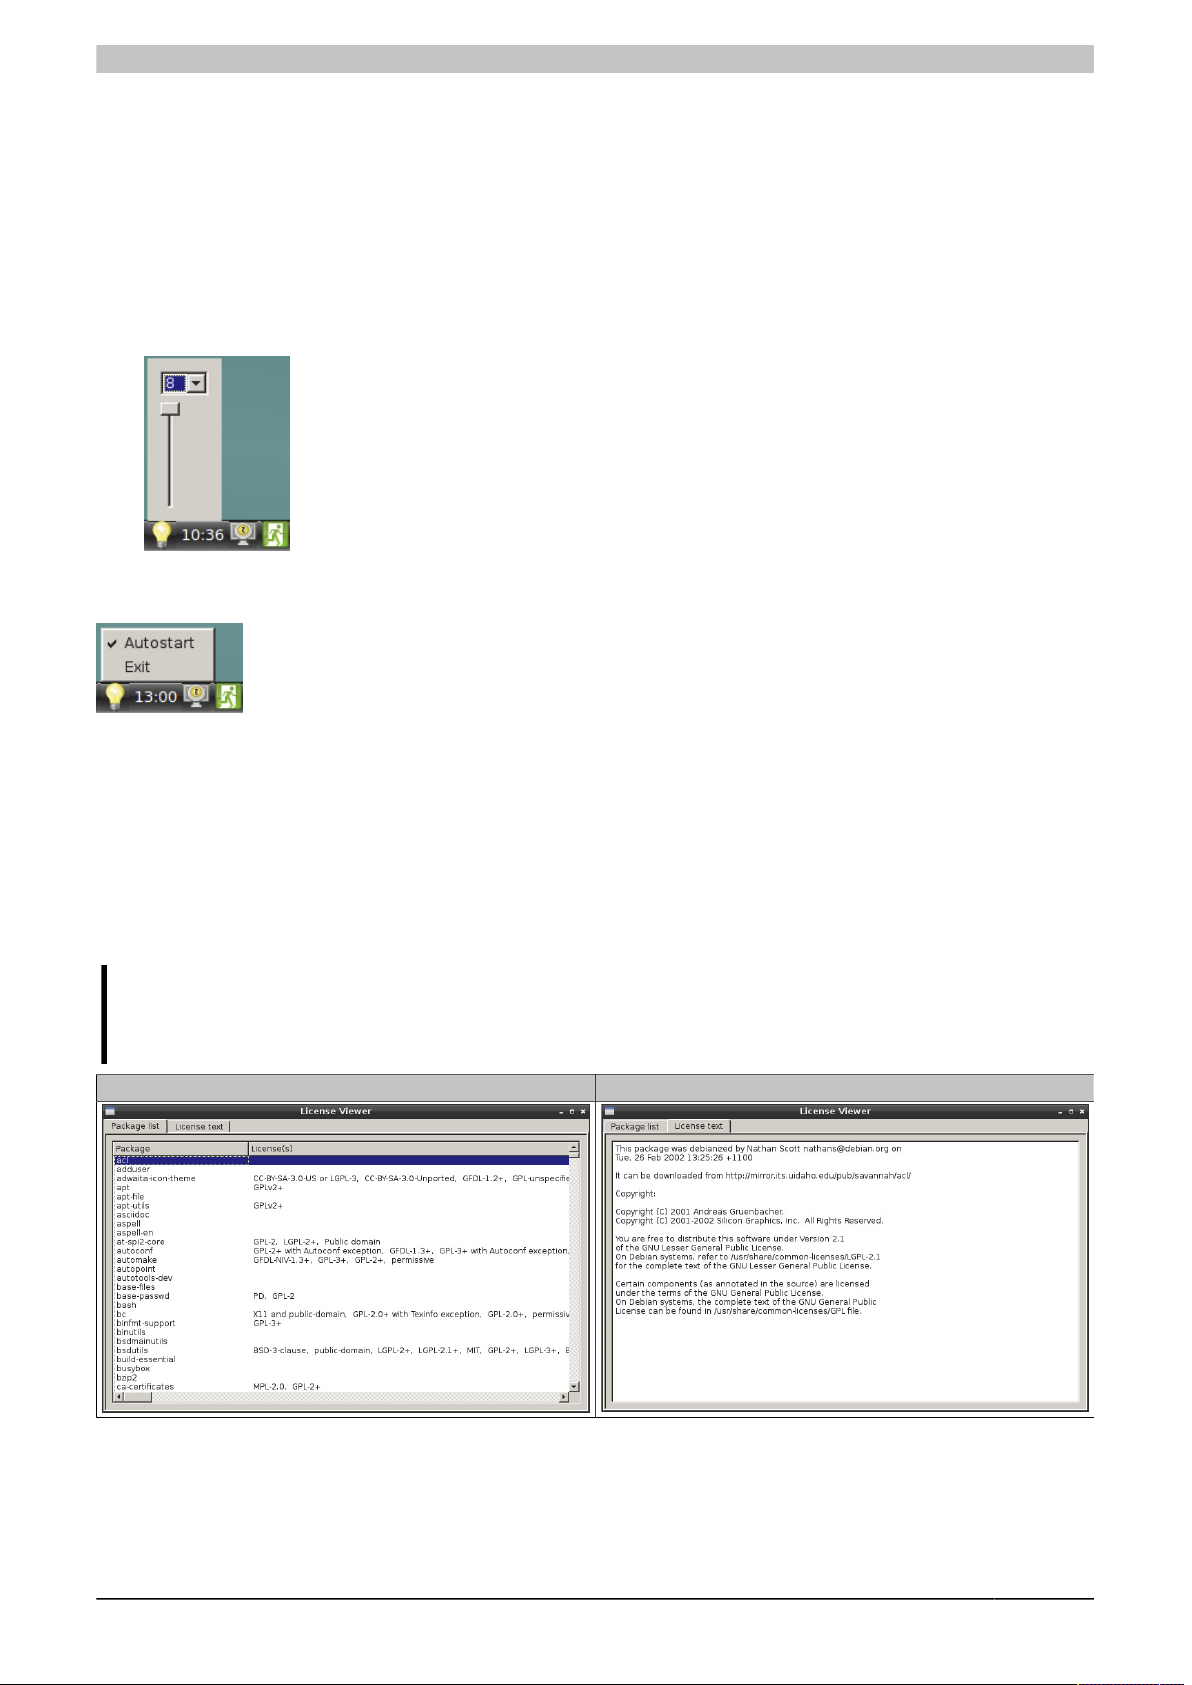
The brightness of the Panel PC display and Automation Panels connected via SDL can be set via tool B&R Display
Brightness.
1. Open the Start menu.
2. Start the program in folder Accessories.
3. Click on the lamp icon in the tray.
The number of detected displays is shown in the menu together with their IDs.
4. Use the slider to set the display brightness.
The program can be closed or the autostart can be enabled by right-clicking on the lamp icon. This setting is userspecific.
6.5 B&R License Viewer
The B&R License Viewer is used to view the licenses of the currently used packages.
1. Start the program via System Tools.
2. Call the list of the currently installed packages under tab "Package list".
3. Select a package (in blue).
4. The licenses of the package can be viewed under tab License text.
Information:
Loading licenses, especially applications with many license notes (e.g. Chromium, Firefox, etc.) may
take some time.
Package list view License view of a package
B&R Linux 9 User's manual V2.03 25
Page 26
Operation
6.6 B&R UPS Manager
Application B&R UPS Manager must be used together with B&R UPS units. To use this application, Debian 8 or
a newer version is required. Debian 7 or other systems that do not use system systemd Init are not supported.
The program can be started via the system tools and consists of 2 packages: ups-daemon and ups-control:
•
Package ups-daemon provides the system service. This package can be installed without ups-control,
and the service can be operated without a GUI.
•
In addition, package ups-control provides a user interface that can be used to configure the service, read
information and display notifications in the notification area.
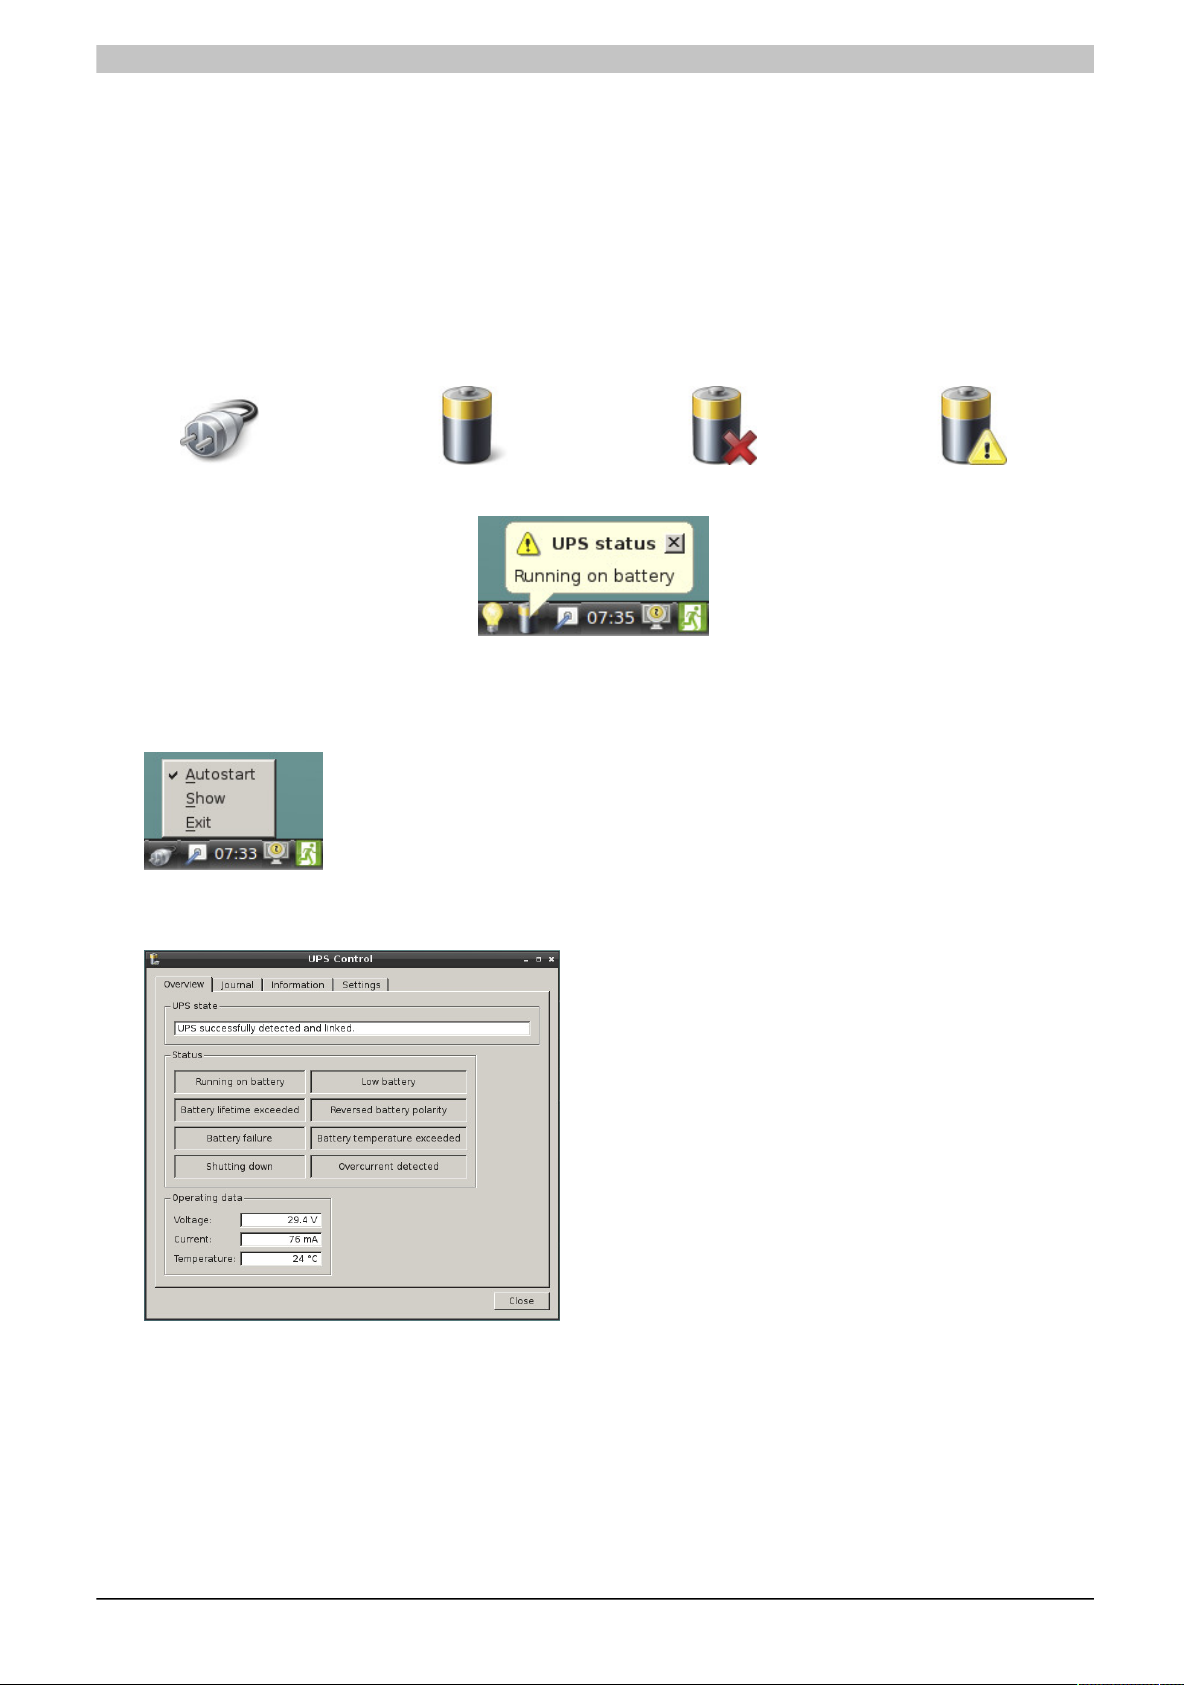
UPS Manager is started minimized in the tray. Four different icons can be displayed there.
Figure 1: Mains operation Figure 2: Battery operation Figure 3: UPS not connected Figure 4: UPS warning
Figure 5: UPS Manager notification
1. Open the shortcut menu with a right-click on the UPS Manager icon.
2. Start the application window via Show.
3. Change to tab Overview.
Data is displayed via the current operating status here.
26 B&R Linux 9 User's manual V2.03
Page 27
Operation
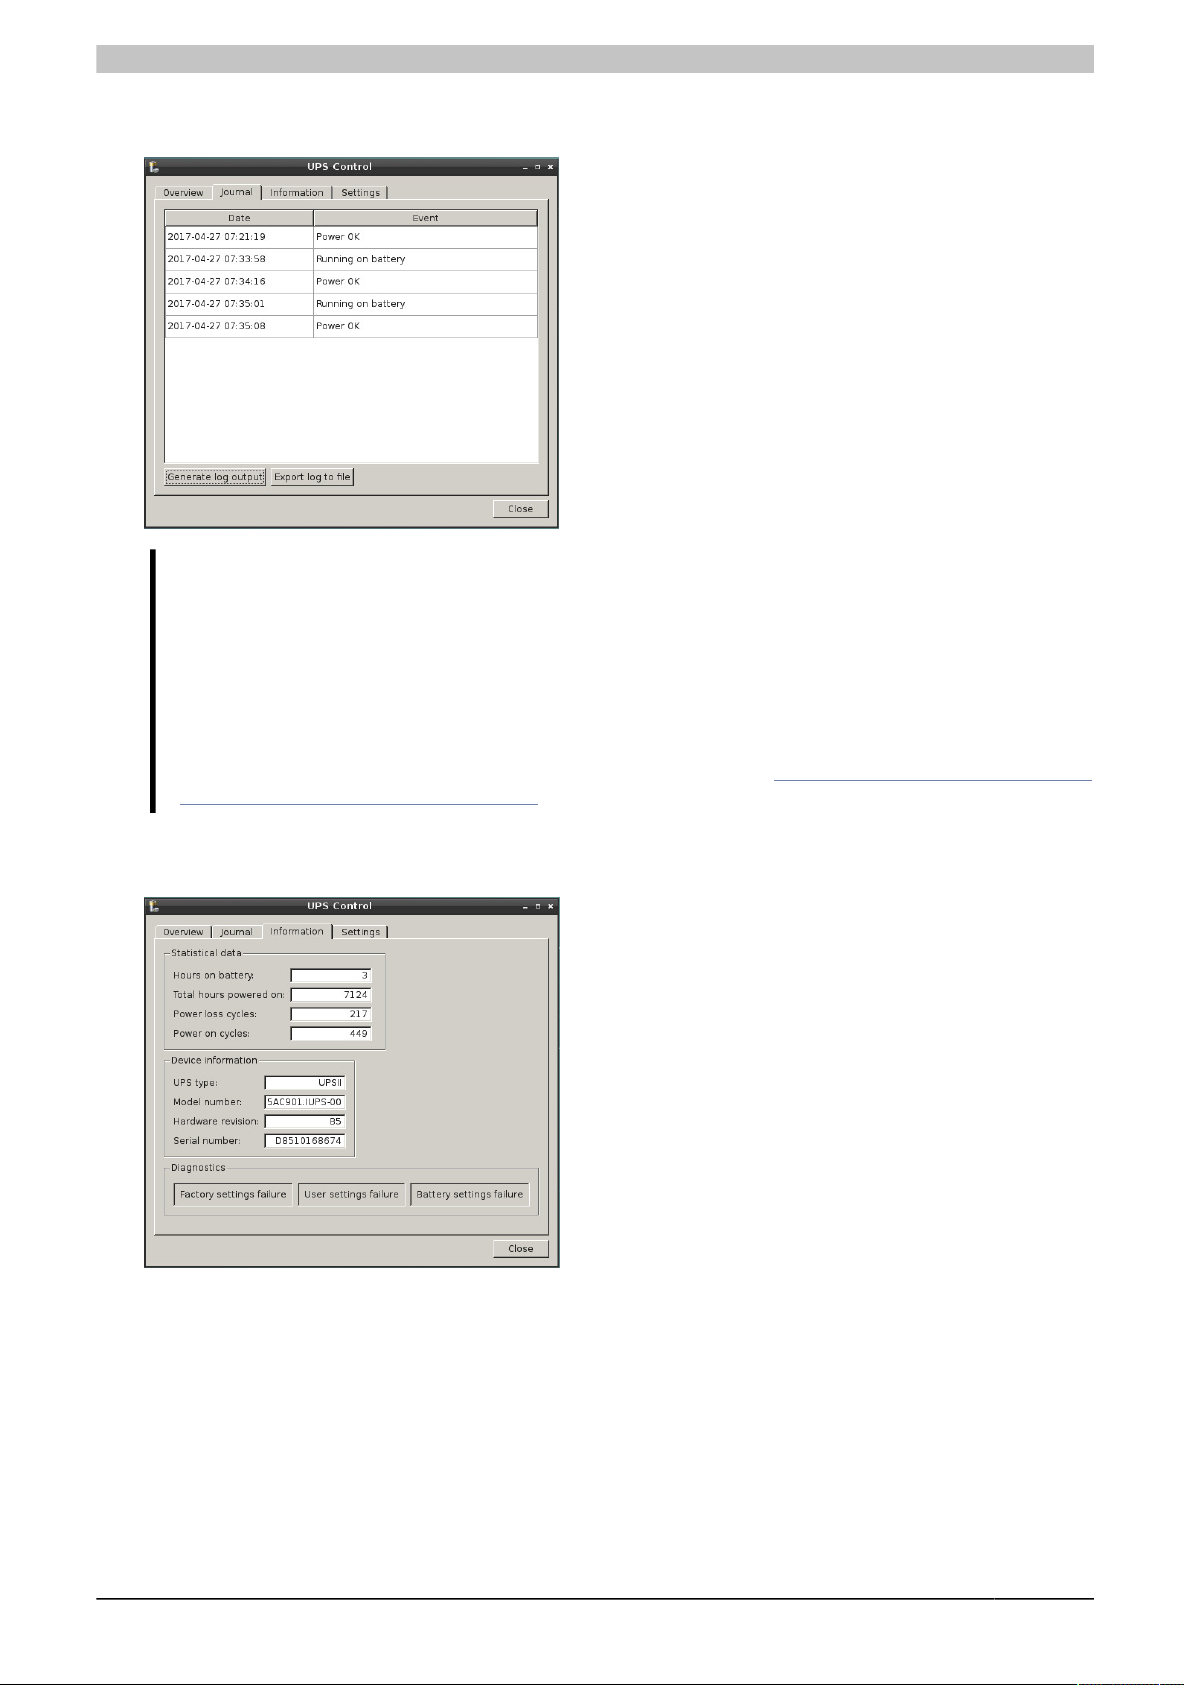
4. Change to tab Journal.
Messages from the system log can be read here. This journal excerpt can also be exported as a CSV file.
Information:
By default, logs are only stored in RAM. To keep logs across system reboots, it is necessary
to configure the journal. Saving log files takes up space and requires write cycles on the drive,
however!
The easiest way to do this is to create folder /var/log/journal; this will automatically store all logs
in it. Detailed settings can be made in configuration file /etc/systemd/journald.conf. In both cases,
root privileges are required.
For additional information about journal configuration, see https://www.freedesktop.org/soft-
ware/systemd/man/journald.conf.html.
5. Change to tab Information.
Information about the UPS hardware used as well as statistical information is available here.
B&R Linux 9 User's manual V2.03 27
Page 28
Operation
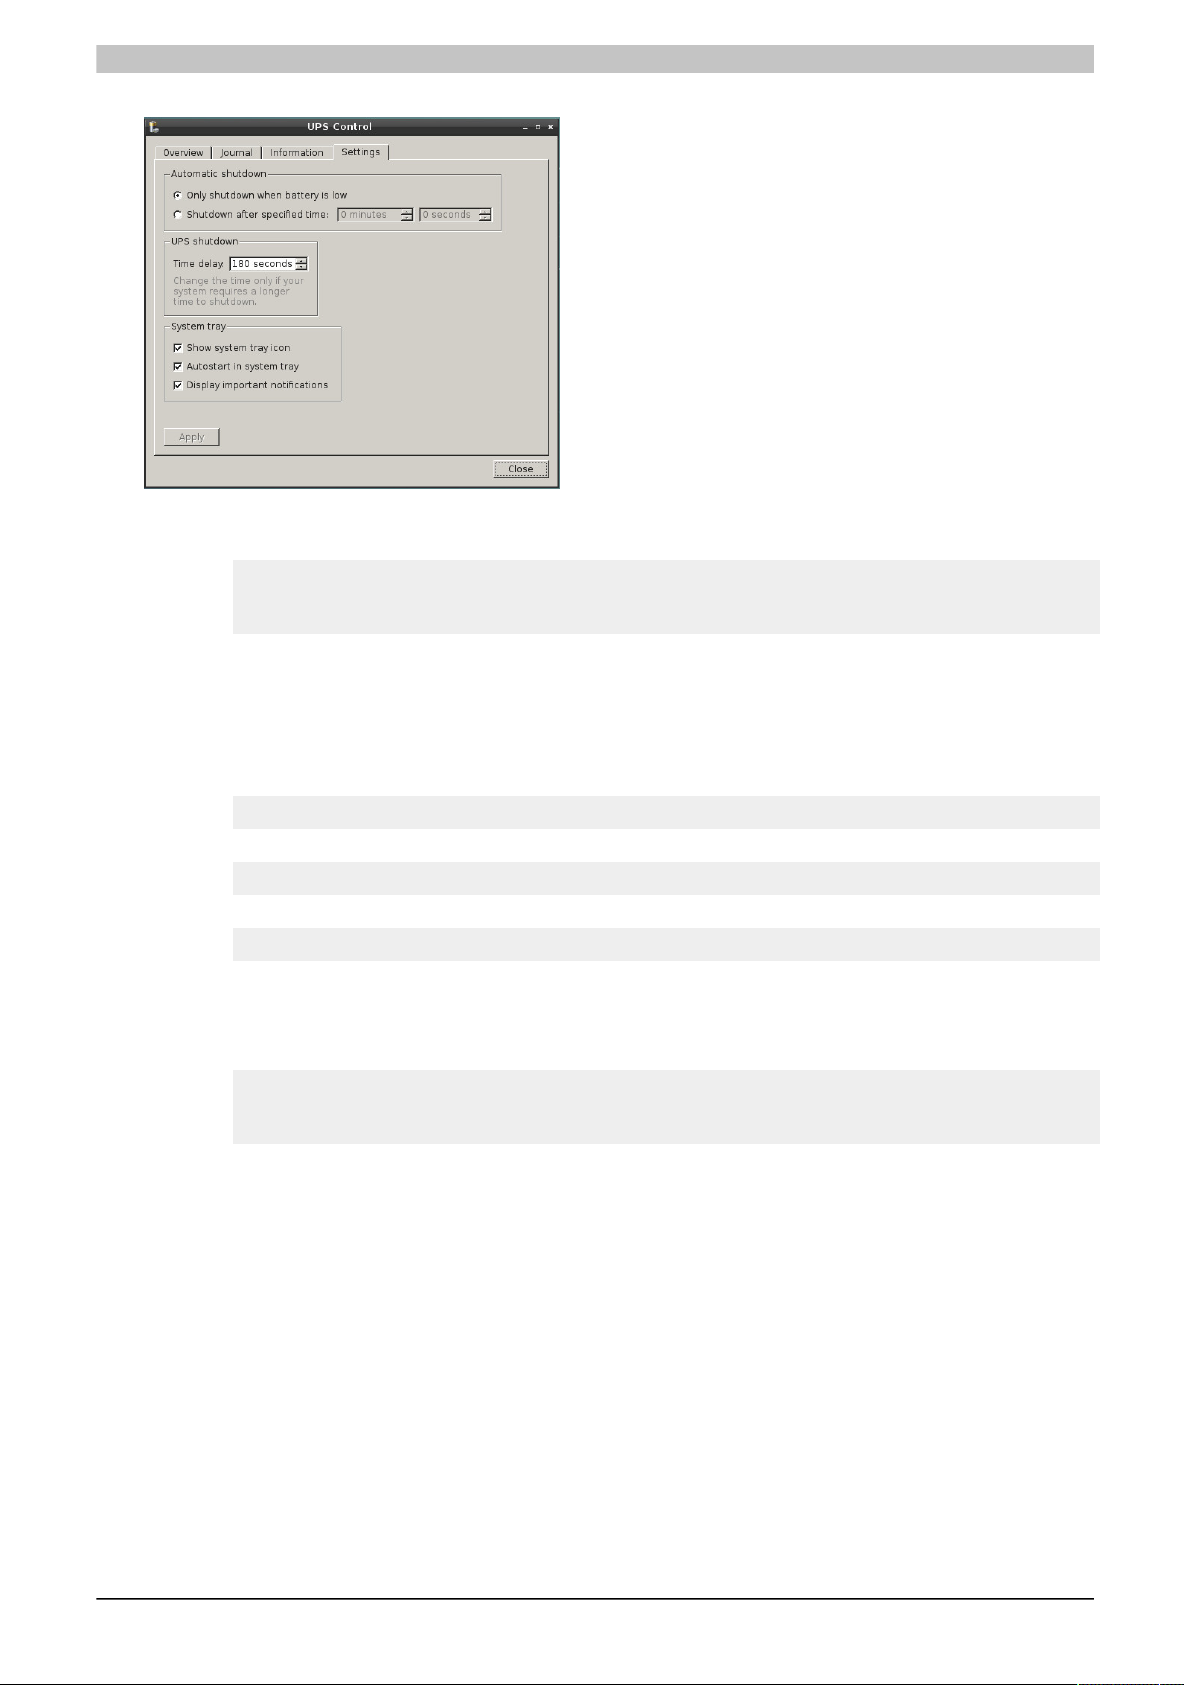
6. Change to tab Settings to configure the UPS service.
1) If ups-daemon is used without the graphical interface, the default settings are used automatically.
To change settings, create file /etc/br/ups.conf and write to it as follows:
[brupsd]
max_battery_time=-1
shutdown_time=180
max_battery_time=-1 is the default value and means that the system will not shut down in battery
mode until the battery level is low.
shutdown_time=180 is the time in seconds for the system to successfully shut down before the
UPS cuts off the power supply.
2) After the file has been created, the UPS service must be notified to apply the changes. Execute the
following command for this (root privileges required):
systemctl reload brupsd
3) Enter the following command to read all current UPS data:
brupsd --report
4) The following command can also be used to read the journal (root rights required):
journalctl _SYSTEMD_UNIT=brupsd.service
The UPS service is enabled by default. If no UPS module is detected on the PC during commissioning, the service is disabled. If a UPS is subsequently connected, the service can be enabled again.
Commands to query the UPS service status, start and permanently enable the UPS service include
the following:
systemctl status brupsd
systemctl start brupsd
systemctl enable brupsd
28 B&R Linux 9 User's manual V2.03
Page 29
Operation
6.7 Virtual keyboard
For keyboard-free operation of the device, a virtual keyboard can be used on the screen. The virtual keyboard
can also be used for login.
The onboard virtual keyboard is used as the virtual keyboard. This is provided by Debian, not B&R. For additional
information, see https://launchpad.net/onboard.
6.8 Language switching
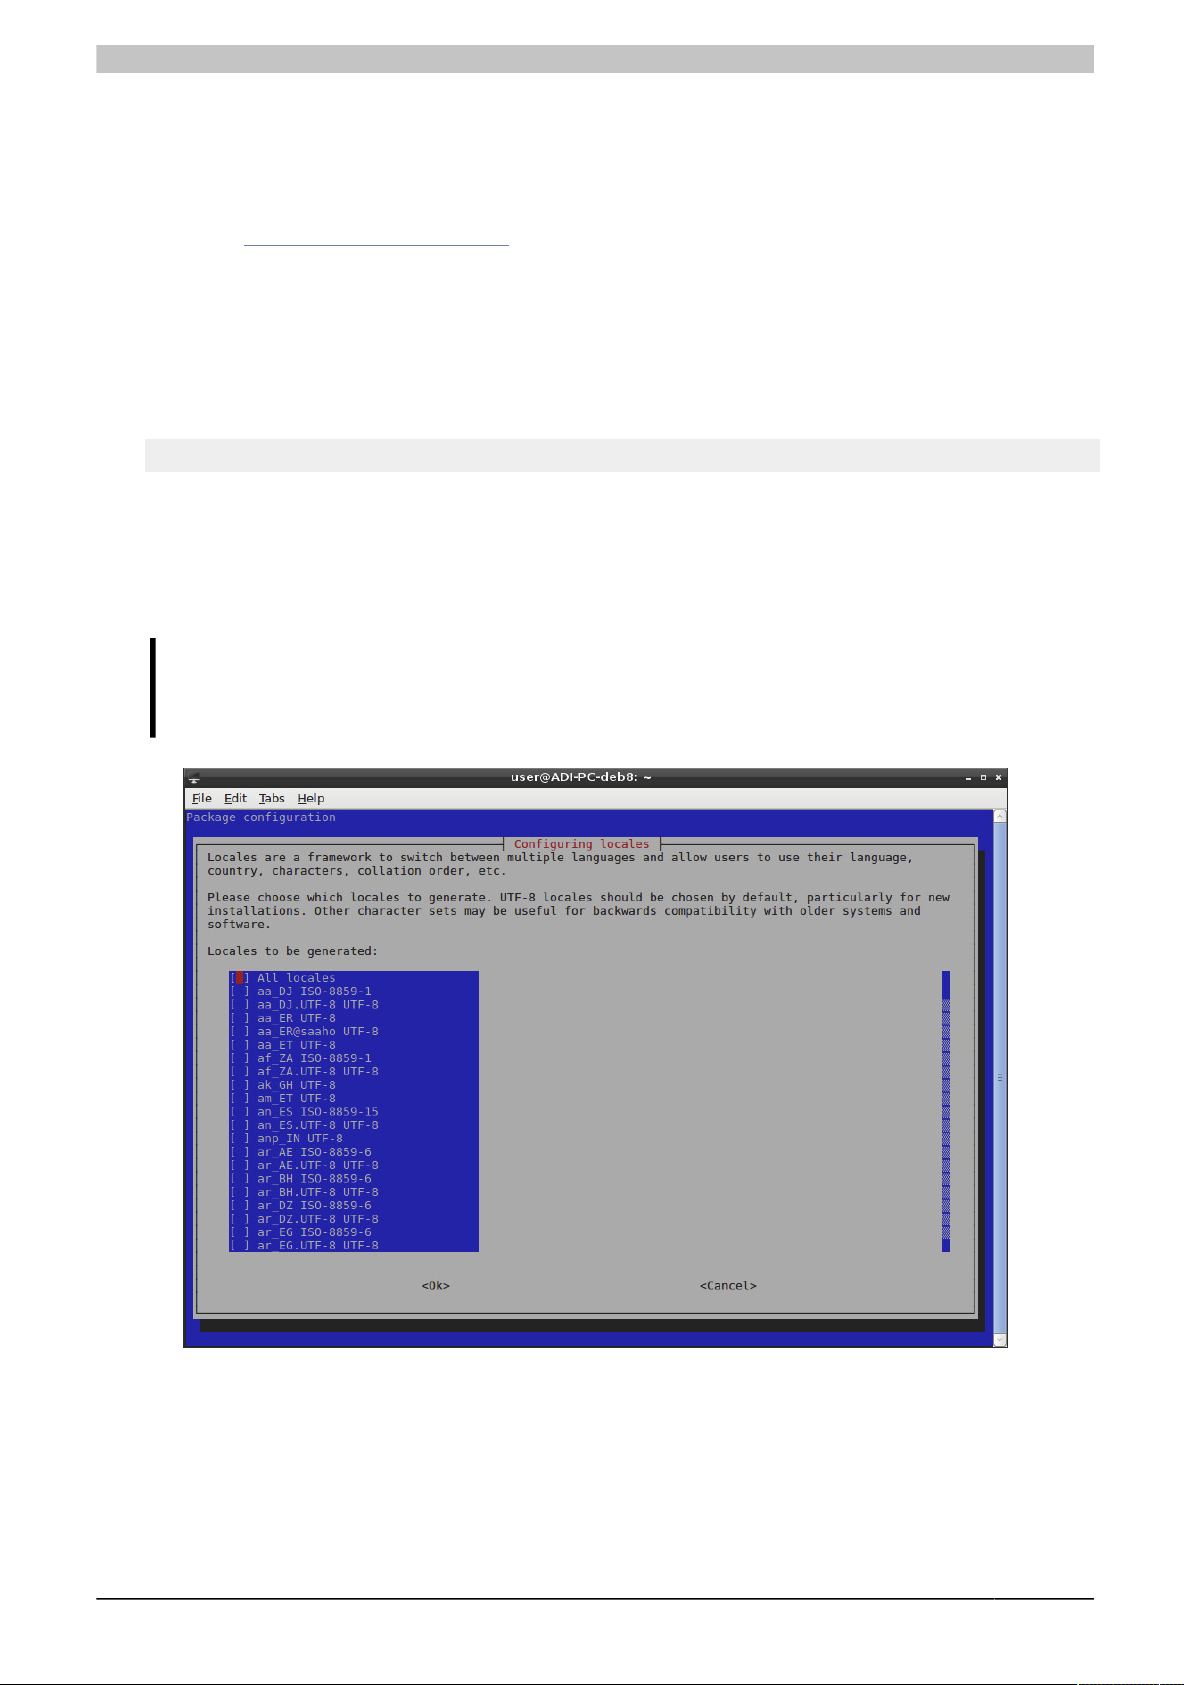
B&R Linux 9 allows the language to be configured by B&R program "First Config" (see chapter "B&R First Config"
on page 13). To change the language settings at a later time or to use a language other than English or German,
proceed as follows:
1. Enter the following command (root rights required):
dpkg-reconfigure locales
2. This opens a dialog box in which all of the necessary languages that should be made available can be
selected.
3. Confirm with OK.
4. Define a standard for the system from the preselection.
5. The selected locales are generated automatically after configuration.
Information:
If a component does not support the selected language, English is used automatically (applies
to all B&R programs).
B&R Linux 9 User's manual V2.03 29
Page 30

Operation
6.9 Multiple monitors
Only displays with the same resolution are supported for multi-screen operation.
6.10 Display resolutions
The graphics driver in B&R Linux 9 can only operate the panel of a B&R Panel PC and connected Automation
Panels with their native resolution. No other resolution can be set in the operating system.
6.11 Accessing Linux file systems in Windows
When accessing a Linux file system via Windows, e.g. for evaluating log files, DiskInternals Linux Reader can
be used. This Windows freeware program can be downloaded from http://www.diskinternals.com/. Note that the
program supports read access only.
6.12 TRIM support
Cyclic TRIM support is preconfigured for B&R Linux. Service systemd is executed weekly for this. This service has
no defined execution time and can thus change during use.
The service configuration can be read as follows:
/etc/systemd/system/fstrim.service
/etc/systemd/system/fstrim.timer
If this service is unwanted, it can be disabled with the following command:
systemctl disable fstrim.timer
Information:
Executing fstrim (https://manpages.debian.org/buster/util-linux/fstrim.8.html) can have a short-term effect on performance.
6.13 Real-time support
Various approaches exist for real-time support together with Linux. Real-time extensions can be added directly
to the Linux kernel, for example. This procedure is preferred by the Open Source Automation Development Lab
(OSADL).
For information and downloads of kernel versions with included real-time patches, see the OSADL website
(https://www.osadl.org/Realtime-Linux.projects-realtime-linux.0.html) or the Real-Time Linux Wiki (https://rt.wiki.k-
ernel.org/index.php/Main_Page).
There are no real-time extensions added to the Linux kernel in B&R Linux 9. The kernel version can be replaced
in the installed image, however. Since multiple versions are available, it is recommended to use the version with
additional text "Latest stable".
Information:
Linux systems with an included "real-time preempt patch" may perform worse, for example in intensive
graphics applications.
B&R has not performed any tests using real-time extensions.
30 B&R Linux 9 User's manual V2.03
Page 31

Operation
6.14 Installing local packages
Packages provided by Debian should always be installed via a package manager from a Debian package archive.
Tools such as apt, aptitude or graphical front ends such as Synaptic Package Manager can be used to download
and install packages directly.
B&R packages are downloaded as .deb files and must be installed locally on the system. apt should be used for
this. APT will also recognize local files if they are uniquely specified. The package name must start either with ./
or / for this:
# apt install /absolute/path/to/package.deb
# apt install ./relative/path/to/package.deb
If multiple packages should be installed and there are dependencies between these packages, it is recommended
to install them all together in one run. apt ensures that the correct sequence is followed:
# apt install /path/to/packages/*.deb
6.15 Installing operating system updates
Information:
If the file system write filter is active, it must be disabled before the update. Otherwise, it is not possible
to install updates because they will be lost after restarting the system.
Operating system updates can be downloaded via the Debian package directories. This requires an Internet connection to access the servers of the Debian package directories. Administrator rights are required for installation.
The first command is used to update the local package index. The second one is used to download and install
the updated packages.
apt update
apt upgrade
The update process is interactive by default, and the individual updates are listed before installation so that they
can be checked. If a non-interactive update is desired, option "--yes" can be added to the apt calls. An additional
automatic update service is available for Debian 9 or later, which is not enabled by default in B&R Linux. For
more information, see the official APT documentation. This refers to more detailed documentation of the individual
commands.
Command for the man page documentation of .apt:
man apt
Updates of B&R packages must be downloaded from the B&R Downloads section and can be installed as local
files. See Downloads and "Installing local packages" on page 31.
6.16 Hibernation support
Hibernate (suspend to disk) is only supported if sufficient swap memory is available, i.e. if there is space for the
entire RAM. It is also necessary to define the swap partition with kernel parameter resume=. If a swap file should
be used instead of a partition, resume_offset= must also be set. In B&R Linux, hibernation is not supported by
default in order to keep the required CFast card size as small as possible and to reduce write cycles to the mass
storage device.
For additional information about swap, see the Debian Wiki (https://wiki.debian.org/Swap) or kernel documentation
(https://www.kernel.org/doc/html/latest/power/swsusp.html).
B&R Linux 9 User's manual V2.03 31
Page 32

Operation
6.17 Browser update
B&R Linux 9 uses Chromium as the default web browser. Unlike Google Chrome, it does not perform automatic
updates. If a newer version should be used, it can be updated separately as long as a more recent version is
available in the Debian archive of the respective distribution version:
•
Online: Execute the following commands for this:
# apt update
# apt install chromium
•
Offline: The Debian packages can be downloaded from the web interface of the Debian package database,
even from another computer. It is necessary to download updated dependencies as well. The downloaded
packages can be installed as follows, as long as they are all located in the current folder:
# apt install ./*.deb
The status of chromium in the Debian archive can be queried via the Debian Tracker.
6.18 Font support
Information:
Standard fonts Arial, Arial Unicode, Times New Roman, Courier New, which are available for configuration in mapp View, are not included in B&R Linux 9 for licensing reasons.
If these are used in a mapp View HMI application, a fallback to Helvetica or a Sans Serif font occurs. If
Times New Roman or Courier New was used, the display may differ from the one configured.
The license conditions of the respective font must be observed.
B&R Linux 9 features the following fonts:
•
DejaVu Sans | SansMono | Serif
For more information about these fonts, see https://packages.debian.org/stretch/fonts-dejavu.
•
Liberation Mono | Sans | Serif
These replace Arial, Times New Roman and Courier New. For more information about these fonts, see
https://packages.debian.org/stretch/fonts-liberation.
•
Adding more fonts:
Copy fonts (OTF or TTF files) to folder /usr/local/share/fonts. For more information, see https://wiki.de-
bian.org/Fonts.
•
Web fonts
The required fonts can also be loaded by the server in a mapp View HMI application. For more information,
see Automation Help.
6.19 Executing privileged processes in the terminal
Depending on the setting in First Config, either su or sudo can be used to execute privileged processes.
•
su: Queries the root user password. Starts a new shell as root after successful authentication. Commands
can be executed as root until this shell is stopped (e.g. with exit). The root password must be set and the
root user must not be locked for this. To clean up the environment variables, it is recommended to start
su with option -, -l or --login.
•
sudo: Queries the user password, provided the user is listed in the sudo group, and executes the next
command. The password is then stored in the current terminal for 15 minutes and is no longer requested
when sudo is called again. The behavior of su can also be imitated by sudo --login.
For more detailed information, see the man pages for su and sudo. See also Editing system files in the terminal.
6.20 CAN
For its industrial PCs, B&R offers CAN modules with two different controllers:
•
CC770
32 B&R Linux 9 User's manual V2.03
Page 33

Operation
This is also supported by Linux in the mainline kernel. B&R offers a Debian package that integrates the
module via Dynamic Kernel Module Support (DKMS). The driver source code from the respective kernel
used in Debian is used.
•
SJA1000
The SJA1000 driver is already included as a module in the Debian standard kernel configuration.
To determine which controller is used for specific hardware, see the corresponding hardware user's manual. Both
modules are connected via the ISA bus, which requires the use of kernel modules sja1000_isa and cc770_isa.
Information about the kernel modules can be queried using the following commands:
# modinfo cc770_isa
# modinfo sja1000_isa
Both drivers require specific parameters when loading:
•
port: I/O number
•
indirect: Indirect access via address and data port
•
irq: IRQ number
Parameter msgobj15_eff=1 can also be used with the CC770 controller. In some situations this can solve problems with the 29-bit addressing (EFF). Alternatively, parameter i82527_compat can be set to 1 to achieve strict
compatibility with the Intel i82527 CAN controller.
The respective module can be loaded with one of these commands:
•
CC770:
#> modprobe cc770_isa port=0x384 indirect=1 irq=10
#> modprobe cc770_isa port=0x384 indirect=1 irq=10 msgobj15_eff=1
#> modprobe cc770_isa port=0x384 indirect=1 irq=10 i82527_compat=1
•
SJA1000:
#> modprobe sja1000_isa port=0x384 indirect=1 irq=10
The following commands can be executed to automate this procedure and make the configuration permanent. This
automatically loads the modules with the corresponding parameters when booting.
•
CC770:
#> echo 'options cc770_isa port=0x384 indirect=1 irq=10' > /etc/modprobe.d/cc770.conf
#> echo 'cc770_isa' > /etc/modules-load.d/cc770.conf
•
SJA1000:
#> echo 'options sja1000_isa port=0x384 indirect=1 irq=10' > /etc/modprobe.d/sja1000.conf
#> echo 'sja1000_isa' > /etc/modules-load.d/sja1000.conf
It should be possible to read this or a similar output after successfully loading the module using "dmesg":
...
[ 47.776948] CAN device driver interface
[ 47.778385] sja1000 CAN netdevice driver
[ 47.779589] sja1000_isa sja1000_isa.0: sja1000_isa device registered
(reg_base=0x00000000c021a4d2, irq=10)
[ 47.779610] Legacy sja1000_isa driver for max. 8 devices registered
...
As soon as the driver is loaded, the CAN interface can be configured like a network interface. This command can
be used to determine the name and existence of the interface:
$ ip link
All network interfaces are listed. The CAN interfaces are enumerated, i.e. the first interface should be called can0
and can be enabled as follows:
# ip link set can0 up type can bitrate [BITRATE_IN_BIT/S]
For example:
# ip link set can0 up type can bitrate 250000
B&R Linux 9 User's manual V2.03 33
Page 34

Operation
The "can-utils" package can be used to test the CAN interface, for example. This can be downloaded and installed
from the Debian package archive:
# apt update
# apt install can-utils
candump can be used to read from the interface, cansend to transmit and cangen to send generated messages.
For detailed information, see the corresponding manpages.
The CAN modules use the Linux SocketCAN driver implementation. For more details about usage, see the official
documentation (https://www.kernel.org/doc/html/latest/networking/can.html).
34 B&R Linux 9 User's manual V2.03
Page 35

Troubleshooting
7 Troubleshooting
Truncated dialog boxes on VGA and WVGA displays
B&R Linux 9 works with VGA and WVGA displays, but some system dialog boxes are not fully displayed. Some
dialog boxes can thus no longer be operated and closed via touch screen or mouse!
As a workaround, the panel bars can be set to Automatic hiding to enlarge the display area or rotate the display
in the B&R "Touch Screen" program (see chapter B&R Config Utils).
Debian not booting on older APC2100 or PPC2100 devices
Debian does not boot on B&R devices with CPU stepping prior to D0. The boot procedure only be performed on
D0 CPU stepping (or later).
USB devices not working on APC2100 or PPC2100 devices
The USB BIOS settings must be set to Smart auto or Enabled under XHCI.
DisplayPort on APC910 with Skylake chipset
On APCs with Skylake chipsets (QM170/HM170/CM236), image output on the DisplayPort interface is not reliable
with every configuration.
B&R Linux 9 User's manual V2.03 35
Page 36

Downloads
8 Downloads
For B&R Linux 9, the following downloads are available on the B&R website (www.br-automation.com).
1)
Documentation
•
Debian 9 installation package
Describes how to perform a standard Debian 9 installation on B&R PCs.
Packages
Information:
The B&R packages are only released for B&R Linux 9. If a different Debian 9 installation is used, the
functionality of the respective package cannot be guaranteed.
•
ADI library (Linux)
Includes the library and development kit as two separate packages.
°
adi: ADI shared library and files required at runtime.
°
adi-dev: Contains C headers, API documentation in HTML format, source code of ADI samples and
other files for developing applications with ADI. This package is not preinstalled.
•
ADI samples (Linux)
Sample programs for using the ADI library. The corresponding source code is included in the ADI Development Kit (adi-dev). This package contains the compiled samples for testing purposes. This package is
not preinstalled.
•
CC770 DKMS
Includes driver-based Dynamic Kernel Module Support (DKMS) for CAN controller CC770. In Debian, this
is not included in the Linux kernel or as a module by default. This package is not preinstalled.
•
Config Utils
Contains a package with tools App Launcher, Autostart Manager and File System Write Protection. This
installation package replaces the service tool and is only included in B&R Linux 9.1.1.0 and later.
•
Display Brightness
Tool for adjusting the display brightness of B&R panels.
•
First Config
Tool for starting B&R Linux images. This package should not be installed on systems that have already
been configured and should not be updated.
•
HMI Report
Contains packages hmi-report and hmi-report-gui, which are used to create reports about the hardware
and operating system for diagnostic purposes. These packages are not preinstalled.
•
License Viewer
GUI tool for viewing the license texts of all installed Debian packages.
•
MTCX DKMS
DKMS kernel driver that enables communication between the ADI library and the MTCX on B&R PCs.
•
Service Tool
Tool was replaced by Config Utils and is therefore no longer installed on B&R Linux 9 1.1.0 and later.
•
Touch Click
Tool that simplifies the operation of touch screens in LXDE.
•
Touch screen
GUI tool for configuring screens and touch screens.
•
UPS Control
GUI for managing B&R UPS units.
1)
Some downloads require a login.
36 B&R Linux 9 User's manual V2.03
Page 37

•
UPS Daemon
System service that controls and monitors B&R UPS units.
Other downloads
•
B&R Linux installer
Live OS for installing B&R Linux images.
Downloads
B&R Linux 9 User's manual V2.03 37
Page 38

Publishing information
Publishing information
B&R Industrial Automation GmbH
B&R Strasse 1
5142 Eggelsberg
Austria
Telephone: +43 7748 6586-0
Fax: +43 7748 6586-26
38 B&R Linux 9 User's manual V2.03
 Loading...