

Page 1
NE 151 Highway 300, Suite A
PO Box 2609
Belfair, WA 98528
360.464.2119
www.boxlight.com
Pro5000SL
Page 2

2
About this manual .....................1
Contents........................................2
Projector features.......................3
Preparations.................................3
Contents of package.........................3
Part names....................................4
Projector............................................4
Control panel ....................................5
Remote control .................................5
Picture menu(PC mode)......................21
Picture menu(Video mode).................22
Audio menu.........................................23
Setting menu(PC mode).....................24
Setting menu(Video mode).................25
Advanced menu..................................26
Logo Setting.................................26-A
Logo Capture................................26-B
Presentation menu..............................27
Security menu......................................28
Auto filter alert..................................30
PIN Key in operation...........................31
Setting up......................................6
Arrangement.....................................6
Connecting your devices..................8
Connecting power supply................10
Using the security anchor................10
Using the hiding-style Handle..........11
Remote control..........................12
Putting batteries..............................12
About the remote control signal......13
Using as a simple PC mouse &
keyboard.........................................13
Power on/off...............................14
Turning on the power......................14
Turning off the power......................14
Operating....................................15
Adjusting the volume......................15
Adjusting the mute..........................15
Selecting an input signal.................15
Searching an input signal...............16
Selecting an aspect ratio................16
Adjusting the image position..........17
Adjusting the zoom and focus........17
Correcting the keystone
distortions
........................................18
Stilling the Screen...........................19
Temporarily blanking the screen.....19
Using the menu function.................20
MENU
Maintenance...................................32
Lamp....................................................32
Lamp Warning...................................33
Air filter................................................34
Other care...........................................35
Troubleshooting............................36
Appendix
Contents
Regarding the indicator lamps............36
Mistaken for machine defects.............37
List of supported Monitor Display.......39
Ceiling Mounted Installation Guide.....40
PIN code number memo.....................41
Page 3
3
1. Design with 3LCD optical system, provide you:Bright image, natural color,
smooth video playback and gentle for your eyes.
2. Design with high efficiency dust air filter and Auto Filter Alert. (See P30)
3. Easy to maintenance design function.(See P32~35)
4. Security PIN Lock function. (See P29)
5. Progressive scans accommodating for High-definition 1080i form.
6. Auto V keystone function, +/- 30 degrees.
7. Auto brightness control.
8. Auto ceiling function.
9. Support DVI ,YPbPr ,Composite Video and S-Video signal. (See P8)
10. Hiding-Style Handle to carry the projector easily. (See P11)
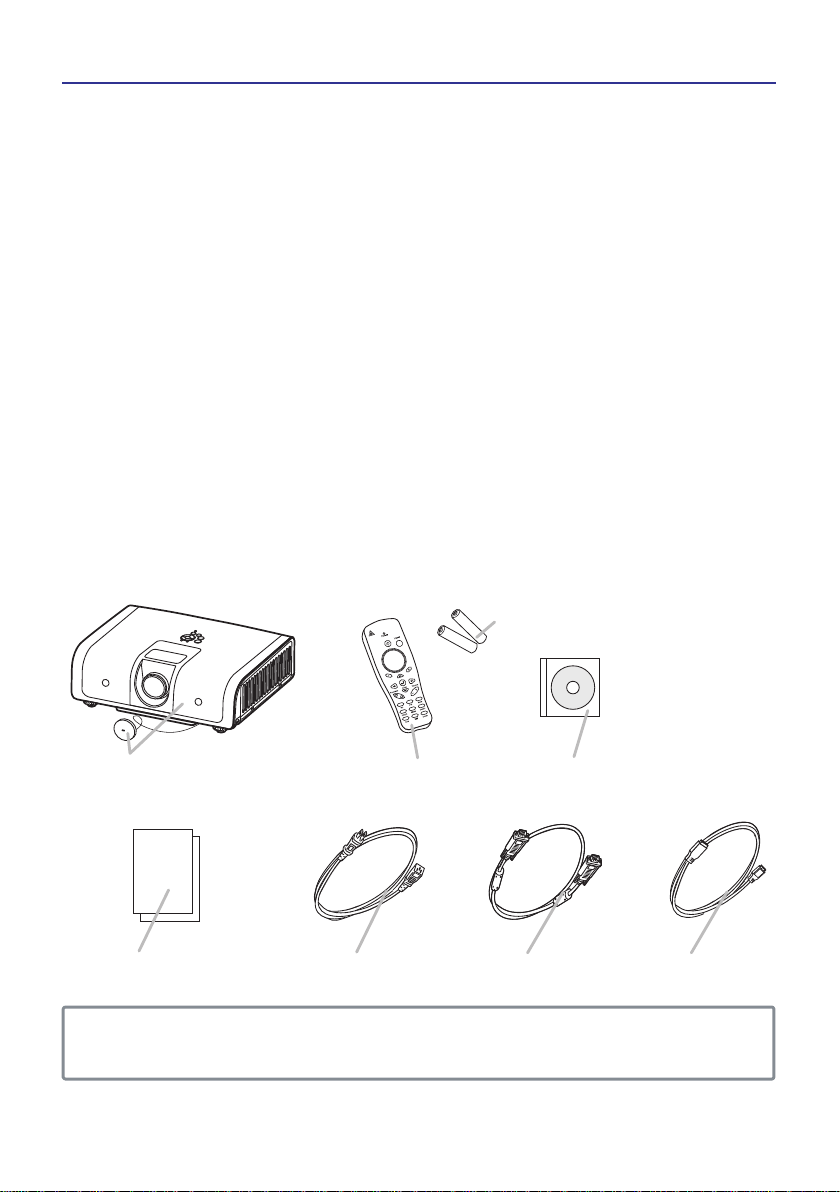
Contents of package( Before Use )
Your projector should come with the items shown there. Contact immediately
your dealer if anything is missing.
Projector features
Preparations
NOTE ► Keep the original packing materials, for future reshipment.
Be sure to use the original packing materials when moving the projector.
(1)Projector and Lens Cap (2)Remote control
(3)Battery (for Remote Control use)
(4)User’s Manual (CD)
(5)Quick Start Guide
(6)Power Cable
(7)VGA Cable (7)USB Cable
Page 4
4
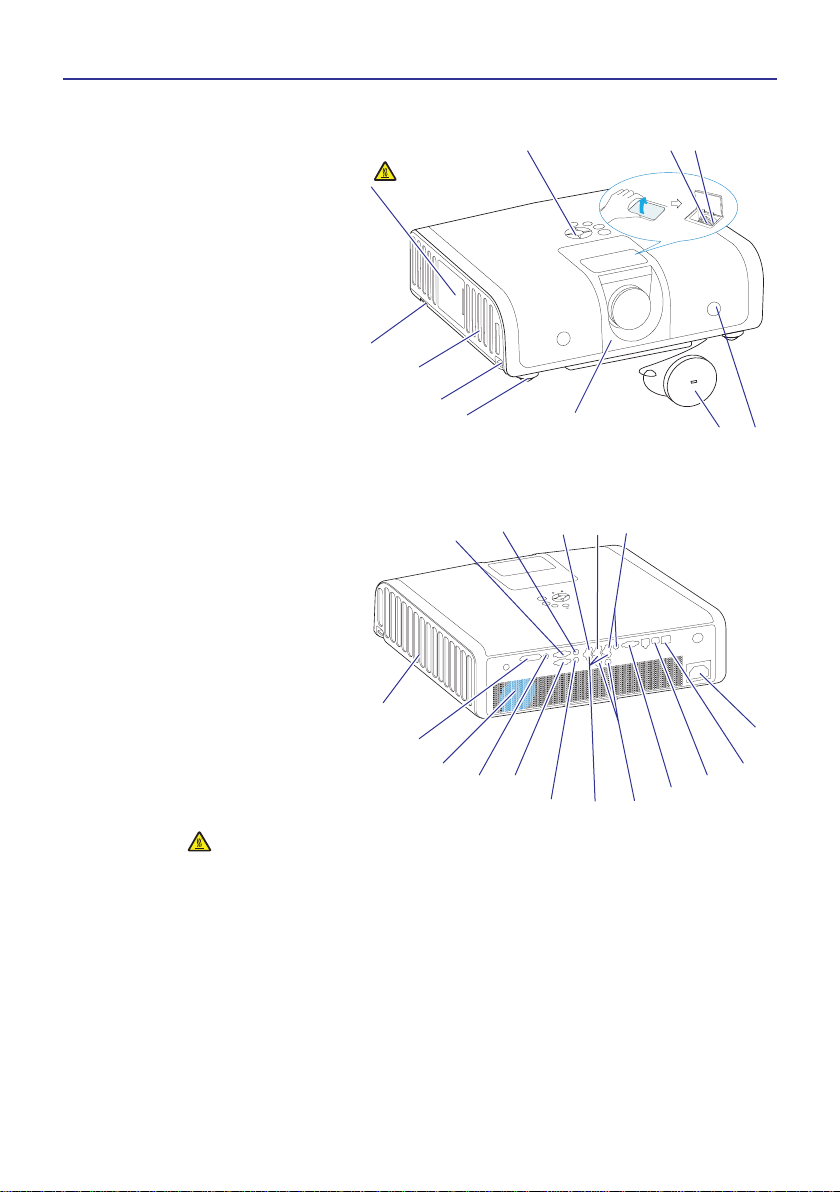
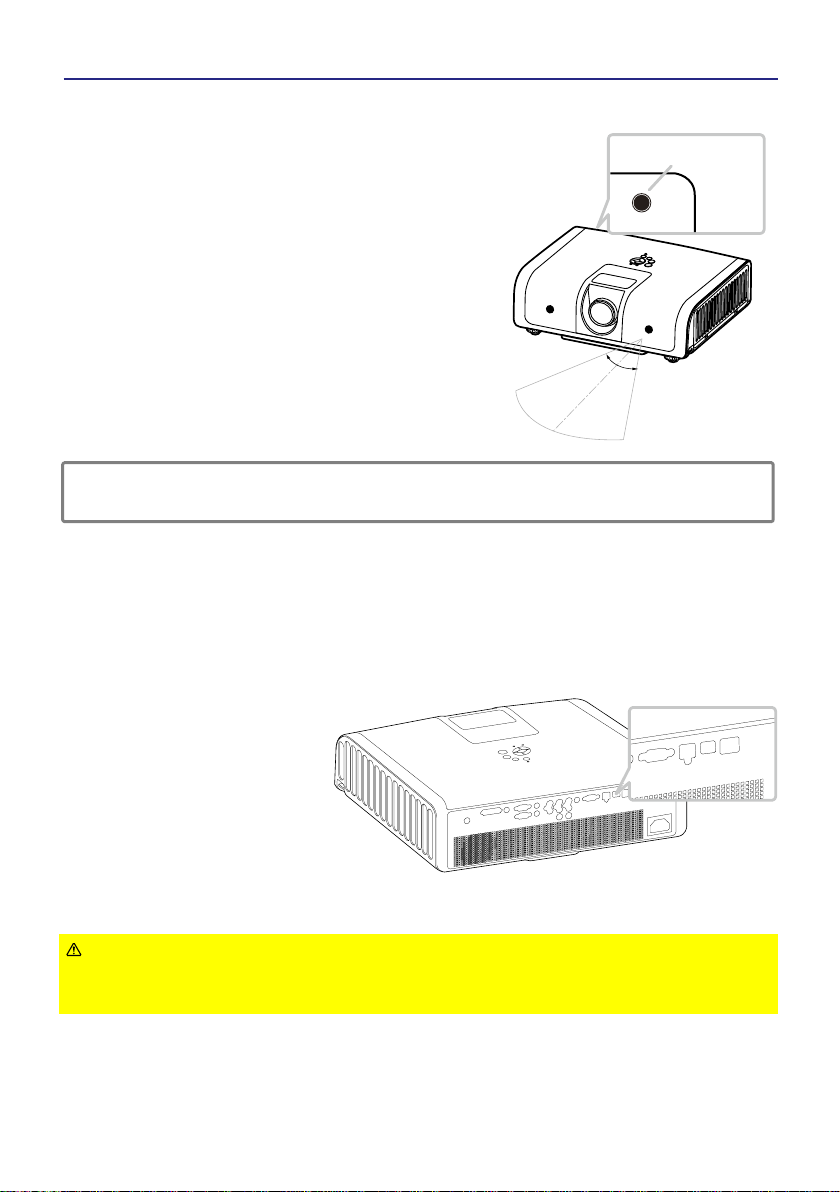
Part names
Projector
(1) Lamp Cover
The lamp is inside.
.
(2) Focus ring( SEE P17)
(3) Zoom ring( SEE P17)
(4) Control panel( SEE P5)
(5) Speaker
(6) Adjustable knobs (x 2)
(7) Adjustable feet (x 2)
(8) Lens Cap
(9) Lens cover
(10) Intake vents
(11) Filter cover
The air filter is inside.
(12) Front IR receiver
(13) Security anchor( SEE P10)
(14) AC inlet( SEE P10)
(15) S-VIDEO port( SEE P16)
(16) AUDIO L/R port( SEE P8)
(17) VIDEO port( SEE P8)
(18) COMPUTER IN1 port( SEE P8)
(19) COMPUTER IN2 / DVI port( SEE P8)
(20) USB port( SEE P13)
(21) AUDIO 1 IN port( SEE P8)
(22) AUDIO 2 IN port( SEE P8)
(23) AUDIO OUT port ( SEE P8)
(24) MONITOR OUT port
(25) YPbPr port ( SEE P16)
&(26) L-AUDIO IN-R port( SEE P8)
(28) RS-232C port( SEE P8)
(29) LAN port (Optional)( SEE P8)
W
ARNING HOT! :
Do not touch the lamp cover and the outlet vents during use or just after use,
since it is too hot.
Do not look into the lens or vents while the lamp is on, since the strong light
is not good for your eyes.
CAUTION
Maintain normal ventilation to prevent the projector from heating up. Do not cover,
block or plug up the vents. Do not place anything that can stick or be sucked to the
vents, around the intake vents. Change the air filter periodically.
Do not use the security anchor to prevent the projector from falling down, since it
is not designed for it.
(1)
HOT!
(3) (2)
(4)
(5)
(6)
(7)
(8)
(9)
(10)
(11)
(13)
(22) (18)
(19)
(20)
(14)
(15) (17) (16)
(25)&(26)
(24)
(12)
(23)
(21)
(28)
(29)
Page 5
MENU
Part names
5
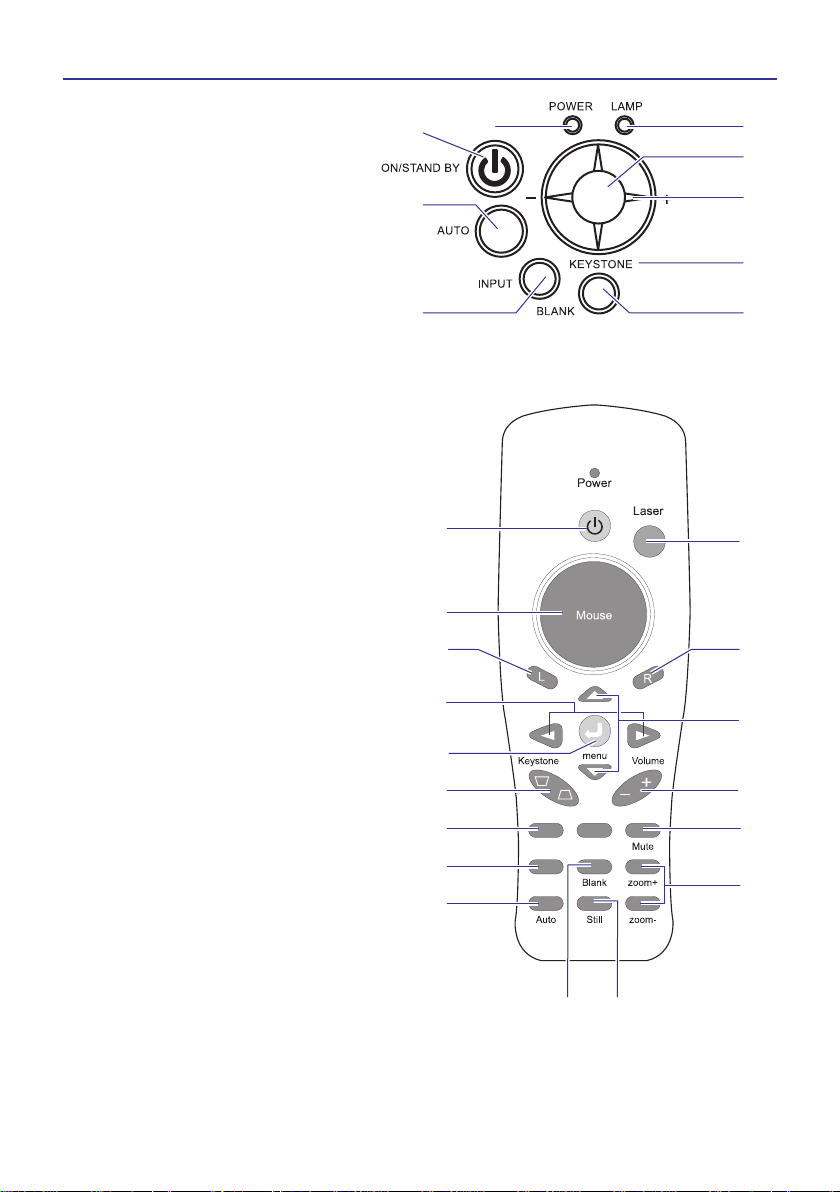
Control panel
(1) ON/STANDBY button(SEE P14)
(2) AUTO button(SEE P15)
(3) INPUT button(SEE P15)
(4) BLANK button
(5) KEYSTONE button
(6) MENU button(SEE P16)
(7) MENU-Left/Right
MENU-Up/Down
(8) POWER indicator(SEE P10,P14)
(9) LAMP indicator (SEE P14)
Remote control
(1) Power button.(SEE P14)
(2) Point button.
(3) Mouse Left button.
(4) Menu-up button / Menu-down button.
(5) Menu button.
(6) Keystone up /down button.
(7) PC button.(SEE P15)
(8) Video button.(SEE P16)
(9) Auto button.(SEE P15)
(10) Blank button.
(11) Still button.
(12) Zoom in / Zoom out button.(SEE P17)
(13) Mute button.(SEE P15)
(14) Volume up / down button.(SEE P15)
(15) Menu-left button / Menu-right button.
Menu-up button / Menu-down button.
(SEE P16)
(16) Mouse Right button.
(17) Laser pointer button.
(1)
(2)
(3) (4)
(5)
(6)
(7)
(9)(8)
(1)
(3)
(2)
(5)
(15)
(6)
(7)
(8)
(9)
(10) (11)
(4)
(17)
(16)
(13)
(12)
(14)
PC
Video
Page 6
6
Setting up
Install the projector according to the environment and manner the projector will
be used in.
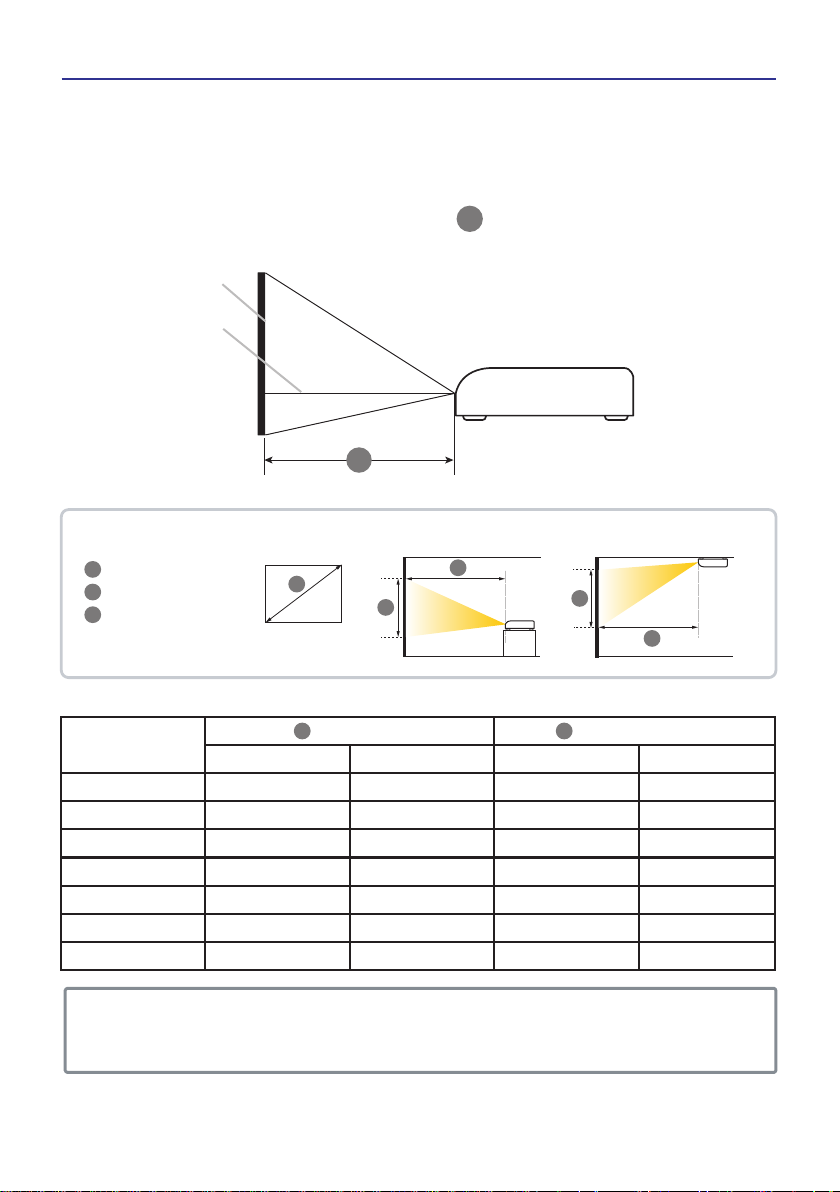
Arrangement
Tele Wide Tele Wide
Screen size
(inch)
Distance (m) Distance (feet)
40
60
70
80
100
200
300
1.50
2.23
2.60
2.97
3.70
7.37
11.04
1.24
1.85
2.15
2.45
3.06
6.10
9.14
4.91
7.32
8.52
9.73
12.14
24.18
36.22
4.06
6.06
7.05
8.05
10.04
20.01
29.97
M M
The distance between the projector and screen determines the actual image size.Refer to
this table, in case of 4:3 aspect ratios. The values M shown in the table are calculated for
a full size screen.
NOTE
► Allowing the proper amount of space on the top, sides, and rear of the
projector cabinet is critical for proper air circulation and cooling of the unit. When in
against at wall, leave about 20cm (7.9in.) between the projector and the wall.
Screen size (diagonal)
Projection distance
Screen height
M
D
H
On a horizontal surface
Suspended from the ceiling
M
M
D
H
H
Lens center
Screen
Side view
M
Page 7

7
Setting up
WARNING
• Place the projector in a stable horizontal position.
If the projector falls or is knocked over it could cause injury and/or damage
to the projector. Using a damaged projector could then result in fire and/or
electric shock.
(1) Do not place the projector on an unstable, slanted or vibrational surface
such as a wobbly or inclined stand.
(2) Do not place the projector on its side, front or rear position.
(3) Consult with your dealer before a special installation such as suspending
from a ceiling.
• Place the projector in a cool place, and ensure that there is sufficient
ventilation. The high temperature of the projector could cause fire, burns and
/or malfunction of the projector.
(1) Do not stop-up, block or otherwise cover the projector's vents.Keep a
space of 20 cm or more between the sides of the projector and other
objects such as walls.
(2) Do not place the projector on metallic thing or anything weak in heat.
(3) Do not place the projector on carpet, cushions or bedding.
(4) Do not place the projector in direct sunlight or near hot objects such as
heaters.
(5) Do not place anything near the projector lens or vents, or on top of the
projector.
(6) Do not place anything that may be sucked into or stick to the vents on
the left of the projector. This projector has some intake vents also on the
left.
• Avoid placing the projector in smoky, humid or dusty place.
• Do not place the projector anyplace where it may get wet. Getting the
projector wet or inserting liquid into the projector could cause fire, electric
shock and/or malfunction of the projector.
(1) Do not place the projector in a bathroom or the outdoors.
(2) Do not place anything containing liquid near the projector.
CAUTION
Placing the projector in such places could cause fire, electric shock and/or
malfunction of the projector.
(1) Do not place the projector near humidifiers, smoking spaces or a kitchen.
(2) Position the projector to prevent light from directly hitting the projector's
remote sensor.
Page 8
8
Setting up
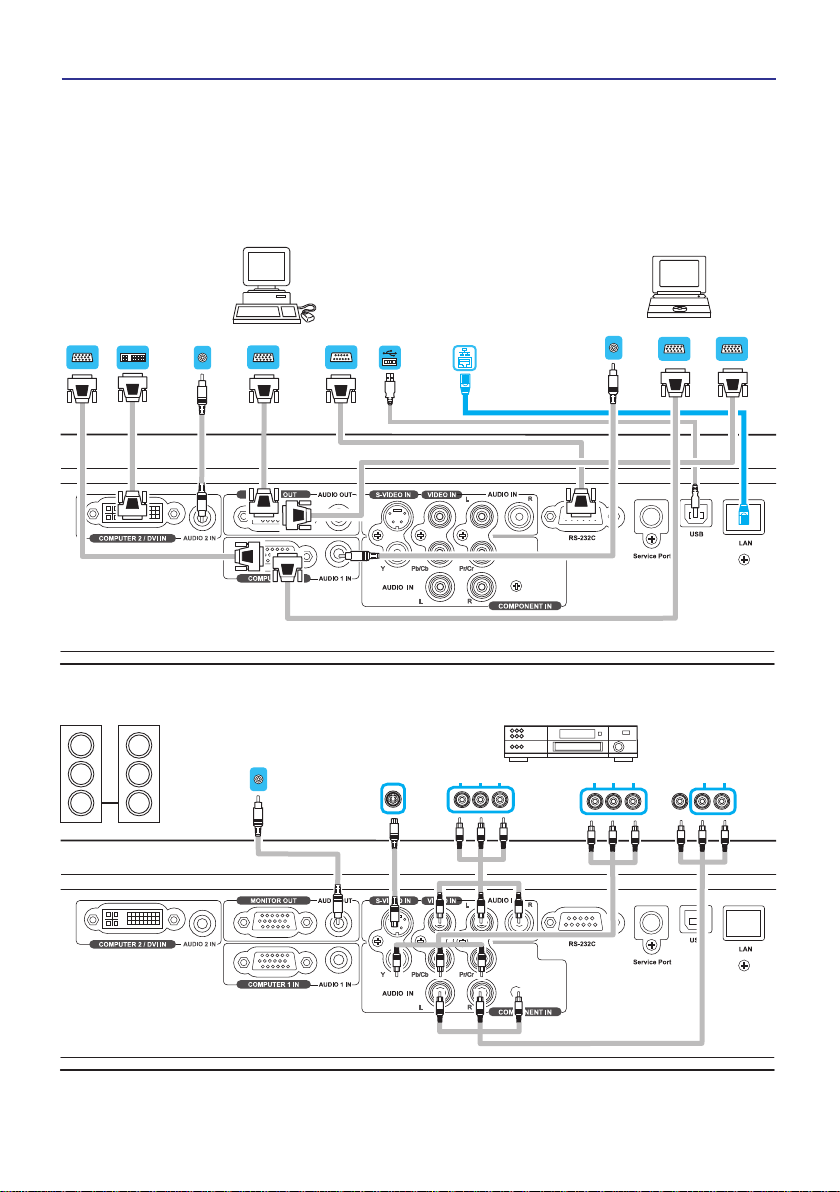
Connecting your devices
Be sure to read the manuals for devices before connecting them to the projector
Make sure that all the devices are suitable to be connected with this product, and
prepare the cables required to connect. Please refer to the following illustrations
to connect them.
PC
LANS
(Optional Function)
Audio out Monitor in
Monitor in
RS-232C
USB
Audio out
Audio out
VGA out
DVI outVGA out
VCD/DVD PlayerSpeaker
Audio out (L)&(R) Audio out (L)&(R)Video outS-video out Y Pb/Cb Pr/Cr
Page 9
9
Setting up
Connecting your devices(Continue)
WARNING ►Do not disassemble or modify the projector and accessories.
►Be careful not to damage the cables, and do not use damaged cables.
CAUTION ►Turn off all devices and unplug their power cords prior to
connecting them to projector. Connecting a live device to the projector may
generate extremely loud noises or other abnormalities that may result in
malfunction or damage to the device and the projector.
►Use appropriate accessory or otherwise designed cables. Ask your dealer
about non-accessory cables which may have other length or equipped with
a core. For cables with a core only at one end, connect the end with the core
to the projector.
►Make sure that devices are connected to the correct ports. An incorrect
connection may result in malfunction or damage to the device and the
projector.
NOTE ►Be sure to read the manuals for devices before connecting them to the
projector, and make sure that all the devices are suitable to be connected with this
product. Before connecting to a PC, check the signal level, the signal timing, and the
resolution.
- Some signal may need an adapter to input this projector.
- Some PCs have multiple screen display modes that may include some signals which
are not supported by this projector.
-The best display performance will be achieved if the resolutions of the input signal
and the projector panel are identical.
►While connecting, make sure that the shape of the cable's connector fits the port to
connect with. And be sure to tighten the screws on connectors with screws.
►When connecting a laptop PC to the projector, be sure to activate the PC’s external
monitor(RGB) output. (Set the laptop PC to CRT display or to simultaneous LCD and
CRT display.) For details on how this is done, please refer to the instruction manual of
the corresponding laptop PC.
►In some cases, this projector may not display a proper picture or display any picture
on screen. For example, automatic adjustment may not function correctly with some
input signals. An input signal of composite sync may confuse this projector, so the
projector may not display a proper picture.
Page 10
10
Setting up
Connecting power supply
WARNING
►Please use extra caution when connecting the power cord, as incorrect or
faulty connections may result in fire and/or electrical shock.
►Only use the power cord that came with the projector. If it is damaged,
contact your dealer soon.
►Only plug the power cord into an outlet rated for use with the power cord's
specified voltage range. The power outlet should be close to the projector
and easily accessible. Remove the power cord for complete separation.
►Never modify the power cord.
Using the Security Anchor
WARNING
►Do not use the security anchor to prevent the projector from falling down or
held, since it is not designed for it.
NOTE ►The security anchor is not comprehensive theft prevention measures.
It is intended to be used as supplemental theft prevention measure.
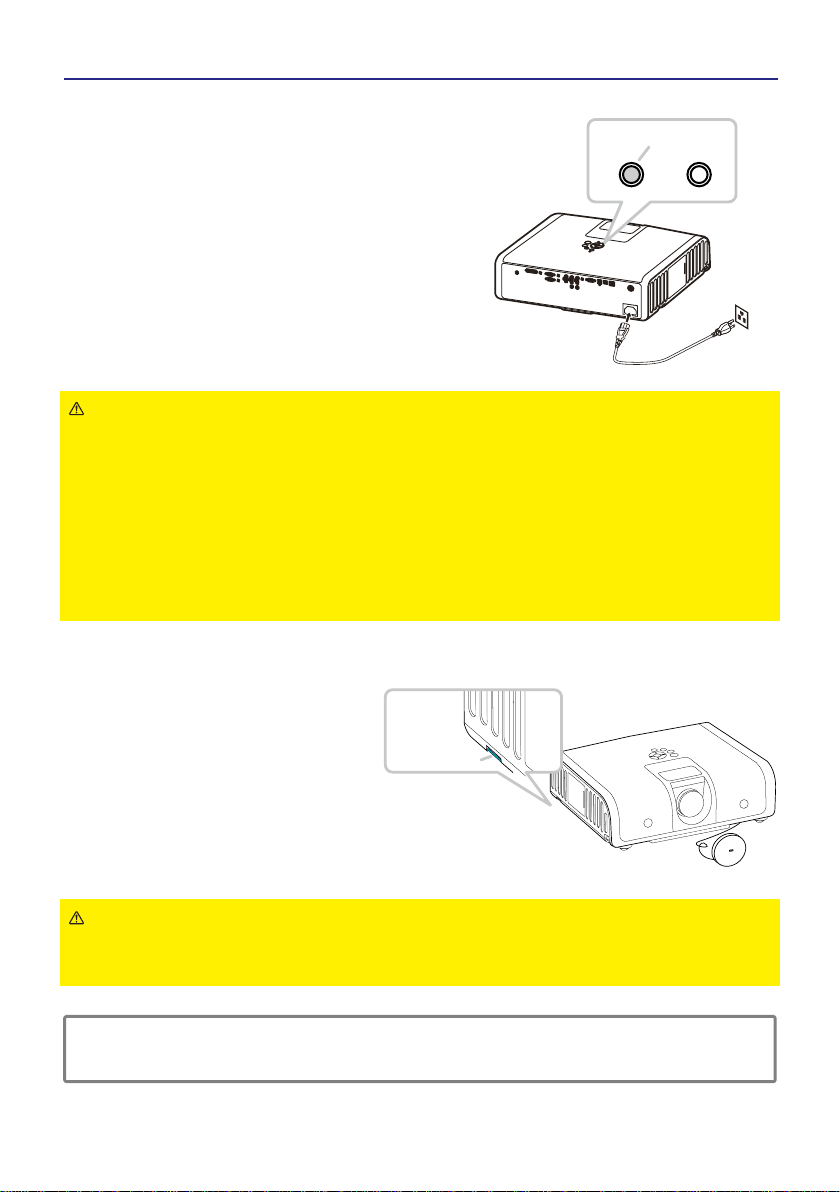
Outlet
AC inlet
1.Connect the connector of the power cord
to the AC inlet of the projector.
2.Firmly plug the power cable’s plug into
the outlet.The POWER indicator will
begin blinking in green.The projector
work on stand by mode.
POWER indicator
Security Anchor
The product has design security
anchor and PIN LOCK functions
(SEE P31)to help prevent
unauthorized removal projector.
Page 11

11
Setting up
Using the Hiding-Styled Handle
Refer to the picture operation direction to
pull the handle.
NOTE ►This handle is designed to carry the projector for short distance only.
►Please do not have added on other goods to use together, it can damage
the projector.
Hiding-Styled Handle
Page 12

12
Putting batteries
Remote control
Please set the batteries to the remote control before using it. If the remote control starts
to malfunction, try to replace the batteries. If you will not use the remote control for long
period, remove the batteries from the remote control and store them in a safe place.
1.Remove the battery cover.
Slide back and remove the battery cover in the
direction of the arrow.
2.Insert the batteries.
Align and insert the two AAA batteries according
to their plusminus terminals
3.Close the battery cover.
Replace the battery cover in the direction of the
arrow and snap it back into place.
WARNING
►Always handle the batteries with care and use them only as directed.
Improper use may result in battery explosion, cracking or leakage, which could
result in fire, injury and/or pollution of the surrounding environment.
►Be sure to use only the batteries with the mentioned specification.
►Do not use batteries of different types at the same time.
►Do not mix a new battery with used one. Make sure the plus and minus
terminals are correctly aligned when loading a battery.
►Keep a battery away from children and pets.
►Do not recharge, short circuit, solder or disassemble a battery.
►Do not allow a battery in a fire or water.
►Keep batteries in a dark, cool and dry place. If you observe a leakage of a
battery, wipe out and then replace a battery. If it adhere your body or clothes,
rinse well with water immediately.
►Dispose of batteries in accord with environmental laws.
About the Battery
Page 13
13
Remote control
Using as a simple PC mouse & keyboard
The enclosed remote control works as a
simple mouse and keyboard of the PC,
when the projector's USB port connects
with the PC's mouse port via a mouse
cable.(SEE P4)
CAUTION ►Improper use of the simple mouse & keyboard function could
damage your equipment. While using this function, please connect this
product only to a PC.
About the remote control signal
1.The remote control works with the
projector’s remote sensor. This
projector have 2 remote sensors
on the front and back.
2.The sensor senses the signal within
the following range when the sensor
is active:30 degrees (15 degrees to
the left and right of the sensor) within
7 meters about.
NOTE ► Laser pointer of the remote control is used in place of a finger or rod.
Never look directly into the laser beam outlet or point the laser beam at other people.
15
0
15
0
remote sensor
Page 14

14
Turning on the power
Power on/off
Turning off the power
1.Make sure that the POWER indicator
turns in steady green and the lens
cover is removed.
2.Press the STANDBY/ON button on
the projector or the remote control.
3.The projection lamp will light up,
the LAMP indicator will not light in
red and the POWER indicator will
begin light in green.
To display the picture, select an input
signal according to the section
“Selecting an input signal” (SEE 15).
WARNING►A strong light is emitted when the projector’s power is on.
Do not look into the lens of the projector or look inside of the projector through
any of the projector’s openings.
►Do not touch around the lamp cover and the exhaust vents during use or
just after use, since it is too hot.
►Remove the power cord for complete separation.
MENU
ON/STANDY BY BUTTON
POWER INDICATOR
MENU
LAMP INDICATOR
PC
Video
Lens cover
1.Press the ON/STAND BY button on the projector or
the remote control. The message [ Power off. Please
press key again to power off. ] will appear on the
screen for about 5 seconds.Press again and the
projector lamp will go off, the POWER indicator will
begin light in green and the LAMP indicator will begin
blinking in red.
2.The LAMP indicator will stop blinking and light in
red. And then the POWER indicator begin blinking
in green when the lamp cooling is complete. Unplug
the power cable.
Attach the lens cap.Do not turn the projector on
immediately after turning off.Turning projector on
again too soon could shorten the lifetime of some
consumable parts of the projector.
Page 15

15
1.Press the VOLUME button on the remote control.
A dialog will appear on the screen to aid you in
adjusting the volume.
2.Use the +/- cursor buttons to adjust the volume.
To close the dialog and complete the operation,
press the MENU button and the menu will
disappear after a few seconds.
1.Press the MUTE button on the remote control.
A dialog will appear on the screen indicating
that you have muted the sound.
2.If you do not do anything, the dialog will
automatically disappear after a few seconds.
3.Press the MUTE button will bring the sound
back to the level before muting.
Selecting an input signal
1.To select a new input,press the PC button
on the projector or remote control. Each time
you press the button, the projector switches
its input port as below.
COMPUTER IN1
COMPUTER IN2
DVI
Operating
Adjusting the volume
Adjusting the mute
(continued on next page)
Volume
Mute
MENU
PC BUTTON
Video BUTTON
PC
Video
PC
Video
PC
Video
YPbPr
COMPOSITE VIDEO
2.If press the Video button on the remote
control.Each time you press the button,
the projector switches its input port as
below.
S-VIDEO
Page 16

Video
PC
16
Operating
YPbPr
COMPOSITE VIDEO
MENU
MENU BUTTON
Searching an input signal
1.Please Press the MENU button on the
projector or remote control.
2.After you can use the cursor button
to chiose [ ON ] in the AUTO SEARCH
item of the SETTING menu.
The projector will start to check its input
ports in order to find any input signals.
When an input is found, the projector
will stop searching and display the
image. If no signal is found, the projector will
return to the source before searching and the
projector switches its input port as below.
COMPUTER IN1
COMPUTER IN2
S-VIDEO
Selecting an input signal (continued)
DVI
Selecting an aspect ratio
1.Press the MENU button on the projector or remote control.
2.After you can select the RESIZE item of the ADVANCED menu. And use the
/ cursor buttons to adjust the aspect ratio.
For a PC signal
4:3 16:9
For a video signal ( s-video signal or component video signal)
4:3
16:9
For no signal
4:3 (fixed)
The RESIZE item does not work when no proper signal is inputted.
The NORMAL mode keeps the original aspect ratio setting.
Performing the automatic adjustment initializes the aspect ratio setting.
(continued on next page)
▲
▲
▲
3.If press AUTO button on the projector.
Each time you press the button, the
projector’s image is in Blank mode.
Automatically adjusts the setting to
match the current input.
Video
PC
AUTO BUTTON
Page 17

17
Operating
Adjusting the zoom and focus
Adjusting the image position
When the place to put the projector is slightly uneven to the left or right, use the
feet to place the projector horizontally. Using the feet can also tilt the projector in
order to project at a suitable angle to the screen.
This projector has 2 feet and 2 knobs.
A foot is adjustable while pulling up the knob on the same side as it.
1.Holding the projector, pull the knobs up to loose the feet.
2.Position the front side of the projector to the desired height.
3.Release the knobs in order to lock the feet.
4.After making sure that the feet are locked, put the projector gently.
CAUTION ►Do not handle the knobs without holding the projector,since the
projector may drop down.
Holding the projector,press the adjustable knobs to extend the both feet.
RING DOOR
ZOOM RING
FOCUS RING
1.Use the focus ring to focus the picture.
2.Use the zoom ring to adjust the screen size.
Page 18

Video
PC
18
Operating
Correcting the keystone distortions
1.Please Press the MENU button on the projector or remote control.
2.After you can use the /► cursor button to select the KEYSTONE V item of
the SETTING menu and press the /► button for keystone adjustment.
(1)The KEYSTONE V item will displays a dialog for keystone correction.
(2)To close the dialog and complete this operation, press the MENU button again.
The dialog will automatically disappear after a few seconds if you do not do
anything.
(3) The adjustable range of this correction will vary among inputs. For some input,
this function may not work well.
(4) When the zoom adjustment is set to the TELE (telephoto focus), the automatic
keystone distortion correction may be excessive. This function should be used
when the zoom adjustment is set to the full WIDE (wide-angle focus) whenever
possible.
►
►
MENU
KEYSTONE BUTTON
Press [ Left ] and [ Right ] buttons to correct
keystone distortion.
SCREEN SCREEN
Page 19

Video
PC
Video
PC
19
Operating
1.Press the Still button on the remote control.
The [ Still ] indication will appear on the screen and the
projector will go into the Still mode.
To exit the still mode and restore the screen to normal, press
the still button again.
If the projector continues projecting a still image for a long time,
the LCD panel might possibly be burned in. Do not leave the
projector in the Still mode for too long.
1.Press the Blank button on the projector or remote control.
The [ Blank ] indication will appear on the
screen and the projector will go into the
Blank mode.
To exit from the blank screen and return to
the input signal screen, press the BLANK
button again.
If the projector is left in Blank mode for more
than 15 minutes, the projector will
automatically shut off the lamp and begin
to cool-down mode.
MENU
BLANK BUTTON
Temporarily blanking the screen
Stilling the screen
Still
BLANK
NOTE ►The sound is not connected with the blank screen function. If
necessary, set the volume or mute first.
Video
PC
Page 20

Video
PC
20
Operating
Using the menu function
This projector has the following categories:
ADVANCED, AUDIO, INPUT, PICTURE, PRESENTATION,SETTING and
SECURITY. ADVANCED MENU consists of functions often used, and the
other menus are classified into each purpose. Each of these menus is operated
using the same methods. The basic operations of these menus are as follows.
1.Press the MENU button on the remote control
or the projector.The MENU button on the
projector works as the cursor buttons.
2.Use the ▲/▼ cursor buttons to select an
category to operate.
3.Use the ◄/► cursor buttons to operate the
category.Then press the ► cursor button,
or the ENTER button to select an item. The
lower layer menu of the selected item
will appear.
4.Some functions cannot be performed
when a certain input port is selected,
or when a certain input signal is
displayed.
5.Reset all
After you select [ Reset all ] on the menu, the following confirmation message
will appear on the screen. Press the MENU button or ignore the message to
exit the [ Reset All ] function without changing any settings.
MENU
MENU BUTTON
CURSOR BUTTON
Reset all?
Please, press reset key to return default setting.
reset all Yes
No
If select to reset all, press [ Yes ].
Page 21

21
Picture menu(PC Mode)
In the PICTURE category, items
shown in the table below can be
performed.
Select an item using the ▲/▼ cursor
buttons, and press the► cursor
button or ENTER button to execute
the item. Then perform it according
to the following table.
Item Description
000/50
000/50
000/002
Brightness
Contrast
Sharpness
Display mode
Adjusts the overall image brightness.
DarkLight
Adjusts the difference between strong and weak areas
of the image.
WeakStrong
Adjusts the image sharpness
WeakStrong
Select mode(
► cursor button)
Select (
► cursor button)
Powerful
Enhance brightness
Video
Keep the soft tender color
Presentation
For computer presentation use
Natural
Nature color(default)
Cinema
Enhance contrast mode for Cinema mode
User color
User color
Adjustments of each RGB color
Green Board
Adjusts the color settings and makes the projected
image on a green board more visible.
User Red
000/50
User Green
000/50
User Blue
000/50
There may be some noise and/or the screen may flicker
for a moment when an adjustment is made. This is not a
malfunction.
Page 22

22
Picture menu(Video Mode)
In the PICTURE category, items
shown in the table below can be
performed.
Select an item using the ▲/▼ cursor
buttons, and press the► cursor
button or ENTER button to execute
the item. Then perform it according
to the following table.
Item Description
000/50
000/50
000/002
Brightness
Contrast
Sharpness
Display mode
Adjusts the overall image brightness.
DarkLight
Adjusts the difference between strong and weak areas
of the image.
WeakStrong
Adjusts the image sharpness
WeakStrong
Select mode(
► cursor button)
Powerful
Enhance brightness
Video
Keep the soft tender color
Presentation
For computer presentation use
Natural
Nature color(default)
Cinema
Enhance contrast mode for Cinema mode
User color
Adjustments of each RGB color
Green Board
Adjusts the color settings and makes the projected
image on a green board more visible.
User Red
000/50
User Green
000/50
User Blue
000/50
Color 000/50
Adjusts the strength of whole color.
WeakStrong
This item can be selected only for a video signal,s-video
signal or component video signal.
Tint 000/50
Adjusts the image tint.
ReddishGreenish
This item can be selected only for a video signal,s-video
signal or component video signal.
Select (► cursor button)
User color
Page 23

23
AUDIO menu
In the AUDIO category, items shown
in the table below can be performed.
Select an item using the ▲/▼ cursor
buttons, and press the► cursor
button or ENTER button to execute
the item. Then perform it according
to the following table.
Item Description
000/40
off/on
Adjusts the volume
LowHigh
Mutes the volume off/on
Volume
Mute
Page 24

24
SETTING menu(PC Mode)
In the SETTING category, items
shown in the table below can be
performed.
When the source is computer.
Select an item using the ▲/▼ cursor
buttons, and press the► cursor button
or enter to execute the item. Then
perform it according to the following
table.
Item Description
H position
000/50
V position
000/50
Phase
000/19
Set the synchronization polarity
Frequency
000/100
Set the horizontal scanning frequency
Auto keystone
Automatically Corrects keystone distortion in
image.
Keystone V
Corrects vertical keystone distortion in image
manually.
Shrink the button of the image Shrink the top of the image
The adjust able range of this function will vary
with the type of input signal. For some input,
this function may not work well.
Auto sync
execute
execute
Sets all of the above settings automatically.
It can not include both Auto Keystone and
Keystone V items to implement the function.
Auto search
Search signal source manually or automatically.
-80/+80
Move the image position horizontally
RightLeft
This item can be selected only for a computer
signal.Pressing the RESET button when the
H POSITION is selected will reset the
H POSITION to the default setting.
Move the image position vertically
DownUp
This item can be selected only for a computer
signal.Pressing the RESET button when the
V POSITION is selected will reset the
V POSITION to the default setting.
off/on
Page 25

25
SETTING menu(Video Mode)
In the SETTING category, items
shown in the table below can be
performed.
When the source is video.
Select an item using the ▲/▼ cursor
buttons, and press the► cursor
button or ENTER button to execute
the item. Then perform it according
to the following table.
Item Description
Auto keystone
Automatically Corrects keystone distortion in
image manually.
Keystone V
Corrects vertical keystone distortion in image
manually.
Shrink the button of the imageShrink the top of the image
The adjustable range of this function will vary
with the type of input signal. For some input,
this function may not work well.
execute
Auto search off/on
Search signal source manually or automatically.
-80/+80
Page 26

26
ADVACED menu
In the ADVANCED category, items shown in the table below can be performed.
Select an item using the ▲/▼ cursor buttons, and press the► cursor button or
ENTER button to execute the item. Then perform it according to the following table.
Item Description
execute
execute
Execute digital zoom and pan function
Freezes the current image on the screen.
Hide the image, displays a blank, black screen.
Resets all Menu function to their factory default
values.
English
(default)
Select the language that the menu and on
screen massage are display in
Select the input source from:
Zoom/pan
Still
Blank
Reset all
Resize 4:3
Language
Select source
Logo Setting
on/off
COMPUTER IN1
COMPUTER IN2 DVI
YPbPr
VIDEO
S-VIDEO
The search is started from the current port.
Then when an input is found, the projector will
stop searching and display the image.
ENGLISH
簡體中文繁體中文
DEUTSCH
FRANÇAISITALIANOESPAÑOL
POLSKI日本語
(continued on next page)
This function allows you to customize the
start-up logo.
Page 27

26-A
ADVACED menu
Item Description
Logo Mode
(continued on next page)
Select Mode( ► cursor button)
User The image you captured.
Default
The factory logo.
Off
The blank image you can select color with
background function.
Start to capture the image.
Set background color
Logo Setting
Logo Capture
Background
Logo Size
IMPORTANT:
To execute the logo function,
you must to enter the PIN code
first.
This function allows you to
customize the start-up logo.
Execute
Black
Blue
White
Original Display the segment of the image in original
size at center of the screen.
Full Expend the image to full screen.
Page 28

26-B
ADVACED menu
Logo capture
How to use this function?
1.
Select Logo capture item in the logo
setting menu, and press ► cursor
button.
2.
You can see the red frame that can
select captured area.
3.
Use 4 direction bottoms to adjust the
position of the frame.
4.
Press “MENU” to start capturing and
display a dialog.
NOTE ► You can only capture an image from computer mode.
► The area that can be captured is 512 x 384 dots.
Logo Capture In Progress.
Dispaly image
2
4
Page 29

27
PRESENTATION menu
In the PRESENTATION category,
items shown in the table below can
be performed.
Select an item using the ▲/▼ cursor
buttons, and press the► cursor
button or ENTER button to execute
the item. Then perform it according
to the following table.
Item Description
(continued on next page)
off/on
Automatically inverts the image when the
projector is turned upside down i.e.
When the projector is mounted on the ceiling.
execute
execute
execute
execute
Normal projection mode.
Mirrors the image vertically, used when the
projector is mounted upside down.
Mirrors the image horizontally, used when
projecting onto a rear projection screen.
Mirrors the image horizontally and vertically,
used when the projector is mounted upside
down and projecting onto a rear projection
screen.
off/on
Auto detects brightness; it turns to economic
mode automatically when the ambient light is
low.When the lamp mode is in economic,auto
brightness will not work.
normal
economic
Economic mode reduces the lamp brightness.
Show Lamp timer
execute
After changing a new lamp,execute this
function for reset the Lamp timer.(see below)
Auto ceiling
Front
Ceiling
Rear
Ceiling and
Rear
Auto Brightness
Lamp mode
Lamp
Reset lamp
timer (optional)
Page 30

28
PRESENTATION menu
The lamp time is the time counted after the last resetting. It is shown in the
PRESENTATION menu as the usage time of the lamp.Pressing the RESET
button or the ► button displays a dialog.To reset the lamp time, select the
RESET using the ► button.
Please reset the lamp time only when you have replaced the lamp, for a suitable
indication about the lamp. For the lamp replacement, see the selection "Lamp" .
(SEE P32)
NOTE
►
The replacement warning message is set to appear after about
2000 hours of lamp use in order to maintain the initial brightness and quality
of the projected images. When the lamp replacement message appears,
replace the lamp with a new one as soon as possible, even if it is still working.
Reset Lamp Timer?
Select “No” to exit.
Lamp Reset Yes
No
Page 31

29
SECURITY menu
In the SECURITY category, items
shown in the table below can be
performed.
Select an item using the ▲/▼ cursor
buttons, and press the► cursor
button or ENTER button to execute
the item. Then perform it according
to the following table.
Item Description
PIN LOCK
PROTECTION
Modify PIN
Off
On 1
On 2
execute
Off :Turn off PIN lock protection.
On 1:PIN code is needed only first time after AC
switched off.
On 2:PIN code is needed every time the projector
been turned on.
CAUTION :
►Once the PIN code had been set, the projector can’t be
used unless you entered the correct PIN code.
►To avoid unnecessary trouble, if you activate the [ PIN
Lock Protection ] , it is highly recommended that you write
down the PIN code and store it in a safe place.
1.Press the MENU button on the projector or
remote control.
2.Use the ► cursor button to select the
Modify PIN item of the SECURITY category.
3.
Press
► cursor button to change PIN lock protection
mode.
4.Please
Enter the original PIN code.
(1) If the PIN is correct, system will allow you to change
a new PIN code.
(2) If the PIN is incorrect, a “Code Error” message will
appear.
5.Please
Enter a new PIN code. And then enter again to
confirm.
NOTES ► To change the PIN lock protection state,
you must enter the PIN code first.
► Please enter: 0000 for first-time use.(default)
►Write your selected password down here in this
manual so that it will help you avoid the trouble
of forgetting the password,see the selection
“Appendix”. (SEE P41)
(continued on next page)
Page 32

30
SECURITY menu
In the SECURITY category, items
shown in the table below can be
performed.
Select an item using the ▲/▼ cursor
buttons, and press the► cursor
button or ENTER button to execute
the item. Then perform it according
to the following table.
Item Description
Filter timer Showing the usage of filter hour.
Reset filter timer Reset the filter timer after cleaning or change filter
Filter counter
500 Hours
800 Hours
1000 Hours
Select from (500Hs/800Hs/1000Hs) depending on
the use environment.(default : 500 Hours)
Please see as below.
(continued on next page)
Auto Filter Alert
NOTE ►
Select from(500H/800H/1000H) according to the use environment.
Filter counter can set to longer in a clean
environment.
► Please reset the Filter time only when you have replaced the filter, for a
suitable indication about the filter. For the filter replacement, see the section
"Air Filter" (SEE P34)
The function is to remind user for filter cleaning or replacement.
It is in the SECURITY category as the usage time of the air filter.Pressing the ►
cursor button displays a dialog. And then select an appropriate filter counter time
according to the use environment.
When the operation time reached the timer set, a warning message will appears
on the screen to remind user that the filter cleaning is required.
Filter Replace...
Filter has been used more than 500 hours.
Page 33

31
PIN key in Operation
When the projector is turned on and
the PIN lock protection is set to[ on ] ,
the image will show for right side.
1.
Press the MENU button on the
projector or remote control.
Enter
PIN code by Keypad or Remote
control.
2.
How to enter a PIN code?
Control panel use way
Remote control use way
MENU
REMOTE CONTROL
BUTTONS
CONTROL PANEL
BUTTONS
The control panel and remote control buttons to enter
a sequence of PIN code are the same with the photo.
(1)
Press
◄ button :
Select the [ 1 ] .
(2)
Press ▲ button :
Select the [ 2 ] .
(3)
Press
►
button :
Select the [ 3 ] .
(4)
Press ▼ button :
Select the [ Enter ] move
to next row.
(5)
Press
(backspace)
item :
In case to entered a wrong digit, select to delete the wrong digit you entered.
(6)
Press
(backspace)
item :
Once all four digits of the PIN been entered, select to confirm.
NOTE ►
If the PIN is correct, projector will show normal image.
►
If the PIN is incorrect, a “Enter new code” message will be showing. Please try
again.
►
If the PIN been input incorrectly three times, a warning message will show up
and the projector will shut itself down after 20 seconds.
►If you lost the PIN completely, contact your dealer for help.
Page 34

32
Maintenance
Lamp
Replacing the lamp
In case of replacement by yourself,
A lamp has finite product life. Reserving is recommended.
1.Turn the projector off, and unplug the power cord. Allow the projector to cool for
at least 45 minutes.
2.
If the projector is mounted on a ceiling, contact your local dealer to replace the lamp.
3.
Remove the Lamp door.(marked by arrow)
4.
Loosen 2 screws of the lamp holder.
Grasp the handle on the top of the lamp
and pull the lamp straight up out of the projector.
5.Insert the new lamp, and retighten firmly the
2 screws of the lamp
holder
and lock the
Lamp Door.
(marked by arrow)
CAUTION ►Do not touch any inside of the projector, while the lamp is taken
out.
WARNING ►Do not touch the bulb. Touching the bulb will greatly decrease
the life of the lamp and could cause the bulb to explode.
NOTE
►
Please reset the lamp time only when you have replaced the lamp,
for a suitable indication about the lamp.
Lamp Door
5
screws
The Handle
4
Lamp Door
3
Page 35

33
Maintenance
Lamp Warning
HIGH VOLTAGE
HIGH TEMPERATURE HIGH PRESSURE
WARNING
►The projector uses a high-pressure mercury glass lamp. The
lamp can break with a loud bang, or burn out, if jolted or scratched, handled
while hot, or worn over time. When the bulb bursts, it is possible for shards of
glass to fly into the lamp housing, and for gas containing mercury to escape
from the projector’s vent holes.
►
►
About disposal of a lamp: This product contains mercury lamp; do not put
it in a trash. Dispose of it in accordance with environmental laws.
• For lamp recycling, go to www.lamprecycle.org. (in the US).
• For product disposal, contact your local government agency
or www.eiae.org (in the US) or www.epsc.ca (in Canada).
For more information, call your dealer.
If the lamp should break (it will make a loud bang when it does),
unplug the power cord from the outlet, and make sure to request a
replacement lamp from your local dealer. Note that shards of glass
could damage the projector’s internals, or cause injury during handling,
so please do not try to clean the projector or replace the lamp yourself.
►If the lamp should break (it will make a loud bang when it does),
ventilate the room well, and make sure not to breathe the gas that
comes out of the projector vents, or get it in your eyes or mouth.
►Before replacing the lamp, turn the projector off and unplug the power
cord, then wait at least 45 minutes for the lamp to cool sufficiently.
Handling the lamp while hot can cause burns, as well as damaging the
lamp.
Never unscrew except the appointed (marked by an arrow) screws.
►Do not open the lamp cover while the projector is suspended from
above. This is dangerous, since if the lamp’s bulb has broken, the
shards will fall out when the cover is opened. In addition, working in
high places is dangerous, so ask your local dealer to have the lamp
replaced even if the bulb is not broken.
►Do not use the projector with the lamp cover removed. At the lamp
replacing, make sure that the screws are screwed in firmly. Loose
screws could result in damage or injury.
Use only the lamp of the specified type.
►If the lamp breaks soon after the first time it is used, it is possible
that there are electrical problems elsewhere besides the lamp. If this
happens, contact your local dealer or a service representative.
Handle with care: jolting or scratching could cause the lamp bulb to burst during use.
►Using the lamp for long periods of time, could cause it dark, not to light
up or to burst. When the pictures appear dark, or when the color tone
is poor, please replace the lamp as soon as possible. Do not use old
(used) lamps; this is a cause of breakage.
Disconnect
the plug
from the
power
outlet
►
►
►
Page 36

34
Maintenance
Air Filiter
Replacing the air filter
When the used time reaches the filter counter
time,the projector will display message such
as” Filter Replace.Filter has been used more
than 100 hours.”
If the filter is difficult to clean or if it is
deteriorating,
also ask the dealer to
replace the filter.
1.
Turn the projector off, and unplug
the powercord. Allow the projector
to sufficiently cool down.
2.
Remove the filter cover from
the right of projector.
3.
Pull out the air filter.
4.
Install the new air filter.
5.
And then put the filter cover
back on.
6.
After please select the
Reset filter timer item of the
Security menu and display a
dialog.
NOTE
►If the internal temperature become too high because of filter blocked, the
projector may turn off itself to prevent the internal heat level rising.
WARNING
►
Use only the air filter of the specified type. Do not use the projector without the
air filter or the filter cover. It could result in a fire or malfunction to the projector.
Screw
Iron net
filter cover
air filter
Please check and clean the air filter periodically. When the dialog have warning
message prompts you to clean the air filter, comply with it as soon as possible.
Replace the air filter when it is damaged or too soiled.
2
4
6
3
Up
Reset Filter Timer?
Select “No” to exit.
Lamp Reset Yes
No
5
Page 37

35
Maintenance
Inside of the projector
In order to ensure the safe use of your projector, please have it maintained
inspected by your dealer about once every year.
Caring for the lens
If the lens is flawed, soiled or fogged, it could cause deterioration of display
quality. After making sure that the projector is cool adequately, lightly wipe
the lens with a commercially available lens-cleaning wipe. Do not touch the
lens directly with your hand. Please handle with care.
NOTE ►After making sure that the projector is cool adequately, lightly wipe
the lens with a commercially available lens-cleaning wipe. Do not touch the
lens directly with your hand.
Other care
WARNING ►Before maintenance, make sure the power cable is not
plugged in, and then allow the projector to cool sufficiently. The care in a high
temperature state of the projector could cause a burn and/or malfunction to
the projector.
►Never try to maintain the inside of the projector by your self.
►Avoid wetting the projector or inserting liquids in the projector. It could
result in a fire, an electric shock, and/or malfunction to the projector
►Do not put anything containing water, cleaners or chemicals near the
projector.
►Do not use aerosols or sprays.
.
.
CAUTION ►Please take right care of the projector according to the
following. Incorrect care could cause not only an injury but adverse influence
such as discoloration, peeling paint, etc.
►Do not use cleaners or chemicals other than those specified in this manual.
►Do not polish or wipe with hard objects.
Page 38

36
Troubleshooting
WARNING ►Never use the projector if abnormal operations such as smoke,
strange odor, excessive sound, damaged casing or elements or cables,
penetration of liquids or foreign matter, etc. should occur. In such cases,
immediately disconnect the power plug from the power outlet. After making
sure that the smoke or odor has stopped, contact your dealer.
Conditions
Stand by
mode
Projector is ready to be turned on (normal)
On mode
Projector is on and operating normally
Cool down
mode
Projector is in cool-down mode and will not respond
to user input (normal)
Fan fault
mode
Lamp cover
open
The lamp cover is open or there is a problem with
the lamp. If the lamp door is closed and replacing
the lamp does not correct the issue, contact your
dealer.
High
temperature
The projector has overheated and shut itself down.
Correct the overtemp condition immediately.
1. Check that the ventilation slots are freefrom
obstructions
2. Check the cleanliness of the air filter.
Regarding the indicator lamps
When operation of the LAMP and POWER indicators differs from usual, check
and cope with it according to the following table. If the problem cannot be
resolved contact your dealer.
POWER
indicator
LAMP
indicator
Description
off
Blinking
In Green
Blinking
In Red
Blinking
In Red
Blinking
In Red
off
In Green
Lighting
Lighting
In Green
Lighting
In Green
Blinking
In Green
Blinking
In Green
Lighting
In Red
The projector has detected a problem with an
Slowinternal fan, the lamp will shut off automatically,
contact your dealer
NOTE ► When the interior portion has become overheated, for safety
purposes, the projector is automatically shut down, and the indicator lamps
may also be turned off. In such a case, disconnect the power cord, and wait
at least 45 minutes. After the projector has sufficiently cooled down, please
make confirmation of the attachment state of the lamp and lamp cover before
turn the power on again.
( Slow )
( Fast )
Page 39

37
Troubleshooting
Phenomenon Cases not involving a machine defect
Reference
page
Power does not
turn on.
Correctly confirm the power cord.
The main power source has been interrupted during
operation such as by a power outage (blackout), etc.
Please disconnect the power plug from the power outlet,
and allow the projector to cool down at least 45 minutes,
then turn the power on again.
Either there is no lamp and/or lamp cover, or either
of these has not been properly fixed.
Please turn the power off and disconnect the power plug from
the power outlet, and allow the projector to cool down at least
45 minutes. After the projector has sufficiently cooled down,
please make confirmation of the attachment state of the lamp
and lamp cover, and then turn the power on again.
Neither sounds
nor pictures are
outputted.
The signal cables are not correctly connected.
Correctly connect the connection cables.
8
Signal source does not correctly work.
Correctly set up the signal source device by referring to the
manual of the source device.
–
The input changeover settings are mismatched.
Select the input signal, and correct the settings.
Sound does not
come out.
The signal cables are not correctly connected.
Correctly connect the audio cables.
8
14
14
14
15
15
15
The MUTE function is set to on.
Restore the sound pressing the MUTE or VOLUME button
on the remote control.
The volume is adjusted to an extremely low level.
Adjust the volume to a higher level using the menu function
or the remote control.
No pictures are
displayed.
The lens cover is not removed.
Remove the lens cover.
The signal cables are not correctly connected.
Correctly connect the connection cables.
8
(continued on next page)
Mistaken for machine defects
About the phenomenon confused with a machine defect, check and cope with it
according to the following table.
(No video / audio)
Page 40

38
Troubleshooting
Mistaken for machine defects (continued)
Phenomenon Cases not involving a machine defect
Reference
page
No pictures are
displayed.
(continued)
The brightness is adjusted to an extremely low level.
Adjust BRIGHTNESS to a higher level using the menu
function or the remote control.
The computer cannot detect the projector as a plug
and play monitor.
Make sure that the computer can detect a plug and play
monitor using another plug and play monitor.
The BLANK screen is displayed.
Press the BLANK button on the remote control.
Video screen
display freezes.
The Still function is set to on.
Press the Still button to restore the screen to normal.
Pictures appear
dark.
The lamp is approaching the end of its product
lifetime.
Replace the lamp.
Pictures appear
blurry.
The focus is not properly adjusted.
Adjust the focus using the focus ring.
The lens is dirty or misty.
Clean the lens referring to the section “Caring for the lens”.
NOTE ► Although bright spots or dark spots may appear on the screen, this
is a unique characteristic of liquid crystal displays, and it does not constitute
or imply a machine defect.
No remote
function
No battery
Remote signal be obstructed
Before use the remote control,
please check battery of remote controller.
Remove obstacle between projector and remote controller
Colors are pale
Color lose.
Caused by poor VGA cable connection.
Color density and color matching are not correctly
adjusted.
Adjust the RGB setting.
–
–
–
–
21
19
19
32
17
12
13
Page 41

39
VGA
60
640X480
VESA
60/72/75/85
640X480
SVGA
56/60/72/75/85
800X600
XGA
60/70/75/85
1024X768
SXGA
70/75
1152X864
SXGA
60/75
1280X960
SXGA
60
1280X1024
SXGA+
60/75
1400 x 1050
67
1280X1024 / 640x480
MAC
75
MAC
832x624
75
MAC
1024x768
MAC 75
1152x870
SDTV(480i) 30 720X480
SDTV(480p)
60
720X480
HDTV(720p)
60
1280X720
HDTV(1080i) 30 1920x1080
TV(NTSC) 60 720X480
TV(PAL,SECAM) 50 720X576
WUXGA
60
1920 x 1200
WXGA
60/75
1280 x 800
WXGA+
60/75/85
1440 x 900
WSXGA+
60
1680 x 1050
UXGA
60
1600 x 1200
Troubleshooting
List of Supported Monitor Displays
Computer mode
Signal Refresh Rate(Hz) Resolution(dots)
Signal Refresh Rate(Hz) Resolution(dots)
Signal Refresh Rate(Hz) Resolution(dots)
Component(YPbPr)
Composite/S-Video
Page 42

40
Appendix
Ceiling Mounted Installation Guide
479
160
480
360
92
90
92
90
92
9296
96
160
360
Dimensions
Unit:mm
Screw Holes of Ceiling Mount
Screw : M4
Depth : 10 mm
Attach the optional ceiling mount at four-suspension bracket fixing points when
suspending from a ceiling.
A special method of installation is required in order to suspend the projector from
the ceiling. Please ask your dealer for more details.
NOTE
►
Please use only with UL Listed ceiling mount bracket.
Page 43

41
Appendix
PIN Code Number Memo
Factory default set No: 0 0 0 0*
Factory default set No: 0 0 0 0*
*Should the four-digit number be changed,
the factory set number will be invalid.
PIN Code Lock No.
Logo PIN Code Lock No.
Write down the PIN code number in the column below and keep it with this
manual securely. If you forgot or lost the number and unable to operate the
projector, contact the service station.
 Loading...