

Bowers & Wilkins CM8, CM9 Owner's Manual

II11823 Issue 2
CM8
CM9
CM Series

Welcome and thank you for choosing Bowers &
Wilkins. Our founder, John Bowers, believed that imaginative
design, innovative engineering and advanced technology
were keys that could unlock the enjoyment of audio in the
home. His belief is one that we continue to share and inspires
every product we design.
This is a high performance product that rewards thoughtful installation, so we suggest that you take some time to
read this manual before you begin. Continue on page 4
Bienvenue et merci d’avoir choisi Bowers & Wilkins.
Notre fondateur, John Bowers, était persuadé qu’une
conception imaginative, des innovations en terme d’ingénierie
et des technologies parmi les plus avancées, étaient les
clés ouvrant les portes du plaisir de l’écoute à domicile. Ce
qu’il croyait fait partie de ce que nous continuons encore
à partager et se retrouve dans tous les produits que nous
concevons aujourd’hui.
Vous disposez d’un produit dont les hautes
performances méritent une installation soignée, par
conséquent nous vous suggérons de consacrer un peu
de temps à lire ce manuel avant de commencer à l’utiliser.
Rendez vous à la page 8
Willkommen bei Bowers & Wilkins. Der Firmengründer
John Bowers war der Meinung, dass ein wunderschönes
Design, eine innovative Konstruktion und ausgeklügelte
Technologien die Schlüssel zu Audio-Entertainment der
Extraklasse in Ihrem Zuhause sind. Wir teilen seine Meinung
und jedes von uns entwickelte Produkt basiert darauf.
Dies ist ein erstklassiges Produkt, dessen Installation
und Setup gut durchdacht werden müssen. Wir
empfehlen daher, sich ein wenig Zeit zu nehmen und
diese Bedienungsanleitung vor der Installation zu lesen.
Fortsetzung auf Seite 12
Benvenuti e grazie per aver scelto un prodotto Bowers
& Wilkins. Il nostro fondatore, John Bowers, era convinto
che design attraente, capacità d’innovare e tecnologie
all’avanguardia fossero fattori vincenti per la riproduzione
audio domestica. Le sue idee sono ancor oggi condivise da
noi tutti e fonte d’ispirazione per ogni nuovo prodotto che
realizziamo.
Questo modello è un diffusore di alte prestazioni
che merita di essere installato in maniera scrupolosa.
Vi suggeriamo pertanto di leggere attentamente questo
manuale prima di iniziare. Continua a pagina 20
Bienvenido y gracias por elegir Bowers & Wilkins. John
Bowers, nuestro fundador, estaba rmemente convencido
de que el diseño imaginativo, la ingeniería innovadora y la
tecnología avanzada eran las claves a la hora de llevar el
disfrute del sonido a la intimidad del hogar. Una creencia que
seguimos compartiendo y que inspira todos y cada uno de
los productos que diseñamos.
Si se instala adecuadamente, este producto es capaz
de ofrecer unas prestaciones muy elevadas, por lo que le
sugerimos que antes de ponerse manos a la obra dedique
un poco de su tiempo a leer este manual. Continúa en la
página 16
Welkom en dank voor de aanschaf van een product van
Bowers & Wilkins. Onze oprichter John Bowers geloofde
in vindingrijke ontwerpen: innovatieve en vooruitstrevende
technologie vormen de kern waarmee plezier met muziek
thuis kan worden gerealiseerd. Deze visie is nog altijd ons
uitgangspunt en vormt de inspiratie voor elk product dat we
ontwikkelen.
Dit is een hoogwaardig product dat een zorgvuldige
installatie verdient, daarom raden we u aan de tijd te nemen
deze handleiding te lezen voordat u begint. Lees verder op
pagina 24
www.bowers-wilkins.com
Добро пожаловать и благодарим вас за
приобретение акустики компании Bowers & Wilkins.
Наш основатель, Джон Бауэрс, верил в то, что
творческий подход в проектировании, новаторская
конструкция и передовые технологии смогут открыть
людям путь к подлинному звучанию в доме. Мы
продолжаем разделять его веру, и она вдохновляет нас
при проектировании всех новых продуктов.
Эти акустические системы способны на
высококачественное воспроизведение звука, поэтому
они заслуживают вдумчивого подхода к установке,
и мы советуем вам уделить некоторое время на
изучение этой инструкции, прежде чем приступить к
прослушиванию. Продолжение на стр. 28
欢迎并感谢您选择Bowers & Wilkins。我们公司的创办人
John Bowers先生相信具有想象力的设计、创新的工程学设
计和先进的技术是开启家庭音响娱乐大门的重要元素。我们
依然坚持着他的信念,并赋予我们所有产品设计灵感。
这是一款高性能产品,在妥当安装后您将获得极佳的音
效,因此我们建议您在开始安装前花一些时间仔细阅读本手
册。第32页继续
Bowers & Wilkins製品をお買い上げいただき、ありが
とうございます。Bowers & Wilkinsの創業者であるJohn
Bowersは、創意に富んだデザインと革新的な工業技術、そして
先進技術が、家庭でもオーディオを充分に楽しむ鍵であると信
じていました。現在でも彼の信念はBowers & Wilkinsで共有
されており、この信念はBowers & Wilkinsが設計するすべて
の製品に命を吹き込んでいます。
お買い上げいただいたスピーカーは、念入りな設置を行う
価値のある、非常に高性能な製品です。ご使用になる前に、この
マニュアルをお読みください。36ページに続く
ENGLISH
4
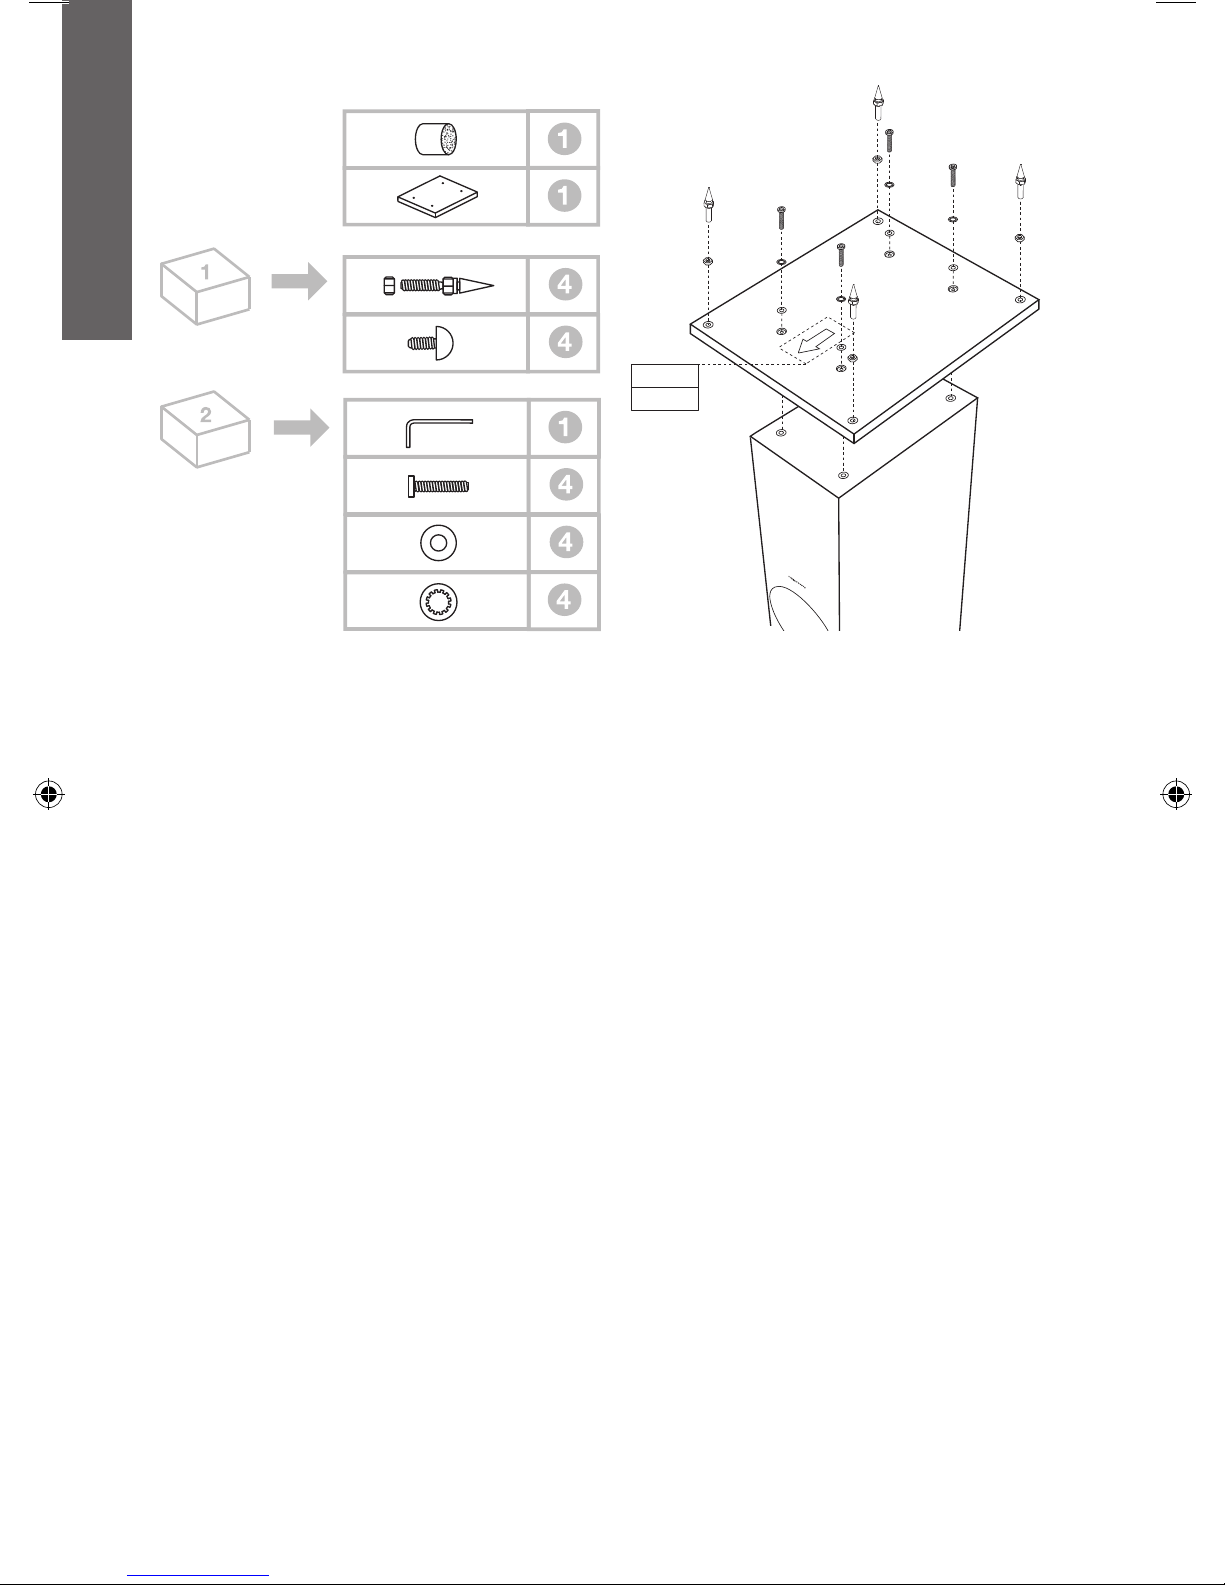
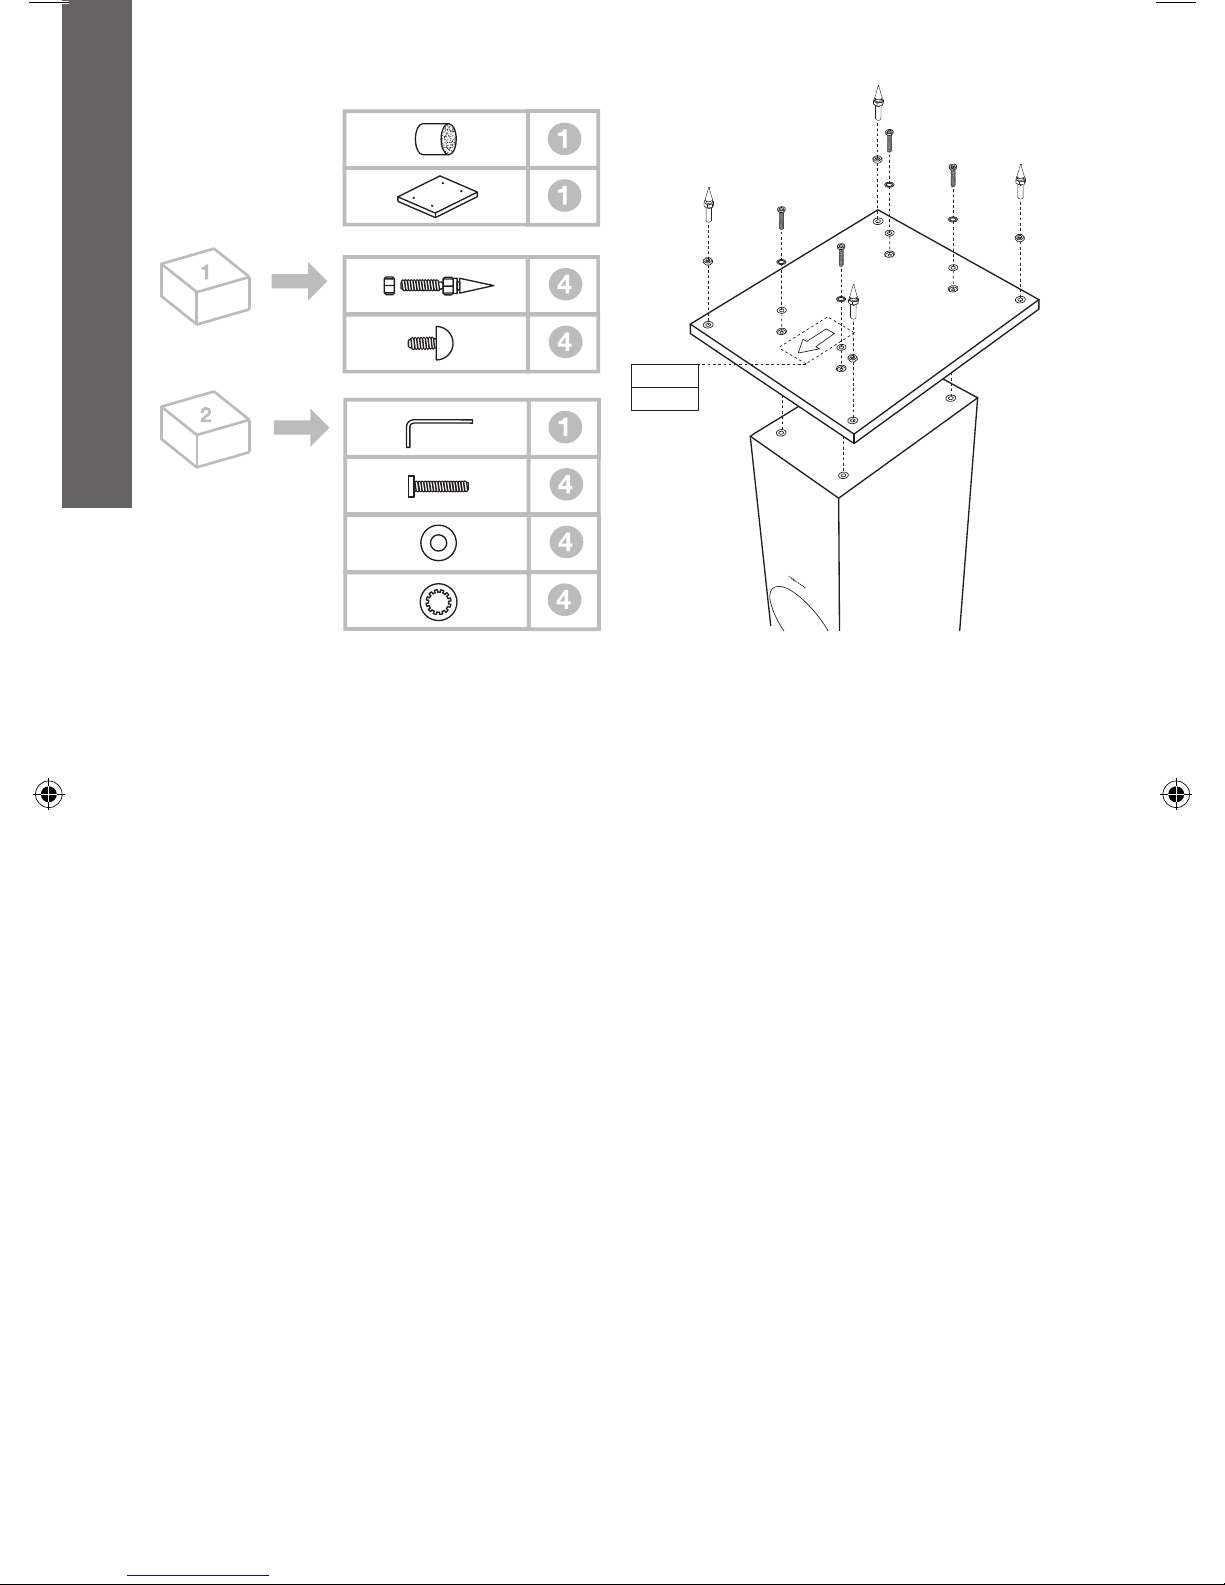
1. Unpacking
Carton Contents
Check in the carton for:
1 Two-part foam plug
1 Plinth
1 Accessory pack containing
4 M4 spike feet
4 Rubber feet
4 Lock nuts (10mm across ats)
1 Accessory pack containing
1 Allen key
4 M6 x 35mm screws
4 Plain washers
4 Shakeproof washers
Environmental Information
This product complies with international directives,
including but not limited to the Restriction of Hazardous
Substances (RoHS) in electrical and electronic equipment,
the Registration, Evaluation, Authorisation and restriction of
CHemicals (REACH) and the disposal of Waste Electrical
and Electronic Equipment (WEEE). Consult your local waste
disposal authority for guidance on how properly to recycle or
dispose of this product.
Speaker Installation
The speakers are intended to be oor mounted only. It is
important to ensure that the speakers stand rmly on the
oor using the spike feet supplied whenever possible. In
addition, t the plinth for proper stability.
To attach the plinth, stand the speaker on its top taking care
not to damage the cabinet or the drive units during handling.
Align the plinth with its attachment holes in the underside of
the cabinet, ensuring that the arrow on the underside of the
plinth points forwards. Secure the plinth using the screws and
washers supplied. Fit the shakeproof washers between the
plain washers and the screw heads. Tighten the screws using
the Allen key supplied.
The spike feet are designed to pierce carpet and rest on the
oor surface. Initially, screw the lock nuts onto the spikes
enough to leave the nuts oating just above the carpet when
the spikes are resting on the oor beneath. Screw the spikes
fully into the threaded inserts in the plinth. If the cabinet
rocks when placed on the oor, unscrew the two spikes that
do not touch the oor until the cabinet rests rmly without
rocking. Finally, lock the nuts against the cabinet. It may be
more convenient to t and adjust the spike feet after speaker
positioning has been optimised.
If there is no carpet and you wish to avoid scratching the oor
surface, use either a protective metal disc (a coin perhaps)
between the spike and the oor, or use the supplied rubber
feet. Fit the rubber feet and level the cabinet in the same
manner as with the spike feet.
2. Positioning
CM9
CM8
ENGLISH
5
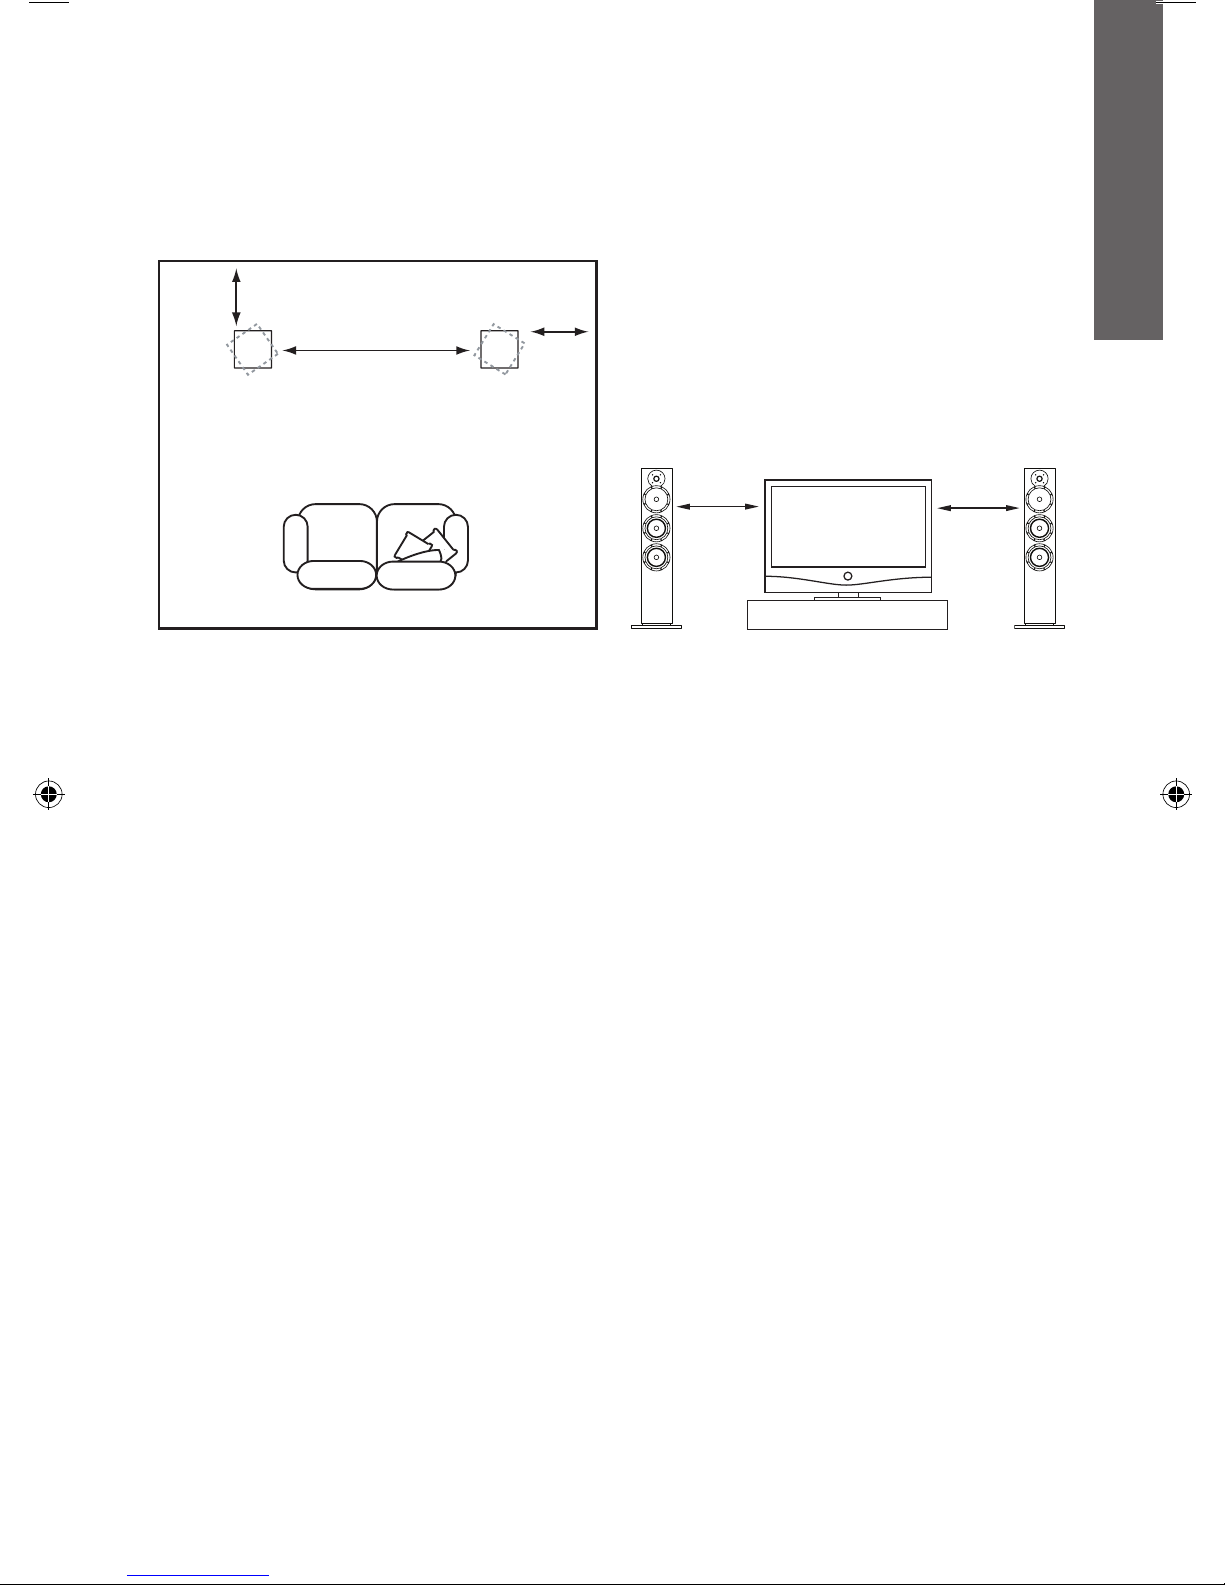
Speaker Positioning
Adjustment of speaker position following initial installation
will probably further improve the sound quality and is usually
worthwhile.
In either stereo or home theatre installations, try to ensure
that the immediate surroundings of each speaker are similar
in acoustic character. For example, if one speaker is adjacent
to bare walls while the other is adjacent to soft furnishings
and curtains, both the overall sound quality and the stereo
image are likely to be compromised.
Conventional Stereo Systems
To begin with, the speakers should be positioned between
1.5m and 3m apart at two corners of an equilateral triangle
completed by the listening area at the third corner. The
speakers should be approximately 0.5m away from the back
wall, and at least 0.5m away from any side walls (above).
Home Theatre Systems
If the speakers are to be used for the front channels in a
home theatre system, they should be placed closer together
than for 2-channel audio, because the surround channels
tend to widen the image. Positioning the speakers within
approximately 0.5m of the sides of the screen will also help
keep the sound image in scale with the visual image. As with
conventional stereo positioning, the speakers should ideally
be at least 0.5m away from any side walls. If the speakers
are preferred placed against the back wall and this location
results in over emphasized bass, see the Fine Tuning section
of this manual for information on using the foam plugs.
Stray Magnetic Fields
The speaker drive units create stray magnetic elds
that extend beyond the boundaries of the cabinet. We
recommend you keep magnetically sensitive articles (CRT
television and computer screens, computer discs, audio and
video tapes, swipe cards and the like) at least 0.5m from the
speaker. LCD, OLED and plasma screens are not affected by
magnetic elds.
>0.5m
>0.5m
1.5m - 3m
0.5m - 1m
0.5m - 1m
1. Unpacking 4
2. Positioning 4
3. Connections 6
4. Fine Tuning 6
5. Running In 7
6. Aftercare 7
ENGLISH
6
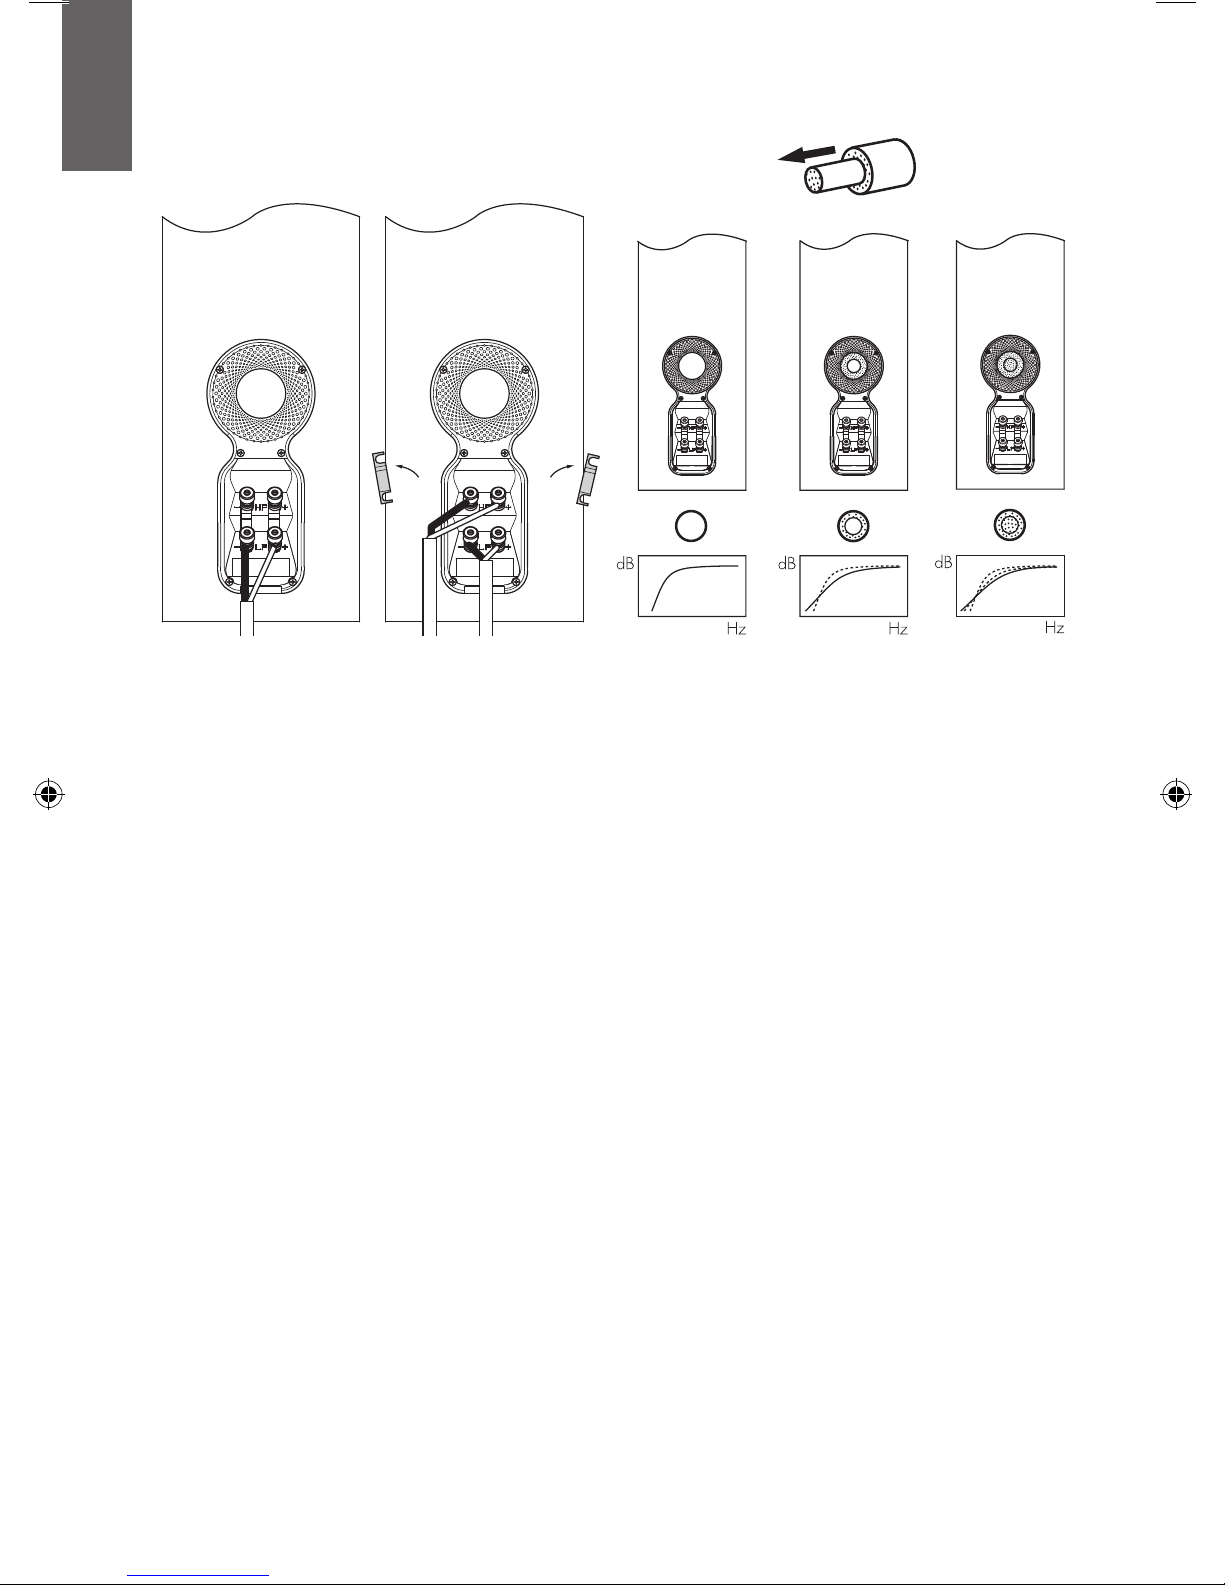
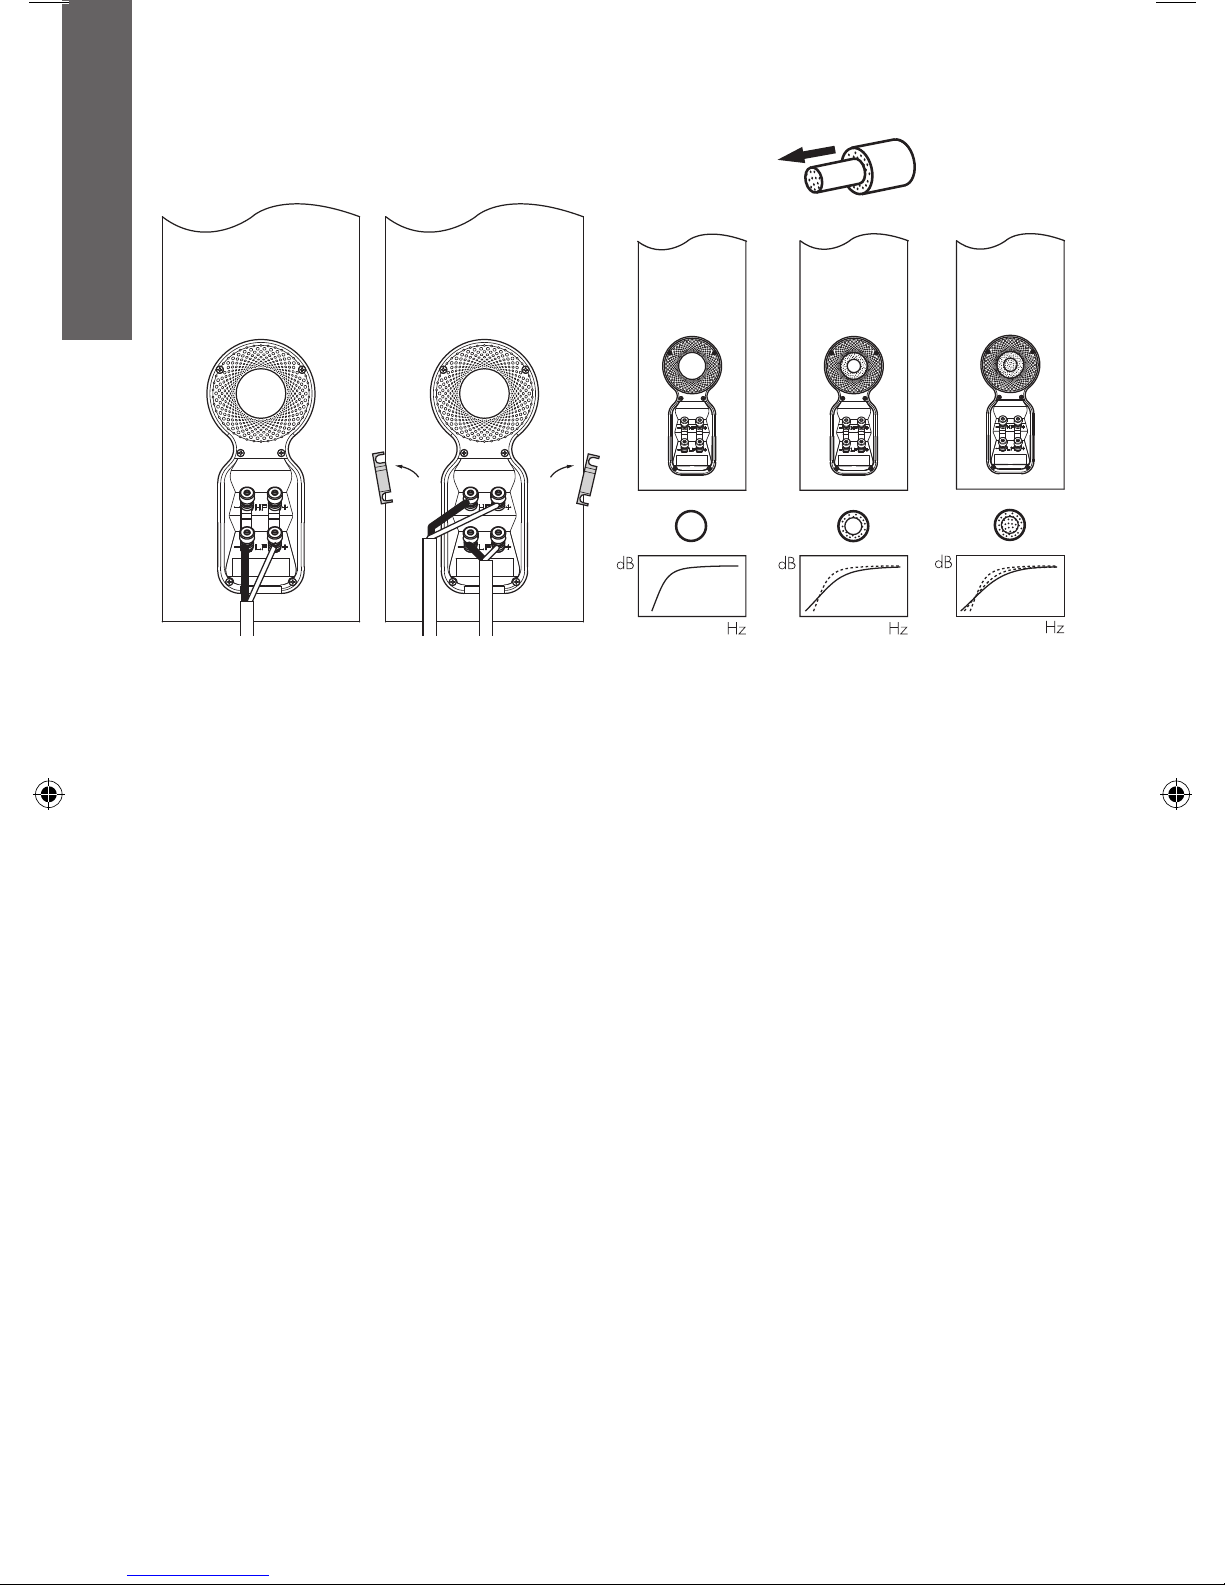
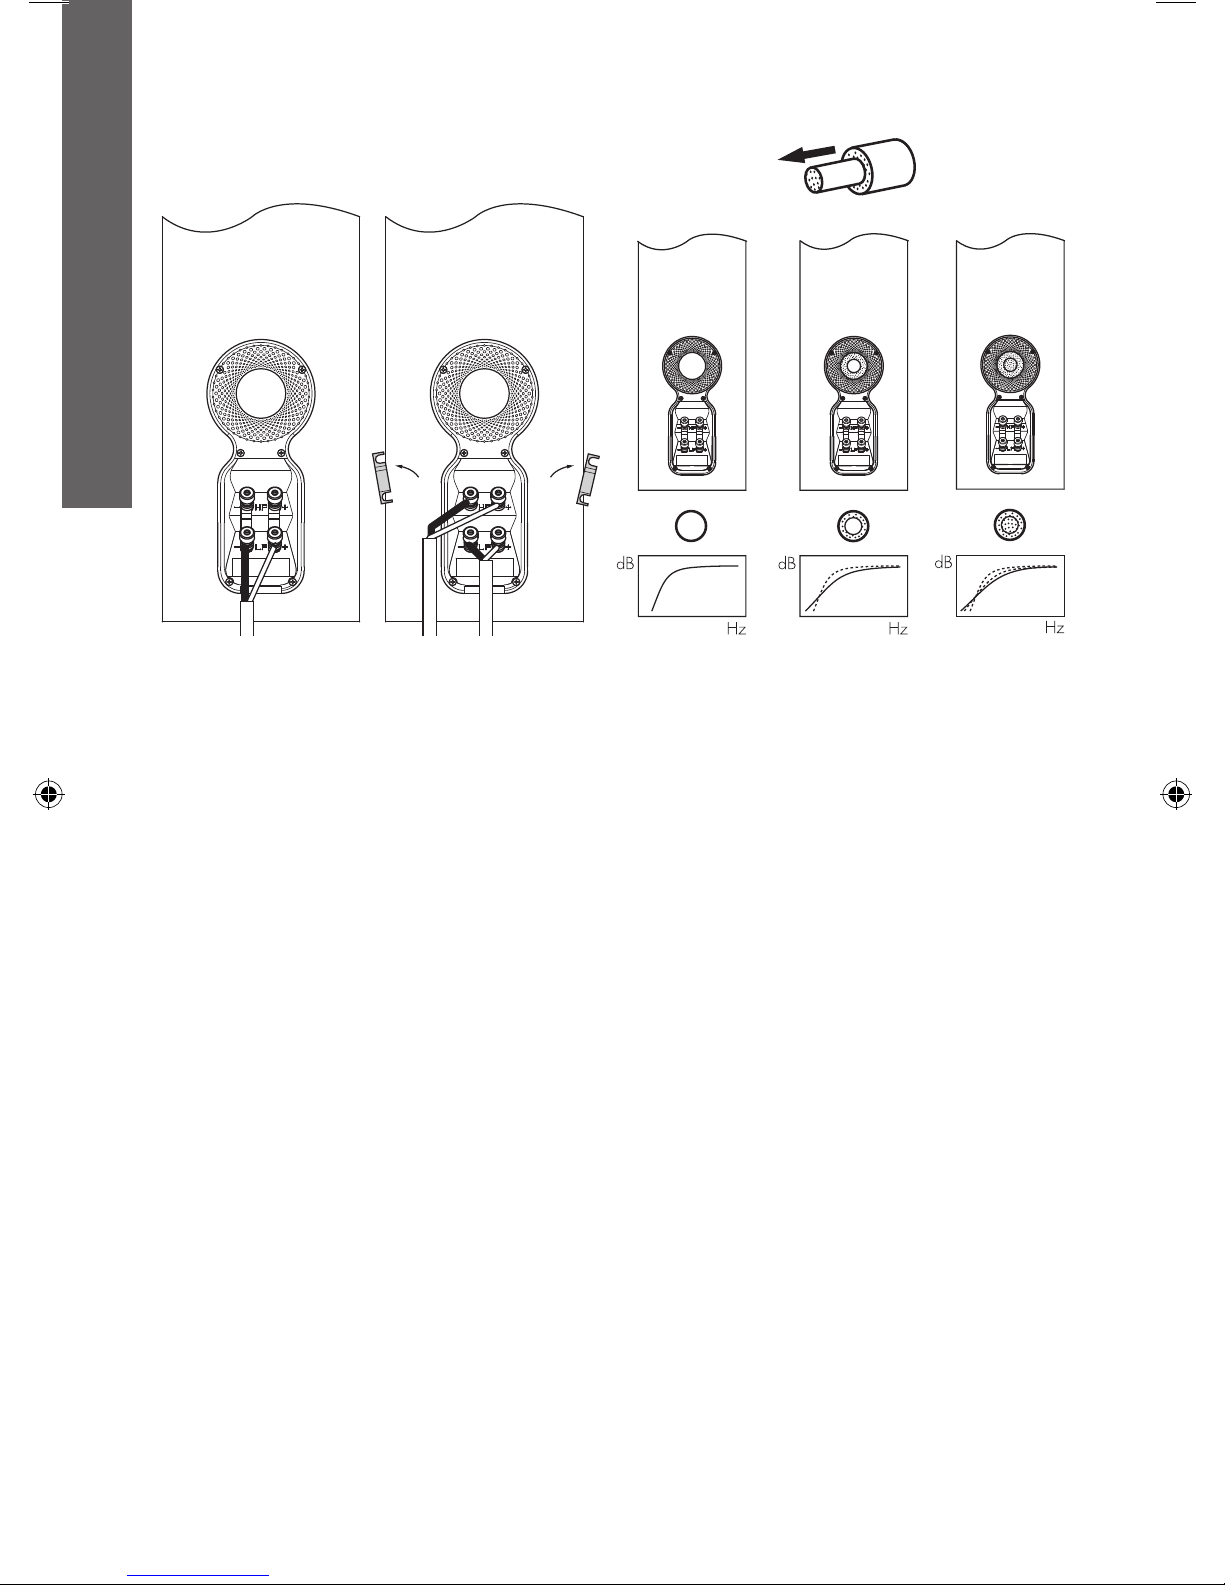
All connections should be made with the equipment switched
off.
There are 2 linked pairs of terminals on the back of the
speaker. For conventional connection (above left), the
terminal links should remain in place (as delivered) and
just one pair of terminals connected to the amplier. For
bi-wire connection (above right), the terminal links should
be removed and each pair of terminals connected to the
amplier independently. Bi-wiring can improve the resolution
of low-level detail.
Ensure that the positive terminals on the speaker (marked
+ and coloured red) are connected to the positive output
terminal on the amplier and the negative terminals on the
speaker (marked – and coloured black) are connected to the
negative output terminal on the amplier. Incorrect connection
can result in poor imaging and loss of bass.
Ask your dealer for advice when selecting speaker cable.
Keep its total impedance below the maximum recommended
in the speaker specication and use a low inductance cable
to avoid attenuation of high frequencies.
Before ne tuning, make sure that all the connections in the
installation are correct and secure.
Moving the speakers further from the walls will generally
reduce the volume of bass. Space behind the speakers will
also help to create an aural impression of depth. Conversely,
moving the speakers closer to the walls will increase the
volume of bass. If you want to reduce the volume of bass
without moving the speakers further from the wall, t the
foam plugs or, for less severe bass reduction, the foam rings
in the port tubes (above).
If the bass seems uneven with frequency this will most
probably be due to resonance modes in the listening room.
Even small changes in the position of the speakers or the
listening position can have a profound effect on how these
resonances affect the sound. Try moving the listening position
or locating the speakers along a different wall. The presence
and position of large pieces of furniture can also inuence
resonance modes.
If the central image lacks focus, try moving the speakers
closer together or angling them inward so that they point at a
location just in front of the listening position.
If the sound is too bright, increasing the amount of soft
furnishing in the room (heavier curtains for example) may help
balance the sound. Conversely, reducing the amount of soft
furnishing may help brighten a dull sound.
Ensure that the speaker stands rmly on the oor. Use carpet
piercing spikes if appropriate and adjust them to take up any
unevenness.
4. Fine Tuning3. Connections

ENGLISH
7
The cabinet surfaces usually only require dusting. If you wish
to use an aerosol or other cleaner, remove the grille rst by
gently pulling it away from the cabinet. Spray aerosols onto
the cleaning cloth, not directly onto the product. Test a small
area rst, as some cleaning products may damage some of
the surfaces. Avoid products that are abrasive, or contain
acid, alkali or anti-bacterial agents. Do not use cleaning
agents on the drive units. The grille fabric may be cleaned
with a normal clothes brush whilst the grille is detached from
the cabinet. Avoid touching the drive units, especially the
tweeter, as damage may result.
In order to avoid the risk of the surface nish cracking,
keep the product away from sources of direct heat such as
radiators and warm air vents. Whenever Bowers & Wilkins
speakers are nished in real wood, the nest veneers are
selected and treated with an ultra-violet resistant lacquer to
minimise changes in colour over time. Nevertheless, like all
natural materials, the veneer will respond to its environment
and a degree of colour change is to be expected. The effect
may be particularly noticeable where the area covered by
the grille, or areas kept in shadow, change more slowly than
other areas. Colour differences may be rectied by exposing
all the veneer surfaces equally and evenly to sunlight until
the colour is uniform. This process can take several days or
even weeks, but may be accelerated by careful use of an
ultra-violet lamp.
The performance of the speaker will change subtly during
the initial listening period. If the speaker has been stored in a
cold environment, the damping compounds and suspension
materials of the drive units will take some time to recover their
correct mechanical properties. The drive unit suspensions will
also loosen up during the rst hours of use. The time taken
for the speaker to achieve its intended performance will vary
depending on previous storage conditions and how it is used.
As a guide, allow up to a week for the temperature effects
to stabilise and 15 hours of average use for the mechanical
parts to attain their intended design characteristics.
However, longer run-in periods (as long as a month) have
been reported and there is evidence to suggest that this has
little to do with the speaker changing and more to do with
the listener getting used to the new sound. This is especially
so with highly revealing speakers such as these, where
there may be a signicant increase in the amount of detail
compared with what the listener has previously been used
to; the sound may at rst appear too “up front” and perhaps
a little hard. After an extended period of time, the sound will
seem to mellow, but without losing clarity and detail.
5. Running In 6. Aftercare
FRANÇAIS
8
1. Déballage
Vérication du contenu de l’emballage
Vériez que le carton contienne bien :
1 tampon en mousse en deux parties
1 support de sol
1 carton d’accessoires contenant :
4 pieds-pointes M6
4 pieds en caoutchouc
4 écrous de blocage (10 mm)
1 carton d’accessoires contenant :
1 clé Allen
4 vis M6 x 35 mm
4 rondelles pleines
4 rondelles autobloquantes
Informations sur l’environnement
Ce produit est conforme avec les directives internationales, y
compris -mais ne se limitant pas- aux restrictions concernant
les substances dangereuses (RoHS) dans les équipements
électroniques et électriques, l’enregistrement, l’évaluation,
la restriction des substances chimiques (REACH) et
l’élimination des déchets électriques et électroniques
(WEEE). Consultez votre service local d’élimination des
déchets sur la manière de bien recycler ou de se débarrasser
de ce produit.
Installation des enceintes
Les enceintes sont uniquement prévues pour être
directement posées au sol. Il est important de s’assurer
qu’elles sont parfaitement équilibrées sur le sol, en utilisant
les pointes de découplage fournies partout où cela est
possible. De plus, xez le support de sol pour une meilleure
stabilité
Pour attacher ce support, retournez l’enceinte en la faisant
reposer sur sa partie supérieure et en prenant soin de ne
pas endommager son coffret ou ses haut-parleurs pendant
cette opération. Alignez le support avec ses trous de xation
présents à la base du coffret de l’enceinte, en vous assurant
que la èche gravée sur le support pointe bien vers l’avant
de l’enceinte. Fixes le support en utilisant les rondelles et les
vis fournies. Placez les rondelles autobloquantes entre les
rondelles pleines et les vis. Serrez soigneusement chaque vis
avec la clé Allen fournie.
Les pieds-pointes fournis sont conçus pour transpercer la
moquette et prendre directement contact sur le sol en dur.
Avant de les mettre en place, vissez les écrous en les laissant
libres, de telle manière qu’ils afeurent la moquette une fois
les pointes correctement mises en contact avec le sol en
dur. Vissez complètement les pointes dans les inserts letés
du support de sol. Si l’enceinte n’est pas totalement stable
sur le sol, dévissez une ou plusieurs pointes jusqu’à ce que
l’enceinte soit parfaitement équilibrée sur le sol. Une fois cela
assuré, vissez complètement chaque écrou de blocage vers
la base de l’enceinte. Il est conseillé de garantir l’équilibrage
parfait de chaque enceinte seulement après avoir
précisément déterminé sa position dans la pièce d’écoute.
2. Positionnement
CM9
CM8
FRANÇAIS
9
Choix de la position
Le réglage de la position des enceintes au moment de
leur installation est susceptible d’améliorer grandement les
résultats sonores, et constitue donc une première étape
essentielle.
Qu’il s’agisse d’une installation stéréophonique ou multicanal
Home Cinema, faites en sorte que l’environnement
acoustique de chaque enceinte soit le plus identique
possible, dans son caractère sonore. Par exemple, si une
des enceintes est placée près d’un mur lisse et nu, tandis
que l’autre se trouve proche d’épais tissus et tapis, la qualité
et l’équilibre stéréophonique naux risquent fort d’être
compromis.
Systèmes stéréophoniques conventionnels
Comme base de départ, placer les deux enceintes éloignées
entre 1,5 et 3 mètres l’une de l’autre, formant ainsi les deux
angles d’un triangle équilatéral dont le troisième angle sera la
position d’écoute privilégiée. Les enceintes seront également
éloignées d’environ 50 centimètres du mur arrière et des
murs latéraux (ci-dessus).
Systèmes Home Cinema
Si les enceintes sont utilisées en tant qu’enceintes
frontales d’un système Home Cinema, elles doivent être
plus rapprochées l’une de l’autre que dans le cas d’une
installation stéréophonique traditionnelle, car les enceintes
Surround arrière ont tendance à agrandir l’image sonore
générale. Positionnez les deux enceintes à environ
0,50 mètre de chaque côté de l’écran, an de conserver une
image sonore en rapport avec l’image vidéo. Si les enceintes
doivent être plaquées contre le mur arrière pour des raisons
pratiques, il peut en résulter une augmentation articielle du
niveau de grave : voir le paragraphe Réglage n plus loin
dans ce manuel, pour une utilisation optimale des tampons
de mousse fournis.
Champs magnétiques
Les haut-parleurs à l’intérieur de l’enceinte génèrent des
champs magnétiques qui peuvent s’étendre au-delà du
coffret de l’enceinte. Nous vous recommandons donc de
tenir éloignés d’au moins 50centimètres des enceintes les
appareils sensibles à ces champs magnétiques (télévisions et
moniteurs informatiques à tube cathodique CRT, cassettes
et bandes magnétiques audio et vidéo, cartes magnétiques,
etc.). Les écrans LCD, OLED et plasma ne sont pas affectés
pas les champs magnétiques.
>0.5m
>0.5m
1.5m - 3m
0.5m - 1m
0.5m - 1m
1. Déballage 8
2. Positionnement 8
3. Connexions 10
4. Ajustements 10
5. Rodage 11
6. Entretien 11
FRANÇAIS
10
Tous les branchements doivent être effectués les appareils
étant tous éteints.
Il y a deux paires de prises réunies entre elles à l’arrière
de chaque enceinte. Pour les branchements classiques
(ci-dessus à gauche), les connexions reliant les prises
(comme installé à la livraison) doivent impérativement rester
en place, une seule paire de prises étant alors reliée à
l’amplicateur. En cas de bi-câblage (ci-dessus à droite), les
liens seront retirés, et chaque paire de prises sera alors reliée
à l’amplicateur de manière indépendante. Ce principe de
bi-câblage permet d’améliorer la résolution et la qualité des
plus ns détails.
Branchez la prise « positif » de l’enceinte (prise de couleur
rouge, avec le repère « + ») sur la prise de sortie enceinte
« positif » de l’amplicateur, et branchez la prise « négatif
» (prise de couleur noire, avec le repère « – ») sur la prise
« négatif » de l’amplicateur. Le non-respect de cette polarité
plus/moins entraîne une image stéréophonique dégradée et
une perte dans le grave.
Demandez conseil à votre revendeur pour le choix du câble
utilisé. L’impédance totale de charge ne doit jamais être
inférieure au minimum recommandé dans les spécications,
et le câble doit présenter une faible inductance, an d’éviter
toute atténuation des fréquences aiguës.
Avant de procéder à ces réglages, vériez que tous les
branchements sont correctement effectués, dans toute
l’installation, et fermement sécurisés.
Décaler les enceintes par rapport aux murs de la pièce a
généralement pour effet de réduire le niveau général du
grave. Un espace sufsant derrière les enceintes acoustiques
permet également d’améliorer la sensation de profondeur
de la reproduction sonore. Inversement, un rapprochement
des enceintes par rapport aux cloisons de la pièce entraîne
une augmentation du niveau du grave. Pour réduire le
niveau de grave sans modier la position des enceintes,
utilisez les tampons de mousse fournis dans les évents de
décompression, ou, si le niveau de grave à corriger reste
limité, utilisez uniquement les anneaux de mousse à la place
des tampons, comme illustré ci-dessus.
Si vous désirez réduire sensiblement le niveau de grave sans
pour autant modier la position des enceintes par rapport
aux murs, placez un des tampons de mousse dans l’évent
de décompression. Pour accéder à ces évents, retirez la grille
frontale des enceintes en la tirant doucement vers l’avant.
Si le niveau de grave vous paraît tout de même encore
trop important, cela est généralement dû à des modes
de résonances parasites dans la pièce d’écoute. Une
modication, même légère, de la position des enceintes
dans la pièce peut alors avoir pour effet des améliorations
très sensibles. Essayez de placer les enceintes le long d’un
autre mur de la pièce. Le déplacement des meubles les
plus encombrants peut également sensiblement modier les
résultats sonores.
Si la focalisation centrale de l’image sonore est mauvaise,
essayez de rapprocher les deux enceintes acoustiques, et/
ou de modier leur angle (plus fermé) par rapport à la zone
centrale d’écoute privilégiée.
Si le son paraît trop brillant, ajoutez des meubles ou éléments
amortissants dans la pièce (par exemple, des tapis plus
nombreux ou épais). Inversement, réduisez l’inuence de tels
éléments si le son semble trop sourd ou éteint.
Assurez-vous que les enceintes sont fermement posées
sur le sol. Utilisez les pointes pour transpercer la moquette
si nécessaire, et réglez-les parfaitement pour compenser
parfaitement toute inégalité du sol.
4. Ajustements3. Connexions

FRANÇAIS
11
Le coffret de l’enceinte ne requiert qu’un dépoussiérage
régulier. Si vous désirez utiliser un nettoyant antistatique
en pulvérisateur, pulvérisez ce produit uniquement sur le
chiffon de dépoussiérage, jamais directement sur l’enceinte
acoustique. La grille frontale peut être nettoyée avec une
brosse à habit classique, après avoir retiré la grille de
l’enceinte. Évitez de toucher les haut-parleurs, et notamment
le tweeter, ce qui pourrait les endommager irrémédiablement.
An d’éviter tout risque de craquèlement de la surface des
enceintes, ne les exposez jamais à une source de chaleur
directe, comme les radiateurs ou les bouches de chaleur
pulsantes. Parce que les enceintes Bowers & Wilkins utilisent
un placage en essence de bois véritable, les vernis les plus
ns ont été sélectionnés, intégrant une laque résistance aux
ultra-violets an de minimiser les changements de teinte
au l du temps. Cependant, comme tous les matériaux
naturels, le vernis interagit avec les éléments extérieurs,
et une variation de couleur peut apparaître petit à petit.
Cet effet est d’autant plus sensible si là où les surfaces de
l’enceinte sont recouvertes par le cache frontal, ou restent en
permanence dans l’ombre. Les variations de teinte sont alors
moins rapides. D’éventuelles différences de teinte peuvent
alors être compensées en exposant à la lumière toutes les
surfaces vernies de manière égale, et même, pour certaines,
directement à la lumière du soleil, an d’égaliser la couleur
des surfaces. Ce procédé peut nécessiter plusieurs jours,
voire semaines, mais peut-être en partie accélérée en utilisant
– avec précaution – une lampe à ultra-violet.
Les performances d’une enceinte acoustique se modient
subtilement pendant une période de rodage initiale.
Si l’enceinte a été stockée dans un environnement de
faible température, ses composants amortissants et les
suspensions des haut-parleurs vont demander un peu
de temps avant de retrouver leurs qualités mécaniques
optimales. De plus, ces suspensions vont également se
« libérer » pendant les premières heures d’utilisation. Ce
temps de rodage est variable, suivant la température de
stockage et la manière dont vous utilisez les enceintes. En
moyenne, comptez un week-end pour que les effets de
la température se stabilisent, et une quinzaine d’heures
d’utilisation normale pour que tous les composants
mécaniques atteignent le fonctionnement parfait
correspondant à leur conception mécanique.
Cependant, des périodes plus longues (jusqu’à un mois)
ont été relevées, mais il semble que cela soit dû un peu à
cause du rodage des enceintes, et beaucoup parce que
l’auditeur doit se familiariser avec le nouveau son ! C’est
particulièrement le cas ici, avec des enceintes extrêmement
dénies, capables de reproduire un niveau de détail
exceptionnellement élevé, plus que ce à quoi s’attendait
l’auditeur ; simplement, au début, ce son peut sembler un
tout petit peu « projeté » en avant et brillant. À la n de la
période de rodage, le son semblera plus neutre, sans ne rien
perdre pour autant de ses qualités en terme de transparence
et de sens du détail.
5. Rodage 6. Entretien
DEUTSCH
12
1. Auspacken
Kartoninhalt
Im Versandkarton liegen:
1 zweiteiliger Schaumstoffeinsatz
1 Sockel
1 Zubehörpaket mit:
4 M4-Spikes
4 Gummifüßen
4 Sicherungsmuttern (Schlüsselweite 10 mm)
1 Zubehörpaket mit:
1 Innensechskantschlüssel
4 Schrauben M6 x 35 mm
4 Unterlegscheiben
4 rüttelfesten Unterlegscheiben
Umweltinformation
Dieses Produkt entspricht den internationalen Richtlinien über
die Beschränkung der Verwendung bestimmter gefährlicher Stoffe in Elektro- und Elektronikgeräten (Restriction
of Hazardous Substances (kurz RoHS genannt)), der
Verordnung zur Registrierung, Bewertung, Zulassung und
Beschränkung chemischer Stoffe (Registration, Evaluation,
Authorisation and Restriction of CHemical substances (kurz
REACH)) und den Richtlinien über Elektro- und Elektronik-
Altgeräte (Waste Electrical and Electronic Equipment
(WEEE)). Erkundigen Sie sich bezüglich des Recyclings
bzw. der Entsorgung dieses Produktes bei der örtlichen
Abfallentsorgung.
Aufstellen der Lautsprecher
Die Lautsprecher sind als Standversion konzipiert. Es ist
wichtig, dass sie fest auf dem Boden stehen. Ver wenden Sie
daher, wann immer möglich, die beiliegen den Spikes. Befestigen Sie zusätzlich den Sockel, um eine optimale Stabilität
zu gewährleisten.
Stellen Sie den Lautsprecher zur Anbringung des Sockels
auf den Kopf. Seien Sie dabei ausgesprochen vorsichtig,
damit das Gehäuse bzw. die Chassis nicht beschädigt
werden. Richten Sie den Sockel den Befestigungslöchern
an der Gehäuseunter seite ent spre chend aus. Stellen Sie
dabei sicher, dass der Pfeil an der Sockelunterseite nach
vorne zeigt. Befestigen Sie den Sockel mit den beiliegenden
Schrauben und Unterlegscheiben. Setzen Sie die rüttelfesten
Unterleg scheiben zwischen die Unterleg scheiben und die
Schraubenköpfe. Ziehen Sie die Schrauben mit dem beiliegenden Innensechskantschlüssel fest.
Die Spikes sind so ausgelegt, dass sie durch einen Teppich
hindurchgehen und auf der Bodenoberäche auiegen. Drehen Sie zunächst die Sicherungsmuttern so auf die Spikes,
dass sie sich über dem Teppich benden, wenn die Spikes
auf dem Boden darunter auiegen. Drehen Sie die Spikes
vollständig in die Gewindebohrungen des Sockels. Sollte
das Gehäuse wackeln, wenn es auf den Boden gestellt wird,
so lösen Sie die beiden nicht auiegenden Spikes, bis der
Lautsprecher fest auf dem Boden steht. Ziehen Sie nun die
Sicherungsmuttern gegen das Gehäuse fest. Es ist sinnvoll,
die Spikes erst dann anzubringen und einzustellen, wenn Sie
die optimale Position für den Lautsprecher gefunden haben.
Liegt kein Teppich und möchten Sie ein Zerkratzen der
Bodenoberäche vermeiden, legen Sie entweder jeweils eine
Schutzscheibe (vielleicht eine Münze) unter die Spikes oder
verwenden die beiliegenden Gummifüße.
2. Aufstellen und Positionieren
CM9
CM8

DEUTSCH
13
Positionieren der Lautsprecher
Die Position der Lautsprecher nach der Installation weiter zu
optimieren, kann zu einer Verbesserung der Klangqualität
führen und ist daher sinnvoll.
Versuchen Sie sowohl bei Stereo- als auch bei Heimkinoinstallationen sicherzustellen, dass sich die direkte
akustische Umgebung aller Lautsprecher ähnelt. Bendet
sich beispielsweise ein Lautsprecher in der Nähe einer kahlen
Wand, während der andere von weichen Einrichtungsgegenständen und Vorhängen umgeben ist, so leiden darunter die
Klang qualität und das Stereo-Klangbild.
Herkömmliche Stereosysteme
Zunächst sind die Lautsprecher in einem Abstand von 1,5 bis
3 m in zwei Ecken eines gleichseitigen Drei ecks zu platzieren,
das an der dritten Ecke durch den Hörbe reich vervollständigt
wird. Der Abstand zur Rück wand und zu den Seitenwänden
sollte mindestens 0,5 m betragen (siehe oben).
Heimkinosysteme
Werden die Lautsprecher für die Frontkanäle eines Heimkinosystems genutzt, so sollten sie näher zusammengestellt
werden als bei 2-Kanal-Audio systemen, da die Surroundkanäle zu einer Erwei te rung des Klangbildes führen. Eine Positionierung der Lautsprecher innerhalb von ungefähr 0,5 m zu
den Seiten des Bildschirms ist darüber hinaus sehr hilf reich,
um das Klangbild optimal an das visuelle Bild anzupassen.
Wie bei der Positionierung in konven tionellen Stereosystemen
sollten die Lautsprecher einen Ab stand von ungefähr 0,5 m
von der Rückwand haben und einen Mindestabstand von
0,5 m zu den Seiten wänden. Sollen die Lautsprecher an die
Rück wand gestellt werden und führt dies zu einem zu starken
Bass, so erhalten Sie unter „Feinabstimmung” in dieser
Bedienungsanleitung Hinweise zur Nutzung der Schaumstoffeinsätze.
Magnetische Streufelder
Die Lautsprecherchassis erzeugen ein magnetisches
Streufeld, das über die Gehäusegrenzen hinaus reicht. Daher
empfehlen wir, einen Mindestabstand von 0,5 m zwischen
magnetisch empndlichen Artikeln (CRT-Fernsehgeräten,
Computerbildschirmen, Discs, Audio- und Videobändern,
Scheckkarten usw.) und Lautspre cher zu bewahren. LCD-,
OLED- und Plasma-Bild schirme werden von magnetischen
Streufeldern nicht beeinusst.
>0.5m
>0.5m
1.5m - 3m
0.5m - 1m
0.5m - 1m
1. Auspacken 12
2. Aufstellen und Positionieren 12
3. Anschließen der Lautsprecher 14
4. Feinabstimmung 14
5. Einlaufphase 15
6. Pege 15
DEUTSCH
14
Schalten Sie alle Geräte vor dem Anschließen ab.
An der Lautsprecherrückseite sind jeweils zwei Anschlussklemmen über Brücken miteinander verbunden. Im
konventionellen Betrieb (siehe oben links) bleiben die Brücken
(wie bei der Lieferung) in ihrer Position und nur ein An-
schlussklemmenpaar wird an den Verstärker ange schlossen.
Sollen die Lautsprecher im Bi-Wiring-Verfahren betrieben
werden (siehe oben rechts), sind zunächst die Brücken zu
entfernen. Hierbei werden alle vier Anschlussklemmen mit
dem Verstärker verbunden. Bi-Wiring kann die Detailtreue im
Tieftonbereich ver bessern.
Stellen Sie sicher, dass positive (rote und mit + gekennzeich-
nete) Anschlussklemmen am Lautsprecher mit dem positiven
Ausgang am Verstärker und nega tive (schwarze und mit
– gekennzeichnete) Anschluss klemmen mit dem negativen
Ausgang am Verstärker verbunden werden. Ein nicht korrektes Anschließen der Kabel kann zu einer Verschlechterung
des Klang bildes und zu Bassverlusten führen.
Lassen Sie sich bei der Auswahl der Lautsprecherka bel von
Ihrem autorisierten Fachhändler beraten. Die Gesamtimpedanz sollte unterhalb der in den Techni schen Daten angegebenen maximalen Kabelimpedanz liegen. Insbesondere sollte
das zum Hochtöner füh rende Kabel eine geringe Induktivität
besitzen, da sehr hohe Töne sonst gedämpft werden.
Vergewissern Sie sich vor der Feinabstimmung Ihres Systems
noch einmal, dass alle Verbindungen richtig hergestellt wurden und alle Kabel ordnungsgemäß angeschlossen sind.
Ein größerer Abstand zwischen Lautsprechern und Wänden
führt zu einer Reduzierung des Bassniveaus. Der Raum
hinter den Lautsprechern schafft auch einen Eindruck der
Tiefe. Umgekehrt wird das Bassniveau erhöht, wenn die
Lautsprecher näher an die Wände gestellt werden. Möchten
Sie das Bassniveau redu zieren, ohne den Abstand zwischen
Lautsprechern und Wand zu vergrößern, setzen Sie die
Schaumstoff einsätze oder – wenn Sie eine geringere Reduzierung des Bassniveaus wünschen – nur die Schaumstoff-
ringe in die Bassreexöffnungen ein (siehe oben).
Steht das Bassniveau nicht im Einklang mit der Frequenz,
so ist dies auf starke Resonanzen im Raum zurückzuführen.
Selbst kleinste Änderungen bei der Lautsprecherpositionierung bzw. in der Hörposition können eine erhebliche Wirkung
auf die wahrgenom mene Klangqualität haben. So ändert sich
die Klang qualität beispielsweise, wenn Sie die Hörposition
verändern oder die Lautsprecher an eine andere Wand gestellt werden. Auch das Vorhandensein großer Möbelstücke
und deren Position können erhebliche Auswirkungen haben.
Ist das Klangbild in der Mitte schlecht, stellen Sie die Lautsprecher näher zusammen oder so auf, dass sie in Richtung
Hörbereich zeigen.
Ist der Klang zu schrill, hilft die Verwendung weicher Einrich-
tungsgegenstände (wie z. B. schwerer Vor hänge). Umgekehrt
sollte man bei dumpfem, leblosem Klang die Verwendung
solcher Einrichtungsgegenstände auf ein Minimum reduzieren.
Stellen Sie sicher, dass der Lautsprecher fest auf dem Boden
steht. Liegt Teppich(boden), verwenden Sie die beiliegenden
Spikes und passen diese so an, dass alle Unebenheiten des
Bodens ausgeglichen werden.
4. Feinabstimmung
3. Anschließen der Lautsprecher
 Loading...