

OWNER’S MANUAL
Important Facts to Know
about your Metal Detector.
1. This is a MOTION detector.
You must sweep the searchcoil from side-to-side to
detect metal.
A motionless searchcoil over a metal object will not
result in detection.
2. Do not use indoors. Detector is for outdoor use only.
Household appliances emit electromagnetic fields, which can interfere with your
detector. If conducting an indoor demonstration, turn the sensitivity down and
keep the searchcoil away from appliances such as microwaves, computers and
televisions. If your detector beeps erratically, turn off appliances and lights.
Do not test by placing coins on the floor. Most floors contain metal.
Keep the searchcoil away from floors, walls, and tables, which can contain
metal.
3. Use 9-volt ALKALINE batteries only.
Do not use Heavy Duty batteries.
Do not use ordinary Zinc-Carbon batteries.
4. Adjust sensitivity to a low level in the event of false signals
Always begin use at reduced sensitivity.
Increase to full sensitivity after you are familiar with the detector’s operation.
INTRODUCTION
The Tracker IV is a user-friendly instrument, requiring only a minimum
of operator skill, yet delivering effective performance over a wide range of
conditions and applications.
Streamlined in appearance,
with only two operating
knobs and a mode selection
switch, the Tracker IV has
eliminated the two most
difficult aspects of metal
detector operation, Tuning
and Ground Balancing. Both
of these functions are automatic
with the Tracker IV.
The Tracker IV will detect in
extreme ground conditions,
ranging from salt (for beach
hunting) to black sand (for
gold prospecting), with no
operator adjustments to the
circuitry and with no loss of
sensitivity.
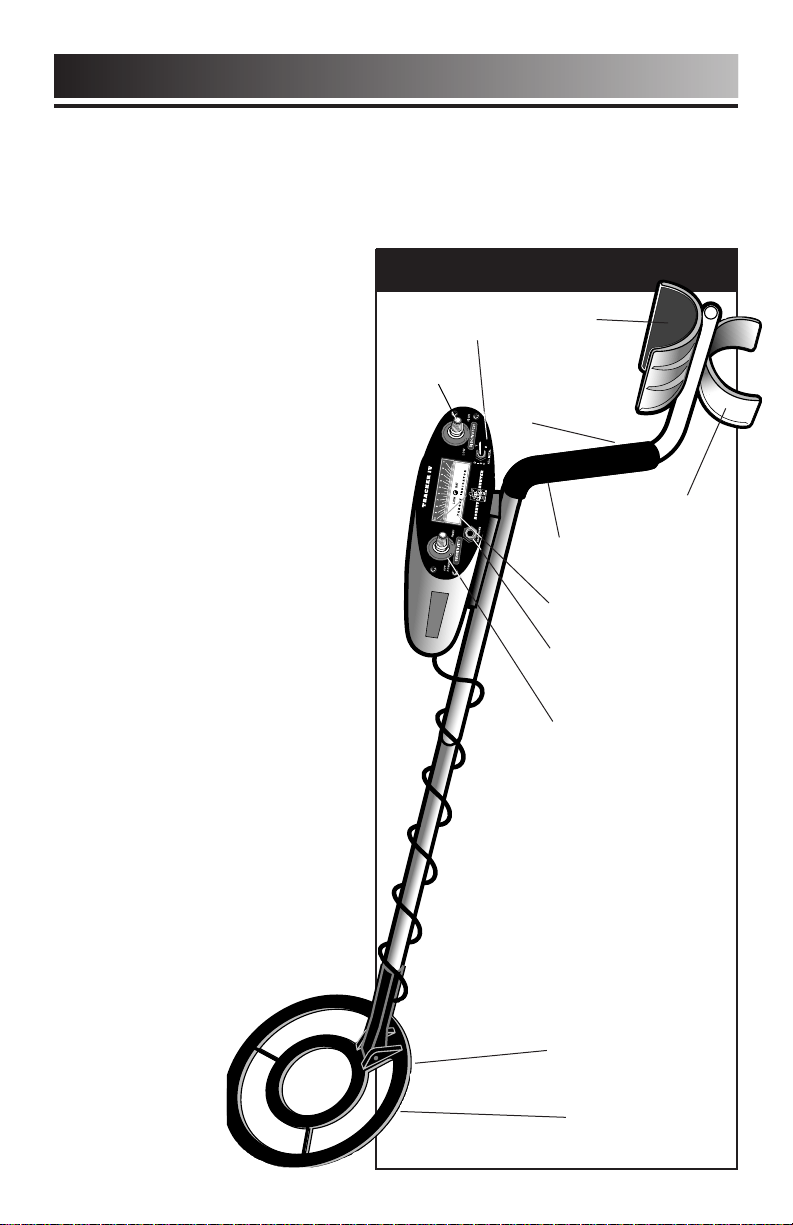
Tracker IV FEATURES
Three-Position
Toggle Switch
Discriminate
Control
Padded
Armrest
S-Rod
Handle
System
Comfort
Hand-grip
Meter System
Headphone Jack
Sensitivity Control
Detector
Stand
From salt water beach
conditions to black sand
deposits common at gold
prospecting locations, the
Tracker IV sees through
the earth’s naturally
occurring
minerals to find
buried metals.
2
Interchangeable
Coil System
8" Waterproof Coil
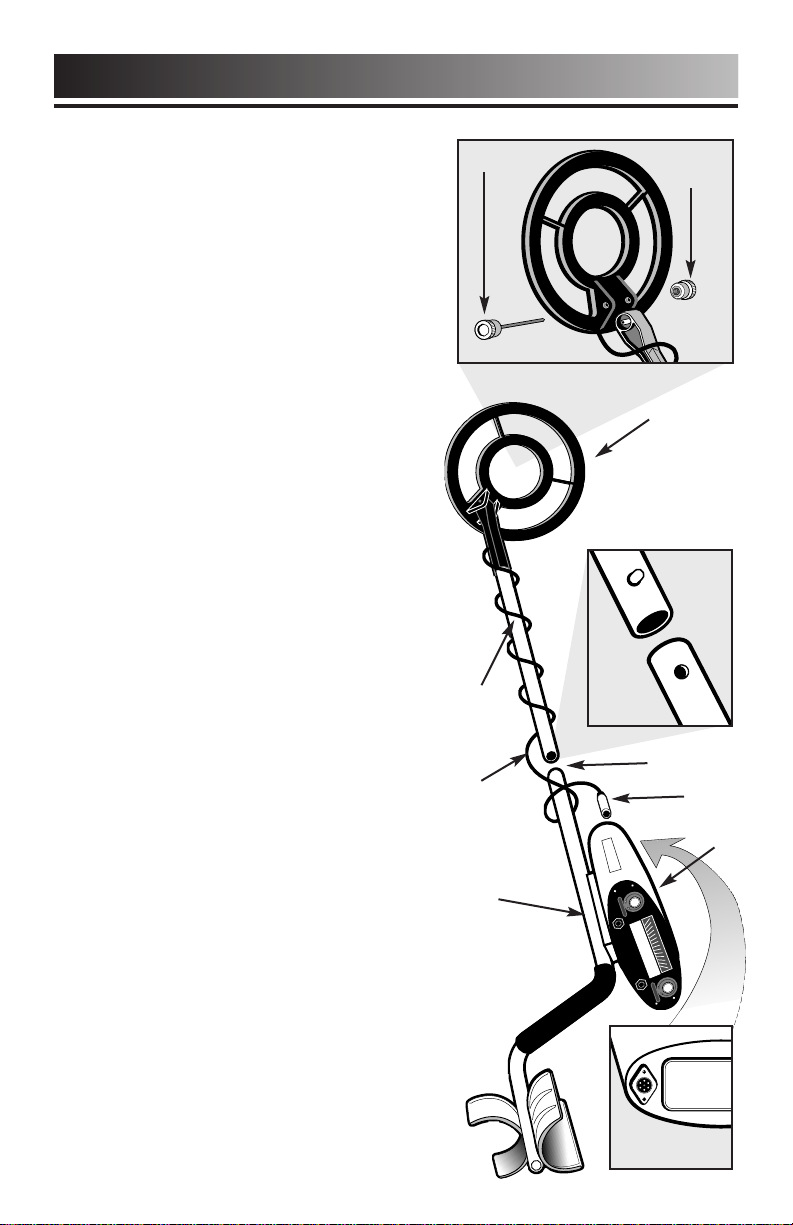
EASY ASSEMBLY
Assembling your Tracker IV Metal
Detector is easy and requires no
tools. Just follow these steps:
1 Using the supplied bolt and
●
knurled knob, attach the search
coil to the lower stem.
2 Press the button on the upper
●
end of the lower stem and slide
the lower stem into the upper
stem.
Adjust the stem to a length that lets you
maintain a comfortable upright posture,
with your arm relaxed at your side.
3 Wind the search coil cable
●
around the stem. Leave enough
slack in the cable to let you adjust
the coil when you are hunting on
uneven ground. Then tighten the
knob at the end of the search
coil.
Note:
To adjust the coil,
simply loosen the knob.
Bolt
Lower
Stem
Search
Coil
Cable
Knurled
Knob
Search Coil
Bottom view
Lower
Stem
Upper
Stem
Bottom side
Plug
Control
Housing
4 Insert the coil’s plug into the
●
matching connector on the control
housing. Be sure the holes and
pins line up correctly.
Caution:
• Do not force the plug in.
Excess force will cause damage.
• To disconnect the cable, pull out
the plug. Do not pull on the cable.
Upper
Stem
Connector
on back of
control housing
3
BATTERIES
IMPORTANT: Always use ALKALINE batteries for optimal
performance.
Always remove the batteries for prolonged storage.
CHECK THE BATTERIES if your detector exhibits any of the
following symptoms:
1 The unit does not turn on.
●
2 Low speaker volume.
●
3 Unit beeps continuously at low sensitivity setting.
●
The Low Battery indicator light will come on and stay on if the
batteries are discharged. It should flash momentarily when the
Power Switch is turned off.
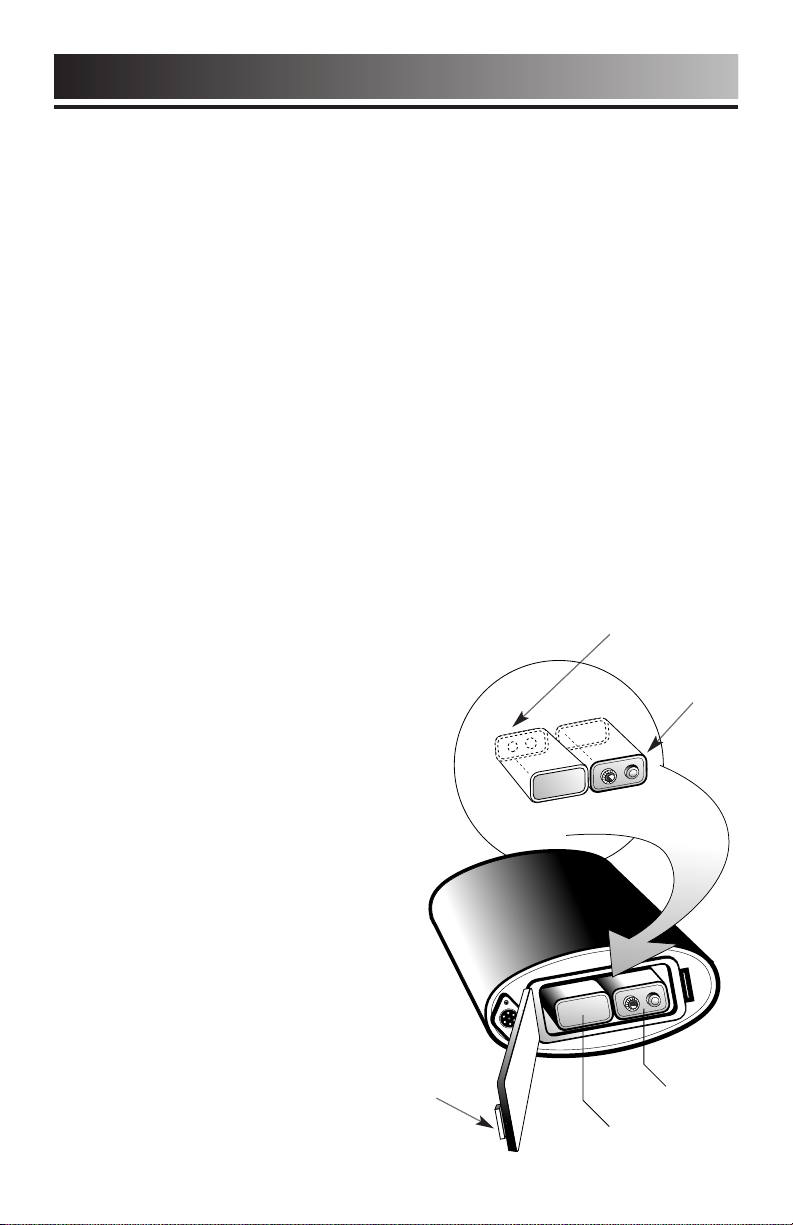
IMPORTANT: Your Tracker IV metal detector requires two 9-Volt
ALKALINE batteries.
Follow these steps to install the batteries.
1 Carefully remove the battery
●
compartment door by pressing
the release clip on the right side
of the door.
2 Snap one battery onto each of the
●
terminals and place the batteries
inside the compartment. Insert
one battery with the terminals
facing down, and the second
battery with terminals facing
outward.
3
Replace the compartment door
●
by carefully inserting opposite
side of clip first. Then press down
on clip side until battery door
Release
Clip
snaps into place.
First Battery
terminals facing in
Second Battery
terminals
facing out
Second Battery
First Battery
4
Tracker IV DEMONSTRATION
Here is a quick way to demonstrate the basic features of your Tracker IV.
I. Supplies Needed
• A quarter (25¢)
• A nickel (5¢)
• A Penny (1¢)
• A small piece of aluminum foil
• A Nail
II. Position your Tracker IV
• Place the detector on a table, with the search coil hanging over the edge.
• Be sure that the search coil is far away from walls or metal objects. Keep the search coil away
from any metal in the table.
III. Beginning Switch Settings
• Right Knob (Discriminate) – LOW
• Toggle Switch – Middle Position
• Turn detector on with "Sensitivity"
knob set to 3:00 position
• Reduce "Sensitivity" in case of interference
IV. All Metal Detection
A.
Wave all objects over the search coil
• NOTICE THE SINGLE TONE
V. Tone Mode Detection
A. Move toggle switch to the right position – TONE
B. Turn the "Discriminate" knob to 2:00 (about 3/4 turn)
C. Sweep all of the different objects back and forth under the
search coil
• NOTICE THE DIFFERENT TONES
• NOTICE THE METALS REJECTED
VI. Disc Mode Detection
A. Move the toggle switch to the left position – DISC
B. Turn the "Discriminate" knob to LOW
C. Sweep all of the different objects back and forth under the
search coil.
• NOTICE THE METALS REJECTED
D. Turn the "Discriminate" knob slowly to the right while
sweeping all of the different objects at different settings.
• NOTICE THE DIFFERENT TONES
• NOTICE THE METALS REJECTED
TOGGLE SWITCH
ALL METAL
TOGGLE SWITCH
TONE
TOGGLE SWITCH
FULL DISC
5

OPERATION
The Tracker IV is a “motion” detector. This means that the search
coil must be moving to detect the presence of metal. When
practicing with a stationary metal detector, keep the target moving
over the coil. Objects held still under the search coil will not be
detected.
THREE MODES OF OPERATION
The Tracker IV allows for three modes of operation:
ALL METAL, TONE AND FULL DISCRIMINATE
After turning the unit on, and adjusting your Sensitivity to the
desired setting, you're now ready to decide on your mode of
operation.
ALL METAL:
different types of metal will be detected such as: iron, steel,
aluminum, brass, silver, copper and gold. Applications: Relic
Hunting, Gold Prospecting, Cache Hunting and general applications
such as property marker locating. This mode provides maximum
depth detection capability.
FULL DISCRIMINATE:
Full Discriminator, most trash items will be automatically rejected.
Adjust the DISCRIMINATE control higher to increase the range of
discrimination.
TONE DISCRIMINATE:
the Tone Discriminator, a unique dual tone “beep” and automatic iron
rejection makes finding treasure fun and easy. It's also possible to
achieve a broken tone for certain pull-tabs by adjusting your
Discriminate control to the approximate center position (12:00).
With the two-tone discrimination, along with a broken tone for
pull-tabs, you will be able to identify types of buried metals
according to the audio tones emitted. Applications: Coinshooting,
Jewelry Hunting and detecting in highly trashed areas.
(Toggle Switch in the Middle)
(Toggle Switch to the Left)
(Toggle Switch to the Right)
In this mode, all
When using the
When using
6

OPERATION
TONE MODE AUDIO RESPONSES
NO
RESPONSE
Iron & Steel
LOW
TONE
Gold & Nickel
BROKEN
TONE
Old & New Pull Tabs
HIGH
TONE
Copper, Silver & Brass
TONE DISCRIMINATION
(continued)
(Toggle switch to the Right)
Classifies
detected metal objects by emitting a low
or high tone.
Adjust the DISCRIMINATE control higher to
increase the range of the low tone. It is
possible to set the DISCRIMINATE level so
that nickels have a low tone, larger coins
have a high tone, and pull-tabs have a low
tone or in-between “broken” tone. The
"broken" tone makes pull-tabs and trash easily recognizable.
Sensitivity will be reduced slightly when
using the Tracker IV in the Tone
Discrimination mode. If you want optimal
depth capability, operate in the All Metal
mode by turning the Discriminate control
completely counterclockwise; then turn the
Sensitivity control clockwise to its highest
clockwise position without chatter. If your
Tracker IV chatters or beeps erratically,
reduce the Sensitivity by turning the left
knob counterclockwise.
7

OPERATION
AUTO GROUIND CONTROL:
The Tracker IV automatic Ground Track feature allows operation in
virtually all soil conditions, regardless of mineral content.
Use it effectively on the beach or for gold prospecting. In the ALL
METAL Mode (Toggle switch in the middle), the Tracker IV will detect
gold nuggets through black sand and will find deeply buried relics in
all types of soil.
OPERATING TIPS:
Turn the detector on using the left knob. NOTE: The detector will remain
silent when turned on. It will emit sound when metal passes beneath
the search coil.
As the left knob is clicked on, it will be at the lowest sensitivity
setting. Turning the control knob toward "HIGH" increases
sensitivity to small or deeply buried objects. If the unit “chatters”,
reduce the sensitivity slightly, until the chatter stops.
For maximum performance, operate with the sensitivity as high as
possible. The sensitivity can generally be set higher when operating
in Full Discriminate (DISC) or Tone Discriminate (TONE) modes.
8

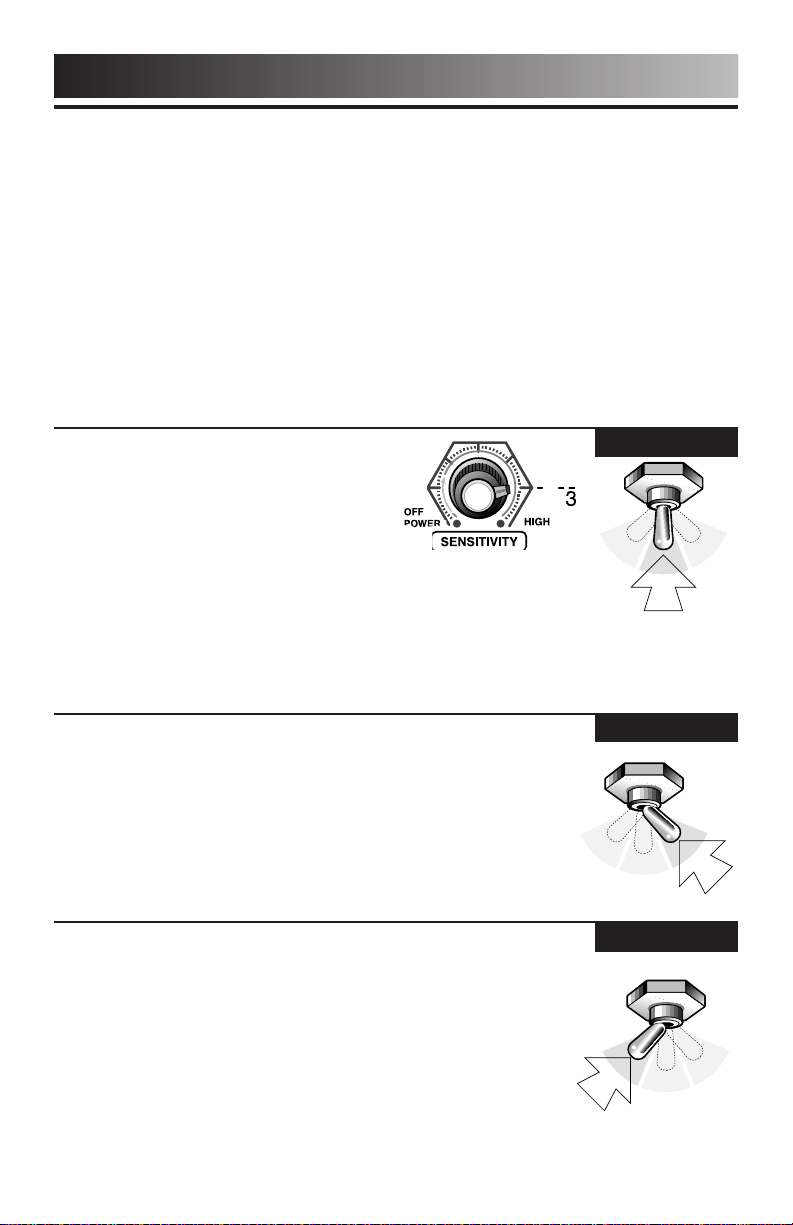
IN THE FIELD
STANCE
Stand with your arm extended in front of
your body. Don’t bend or stoop; stand in a
comfortable position. Hold the unit so that
the search coil is about 1/2-inch above the
ground. Adjust the search coil so that it is
parallel to the ground.
SWEEP
Standing in the search position,
swing the search coil gently from
side to side, slightly overlapping
each sweep as you move
forward. Keep your search coil
approximately 1/2-inch above
the ground as you search.
Raising it during the sweep ,
or at the ends of your
sweep, can cause false
readings. Move slowly;
hurrying will cause you
to miss targets.
Most desireable objects will respond with a repeatable tone. When
discriminating, iron and foil objects generally do not respond. False
signals can be caused by trashy ground, electrical interference, or by large
irregular trash objects. These signals are easily recognized by their often
broken or non-repeatable nature.
CORRECT
WRONG
9

IN THE FIELD
(cont.)
PINPOINTING
Accurate pinpointing takes practice and is best accomplished by
“X-ing” the suspected target area.
1 Once a buried target is identified by a good tone response,
●
continue sweeping the coil over the target in a narrowing
side to side pattern.
2 Take visual note of the place on the ground where the
●
“beep” occurs as you move the coil slowly from side to
side.
3 Stop the coil directly over this spot on the ground.
●
4 Now move the coil straight forward and straight back
●
towards you a couple of times.
5 Again make visual note of the spot on the ground at which
●
the “beep” occurs.
6 If needed, “X” the target at different angles to “zero in” on
●
the exact spot on the ground at which the “beep” occurs.
REMEMBER: The detector will beep just as the center of the
search coil passes directly over the buried object.
If you have difficulty pinpointing very strong signals, try lifting
the coil higher off the ground until a weaker, but more concise,
signal is heard. For very weak signals, try moving the coil in
short quick sweeps, closer to the ground.
WHAT
READS
LIKE THIS
10
…MAY
ACTUALLY
BE THIS

TROUBLESHOOTING
The following troubleshooting steps may assist you in case you’re
having problems with your Tracker IV.
YOUR DETECTOR IS EMITTING ERRATIC SIGNALS
WHEN YOU’RE IN THE FIELD.
Your SENSITIVITY may be set too high.
Try reducing the
until the false signaling disappears.
Remember to swing your coil slowly.
Some inconsistent signals will occur on
highly rusted metals. If the signal does not
repeat after successive passes of the coil
over the same area, then the target is usually not worthwhile.
Natural and man-made electromagnetic fields can cause interference.
YOUR DETECTOR IS NOT STABLE AND HAS A PULSING, DISTORTED
TONE INSTEAD OF A CLEAR TONE.
This can occur if you’re operating near another detector or near power
lines that can interfere with the detector’s operating frequency.
SENSITIVITY slightly
YOUR DETECTOR IS EMITTING A CONSTANT LOUD TONE OR
CONSTANT REPEATING TONES
This usually occurs when the batteries are low. Try replacing your
batteries with two new alkaline batteries.
NOTE:
Always use Alkaline Batteries for proper performance.
11

CARE AND MAINTENANCE
Your Tracker IV Metal Detector is an example of superior design and
craftsmanship. The following suggestions will help you care for your
metal detector so that you can enjoy it for years.
Handle the metal detector gently
and carefully. Dropping it can
damage electronic components.
Use and store the metal detector
only in normal temperature
environments. Temperature
extremes can shorten the life of
electronic devices and distort or
melt plastic parts.
Wipe the metal detector with a
damp cloth occasionally to keep
it looking new. Do not use harsh
chemicals, cleaning solvents, or
strong detergents to clean the
metal detector.
12
The coil is waterproof and may
be submerged into either fresh or
salt water. Be careful to prevent
water from entering the control
housing. After using the coil in
salt water, rinse it with fresh
water to prevent corrosion of the
metal parts.

METAL DETECTING APPLICATIONS
COINSHOOTING
The most popular application for metal detectors
CONTROL SETTINGS REQUIRED:
1 Toggle switch to the left (disc. mode).
●
2 Discriminate knob at 3:00 (3/4 turn).
●
Only silver, copper and brass will be detected. Gold items will be
eliminated. Different denominations of coins will induce different
sounds.
RELIC HUNTING
A relic is a historical object, sometimes of great value. The most effective
method for locating relics is to first conduct historical research. Visit your local
library to learn of historical events having occurred in your area. You can then
target your search to a specific area and gain valuable insight into your local
history.
CONTROL SETTINGS REQUIRED:
1 Toggle switch in center position.
●
2 Discriminate knob is in OFF position.
●
CACHE HUNTING
A cache, pronounced
inside a case, can, strong box, or a bag. A cache could be the loot
from a bank robbery or just someone’s life savings. A cache is often
hidden in the floor or walls of an old house, or is buried nearby. Also
search old camp sites.
CONTROL SETTINGS REQUIRED:
1 Toggle switch in center position.
●
2 Discriminate knob is in OFF position.
●
“cash”
, is a buried or hidden valuable stored
JEWELRY HUNTING
Jewelry can be found wherever people congregate. Beaches, parks,
school yards and fair grounds are all littered with lost jewelry.
CONTROL SETTINGS REQUIRED:
1 Toggle switch in RIGHT position (tone mode).
●
2 Discriminate knob at half way, 12:00 position.
●
You should dig only the lower and high tones. Broken tones indicate
13

METAL DETECTING APPLICATIONS
trash items. Gold rings will induce a low sound. Be aware that some
pull-tabs can also induce a low tone.
Silver will induce a high tone. Chains and necklaces are difficult to
find. If you are looking for gold rings, don’t get discouraged; you
will dig up many broken pull-tabs before you find your first gold
ring!
(cont.)
HOUSEHOLD APPLICATIONS
Find property markers, lost keys, machine parts, and other lost
items..
CONTROL SETTINGS REQUIRED:
1 Toggle switch in center position.
●
2 Discriminate control knob is in OFF position.
●
GOLD PROSPECTING
Find gold in abandoned gold mines and river beds where gold is
continuously washed down stream from its place of origin.
CONTROL SETTINGS REQUIRED:
1 Toggle switch in center position.
●
2 Discriminate control knob is in OFF position.
●
14

ACCESSORIES
MAXIMIZE YOUR METAL DETECTING EXPERIENCE WITH THESE
OPTIMAL BOUNTY HUNTER ACCESSORIES
4 INCH COIL
Great for searching in
trashy areas with its
smaller target area. Also
perfect for gold prospecting
and fitting into tight spaces.
10 INCH COIL
For maximum depth
detection.
HEADPHONES
Increase battery life and
find more deeply buried
objects, evidenced by faint
signals sometimes
undetected with the
standard speaker.
CARRY BAG
Custom-sized to carry your
Tracker IV.
COIL COVERS
Protect your coil from wear
& tear. 4 inch, 8 inch, 10
inch.
www.detecting.com
15

TREASURE HUNTER’S CODE OF ETHICS:
1. Respect the rights and property of others.
2. Observe all laws, whether national, state or local.
3. Never destroy historical or archaeological treasures.
4. Leave the land and vegetation as it was. Fill in the holes.
5. All treasure hunters may be judged by the example you set.
Always obtain permission before searching any site. Be
extremely careful while probing, picking up, or discarding trash
items. And ALWAYS COVER YOUR HOLES!
FIRST TEXAS PRODUCTS, LP
5-YEAR LIMITED WARRANTY
Bounty Hunter Metal Detectors are warranted against
defects in workmanship or materials under normal
use for five years from date of purchase to the
original user. Liability in all events is limited to the
purchase price paid. Liability under this Warranty is
limited to replacing or repairing, at our option, any
Bounty Hunter Detector returned, shipping cost
prepaid, to First Texas Products, LP. Damage due to
neglect, accidental damage or misuse of this product
is not covered by this warranty.
Copyright© 2001 by First Texas Products, L.P.
All rights reserved, including the right to reproduce this book, or parts thereof, in any form.
Published by First Texas Products,L.P.
Bounty Hunter®is a registered trademark of First Texas Products, L.P.
www.detecting.com
First Texas Products, LP
El Paso, TX 79907
(915) 633-8354
1100 Pendale
REVISED 01/04
 Loading...