


OWNER’S MANUAL
Your Quick Draw II Metal Detector incorporates patented microprocessorcontrolled technology. The Quick Draw II is a motion detector; movement over an object is required in order for the machine to detect the object and emit a tone. Alternatively, you can sweep a metal object over a motionless search coil.
THIS METAL DETECTOR HAS TWO TYPES OF OPERATING MODES: 1. ALL METAL DETECTION
All metals will be detected.
2. DISCRIMINATE, NOTCH, and AUTO NOTCH modes
In any of these three detection modes, the detector will emit different tones, depending upon the type of metal present. The characteristics are adjustable. Depending on the detector control settings, some metals will also be eliminated from detection.
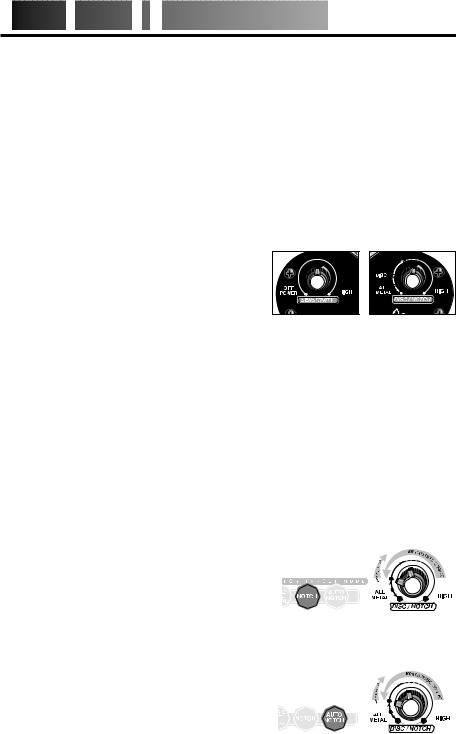
DISCRIMINATE:
Eliminates iron and trash items with the use of the
DISC/NOTCH knob.
NOTCH:
Provides an adjustable rejection "window" to eliminate undesirable metals from detection. Move the rejection "window" with the DISC/NOTCH knob.
AUTO NOTCH:
Provides a pre-set rejection "window", automatically eliminating most pull-tabs and trash items from detection.
CAUTION:
•Do not test the detector by placing coins or metal objects on the floor. Most floors contain metal, which will cause interference.
•Use 9-VOLT ALKALINE batteries only.
DO NOT USE INDOORS. LIGHTS AND HOUSEHOLD APPLIANCES EMIT ELECTROMAGNETIC FIELDS WHICH INTERFERE WITH THE DETECTOR’S
OPERATION


 INTRODUCTION


Your Quick Draw II is an advanced technology metal detector, designed for a variety of applications including coinshooting, relic hunting, and general purpose detecting.
Before using your Quick Draw II, it is important to read these instructions. This manual's description of detection
concepts and types of metals is necessary to avoid frustration if you are new to the hobby of metal detecting.
Terminology |
|
|
|
|
|
|
||
Elimination — Reference to a metal or |
|
|||||||
target being "eliminated" means that |
|
|||||||
the detector will not emit a tone nor |
|
|||||||
light up an LCD indicator when an |
|
|||||||
object is in the coil’s detection field. |
E |
|||||||
D |
||||||||
O |
||||||||
TM |
||||||||
Discrimination |
— |
When |
the |
|
||||
detector emits different tones for |
|
|||||||
different types of metals, and when |
|
|||||||
the |
detector |
"eliminates" |
certain |
|
||||
metals, we |
refer to |
this |
as |
the |
|
|||
detector |
"discriminating" |
among |
|
|||||
different types of objects. |
|
|
|
|||||
Iron — Iron is a common, low-grade |
|
|||||||
metal which is often an undesirable |
|
|||||||
target. Examples of undesirable iron |
|
|||||||
objects are old cans, pipes, bolts, |
|
|||||||
and nails. |
|
|
|
|
|
|
||
Relic — A relic is an aged object of |
|
|||||||
historical |
significance. Note |
that |
|
|||||
many relics are made of iron, an |
|
|||||||
otherwise |
undesirable object in |
|
||||||
some metal |
detecting applications. |
|
||||||
Pull-tabs and Trash Items — |
|
|||||||
Discarded pull-tabs from beverage |
|
|||||||
containers are the most bothersome |
|
|||||||
items for professional and hobby |
|
|||||||
metal detectorists. These items are |
|
|||||||
generally constructed of aluminum, |
|
|||||||
iron, or steel. We |
|
|
|
|
||||
therefore |
incorporated |
|
|
|
|
|||
special features |
into |
|
|
|
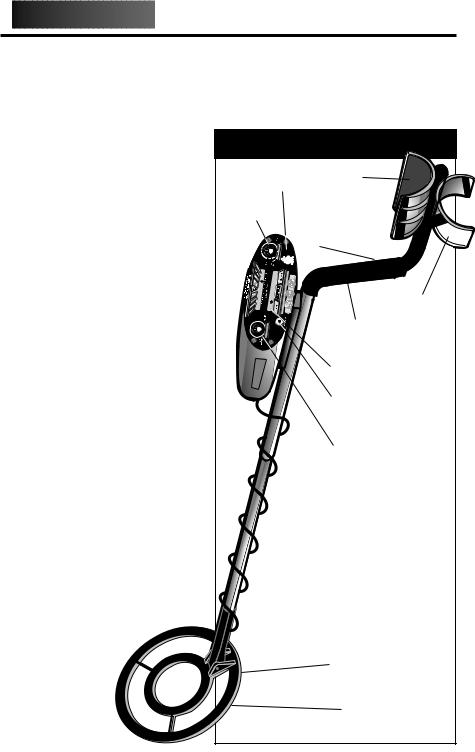
Interchangeable |
|||
the |
Quick Draw II |
|
|
|
Coil System |
|||
to eliminate |
these |
|
|
|
8" Waterproof |
|||
targets or |
to |
alert |
|
|
|
|||
you to their possible |
|
|
|
Search Coil |
||||
|
|
|
|
|||||
presence. |
|
|
|
|
|
|
|
|
2


 TABLE
TABLE

 OF
OF
 CONTENTS


ASSEMBLY . . . . . . . . . . . . . . . . . . . . . . . . . . . . . . . . . . . . . . . . .4
S-Rod Assembly . . . . . . . . . . . . . . . . . . . . . . . . . . . . . . . . . .4
Mounting the Coil . . . . . . . . . . . . . . . . . . . . . . . . . . . . . . . . .4
INSTALLING BATTERIES . . . . . . . . . . . . . . . . . . . . . . . . . . . . . . .5
DEMONSTRATION . . . . . . . . . . . . . . . . . . . . . . . . . . . . . . . . . . . .6
BASIC OPERATION . . . . . . . . . . . . . . . . . . . . . . . . . . . . . . . . . . .7 Turning on Your Detector . . . . . . . . . . . . . . . . . . . . . . . . . . .7 Set the Mode . . . . . . . . . . . . . . . . . . . . . . . . . . . . . . . . . . . .7 Reading the Display . . . . . . . . . . . . . . . . . . . . . . . . . . . . . . .8 Low Battery Indicator . . . . . . . . . . . . . . . . . . . . . . . . . . . . . .9 Depth Indicator . . . . . . . . . . . . . . . . . . . . . . . . . . . . . . . . . . .9
SENSITIVITY ADJUSTMENT . . . . . . . . . . . . . . . . . . . . . . . . . . .10
MODES OF OPERATION . . . . . . . . . . . . . . . . . . . . . . . . . . .11 & 12
AUDIO TARGET ID . . . . . . . . . . . . . . . . . . . . . . . . . . . . . . . . . . .13
IN THE FIELD TECHNIQUES . . . . . . . . . . . . . . . . . . . . . . . . . . .14
Pinpointing . . . . . . . . . . . . . . . . . . . . . . . . . . . . . . . . . . . . .14
Coil Movement . . . . . . . . . . . . . . . . . . . . . . . . . . . . . .14 & 15
METAL DETECTING APPLICATIONS . . . . . . . . . . . . . . . . . . . . .16
ACCESSORIES . . . . . . . . . . . . . . . . . . . . . . . . . . . . . . . . . . . . . .17
TROUBLESHOOTING . . . . . . . . . . . . . . . . . . . . . . . . . . . . . . . . .18
CARE & MAINTENANCE . . . . . . . . . . . . . . . . . . . . . . . . . . . . . . .19
TREASURE HUNTER’S CODE OF ETHICS . . . . . . . . . .BACK COVER
WARRANTY INFORMATION . . . . . . . . . . . . . . . . . . . .BACK COVER
3


 EASY
EASY
 ASSEMBLY


Assembling your Quick Draw II Metal Detector is easy and requires no tools. Just follow these steps:
●1 Using the supplied bolt and knurled knob, attach the search coil to the lower stem.
●2 Press the button on the upper end of the lower stem and slide the lower stem into the upper stem.
Adjust the stem to a length that lets you maintain a comfortable upright posture, with your arm relaxed at your side.
●3 Wind the search coil cable around the stem. Leave enough slack in the cable to let you adjust the coil when you are hunting on uneven ground. Then tighten the knob at the end of the search coil.
Note: To adjust the coil, simply loosen the knob.
●4 Insert the coil’s plug into the matching connector on the control housing. Be sure the holes and pins line up correctly.
Caution:
•Do not force the plug in.
Excess force will cause damage.
•To disconnect the cable, pull on the plug. Do not pull on the cable.
Bolt |
Knurled |
|
Knob |
Search Coil
Bottom view
|
Lower |
|
|
Stem |
|
|
Upper |
|
Lower |
Stem |
|
|
||
Stem |
|
|
|
Bottom side |
|
Search |
Plug |
|
Coil |
||
|
||
Cable |
Control |
|
|
||
|
Housing |
|
Upper |
|
|
Stem |
|
Connector on back of
control housing
4


 BATTERIES


IMPORTANT: Always use ALKALINE batteries for optimal performance. Always remove the batteries for prolonged storage.
CHECK THE BATTERIES if your detector exhibits any of the following symptoms:
●1 The unit does not turn on.
●2 Low speaker volume.
●3 Unable to tune detector with the discriminate knob.
The Low Battery indicator light will come on and stay on whenever the batteries need replacing. It should flash momentarily when the Power Switch is turned on.
IMPORTANT: Your Quick Draw II metal detector requires two 9-Volt ALKALINE batteries.
Follow these steps to install the batteries.
●1 Carefully remove the battery compartment door by pressing the release clip on the right side of the door.
●2 Snap one battery onto each of the terminals and place the batteries inside the compartment. Insert one battery with the terminals facing down, and the second battery with terminals facing outward.
●3 Replace the compartment door by carefully inserting opposite side of clip first. Then press down on clip side until battery door snaps into place.
First Battery terminals facing in
Second Battery terminals facing out
Release
Clip
Second Battery
First Battery
5


 Quick
Quick
 Draw
Draw
 II
II

 DEMONSTRATION


Here is a quick way to demonstrate the basic features of your Quick Draw II.
I. Supplies Needed
• |
A quarter (25¢) |
• A penny (1¢) |
• A dime (10¢) |
• |
A nickel (5¢) |
• Small piece of aluminum foil • A nail |
|
II.Position your Quick Draw II
•Place the detector on a table, with the search coil hanging over the edge.
•Be sure that the search coil is far away from walls or metal objects. Keep the search coil away from any metal in the table.
•Turn off appliances or lights which cause electromagnetic interference
III.Beginning Switch Settings
•Right Knob (DISC/NOTCH) —
100% counterclockwise to low
• Left Knob (SENSITIVITY) —
click on and set to 3:00 (3/4 turn)
• Do not press any touchpads
IV. All Metal Detection
A.Wave all objects under the search coil
•NOTICE THE TONES
V.Discriminate Mode
A.Turn the right knob (DISC/NOTCH) slowly to the right past the "DISC" indication.
B.Wave all objects under the search coil at different "DISC" settings.
•NOTICE THE DIFFERENT TONES
•NOTICE THE METALS ELIMINATED
VI. Notch Mode
A.Press the NOTCH touchpad
B.Right knob (DISC/NOTCH) 100% counterclockwise to low
C. Wave all objects under the search coil while slowly turning the right knob clockwise.
• NOTICE THE DIFFERENT TONES
• NOTICE THE METALS ELIMINATED
VII. Auto Notch Mode
A.Press the AUTO NOTCH touchpad
B.Right knob (DISC/NOTCH) 100% counterclockwise to low
C. Wave all objects under the search coil while slowly turning the right knob clockwise.
• NOTICE THE DIFFERENT TONES
• NOTICE THE METALS ELIMINATED
6
 Loading...