

Bounty Hunter Pioneer EX Owner's Manual

OWNER’S MANUAL
The
Pioneer
EX is an
easy to use detector. The most difficult
aspects of metal detecting have been
automated.
However if you are new to the hobby, we strongly
recommend that you:
1) Adjust the Sensitivity to a low setting in the
event of false signals. The detector powers on a
3/4 sensitivity; increase to full sensitivity after you have
become familiar with the detector.
2) Do not use indoors. This detector is for outdoor use only. Many
household appliances emit electromagnetic energy, which can
interfere with the detector. If conducting an indoor demonstration,
turn the sensitivity down and keep the searchcoil away from
appliances such as computers, televisions and microwave ovens.
If your detector beeps erratically, turn off appliances and lights.
Also keep the searchcoil away from objects containing metal, such as
floors and walls.
3) Read this manual. Most importantly, review the Quick-Start Demo
(p.6) and Basic Operation (p. 8-10).
4)
Use 9-volt ALKALINE batteries only.
Do not use Heavy Duty or ordinary Zinc-carbon Batteries.

Terminology . . . . . . . . . . . . . . . . . . . . . . . . . . . .3
Assembly
. . . . . . . . . . . . . . . . . . . . . . . . . . . . . .4
Batteries
. . . . . . . . . . . . . . . . . . . . . . . . . . . . . . .5
Quick-Start Demo
. . . . . . . . . . . . . . . . . . . . . .6-7
Basic Operation
Powering Up . . . . . . . . . . . . . . . . . . . . . . . .8
The Display . . . . . . . . . . . . . . . . . . . . . .8-10
Operating Controls . . . . . . . . . . . . . . . . . . . . . .11
Environmental Conditions . . . . . . . . . . . . . . . .12
Audio Target-Identification
. . . . . . . . . . . . . . .13
Depth Select (Sensitivity Adjustment) . . . . . . .14
In The Field Techniques
. . . . . . . . . . . . . . .15-16
Metal Detecting Applications . . . . . . . . . . . . . .17
Troubleshooting
. . . . . . . . . . . . . . . . . . . . . . . .18
Treasure Hunter’s Code of Ethics
. . . . . . . . . . .19
Warranty
. . . . . . . . . . . . . . . . . . . . . . . . . . . . .19
Accessories
. . . . . . . . . . . . . . . . . . . . .Back Cover
The BOUNTY HUNTER PIONEER series of metal detectors is not
associated or connected in any way with Pioneer Corporation or its
PIONEER brand audio and video products or other products.
2
TABLE OF CONTENTS

3
TERMINOLOGY
The following terms are used throughout the manual, and are standard
terminology among detectorists.
ELIMINATION
Reference to a metal being "eliminated" means that the detector will
not emit a tone, nor light up an indicator, when a specified object
passes through the coil’s detection field.
DISCRIMINATION
When the detector emits different tones for different types of metals,
and when the detector "eliminates" certain metals, we refer to this
as the detector "discriminating" among different types of metals.
Discrimination is an important feature of professional metal
detectors. Discrimination allows the user to ignore trash and
otherwise undesirable objects.
RELIC
A relic is an object of interest by reason of its age or its association
with the past. Many relics are made of iron, but can also be made
of bronze or precious metals.
IRON
Iron is a common, low-grade metal that is an undesirable target in
certain metal detecting applications. Examples of undesirable iron
objects are old cans, pipes, bolts, and nails.
Sometimes, the desired target is made of iron. Property markers,
for instance, contain iron. Valuable relics can also be composed of
iron; cannon balls, old armaments, and parts of old structures and
vehicles can also be composed of iron.
FERROUS
Metals which are made of, or contain, iron.
PINPOINTING
Pinpointing is the process of finding the exact location of a buried
object. Long-buried metals can appear exactly like the surrounding
soil, and can therefore be very hard to isolate from the soil.
PULL-TABS
Discarded pull-tabs from beverage containers are the most bothersome
trash items for treasure hunters. They come in many different shapes
and sizes. Pull-tabs can be discriminated, but some other valuable
objects can have a magnetic signature similar to pull-tabs, and will also
be eliminated when discriminating out pull-tabs.
GROUND BALANCE
Ground Balancing is the ability of the detector to ignore, or "see
through," the earth’s naturally occurring minerals, and only sound
a tone when a metal object is detected.
4
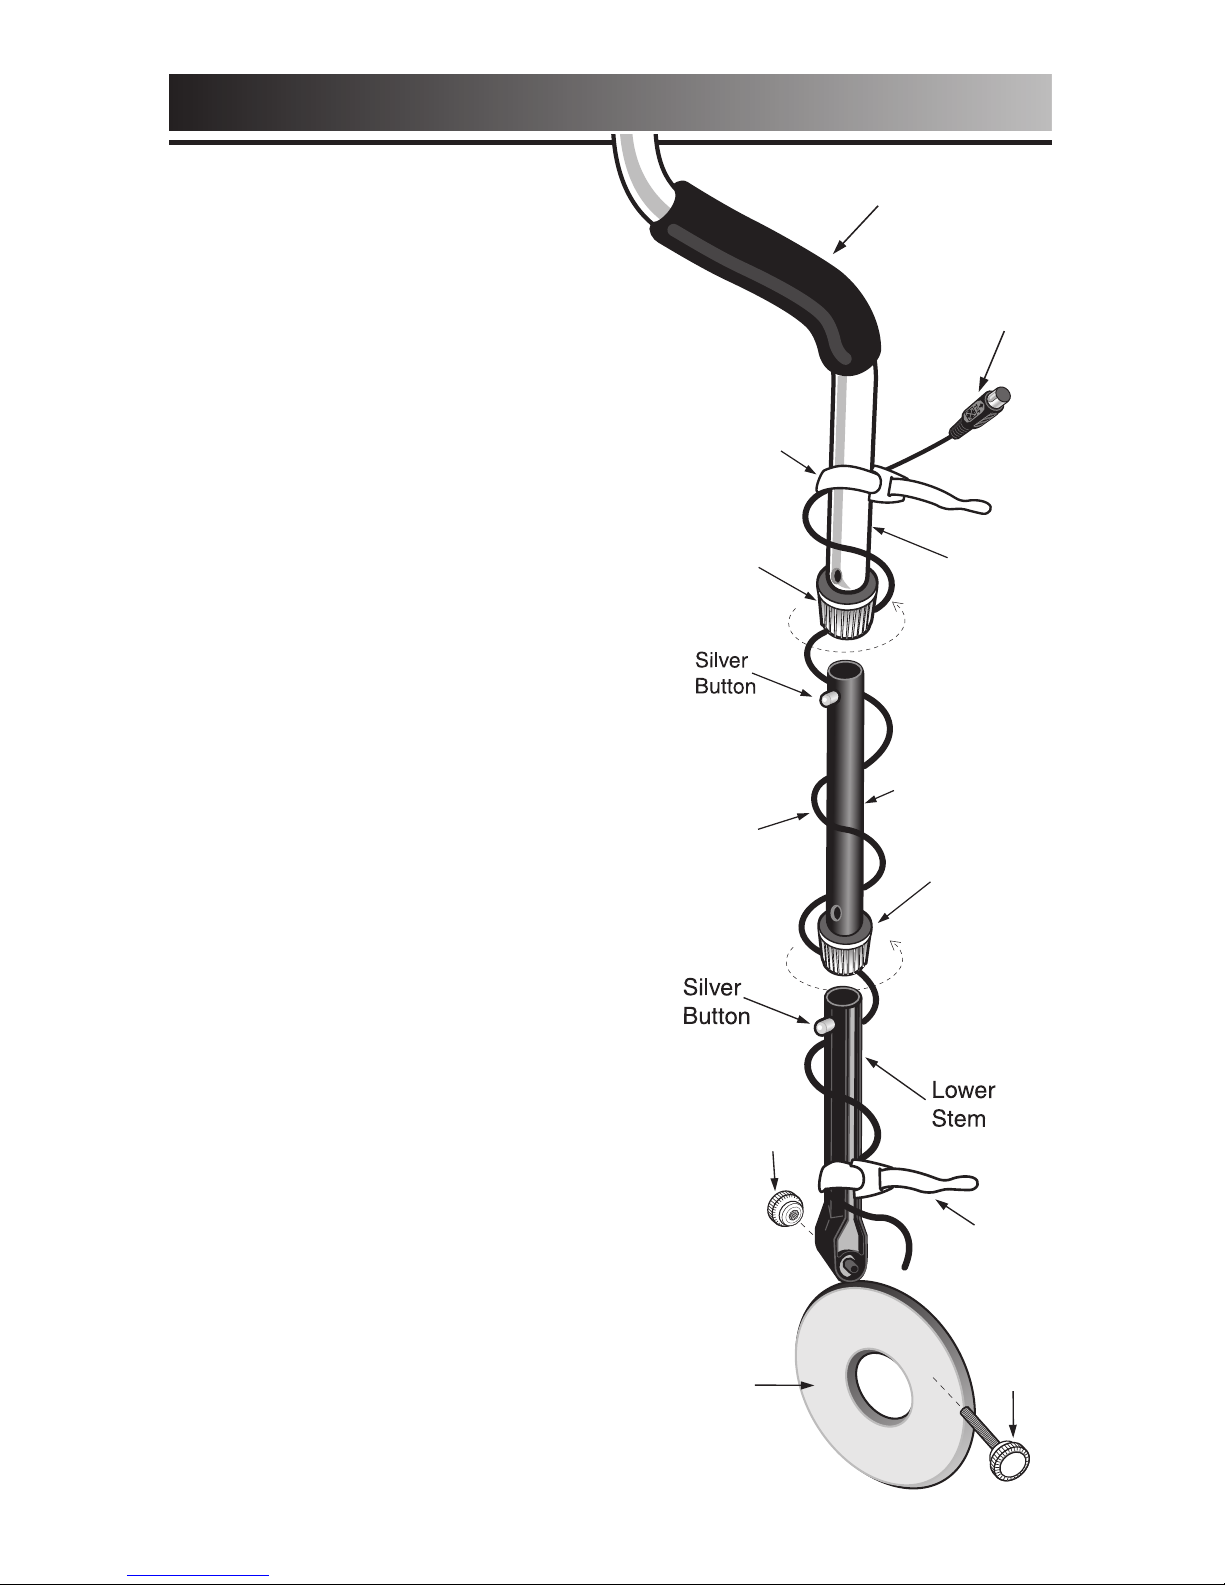
ASSEMBLY
Assembly is easy and
requires no tools.
●
1 Loosen both Locking Collars by
rotating 100% counterclockwise.
●
2 Insert the Upper Stem into the S-Rod and
click Silver Button into hole.
●
3 Position the Lower Stem with the
Silver Button toward the back. Using
the Bolt and Knurled Knob, attach the
Searchcoil to the Lower Stem.
●
4 Press the button on the upper end of
the Lower Stem and slide the Lower
Stem in to the Upper Stem.
Adjust the stem to a length that
lets you maintain a comfortable
upright posture, with your arm
relaxed at your side, and the searchcoil parallel to
the ground in front of you.
●
5 Wind the cable securely around the
stems.
●
6 Insert the plug into the matching connector
on the back of the detector body. Be
sure that the key-way and pins line
up correctly.
●
7 Tighten both Locking Collars.
●
8 Secure the cable with the 2 velcro
straps provided, one on the Lower
Stem close to the coil, one on the Upper
Stem, close to the housing.
Caution: Do not force the plug in. Excess force will
cause damage. To disconnect the cable, pull on
the plug.
Do not pull on the cable.
Loc
kin
g
Col
lar
S-R
od
Vel
cro
Str
ap
Hand-grip
Sea
rch
coil
Cab
le
Cable
Plug
Loc
kin
g
Col
lar
Upp
er
Ste
m
Knu
rle
d
Knob
Bolt
Coi
l
Vel
cro
Strap
5
IMPORTANT: Always use ALKALINE batteries only.
Do not use heavy duty batteries.
Always remove the batteries for prolonged storage.
DO NOT MIX OLD AND NEW BATTERIES
CHECK THE BATTERIES
if your detector exhibits any of the following
symptoms:
●
1 The unit does not turn on.
●
2 Low speaker volume.
●
3
Unit beeps continuously or erratically.
The LOW BATTERY indicator will come on and stay on if the batteries
are discharged. You may notice erratic beeping if using with LOW
BATTERY illuminated.
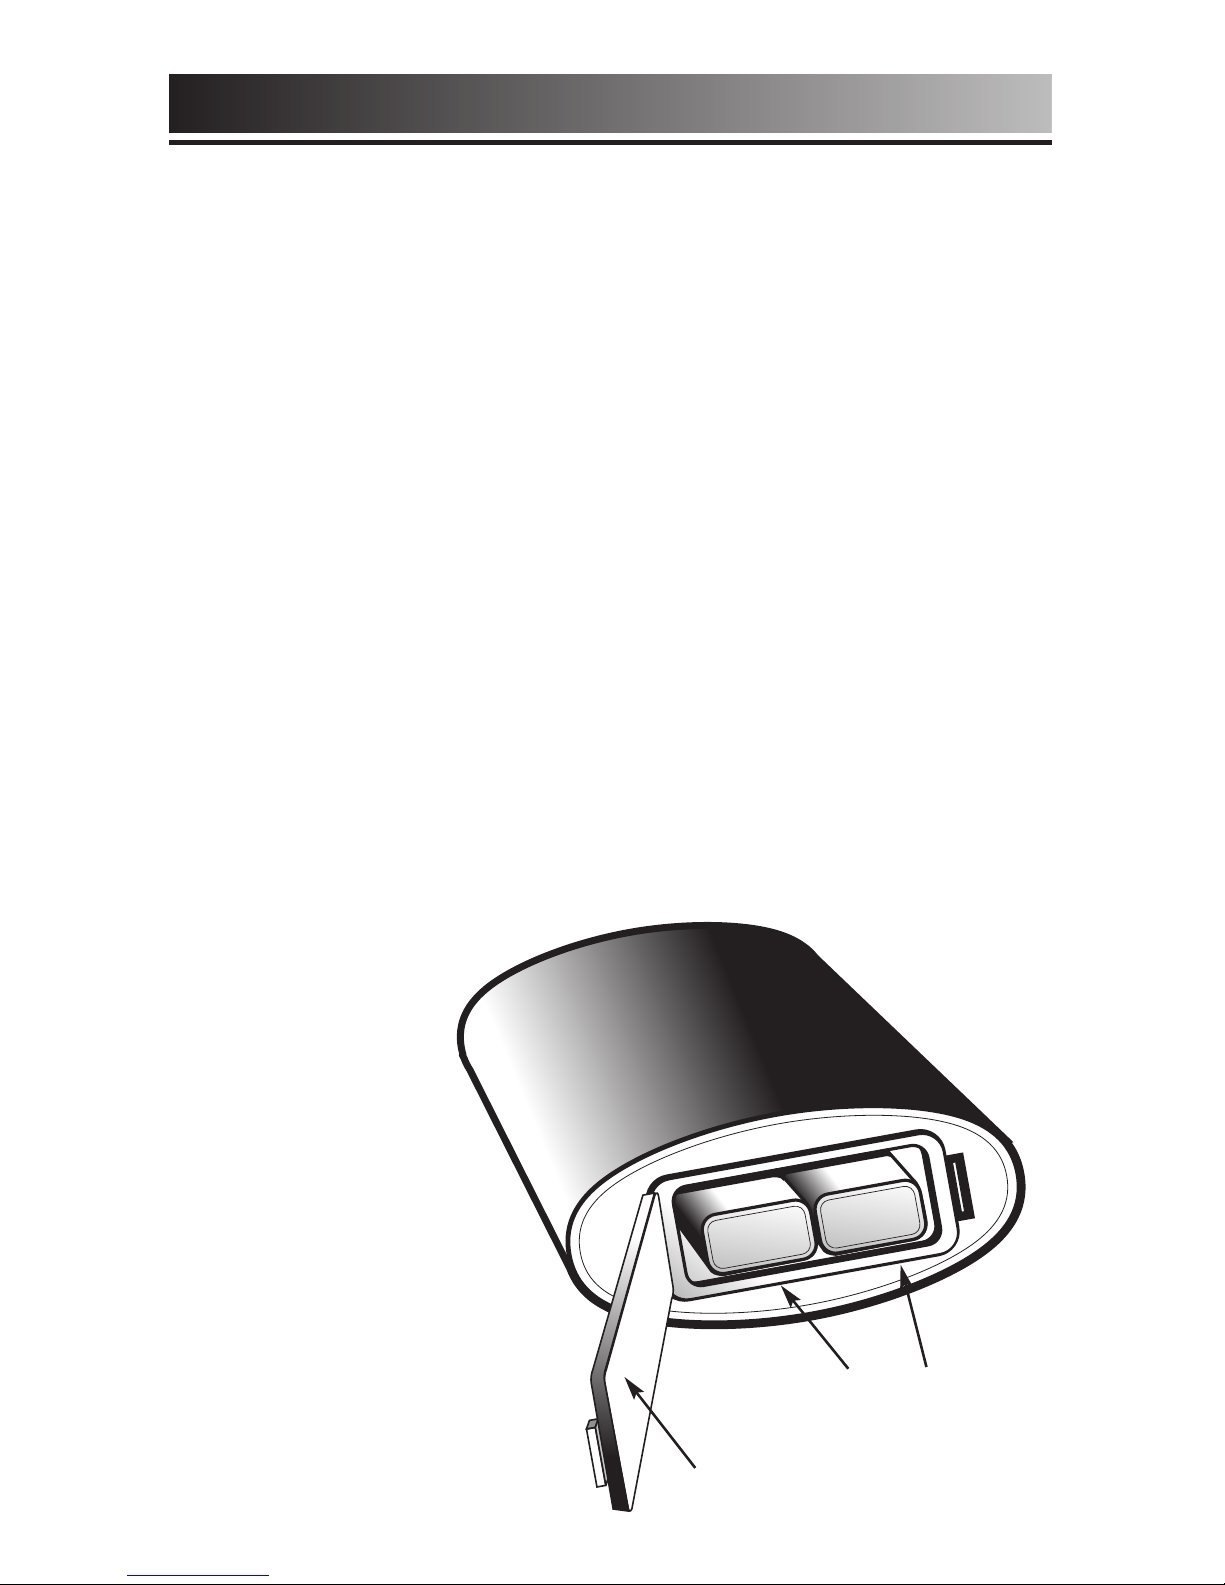
IMPORTANT: Your Pioneer EX metal detector requires two 9-Volt
ALKALINE batteries.
Follow these steps to install the batteries.
●
1 Carefully remove the battery compartment door by pressing the release
clip on the right side of the door.
●
2 Snap one battery onto each of the terminals and place the batteries in-
side the compartment.
Insert booth of
the batteries
with terminals
facing inward.
●
3
Replace the
compartment
door by carefully
inserting opposite side of clip
first. Then press
down on clip
side until battery
door snaps into
place.
BATTERIES
Release
Clip
Both Battery
terminals
facing in
6
Q
UICK-START DEMONSTRATION
I. Supplies Needed
• A Medium-Size Nail • A Quarter
• A Nickel • A Zinc Penny (dated after 1982)
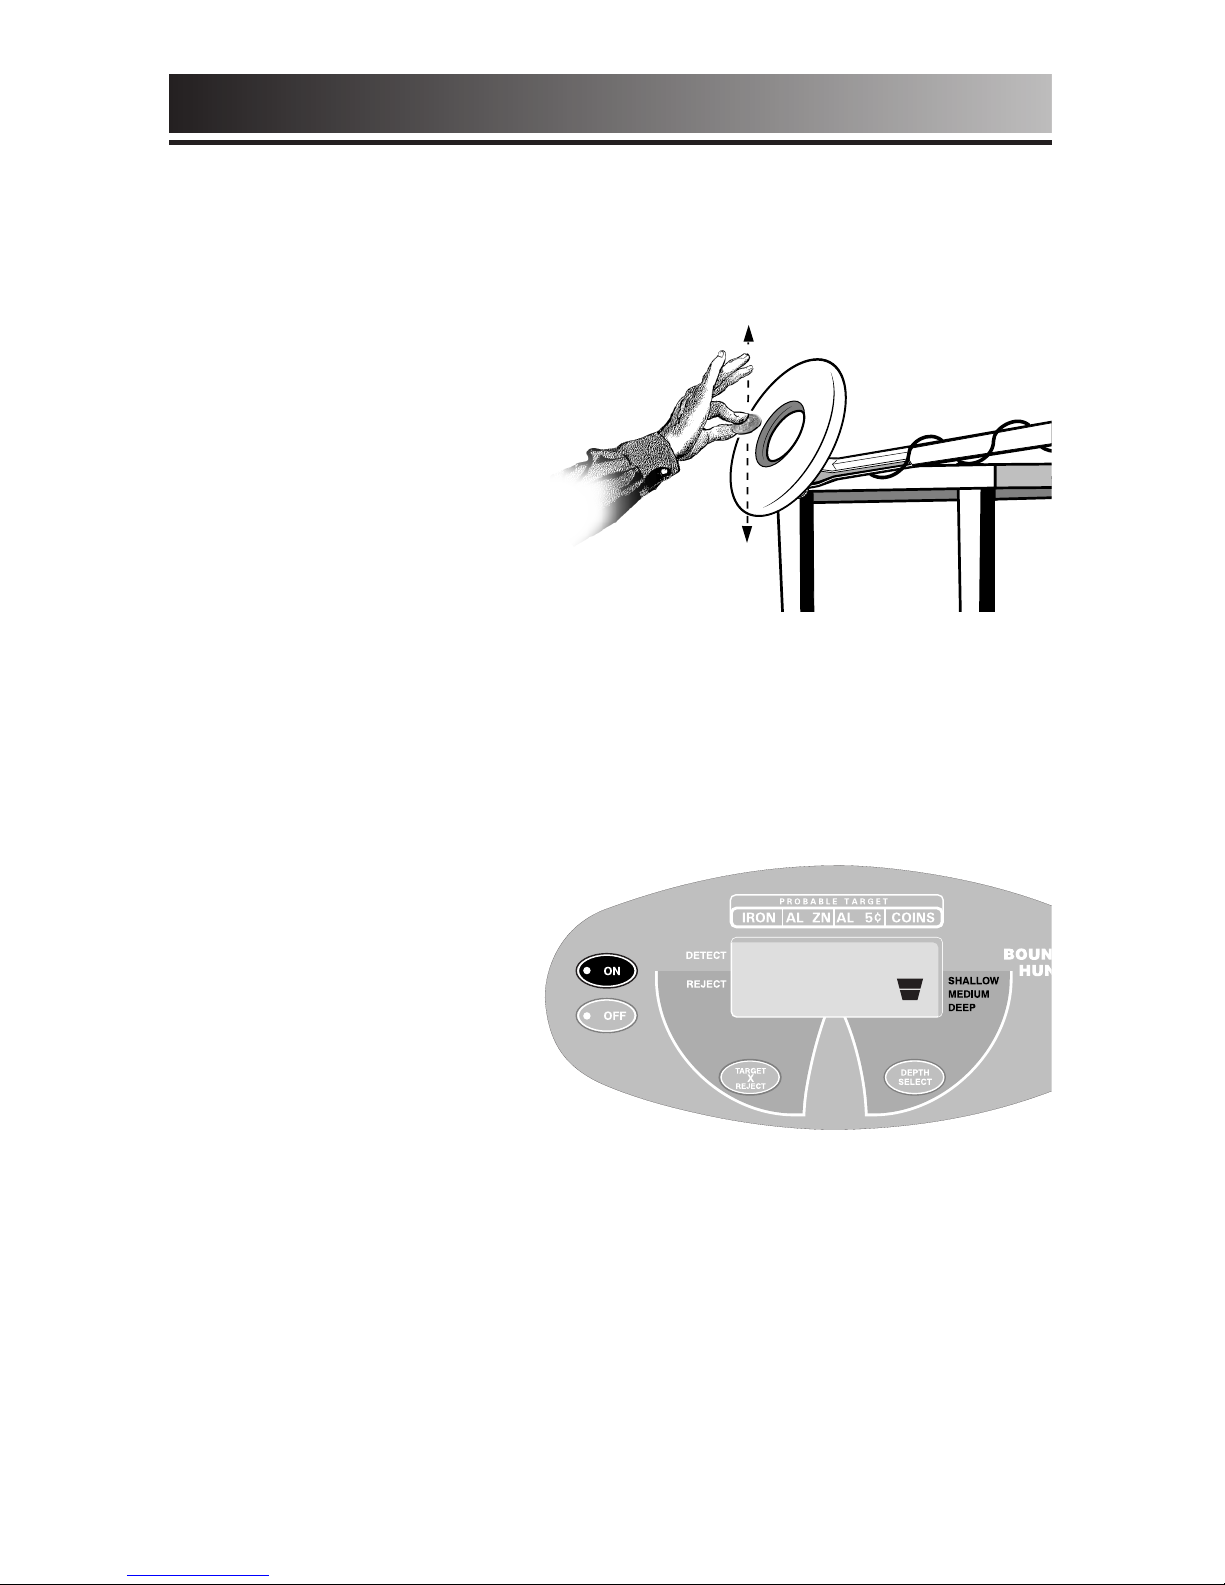
II. Position the Detector
a. Place the detector on a
table, with the searchcoil
hanging over the edge.
(or better, have a friend
hold the detector, with
the coil off the ground)
b. Keep the searchcoil away
from walls, floors, and
metal objects.
c. Remove watches, rings and other jewelry or metal objects from
hands and wrists.
d. Turn off appliances or lights that cause electromagnetic
interference.
e. Pivot the searchcoil back toward the detector body.
III. Power Up
Press the ON touchpad.
The detector will beep
several times and the
sensitivity setting will
be indicated on the
right of the display. Two
illuminated segments
indicates 3/4 sensitivity.
IV. Wave each Object over the Searchcoil (
pass the flat side of the coins
parallel to the coil)
a.Notice a different tone for each object.
Low Tone: Nail
Medium Tone: Nickel & Zinc Penny
High Tone: Quarter
b.Motion is required. Objects must be in motion over the
searchcoil to be detected.
 Loading...