

User’s Manual
To get the most enjoyment from your Metal Detector, we suggest you do the
following:
1. Use 9-volt ALKALINE batteries only.
• Do not use Heavy Duty batteries.
• Do not use ordinary Zinc-Carbon Batteries.
2. Make sure the right knob is clicked on (i.e. not in battery-test
position).
3. Use your detector OUTDOORS only
• Large metal objects inside the home may interfere with the
detector’s operation. Floors and walls of most homes contain
metal.
• Electrical appliances inside the home, like microwave ovens,
televisions, and some light fixtures, emit electromagnetic energy
which can interfere with the detector’s operation.
• Do not place coins on the floor of your home and try to detect.
Try this test outside only.
• If conducting an indoor demonstration, hold search coil off
ground and wave coins over search coil.
2
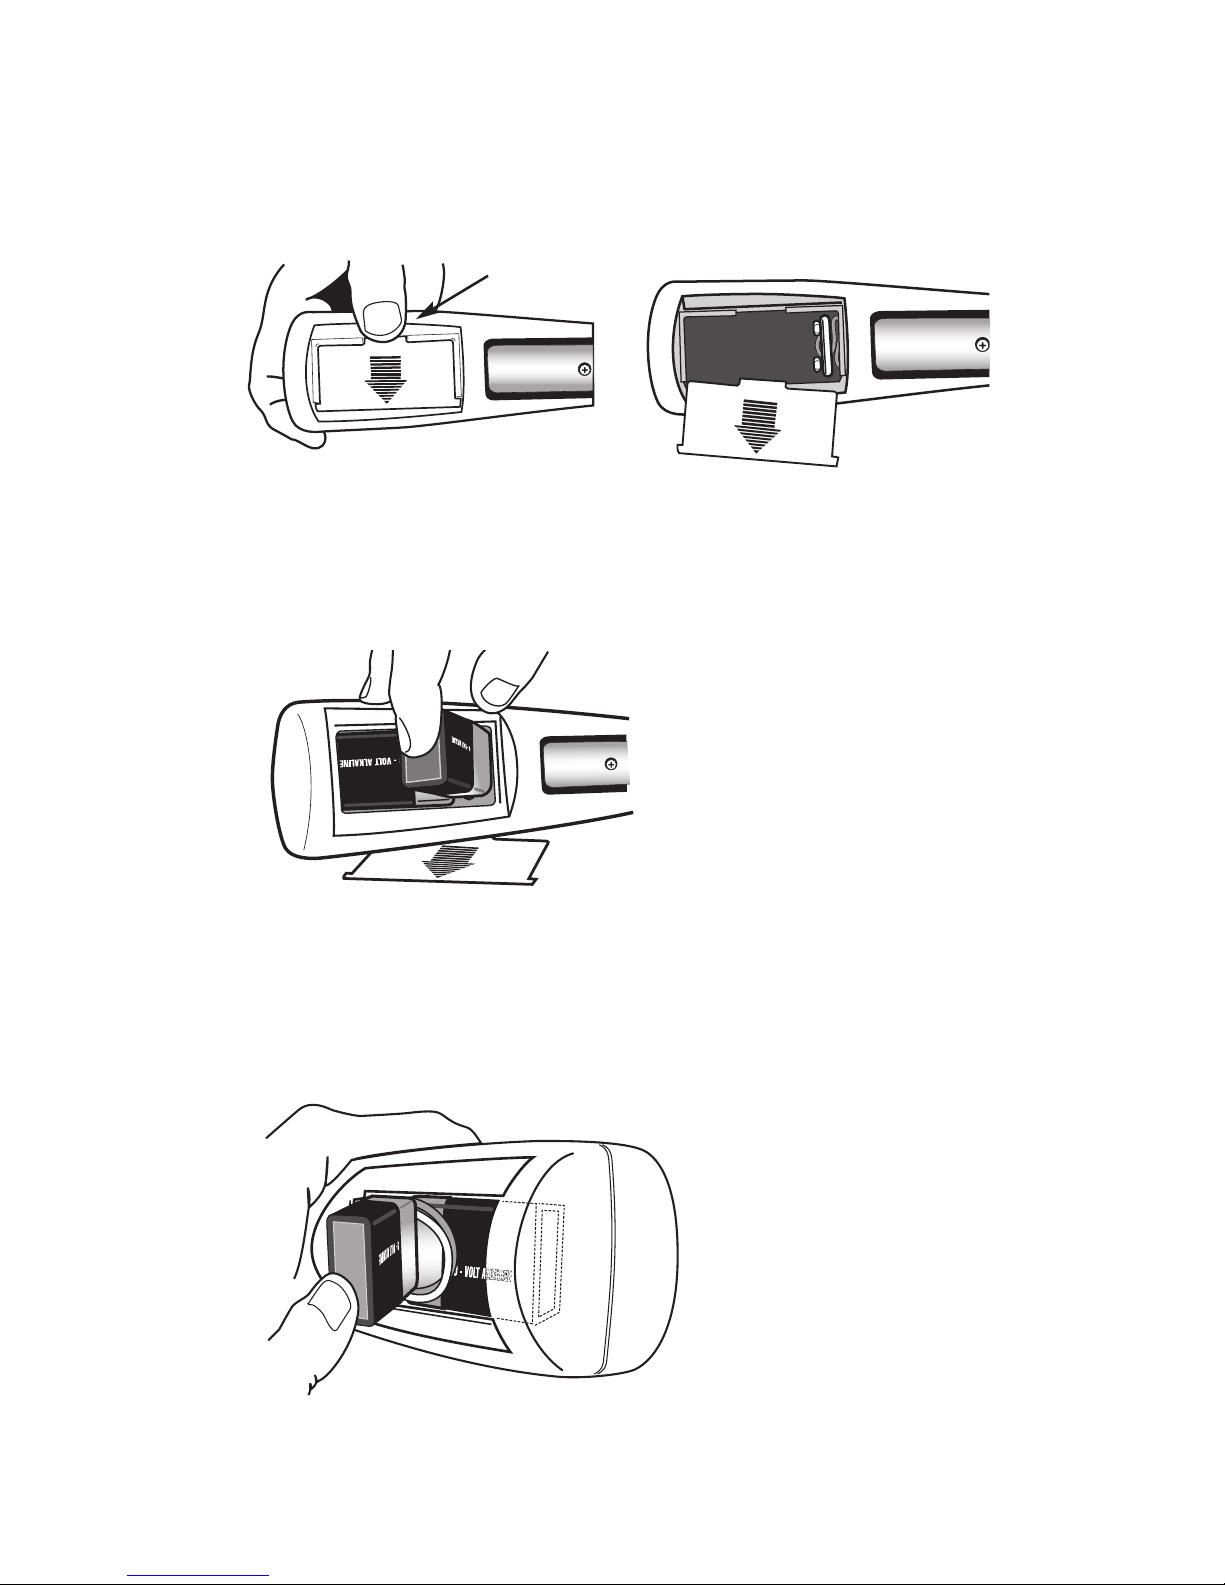
Installing Batteries
Use 9-volt ALKALINE batteries only!
1. Remove the battery door from the underside of the detector.
2. Pull out the two battery connectors.
3. Snap on two 9-volt ALKALINE batteries.
Do not use Heavy Duty or ordinary Zinc Carbon batteries.
4. Place batteries into compartment one on top of the other.
5. Replace the battery door.
Slide over until it shuts securely in place.
All battery brands differ slightly in size.
If you want to secure the batteries more tightly in the
compartment, feed the battery wires underneath and between the
batteries.
If batteries fit too tightly, causing battery door to bulge, move
battery wires toward front of compartment, not between the
batteries.
push door
from side

3
Quick-Start Demo
Try this quick way to demonstrate the basic features of your metal detector:
I. Supplies Needed
a. A nail
b. A zinc penny (pennies dated after 1982 are made of zinc)
c. A quarter
II. Position Your Detector
Keep the detector away from floors, walls, and metal objects.
One person holds the detector still, so that another can sweep
coins under the coil.
Sweep coins under the bottom of the search coil.
III.
Beginning Settings
a. Left Knob: At 6:00 position
b. Right Knob: Click on, but keep counterclockwise
IV. Detecting All Types of Metals
a. Wave each object over the search coil. Notice the tone is
loudest as the object passes over the center.
b. Pass each object at varying distances from the search coil.
Notice that the sound gets louder as the object moves closer to
the search coil. Also notice that beyond a certain distance, the
object is no longer detected.
V. Eliminating Some Metals
a. Wave the nail and slowly turn the right knob to the right.
• Notice where the nail is eliminated from detection
b. Wave the penny and keep turning the right knob until the
penny is eliminated from detection
c. Wave the quarter
• Notice that the quarter is never eliminated from detection.

4
Adjusting Length
Loosen the tube clamping nut 1/4 turn
Extend tube assembly
1. Grasp the top tube with one hand.
2. Grasp the search coil with the other hand.
3. Pull two sections apart to slide the bottom tube out of the top
tube.
Establish Tube Length
1. Pivot the search coil perpendicular to the tube.
2. Place detector in user’s hand, with arm extended.
3. Adjust tube length so that search coil rests on the ground, close
to the user’s feet.
4. Align the coil to the detector body.
5. Tighten the tube clamping nut, while
holding the search coil in place on
the ground to prevent twisting of
the tube assembly while tightening.

5
Battery Test
Click the right knob fully counterclockwise (all the way to the left), in order to test
the batteries.
If the batteries are good, the needle will move to the right and enter the green
zone on the indicator label.
If the needle does not enter the green zone, replace the batteries.
Practicing Outside
1. Turn the detector on
a. Rotate
left knob clockwise to a high sensitivity setting.
b. Click right knob on to exit the “battery test” mode.
c. Maintain right knob in counterclockwise position, but do
not click into the “battery test” mode.
2. Find a clear area in the grass
Sweep the search coil around the grass to find an area where
the detector does not beep. In order to test your detector, you
must first find an area free of metal objects.
3. Toss these metal objects on the ground
a. A nail or other iron object like a small screwdriver
b. A zinc penny (dated after 1982)
c. A quarter
4. Keep the objects spaced apart on the ground
5. Sweep the search coil over each of the objects
a. You must keep the search coil moving.
b. Notice that the sound is loudest when the metal object is
under the center of the search coil.
c. While sweeping back and forth, slowly raise the search coil
several inches off the ground.
Notice that the sound is louder when the search coil is closer
to the objects.
6. Turn the right knob progressively to the right while passing the
search coil over each of the objects
The nail (or small iron object) is eliminated from detection
with the right knob in approximately the 3:00 position.
The zinc penny (pre-1982) is eliminated from detection with
the right knob in approximately the 6:00 position.

6
Sensitivity and Target Elimination
Adjusting Sensitivity
The left knob clicks on to power the detector on.
After turning on, the left knob is used to control the detector’s sensitivity level. In
the 100% clockwise position, the detector is at maximum sensitivity. At this
level, the detector will detect a coin-sized object, like a quarter, up to 5” away
from the coil. Very large metal objects will be detected up to one and one-half
feet from the search coil at maximum sensitivity.
Reduce the sensitivity if the detector chatters or emits false signals; your detector
is probably reacting to electromagnetic interference.
Target Elimination
The right knob is used to eliminate unwanted metals from detection.
For instance, you may be searching for coins, and want to eliminate objects like
nails, bolts, or pull-tabs from detection.
As you turn the right knob clockwise, you progressively eliminate different types
of metals from detection. As you rotate the right knob, you first eliminate iron
objects from detection. Iron objects include nails, bolts, old cans, and tools.
Next, you eliminate nickels, pull-tabs, and finally zinc pennies.
Gold is also eliminated from detection with the right knob. First smaller gold
objects are eliminated; as you rotate the knob further, larger gold objects are
eliminated. Silver objects, like high-value coins, are not eliminated from
detection.
Refer to this scale for the relative positions at which different types of metals are
eliminated from detection:

7
Operation in the Field
Sweep the search coil from side to side, in slow, overlapping motions.
Keep the search coil parallel to the ground.
Keep search coil 1/2” off the ground and try not to make contact with the ground.
Try not to lift the search coil at the end of your sweeps. This may be difficult for
younger children, but the closer the search coil is to the ground throughout the
sweep, the more likely you are to find buried metal objects.
Keep the left knob in the maximum sensitivity setting possible.
Click the right knob on and start searching with it in the fully counterclockwise
position.
You may want to move the right knob during your search, depending on what
you find. For instance, if you start searching with the right knob to the left(but
not in battery test mode), you will detect all types of metal objects. If you find
that you are in a trashy area, and wish to eliminate unwanted objects from
detection, sweep the search coil over an undesirable object while turning the
knob. Find the knob setting at which certain types of metals are eliminated, and
adjust your settings accordingly.
CAUTION: Gold rings can be eliminated from detection along with pull-tabs.
Be aware that some desirable objects, like nickels and gold, are
eliminated from detection in the middle of the range. Gold rings have a
metallic signature similar to pull-tabs; nickels have a metallic signature
similar to some newer pull tabs. It requires practice and patience to
understand what types of objects are eliminated at each setting.
Pinpointing
Accurate pinpointing takes practice and is best accomplished by “X-ing” the suspected target area.
1. Once a buried target is identified by a good tone response, continue
sweeping the coil over the target in a narrowing side to side pattern.
2. Take visual note of the place on the ground where the “beep” occurs
as you move the coil slowly from side to side.
3. Stop the coil directly over this spot on the ground.
4. Now move the coil straight forward and straight back towards you a
couple of times.
5. Again make visual note of the spot on the ground at which the “beep”
occurs.
6. If needed, “X” the target at different angles to “zero in” on the exact
spot on the ground at which the “beep” occurs.
REMEMBER: The detector will beep just as the search coil passes over the
buried object.
If you have difficulty pinpointing very strong signals, try lifting the coil higher
off the ground until a weaker, but more concise, signal is heard. For very
weak signals, try moving the coil in short quick sweeps, closer to the ground.

TREASURE HUNTER’S CODE OF ETHICS:
1. Respect the rights and property of others.
2. Observe all laws, whether national, state or local.
3. Never destroy historical or archaeological treasures.
4. Leave the land and vegetation as it was. Fill in the holes.
5. All treasure hunters may be judged by the example you set.
Always obtain permission before searching any site. Be
extremely careful while probing, picking up, or discarding trash
items. And ALWAYS COVER YOUR HOLES!
First Texas Products, LP
1100 Pendale
El Paso, TX 79907
(915) 633-8354
MBHJS 11/2004
Bounty Hunter Metal Detectors are warranted against
defects in workmanship or materials under normal
use for five years from date of purchase to the
original user. Liability in all events is limited to the
purchase price paid. Liability under this Warranty is
limited to replacing or repairing, at our option, any
Bounty Hunter Detector returned, shipping cost
prepaid, to First Texas Products, LP. Damage due to
neglect, accidental damage or misuse of this product
is not covered by this warranty.
FIRST TEXAS PRODUCTS, LP
1-YEAR LIMITED WARRANTY
Copyright© 2004 by First Texas Products, L.P.
All rights reserved, including the right to reproduce this book, or parts thereof, in any form.
Published by First Texas Products, L.P.
Bounty Hunter®and Bounty Hunter Junior are registered trademarks of First Texas Products, L.P.
www.detecting.com
 Loading...