

Bounty Hunter Lone Star Pro Owner's Manual

OWNER’S MANUAL
Use 9-volt
ALKALINE batteries.
Do not use
“Heavy Duty” batteries.
Do not use
ordinary “Zinc Carbon” batteries.

2
TABLE OF CONTENTS
Congratulations!
Congratulations on the purchase of your new Bounty Hunter
®
Lone Star™ Pro
Metal Detector. The Lone Star Pro is the result of nine years of software
engineering and features the latest advancements in lightweight design and
target accuracy.
The
Lone Star Pro can be used with its default turn-on-and-go settings, or you
can adjust the detector's settings to match your hunting conditions. Treasure
hunting enthusiasts from around the world were involved in the development
of this revolutionary new detector. This manual has been written to help you
get optimal use of your detector so we hope you will read it thoroughly before
your first outing.
Happy Hunting from First Texas Products!
Terminology . . . . . . . . . . . . . . . . . . . . . . . . . . . . . . . . . . . . . . . . . . . . . . . . . . . . . . . . .3
Contents . . . . . . . . . . . . . . . . . . . . . . . . . . . . . . . . . . . . . . . . . . . . . . . . . . . . . . . . . . .4
Assembly . . . . . . . . . . . . . . . . . . . . . . . . . . . . . . . . . . . . . . . . . . . . . . . . . . . . . . . . . . .5
Batteries (use alkaline batteries only) . . . . . . . . . . . . . . . . . . . . . . . . . . . . . . . . . . . .6
Quick-Start Demonstration . . . . . . . . . . . . . . . . . . . . . . . . . . . . . . . . . . . . . . . . . . . . .7
The Basics of Metal Detecting . . . . . . . . . . . . . . . . . . . . . . . . . . . . . . . . . . . . . . . .8-9
How to Work the Controls . . . . . . . . . . . . . . . . . . . . . . . . . . . . . . . . . . . . . . . . . . . . .10
The Display . . . . . . . . . . . . . . . . . . . . . . . . . . . . . . . . . . . . . . . . . . . . . . . . . . . . . . . .11
Target Identification . . . . . . . . . . . . . . . . . . . . . . . . . . . . . . . . . . . . . . . . . . . . . . . . .12
Depth and Target Display . . . . . . . . . . . . . . . . . . . . . . . . . . . . . . . . . . . . . . . . . . . . .13
Controls . . . . . . . . . . . . . . . . . . . . . . . . . . . . . . . . . . . . . . . . . . . . . . . . . . . . . . . .14-15
Sensitivity . . . . . . . . . . . . . . . . . . . . . . . . . . . . . . . . . . . . . . . . . . . . . . . . . . . . .14
Discrimination . . . . . . . . . . . . . . . . . . . . . . . . . . . . . . . . . . . . . . . . . . . . . . . . . . .14
Notch . . . . . . . . . . . . . . . . . . . . . . . . . . . . . . . . . . . . . . . . . . . . . . . . . . . . 14-15
Headphones . . . . . . . . . . . . . . . . . . . . . . . . . . . . . . . . . . . . . . . . . . . . . . . . . . . . . . .15
Pinpointing . . . . . . . . . . . . . . . . . . . . . . . . . . . . . . . . . . . . . . . . . . . . . . . . . . . . . . . .16
Characteristics & Limitations . . . . . . . . . . . . . . . . . . . . . . . . . . . . . . . . . . . . . . . . . .17
Troubleshooting . . . . . . . . . . . . . . . . . . . . . . . . . . . . . . . . . . . . . . . . . . . . . . . . . . . .18
Treasure Hunter's Code of Ethics . . . . . . . . . . . . . . . . . . . . . . . . . . . . . . . . . . . . . .19
Warranty . . . . . . . . . . . . . . . . . . . . . . . . . . . . . . . . . . . . . . . . . . . . . . . . . . . . . . . . . .19
Accessories . . . . . . . . . . . . . . . . . . . . . . . . . . . . . . . . . . . . . . . . . . . . . . . . . . . . . . .20

TERMINOLOGY
The following terms are used throughout the manual, and are standard
terminology among detectorists.
RELIC
A relic is an object of interest by reason of its age or its association with
the past. Many relics are made of iron, but can also be made of bronze
or precious metals.
IRON
Iron is a common, low-grade metal that is an undesirable target in certain
metal detecting applications. Examples of undesirable iron objects are old
cans, pipes, bolts and nails.
Sometimes, the desired target is made of iron. Property markers, for
instance, contain iron. Valuable relics can also be composed of iron;
cannon balls, old armaments and parts of old structures and vehicles can
also be composed of iron.
FERROUS
Metals which are made of, or contain, iron.
ELIMINATION
Reference to a metal being "eliminated" means that the detector will not
emit a tone, nor display a Target-ID, when a metal object passes through
the searchcoil's detection field.
DISCRIMINATION
When the detector emits different tones for different types of metals, and
when the detector "eliminates" certain metals, we refer to this as the
detector "discriminating" among different types of metals.
Discrimination is an important feature of professional metal detectors.
Discrimination allows the user to ignore trash and otherwise undesirable
objects.
PINPOINTING
Pinpointing is the process of finding the exact location of a buried object.
Long-buried metals can appear exactly like the surrounding soil, and can
therefore be very hard to isolate from the soil.
GROUND CANCELATION
Ground Cancelation is the ability of the detector to ignore, or "see through,"
the earth's naturally occurring minerals, and only sound a tone when a
metal object is detected. This detector incorporates proprietary circuitry to
eliminate false signals from many mineralized soils.
3
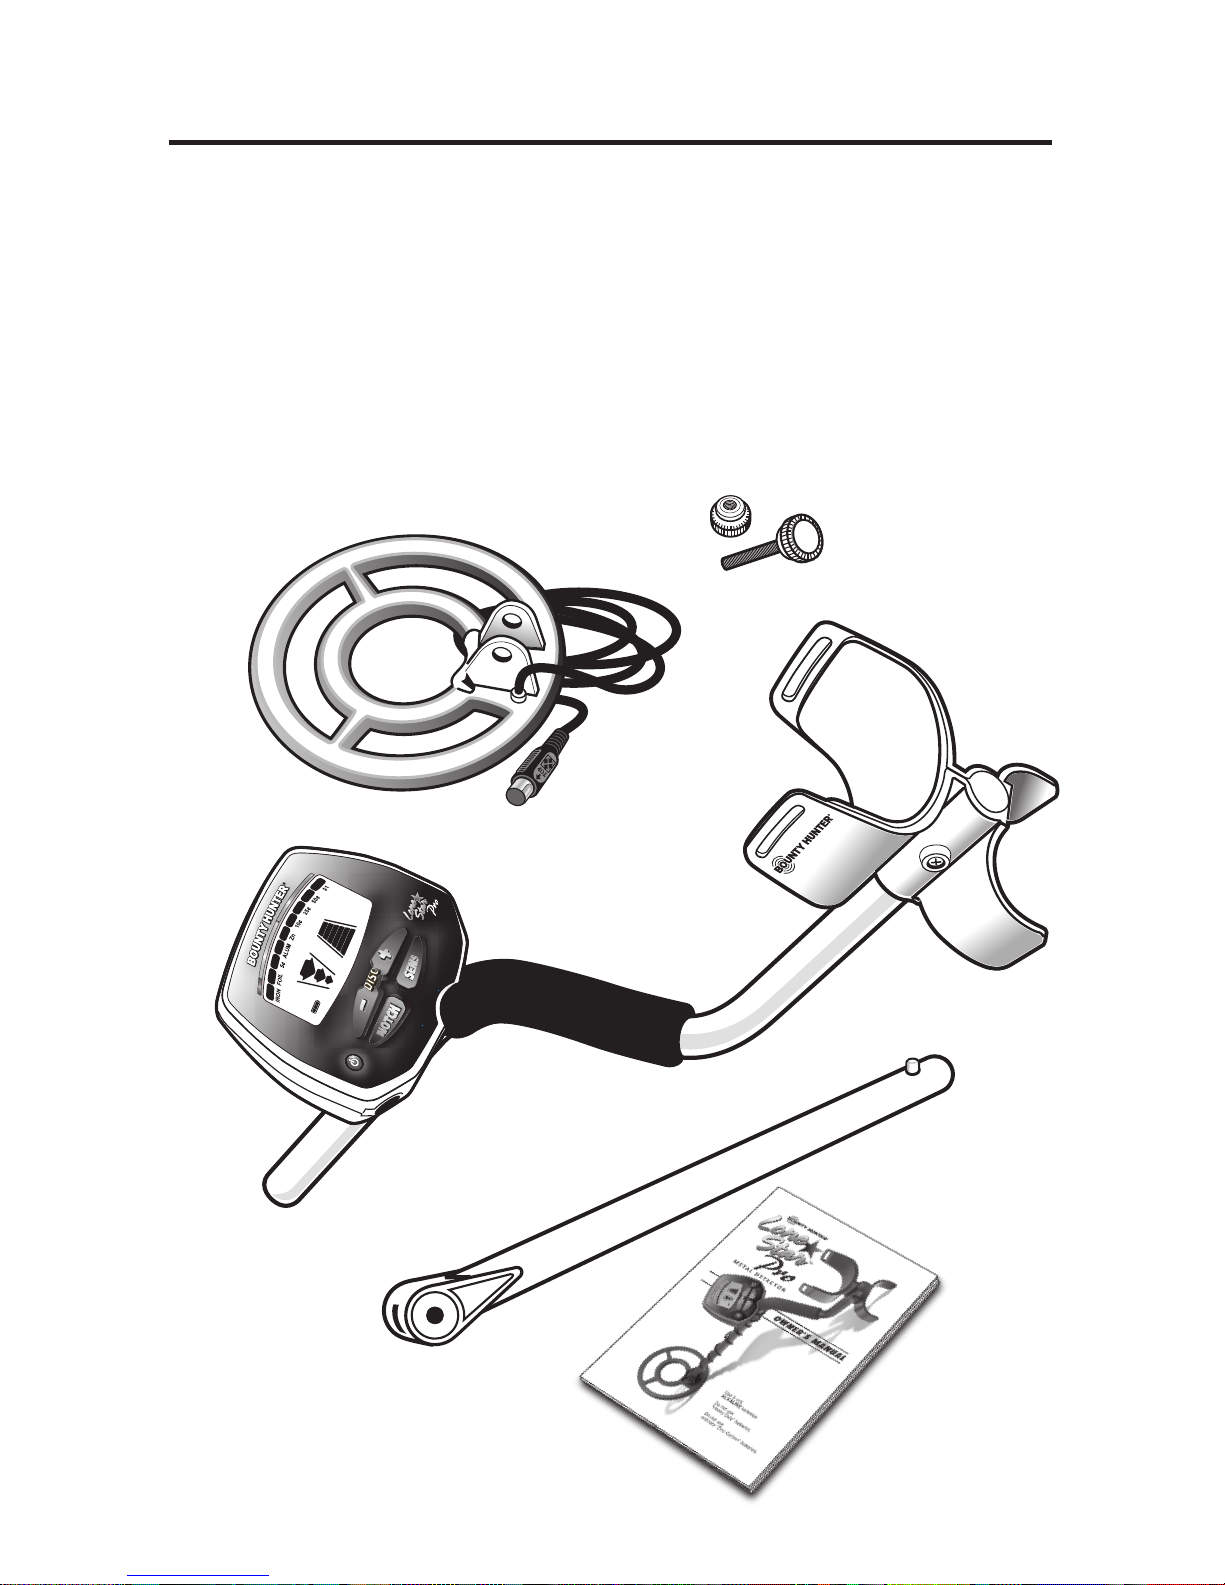
CONTENTS OF BOX
The following detector components are in the box:
1. S-ROD with Control Housing, Arm Rest
2. Lower Stem
3. Searchcoil
4. Bolt & Knurled Knob
5. This Owner's Manual
DEP
TH
SEN
S
4
●
1
●
2
●
3
●
4
●
5
5
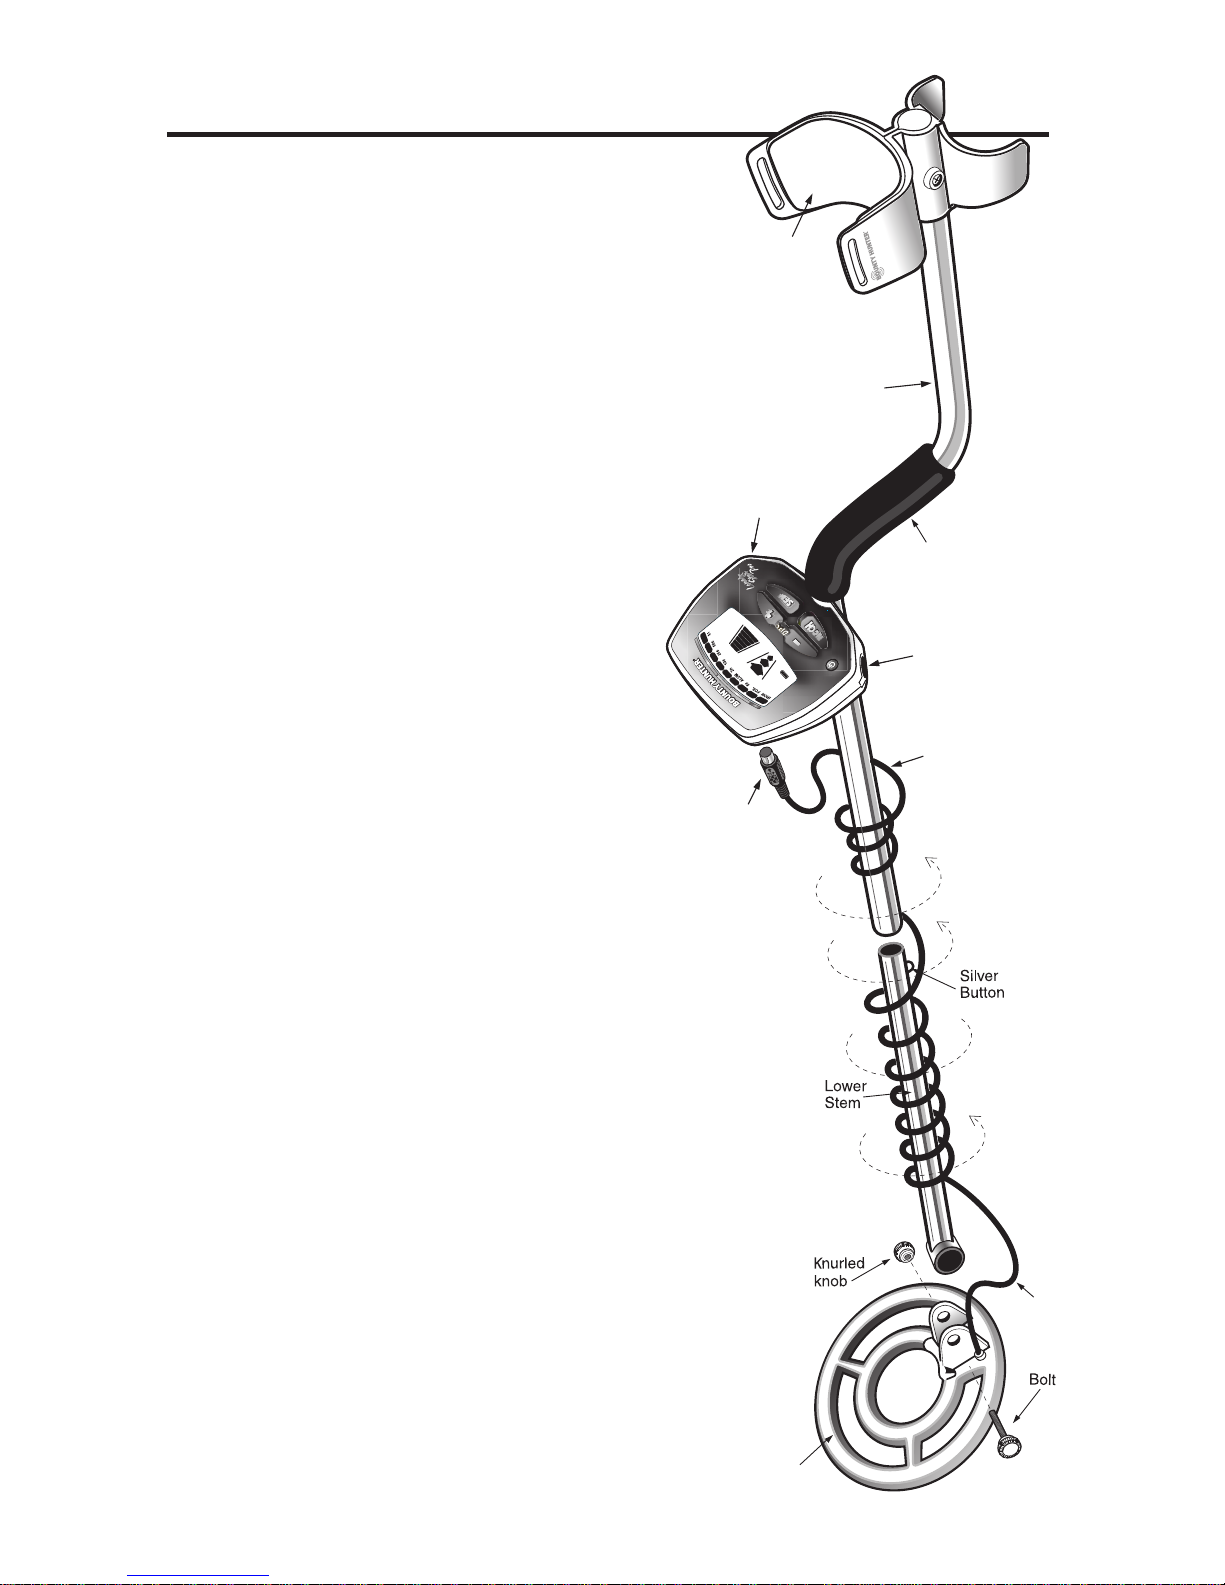
ASSEMBLING THE DETECTOR
Hand-grip
Search
coil
Cab
le
Cable
Plug
S-R
od
Battery
Compart
men
t
(ba
ck side)
Headphone
Jack
Armrest
Slack
in cab
le
DEP
TH
SENS
Sea
rch
coi
l
●
1 Hold S-ROD upright.
●
2 Insert LOWER STEM into S-ROD
and click SILVER BUTTON into a
hole.
●
3 Attach the SEARCHCOIL to the
LOWER STEM using the BOLT
and KNURLED KNOB.
●
4 Adjust the LOWER STEM to a
length that lets you maintain a
comfortable upright posture while
holding the detector relaxed at
your side with the SEARCHCOIL
parallel to the ground in front of
you.
●
5 Wind the CABLE around the
STEM.
Leave slack in the cable at the
bottom to allow the searchcoil to
pivot.
●
6 Align the pins on the CABLE
PLUG to the connector holes on
the rear of the control housing.
●
7 Push in CABLE PLUG.
6
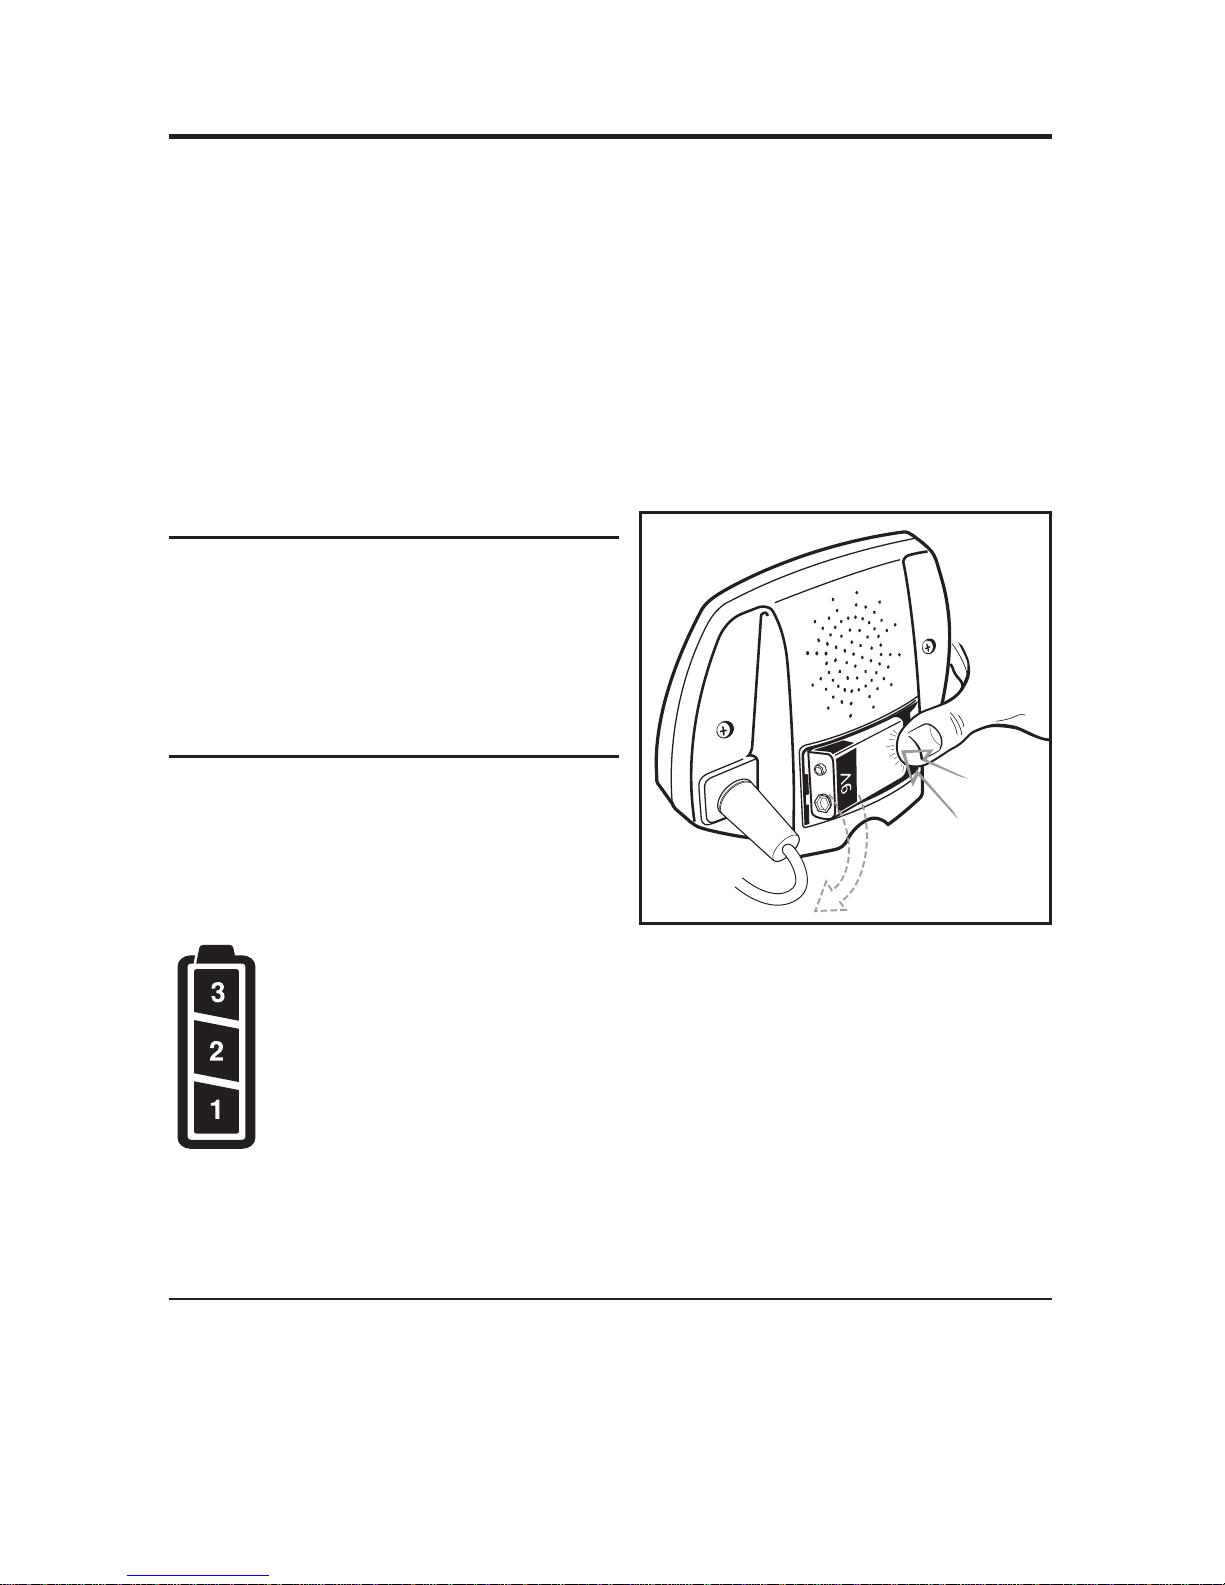
The detector requires a single 9-volt ALKALINE battery (battery not included).
Do not use ordinary “Zinc Carbon” batteries
Do not use “Heavy Duty” batteries.
Rechargeable batteries can also be used. If you use rechargeables, we
recommend using a “Nickel Metal Hydride” rechargeable battery.
The battery compartment is located on the back side of the Control Housing.
Slide the battery door to the side to remove. Insert battery. Close battery door.
When it's time to replace the battery simply push down firmly on the bottom of
the battery
(see illustration).
BATTERY LIFE
Expect 20 to 25 hours of life from a
9-volt alkaline battery.
Rechargeable batteries provide about 8
hours of usage per charge.
BATTERY INDICATOR
The battery icon has three segments
plus an outline segment.
The amount of battery voltage for an
ALKALINE battery is indicated as
follows:
3 segments illuminated: 8.1 volts or more
2 segments illuminated: 7.1 to 8.0 volts
1 segment illuminated: 6.5 to 7.0 volts
No segments illuminated: 6.2 to 6.4 volts
Outline Flashing: 6.1 or less
SPEAKER VOLUME AND BATTERY CHARGE
You may notice the speaker volume drop while one battery segment is
illuminated.
With the outline flashing, low speaker volume will be very apparent.
BATTERIES
BATTERY
REMOVAL
Patent Pending
 Loading...