

Bounty Hunter Land Ranger Pro Owenrs Manual

METAL DETECTOR
OWNER’S MANUAL
Use 9-volt
ALKALINE batteries.
Do not use
“Heavy Duty” batteries.
Do not use
ordinary “Zinc Carbon” batteries.

2
TABLE OF CONTENTS
Congratulations!
Congratulations on the purchase of your new Bounty Hunter
®
Land Ranger
™
Pro Metal Detector . The Land RangerPro is the result of nine years of software
engineering and features the latest advancements in lightweight design, target
accuracy and deep-penetrating detection technology.
The
Land Ranger Pro can be used with its default turn-on-and-go settings or it
can be customized for any of your treasure hunting applications with its unique
features like Enhanced V-Break
®
, High Resolution Conductivity Arc and
Program Memory, as well as Manual and Automatic Search Modes. Treasure
hunting enthusiasts from around the world were involved in the development
of this revolutionary new detector. This manual has been written to help you
get optimal use of your detector so we hope you will read it thoroughly before
your first outing.
Happy Hunting from First Texas Products!
Terminology . . . . . . . . . . . . . . . . . . . . . . . . . . . . . . . . . . . . . . . . . . . . . . . . . . . . . . . .3
Contents . . . . . . . . . . . . . . . . . . . . . . . . . . . . . . . . . . . . . . . . . . . . . . . . . . . . . . . . . . .4
Assembly . . . . . . . . . . . . . . . . . . . . . . . . . . . . . . . . . . . . . . . . . . . . . . . . . . . . . . . . . .5
Batteries (use alkaline batteries only) . . . . . . . . . . . . . . . . . . . . . . . . . . . . . . . . . . . .6
Quick-Start Demonstration . . . . . . . . . . . . . . . . . . . . . . . . . . . . . . . . . . . . . . . . . . . . .7
The Basics of Metal Detecting . . . . . . . . . . . . . . . . . . . . . . . . . . . . . . . . . . . . . . . .8-9
How to Work the Controls . . . . . . . . . . . . . . . . . . . . . . . . . . . . . . . . . . . . . . . . . . . .10
The Display . . . . . . . . . . . . . . . . . . . . . . . . . . . . . . . . . . . . . . . . . . . . . . . . . . . . . . . .11
Target Identification . . . . . . . . . . . . . . . . . . . . . . . . . . . . . . . . . . . . . . . . . . . . . . . . . .12
Operation and Control . . . . . . . . . . . . . . . . . . . . . . . . . . . . . . . . . . . . . . . . . . . . . . .13
Menu . . . . . . . . . . . . . . . . . . . . . . . . . . . . . . . . . . . . . . . . . . . . . . . . . . . . . . . . . . .14-16
Operating Modes . . . . . . . . . . . . . . . . . . . . . . . . . . . . . . . . . . . . . . . . . . . . . . . . . . . .17
Pinpoint . . . . . . . . . . . . . . . . . . . . . . . . . . . . . . . . . . . . . . . . . . . . . . . . . . . . . . . . . . .18
Ground Cancelation . . . . . . . . . . . . . . . . . . . . . . . . . . . . . . . . . . . . . . . . . . . . . . .19-20
Headphones . . . . . . . . . . . . . . . . . . . . . . . . . . . . . . . . . . . . . . . . . . . . . . . . . . . . . . .20
Depth and Target Display . . . . . . . . . . . . . . . . . . . . . . . . . . . . . . . . . . . . . . . . . . . . .21
Troubleshooting . . . . . . . . . . . . . . . . . . . . . . . . . . . . . . . . . . . . . . . . . . . . . . . . . . . . .22
Treasure Hunter’s Code of Ethics . . . . . . . . . . . . . . . . . . . . . . . . . . . . . . . . . . . . . . .23
Warranty . . . . . . . . . . . . . . . . . . . . . . . . . . . . . . . . . . . . . . . . . . . . . . . . . . . . . . . . . .23
Accessories . . . . . . . . . . . . . . . . . . . . . . . . . . . . . . . . . . . . . . . . . . . . . . . . . . . . . . . .24

TERMINOLOGY
The following terms are used throughout the manual, and are standard
terminology among detectorists.
RELIC
A relic is an object of interest by reason of its age or its association with
the past. Many relics are made of iron, but can also be made of bronze
or precious metals.
IRON
Iron is a common, low-grade metal that is an undesirable target in certain
metal detecting applications. Examples of undesirable iron objects are old
cans, pipes, bolts and nails.
Sometimes, the desired target is made of iron. Property markers, for
instance, contain iron. Valuable relics can also be composed of iron;
cannon balls, old armaments and parts of old structures and vehicles can
also be composed of iron.
FERROUS
Metals which are made of, or contain, iron.
ELIMINATION
Reference to a metal being "eliminated" means that the detector will not
emit a tone, nor display a Target-ID, when a metal object passes through
the searchcoil's detection field.
DISCRIMINATION
When the detector emits different tones for different types of metals, and
when the detector "eliminates" certain metals, we refer to this as the
detector "discriminating" among different types of metals.
Discrimination is an important feature of professional metal detectors.
Discrimination allows the user to ignore trash and otherwise undesirable
objects.
PINPOINTING
Pinpointing is the process of finding the exact location of a buried object.
Long-buried metals can appear exactly like the surrounding soil, and can
therefore be very hard to isolate from the soil.
V.C.O.
Meaning “voltage controlled oscillator,” the V.C.O. audio method causes
both the
audio pitch and the volume to rise as signal strength increases.
V.C.O. improves the user's ability to interpret a target's size and depth.
Very weak signals (for small or very deeply buried objects) have the
faintest volume and the lowest pitch. Larger objects, and those closer to
the searchcoil, will induce a higher volume and higher pitch sound.
GROUND CANCELATION
Ground Cancelation is the ability of the detector to ignore, or "see through,"
the earth's naturally occurring minerals, and only sound a tone when a
metal object is detected. This detector incorporates proprietary circuitry to
eliminate false signals from many mineralized soils.
3
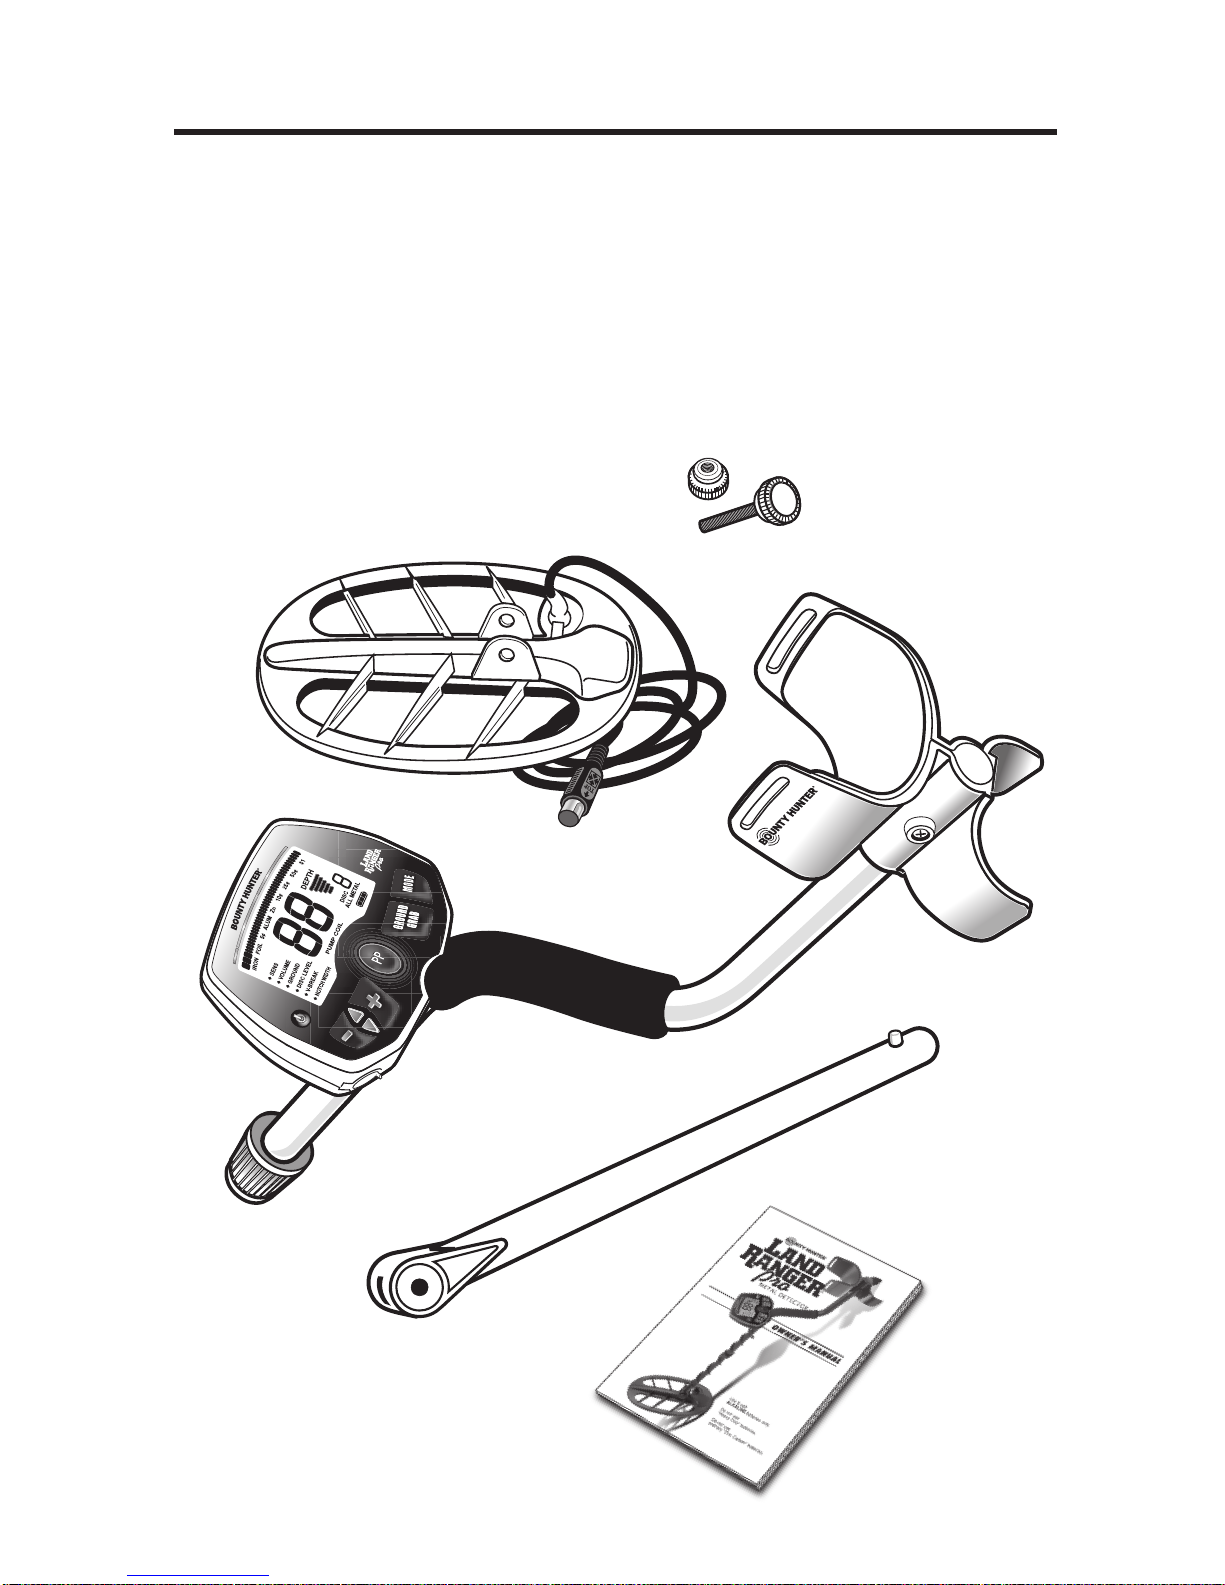
CONTENTS OF BOX
The following detector components are in the box:
1. S-ROD with Control Housing, Arm Rest and Locking Collar
2. Lower Stem
3. Searchcoil
4. Bolt & Knurled Knob
5. This Owner's Manual
4
●
1
●
2
●
3
●
4
●
5
5
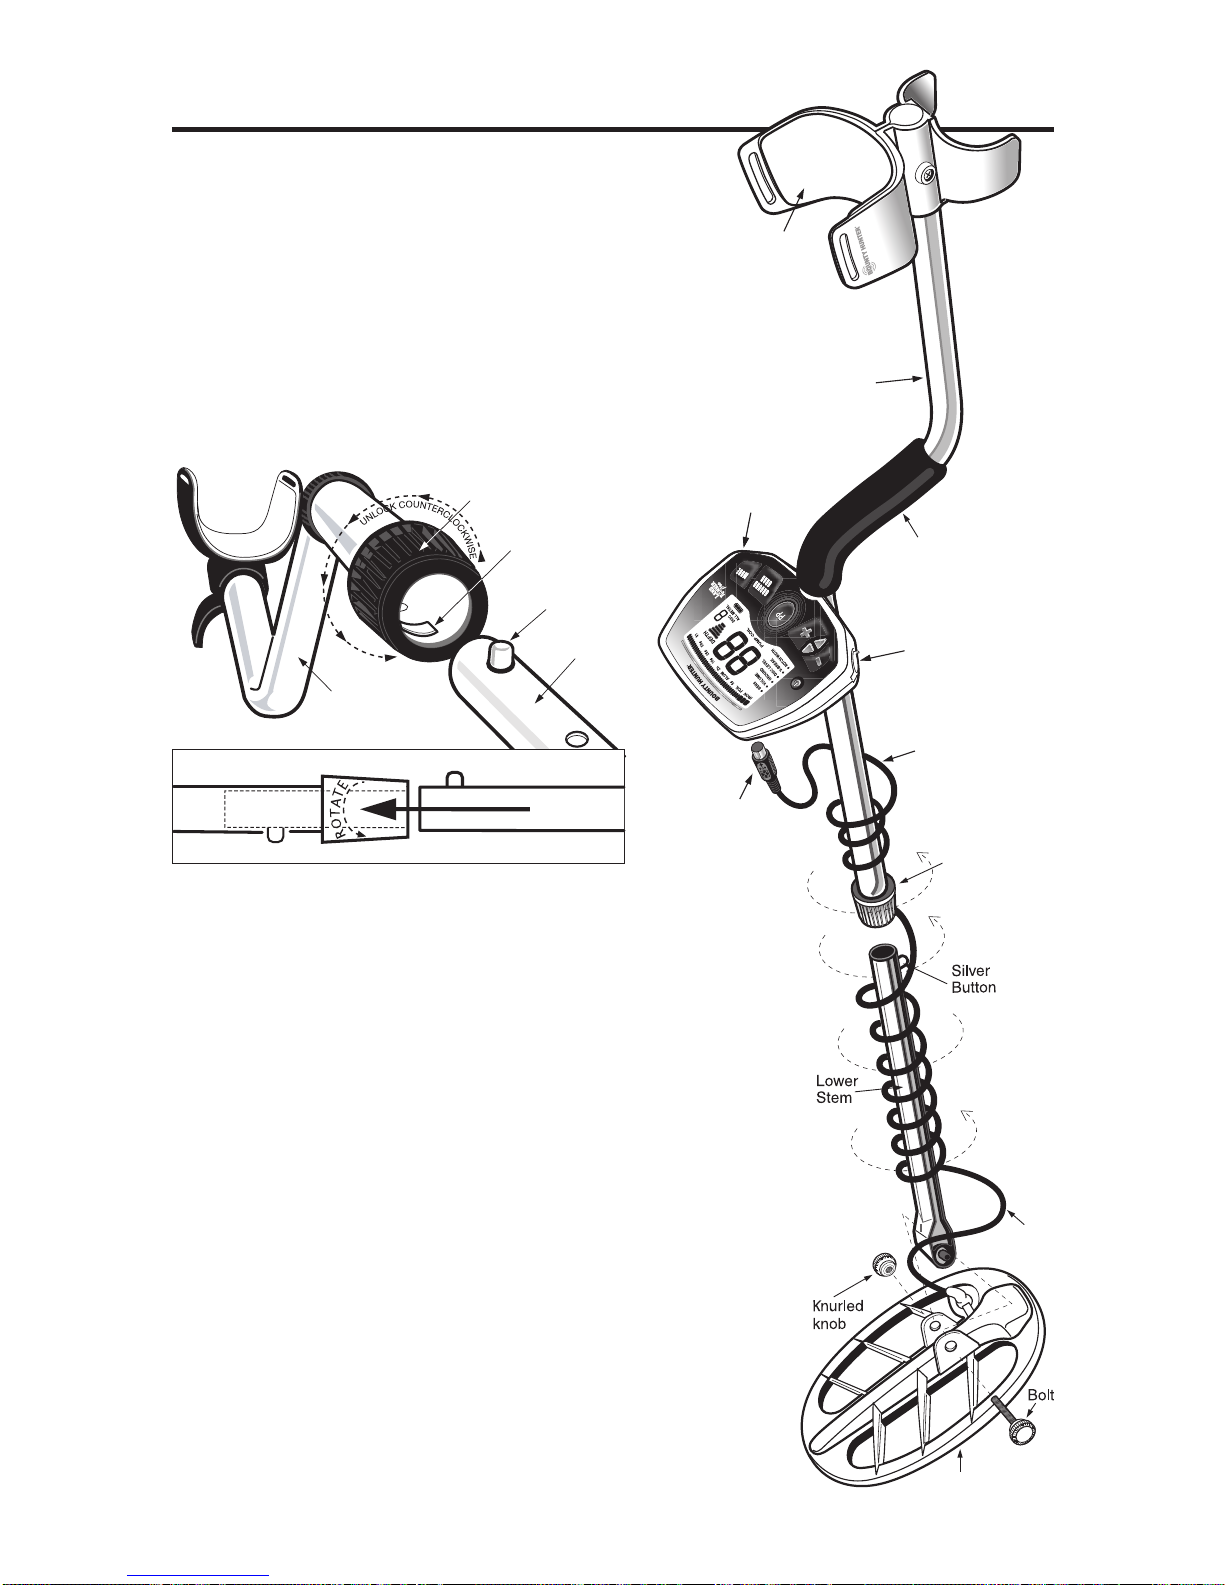
ASSEMBLING THE DETECTOR
Hand-grip
Search
coil
Cab
le
Cable
Plug
S-R
od
Locking
Collar
Battery
Compart
men
t
(ba
ck side)
Headphone
Jack
Armrest
Sea
rchcoi
l
Slack
in cab
le
●
1 Hold S-ROD upright.
●
2 Loosen LOCKING COLLAR on S-ROD;
rotate counterclockwise.
●
3 Insert LOWER STEM into S-ROD with the
SILVER BUTTON pointed upward.
●
4 Rotate the LOWER STEM until the
SILVER BUTTON locates and clicks into
a hole.
●
5 Attach the SEARCHCOIL to the LOWER
STEM using the BOLT and KNURLED
KNOB.
●
6 Adjust the LOWER STEM to a length that
lets you maintain a comfortable upright
posture while holding the detector relaxed
at your side with the SEARCHCOIL
parallel to the ground in front of you.
●
7 Wind the CABLE around the STEM.
Leave slack in the cable at the bottom to
allow the searchcoil to pivot.
●
8 Align the pins on the CABLE PLUG to the
connector holes on the rear of the control
housing.
●
9 Push in CABLE PLUG.
●
10 Twist the LOCKING COLLAR fully in the
clockwise direction until stems are locked
securely together.
S-ROD
LOCKING
COLLAR
INTERNAL
CAM LOCK
SILVER BUTTON
LOWER
STEM
S-ROD
LOWER STEM
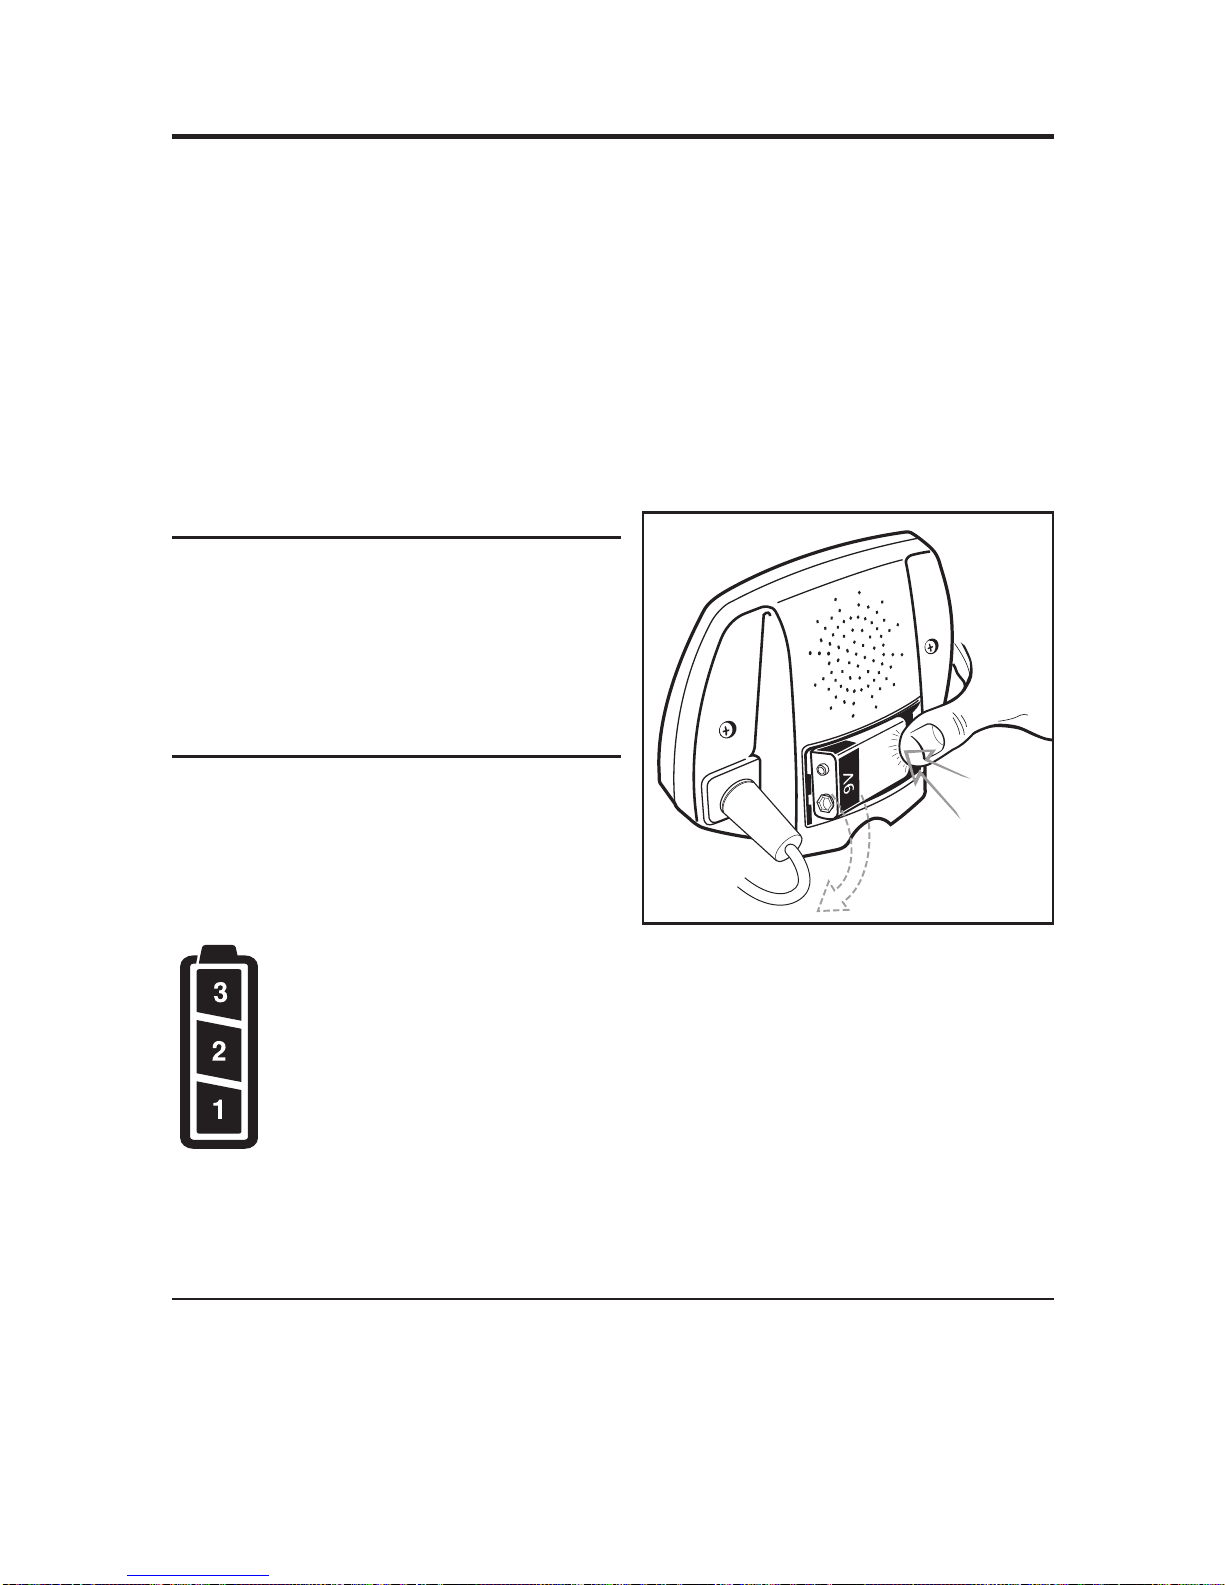
The detector requires a single 9-volt ALKALINE battery (battery not included).
Do not use ordinary “Zinc Carbon” batteries
Do not use “Heavy Duty” batteries.
Rechargeable batteries can also be used. If you use rechargeables, we
recommend using a “Nickel Metal Hydride” rechargeable battery.
The battery compartment is located on the back side of the Control Housing.
Slide the battery door to the side to remove. Insert battery. Close battery door.
When it's time to replace the battery simply push down firmly on the bottom of
the battery
(see illustration).
BATTERY LIFE
Expect 20 to 25 hours of life from a
9-volt alkaline battery.
Rechargeable batteries provide about 8
hours of usage per charge.
BATTERY INDICATOR
The battery icon has three segments
plus an outline segment.
The amount of battery voltage for an
ALKALINE battery is indicated as
follows:
3 segments illuminated: 8.1 volts or more
2 segments illuminated: 7.1 to 8.0 volts
1 segment illuminated: 6.5 to 7.0 volts
No segments illuminated: 6.2 to 6.4 volts
Outline Flashing: 6.1 or less
SPEAKER VOLUME AND BATTERY CHARGE
You may notice the speaker volume drop while one battery segment is
illuminated.
With the outline flashing, low speaker volume will be very apparent.
6
BATTERIES
BATTERY
REMOVAL
Patent Pending
I. Supplies Needed:
a Nail (made of iron) a U.S. Quarter (or silver coin)
a U.S. Nickel a Gold Ring
a U.S. Dime a U.S. Penny, dated after 1982 (post-1982
pennies are made of Zinc)
(Most newer non-U.S. coinage also contains mostly Zinc)
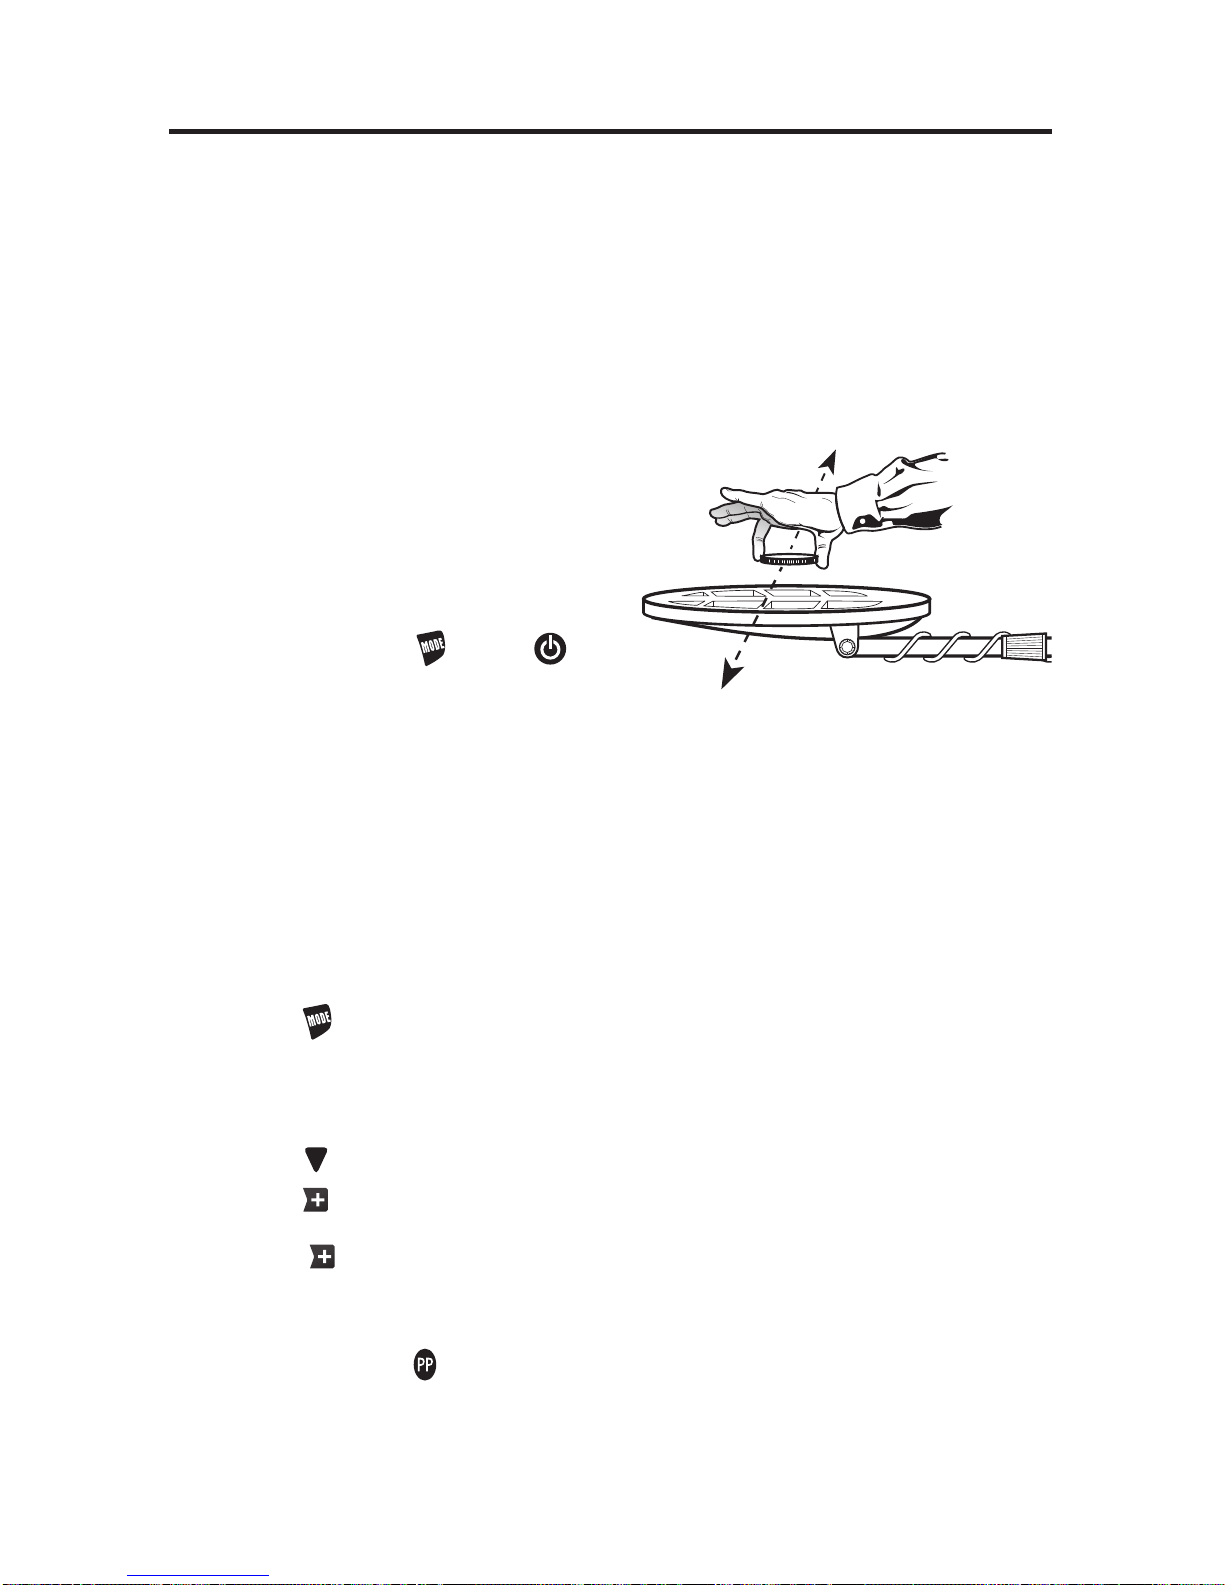
II. Position the Detector:
a.Place the detector on a table with the searchcoil hanging over the edge. Or
better, have a friend hold the detector with the searchcoil off the ground.
b.Keep the searchcoil away from walls, floors and metal objects.
c.Remove watches, rings and jewelry.
d.Turn off lights or appliances whose
electromagnetic emissions may cause
interference.
e.Pivot the searchcoil back.
f. Reset detector to default settings:
with detector OFF,
Press-and-Hold . Press .
III. Demonstrate COIN MODE:
a.If display does not indicate “DISCC”, repeat step II.f. above.
You are now in the preset Coin Mode.
b.Wave objects over searchcoil.
Wave coins flat, parallel to searchcoil.
Notice the different sounds and 2-digit Target-IDs while you wave each
object over the searchcoil:
High Tone: Dime, Quarter & Silver Coin
Medium Tone: Nickel, larger Gold Rings
Low Tone: Zinc Penny, smaller Gold Rings
The Nail will not be detected in COIN MODE.
IV. Demonstrate DISCRIMINATION MODE:
(This demo uses the DISC2 Mode. There are other discrimination modes.)
a.Push until
DISC2 appears on lower right of the display.
b.Wave the nail; it is now detected. Notice the low tone.
c.Wave all other objects over searchcoil. They all induce the same sound, but
have different Target-IDs. Notice V.C.O. change as objects move closer or
farther from searchcoil.
d.Push until “DISC LEVEL” is highlighted.
e.Push until “19” is displayed.
f. Wave nail. It will not be detected because it has been “discriminated out.”
g.Press until “59” is displayed.
h.The Penny and Nickel will not be detected. They have now been
“discriminated out.”
V. Demonstrate PINPOINT FEATURE:
a.Press and hold . “PP” momentarily appears on the screen
b.Hold a coin motionless over the searchcoil.
c.Lower coin toward searchcoil and then raise coin away from searchcoil.
d.Notice that the sound changes as the coin moves closer and farther.
e.Notice that the depth indicator changes as the coin moves up and down.
7
QUICK-START DEMONSTRATION

This metal detector is intended for locating buried metal objects. When
searching for metals, underground or on the surface, you have the following
challenges and objectives:
1. Ignoring signals caused by ground minerals.
2. Ignoring signals caused by metal objects that you do not want to find, like
nails.
3. Identifying a buried metal object before you dig it up.
4. Estimating the size and depth of objects, to facilitate digging them up.
5. Eliminating the effects of electromagnetic interference from other
electronic devices.
Your metal detector is designed with these points in mind.
1. Ground Minerals
All soils contain minerals. Signals from ground minerals can interfere with
the signals from metal objects you want to find. All soils differ, and can differ
greatly, in the type and amount of ground minerals present. You therefore
want to “calibrate” the detector to the specific ground conditions where you
are hunting. The detector incorporates both automated and manual ground
cancelation features which will eliminate false signals caused by most types
of soils. If you want to maximize the detector's target identification accuracy
and depth of detection, use the GROUND GRAB
®
Computerized Ground
Cancelation function to calibrate the detector to the ground where you are
searching. See the section on Ground Cancelation for details.
2. Trash
If searching for coins, you want to ignore items like aluminum foil and nails.
You can see the Target-ID value of the buried objects, listen to the sounds
and then decide what you want to dig up. Or you can eliminate unwanted
metals from detection by using the DISCRIMINATION feature.
3. Identifying Buried Objects
Metal objects are identified by a 2-digit number on the display screen. This scale
has 99 points of resolution, and is an indicator of the relative electrical
conductivity of different objects. Higher numbers indicate more conductive
targets. Iron objects, which are usually of lesser value, display lower
numbers. Silver coins, for instance, usually display the highest numbers.
4. Size and Depth of Buried Objects
The 5-segment target depth indicator shows the relative depth of a buried
metal object.
This bar graph can indicate the relative size of different objects or their
distance from the searchcoil. For a given object, the more distance between it
and the searchcoil, the more bars illuminated. A more accurate, and higher
resolution, depth reading is available when using Pinpoint. Pinpoint does not
require the searchcoil to be in motion to detect metals. The ability to hold the
searchcoil motionless over the target also aids in tracing an outline of the
buried object, or in pinpointing the exact location of the object using
techniques described in the pinpointing section of this manual.
8
THE BASICS OF METAL DETECTING
 Loading...