

Page 1
TSU501
REMOTE CONTROL
SETUP AND USE GUIDE
Page 2

FCC COMPLIANCY
This equipment has been tested and found to comply with the limits for a Class B digital device, pursuant to
part 15 of the FCC rule. These limits are designed to provide reasonable protection against harmful interference
in residential installations. This equipment generates, uses, and can radiate radio frequency energy and if, not
installed and used in accordance with the instructions, may cause harmful interference to radio communications.
However, there is no guarantee that interference will not occur in a particular installation. If the equipment does
cause harmful interference to radio or televisions reception, which can be determined by turning the equipment
off and on, the user is encouraged to try to correct the interference by one or more of the following measures:
• Reorient or relocate the receiving antenna.
Increase the separation between the equipment and receiver.
•
• Connect the equipment into an outlet on a different circuit from the receiver.
• Consult the dealer or an experienced radio/TV technician for help.
Note If serial or parallel ports are configured, a filtered/shielded serial or parallel cable is recommended to
minimize EMI and ensure FCC class B compliance.
Page 3
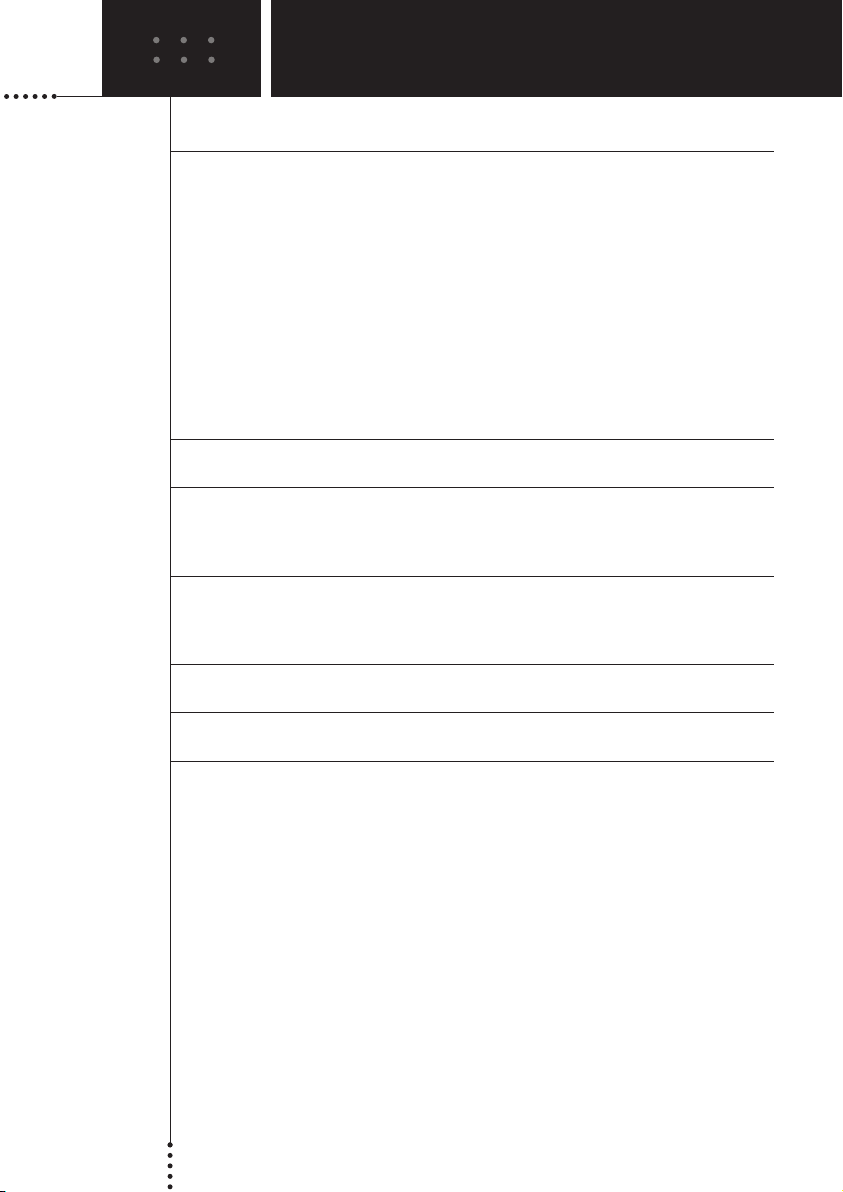
TABLE OF CONTENTS
Taking a First Look 2
Using the Avidea Remote
The Batteries 3
The Remote Control Layout 4
Activating the Avidea Remote 5
The Touch Screen 6
Operating Devices 9
Working with Modes 13
Adjusting the Settings 14
Changing the RF/IR Settings 18
Entering Codes for Other Devices 21
Learning Commands 24
Labeling Buttons and Devices 26
Recording Macros 28
Freedom Edit 32
Maintaining the Avidea Remote 34
Important Notices 34
Cleaning Avidea Remote 34
Troubleshooting 36
General Problems 36
Programming Problems 38
SETUP AND USE GUIDE
Specifications 39
Table of Brands 40
Index 54
Page 4

TAKING A FIRST LOOK
The Avidea Remote Control is a Radio Frequency (RF) and Infrared (IR)
remote that can be programmed to operate all the Devices connected to your
Avidea System, such as your TV, cable box, satellite receiver, VCR, etc. It has
an extensive library of codes for these Devices that can be easily programmed.
See "Entering Codes for Other Devices" on p. 21.
In addition, the Avidea Remote can "learn" codes from your existing remote
controls that are not already stored in its library. See "Learning Commands"
on p. 24.
You can label the touch screen buttons on the Avidea Remote. Characters and
numbers are available for labeling as well as various audio and video symbols.
See ‘Labeling Buttons and Devices’ on p. 26.
Recording macros is another feature of the Avidea Remote. If you wish to
assign a sequence of commands to a single button, you can record a macro. See
‘Recording Macros’ on p. 28.
We have provided you with software for use on a PC called Freedom Edit, so
that you can create your own screens and create an individualized look for
your remote. You can find Freedom Edit on the included CD-ROM and on
the Boston Acoustics website www.bostonacoustics.com/avidea. Freedom
Edit’s online help system will guide you through the process. In the future
Freedom Edit will also allow you to upgrade your Avidea Remote. See
‘Freedom Edit’ on p. 32.
SETUP AND USE GUIDE
22
Page 5
USING THE AVIDEA REMOTE
The Batteries
The Avidea Remote requires 3 AA-batteries (3 x 1.5 V) to function.
You can use either the supplied batteries or purchase rechargeable batteries.
1 Remove the battery cover by releasing the tab and lifting.
2 Install the batteries in the battery compartment.
3 Replace the battery cover.
After a few seconds, the Avidea Remote starts up automatically and beeps
twice to indicate that it is ready for use.
SETUP AND USE GUIDE
Note: Do not touch the screen or hard buttons during start up as this may cause your
emote to lock up. If it does lock up, r
r
3
emove one battery and start again.
Page 6
TABLE OF CONTENTSUSING THE AVIDEA REMOTE
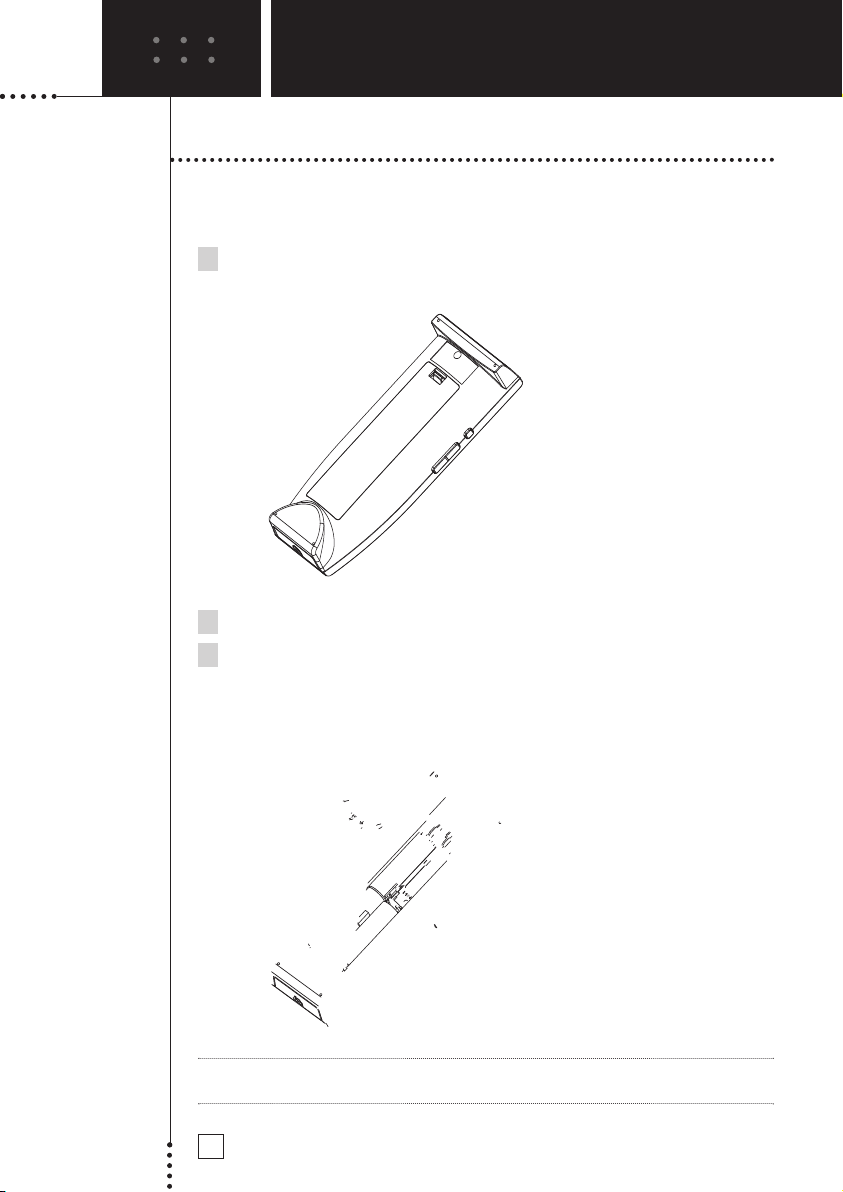
The Remote Control Layout
On the Avidea Remote you can perform functions by means of soft and hard
buttons.
• Soft buttons are the buttons you can tap on the LCD Touch Screen.
• Hard buttons are the buttons located above, below and on the left side of
the LCD touch screen.
• The 2 hard buttons located above the Touch Screen turn the Avidea
System and TV Power on and off.
• The 4 hard buttons just below the touch screen are Mode, OSD (On
Screen Display) Close (Closes OSD), and the Device button. Their
labels are displayed at the bottom of the Touch Screen.
• The hard buttons located at the bottom are for the Avidea System
Volume Up/Down, Mute, Channel Up/Down, TV source, and the
Navigation buttons.
• The hard buttons located on the left side of the Avidea Remote are
the Backlight button and the Touch Screen Page Up/Down buttons.
Avidea System Power TV power
LCD Touch Screen
SETUP AND USE GUIDE
Backlight button to
activate the Backlight
Page Up button
Page Down button
to switch to another mode
Avidea System Volume
4
Mode button
Up/Down
Navigation
buttons
Avidea Mute
Soft buttons
OSD (On Screen
Display)
Close (Closes On
Screen Display)
Device button
to go to the
Device Page
Channel Up/Down
TV Source
Learning eye
Serial port for
connecting to a PC
Page 7
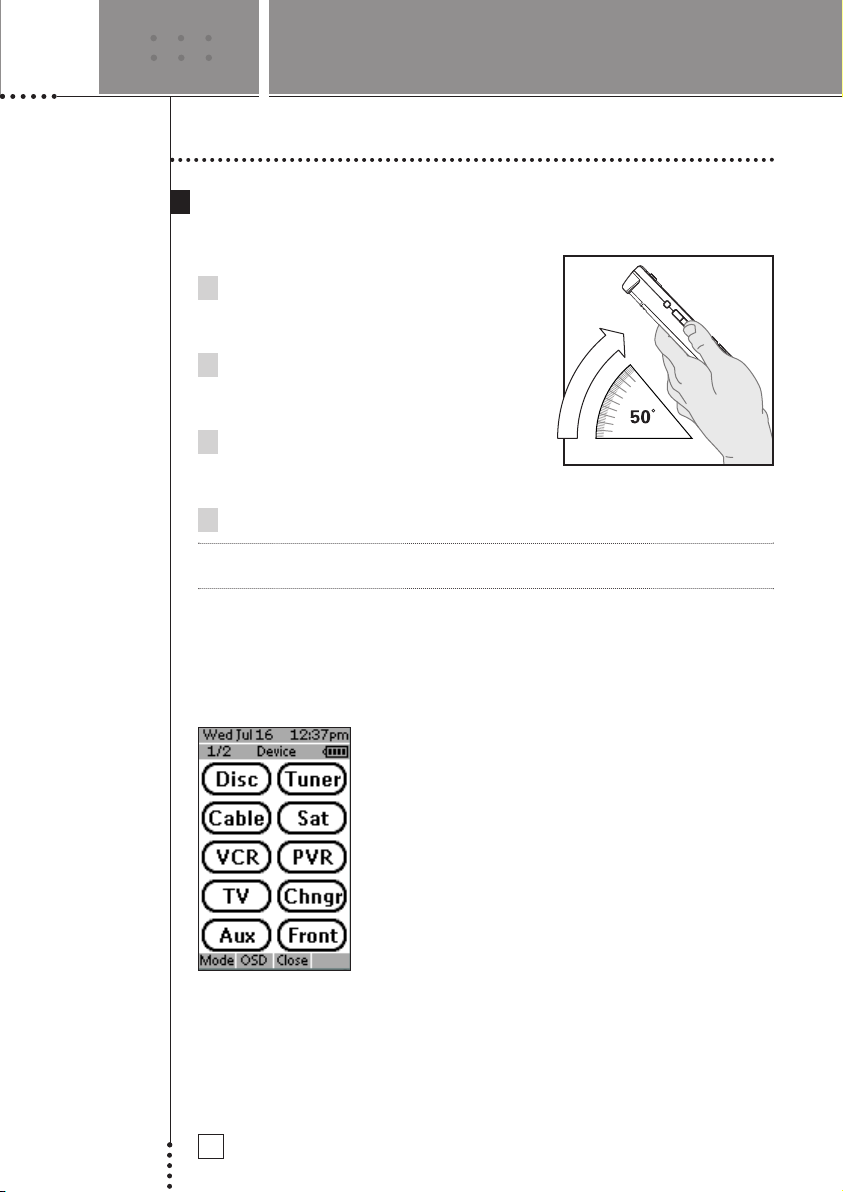
TABLE OF CONTENTS
USING THE AVIDEA REMOTE
Activating the Remote Control
Turning on the Display and the Backlight
The Remote Control’s display can be activated
in four different ways:
Tilting the unit more than 50 degrees
as illustrated activates the display but
not the backlight.
Pressing the Backlight button on the
left side will activate the display and
the backlight.
Tapping the screen gently with your finger
or a blunt, soft object like a pencil eraser
will activate the display, but not the backlight.
Pressing any button will activate the display, but not the backlight.
Note: You can set the backlight to automatically activate whenever you use the
remote. See ‘Adjusting the Backlight Timer’ on p. 15.
Whenever batteries are installed in the Avidea Remote or when it is reset, the
Remote will beep twice. The Avidea Remote then automatically switches to
the Device Page that displays all potential Devices that your Avidea Remote
can operate.
SETUP AND USE GUIDE
Fig 1: Device Page
5
Page 8
USING THE AVIDEA REMOTE
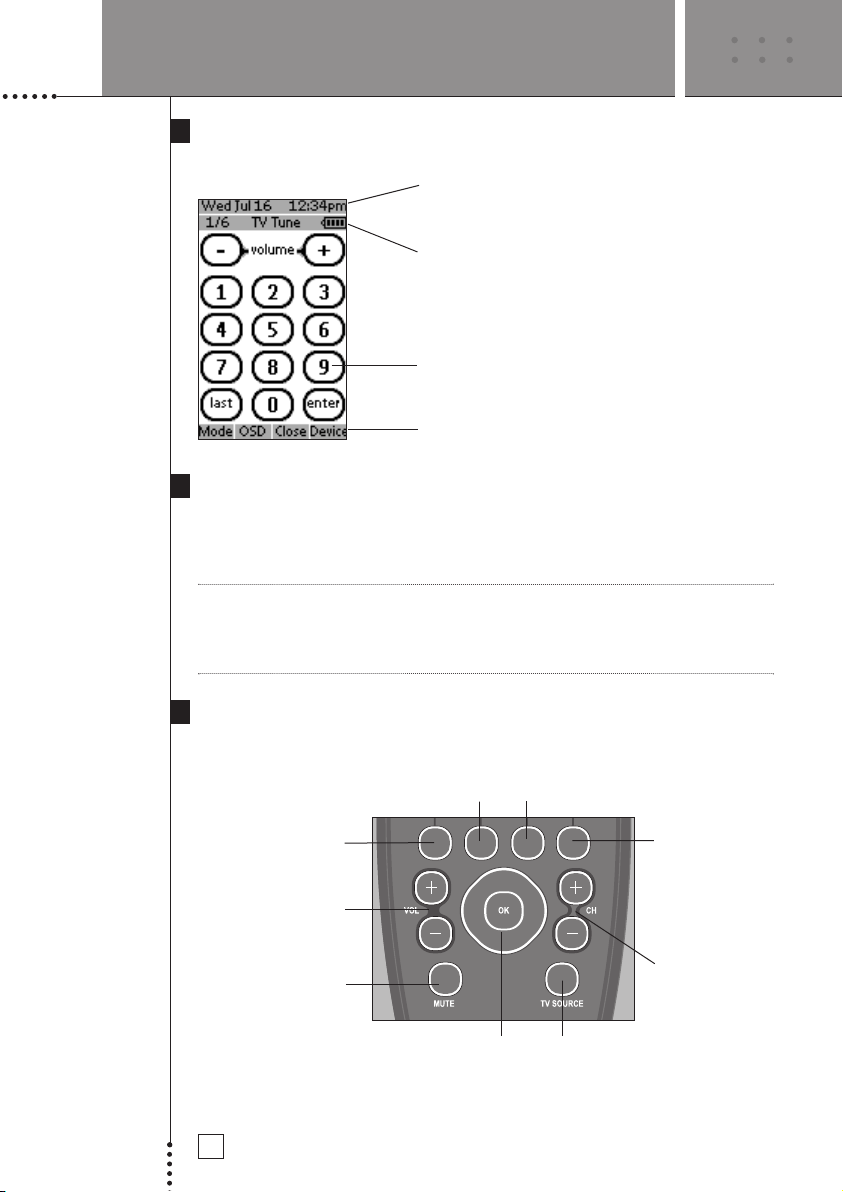
The Touch Screen
The LCD Touch Screen is divided into different sections:
Here the date and time are displayed when you are
operating your Devices. See p. 15 & 16 to set time
and date.
In this area you can see:
· The page number of the Device
· The Device you are operating
· The battery level indicator
With these soft buttons you operate your Device.
These are the labels of the 4 hard buttons below the
touch screen.
Using the Soft Buttons
By tapping the soft buttons on the LCD Touch Screen you send commands to
the Device you have selected. The name of the active Device is indicated at
the top of the touch screen.
Note You can operate the soft buttons in the same way you operate hard buttons on
a conventional remote control. When you keep the soft button pressed
instead of tapping it, the Avidea Remote keeps sending the command for up
to 30 seconds.
SETUP AND USE GUIDE
Using the Hard Buttons
Hard Buttons can be operated at any time, even without turning on the LCD
Touch Screen.
OSD (opens On Screen Display)
Mode button:
Press and hold 3 seconds to
activate the Mode screen.
Avidea System
Volume Up/Down
Avidea System Mute
Navigation buttons:
To perform actions in the menu of a Device, like the on
screen display of a TV or a VCR display. Use the cursor
to move up, down, left or right in the menu and press
OK to select.
6
Close (closes On Screen Display)
Device button:
Press to go to the
Device Page. Only
active when the word
“Device” is displayed
above the button.
Channel Up/Down
TV Source:
Selects the input on your TV
.
Page 9
USING THE AVIDEA REMOTE
Using the Page Up and Page Down Buttons
The controls to operate your Devices are typically located on different pages.
You can scroll through these pages using the Page Up and Page Down
buttons on the left side of the touch screen. The page number on the left of
the touch screen indicates the active page number and the total number of
screens; for example 1/6 means page 1 of 6 pages. The pages also “wrap
around” which means you can go to any page in any direction.
Using the Backlight Button
Use the Backlight button to activate the Avidea Remote’s display and
backlight.
Note If the screen stays black or becomes blank, adjust the contrast using the page
buttons on the left side. See Changing the LCD Contrast below. The Remote
Control also has an automatic shut-off feature to conserve battery life.
See ‘Adjusting the Backlight Timer’ on p. 15.
SETUP AND USE GUIDE
Changing the LCD Contrast
To adjust the LCD contrast on the touch screen:
1 Press and hold the Backlight button.
The screen lights up.
2 While still holding the Backlight button, press the Page Up button
once to increase the LCD contrast one level.
The LCD contrast is adjusted one level up.
–or–
Press the Page Down button once to decrease the LCD contrast
one level.
The LCD contrast is adjusted one level down.
7
Page 10
USING THE AVIDEA REMOTE
3 Release the Backlight button when the contrast is satisfactory.
The LCD contrast can be adjusted to 4 different levels.
Note To adjust the contrast multiple levels, press the Page Up or Page Down
button multiple times. When you press and hold the Page Up or Page Down
button, the LCD contrast will change only one level.
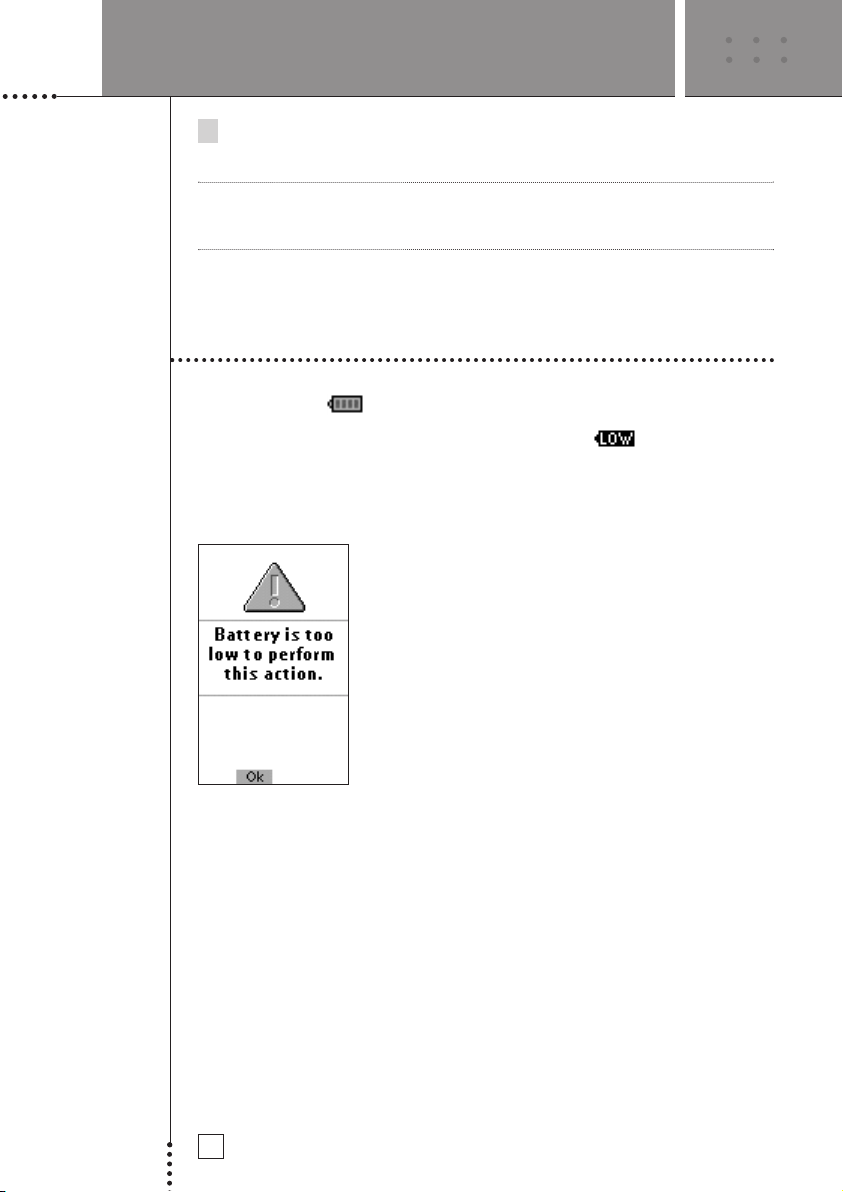
The Battery Status
The battery icon indicates the status of your batteries.
When the battery status is low, the Low Battery icon appears at the top
of the touch screen. You can still operate your Devices, but you cannot adjust
the settings, enter codes, learn commands or record macros anymore. When
you try to perform these actions, a message screen appears.
SETUP AND USE GUIDE
Replace the batteries to make the Avidea Remote fully functional again. See
‘The Batteries’ on p. 3 to replace the batteries.
8
Page 11
USING THE AVIDEA REMOTE
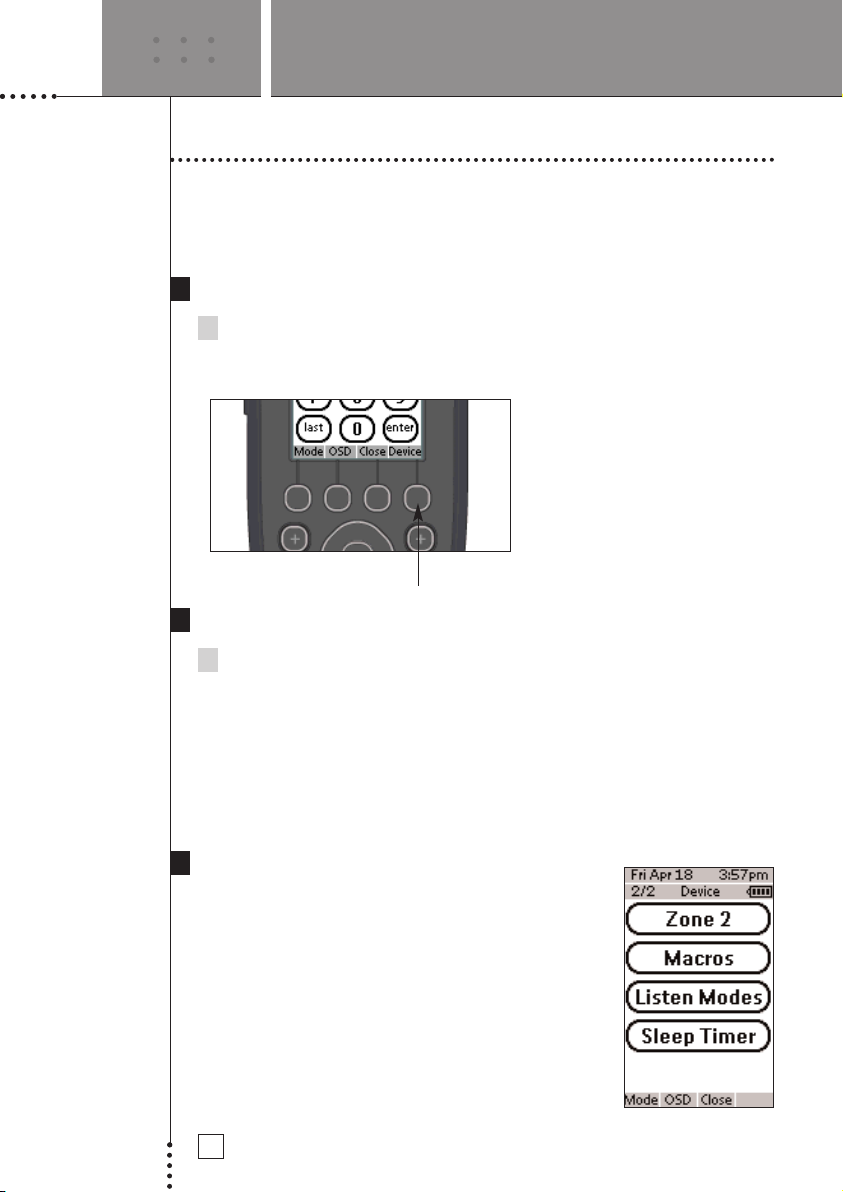
Operating Devices
To operate Devices on your Avidea Remote select the Device Page. This
screen displays the available Devices: TV, VCR, Disc, Tuner, Sat, etc.
Activating the Device Page
Press the Device button.
The Device Page appears.
Fig. 2: The Device button
Selecting a Device on the Device Page
SETUP AND USE GUIDE
Tap the soft button of the Device you want to operate.
The first page of the selected Device appears. Using the Page Up and
Page Down Buttons you can go to another page of the Device.
You operate Devices using the buttons on your Avidea Remote:
• Soft buttons (touch screen buttons)
• Hard buttons
Selecting Other Device Functions
The second Device Page allows you additional control
of your Avidea System. On this page you will find four
soft buttons labeled Zone 2, Macros, Listen Modes,
and Sleep Timer.
9
Page 12
USING THE AVIDEA REMOTE
Zone 2
The Avidea System has the ability to provide audio simultaneously and
independently in two different listening "zones". With the connection of
additional amplification and loudspeakers to the Zone 2 output from your
Avidea Control Center you can for instance, enjoy a CD in one room and the
FM tuner in another.
To activate a Device from Zone 2 tap the Zone 2 button. Devices available
now come up in a new page labeled Zone 2. You operate the Devices as you
would in Zone 1. To turn off Zone 2, or return operation to Zone 1, tap the
Off or Zone 1 soft buttons at the bottom of the touch screen.
Note If a Zone 2 user selects a Device already in operation in Zone 1 (or vice versa)
both users will have control of that same Device. This may cause conflicting
use and programming.
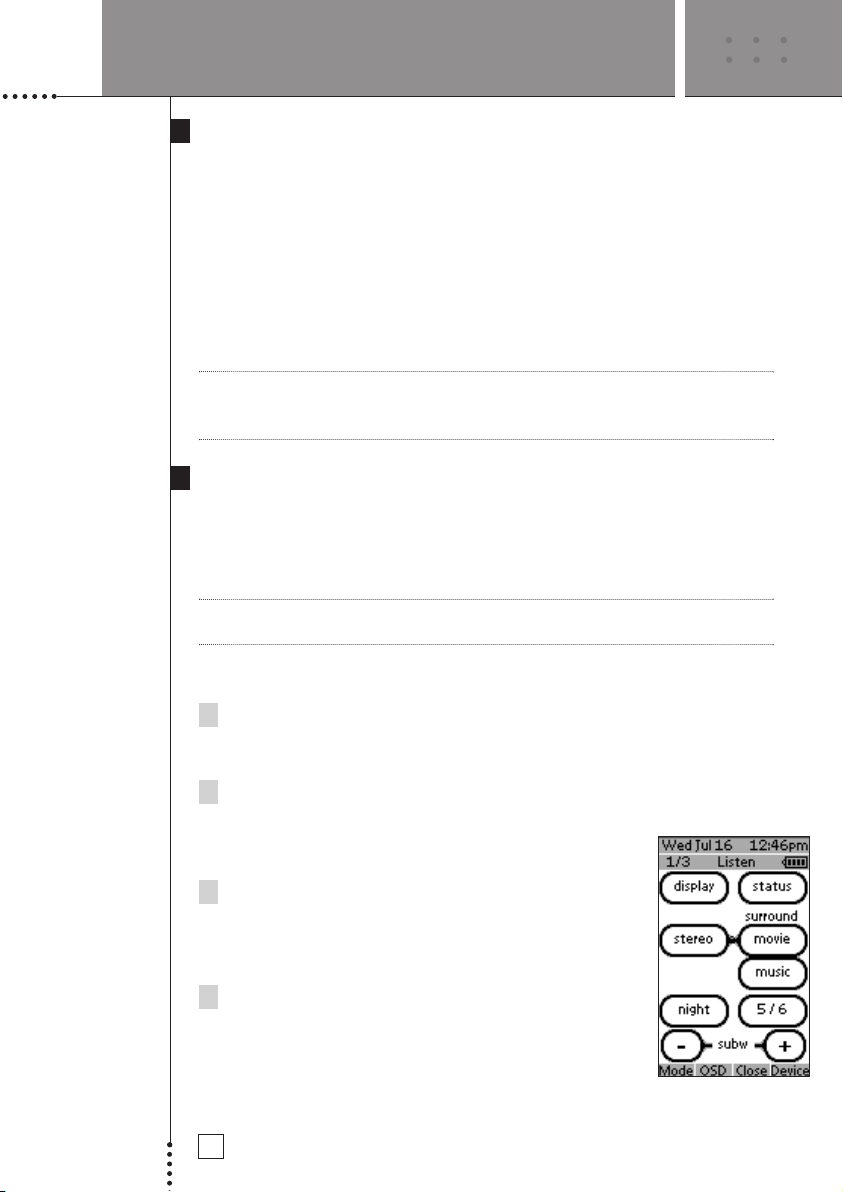
Listen Modes
The Avidea Remote allows adjustment of several “listening modes”. Listening
Modes allow you to use two, five or all six of the system’s speakers, depending
on program type, format, and personal choice. The Avidea subwoofer is
always on, regardless of the number of speakers being used.
Note Page 2 of each Device contains a customized Listening Mode page for that
Device.
SETUP AND USE GUIDE
On the Listening Mode page you will find the following soft buttons:
Display
Turns the display and lights on the Avidea Control Center on or off. The
power button will remain illuminated.
Status
Brings up the Status Bar on your TV. Shows full
system configuration, settings, and Device playback
information.
Surround Music
Uses all six speakers to recreate the ambience of a
live musical performance. This is the preset mode
for all audio-only Devices.
Stereo
Uses only two speakers, the front left and front right,
allowing Avidea to behave like a traditional 2-channel
eo system.
ster
10
Page 13

USING THE AVIDEA REMOTE
Surround Movie
Uses all six speakers to recreate a movie theater surround sound experience
from sources that are not Dolby
for all video Devices. When any external Device provides a Dolby Digital
or DTS signal, the Avidea System will automatically select the ideal
playback mode.
5/6
Turns the rear center speaker on and off. The Avidea System can properly
decode the latest surround sound formats: Dolby
and DTS®-ES™. Both of these formats are available on DVD, and may be
provided by some digital cable and satellite programming.
The proper amount of sound will come automatically from the rear center
speaker when watching an EX- or ES-encoded movie. A regular Dolby
Digital or DTS soundtrack will also send sound to this speaker. However,
when watching these movies it is possible that too much sound can come
from the rear center speaker, and not enough from the rear left and right
speakers. If that is the case, press the 5/6 button to turn the rear center
speaker on or off. (The corresponding blue light on the control center will
provide a visual confirmation of the status of the rear center speaker.)
Simply choose which system configuration you prefer for a specific movie
soundtrack.
Subw -/+
Adjusts the output level of the subwoofer to match the type of
programming being played. You may also find that a relatively higher
subwoofer level is preferred when playing the system at lower volumes.
The range of this control is -12 to +12, and a visual indication of any
level change will appear on the control center display and your television.
®
Digital or DTS®. This is the preset mode
®
Digital Surround EX
™
SETUP AND USE GUIDE
Night (Disc and Changer Device only)
Changes the Avidea System’s overall dynamic range while listening to
DVD’s. This will reduce the difference between a movie’s softest and
loudest passages, making the movie more suitable for viewing when you
are concerned about disturbing others.
Note: The Avidea System has Listening Mode Memory™. It will automatically
remember both the Listening Mode and the associated subwoofer level setting
for each Device. Let’s say that the last time you listened to the Tuner you
listened in Stereo and set the subwoofer to +3. You just finished watching a
movie in Dolby Digital Surround EX with the rear center speaker on and the
subwoofer set to +5. When you switch to Tuner, the system will
automatically switch to Ster
Listen Mode settings will be stored automatically in the system’s memory and
recalled the next time you choose that Device.
11
eo, subwoofer +3. Any changes you make to the
Page 14
USING THE AVIDEA REMOTE
Macros
A macro allows you to send a sequence of commands using one single
button. You can for instance switch on your TV, turn on your cable box
and tune to a movie channel, all by pressing a single button. Pressing the
Macros soft button on the second page of the Device Overview will bring
you to a set of Macro soft buttons. Refer to ‘Recording Macros’ on p. 28
to learn how to program these for your particular needs.
Sleep
You can program your Avidea System to shut off automatically. Using the
- and + soft buttons allows you to program the Avidea System to shut off
automatically in 15 minute intervals for up to 90 minutes.
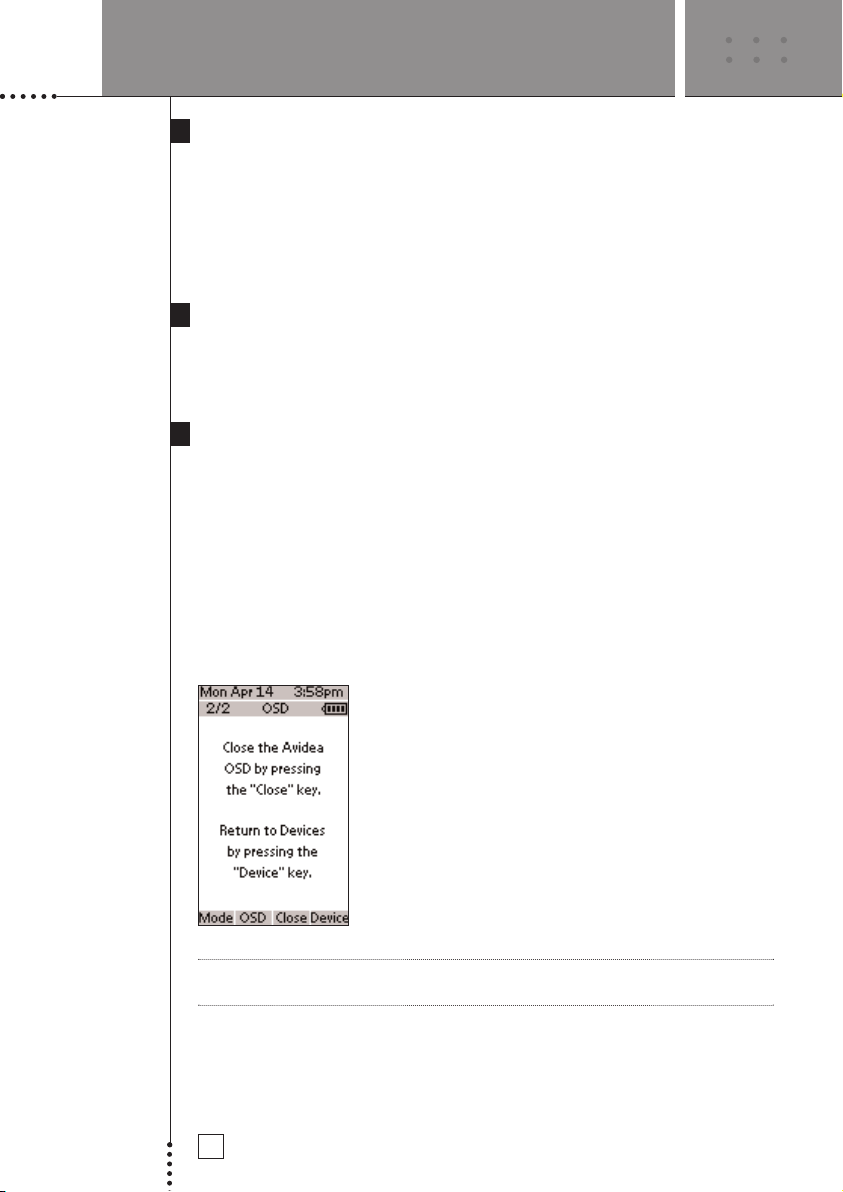
Activating The Avidea System ‘On Screen Display’ (OSD)
Your Avidea System is equipped with an On Screen Display (OSD). The OSD
is used to check system status and make adjustments to your Avidea System.
Adjustments may include things like TV aspect ratios, speaker levels and
parental controls. (See your Avidea Home Theater System Setup and Use
Guide for complete information on the use of the OSD)
To access the OSD press the
display. You use the Navigation Buttons (up/down/left/right/ok) to access
specific adjustments within the OSD. Use the Close hard button at the bottom
of the LCD display to close the OSD.
OSD hard button at the bottom of the LCD
SETUP AND USE GUIDE
Note
12
After pushing the Close button it is necessary to press the Device button to
n to normal remote operation.
etur
r
Page 15
USING THE AVIDEA REMOTE
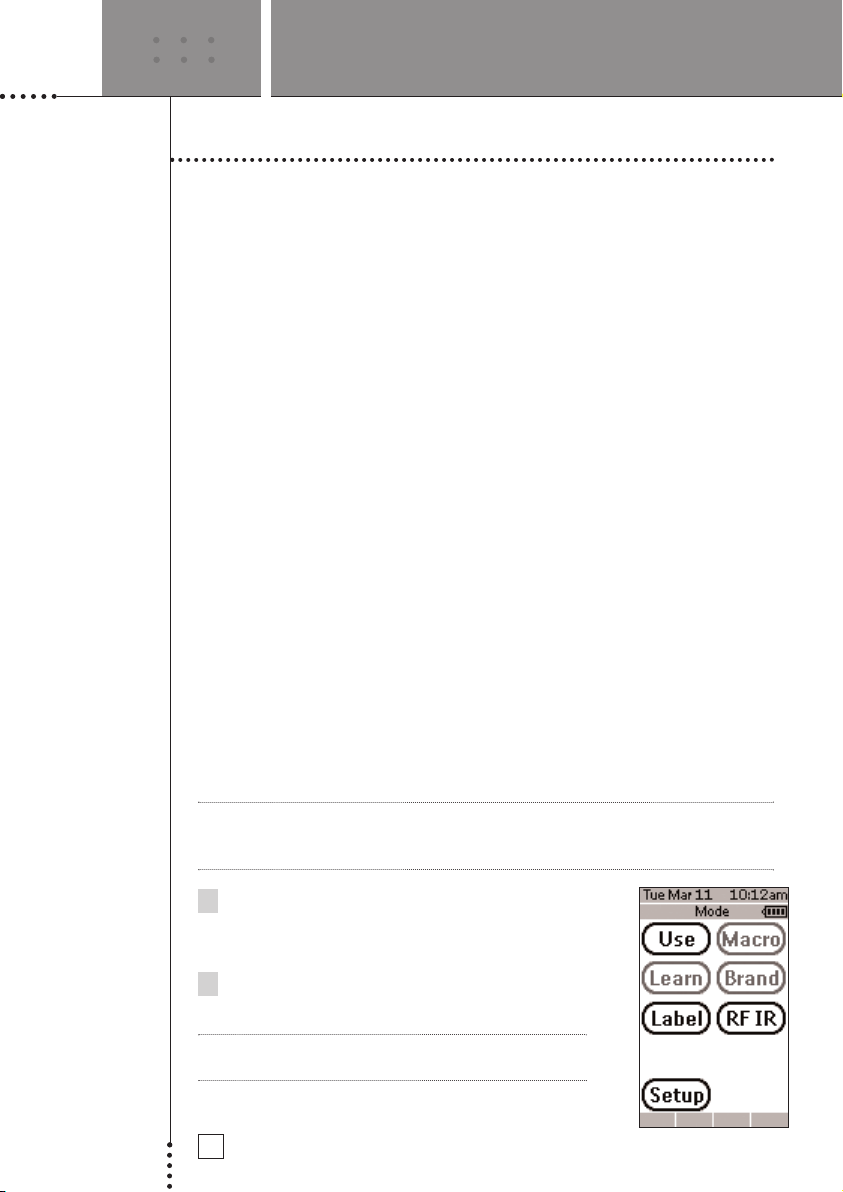
Working with Modes
Operation of the Avidea System or connected Devices requires that the remote
be in Use mode. For customizing the Avidea Remote (adjusting the settings,
entering codes, learning and labeling buttons, or recording macros) requires
switching to the appropriate mode.
The Avidea Remote can be put into 7 different modes. These modes are:
Use mode The normal mode for operating your Avidea System and all
the connected Devices. See ‘Operating Devices’ on p. 9.
Setup modeFor changing the Avidea Remote settings.
See ‘Adjusting the Settings’ on p. 14.
Brand modeFor entering the codes for the brands of your Devices using
the Avidea Remote’s library. See ‘Entering Codes for Other
Devices' on p. 21.
Learn modeFor learning commands from other remote controls. See
‘Learning Commands’ on p. 24.
Label modeFor re-labeling buttons and re-naming Devices on the Avidea
Remote. See ‘Labeling Buttons and Devices’ on p. 26.
Macro modeFor recording macros. You can assign multiple commands to
one single button. See ‘Recording Macros’ on p. 28.
RF/IR modeFor changing mode of communication to connected Devices.
You can control other Devices (VCR, satellite receiver) from
greater distances. See ‘Changing the RF/IR settings’ on p. 18.
SETUP AND USE GUIDE
Note For learning commands, entering codes, and recording macros, it is necessary
to select a Device on the Device Page. (See below.)
1 On the Device Page tap the soft button of
the Device you want to customize.
The first page of the selected Device appears.
2 Press and hold the Mode button for 3 seconds.
The Mode screen appears.
Note You have to press and hold the Mode button for
3 seconds to pr
13
event accidental changes.
Page 16

USING THE AVIDEA REMOTE
3 Select the desired mode from the Mode screen.
Adjusting the Settings
The Avidea Remote settings can be adjusted in the Setup mode.
1 Press and hold the Mode button for 3 seconds.
The Mode screen appears.
2 Tap Setup in the Mode screen.
The first Setup page appears.
The Avidea Remote settings consist of 3 setup pages with several settings per
page. Use the Page Up and Page Down buttons to navigate to the appropriate
setup page.
First Setup Page
On the first setup page you can adjust:
• The LCD timer
• The backlight timer
• The beep volume
SETUP AND USE GUIDE
Adjusting the LCD Timer
The LCD timer indicates how long the LCD touch scr
before it turns off. You can set the timer between 3 and 120 seconds.
14
een stays active befor
e
Page 17
USING THE AVIDEA REMOTE
Press ‘+’ to increase or ‘-’ to decrease the time the LCD stays active.
1 Tap ‘+’ or ‘-’ once to adjust the timer 1 second up or down.
2 Press and hold ‘+’ or ‘-’ to adjust the timer in 10 second intervals.
Adjusting the Backlight Timer
The backlight setting indicates how long the backlight of the LCD touch
screen and the buttons stays active. The backlight timer can be set between 1
second and 120 seconds. You can also set the backlight in the ‘On’ setting so
that the backlight automatically activates when the touch screen is tapped or
a hard button is pressed.
Note The backlight cannot stay active longer than the LCD. If you increase the
backlight timer, the LCD timer will automatically increase as well.
Press ‘+’ to increase or ‘-’ to decrease the time the backlight stays active.
1 Tap ‘+’ or ‘-’ once to adjust the timer 1 second up or down.
2 Press and hold ‘+’ or ‘-’ to adjust the timer in 10 second intervals.
3 After you have reached 120 seconds, press the ‘+’ once more to jump
to the ‘On’ state which will automatically activate the backlight whenever
the unit is used.
Note Battery life will be reduced when the settings for the LCD timer and the
backlight timer are high or when the backlight is activated automatically.
SETUP AND USE GUIDE
Change the Beep Volume
The beep volume setting adjusts or turns off the volume of all button and
system beeps on the Avidea Remote. The beep volume levels are mute, soft,
medium and loud.
Press ‘+’ to increase or ‘-’ to decrease the beep volume.
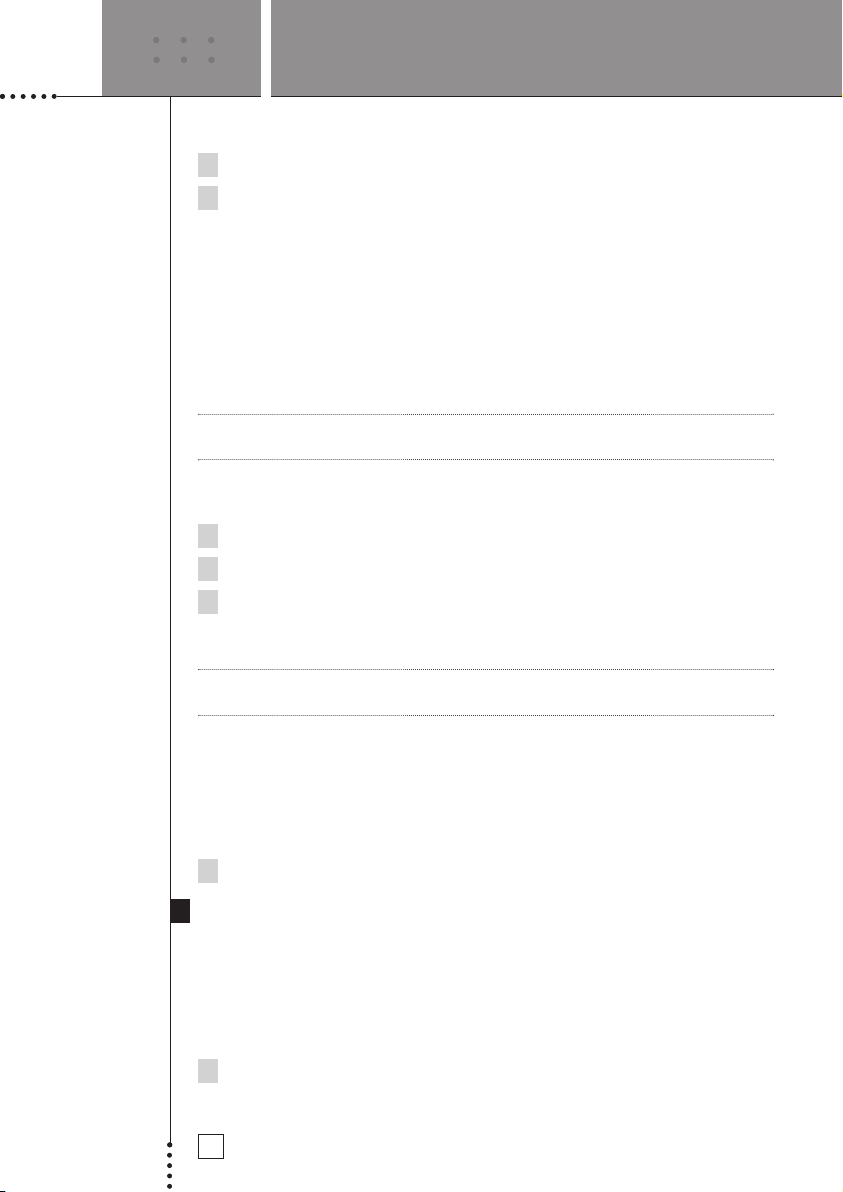
Second Setup Page
Use the Page Down button to get to page 2.
Adjust the Date
You can set the year, the month and the day.
ess ‘+’ to incr
Pr
ease or ‘-’ to decr
ease the value for the year
1 Tap ‘+’ or ‘-’ once to adjust the year, month and day one value up
or down.
15
, month, and day.
Page 18
USING THE AVIDEA REMOTE
2 Press and hold ‘+’ or ‘-’ to adjust the values for
the year and the month more rapidly. The value
for the day settings will change per 5 days.
The Avidea Remote will immediately reflect the date
change at the top of the screen.
Adjust the Time
1 Tap ‘+’ or ‘-’ once to adjust the time 1 minute
up or down.
2 Press and hold ‘+’ or ‘-’ to adjust the time more
rapidly. The time will increase or decrease per
30 minutes.
The Avidea Remote will immediately reflect the time
change at the top of the screen.
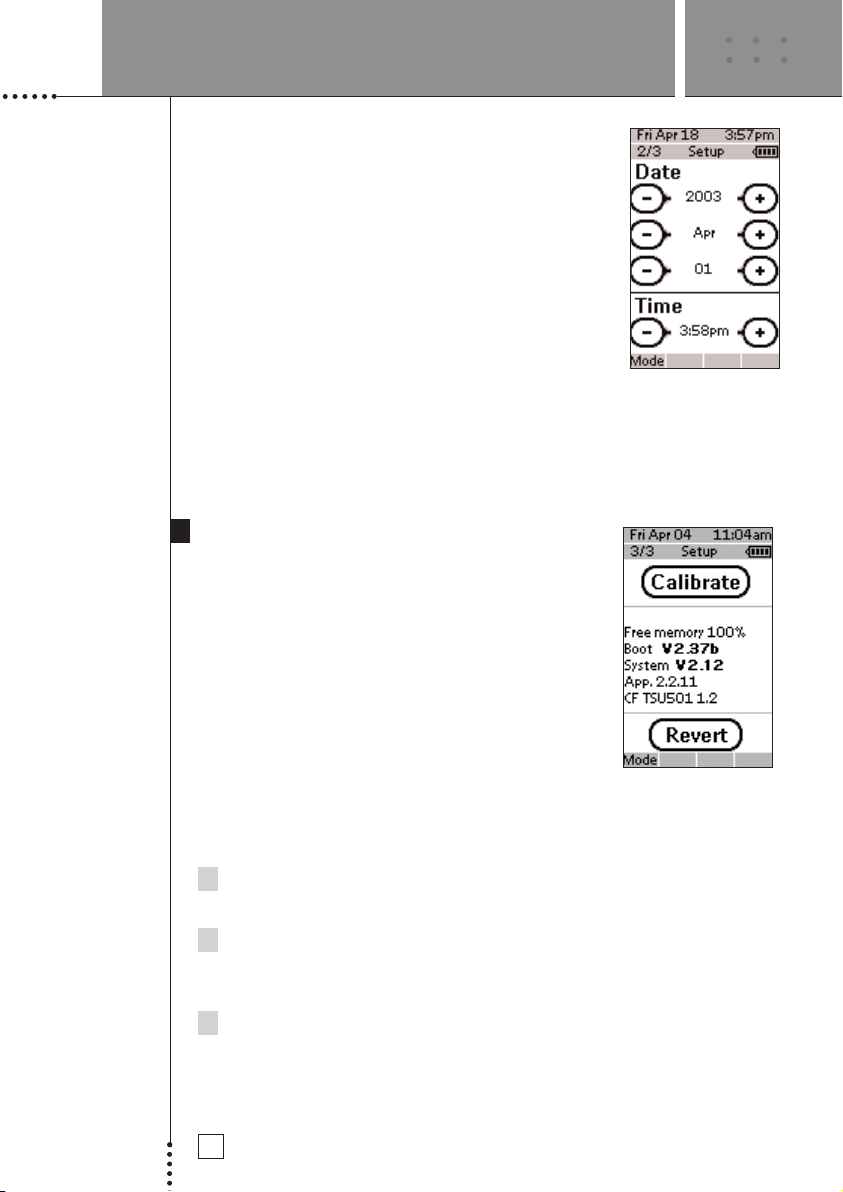
Third Setup Page
Use the Page Down button to get to page 3.
On the third setup page you can:
• Calibrate the touch screen
• Read information about your Device
• Revert the Avidea Remote
SETUP AND USE GUIDE
Calibrate the touch screen
1 Tap the Calibrate button.
The first instruction “Touch the top left corner” appears.
ap as accurately as possible in the center of the image in the upper left
2 T
corner using a small blunt object such as a pen cap or PDA stylus.
The second instr
3 Tap as accurately as possible in the center of the image in the lower right
corner using a small blunt object such as a pen cap or PDA stylus.
A message scr
panel appears again.
16
uction “T
een “Calibration successful” appears for 3 seconds. The setup
ouch the button right cor
ner” appears.
Page 19

USING THE AVIDEA REMOTE
Avidea Remote Information
This page contains information that may be important to the dealer in case of
a defect. The following information is displayed on this screen:
• Free memory (in percentage), which gives you an indication on how much
memory is left to (further) customize the Avidea Remote
• Boot version
• Application version
• Configuration file
Revert
Warning When you revert the Avidea Remote, all customization is lost. You loose all
the Avidea Remote settings, Device codes, learned codes, and custom macros.
You should save your configuration file to your PC before reverting. See the
Freedom Edit on p. 32 for more details.
By tapping the Revert button the Avidea Remote will be reverted to the
original configuration file. You might have to revert when you notice that
scrolling through pages is slowing down.
1 Tap the Revert button.
A message screen appears to confirm or cancel the revert process.
SETUP AND USE GUIDE
2 Press OK or Cancel.
To exit Setup Mode
1 Press the Mode button.
The Mode screen appears.
e Mode button you want to go to.
ap th
T
2
For normal operation, press Use.
17
Page 20

Changing the RF/IR Settings
Your Avidea Remote Control comes from the factory ready to control the
Avidea System using Radio Frequencies (RF). RF signals have an operating
range of 20 meters (66 feet) in a typical home and unlike traditional Infrared
(IR) signals used by most consumer electronics, RF signals can go through
SETUP AND USE GUIDE
18
Page 21

USING THE AVIDEA REMOTE
2 From the Mode page press the RF/IR button.
A message will ask you to select the Device you want to change. Press
Next.
3 On the next screen select the Device you wish to change.
The first RF/IR page appears.
SETUP AND USE GUIDE
4 Select the transmission mode. The preset mode for Devices you have
connected to your Avidea System is IR. If you want to change this to RF,
press the RF button. Tap the Done button to finish.
19
Page 22

USING THE AVIDEA REMOTE
Now when using the Remote, all commands will be transmitted in RF mode
and converted by the Avidea System to IR. The IR signal is then sent through
the IR Emitter and delivered to the selected Device.
Note Please do not change the RF settings to IR for Disc or Tuner unless you
cannot get your Avidea System to respond to RF commands.
Changing RF Settings- RF ID
If you have more than one Avidea System in your home or perhaps a neighbor
in close proximity also has a system, you may find that the RF signals from
one system’s Remote Control will interfere with the other. In this case you
will want to change your system’s ID code so that your system operates
independently.
1 Looking at the rear panel of your Avidea Control Center you will find
a dial labeled ID located near the main power line. By rotating the dial,
change the setting from the default ‘A’ setting to another. Note the
new setting.
2 From the Device Page, press and hold
the Mode button for 3 seconds.
The Mode screen appears.
3 From the Mode page press the RF/IR button.
A message will ask you to select the Device you
want to change. Press Next.
SETUP AND USE GUIDE
4 On the next screen select the Device you wish
to change.
The RF/IR page will appear.
5 Press the button labeled Change RF Settings.
The second RF/IR page will appear.
6 On this screen find the box labeled Change RF ID. Scroll to the ID
designation that matches the ID knob on the back of the Control Center.
Press Done.
Note All Devices must match the ID number selected on the Control Center. If
you change one Device you must change all others in the same manner for
proper operation.
20
Page 23

USING THE AVIDEA REMOTE
Changing RF Settings- RF Channel
In rare occasions, other RF controlled Devices (garage door openers, cordless
phones) may interfere with the operation of your Avidea Remote Control. If
you suspect interference, you can choose another channel to operate your
Avidea System.
1 Looking at the rear panel of your Avidea
Control Center you will find a dial labeled CH
located near the main power line. By rotating
the dial, change the setting from the default 0
setting to another. Note the new setting.
2 From the Device Page, press and
hold the Mode button for 3 seconds.
The Mode screen appears.
3 From the Mode page press the RF/IR button.
A message will ask you to select the Device you
want to change. Press Next.
4 On the next screen select the Device you wish to change.
The RF/IR page will appear.
5 Press the button labeled Change RF Settings.
The second RF/IR page will appear.
SETUP AND USE GUIDE
6 On the next screen find the box labeled Change RF Channel. Scroll to the
RF designation that matches the CH knob on the back of the Control
Center. Press Done.
Note All Devices must match the CH number selected on the Control Center. If
you change one Device you must change all others in the same manner for
proper operation.
Entering Codes for Other Devices
The Avidea Remote can operate other Devices (VCR, Satellite Receiver) that
are connected to your Avidea System. This eliminates the need to use
multiple remotes, as well as allowing a sequence of commands to be
ogrammed as "macros". See ‘Recording Macros’ on p. 28.
pr
To take advantage of the Avidea Remote’s ability to control other brands and
Devices, follow these steps.
21
Page 24

USING THE AVIDEA REMOTE
To enter codes:
1 Locate Code.
We recommend that you look up the codes for all other Devices that are
connected to your Avidea System (located in the back of this manual
starting at p. 40). Once the correct codes are located, record them in the
space provided below for future reference.
2 Select the Device, e.g. TV, for which you want to enter a code.
The first page for that Device appears.
3 Press and hold the Mode button for 3 seconds.
The Mode screen appears.
4 Select Brand.
The Brand screen appears.‘Brand’ and the label of the selected Device
appear at the top of the LCD touch screen.
Device Table Code
Cable Cable
Sat Sat/DBS
VCR VCR
PVR PVR
TV TV
Chngr CD(R)
Aux CD(R)
SETUP AND USE GUIDE
5 Tap Next to enter the code for your Device.
The code screen appears. When a code is already stored, as in the
illustration below, that code is displayed.
22
Page 25

USING THE AVIDEA REMOTE
6 Enter the code from the ‘Table of Brands’ from p. 40 onwards.
Note To delete a number, tap on the LCD touch screen.
In the Table of Brands the brands are ordered alphabetically per Device.
Some brands use several codes for the same Device. The codes in the table
of brands contain only the basic functions of the Devices. Enter the first
code and see how well it operates your Device. If your Device is not
responding properly, you should try out the second code for that brand.
Try out all codes for the brand until you can operate the Device to your
satisfaction.
Note The Brand Codes provided for your remote represent the most comprehensive
library currently available. You may discover that certain hard and/or soft
buttons do not perform exactly as you expect. If this happens, please use
Learning Mode to teach your Avidea Remote the exact desired functionality
using your original remote controls. See ‘Learning Commands’ on p. 24.
7 Press OK to enter the code for your Device.
When the code is correct, you will hear a confirmation beep. Press the
mode button for 3 seconds. The mode screen appears. For normal
operation, press Use.
SETUP AND USE GUIDE
If you enter an incorrect code, you will hear an error beep. A message screen
appears.
1 Press OK.
videa Remote returns to the Brand screen where the incorrect code
The A
is displayed.
2 Look up the correct code and repeat instructions 6 and 7.
23
Page 26

USING THE AVIDEA REMOTE
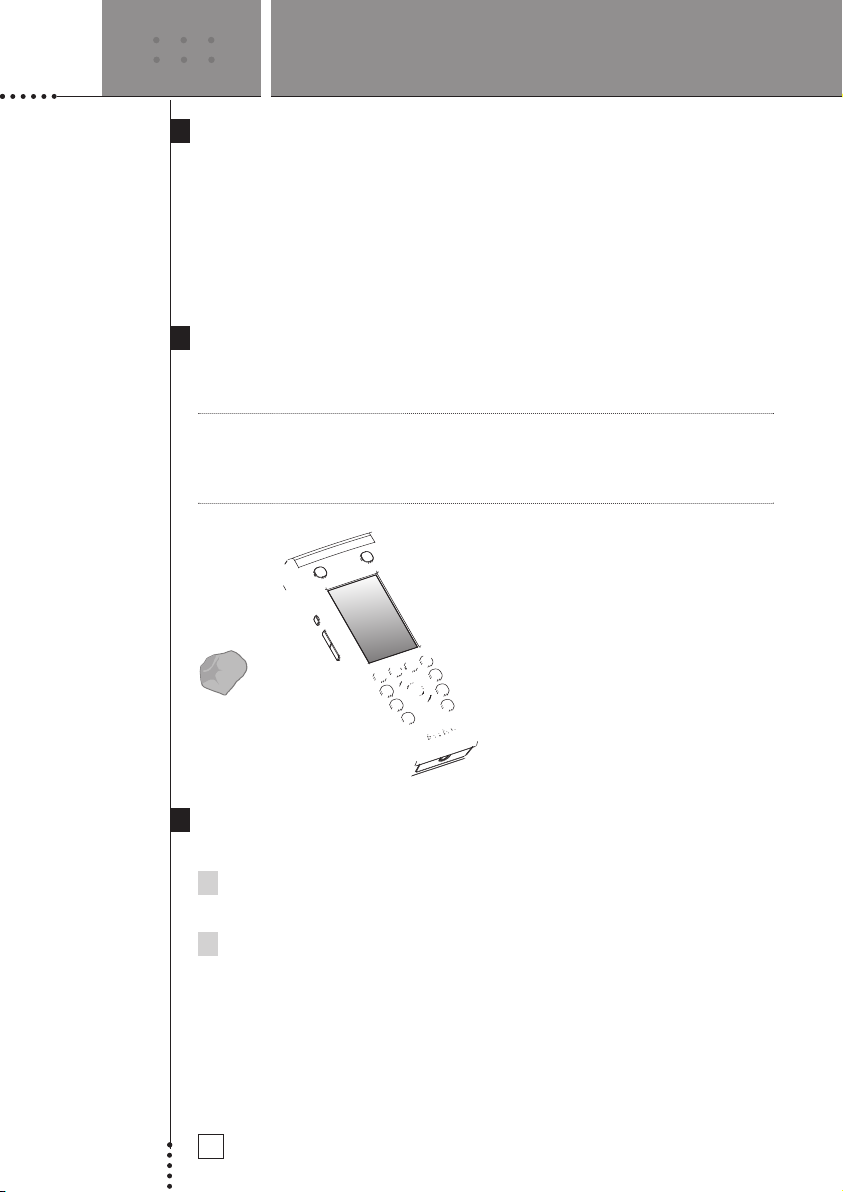
Learning Commands
If a Brand code in the library is not appropriate for your Device, or if buttons
on the Avidea Remote do not work as expected, you can program the Avidea
Remote by transmitting IR signals from your existing remote controls to the
Avidea Remote’s learning eye. To do this, place the Avidea Remote and the
Device’s remote control on a flat, opaque surface, 1 to 4 inches (2 to 10 cm)
apart.
1 to 4 inches (2 to 10 cm)
SETUP AND USE GUIDE
The Learn Sequence
1 Select the Device, e.g. TV, for which you want to learn a function.
The first page for that Device appears.
2 Press and hold the Mode button for 3 seconds.
The Mode screen appears.
3 Tap Learn on the Mode screen.
The Avidea Remote is now in Learn Mode.
‘Learn’ and the label of the selected Device
appear at the top of the touch screen.
24
Page 27

USING THE AVIDEA REMOTE
4 Use, if necessary, the Page Up or Page Down button to go to the next
button you want to ‘teach’.
5 Press the soft or hard button you want to ‘teach’ on the Avidea Remote.
The soft button will go from light to dark, and the Learn label changes to
Learning, which means the Avidea Remote is ready to receive commands
from an existing remote control. The Avidea Remote will wait for 5
seconds to receive an IR code from another remote control.
Note When a hard button is pressed to learn, there is no on-screen feedback to
indicate which button is pressed.
6 Press and hold the button on the existing remote control you want to
‘teach’ to the Avidea Remote.
When the Avidea Remote receives an IR code:
• You hear a confirmation beep.
• The label changes from Learning to OK. The Learn sequence has
been completed successfully.
SETUP AND USE GUIDE
For each Device you can ‘teach’ all soft and hard buttons on the Avidea
Remote, except for:
• the Backlight button
• the Page Up and Page Down buttons
• the Mode button
• the Device button
25
Page 28

USING THE AVIDEA REMOTE
When the Avidea Remote does not receive an IR code in 5 seconds:
• You will hear an error beep.
• The label changes from Learning to Failed. The Learn sequence has failed.
• The Avidea Remote will return to Learn mode. Return to step 5 of the
Learn sequence to relearn the button.
7 Go to other pages of the selected Device with the Page Up and Page
Down buttons. Repeat steps 5 and 6 until you have copied all the
commands of the existing remote control.
8 Press Done when you have finished learning commands to the buttons of
your choice.
The Avidea Remote returns to Use Mode. You can try out the new IR
codes or select another Device to learn.
Labeling Buttons and Devices
SETUP AND USE GUIDE
You can label or relabel buttons and Devices with:
• Characters in lower case and upper case
• Numbers
• Symbols
To label a Device:
1 Go the Device Page.
2 Press and hold the Mode button for 3 seconds.
The Mode screen appears.
26
Page 29

USING THE AVIDEA REMOTE
3 Tap Label on the Mode screen.
The Avidea Remote is now in Label Mode. ‘Label’
and the ‘Device’ appear at the top of the touch
screen with the following message on screen.
4 Tap Next
5 Tap the Device that you want to re-label. The Avidea
Remote shows a mini-keyboard. The text you
want to re-label is displayed above the keyboard.
6 Edit the label.
Press Del to delete the current text.
Tap the characters, numbers, and/or symbols you
want to use.
To enter a space, press Space.
To display other keyboards with capital letters
and symbols, press the Page Up or Page
Down button repeatedly.
Note You will hear an error beep, when you selected
more characters than can be displayed on the
selected button.
SETUP AND USE GUIDE
6 Tap OK to save the changes and return to the
Device Page.
-or-
Tap Cancel to Return to the Device Page without
saving changes.
7 Label all other elements you want. You can navigate
to the different pages of the selected Device screens
or the Device Overview, using the Page Up and the
Page Down button.
8 Press Done when you have finished labeling the
buttons of your choice. The Avidea Remote returns
to Use Mode. You can see the label or select
another Device to label.
o label a button within a Device:
T
Go the Device Page.
1
2 Select the Device that contains the button you wish
27
Page 30

USING THE AVIDEA REMOTE
to relabel.
3 Press and hold the Mode button for 3 seconds.
The Mode screen appears.
4 Tap Label, Tap Next, select the button you wish to label, and continue
with step number 3 above (p. 27). Use the Page Up/Down keys to access
other buttons within the Device.
Recording Macros
A macro allows you to send a sequence of commands using one single button.
You can for instance, switch on your TV, turn to a movie channel and prepare
your VCR for recording by rewinding the videotape.
To record macros, the Avidea Remote has to be in Macro mode.
1 Go the Device Page.
2 Select the Device, e.g. TV, with the buttons you want to program
as a macro.
Note Basically, you can assign any button as a macro button. However, it is
recommended to assign only the reserved macro buttons on the last page of
every Device. Use the Page Up and Page Down buttons to go to the last page
of the Device.
SETUP AND USE GUIDE
3 Press and hold the Mode button for 3 seconds.
The Mode screen appears.
4 Tap Macro on the Mode screen.
A message screen appears. The Avidea Remote
is now in Macro Mode.
28
Page 31

USING THE AVIDEA REMOTE
5 Tap Next.
The Device screen with the Macro label appears. With the Page Up and
Page Down buttons you can go to other screens of the selected Device
6 Tap the soft or hard button you want to select as a macro.
A message screen appears
SETUP AND USE GUIDE
7 Tap Start.
The Device Overview appears with the ‘Recording’ label at the top of the
screen. From the Device Overview you can go to the different Devices or
you can press the Extra hard button to go to the Extra screen with delays
and beeps.
29
Page 32

USING THE AVIDEA REMOTE
8 Tap the button of the Device you want to go to.
The Device screen appears.
9 Tap the soft or hard buttons with the commands you want to record.
10 Press the Page Up and Page Down buttons to go to different screens of
the same Device.
–or–
Press the
11 To add delays and beeps to the macro, press the Extra hard button on the
Device Page.
The Extra screen appears.
Device button to go to the Device Page again.
SETUP AND USE GUIDE
Note Delays may be required between commands. Some Devices will not respond
to another remote command immediately after turning on.
o add a delay
T
1
, tap one of the Delay buttons.
By tapping several Delay buttons, the duration of the delay will
eased.
be incr
o add a beep, tap the
T
2
Beep button.
3 Press the Device button to go to the Device Page again.
30
Page 33

USING THE AVIDEA REMOTE
12 Press Stop to stop recording.
A message screen appears.
13 Press OK to save the macro and return to the Mode screen.
The existing command of the selected button is replaced by the macro.
–or–
Press
Cancel to return to the Mode screen without saving the macro.
The button retains its previous command.
14 Set the Avidea Remote in Use mode to test the recorded macro.
SETUP AND USE GUIDE
N
31
Page 34

FREEDOM EDIT
If you want to personalize your Avidea Remote even more beyond its standard
programming features, Freedom Edit is the tool for you to use. Freedom Edit
is the Avidea Remote’s companion software that you find on the included
CD-ROM.
You can find more information and updates of the software on
http://www.bostonacoustics.com/avidea.
Freedom Edit is the visual editor for creating and configuring the Avidea
Remote Configuration Files (NCF) on your computer. An NCF is a file that is
used to define the Avidea Remote behavior and look for the LCD touch
screen.
Note It is a good idea to make back-up copies of your own configurations. This can
be done with Freedom Edit.
With Freedom Edit you can:
• Define the types and brands of your Devices.
• Generate a new Device Page.
• Design the page layout and the appearance of buttons.
• Configure the behavior of the hard buttons and soft buttons.
• Access Freedom Edit’s extended help system by pressing F1.
• Save, duplicate and share NCFs, Devices, buttons, bitmaps or codes with
another Avidea Remote.
• Preview the NCF on the Freedom Emulator.
• Download the new configurations to your Avidea Remote and upload the
configuration file on your Avidea Remote to Freedom Edit by means of
the included serial cable.
1 Plug one end of the serial cable in the serial port on your computer.
2 Plug the other end of the serial cable in the serial port on the Avidea
Remote.
SETUP AND USE GUIDE
Note When the Avidea Remote is connected to the PC, the battery life will be
reduced.
32
Page 35

FREEDOM EDIT
Minimum System Requirements
• PC with a Pentium 166 MHz or higher
• Windows 98/ME/XP
• 32 MB of RAM
• 16 MB of free hard disk space
• Free serial port
• CD-ROM player
Installing Freedom Edit from the CD-ROM
1 Place the Freedom Edit CD-ROM in your computer.
Freedom Edit setup will start up automatically. If not, you can install
Freedom Edit by double-clicking the FreedomEditSetup.exe file on the
CD-ROM.
2 Follow the instructions on screen that will guide you through the
installation procedure.
The first time you run Freedom Edit, you have to accept the license
agreement. Otherwise Freedom Edit will not run.
SETUP AND USE GUIDE
33
Page 36

MAINTAINING THE AVIDEA REMOTE
Important Notices
Take care not to scratch the touch screen
Use your finger to tap the LCD touch screen or use plastic-tipped pens
intended for use with touch screens, such as a PDA stylus.
Never use an actual pen, pencil or other sharp object on the LCD touch
screen.
Protect the Avidea Remote from extreme temperatures
Keep the Avidea Remote away from heaters and other heat sources.
The Avidea Remote is not waterproof
The Avidea Remote should not be exposed to rain or moisture.
Do not store or use the Avidea Remote in any location that is extremely damp
or wet.
When you have spilled water on the Avidea Remote, you have to take out the
batteries and let the Avidea Remote dry for 48 hours before returning the
batteries to the Remote.
When you have spilled other liquids like coffee on the Avidea Remote, you
can clean it with distilled water. Make sure no water gets into the housing.
The touch screen of the Avidea Remote contains a glass element
Do not drop the Avidea Remote or subject it to any strong impact.
SETUP AND USE GUIDE
Cleaning the Avidea Remote
Use a soft, damp cloth to clean the Avidea Remote.
If the LCD touch screen of the Avidea Remote is soiled, clean it with a soft
cloth moistened with a diluted window-cleaning solution.
Do not use a corrosive detergent or an abrasive sponge.
Avoid the use of abundant water.
Tip You may want to switch your Avidea Remote to Front input to avoid system
operation while cleaning. Using the front input eliminates any soft buttons
that can be activated during cleaning.
34
Page 37

MAINTAINING THE AVIDEA REMOTE
How do I reset the Avidea Remote?
Under normal circumstances, you will never have to reset the Avidea Remote.
However, on rare occasions, if the Avidea Remote’s touch screen freezes or if
you notice unusual behavior, you need to perform a reset to get the Avidea
Remote running again. All customized commands and Devices are retained,
however you will need to reset the time and date.
1 Remove the battery cover from the back of the Avidea Remote.
You will see the Reset button in the battery compartment.
2 Use an unfolded paperclip or
a sharp pencil to carefully
press the Reset button.
The Avidea Remote restarts and
beeps twice to indicate it is
ready for use.
How do I revert to the last downloaded configuration?
Reset button
Reverting to the last downloaded configuration restores the Avidea Remote’s
Devices and commands to the state last downloaded from your PC. This
means that any changes made in the remote are lost permanently. Normally,
you never have to revert the Avidea Remote.
1 Press and hold the Mode button for 3 seconds.
The mode screen appears.
2 Tap the Setup button.
3 Press the Page Down button to access setup page 3.
4 Tap the Revert button.
A message screen appears to confirm or cancel the revert process.
5 Press OK or Cancel.
Do I have to calibrate the touch screen?
The Avidea Remote’s touch screen is calibrated when it leaves the factory.
You only have to calibrate the LCD touch screen:
• When you upgrade the Avidea Remote’s software in the future. The
Avidea Remote displays a message to calibrate the touch screen. Complete
the instr
When the touch scr
•
uctions in ‘Calibrate the touch scr
een buttons do not respond properly. Navigate to
een’ on p. 16.
Setup Mode first as described in ‘Adjusting the Settings’ on p. 14 and
continue with the instr
uctions in ‘Calibrate the touch scr
een’ also on p.
16.
SETUP AND USE GUIDE
35
Page 38

TROUBLESHOOTING
General Problems
The display stays blank or becomes black
• Make sure the batteries are properly installed. See ‘The Batteries’ on p. 3.
• Press the Backlight button to make sure the Avidea Remote and the
backlight are turned on. See ‘Turning on the Display and the Backlight’
on p. 5.
• Adjust the contrast using the Backlight button and the Page Up or Page
Down buttons on the left side of the Avidea Remote. See ‘Changing the
LCD Contrast’ on p. 7.
The display is too light or too dark
• Adjust the contrast using the Backlight button and the Page Up or Page
Down buttons on the left side of the Avidea Remote. See ‘Changing the
LCD Contrast’ on p. 7.
The Avidea Remote shuts off automatically
• This is a timeout feature of the Avidea Remote to save power. You can
change the time Avidea Remote stays on in the Settings. See ‘Adjust the
LCD Timer’ on p. 14.
IR Devices that have been configured 90006w do not respond to commands
from the remote control.
• Check in the IR/6w mode if the Devices you want to operate are set up
properly. See ‘Changing IR Devices to06w Control’ on p. 18.
• Make sure the IR emitter is placed near the Devices you want to use with
6w signals. See ‘Changing IR Devices to06w Control’ on p. 18.
• Be aware that more than one IR emitter may be needed if many IR
Devices are stacked or located on different shelves. See ‘Changing IR
Devices to06w Control’ on p. 18.
SETUP AND USE GUIDE
A Device responds to0some06w signals and not to others.
It is possible that a Device does not respond properly when operated with RF
signals. This is mostly due to IR signals that cannot be properly transmitted
as06w signals. In that case, you have to reconfigure the remote control to
operate the Device with IR signals again. See ‘Changing IR Devices to06w
Control’ on p. 18.You also may be receiving interference from another RF
Device. See ‘Changing 6w Settings’ on p. 20 and p. 21.
Note The brand codes provided with your remote represent the most
comprehensive library currently available. You may discover that certain hard
and/or soft buttons do not per900m exactly as you expect. If this happens,
please use Learning Mode to ‘teach’ your Avidea Remote the exact desired
functionality using your original remote controls. See ‘Learning Commands’
on p. 24.
36
Page 39

TROUBLESHOOTING
My Avidea System operates without me controlling it.
You may be receiving interference from another Avidea System. See ‘Changing
RF Settings’ on p. 20 and p. 21.
External Devices do not respond to commands from the Avidea Remote
• Make sure the Avidea Remote is in Use mode. See ‘Working with Modes’
on p. 13.
• If in IR mode, make sure the Avidea Remote’s sending LED is pointed
towards the Device you’re operating.
• Check if the battery level is low. If so, replace the batteries. See ‘The
Batteries’ on p. 3.
• Check if you have entered the correct codes for your Devices. See ‘Entering
Codes for Other Devices’ on p.21.
• Check if the button you are trying to use is assigned properly via Brand
mode, Learn mode or Macro mode. See ‘Entering Codes for Other Devices’ on
p. 21, ‘Learning Commands’ on p. 24 and ‘Recording Macros’ on p. 28.
• Calibrate the touch screen. See ‘Calibrating the touch screen’ on p. 16.
The TV Power button turns my TV On but not Off.
If the code library for your TV includes discrete On/Off commands they will be
stored on TV p. 2 as soft buttons. It is possible that only your TV's On command
will be stored to the TV Power hard button. To fix this problem simply use
Learning Mode and your original TV remote to properly configure your TV
Power button. See ‘Learning Commands’ on p. 24.
SETUP AND USE GUIDE
The Avidea Remote does not learn commands from an existing remote control
• Press and hold the buttons on the existing remote control for a longer or
shorter period of time.
• Make sure the distance between the Avidea Remote and the existing remote
control is between 1 and 4 inches (2 to 10 cm). See ‘Learning Commands’
on p. 24.
• Do not ‘teach’ commands directly under fluorescent lights.
• Do not ‘teach’ commands on a reflecting table surface.
• Check if the battery level is low. If so, replace the batteries. See ‘The
Batteries’ on p. 3.
• Check if there is sufficient memory to learn commands. If not, revert the
Avidea Remote. See ‘Avidea Remote Information’ and ‘Revert’ on p. 17.
• Make sure that the Avidea Remote page label changes from Learn to Learning
before pressing the button you are trying to learn on the existing remote.
The Avidea Remote is not recognized by the Freedom Edit software
• Make sure the serial cable is properly connected. See ‘Freedom Edit’ on p. 32
• Disconnect other equipment connected to the serial ports, e.g. PDA’s.
• Plug the serial cable in another serial port.
• Try to connect multiple times.
37
Page 40

TROUBLESHOOTING
Programming Problems
Buttons are not sending the correct commands
• Check if you have defined the correct brands for your Devices. See
‘Entering Codes for Other Devices’ on p. 21.
• Check whether the button of the Device is learned properly. See ‘Learning
Commands’ on p. 24.
• Check whether the macro is recorded properly. See ‘Recording Macros’
on p. 28.
The Avidea Remote will not switch modes
• Replace the batteries. When the batteries are low the Avidea Remote
prevents you from switching modes so that no customization can get lost.
The Avidea Remote is low on memory
• Revert the Avidea Remote. See ‘Revert’ on p. 17.
The configuration file is corrupted
• When this unlikely event occurs, you have to revert to the original
configuration or use Freedom Edit to download a new configuration file.
All your customized commands and Devices will be lost and you will have
to reprogram your Avidea Remote. If you use Freedom Edit, please make
backup copies of your customized configurations. See ‘Revert’ on p. 17
and ‘Freedom Edit’ on p. 32.
SETUP AND USE GUIDE
The Avidea Remote error message
If the error message ‘Invalid CF version or corrupt Flash!’ occurs:
• Use the Reset button on the back of the Avidea Remote. See ‘How do I
reset the Avidea Remote?’ on p. 35.
• Try to recover the Avidea Remote Configuration File (NCF) by
downloading a backup copy or the default file from Freedom Edit. See
‘Freedom Edit’ on p. 32.
• Go to the Boston Acoustics website
http://www.bostonacoustics.com/avidea for more information.
38
Page 41

SPECIFICATIONS
The specifications and design of this product are subject to change without
notice.
SETUP AND USE GUIDE
Display Monochrome touch screen LCD with 4 gray levels and
digital contrast control.
Resolution: 160 x 100 pixels
Blue EL backlighting for LCD and hard buttons
Interface 3-wire (RS232) serial port connector
Software Built-in Boston Acoustics Radio Frequency codes
Library with IR codes to operate different brands
Total number of Devices limited only by memory
Infrared (IR) Infrared sending LED and learning eye
Operating distance of 33 feet (10 meters)
Learning frequency up to 56 kHz and 455 kHz
Learning distance 1 inch (2 cm) up to 4 inch (10 cm)
Radio Frequency Band: 418 MHz
16 Extender ID’s and 4 Channels
Minimum System PC with a Pentium 166 MHz or higher
Requirements Windows 98/ME/XP
32 MB of RAM
16 MB of free hard disk space
Free serial port
CD-ROM player
Memory 2 MB non-volatile flash memory
Batteries 3 AA-batteries (3 x 1,5V): primary or rechargeable
Power Management Tilting the unit more than 50 degrees. The display will
be activated, but not the backlight.
Pressing the backlight button on the left side. The
display as well as the backlight will be activated.
Tapping the screen gently with your finger or a blunt,
soft object like a pencil eraser. The display will be
activated, but not the backlight.
Pressing any button will activate the display, but not the
backlight.
Power off automatically
Dimensions 7.2 inch x 2.8 inch x 1.3 inch (183mm x 72mm x
33mm)
Operating Temperature 41°F to 113°F (5°C to 45°C)
Accessories RS232 cable for PC connection
CD-ROM with Freedom Edit software
3 AA-batteries
mation: Designed by UEI Technology Licensed under
y infor
39
Librar
U.S. Patent 5,689,353 Portions © UEI 2003
Page 42

TABLE OF BRANDS
SETUP AND USE GUIDE
SETUP CODES FOR CABLE
ABC 0003, 0008, 0014, 0017
Allegro 0153
Americast 0899
Archer 0153
Bell & Howell 0014
Bell South 0899
Century 0153
Citizen 0153
Colour Voice 0025, 0031
Comtronics 0060
Director 0476
FutureVision 0649
Garrard 0153
Gemini 0242
General Instrument 0003, 0276, 0476, 0810
GoldStar 0144
Hamlin 0009, 0273
Jasco 0153
Jerrold 0003, 0012, 0014, 0276, 0476, 0810
Magnavox 0027, 0334
Memorex 0000
Motorola 0276, 0476, 0810, 1106
Pace 0237
Panasonic 0000, 0107
Paragon 0000
Philips 0025, 0027, 0028, 0029, 0030, 0031,
0153, 0242, 0290, 0305, 0317, 0334, 0649,
0652
Pioneer 0144, 0533, 0877, 1877
Pulsar 0000
Quasar 0000
Regal 0273, 0279
Runco 0000
Samsung 0144
Scientific Atlanta 0008, 0017, 0477, 0877,
1877
Sony 1006
Starcom 0003
Supercable 0276
Tocom 0012
Torx 0003
Toshiba 0000
Unika
Universal 0153
Viewstar 0027, 0060
Zenith
40
0000, 0525, 0899
0153
SETUP CODES FOR SAT/DBS
AlphaStar 0772
Astro Industries 0095
Bell ExpressVu 1167
BSR 0095
Capetronic 0095
Channel Master 0018, 0212
Chaparral 0053, 0209
Crossdigital 1109
Drake 0018, 0064, 0245
DX Antenna 0041
Echostar 0148, 0159, 0269, 0280, 0775, 1005,
1170, 1171
Expressvu 0775
GE 0566
General Instrument 0627, 0823, 0869, 0891,
0892
GOI 0775
Hitachi 0819
Homecable 0238
HTS 0775
Hughes Network Systems 0749, 1142, 1749
Hytek 0095
Innova 0099
IQ 0210
IQ Prism 0210
Janeil 0152
Jerrold 0627
JVC 0775
Legend 0269
Macom 0018
Magnavox 0722, 0724, 0725, 0726, 0727,
0728, 0729, 0730
Memorex 0269, 0724
Mitsubishi 0749
Motorola 0869
Netsat 0099
Next Level 0869, 0891, 0892
Panasonic 0152, 0247, 0701, 1189
Paysat 0724
Philips 9100, 0099, 0200, 0516, 0722, 0724,
0725, 0726, 0727, 0728, 0729, 0730, 0749,
1076, 1142
Primestar
Proscan 0392
RCA 0143, 0392, 0566, 0855, 1107
Realistic
Samsung 1108, 1109
Shack 0869
0627, 0823, 0824, 0825
0052
Page 43

TABLE OF BRANDS
SETUP AND USE GUIDE
SKY 0099
Sony 0639
Star Choice 0869
Star Trak 0180
STS 0041, 0210
Toshiba 0082, 0749, 0790, 1749
Uniden 0052, 0074, 0076, 0238, 0370, 0722,
0724
Zenith 0064, 0856, 1856
SETUP CODES FOR
HOME AUTOMATION
Audio Access 0154
Auto-Tilt 0849
Cableshare 0537
Carlon 0451
Comfortex 0400
Command Center 0252
Cool Breeze 0509
Da-Lite 0780
Draper 0416
Elero 0434
Evergo 0059
GE 0240
Gewa 0095
Lightolier 0184, 1204, 1205, 1206
LiteTouch 0084
Louver Magic 0401
Lutron 0318, 0597, 1239, 1597
Luxaflex 0580
Makita 0409
Nichibei 0416
One For All 0167, 0252
Panja 1168, 1169, 1170, 1171
Phast 1164, 1165, 1166, 1167
RadioShack 0240
Rainban 0416
Sanyo 0336
Security System 0167
Sharper Image 0846
Silent Gliss 0442
SMC 0458
Solar Drape 0402
Somfy
Staron 0399
Tash 0613
ronics
ouchT
T
UIC 0574
Universal 0252
41
0438, 0780
0104
Universal X10 0167
X10 0167, 0252
Xantech 0573, 0781, 0782, 0783, 0784, 0785,
0786, 0787, 0883, 0884, 0885, 0886
Yokota 0408
SETUP CODES FOR LD
ADS 0305
Aiwa 0203
Carver 0064, 0194, 0323
Denon 0059, 0172, 0241
Disco Vision 0023, 0276
Funai 0203
Harman/Kardon 0194
Hitachi 0023, 0395
Kenwood 0258
Magnavox 0194, 0217, 0241
Marantz 0064, 0194
Mitsubishi 0059
NAD 0059
NEC 0286
Nikkodo 0411
Onkyo 9300
Optimus 0059
Panasonic 0204
Philips 9000, 0064, 0194
Pioneer 0023, 0059
Polk Audio 0194
Quasar 0204
RCA 0073, 0128, 0351
Realistic 0203
Samsung 0323
Sega 0023
Sharp 0001
Sony 0193, 0201, 0270
Technics 0204
Theta Digital 0194
Victor 0245
Yamaha 9200, 9201, 9202, 9203, 0217, 0451
SETUP CODES FOR TAPE
ADC 0171
0015, 0029, 0078, 0079, 0111, 0148,
Aiwa
0197, 0200, 0223, 0263, 0264, 0376, 0435,
0437, 0438
Akai
B & K 0656, 0657, 0658, 0659, 0660, 0661
Bang & Olufsen 0219
0188, 0189, 0283, 0306
Page 44

TABLE OF BRANDS
SETUP AND USE GUIDE
BSR 0224
Carver 0029, 0261, 0402
Denon 0076, 0259, 0260, 0371, 0421
Fisher 0074, 0261
Garrard 0300, 0308, 0309, 0375, 0439, 0448
Gradiente 0407
Harman/Kardon 0029, 0182
Hitachi 0163, 0164, 0393, 0394, 0450
Inkel 0085, 0086
JVC 0244, 0273, 0274, 0303, 0304, 0310
Kenwood 0070, 0071, 0092, 0183, 0205, 0233,
0234, 0251, 0386
Koss 0472
Kyocera 0171
Luxman 0012, 0091, 0095, 0266, 0328, 0329
Magnavox 0029, 0083
Marantz 0009, 0029
MGA 0313
Mitsubishi 0283, 0306, 0313, 0314
NAD 0144
Nakamichi 0147, 0151, 0218, 0247, 0248, 0301,
0302
NEC 0165
Nikko 0311, 0312, 0364, 0365
Olympus 0266
Onkyo 9300, 9301, 9302, 9303, 0100, 0135,
0136, 0150, 0282, 0362, 0520
Optimus 0027, 0220, 0300, 0318, 0337, 0338,
0439
Panasonic 0229, 0250, 0272
Philips 9000, 9001, 0029
Pioneer 0027, 0099, 0220
Polk Audio 0029
Proton 0028, 0198
RCA 0026, 0027, 0220, 0261, 0398, 0399
Revox 0190
Samsung 0391, 0392
Sansui 0009, 0029, 0152, 0153, 0257, 0265,
0444, 0445
Sanyo 0261
Scott 0267
Sharp 0205, 0231
Sherwood 0337, 0338, 0409, 0424
Sonic 0375
Sony
STS 0287
Sylvania 0083
andberg
T
Teac 0280, 0289, 0308, 0309, 0391, 0392
Technics 0229, 0353
42
0170, 0243, 0291, 0523, 0559
0108, 0109
Techwood 0364, 0365
Toshiba 0341, 0342
Victor 0273, 0274
Wards 0027
Yamaha 9200, 9201, 9202, 9203, 9204, 0094,
0097, 0205, 0460, 0478, 0524
SETUP CODES FOR TV
3M 0737
A-Mark 0003
Abex 0032
Admiral 0093, 0463
Advent 0761
Adventura 0046
Aiko 0092
Aiwa 0701
Akai 0030, 0098, 0591
Alaron 0179, 0183, 0216
Ambassador 0177
America Action 0180
Ampro 0751
Anam 0004, 0009, 0068, 0180
Anam National 0055, 0161
AOC 0003, 0019, 0030, 0052, 0137, 0185
Apex Digital 0748, 0767
Archer 0003
Audinac 0391
Audiovox 0003, 0092, 0180, 0451, 0623
Barco 0410, 0479
Baysonic 0180
Belcor 0019
Bell & Howell 0016, 0154
Bradford 0180
Brockwood 0019
Broksonic 0003, 0236, 0426, 0463, 0642
Bush 0355
Candle 0030, 0046, 0056, 0186
Carnivale 0030
Carver 0054, 0170
Casio 0611
CCE 0037, 0217, 0329
Celebrity 0000
Cineral 0092, 0451
0030, 0039, 0046, 0056, 0060, 0092,
Citizen
0186, 0280, 0561
Clairtone 0185
Compaq
Concerto 0056
Contec 0157, 0158, 0180, 0185
0749, 0750
Page 45

TABLE OF BRANDS
SETUP AND USE GUIDE
Craig 0161, 0180
Crosley 0054
Crown 0039, 0180, 0672
Curtis Mathes 0016, 0030, 0039, 0047, 0051,
0054, 0056, 0060, 0093, 0145, 0154, 0166,
0415, 0451, 0466, 0702, 0747, 1147, 1347
CXC 0180
Daewoo 0019, 0039, 0066, 0067, 0091, 0092,
0451, 0623, 0624
Daytron 0019
Denon 0145, 0511
Dumont 0017, 0019
Dwin 0720, 0774
Dynatech 0049
Ectec 0391
Eiki 0735
Electroband 0000, 0185
Electrohome 0381, 0389, 0409, 0446
Emerson 0019, 0038, 0039, 0154, 0158, 0177,
0178, 0179, 0180, 0181, 0182, 0183, 0185, 0236,
0270, 0280, 0282, 0463, 0623, 0624
Envision 0030
Fisher 0154, 0159
Focus 0711
Fujitsu 0179, 0683
Funai 0171, 0179, 0180
Futuretech 0180
GE 0021, 0027, 0029, 0047, 0051, 0055, 0093,
0135, 0138, 0174, 0178, 0251, 0279, 0282,
0451, 0747, 1147, 1347
Gibralter 0017, 0019, 0030
GoldStar 0001, 0002, 0019, 0030, 0032, 0056,
0178, 0409
Goodmans 0360
Gradiente 0053, 0056, 0170, 0392
Grundig 0037, 0195
Grunpy 0179, 0180
Haier 0768
Hallmark 0178
Harley Davidson 0043, 0179
Harman/Kardon 0054, 0078
Harvard 0068, 0180
Hauppauge 0693
Havermy 0093
0016, 0032, 0038, 0056, 0095, 0097,
Hitachi
0145, 0151, 0173, 0227, 0279, 0409, 0413,
0576, 0577, 0583, 0723, 0770
Infinity
InFocus 0736, 0738, 0739, 0741, 0752, 0759
Innova 0037
43
0054
Inteq 0017
Janeil 0046
JBL 0054
JCB 0000
Jensen 0050
JVC 0036, 0053, 0069, 0160, 0169, 0182
Kamp 0216
Kawasho 0158, 0216, 0308
Kaypani 0052
KEC 0180
Kenwood 0019, 0030
Kloss 0024, 0046, 0078
Konka 0628, 0632, 0638, 0703, 0707
KTV 0030, 0039, 0180, 0183, 0185, 0217, 0280
LG 0056, 0442
Loewe 0136, 0633, 0693, 0694
Logik 0016
Luxman 0056
LXI 0047, 0054, 0148, 0154, 0156, 0178, 0747
Magnavox 0020, 0024, 0028, 0030, 0036, 0054,
0096, 0179, 0186, 0187, 0230, 0386, 1254
Majestic 0015, 0016
Marantz 0030, 0037, 0054, 0444
Matsushita 0250, 0650
Megatron 0003, 0145, 0178
MEI 0185
Memorex 0016, 0056, 0150, 0154, 0178, 0179,
0250, 0463, 1037
Mercury 0001
MGA 0019, 0030, 0150, 0155, 0178
Midland 0017, 0032, 0039, 0047, 0051, 0135,
0747
Minutz 0021
Mitsubishi 0014, 0019, 0093, 0098, 0150, 0155,
0178, 0331, 0358, 0592
Motorola 0055, 0093
MTC 0019, 0030, 0049, 0056, 0060, 0091,
0185, 0216
Multitech 0049, 0180, 0217
NAD 0156, 0166, 0178
NEC 0019, 0030, 0036, 0056, 0170, 0434, 0455,
0497, 0704
Netsat 0037
Nikko 0030, 0092, 0178, 0317
Nisato
Noblex 0430
Noshi 0018
NTC
On Command 0531
Onkyo 9300
0391
0092
Page 46

TABLE OF BRANDS
SETUP AND USE GUIDE
Onwa 0180
Optimus 0154, 0166, 0250, 0650
Optiview 0756
Optonica 0093, 0165
Orion 0179, 0236, 0463
Ovation 0734
Panasonic 0051, 0055, 0162, 0226, 0250, 0338,
0375, 0650
Penney 0002, 0003, 0018, 0019, 0021, 0027,
0030, 0032, 0039, 0047, 0051, 0056, 0060,
0110, 0135, 0138, 0149, 0156, 0178, 0309,
0747, 1347
Philco 0019, 0020, 0028, 0030, 0054, 0096,
0145, 0302, 0463
Philips 9000, 9100, 0037, 0054, 1354, 1454
Pilot 0019, 0030, 0039
Pioneer 0038, 0166, 0172, 0679
Portland 0019, 0039, 0092
Princeton 0685, 0700, 0717
Prism 0051
ProPresenter 0728, 0733
Proscan 0047, 0747
Proton 0003, 0031, 0052, 0178, 0466
Proxima 0734, 0735, 0737, 0742
Pulsar 0017, 0019
Quasar 0051, 0055, 0165, 0219, 0250, 0650
Radio Shack 0180
RadioShack 0019, 0030, 0032, 0039, 0047,
0056, 0154, 0165, 0178, 0409, 0747
RCA 0018, 0019, 0029, 0038, 0047, 0051,
0090, 0093, 0135, 0174, 0254, 0278, 0679,
0747, 1047, 1147, 1247, 1347, 1447
Realistic 0019, 0030, 0032, 0039, 0056, 0154,
0165, 0178, 0180
Rhapsody 0183, 0185, 0216
Runco 0017, 0030, 0251, 0494, 0497, 0603,
0612
Sampo 0030, 0032, 0039, 0052, 0100, 0110
Samsung 0019, 0030, 0032, 0037, 0056, 0060,
0178, 0329, 0408, 0427, 0482, 0702
Samsux 0039
Sansei 0451
Sansui 0463
Sanyo 0088, 0107, 0146, 0154, 0159, 0232,
0484
Scimitsu 0019
Scotch 0178
Scott
Sears 0015, 0047, 0054, 0056, 0146, 0148,
0149, 0154, 0156, 0159, 0168, 0171, 0178,
0019, 0178, 0179, 0180, 0236, 0309
44
0179, 0281, 0747
Semivox 0180
Semp 0156
Sharp 0039, 0093, 0153, 0157, 0165, 0220,
0281, 0386, 0398, 0491, 0688, 0689
Shogun 0019
Signature 0016
Simpson 0186, 0187
Sinudyne 0347
SKY 0037
Sony 0000, 0011, 0080, 0111, 0273, 0353, 0699
Soundesign 0178, 0179, 0180, 0186
Spectricon 0003, 0137
Squareview 0171
SSS 0019, 0180
Starlite 0180
Supre-Macy 0046
Supreme 0000
Sylvania 0020, 0028, 0030, 0054, 0065, 0096,
0171, 0381
Symphonic 0171, 0180
Tandy 0093
Tashiko 0588
Tatung 0003, 0049, 0055, 0396
Technics 0051, 0250
Technol Ace 0179
Technovox 0007
Techwood 0003, 0051, 0056
Teknika 0016, 0019, 0039, 0054, 0056, 0060,
0092, 0150, 0175, 0179, 0180, 0186, 0312,
0322
Telefunken 0056, 0074, 0101, 0702
Telemagic 0735
Tera 0031
Thomson 0209, 0210
TMK 0056, 0177, 0178
TNCi 0017, 0709
Toshiba 0036, 0060, 0149, 0154, 0156, 1256
Tosonic 0185
Totevision j0039
Trical 0157
Ultra 0391
Universal 0027
Vector Research 0030
ictor
V
Video Concepts 0098
Vidikron 0054, 0242
idtech
V
Viking 0046, 0312
Wards 0016, 0019, 0020, 0021, 0027, 0028,
0019, 0036, 0178
0053
Page 47

TABLE OF BRANDS
SETUP AND USE GUIDE
0029, 0030, 0054, 0056, 0080, 0096, 0111,
0165, 0174, 0178, 0179, 0202
Waycon 0156
White Westinghouse 0463, 0623, 0624
Yamaha 0019, 0030
Zenith 0016, 0017, 0092, 0463, 0624
Zonda 0003
SETUP CODES FOR VCR
Action 0317
Admiral 0048, 0209
Advantz 0356
Adventura 0000
Aiko 0278
Aiwa 0000, 0037, 0124, 0307, 0406, 0436,
0468, 0557, 0680
Akai 0041, 0049, 0053, 0061, 0106, 0156,
0175, 0242, 0315
America Action 0278
American High 0035
Asha 0240
Audiovox 0037
Beaumark 0240
Bell & Howell 0104
Blaupunkt 0006
Broksonic 0002, 0121, 0184, 0209, 0211, 0295,
0348, 0361, 0479, 1479
Calix 0037
Canon 0035, 0102, 0167
Capehart 0020, 0554
Carver 0081, 0146
CCE 0072, 0278
Cineral 0278
Citizen 0037, 0278, 1278
Colt 0072
Craig 0037, 0047, 0072, 0240, 0271
Curtis Mathes 0035, 0041, 0060, 0162, 0760,
1035
Cybernex 0051, 0240
Daewoo 0017, 0020, 0045, 0087, 0278, 0554,
0561, 1278
Daytron 0020, 0554
Denon 0042
Dynatech
Electrohome 0037
Electrophonic 0037
Emerex
Emerson 0000, 0002, 0036, 0037, 0043, 0061,
0068, 0088, 0121, 0184, 0208, 0209, 0211,
45
0000
0032
0212, 0278, 0294, 0295, 0361, 0479, 0510,
0561, 1278, 1479
Fisher 0047, 0054, 0066, 0104
Fuji 0033, 0035
Funai 0000
Garrard 0000
GE 0035, 0048, 0060, 0065, 0202, 0240, 0760,
0761, 0807, 1035, 1060
Go Video 0232, 0279, 0350, 0432, 0526, 0620,
0643, 0663, 0669
GoldStar 0018, 0037, 0038, 0471, 0480, 1237
Gradiente 0000, 0008, 0408
Grundig 0195
Harley Davidson 0000
Harman/Kardon 0038, 0075, 0081, 0146, 0161
Harwood 0068, 0072
Headquarter 0046
HI-Q 0047
Hitachi 0000, 0041, 0042, 0065, 0082, 0089,
0105, 0166, 0235, 0292, 0543, 0544, 0566,
0688
Hughes Network Systems 0042
Jensen 0041
JVC 0008, 0041, 0067, 0206, 0207, 0384, 0486
KEC 0037, 0278
Keen 0693
Kenwood 0038, 0041, 0067, 0384
KLH 0072
Kodak 0035, 0037
Lloyd's 0000, 0208
Logik 0072
LXI 0037
Magnasonic 0278, 0593, 1278
Magnavox 0000, 0035, 0039, 0081, 0103,
0110, 0149, 0519, 0563, 1781
Magnin 0240
Marantz 0035, 0081, 0146, 0161
Marta 0037
Matsushita 0035, 0162, 0454
MEI 0035
Memorex 0000, 0035, 0037, 0039, 0046,
0047, 0048, 0104, 0162, 0209, 0240, 0268,
0299, 0307, 0348, 0454, 0479, 1037, 1162,
1237, 1262
MGA
MGN Technology 0240
Minolta 0042, 0105
Mitsubishi
0173, 0214, 0242, 0443, 0807
Motorola 0035, 0048
0043, 0048, 0061, 0067, 0075,
0043, 0061, 0240
Page 48

TABLE OF BRANDS
SETUP AND USE GUIDE
MTC 0000, 0240
Multitech 0000, 0072
NAD 0058
NEC 0038, 0040, 0041, 0050, 0067, 0082,
0104, 0457
Nikko 0037
Nikon 0034
Noblex 0240
Olympus 0035, 0226
Onkyo 0222
Optimus 0037, 0048, 0058, 0104, 0162, 0432,
0454, 0568, 0593, 0619, 1048, 1062, 1162,
1262
Optonica 0062
Orion 0002, 0184, 0209, 0295, 0479, 1479
Panasonic 0035, 0077, 0102, 0162, 0225,
0226, 0227, 0246, 0254, 0378, 0454, 0485,
0616, 1035, 1062, 1162, 1262, 1362
Penney 0035, 0037, 0038, 0040, 0042, 0054,
0240, 1035, 1237
Pentax 0042, 0065, 0105
Philco 0035, 0209, 0479
Philips 9000, 9001, 0035, 0062, 0081, 0110,
0146, 0403, 0618, 0749, 1081, 1181
Pilot 0037
Pioneer 0058, 0067, 0168
Polk Audio 0081, 0146
Portland 0020, 0554
Profitronic 0240
Proscan 0060, 0202, 0760, 0761, 1060
Protec 0072
Pulsar 0039, 0051
Quarter 0046
Quartz 0046, 0155
Quasar 0035, 0077, 0162, 0454, 1035, 1162
RadioShack 0000, 1037
Radix 0037
Randex 0037
RCA 0035, 0042, 0048, 0058, 0060, 0065,
0077, 0105, 0106, 0149, 0202, 0240, 0277,
0453, 0619, 0760, 0761, 0807, 1035, 1060
Realistic 0000, 0035, 0037, 0046, 0047, 0048,
0062, 0066, 0104
ReplayTV 0614, 0616
Ricoh
Runco 0039
Salora 0075
Samsung
Samtron 0643
Sanky 0039, 0048
46
0045, 0051, 0053, 0240, 0489
0034, 0565
Sansui 0000, 0041, 0067, 0082, 0209, 0271,
0479, 1479
Sanyo 0046, 0047, 0104, 0159, 0240, 0268,
0372
Scott 0043, 0045, 0121, 0184, 0210, 0211,
0212
Sears 0000, 0035, 0037, 0042, 0046, 0047,
0054, 0057, 0066, 0104, 0105, 1237
Semp 0045
Sharp 0048, 0062, 0738, 0807
Shintom 0072
Shogun 0051, 0240
Singer 0072
Sonic Blue 0614
Sony 0000, 0011, 0022, 0032, 0033, 0034,
0035, 0275, 0586, 0636, 0639, 0640, 1032,
1232
STS 0042
Sylvania 0000, 0035, 0043, 0081, 0103, 0110,
1781
Symphonic 0000, 0593
Tatung 0041
Teac 0000, 0041
Technics 0035, 0162, 0246
Teknika 0000, 0035, 0037, 0052
Thomas 0000
Tivo 0618, 0636
TMK 0036, 0208, 0240
Toshiba 0043, 0045, 0057, 0066, 0210, 0212,
0366, 0845
Totevision 0037, 0240
Unitech 0240
Vector 0045
Vector Research 0038, 0040
Video Concepts 0040, 0045, 0061, 0221
Videomagic 0037
Videosonic 0240
Villain 0000
Wards 0000, 0035, 0042, 0047, 0048, 0060,
0062, 0072, 0081, 0149, 0161, 0212, 0240,
0760
White Westinghouse 0072, 0209, 0278, 1278
XR-1000 0000, 0035, 0072
Yamaha 0038
0000, 0033, 0034, 0039, 0209, 0479,
Zenith
0637, 1479
SETUP CODES FOR WEBTV
Activy 1139
Page 49

TABLE OF BRANDS
SETUP AND USE GUIDE
AOL 1061
AVerMedia 0876
Channel Master 0094
Cool Electronic Stuff Inc. 0318
Elbex 0484
Everquest 0412, 0595
GC Electronics 0231, 0337
HSN Marketing 0595
Instructional Video 0110
Jensen 1165
Kodak 0410
Luxman 0106
Magnavox 1818
Minota 0318
Mitsubishi 1002
Movie Time 0337
MultiVision 0088, 0089, 0205
Nikon 0324
Panasonic 1120
Philips 9100, 1061, 1818
Pinnacle Systems 1268
Pioneer 1010
Princeton 0113, 0295
Pulsar 0085
Rabbit 0081
Recoton 0337
Roctec 0456
Runco 0085
Samsung 1190, 1204
Scan America 0569
Sensory Science 1126
Sharp 1010
Sony 0308, 0850
SuperGuide 0169
Teknika 0367
TeleCaption 0171
Toshiba 0401
TurboScan 0583
Video Link 0403, 0595
Xantech 0403, 0595
Zenith 0085, 0854
SETUP CODES FOR CD(R)
Acoustic Research
ADC 0018, 0033
Adcom 0155, 0234
Admiral
ADS 0243
Aiwa 0012, 0124, 0157, 0213, 0830
47
0123
1072
Akai 0156, 0676
Alpine 0341
Anthem 0897
Arcam 0650, 1650
Audio Alchemy 0194
Audio-Technica 0170
B & K 1118, 1119
Bang & Olufsen 0212
BSR 0134, 0194, 0245, 0366
Burmester 0420
California Audio Labs 0029, 0303, 0887
Capetronic 0237
Carrera 0194, 0394
Carver 0157, 0179, 0299, 0365, 0437, 0737
CCE 0643
Clarion 0748, 0753
Classic 1297
Craig 0615
Crown 0122, 0718
DAK 0245
DBX 0254
Denon 0003, 0034, 0766, 0873
DKK 0000
DMX Electronics 0157
Emerson 0155, 0164, 0305, 0469
Eroica 0041
Fisher 0088, 0174, 0179, 0342
Garrard 0245, 0280, 0393, 0420, 0425, 0633,
0788
GE 0009, 0334
Gemini 0625
Genexxa 0032, 0164, 0305
GoldStar 0030, 0383, 0394, 0417, 0525
GPX 1296
Gradiente 0558
Harman/Kardon 0060, 0083, 0108, 0109, 0157,
0173, 0426, 1001, 1008, 1202, 1259
Hitachi 0032, 0126, 0139, 0155, 0227, 0608
Inke l0061, 0065
JVC 0072, 0655, 0656, 0658
Kenwood 0028, 0037, 0190, 0338, 0339, 0340,
0523, 0626, 0677, 0681, 0826, 0858, 0859
Kodak 0287
Koss 0734
Krell
Kyocera 0018
Linn 0157
0035, 0093, 0266, 0327, 0328, 0430,
Luxman
0432, 0483, 0489
LXI 0305
0157
Page 50

TABLE OF BRANDS
SETUP AND USE GUIDE
Magnavox 0038, 0129, 0157, 0225, 0305, 0526
Marantz 0005, 0029, 0038, 0157, 0180, 0373,
0435, 0436, 0478, 0514, 0519, 0626
McIntosh 0256, 0287, 0290, 0660
MCS 0029, 0043, 0345, 0454
Memorex 1102, 1103
MGA 0083
Miro 0000
Mission 0157
Mitsubishi 0083, 0098, 0808
MTC 0017, 0420, 0625
Museatex 0283, 0496
NAD 0019, 0299, 0316, 0720, 0721
Nakamichi 0079, 0147, 0439, 0444, 0664
NEC 0043, 0130, 0234
Nikko 0164, 0169, 0170, 0174, 0362, 0525,
0625
NSM 0157, 0332
Onkyo 9300, 9301, 9302, 9303, 9304, 9305,
9306, 9307, 9308, 9309, 9310, 9311, 9312,
9313, 0101, 0102, 0138, 0381, 0868, 1116
Optimus 0000, 0032, 0037, 0087, 0145, 0175,
0179, 0194, 0196, 0280, 0305, 0342, 0420,
0426, 0437, 0468, 0536, 0671, 0775, 0850,
1063, 1075
Panasonic 0029, 0303, 0388, 0752
Parasound 0194, 0420
Philco 0603, 0734
Philips 9000, 9001, 0157, 0274, 0287, 0519,
0626, 0805, 0806
PianoDisc 0706
Pioneer 0032, 0305, 0468, 0551, 1062, 1063
Polk Audio 0157
Proton 0152, 0157
QED 0157
Quasar 0029
RadioShack 1075, 1083
RCA 0009, 0032, 0053, 0155, 0179, 0305, 0468,
0764, 0810, 1062
Realistic 0155, 0164, 0175, 0179, 0180, 0237,
0420
Revox 0113
Rotel 0157, 0420, 0897
SAE 0157
Samsung
Sansui 0157, 0202, 0216, 0305
Sanyo 0087, 0179
Schneider
Scott 0155, 0164, 0305
Sears 0305
48
0524
0560
Sharp 0037, 0180, 0265, 0861
Sherwood 0061, 0065, 0114, 0180, 0196,
0426, 1067, 1068
Shure 0043
Signature 0108
Sonic Frontiers 0157
Sontec 0067
Sony 0000, 0100, 0185, 0343, 0490, 0604,
0605, 0673, 0727, 0790
Soundesign 0145, 0425, 0865
Staron 0398
STS 0018
Sylvania 0225
Symphonic 0183
Tandberg 0203
Tascam 0420
TDK 1208
Teac 0016, 0045, 0153, 0174, 0180, 0183,
0378, 0393, 0420, 1277
Technics 0029, 0207, 0303
Techwood 0362
Toshiba 0019, 0299
Vector Research 0033, 0109, 0194, 0394, 0417
Victor 0072
Wadia Digital 0761
Wards 0053, 0108, 0157, 0559
Wurlitzer 1183
Yamaha 9200, 9201, 9202, 9203, 9204, 9205,
9206, 9207, 9208, 0036, 0170, 0187, 0261,
0888, 1292
Yorx 0461
Zenith 0615, 0822
SETUP CODES FOR PVR
Action 0317
Admiral 0048, 0209
Advantz 0356
Adventura 0000
Aiko 0278
Aiwa 0000, 0037, 0124, 0307, 0406, 0436,
0468, 0557, 0680
Akai 0041, 0049, 0053, 0061, 0106, 0156,
0175, 0242, 0315
America Action
American High 0035
Asha 0240
Audiovox
Beaumark 0240
Bell & Howell 0104
0278
0037
Page 51

TABLE OF BRANDS
SETUP AND USE GUIDE
Blaupunkt 0006
Broksonic 0002, 0121, 0184, 0209, 0211, 0295,
0348, 0361, 0479, 1479
Calix 0037
Canon 0035, 0102, 0167
Capehart 0020, 0554
Carver 0081, 0146
CCE 0072, 0278
Cineral 0278
Citizen 0037, 0278, 1278
Colt 0072
Craig 0037, 0047, 0072, 0240, 0271
Curtis Mathes 0035, 0041, 0060, 0162, 0760,
1035
Cybernex 0051, 0240
Daewoo 0017, 0020, 0045, 0087, 0278, 0554,
0561, 1278
Daytron 0020, 0554
Denon 0042
Dynatech 0000
Electrohome 0037
Electrophonic 0037
Emerex 0032
Emerson 0000, 0002, 0036, 0037, 0043, 0061,
0068, 0088, 0121, 0184, 0208, 0209, 0211,
0212, 0278, 0294, 0295, 0361, 0479, 0510,
0561, 1278, 1479
Fisher 0047, 0054, 0066, 0104
Fuji 0033, 0035
Funai 0000
Garrard 0000
GE 0035, 0048, 0060, 0065, 0202, 0240, 0760,
0761, 0807, 1035, 1060
Go Video 0232, 0279, 0350, 0432, 0526, 0620,
0643, 0663, 0669
GoldStar 0018, 0037, 0038, 0471, 0480, 1237
Gradiente 0000, 0008, 0408
Grundig 0195
Harley Davidson 0000
Harman/Kardon 0038, 0075, 0081, 0146, 0161
Harwood 0068, 0072
Headquarter 0046
HI-Q 0047
Hitachi 0000, 0041, 0042, 0065, 0082, 0089,
0105, 0166, 0235, 0292, 0543, 0544, 0566,
0688
Hughes Network Systems 0042
Jensen
JVC 0008, 0041, 0067, 0206, 0207, 0384, 0486
KEC 0037, 0278
49
0041
Keen 0693
Kenwood 0038, 0041, 0067, 0384
KLH 0072
Kodak 0035, 0037
Lloyd's 0000, 0208
Logik 0072
LXI 0037
Magnasonic 0278, 0593, 1278
Magnavox 0000, 0035, 0039, 0081, 0103,
0110, 0149, 0519, 0563, 1781
Magnin 0240
Marantz 0035, 0081, 0146, 0161
Marta 0037
Matsushita 0035, 0162, 0454
MEI 0035
Memorex 0000, 0035, 0037, 0039, 0046, 0047,
0048, 0104, 0162, 0209, 0240, 0268, 0299,
0307, 0348, 0454, 0479, 1037, 1162, 1237,
1262
MGA 0043, 0061, 0240
MGN Technology 0240
Minolta 0042, 0105
Mitsubishi 0043, 0048, 0061, 0067, 0075,
0173, 0214, 0242, 0443, 0807
Motorola 0035, 0048
MTC 0000, 0240
Multitech 0000, 0072
NAD 0058
NEC 0038, 0040, 0041, 0050, 0067, 0082,
0104, 0457
Nikko 0037
Nikon 0034
Noblex 0240
Olympus 0035, 0226
Onkyo 0222
Optimus 0037, 0048, 0058, 0104, 0162, 0432,
0454, 0568, 0593, 0619, 1048, 1062, 1162,
1262
Optonica 0062
Orion 0002, 0184, 0209, 0295, 0479, 1479
Panasonic 0035, 0077, 0102, 0162, 0225,
0226, 0227, 0246, 0254, 0378, 0454, 0485,
0616, 1035, 1062, 1162, 1262, 1362
Penney 0035, 0037, 0038, 0040, 0042, 0054,
0240, 1035, 1237
Pentax 0042, 0065, 0105
Philco 0035, 0209, 0479
0035, 0062, 0081, 0110, 0146, 0403,
Philips
0618, 0749, 1081, 1181
Pilot 0037
Page 52

TABLE OF BRANDS
SETUP AND USE GUIDE
Pioneer 0058, 0067, 0168
Polk Audio 0081, 0146
Portland 0020, 0554
Profitronic 0240
Proscan 0060, 0202, 0760, 0761, 1060
Protec 0072
Pulsar 0039, 0051
Quarter 0046
Quartz 0046, 0155
Quasar 0035, 0077, 0162, 0454, 1035, 1162
RadioShack 0000, 1037
Radix 0037
Randex 0037
RCA 0035, 0042, 0048, 0058, 0060, 0065,
0077, 0105, 0106, 0149, 0202, 0240, 0277,
0453, 0619, 0760, 0761, 0807, 1035, 1060
Realistic 0000, 0035, 0037, 0046, 0047, 0048,
0062, 0066, 0104
ReplayTV 0614, 0616
Ricoh 0034, 0565
Runco 0039
Salora 0075
Samsung 0045, 0051, 0053, 0240, 0489
Samtron 0643
Sanky 0039, 0048
Sansui 0000, 0041, 0067, 0082, 0209, 0271,
0479, 1479
Sanyo 0046, 0047, 0104, 0159, 0240, 0268,
0372
Scott 0043, 0045, 0121, 0184, 0210, 0211,
0212
Sears 0000, 0035, 0037, 0042, 0046, 0047,
0054, 0057, 0066, 0104, 0105, 1237
Semp 0045
Sharp 0048, 0062, 0738, 0807
Shintom 0072
Shogun 0051, 0240
Singer 0072
Sonic Blue 0614
Sony 0000, 0011, 0022, 0032, 0033, 0034,
0035, 0275, 0586, 0636, 0639, 0640, 1032,
1232
STS 0042
Sylvania 0000, 0035, 0043, 0081, 0103, 0110,
1781
Symphonic 0000, 0593
Tatung 0041
eac
T
Technics 0035, 0162, 0246
Teknika 0000, 0035, 0037, 0052
50
0000, 0041
Thomas 0000
Tivo 0618, 0636
TMK 0036, 0208, 0240
Toshiba 0043, 0045, 0057, 0066, 0210, 0212,
0366, 0845
Totevision 0037, 0240
Unitech 0240
Vector 0045
Vector Research 0038, 0040
Video Concepts 0040, 0045, 0061, 0221
Videomagic 0037
Videosonic 0240
Villain 0000
Wards 0000, 0035, 0042, 0047, 0048, 0060,
0062, 0072, 0081, 0149, 0161, 0212, 0240,
0760
White Westinghouse 0072, 0209, 0278, 1278
XR-1000 0000, 0035, 0072
Yamaha 0038
Zenith 0000, 0033, 0034, 0039, 0209, 0479,
0637, 1479
SETUP CODES FOR DVD(R)
Aiwa 0641
Anaba 0813
Apex Digital 0672, 0717, 0755, 0794, 0795,
0796, 0797
Arcam 0732
Audiologic 0736
B & K 0655, 0662
Blue Parade 0571
Boston Acoustics 9360
Broksonic 0695
Daewoo 0784
Denon 0490, 0634
Emerson 0591
Enterprise 0591
Fisher 0670
GE 0522, 0717, 0815
Genica 0750
Go Video 0715, 0783
GPX 0699, 0769
Gradiente 0651
Greenhill
Harman/Kardon 0582, 0702
Hitachi 0573, 0664
Hiteker
InterAct 0697
JBL 0702
0717
0672
Page 53

TABLE OF BRANDS
SETUP AND USE GUIDE
JVC 0558, 0623
Kenwood 0534, 0682, 0737
KLH 0717
Konka 0711, 0719, 0720, 0721
Koss 0651
Lasonic 0798
LG 0801
Loewe 0511
Magnavox 0503, 0675
Malata 0782
Marantz 0539
Microsoft 0522
Mitsubishi 0521
Mobile Authority 0812
NEC 0785
Onkyo 9300, 9301, 9302, 9303, 9304, 0503,
0627, 0792
Optiview 0813
Oritron 0651
Panasonic 0490, 0632, 0677, 0703
Pelican Accessories 0731
Philips 9100, 9101, 0503, 0539, 0646, 0854
Pioneer 0525, 0571, 0632
Princeton 0674
Proscan 0522
Raite 0665
RCA 0522, 0571, 0717, 0822, 1022
Rowa 0823
Saitek 0731
Sampo 0698
Samsung 0573, 0820
Sansui 0695
Sanyo 0670
Sharp 0630
Sherwood 0633
Sony 0533, 0772, 1533
Sylvania 0821
Teac 0809
Technics 0490, 0703
Techwood 0692
Theta Digital 0571
Thrustmaster 0498
Toshiba 0503, 0695, 1045
Tredex 0799, 0800, 0803, 0804
Urban Concepts
Yamaha 9200, 0490, 0545, 0817
Zenith 0503, 0591, 0741
51
0503
SETUP CODES FOR PREAMP
3M 0854
Accuphase 0382
Acurus 0765
Adcom 1100
Aiwa 0406
Alchemy 0843
Angstrom 0863
Arcam 1213
AudioSource 0011
Biamp 0582
Bose 0674
Boston Acoustics 9360
Carver 0269
Chase Technologies 0802
Chiro 0880, 1182
Curtis Mathes 0300
Denon 0160, 0272, 0522, 1073, 1260
Digital Audio Control 0085
Elan 0647
Forte 0606
Fosgate 0111
GE 0078
GoldStar 0031
Harman/Kardon 0106, 0892, 1018
JBL 0668, 1003
JVC 0331
Kenwood 0297, 0356
Krell 0834
Left Coast 0892
Linn 0269, 0282, 0829
Luxman 0165
Magnavox 0269
Marantz 0269, 0321, 0892
McIntosh 0251
Midiland 1095
Naim 0552
Nakamichi 0321
NEC 0092, 0116, 0131, 0264, 0302
Onkyo 9300, 9301, 9302, 9303, 9304, 9305
Optimus 0300, 0395, 0823
Panasonic 0308, 0521
Parasound 0246, 0661
Philips
Pioneer 0013, 0257, 0300, 0823
Plasse Audio 0733
Polk Audio
Proceed 1099
QED 0663, 0837
9000, 9001, 0269, 0892
0269, 0892
Page 54

TABLE OF BRANDS
SETUP AND USE GUIDE
RCA 0300, 0823
Realistic 0395
Rotel 0726, 0793
Sansui 0321, 0623, 0652
Sharp 0226
Shure 0264
Sony 0220, 0465, 0689, 0815, 1126
Soundesign 0078, 0211
Soundstream 0141
Tandberg 0206
Technics 0308, 0372, 0374, 0521
Theta Digital 1049
Toshiba 0353
Victor 0331
Wards 0013, 0078, 0211
Yamaha 9200, 9201, 9202, 9203, 9204, 9205,
9206, 9207, 0133, 0143, 0354, 0504
SETUP CODES FOR Tuner
ADC 0531
Adcom 0002, 0304, 0319, 0616
Admiral 0182
ADS 0375, 1157
Aiwa 0121, 0125, 0158, 0162, 0189, 0249,
0284, 0301, 0361, 0405, 0544, 0601, 0745,
1088, 1089, 1188, 1243, 1321, 1388, 1405
Akai 0076, 0115, 0151, 0224, 0450, 1255
Alco 1390
Anam 1074, 1609
Apex Digital 1257
Arcam 1212, 1214, 1216
Audio Access 0403
Audio Authority 1256
AudioEase 0210
AudioSource 0687
Audiotronic 1189
Audiovox 1390
B & K 0701, 0820, 0840
Bang & Olufsen 0898, 1040
BK 0702
Bondstec 0049
Bose 0238, 0639, 1229
Boston Acoustics 9360
Capetronic
Carver 0008, 0042, 0189, 0270, 0360, 0412,
1089, 1189
Casio
Celestion 1264
Clarinette 0195
52
0531, 0690
0195, 0201
Compaq 1136
Counterpoint 0253
Creek 0792
Curtis Mathes 0080, 0201
Denon 0004, 0273, 0386, 0771, 1104, 1142,
1160, 1360
EAD 1045, 1046, 1047, 1048
Eclipse 1061
Emerson 0020, 0255, 0424, 0495
Enlightened Audio Designs 1045, 1046, 1047,
1048
Eroica 0051
Fisher 0042, 0219, 0360
Garrard 0146, 0281, 0286, 0407, 0424, 0440,
0463, 0640, 0644, 0744
GE 0260, 0649
Glory Horse 1263
GoldStar 0057
GPX 0744, 1299
Gradiente 0557
Hafler 0146, 0294
Hanwah 0741
Harman/Kardon 0107, 0110, 0189, 0891, 1004,
1005
Hewlett Packard 1181
Hitachi 0228, 0386, 0659, 1273
Inkel 0062, 0066
JBL 0110, 0794, 1002
Jensen 0705, 0713, 0754
JVC 0074, 0464, 0756, 1263
Kansai 0440
Kenwood 0027, 0042, 0077, 0186, 0239, 0313,
0314, 0337, 0569, 1027, 1032, 1051, 1052,
1313, 1569, 1570, 1670
KLH 1138, 1390
Koss 0255, 0424, 0495, 0624, 0636, 0744
Lexicon 1076
Linn 0189
Lloyd's 0195
Luxman 0149, 0166, 0267, 0329, 0330, 0429,
0431
LXI 0181, 0744, 0755
Magnavox 0128, 0189, 0195, 0204, 0222,
0364, 0391, 0531, 1089, 1189
Magnum Dynalab
Marantz 0006, 0039, 0128, 0189, 0200, 0352,
0412, 0455, 1089, 1189, 1289
McIntosh
MCS 0039, 0044, 0201, 0346
McSilver 0466
0729
0258, 0619
Page 55

TABLE OF BRANDS
SETUP AND USE GUIDE
Mediacom 0446
Memorex 0335
Modulaire 0195
Museatex 0476, 0497
Musicmagic 1089
NAD 0320
Nakamichi 0075, 0097, 0347, 0876
NEC 0235
Nikko 0215, 0407, 0466, 0467, 0542, 0543,
0609
Niles 0413, 1173
NTDE Geniesom 0744
Onkyo 9300, 9301, 9302, 9303, 9304, 0100,
0119, 0135, 0137, 0144, 0380, 0838, 0842
Optimus 0042, 0080, 0177, 0181, 0186, 0219,
0229, 0286, 0440, 0531, 0622, 0670, 0690,
0738, 0744, 0754, 0797, 0801, 0803, 0849,
1023, 1074
Orient Power 0744
Panasonic 0039, 0309, 0367, 0389, 0518,
0763, 1288, 1518, 1763, 1764
Panor 0350
Parasound 0549, 0895, 1124, 1238
Penney 0044, 0195, 0201, 0449
Philco 0479
Philips 9000, 0189, 0391, 0412, 0620, 0642,
1089, 1120, 1189, 1268, 1269, 1283
Pioneer 0014, 0080, 0150, 0244, 0289, 0531,
0630, 1023, 1084, 1123, 1184
Polk Audio 0189, 1289
Proscan 1254
Proton 0026, 0047
Quasar 0039
RadioShack 0744, 1263
RCA 0054, 0080, 0346, 0360, 0530, 0531,
0649, 1023, 1074, 1122, 1123, 1154, 1254,
1390, 1609
RDS 0242
Realistic 0001, 0025, 0163, 0178, 0181, 0182,
0195, 0534
Revox 0140, 0250
Rotel 0007, 0852
Samsung 0069, 0070, 0112, 1295
Sansui 0148, 0189, 0193, 0323, 0346, 0593,
1089
Sanyo 0219, 0448, 0801, 1251
Schneider 0364
0105, 0163, 0322, 0390, 0396, 0418,
Scott
0449, 0495
Sears 0201
53
Semivox 0255
Sharp 0117, 0186, 0262, 1286, 1386
Sherwood 0062, 0066, 0324, 0475, 0491,
0502, 0565, 0653, 1066, 1077
SII 0355
Sonic 0281
Sontec 0068
Sony 0158, 0168, 0415, 0474, 0776, 1042,
1058, 1158, 1258, 1458
Soundesign 0670
Soundstream 0090
Stereophonics 1023
STS 0217
Sunfire 0313, 0314, 1052, 1313
Sylvania 0222
Symphonic 0182
Tandberg 0204, 0205
Teac 0112, 0163, 0298, 0387, 0463, 0870,
1074, 1267
Technics 0039, 0208, 0309, 0518, 1308, 1309,
1518
Techwood 0281, 0344, 0364, 0609
Thorens 1189
Topline 0767
Ultrx 0333, 0427
Vector Research 0218, 0352
Venturer 0849, 1390
Victor 0074
Wards 0014, 0054, 0080, 0158, 0189
Welton 0344
Yamaha 9200, 9201, 9202, 9203, 9204, 9205,
9206, 9207, 9208, 9209, 0081, 0082, 0142,
0176, 0186, 0293, 0545, 0712, 1176, 1276
Yorx 0195
Zenith 0281, 0511, 0622, 0705, 0736, 0744,
0857
Page 56

INDEX
A
activating
a Device, 9
Avidea Remote, 4
adjusting
backlight timeout, 15
beep volume, 15
date, 15
LCD contrast, 7
LCD timeout, 14
settings, 14
time, 15
B
backlight
timeout, 15
turning on, 4, 7
Backlight button, 4, 5, 7
batteries, 3
installing, 3
status, 8
battery cover, 3
beep
confirmation beep, 23, 25
error beep, 23, 26, 27
two beeps, 3
volume, 15
brands
defining, 21
table, 40
buttons
backlight, 5, 7, 8
calibrate, 16
delay, 30
device, 5, 6
hard, 5, 6
mode, 5, 6
page up and page down, 5, 7
reset, 35
revert, 16
soft, 5, 6
touch screen, 6
C
Calibrate button, 16
calibrating the touch screen, 16
CD-ROM, 32
cleaning Avidea Remote, 34
connecting to PC, 32
customizing
adjusting settings, 14
entering codes, 21
learning commands, 24
Freedom Edit, 32
recording macros, 28
labeling buttons and devices, 26
D
date, 16
Delay button, 30
Device button, 5, 6
Device Page, 9
Devices
labeling, 26
selecting, 9
display
cleaning, 34
timeout, 15
turning on, 4, 5
E
editing, See customizing
entering codes, 21
eye
for learning commands, 5, 24
F
first time usage
activating, 4
adjusting settings, 14
entering codes, 21
H
hard buttons, 5, 6
I
installing
Freedom Edit, 32
the batteries, 3
K
keyboard, 27
character, 27
deleting a character
, 27
number
space, 27
symbols, 27
, 27
SETUP AND USE GUIDE
54
Page 57

INDEX
L
Label mode, 13
Library, 34, 36, 40
labeling
buttons, 26
devices, 26
LCD
contrast, 7
timeout, 14
Learn mode, 13, 24
learning
commands from existing remote
controls, 24
distance, 24
eye, 5, 24
M
Macro mode, 12, 13, 28
maintaining Avidea Remote, 34
mode, 13
Brand mode, 13
Label mode, 13
Learn mode, 13
Macro mode, 13
Setup mode, 13
Use mode, 13
Mode button, 5, 6
N
NCF, See Avidea Remote
Configuration File
Freedom Edit, 32
Freedom emulator, 32
O
overview of devices, 4, 9
P
page number, 6, 7
Page Up/Page Down buttons, 5, 7
powering
battery status, 8
installing the batteries, 3
programming,
Avidea Remote Configuration File,
32
Avidea Remote
cleaning, 34
information, 17
ever
r
See customizing
ting, 17, 35
R
recording macros, 28
relabeling,
renaming,
Reset button, 35
resetting the Avidea Remote, 35
Revert button, 17
reverting the Avidea Remote, 17, 35
S
selecting
serial cable, 32
serial port, 5, 32
settings
Setup mode, 13
setup page
soft buttons, 5, 6
software, 32
switching modes, 13
system requirements, 33, 39
T
table of brands, 40
time, 16
timer
touch screen, 5, 6
turning on
U
Use mode, 13
W
website, 2, 32, 38
See labeling
See labeling
devices, 9
modes, 13
adjusting, 14
reverting, 17, 35
first, 14
second, 15
third, 16
backlight, 7, 15
LCD, 14
calibrating, 16
backlight, 4, 5, 7
display, 4
Avidea Remote, 4
SETUP AND USE GUIDE
55
Page 58

© Boston Acoustics, Inc.
All rights are reserved. Reproduction in whole or in part is prohibited without the prior
written consent of the copyright owner. Dolby is a registered trademark of Dolby
Laboratories. DTS is a registered trademark of Digital Theater Systems, Inc.
Page 59

www.bostonacoustics.com/avidea
Boston Acoustics, Inc. 300 Jubilee Drive Peabody MA 01960 USA
t : 978.538.5000 f : 978.538.5100
 Loading...