

Page 1
SETUP AND U
SETUP AND USE GUIDE
DVD/VCD/CD SURROUND SYSTEM
DVD RECEIVER 2.0
INSTRUCTION MANUAL
Volume
English-US
Volume
Phones
Page 2

2
ENGLISH
Introduction
Before Applying Power
This symbol found on the apparatus indicates
hazards arising from dangerous voltages.
This symbol found on the apparatus indicates
the user should read all safety statements
found in the user manual.
WARNING! To reduce the risk of fire or
electric shock, do not expose the apparatus to
rain or moisture.apparatus to rain or moisture.
1. Read these instructions.
2. Keep these instructions.
3. Heed all warnings.
4. Follow all instructions.
5. Do not use this apparatus near water.
6. Clean only with dry cloth.
7. Do not block any ventilation openings. Install in
accordance with the manufacturer’s instructions.
8. Do not install near any heat sources such as
radiators, heat registers, stoves, or other apparatus
(including amplifiers) that produce heat.
9. Do not defeat the safety purpose of the polarized or
grounding-type plug. A polarized plug has two blades
with one wider than the other. A grounding type plug has
two blades and a third grounding prong. The wide blade
or the third prong are provided for your safety. If the provided plug does not fit into your outlet, consult an electrician for replacement of the obsolete outlet.
10. Protect the power cord from being walked on or
pinched – particularly at plugs, convenience receptacles,
and the point where they exit from the apparatus.
11. Only use attachments/accessories specified by the
manufacturer.
12. Unplug this apparatus during lightning storms or
when unused for long periods of time.
13. Refer all servicing to qualified service personnel.
Servicing is required when the apparatus has been damaged in any way, such as if the power-supply cord or plug
is damaged, liquid has been spilled or objects have fallen
into the apparatus, the apparatus has been exposed to rain
or moisture, does not operate normally, or has been
dropped.
14. Maintain a minimum distance of 2 inches (50mm)
around the front, rear, and sides of the apparatus for
sufficient ventilation. The ventilation should not be
impeded by covering the ventilation openings or placing
on or around the apparatus items such as newspapers,
tablecloths, curtains, etc.
15. No naked flame sources, such as lighted candles,
should be placed on the apparatus.
16. The apparatus should not be exposed to dripping or
splashing. No objects filled with liquids, such as vases,
should be placed on the apparatus.
17. The apparatus is suitable for use in tropical and/or
moderate climates.
18. LASER BEAM: Do not look into the opening of
the disc slot or ventilation opening of the product to see
the source of the laser beam. It may cause sight damage.
19. DISC: Do not use a cracked, deformed, or repaired
disc. These discs are easily broken and may cause serious
personal injury and product malfunction.
20. NOTE TO CATV SYSTEM INSTALLER: This
reminder is provided to call the CATV system installer’s
attention to Article 820.40 of the NEC that provides
guidelines for proper grounding and, in particular, specifies
that the cable ground shall be connected to the grounding system of the building, as close to the point of cable
entry as practical.
Page 3

Knowledge
In Case of Difficulty 50
Specifications 53
Universal Set-Up 54
Universal Code List 55
Introduction
Before Applying Power 2
Safety Precautions 2
Contents 3
Accessories 4
IMPORTANT SAFEGUARDS 5
Maintenance 6
Discs Information 7
Types of Playable Discs 7
Unplayable Discs 7
Icons on the DVD Video Discs 7
Region Codes 8
World Region Codes 8
Video Formats 9
System Connections 10
Loudspeakers 10
AM Loop Antenna 11
FM Antenna 11
Connecting to a TV 12
Connecting to a Satellite Tuner 12
Connecting to Audio Video Equipment 13
Controls and Indicators 14
Operation of Remote Control Unit 15
Set Up Functions 16
Preparation for Set Up 16
Setup Menu 16
Select TV Display 18
Select Picture Mode 18
Select Angle Mark On or Off 19
Select OSD Language 19
Select Captions On or Off (NTSC only) 20
Select Screen Saver On or Off 20
Select Dynamic Range 21
Select Audio Language 22
Select Subtitle Language 22
Select Disc Menu Language 23
Select Parental Level 23
Change Password 24
Reset to Default Setting 24
DVD Menu Language Code List 25
Setting Up SURROUND Mode 26
What are SURROUND Modes? 26
3
ENGLISH
Introduction
Contents
Preparation
Operations
Let's Play Some Sound 31
Basic Use Method 31
Assigning the Digital(Optical In) 31
Selecting Surround Sound Mode 32
Receiving Broadcast Stations 33
Storing the Broadcast Stations (one-by-one
presetting) 34
Playback of Disc 35
Basic Play 35
Disc Playback Features 36
On Screen Display 37
Various Playback Functions 38
Select Audio Language 38
Select the Audio Channel 38
Select Subtitle Language 38
Select Subtitle On or Off 38
Select Camera Angle 39
Random Play 39
Repeat Play 40
A-B Repeat Play 40
Using Bookmarks 41
Using IntroScan Function 41
Program Play 42
Menu Playback 44
Hierarchical Structure of VCD Menus 44
MP3/WMA/JPEG Media Playback 45
Guidance of MP3/WMA/JPEG 45
Playing Back MP3/WMA/JPEG Files 46
Select Files to be Played Back Directly 47
Rotating a Picture (JPEG files only) 47
MP3/WMA/JPEG Repeat Play 48
MP3/WMA/JPEG Random Play 48
MP3/WMA/JPEG Program Playback 49
Setting SURROUND Mode Manually 27
Speaker Setting 28
Speaker Level Setting 28
Delay Time Setting 29
Level Setting Using a Music Source 30
Caution: Read the pages marked carefully to ensure safe operation.
r
Page 4
4
ENGLISH
Introduction
Accessories
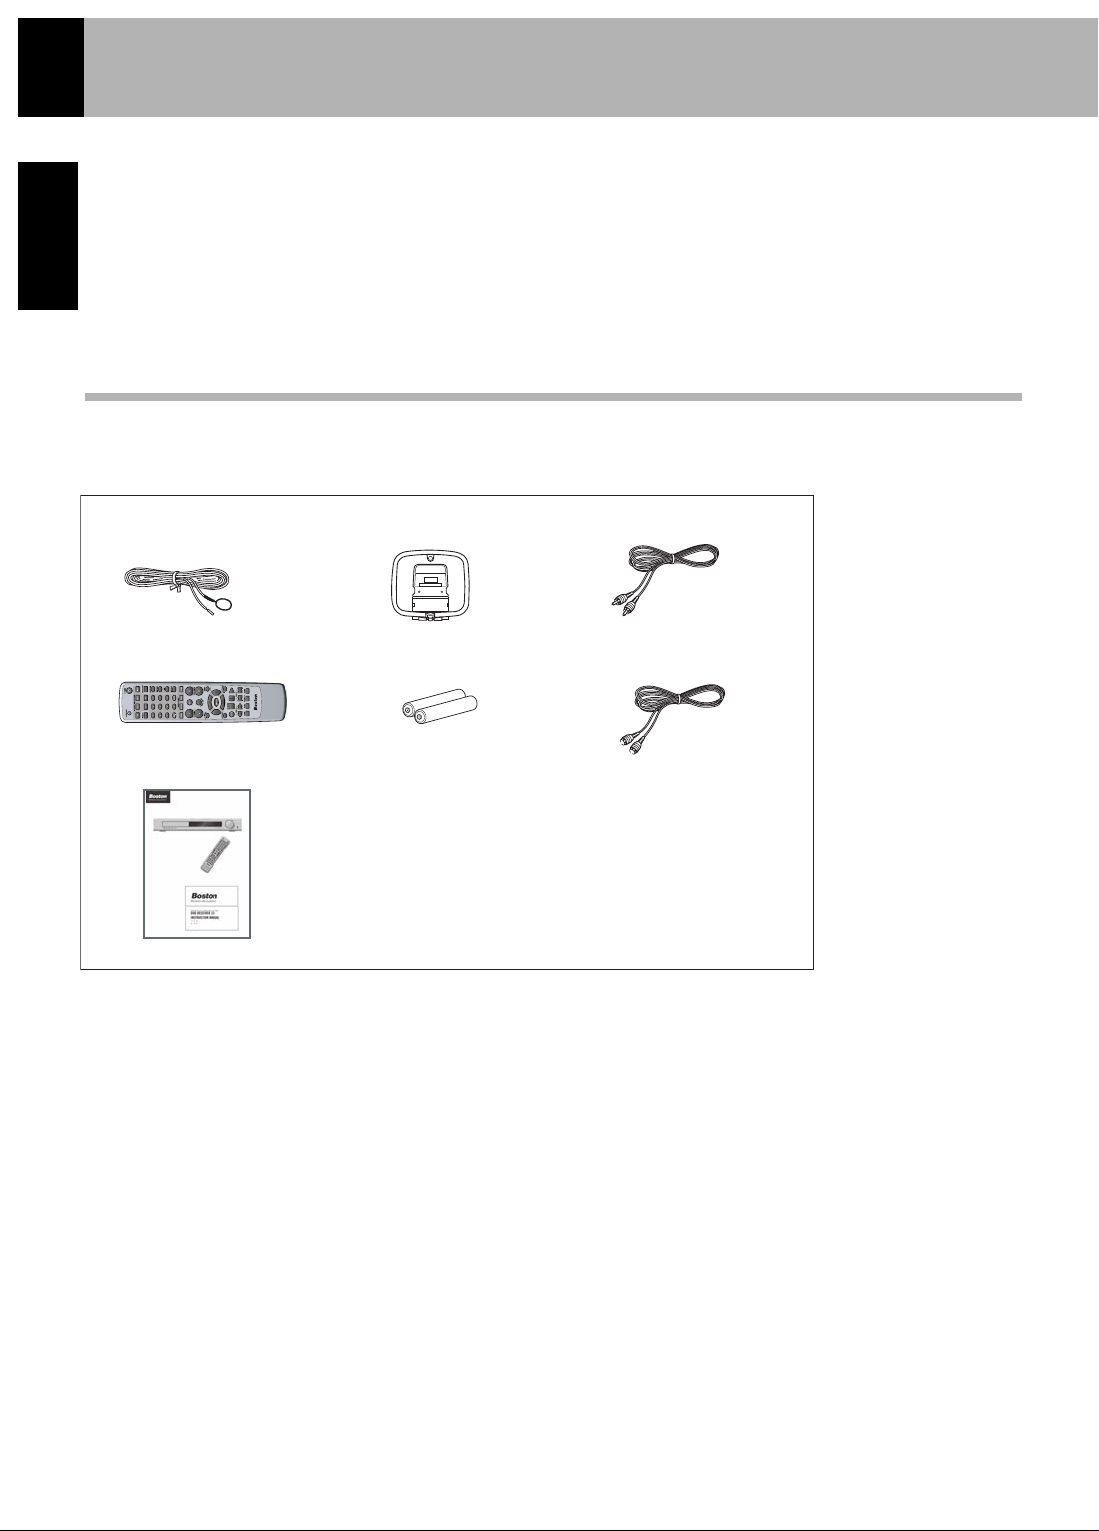
Please confirm that the following accessories are present.
Unpacking
Unpack the unit carefully and make sure that all accessories are put aside so they will not be lost. Examine the unit for any possibility
of shipping damage. If your unit is damaged or fails to operate, notify your dealer immediately. If your unit was shipped to you
directly, notify the shipping company without delay. Only the consignee (the person or company receiving the unit) can file a claim
against the carrier for shipping damage. We recommend that you retain the original carton and packing materials for use should
you transport or ship the unit in the future.
Keep this manual handy for future reference.
Accessories packed with the DVD RECEIVER 2.0 unit
FM Indoor Antenna (1) AM Loop Antenna (1) Video Cable (1)
Remote Control (1) Batteries (R03"/AAA") (2) S-Video Cable (1)
SystemManuals (1)
Page 5
5
IMPORTANT SAFETY INSTRUCTIONS
ENGLISH
CAUTION: THIS DIGITAL VIDEO PLAYER EMPLOYS A
LASER SYSTEM.
TO ENSURE PROPER USE OF THIS PRODUCT,
PLEASE READ THIS USER’S GUIDE CAREFULLY
AND RETAIN FOR FUTURE REFERENCE.
SHOULD THE UNIT REQUIRE MAINTENANCE,
CONTACT A BOSTON ACOUSTICS AUTHORIZED SERVICE CENTER.
USE OF CONTROLS, ADJUSTMENTS OR THE
PERFORMANCE OF PROCEDURES OTHER
THAN THOSE SPECIFIED HEREIN MAY RESULT
IN HAZARDOUS RADIATION EXPOSURE.
TO PREVENT DIRECT EXPOSURE TO LASER
BEAM, DO NOT TRY TO OPEN THE ENCLOSURE.
VISIBLE LASER RADIATION MAY BE PRESENT
WHEN THE ENCLOSURE IS OPENED.
DO NOT STARE INTO BEAM.
Regulatory Compliance Statements
American Users:
This equipment has been tested and found to comply
with the limits for a Class B digital device, pursuant to
part 15 of the FCC Rules. These limits are designed to
provide reasonable protection against harmful interference
in a residential installation. This equipment generates,
uses, and can radiate radio frequency energy and, if not
installed and used in accordance with the instructions,
may cause harmful interference to radio communications.
However, there is no guarantee that interference will not
occur in a particular installation. If this equipment does
cause harmful interference to radio or television reception,
which can be determined by turning the equipment off
and on, the user is encouraged to try to correct the
interference by one or more of the following measures:
1. Reorient or relocate the receiving antenna.
2. Increase the separation between the equipment
and receiver.
3. Connect the equipment into an outlet on a circuit
different from that to which the
receiver is connected.
4. Consult the dealer or an experienced radio/TV
technician for help.
CAUTION: Unauthorized changes or modifications to
the receiver could void the user’s authority to operate
the equipment.
Canadian Users:
This class B digital apparatus complies with Canadian
ICES-003.
Cet appareil numérique de classe B est conforme á la
norme NMB-003 du Canada.
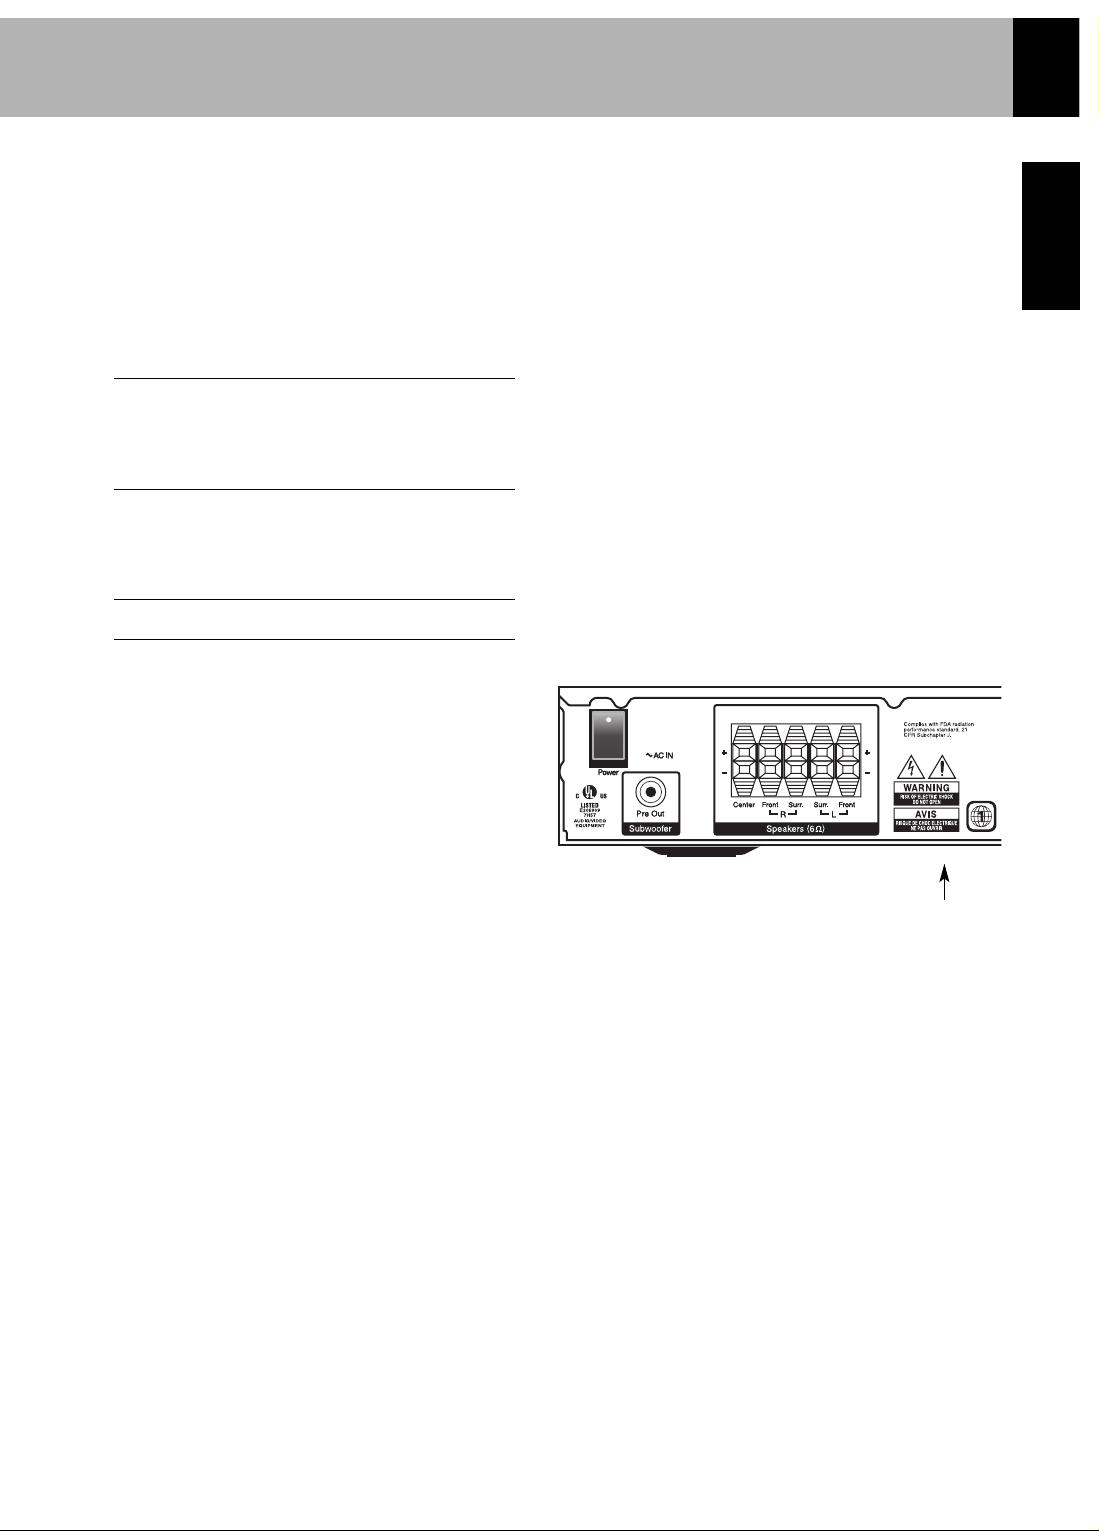
Location of the Required Label
Complies with FDA radiation performance
standard, 21 CFR subchapter J.
Manufactured by: BOSTON ACOUSTICS INC.
300 Jubilee Drive
Peabody, MA 01960 USA
Location of the Required Label
Page 6
6
ENGLISH
Transportation and Movement
Before transporting or moving this unit, carry out the
following operations.
1. Set the POWER ON/OFF switch to ON without
loading a disc.
2. Wait a few seconds and verify that the display shown
appears.
3. Set the POWER ON/OFF switch to OFF.
Maintenance
Maintenance
Reference
Maintenance of the Unit
When the front panel or case becomes dirty, wipe
with a soft, dry cloth. Do not use thinner, benzene,
alcohol, etc. for these agents may cause discoloration.
Disc Handling Precautions
Discs Which Can be Played With this Unit
Use discs that comply with the IEC standard, for example a disc
carrying the marking on the label surface.
Disc Accessories
The disc accessories (stabilizer, protection sheet, protection ring,
etc.) which are marketed for improving the sound quality or
protection of discs as well as the disc cleaner should not be used
with this system because they may cause a malfunction.
Never Play a Cracked or Warped Disc
During playback, the disc rotates at a high speed in the player.
Therefore, to avoid danger, never use a cracked or deformed
disc or a disc repaired with tape or an adhesive agent. Please
do not use discs which are not round because they may cause
malfunctions.
In Regard to Contact Cleaner
Do not use contact cleaners because it could cause a
malfunction. Be specially careful not to use contact
cleaners containing oil, for they may deform the plastic
component.
Caution on Condensation
Condensation (of dew) may occur inside the unit when there is
a great difference in temperature between this unit and the outside. This unit may not function properly if condensation
occurs. In this case, leave the unit for a few hours and restart the
operation after the condensation has dried up.
Be specially cautious against condensation in the following
circumstances:
When this unit is carried from one place to another across a
large difference in temperature, when the humidity in the room
where this unit is installed increases, etc.
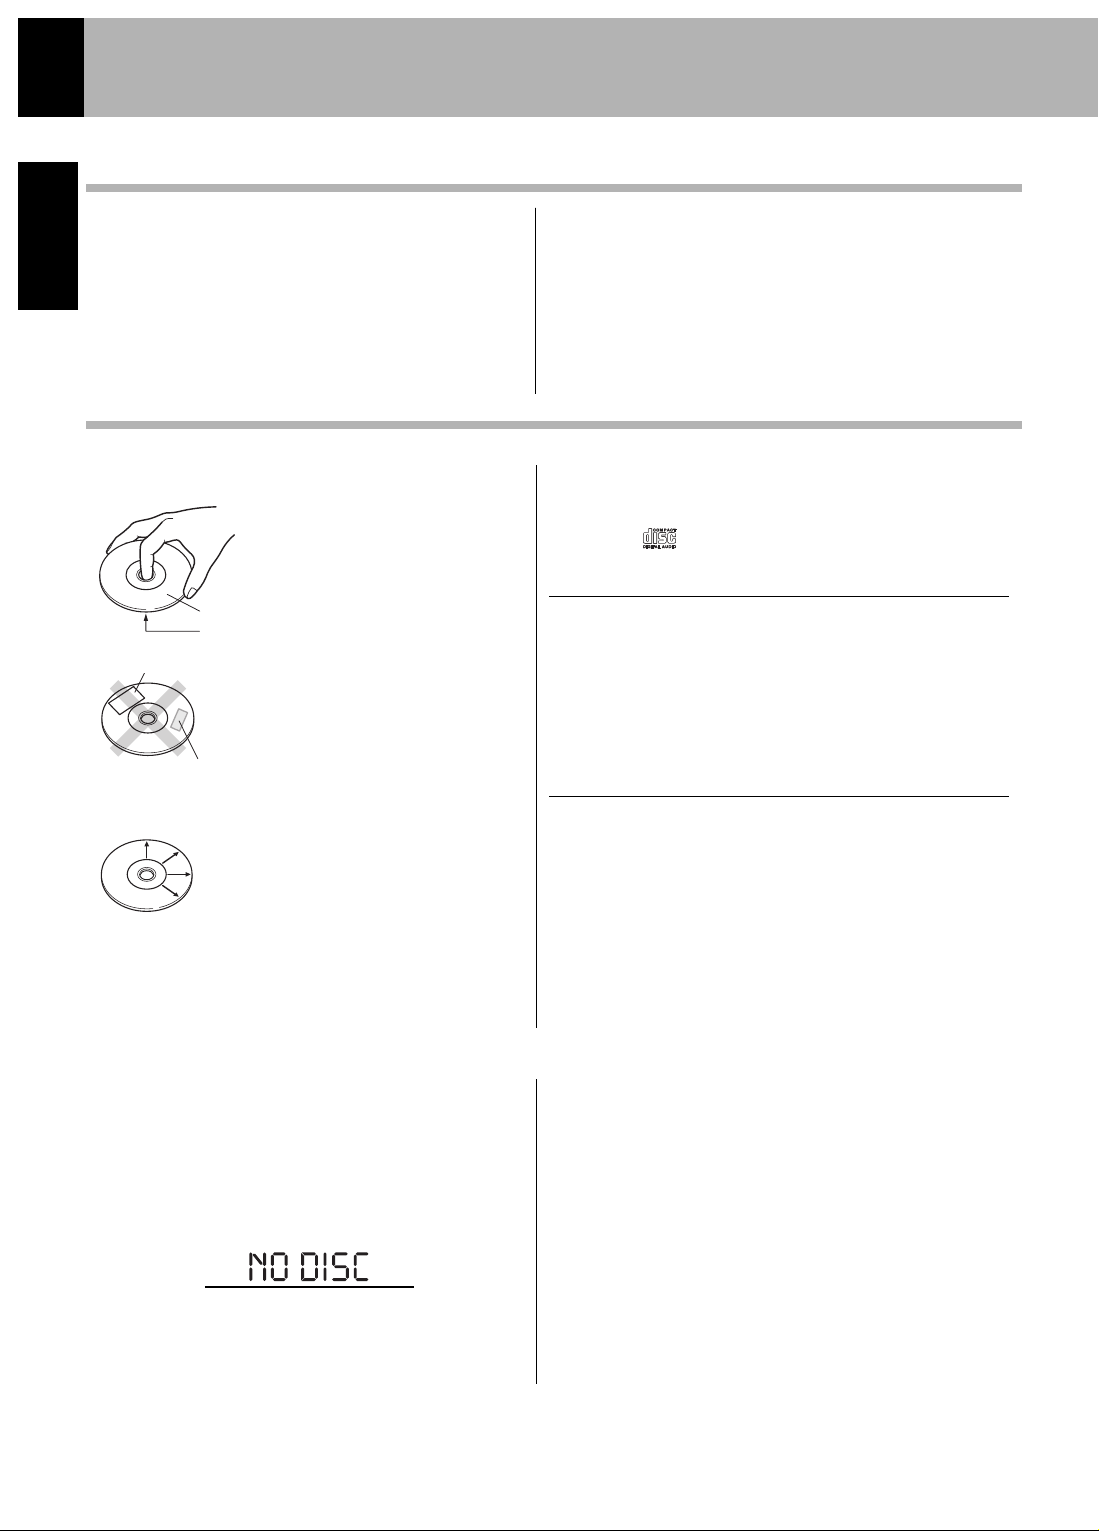
Handling
Hold the disc so that you do not touch the
playing surface.
Label side
Playing side
Sticker
Do not attach paper or tape to either the
playing side or the label side of the disc.
Cleaning
If there are fingerprint marks or foreign
matter found on the disc, lightly wipe the
disc with a soft cotton cloth (or similar)
from the center of the disc outwards in a
radial manner.
Storage
When a disc is not to be played for a long
period of time, remove it from the player
and store it in its case.
Sticky paste
Page 7
DVD AUDIO (Can play Dolby Digital tracks of DVD
Audio Disc.)
DVD ROM discs
DVD RAM discs
SACD discs (Can play CD layer of hybrid discs.)
7
ENGLISH
Discs Information
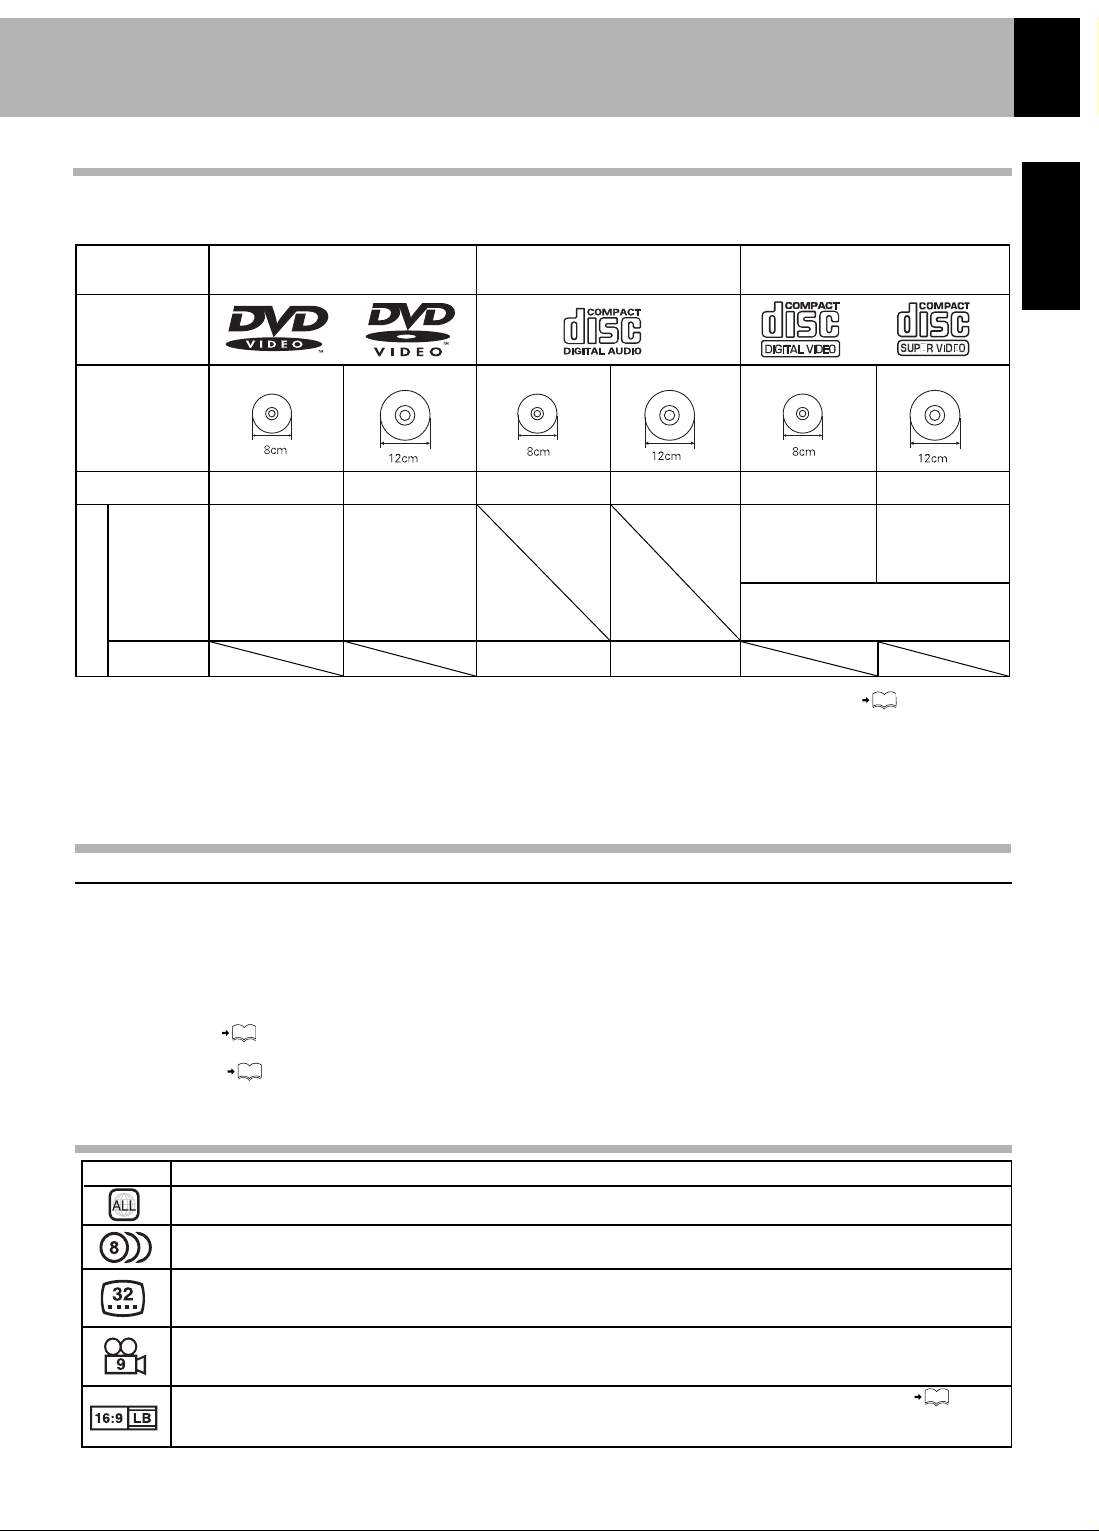
Types of Playable Discs
Unplayable Discs
Icons on the DVD Video Discs
This unit does not only play music from CDs but can also play the discs listed below to offer you high-quality
entertainment of videos, movies and live concerts.
MP3 and WMA media and JPEG picture CDs can be played back with this equipment (CD-R, CD-RW)
* This unit can play SVCDs, but some functions will not work.
* This unit can play DVD-R, DVD+R, DVD-RW, and DVD+RW discs, but depending on the recording unit, the disc
manufacturer, etc., playback sometimes may not be possible.
* This unit may also be incapable of playing certain CD-R/RW discs depending on their properties, recording conditions, etc.
This unit may not play some WMA, JPEG and MP3 formats. This player cannot playback any of the following discs.
CD-ROM discs (Except MP3, WMA, and JPEG discs [ISO 9660 level 1])
VSD discs
CDV discs (Only the audio part can be reproduced.)
CD-G/CD-EG/CD-EXTRA discs (Only the audio can be reproduced.)
Aspect ratios that can be selected. “NORMAL/LB” stands for Letter Box and “NORMAL/PS” for Pan/Scan.
In the example on the left, the 16:9 video can be converted into letter box video.
Number of angles provided by the angle function. The number in the icon indicates the number of angles. (Max. 9 angles)
Number of voice languages recorded with the audio function. The number in the icon indicates the number of voice
languages. (Max. 8 languages)
Number of subtitle languages recorded with the subtitle function. The number in the icon indicates the number of
subtitle languages. (Max. 32 languages)
Indicates the region code where the disc can be played.
Description
Icon
Playable Disc
Logo mark on disc
Disc size
Played sides
One or both
One or both
Approx. 133 min,
(1 side, 1 layer)
Approx. 242 min.
(1 side, 2 layers)
Approx. 266 min.
(2 sides, 1 layer)
Approx. 484 min.
(2 sides, 2 layers)
Approx. 41 min,
(1 side, 1 layer)
Approx. 75 min.
(1 side, 2 layers)
Approx. 82 min.
(2 sides, 1 layer)
Approx. 150 min.
(2 sides, 2 layers)
Video + Audio
Audio
One side only
Max. 20 min., digital
Max. 80 min., digital
One side only
One side only
One side only
Max. 20 min.
Max. 74 min.
(In case of an SVCD, the possible
playback time becomes shorter.)
DVD VIDEO
CD (CD-R, CD-RW)
VCD (SVCD*)
Contents
47
16
8
9
• A DVD VIDEO disc with a region code which does not match this unit or without a region code. For details, see
“Region Codes”.
• When the video format of a disc differs from that of the TV in use, the disc cannot be played normally. For details, see
“Video Formats”.
Page 8

8
ENGLISH
Region Codes
Every player of this model has a certain region code assigned to it based on the country where the player is used.
When the player is used to play back DVD VIDEO discs, it can only play DVD VIDEO discs carrying the
region codes matching the region code of the player.
The region code for this player is described on the rear panel of the player.
The DVD players are given a region code according to the country or area it is marketed, as shown in the
following map.
Professional use discs
(Air Line cabin service)
Region Codes of the DVD Video Discs That Can be Played With This Player
This player can play back a DVD VIDEO disc which carries the corresponding code to the region code of the player
shown in the table above, a marking containing the region code of the player or the “ALL” marking shown below. Even
when a DVD VIDEO disc does not carry any indication of the region code, it may sometimes unable to be played on
this player due to certain restrictions.
Restrictions Due to Difference Between Discs
Some DVD and VCD discs can be played only in certain playback modes according to the
intentions of the software producers. As this player plays discs according to their intentions,
some functions may not work as intended by you. Please be sure to read the instructions
provided with each disc. When an inhibition icon is displayed on the TV screen connected to
the player, it indicates that the disc being played is under the restriction as described above.
halt icon
World Region Codes
Page 9
16
16
9
ENGLISH
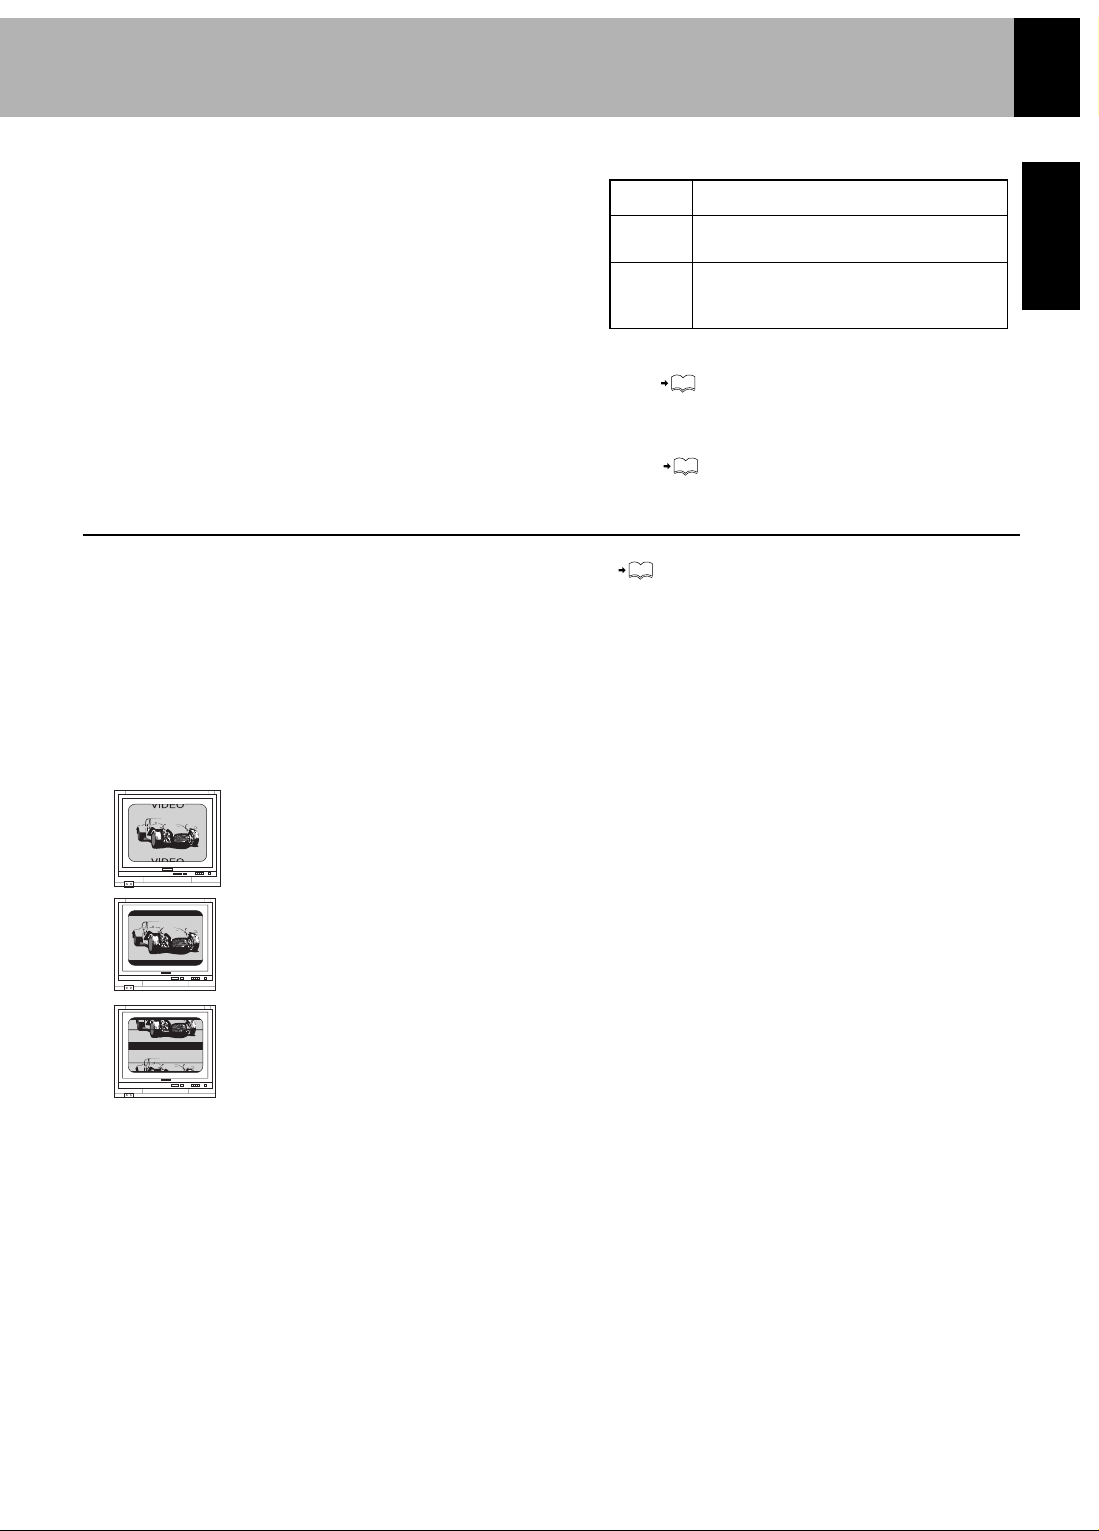
Video Formats
The TV picture display and disc signal systems can be
divided roughly into two TV formats (NTSC and PAL).
They are variable depending on countries and areas.
TV formats of major countries
TV Format
Major Countries & Areas
Japan, Taiwan, Korea, USA, Canada, Mexico,
Philippines, Chile, etc.
China, U.K., Germany, Australia, New
Zealand, Kuwait, Singapore, etc.
NTSC
PAL
When the video formats are different:
Try playing the disc. If the video formats of the disc and TV
do not match, the played video may be black and white or become as
shown below.
Top and bottom edges are not displayed.
Top and bottom areas are dark.
Picture turbulence due to sync unmatching.
Checking the Video Format (“Preparation for Set Up” )
Check the video format of the TV to be used
16
(For Europe and Australia)
This unit has a function for changing the video format according to the TV type. ( ) The initial setting of this unit for “TV
Type” is NTSC. Please confirm the type of your TV.
(For other countries)
This unit has a function for changing the video format according to the TV type. ( ) The initial setting of this unit for “TV
Type” is PAL. Please confirm the type of your TV.
Page 10
10
ENGLISH
System Connections
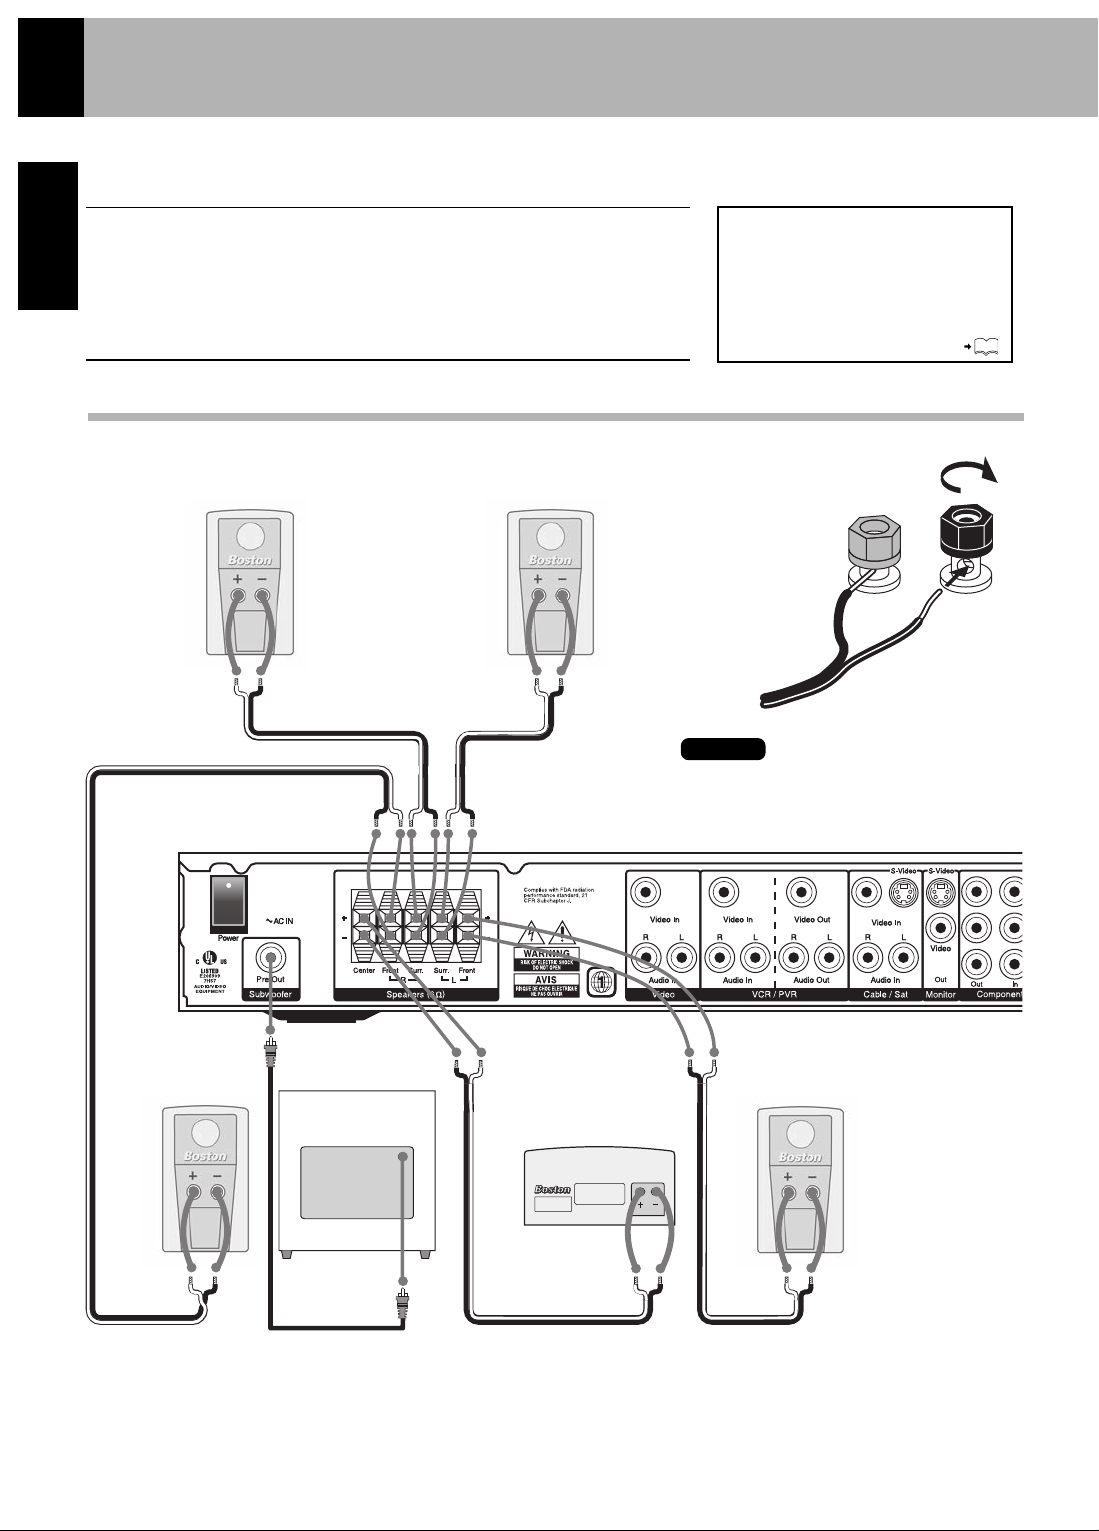
Loudspeakers
Caution: Do not plug in the power lead until all
connections are completed.
Make connections as shown below.
When connecting the related system components, refer
also to the instruction manuals of the related components.
Caution
Be sure to adhere to the following or proper ventilation will be blocked causing damage
or fire hazard.
• Do not place any objects impairing heat radiation onto the top of the unit.
• Leave a space around the unit (from the largest outside dimension including
projection) equal or greater than, shown below.
Top panel: 19.7
"
(50 cm) Side panel: 3.95"(10 cm) Back panel: 3.95"(10 cm)
Malfunction of Microcomputer
If operation is not possible or erroneous
display appears even though all connections
have been made properly, reset the microcomputer referring to “In case of difficulty”.
Right
surround
speaker
Left
surround
speaker
When making all connections,
use the markings on the wire to
connect + to + and - to -.
Left front speakerCenter speaker
Subwoofer
Right front
speaker
50
Note
Page 11
11
ENGLISH
System Connections
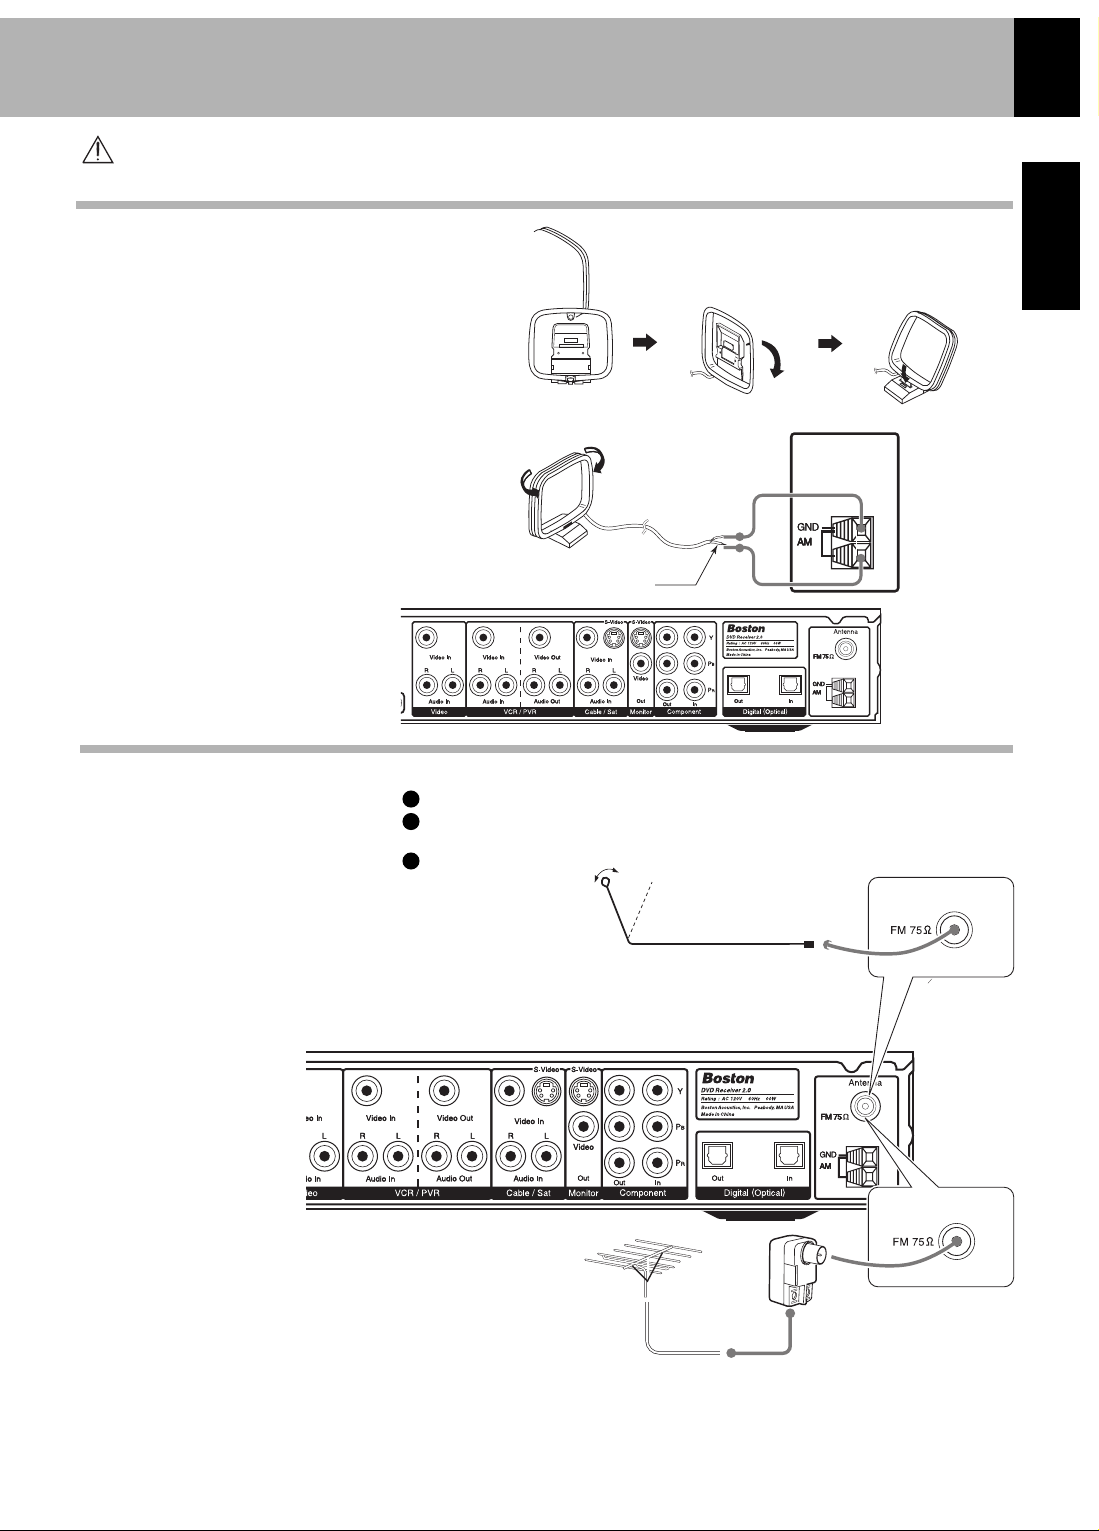
AM Loop Antenna
FM Antenna
Caution: Read this page carefully to ensure safe operation.
The supplied antenna is for
indoor use. Place it as far as
possible from the main system,
TV set, speaker wires and
power cord, and set it in a
position which provides the
best reception.
The accessory indoor antenna
is for temporary indoor use only.
For stable signal reception we
recommend using an outdoor
antenna.
Lead the 75Ω coaxial cable
connected to the FM outdoor
antenna into the room and
connect it to the FM 75Ω
terminal.
Connect to the antenna terminal.
Locate the position providing good
reception.
Fix the antenna.
FM Indoor Antenna Connection
AM Loop Antenna Connection
FM Outdoor Antenna
(commercially available)
1
2
3
Page 12
12
ENGLISH
The TV Button on the remote selects the video input. In this way you can use the TV button on the
remote to control the TV, and connect the TV’s audio to the video audio input. Please see the Universal
Code list on page 54.
Note
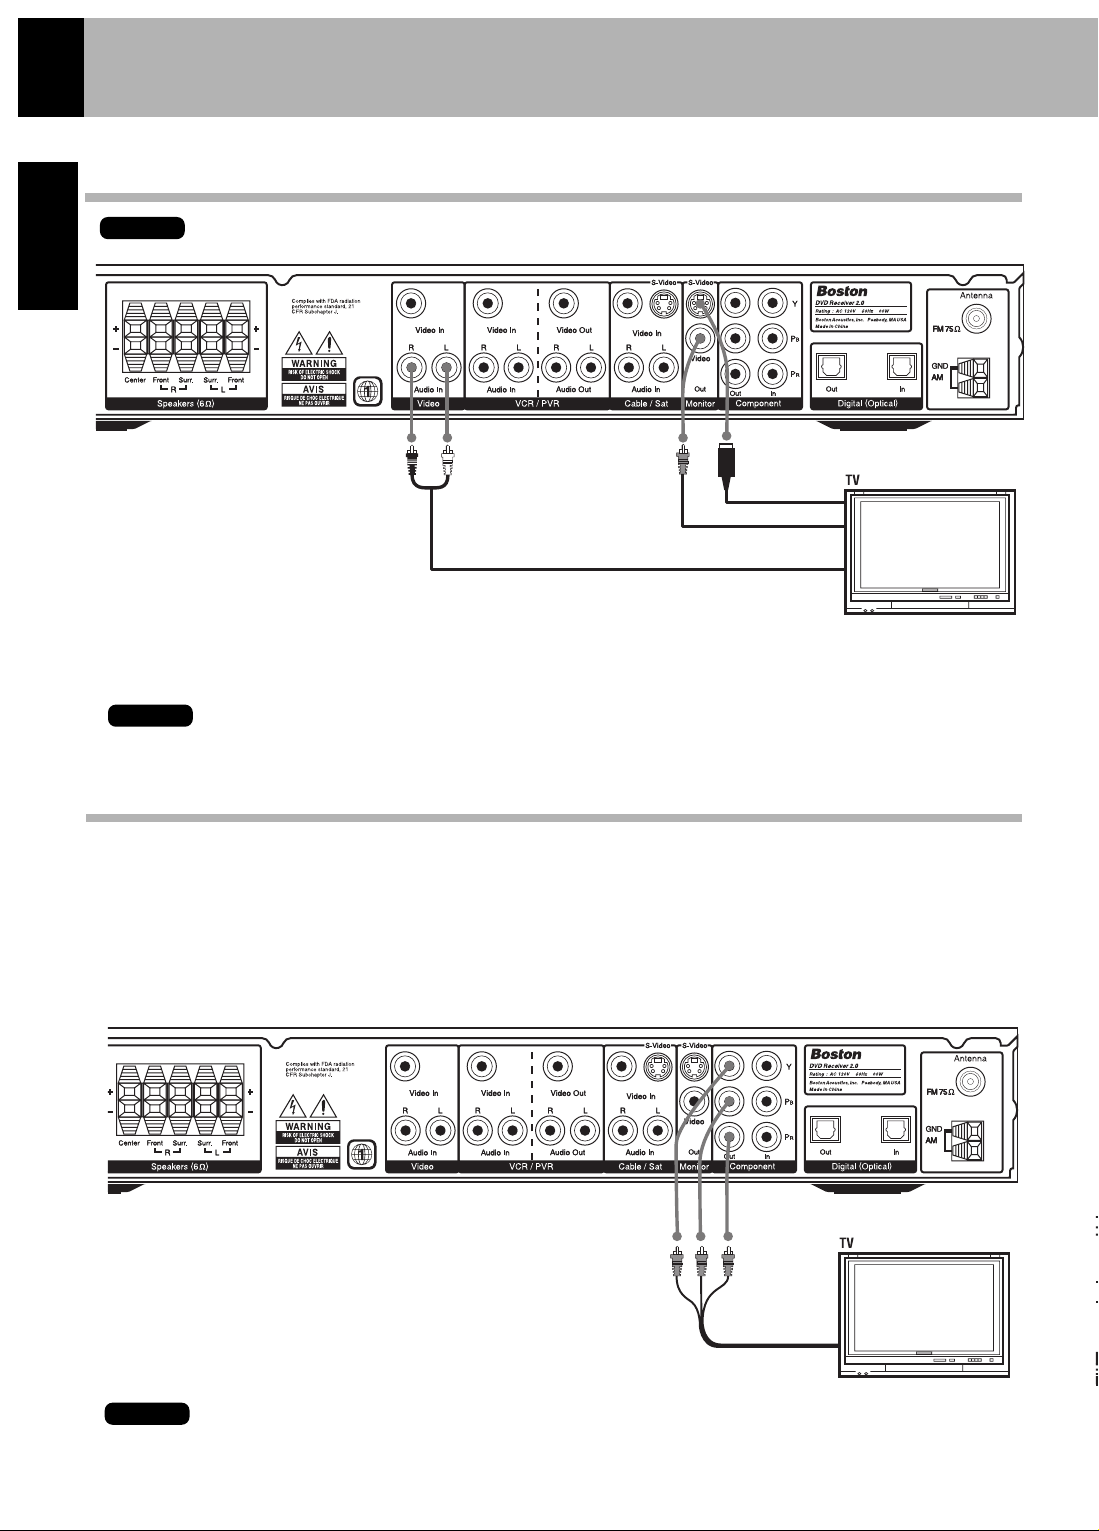
The S-Video and the Composite Video are deactivated when progressive scan in turned on.
Note
System Connections
Connecting to a TV(S-Video, Monitor Out)
Connecting to a TV(Component Out)
For remote control programming see page 54.
Progressive displays, such as high performance CRT/LCD/DLP/LCOS projectors and the HDTV-ready TVs can take advantage
of the high definition source this unit can provide. These devices may require Progressive Scan.
Activate Progressive Scan
While the unit is in standby, press and hold the OPEN/CLOSE button and PLAY/PAUSE button at the same time
to toggle progressive scan on and off.
Note
Composite Video Cable
OR
S-Video Cable
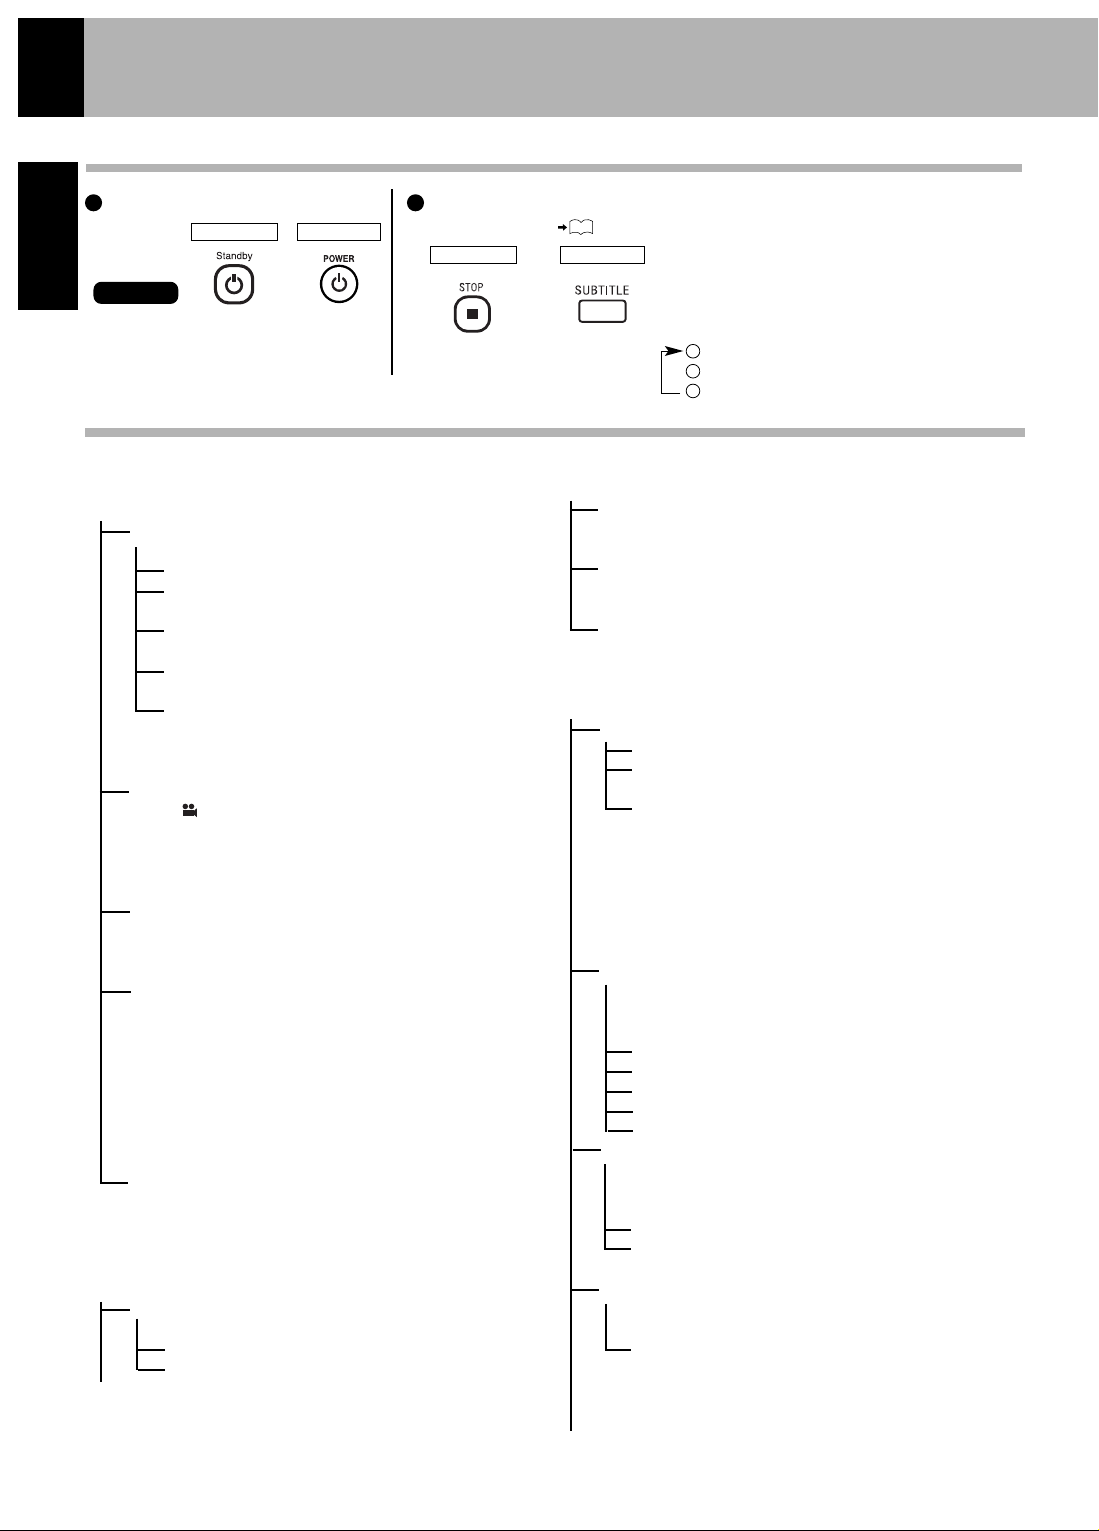
Switching NTSC/PAL video signal
Depending on what type of TV you own, you may have to switch the video signal.
Press the OPEN/CLOSE button on the unit to open the tray. When the tray is
open, press the STOP button on the top panel of the unit and press the
SUBTITLE button on the remote.
Audio Cable
Component
Video
Cable
(accessory)
Page 13
13
ENGLISH
ENGLISH
System Connections
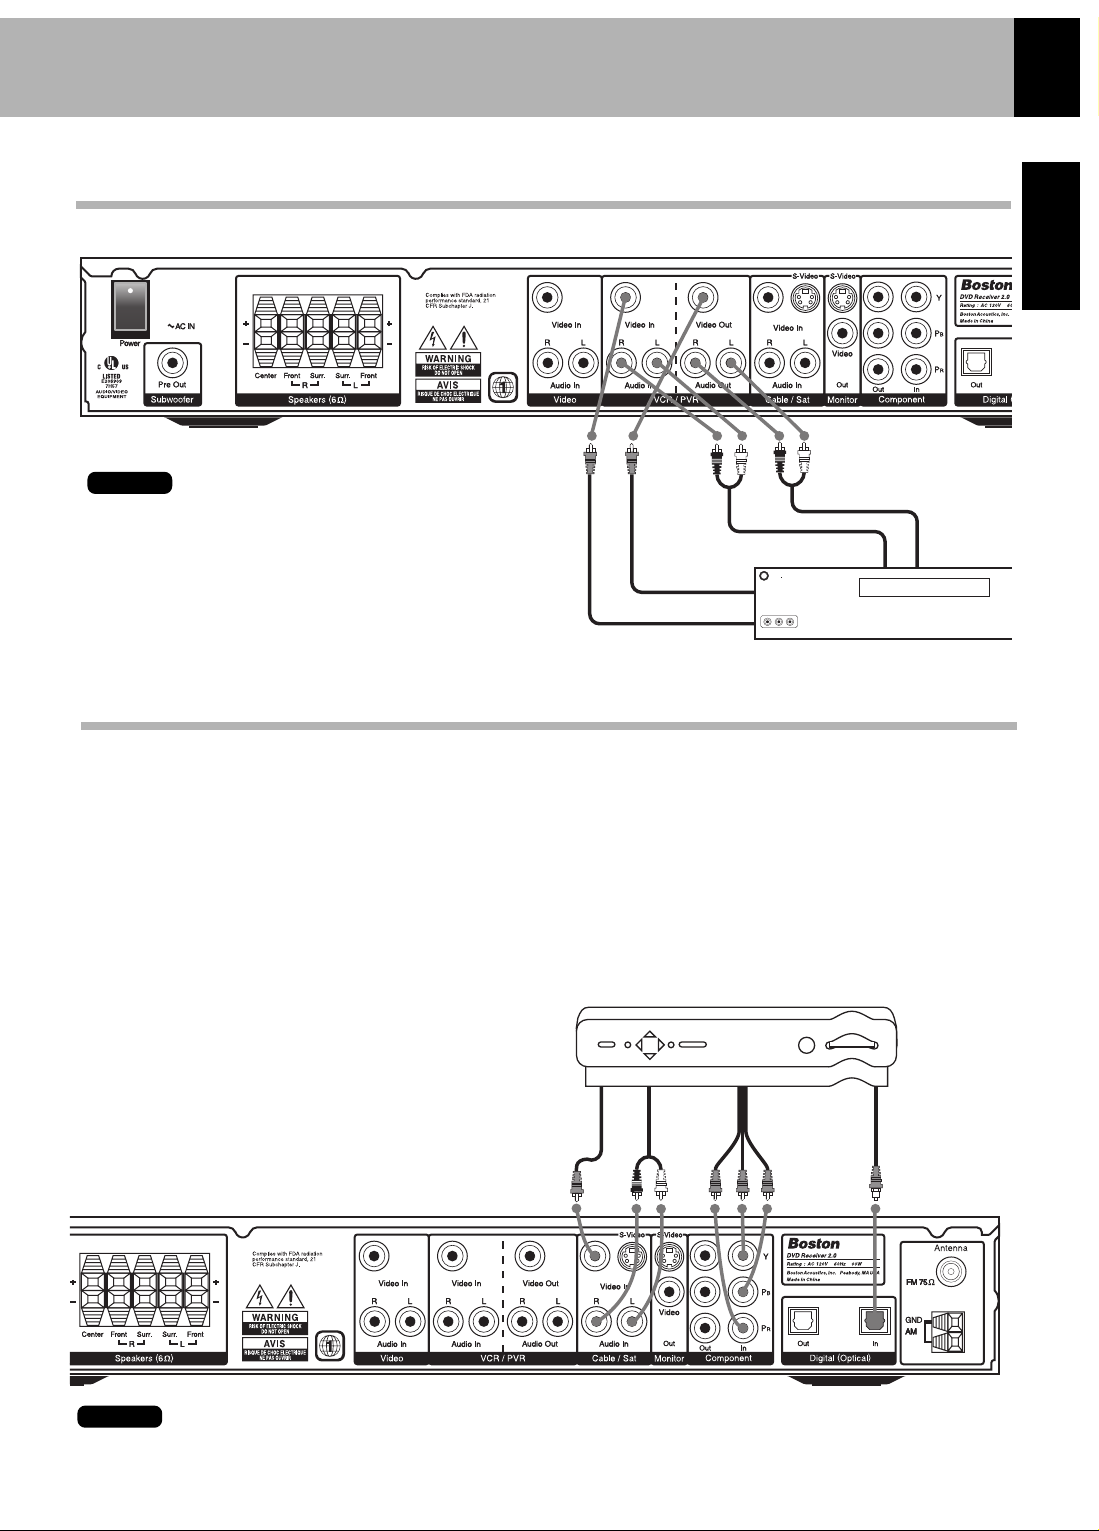
Connecting to Audio Video Equipment
Use the Optical Out to connect to a CD recorder or MD recorder to record audio.
Note
COMPOSITE Video cables
Audio Cable
Audio Cable
Play
Play
Record
Record
Connecting to a Satellite Tuner, Cable Box or other Digital Device
Satellite tuner
COMPOSITE
Video Cable
Audio
Cable
Optical Digital
Cable
(accessory)
Component
Video
Cable
(accessory)
When connecting video devices, separate cables are required for the picture (video) and the sound (audio). However the
component video input has to be assigned in order to enable the system.
If you would like to use the component video or optical digital inputs, you will need to assign them to the CBL/SAT,
VCR/PVR, or VIDEO sources. When selected, these connections override the standard audio/video connections.
Assign the Component Input
Important note for assigning the Component Input: Select the DVD input on the Remote Control and press the AUDIO
SETUP button. The display will show the current setting. Toggle through the list using the right or left cursor buttons:
VIN-OFF, VIN-VIDEO, VIN-VCR, or VIN-CABLE.
Assign the Digital Input
Important note for assigning the Digital Input: Select the
DVD input on the Remote Control and press the AUDIO
SETUP button TWICE. The display will show the current
setting. Toggle through the list using the right or left cursor
buttons: DIN-OFF, DIN-VIDEO, DIN-VCR, or DIN-CABLE.
Recording from the VCR OUT terminal
of this unit is only possible when the
SURROUND MODE is set to STEREO.
Note
Page 14
14
ENGLISH
Switching as shown below is done each time the DIMMER
button on the remote control is pressed.
Bright
Dim 1
Dim 2
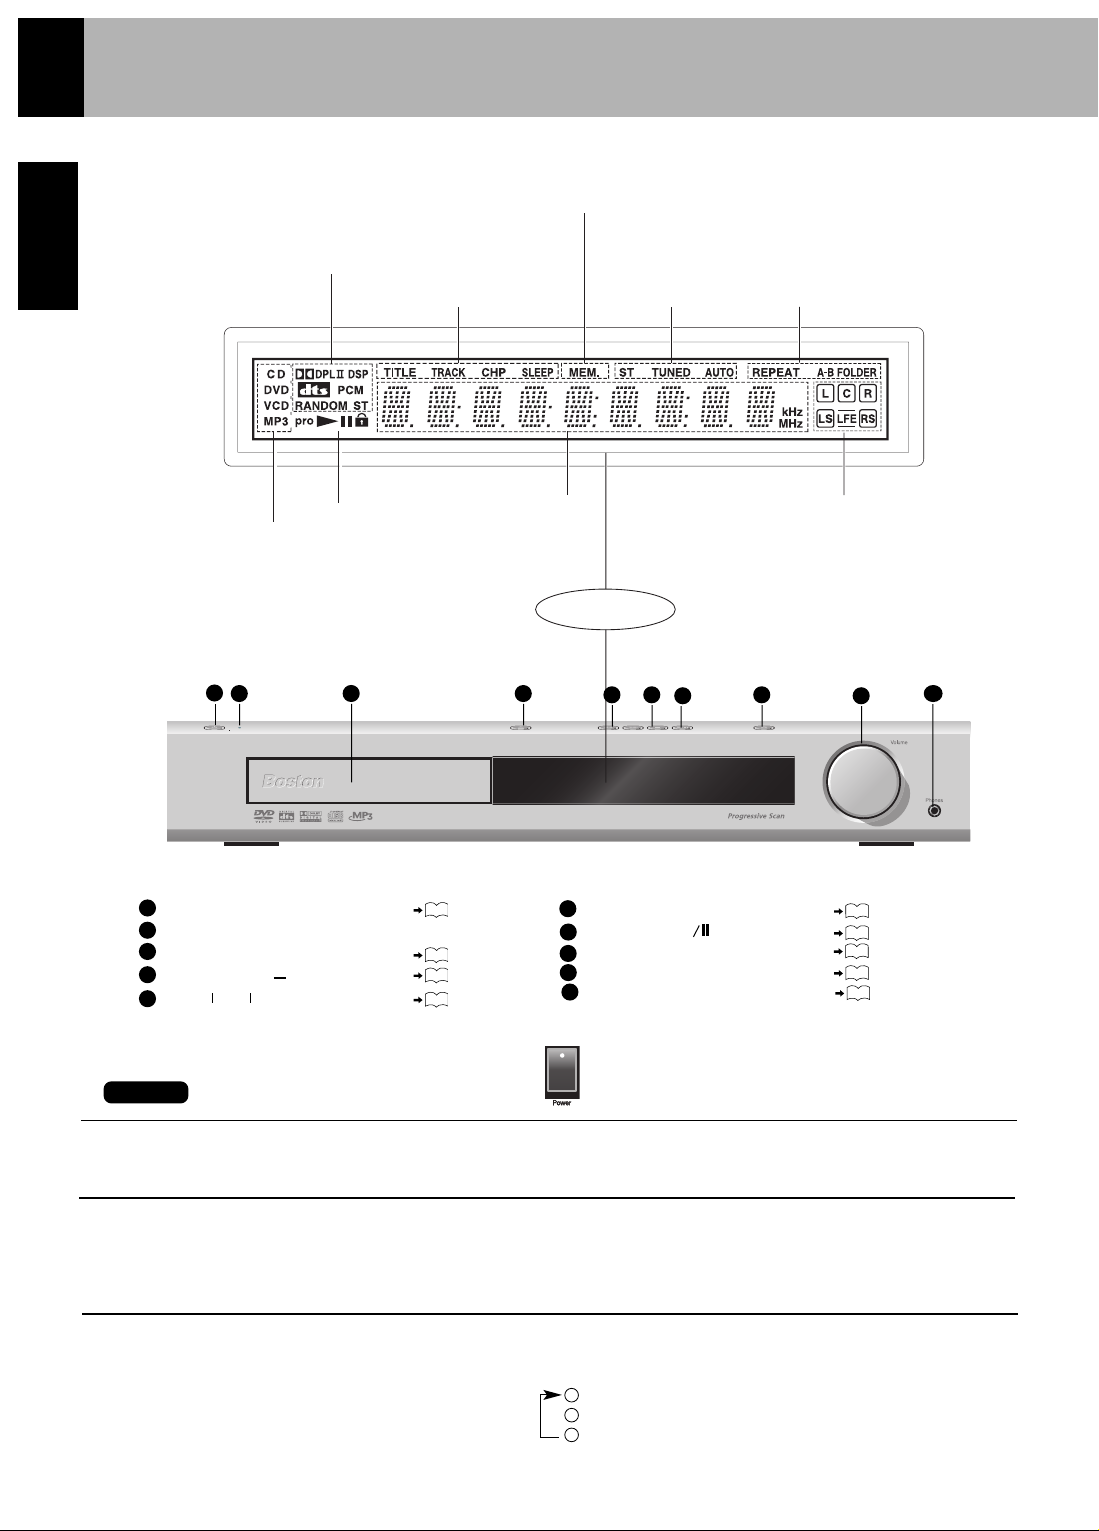
Controls and Indicators
CAUTION
The power will not be completely cut off from the AC wall outlet when the main switch is turned OFF.
Standby Mode
While the standby indicator is lit, a small amount of power is supplied to the system to back up the memory. This is called standby
mode. Under this condition, the system can be turned ON by the remote control unit.
DIMMER Function
The display brightness of the main
unit can be changed.
DOLBY DIGITAL indicator
DOLBY Pro Logic II indicator
DTS indicator
RANDOM indicator
PCM indicator
ST (STEREO) indicator
DSP indicator
TITLE indicator
TRACK indicator
CHP (CHAPTER)
indicator
SLEEP indicator
ST (STEREO) indicator
TUNED indicator
AUTO indicator
REPEAT indicator
A-B indicator
FOLDER indicator
IN/OUT status indicator
L : Left speaker
C : Center speaker
R : Right speaker
LS : Left surround speaker
LFE : Low frequency effect
RS : Right surround speaker
Memory indicator
Display
Character
information
display section
PLAY / PAUSE indicator
CD indicator
DVD indicator
VCD indicator
MP3 indicator
This lights when an MP3, WMA,
or a JPEG disc is set.
STANDBY button
STANDBY indicator
Disc tray
OPEN/CLOSE ( )
STOP (
Q)
SKIP ( )
W
3
2
1
W
W
W
W
1
2
3
4
5
6
31
37
37
38
37
There is an AC power switch on the rear panel.
Note
1
2
3
4
5 6
7
8
9
10
PLAY/PAUSE ( )
7
37
W
SOURCE
8
31
VOLUME CONTROL
9
31
PHONES jack
31
10
Page 15
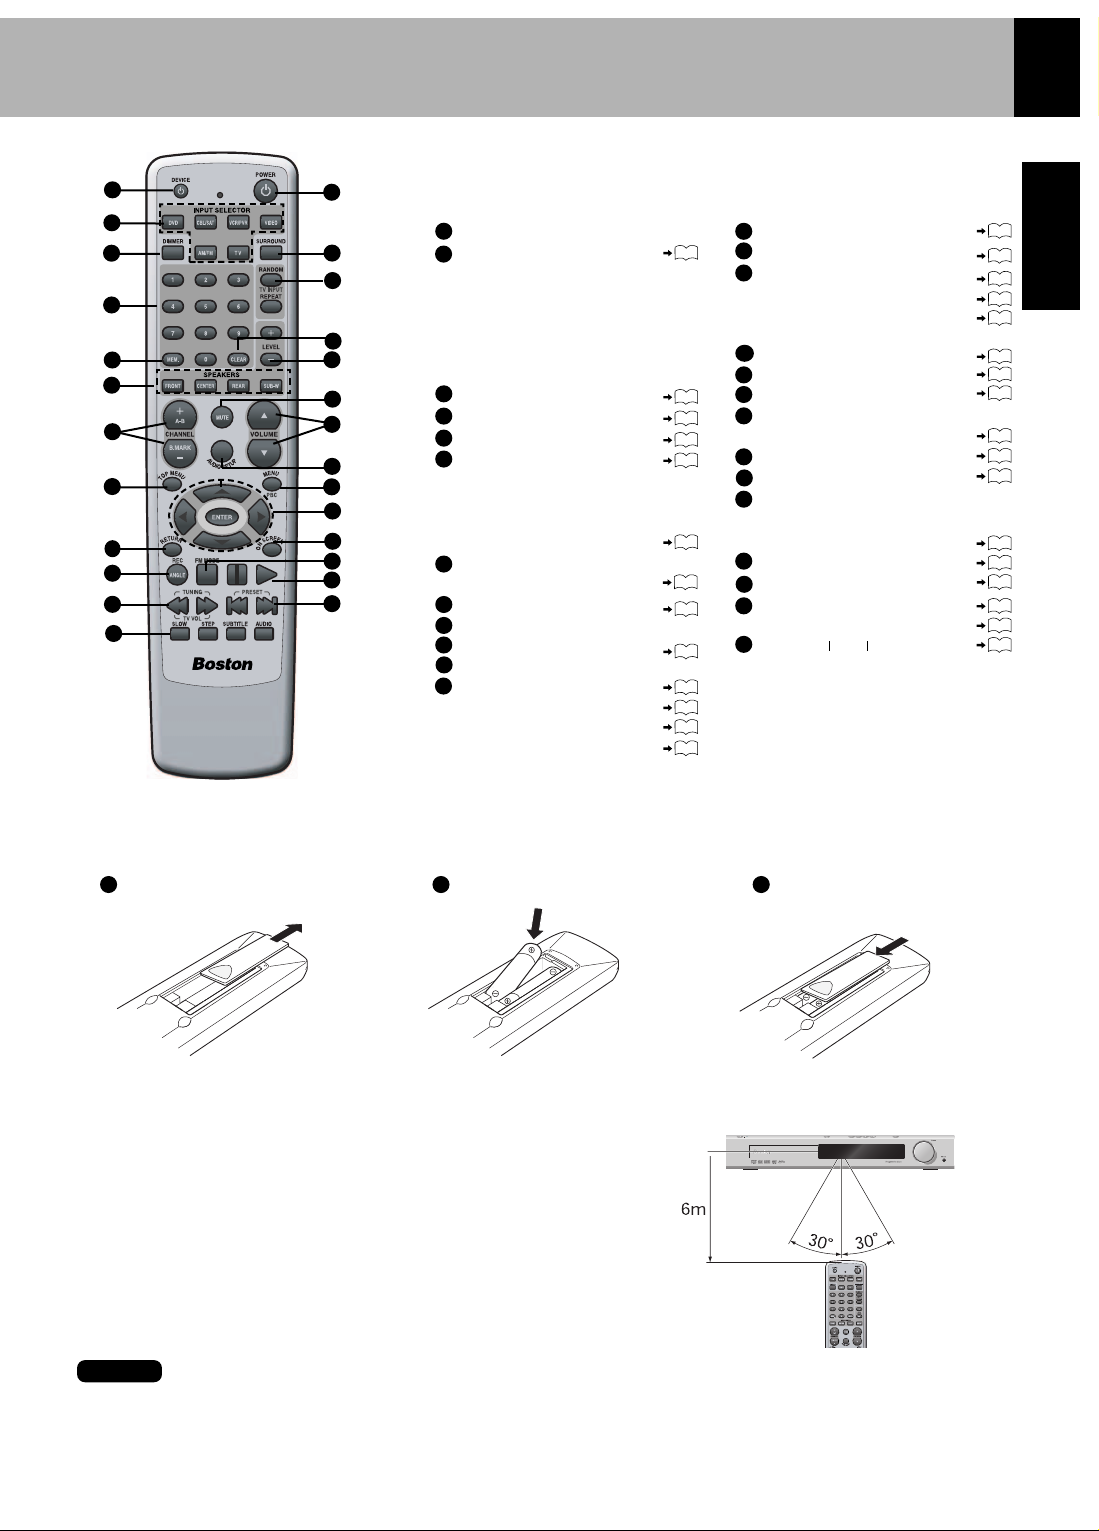
DEVICE POWER OFF
INPUT SELECTOR buttons
DVD button
CBL/SAT button
VCR/PVR button
VIDEO button
AM/FM button
TV button
DIMMER button
Numeric buttons
MEM. button
Speaker select buttons
FRONT button
CENTER button
REAR button
SUB-W (Subwoofer)
CHANNEL buttons, A-B, B. Mark
Up (+), Down (-)
TOP MENU button
RETURN button
REC/ANGLE button
TUNING (Search) buttons
SLOW button
STEP button
SUBTITLE button
AUDIO button
15
ENGLISH
Operation of Remote Control Unit
The remote control provided with the DVD Receiver 2.0 is a universal
remote. The universal remote is pre-programmed for hundreds of
different devices. Please see page 54 for instructions.
Infrared ray system
Loading Batteries
Insert batteries.
Remove the cover.
Close the cover.
• Insert two AAA (R03-size) batteries
following the polarity indications.
Operation
Insert the power plug into a power outlet, press the
POWER switch on the main unit to ON, then press the
POWER button on the remote control.
• When pressing more than one remote control buttons succes-
sively, press the buttons securely by leaving an interval of 1 second or more between pressing of buttons.
1. The provided batteries are intended for use in operation checking, and their service life may be short.
2. When the remote controllable distance becomes short, replace both of the batteries with new ones.
3. If direct sunlight or the light of a high-frequency fluorescent lamp (inverter type, etc.) is incident to the remote sensor,
malfunction may occur. In such a case, change the installation position to avoid malfunction.
Operating range (approx.)
Remote sensor
POWER button
SURROUND button
RANDOM button
REPEAT button
A-B REPEAT button
TV INPUT button
CLEAR button
LEVEL buttons, Up (+), Down (-)
MUTE button
VOLUME
Up, ( ), Down ( ) buttons
AUDIO SETUP button
MENU/PBC button
CURSOR Up ( ), Down ( ),
Left ( ), and Right ( )
ENTER button
ON SCREEN button
Q (Stop)/FM MODE
Pause button
Play button
PRESET (Skip) buttons
W
W
W
W
W
W
W
W
W
W
W
W
W
1
2
15
3
4
5
6
8
7
9
10
12
11
13
14
15
16
17
18
19
21
20
1 2 3
Notes
31
14
34
34
30
28
42
39
33
36
38
38
31
43
31
31
28
18
35
33
4
16
22
26
6
17
18
14
2
1
13
5
11
8
21
24
7
19
3
9
W
22
23
24
25
12
20
26
23
25
37
27
39
40
40
28
18
36
35
33
10
Page 16
9
16
ENGLISH
Set Up Functions
Preparation for Set Up
Set Up Menu
Press the OPEN/CLOSE button on the unit
to open the tray. When the tray is open, press
the STOP button on the top panel of the unit
and press the SUBTITLE button on the
remote.
MULTI ( NTSC/PAL switchable)
NTSC
PAL
The SETUP functions are the following diverse functions. Please change them according to your use environment.
Turn on the POWER.
1 2
3
2
1
+
This model has a rear panel power switch.
If unit appears not to function make sure
AC cord is plugged in and rear panel power
switch is turned on.
Note
Set the TV Format according to the connected TV type.
(Initial Settings)
MAIN UNIT
REMOTE
MAIN UNIT
REMOTE
GENERAL SETUP
Picture Mode This adjusts the screen quality
according to the material being played back.
Auto The picture quality is adjusted automatically.
Film Choose this setting to reproduce the picture
quality of FILM material.
Video Choose this setting to reproduce the picture
quality of VIDEO material.
Smart Choose this setting to reproduce progressive
and interlaced materials with limited motion.
Super Smart Choose this setting to reproduce
progressive and interlaced materials with motion
(motion adaptive interlacing.)
Angle Mark When this is set to ON, the ANGLE
mark will be displayed when a multi angle scene
is reached during playback of a DVD.
On
Off
OSD Language
This switches the language for the
on-screen display.
English, French, German, Italian, Spanish
Captions (NTSC ONLY)
This switches the CLOSED
CAPTION ON or OFF. “Closed caption” is a subtitle
display system developed for the hearing-impaired,
but it is also a very effective system for learning
foreign languages. When your TV is compatible with
“closed caption” and you select ON, you can use the
CLOSED CAPTION function.
On
Off
Screen Saver This switches the screen saver ON or
OFF. When SCR SAVER is ON, the screen saver
function will operate after approx. 3 minutes have
passed with a still picture (display of BOSTON).
On, Off
SPEAKER
Downmix The digital output will automatically provide
a stereo downmix in case a multichannel signal is detected.
On
Off Allows Surround Sound to operate.
Center Allows you to turn off the Center channel.
On
Off
Rear Allows you to turn off the Rear channel.
On
Off
Subwoofer Allows you to turn off the Subwoofer.
On
Off
AUDIO
Audio Out
Off
Bit Stream A signal(DTS, DD or PCM) that is
compressed and changed into digital format.
PCM PCM (Pulse Code Modulation) is the most
common system of encoding digital audio.
Sound can be turned into digital audio data at
different sampling rates; the higher the rate, the
better the quality. PCM soundtracks are mono
or stereo only.
Compression (ONLY FOR Dolby Digital Sources only)
Setting the dynamic range to levels below full will
provide a limited soft to loud range that maybe desirable
for late night listening
Full (Most Compression)
3/4
1/2
1/8 (Least Compression)
Off
LPCM Output LPCM is a signal that is changed to a digital
format without compression. A CD is recorded with 16bit sound at 44.1kHz, while DVD recording is anywhere
between 16 bits at 48kHz to 24 bits at 192kHz.
LPCM 48k
LPCM 96k
DOLBY Pro Logic II Mode This mode applies conventional
2-channel signals such as digital pcm or analog as well as
Dolby Surround signals to surround processing.
Music This mode allows you to further enhance
Page 17

17
ENGLISH
Set Up Functions
your listening experience by adding processing that
emphasizes the musical effects.
Movie This mode allows you to further enhance
your movie experience by adding processing that
emphasizes the sounds of the audio special effects.
Dolby Pro Logic II Control
Panorama (On or Off) Expands the image of front-
channel stereo to the surround speakers to create
a sound environment that fills your surroundings.
(To change the Panorama mode, press SETUP
at the time of Dolby Pro Logic II Music mode.
Display the PANORA OFF or ON, then press
the LEVEL buttons to select on or off.)
Dimension (-3 to 3) Dimension: This controls
the balance between the Front and Rear in 2 steps
on the front and 2 steps on the rear. Set this
parameter to one of the Front steps if the surround
effect is too strong, or to one of the Back
steps if it is too weak. (To change the Dimension,
press SETUP button twice at the time of Pro Logic II
Music mode. Display the DIMEN 0
(or other value), then press the LEVEL buttons
to select F-2, F-3, R-2 or R-3.)
Center Width (0 to 7) The center channel signal can
be divided and distributed to the Front L/R
channels.The adjustment for distributing the
center channel signal to the front channels can
be applied in eight steps from 0 to 7. Use this
adjustment when the center image seems to be
too strong. (To change the Center Width, press
SETUP button 3 times at the time of Dolby Pro
Logic II Music mode. Display the C-WIDTH 0
(or other value), then press the LEVEL buttons to
select 0-7.)
PREFERENCES
TV Display This sets the screen size (4:3 or 16:9
aspect ratio) according to the connected TV.
NORMAL/PS (Pan Scan) Choose this setting if you
want the movie to fill the entire screen of your 4:3
TV. You won’t see part of the picture (particularly
the right and left edge). Some discs produced in a
wide screen format can not be cropped in this
fashion, which means the black bars would appear
at the top and the bottom of the screen.
NORMAL/LB (Letter Box) Choose this setting if
you would prefer to see movies in their original
aspect ratio of your 4:3 TV. You will see the entire
frame of the movie, but it will occupy a smaller
portion of the screen. This setting may result in
the movie appearing with black bars at the top
and bottom of the screen.
Wide Choose this setting if your DVD Receiver is
connected to a wide screen 16:9 aspect ratio TV.
Audio Choose the language for Audio
English, French, Spanish, Chinese, Italian or
German
Subtitle Choose the language for Subtitle
English, French, Spanish, Chinese, Italian or
German
Disc Menu Choose the language for Disc Menu
English, French, Spanish, Chinese, Italian or
German
Parental
This can restrict playback of adult-oriented
DVD discs that you do not want to be seen by
children. However, even when a DVD disc is
marked “Adult-oriented” or so on the label, its
viewing cannot be restricted unless the restriction
level is recorded in the disc itself.
Parental lock level:
Level 8: All DVDs can be played back.
(Factory preset)
Level 7 to 2: DVDs for general
audiences/children can be played back.
(DVDs for adults are prohibited.)
Level 1: DVDs for children can be played
back (DVDs for adults/general audiences are
prohibited.)
1, 2, 3 PG, 4 PG 13, 5, 6 PG-R, 7, 8,
Defaults
This resets all settings, except for PARENTAL
and PASSWORD, to the factory defaults.
Defaults
Password
The password for PARENTAL setting,
change, cancellation, etc. is set. The password set at
the time of shipping from the factory is 0000.
Old Password
New Password
Confirm
Page 18
18
ENGLISH
W
W
Press cursor up/down ( / ) buttons on the remote
to select PIC MODE, then press the cursor right
( ) button to access the sub features.
2
3
4
5
6
Press cursor up/down ( / ) buttons on the remote to
select the specific mode, then press the ENTER button.
W
W
Set Up Functions
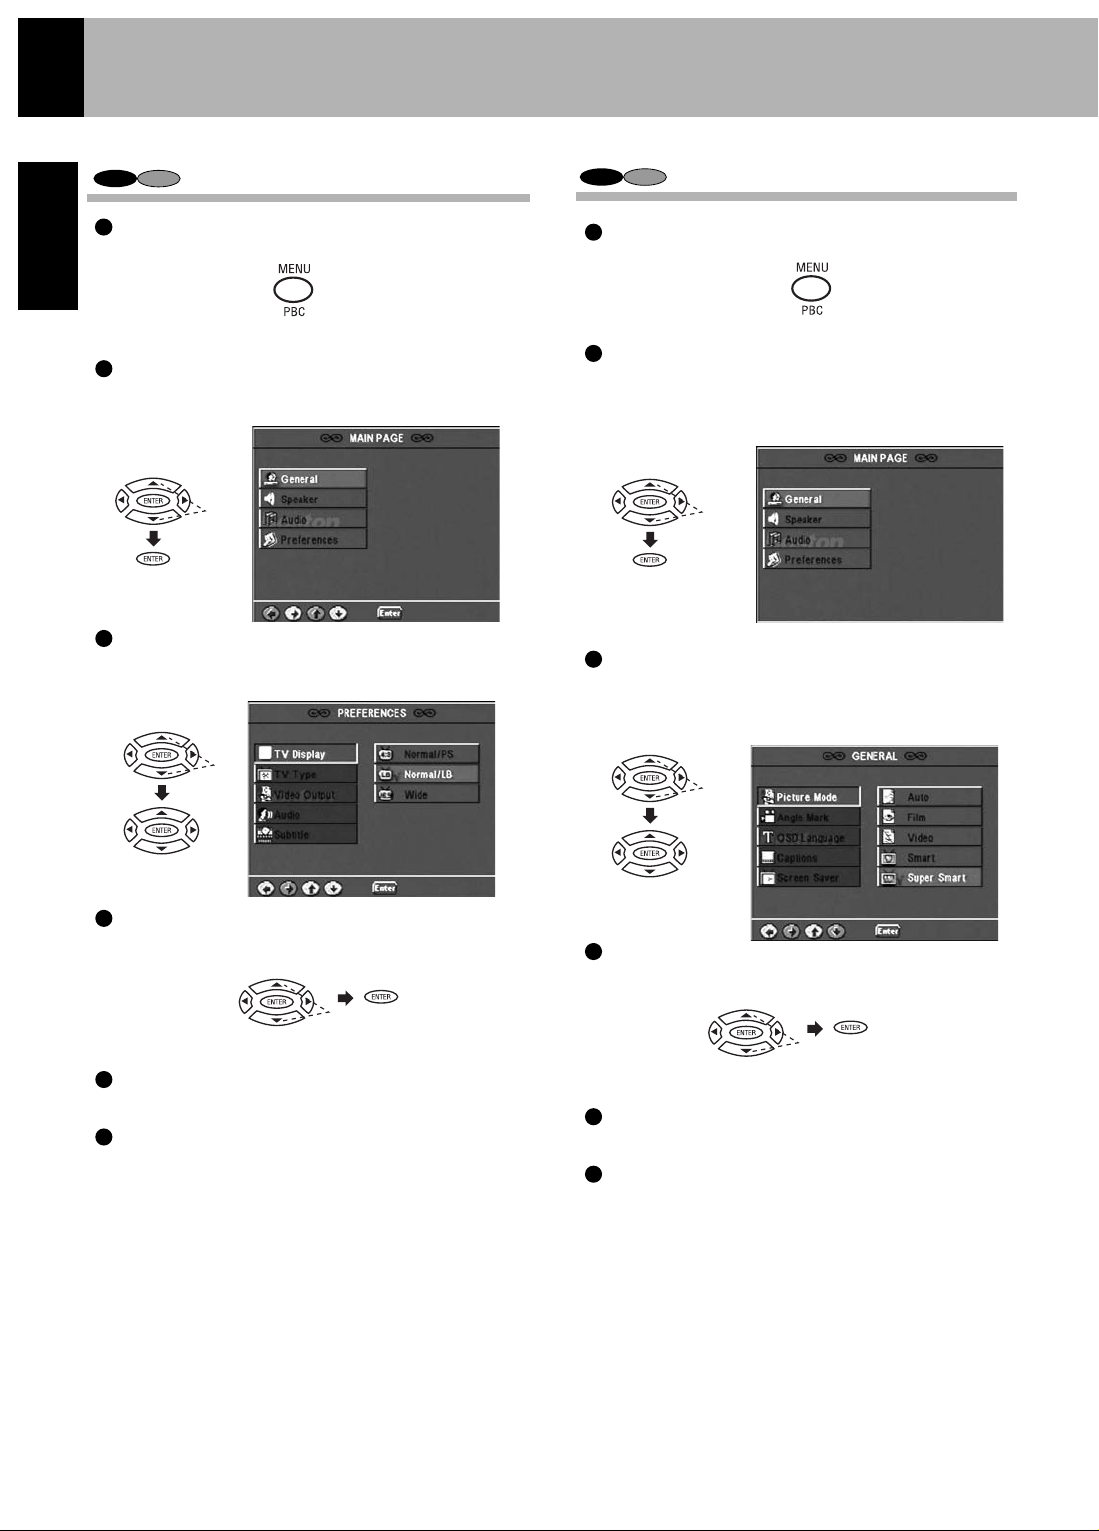
Select TV Display
Select Picture Mode
During stop mode, press the MENU button on
the remote.
Press cursor up/down ( / ) buttons on the remote
to select PREFERENCES, then press the ENTER
button to access the sub features.
Press cursor up/down ( / ) buttons on the remote
to select TV DISPLAY, then press the cursor right
( ) button to access the sub features.
Press cursor up/down ( / ) buttons on the remote to
select TV DISPLAY type, then press the ENTER button.
Press cursor left ( ) button on the remote to return to
previous menu.
Press cursor up/down ( / ) buttons on the remote to
select EXIT SETUP, then press the ENTER button.
Please refer to pages 16 and 17 for setup.
W
W
W
W
W
W
W
W
W
W
During stop mode, press the MENU button on the
remote.
Press cursor up/down ( / ) buttons on the remote
to select GENERAL SETUP, then press the ENTER
button to access the sub features.
Press cursor left ( ) button on the remote to return
to previous MENU.
Press cursor up/down ( / ) buttons on the remote to
select EXIT SETUP, then press the ENTER button.
W
W
W
W
W
W
1
2
3
4
5
6
1
VCD
DVD
VCD
DVD
Page 19

19
ENGLISH
During stop mode, press the MENU button on
the remote.
CD
VCD
1
2
3
4
5
6
5
6
4
3
Set Up Functions
Please refer to pages 16 and 17 for setup.
Press cursor up/down ( / ) buttons on the remote
to select GENERAL SETUP, then press the ENTER
button to access the sub features.
Press cursor up/down ( / ) buttons on the remote
to select ANGLE MARK, then press the cursor
right ( ) button to access the sub features.
Press cursor up/down ( / ) buttons on the remote
to select ON or OFF, then press the ENTER button.
Press cursor left ( ) button on the remote to return
to the previous menu.
Press cursor up/down ( / ) buttons on the remote
to select EXIT SETUP, then press the ENTER button.
W
W
W
W
W
W
W
W
During stop mode, press the MENU button on the
remote.
Press cursor up/down ( / ) buttons on the remote
to select GENERAL SETUP, then press the ENTER
button to access the sub features.
Press cursor up/down ( / ) buttons on the remote
to select OSD LANG, then press the cursor right
( ) button to access the sub features.
Press cursor up/down ( / ) buttons on the remote to
select the specific language, then press the ENTER
button.
Press cursor left ( ) button on the remote to return to
the previous menu.
Press cursor up/down ( / ) buttons on the remote to
select EXIT SETUP, then press the ENTER button.
W
W
W
W
W
W
W
W
W
W
W
W
2
1
DVD
DVD
Select OSD Language
Select Angle Mark On or Off
Page 20

20
ENGLISH
ENGLISH
Set Up Functions
5
6
4
3
2
1
During stop mode, press the MENU button on
the remote.
Press cursor up/down ( ) buttons on the
remote to select GENERAL SETUP, then press
the ENTER button to access the sub features.
Press cursor up/down ( ) buttons on the remote
to select SCR SAVER, then press the cursor right
( ) button to access the sub features.
Press cursor up/down ( ) buttons on the remote to
select ON or OFF, then press the ENTER button.
Press cursor left ( ) button on the remote to return to
the previous menu.
Press cursor up/down ( ) buttons on the remote to
select EXIT SETUP, then press the ENTER button.
W
W
W
W
CD
VCD
DVD
W
W
W
W
W
W
Select Screen Saver On or Off
3
2
1
Select Captions On
or Off (NTSC only)
Please refer to pages 16 and 17 for setup.
During stop mode, press the MENU button on
the remote.
Press cursor up/down ( ) buttons on the remote
to select GENERAL SETUP, then press the ENTER
button to access the sub features.
Press cursor up/down ( ) buttons on the remote
to select CAPTIONS, then press the cursor right
( ) button to access the sub features.
W
W
W
CD
VCD
DVD
W
W
5
6
4
Press cursor up/down ( ) buttons on the remote
to select ON or OFF, then press the ENTER button.
Press cursor left ( ) button on the remote to return to
the previous menu.
Press cursor up/down ( ) buttons on the remote to
select EXIT SETUP, then press the ENTER button.
W
W
W
W
W
Page 21

21
ENGLISH
ENGLISH
5
6
4
3
2
1
Set Up Functions
This function operates only at the time of playback of
DVDs recorded with Dolby Digital.
During stop mode, press the MENU button on
the remote.
Press cursor up/down ( ) buttons on the remote to
select the AUDIO, then press the ENTER button to access
the sub features.
Press cursor up/down ( ) buttons on the remote
to select COMPRESSION then press the cursor
right ( ) button to access the sub features.
Press cursor up/down ( ) buttons on the remote to
select specific dynamic range, then press the ENTER
button.
Press cursor left ( ) button on the remote to return to
the previous menu.
Press cursor up/down ( ) buttons on the remote to
select EXIT SETUP, then press the ENTER button.
W
W
Select Dynamic Range
DVD
W
W
W
W
W
W
W
W
Please refer to pages 16 and 17 for setup.
Page 22

25
1
2
3
To select other languages
Select “OTHER” and press the ENTER button.
Input 4 digit code by pressing the numeric buttons
on the remote.
Press the ENTER button. (DVD menu language
code list. )
25
To select other languages
Select “OTHER” and press the ENTER button.
Input 4 digit code by pressing the numeric
button on the remote.
Press the ENTER button. (DVD menu language
code list. )
1
2
3
22
ENGLISH
7
5
6
4
3
2
1
7
5
6
4
3
2
1
Press cursor left ( ) button on the remote to return
to the previous menu.
Press cursor up/down ( ) buttons on the remote to
select MAIN PAGE, then press the ENTER button.
Select Subtitle Language
Please refer to pages 16 and 17 for setup.
During stop mode, press the MENU button on the
remote.
Press cursor up/down ( ) buttons on the remote to
select PREFERENCE, then press the ENTER button to
access the sub features.
Press cursor up/down ( ) buttons on the remote to
select AUDIO, then press the cursor right ( ) button to
access the sub features.
Press cursor up/down ( ) buttons on the remote to
select a specific language, then press the ENTER button.
Press cursor up/down ( ) buttons on the remote to
select EXIT SETUP, then press the ENTER button.
W
W
Press cursor left ( ) button on the remote to return
to the previous menu.
Press cursor up/down ( ) buttons on the remote to
select MAIN PAGE, then press the ENTER button.
During stop mode, press the MENU button on
the remote.
Press cursor up/down ( ) buttons on the remote
to select PREFERENCE, then press the ENTER
button to access the sub features.
Press cursor up/down ( ) buttons on the remote
to select SUBTITLE, then press the cursor right ( )
button to access the sub features.
Press cursor up/down ( ) buttons on the remote to
select a specific language, then press the ENTER
button.
Press cursor up/down ( ) buttons on the remote to
select EXIT SETUP, then press the ENTER button.
W
W
DVD
DVD
W
W
W
W
W
W
W
W
W
W
W
W
W
W
W
W
W
W
W
W
Select Audio Language
Set Up Functions
Page 23

23
ENGLISH
Press cursor up/down ( ) buttons on the remote to
select EXIT SETUP, then press the ENTER button.
W
W
Set Up Functions
7
5
6
4
3
2
1
7
5
6
4
3
2
1
1
2
3
Press cursor up/down ( ) buttons on the remote to
select DISC MENU, then press the cursor right
( ) button to access the sub features.
Select Disc Menu Language
Please refer to pages 16 and 17 for setup.
Select Parental Level
Press cursor left ( ) button on the remote to return to
the previous menu.
Press cursor up/down ( ) buttons on the remote to
select MAIN PAGE, then press the ENTER button.
During stop mode, press MENU button on the remote.
Press cursor up/down ( ) buttons on the remote to
select PREFERENCE, then press the ENTER button
to access the sub features.
Press cursor up/down ( ) buttons on the remote to
select a specific language, then press the ENTER button.
W
W
Enter the password, then press the ENTER button.
The password set at the time of shipping from the factory is
“0000”.
Refer to the item “Change Password” when the password is
to be changed.
Press cursor left ( ) button on the remote to return to
the previous menu.
Press cursor up/down ( ) buttons on the remote to
select MAIN PAGE, then press the ENTER button.
During stop mode, press MENU button on the remote.
Press cursor up/down ( ) buttons on the remote to
select PREFERENCE, then press the ENTER button
to access the sub features.
Press cursor up/down ( ) buttons on the remote to
select PARENTAL, then press the cursor right ( )
button to access the sub features.
Press cursor up/down ( ) buttons on the remote to
select a specific level, then press the ENTER button.
Press cursor up/down ( ) buttons on the remote to
select EXIT SETUP, then press the ENTER button.
W
W
This part of the DVD rating lets you determine how your
player will react to discs that contain movies that are rated
(in the U.S.A the Motion Pictures Association of America
rates movies as G, PG, PG-13, etc.).
DVD
DVD
W
W
W
W
W
W
W
W
W
W
W
W
W
W
W
W
W
W
25
To select other languages
Select “OTHER” and press the ENTER button.
Input 4 digit code by pressing the numeric buttons
on the remote.
Press the ENTER button. (DVD menu language
code list. )
Page 24

24
ENGLISH
5
4
3
2
1
7
5
6
4
3
2
1
Press cursor up/down ( ) buttons on the remote to
select MAIN PAGE, then press the ENTER button.
Set Up Functions
Please refer to pages 16 and 17 for setup.
During stop mode, press MENU button on the remote.
Press cursor up/down ( ) buttons on the remote
to select PREFERENCE, then press the ENTER
button to access the sub features.
Press cursor up/down ( ) buttons on the remote to
select PASSWORD, then press the cursor right ( )
button to access the sub features.
Press the ENTER button to select CHANGE.
Enter the old password, the new password and the
new password again to confirm, then press the
ENTER button. (The password set at the time of
shipping from the factory is “0000”.)
Press cursor up/down ( ) buttons on the remote to
select EXIT SETUP, then press the ENTER button.
W
During stop mode, press MENU button on the
remote.
Press cursor up/down ( ) buttons on the remote
to select PREFERENCE, then press the ENTER
button to access the sub features.
Press cursor up/down ( ) buttons on the remote to
select DEFAULTS, then press the cursor right ( )
button to access the sub features.
Press the ENTER button to select RESET.
Press cursor up/down ( ) buttons on the remote to
select EXIT SETUP, then press the ENTER button.
W
DVD
CD
VCD
DVD
W
W
W
W
W
W
W
W
W
W
W
W
W
W
Reset To Default Setting
Change Password
Page 25

25
ENGLISH
1482
1483
1489
1491
1495
1498
1501
1502
1503
1505
1506
1507
1508
1509
1511
1512
1513
1514
1515
1516
1517
1521
1525
1527
1528
1529
1531
1532
1534
1535
1538
1539
1540
1543
1557
1564
1572
1581
1587
1613
1632
1665
1684
1697
Kirundi
Roumain
Russian
Kinyarwanda
Sanskrit
Sindhi
Sangro
Serbo-Croatian
Shinghalese
Slovak
Slovenian
Samoan
Shona
Somali
Albanian
Serbian
Siswati
Sesotho
Sundanese
Swedish
Swahili
Tamil
Tegulu
Tajik
Thai
Tigrinya
Turkmen
Tagalog
Setswana
Tonga
Turkish
Tsonga
Tatar
Tw i
Ukrainian
Urdu
Uzbek
Vietnamese
Volapuk
Wolof
Xhosa
Yoruba
Chinese
Zulu
Code No. Language
1027
1028
1032
1039
1044
1045
1051
1052
1053
1057
1059
1060
1069
1066
1067
1070
1079
1093
1097
1103
1105
1109
1130
1142
1144
1145
1149
1150
1151
1157
1165
1166
1171
1174
1181
1183
1186
1194
1196
1203
1209
1217
1226
1229
1233
1235
Code No.
Language
Set Up Functions
DVD Menu Language Code List
1239
1245
1248
1253
1254
1257
1261
1269
1283
1287
1297
1298
1299
1300
1301
1305
1307
1311
1313
1326
1327
1332
1334
1345
1347
1349
1350
1352
1352
1353
1356
1357
1358
1363
1365
1369
1376
1379
1393
1403
1408
1417
1428
1435
1436
1463
1481
Interlingue
Inupiak
Indonesian
Icelandic
Italian
Hebrew
Japanese
Yiddish
Javanese
Georgian
Kazakh
Greenlandic
Cambodian
Kannada
Korean
Kashmiri
Kurdish
Kirghiz
Latin
Lingala
Laothian
Lithuanian
“Latvian, Lettish”
Malagasy
Maori
Macedonian
Malayalam
Mongolian
Moldavian
Marathi
Malay
Maltese
Burmese
Nauru
Nepali
Dutch
Norwegian
Occitan
(Afan) Oromo
Oriya
Punjabi
Polish
“Pashto, Pushto”
Portuguese
Quechua
Rhaeto-Romance
Afar
Abkhazien
Afrikaans
Amharic
Arabic
Assamese
Aymara
Azerbijani
Bashkir
Byelorussian
Bulgarian
Bihari
Bislama
Bengali; Bangla
Tibetan
Breton
Catalan
Corsican
Czech
Welsh
Danish
German
Bhutani
Greek
English
Esperanto
Spanish
Estonian
Basque
Persian
Finnish
Fiji
Faeroese
French
Frisian
Irish
Scots Gaelic
Galician
Guarani
Gujarati
Hausa
Hindi
Croatian
Hungarian
Armenian
Interlingua
Code No. Language
Page 26

26
ENGLISH
Setting Up SURROUND Mode
What are SURROUND Modes?
You can experience true home-theater sound with your new system. This system incorporates several surround modes
to let you enjoy surround sound with a wide variety of program sources. Each produces multiple channels of surround-sound, but each does it differently.
Dolby Digital: Dolby Digital uses an encode/decode process based on its theatrical digital surround sound technology. The five
main channels are full-frequency and independent, so sound can completely envelop you or soar anywhere in the room, just like
at the movies.
Compared with Dolby Pro Logic, Dolby Digital has more clarity, greater surround envelopment, and more realistic sound movement between channels.
Dolby Pro Logic and Dolby Pro Logic II: Dolby Pro Logic reproduces a surround sound like in a movie theater from Dolby
Surround-encoded program source (videotape or LaserDisc software carrying the Dolby Surround logo), and features excellent
sound movement on the front and a surrounding atmosphere of movie theaters. Meanwhile, Dolby Pro Logic II decodes a signal
encoded in 2 channels into 5-channel signals composed of the left/right front signals, center signal and surround left/right signals.
Dolby Pro Logic II is an advanced version of the decoding technology used with Dolby Pro Logic. It inputs 2-channel signals
from a Dolby Surround-encoded source and reproduces 5-channel signals in which the surround channel is divided into independent channels for the left and right. Dolby Pro Logic II has the MOVIE mode and MUSIC mode.
DTS: DTS has five full-frequency channels that create effects nearly identical to those in a theater. Sounds seem to zoom from
one place to another or entirely surround you. Like Dolby Digital, DTS has much-improved clarity, surround and sound movement capability compared with Dolby Pro Logic. This surround mode is available on CD, LD, and DVD media. DTS is a strictly
digital format that can be supplied only by a CD, LD, or DVD player that supports DTS sound.
Stereo: Stereo surround mode provides standard stereo sound to the front left and right speakers.
When recording to VCR from the DVD player, set the SURROUND mode to stereo. Do not switch the
SURROUND mode while recording to VCR.
The INPUT/OUTPUT status indicator becomes an input indicator at the time of DOLBY DIGITAL and
DTS source and an output indicator at all other times.
MANUFACTURED UNDER LICENSE FROM DOLBY
LABORATORIES. “DOLBY”, “PRO LOGIC” AND THE
DOUBLE-D SYMBOL ARE TRADEMARKS OF DOLBY
LABORATORIES.
MANUFACTURED UNDER LICENSE FROM DIGITAL
THEATER SYSTEMS, INC. US PAT. NO. 5,451,942,
5,956,674, 5,974,380, 5,978,762 AND OTHER WORLDWIDE PATENTS ISSUED AND PENDING. “DTS” AND
“DTS DIGITAL SURROUND” ARE REGISTERED
TRADEMARKS OF DIGITAL THEATER SYSTEMS, INC.
COPYRIGHT 1996, 2000 DIGITAL THEATER SYSTEMS,
INC. ALL RIGHTS RESERVED
Note
L C R
LS RSLFE
Page 27

27
ENGLISH
Setting Up SURROUND Mode
According to the contents of the disc played in this unit, the SURROUND MODE (selected by the SURROUND button) can be found in the following table:
At the Time of DTS or DOLBY DIGITAL (5.1 ch) Source
When the SET UP button is pressed at the time of PL II
MUSIC, switching of Panorama mode, Dimension, and
Center Width is possible with the LEVEL buttons on
the remote.
Press the SURROUND button.
REMOTE
REMOTE
Press the SURROUND button.
At the Time of PCM or DOLBY DIGITAL (2 ch) Source
Description of Dolby Pro Logic II: Music Mode
Panorama: Expands the image of front-channel stereo to the surround speakers to create a sound environment that fills
your surroundings. (To change the Panorama mode, press SETUP at the time of Dolby Pro Logic II Music
mode. Display the PANORA OFF or ON, then press the LEVEL ( ) buttons to select on or off.)
Dimension: This controls the balance between the Front and Rear in 2 steps on the front and 2 steps on the rear. Set this
parameter to one of the Front steps if the surround effect is too strong, or to one of the Back steps if it is too
weak. (To change the Dimension, press SETUP button twice at the time of Dolby Pro Logic II Music mode.
Display the DIMEN 0 (or other value), then press the LEVEL ( ) buttons to select F-2, F-3, R-2 or R-3.)
Center
Width: The center channel signal can be divided and distributed to the Front L/R channels.
The adjustment for distributing the center channel signal to the front channels can be applied in eight steps
from 0 to 7. Use this adjustment when the center image seems to be too strong. (To change the Center Width,
press SETUP button 3 times at the time of Dolby Pro Logic II Music mode. Display the C-WIDTH 0 (or other
value), then press the LEVEL ( ) buttons to select 0-7.)
DOLBY
DIGITAL
(5.1ch)
DOLBY
DIGITAL
(2ch)
DTS
VCD/CD
(PCM, MP3)
(ANALOG)
SURROUND MODE
SOURCE
STEREO
DOLBY PRO LOGIC II
DTS
DOLBY DIGITAL
DISC
Input
(OPTICAL)
Input
(At the time of DOLBY DIGITAL) (5.1 ch) source)
DOLBY D (DIGITAL)
STEREO
(At the time of DTS source)
DTS
STEREO
Each press switches the modes as shown below.
Each press switches the modes as shown below.
DOLBY PRO LOGIC II
(PL II MOVIE or PL II MUSIC)
STEREO
W
W
W
W
W
W
2
1
2
1
1
2
1
Setting the SURROUND Mode Manually
Page 28

After all speakers have been adjusted, operate the
Delay time setting.
28
ENGLISH
2
Adjust the volume with the LEVEL ( ) buttons
while the indicator is flashing so that the volume from
all speakers except the subwoofer (SUB-W) appears
the same. Level adjustment is possible in the range
from -10 dB
Speaker Setting
Positioning the Speakers
To achieve the optimum effects obtainable with this SURROUND SOUND system, it is important to position the speakers
properly. Refer to the following illustration to find the best location in your room.
Preparation
Press the Standby button.
For this unit, the speaker levels have been set in advance so that the best volume balance is obtained
with standard use.
Initial set values for the speaker level:
Left Front channel (L) : 0 dB
Center channel (C) : 0 dB
Right Front channel (R) : 0 dB
Right Surround channel (RS) : 0 dB
Left Surround channel (LS) : 0 dB
Subwoofer (SUB-W) : 0 dB
Reset as follows to match your listening environment.
Speaker Test Tone and Level Setting
Press the AUDIO SETUP button
for more than 3 seconds.
Press the LEVEL ( ) buttons to
control the speaker level.
As the subwoofer (SUB-W) has a special playback band,
normal adjustment is not possible with the test tone.
Please adjust the subwoofer while listening to actual
music.
The speakers will be switched as follows in intervals of
about 2 seconds.
The test tone is played back from the Left Front speaker.
Adjust the VOLUME CONTROL so that it is slightly
loud and fix it there.
Note
30
29
W
W
W
W
LCRRS
LS
SW
“L” Blinks
Some revisions of this model have a rear panel power switch.
If unit appears not to function make sure AC cord is plugged
in and rear panel power switch is turned on.
1
Note
Page 29

29
ENGLISH
Speaker Setting
Delay Time Setting
The ideal listening position for 6-channel surround playback is the point at equal distance from all speakers. By setting
the delay time for the center and surround speakers, this item realizes the ideal listening position virtually. (The center
and surround speakers can be set as if they are laid out on the dotted line circle shown below.)
Ideal surround
speaker position
How to Set the Delay Time
The front speakers (L/R) can be adjusted between 40
feet (12 m) and 3 feet (0.9m).
The range which can be set for the center speaker (C)
and the surround speakers (LS/RS) differs according to
the setting for the front speakers. A longer distance than
for the front speakers can not be set.
Delay time setting sets the delay time converted to the
distance from the speaker to the listening position.
Feet indication
Meter indication
The original display returns when no operation is
performed for about 5 seconds.
The process advances to center speaker adjustment
when the SETUP button is pressed.
Repeat and in the same way to adjust the
surround speakers.
Press the SETUP button to end speaker setting.
Press the LEVEL ( ) buttons to
select the speaker distance.
Press the LEVEL ( ) buttons to
select the speaker distance.
Press the AUDIO SETUP button.
Press AUDIO SETUP button.
This operation is performed following the adjustment of
the speaker level setting on page 28. In test tone mode:
Ideal center speaker position
3 4
1
2
3
4
W
W
W
W
Page 30

30
ENGLISH
FRONT: Front speakers
Switching is done as follows each time the switch is
pressed.
L ch: Left speaker
R ch: Right speaker
CENTER: Center speaker
REAR: Rear (Surround) speakers
Switching is done as follows each time the switch is
pressed.
LS ch: Left surround speaker
RS ch: Right surround speaker
SUB-W: Subwoofer
Speaker Setting
Level Setting Using a Music Source
A music source can be used for speaker level setting and subwoofer level setting.
Play a disc.
Select the speaker button.
Press the LEVEL ( ) button to set
the speaker level.
Speaker level adjustment can be performed by pressing
the buttons FRONT, CENTER, REAR and SUB-W.
The speaker level can be changed in the range from -10dB
to + 10dB.
1
2
3
2
1
2
1
W
W
In stereo mode, The speaker level can be
changed in L Ch, R Ch, and Subwoofer.
Note
Page 31

Volume
Phones
Volume
31
ENGLISH
Let’s Play Some Sound
Basic Use Method
Preparation
Press POWER.
MAIN UNIT
Switching is done as follows when the SOURCE
button on the main unit is pressed.
Volume Adjustment
Muting the Sound Temporarily
Listening Through Headphones
Insert the headphone plug into the PHONES jack.
MAIN UNIT
REMOTE
REMOTE
To decrease
To increase
To decrease
To increase
The sound from all speakers is cut off.
This unit offers various surround modes, but it switches
automatically to stereo mode when headphones are
connected.
Press the MUTE button.
Press again to resume the original volume.
The sound muting is also cancelled when the volume is
adjusted.
Normally “MAX” is displayed when the volume settings are
set to the maximum value.
Depending on the speaker setting value “MAX” will not be
displayed.
When one of the buttons on the left is pressed while
in STANDBY mode, the power will be switched on
automatically and the input will be selected.
The power will be switched on and the respective operation will be performed also when the EJECT button,
the PLAY/PAUSE button or the SOURCE button on
the main unit is pressed during STANDBY mode.
When a disc is set in the disc tray and the DVD button
is pressed, disc playback will start automatically.
Selecting the Desired Input
In case of operation with the remote control unit, first
select the input or device to be operated with the
INPUT SELECTOR buttons etc., and then perform the
desired operation.
The present mode of the remote control unit may not
coincide with the equipment to be operated.
2
1
Note
This model has a rear panel power switch. If unit appears not
to function make sure AC cord is plugged in and rear panel
power switch is turned on.
Note
Standby
Source
Volume
Phones
jack
Input
buttons
Power
Volume
buttons
Mute
buttons
DVD
CBL/SAT
VCR/PVR
VIDEO
AM/FM
TV
3
2
1
4
5
6
REMOTE
MAIN UNIT
REMOTE
CBL/SAT
Volume
Volume
Phones
Page 32

32
ENGLISH
Press the SURROUND button repeatedly.
Selecting the Surround Sound Mode
Four different sounds are preset in DSP mode. DSP mode can be selected only during playback of a PCM source (music
CD, MP3 file, etc.).
Assign the Digital Input
Press the appropriate Input Selector button: CBL/SAT, VCR/PVR or Video. Press the SETUP button TWICE.
The display will show the current setting. Toggle through using the right or left cursor buttons: DIN-OFF,
DIN-VIDEO, DIN-VCR, or DIN-CABLE.
Each press switches the mode
(At the time of music CD)
Let’s Play Some Sound
1
2
DOLBY PL II MOVIE
DOLBY PL II MUSIC
STEREO
3
REMOTE
Page 33

33
ENGLISH
Receiving Broadcast Stations
It is also possible to receive stations using one-touch operations
by storing up to 40 stations in the preset memory. (see page 34)
When the SOURCE or AM/FM button is pressed,
this unit will be switched on automatically.
Tuning indication
Stereo tuning indication
Frequency display
Band display
Preset number
Each press changes the band.
FM
AM
Each press switches the mode.
AUTO: auto mode
MONO: monaural mode
When the tuning buttons are pressed in AUTO mode, a station
will be tuned in automatically and tuning will stop. Stereo reception will be made automatically when a stereo broadcast with sufficient signal strength is received.
MONO mode
(manual tuning)
AUTO mode
(auto tuning)
Select a Station
PRESET
Select a Tuning Mode
Select the Broadcast Band
Each time a button is pressed, the frequency is
changed by one step.
When a button is pressed continuously, the
frequency changes continuously.
Use the manual tuning mode when reception is
noisy due to weak reception. (In the manual
mode, stereo broadcasts are received in monaural.)
Press the tuning buttons to receive the
next tuned station automatically
Press the ( ) buttons to select a preset
station.
Select the TUNER Input
1
2
3
4
W
W
W
W
2
1
2
1
MAIN UNIT
MAIN UNIT
REMOTE
MAIN UNIT
REMOTE
REMOTE REMOTE
REMOTE
REMOTE
Skip
AM/FM
button
Power
Preset
buttons
FM Mode button
Source
Tuning buttons
Volume
Volume
Phones
Page 34

34
ENGLISH
Receiving Broadcast Station
Storing Broadcast Stations (One-by-One Presetting)
Press the MEM. button
Select a station (auto tuning or
manual tuning)
Select the desired preset number
Press the MEM. button
You can store up to 40 stations in the memory and recall
with a single touch of the button.
Repeat steps to to preset other
stations.
In case of input with the number
buttons, a preset number will
be decided simply by input of a
2-digit number without
pressing the MEM. button.
Please perform the next operation while the indicator is
blinking.
Blinks
Presetting can be done with a mixing of FM and AM stations.
(Example)
01: FM 90.00
02: AM 531
03: FM 88.00
1
2
3
4
33
1
4
REMOTE
REMOTE
REMOTE
Enter button
MEM. button
Page 35

Preparation
Press POWER.
Play a Disc
Basic Play
Load a disc
Start playback
To Stop Playback
Open the tray.
Place a disc.
When the PLAY/PAUSE button or open/close ( ) button
is pressed while a tray is open, the tray closes automatically,
and then playback begins.
When a Disc Menu appears on the screen
In case of interactive DVDs, a Disc Menu appears on the screen.
Press ENTER to select a specific menu you want to play by using
the cursor buttons.
When a menu screen is recorded on the DVD disc,
the menu screen will be displayed when the TOP
MENU button or MENU button is pressed. At the
menu screen, the menu can be selected by pressing the
cursor buttons.
RESUME playback (only DVD)
When the Q (Stop) button has been pressed once during
playback to stop the playback, and then playback is started
again, play will start from the point where the playback had
been stopped. This is called the RESUME function. When
the
Q (Stop) button is pressed again during stop, the
RESUME function is cancelled.
W
1
2
1
2
Note
After the power is switched ON, there is a delay
of about 3 seconds before the display is lit.
MAIN UNIT
MAIN UNIT
REMOTE
MAIN UNIT
REMOTE
Pause
REMOTE
MAIN UNIT
REMOTE
TITLE No. (DVD) Time Display
CHAPTER No. (DVD)
TRACK NO. (CD/VCD)
Each press of the
PLAY/PAUSE button on
the main unit, pauses and
plays the disc alternately.
Press the (pause) button
on the remote.
OR
Standby
Disc tray
Play/Pause
Top Menu
Power
Volume
buttons
Stop
Stop
Open/Close
Play
35
ENGLISH
MAIN UNIT
REMOTE
Volume
Volume
Phones
Page 36

36
ENGLISH
Playback of Disc
Disc Playback Features
Skipping Chapters or Tracks
You will not hear the sound (audio) of the DVD
and VCD when you're using the Skip, Search,
Step or Slow motion features.
Playback features are not available during the
opening credits of a movie.
: skip backward
: skip forward
Searching
STEP (Freeze Frame and Frame Advance)
Press the button at any time to resume normal playback.
During playback, press the or button.
Each press switches the searching speed.
The Chapter feature won't work if the disc
isn't formatted with separate chapters.
The chapter (or track) in the direction of the button
pressed is skipped, and the selected chapter (or track)
will be played from the beginning.
When the button is pressed once during playback,
the chapter (or track) being played will be played
from the beginning.
FF 2 X ( ) or FR 2 X ( )
FF 4 X ( ) or FR 4 X ( )
FF 8 X ( ) or FR 8 X ( )
FF 16 X ( ) or FR 16 X ( )
Normal playback.
W
W
W
W
: search backward
: search forward
W
W
W
W
W
W
W
W
W
W
W
W
W
W
W
W
W
W
W
W
W
W
W
W
Notes
CD
VCD
DVD
CD
VCD
DVD
VCD
DVD
3
4
5
2
1
Note
MAIN UNIT
REMOTE
REMOTE
REMOTE
W
During playback, press STEP.
Each time you press the button, the picture
advances one frame.
Press the button at any time to resume normal
playback.
W
W
W
•
Each press pauses and plays the disc alternately.
Play/Pause
Tuning
Step
Skip
Play
Numeric
Slow
Enter
On
screen
STEP
Volume
Volume
Phones
Volume
Volume
Phones
Page 37

37
ENGLISH
Notes
Playback of Disc
Slow Motion Playback
Playback From Desired Track or Title
On Screen Display
Because DVD VIDEO discs use digital technology, a title can be divided into individual chapters (similar to tracks on a CD).
The elapsed time or the remaining time for the chapter or the
track can be displayed on the monitor (TV) screen.
Press the ON SCREEN button on the remote.
Each press of the button switches the display.
At the time of DVD playback.
At the time of CD/VCD playback.
“SINGLE ELAPSED”
Elapsed time of the track being played.
(Example) 22:23 TRACK 05/15
“SINGLE REMAIN”
Remaining time of the track being played.
“TOTAL ELAPSED”
Elapsed time of the disc being played.
“TOTAL REMAIN”
Remaining time of the disc being played.
“OFF”
Items marked by * are not displayed in PBC on mode
of VCD.
PBC on mode of VCD, the Selecting a
Track function may not work.
Select the desired track No. (CD, VCD) or title No. (DVD)
Press the numeric as shown below
(Example) To select track No 23:
Press the ENTER button.
Press to resume normal playback.
During playback, press SLOW.
Each press switches the motion speed.
1
2
3
4
SF 1/4
SF 1/8
SF 1/16
Normal playback
Title number and chapter number display.
(Example) TITLE 01/02 CHAPTER 005/015
00:05:12 (elapsed time of the title)
“TITLE REMAIN”
Remaining time of the title being played.
“CHAPTER ELAPSED”
Elapsed time of the chapter being played.
“CHAPTER REMAIN”
Remaining time of the chapter being played.
“OFF”
W
1
2
2 3
VCD
DVD
CD
VCD
DVD
CD
VCD
DVD
3
4
5
2
1
3
4
5
2
1
34
REMOTE
REMOTE
Page 38

38
ENGLISHENGLISH
Various Playback Functions
Select Audio Language
Select Subtitle Language
Select the Audio Channel
If the disc was created with different language tracks, you
can use the AUDIO button on the remote to temporarily
change the DVD player's Audio setting.
During playback, press the AUDIO button on the remote.
The language is switched each time the AUDIO
button is pressed.
The display is switched off when no operation is
performed for about 2 seconds.
The language feature only works if the disc was
created with multiple audio tracks.
When you chose an audio language by the
AUDIO button, you only override the audio
language setting in the DVD Player’s main
menu (in the language preferences menu within
Setup menu) temporarily.
You can choose to play back only the right or the left
channel of audio recorded on the disc, or you can select
stereo playback.
During VCD playback, press the AUDIO button on
the remote.
Each press of the button switches the mode.
The subtitle feature only works if the disc was created
with multiple subtitle tracks.
The subtitle menu of the disc appears in some discs.
The language is switched each time the SUBTITLE
button is pressed.
The display is switched off when no operation is
performed for about 2 seconds.
During playback, press the SUBTITLE button on
the remote.
You can change the Subtitle language while you're
watching a disc (but only if the disc was created
with subtitles).
MONO LEFT
MONO RIGHT
STEREO
1
2
1
2
DVD
DVD
VCD
Notes
Notes
1
2
3
Select Subtitle On or Off
When the SUBTITLE ON/OFF button is pressed,
subtitles will be displayed. Switching between display
or subtitles and no display of subtitles is done each
time the button is pressed.
Press SUBTITLE button on the remote.
VCD
Page 39

39
ENGLISH
1
2
1
2
Various Playback Functions
Select Camera Angle
Random Play
Some discs contain multiple angles for a particular scene
or sequence. If the disc only has one angle, this feature
won't work.
During playback, press the ANGLE button on the
remote.
Select the Camera angle by pressing the ANGLE button.
The display is switched off when no operation is
performed for about 2 seconds.
After all tracks of a disc have been played in random order,
playback will stop.
When playing a DVD, the Random mode does not work.
When switching to RANDOM mode with a VCD in PBC
ON mode, the PBC mode will become OFF.
Each press of the button switches the mode.
During random playback, press the REPEAT button
on the remote.
To Repeat Random Play
Press the stop (Q) button to stop playback.
Press the RANDOM button to cancel random playback.
To Cancel Random Play
MP3/WMA/JPEG Random play
The menu is switched off when no operation
is performed for about 2 seconds.
Each time you press the RANDOM button on the
remote, random play is turned on and off.
Press the play pause ( ) button to start random
playback.
During stop mode, press the RANDOM button
on the remote.
The tracks of the disc are played in random order.
REPEAT ONE
REPEAT ALL
REPEAT OFF
W
Notes
50
CD
VCD
DVD
1
2
3
2
1
LitLit
Display
The Random play display appears
Page 40

40
ENGLISH
Various Playback Functions
Repeat Play
A-B Repeat Play
Desired title, chapter, track or disc can be played back
repeatedly.
At the time of DVD playback:
CHAPTER REPEAT : Repeat the chapter that is playing.
TITLE REPEAT : Repeat the title that is playing.
At the time of CD/VCD playback:
REPEAT ONE : Repeat the track that is playing.
REPEAT ALL : Repeat the disc that is playing.
During playback, press the REPEAT button on the remote.
Each press of the button switches the REPEAT mode.
At the time of DVD playback:
CHAPTER REPEAT ON Display lit REPEAT and
CHAP blinks.
TITLE REPEAT ON Display lit REPEAT and
TITLE blinks.
REPEAT OFF
At the time of CD/VCD playback:
REPEAT ONE Display lit REPEAT and TRACK blinks.
REPEAT ALL Display lit REPEAT.
REPEAT OFF
To cancel repeat playback, press the REPEAT
button and select REPEAT OFF.
The menu is switched off when no operation is
performed for about 2 seconds.
MP3/WMA/JPEG Repeat play
PBC on mode of VCD, the Repeat play function does not work.
The A-B repeat function lets you mark a segment
to repeat between the beginning “A” and the end
“B” of the segment you want to replay.
Press the A-B button on the remote when you want
to choose a scene (sound) as the beginning point.
Press the A-B button again to choose a scene
(sound) as the end point.
The Repeat B (Repeat A-B) display appears
To cancel A-B Repeat playback, press the A-B button.
The menu is switched off when no operation is
performed for about 2 seconds.
Note
48
1
2
1
2
3
1
2
3
CD
VCD
DVD
CD
VCD
DVD
Lit
Display
44
Blinks
At the time of REPEAT
mode REPEAT is light
Display
Display
Lit
Page 41

41
ENGLISH
2
3
1
2
3
Various Playback Functions
Using Bookmarks
The bookmark feature lets you mark a point on the
disc that you can go to quickly. You can store up to
l4 bookmarks.
Create a Bookmark
During playback, press the B. MARK button on
the remote.
Press cursor up/down ( ) buttons on the remote
to select desired bookmark number.
When you reach the scene you want to mark, press
the ENTER button.
Up to 14 bookmarks can be applied in the same way
for one disc.
When the ENTER button is pressed at a previously
marked bookmark, that mark will be changed to the
new point.
Recalling a Bookmarked Scene
Press the cursor right ( ) button on the remote to
recall a bookmark number.
Press the cursor up/down ( ) button on the remote
to select the bookmark number you want to activate,
then press ENTER button.
If all 14 bookmarks are in use, you can still mark new scenes, but
the previous bookmarks will be erased.
Depending on the disc, the Bookmark function may not work.
PBC on mode of VCD, the Bookmark function does not work.
During playback, press the B. MARK button on
the remote.
W
W
W
CD
VCD
DVD
1
44
Notes
W
W
Page 42

42
ENGLISH
You can listen to the desired tracks of the current CD or VCD in any desired order.
Program Edit
During stop mode, press the MEM. button on
the remote.
Select a specific track by pressing the cursor
up/down ( ) button.
Select ADD icon on the screen to register selected
value onto PROGRAM LIST, then press the
ENTER button.
You can select a maximum of 21 values by repeating step - .
Select the “PLAY” icon on the screen, then press
the ENTER button to start program play.
To Repeat Program Play
During program playback, press the REPEAT
button on the remote.
Each press of the button switches the mode.
MP3/WMA/JPEG discs can not be programmed with this
program mode. (MP3/WMA/JPEG program playback ).
The unit stops when the STOP (
Q ) button is pressed.
To restart program play, press the MEM. button, display the
program screen, select the “PLAY” icon, and press the
ENTER button.
Program edit screen appears.
ADD icon : Add value onto PROGRAM LIST
DELETE icon : Delete value from PROGRAM LIST
INSERT icon : Insert value in PROGRAM LIST
PLAY icon : Play program play
CLEAR icon : When this icon is selected and the
ENTER button is pressed, the entire
contents of the PROGRAM LIST will
be deleted, and the Program edit screen
also will disappear.
Program Play
W
W
2
3
“REPEAT ONE”
“REPEAT ALL”
“REPEAT OFF”
CD
VCD
1
2
3
4
5
3
2
1
Notes
49
Page 43

43
ENGLISH
3
2
1
Program Play
Insert Track
During stop mode, press the MEM. button on the remote.
Select a specific track to insert by pressing the cursor
up/down ( ) buttons.
Move the cursor with the cursor right ( ) button
to the “PROGRAM LIST” and select the column to
be added with the cursor up/down ( ) buttons.
(The color of the column where the cursor is
located will change.)
Press the cursor left ( ) button, use the cursor up/
down ( ) buttons to move the cursor to the
“INSERT” icon, and press the ENTER button.
The new track will be inserted after (below)
the selected column.
Delete Program
During stop mode, press the MEM. button on the remote.
Move the cursor with the cursor right ( ) button to
the “PROGRAM LIST” and select the column to be
deleted with the cursor up/down ( ) buttons. (The
color of the column where the cursor is
located will change.)
Press the cursor left ( ) button use the cursor up/down
( ) buttons to move the cursor to the “DELETE” icon,
and press the ENTER button.
Selected value deletes
Program edit screen appears.
Release Program Play
In following case, Program play would be released.
1. When you open and close tray.
2. When you turn power off and on.
3. Press the CLEAR button during display of the
program edit screen.
W
W
W
W
W
W
W
W
W
W
W
W
W
W
2
1
PBC on mode of VCD, the Program play
function does not work.
Note
34
Page 44

44
ENGLISH
Menu Playback
Hierarchical Structure of VCD Menus
When an item is selected on the menu screen during playback of a PBC compatible VCD, another menu with
more details items may be displayed. When a number of menus are connected in multiple layers in this way, it
is said that the menus have a hierarchical structure. In this structure, the desired scene can be reached by
repeating item selections on the menu screens.
Example of a hierarchical structure
PLAY
First level (menu)
Second level (submenu)
Third level (scenes)
When an item is selected on the menu screen with the
ENTER (Select) button or the numeric buttons, advance
is made to the next lower menu level. When the advance
destination is the “scene” to be played, the contents will
be played.
To move to a higher level, press return.
When several menus (scenes) can be selected in each level
screen switching is possible with the buttons (NEXT)
and (PREV).
Examples of Operation Buttons and Indications Used During VCD Playback
Depending on the software, the jacket indication may differ from the above.
Advancing Returning
Soft jacket indication
Boston Acoustics operation
button
RETURN ENTER
( SELECT )
W
W
W
W
RETURN
ENTER
(NEXT)
W
W
(NEXT)
W
W
(NEXT)
W
W
(PREV.)
W
W
(PREV.)
W
W
(PREV.)
W
W
W
W
W
W
W
W
W
W
WW
VCD
W
Page 45

45
ENGLISH
MP3/WMA/JPEG Media Playback
Guidance for MP3/WMA/JPEG
MP3/WMA/JPEG media that can be played back with this equipment
Usable media: CD-ROM, CD-R, CD-RW
Usable formats: IS09660 level 1 (excluding expanded formats)
Files that can be played back: MP3, WMA, and JPEG.
Creating media for playing back on this equipment
Compressing MP3
Set up the transfer bit rate setting for the compression software when compressing MP3 files as follow.
MP3 Files: 128kbps recommended (32kbps-320 kbps)
This unit is compatible with 32 kHz, 44.1kHz(recommended) and 48kHz sampling frequencies.
This unit is compatible with ID3-TAG Ver. 1.
Some MP3, WMA, and JPEG files are not playable.
Naming Folders and Files
Single-byte characters between A and Z, single-byte numerals between 0 and 9, and the single-byte under score (_) can be
displayed. Ensure that the “.mp3” (MP3 files), “.wma” (WMA files) or “.jpg” (JPEG files) extension leg is attached to all
file names.
Do not add the “mp3” extension log to any files other than MP3 files. If the “mp3” extension log is added to
any files other than MP3 files, the equipment will assume that they can be played back, and this will produce
loud noises in the speakers, resulting in damage or adverse effects.
Do not add the “jpg” extension log to any files other than JPEG files. If the “jpg” extension log is added to any
files other than JPEG, the unit will not operate properly.
Confirming Media and Files
Check to ascertain that MP3 and WMA files can be played back correctly on the personal computer in use prior to
saving them onto the media. Check to ensure that the saved file can be played back normally.
Confirm that the WMA and MP3 files can be played on a PC prior to saving to the media.
When Saving Files onto Media
Ensure that the session is closed or finalized when data has been written on media There are cases where media on
which the session has not be closed or finalized will not be played back correctly with this equipment.
There are cases where the folder names and file names will not be displayed correctly depending on the software
used to save them.
Do not store files or folders other than MP3, WMA, or JPEG on media to be played back with this equipment.
It is recommended that ten or less sessions are stored when recording MP3 files onto a media.
In case of a multi session disc, a delay may sometimes occur until playback begins.
There are cases where playback is not possible when MP3/WMA/JPEG files (CD-ROM) and music CD
information (CD-DA) are saved on the same media.
Example for a Hierarchical Structure
Example for the playback sequence
Playback is made in the order of to in the following
example:
Folder names and file names are displayed up to 8 characters. When folder names and file names are recorded with more
than 8 characters, the names will be displayed in abbreviated form.
Root
Folder
File
Folder
File
Layer 1 Layer 2 Layer 3 Layer 4
Recording Sequence
4
3
2
1
7
8
9
10
11
6
5
1 11
Note
Note
Page 46

46
ENGLISH
MP3/JPG Media Playback
Playing Back MP3/WMA/JPEG Files
It is not possible to play back folders and files that exceed the
maximum limitations of the media.
A certain amount of time is required for the player to confirm the
media on which MP3/WMA/JPEG files have been recorded before
playback will commence.
Playback
Press cursor up/down ( ) buttons on the remote
to select desired file, then press the ENTER button
to start playback.
When JPEG files are displayed, the display is
switched automatically from one file to the next.
The switching speed differs according to the file size.
To stop playback press the
Q (STOP) button.
Skipping Files
During playback, press the or button.
When the play mode is FOLDER, FOLDER
REPEAT or REPEAT ONE, skipping to outside
the folder being played is not possible.
: Skip backward
: Skip forward
During playback, press the or button.
The SMART MENU screen will be displayed when an
MP3, WMA or JPEG disc is set.
Searching (only for MP3/WMA files)
Press REPEAT button on the remote to select play mode.
Each press switches the searching speed.
FF 2 X ( button) or FR 2 X ( button)
FF 4 X ( button) or FR 4 X ( button)
FF 6 X ( button) or FR 6 X ( button)
FF 8 X ( button) or FR 8 X ( button)
Normal playback
3
4
5
2
1
Each press switches the play mode.
FOLDER: Playback the folder that is selected.
DISC: Playback all files on the disc.
FOLDER REPEAT: Repeat the folder that is selected.
DISC REPEAT: Repeat all files on the disc.
REPEAT ONE: Repeat the file that is selected.
W
W
W
W
W
W
W
W
W
W
W
W
W
W
W
W
W
W
W
W
W
W
W
W
1
2
3
4
5
2
1
Note
Searching backwards is not available for WMA
file playback.
Note
W
W
MAIN UNIT
REMOTE
REMOTE
This lights when an MP3, WMA,
or a JPEG disc is set.
W
W
W
W
Page 47

47
ENGLISH
ENGLISH
Press button
W
Press button
W
Press button
W
MP3/JPEG Media Playback
Selects Files to be Played
Rotating a Picture (JPEG Files Only)
Press the numeric buttons on the remote to enter
the desired file number or folder number.
(Example)
To select track No. 23:
When a folder is selected, the contents of
the selected folder will be displayed.
When the file is selected, playback of the
selected file will start.
It is possible to rotate a picture.
During JPEG file playback, press the cursor
( / ) buttons on the remote.
Display examples
For selection of a number, refer to the file numbers
on the SMART NAVI screen.
The file numbers shown on the display of the main
unit differ from the file numbers entered directly
with the numeric buttons, as the numbers for each
folder are displayed.
Switching as shown is done when the cursor buttons are
pressed.
button : 90° rotation in clockwise direction.
button : 90° rotation in counter clockwise direction.
button : Vertical mirror image.
button : Horizontal mirror image.
W
W
W
W
Press button
W
W
W
Note
W
W
2 3
File numbers and folder numbers
Page 48

48
ENGLISH
2
1
2
MP3/JPEG Media Playback
MP3/WMA/JPEG Random Play
Perform operation in REPEAT mode always under observation
of the SMART MENU screen.
Desired folders or discs can be played back repeatedly.
REPEAT ONE
: Repeat the file that is selected.
FOLDER REPEAT: Repeat the folder that is selected.
DISC REPEAT: Repeat the disc that is played.
During stop mode, press the REPEAT button
on the remote.
Each time you press the RANDOM button on the
remote, random play will be turned on and off.
Press cursor up/down ( ) button on the remote to
select desired file, then press the ENTER button or
the play/pause ( ) button to start playback.
The files of a folder are played in random order.
“RANDOM ON” The files of a folder being played will be
selected in random order for playback.
Do not select DISC REPEAT when files other than
MP3, WMA, and JPEG have been recorded on the
disc.
During stop mode, press the RANDOM button on the remote.
Select a file in the folder to be played, press the
play/pause ( )
button, and start random playback.
Press the stop
button to stop playback.
Press the RANDOM
button to cancel random playback.
Cancel Random Play
Random Repeat Play
During stop mode, press the RANDOM button, then
press the REPEAT button on the remote.
In case of RANDOM REP mode, all files in the folder
will be played back repeatedly. It is also possible that
the same file will be played back twice in a row.
In case of RANDOM ON mode, play back will stop
after all files in the folder have been played back once.
To Cancel Random Repeat Play
Press the stop (Q) button to stop random repeat
play-back, then press the REPEAT or RANDOM
button.
Each press switches the play mode.
FOLDER: Playback the folder that is selected.
DISC: Playback all files on the disc.
FOLDER REPEAT: Repeat the folder that is selected.
DISC REPEAT: Repeat all files on the disc.
REPEAT ONE: Repeat the file that is selected.
W
W
Note
3
4
5
2
1
1
2
1
W
W
MP3/WMA/JPEG Repeat Play
When the REPEAT mode is
active “REPEAT” is lit.
DISPLAY
When the REPEAT mode is
active “REPEAT” is lit.
DISPLAY
Page 49

49
ENGLISH
The selected file goes to program window.
You can select a maximum of about 100 files by
repeating step . . However, note that the maximum
number of programmable files depends on the number
of files and folders in the MP3/WMA disc and on the
total number of characters used in the file and folder
names.
MP3/JPEG Media Playback
MP3/WMA Program Playback
Program repeat play is not available with MP3/WMA
discs.
You can listen to the desired files of the current MP3/WMA disc in any desired order.
Select ADD PLT in the window with the direction key
and press ENTER on the Remote.
After the
Q (Stop) button has been pressed and
the program has been confirmed, the program
no longer can be changed.
Press the (MEM) button.
Press PLAY button to start program playback.
During program edit mode, press the cursor up/
down buttons in the program window, select the
file to be deleted, and press the CLEAR button.
During stop mode, press the ON SCREEN button on
the track you desire.
Program Edit
Delete Program
After the Q (Stop) button has been pressed and the program
has been confirmed, the program no longer can be changed.
All programs can be canceled by pressing the MEM. button
during stop in program mode. All programs also
can be canceled by opening the disc tray.
Confirm that the cursor is at the position of a
“file” and press the button.
Playback is not possible when the cursor is at
the position of a “folder”.
W
2
Program window
PROG END display
1
2
3
4
Note
W
Page 50

50
ENGLISH
Symptom Cause Remedy
The speaker wires are disconnected.
The MUTE switch of remote control
unit is switched ON.
The headphone plug is inserted into
the jack.
The antennas have not been connected
A proper broadcasting band has not
been selected.
The frequency of the station to be
received is not tuned.
The frequency of the preset station is
not tunable.
The preset memory has been cleared
because the power cord has been
unplugged for a long period.
The speaker connection is abnormal.
The SURROUND mode is
STEREO.
Car ignition noise.
Influence of an electric appliance.
Sound is not produced.
Radio stations cannot be received.
Noise interference.
A station has been preset but it can
not be received by pressing the PRESET button.
The STANDBY indicator flashes red.
No sound from the surround speakers.
•
•
•
Connect properly referring to “System
Connection”.
Switch MUTE OFF.
Unplug the headphone plug.
Connect antennas
Select a band
Tune to the frequency of the desired station.
Install the outdoor antenna in an apart
position from the roof.
Preset stations with tunable frequencies.
Preset stations again.
Check the speaker connection. If this does
not help, contact your dealer for service.
Select Surround with the SURROUND button.
•
•
•
•
•
•
•
•
•
•
•
•
•
•
•
In Case of Difficulty
If your unit should not perform as expected, consult the table below to see if the problem can be corrected
before seeking help from your dealer or service representative.
The microprocessor may malfunction (impossible to operate erroneous display, etc.) when the
power cord is unplugged while power is ON or
due to an external factor. In this case, switch
off the power, wait for several seconds, and
then switch the power on again.
Returning to the factory defaults by resetting
the microprocessor is done as follows.
Press the DVD button on the remote or set the DVD mode with the
Source button on the main unit.
Hold the STOP button on the main unit and press the MENU button
on the remote.
Serrez la puissance au loin sur l'unité principale
When resetting is done according to this method, all settings,
including the settings for password and parental level, will be reset to the
factory defaults.
Operation to Reset
1
2
3
10
31
31
11
33
33
11
34
27
Some versions of this model have a rear panel power switch. If the unit appears not to function
make sure AC cord is plugged in and rear panel power switch is turned on.
Note
Page 51

51
ENGLISH
Symptom
DVD Receiver 2.0
Cause Remedy
There is no disc in the player.
There are no signals recorded on the
side of the disc being played.
The TV is not turned on.
The connection cords are not properly
connected.
The picture is slightly distorted during
fast forward and fast reverse operations.
The audio output cables are not
properly connected.
The volume control of the TV or
amplifier is not adjusted properly.
The player is in a special playback
mode.
A nearby device is generating noise.
The disc is dirty.
The disc is damaged.
There is condensation on the
optical lens.
Time is required for the unit to detect
the disc type and size and for the
rotation of the motor to stabilize. This
is not a malfunction.
The disc is not placed horizontally.
The video format of the disc being
played does not match that of the connected TV monitor.
The DVD disc being played does not
contain the recording of subtitles.
The subtitle mode is set to off.
The DVD disc being played does not
contain the recording of more than
one audio (or subtitle) language.
The DVD disc being played does not
contain the recording of more than
one angle.
You are attempting to switch the
angle in a section where more than
one angle is not recorded.
Playback does not start when the
button is pressed.
Playback starts but no image/sound is
seen or heard.
The picture is distorted when the
image is fast forwarded or fast
reversed.
No sound is heard.
The picture does not look good or the
picture/sound quality is poor.
It takes a while for the disc to start
playing.
The tray opens automatically.
The top and bottom of the screen
cannot be seen, or the screen becomes
black and white.
Subtitles are not displayed.
The voice (or subtitle) language
can not be changed.
The viewing angle cannot be changed.
•
•
•
•
Load a disc and press the button.
Turn the disc over and properly place it on
the disc tray.
Turn on the TV.
Properly reconnect the connection cords.
This is not a malfunction.
Properly connect the audio cables.
Set the sound volume to an appropriate
level.
Press the button to resume normal
play back mode
Separate this unit as far as possible from
the device you think is generating the noise.
Refer to the “Disc handling precautions”
section and wipe dirt from the disc.
Use a new disc.
Refer to the “Caution on condensation”
section and evaporate the condensation.
Approximately 10 to 20 seconds are
required for a disc to start playing, although
the time differs depending on the disc.
Properly place the disc on the tray.
Refer to the “Video Formats” section and
use a disc with the appropriate video format
for your TV or a TV with the appropriate
video format for the disc.
The subtitle cannot be displayed when the
DVD disc being played does not contain
the recording of subtitles.
Press the SUBTITLE ON/OFF button to
switch on the subtitle mode.
The voice (or subtitle) language cannot be
changed when the DVD disc being played
does not contain the recording of more
than one voice (or subtitle) language.
The viewing angle cannot be changed
when the DVD disc being played does not
contain the recording of more than one
angle.
More than one viewing angle may be recorded only in limited sections in a disc.
•
•
•
•
•
•
•
•
•
•
•
•
•
•
•
•
•
•
•
•
•
•
•
•
•
•
In Case of Difficulty
W
W
W
10
10
6
9
38
Page 52

52
ENGLISH
In Case of Difficulty
Playback will not start even after a title
is selected.
The parental level cannot be changed.
The voice or subtitle language selected
in the initial setting is not played.
Menu screen messages are not shown in
the desired language.
A VCD cannot be played using menus.
The VCD disc being played is not
compatible with PBC.
Menu playback is available only with
VCD discs recorded with PBC.
The menu language function
(MENU) is not set to desired language.
Select disc menu language.
The DVD disc being played does not
contain the recording of the selected
voice or subtitle language.
The initial playback language is
specified by the DVD disc.
The DVD specifications provide for
selection at the menu screen.
Use a DVD disc containing the recording
of the selected voice or subtitle language.
Press SUBTITLE or the AUDIO button
on the remote and select the language.
Select at the menu screen of the disc.
You have forgotten the password.
Set the initial setup to the factory setup
with the following procedure.
Press the DVD button on the remote
or set the DVD mode with the Source
button on the main unit.
Hold the STOP button on the main
unit and press the MENU button on
the remote.
Press Power off on the main unit.
.
A viewing restriction (PARENTAL) has
been set for the disc.
Check the viewing restriction level
(PARENTAL) setting.
“THE PLAYER IS LOCKED” is
displayed on the TV screen (the mark
on the main unit display is lit), and
disk tray opening/closing operation is
not accepted.
Operation is prohibited.
Press the MENU button on the remote
control for several seconds while holding
down the stop (
Q) button on the main unit.
“THE PLAYER IS UNLOCKED” will be
displayed the ( ) mark will not be lit, and
operation will become possible.
•
Halt Icon
The halt icon is displayed
and remote control is not usable.
Playback is restricted intentionally by
the software producer.
The operation is inhibited. Please try another
operation.
Remote Control Unit
Symptom
Cause Remedy
Remote control operation is not
possible.
Batteries are exhausted.
The remote control is too far away from
the system, the controlling angle is deviated or there is an obstacle in between.
Replace with new batteries.
Operate the unit inside the remote controllable range.
•
•
•
•
•
•
•
•
•
•
•
Symptom
Cause Remedy
Symptom
Cause Remedy
1
2
3
38
23
Page 53

53
ENGLISH
Boston Acoustics follows a policy of continuous advancements in development. For this reason specifications
may be changed without notice.
Sufficient performance may not be exhibited at extremely cold locations.
Specifications
General Specifications
DVD Receiver 2.0
Input sensitivity/impedance
VCR/SAT/AV AUX 600mV/68kΩ
Output level/impedance
VCR 600mV/470Ω
(Tuner Section)
FM Tuner section
FM with Tuner 87.5 MHz - 107.9 MHz
AM Tuner section
Tuning frequency range 530 kHz - 1610 kHz
(DVD/CD AUDIO/ VIDEO CD/MP3 player section)
Laser Semiconductor laser
Wow & Flutter Less than unmeasurable limit
Video output format NTSC/PAL
VIDEO OUTPUT
Composite video output level/impedance 1 Vp-p (75Ω)
S-video output
Component Output Interlaced/Progressive Switchable
Y output level/impedance 1 Vp-p ( 75Ω)
C output level/impedance
NTSC 0.286 Vp-p ( 75Ω)
PAL 0.3 Vp-p ( 75Ω)
Compression format MPEG1/MPEG2
Component Output Interlaced/Progressive Switchable
Power consumption 70 W
Dimensions W: 17.25
"
(440 mm)
H: 2.625
"
(67 mm)
D: 13.625
"
(346 mm)
Weight (net) 9.6 lbs (4.3 kg)
Note
Page 54

54
ENGLISH
UNIVERSAL SET-UP
Universal Set-Up
The universal remote control can operate
the DVD Receiver 2.0 and other popular
brands of components. Depending on the
manufacturer and model, you may not be
able to control some equipment. If that is
the case, please use the remote supplied
with the product that is not programmable.
To program the remote control
for other devices.
1. Turn on the product that you would like
the remote control to operate.
2. Find the three digit set-up code number
for your product from the following tables.
3. Press the Input Selector you want to
program on the input selector section of the
remote. (CBL/SAT, VCR/PVR, or TV)
4. Press and hold the enter button on the
remote for three seconds. While pressing the
enter button, press in three digit code for
the device. If the LED on the remote blinks
twice, the code is correct.
5. Press the device power button on the
remote. If the device turns off, your code is
correct.
6. Repeat the above steps to program the
remaining devices you would like to control.
Search method
If the programming instructions above do
not control the device or if the manufacturer
or brand for your device is not listed in
Universal Code list, please follow these
instructions.
1. Turn on the device that you would like the
remote control to operate; either manually or
with your original remote control.
2. Press and hold the Input Selector button
you want to program (on the input selector
section of the remote: CBL/SAT,
VCR/PVR, or TV). While holding the
Input Selector button, press the DEVICE
button repeatedly until the controlled
product turns off. This indicates you have
found the correct code. If one of the
CBL/SAT, VCR/PVR, or TV buttons is not
pressed or the DEVICE button is not
pressed, this function will be canceled.
3. When your device turns off, press and
release the DEVICE power button to lock
in the code for your device.
Code Number Check
You can check what code was set for each
device.
1. Press and hold the Input Selector button
that you are testing (on the input selector
section of the remote: CBL/SAT,
VCR/PVR, or TV) and the ONSCREEN
button for one second.
2. The LED on the remote will blink twice.
3. After one second, the LED will blink.
Count the number of flashes. In case of 0,
the LED will blink ten times. Series of flashes
will be separated by one second.
The universal remote does not emulate your other devices’ remote control completely. It allows for a certain level of control.
The diagrams below illustrate what buttons are accessible and what their functions are. Active buttons are colored gray.
Note
When you select DVD or AM/FM, the device
power button turns the DVD Receiver off.
This is helpful for accessory remote programming
(in whole house systems).
Note
When you select the TV button on the remote,
the Video input on the DVD Receiver is automatically
selected. Therefore you can connect your TV’s audio
output to the Video input of the DVD Receiver and
control your TV’s channels with the remote control.
Note
CBL/SAT
System Power
Cable Power
Numeric buttons
Channel buttons
Menu
Enter
On Screen
7
6
5
4
3
2
1
VCR/PVR
System Power
VCR Power
Numeric buttons
Channel buttons
Menu
Enter
Record
Stop
Play
Pause
FF
Rewind
12
11
10
9
8
7
6
5
4
3
2
1
TV
System Power
TV Power
TV/Video
Input
Selection
Numeric buttons
Channel buttons
Menu
Enter
TV Volume
8
7
6
5
4
3
2
1
Page 55

55
ENGLISH
UNIVERSAL CODE LIST
1) CBL
ABC 002 003 009 030
006 008
Allegro 018 021
Archer 018 026
Bell&Howell 009
Century 018
Citizen 018 021
Comtronics 014
Contec 011
Easten 001
Emerson 026
Everquest 010 014
Focus 022
Garrard 018
Gemini 010
General Instrument033 032 006 034
GoldStar 017 014
Goodmind 026
Hamlin 012 020 004 013
Hitachi 006
Jasco 010 018 021
Jerrold 002 007 033 032 009
010 006 034
Memolex 025
Movie Time 015
NSC 015
Oak 011
Optimus 031
Panasonic 025 016 031
Paragon 025
Philips 018
Pioneer 017 000
Popular Mechanics 022
Pulsar 025
Quasar 025
RCA 031
Radio Shack 010 021 026 028
Recoton 022
Regal 012 020
Regency 001
Rembrandt 006
Runco 025
SL Marx 014
Samsung 017 014
Scientific Atlanta 003 023 030 027
Signal 010 014
Signature 006
Sprucer 031
Starcom 002 010
Stargate 010 014 026
Starquest 010
TV86 015
Teleview 014
Tocom 007 008
Toshiba 025
Tusa 010
Unika 018
Universal 018 019
Viewstar 015
Zenith 025 024
Zentek 022
2) SAT
AlphaStar 043
Chaparral 036
Echostar 044
Expreevu 044
General Instrument051 050 053
HTS 044
Hitachi 046
Hughes Net. Sys 042
JVC 044
Jerrold 051 050
Megavox 041 040
Memorex 041
Next Level 053
Panasonic 052
Philips 041 040
Primestar 051 050
RCA 038 035 037 047
Radio Shack 053
Realistic 049
Sony 039
Star Choice 053
Toshiba 045
Uniden 041 040 049
Zenith 048
3) VCR
Admiral 027 021
Adventura 023
Aiwa 005 023
Akai 026
Asha 000
Audiovox 005
Beaumark 000
Bell&Howell 017
Brocksonic 021
Broksonic 020 018 021 001
CCE 015 025
Canon 004
Carver 016
Citizen 005 025
Craig 005 012 000 015 024
Curtis Mathes 013 004 026 028
Cybernex 000
Daewoo 010 025
Denon 008
Dynatech 023
Electrohome 005
Electrophonic 005
Emerson 005 020 023 018 009
021 001 025
Fisher 012 017
Fuji 004 003
Funai 023
GE 013 004 027 000
Garrard 023
GoldStar 005 006
Harley Davidson 023
Harman/Kardon 016 006
Hitachi 023 008 026
JVC 014 026
Jensen 026
KEC 005 025
KLH 015
Kenwood 014 026 006
Kodak 004 005
LXI 005
Lloyd’s 023
MEI 004
MGA 000 009
MTC 000 023
Magnavox 004 007 016 023 019
Marantz 004 016
Matsushita 004 028 029
Memorex 004 005 027 007 012
000 023 017 021 011
031 032
Minolta 008
Mitsubishi 027 014 009
Motorola 004 016
Multitech 023 015
NEC 017 014 026 006
Nikko 005
Noblex 000
Olympus 004
Opimus 005 027 017 028 029
030 031 032
Orion 020 021 001
Panasonic 004 028 022 029 031
Penny 004 005 000 008 006
Pentax 008
Philco 004 021
Philips 004 016
Pilot 005
Pioneer 014
Proscan 013
Protec 015
Pulsar 007
Quarter 011
Quartz 011
Quasar 004 028 029 031
RCA 013 004 027 000 008
019
Radio Shack 023
Radix 005
Randex 005
Realistic 004 005 027 012 023
017 011
Runco 007
Samsung 000 010 033
Sanky 027 007
Sansui 023 014 021 026 024
Sanyo 012 000 017 011
Scott 020 010 018 009
Sears 004 005 012 023 008
017 011
Sharp 027
Singer 015
Sony 004 002 023 003
Syvania 004 016 023009
Symphonic 023
Universal Code List
Page 56

56
ENGLISH
TMK 000
Tatung 026
Teac 023 026
Technics 004 028
Teknika 004 005 023
Thomas 023
Toshiba 010 009
Totevision 005 000
Unitech 000
Vector 010
Vector Research 006
Video Concepts 010
Videosonic 000
Wards 013 004 027 012 016
000 023 008 015 019
White WestingHouse 021 025
Yamaha 006
Zenith 007 023 021 003
4) TV/ VCR
Brocksonic 001
Cutis Mathes 004(TV use 008)
Daewoo 025
Emerson 001
Funai 023
GE 004(TV use 008)
013(TV use 007)
027(TV use 041)000
Hitachi 004(TV use 008)023
HQ 023
Lloyds 023
MGA 000
Megavox 016(TV use 010)
004(TV use 008)023
Memorex 005 028(TV use 042)
Mitsubishi 027(TV use 041)
Orion 001
Panasonic 004(TV use 008)
028(TV use 042)
Penney 004(TV use 008)000
028(TV use 042)
Quasar 004(TV use 008)
028(TV use 042)
RCA 013(TV use 007)
004(TV use 008)
027(TV use 041)
Sansui 023
Sanyo 000
Sear 023 005
Sharp 027(TV use 041)
Sony 002(TV use 050)
Symphonic 023
Zenith 023
5) TV
AOC 005 000
Admiral 041 031
Akai 005
Ambassador 024
Ampro 043
Audiovox 030 027 014 034
Baysonic 027
Bell&Howell 019 001
Bradford 027
Broksonic 028 031
CXC 027
Carver 010
Celebrity 050
Citizen 012 005 011 006 014
Concerto 011
Craig 027
Crosley 010
Crown 027 006
Curtis Mathes 007 010 019 008 030
041 012 005 016 011
001 006 022 032 038
040
Daewoo 030 000 006 014 034
035
Denon 016
Dumont 002 000
Dwin 044 036
Electroband 050
Emerson 019 028 031 027 029
025 000 026 006 024
034 035
Envision 005
Fisher 019
Fujitsu 026
Funai 027 026 023
Futuretech 027
GE 007 008 030 041 029
025 004 015 038 040
Gibralter 002 005 000
Goldstar 005 025 000 011
Gradiente 009 011
Hallmark 025
Harley Davidson 026
Harman/Kardon 010
Havard 027
Hitachi 016 011 018
Infinity 010
Inteq 002
JBL 010
JCB 050
JVC 009 046
KEC 027
KTV 027 005 006
Kenwood 005 000
LG 011
LXI 007 010 019 020 025
Luxman 011
MGA 017 005 025 000
MTC 012 005 000 011
Magnavox 010 005 026
Majestic 001
Marantz 010 005
Mitsushita 042
Magatron 025 016
Memorex 019 042 031 017 025
011 025
Midland 007 002 008 006 015
Mitsubishi 041 017 025 000
Motorola 041
Multitech 027
NAD 020 025 022
NEC 005 000 011
NTC 014
Nikko 005 025 014
Optimus 019 042 022
Optonica 041 021
Orion 028 031 026
Panasonic 008 042
Penney 007 020 008 012 005
025 004 000 011 006
015 040
Pilco 010 031 005 016 000
Philips 010
Pilot 005 000 006
Pioneer 022
Portland 000 006 014
Prism 008
Proscan 007
Proton 025 032
Pulsar 002 000
Quasar 008 042 021
RCA 007 008 041 000 013
015 037 038 039 040
Radio Shack 007 019 021 027 005
025 000 011 006
Realistic 019 021 027 005 025
000 011 006
Runco 002 005 033
Sampo 005 006
Samsung 012 005 025 000 011
045
Samsux 006
Sansei 030
Sansui 031
Sanyo 019
Scotch 025
Scott 028 027 025 000 026
Sears 007 010 019 020 025
026 011 023
Sharp 041 021 006
Sony 050
Soundesign 027 025 026
Sylvania 010 005
Symphonic 023
TMK 025 011 024
Tandy 041
Technics 008 042
Techwood 008 011
Teknika 010 027 017 012 000
026 011 001 006 014
Telefunken 011
Toshiba 019 020 012
Vector Research 005
Victor 009
Vidikron 010
Vidtech 025 000
UNIVERSAL CODE LIST
Page 57

57
ENGLISH
Wards 010 021 005 025 004
000 026 011 001
White Westinghouse031034 035
Yamaha 005 000
Zenith 002 031 001 014
Page 58

58
ENGLISH
Page 59

59
ENGLISH
Page 60

ENGLISH
Boston, Boston Acoustics, and the Boston
Logo are registered trademarks of Boston
Acoustics, Inc.
© 2004 Boston Acoustics, Inc.
300 Jubilee Drive
Peabody, MA 01960
978.538.5000
bostonacoustics.com
042-002142-0
 Loading...