


A Series
ASW 650, ASW 250
Subwoofers
Español |
Italiano |
Deutsch |
Subwoofers Boston |
Subwoofers |
Subwoofers |
A Series |
Manuale dell’utente / |
/ Sicherheitshinweise / |
Manual del Propietario / |
Istruzioni di sicurezza / |
Konformitätserklärung |
Instrucciones de Seguridad / |
Informazioni sulla conformità |
|
Información de Cumplimiento |
|
|
Français |
Svenska |
Caissons de graves Boston A |
Subwoofrar / Bruksanvisning |
Series / Guide de l’utilisateur |
/ Säkerhetsanvisningar / |
/ Instructions de sécurité / |
Information om |
Informations relatives à la |
överensstämmelse |
conformité |
|
Information Compliance / Instructions Safety / Manual Owner’s

IMPORTANT SAFETY INSTRUCTIONS
This symbol found on the apparatus indicates hazards arising from dangerous voltages.
This symbol found on the apparatus indicates the user should read all safety statements found in the user manual.
This symbol found on the apparatus indicates double insulation.
1.Read these instructions.
2.Keep these instructions.
3.Heed all warnings.
4.Follow all instructions.
5.Do not use this apparatus near water.
6.Clean only with dry cloth.
7.Do not block any ventilation openings. Install in accordance with the manufacturer’s instructions.
8.Do not install near any heat sources such as radiators, heat registers, stoves, or other apparatus (including amplifiers) that produce heat.
9.Do not defeat the safety purpose of the polarized or grounding type plug. A polarized plug has two blades with one wider than the other. A grounding-type plug has two blades and a third grounding prong. The wide blade or the third prong is provided for your safety. If the provided plug does not fit into your outlet, consult an electrician for replacement of the obsolete outlet.
10.Protect the power cord from being walked on or pinched particularly at plugs, convenience receptacles, and the point where they exit from the apparatus.
11.Only use attachments/accessories specified by the manufacturer.
12.Unplug this apparatus during lightning storms or when unused for long periods of time.
13.Refer all servicing to qualified service personnel. Servicing is required when the apparatus has been damaged in any way, such as power-supply cord or plug is damaged, liquid has been spilled or objects have fallen into the apparatus, the apparatus has been exposed to rain or moisture, does not operate normally, or has been dropped.
14.Maintain a minimum distance of 2” (50mm) around the front, rear, and sides of the apparatus for sufficient ventilation. The ventilation should not be impeded by covering the ventilation openings or placing on or around the apparatus items such as newspapers, table-cloths, curtains, etc.
15.No open flame sources, such as lighted candles, should be placed on the apparatus.
16.The apparatus shall not be exposed to dripping or splashing. No objects filled with liquids, such as vases, shall be placed on the apparatus.
Warning! To reduce the risk of fire or electrical shock, do not expose this apparatus to rain or moisture.
This symbol found on the apparatus indicates that the apparatus must be placed in a separate collection facility for electronic waste and not dosposed with household waste.
17.Either the power inlet connector on the rear of the apparatus or the power plug at the wall must remain accessible, to be able to disconnect power from the apparatus.
18.To completely disconnect this apparatus from the AC Mains, disconnect the power supply cord plug from the AC receptacle.
19.The mains plug of the power supply cord shall remain readily operable.
American Users:
Note: This equipment has been tested and found to comply with the limits for a Class B digital device, pursuant to part 15 of the FCC Rules. These limits are designed to provide reasonable protection against harmful interference in a residential installation. This equipment generates, uses, and can radiate radio frequency energy and, if not installed and used in accordance with the instructions, may cause harmful interference to radio communications. However, there is no guarantee that interference will not occur in a particular installation. If this equipment does cause harmful interference to radio or television reception, which can be determined by turning the equipment off and on, the user is encouraged to try to correct the interference by one or more of the following measures:
•Reorient or relocate the receiving antenna.
•Increase the separation between the equipment and receiver.
•Connect the equipment into an outlet on a circuit different from that to which the receiver is connected.
•Consult the dealer or an experienced radio/TV technician for help.
Canadian Users
This class B digital apparatus complies with Canadian ICES-003. Cet appareil numérique de classe B est conforme á la norme NMB-003 du Canada.

Specifications |
ASW 650 |
ASW 250 |
|
|
|
Frequency Range: |
28Hz – 150Hz |
35Hz – 150Hz |
|
|
|
Amplifier Power: |
300 watts RMS |
100 watts RMS |
|
(650 watts Peak) |
(250 watts Peak) |
|
|
|
Bass Driver: |
10” (254mm) DCD |
10” (254mm) DCD |
|
|
|
Dimensions: (H x W x D) |
155⁄16 x 1411⁄16 x 163⁄16 ” |
141⁄16 x 1411⁄16 x 163⁄8” |
|
(388 x 372 x 411mm) |
(356 x 372 x 415mm) |
|
|
|
Introduction
Boston A Series Subwoofers
Thank you for choosing Boston Acoustics. The A Series subwoofers incorporate high-quality components that produce the legendary Boston Sound. The subwoofers are ideally suited for use in a high-quality 5.1 channel home theater or stereo music system. They are capable of impressive deep bass and high output from remarkably compact enclosures. In addition, they feature BassTrac®, a proprietary Boston-designed circuit that tracks the input signal to the subwoofer and prevents its amplifier from being driven into audible distortion. The benefit: the bass stays clean and strong at any listening level.
E N G L I S H
3

Unpacking the System
Carefully unpack the subwoofer. If there is any sign of damage from transit, report it immediately to your dealer and/or delivery service. Keep the shipping carton and packing materials for future use. Be sure to keep your purchase receipt in a safe place, as it may be required for warranty purposes.
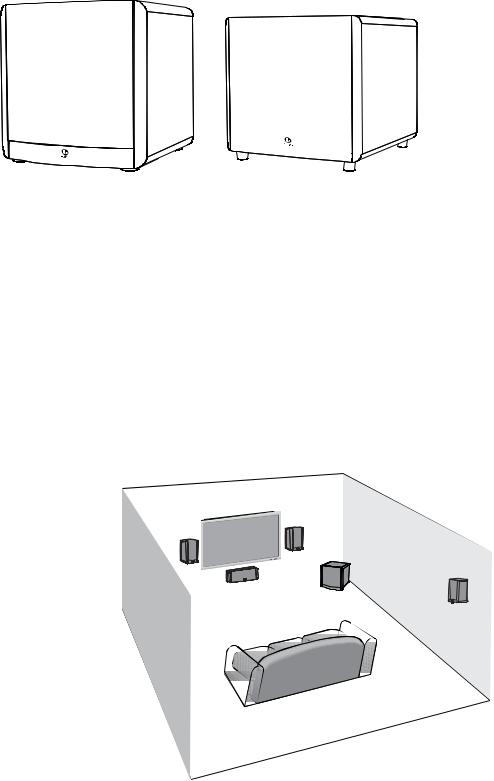
ASW 650 and ASW 250 subwoofers
Placement Options
Place the subwoofer next to a wall or in a corner near your main speakers. The sound is typically best when the subwoofer is within 15 feet (4.5m) of the main speakers. The sharp 24dB/octave crossover roll-off permits placement farther from the main speakers if necessary. Since the ear is unable to localize the low frequencies of the subwoofer, the bass still appears to come from the main speakers. Experimentation is key, however most positions in the room will work well.
The level of bass output from the subwoofer will vary at different positions in a room. When placed near walls, its loudness is emphasized. Corner placement provides the most bass output. Placement completely away from walls may produce too little bass. Regardless of the natural bass level within the room you will always have the ability to adjust the level of the subwoofer from the built in volume control. If at any time you move the subwoofer be sure to check all of your settings.
IMPORTANT: Do not place the subwoofer where there is a chance of contact between the rear panel and drapes or furniture.
Position subwoofer
in corner for maximum bass output
4
Connections
After your speakers are properly placed, you are ready to wire your system.
NOTE: Power is always supplied to the subwoofer electronics unless it is unplugged or switched to the Mute position using the Audio On switch located on the rear panel. The auto-on circuitry only activates or deactivates the power amplifier. Make sure your subwoofer and receiver are unplugged when making the connection (All models include a main power switch which turns off all power to the subwoofer).
Power: When plugging your subwoofer in be sure to use a wall outlet, or dedicated electrical outlet. Some receivers will provide a switched outlet. Do not use this. These on-board electrical outlets do not offer the amount of current or proper isolation required by a power amplifier, such as the one in your subwoofer.
Line level or LFE: On most systems use the line level input or the LFE input. These inputs accept the line-level signal from your receiver’s subwoofer output. Your receiver’s manual should indicate which input is most appropriate.
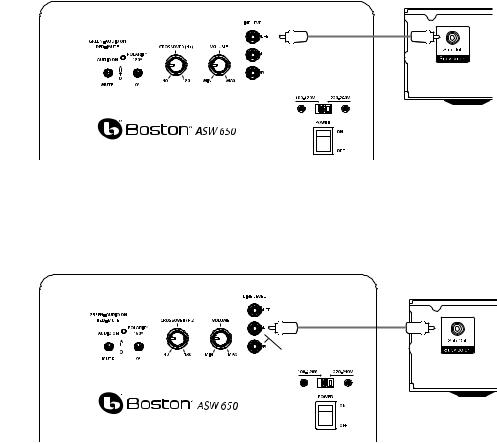
Connecting the Subwoofer to Digital Home Theater Systems Using LFE
Digital 5.1, 6.1 and 7.1 home theater electronics dedicate one channel (the “.1”) to reproduce the special low-frequency effects (LFE) information (such as explosions and thunder) contained in digitally-encoded soundtracks.
Select ”subwoofer-yes” from your receiver’s set-up menu. Hooked up this way, the receiver’s amplifier is relieved of having
to reproduce the difficult low bass signals that can drive the receiver into audible distortion. In some cases it can also depend on several other settings within a receiver. We recommend consulting your receiver manual for further assistance in this area.
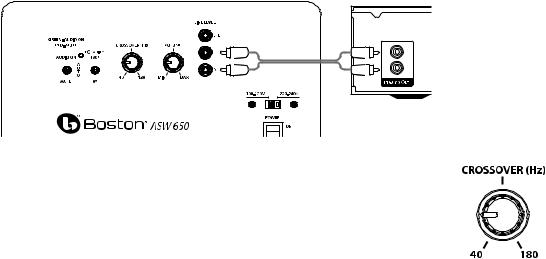
Use an RCA cable (not included), as shown, to connect your digital receiver’s LFE/subwoofer output to the subwoofer.
digital receiver
Connect the other end to the Line Level/LFE input.
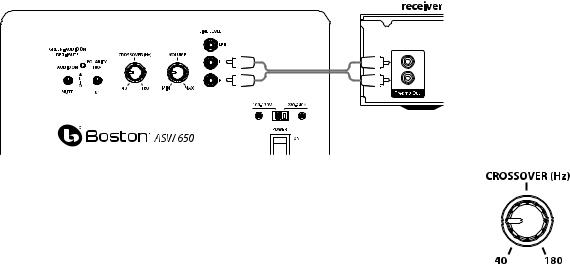
Connecting the Subwoofer to Stereo
For stereo use the “sub out” connection from your receiver to the input on the subwoofer marked “L” or “R”.
digital receiver
use either input
5
Connecting to Electronics Without a Subwoofer Output
If the receiver in your system does not have a subwoofer or LFE output you can connect the subwoofer to a preamp output. Use a stereo RCA cable (not included) to connect the preamp outputs to the “L” and “R” Line Level inputs.
Adjusting the Crossover Control
When using the Line Level inputs (not the LFE input) the subwoofer’s built-in crossover is engaged. As a starting point, set the crossover control on the subwoofer about 10Hz higher than the lower limit of your main speakers’ bass response. Fine-tune the crossover setting by ear for the smoothest blend with your main speakers. The best setting of the crossover control will depend on speaker placement and personal preference.
Operation
Audio On/Auto/Mute
Plug the subwoofer’s AC cord into a wall outlet. Do not use the outlets on the back of the receiver. Set the audio switch to the desired setting.
AUDIO ON – The subwoofer audio is always on.
AUTO – The subwoofer audio will turn on whenever a signal is detected. If no signal is detected after several minutes, it will automatically enter the Mute mode.
MUTE – The subwoofer is muted and will not produce any sound. You may turn off the main power switch, if you will not be using it for some time or wish to conserve electricity.
An LED indicator next to the Polarity switch indicates what mode the subwoofer is in:
OFF – The subwoofer is unplugged (or the main power switch is off )
RED – Mute (No signal detected, Amp Off )
GREEN – Audio On (Signal detected, Amp On)
The subwoofer will automatically enter the Mute mode after several minutes when no signal is detected from your system. The subwoofer audio will then turn ON instantly when a signal is detected.
Polarity Control
(0° or 180°): Selects regular (0°) or inverted (180°) phase for the subwoofer. Set this switch to provide the fullest, most dynamic bass. The effect of phase will be most audible on low-frequency percussion instruments or music with a continuously repeating bass line.
Crossover Control
Adjusts the frequency of the low pass filter for the subwoofer. Note: This control is not active when using the LFE input jack.
Volume Control
Turn the subwoofer Volume control to the 11 o’clock position. If no sound emanates from the subwoofer, check the AC-line cord, Audio On switch, Power switch, and input cables.
Adjust the subwoofer Volume control until you hear a match between the main speaker and subwoofer. Bass response should not overpower the room but rather be adjusted so there is a natural blend across the entire musical range.
6

Maintenance and Service
All wiring connections should be inspected and cleaned or remade at least once a year.
If a problem does occur, make sure that all connections are properly made, secure and clean. If a problem occurs in one loudspeaker, rewire that speaker in a different location within the system. Should the problem persist then the problem is within the speaker. If the speaker sounds fine in the new position it is a strong indication of a more in depth issue with the electronics in the system. In the event that your speakers ever need service, contact your local Boston Acoustics dealer or visit bostonacoustics.com/dealers for a list of dealers in your area.
Limited Warranty
Boston Acoustics warrants to the original purchaser of an A Series subwoofer that it will be free of defects in materials and workmanship in its mechanical parts for a period of 5 years from the date of purchase. The warranty period for the electrical components is 1 year.
Your responsibilities are to install and use them according to the instructions supplied, to provide safe and secure transportation to an authorized Boston Acoustics service representative, and to present proof of purchase in the form of your sales slip when requesting service.
Excluded from this warranty is damage that results from abuse, misuse, improper installation, accidents, shipping, or repairs/ modifications by anyone other than an authorized Boston Acoustics service representative.
This warranty is limited to the Boston Acoustics product and does not cover damage to any associated equipment. This warranty does not cover the cost of removal or reinstallation. This warranty is void if the serial number has been removed or defaced. This warranty gives you specific legal rights, and you may also have other rights which vary from state to state.
If Service Seems Necessary
United States
First, contact the dealer from whom you purchased the product. If that is not possible, send an email to: support@bostona.com or write to:
Boston Acoustics, Inc.
100 Corporate Drive Mahwah, NJ 07490 USA
Canada
First, contact the dealer from whom you purchased the product. If that is not possible, send an emailto: support@dmcanada.ca or write to:
D&M Canada
5-505 Apple Creek Blvd
Markham, ON L3R 5B1
All Other Countries
Contact the dealer from whom you purchased the product or contact your local distributor.
For more information, please visit bostonacoustics.com/support
For EU Customers Only
This symbol found on the product indicates that the product must not be disposed of with household waste. Instead, it may be placed in a separate collection facility for electronic waste or returned to a retailer when purchasing similar product. The producer paid to recycle this product. Doing this contributes to reuse and recycling, minimizes adverse effects on the environment and human health and avoids any fines for incorrect disposal
7
E |
|
|
|
s |
|
|
|
P |
|
|
|
A |
INSTRUCCIONES DE SEGURIDAD IMPORTANTES |
||
ñ |
|||
O |
|
|
|
L |
|
|
Este símbolo que se encuentra en el aparato indica |
|
|
|
|
|
|
|
peligros derivados de niveles de energía peligrosos. |
|
|
|
Este símbolo que se encuentra en el aparato indica |
|
|
|
que el usuario debería leer todas las declaraciones de |
|
|
|
seguridad que se encuentran en el manual del usuario. |
|
|
|
Este símbolo que se encuentra en el aparato indica un |
|
|
|
|
|
|
|
doble aislamiento. |
|
|
|
|
|
1. |
|
Lea estas instrucciones. |
|
2. |
|
Conserve estas instrucciones. |
|
3. |
|
Preste atención a todas las advertencias. |
|
4. |
|
Siga todas las instrucciones. |
|
5. |
|
No utilice este aparato cerca del agua. |
|
6. |
|
Límpielo sólo con un paño seco. |
|
7. |
|
No bloquee ninguna abertura de ventilación. Instálelo de |
|
|
|
acuerdo con las instrucciones del fabricante. |
|
8. |
|
No lo instale cerca de ninguna fuente de calor como |
|
|
|
radiadores, registradores térmicos, estufas u otros aparatos |
|
|
|
(incluidos amplificadores) que produzcan calor. |
|
9. |
|
No elimine la finalidad de seguridad del enchufe de tipo de |
|
|
|
puesta a tierra o polarizado. Un enchufe polarizado tiene |
|
|
|
dos patas con una más ancha que la otra. Un enchufe de |
|
|
|
tipo de puesta a tierra tiene dos patas y un tercer terminal |
|
|
|
de puesta a tierra. La pata ancha o el tercer terminal se |
|
|
|
suministran para su seguridad. Si el terminal suministrado |
|
|
|
no encaja en su toma de corriente, consulte a un electricista |
|
|
|
cómo realizar el cambio de la toma de corriente obsoleta. |
|
10. |
Procure que el cable eléctrico no se pise ni resulte atrapado, |
|
|
|
|
especialmente en los enchufes, las tomas de corriente y el |
|
|
|
punto donde sale del aparato. |
|
11. |
Utilice sólo implementos / accesorios especificados por |
|
|
|
|
el fabricante. |
|
12. |
Desenchufe el aparato durante tormentas eléctricas |
|
|
|
|
o cuando no vaya a utilizarse por períodos de |
|
|
|
tiempo prolongados. |
|
13. |
Encargue todas las revisiones a personal de servicio |
|
|
|
|
cualificado. Se precisa servicio cuando el aparato haya |
|
|
|
resultado dañado de cualquier forma, como cuando el cable |
|
|
|
eléctrico o el enchufe están dañados, se ha vertido líquido |
|
|
|
o se han introducido objetos en el aparato, el aparato |
|
|
|
se ha expuesto a la lluvia o la humedad, no funciona |
|
|
|
normalmente o ha caído. |
|
14. |
Mantenga una distancia mínima de 2” (50 mm) alrededor |
|
|
|
|
de la parte delantera, trasera y a los lados del aparato para |
|
|
|
que haya una ventilación suficiente. No debería impedirse |
|
|
|
la ventilación cubriendo las aberturas de ventilación ni |
poniendo encima ni alrededor del aparato objetos tales como periódicos, manteles, cortinas, etc.
¡ADVERTENCIA! Para reducir el riesgo de incendio o descarga eléctrica, no exponga este aparato a la lluvia o la humedad.
Este símbolo que se encuentra en el aparato indica que el aparato debe depositarse en un lugar de recogida aparte para residuos electrónicos y no desecharse junto con los residuos domésticos.
15.No debería ponerse sobre el aparato ninguna fuente de llama viva, como velas encendidas.
16.El aparato no debe verse expuesto a goteo ni salpicaduras. No debe ponerse sobre el aparato ningún objeto que contenga líquidos, como jarrones.
17.El conector de entrada eléctrico en la parte trasera del aparato o el enchufe eléctrico en la pared deben permanecer accesibles, para poder desconectar la alimentación del aparato.
18.Para desconectar completamente este aparato del la red de CA, desconecte el enchufe del cable eléctrico de la toma de corriente de CA.
19.El enchufe de red del cable eléctrico debe permanecer operativo en todo momento.
Usuarios de los Estados Unidos:
Nota: este equipo ha sido probado y se ha considerado que está dentro de los límites de dispositivos digitales de clase B, de
conformidad con la parte 15 de las normas de la Comisión Federal de Comunicaciones. Estos límites están diseñados para ofrecer una protección razonable contra interferencias perjudiciales en una instalación residencial. Este equipo genera, utiliza y puede irradiar energía de radiofrecuencia y, si no se instala y utiliza de acuerdo con las instrucciones, puede ocasionar interferencias perjudiciales para las comunicaciones de radio. Sin embargo, no hay ninguna garantía de que no vayan a producirse interferencias en una instalación concreta. Si este equipo ocasiona interferencias perjudiciales en la recepción de radio o televisión, lo cual puede determinarse conectado y desconectando el equipo, se aconseja al usuario que trate de corregir la interferencia mediante una o más de las medidas siguientes:
•Vuelva a orientar o vuelva a colocar la antena receptora.
•Aumente la separación entre el equipo y el receptor.
•Conecte el equipo a una toma de corriente en un circuito diferente a aquel en el que el receptor esté conectado.
•Consulte al distribuidor o a un técnico de radio / TV experto para pedir ayuda.
Usuarios de Canadá:
 Este aparato digital de clase B cumple la norma canadiense ICES-003.
Este aparato numérico de clase B cumple la norma NMB-003 de Canadá.
8
Especificaciones |
ASW 650 |
ASW 250 |
|
|
|
Margen de frecuencias: |
28Hz – 150Hz |
35Hz – 150Hz |
|
|
|
Potencia del amplificador: |
300 vatios RMS |
100 vatios RMS |
|
(650 watt de pico) |
(250 watt de pico) |
|
|
|
Unidad de bajos: |
10” (254mm) DCD |
10” (254mm) DCD |
|
|
|
Dimensiones: (A x A x P) |
155⁄16 x 1411⁄16 x 163⁄16” |
141⁄16 x 1411⁄16 x 163⁄8” |
|
(388 x 372 x 411mm) |
(356 x 372 x 415mm) |
|
|
|
Introducción
Subwoofers Boston Acoustics Serie A
Gracias por escoger Boston Acoustics. Los subwoofers Serie A incorporan componentes de alta calidad que producen el legendario sonido de Boston. Los subwoofers son ideales para el uso en un sistema musical estéreo o home theater de 5.1 canales de alta calidad. Pueden producir unos bajos profundos impresionantes y una intensidad elevada desde unas cajas muy compactas. Además, presentan BassTrac ®, un circuito patentando diseñado por Boston que sigue la señal de entrada hasta el subwoofer e impide que su amplificador sufra una distorsión audible. La ventaja: los bajos es que se mantienen limpios y resistentes con cualquier nivel de sonido.
9
Desembalaje del sistema
Desembale con cuidado el subwoofer. Si hay alguna señal de daños debidos al transporte, comuníquela inmediatamente a su concesionario y / o servicio de entrega. Conserve la caja de cartón del envío y los materiales de embalaje para uso futuro. Asegúrese de conservar su recibo de compra en un lugar seguro, dado que puede necesitarlo para hacer uso de la garantía.
Subwoofers ASW 650, y ASW 250
Opciones de colocación
Ponga el subwoofer al lado de una pared o en una esquina cerca de sus altavoces principales. El sonido es habitualmente mejor cuando el subwoofer se encuentra a menos de 15 pies (4,5 m) de los altavoces principales. La elevada atenuación progresiva de 24 dB / octava de la frecuencia de cruce permite colocarlos más lejos de los altavoces principales si es necesario. Dado que el oído no puede localizar las bajas frecuencias del subwoofer, los bajos todavía parecen provenir de los altavoces principales. Aunque la experimentación es clave, el dispositivo funcionará bien en la mayoría de las posiciones de la habitación.
El nivel de intensidad de bajos del subwoofer variará en diferentes posiciones en una habitación. Cuando se coloca cerca de las paredes, se enfatiza su intensidad de bajos. La colocación en una esquina proporciona la mayor intensidad de bajos. La colocación muy separado de las paredes puede producir unos bajos demasiado reducidos. Independientemente del nivel de bajos natural dentro de la habitación, siempre tendrá la capacidad de ajustar el nivel del subwoofer desde el control de volumen incorporado. Si en cualquier momento mueve el subwoofer, asegúrese de comprobar todos sus ajustes.
IMPORTANTE: no coloque el subwoofer donde exista la posibilidad de un contacto entre el panel trasero y cortinas o muebles.
Sitúe el subwoofer en una esquina para lograr una intensidad de bajos máxima
10
Conexiones
Tras colocar sus altavoces de la forma adecuada, estará listos para disponer el cableado de su sistema.
NOTA: alimentación al sistema electrónico del subwoofer a no ser que esté desenchufado o desconectado en la posición “Mute” utilizando el interruptor Audio encendido de alimentación situado en el panel trasero. Los circuitos de activación automática sólo activan o desactivan el amplificador de potencia. Asegúrese de que su subwoofer y receptor estén desenchufados al realizar la conexión (los modelos 230v incluyen un interruptor de suministro principal que desconecta todo el suministro del subwoofer).
Alimentación: al enchufar su subwoofer asegúrese de usar una toma de corriente de pared o una toma eléctrica especializada. Algunos receptores proporcionarán una toma de corriente conmutada. No la utilice. Estas tomas de corriente eléctricas incorporadas no ofrecen la cantidad de corriente o el aislamiento adecuado requerido por un amplificador de potencia, como el de su subwoofer.
Line level (nivel de línea) o LFE (BF): en la mayoría de sistemas, utilice la entrada LFE (BF) o line level de entrada (nivel de línea de entrada). Estas entradas aceptan la señal de nivel de línea de la salida de subwoofer de su receptor. El manual de su receptor debería indicar qué entrada es la más apropiada.
Conexión del subwoofer a los sistemas home theater digitales utilizando LFE (BF)
Los sistemas electrónicos de los home theater digitales 5.1, 6.1 y 7.1 dedican un canal (el “.1”) a reproducir la información especial de bajas frecuencias (BF) (como explosiones y truenos) contenida en las pistas sonoras codificadas digitalmente.
Seleccione “subwoofer-sí” en el menú de ajuste de su receptor. Conectado de esta forma, el amplificador del receptor se libera de tener que reproducir las difíciles señales de bajos que pueden ocasionar distorsión audible en el receptor. En algunos casos también puede depender de varios ajustes diversos en un receptor. Recomendamos consultar el manual de su receptor para obtener más asistencia en esta área.
Utilice un cable RCA (no incluido), tal como se muestra, para conectar la salida de subwoofer LFE (BF) de su receptor digital al subwoofer. Conecte el otro extremo a la entrada Line Level/LFE (BF).
Receptor digital
Conexión del subwoofer a estéreo
Para sistemas estéreo utilice la conexión “sub out” de su receptor hasta
hasta la entrada del subwoofer marcada como “L” (izquierda) y “R” (derecha).
 Utilice cualquiera de las entradas
Receptor |
11
Conexión al sistema electrónico sin una salida de subwoofer
Si el sistema electrónico en su sistema no tiene una salida de subwoofer o LFE (BF), puede conectar las subwoofer CPS a una salida de pre-amplificador. Utilice un cable RCA estéreo (no incluido) para conectar las salidas de pre-amplificador a las entradas line level “L” y “R” (nivel de entrada izquierda y derecha).
Receptor |
Ajuste del control de frecuencia de cruce
Al utilizar las entradas line level (nivel de línea) (no la entrada LFE (BF)), entra en funcionamiento el circuito de división de frecuencias incorporado del subwoofer. Como punto de partida, ajuste el control de frecuencia de cruce en el subwoofer aproximadamente 10 Hz por encima del límite inferior de la respuesta de bajos de sus altavoces principales. Realice una sintonización fina del ajuste del circuito de división de frecuencias de oído para obtener la mezcla más suave con sus altavoces principales. El mejor ajuste para el control de frecuencia de cruce dependerá de la colocación de los altavoces y la preferencia personal.
Funcionamiento
Audio On (Encendido) /Auto (Automático) / Mudo (En espera)
Enchufe el cable de CA del subwoofer en una toma de corriente de pared. No utilice las tomas de corriente de la parte trasera del receptor. Ajuste el interruptor de alimentación a la posición deseada.
AUDIO ON – El subwoofer está siempre encendido.
AUTO – El subwoofer se activará siempre que se detecte una señal. Si no se detecta ninguna señal tras varios minutos, automáticamente entrará en el modo de espera.
MUTE – El subwoofer está mudo y no producirá ningún sonido. Tal vez desee desactivar su subwoofer si no va a utilizarlo durante algún tiempo o desea ahorrar electricidad. (Puede desconectar la alimentación principal, ubicada junto al cable de alimentación)
Un indicador de LED entre el interruptor Power (alimentacion) y el interruptor Polarity (polaridad) indica en qué modo está el subwoofer.
APAGADO – El subwoofer está desenchufado (o el interruptor de alimentación principal está apagado) ROJO – MUDO (ninguna señal detectada, amplificador desactivado)
VERDE – AUDIO ON (señal detectada, amplificador activado)
El subwoofer entrará automáticamente en el modo de espera tras varios minutos sin detectarse ninguna señal desde su sistema. A continuación, el subwoofer se activará instantáneamente cuando se detecte una señal.
Control de frecuencia de cruce
Ajusta la frecuencia del filtro de paso bajo para el subwoofer. Nota: este control no está activo al utilizar el conector de entrada LFE (BF).
Control de volumen
Ponga el control Volume (volumen) del subwoofer en la posición de las 11. Si el subwoofer no emite ningun sonido, compruebe el cable eléctrico de CA, interruptor de Audio encendido, el interruptor alimentación (alimentacion) y los cables de entrada.
Ajuste el control Volume (volumen) hasta que oiga una correspondencia entre el altavoz principal y el subwoofer. La respuesta de los bajos no debería tener una intensidad demasiado alta para la habitación sino que debería ajustarse de forma que se produzca una mezcla natural en todo la gama musical.
Control de polaridad
(0° or 180°): selecciona la fase regular (0º) o invertida (180º) para el subwoofer. Ajuste este interruptor para proporcionar los bajos más completos y dinámicos. El efecto de la fase se oirá más en música o instrumentos de percusión de bajas frecuencias con una línea de bajos con repetición continua.
12
 Loading...