

Page 1
1. Read these instructions.
2. Keep these instructions.
3. Heed all warnings.
4. Follow all instructions.
5. Do not use this apparatus near water.
6. Clean only with a dry cloth.
7. Do not block any ventilation openings. Install in accordance with
the manufacturer’s instructions.
8. Do not install near any heat sources such as radiators, heat
registers, stoves, or other apparatus (including amplifiers) that
produce heat.
9. Do not defeat the safety purpose of the polarized or grounding-
type plug. A polarized plug has two blades with one wider than the
other. A grounding-type plug has two blades and a third grounding
prong. The wide blade or the third prong is provided for your
safety. If the provided plug does not fit into your outlet, consult an
electrician for replacement of the obsolete outlet.
10. Protect the power cord from being walked on or pinched particularly
at plugs, convenience receptacles, and the point where they exit
from the apparatus.
11. Only use attachments/accessories specified by the manufacturer.
12. Unplug this apparatus during lightning storms or when unused for
long periods of time.
IMPORTANT SAFETY INSTRUCTIONS
13. Refer all servicing to qualified service personnel. Servicing is
required when the apparatus has been damaged in any way, such
as power-supply cord or plug is damaged, liquid has been spilled
or objects have fallen into the apparatus, the apparatus has been
exposed to rain or moisture, does not operate normally, or has
been dropped.
14. Maintain a minimum distance of 2" (50mm) around the front, rear,
and sides of the apparatus for sufficient ventilation. The ventilation
should not be impeded by covering the ventilation openings or
placing on or around the apparatus items such as newspapers,
table-cloths, curtains, etc.
15. No open flame sources, such as lighted candles, should be
placed on the apparatus.
16. The apparatus shall not be exposed to dripping or splashing.
No objects filled with liquids, such as vases, shall be placed on
the apparatus.
Note: This equipment has been tested and found to comply with
the limits for a Class B digital device, pursuant to part 15 of the FCC
Rules. These limits are designed to provide reasonable protection
against harmful interference in a residential installation. This equipment generates, uses, and can radiate radio frequency energy and, if
not installed and used in accordance with the instructions, may cause
harmful interference to radio communications. However, there is no
guarantee that interference will not occur in a particular installation. If
this equipment does cause harmful interference to radio or television
reception, which can be determined by turning the equipment off and
on, the user is encouraged to try to correct the interference by one or
more of the following measures:
• Reorient or relocate the receiving antenna.
• Increase the separation between the equipment and receiver.
• Connect the equipment into an outlet on a circuit different from
that to which the receiver is connected.
• Consult the dealer or an experienced radio/TV technician for help.
Caution: Unauthorized changes or modifications to the receiver could
void the user’s authority to operate the equipment.
This symbol found on the apparatus indicates hazards
arising from dangerous voltages.
This symbol found on the apparatus indicates the user
should read all safety statements found in the user manual.
This symbol found on the apparatus indicates
double insulation.
Warning!
To reduce the risk of fire or electrical shock, do not
expose this apparatus to rain or moisture.
BOSTON ACOUSTICS RECEPTER RADIO
TM
Page 2
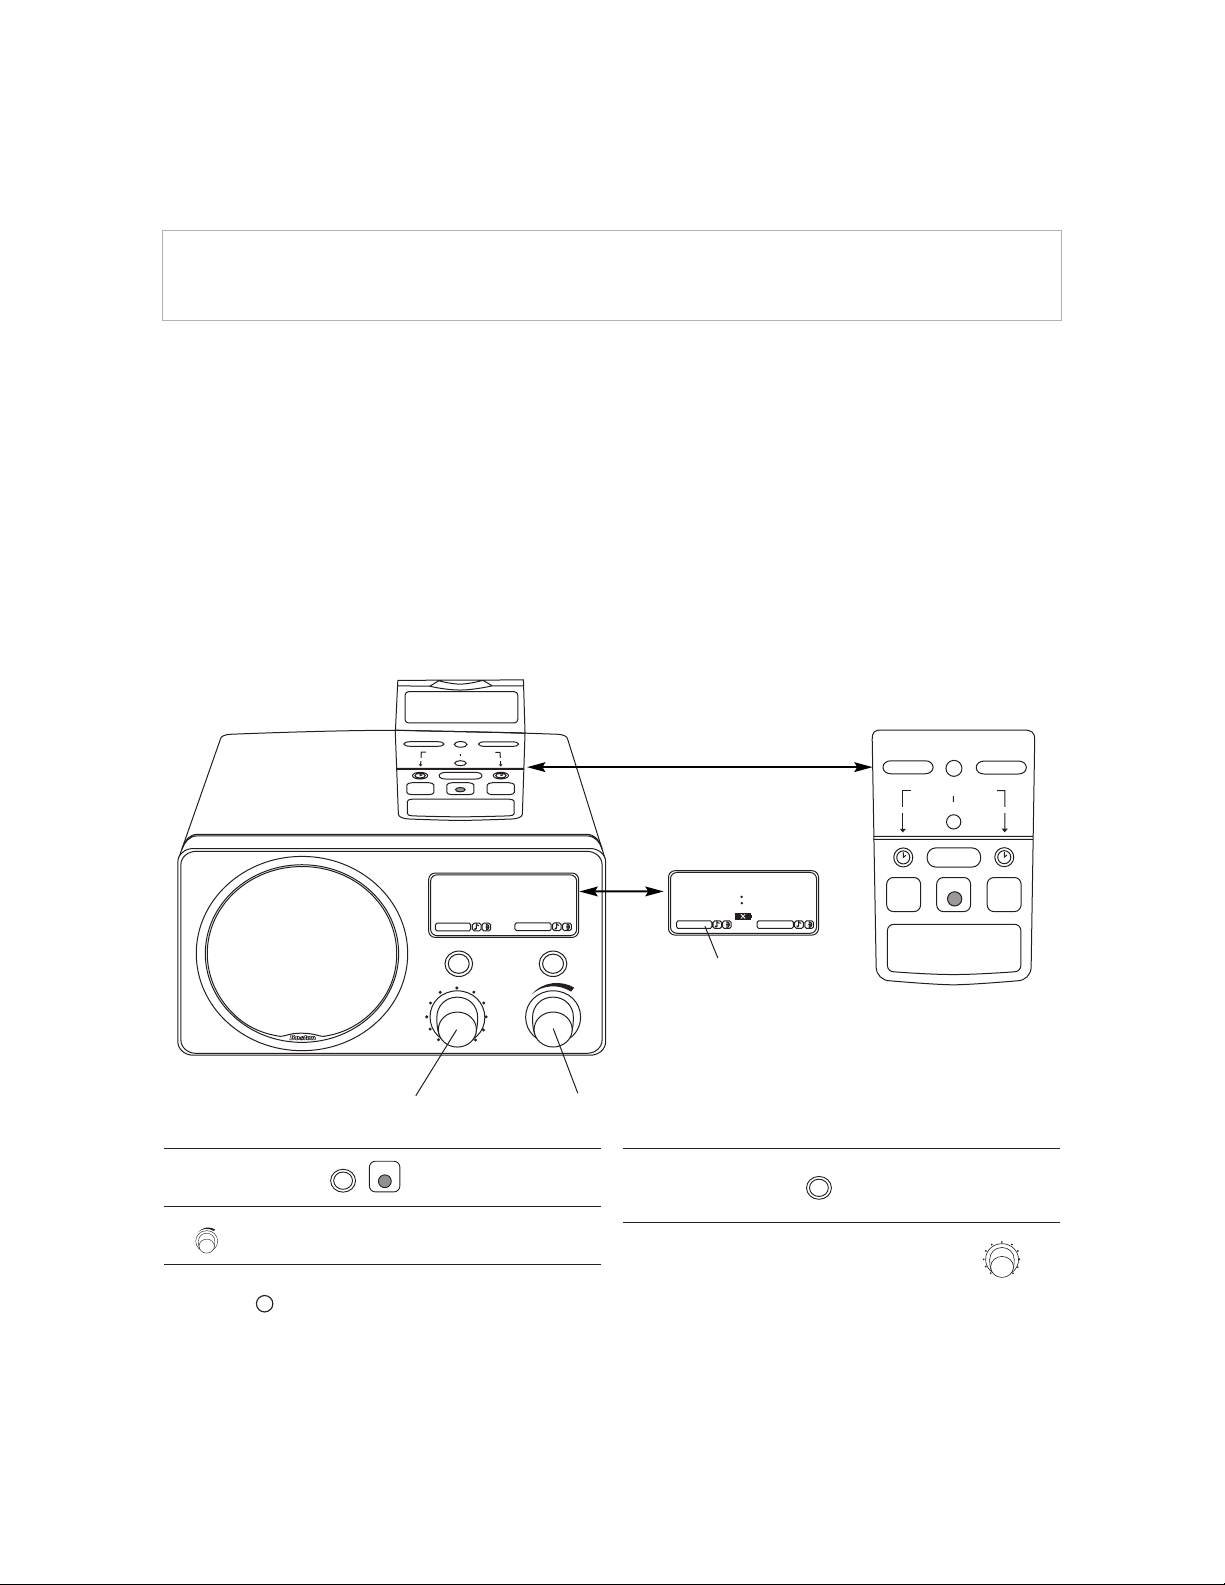
ON/OFF BUTTONS
Turns the Radio on or off.
VOLUME KNOB
Turn clockwise to increase volume.
SETTING THE CLOCK
1. Push the button (time display will flash).
2. While the time display is flashing, turn the tuning knob to the
desired time.
Note: PM is indicated on the display; AM has
no indication.
CHOOSING AM/FM BAND
1. Push AM>FM>Presets button until “AM Tuning”
or “FM Tuning” is displayed.
MANUALLY TUNING TO A STATION
1. After choosing either AM or FM band, turn the tuning
knob until the desired station is tuned.
To store a preset station:
- Use AM>FM> Presets to
choose AM or FM tuning.
- Tune station with knob.
Then use AM>FM>Presets to
- Hold store for 3 seconds.
set knob to tune Presets only
96.9
AM>FM>Presets On/off
Presets FM
20
Alarm 1
Alarm 2
storepreset presetclear
set with tuning knob
Display
Alarm
1
Alarm
2
On/off
Snooze / sleep
dim
clock
Tuning knob Volume knob
alarm 2
alarm 1
Presets Tuning FM
20
Sleep
10:03
PM
Readout showing clock time,
sleep mode, and low battery indicator
Alarm 1
Alarm 2
Alarm activated,
music + buzzer mode
Display
Alarm
1
Alarm
2
On/off
Snooze / sleep
store preset presetclear
set with tuning knob
dim
clock
Alarm 1 Alarm 2
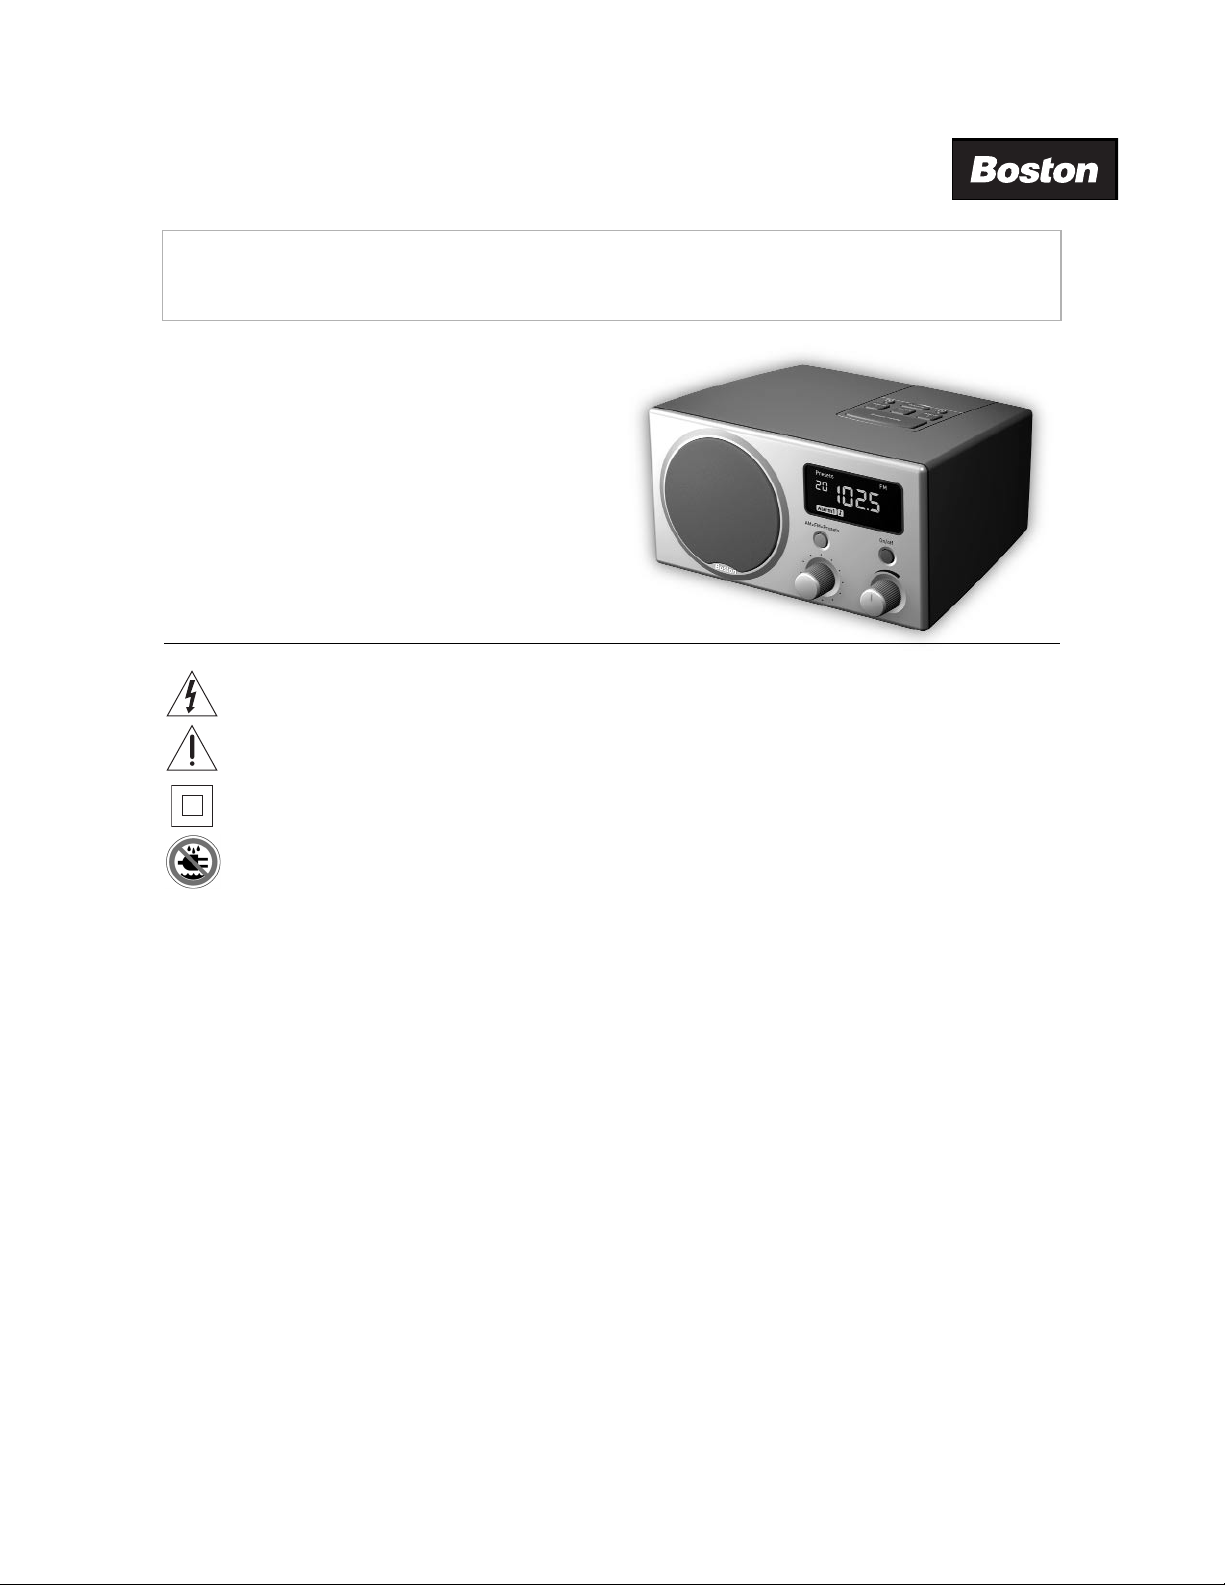
Thank you for purchasing the Boston Acoustics Recepter™Radio. We have designed this product to provide rich, lifelike musical sound and simple
operation in a compact, easy-to-place format.
The Boston Acoustics Recepter
™
Radio’s surprising performance is made possible by Boston Acoustics’ many years of experience in designing and
manufacturing high-performance audio equipment. The key to the Radio’s sound is its Boston-designed wide-range driver. Optimized specifically
for the Radio, it is combined with an actively-equalized amplifier that that uses proprietary Boston BassTrac
®
circuitry for full, satisfying bass even
at low volume. The result is a unit that delivers smooth, natural response and room-filling sound that belies its small size. This outstanding audio
performance is coupled with a highly sensitive AM/FM tuner with a 20 preset-station memory for clear, distortion-free reception.
The Radio also has two independent wake-up alarms. Either alarm can be set to music, buzzer, or both. A large, easy-to-read LCD display
clearly presents the station, clock, and alarm/sleep status, while a built-in sleep function lets the Radio play for up to 60 minutes before turning
off automatically.
The Radio is fast and easy to use and set, since times and stations can be rapidly selected by spinning a knob rather than repeatedly pressing buttons.
And once you have stored your favorite stations in memory, the tuning knob can be set to tune in only those stations.
BOSTON ACOUSTICS RECEPTER RADIO
TM
k
cloc
On/off
On/off
AM>FM>Presets
Page 3

ENTERING STATIONS INTO PRESET MEMORY
1. Manually tune to desired station.
2. Press and hold the button for 1 second until you hear
a beep confirmation.
3. The display will show the preset station number in the upper left
corner of the display.
4. Note: Stations will store in the order that they were entered into
memory, regardless of whether they are FM or AM stations.
LISTENING TO PRESET STATIONS
1. Push button until the word “Presets” is displayed.
2. Turn the tuning knob to the preset you wish to listen to.
CLEARING STATIONS FROM PRESET MEMORY
1. Push the AM>FM>Presets button to engage Presets mode.
2. Turn the tuning knob to the preset you wish to clear.
3. Press and hold the button for 1 second until you hear
a beep confirmation. When a station is cleared from memory, the
Radio will mute until the tuning knob is turned again.
4. Note: Holding the clear preset button for 10 seconds will clear
ALL the preset stations. You will hear three quick beeps to confirm
an “all clear” operation.
DISPLAY MODE (STATION FREQUENCY/CLOCK TIME)
WHEN POWER IS ON
The Radio normally displays the station frequency when the power is
on. To recall the clock time:
1. To recall the clock time, tap the button. The time will be
displayed for five seconds
2. To change the default display mode from station frequency to
clock time (or vice versa), press and hold the
Display button
until you hear a beep confirmation (about three seconds).
3. When power is off, the Radio always displays the current clock
time, even if the default display mode when the power is on is
the station frequency.
BRIGHT/DIM DISPLAY MODE
The bright display mode is the default setting.
1. Push the button to change the display from bright
to dim; push again to change it back.
SETTING THE WAKE-UP ALARM
1. Press the (or Alarm 2) button repeatedly to choose the
desired alarm mode—one press for music, two presses for buzzer,
three presses for music + buzzer.
Note: Pressing the Alarm
button a fourth time will disable the alarm. The display will indicate
if an alarm is set and its mode of operation. In the music +
buzzer mode, the Radio plays for 5 minutes, turns off, and then
the buzzer comes on.
2. Press the button above the Alarm 1 (or Alarm 2) button.
The time display will flash.
3. While the time display is flashing, turn the tuning knob to the
desired wake-up time.
Note: PM is indicated on display; AM
has no indication.
DISPLAYING THE WAKE-UP ALARM TIME
1. When an alarm is set, tap the button above the appropriate
Alarm 1 or Alarm 2 button to check the respective alarm time set-
ting. The alarm time will flash in the display for 5 seconds, then
the display will revert to its normal readout (either current clock
time or radio frequency if the Radio power is on, or current
clock time if the Radio power is off).
TURNING OFF THE ALARM WHEN IT IS SOUNDING
1. To turn off the alarm, press the On/off button on either
the top or front of the Radio. The alarm will remain set to go off
at the same time the next day.
2. To disable the alarm completely, press the Alarm 1 (or Alarm 2)
button repeatedly until the “Alarm” indicator is no longer visible in
the display.
USING THE SNOOZE FUNCTION
1. When the alarm sounds, push the button once
to silence the alarm for 10 minutes.
2. If the Snooze/sleep button is pushed again within 3 seconds of
the first push, 5 minutes will be added to snooze time, up to a
maximum of 60 minutes. Example: If the button is pushed rapidly
three times, the Radio will go into snooze mode for 20 minutes
(10 + 5 + 5 minutes).
3. Once the Radio is in snooze mode, tapping the Snooze/sleep
button will display the remaining snooze time, counting down. The
display will then revert to normal after 5 seconds.
USING THE SLEEP FUNCTION
When listening to the Radio, this function turns the Radio off automat-
ically after a predetermined time.
1. When the Radio is playing normally (no alarm is sounding), hold
the button down for 1 second.
2. The word Sleep is shown in the display, and the time 60:00 is
shown temporarily.
3. Each additional press of the Snooze/sleep button will reduce the
remaining sleep time in 10-minute increments, to the nearest 10
minutes. Example: If there are 59:48 minutes remaining in sleep,
pressing the button once will reduce the sleep time to 50 minutes,
twice will reduce it to 40 minutes, etc.
DISPLAYING THE REMAINING SLEEP TIME
1. While the Radio is in sleep mode, press the button
once. The remaining sleep time will be temporarily shown in the
display, then the display will revert to its normal readout (either
current clock time or radio frequency, depending on which has
been selected).
store preset
AM>FM>Presets
presetclear
Display
dim
Alarm
1
On/off
On/off
Snooze / sleep
Snooze / sleep
Snooze / sleep
Page 4

ANTENNA GROUNDING
Example of antenna grounding, per the National Electrical Code,
ANSI/NFPA 70
NOTICE FOR CABLE TV SYSTEM INSTALLER
Please make note of Article 820-40 of the NEC (of USA) that provides
guidelines for proper grounding. In particular, this standard specifies
that the cable ground shall be connected to the grounding system of
the building, as close to the point of cable entry as is practical.
LIMITED WARRANTY
For one year from the date of purchase, Boston Acoustics will repair
for the original owner any defect in materials or workmanship that
occurs in normal use of the Boston Acoustics Recepter Radio, without
charge for parts and labor.
Your responsibilities are to use the unit according to the instructions
supplied, to provide safe and secure transportation to an authorized
Boston Acoustics service representative, and to present proof of purchase
in the form of your sales slip when requesting service.
Excluded from this warranty is damage that results from abuse, misuse,
accidents, shipping, or repairs or modifications by anyone other than
an authorized Boston Acoustics service representative.
This warranty is void if the serial number has been removed or defaced.
This warranty gives you specific legal rights, and you may also have
other rights that vary from state to state.
If service seems necessary:
First, contact the retailer from whom you purchased the system. If that
is not possible, write to:
Boston Acoustics, Inc., 300 Jubilee Drive, Peabody, MA 01960 USA
We will promptly advise you of what action to take. If it is necessary to
return the product to the factory, please ship it prepaid. After it has
been repaired, we will return it freight prepaid in the U.S. and Canada.
BOSTON ACOUSTICS RECEPTER RADIO BACK PANEL
LOADING THE BACKUP BATTERIES
1. Load the 3 AAA batteries as shown. Insert the “-” end of the
batteries first.
The batteries will keep the clock time and preset/alarm settings when
AC power is interrupted, but the Radio will not operate. Clock display,
radio operation, and alarm functionality resume when AC power is
restored. Change the batteries when the low battery symbol appears
in the display.
To preserve memory settings, leave the Radio plugged in when
changing the batteries.
CONNECTING THE FM ANTENNA WIRE
The FM antenna comes pre-attached. If the antenna is disconnected,
follow these steps to reconnect it:
1. Push the “F” connector plug on the end of the antenna wire into
the receptacle on the Radio.
2. Straighten out the antenna to its full length.
3. Orient the wire for best reception. (The position for best reception
is guaranteed by Murphy’s Law to be wherever it looks the worst,
like draped down over the front of the kitchen counter.)
CONNECTING THE BOSTON RADIO TO A CABLE RADIO SIGNAL
The Radio’s FM antenna connector is a standard “F” connector and will
accept the cable FM feed from most cable systems that provide FM
programming. To connect your radio to the FM signal available from
some cable TV providers, contact your cable TV company for assistance.
Be sure that the installation includes a splitter that filters
the signal to prevent any re-emission of the TV spectrum
through the Radio, so only the FM band, not the cable TV
signal, is transmitted to the Radio.
CONNECTING AN EXTERNAL AM ANTENNA
(Not included—available at most stores that sell audio/video parts and
accessories)
1. Disconnect the built-in internal AM antenna wires from the
spring terminals.
2. Connect the wires of the external AM antenna to these terminals.
– +
© 2002. All rights reserved. Boston Everywhere, the Boston Sound and Recepter are
trademarks and BassTrac, Boston, Boston Acoustics, and the Boston logo are registered
trademarks of Boston Acoustics, Inc. 042-001642-0
www.bostonacoustics.com
Boston Acoustics, Inc.
300 Jubilee Drive, Peabody, MA 01960 USA 978.538.5000
BATT
Internal AM antenna:
Disconnect if using
external AM antenna
120V~
60Hz
0.5A
FM external (75Ω )
AM (300Ω)
AAA (3)
Electric
Service
Equipment
Ground
Clamp
Power Service Grounding
Electrode System
(NEC ART 250 Part H)
Antenna Lead In Wire
Antenna Discharge Unit
(NEC Section 810-20)
Grounding Conductors
(NEC Section 810-21)
Ground Clamps
 Loading...