

Page 1
Powered Subwoofer
PV500
Page 2
2
Important Safety Instructions
This symbol found on the apparatus indicates hazards arising from dangerous
voltages.
This symbol found on the apparatus indicates the user should read all safety statements found in the user manual.
This symbol found on the apparatus indicates double insulation.
WARNING! To reduce the risk of fire or electric shock, do not expose this product to rain or
moisture.
1. Read these instructions.
2. Keep these instructions.
3. Heed all warnings.
4. Follow all instructions.
5. Do not use this apparatus near water.
6. Clean only with dry cloth.
7. Do not block any ventilation openings.
Install in accordance with the manufacturer's
instructions.
8. Do not install near any heat sources such
as radiators, heat registers, stoves, or other
apparatus (including amplifiers) that produce
heat.
9. Do not defeat the safety purpose of the
polarized or grounding-type plug. A polarized
plug has two blades with one wider than the
other. A grounding type plug has two blades
and a third grounding prong. The wide blade or
the third prong are provided for your safety. If
the provided plug does not fit into your outlet,
consult an electrician for replacement of the
obsolete outlet.
10. Protect the power cord from being
walked on or pinched particularly at plugs,
convenience receptacles, and the point where
they exit from the apparatus.
11. Only use attachments/accessories
specified by the manufacturer.
12. Unplug this apparatus during lightning
storms or when unused for long periods of time.
13. Refer all servicing to qualified service
personnel. Servicing is required when the
apparatus has been damaged in any way, such
as power-supply cord or plug is damaged, liquid
has been spilled or objects have fallen into the
apparatus, the apparatus has been exposed to
rain or moisture, does not operate normally, or
has been dropped.
14. Maintain a minimum distance of 50 mm
around the front, rear and sides of the
apparatus for sufficient ventilation. The
ventilation should not be impeded by covering
the ventilation openings or placing on or
around the apparatus items such as
newspapers, table-cloths, curtains, etc.
15. No naked flame sources, such as lighted
candles, should be placed on the apparatus.
16 The apparatus shall not be exposed to
dripping or splashing. No objects filled with
liquids, such as vases, shall be placed on the
apparatus.
17. The apparatus is suitable for use in
tropical and/or moderate climates.
Page 3

3
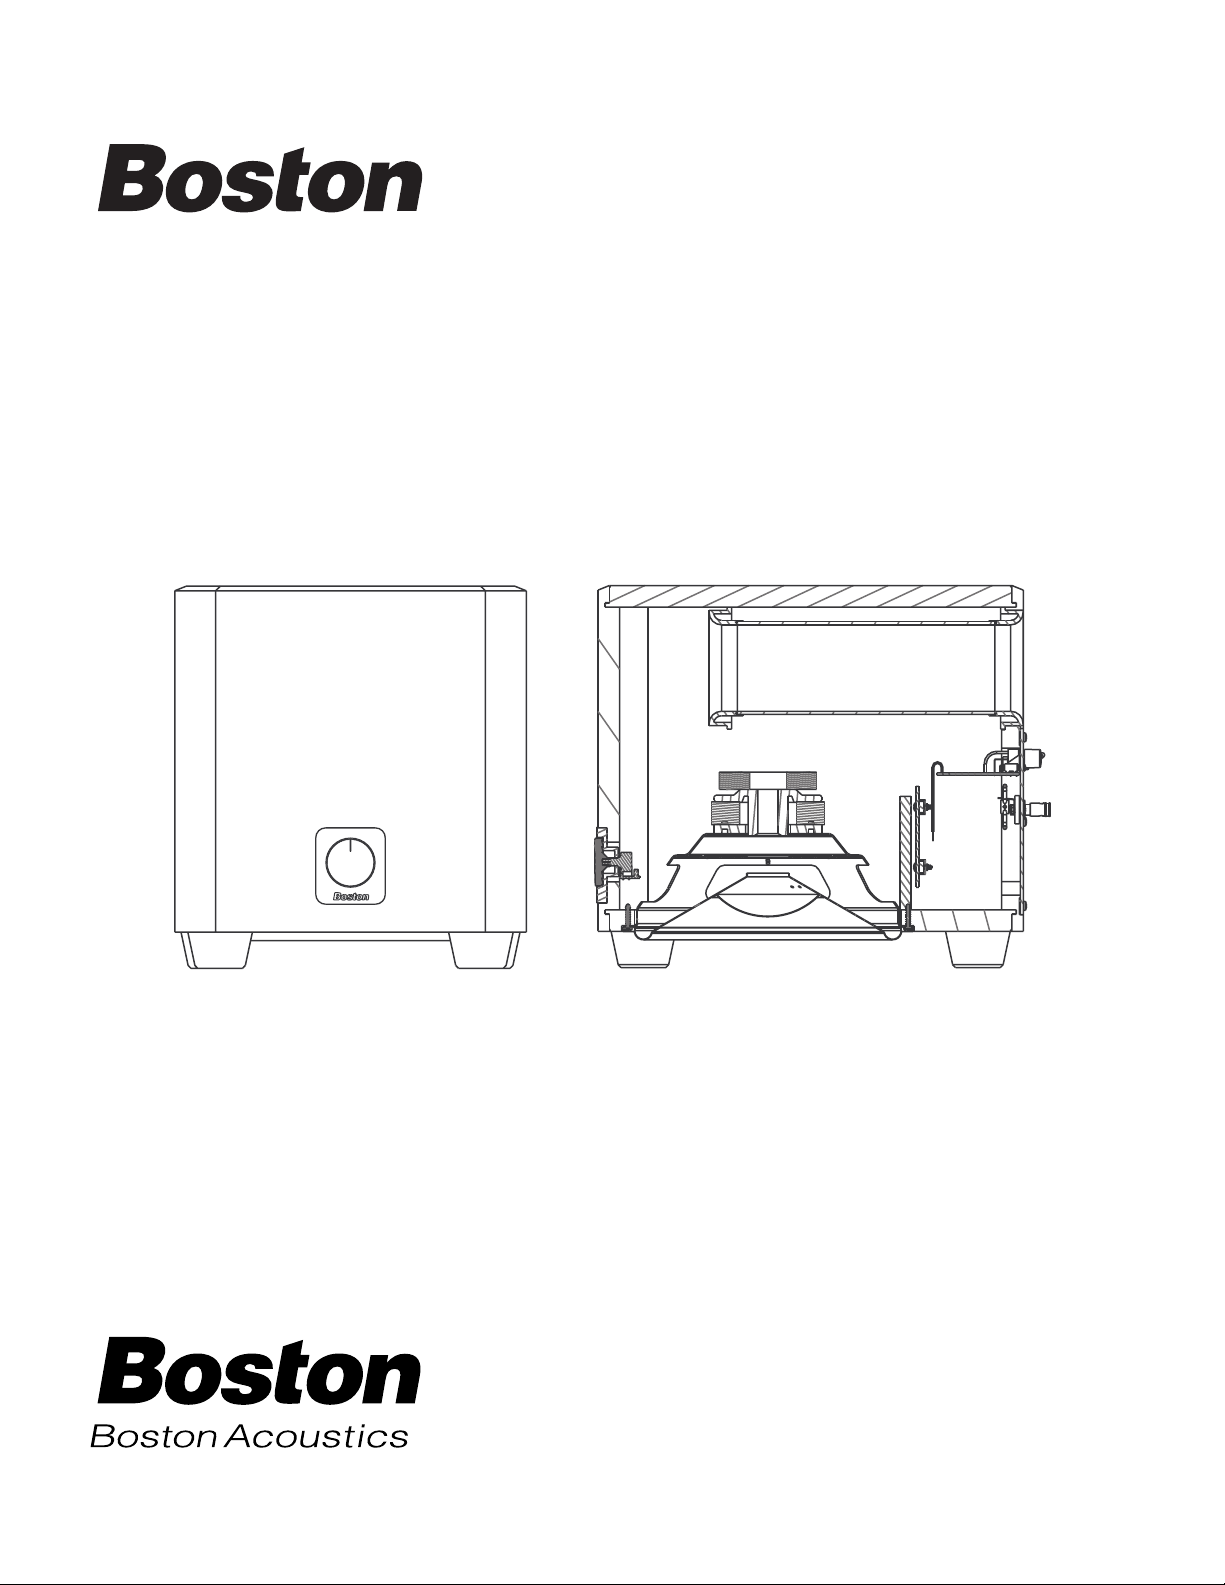
Description
Boston’s PV500 subwoofer delivers the dynamic bass foundation that is essential for lifelike reproduction of movie
soundtracks and music in the home. This attractive, powered subwoofer will complement any stereo or home theater
surround sound system with its impressive bass output and compact size.
This subwoofer utilizes our rugged DCD™ (Deep Channel Design) bass unit designed in Boston’s state-of-the-art
engineering facility in Peabody, Massachusetts. Every one is tested as it comes off the line to be within ±1dB of the lab
reference unit, an incredibly tight tolerance. The amplifier has a built-in variable crossover that makes it easy to achieve a
seamless blend with the main speakers, while a 24dB/octave low-pass filter prevents the subwoofer from being easily
localized by ear, increasing placement flexibility. A crossover bypass function is provided for use with home theater
electronics that perform their own bass management.
Because of its high-powered amplifier and computer-optimized tuning, the PV500 is capable of impressive deep bass
and high output from a remarkably compact enclosure. In addition, it features BassTrac®, a proprietary Boston-designed
circuit that tracks the input signal to the subwoofer and prevents its amplifier from being driven into audible distortion.
The benefit: The bass stays clean and strong at any listening level.
Auto on-off amplifier switching and easily accessible controls make the PV500 subwoofer as convenient to use as it is
exciting to listen to.
Specifications
Frequency Response (±3dB) 38Hz–180Hz
Subwoofer Amplifier Power Nominal: 100 watts RMS @ 1% THD maximum
FTC Rated Power: 85 watts from 38-180Hz at less than 1% THD
Subwoofer Crossover 75–150Hz
24dB/octave low-pass
LFE Input Ye s
Crossover Bypass Ye s
Bass Unit 10" (254mm) DCD
down-firing
Enclosure Type Single ported
Dimensions (HxWxD) 13
1
/4 x 121/4 x 153/4"
(with feet and rear connectors) (337 x 310 x 400mm)
Weight 28.5 lbs (12.8kg)
Finish Charcoal grey and black vinyl veneer
Page 4

4
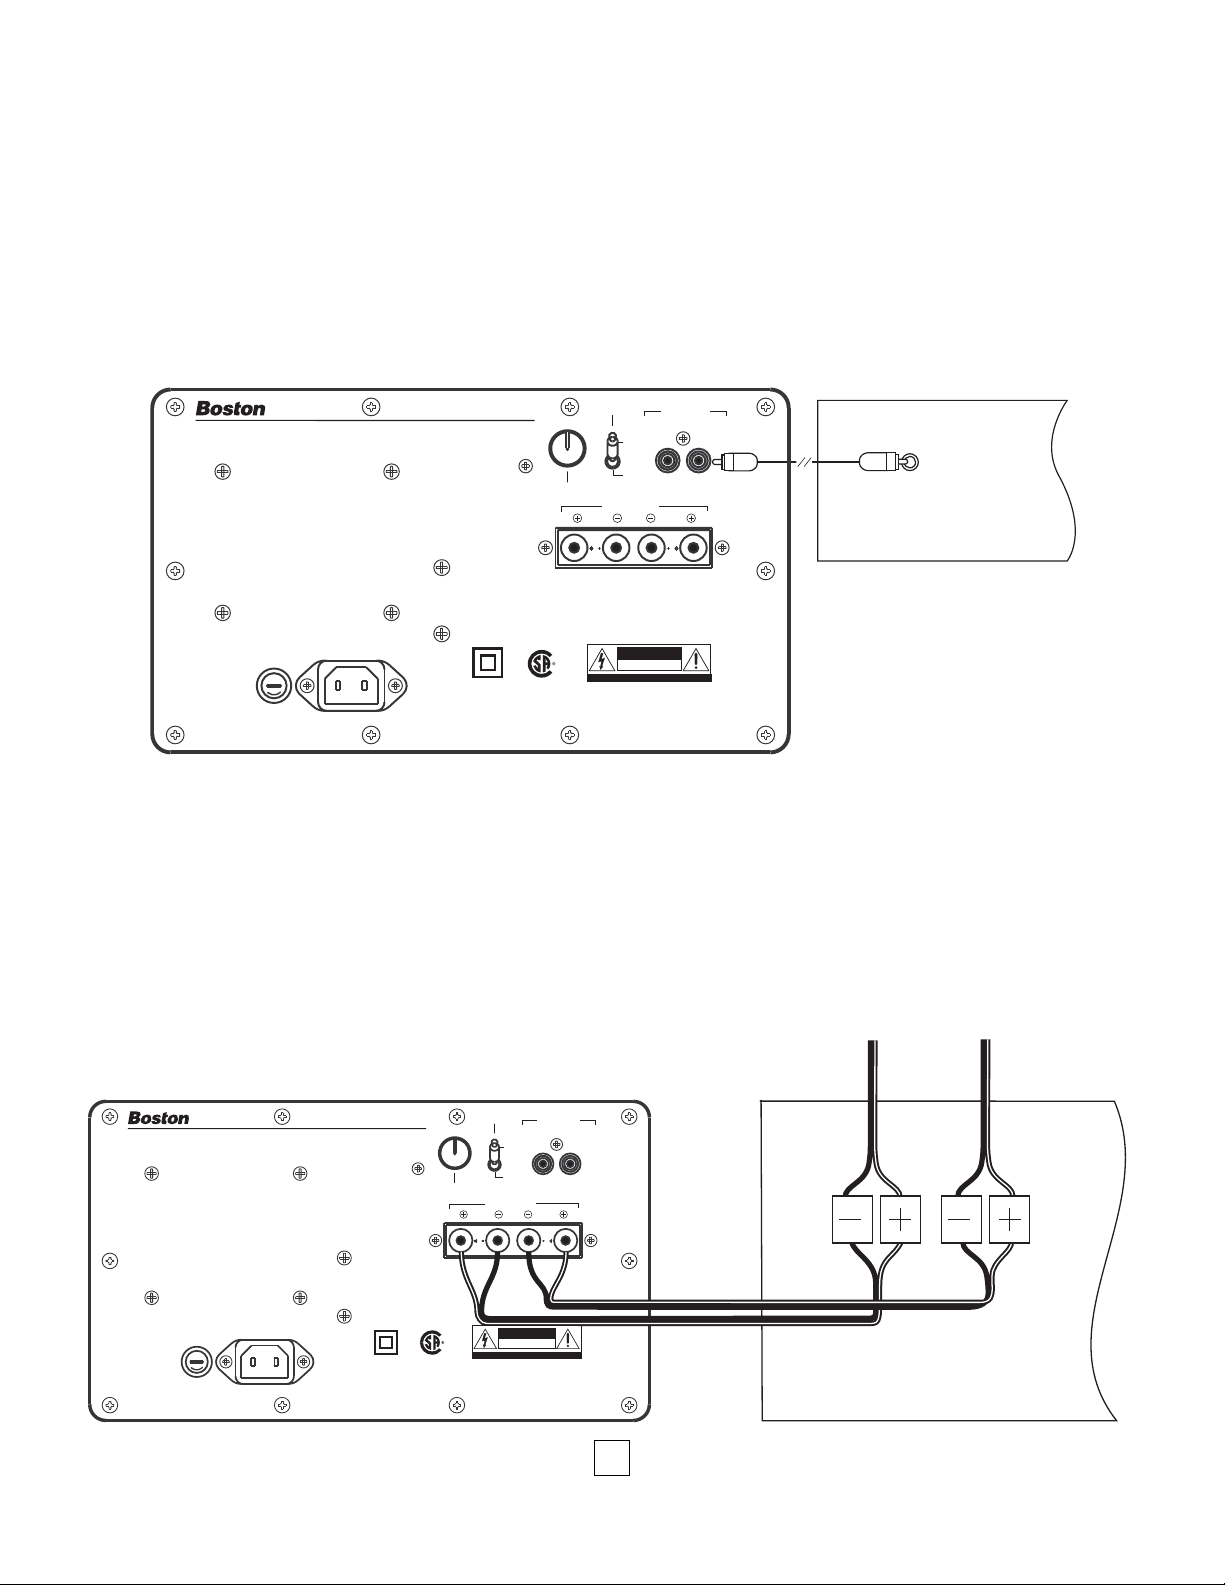
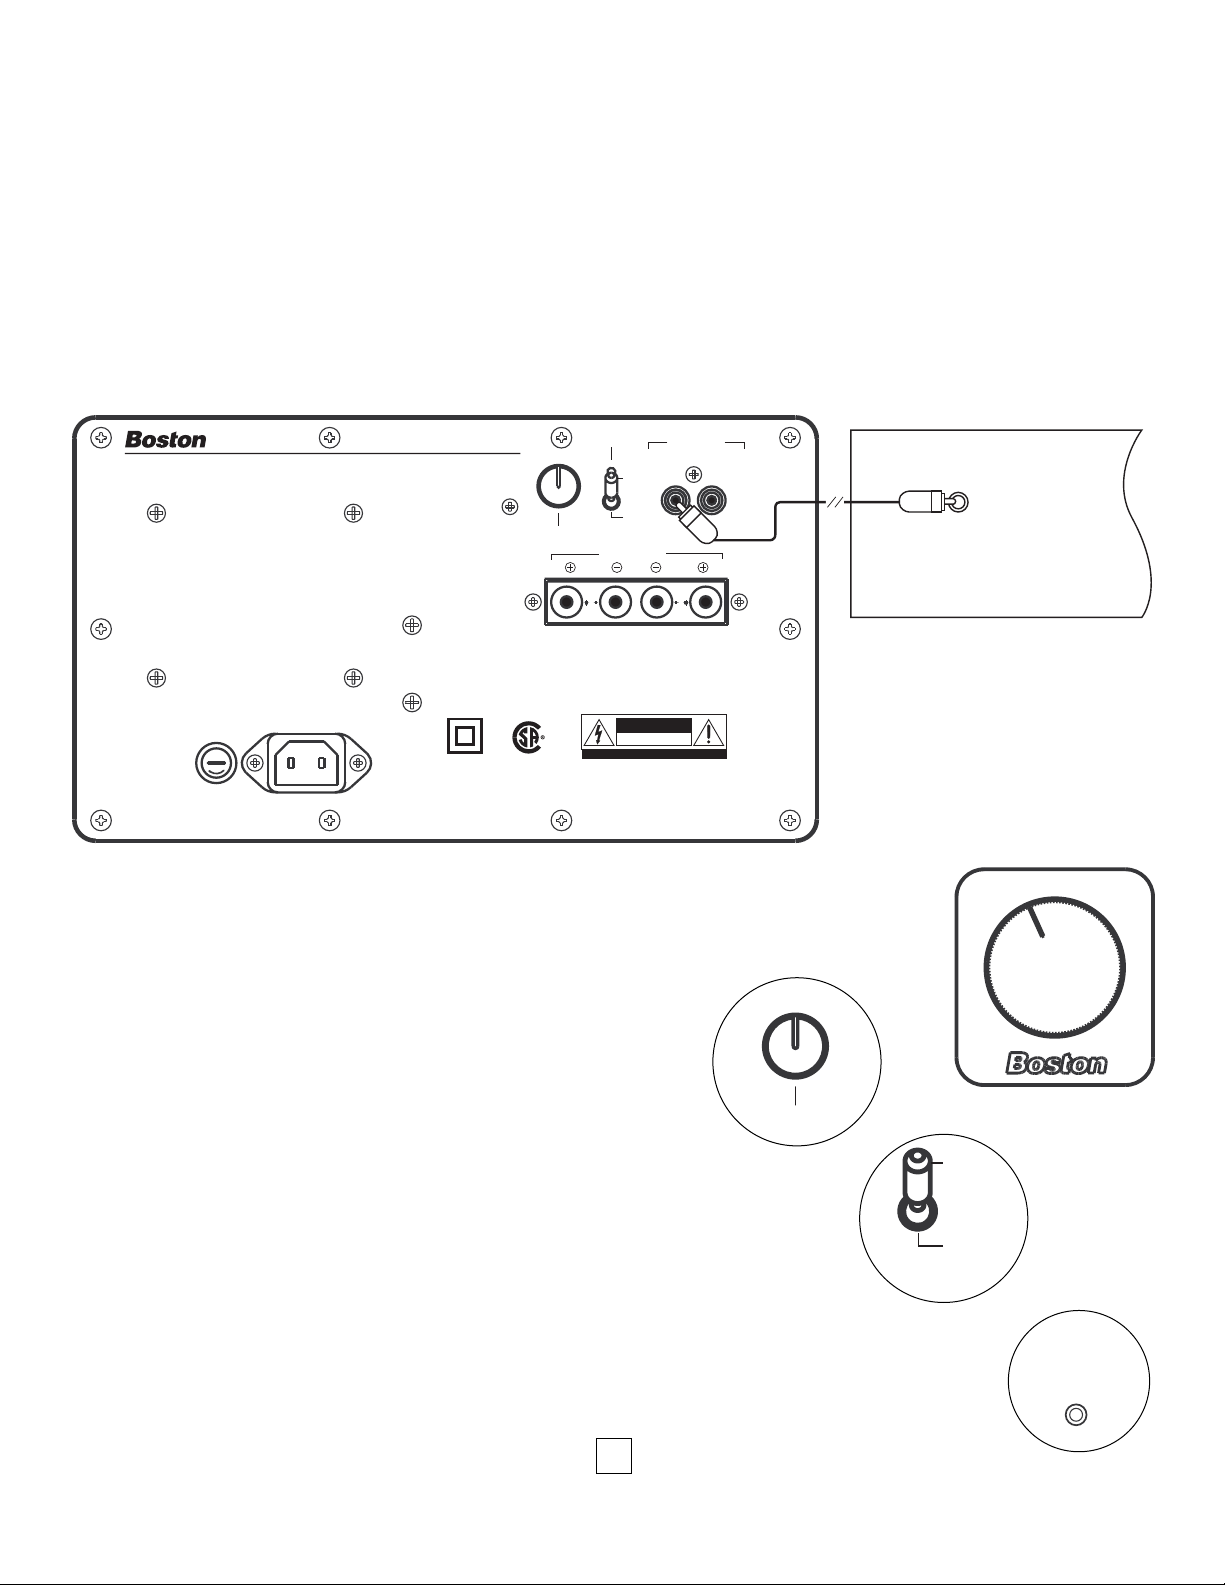
Connections
NOTE: Power is always supplied to the subwoofer electronics unless it is unplugged.
The auto-on circuitry only activates or deactivates the power amplifier. Make sure your subwoofer and receiver are
unplugged when making the connection.
Line level: Use one of the “line level in” jacks with most systems. These inputs accept the line level signal from your
receiver’s subwoofer output. When using the “use crossover control” input, the subwoofer’s circuitry filters out the high
frequencies and sends the remaining low frequencies to the subwoofer power amplifier.
Speaker level: Use these high-level terminals with receivers that do not have subwoofer output. The speaker inputs
accept both left and right channel speaker signals from your receiver.
How to Connect Using the Speaker Terminals
We recommend 18-gauge wire or thicker for runs up to 15 feet (4.5m), and 16-gauge wire or thicker for longer runs.
Separate the first few inches of the wire conductors. Strip off
1
⁄
2
-inch (13mm) of insulation from the ends of each speaker
wire to expose the two conductors and tightly twist the wire strands.
WARNING: To prevent electrical shock hazard, always switch off the amplifier or receiver when making connections to
the speaker.
When making all connections, be sure to connect the + (red) on the speaker to the + (red) on the amplifier, and
the – (black) on the speaker to the – (black) on the amplifier.
IMPORTANT: Typically, one side of the wire is
smooth. Connect this side to the – (black) connection.
The other side has a rib or stripe. Connect this to the
+ (red) connection.
Using the spring terminal posts: The spring
terminal posts permit easy connection to banana
plugs, spade lugs, and bare wire.
Push the the top of the terminal down by
approximately
1
⁄
4
-inch (6mm), exposing the hole.
Insert the wire in the hole and release the terminal.
1
/
4
"
+ –– +
–
+
Page 5
5
BACK OF RECEIVER
Connecting the Subwoofer to Digital Home Theater Systems
Digital 5.1, 6.1 and 7.1 home theater electronics dedicate one channel (the “.1”) to reproduce the special
low-frequency (LFE) information (such as explosions and thunder) contained in digitally-encoded soundtracks.
Select ”subwoofer-yes“ from your receiver’s set-up menu. Hooked up this way, the receiver’s amplifier is relieved of
having to reproduce the difficult low bass signals that can drive the receiver into audible distortion.
Use an RCA cable (not included), as shown, to connect your digital receiver’s subwoofer output to the subwoofer.
Connect the other end to the PV500 jack labeled “bypass crossover control” underneath “line level in”.
Be sure to connect + to + (red) and – to – (black
).
If you do not wish to run RCA cables to your subwoofer, you may use speaker wire to connect the subwoofer in parallel
with your main speakers (see diagram below). The subwoofer does not present any additional load to your receiver.
Select “subwoofer-no” from your receiver’s set-up menu. This sends the LFE signal to the main left and right speakers,
and thus, to the subwoofer. Consult your receiver’s owner’s manual for more details.
When using the speaker wire hookup, the subwoofer’s built-in crossover is engaged. As a starting point, set the
crossover control on the subwoofer about 10Hz higher than the lower limit of your main speakers’ bass response (for
Boston Acoustics front speakers, refer to the included “Optimal Crossover Settings...”sheet). Fine-tune the crossover
setting by ear for the smoothest blend with your main speakers. The best setting of the crossover control will depend on
speaker placement and personal preference.
SUBWOOFER OUT
BACK OF RECEIVER
left right
front
speakers
to main
speakers
PowerVent Powered Subwoofer
Featuring BassTrac
PV500
®
®
* use crossover control: removes high
frequencies; use with sources lacking suitable
filtering (most products without Dolby Digital
or THX), or where manual control is desired.
** bypass crossover control: direct to woofer;
use with sources having built-in crossover
controls or bass management (most products
with Dolby Digital or THX).
CAUTION: Disconnect supply cord
before replacing fuse. For continued
protection against risk of fire, replace only
with same type fuse.
ATTENTION: Debrancher avant de
remplacer le fusible. Utiliser un fusible de
rechange de même type.
T 1.5A L 250V
120V ~ 60Hz 1.25A
100 125
75
C US
power
150
crossover (Hz)
speaker level in
left right
AVIS: RISQUE DE CHOC ELECTRIQUE-NE PAS OUVRIR
use
crossover
control *
0º
180 º
polarity
CAUTION
RISK OF ELECTRIC SHOCK
DO NO
T OPEN
line level in
bypass
crossover
control **
PowerVent Powered Subwoofer
Featuring BassTrac
PV500
®
®
* use crossover control: removes high
frequencies; use with sources lacking suitable
filtering (most products without Dolby Digital
or THX), or where manual control is desired.
** bypass crossover control: direct to woofer;
use with sources having built-in crossover
controls or bass management (most products
with Dolby Digital or THX).
CAUTION: Disconnect supply cord
before replacing fuse. For continued
protection against risk of fire, replace only
with same type fuse.
ATTENTION: Debrancher avant de
remplacer le fusible. Utiliser un fusible de
rechange de même type.
T 1.5A L 250V
120V ~ 60Hz 1.25A
C US
100 125
150
75
crossover (Hz)
left right
AVIS: RISQUE DE CHOC ELECTRIQUE-NE PAS OUVRIR
power
0º
180 º
polarity
speaker level in
CAUTION
RISK OF ELECTRIC SHOCK
DO NO
use
crossover
control *
T OPEN
line level in
bypass
crossover
control **
Page 6
6
Controls
Volume (on front panel): Adjusts the sound level of the subwoofer. A typical setting is around
11 o’clock.
Crossover (Hz): Adjusts the frequency of the low-pass filter for the
subwoofer. This control is inactive when using the “bypass crossover
control” input jack.
Polarity (0° or 180°): Selects regular (0°) or inverted (180°) polarity for the subwoofer.
Set this switch to provide the fullest, most dynamic bass. The effect of phase will be
most audible on low-frequency percussion instruments or music with a continuously
repeating bass line.
Power light and power status: The power light turns on whenever the PV500 is plugged into an
electrical outlet. The PV500’s auto-on circuitry turns the subwoofer on when a signal is presented, and
turns it off if no signal is detected. NOTE: Power is always supplied to the subwoofer electronics unless
it is unplugged. The auto-on circuitry only activates or deactivates the power amplifier.
Connecting the Subwoofer to Stereo or Dolby®Pro Logic®Systems
For stereo or Dolby Pro Logic systems, the easiest method is to use the same speaker wire connections as shown on page 5.
You may also use the “sub out” connection from your receiver to the input on the subwoofer marked use crossover
control. When using speaker wire or the use crossover control input, the subwoofer’s built-in crossover is engaged. As a
starting point, set the crossover control on the subwoofer about 10Hz higher than the lower limit of your main speakers’
bass response (for Boston Acoustics front speakers, refer to the included “Optimal Crossover Settings...”sheet). Finetune the crossover setting by ear for the smoothest blend with your main speakers. The best setting of the crossover
control will depend on speaker placement and personal preference.
BACK OF RECEIVER
SUBWOOFER OUT
75
100 125
150
crossover (Hz)
0º
180 º
polarity
power
PowerVent Powered Subwoofer
Featuring BassTrac
PV500
®
®
* use crossover control: removes high
frequencies; use with sources lacking suitable
filtering (most products without Dolby Digital
or THX), or where manual control is desired.
** bypass crossover control: direct to woofer;
use with sources having built-in crossover
controls or bass management (most products
with Dolby Digital or THX).
CAUTION: Disconnect supply cord
before replacing fuse. For continued
protection against risk of fire, replace only
with same type fuse.
ATTENTION: Debrancher avant de
remplacer le fusible. Utiliser un fusible de
rechange de même type.
100 125
75
crossover (Hz)
power
150
polarity
speaker level in
left right
180 º
0º
use
crossover
control *
line level in
bypass
crossover
control **
T 1.5A L 250V
120V ~ 60Hz 1.25A
C US
CAUTION
RISK OF ELECTRIC SHOCK
DO NO
AVIS: RISQUE DE CHOC ELECTRIQUE-NE PAS OUVRIR
T OPEN
Page 7

7
Placement
Place the subwoofer next to a wall or in a corner near your main speakers. Typically, the sound is best when the subwoofer
is within 15 feet (5m) of the main speakers. However, the sharp 24dB/octave crossover roll-off permits placement farther
from the main speakers if necessary. Since the ear is unable to localize the low frequencies of the subwoofer, the bass still
appears to come from the main speakers. In most cases, the subwoofer may be placed anywhere in the listening room.
The level of bass output from the subwoofer will vary at different positions in a room. When placed near walls, its loudness
is emphasized. Corner placement provides the most bass output, while placement near only one wall will provide somewhat less bass. Placement completely away from walls may produce too little bass. Regardless of how you place the subwoofer, you can adjust the subwoofer’s level with its volume control. If you move the subwoofer, recheck the setting of the
polarity switch. Use the setting that yields the louder and more dynamic sound.
IMPORTANT: Do not place the subwoofer where there is a chance of contact between the rear panel and drapes or
furniture. Avoid obstructing air flow to the back.
Position PV500 in corner
for maximum bass output
Page 8

8
DCD is a trademark and BassTrac, Boston and Boston Acoustics are
registered trademarks of Boston Acoustics, Inc. Dolby and Dolby Pro Logic
are registered trademarks of Dolby Laboratories Licensing Corporation.
© 2002 Boston Acoustics, Inc. All rights reserved.
Specifications subject to change without notice.
300 Jubilee Drive
Peabody, MA 01960 U.S.A.
978.538.5000
www.bostonacoustics.com
042-001578-1
Limited Warranty
For one year from the date of purchase, Boston Acoustics will repair for the original owner any defect in materials
or workmanship that occurs in normal use of the subwoofer, without charge for parts and labor.
Your responsibilities are to use the system according to the instructions supplied, to provide
safe and secure transportation to an authorized Boston Acoustics service representative, and to present proof of
purchase in the form of your sales slip when requesting service.
Excluded from this warranty is damage that results from abuse, misuse, accidents, shipping,
or repairs or modifications by anyone other than an authorized Boston Acoustics service
representative.
This warranty is void if the serial number has been removed or defaced.
This warranty gives you specific legal rights, and you may also have other rights which vary
from state to state.
If Service Seems Necessary
First, contact the dealer from whom you purchased the PV500. If that is not possible, write to:
Customer Service
Boston Acoustics, Inc.
300 Jubilee Drive
Peabody, MA 01960 U.S.A.
Or visit our web site at:
www.bostonacoustics.com
We will promptly advise you of what action to take. If it is necessary to return your unit to the factory, please ship it
prepaid. After it has been repaired, we will return it freight prepaid in the U.S. and Canada.
Page 9

Page 10

Page 11

Page 12

Page 13

Page 14

Page 15

Page 16

Page 17

 Loading...