

Page 1

BF33
BF33-2
GB
TOOL SAFETY & OPERATING INSTRUCTIONS (ORIGINAL INSTRUCTIONS)
CONSIGNES DE SÉCURITÉ DE L’OUTIL ET INSTRUCTION D’UTILISATION (INSTRUCTIONS
FR
ORIGINALES)
DE
ANWEISUNGEN ZU WERKZEUGSICHERHEIT & BETRIEB (ORIGINALANWEISUNGEN)
VEILIGHEIDS- EN BEDIENINGSINSTRUCTIES VOOR GEREEDSCHAP (ORIGINELE
NL
INSTRUCTIES)
DK
VÆRKTØJSSIKKERHEDS- & DRIFTSINSTRUKTIONER (ORIGINALE INSTRUKTIONER)
FI
TYÖKALUTURVALLISUUS JA KÄYTTÖOHJEET (ALKUPERÄISET OHJEET)
ΟΔΗΓΙΕΣ ΑΣΦΑΛΕΙΑΣ & ΧΡΗΣΗΣ ΤΟΥ ΕΡΓΑΛΕΙΟΥ (ΜΕΤΑΦΡΑΣΗ ΑΠΟ ΤΟ
GR
ΠΡΩΤΟΤΥΠΟ
IT
ISTRUZIONI DI SICUREZZA E D’USO DEGLI UTENSILI (ISTRUZIONI ORIGINALI)
NO
SIKKERHETS- OG RUKSANVISNING FOR VERKTØYET (ORIGINALE INSTRUKSER)
INSTRUÇÕES DE SEGURANÇA E FUNCIONAMENTO DA FERRAMENTA (INSTRUÇÕES
PT
ORIGINAIS)
INSTRUCCIONES DE FUNCIONAMIENTO Y SEGURIDAD DE LA HERRAMIENTA
ES
(INSTRUCCIONES ORIGINALES)
SE
VERKTYGSSÄKERHET OCH DRIFTINSTRUKTIONER (ORIGINALINSTRUKTIONER)
INSTRUKCJA BEZPIECZEŃSTWA I OBSŁUGI NARZĘDZIA (ORYGINAŁ
PL
INSTRUKCJI)
BEZPEČNOSTNÍ POKYNY A NÁVOD K OBSLUZE NÁŘADÍ (ORIGINÁLNÍ NÁVOD K
CZ
OBSLUZE)
BEZPEČNOSTNÉ POKYNY A NÁVOD NA OBSLUHU NÁRADIA (ORIGINÁLNY
SK
NÁVOD NA OBSLUHU)
HU
SZERSZÁMBIZTONSÁG ÉS HASZNÁLATI UTASÍTÁSOK (EREDETI UTASÍTÁSOK)
INSTRUCŢIUNI DE SIGURANŢĂ ŞI OPERARE PENTRU UNELTE (TRADUCERE A
RO
INSTRUCŢIUNILOR ORIGINALE)
)
www.bostitch.eu
Page 2

GB
English (original instructions) 4
FR
Français (traduction de la notice d’instructions originale) 18
DE
Deutsch (übersetzt von den Originalanweisungen) 35
NL
Nederlands (vertaald vanuit de originele instructies) 53
DK
Dansk (oversat fra original brugsvejledning) 70
FI
Suomi (käännetty alkuperäisestä käyttöohjeesta) 86
GR
Ελληνικά (μετάφραση από τις πρωτότυπες οδηγίες) 101
IT
Italiano (tradotto dalle istruzioni originali) 121
NO
Norsk (oversatt fra de originale instruksjonene) 138
PT
Português (traduzido das instruções originais) 153
ES
Español (traducido de las instrucciones originales) 171
SE
Svenska (översatt från de ursprungliga instruktionerna) 188
PL
Polski (oryginał instrukcji) 204
CZ
Česky (originální návod k obsluze) 223
SK
Slovensky (originálny návod na obsluhu) 241
HU
Magyar (eredeti utasítások) 260
RO
Română (traducere a instrucţiunilor originale) 278
II
Copyright Bostitch
Page 3
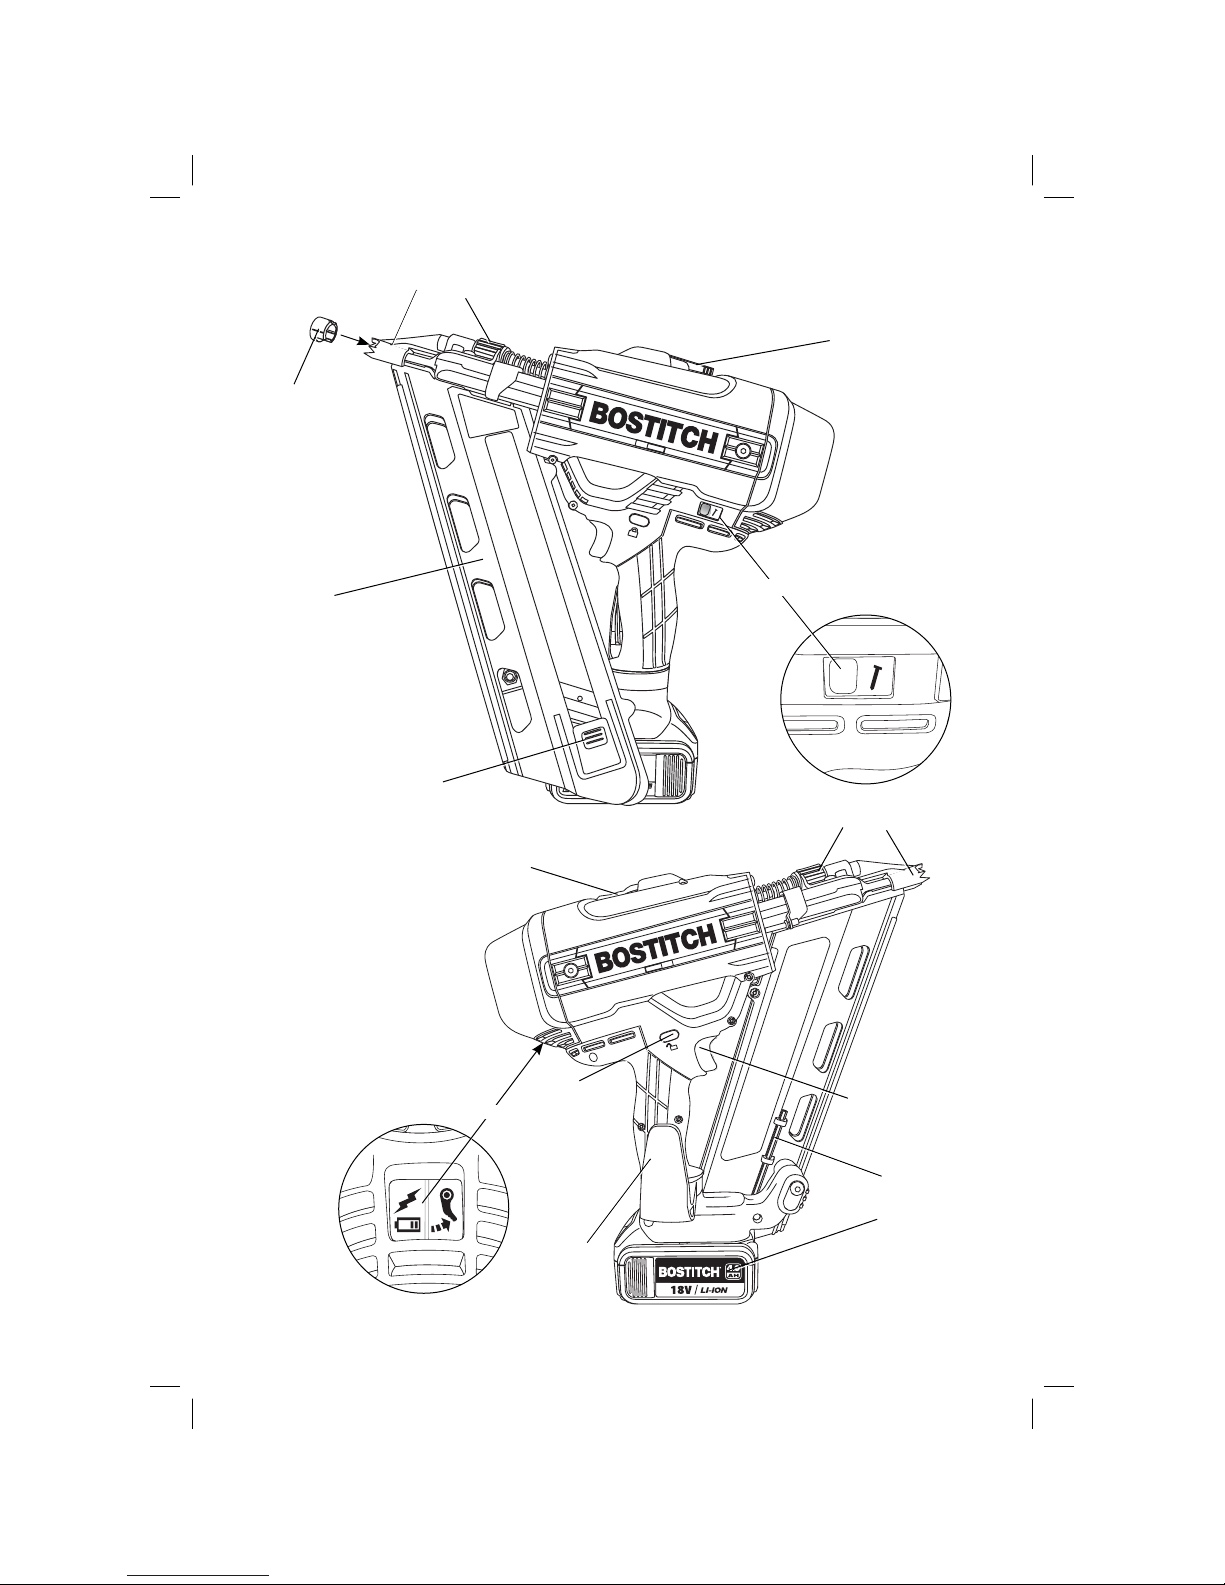
Figure 1
m
c
d
f
g
i
h
d
c
f
b
e
a
k
l
j
1
Page 4
Figure 2
l
n
Figure 2A
Figure 3
o
q
f
b
g
2
Page 5
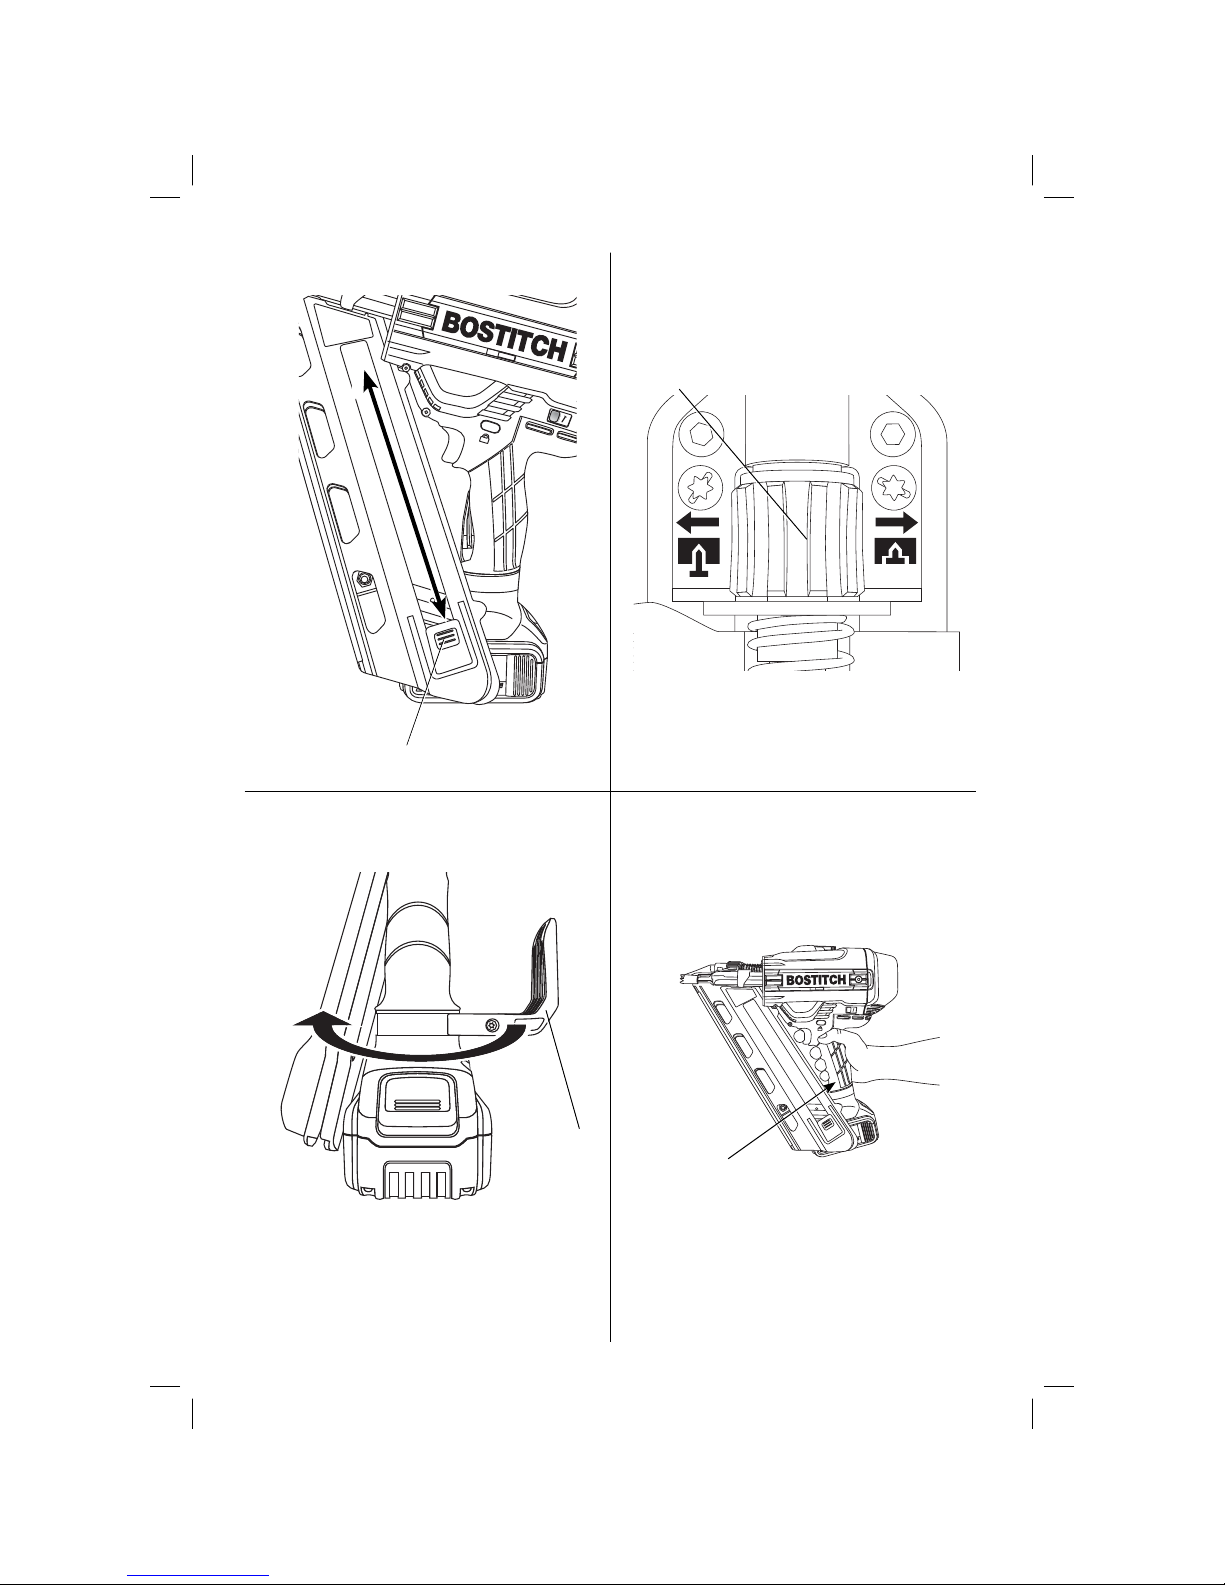
Figure 5Figure 4
h
Figure 6 Figure 7
d
j
p
3
Page 6
18V LI-ION CORDLESS FRAMING NAILER
BF33, BF33-2
Congratulations!
Bostitch tools are precision built and designed
for high speed, high volume fastening. They will
deliver efficient, dependable service when used
correctly and with care. As with any fine power
tool, the manufacturer’s instructions must be
followed for best results. Contact your Bostitch
representative or distributor with any questions
concerning the tool and it’s use.
Technical Data
BF33 BF33-2
Voltage VDC 18 18
Type 1 1
Actuating mode Sequential/ Sequential
Bump only
Magazine angle 33° 33°
Fasteners
length mm 50–90 50–90
shank diameter mm 2.8–3.3 2.8–3.3
angle 30–34° 30–34°
head geometry clipped or clipped or
offset round offset round
collation type paper paper
Weight (without battery pack) kg 3.53 3.53
Drive energy J 105 105
LPA (sound pressure) dB(A)
KPA (sound pressure
uncertainty) dB(A)
LWA (sound power) dB(A)
KWA (sound power
uncertainty) dB(A)
Vibration total values (triax vector sum) determined according
to EN 60745:
Vibration emission value a
ah
=
The vibration emission level given in this
information sheet has been measured in
accordance with a standardised test given in
EN60745 and may be used to compare one tool
with another. It may be used for a preliminary
assessment of exposure.
Uncertainty K = m/s²
h
m/s² 3.8 3.8
84 84
3 3
95 95
3 3
1.5 1.5
WARNING: The declared vibration
An estimation of the level of exposure
Identify additional safety measures to
Battery pack B-CB182
Battery type Li-Ion
Voltage V
Capacity Ah 4.0
Weight kg 0.61
Charger B-CB105
Mains voltage VAC 230
Battery type Li-Ion
Approx. charging time min 70
(4.0 Ah packs)
Weight kg 0.49
Fuses
Europe 230 V tools 10 Amperes, mains
U.K. & Ireland 230 V tools 13 Amperes, in plugs
emission level represents the main
applications of the tool. However if the
tool is used for different applications,
with different accessories or poorly
maintained, the vibration emission may
differ. This may significantly increase the
exposure level over the total working
period.
to vibration should also take into
account the times when the tool is
switched off or when it is running but
not actually doing the job. This may
significantly reduce the exposure level
over the total working period.
protect the operator from the effects
of vibration such as: maintain the tool
and the accessories, keep the hands
warm, organisation of work patterns.
18
DC
Defi nitions: Safety Guidelines
The definitions below describe the level of severity
for each signal word. Please read the manual and
pay attention to these symbols.
DANGER: Indicates an imminently
hazardous situation which, if not
avoided, will result in death or serious
injury.
4
Page 7

WARNING: Indicates a potentially
CAUTION: Indicates a potentially
NOTICE: Indicates a practice not
Denotes risk of fire.
hazardous situation which, if not
avoided, could result in death or
serious injury.
hazardous situation which, if not
avoided, may result in minor or
moderate injury.
related to personal injury which, if
not avoided, may result in property
damage.
Denotes risk of electric shock.
EC-Declaration of Conformity
MACHINERY DIRECTIVE
BF33, BF33-2
Bostitch declares that these products described
under Technical Data are in compliance with:
2006/42/EC, EN 60745-1, EN 60745-2-16.
These products also comply with Directive
2004/108/EC and 2011/65/EU. For more
information, please contact Bostitch at the
following address.
The undersigned is responsible for compilation of
the technical file and makes this declaration on
behalf of Bostitch.
Colin Earl
Managing Director
Europe, Middle East & Africa
Stanley Black & Decker bvba
Kanaalweg 112 IZ Ravenshout zone 3
3980 Tessenderlo, Belgium
28.06.2013
WARNING: To reduce the risk of injury,
read the instruction manual.
General Power Tool Safety
Warnings
WARNING! Read all
safety warnings and
all instructions. Failure
to follow the warnings
and instructions may result in electric
shock, fire and/or serious injury.
SAVE ALL WARNINGS AND INSTRUCTIONS
FOR FUTURE REFERENCE
The term “power tool” in the warnings refers to
your mains-operated (corded) power tool or
battery-operated (cordless) power tool.
1) WORK AREA SAFETY
a) Keep work area clean and well lit.
Cluttered or dark areas invite accidents.
b) Do not operate power tools in explosive
atmospheres, such as in the presence of
flammable liquids, gases or dust. Power
tools create sparks which may ignite the
dust or fumes.
c) Keep children and bystanders away
while operating a power tool. Distractions
can cause you to lose control.
2) ELECTRICAL SAFETY
a) Power tool plugs must match the outlet.
Never modify the plug in any way. Do
not use any adapter plugs with earthed
(grounded) power tools. Unmodified plugs
and matching outlets will reduce risk of
electric shock.
b) Avoid body contact with earthed or
grounded surfaces such as pipes,
radiators, ranges and refrigerators. There
is an increased risk of electric shock if your
body is earthed or grounded.
c) Do not expose power tools to rain or
wet conditions. Water entering a power
tool will increase the risk of electric shock.
d) Do not abuse the cord. Never use the
cord for carrying, pulling or unplugging
the power tool. Keep cord away from
heat, oil, sharp edges or moving parts.
Damaged or entangled cords increase the
risk of electric shock.
e) When operating a power tool outdoors,
use an extension cord suitable for
outdoor use. Use of a cord suitable for
outdoor use reduces the risk of electric
shock.
f) If operating a power tool in a damp
location is unavoidable, use a residual
current device (RCD) protected supply.
Use of an RCD reduces the risk of electric
shock.
GB
5
Page 8

3) PERSONAL SAFETY
a) Stay alert, watch what you are
doing and use common sense when
operating a power tool. Do not use
a power tool while you are tired or
under the influence of drugs, alcohol or
medication. A moment of inattention while
operating power tools may result in serious
personal injury.
b) Use personal protective equipment.
Always wear eye protection. Protective
equipment such as dust mask, non-skid
safety shoes, hard hat, or hearing protection
used for appropriate conditions will reduce
personal injuries.
c) Prevent unintentional starting. Ensure
the switch is in the off position before
connecting to power source and/or
battery pack, picking up or carrying the
tool. Carrying power tools with your finger
on the switch or energising power tools
that have the switch on invites accidents.
d) Remove any adjusting key or wrench
before turning the power tool on. A
wrench or a key left attached to a rotating
part of the power tool may result in
personal injury.
e) Do not overreach. Keep proper footing
and balance at all times. This enables
better control of the power tool in
unexpected situations.
f) Dress properly. Do not wear loose
clothing or jewellery. Keep your hair,
clothing and gloves away from moving
parts. Loose clothes, jewellery or long hair
can be caught in moving parts.
g) If devices are provided for the
connection of dust extraction and
collection facilities, ensure these are
connected and properly used. Use of dust
collection can reduce dust-related hazards.
4) POWER TOOL USE AND CARE
a) Do not force the power tool. Use the
correct power tool for your application.
The correct power tool will do the job
better and safer at the rate for which it
was designed.
b) Do not use the power tool if the switch
does not turn it on and off. Any power
tool that cannot be controlled with the
switch is dangerous and must be repaired.
c) Disconnect the plug from the power
source and/or the battery pack from
the power tool before making any
adjustments, changing accessories, or
storing power tools. Such preventive
safety measures reduce the risk of starting
the power tool accidentally.
d) Store idle power tools out of the reach
of children and do not allow persons
unfamiliar with the power tool or these
instructions to operate the power tool.
Power tools are dangerous in the hands of
untrained users.
e) Maintain power tools. Check for
misalignment or binding of moving
parts, breakage of parts and any other
condition that may affect the power
tool’s operation. If damaged, have the
power tool repaired before use. Many
accidents are caused by poorly maintained
power tools.
f) Keep cutting tools sharp and clean.
Properly maintained cutting tools with sharp
cutting edges are less likely to bind and are
easier to control.
g) Use the power tool, accessories and
tool bits etc., in accordance with these
instructions taking into account the
working conditions and the work to
be performed. Use of the power tool for
operations different from those intended
could result in a hazardous situation.
5) BATTERY TOOL USE AND CARE
a) Recharge only with the charger specified
by the manufacturer. A charger that is
suitable for one type of battery pack may
create a risk of fire when used with another
battery pack.
b) Use power tools only with specifically
designated battery packs. Use of any
other battery packs may create a risk of
injury and fire.
c) When battery pack is not in use, keep it
away from other metal objects like paper
clips, coins, keys, nails, screws or other
small metal objects that can make a
connection from one terminal to another.
Shorting the battery terminals together may
cause burns or a fire.
d) Under abusive conditions, liquid may be
ejected from the battery; avoid contact.
If contact accidentally occurs, flush with
water. If liquid contacts eyes, additionally
seek medical help. Liquid ejected from the
battery may cause irritation or burns.
6) SERVICE
a) Have your power tool serviced by
a qualified repair person using only
identical replacement parts. This will
ensure that the safety of the power tool is
maintained.
6
Page 9

Safety Instructions for Cordless
Nailers
• Always assume that the tool contains
fasteners. Careless handling of the nailer can
result in unexpected firing of fasteners and
personal injury.
• Do not point the tool towards yourself or
anyone nearby. Unexpected triggering will
discharge the fastener causing an injury.
• Do not actuate the tool unless the tool is
placed firmly against the workpiece. If the
tool is not in contact with the workpiece, the
fastener may be deflected away from your
target.
• Disconnect the tool from the power source
when the fastener jams in the tool. While
removing a jammed fastener, the nailer may
be accidentally activated if it is plugged in.
• Do not use this nailer for fastening
electrical cables. It is not designed for
electric cable installation and may damage the
insulation of electric cables thereby causing
electric shock or fire hazards.
• Always wear safety glasses.
• Always wear ear protection.
• Only use fasteners of the type specified in the
manual.
• Do not use any stands for mounting the tool
to a support.
• Do not disassemble or block any parts of the
fastener driving tool such as the contact trip.
• Prior to each operation check that the safety
and triggering mechanism is functioning
properly and that all nuts and bolts are tight.
• Do not use the BF33
– when changing from one driving location to
another involving the use of scaffoldings,
stairs, ladders or ladder-like constructions,
e.g., roof laths, etc.;
– when closing boxes or crates;
– when fitting transportation safety systems,
e.g., on vehicles, wagons, etc.
For exemptions check your local national
workplace regulations.
• Always check local workplace regulations.
• Do not use the tool as a hammer.
• Never actuate the fastener driving tool into
free space.
• In the work area, carry the tool at the
workplace using only one handle, and never
with the trigger actuated.
• Consider the conditions in
the work area. Fasteners can
penetrate thin work pieces or slip
off corners and edges of the work
piece, and thus put people at risk.
• Do not drive fasteners close to the
edge of the workpiece.
• Do not drive fasteners on top of other
fasteners.
GB
Residual Risks
The following risks are inherent to the use of these
machines:
– Injuries caused by improper handling of the
tool.
– Loss of control due to not gripping tool firmly.
– Muscle strain of arms and hands, especially
when working overhead. Always take regular
breaks when working for long periods of time.
In spite of the application of the relevant safety
regulations and the implementation of safety
devices, certain residual risks cannot be avoided.
These are:
– Impairment of hearing.
– Risk of personal injury due to flying particles.
– Risk of personal injury due to prolonged use.
– Loss of control caused by recoil.
– Risk of injury caused by pinch points, sharp
edges and improper handling of workpiece.
– Risk of injury caused by sharp edges when
changing nails or inserting nail sticks.
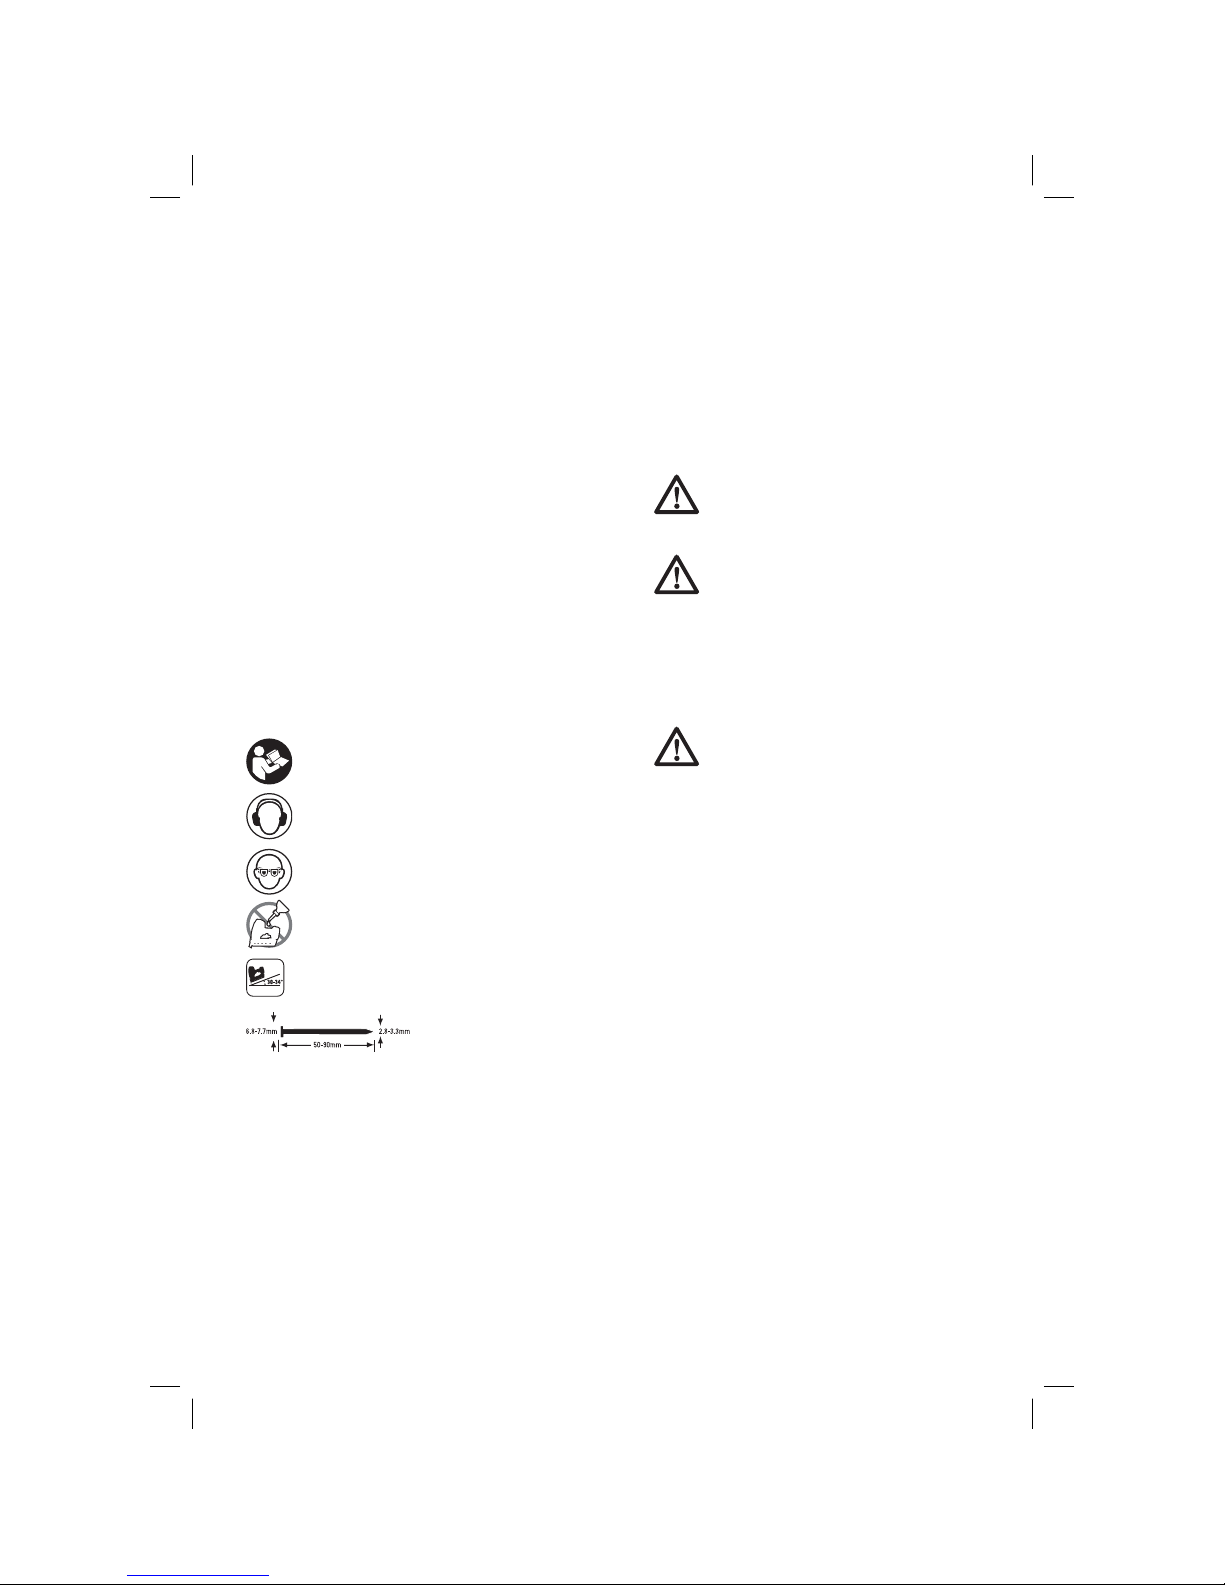
Markings on Tool
The following pictograms are shown on the tool:
Read instruction manual before use.
Wear ear protection.
Wear eye protection.
Do not apply lubrication to tool.
Suitable nail collation angle.
Length of nails/
Nail thickness.
7
Page 10
DATE CODE POSITION
The Date Code, which also includes the year of
manufacture, is printed into the housing surface
that forms the mounting joint between tool and
battery.
Example:
2013 XX XX
Year of Manufacture
Important Safety Instructions for All
Battery Chargers
SAVE THESE INSTRUCTIONS: This manual
contains important safety and operating instructions for the B-CB105 battery charger.
• Before using the charger, read all instructions
and cautionary markings on charger, battery
pack and product using the battery pack.
WARNING: Shock hazard. Do not
allow any liquid to get inside charger.
Electric shock may result.
CAUTION: Burn hazard. To reduce
the risk of injury, charge only Bostitch
rechargeable battery packs. Other
types of batteries may overheat and
burst resulting in personal injury and
property damage.
CAUTION: Children should be
supervised to ensure that they do not
play with the appliance.
NOTICE: Under certain conditions,
with the charger plugged in to the
power supply, the exposed charging
contacts inside the charger can be
shorted by foreign material. Foreign
materials of a conductive nature such
as, but not limited to, steel wool,
aluminum foil or any buildup of metallic
particles should be kept away from
charger cavities. Always unplug the
charger from the power supply when
there is no battery pack in the cavity.
Unplug charger before attempting to
clean.
• DO NOT attempt to charge the battery
pack with any chargers other than the ones
in this manual. The charger and battery pack
are specifically designed to work together.
• These chargers are not intended for
any uses other than charging Bostitch
rechargeable batteries. Any other uses
may result in risk of fire, electric shock or
electrocution.
• Do not expose charger to rain or snow.
• Pull by plug rather than cord when
disconnecting charger. This will reduce risk
of damage to electric plug and cord.
• Make sure that cord is located so that it
will not be stepped on, tripped over or
otherwise subjected to damage or stress.
• Do not use an extension cord unless it
is absolutely necessary. Use of improper
extension cord could result in risk of fire,
electric shock or electrocution.
• When operating a charger outdoors,
always provide a dry location and use an
extension cord suitable for outdoor use.
Use of a cord suitable for outdoor use reduces
the risk of electric shock.
• Do not block the ventilation slots on the
charger. The ventilation slots are located
on the top and sides of the charger. Place
the charger in a position away from any heat
source.
• Do not operate charger with damaged cord
or plug — have them replaced immediately.
• Do not operate charger if it has received
a sharp blow, been dropped or otherwise
damaged in any way. Take it to an authorised
service centre.
• Do not disassemble the charger; take it to
an authorised service centre when service
or repair is required. Incorrect reassembly
may result in a risk of electric shock,
electrocution or fire.
• In case of damaged power supply cord the
supply cord must be replaced immediately by
the manufacturer, its service agent or similar
qualified person to prevent any hazard.
• Disconnect the charger from the outlet
before attempting any cleaning. This will
reduce the risk of electric shock. Removing
the battery pack will not reduce this risk.
• NEVER attempt to connect 2 chargers
together.
• The charger is designed to operate on
standard 230 V household electrical power.
Do not attempt to use it on any other
voltage. This does not apply to the vehicular
charger.
SAVE THESE INSTRUCTIONS
Chargers
The B-CB105 charger accepts 18 V Li-Ion
(B-CB182) battery pack.
8
Page 11

This charger requires no adjustment and is
designed to be as easy as possible to operate.
Charging Procedure (fi g. 2)
1. Plug the charger into an appropriate 230 V
outlet before inserting the battery pack.
2. Insert the battery pack (l) into the charger,
making sure the pack is fully seated in the
charger. The red (charging) light will blink
continuously indicating that the charging
process has started.
3. The completion of charge will be indicated by
the red light remaining ON continuously. The
pack is fully charged and may be used at this
time or left in the charger.
NOTE: To ensure maximum performance and life
of Li-Ion batteries, charge the battery pack fully
before first use.
Charging Process
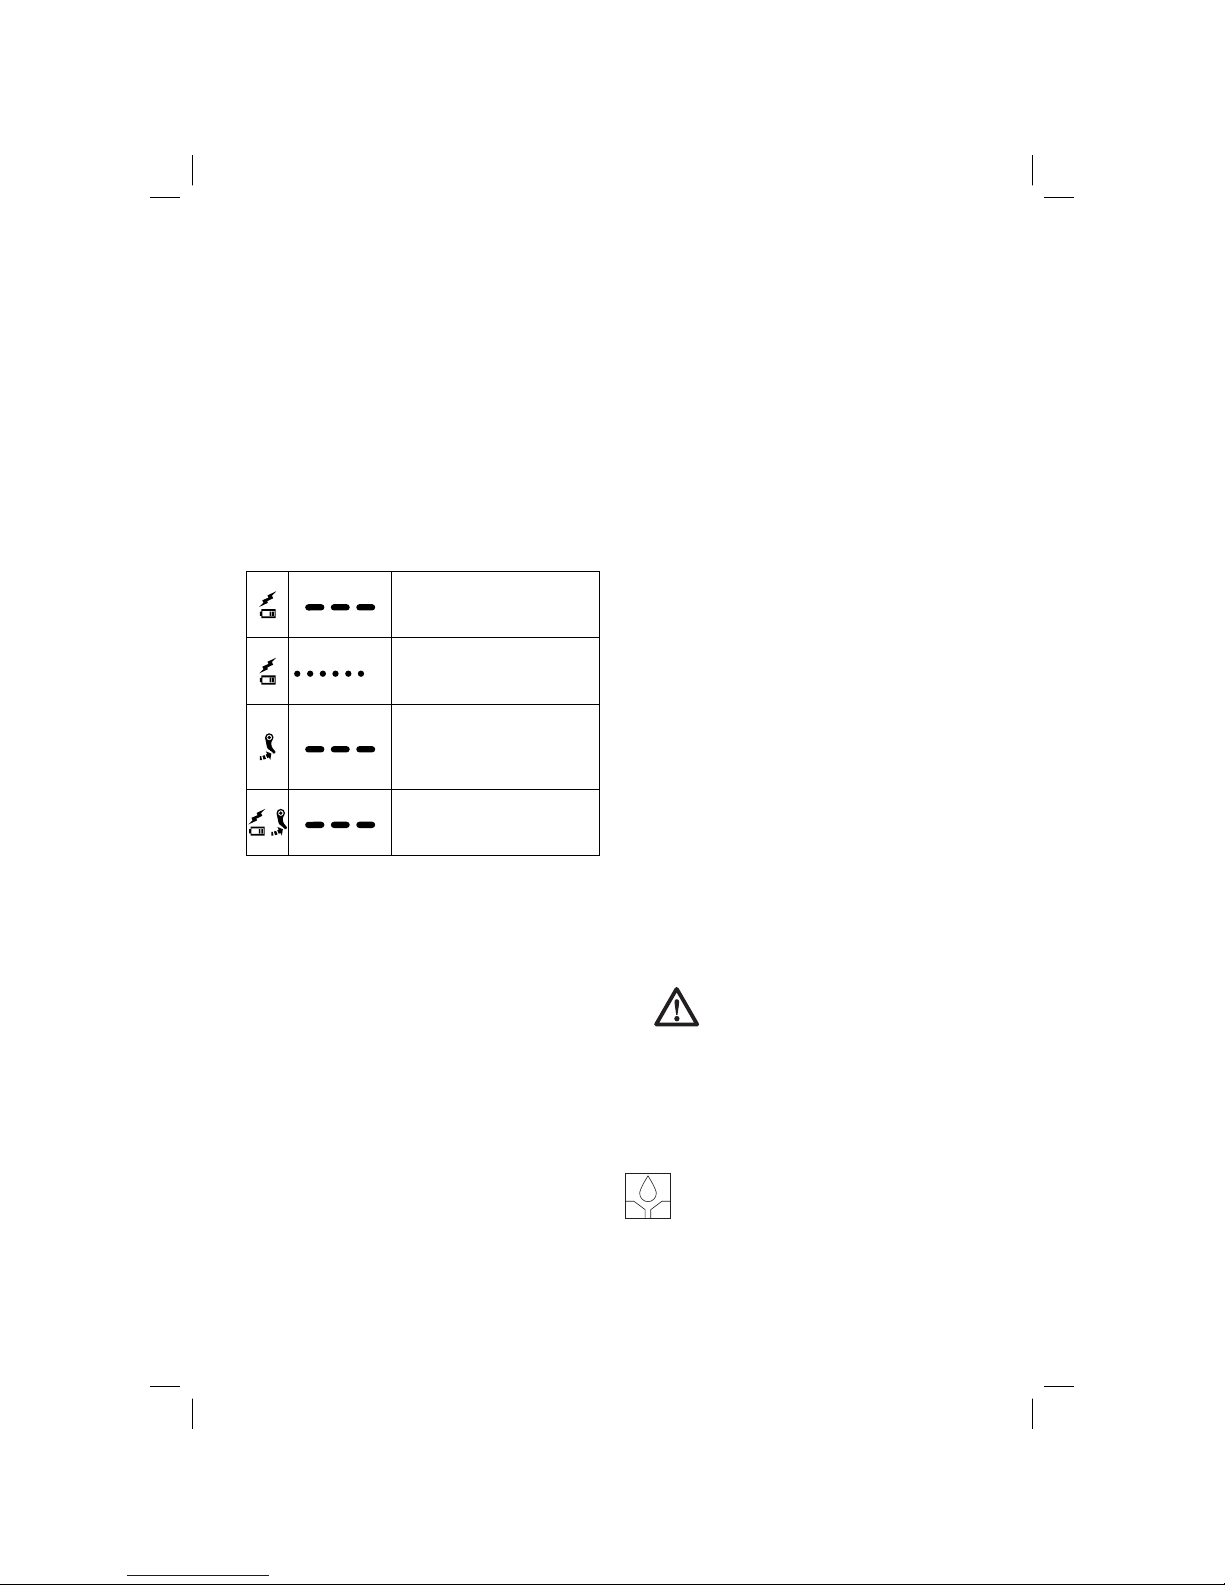
Refer to the table below for the state of charge of
the battery pack.
State of charge
charging –– –– ––
fully charged –––––––––––––
hot/cold pack delay –– • –– • –– •
x problem pack or charger • • • • • • • •
problem powerline •• •• •• ••
This charger will not charge a faulty battery pack.
The charger will indicate faulty battery by refusing
to light or by displaying problem pack or charger
blink pattern.
NOTE: This could also mean a problem with a
charger.
If the charger indicates a problem, take the charger
and battery pack to be tested at an authorised
service centre.
Hot/Cold Pack Delay
When the charger detects a battery that is too hot
or too cold, it automatically starts a hot/cold pack
delay, suspending charging until the battery has
reached an appropriate temperature. The charger
then automatically switches to the pack charging
mode. This feature ensures maximum battery life.
Li-Ion tools are designed with an Electronic
Protection System that will protect the battery
against overloading, overheating or deep discharge.
The tool will automatically turn off if the Electronic
Protection System engages. If this occurs, place
the Li-Ion battery on the charger until it is fully
charged.
A cold battery pack will charge at
about half the rate of a warm battery
pack. The battery pack will charge at
that slower rate throughout the entire
charging cycle and will not return to
maximum charge rate even if the
battery warms.
GB
Important Safety Instructions for All
Battery Packs
When ordering replacement battery packs, be sure
to include the catalog number and voltage.
The battery pack is not fully charged out of the
carton. Before using the battery pack and charger,
read the safety instructions below and then follow
the charging procedures outlined.
READ ALL INSTRUCTIONS
• Do not charge or use the battery pack in
explosive atmospheres, such as in the
presence of flammable liquids, gases or
dust. Inserting or removing the battery pack
from the charger may ignite the dust or
fumes.
• Never force the battery pack into charger.
Do not modify the battery pack in any way
to fit into a non-compatible charger as
battery pack may rupture causing serious
personal injury.
• Charge the battery packs only in designated
Bostitch chargers.
• DO NOT splash or immerse in water or other
liquids.
• Do not store or use the tool and battery
pack in locations where the temperature
may reach or exceed 40˚C (105˚F) (such
as outside sheds or metal buildings in
summer).
• For best results, make sure the battery pack is
fully charged before use.
WARNING: Never attempt to open
the battery pack for any reason. If
the battery pack case is cracked or
damaged, do not insert it into the
charger. Do not crush, drop or damage
battery pack. Do not use a battery
pack or charger that has received a
sharp blow, been dropped, run over
or damaged in any way (e.g., pierced
with a nail, hit with a hammer, stepped
on). Electric shock or electrocution may
result. Damaged battery packs should
be returned to the service centre for
recycling.
9
Page 12
CAUTION: When not in use, place
SPECIFIC SAFETY INSTRUCTIONS FOR LITHIUM ION
(Li-Ion)
• Do not incinerate the battery pack even if it
• If battery contents come into contact with
• Contents of opened battery cells may
tool on its side on a stable surface
where it will not cause a tripping or
falling hazard. Some tools with large
battery packs will stand upright on the
battery pack but may be easily knocked
over.
is severely damaged or is completely worn
out. The battery pack can explode in a fire.
Toxic fumes and materials are created when
lithium ion battery packs are burned.
the skin, immediately wash the area with
mild soap and water. If the battery liquid
gets into the eye, rinse water over the open
eye for 15 minutes or until irritation ceases.
If medical attention is needed, the battery
electrolyte is composed of a mixture of liquid
organic carbonates and lithium salts.
cause respiratory irritation. Provide fresh air.
If symptoms persists, seek medical attention.
WARNING: Burn hazard. Battery liquid
may be flammable if exposed to spark
or flame.
Battery Pack
BATTERY TYPE
The BF33 and BF33-2 operate on an 18 volt battery
pack.
The B-CB182 battery packs may be used. Refer to
Technical Data for more information.
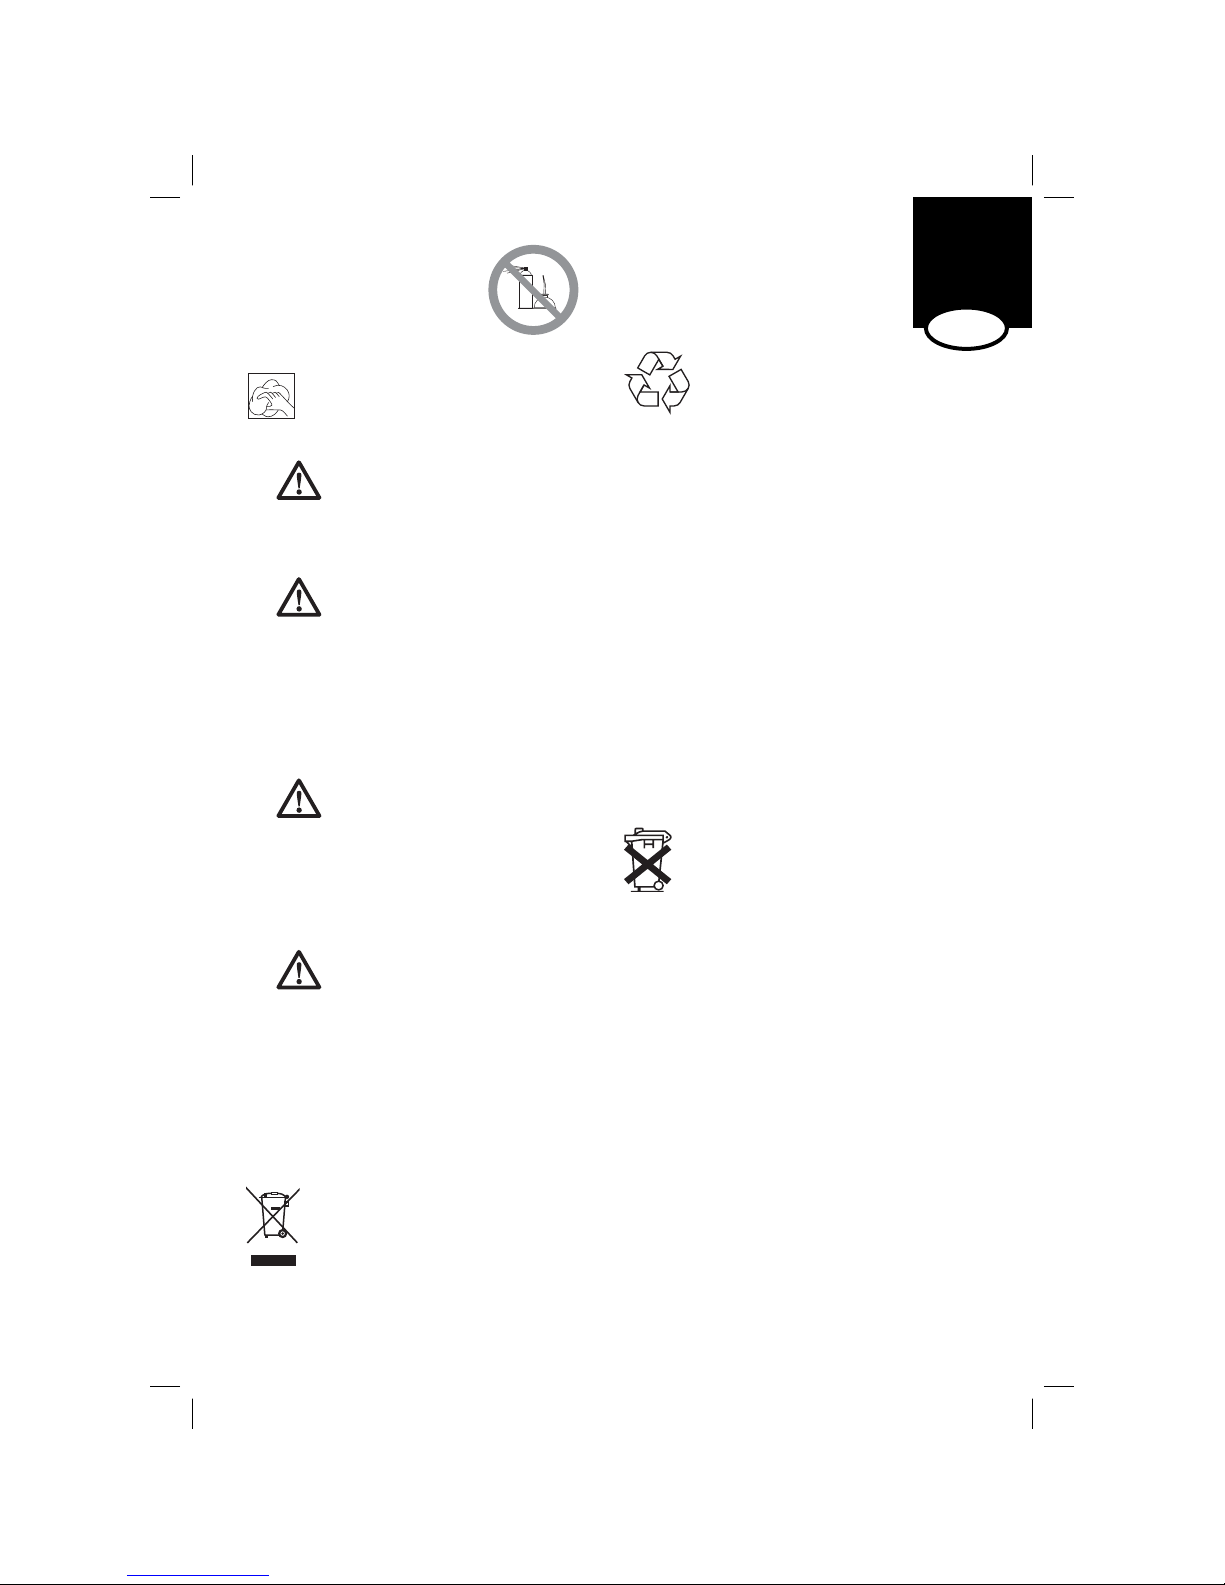
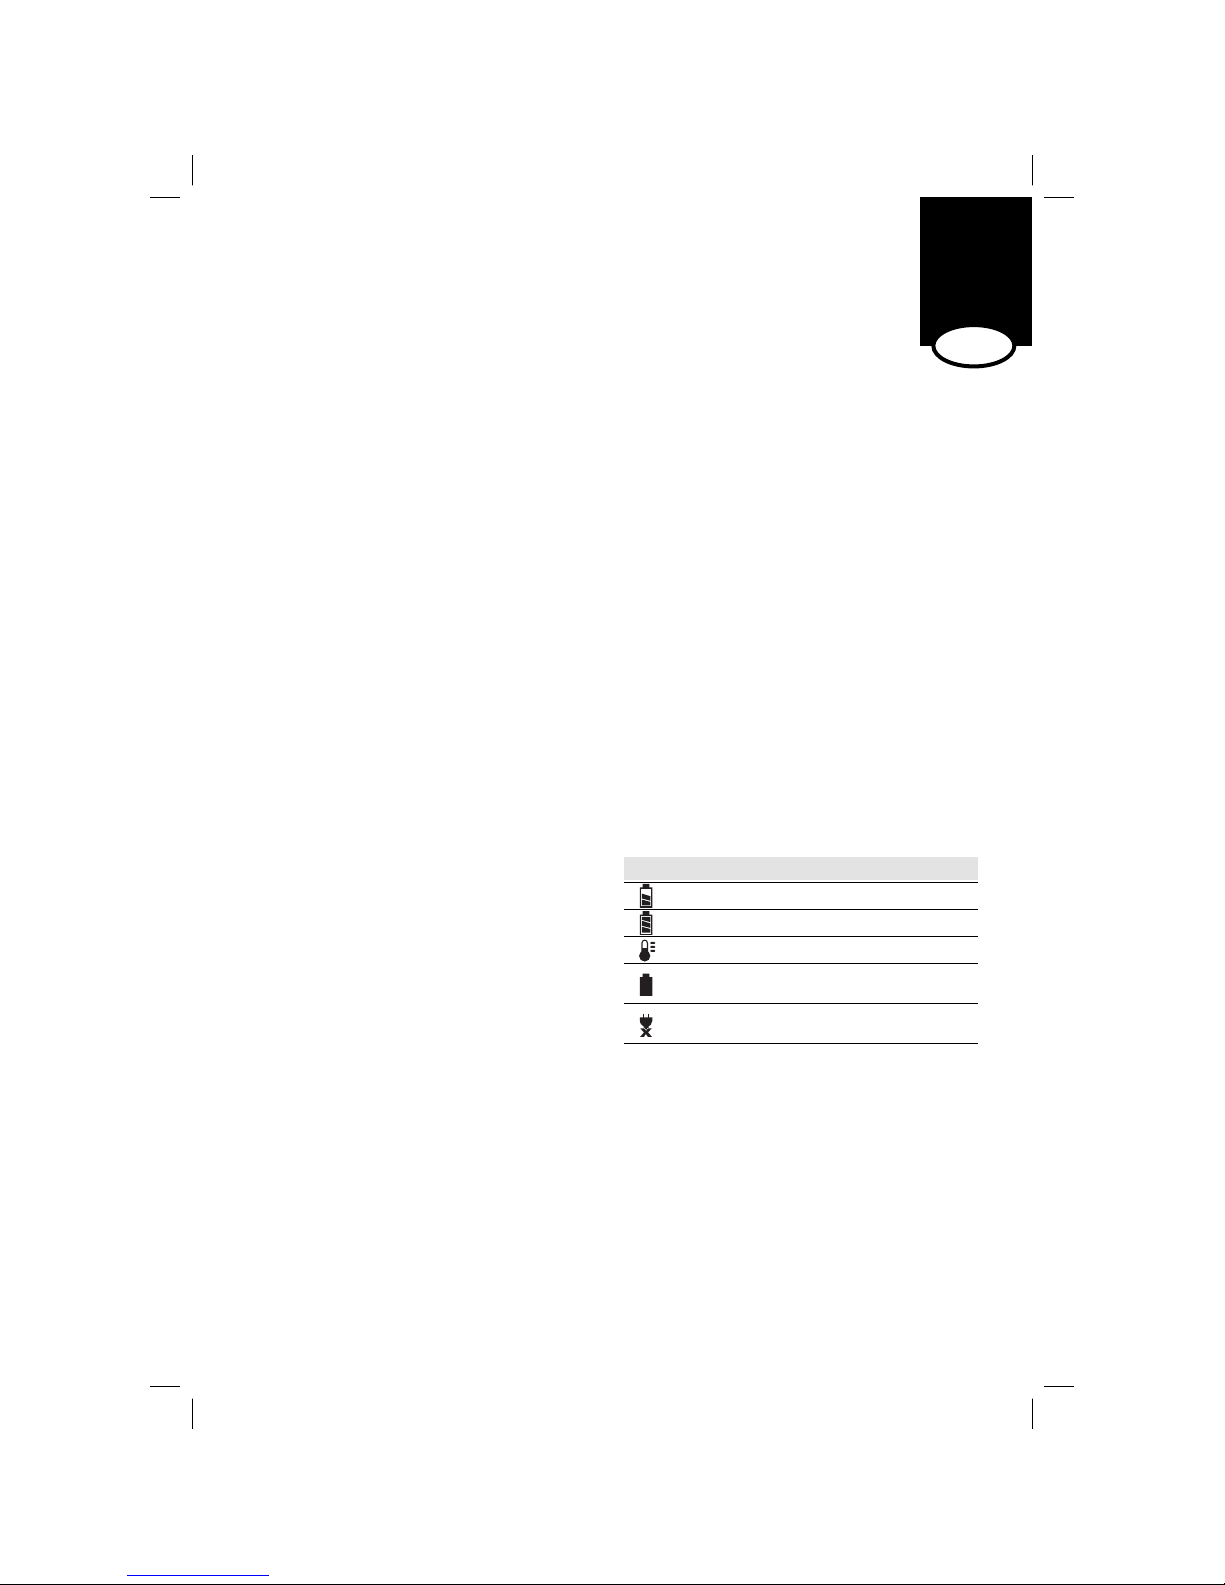
Read instruction manual before use.
Charging.
Fully charged.
Hot/cold pack delay.
Problem pack or charger.
x
Problem powerline.
Do not probe with conductive objects.
Do not charge damaged battery packs.
Use only with Bostitch battery packs.
Others may burst, causing personal
injury and damage.
Do not expose to water.
Have defective cords replaced
immediately.
Charge only between 4 °C and 40 °C.
Discard the battery pack with due care
for the environment.
Storage Recommendations
1. The best storage place is one that is cool and
dry away from direct sunlight and excess heat
or cold. For optimum battery performance and
life, store battery packs at room temperature
when not in use.
2. For long storage, it is recommended to store a
fully charged battery pack in a cool, dry place
out of the charger for optimal results.
NOTE: Battery packs should not be stored
completely depleted of charge. The battery pack
will need to be recharged before use.
Labels on Charger and Battery Pack
In addition to the pictographs used in this manual,
the labels on the charger and the battery pack
show the following pictographs:
10
Do not incinerate the battery pack.
Charges Li-Ion battery packs.
See Technical Data for charging time.
Package Contents
The package contains:
1 Nailer
1 Charger
2 Battery packs
1 Non-mar tip
1 Kitbox
Page 13
1 Instruction manual
1 Exploded drawing
• Check for damage to the tool, parts or
accessories which may have occurred during
transport.
• Take the time to thoroughly read and
understand this manual prior to operation.
Description (fi g. 1)
WARNING: Never modify the power
tool or any part of it. Damage or
personal injury could result.
a. Trigger
b. Trigger safety lock-off
c. Contact trip
d. Depth adjustment wheel
e. Low battery and jam/stall indicator light
f. Stall release lever
g. Magazine
h. Pusher latch
i. Mode selector switch (BF33 only)
j. Rotating rafter/belt hook
k. On-board hex wrench
l. Battery pack
m. Non-mar tip
INTENDED USE
The BF33/BF33-2 cordless framing nailer has been
designed for driving nails into wooden workpieces.
The BF33 cordless framing nailer is designed for
sequential/bump modes. Nailers designed for
sequential/bump modes MUST NOT be used
on scaffoldings, stairs, ladders or ladder-like
constructions, e.g., roof laths. For exemptions
check your local national workplace regulations.
The BF33-2 cordless framing nailer is designed
for sequential only mode. Nailers designed
for sequential only mode MAY BE used on
scaffoldings, stairs, ladders or ladder-like
constructions, e.g., roof laths.
DO NOT use under wet conditions or in presence
of flammable liquids or gases.
These cordless nailers are professional power
tools.
DO NOT let children come into contact with the
tool. Supervision is required when inexperienced
operators use this tool.
• This product is not intended for
use by persons (including children)
suffering from diminished physical,
sensory or mental abilities; lack of
experience, knowledge or skills
unless they are supervised by a
person responsible for their safety.
Children should never be left alone with this
product.
GB
Electrical Safety
The electric motor has been designed for one
voltage only. Always check that the battery pack
voltage corresponds to the voltage on the rating
plate. Also make sure that the voltage of your
charger corresponds to that of your mains.
Your Bostitch charger is double insulated
in accordance with EN 60335; therefore
no earth wire is required.
If the supply cord is damaged, it must be replaced
by a specially prepared cord available through the
Bostitch service organisation.
Mains Plug Replacement
(U.K. & Ireland Only)
If a new mains plug needs to be fitted:
• Safely dispose of the old plug.
• Connect the brown lead to the live terminal in
the plug.
• Connect the blue lead to the neutral terminal.
Follow the fitting instructions supplied with good
quality plugs. Recommended fuse: 3 A.
WARNING: No connection is to be
made to the earth terminal.
Using an Extension Cable
An extension cord should not be used unless
absolutely necessary. Use an approved extension
cable suitable for the power input of your charger
(see Technical Data). The minimum conductor size
is 1 mm2; the maximum length is 30 m.
When using a cable reel, always unwind the cable
completely.
ASSEMBLY AND ADJUSTMENTS
WARNING: Prior to assembly and
WARNING: Use only Bostitch battery
adjustment, always remove the
battery pack. Always lock off the
tool before inserting or removing
the battery pack.
packs and chargers.
11
Page 14
Inserting and Removing the
Battery Pack from the Tool (fi g. 2)
WARNING: To reduce the risk of
serious personal injury, lock tool
off and disconnect battery pack
before making any adjustments or
removing/installing attachments or
accessories. An accidental start-up can
cause injury.
NOTE: Make sure your battery pack (l) is fully
charged. The battery packs supplied will not
necessarily be fully charged.
TO INSTALL THE BATTERY PACK INTO THE TOOL
HANDLE
1. Align the notch inside the tool’s handle with
the battery pack (l).
2. Slide the battery pack firmly into the handle
until you hear the lock snap into place.
TO REMOVE THE BATTERY PACK FROM THE TOOL
1. Press the release button (n) and slide the
battery pack out of the tool handle.
2. Insert battery pack into the charger as
described in the charger section of this
manual.
FUEL GAUGE BATTERY PACKS (FIG. 2, 2A)
Some Bostitch battery packs include a fuel gauge
which consists of three green LED lights that
indicate the level of charge remaining in the battery
pack.
To actuate the fuel gauge, press and hold the
fuel gauge button (o). A combination of the three
green LED lights will illuminate designating the
level of charge left. When the level of charge in the
battery is below the usable limit, the fuel gauge
will not illuminate and the battery will need to be
recharged.
NOTE: The fuel gauge is only an indication of the
charge left on the battery pack. It does not indicate
tool functionality and is subject to variation based
on product components, temperature and enduser application.
NOTICE: Do not store tool with battery
pack installed. To prevent damage to
the pack and to ensure best battery
life, store battery packs out of the tool
or charger in a cool, dry location.
Rotating Rafter/Belt Hook (fi g. 6)
The rafter/belt hook (j) and can be easily positioned
to the left or right of the tool to accommodate leftor right-handed users.
If use of the hook is not desired at all, it can be
rotated to the front or back of the handle base.
12
Loading the Tool (fi g. 4)
WARNING: Always lock tool off and
disconnect battery pack before loading
and unloading fasteners.
1. Slide the spring-loaded pusher latch (h) to the
base of the magazine to lock it into place.
2. Select an appropriate collated nail stick. (Refer
to Technical Data.) Bostitch would always
recommend that you use Bostitch branded
first fix nails.
WARNING: Since accessories, other
than those offered by Bostitch, have
not been tested with this product,
use of such accessories with this tool
could be hazardous. To reduce the risk
of injury, only Bostitch recommended
accessories should be used with this
product.
3. Insert collated nail stick into the loading slot on
side of the magazine. Be sure the fasteners
ride on their tips in the nail channel.
4. Close the magazine by releasing the pusher
latch. Carefully allow the latch to slide forward
and engage the nail strip.
Dry Fire Lock out
The nailer is equipped with a dry fire lock out
which restricts the tool from actuating when the
magazine is nearly empty. When approximately 7
to 9 nails remain in the magazine, the tool dry fire
lock actuates. Refer to Loading the Tool to reload
a stick of collated nails.
NOTE: If heavy force is placed on the tool it is
possible to override the lock out. This protects the
tool from potential damage if dropped.
Adjusting the Driving Depth (fi g. 5)
The nail driving depth can be adjusted using the
depth adjustment wheel.
1. To drive the nail shallower, rotate the depth
adjustment wheel (d) to the left, toward the
shallow nail icon.
2. To sink a nail deeper, rotate the depth
adjustment wheel (d) to the right, toward the
deeper nail icon.
Selecting the Mode (fi g. 1)
BF33 ONLY
To select sequential action mode, slide the mode
selector switch (i) to display the single nail
icon ( ).
To select bump action mode, slide the mode
selector switch (i) to display the three nail
icon ( ).
Page 15

NOTE: Maximum power for driving long nails is
achieved in sequential mode, so limit use of bump
mode when driving longer nails.
OPERATION
Instructions for Use
WARNING: Always observe the safety
instructions and applicable regulations.
There may be local workplace
regulations applicable which interdict
the use of the bump action mode for
certain applications.
WARNING: To reduce the risk of
serious personal injury, turn tool
off and disconnect battery pack
before making any adjustments or
removing/installing attachments or
accessories. An accidental start-up can
cause injury.
Proper Hand Position (fi g. 7)
WARNING: To reduce the risk of
WARNING: To reduce the risk of
Proper hand position requires one hand on the
main handle (p) as shown.
serious personal injury, ALWAYS use
proper hand position as shown.
serious personal injury, ALWAYS hold
securely in anticipation of a sudden
reaction.
Preparing the Tool (fi g. 1)
1. Remove the battery pack (l) from the tool and
ensure the tool is locked off.
2. Remove all nails from the magazine (g).
3. Check if the contact trip (c) can move freely.
4. Reload the nails to the magazine.
5. Insert battery pack.
WARNING: Do not use the tool if the
NOTICE: NEVER
contact trip or nail pusher cannot move
freely.
spray or in any other
way apply lubricants or
cleaning solvents inside
the tool. This can
seriously affect the life and
performance of the tool.
Actuating the Tool (fi g. 1)
The tool can be operated using one of two modes:
sequential action mode or bump action mode.
SEQUENTIAL ACTION MODE
The sequential action mode is used for
intermittent nailing when very careful
and accurate placement is desired. It
also offers the maximum delivery of
power for driving the longest nails.
1. Using the mode selector switch (i), select the
sequential action mode ( ).
2. Release the trigger safety lock-off (b).
3. Push the contact trip (c) against the work
surface.
4. Pull the trigger switch (a) to actuate the tool.
5. Release the trigger and raise the nailer from
the work surface.
6. Repeat steps 3–5 to actuate the next nail.
BUMP ACTION MODE (BF33 ONLY)
The bump action mode is used for rapid nailing on
flat, stationary surfaces and typically most effective
for application driving shorter nails.
1. Using the mode selector switch (i) to select
the bump action mode ( ).
2. Release the trigger safety lock-off (b).
3. To drive a single nail, operate the tool as
described for sequential action:
a. Push the contact trip (c) against the work
surface.
b. Pull the trigger switch (a) to actuate the
tool. Each trigger pull with the contact trip
pushed against the work surface will drive
one nail.
4. To drive several nails, depress and hold the
trigger switch (a), and then push the contact
trip (c) repeatedly against the work surface.
WARNING: Do not keep the trigger
depressed when the tool is not in
use. Keep the trigger safety lock-off
(b) in the locked position to prevent
accidental actuation when the tool is
not in use.
5. When changing between sequential and
bump modes, it may be necessary to adjust
the driving depth. Refer to Adjusting the
Driving Depth for instructions.
GB
Using the Trigger Lock-off (fi g. 3)
Each Bostitch nailer is equipped with a trigger lockoff (b) which when pushed to the right as shown
in Figure 3, prevents the tool from firing a nail by
locking the trigger and bypassing power to the
motor.
13
Page 16
When the trigger lock-off is pressed to the left,
the tool will be fully operational. The trigger
lock-off should always be locked off whenever
any adjustments are made or when tool is not
in immediate use.
Non-mar Tip (fi g. 1)
When using this tool on materials that you do
not want to mark, such as wood cladding, use
the plastic non-mar tip (m) over the contact
trip(c).
LED Indicator (fi g. 1)
Your nailer is equipped with two LED indicator
lights (e) located on the back of the tool just below
the back cap. Also refer to to the Troubleshooting
Guide for further instruction.
LOW BATTERY
Replace battery with a
charged pack.
HOT PACK
Let the battery cool or
replace it with a cool pack.
JAM/STALL CONDITION
Rotate the stall release
lever to release. Refer to
Stall Release.
HOT TOOL
Let the tool cool down
before continuing use.
Stall Release (fi g. 1, 3)
If the nailer is used in rigorous application where
all available energy in the motor is used to drive
a fastener, the tool may stall. The driver blade did
not complete the drive cycle and the jam/stall
indicator(e) will flash. Rotate the stall release lever
(f) on the tool and the mechanism will release.
If the driver blade does not automatically return
to the home position, proceed to Clearing a
Jammed Nail. If the unit continues to stall please
review the mode selection, material and fastener
length to be sure that it is not too rigorous an
application.
Clearing a Jammed Nail (fi g. 1, 3)
If a nail becomes jammed in the nosepiece, the
jam/stall indicator light (e) will flash.
1. Remove battery pack from tool and engage
trigger safety lock-off (b).
2. Slide the spring-loaded pusher latch (h) to the
base of the magazine to lock it into place and
unload nail strip.
3. Using the hex tool (k) provided, loosen the
two hex bolts (q) at the top of the magazine.
4. Rotate the magazine (g) forward.
5. Remove jammed/bent nail, using pliers if
necessary.
6. If driver blade is in the down position, rotate
the stall release lever (f) on the top of the
nailer.
NOTE: If the driver blade will not reset after
rotating the stall release lever, manually
resetting the blade with a long screwdriver
may be necessary.
7. Rotate the magazine back into position under
the nose of the tool and tighten hex bolts (q).
8. Reinsert battery pack.
NOTE: The tool will disable itself and not reset
until the battery pack has been removed and
reinserted.
9. Reinsert nails into magazine (refer to Loading
the Tool).
10. Release the pusher latch (h).
11. Disengage the trigger safety lock-off (b) when
ready to continute nailing.
If nails become jammed in the nosepiece
frequently, have the tool serviced by an
authorised Bostitch service centre.
MAINTENANCE
Your Bostitch power tool has been designed to
operate over a long period of time with a minimum
of maintenance. Continuous satisfactory operation
depends upon proper tool care and regular
cleaning.
WARNING: To reduce the risk of
serious personal injury, turn tool
off and disconnect battery pack
before making any adjustments or
removing/installing attachments or
accessories. An accidental start-up can
cause injury.
The charger and battery pack are not serviceable.
There are no serviceable parts inside.
Lubrication
Your power tool requires no additional lubrication.
14
Page 17
NOTICE: NEVER
spray or in any other
way apply lubricants or
cleaning solvents inside
the tool. This can
seriously affect the life
and performance of the tool.
Cleaning
WARNING: Blow dirt and dust out of
the main housing with dry air as often
as dirt is seen collecting in and around
the air vents. Wear approved eye
protection and approved dust mask
when performing this procedure.
WARNING: Never use solvents or
other harsh chemicals for cleaning the
non-metallic parts of the tool. These
chemicals may weaken the materials
used in these parts. Use a cloth
dampened only with water and mild
soap. Never let any liquid get inside
the tool; never immerse any part of the
tool into a liquid.
CHARGER CLEANING INSTRUCTIONS
WARNING: Shock hazard. Disconnect
the charger from the AC outlet before
cleaning. Dirt and grease may be
removed from the exterior of the
charger using a cloth or soft nonmetallic brush. Do not use water or
any cleaning solutions.
Optional Accessories
WARNING: Since accessories, other
than those offered by Bostitch, have
not been tested with this product,
use of such accessories with this tool
could be hazardous. To reduce the risk
of injury, only Bostitch recommended
accessories should be used with this
product.
Consult your dealer for further information on the
appropriate accessories.
Should you find one day that your
Bostitch product needs replacement,
or if it is of no further use to you,
do not dispose of it with household
waste. Make this product available for
separate collection.
Separate collection of
used products and packaging allows
materials to be recycled and used
again. Re-use of recycled materials
helps prevent environmental pollution
and reduces
the demand for raw materials.
Local regulations may provide for separate
collection of electrical products from the
household, at municipal waste sites or by the
retailer when you purchase a new product.
Bostitch provides a facility for the collection and
recycling of Bostitch products once they have
reached the end of their working life. To take
advantage of this service please return your
product to any authorised repair agent who will
collect them on our behalf.
You can check the location of your nearest
authorised repair agent by contacting your local
Bostitch office at the address indicated in this
manual. Alternatively, a list of authorised Bostitch
repair agents and full details of our after-sales
service and contacts are available on the Internet
at: www.Bostitch.eu.
GB
Rechargeable Battery Pack
This long life battery pack must be recharged when
it fails to produce sufficient power on jobs which
were easily done before. At the end of its technical
life, discard it with due care for our environment:
• Run the battery pack down completely, then
remove it from the tool.
• Li-Ion, NiCd and NiMH cells are recyclable.
Take them to your dealer or a local recycling
station. The collected battery packs will be
recycled or disposed of properly.
Protecting the Environment
Separate collection. This product must
not be disposed of with normal
household waste.
15
Page 18
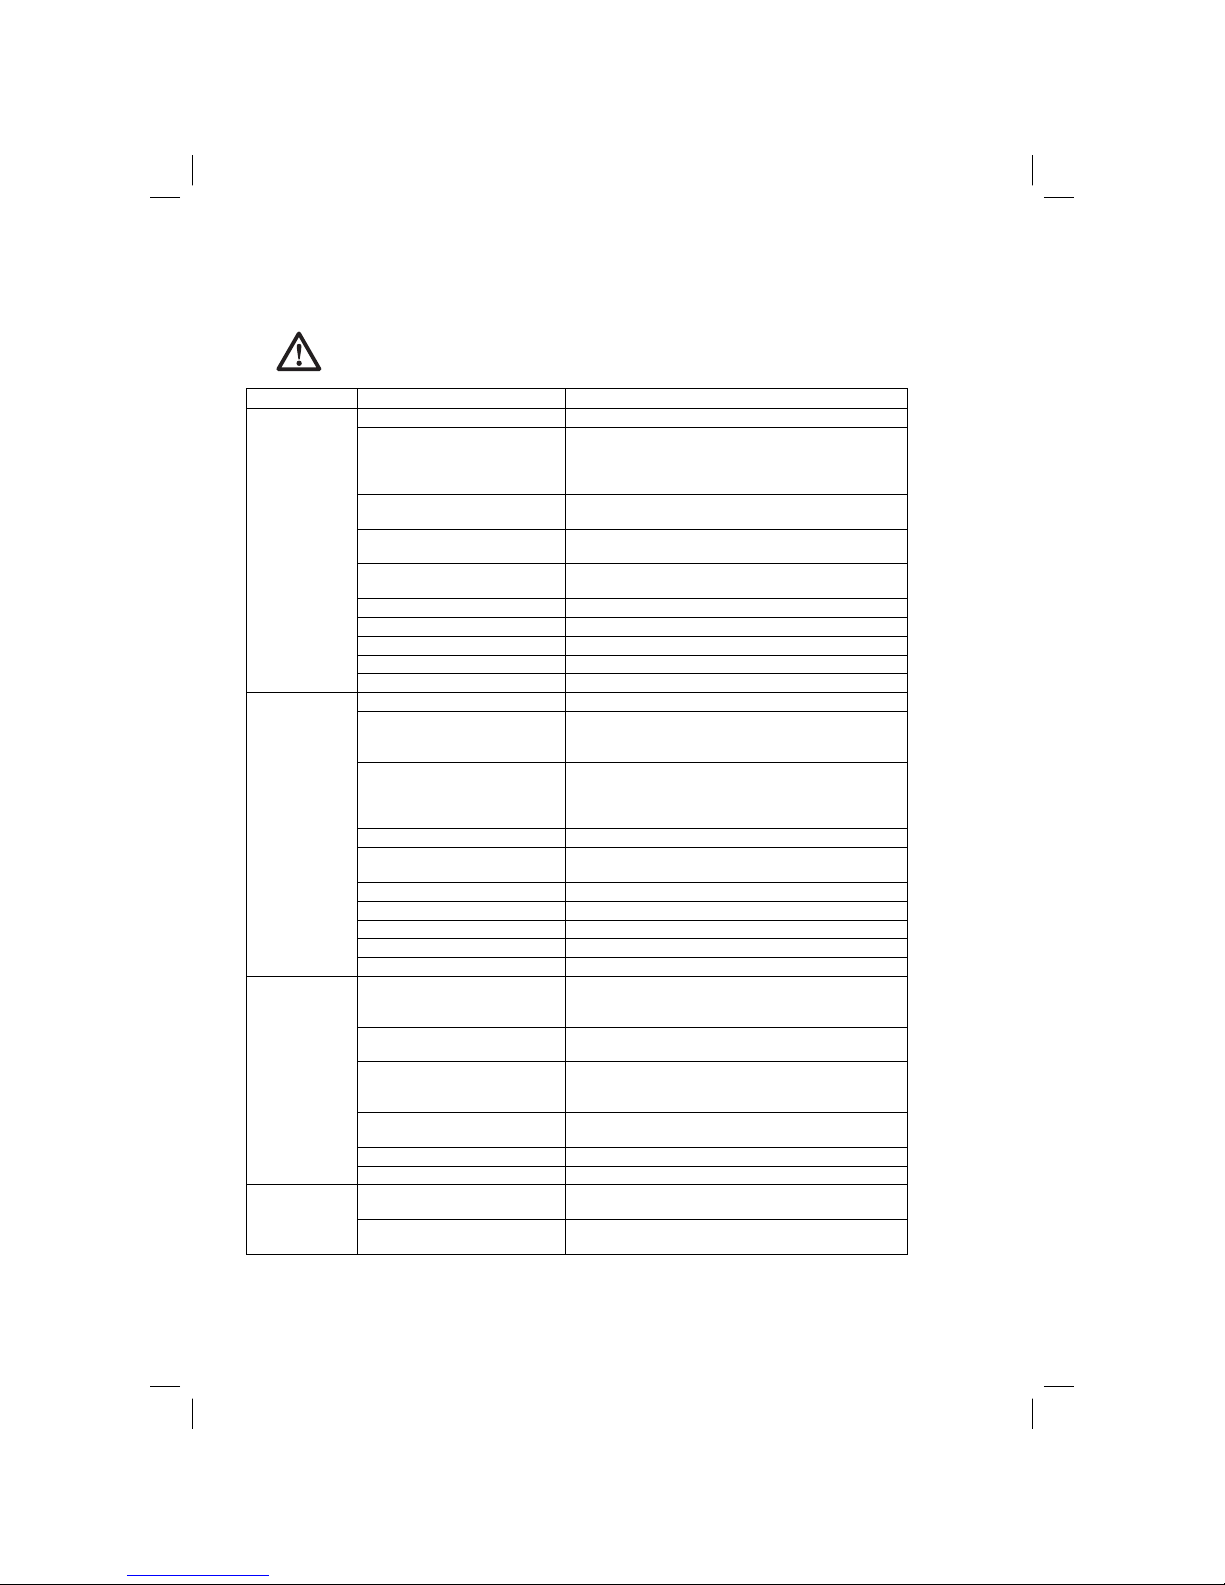
TROUBLESHOOTING GUIDE
MANY COMMON PROBLEMS CAN BE SOLVED EASILY BY UTILIZING THE CHART BELOW.
For more serious or persistent problems, contact your nearest authorised Bostitch repair agent,
or contact your Bostitch office at the address indicated in this manual.
WARNING: To reduce the risk of serious personal injury, ALWAYS lock off the tool
SYMPTOM CAUSE FIX
Motor does not
run with trigger
depressed
Motor does not
run with contact
trip depressed
Tool does not
actuate (motor
runs but will not
fire)
Motor starts up
but generates a
lot of noise
and disconnect battery pack from tool before all repairs
Trigger lock in locked position Unlock trigger lock.
Tool is stalled, locking the motor
from rotating
Tool is in the sequential
actuation mode
Tool internal electronics need to
be reset
Motor stops running after 5
seconds
Terminals are dirty or damaged See authorised Bostitch repair agent.
Damaged internal electronics See authorised Bostitch repair agent.
Damaged trigger See authorised Bostitch repair agent.
Battery is hot Let the battery cool or replace it with a cool pack.
Tool is hot Let the tool cool down before continuing use.
Trigger lock in locked position Unlock trigger lock.
Dry fire lock out engaged,
blocking contact trip from
traveling fully
Tool is stalled, locking the motor
from rotating
Bent contact trip See authorised Bostitch repair agent.
Motor stops running after 5
seconds
Terminals are dirty or damaged See authorised Bostitch repair agent.
Damaged internal electronics See authorised Bostitch repair agent.
Damaged trigger See authorised Bostitch repair agent.
Battery is hot Let the battery cool or replace it with a cool pack.
Tool is hot Let the tool cool down before continuing use.
Dry fire lock out engaged,
blocking contact trip from
traveling fully
Low battery charge or damaged
battery
Jammed nail/drive blade not
returned to home position
Damaged driver/return
assembly
Jammed internal mechanism See authorised Bostitch repair agent.
Damaged internal electronics See authorised Bostitch repair agent.
Jammed nail and driver blade is
stuck in down position
Damaged driver/return
assembly
Rotate the stall release lever on the tool and the
mechanism will release. If driver blade does not
return, remove battery and manually push driver blade
back to home position.
Depress contact trip first before firing or switch to
bump mode (BF33 only).
Remove battery, wait 3 seconds and reinsert.
Normal operation, release trigger and redepress.
Load more nails into magazine.
Rotate the stall release lever on the tool and the
mechanism will release. If driver blade does not
return, remove battery and manually push driver blade
back to home position.
Normal operation, release contact trip and redepress.
Load nails into magazine.
Check charge level if pack shows state-of-charge.
Charge or replace battery pack if necessary.
Remove battery, clear jammed nail, cycle stall release
lever, (push driver blade up manually if necessary)
reinsert battery pack.
Replace driver/return assembly. See authorised
Bostitch repair agent.
Use stall release lever, clear any jammed nails, and
return driver blade manually if necessary.
Replace driver/return assembly. See authorised
Bostitch repair agent.
16
Page 19
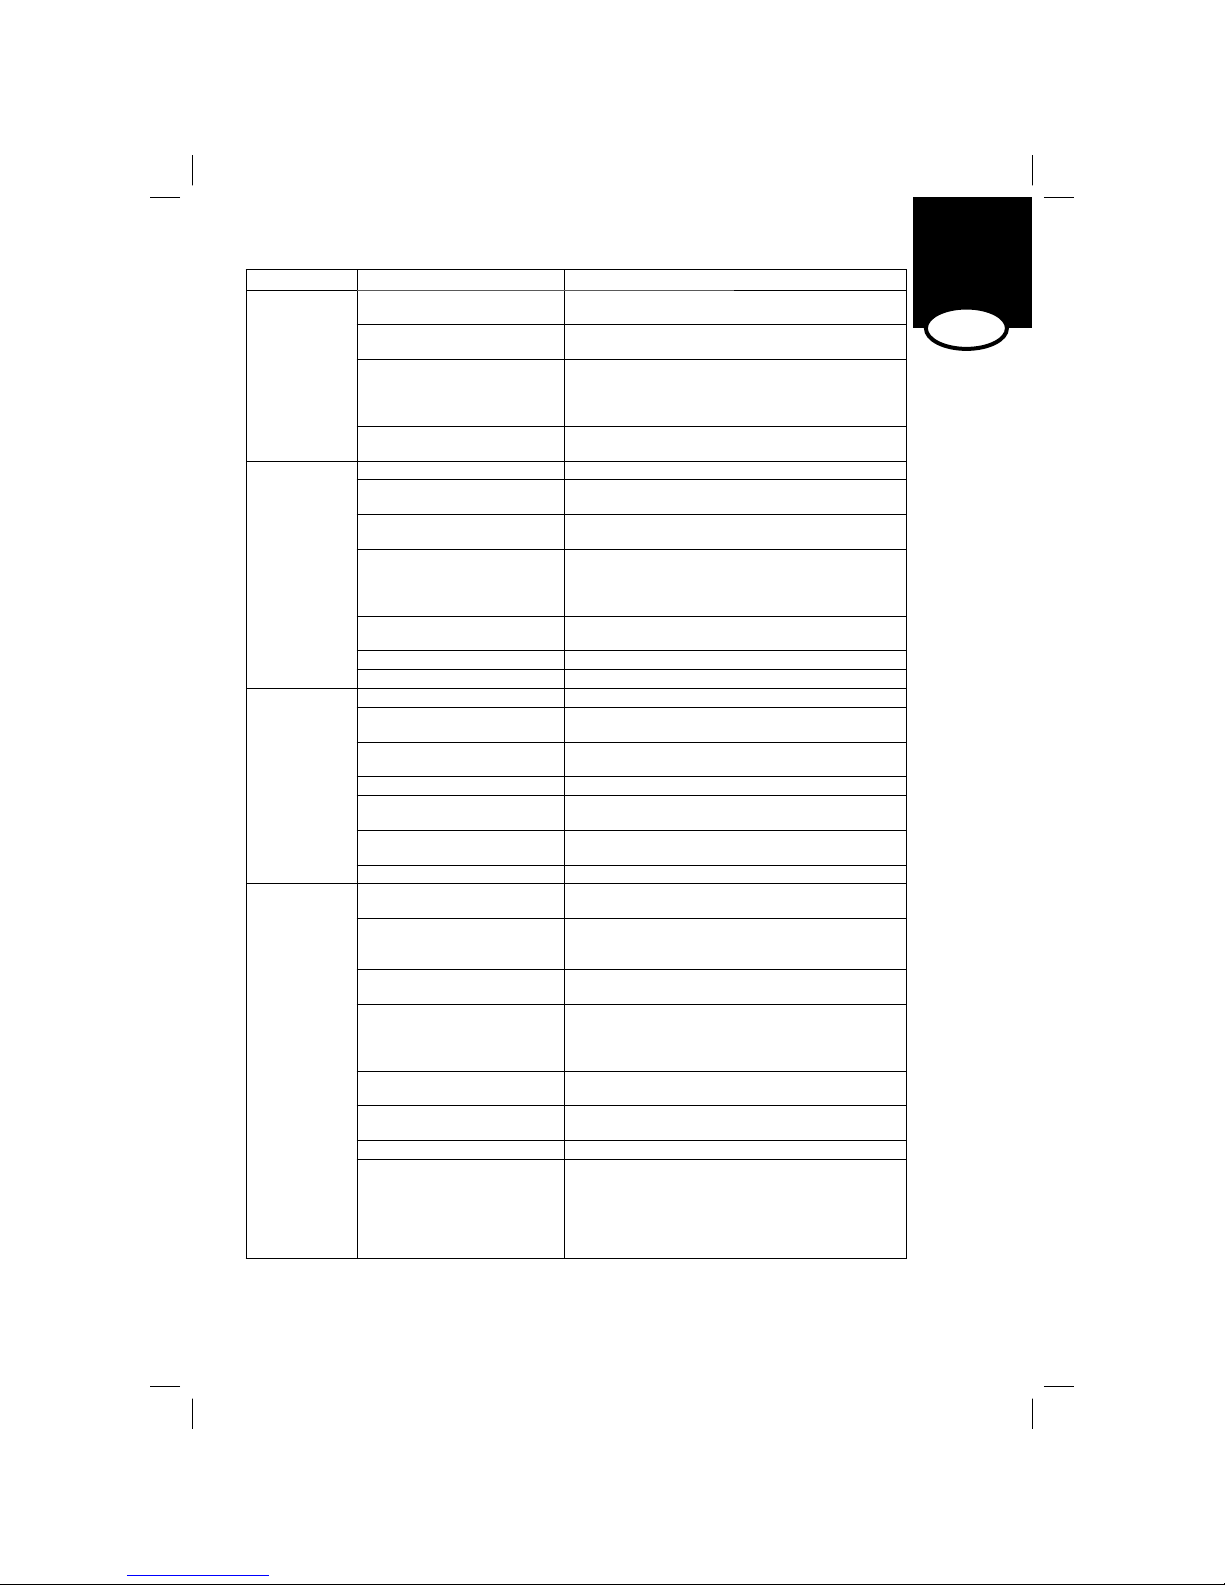
TROUBLESHOOTING GUIDE (continued)
SYMPTOM CAUSE FIX
Drive blade
continues to get
stuck in down
position
Tool operates
but does not
drive fasteners
fully
Tool operates,
but no fastener
is driven
Jammed nail Wrong size or angle nails Use only the recommended nails. Refer to Technical
Jammed nail and driver blade is
stuck in down position
Damaged driver/return
assembly
Material and fastener length If the unit continues to stall (forcing the need to
Debris in nosepiece Clean nose area and watch closely for small pieces of
Depth adjust set too shallow Rotate depth adjust to a deeper setting.
Tool not firmly applied to
workpiece
Bump mode selected with long
nails (BF33 only)
Material and fastener length If the unit continues to stall (forcing the need to rotate
Damaged or worn driver blade
tip
Tool used with non-mar tip Remove non-mar tip.
Damaged actuation mechanism See authorised Bostitch repair agent.
No nails in magazine Load nails in magazine.
Wrong size or angle nails Use only the recommended nails. Refer to Technical
Debris in nosepiece Clean nose area and watch closely for small pieces of
Debris in magazine Clean magazine.
Worn magazine Replace magazine. See authorised Bostitch repair
Damaged or worn driver blade Replace driver blade. See authorised Bostitch repair
Damaged pusher spring Replace spring; See authorised Bostitch repair agent.
Magazine screws not secured
after previous jam clear/
inspection
Damaged or worn driver blade Replace driver blade. See authorised Bostitch repair
Material and fastener length If the unit continues to stall (forcing the need to
Debris in nosepiece Clean nose area and watch closely for small pieces of
Worn magazine Replace magazine. See authorised Bostitch repair
Damaged pusher spring Replace spring. See authorised Bostitch repair agent.
Dry fire lock out is engaged
with only 7-9 nails remaining
in magazine and the user is
applying excessive force to
contact trip, overriding the
lockout
Use stall release lever, clear and jammed nails, and
return driver blade manually if necessary.
Replace driver/return assembly. See authorised
Bostitch repair agent.
rotate the Stall release lever) choose the appropriate
material and fastener length that is not too rigorous an
application.
broken nails stuck in the track.
Apply adequate force to tool securing it tightly to
workpiece. Refer to instruction manual.
Select sequential mode.
the Stall release lever) choose the appropriate material
and fastener length that is not too rigorous of an
application.
Replace driver/return assembly. See authorised
Bostitch repair agent.
Data.
broken nails stuck in the track
agent.
agent.
Data.
Make sure to tighten magazine hex bolts with wrench
provided.
agent.
rotate the Stall release lever) choose the appropriate
material and fastener length that is not too rigorous an
application.
broken nails stuck in the track.
agent.
Load more nails in magazine to disengage dryfire
lockout.
GB
17
Page 20
CLOUEUSE À CHARPENTE SANS FIL 18V LI-ION
BF33, BF33-2
Félicitations!
Les outils Bostitch sont des outils de précisions
conçus pour un grand volume de fixation à grande
vitesse. Ils offrent un service efficace et fiable
lorsqu’ils sont utilisés correctement et avec
soin. Comme pour tout autre outil électrique de
qualité, les instructions du fabricant doivent être
respectées afin d’obtenir de meilleurs résultats.
Contactez votre représentant ou distributeur
Bostitch pour toute question concernant l’outil et
son utilisation.
Caractéristiques techniques
BF33 BF33-2
Tension VCC 18 18
Type 1 1
Mode de commande Séquentiel/ Séquentiel/
contact uniquement
Angle du magasin 33° 33°
Clous
longueur mm 50–90 50–90
diamètre de la tige mm 2,8–3,3 2,8–3,3
angle 30–34° 30–34°
géométrie de tête coupée ou coupée ou
ronde décalée ronde décalée
type d’assemblage papier papier
Poids (sans le bloc-piles) kg 3,53 3,53
Énergie d’entraînement J 105 105
AVERTISSEMENT: le taux d’émission
Toute estimation du degré d’exposition
Identifier des mesures de sécurité
Bloc-piles B-CB182
Type de pile Li-Ion
Tension V
Capacité Ah 4,0
Poids kg 0,61
de vibrations déclaré correspond aux
applications principales de l’outil.
Néanmoins, si l’outil est utilisé pour
différentes applications ou est mal
entretenu, ce taux d’émission de
vibrations pourra varier. Ces éléments
peuvent augmenter considérablement
le niveau d’exposition sur la durée
totale de travail.
à des vibrations doit également
prendre en compte les heures où
l’outil est mis hors tension ou lorsqu’il
tourne sans effectuer aucune tâche.
Ces éléments peuvent réduire
sensiblement le degré d’exposition sur
la durée totale de travail.
supplémentaires pour protéger
l’opérateur contre les effets nocifs des
vibrations telles que: maintenance de
l’outil et des accessoires, maintenir
la température des mains élevée,
organisation du travail.
18
CC
LPA (pression acoustique) dB(A) 84 84
KPA (incertitude de pression
acoustique) dB(A) 3 3
LWA (puissance acoustique) dB(A) 95 95
KWA (incertitude de puissance
acoustique) dB(A) 3 3
Valeurs du taux de vibrations (somme vectorielle de triaxialité)
déterminées conformément à la norme EN 60745:
Valeur d’émission de vibration a
ah = m/s
Incertitude K = m/s2
Le taux d’émission de vibrations indiqué dans ce
feuillet informatif a été mesuré conformément
à une méthode d’essai normalisé établie par
EN 60745, et peut être utilisé pour comparer un
outil à un autre. Il peut également être utilisé
pour effectuer une évaluation préliminaire de
l’exposition.
18
h
2
3,8 3,8
1,5 1,5
Chargeur B-CB105
Tension secteur VAC 230
Type de pile Li-Ion
Durée de charge approx. min 70
(batteries 4,0 Ah)
Poids kg 0,49
Fusibles
Europe Outils 230V 10 ampères, secteur
Défi nitions: consignes de sécurité
Les définitions ci-après décrivent le degré
de risques associé à chaque balise. Lire
soigneusement la notice d’instructions et
respecter ces symboles.
Page 21

DANGER: indique une situation
AVERTISSEMENT: indique une
AVIS: indique une pratique ne
Indique des risques de décharges
Indique des risques d’incendie.
de danger imminent qui, si rien
n’est fait pour l’éviter, aura comme
conséquences la mort ou des
dommages corporels graves.
situation de danger potentiel qui, si
rien n’est fait pour l’éviter, pourra avoir
comme conséquences la mort ou des
dommages corporels graves.
ATTENTION: indique une situation de
danger potentiel qui, si rien n’est fait
pour l’éviter, pourrait avoir comme
conséquences des dommages
corporels mineurs ou moindres.
posant aucun risque de dommages
corporels, mais qui par contre, si rien
n’est fait pour l’éviter, pourrait poser
des risques de dommages matériels.
électriques.
Certifi cat de conformité CE
DIRECTIVES MACHINES
BF33, BF33-2
Bostitch certifie que les produits décrits dans le
paragraphe Caractéristiques techniques sont
conformes aux normes:
2006/42/CE, EN 60745-1, EN 60745-2-16.
Ces produits sont également conformes aux
normes 2004/108/CE et 2011/65/UE. Pour plus
d’informations, veuillez contacter Bostitch à
l’adresse suivante.
Le soussigné est responsable de la compilation du
fichier technique et fait cette déclaration au nom
de Bostitch.
Colin Earl
Directeur général
Europe, Moyen-Orient et Afrique
Stanley Black & Decker bvba
Kanaalweg 112 IZ Ravenshout zone 3
3980 Tessenderlo, Belgique
28.06.2013
FR
AVERTISSEMENT: pour
réduire tout risque de dommages
corporels, lire la notice d’instructions
Consignes de sécurité générales
propres aux outils électriques
AVERTISSEMENT! lire toutes les
directives et consignes de sécurité.
Tout manquement aux directives et
consignes ci-incluses comporte des
risques de décharges électriques,
d’incendie et/ou de dommages
corporels graves.
CONSERVER TOUTES CES DIRECTIVES ET
CONSIGNES À TITRE DE RÉFÉRENCE
Le terme «outil électrique» mentionné dans les
avertissements ci-après se rapporte aux outils
alimentés sur secteur (avec fil) ou par piles
(sans fil).
1) SÉCURITÉ – AIRE DE TRAVAIL
a) Maintenir l’aire de travail propre et bien
éclairée. Les lieux sombres ou encombrés
sont propices aux accidents.
b) Ne pas utiliser un outil électrique
dans un milieu déflagrant, comme en
présence de liquides, gaz ou poussières
inflammables. Les outils électriques
peuvent produire des étincelles qui
pourraient enflammer toute émanation ou
poussière ambiante.
c) Maintenir à l’écart les enfants, ou toute
autre personne, lors de l’utilisation d’un
outil électrique. Toute distraction pourrait
faire perdre la maîtrise de l’appareil.
2) SÉCURITÉ – ÉLECTRICITÉ
a) La fiche électrique de l’outil doit
correspondre à la prise murale. Ne
modifier la fiche en aucune façon. Ne
pas utiliser de fiche d’adaptation avec
un outil électrique mis à la terre (masse).
L’utilisation de fiches d’origine et de
prises appropriées réduira tout risque de
décharges électriques.
b) Éviter tout contact corporel avec des
éléments mis à la terre comme: tuyaux,
radiateurs, cuisinières ou réfrigérateurs.
Les risques de décharges électriques
augmentent lorsque le corps est mis à la
terre.
19
Page 22

c) Ne pas exposer les outils électriques à
la pluie ou à l’humidité. Tout contact d’un
outil électrique avec un liquide augmente
les risques de décharges électriques.
d) Ne pas utiliser le cordon de façon
abusive. Ne jamais utiliser le cordon
pour transporter, tirer ou débrancher un
outil électrique. Protéger le cordon de
toute source de chaleur, de l’huile, et de
tout bord tranchant ou pièce mobile.
Les cordons endommagés ou emmêlés
augmentent les risques de décharges
électriques.
e) En cas d’utilisation d’un outil électrique
à l’extérieur, utiliser systématiquement
une rallonge conçue à cet effet. Cela
diminuera tout risque de décharges
électriques.
f) Si on ne peut éviter d’utiliser un outil
électrique en milieu humide, utiliser
un circuit protégé par un dispositif de
courant résiduel (RCD). Cela réduira tout
risque de décharges électriques.
3) SÉCURITÉ INDIVIDUELLE
a) Rester systématiquement vigilant et faire
preuve de jugement lorsqu’on utilise un
outil électrique. Ne pas utiliser d’outil
électrique en cas de fatigue ou sous
l’influence de drogues, d’alcool ou de
médicaments. Tout moment d’inattention
pendant l’utilisation d’un outil électrique
comporte des risques de dommages
corporels graves.
b) Porter un équipement de protection
individuel. Porter systématiquement
un dispositif de protection oculaire. Le
fait de porter un masque anti-poussières,
des chaussures antidérapantes, un casque
de sécurité ou un dispositif de protection
auditive, lorsque la situation le requiert,
réduira les risques de dommages corporels.
c) Prévenir tout démarrage accidentel.
S’assurer que l’interrupteur est en
position d’arrêt avant de brancher l’outil
sur le secteur et/ou à la batterie, ou de le
ramasser ou le transporter. Transporter un
outil le doigt sur l’interrupteur ou brancher
un outil électrique alors que l’interrupteur
est en position de marche invite les
accidents.
d) Retirer toute clé de réglage avant de
démarrer l’outil. Une clé laissée sur une
pièce rotative d’un outil électrique comporte
des risques de dommages corporels.
e) Adopter une position stable. Maintenir
les pieds bien ancrés au sol et conserver
son équilibre en permanence. Cela
permettra de mieux maîtriser l’outil
électrique en cas de situations imprévues.
f) Porter des vêtements appropriés. Ne
porter aucun vêtement ample ou bijou.
Maintenir cheveux, vêtements et gants
à l’écart des pièces mobiles, car ils
pourraient s’y faire prendre.
g) Lorsqu’un dispositif de connexion
à un système de dépoussiérage ou
d’élimination est fourni, s’assurer qu’il
est branché et utilisé correctement.
L’utilisation de ces dispositifs peut réduire
les risques engendrés par les poussières.
4) UTILISATION ET ENTRETIEN DES OUTILS
ÉLECTRIQUES
a) Ne pas forcer un outil électrique. Utiliser
l’outil approprié au travail en cours. L’outil
approprié effectuera un meilleur travail, de
façon plus sûre et à la vitesse pour laquelle
il a été conçu.
b) Ne pas utiliser un outil électrique dont
l’interrupteur est défectueux. Tout appareil
dont l’interrupteur est défectueux est
dangereux et doit être réparé.
c) Débrancher la fiche du secteur et/ou
la batterie de l’outil électrique avant
d’effectuer tout réglage, de changer tout
accessoire, ou avant de le ranger. Ces
mesures préventives réduiront tout risque
de démarrage accidentel de l’appareil.
d) Après utilisation, ranger les outils
électriques hors de portée des enfants
et ne permettre à aucune personne non
familière avec son fonctionnement (ou
sa notice d’instructions) de l’utiliser. Les
outils peuvent être dangereux entre des
mains inexpérimentées.
e) Entretenir les outils électriques. Vérifier
les pièces mobiles pour s’assurer qu’elles
sont bien alignées et tournent librement,
qu’elles sont en bon état et ne sont
affectées d’aucune condition susceptible
de nuire au bon fonctionnement de
l’outil. En cas de dommage, faire réparer
l’outil électrique avant toute nouvelle
utilisation. De nombreux accidents sont
causés par des outils mal entretenus.
f) Maintenir tout organe de coupe propre
et bien affûté. Les outils de coupe
bien entretenus et affûtés sont moins
susceptibles de se coincer et sont plus
faciles à contrôler.
g) Utiliser un outil électrique, ses
accessoires, mèches, etc., conformément
aux présentes directives et suivant la
manière prévue pour ce type particulier
d’outil électrique, en tenant compte des
conditions de travail et de la tâche à
effectuer. L’utilisation d’un outil électrique
à des fins autres que celles prévues est
potentiellement dangereuse.
20
Page 23
5) UTILISATION ET ENTRETIEN DE LA BATTERIE
a) Recharger la batterie uniquement avec
le chargeur spécifié par le fabricant.
Un chargeur propre à un certain type de
batterie peut créer des risques d’incendie
lorsqu’utilisé avec d’autres batteries.
b) Utiliser les outils électriques uniquement
avec leur batterie spécifique. L’utilisation
d’autres batteries comporte des risques de
dommages corporels ou d’incendie.
c) Après utilisation, ranger la batterie
à l’écart d’objets métalliques, tels
que trombones, pièces de monnaie,
clés, clous, vis ou autres petits objets
métalliques susceptibles de conduire
l’électricité entre les bornes, car cela pose
des risques de brûlures ou d’incendie.
d) Si utilisée de façon abusive, la batterie
pourra perdre du liquide. Éviter alors tout
contact. En cas de contact accidentel,
rincer abondamment à l’eau claire.
En cas de contact oculaire, rincer puis
consulter immédiatement un médecin.
Le liquide de la batterie peut engendrer
irritation ou brûlures.
6) RÉPARATION
a) Faire entretenir les outils électriques par
un réparateur qualifié en n’utilisant que
des pièces de rechange identiques. Cela
permettra de préserver l’intégrité de l’outil
électrique et la sécurité de l’utilisateur.
Consignes de sécurité pour les
cloueuses sans fi l
• Supposez toujours que l’outil contient
des attaches. Une manipulation négligente
de la cloueuse peut entraîner la décharge
inattendue des attaches et des blessures.
• Ne dirigez pas l’outil vers vous-même
ou d’autres personnes à proximité. Un
déclenchement inattendu déchargera l’attache
et causera des blessures.
• N’actionnez pas l’outil s’il n’est pas placé
fermement contre l’ouvrage. Si l’outil n’est
pas en contact avec l’ouvrage, l’attache peut
être déviée de votre cible.
• Débranchez l’outil de la source
d’alimentation lorsque les attaches se
coincent dans l’outil. Lors du retrait d’une
attache coincée, la cloueuse peut être activée
involontairement si elle est branchée.
• N’utilisez pas cette cloueuse pour la
fixation des câbles électriques. Elle n’est
pas conçue pour l’installation des câbles
électriques et peut endommager l’isolation
des câbles électrique, causant ainsi un choc
électrique ou un risque d’incendie.
• Portez toujours des lunettes de
sécurité.
• Portez toujours un serre-tête
antibruit.
• N’utilisez que le type de fixation
spécifié dans ce mode d’emploi.
• N’utilisez pas de socle pour monter
l’outil sur un support.
• Ne désassemblez, ni ne bloquez les pièces du
cloueur comme le bout de contact.
• Avant chaque utilisation, vérifiez que le
mécanisme de sûreté et de déclenchement
fonctionne correctement et que tous les
écrous et boulons sont bien serrés.
• N’utilisez pas le BF33
– lors du changement d’emplacement
de clouage impliquant l’utilisation
d’échafaudages, d’escalier, d’échelles ou de
constructions similaires (par ex. lattes de
toit, etc.);
– lors de la fermeture de boîtes ou de
caisses;
– lors de l’installation de systèmes de sécurité
du transport, par ex. sur des véhicules,
wagons, etc.
Pour les exceptions, consultez les
réglementations nationales relatives au lieu de
travail.
• Toujours vérifier les réglementations locales
du lieu de travail.
• N’utilisez pas l’outil comme un marteau.
• Ne faites jamais fonctionner le cloueur à vide.
• Transportez l’outil jusqu’à l’aire de travail en le
tenant par une seule poignée et jamais avec la
gâchette enfoncée.
• Prenez en compte l’environnement de l’aire
de travail. Les clous peuvent perforer les
pièces minces ou déraper sur les coins ou les
arêtes de la pièce, ce qui peut ainsi mettre en
danger les personnes présentes.
• N’enfoncez pas les clous trop près des arêtes
de la pièce travaillée.
• N’enfoncez pas les clous les uns au-dessus
des autres.
FR
Risques résiduels
Les risques suivants sont inhérents à l’utilisation
de ces machines:
– Blessures causées par une manipulation
incorrecte de l’outil.
– Perte de contrôle due à l’absence de prise en
main ferme de l’outil.
21
Page 24
– Fatigue musculaire des bras et des mains,
notamment lors du travail au-dessus de la
tête. Faites toujours des pauses régulières
lorsque vous travaillez pendant de longues
durées.
En dépit de l’application des normes de sécurité
en vigueur et de l’installation de dispositifs
de sécurité, certains risques résiduels sont
inévitables. Il s’agit de:
– Diminution de l’acuité auditive.
– Risques de dommages corporels dus à des
projections de particules.
– Risques de dommages corporels dus à un
usage prolongé.
– Perte de contrôle causée par le recul.
– Risque de blessures causé par les points
de pincement, les bords tranchants et la
manipulation incorrecte de l’ouvrage.
– Risque de blessures causé par les bords
tranchant lors du remplacement des clous ou
de l’introduction des cartouches de clous.
Étiquettes sur l’appareil
On trouve les diagrammes suivants sur l’outil:
Lire la notice d’instructions avant toute
utilisation.
Porter un dispositif de protection
auditive.
Porter un dispositif de protection
oculaire.
N’appliquez aucune lubrifi cation sur
l’outil.
Angle du magasin.
Longueur des clous/
Épaisseur des clous.
EMPLACEMENT DE LA DATE CODÉE DE FABRICATION
La date codée de fabrication, qui comprend aussi
l’année de fabrication, est imprimée sur la surface
interne du boîtier formant charnière entre l’outil et
la batterie.
Exemple:
2013 XX XX
Année de fabrication
Consignes de sécurité importantes
propres à tous les chargeurs de
batteries
CONSERVEZ CES INSTRUCTIONS: ce manuel
contient des instructions importantes concernant
la sécurité et l’utilisation du chargeur de batterie
B-CB105.
• Avant d’utiliser le chargeur, lire toutes les
instructions et les marquages d’avertissement
sur le chargeur, le bloc batterie et le produit
utilisant le bloc batterie.
AVERTISSEMENT: risque de choc.
Ne pas laisser les liquides pénétrer
dans le chargeur. Risque de choc
électrique.
ATTENTION: risque de brûlure.
Pour réduire le risque de blessures,
ne charger que des blocs batteries
rechargeables Bostitch. Tout autre
type de batterie peut surchauffer et
exploser, entraînant des blessures
et des dégâts matériels. Ne pas
recharger les
batteries non rechargeables.
ATTENTION: les enfants doivent
être surveiller pour s’assurer qu’ils ne
jouent pas avec l’appareil.
AVIS: dans certaines conditions, avec
le chargeur branché dans la prise, le
chargeur peut être court-circuité par
un matériel étranger. Les matériaux
étrangers de nature conductrice
comme, sans limitation, la limaille,
les copeaux métalliques, la laine
d’acier, les feuilles d’aluminium ou les
accumulation de particules métalliques
doivent être tenus à distance
des cavités du chargeur. Toujours
débrancher le chargeur de la prise
lorsqu’il n’y a pas de bloc batterie dans
la cavité. Débrancher le chargeur avant
de le nettoyer.
• NE PAS tenter de charger le bloc batterie
avec un chargeur différent de ceux indiqués
dans ce manuel. Le chargeur et le bloc
batterie sont spécifiquement conçus pour
fonctionner ensemble.
• Ces chargeurs ne sont pas prévus pour
d’autres utilisation que la charge des
batteries rechargeables Bostitch. Toute autre
utilisation peut causer un risque d’incendie, de
choc électrique ou d’électrocution.
• Ne pas exposer le chargeur à la pluie ou à
la neige.
22
Page 25
• Pour débrancher le chargeur, tirer sur la
fiche et non sur le cordon. Cela réduira le
risque de dégât à la fiche et au cordon.
• S’assurer que le cordon est placé de sorte
qu’on ne puisse pas marcher dessus,
trébucher ou l’endommager d’une autre
manière.
• Ne pas utiliser de rallonge sauf si cela est
absolument nécessaire. Toute utilisation
impropre d’une rallonge peut causer un
risque d’incendie, de choc électrique ou
d’électrocution.
• Lors de l’utilisation d’un chargeur à
l’extérieur, toujours prévoir un lieu sec
et utiliser une rallonge appropriée pour
l’utilisation à l’extérieur. Cela diminuera tout
risque de décharges électriques.
• Ne pas obstruer les fentes de ventilation
sur le chargeur. Les fentes de ventilation
sont situées au-dessus et sur les côtés du
chargeur. Placer le chargeur dans une position
éloignée de toute source de chaleur.
• Ne pas utiliser un chargeur ayant un
cordon ou une fiche endommagés — les
faires remplacer immédiatement.
• Ne pas utiliser le chargeur s’il a reçu
un choc violent, s’il est tombé ou s’il a
été autrement endommagé de quelque
manière que ce soit. Apporter le chargeur à
un centre de réparation agréé.
• Ne pas démonter le chargeur; l’apporter
à un centre de réparation agréé lorsqu’un
entretien ou une réparation est nécessaire
Un chargeur mal réassemblé peut entraîner un
risque de choc électrique, d’électrocution ou
d’incendie.
• Si le cordon d’alimentation est endommagé,
il doit être remplacé immédiatement par
le fabricant, un agent de réparation ou une
personne qualifiée similaire pour éviter tout
risque.
• Débrancher le chargeur de la prise secteur
avant de procéder à son nettoyage. Cette
précaution réduira le risque de choc
électrique. Le retrait du bloc batterie ne
réduira pas les risques.
• NE JAMAIS tenter de relier 2 chargeurs
ensemble.
• Le chargeur est conçu pour être alimenté
en courant électrique domestique standard
230V. Ne pas essayer de l’utiliser avec
n’importe quelle autre tension Cette
directive ne concerne pas le chargeur pour
véhicule.
CONSERVEZ CES INSTRUCTIONS
Chargeurs
Le chargeur B-CB105 est compatible
avec les blocs batterie Li-Ion de 18 V
(B-CB182).
Ce chargeur ne nécessite aucun réglage
et il est conçu pour une utilisation la plus simple
possible.
FR
Procédure de charge (fi g. 2)
1. Branchez le chargeur dans une prise 230V
appropriée avant d’insérer le bloc batterie.
2. Insérez le bloc batterie (l) dans le chargeur en
prenant soin que le bloc sont complètement
inséré dans le chargeur. Le témoin rouge
(charge) clignote en continu pour indiquer que
le processus de charge a commencé.
3. Lorsque le voyant rouge RESTE ALLUMÉ en
continu, il indique que la charge est terminée.
La batterie est alors complètement chargée et
peut être immédiatement utilisée ou laissée
dans son chargeur.
REMARQUE: Pour garantir les meilleures
performances et une durée de vie plus longue
des batteries Li-Ion, chargez complètement le bloc
batterie avant la première utilisation.
Processus de charge
Se reporter au tableau suivant pour déterminer
l’état de charge de la batterie.
État de charge
charge en cours –– –– ––
pleinement chargée –––––––––––––––––––––
suspension de charge –– • –– • –– •
x problème du bloc
ou du chargeur • • • • • • • •
problème de ligne
d’alimentation •• •• •• ••
Ce chargeur ne peut charger un bloc batterie
défectueux. Le chargeur indique la batterie
défectueuse en refusant de s’allumer ou en
affichant le message problème bloc ou le motif
clignotant du chargeur.
REMARQUE: Cela peut également signifier un
problème avec un chargeur.
Si le chargeur indique un problème, porter le
chargeur et le bloc batterie pour un essai dans un
centre de service agréé.
23
Page 26
Suspension de charge contre le
chaud/froid
Lorsque le chargeur détecte qu’une batterie
est trop chaude ou trop froide, il démarre
automatiquement la fonction de suspension
de charge, arrêtant ainsi le chargement de
la batterie jusqu’à ce qu’elle reprenne sa
température adéquate. Le chargeur se met alors
automatiquement en mode de charge. Cette
caractéristique assure aux batteries une durée
maximale de vie.
Les outils Li-Ion sont conçus avec un système
de protection électronique qui protège la batterie
contre la surcharge, la surchauffe ou la décharge
complète.
L’outil s’arrêtera automatiquement lorsque le
système électronique de protection sera activé.
Dans cette éventualité, placer la batterie Li-Ion sur
le chargeur pour la recharger pleinement.
Un bloc batterie froid se chargera à environ la
moitié d’un bloc batterie chaud. Le bloc batterie
se chargera plus lentement durant tout le cycle
de charge et n’atteindra pas la charge maximale
même si la batterie chauffe.
Consignes de sécurité importantes
propres à toutes les batteries
Pour commander une batterie de rechange,
s’assurer d’inclure son numéro de catalogue et sa
tension.
Le bloc batterie n’est pas complètement chargé
lors du déballage. Avant d’utiliser le bloc batterie
et le chargeur, lisez les consignes de sécurité
ci-dessous, puis suivez les procédures de charge
indiquées.
LIRE TOUTES CES CONSIGNES
• Ne pas charger ou utiliser un bloc batterie
dans un milieu déflagrant, comme en
présence de liquides, gaz ou poussières
inflammables. Insérer ou retirer le bloc
batterie du chargeur peut enflammer la
poussière ou des émanations.
• Ne jamais forcer le bloc batterie dans
le chargeur. Ne modifier le bloc batterie
d’aucune manière que ce soit pour le faire
entrer sur un chargeur incompatible, car le
bloc batterie peut se casser et causer de
graves blessures.
• Charger le bloc batterie uniquement dans les
chargeurs Bostitch prévus.
• NE PAS l’éclabousser ou l’immerger dans
l’eau ou d’autres liquides.
• Ne pas ranger ou utiliser l’outil et le blocpiles dans des endroits où la température
peut atteindre ou excéder 40°C (105°F)
(comme dans les remises extérieures ou les
bâtiments métalliques l’été).
• Pour un résultat optimal, assurez-vous que le
bloc batterie est complètement chargé avant
l’utilisation.
ATTENTION: après utilisation,
CONSIGNES DE SÉCURITÉ SPÉCIFIQUES PROPRES AUX
BATTERIES AU LITHIUM ION (Li-Ion)
• Ne pas incinérer la batterie même si
• En cas de contact du liquide de la batterie
• Le contenu des cellules d’une batterie
AVERTISSEMENT: ne jamais tenter
d’ouvrir le bloc batterie pour quelque
raison que ce soit. Si le boîtier du bloc
batterie est fi ssuré ou endommagé,
ne pas l’insérer dans un chargeur
Ne pas écraser, laisser tomber, ou
endommager le bloc batterie. Ne
pas utiliser un bloc batterie ou un
chargeur ayant reçu un choc violent,
étant tombé, ayant été écrasé ou
endommagé de quelque façon que ce
soit (par ex. percé par un clou, frappé
d’un coup de marteau, piétiné). Risque
de choc électrique ou d’électrocution.
Les blocs batterie endommagés
doivent être renvoyés à un centre de
réparation pour y être recyclés.
ranger l’outil, à plat, sur une surface
stable là où il ne pourra ni faire
tomber ni faire trébucher personne.
Certains outils équipés d’une large
batterie peuvent tenir à la verticale
sur celle-ci, mais manquent alors de
stabilité.
elle est sévèrement endommagée ou
complètement usagée, car elle pourrait
exploser au contact des flammes. Au cours de
l’incinération des batteries au lithium-ion, des
vapeurs et matières toxiques sont dégagées.
avec la peau, la rincer immédiatement
au savon doux et à l’eau claire. En cas de
contact oculaire, rincer l’œil ouvert à l’eau
claire une quinzaine de minutes, ou jusqu’à ce
que l’irritation cesse. Si des soins médicaux
sont nécessaires, noter que l’électrolyte de
la batterie est composé d’un mélange de
carbonates organiques liquides et de sels de
lithium.
ouverte pourrait causer une irritation des
voies respiratoires. Dans cette éventualité,
exposer l’individu à l’air libre. Si les
symptômes persistent, consulter un médecin.
24
Page 27

AVERTISSEMENT: risques de
brûlures. Le liquide de la batterie
pourrait s’enflammer s’il est exposé à
des étincelles ou à une flamme.
Batterie
TYPE DE BATTERIE
Les modèles BF33 et BF33-2 fonctionnent avec un
bloc batterie de 18 volts.
Les blocs batterie B-CB182 peuvent être utilisés.
Consultez les Caractéristiques techniques
pour plus d’informations.
Recommandations de stockage
1. Le lieu idéal de rangement est un lieu frais et
sec, à l’abri de toute lumière solaire directe
et de tout excès de température. Pour des
performances et une durée de vie optimales,
entreposer les batteries à température
ambiante après utilisation.
2. Pour un stockage prolongé, il est recommandé
de conserver la batterie complètement
chargée dans un lieu frais et sec, hors du
chargeur pour de meilleurs résultats.
REMARQUE: Les blocs batterie ne doivent pas
être stockés complètement déchargés. Le bloc
batterie devra être rechargé avant l’utilisation.
Étiquettes sur le chargeur et la
batterie
En plus des diagrammes utilisés dans ce manuel,
les étiquettes sur le chargeur et la batterie
comportent les diagrammes suivants:
Lire la notice d’instructions avant toute
utilisation.
Charge en cours.
Batterie chargée.
Suspension de charge.
Utiliser le chargeur
exclusivement avec des
batteries Bostitch. Tout autre
type de batteries pourrait
exploser et causer des
dommages corporels et
matériels.
Ne pas exposer à l’eau.
Remplacer systématiquement tout
cordon endommagé.
Recharger seulement entre 4°C et
40°C.
Mettre la batterie au rebut
conformément à la réglementation en
matière d’environnement.
Ne jetez pas le bloc batterie au feu.
Charge les batteries Li-Ion.
Consulter la Caractéristiques
techniques pour les temps de charge.
Contenu de l’emballage
Ce carton comprend:
1 cloueur
1 Chargeur
2 Blocs batterie
1 Embout anti-marque
1 Coffret de transport
1 Notice d’instructions
1 Dessin éclaté
• Vérifier que l’appareil et ses pièces ou
accessoires n’ont pas été endommagés lors
du transport.
• Prendre le temps de lire attentivement et
comprendre cette notice d’instructions avant
toute utilisation de l’appareil.
FR
Problème du bloc ou du chargeur.
x
Problème de ligne d’alimentation.
Ne pas mettre en contact avec des
objets conducteurs.
Ne pas recharger une batterie
endommagée.
Description (fi g. 1)
AVERTISSEMENT: ne jamais
modifier l’outil électrique ni aucun
de ses composants. Il y a risques de
dommages corporels ou matériels.
a. Gâchette
b. Verrou de sécurité de la gâchette
c. Bout de contact
25
Page 28
d. Molette de réglage de profondeur
e. Voyant batterie faible et bourrage/calage
f. Levier de libération de calage
g. Magasin
h. Verrou à poussoir
i. Commutateur de mode (BF33 uniquement)
j. Chevron rotatif/crochet pour ceinture
k. Clé hexagonale intégrée
l. Bloc batterie
m. Embout anti-marque
UTILISATION PRÉVUE
La cloueuse sans fil à charpente BF33/BF33-2
a été conçue pour enfoncer des clous dans les
ouvrages en bois.
La cloueuse de charpente sans fil BF33 est
conçue pour les modes séquentiel/contact. Les
cloueuses conçues pour les modes séquentiel/
contact NE DOIVENT PAS être utilisées sur les
échafaudages, les escaliers, les échelles ou les
constructions similaires (par ex. lattes de toit).
Pour les exceptions, consultez les réglementations
nationales relatives au lieu de travail.
La cloueuse de charpente sans fil BF33-2 est
conçue uniquement pour le mode séquentiel.
Les cloueuses conçues pour le mode séquentiel
PEUVENT ÊTRE utilisées sur les échafaudages,
les escaliers, les échelles ou les constructions
similaires (par ex. lattes de toit).
NE PAS les utiliser en milieu humide ou en
présence de gaz ou de liquides inflammables.
Ces cloueuses sont des outils électriques de
professionnels.
NE PAS les laisser à la portée des enfants.
Une supervision est nécessaire auprès de tout
utilisateur non expérimenté.
• Ce produit n’est pas prévu pour être utilisé par
des personnes (y compris les enfants) dont les
capacité physiques, sensorielles ou mentales
sont réduites ou qui manquent d’expérience
ou d’aptitudes, sauf si ces personnes
sont surveillées par une autre personne
responsable de leur sécurité. Ne jamais laisser
les enfants seuls avec ce produit.
Sécurité électrique
Le moteur électrique a été conçu pour fonctionner
sur une tension unique. Vérifier systématiquement
que la tension de la batterie correspond bien à la
tension indiquée sur la plaque signalétique. Vérifier
également que la tension du chargeur correspond
bien à la tension du secteur.
Votre chargeur Bostitch à double
isolation est conforme à la norme
EN60335; un branchement à la terre
n’est donc pas nécessaire.
Si le cordon fourni est endommagé, le remplacer
par un cordon spécialement conçu à cet effet, et
disponible auprès du service après-vente Bostitch.
Toujours utiliser la fiche prescrite lors du
CH
remplacement du câble d’alimentation.
Type 11 pour la classe II
(Isolation double) – outils
Type 12 pour la classe I
(Conducteur de terre) – outils
En cas d’utilisation à l’extérieur, connecter
CH
les outils portatifs à un disjoncteur FI.
Utilisation d’une rallonge
N’utiliser une rallonge qu’en cas de nécessité
absolue. Utiliser une rallonge homologuée
compatible avec la tension nominale du chargeur
(consulter la Caractéristiques techniques). La
section minimale du conducteur est de 1mm2
pour une longueur maximale de 30m.
En cas d’utilisation d’un dévidoir, dérouler
systématiquement le câble sur toute sa longueur.
MONTAGE ET RÉGLAGES
AVERTISSEMENT: avant le
AVERTISSEMENT: utiliser
montage et les réglages, retirez
toujours le bloc batterie. Toujours
verrouiller l’outil avant d’insérer ou
de retirer le bloc batterie.
exclusivement des batteries et
chargeurs Bostitch.
Insertion et Retrait de la Batterie de
l’outil (fi g. 2)
AVERTISSEMENT: pour réduire
REMARQUE: assurez-vous que votre bloc
batterie(l) est complètement chargé. Les blocs
batterie fournis ne sont pas nécessairement
complètement chargés.
POUR INSTALLER LA BATTERIE DANS LA POIGNÉE DE
L’OUTIL
1. Aligner la batterie (l) sur l’encoche de la face
tout risque de dommages corporels
graves, verrouiller et débrancher
l’outil du bloc batterie avant tout
réglage ou avant de retirer ou
d’installer toute pièce ou tout
accessoire. Un démarrage accidentel
peut provoquer des blessures.
interne de la poignée de l’outil.
26
Page 29
2. Insérer la batterie fermement dans la
poignée jusqu’à ce qu’elle s’y enclenche
complètement.
POUR RETIRER LA BATTERIE DE L’OUTIL
1. Appuyez sur le bouton de libération (n) et
sortez le bloc batterie de la poignée de l’outil.
2. Insérer la batterie dans son chargeur comme
décrit dans la section appropriée de ce
manuel.
TÉMOIN DE CHARGE DES BLOCS BATTERIE (FIG. 2, 2A)
Certains blocs batterie Bostitch incluent un témoin
de charge composé par trois voyants verts qui
indiquent le niveau de charge restant dans le bloc
batterie.
Pour activer le témoin de charge, maintenir
enfoncé le bouton du témoin de charge (o). Une
combinaison de trois voyants verts s’allume pour
indiquer le niveau de charge restant. Lorsque le
niveau de charge de la batterie est au-dessous de
la limite utilisable, le témoin de charge ne s’allume
pas et la batterie doit être rechargée.
REMARQUE: le témoin de charge est
uniquement une indication de la charge
restant dans le bloc batterie. Il n’indique pas la
fonctionnalité de l’outil et peut être sujet à des
variations selon les composants du produit, la
température et l’application de l’utlisateur final.
AVIS: ne conservez pas l’outil avec
le bloc batterie installé. Pour éviter
les dégâts au bloc et pour assurer
la meilleure durée de la batterie,
conservez les blocs batteries hors de
l’outil ou du chargeur dans un lieu frais
et sec.
2. Sélectionnez des clous en bande
adaptés. (Voir les Caractéristiques
techniques.) Bostitch recommande
d’utiliser toujours des clous de
fixation de marque Bostitch.
AVERTISSEMENT:
comme les accessoires
autres que ceux offerts
par Bostitch n’ont pas été testés avec
ce produit, leur utilisation avec cet
appareil pourrait être dangereuse.
Pour réduire tout risque de dommages
corporels, seuls des accessoires
Bostitch recommandés doivent être
utilisés avec cet appareil.
3. Insérez la bande de clous dans l’encoche de
chargement sur le côté du magasin. Veillez
à ce que les clous soient disposés sur leur
pointe dans le conduit.
4. Fermez le magasin en libérant le verrou à
poussoir. Laissez soigneusement le verrou
coulisser vers l’avant et s’engager dans la
cartouche de clous.
FR
Verrouillage de décharge à vide
La cloueuse est dotée d’un verrouillage de
décharge à vide qui empêche l’activation de l’outil
lorsque le magasin est presque vide. Lorsqu’il
reste environ 7 à 9 clous dans le magasin, le
verrouillage de décharge à vide de l’outil s’active.
Consultez la section Chargement de l’outil pour
recharger une cartouche de clous collés.
REMARQUE: Si vous forcez trop sur l’outil, il est
possible de débloquer le verrouillage. Ceci protège
l’outil contre les éventuels dégâts en cas de chute.
Chevron rotatif/crochet pour
ceinture (fi g. 6)
Le chevron rotatif/crochet pour ceinture (j) peut
être aisément placé à gauche ou à droite de
l’outil pour s’adapter aux utilisateurs gauchers ou
droitiers.
Si l’utilisation du crochet n’est pas nécessaire, il
peut être pivoté vers l’avant ou l’arrière de la base
de la poignée.
Chargement de l’outil (fi g. 4)
AVERTISSEMENT: toujours
verrouiller l’outil et débrancher le bloc
batterie avant le chargement et le
déchargement des attaches.
1. Faites coulisser le verrou à poussoir à ressort
(h) vers la base du magasin pour le bloquer en
position.
Réglage de la profondeur de
clouage (fi g. 5)
La profondeur de clouage peut être réglée en
utilisant la molette de réglage de profondeur.
1. Pour enfoncer le clou moins profondément,
tournez la molette de réglage de profondeur
(d) vers la gauche, vers l’icône clou peu
enfoncé.
2. Pour enfoncer le clou plus profondément,
tournez la molette de réglage de profondeur
(d) vers la droite, vers l’icône clou très
enfoncé.
Sélection du mode (fi g. 1)
BF33 UNIQUEMENT
Pour sélectionner le mode d’action séquentiel,
faites coulisser le commutateur de mode (i) de
manière à afficher l’icône avec un seul clou ( ).
27
Page 30
Pour sélectionner le mode d’action contact, faites
coulisser le commutateur de mode (i) de manière
à afficher l’icône avec trois clous ( ).
REMARQUE: La puissance maximale pour
enfoncer de longs clous est obtenue en mode
séquentiel. Veuillez donc limiter l’utilisation du
mode contact lorsque vous enfoncez de longs
clous.
FONCTIONNEMENT
Consignes D’utilisation
AVERTISSEMENT : respectez toujours
les consignes de sécurité et les règles
en vigueur.Certaines réglementations
locales du lieu de travail peuvent
interdire l’utilisation du mode contact
pour certaines applications.
AVERTISSEMENT: pour réduire
tout risque de dommages corporels
graves, arrêter et déconnecter la
batterie avant tout réglage ou avant
de retirer ou installer toute pièce
ou tout accessoire. Tout démarrage
accidentel pourrait causer des
dommages corporels.
Position Correcte des Mains (fi g. 7)
AVERTISSEMENT: pour réduire tout
AVERTISSEMENT: pour réduire
La position correcte des mains nécessite une main
sur la poignée principale (p) comme illustré.
risque de dommages corporels graves,
adopter SYSTÉMATIQUEMENT la
position des mains illustrée.
tout risque de dommages corporels
graves, maintenir fermement et
SYSTÉMATIQUEMENT l’outil pour
anticiper toute réaction soudaine de sa
part.
Préparation de L’outil (fi g. 1)
1. Retirez le bloc batterie (l) de l’outil et assurezvous que l’outil est verrouillé.
2. Retirez tous les clous du magasin (g).
3. Vérifiez si le bout de contact (c) peut bouger
sans difficulté.
4. Rechargez les clous dans le magasin.
5. Insérez le bloc-piles.
AVERTISSEMENT : n’utilisez pas
28
l’outil si le bout de contact ou
l’enfonceur de clou ne bougent que
difficilement.
AVIS : JAMAIS de
lubrifiants ou solvants
de nettoyage avec un
atomiseur ou autre à
l’intérieur de l’outil. Cela
pourrait gravement
affecter la durée de vie et la
performance de l’outill.
Fonctionnement de L’outil (fi g. 1)
Cet outil peut être utilisé selon deux modes de
travail : mode d’action séquentielle et mode
d’action à percussion.
MODE D’ACTION SÉQUENTIELLE
Le mode d’action séquentielle permet d’enfoncer
des clous de façon intermittente lorsqu’un
placement très soigneux et très précis est requis.
Il offre également la meilleure puissance pour
enfoncer les clous plus longs.
1. Sélectionnez le mode d’action séquentielle
avec le sélecteur de mode ( ) (i).
2. Relâchez le verrou de sécurité de la
gâchette(b).
3. Poussez le bout de contact contre la surface de
travail.
4. Tirez sur la gâchette (a) pour faire fonctionner
l’outil.
5. Relâchez la gâchette et relevez la cloueuse de
la surface de travail.
6. Répétez les étapes 3 à 5 pour enfoncer le
clou suivant.
MODE D’ACTION CONTACT (BF33 UNIQUEMENT)
Le mode contact est utilisé pour un clouage
rapide sur des surfaces planes et fixes et il est
généralement plus efficace pour enfoncer les clous
plus courts.
1. Sélectionnez le mode d’action à percussion
avec le sélecteur de mode ( ) (i).
2. Relâchez le verrou de sécurité de la
gâchette(b).
3. Pour enfoncer un seul clou, faites fonctionner
l’outil comme indiqué pour l’action
séquentielle :
a. Poussez le bout de contact (c) contre la
surface de travail.
b. Tirez sur la gâchette (a) pour faire
fonctionner l’outil. Chaque fois que vous
tirez sur la gâchette avec le bout de contact
appuyé contre la surface de travail, un clou
est enfoncé.
4. Pour enfoncer plusieurs clous, maintenez
enfoncée la gâchette (a), puis poussez le bout
de contact (c) de manière répétée contre la
surface de travail.
Page 31

AVERTISSEMENT: ne maintenez
pas la gâchette enfoncée lorsque
l’outil n’est pas utilisé. Maintenez le
verrou de sécurité de la gâchette (b) en
position bloquée pour empêcher toute
activation accidentelle lorsque l’outil
n’est pas utilisé.
5. Lors du changement de mode, il peut
être nécessaire de réglage la profondeur de
clouage. Consultez la section Réglage de la
profondeur de clouage pour les instructions.
Utilisation du verrou de la gâchette
(fi g. 3)
Chaque cloueuse Bostitch est dotée d’un verrou
de gâchette (b) qui, une fois poussé à droite
comme illustré sur la Figure 3, empêche la
décharge d’un clou en bloquant la gâchette et
coupant l’alimentation du moteur.
Lorsque le verrou de gâchette est enfoncé à
gauche, l’outil est à nouveau opérationnel. Le
verrou de gâchette doit toujours être bloqué
lors des réglages ou lorsque l’outil n’est pas
immédiatement utilisé.
Embout anti-marquage (fi g. 1)
Lors de l’utilisation de cet outil sur des
matériaux que vous ne voulez pas marquer (par
ex. revêtement en bois), utilisez l’embout antimarquage en plastique (m) par-dessus l’embout
de contact (c).
Voyant (fi g. 1)
Votre cloueuse est dotée de deux voyants (e)
situés à l’arrière de l’outil, juste au-dessus du
capuchon arrière. Consultez également la section
Guide De Dépannage pour plus d’instructions.
BATTERIE FAIBLE
Remplacez la
batterie par un bloc
rechargé.
BLOC CHAUD
Laissez la batterie
refroidir ou
remplacez-la par un
bloc froid.
BOURRAGE/
CALAGE
Tournez le levier de
libération de calage
pour la libération.
Consultez la
section Libération
du calage.
OUTIL CHAUD
Laissez l’outil
refroidir avant
de continuer
l’utilisation.
FR
Libération du calage
(fi g.1,3)
Si la cloueuse est utilisée dans des applications
exigeantes où toute la puissance disponible
du moteur est utilisée pour enfoncer une
attache, l’outil peut caler. La lame de clouage
ne termine pas le cycle de clouage et le voyant
bourrage/calage(e) clignote. Tournez le levier de
libération de calage (f) sur l’outil pour libérer le
mécanisme. Si la lame de clouage ne revient pas
automatiquement en position initiale, passez à
la section Retrait d’un clou coincé. Si l’appareil
continue à caler, veuillez vérifier mode choisi, le
matériau et la longueur de l’attache pour vous
assurer que l’application n’est pas trop exigeante.
Retrait d’un clou coincé (fi g. 1, 3)
Si un clou se coince dans le nez de l’outil, le
voyant bourrage/calage (e) clignote.
1. Retirez le bloc batterie de l’outil et engagez
le verrou de sécurité de la gâchette (b).
2. Faites coulisser le verrou à poussoir à ressort
(h) vers la base du magasin pour le bloquer en
position et décharger la cartouche de clous.
3. Utilisez la clé hexagonale (k) fournie pour
desserrer les deux boulons Allen (q) au
sommet du magasin.
4. Pivotez le magasin (g) vers l’avant.
5. Retirez le clou coincé/tordu en utilisant des
pinces si nécessaire.
6. Si la lame de clouage est en position basse,
tournez le levier de libération de calage (f) au
sommet de la cloueuse.
REMARQUE: si la lame de clouage ne
revient pas en position initiale après avoir
tourné le levier de libération de calage, il
peut être nécessaire de remettre la lame de
clouage dans sa position initiale à l’aide d’un
long tournevis.
7. Remettez le magasin en position sous le nez
de l’outil et serrez les boulons hex (q).
8. Remontez le bloc batterie.
REMARQUE: l’outil se désactivera et ne se
réinitialisera que lorsque le bloc batterie aura
été retiré, puis remis en place.
9. Remettez les clous dans le magasin (voir
Chargement de l’outil).
29
Page 32

10. Libérez le verrou à poussoir (h).
11. Dégagez le verrou de sécurité de la gâchette
(b) lorsque vous êtes prêt à continuer le
clouage.
Si les clous se coincent fréquemment dans le
nez, faites réviser l’outil par un centre de service
agréé Bostitch.
MAINTENANCE
Votre outil électrique Bostitch a été conçu pour
fonctionner longtemps avec un minimum de
maintenance. Le fonctionnement continu et
satisfaisant de l’outil dépendra d’une maintenance
adéquate et d’un nettoyage régulier.
AVERTISSEMENT: pour réduire
tout risque de dommages corporels
graves, arrêter et déconnecter la
batterie avant tout réglage ou avant
de retirer ou installer toute pièce
ou tout accessoire. Tout démarrage
accidentel pourrait causer des
dommages corporels.
Le chargeur et le bloc batterie ne peuvent pas
être réparés. L’appareil ne comprend aucune pièce
destinée à être entretenue par l’utilisateur.
Lubrifi cation
Votre outil électrique ne requiert aucune
lubrification additionnelle.
AVIS : JAMAIS de
lubrifiants ou solvants de
nettoyage avec un
atomiseur ou autre à
l’intérieur de l’outil. Cela
pourrait gravement
affecter la durée de vie et la
performance de l’outill.
Entretien
AVERTISSEMENT: éliminer poussière
et saleté du boîtier principal à l’aide
d’air comprimé chaque fois que
les orifices d’aération semblent
s’encrasser. Porter systématiquement
des lunettes de protection et un
masque anti-poussières homologués
au cours de cette procédure.
ENTRETIEN DU CHARGEUR
AVERTISSEMENT: ne jamais utiliser
de solvants ou tout autre produit
chimique décapant pour nettoyer les
parties non métalliques de l’outil.
Ces produits chimiques pourraient en
attaquer les matériaux utilisés. Utiliser
un chiffon humidifié avec de l’eau et
un savon doux. Protéger l’outil de tout
liquide et n’immerger aucune de ses
pièces dans aucun liquide.
AVERTISSEMENT: risques de
décharges électriques. Débrancher
le chargeur de la prise de courant
alternatif avant tout entretien. Éliminer
toute saleté ou graisse de la surface
externe du chargeur à l’aide d’un
chiffon ou d’une brosse non métallique
douce. Ne pas utiliser d’eau ou tout
autre nettoyant liquide.
Accessoires en option
AVERTISSEMENT: comme les
Veuillez consulter votre revendeur pour plus
d’informations sur les accessoires appropriés.
accessoires autres que ceux offerts
par Bostitch n’ont pas été testés avec
ce produit, leur utilisation avec cet
appareil pourrait être dangereuse.
Pour réduire tout risque de dommages
corporels, seuls des accessoires
Bostitch recommandés doivent être
utilisés avec cet appareil.
Protection de l’environnement
Collecte sélective. Ne pas jeter ce
produit avec les ordures ménagères.
En fin de durée de vie ou d’utilité de votre
produit Bostitch, ne pas le jeter avec les ordures
ménagères, mais dans les conteneurs de collecte
sélective.
La collecte sélective des produits et
emballages usagés permet de recycler
et réutiliser leurs matériaux. La
réutilisation de matériaux recyclés aide
à protéger l’environnement contre la
pollution et à réduire la demande en
matière première.
Selon les réglementations locales, il peut être
offert: service de collecte sélective individuel des
produits électriques, ou déchetterie municipale ou
collecte sur les lieux d’achat des produits neufs.
30
Page 33

Bostitch dispose d’installations pour la collecte et
le recyclage des produits Bostitch en fin de vie.
Pour profiter de ce service, veuillez rapporter votre
produit auprès d’un centre de réparation agréé qui
le recyclera en notre nom.
Batterie rechargeable
Recharger cette batterie longue durée lorsqu’elle
ne produira plus assez de puissance pour effectuer
un travail qu’elle faisait facilement auparavant.
En fin de vie utile, mettre la batterie au rebut
conformément à la réglementation en matière
d’environnement:
• Décharger complètement la batterie, puis la
retirer de l’outil.
• Les cellules des batteries Li-Ion, NiCd et NiMH
sont recyclables. Rapporter ces batteries
auprès de votre revendeur ou dans un centre
de recyclage local. Les batteries collectées
seront recyclées ou mises au rebut de façon
appropriée.
FR
31
Page 34

GUIDE DE DÉPANNAGE
DE NOMBREUX PROBLÈMES PEUVENT ÊTRE FACILEMENT RÉSOLUS EN UTILISANT
LE TABLEAU CI-DESSOUS.
Pour des problèmes plus graves ou persistants, contactez votre technicien réparateur agréé
Bostitch ou le bureau Bostitch à l’adresse indiquée dans ce manuel.
SYMPTÔME CAUSE SOLUTION
Le moteur ne
fonctionne pas
lorsque la gâchette est
enfoncée
Le moteur ne
fonctionne pas
lorsque le bout de
contact est enfoncé
AVERTISSEMENT: afin de réduire les risques de blessures, débranchez
TOUJOURS le bloc batterie de l’outil avant toute réparation
Verrou de gâchette en
position bloquée
L’outil a calé et empêche le
moteur de tourner
L’outil est en mode d’action
séquentielle
Le circuit électronique interne
de l’outil doit être réinitialisé
Le moteur s’arrête au bout de
5secondes
Les bornes sont sales ou
endommagées
Circuit électronique interne
endommagé
Gâchette endommagée Consultez un technicien réparateur agréé Bostitch.
La batterie est chaude Laissez la batterie refroidir ou remplacez-la par un
L’outil est chaud Laissez l’outil refroidir avant de continuer
Verrou de gâchette en
position bloquée
Verrouillage de décharge à
vide engagé et bloquant la
course complète du bout de
contact
L’outil a calé et empêche le
moteur de tourner
Bout de contact tordu Consultez un technicien réparateur agréé Bostitch.
Le moteur s’arrête au bout de
5secondes
Les bornes sont sales ou
endommagées
Circuit électronique interne
endommagé
Gâchette endommagée Consultez un technicien réparateur agréé Bostitch.
La batterie est chaude Laissez la batterie refroidir ou remplacez-la par un
L’outil est chaud Laissez l’outil refroidir avant de continuer
Débloquez le verrou de gâchette.
Tournez le levier de libération de calage sur l’outil
pour libérer le mécanisme. Si la lame de clouage
ne revient pas, retirez la batterie et poussez
manuellement la lame de clouage en position
initiale.
Enfoncez d’abord le bout de contact avant la
décharge ou passez en mode contact (BF33
uniquement).
Retirez la batterie, patientez 3 secondes, puis
remontez-la.
Fonctionnement normal, relâchez la gâchette et
enfoncez-la à nouveau.
Consultez un technicien réparateur agréé Bostitch.
Consultez un technicien réparateur agréé Bostitch.
bloc froid.
l’utilisation.
Débloquez le verrou de gâchette.
Chargez davantage de clous dans le magasin.
Tournez le levier de libération de calage sur l’outil
pour libérer le mécanisme. Si la lame de clouage
ne revient pas, retirez la batterie et poussez
manuellement la lame de clouage en position
initiale.
Fonctionnement normal, relâchez le bout de contact
et enfoncez-le à nouveau.
Consultez un technicien réparateur agréé Bostitch.
Consultez un technicien réparateur agréé Bostitch.
bloc froid.
l’utilisation.
32
Page 35

GUIDE DE DÉPANNAGE (suite)
SYMPTÔME CAUSE SOLUTION
L’outil ne s’actionne
pas (le moteur
fonctionne, mais il n’y
a aucune décharge)
Le moteur démarre,
mais fait beaucoup
de bruit
La lame de clouage
continue à se coincer
en position basse
L’outil fonctionne,
mais n’enfonce pas
complètement les
attaches
Verrouillage de décharge à
vide engagé et bloquant la
course complète du bout de
contact
Batterie faible ou
endommagée
Clou coincé ou la lame de
clouage n’est pas revenue en
position initiale
Ensemble clouage/retour
endommagé
Mécanisme interne coincé Consultez un technicien réparateur agréé Bostitch.
Circuit électronique interne
endommagé
Clou coincé et lame de
clouage bloquée en position
basse
Ensemble clouage/retour
endommagé
Clou coincé et lame de
clouage bloquée en position
basse
Ensemble clouage/retour
endommagé
Matériau et longueur
d’attache
Débris dans le nez Nettoyez la zone du nez et vérifiez attentivement
Le réglage de profondeur est
trop faible
L’outil n’est pas fermement
appliqué sur l’ouvrage
Le mode contact est
sélectionné avec de longs
clous (BF33 uniquement)
Matériau et longueur
d’attache
Embout de lame de clouage
endommagé ou usé
L’outil est utilisé avec un
embout anti-marque
Mécanisme d’actionnement
endommagé
Chargez des clous dans le magasin.
Vérifiez le niveau de charge si le bloc indique l’état
de charge. Rechargez ou remplacez le bloc batterie
si nécessaire.
Retirez la batterie, retirez le clou coincé, actionnez
le levier de libération de calage (poussez la lame de
clouage manuellement au besoin) et remontez le
bloc batterie.
Remplacez l’ensemble clouage/retour. Consultez un
technicien réparateur agréé Bostitch.
Consultez un technicien réparateur agréé Bostitch.
Utilisez le levier de libération de calage, retirez les
clous coincés et remettez la lame de clouage en
place manuellement au besoin.
Remplacez l’ensemble clouage/retour. Consultez un
technicien réparateur agréé Bostitch.
Utilisez le levier de libération de calage, retirez les
clous coincés et remettez la lame de clouage en
place manuellement au besoin.
Remplacez l’ensemble clouage/retour. Consultez un
technicien réparateur agréé Bostitch.
Si l’appareil continue à caler (forçant à tourner le
levier de libération de calage), choisissez le matériau
et la longueur d’attache appropriés pour que
l’application ne soit pas trop exigeante.
la présence de petits éléments ou de clous cassés
coincés dans le passage.
Tournez le réglage de profondeur sur une valeur plus
importante
Appuyez suffisamment fort sur l’outil pour le
maintenir sur l’ouvrage. Consultez le manuel
d’instructions.
Sélectionnez le mode séquentiel.
Si l’appareil continue à caler (forçant à tourner le
levier de libération de calage), choisissez le matériau
et la longueur d’attache appropriés pour que
l’application ne soit pas trop exigeante.
Remplacez l’ensemble clouage/retour. Consultez un
technicien réparateur agréé Bostitch.
Retirez l’embout anti-marque.
Consultez un technicien réparateur agréé Bostitch.
FR
33
Page 36

GUIDE DE DÉPANNAGE (suite)
SYMPTÔME CAUSE SOLUTION
L’outil fonctionne,
mais aucun clou n’est
enfoncé
Clou coincé Mauvaise taille ou clous pliés N’utilisez que les clous recommandés. Consultez la
Aucun clou dans le magasin Chargez des clous dans le magasin.
Mauvaise taille ou clous pliés N’utilisez que les clous recommandés. Consultez la
Débris dans le nez Nettoyez la zone du nez et vérifiez attentivement
Débris dans le magasin Nettoyez le magasin.
Magasin usé Remplacez le magasin. Consultez un technicien
Lame de clouage
endommagée ou usée
Ressort du poussoir
endommagé
Les vis du magasin n’ont pas
été serrées après un retrait
de clou ou une inspection
précédents
Lame de clouage
endommagée ou usée
Matériau et longueur
d’attache
Débris dans le nez Nettoyez la zone du nez et vérifiez attentivement
Magasin usé Remplacez le magasin. Consultez un technicien
Ressort du poussoir
endommagé
Le verrouillage de décharge à
vide est engagé lorsqu’il ne
reste que 7 à 9 clous dans
le magasin et l’utilisateur
applique une force excessive
sur l’embout de contact,
débloquant le verrouillage.
section Caractéristiques techniques.
la présence de petits éléments ou de clous cassés
coincés dans le passage.
réparateur agréé Bostitch.
Remplacez la lame de clouage. Consultez un
technicien réparateur agréé Bostitch.
Remplacez le ressort; consultez un technicien
réparateur agréé Bostitch.
section Caractéristiques techniques.
Assurez-vous de serrer les boulons hex du magasin
avec la clé fournie.
Remplacez la lame de clouage. Consultez un
technicien réparateur agréé Bostitch.
Si l’appareil continue à caler (forçant à tourner le
levier de libération de calage), choisissez le matériau
et la longueur d’attache appropriés pour que
l’application ne soit pas trop exigeante.
la présence de petits éléments ou de clous cassés
coincés dans le passage.
réparateur agréé Bostitch.
Remplacez le ressort. Consultez un technicien
réparateur agréé Bostitch.
Chargez davantage de clous dans le magasin pour
libérer le verrouillage de charge à vide.
34
Page 37

18 V DRUCKLUFTNAGLER MIT LI-IONEN-AKKU
BF33, BF33-2
Herzlichen Glückwunsch!
Bostitch-Werkzeuge sind präzisionsgefertigt
und für Befestigungsarbeiten bei
Hochgeschwindigkeit und mit hohen
Stückzahlen vorgesehen. Sie ermöglichen bei
korrekter und sorgfältiger Verwendung eine
effiziente und zuverlässige Arbeit. Wie bei allen
hochwertigen Elektrowerkzeugen müssen die
Herstelleranweisungen befolgt werden, um
optimale Ergebnisse zu erhalten. Wenden Sie
sich an Ihren Vertreter oder Händler von Bostitch,
wenn Sie Fragen zu dem Werkzeug und seiner
Verwendung haben.
Technische Daten
BF33 BF33-2
Spannung VDC 18 18
Typ 1 1
Auslösemodus Sequentiell/ Sequentiell/
Einzelstoß Nur
Magazinwinkel 33° 33°
Befestigungsmittel
Länge mm 50–90 50–90
Schaftdurchmesser mm 2,8–3,3 2,8–3,3
Winkel 30–34° 30–34°
Kopfgeometrie zugeschnittenes zugeschnittenes
oder oder
rundes Offset rundes Offset
in loser Form Papier Papier
Gewicht (ohne Akku) kg 3,53 3,53
Antriebsenergie J 105 105
LPA (Schalldruckpegel) dB(A) 84 84
KPA (Schalldruckpegel Messungenauigkeit) dB(A) 3 3
LWA (Schallleistung) dB(A) 95 95
KWA (Schallleistung Messungenauigkeit) dB(A) 3 3
Gesamtschwingungspegel (triaxiale Vektorsumme) gemäß
EN 60745:
Schwingungsemissionswert a
ah = m/s2 3,8 3,8
Messungenauigkeit
K = m/s2 1,5 1,5
h
Der in diesem Informationsblatt
angegebene Vibrationsemissionswert
wurde gemäß einem standardisierten
Test laut EN 60745 gemessen und
kann für einen Vergleich zwischen zwei
Geräten verwendet werden. Er kann zu einer
vorläufigen Einschätzung der Exposition verwendet
werden.
Eine Schätzung der Vibrationsstärke
Es sind zusätzliche
Akku B-CB182
Akkutyp Li-Ion
Spannung VDC 18
Kapazität Ah 4,0
Gewicht kg 0,61
Ladegerät B-CB105
Netzspannung VAC 230
Akkutyp Li-Ion
Ungefähre Ladezeit min. 70
Gewicht kg 0,49
Sicherungen
Europa 230 V Werkzeuge 10 Ampere Stromversorgung
WARNUNG: Der angegebene
Vibrationsemissionswert bezieht sich
auf die Hauptanwendung des Gerätes.
Wenn das Gerät jedoch für andere
Anwendungen, mit anderem Zubehör
oder schlecht gewartet eingesetzt
wird, kann die Vibrationsemission
verschieden sein. Dies kann
den Expositionsgrad über die
Gesamtbetriebszeit erheblich erhöhen.
sollte auch berücksichtigen, wie oft das
Gerät ausgeschaltet wird oder über
welche Zeit es zwar läuft, aber nicht
wirklich in Betrieb ist. Dies kann die
Exposition über die Gesamtbetriebszeit
erheblich mindern.
Sicherheitsmaßnahmen zum
Schutze der Betriebsperson vor
den Auswirkungen der Vibration in
Betracht zu ziehen, z.B.: Wartung
des Gerätes und des Zubehörs,
Warmhalten der Hände, Organisation
des Arbeitsablaufes.
4,0-Ah-Akkus)
DE
35
Page 38

Defi nitionen: Sicherheitsrichtlinien
Im Folgenden wird die Relevanz der einzelnen
Warnhinweise erklärt. Bitte lesen Sie die
Betriebsanleitung und achten Sie auf diese
Symbole.
GEFAHR: Weist auf eine unmittelbar
drohende gefährliche Situation hin, die,
sofern nicht vermieden, zu tödlichen
oder schweren Verletzungen führt.
WARNUNG: Weist auf eine
möglicherweise gefährliche Situation
hin, die, sofern nicht vermieden,
zu tödlichen oder schweren
Verletzungen führen kann.
VORSICHT: Weist auf eine
möglicherweise gefährliche Situation
hin, die, sofern nicht vermieden,
zu leichten oder mittelschweren
Verletzungen führen kann.
HINWEIS: Weist auf ein Verhalten hin,
das nichts mit Verletzungen zu tun
hat, aber, wenn es nicht vermieden
wird, zu Sachschäden führen kann.
Weist auf ein Stromschlagrisiko hin.
Weist auf eine Brandgefahr hin.
EG-Konformitätserklärung
MASCHINENRICHTLINIE
BF33, BF33-2
Bostitch erklärt hiermit, dass diese unter
Technische Daten beschriebenen Produkte die
folgenden Vorschriften erfüllen:
2006/42/EG, EN 60745-1, EN 60745-2-16.
Diese Produkte erfüllen auch die Richtlinie
2004/108/EG und 2011/65/EU. Für weitere
Informationen wenden Sie sich bitte an Bostitch
unter der folgenden Adresse.
Der Unterzeichnete ist verantwortlich für die
Zusammenstellung des technischen Dossiers und
gibt diese Erklärung im Namen von Bostitch ab.
Colin Earl
Managing Director
Europa, Mittlerer Osten & Afrika
Stanley Black & Decker bvba
Kanaalweg 112 IZ Ravenshout zone 3
3980 Tessenderlo, Belgien
28.06.2013
WARNUNG: Zur Reduzierung
der Verletzungsgefahr bitte die
Betriebsanleitung lesen.
Allgemeine
Sicherheitswarnhinweise für
Elektrowerkzeuge
WARNUNG! Lesen Sie alle
Der Begriff „Elektrowerkzeug“ in den
Warnhinweisen bezieht sich auf Ihr
netzbetriebenes Elektrowerkzeug (mit Kabel)
oder auf Ihr akkubetriebenes (kabelloses)
Elektrowerkzeug.
1) SICHERHEIT IM ARBEITSBEREICH
a) Halten Sie den Arbeitsbereich sauber
b) Betreiben Sie das Elektrowerkzeug nicht
c) Halten Sie Kinder und Zuschauer fern,
2) ELEKTRISCHE SICHERHEIT
a) Der Stecker des Elektrogerätes muss
b) Vermeiden Sie Körperkontakt mit
Sicherheitswarnhinweise und alle
Anweisungen. Das Nichtbeachten
von Warnhinweisen und Anweisungen
kann zu elektrischem Schlag, Brand
und/oder schweren Verletzungen
führen.
BEWAHREN SIE ALLE WARNHINWEISE UND
ANWEISUNGEN ZUM SPÄTEREN
NACHSCHLAGEN AUF
und gut ausgeleuchtet. Unaufgeräumte
oder dunkle Bereiche begünstigen Unfälle.
in explosionsgefährdeten Umgebungen,
in denen sich z. B. brennbare
Flüssigkeiten, Gase oder Staub befinden.
Elektrowerkzeuge erzeugen Funken, die
den Staub oder die Dämpfe entzünden
können.
während Sie ein Elektrogerät betreiben.
Ablenkung kann dazu führen, dass Sie die
Kontrolle über das Gerät verlieren.
in die Steckdose passen. Ändern Sie
niemals den Stecker in irgendeiner Form.
Verwenden Sie keinerlei Adapterstecker
an geerdeten Elektrogeräten.
Unveränderte Stecker und passende
Steckdosen mindern die Gefahr eines
elektrischen Schlages.
geerdeten Flächen, wie Rohre,
Radiatoren, Herde und Kühlgeräte. Es
36
Page 39

besteht eine erhöhte Gefahr für einen
elektrischen Schlag, wenn Ihr Körper
geerdet ist.
c) Setzen Sie Elektrogeräte keinem Regen
oder feuchter Umgebung aus. Wenn
Wasser in das Elektrogerät eindringt, erhöht
sich die Gefahr eines elektrischen Schlages.
d) Überlasten Sie das Kabel nicht.
Verwenden Sie niemals das Kabel,
um das Elektrogerät zu tragen oder
durch Ziehen vom Netz zu trennen.
Halten Sie das Kabel fern von Hitze,
Öl, scharfen Kanten oder beweglichen
Teilen. Beschädigte oder verhedderte Kabel
erhöhen die Gefahr eines elektrischen
Schlages.
e) Wenn Sie ein Elektrogerät im Freien
betreiben, verwenden Sie ein für
den Außeneinsatz geeignetes
Verlängerungskabel. Die Verwendung von
für den Außeneinsatz geeigneten Kabeln
mindert die Gefahr eines elektrischen
Schlages.
f) Wenn der Betrieb eines Elektrogerätes
in feuchter Umgebung unumgänglich
ist, verwenden Sie eine durch
einen Fehlerstromschutzschalter
(FI-Schalter oder RCD) geschützte
Stromversorgung. Der Einsatz eines
Fehlerstromschutzschalters mindert die
Gefahr eines elektrischen Schlages.
3) SICHERHEIT VON PERSONEN
a) Seien Sie aufmerksam, achten Sie
darauf, was Sie tun, und gehen Sie
mit Vernunft an die Arbeit mit einem
Elektrowerkzeug. Benutzen Sie kein
Elektrowerkzeug, wenn Sie müde sind
oder unter dem Einfluss von Drogen,
Alkohol oder Medikamenten stehen. Ein
Moment der Unachtsamkeit beim Betrieb
eines Elektrogerätes kann zu schweren
Verletzungen führen.
b) Tragen Sie persönliche Schutzausrüstung
und immer eine Schutzbrille. Das
Tragen persönlicher Schutzausrüstung, wie
Staubmaske, rutschfeste Sicherheitsschuhe,
Schutzhelm oder Gehörschutz, je nach
Art und Einsatz des Elektrowerkzeuges,
verringert das Risiko von Verletzungen.
c) Vermeiden Sie unbeabsichtigtes Starten.
Vergewissern Sie sich, dass der Schalter
in der AUS-Position ist, bevor Sie das
Gerät an die Stromversorgung und/oder
an den Akku anschließen oder wenn Sie
das Gerät aufnehmen oder tragen. Wenn
Sie beim Tragen des Elektrowerkzeuges
den Finger am Schalter haben oder das
Gerät eingeschaltet an die Stromversorgung
anschließen, kann dies zu Unfällen führen.
d) Entfernen Sie alle
Einstellschlüssel oder
Werkzeuge, bevor Sie das
Elektrogerät einschalten.
Werkzeuge oder Schlüssel,
die an rotierenden Teilen des
Elektrogerätes angebracht sind,
können zu Verletzungen führen.
e) Vermeiden Sie eine abnormale
Körperhaltung. Sorgen Sie
für einen sicheren Stand und halten
Sie jederzeit das Gleichgewicht.
Dadurch können Sie das Elektrowerkzeug
in unerwarteten Situationen besser
kontrollieren.
f) Tragen Sie geeignete Kleidung. Tragen
Sie keine weite Kleidung und keinen
Schmuck. Halten Sie Ihre Haare, Kleidung
und Handschuhe von beweglichen Teilen
fern. Lose sitzende Kleidung, Schmuck
oder lange Haare können sich in den
beweglichen Teilen verfangen.
g) Wenn Geräte für den Anschluss an eine
Staubabsaugung und Staubsammlung
vorgesehen sind, vergewissern Sie sich,
dass diese richtig angeschlossen sind
und verwendet werden. Der Einsatz
von Staubsammlern kann staubbedingte
Gefahren mindern.
4) VERWENDUNG UND PFLEGE DES ELEKTROGERÄTES
a) Überlasten Sie das Elektrogerät nicht.
Verwenden Sie das für Ihre Arbeit
passende Elektrogerät. Das richtige Gerät
wird die Aufgabe besser und sicherer
erledigen, wenn es bestimmungsgemäß
verwendet wird.
b) Benutzen Sie kein Elektrowerkzeug,
dessen Schalter defekt ist. Ein
Elektrowerkzeug, das sich nicht mehr
ein- oder ausschalten lässt, ist gefährlich
und muss repariert werden.
c) Trennen Sie den Stecker vom Netz
und/oder die Akkus vom Elektrogerät,
bevor Sie Einstellungen am Gerät
vornehmen, Zubehör wechseln oder es
aufbewahren. Diese Vorbeugemaßnahmen
mindern die Gefahr, dass das Elektrogerät
unbeabsichtigt startet.
d) Bewahren Sie nicht verwendete
Elektrogeräte für Kinder unerreichbar auf
und lassen Sie nicht zu, dass Personen
ohne Erfahrung mit dem Elektrogerät
oder mit diesen Anweisungen das
Elektrogerät bedienen. Elektrogeräte sind
in den Händen nicht geschulter Personen
gefährlich.
e) Warten Sie die Elektrogeräte. Prüfen
Sie, ob bewegliche Teile verzogen oder
ausgeschlagen, ob Teile gebrochen oder
DE
37
Page 40

in einem Zustand sind, der den Betrieb
des Elektrogerätes beeinträchtigen
kann. Bei Beschädigungen lassen Sie
das Elektrogerät reparieren, bevor Sie es
verwenden. Viele Unfälle entstehen wegen
mangelnder Wartung der Elektrogeräte.
f) Halten Sie Schneidwerkzeuge
scharf und sauber. Richtig gewartete
Schneidwerkzeuge mit scharfen Klingen
blockieren seltener und sind leichter unter
Kontrolle zu halten.
g) Verwenden Sie Elektrogeräte,
Zubehör und Einsätze (Bits) usw.
gemäß diesen Anweisungen
und unter Berücksichtigung der
Arbeitsbedingungen und der Aufgabe.
Wenn Sie das Elektrogerät für Aufgaben
verwenden, die nicht bestimmungsgemäß
sind, kann dies zu gefährlichen Situationen
führen.
5) VERWENDUNG UND PFLEGE VON AKKUGERÄTEN
a) Laden Sie die Akkus nur in Ladegeräten
auf, die vom Hersteller empfohlen
werden. Ein Ladegerät, das für einen
bestimmten Akkutyp geeignet ist, kann zu
Brandgefahr führen, wenn es mit einem
anderen Akku verwendet wird.
b) Verwenden Sie Elektrogeräte nur mit
den speziell vorgesehenen Akkus. Der
Einsatz anderer Akkus kann zu Verletzungsund Brandgefahr führen.
c) Wenn Akkus nicht verwendet werden,
halten Sie sie von anderen Metallteilen,
z. B. Büroklammern, Münzen, Schlüsseln,
Nägeln, Schrauben oder anderen kleinen
Metallteilen fern, die eine Verbindung
zwischen den Polen verursachen können.
Wenn die Akkupole kurzgeschlossen
werden, kann dies zu Verbrennungen oder
einem Brand führen.
d) Bei falscher Anwendung kann Flüssigkeit
aus dem Akku austreten. Vermeiden
Sie den Kontakt damit. Bei zufälligem
Kontakt mit Wasser abspülen. Wenn die
Flüssigkeit in die Augen kommt, nehmen
Sie zusätzlich ärztliche Hilfe in Anspruch.
Austretende Akkuflüssigkeit kann zu
Hautreizungen oder Verbrennungen führen.
6) SERVICE
a) Lassen Sie Ihr Elektrowerkzeug nur von
qualifiziertem Fachpersonal und nur mit
Original- Ersatzteilen reparieren. Damit
wird sichergestellt, dass die Sicherheit des
Gerätes erhalten bleibt.
Sicherheitsanweisungen für AkkuNagelmaschinen
• Gehen Sie immer davon aus, dass das
Werkzeug Nägel enthält. Die sorglose
Behandlung der Nagelmaschine kann zum
unerwarteten Abfeuern der Nägel und zu
Personenverletzung führen.
• Richten Sie das Werkzeug nicht auf sich
oder jemand in der Nähe. Bei unerwarteter
Auslösung werden Nägel abgegeben,
wodurch eine Verletzung verursacht wird.
• Setzen Sie das Werkzeug nicht in Gang,
wenn es nicht fest auf dem Werkstück ruht.
Wenn das Werkzeug keinen Kontakt zum
Werkstück hat, kann der Nagel von Ihrem Ziel
abgelenkt werden.
• Trennen Sie das Werkzeug von der
Stromquelle ab, wenn der Nagel im
Werkzeug klemmt. Wenn Sie einen
klemmenden Nagel entfernen, kann die
Nagelmaschine unbeabsichtigt eingeschaltet
werden, wenn der Akku sich noch im Gerät
befindet.
• Benutzen Sie diese Nagelmaschine nicht
zur Befestigung von Stromkabeln. Sie ist
nicht für die Installation von Stromkabeln
bestimmt und kann die Isolierung von
Stromkabeln beschädigen, wodurch
Stromschlag- oder Brandgefahren verursacht
werden.
• Tragen Sie stets eine Schutzbrille.
• Tragen Sie stets einen Gehörschutz.
• Verwenden Sie ausschließlich die im
Handbuch angegebenen Befestigungsmittel.
• Verwenden Sie keine Ständer, um das
Werkzeug an einer Halterung zu befestigen.
• Zerlegen oder blockieren Sie niemals Teile des
Befestigungswerkzeugs, wie beispielsweise
den Kontaktanschlag.
• Vergewissern Sie sich vor jeder Arbeit
mit dem Gerät, dass der Sicherheits- und
Auslösemechanismus einwandfrei arbeitet und
sämtliche Muttern und Schrauben fest sitzen.
• Verwenden Sie den BF33 nicht:
– wenn Sie von einem Nagelbereich zu einem
anderen wechseln und dazu Gerüste,
Treppen, Leitern oder leiterähnliche
Konstruktionen verwenden, z.B. Dachlatten
usw.;
– beim Verschließen von Kästen oder Kisten;
– zum Anbringen von Sicherheitssystemen für
den Transport, z.B. an Fahrzeugen, Waggons
usw.
38
Page 41

Ausnahmen entnehmen Sie Ihren örtlichen
nationalen Arbeitsplatzvorschriften.
• Immer die lokalen Arbeitsplatzvorschriften
beachten.
• Verwenden Sie das Werkzeug nicht als
Hammer.
• Lösen Sie das Befestigungswerkzeug niemals
im freien Raum aus.
• Tragen Sie das Werkzeug im Arbeitsbereich
nur am Griff und niemals mit betätigtem
Auslöser.
• Berücksichtigen Sie die Bedingungen im
Arbeitsbereich. Befestigungsmittel können
dünne Werkstücke durchdringen oder von den
Ecken und Kanten des Werkstücks abrutschen,
was Personen gefährden kann.
• Schlagen Sie keine Befestigungsmittel in der
Nähe der Werkstückkanten ein.
• Schlagen Sie keine Befestigungsmittel über
bereits vorhandenen Befestigungsmitteln ein.
Restrisiken
Folgende Risiken sind mit der Verwendung von
diesen Maschinen untrennbar verbunden:
– Verletzungen, die durch ungeeignete
Behandlung des Werkzeugs verursacht
werden.
– Verlust der Kontrolle, weil das Werkzeug nicht
fest ergriffen wird.
– Muskelbelastung der Arme und Hände,
besonders bei Arbeiten über Kopf. Machen Sie
immer regelmäßige Pausen, wenn Sie lange
gearbeitet haben.
Trotz Beachtung der geltenden
Sicherheitsvorschriften und des Einsatzes von
Schutzvorrichtungen können bestimmte Risiken
nicht vermieden werden. Diese sind:
– Beeinträchtigung des Gehörs.
– Verletzungsgefahr durch herumfliegende
Teilchen.
– Verletzungsgefahr durch andauernden
Gebrauch.
– Verlust der Kontrolle durch Rückstoß.
– Verletzungsgefahr durch spitze Stellen, scharfe
Kanten und ungeeignete Handhabung des
Werkstücks.
– Verletzungsgefahr durch scharfe Kanten, wenn
Nägel gewechselt werden oder Nagelstangen
eingelegt werden.
Bildzeichen am Werkzeug
Die folgenden Bildzeichen sind am Gerät sichtbar
angebracht:
Vor der Verwendung die
Betriebsanleitung lesen.
Tragen Sie Gehörschutz.
Tragen Sie Augenschutz.
DE
Tragen Sie keine
Schmiermittel auf das Werkzeug auf.
Magazinwinkel.
Nagellänge/
Nagelstärke.
LAGE DES DATUMSCODES
Der Datumscode, der auch das Herstelljahr
enthält, ist in die Gehäusefläche geprägt, die die
Montagefuge zwischen Gerät und Akku bildet.
Beispiel:
2013 XX XX
Herstelljahr
Wichtige Sicherheitshinweise für
alle Akku-Ladegeräte
BEWAHREN SIE DIESE ANWEISUNGEN AUF:
Diese Anleitung enthält wichtige Sicherheits- und
Betriebsanweisungen für das Ladegerät B-CB105.
• Lesen Sie vor der Verwendung des Ladegeräts
alle Anweisungen und Warnhinweise auf dem
Ladegerät und dem Akku.
WARNUNG: Stromschlaggefahr.
Keine Flüssigkeiten in das Ladegerät
gelangen lassen. Dies kann einen
elektrischen Schlag zur Folge haben.
VORSICHT: Verbrennungsgefahr. Zur
Reduzierung der Verletzungsgefahr
sollten nur Akkus von Bostitch
verwendet werden. Andere Akkutypen
können sich überhitzen und bersten,
was zu Verletzungen und Sachschäden
führen kann. Nicht aufl adbare
Batterien dürfen nicht wieder
aufgeladen werden.
VORSICHT: Lassen Sie nicht zu, dass
Kinder mit dem Werkzeug spielen.
HINWEIS: Unter bestimmten
Umständen können bei an die
Stromquelle angeschlossenem
Ladegerät die Kontakte im Ladegerät
durch Fremdmaterial kurzgeschlossen
werden. Leitende Fremdmaterialien,
wie z. B. Schleifstaub, Metallspäne,
39
Page 42

Stahlwolle, Aluminiumfolie oder die
Ansammlung von Metallpartikeln von
den Hohlräumen des Ladegerätes
fernhalten. Ziehen Sie den Netzstecker
des Ladegerätes immer aus der
Steckdose, wenn kein Akku in der
Vertiefung steckt. Ziehen Sie den
Netzstecker des Ladegerätes vor dem
Reinigen aus der Steckdose.
• Der Akku darf NIEMALS in einem anderen
Ladegerät, außer dem in diesem Handbuch
beschriebenen, aufgeladen werden. Das
Ladegerät und der Akku wurden speziell zur
gemeinsamen Verwendung konzipiert.
• Diese Ladegeräte sind ausschließlich für
das Laden von Bostitch Akkus bestimmt.
Eine anderweitige Verwendung kann zu
Brand führen oder gefährliche oder tödliche
Verletzungen durch Elektroschock verursachen.
• Setzen Sie das Ladegerät weder Regen
noch Schnee aus.
• Ziehen Sie immer am Stecker und nicht
am Kabel, um das Ladegerät von der
Stromquelle zu trennen. Dadurch wird das
Risiko einer Beschädigung von Stecker und
Kabel reduziert.
• Verlegen Sie das Netzkabel so, dass
niemand darauf treten oder darüber
stolpern kann und dass es keinen sonstigen
schädlichen Einflüssen oder Belastungen
ausgesetzt wird.
• Ein Verlängerungskabel sollte nur
dann verwendet werden wenn es
absolut notwendig ist. Ein ungeeignetes
Verlängerungskabel kann zu Brand führen oder
gefährliche oder tödliche Verletzungen durch
Elektroschock verursachen.
• Wenn Sie ein Ladegerät im Freien
betreiben, tun Sie dies an einem
trockenen Ort und verwenden Sie
ein für den Außeneinsatz geeignetes
Verlängerungskabel. Die Verwendung von für
den Außeneinsatz geeigneten Kabeln mindert
die Gefahr eines elektrischen Schlages.
• Blockieren Sie nicht die Lüftungsschlitze
am Ladegerät. Die Lüftungsschlitze
befinden sich oben und an den Seiten des
Ladegeräts. Stellen Sie das Ladegerät von
Hitzequellen entfernt auf.
• Betreiben Sie das Ladegerät nicht mit
einem beschädigten Netzkabel oder
Netzstecker — beschädigte Teile sind
unverzüglich auszuwechseln.
• Benutzen Sie das Ladegerät nicht, wenn
es einen harten Stoß erlitten hat fallen
gelassen oder anderweitig beschädigt
wurde. Bringen Sie es zu einer autorisierten
Kundendienststelle.
• Das Ladegerät darf nicht zerlegt werden.
Bringen Sie es zu einer autorisierten
Kundendienststelle, wenn es gewartet oder
repariert werden muss. Ein unsachgemäßer
Zusammenbau kann gefährliche oder tödliche
Verletzungen durch Elektroschock verursachen
oder zu Brand führen.
• Zur Vermeidung von Gefahren muss ein
beschädigtes Netzkabel unverzüglich vom
Hersteller, einer Kundendienststelle oder einer
anderen qualifizierten Person ausgetauscht
werden.
• Ziehen Sie den Netzstecker des
Ladegerätes vor dem Reinigen aus der
Steckdose. Dadurch wird das Risiko eines
Stromschlags reduziert. Durch alleiniges
Herausnehmen des Akkus wird dieses Risiko
nicht reduziert.
• Versuchen Sie NIEMALS 2 Ladegeräte
miteinander zu verbinden.
• Das Ladegerät wurde für den Betrieb
mit standardmäßigem 230 V Netzstrom
konzipiert. Es darf mit keiner anderen
Spannung verwendet werden. Dies gilt nicht
für das Fahrzeugladegerät.
BEWAHREN SIE DIESE ANWEISUNGEN AUF
Ladegeräte
Das Ladegerät B-CB105 kann 18 V Li-Ion-Akkus
(B-CB182) laden.
An diesem Ladegerät müssen keine Einstellungen
vorgenommen werden, und es wurde für eine
möglichst einfache Bedienung konzipiert.
Ladevorgang [Abb. (fi g.) 2]
1. Stecken Sie das Ladegerät in eine geeignete
Steckdose mit 230 V, bevor Sie den Akku
einsetzen.
2. Legen Sie den Akku (l) vollständig in das
Ladegerät ein. Die rote Leuchte (Aufladen)
blinkt dauerhaft und zeigt dadurch an, dass der
Ladevorgang begonnen wurde.
3. Der Ladevorgang ist abgeschlossen, wenn die
rote Kontrollleuchte ununterbrochen leuchtet.
Der Akku ist vollständig aufgeladen und kann
jetzt benutzt oder im Ladegerät belassen
werden.
HINWEIS: Um die maximale Lebensdauer der
Li-Ion-Akkus zu gewähren, laden Sie den Akkusatz
vor der ersten Verwendung vollständig auf.
40
Page 43

Ladevorgang
Die Ladezustände des Akkus sind in der Tabelle
unten aufgeführt.
Ladezustand
wird geladen –– –– ––
vollständig geladen ––––––––––––
Temperaturverzögerung –– • –– • –– •
x Problem mit Akku
oder Ladegerät • • • • • • • •
Problem mit der
Stromversorgung •• •• •• ••
Dieses Ladegerät lädt keine defekten Akkus
auf. Das Ladegerät zeigt einen defekten Akku
an, indem es nicht leuchtet oder indem das
Blinkmuster für Probleme mit dem Akku oder dem
Ladegerät angezeigt werden.
HINWEIS: Dies kann auch auf ein Problem mit
dem Ladegerät hinweisen.
Wenn das Ladegerät auf ein Problem hinweist,
bringen Sie es zusammen mit dem Akku zur
Überprüfung zu einer autorisierten Servicestelle.
Temperaturverzögerung
Wenn das Ladegerät feststellt, dass der Akku
zu heiß oder zu kalt ist, wird automatisch die
Temperaturverzögerung ausgelöst. Dabei wird
der Ladevorgang so lange ausgesetzt, bis der
Akku eine geeignete Temperatur erreicht hat.
Das Ladegerät schaltet dann automatisch
auf Ladebetrieb. Dieses Funktionsmerkmal
gewährleistet die maximale Lebensdauer des
Akkus.
Li-Ionen-Werkzeuge sind mit einem elektronischen
Schutzsystem ausgestattet, das den Akku vor
Überladung, Überhitzung und vollständiger
Entladung schützt.
Das Gerät schaltet sich automatisch aus, wenn
der elektronische Schutz anschlägt. Wenn dies
geschieht, setzen Sie den Li-Ion-Akku in das
Ladegerät, bis er vollständig geladen ist.
Ein kalter Akku wird mit etwa der halben
Geschwindigkeit eines warmen Akkus geladen.
Der Akku wird während des gesamten
Ladevorgangs mit der geringeren Geschwindigkeit
geladen, die sich auch nicht erhöht, wenn der Akku
wärmer wird.
Wichtige Sicherheitsanweisungen
für alle Akkus
Achten Sie beim Bestellen von Ersatzakkus darauf,
dass Sie die Katalognummer und die Spannung
angeben.
Der Akku ist bei der Lieferung nicht
vollständig aufgeladen. Lesen Sie
vor der Verwendung von Akku
und Ladegerät die folgenden
Sicherheitsanweisungen und befolgen
Sie dann die genannten Schritte zum
Aufladen.
LESEN SIE SÄMTLICHE ANWEISUNGEN
• Laden oder benutzen Sie den
Akku nicht in explosionsgefährdeten
Umgebungen, in denen sich z. B. brennbare
Flüssigkeiten, Gase oder Staub befinden.
Beim Einsetzen und Herausnehmen des
Akkus aus dem Ladegerät können sich Staub
oder Dämpfe entzünden.
• Setzen Sie das Akku niemals mit Gewalt
in das Ladegerät ein. Führen Sie niemals
Änderungen am Akku durch, damit es in
ein anderes Ladegerät passt, da das Akku
reißen kann, was zu schweren Verletzungen
führen kann.
• Laden Sie die Akkus nur in ausgewiesenen
Ladegeräten von Bostitch auf.
• Das Ladegerät KEINEN Spritzern aussetzen
und NICHT in Wasser oder andere
Flüssigkeiten eintauchen.
• Das Werkzeug und den Akku niemals in
Bereichen lagern oder verwenden, in denen
die Temperatur 40 ºC überschreiten könnte
(z. B. Scheunen oder Metallgebäude im
Sommer).
• Um beste Ergebnisse zu erzielen, sollte
der Akku vor der Verwendung vollständig
aufgeladen werden.
WARNUNG: Versuchen Sie niemals
und unter keinen Umständen,
den Akku zu öffnen. Wenn
das Akkugehäuse Risse oder
Beschädigungen aufweist, darf es
nicht in das Ladegerät gelegt werden.
Den Akku nicht quetschen, fallen
lassen oder beschädigen. Verwenden
Sie niemals einen Akku oder ein
Ladegerät, wenn sie einen harten
Schlag erlitten haben, fallen gelassen,
überfahren oder sonst wie beschädigt
wurden (z. B. wenn sie mit einem
Nagel durchlöchert wurden, mit
einem Hammer darauf geschlagen
oder getreten wurde). Ein Stromunfall
oder ein tödlicher Stromschlag könnte
entstehen. Beschädigte Akkus sollten
zum Recycling zur Kundendienststelle
zurückgebracht werden.
DE
41
Page 44

VORSICHT: Wenn das Werkzeug
BESONDERE SICHERHEITSANWEISUNGEN FÜR
LITHIUMIONEN (Li-Ion) - AKKUS
• Den Akku nicht verbrennen, auch wenn
• Wenn der Akkuinhalt mit der Haut in
• Der Inhalt einer geöffneten Akkuzelle
nicht gebraucht wird, muss es
seitlich auf eine stabile Fläche gelegt
werden, wo es kein Stolperrisiko
darstellt und nicht herunterfallen
kann. Manche Werkzeuge mit großen
Akkus können aufrecht auf dem
Akku stehen, aber leicht umgestoßen
werden.
er stark beschädigt oder vollkommen
verschlissen ist. Der Akku kann im Feuer
explodieren. Beim Verbrennen eines
Lithiumionen-Akkus entstehen giftige Dämpfe
und Stoffe.
Kontakt kommt, waschen Sie die Stelle
sofort mit einer milden Seife und Wasser.
Wenn Akkuflüssigkeit in die Augen gelangt,
spülen Sie das offene Auge für 15 Minuten,
oder bis die Reizung nachlässt, mit Wasser.
Falls Sie sich in ärztliche Behandlung begeben
müssen: Das Akkuelektrolyt besteht aus einer
Mischung von organischen Karbonaten und
Lithiumsalzen.
kann Atemwegsreizungen verursachen.
Sorgen Sie für Frischluft. Wenn die Symptome
anhalten, begeben Sie sich in ärztliche
Behandlung.
WARNUNG: Verbrennungsgefahr. Die
Akkuflüssigkeit kann brennbar sein,
wenn sie Funken oder einer Flamme
ausgesetzt ist.
Akku
AKKUTYP
Für die Modelle BF33 und BF33-2 wird ein 18 Volt
Akku eingesetzt.
Die Akkus B-CB182 können verwendet
werden. Weitere Informationen finden Sie unter
Technische Daten.
Ladegeräts aufbewahrt werden, um optimale
Ergebnisse zu erhalten.
HINWEIS: Akkus sollten nicht vollständig entladen
aufbewahrt werden. Der Akku muss vor der
Verwendung aufgeladen werden.
Schilder am Ladegerät und Akku
Zusätzlich zu den in dieser Betriebsanleitung
verwendeten Bildzeichen befinden sich die
folgenden Bildzeichen auf dem Ladegerät und dem
Akku:
Vor der Verwendung die
Betriebsanleitung lesen.
Akku wird geladen.
Akku ist geladen.
Temperaturverzögerung.
Problem mit Akku oder Ladegerät.
x
Problem mit der Stromversorgung.
Nicht mit elektrisch leitenden
Gegenständen berühren.
Beschädigte Akkus nicht aufladen.
Nur mit Bostitch Akkus verwenden.
Andere Akkutypen können bersten
und Verletzungen und Beschädigungen
verursachen.
Das Gerät keiner Nässe aussetzen.
Beschädigte Kabel sofort austauschen.
Empfehlungen für die Lagerung
1. Ein idealer Lagerplatz ist kühl und trocken und
nicht direktem Sonnenlicht sowie übermäßiger
Hitze oder Kälte ausgesetzt. Für eine optimale
Akkuleistung und Lebensdauer lagern Sie die
Akkus bei Raumtemperatur, wenn sie nicht
verwendet werden.
2. Bei längerer Aufbewahrung sollte ein
vollständig aufgeladener Akku an einem
kühlen, trockenen Ort und außerhalb des
42
Nur zwischen 4°C und 40°C aufladen.
Akku umweltgerecht entsorgen.
Den Akku nicht verbrennen.
Lädt nur Li-Ion-Akkus.
Page 45

Die Ladezeit ist den Technischen Daten
zu entnehmen.
Packungsinhalt
Die Packung enthält:
1 Nagler
1 Ladegerät
2 Akkupacks
1 Nichtmarkierungsspitze
1 Werkzeugkasten
1 Betriebsanleitung
1 Explosionszeichnung
• Prüfen Sie das Gerät, die Teile oder
Zubehörteile auf Beschädigungen, die beim
Transport entstanden sein könnten.
• Nehmen Sie sich Zeit, die Betriebsanleitung
vor Inbetriebnahme sorgfältig zu lesen.
Beschreibung (Abb. 1)
WARNUNG: Nehmen Sie niemals
Änderungen am Elektrowerkzeug
oder seinen Teilen vor. Dies könnte zu
Schäden oder Verletzungen führen.
a. Auslöseschalter
b. Sicherheitssperre für Auslöseschalter
c. Kontaktanschlag
d. Tiefeneinstellrad
e. Anzeigelampe für schwachen Akku & Stau/
Blockierung
f. Blockierungslösehebel
g. Magazin
h. Schieberriegel
i. Betriebsart-Wahlschalter (nur BF33)
j. Drehbarer Sparren-/Bandhaken
k. Zugehöriger Inbusschlüssel
l. Akkupack
m. Nichtmarkierungsspitze
VERWENDUNGSZWECK
Die Akku-Rahmennagelmaschine BF33/
BF33-2 wurde zum Einschlagen von Nägeln in
Holzwerkstücke konstruiert.
Der kabellose Streifennagler BF33 ist für die
Kontakt- und Sequenzauslösung konzipiert.
Nagler, die für die Kontakt- und Sequenzauslösung
konzipiert sind, DÜRFEN NICHT auf Gerüsten,
Treppen, Leitern oder leiterähnlichen
Konstruktionen, z.B. Dachlatten, verwendet
werden. Ausnahmen entnehmen
Sie Ihren örtlichen nationalen
Arbeitsplatzvorschriften.
Der kabellose Streifennagler BF33-2 ist
nur für die Sequenzauslösung konzipiert.
Nagler, die nur für die Sequenzauslösung
konzipiert sind, DÜRFEN auf Gerüsten,
Treppen, Leitern oder leiterähnlichen
Konstruktionen, z.B. Dachlatten,
verwendet werden.
NICHT VERWENDEN in nasser Umgebung oder
in der Nähe von entflammbaren Flüssigkeiten oder
Gasen.
Diese Akku-Nagelmaschinen sind Elektrogeräte für
den professionellen Einsatz.
LASSEN SIE NICHT ZU, dass Kinder in Kontakt
mit dem Gerät kommen. Wenn unerfahrene
Personen dieses Gerät verwenden, sind diese zu
beaufsichtigen.
• Dieses Gerät darf nicht von Personen
(einschließlich Kindern) mit eingeschränkten
physischen, sensorischen oder mentalen
Fähigkeiten oder ohne ausreichende Erfahrung
oder Kenntnisse verwendet werden, außer
wenn diese Personen von einer Person, die
für ihre Sicherheit verantwortlich ist, bei der
Verwendung des Geräts beaufsichtigt werden.
Lassen Sie nicht zu, dass Kinder mit diesem
Produkt allein gelassen werden.
DE
Elektrische Sicherheit
Der Elektromotor wurde für eine einzige
Spannung konstruiert. Überprüfen Sie immer,
ob die Spannung des Akkus der Spannung auf
dem Typenschild entspricht. Stellen Sie auch
sicher, dass die Spannung Ihres Ladegeräts der
Netzspannung entspricht.
Ihr Bostitch Ladegerät ist gemäß
EN 60335 doppelt isoliert. Es muss
deshalb nicht geerdet werden.
Wenn das Stromversorgungskabel beschädigt
ist, muss es durch ein speziell ausgestattetes
Kabel ersetzt werden, dass bei der Bostitch
Kundendienstorganisation erhältlich ist.
CH Bei Ersatz des Netzkabels achten Sie auf
Verwendung des Schweizer Netzsteckers.
Typ 11 für Klasse II
(Doppelisolierung) – Geräte
Typ 12 für Klasse I (Schutzleiter) – Geräte
Ortsveränderliche Geräte, die im Freien
CH
verwendet werden, müssen über einen
Fehlerstromschutzschalter angeschlossen
werden.
43
Page 46

Verwendung eines
Verlängerungskabels
Ein Verlängerungskabel sollte nur verwendet
werden, wenn es absolut notwendig
ist. Verwenden Sie ein zugelassenes
Verlängerungskabel, das für die
Leistungsaufnahme Ihres Ladegerätes geeignet ist
(siehe Technische Daten). Der Mindestquerschnitt
der Leitungen beträgt 1 mm² und die Höchstlänge
beträgt 30 m.
Wenn Sie eine Kabeltrommel verwenden, wickeln
Sie das Kabel vollständig ab.
ZUSAMMENBAU UND
EINSTELLUNGEN
WARNUNG: Entfernen Sie vor dem
Zusammenbauen und Einstellen
immer den Akku. Schalten Sie das
Werkzeug immer aus, bevor Sie den
Akku einsetzen oder entfernen.
WARNUNG: Verwenden Sie nur
Akkus und Ladegeräte von Bostitch.
Einsetzen und Entnahme des Akkus
aus dem Gerät (Abb. 2)
WARNUNG: Um die Gefahr
schwerer Verletzungen zu mindern,
sperren Sie das Werkzeug und
entfernen Sie den Akku oder
trennen Sie ihn vom Netz, bevor
Sie Einstellungen vornehmen
oder Anbaugeräte oder Zubehör
anbringen oder entfernen.
Ungewolltes Anlaufen kann
Verletzungen verursachen.
HINWEIS: Achten Sie darauf, dass Ihr Akkupack
(l) voll geladen ist. Die gelieferten Akkupacks sind
nicht unbedingt voll geladen.
EINSETZEN DES AKKUS IN DEN GERÄTEGRIFF
1. Richten Sie die Kerbe im Gerätegriff an dem
Akku aus (l).
2. Schieben Sie den Akku fest in den Griff, bis er
hörbar einrastet.
ENTNAHME DES AKKUS AUS DEM GERÄT
1. Drücken Sie auf den Freigabeknopf (n)
und schieben den Akkupack aus dem
Werkzeuggriff heraus.
2. Setzen Sie den Akku in das Ladegerät, wie
im Abschnitt über das Ladegerät in dieser
Betriebsanleitung beschrieben.
AKKU-LADESTANDSANZEIGE (ABB. 2, 2A)
Einige Bostitch-Akkus besitzen eine
Ladestandsanzeige mit drei grünen LEDs, die den
verbleibenden Ladestand des Akkus anzeigen.
Zum Betätigen der Ladestandsanzeige halten Sie
die Taste für die Ladestandsanzeige (o) gedrückt.
Eine Kombination der drei grünen LEDs leuchtet
auf und zeigt den verbleibenden Ladestand an.
Wenn der verbleibende Ladestand im Akku nicht
mehr ausreicht, um das Werkzeug zu verwenden,
leuchtet die Ladestandsanzeige nicht auf und der
Akku muss aufgeladen werden.
HINWEIS: Die Ladestandsanzeige ist nur eine
Schätzung des verbleibenden Akku-Ladestands.
Sie zeigt nicht die Funktionsfähigkeit des
Werkzeugs an und unterliegt Unterschieden, die
auf Bauteilen, Temperatur und Anwendungsart des
Endbenutzers basieren.
HINWEIS: Lagern Sie das Werkzeug
nicht mit eingelegtem Akkupack.
Damit der Akkupack nicht beschädigt
wird und beste Akkulebensdauer
erreicht wird, lagern Sie die Akkupacks
außerhalb des Werkzeugs oder
Ladegeräts an einer kühlen, trockenen
Stelle.
Drehbarer Sparren-/Bandhaken
(Abb. 6)
Der Sparren-/Bandhaken (j) kann leicht auf die
linke oder rechte Seite des Werkzeugs positioniert
werden, um links- oder rechtshändigen Benutzern
entgegenzukommen.
Wenn überhaupt kein Haken benutzt wird, kann
er am Unterteil des Griffs nach vorn oder hinten
gedreht werden.
Laden des Werkzeugs (Abb. 4)
WARNUNG: Sperren Sie das
Werkzeug immer und entfernen
Sie den Akku, bevor Sie
Befestigungsmittel einlegen oder
entfernen.
1. Schieben Sie den federbelasteten
Schieberiegel (h) zum Unterteil des Magazins,
damit er dort einrastet.
2. Wählen Sie den gewünschten Nagelstreifen.
(Siehe Technische Daten.) Bostitch empfiehlt
für alle Anwendungsfälle den Einsatz von
Bostitch First Fix Nails.
44
Page 47

WARNUNG: Da Zubehör, das nicht
von Bostitch angeboten wird, nicht
mit diesem Produkt geprüft worden
ist, kann die Verwendung von solchem
Zubehör an diesem Gerät gefährlich
sein. Um das Verletzungsrisiko zu
mindern, sollte mit diesem Produkt
nur von Bostitch empfohlenes Zubehör
verwendet werden.
3. Stecken Sie den Nagelstreifen in den
Ladeschlitz an der Seite des Magazins. Achten
Sie darauf, dass die Befestigungsmittel auf
ihren Spitzen durch den Nagelkanal gleiten.
4. Schließen Sie das Magazin, indem Sie den
Schieberiegel loslassen. Lassen Sie den
Schieberiegel sich vorsichtig nach vorn
schieben und die Nagelstange ergreifen.
Trockentrainingssperre
Die Nagelmaschine ist mit einer
Trockentrainingssperre ausgestattet, mit der
eingeschränkt wird, dass das Werkzeug betätigt
wird, wenn das Magazin nahezu leer ist. Wenn
etwa 7 bis 9 Nägel im Magazin bleiben, wird die
Trockentrainingssperre des Werkzeugs aktiviert.
Siehe Laden des Werkzeugs, um eine Stange
passender Nägel neu zu laden.
HINWEIS: Wenn auf das Werkzeug starke
Kräfte aufgewendet werden, kann die Sperre
überwunden werden. Hierdurch werden
mögliche Schäden vermieden, falls das Werkzeug
herunterfällt.
Einstellen der Einschlagtiefe
(Abb. 5)
Die Nageleinschlagtiefe kann mit dem
Tiefeneinstellrad eingestellt werden.
1. Um den Nagel flacher einzuschlagen, drehen
Sie das Tiefeneinstellrad (d) nach links zum
Flach-Nagel-Symbol.
2. Um den Nagel tiefer zu versenken, drehen
Sie das Tiefeneinstellrad (d) nach rechts zum
Tiefer-Nagel-Symbol.
Wahl der Betriebsart (Abb. 1)
NUR BF33
Um den sequentiellen Modus auszuwählen,
schieben Sie den Betriebsartwahlschalter (i), um
das Einzel-Nagel-Symbol ( ) anzuzeigen.
Um den Einzelstoßmodus auszuwählen, schieben
Sie den Betriebsartwahlschalter (i), um das DreiNagel-Symbol ( ) anzuzeigen.
HINWEIS: Beim Eintreiben langer
Nägel wird die maximale Kraft im
Sequenzmodus erreicht; daher sollte
der Stoßmodus eingeschränkt werden,
wenn längere Nägel eingetrieben
werden sollen.
BETRIEB
DE
Betriebsanweisungen
WARNUNG: Beachten Sie immer
WARNUNG: Um die Gefahr
die Sicherheitsanweisungen und die
geltenden Vorschriften. Es können
lokale Arbeitsplatzvorschriften gelten,
die die Verwendung des Stoßmodus
für bestimmten Anwendungen
untersagen.
ernsthafter Verletzungen zu
reduzieren, muss vor jeder
Einstellung und jedem Abnehmen/
Installieren von Zubehör das
Werkzeug ausgeschaltet und
der Akku entfernt werden. Ein
unbeabsichtigtes Starten kann zu
Verletzungen führen.
Richtige Haltung der Hände (Abb. 7)
WARNUNG: Um die Gefahr schwerer
WARNUNG: Um die Gefahr schwerer
Bei der korrekten Handposition liegt eine Hand wie
abgebildet auf dem Hauptgriff (p).
Verletzungen zu mindern, beachten
Sie IMMER die richtige Haltung der
Hände, wie dargestellt.
Verletzungen zu mindern, halten Sie
das Gerät IMMER sicher fest und
seien Sie auf eine plötzliche Reaktion
gefasst.
Vorbereiten des Werkzeugs (Abb. 1)
1. Entfernen Sie den Akku (l) aus dem Werkzeug
und überprüfen Sie, ob das Werkzeug gesperrt
wurde.
2. Entfernen Sie alle Nägel aus dem Magazin (g).
3. Überprüfen Sie die unbehinderte Bewegung
des Kontaktanschlags (c).
4. Füllen Sie Nägel im Magazin nach.
5. Stecken Sie den Akku wieder hinein.
WARNUNG: Verwenden Sie
das Werkzeug nicht, wenn sich
der Kontaktanschlag oder der
Nagelschieber nicht ungehindert
bewegen können.
45
Page 48

HINWEIS: Verwenden
Sie NIEMALS
Schmierstoffe oder
Reinigungslösungen als
Spray oder in sonstiger
Form im Inneren des
Werkzeugs. Dies kann die
Lebensdauer und Leistung des
Werkzeugs erheblich beeinträchtigen.
Auslösen des Werkzeugs (Abb. 1)
Dieses Werkzeug lässt sich in zwei Betriebsarten
benutzen: Einzel- oder Dauerauslösung.
EINZELAUSLÖSUNG
Der Einzelauslösemodus wird für das Nageln mit
Unterbrechungen verwendet, bei dem ein sehr
vorsichtiges und genaues Platzieren gewünscht
wird. Er bietet auch die maximale Kraft beim
Eintreiben der längsten Nagelsorten.
1. Benutzen Sie den Wahlschalter (i), um die
Einzelauslösung ( ) zu wählen.
2. Lösen Sie die Auslösersicherheitssperre (b).
3. Drücken Sie den Kontaktanschlag gegen die
Arbeitsfläche.
4. Ziehen Sie den Auslöser (a), um das Werkzeug
auszulösen.
5. Lösen Sie den Auslöser und heben die
Nagelmaschine von der Arbeitsfläche.
6. Wiederholen Sie die Schritte 3-5, um den
nächsten Nagel auszulösen.
EINZELSTOSSMODUS (NUR BF33)
Der Stoßmodus ist für das schnelle Nageln auf
flachen, unbeweglichen Flächen vorgesehen
und am effektivsten, um kürzere Nagelsorten
einzutreiben.
1. Benutzen Sie den Wahlschalter (i), um die
Dauerauslösung ( ) zu wählen.
2. Lösen Sie die Auslösersicherheitssperre (b).
3. Um einen einzelnen Nagel einzuschlagen,
bedienen Sie das Werkzeug auf die gleiche Art
und Weise wie beim Einzelauslösemodus.
a. Drücken Sie den Kontaktanschlag (c) gegen
die Arbeitsfläche.
b. Ziehen Sie den Auslöser (a), um das
Werkzeug auszulösen. Jedes Mal, wenn
bei gegen die Arbeitsfläche gedrücktem
Kontaktanschlag der Auslöser betätigt wird,
wird ein Nagel eingeschlagen.
4. Um mehrere Nägel einzuschlagen, halten Sie
den Auslöser (a) gedrückt und drücken Sie
den Kontaktanschlag (c) wiederholt gegen die
Arbeitsfläche.
5. Wenn zwischen den Betriebsarten
WARNUNG: Halten Sie den Auslöser
nicht gedrückt, wenn das Werkzeug
nicht verwendet wird. Lassen Sie
die Auslösersicherheitssperre (b)
in der verriegelten Position, um
eine unbeabsichtigte Betätigung zu
verhindern, wenn das Werkzeug nicht
benutzt wird.
Sequentiell und Einzelstoß gewechselt wird,
kann es notwendig sein, die Einschlagtiefe
einzustellen. Siehe Einstellen der
Einschlagtiefe zu Anweisungen.
Benutzung der Auslösersperre
(Abb.3)
Alle Bostitch Nagelmaschinen sind mit einer
Auslösersperre (b) ausgestattet, die beim
Verschieben nach rechts (siehe Abb. 3) verhindert,
dass ein Nagel abgefeuert wird, indem der
Auslöser gesperrt wird und der Strom zum Motor
umgeleitet wird.
Wenn die Auslösersperre nach links gedrückt
wird, ist das Werkzeug voll funktionsfähig. Die
Auslösersperre sollte immer verriegelt sein (siehe,
wenn irgendwelche Einstellungen vorgenommen
werden oder das Werkzeug nicht direkt benutzt
wird.
Nichtmarkierungsspitze (Abb. 1)
Wenn Sie dieses Werkzeug auf Materialien
benutzen, die Sie nicht markieren möchten,
wie Holzverkleidung, benutzen Sie die
Nichtmarkierungsspitze aus Kunststoff (m) über
dem Kontaktanschlag (c).
LED-Anzeiger (Abb. 1)
Ihre Nagelmaschine ist mit zwei LEDAnzeigelampen (e) ausgestattet, die sich auf der
Rückseite des Werkzeugs direkt unterhalb der
hinteren Kappe befinden. Siehe auch Fehlersuche
zu weiteren Anweisungen.
SCHWACHER AKKU
Ersetzen Sie den Akku
durch einen geladenen
Akkupack.
HEISSER AKKUPACK
Lassen Sie den Akkupack
abkühlen, oder ersetzen
Sie ihn durch einen kühlen
Akkupack.
46
Page 49

STAU/BLOCKIERUNG
Drehen Sie den
Blockierungslösehebel,
um den Mechanismus
freizugeben. Siehe
Blockierung lösen.
HEISSES WERKZEUG
Lassen Sie das Werkzeug
abkühlen, bevor Sie
weitermachen.
Blockierung lösen (Abb. 1, 3)
Wenn die Nagelmaschine unter schweren
Bedingungen benutzt wird, in denen alle
vorhandene Energie im Motor benötigt wird, um
einen Nagel einzuschlagen, kann das Werkzeug
abgewürgt werden. Die Einschlagklinge hat
den Einschlagzyklus nicht beendet, und der
Anzeiger für Stau/Blockierung (e) blinkt. Drehen
Sie den Blockierungslösehebel (f) am Werkzeug,
und der Mechanismus wird freigegeben.
Wenn die Einschlagklinge nicht automatisch in
die Ausgangsstellung zurückkehrt, fahren Sie
mit Beseitigen eines klemmenden Nagels
fort. Wenn das Gerät immer noch blockiert,
untersuchen Sie bitte die Moduseinstellung, das
Material und die Nagellänge, um sicher zu sein,
dass die Anwendung nicht zu schwer ist.
Beseitigen eines klemmenden
Nagels (Abb. 1, 3)
Wenn ein Nagel im Mundstück eingeklemmt wird,
leuchtet die Anzeigelampe für
Stau/Blockierung (e) auf.
1. Nehmen Sie den Akkupack aus dem
Werkzeug heraus und kuppeln die
Auslösersicherheitssperre (b) ein.
2. Schieben Sie den federbelasteten
Schieberiegel (h) zum Unterteil des Magazins,
damit er dort einrastet, und entladen die
Nagelstange.
3. Lösen Sie mit dem mitgelieferten
Inbusschlüssel (k) die beiden
Sechskantschrauben (q) am Oberteil des
Magazins.
4. Drehen Sie das Magazin (g) vorwärts.
5. Entfernen Sie den klemmenden/vorbogenen
Nagel gegebenenfalls mit einer Zange.
6. Wenn die Einschlagklinge in der
unteren Position ist, drehen Sie den
Blockierungslösehebel (f) am Oberteil der
Nagelmaschine.
HINWEIS: Wenn die Einschlagklinge
nach dem Drehen des
Blockierungslösehebels nicht
zurückgesetzt wird, kann das
manuelle Rücksetzen der Klinge
mit einem langen Schraubendreher
nötig sein.
7. Drehen Sie das Magazin
zurück in die Position unter
der Nase des Werkzeugs und ziehen die
Sechskantschrauben (q) fest.
8. Wiedereinsetzen des Akkupacks.
HINWEIS: Das Werkzeug deaktiviert sich
selbst und setzt sich nicht zurück, bevor der
Akkupack herausgenommen und wieder
eingesetzt worden ist.
9. Legen Sie Nägel wieder ins Magazin ein
(siehe Laden des Werkzeugs).
10. Lösen Sie den Schieberiegel (h).
11. Kuppeln Sie die Auslösersicherheitssperre (b)
aus, wenn Sie bereit sind, weiter zu nageln.
Wenn Nägel häufig im Mundstück stecken
bleiben, muss das Werkzeug von einer
autorisierten Bostitch-Werkstatt repariert
werden.
WARTUNG
Ihr Bostitch Elektrowerkzeug wurde für
langfristigen Betrieb mit minimalem
Wartungsaufwand konstruiert. Ein kontinuierlicher,
zufriedenstellender Betrieb hängt von der
geeigneten Pflege des Elektrowerkzeugs und
seiner regelmäßiger Reinigung ab.
WARNUNG: Um die Gefahr
ernsthafter Verletzungen zu
reduzieren, muss vor jeder
Einstellung und jedem Abnehmen/
Installieren von Zubehör das
Werkzeug ausgeschaltet und
der Akku entfernt werden. Ein
unbeabsichtigtes Starten kann zu
Verletzungen führen.
Das Ladegerät und der Akku können nicht
gewartet werden. Es gibt im Inneren keine vom
Benutzer zu wartenden Teile.
Schmierung
Ihr Elektrogerät benötigt keine zusätzliche
Schmierung.
DE
47
Page 50

HINWEIS: Sprühen
Sie NIE Schmiermittel
oder Reinigungslösungen
in das Innere des
Werkzeugs oder tragen
diese auf irgendeine
andere Weise auf. Das kann die
Lebensdauer und Leistung des
Werkzeugs ernsthaft beeinträchtigen.
Reinigung
WARNUNG: Blasen Sie mit Trockenluft
REINIGUNGSANWEISUNGEN FÜR LADEGERÄTE
WARNUNG: Gefahr eines elektrischen
immer dann Schmutz und Staub
aus dem Hauptgehäuse, wenn sich
Schmutz sichtbar in und um die
Lüftungsschlitze ansammelt. Tragen
Sie bei diesen Arbeiten zugelassenen
Augenschutz und eine zugelassene
Staubmaske.
WARNUNG: Verwenden Sie niemals
Lösungsmittel oder andere scharfe
Chemikalien für die Reinigung der
nicht-metallischen Teile des Gerätes.
Diese Chemikalien können das in
diesen Teilen verwendete Material
aufweichen. Verwenden Sie ein nur
mit Wasser und einer milden Seife
befeuchtetes Tuch. Achten Sie darauf,
dass niemals Flüssigkeiten in das
Gerät eindringen. Tauchen Sie niemals
irgendein Teil des Gerätes in eine
Flüssigkeit.
Schlages. Trennen Sie das Ladegerät
von der Wechselstromsteckdose,
bevor Sie es reinigen. Schmutz und
Fett an der Außenseite des Ladegeräts
können mit einem Tuch oder einer
weichen, nicht-metallischen Bürste
entfernt werden. Verwenden Sie kein
Wasser oder Reinigungslösungen.
Fragen Sie Ihren Händler nach weiteren
Informationen zu geeignetem Zubehör.
Umweltschutz
Abfalltrennung. Dieses Produkt darf
nicht mit normalem Haushaltsabfall
entsorgt werden.
Wenn Sie eines Tages feststellen, dass Ihr
Bostitch-Produkt ersetzt werden muss oder Sie es
nicht mehr benötigen, entsorgen Sie es nicht mit
dem normalen Haushaltsabfall. Führen Sie dieses
Produkt der Abfalltrennung zu.
Die separate Entsorgung von
Gebrauchtprodukten und Verpackungen
ermöglicht das Recycling und die
Wiederverwendung der Stoffe. Die
Wiederverwendung von
Recyclingstoffen hilft,
Umweltverschmutzung zu vermeiden
und mindert die Nachfrage nach
Rohstoffen.
Lokale Vorschriften regeln möglicherweise die
getrennte Entsorgung von Elektroprodukten
und Haushaltsabfall an kommunalen
Entsorgungsstellen oder beim Einzelhändler, wenn
Sie ein neues Produkt kaufen.
Bostitch stellt Möglichkeiten für die Sammlung
und das Recycling von Bostitch-Produkten nach
Ablauf des Nutzungszeitraums zur Verfügung.
Um diesen Service zu nutzen, bringen Sie bitte
Ihr Produkt zu einer beliebigen autorisierten
Kundendienstwerkstatt, die es in unserem Auftrag
sammeln.
Die nächstgelegene autorisierte
Kundendienststelle erfahren Sie bei Ihrem
örtlichen Bostitch-Geschäftsstelle unter der in
dieser Betriebsanleitung angegebenen Adresse.
Alternativ erhalten Sie eine Liste der autorisierten
Bostitch-Kundendienstwerkstätten und vollständige
Informationen über unseren Kundendienst im
Internet unter: www.2helpU.com.
Optionales Zubehör
WARNUNG: Da Zubehör, das nicht
von Bostitch angeboten wird, nicht
mit diesem Produkt geprüft worden
ist, kann die Verwendung von solchem
Zubehör an diesem Gerät gefährlich
sein. Um das Verletzungsrisiko zu
mindern, sollte mit diesem Produkt
nur von Bostitch empfohlenes Zubehör
verwendet werden.
48
Aufl adbarer Akku
Dieser Akku mit langer Lebensdauer muss
wieder aufgeladen werden, wenn er nicht mehr
ausreichend Energie bei Arbeiten liefert, die vorher
problemlos durchgeführt werden konnten. Am
Ende seiner technischen Lebensdauer entsorgen
Sie ihn bitte umweltgerecht.
Page 51

• Lassen Sie den Akku sich vollständig entladen
und entfernen Sie ihn dann vom Werkzeug.
• Lithiumionen-, NiCd- und NiMH-Zellen sind
recyclingfähig. Bringen Sie sie zu Ihrem
Händler oder zu einer Recycling-Sammelstelle
am Ort. Die gesammelten Akkus werden
recycelt oder ordnungsgemäß entsorgt.
DE
49
Page 52

ANLEITUNG ZUR FEHLERSUCHE
VIELE GEWÖHNLICHE PROBLEME KÖNNEN LEICHT MITHILFE DER TABELLE UNTEN
GELÖST WERDEN.
Bei schwereren oder dauerhaften Problemen wenden Sie sich an Ihre nächste BostitchReparaturwerkstatt oder an Ihr Bostitch-Büro unter der in diesem Handbuch aufgeführten
Adresse.
WARNUNG: Um die Gefahr schwerer Personenverletzung zu verringern, trennen
SYMPTOM URSACHE BESETIGUNG
Motor läuft nicht,
wenn Auslöser
gedrückt ist
Motor läuft
nicht, wenn
Kontaktanschlag
gedrückt ist
Sie den Akkupack vor allen Reparaturen IMMER vom Werkzeug.
Auslösersperre in verriegelter
Position
Werkzeug wurde abgewürgt,
Motor kann sich nicht drehen
Werkzeug befindet
sich im sequentiellen
Betätigungsmodus
Die interne Elektronik des
Werkzeugs muss zurückgesetzt
werden
Motor hört nach 5 Sekunden
auf zu laufen
Klemmen sind schmutzig oder
beschädigt
Beschädigte innere Elektronik Siehe autorisierte Bostitch Reparaturwerkstatt.
Beschädigter Auslöser Siehe autorisierte Bostitch Reparaturwerkstatt.
Akku ist heiß Lassen Sie den Akkupack abkühlen oder ersetzen Sie
Werkzeug ist heiß Lassen Sie das Werkzeug abkühlen, bevor Sie
Auslösersperre in verriegelter
Position
Trockentrainingssperre
eingekuppelt, Kontaktanschlag
kann nicht voll fahren
Werkzeug wurde abgewürgt,
Motor kann sich nicht drehen
Kontaktanschlag verbogen Siehe autorisierte Bostitch Reparaturwerkstatt.
Motor hört nach 5 Sekunden
auf zu laufen
Klemmen sind schmutzig oder
beschädigt
Beschädigte innere Elektronik Siehe autorisierte Bostitch Reparaturwerkstatt.
Beschädigter Auslöser Siehe autorisierte Bostitch Reparaturwerkstatt.
Akku ist heiß Lassen Sie den Akkupack abkühlen oder ersetzen Sie
Werkzeug ist heiß Lassen Sie das Werkzeug abkühlen, bevor Sie
Auslösersperre entriegeln.
Drehen Sie den Blockierungslösehebel am Werkzeug,
und der Mechanismus wird freigegeben. Wenn die
Einschlagklinge nicht zurückkehrt, nehmen Sie den
Akku heraus und drücken die Einschlagklinge zurück
in die Ausgangsposition.
Drücken Sie zuerst den Kontaktanschlag, bevor
Sie den Nagel abfeuern, oder schalten Sie in den
Einzelstoßmodus um (nur BF33).
Nehmen Sie den Akku heraus, warten 3 Sekunden
und setzen ihn wieder ein.
Normaler Betrieb, Auslöser lösen und noch einmal
drücken.
Siehe autorisierte Bostitch Reparaturwerkstatt.
ihn durch einen kühlen Akkupack.
weitermachen.
Auslösersperre entriegeln.
Mehr Nägel ins Magazin laden.
Drehen Sie den Blockierungslösehebel am Werkzeug,
und der Mechanismus wird freigegeben. Wenn die
Einschlagklinge nicht zurückkehrt, nehmen Sie den
Akku heraus und drücken die Einschlagklinge zurück
in die Ausgangsposition.
Normaler Betrieb, Kontaktanschlag lösen und noch
einmal drücken.
Siehe autorisierte Bostitch Reparaturwerkstatt.
ihn durch einen kühlen Akkupack.
weitermachen.
50
Page 53

ANLEITUNG ZUR FEHLERSUCHE (forts.)
SYMPTOM URSACHE BESETIGUNG
Werkzeug kann
nicht betätigt
werden (Motor
läuft, aber feuert
nicht ab).
Motor läuft an,
aber erzeugt viel
Lärm
Die
Einschlagklinge
sitzt weiterhin
in der unteren
Position fest
Werkzeug
funktioniert, aber
schlägt die Nägel
nicht vollständig
ein
Trockentrainingssperre
eingekuppelt, Kontaktanschlag
kann nicht voll fahren
Schwacher oder beschädigter
Akku
Klemmendes Nagel-/
Einschlagblatt kehrt nicht in die
Ausgangsstellung zurück
Beschädigte Einschlag-/
Rückkehrbaugruppe
Klemmender innerer
Mechanismus
Beschädigte innere Elektronik Siehe autorisierte Bostitch Reparaturwerkstatt.
Klemmender Nagel und
Einschlagklinge sitzt in der
unteren Position fest
Beschädigte Einschlag-/
Rückkehrbaugruppe
Klemmender Nagel und
Einschlagklinge sitzt in der
unteren Position fest
Beschädigte Einschlag-/
Rückkehrbaugruppe
Material und Nagellänge Wenn das Werkzeug weiter blockiert wird (der
Trümmer im Mundstück Reinigen Sie den Mundbereich, und suchen Sie
Tiefe ist zu gering eingestellt
worden
Werkzeug nicht fest auf
Werkstück aufgelegt
Stoßmodus wurde mit langen
Nägeln gewählt (nur BF33)
Material und Nagellänge Wenn das Werkzeug weiter blockiert wird (der
Beschädigte oder verschlissene
Einschlagklingenspitze
Werkzeug mit
Nichtmarkierungsspitze
verwendet
Beschädigter
Betätigungsmechanismus
Nägel ins Magazin laden.
Überprüfen Sie den Ladestand, wenn der Akkupack
den Ladestand anzeigt. Wenn nötig, laden oder
wechseln Sie den Akkupack.
Nehmen Sie den Akku heraus, beseitigen
Sie den klemmenden Nagel, bringen Sie den
Blockierungslösehebel an den Anfangspunkt zurück
(wenn nötig, drücken Sie die Einschlagklinge manuell
nach oben), legen Sie den Akkupack wieder ein.
Wechseln Sie die Einschlag-/Rückkehrbaugruppe
Siehe autorisierte Bostitch Reparaturwerkstatt.
Siehe autorisierte Bostitch Reparaturwerkstatt.
Benutzen Sie den Blockierungslösehebel, beseitigen
Sie alle klemmenden Nägel, und führen Sie die
Einschlagklinge manuell zurück, wenn nötig.
Wechseln Sie die Einschlag-/Rückkehrbaugruppe
Siehe autorisierte Bostitch Reparaturwerkstatt.
Benutzen Sie den Blockierungslösehebel, beseitigen
Sie alle klemmenden Nägel, und führen Sie die
Einschlagklinge manuell zurück, wenn nötig.
Wechseln Sie die Einschlag-/Rückkehrbaugruppe
Siehe autorisierte Bostitch Reparaturwerkstatt.
Blockierungslösehebel gedreht werden muss),
wählen Sie das geeignete Material und die geeignete
Nagellänge, die für eine Anwendung nicht zu schwer
sind.
genau nach kleinen Teilen zerbrochener Nägel, die in
der Führung stecken geblieben sind.
Drehen Sie die Tiefeneinstellung auf tiefer ein.
Drücken Sie ausreichend stark auf das Werkzeug,
indem Sie es fest am Werkstück sichern. Siehe
Anweisungshandbuch.
Sequenzmodus wählen.
Blockierungslösehebel gedreht werden muss),
wählen Sie das geeignete Material und die geeignete
Nagellänge, die für eine Anwendung nicht zu schwer
sind.
Wechseln Sie die Einschlag-/Rückkehrbaugruppe
Siehe autorisierte Bostitch Reparaturwerkstatt.
Nichtmarkierungsspitze entfernen.
Siehe autorisierte Bostitch Reparaturwerkstatt.
DE
51
Page 54

ANLEITUNG ZUR FEHLERSUCHE (forts.)
SYMPTOM URSACHE BESETIGUNG
Werkzeug
funktioniert,
aber es wird
kein Nagel
eingeschlagen
Klemmender
Nagel
Keine Nägel im Magazin Laden Sie Nägel ins Magazin.
Falsche Größe oder
Winkelnägel
Trümmer im Mundstück Reinigen Sie den Mundbereich, und suchen Sie
Trümmer im Mundstück Reinigen Sie das Magazin.
Verschlissenes Magazin Wechseln Sie das Magazin. Siehe autorisierte
Beschädigte oder verschlissene
Einschlagklinge
Beschädigte Drückerfeder Wechseln Sie die Feder. Siehe autorisiertes
Falsche Größe oder
Winkelnägel
Die Schrauben im Magazin sind
nach der vorangegangenen
Staubeseitigung/Inspektion
nicht gesichert
Beschädigte oder verschlissene
Einschlagklinge
Material und Nagellänge Wenn das Werkzeug weiter blockiert wird (der
Trümmer im Mundstück Reinigen Sie den Mundbereich, und suchen Sie
Verschlissenes Magazin Wechseln Sie das Magazin. Siehe autorisierte
Beschädigte Drückerfeder Wechseln Sie die Feder. Siehe autorisierte Bostitch
Trockentrainingssperre wurde
aufgrund von nur noch 7-9
Nägeln im Magazin aktiviert
und der Benutzer wendet
übermäßige Kraft auf die
Kontaktspitze an, wodurch die
Sperre überwunden wird
Benutzen Sie nur die empfohlenen Nägel. Siehe
Technische Daten.
genau nach kleinen Teilen zerbrochener Nägel, die in
der Führung stecken geblieben sind.
Bostitch Reparaturwerkstatt.
Wechseln Sie die Einschlagklinge. Siehe autorisierte
Bostitch Reparaturwerkstatt.
Servicezentrum.
Benutzen Sie nur die empfohlenen Nägel. Siehe
Technische Daten.
Überzeugen Sie sich davon, dass die
Sechskantschrauben im Magazin mit dem
mitgelieferten Schraubenschlüssel festgezogen sind.
Wechseln Sie die Einschlagklinge. Siehe autorisierte
Bostitch Reparaturwerkstatt.
Blockierungslösehebel gedreht werden muss),
wählen Sie das geeignete Material und die geeignete
Nagellänge, die für eine Anwendung nicht zu schwer
sind.
genau nach kleinen Teilen zerbrochener Nägel, die in
der Führung stecken geblieben sind.
Bostitch Reparaturwerkstatt.
Reparaturwerkstatt.
Mehr Nägel in das Magazin laden, um die
Trockentrainingssperre zu deaktivieren.
52
Page 55

SNOERLOOS SPIJKERAPPARAAT 18V LI-ION
BF33, BF33-2
Hartelijk Gefeliciteerd!
Bostitch-gereedschap is gebouwd volgens
strikte specificaties en ontworpen voor het snel
uitvoeren van omvangrijk bevestigingswerk.
Het gereedschap doet efficiënt en betrouwbaar
dienst, wanneer het op juiste wijze en zorgvuldig
wordt gebruikt. Zoals bij ieder goed stuk
gereedschap worden de beste resultaten bereikt
wanneer de instructies van de fabrikant worden
opgevolgd. Neem contact op met uw Bostitchvertegenwoordiger of -distributeur als u vragen
mocht hebben over het gereedschap of het
gebruik ervan.
Technische Gegevens
BF33 BF33-2
Voltage V
Type 1 1
Aandrijfmodus Sequentieel/ Sequentieel/
Snelvuur Alleen
Magazijnhoek 33° 33°
Spijkers
lengte 50–90 50–90
diameter schacht mm 2,8–3,3 2,8–3,3
hoek 30–34° 30–34°
kopgeometrie afgekort of afgekort of
rond rond
afgewerkt afgewerkt
collatietype paper paper
Gewicht (zonder accuset) kg 3,53 3,53
Aandrijfenergie J 105 105
LPA (geluidsdruk) dB(A) 84 84
KPA (onzekerheidsfactor
geluidsdruk) dB(A) 3 3
LWA (akoestisch vermogen) dB(A) 95 95
KWA (onzekerheid akoestisch
vermogen) dB(A) 3 3
Vibratie totaalwaarden (triax vectorsom) vastgesteld in
overeenstemming met EN 60745:
Vibratie-emissiewaarde a
ah = m/s2 3,8 3,8
Onzekerheid K = m/s2 1,5 1,5
Het vibratie-emissieniveau dat in dit informatieblad
wordt gegeven, is gemeten in overeenstemming
met een gestandaardiseerde test volgens
DC
h
18 18
EN60745 en kan worden gebruikt
om het ene gereedschap met het
andere te vergelijken. Het kan worden
gebruikt voor een eerste inschatting van
blootstelling.
Een inschatting van het
Stel aanvullende
Batteripakke B-CB182
Accutype Li-Ion
Voltage V
Vermogen Ah 4,0
Gewicht kg 0,61
Lader B-CB105
Netspanning VAC 230
Accutype Li-Ion
Geschatte oplaadtijd min 70
(4,0 Ah packs)
Gewicht kg 0,49
Zekeringen
Europa 230 V gereedschappen 10 Ampère, hoofdstroom
WAARSCHUWING: Het
verklaarde vibratie-emissieniveau
geldt voor de hoofdtoepassingen
van het gereedschap. Als het
gereedschap echter voor andere
toepassingen wordt gebruikt, dan
wel met andere accessoires of slecht
wordt onderhouden, kan de vibratieemissie verschillen. Dit kan het
blootstellingniveau aanzienlijk verhogen
gedurende de totale arbeidsduur.
blootstellingniveau aan vibratie dient
ook te worden overwogen wanneer
het gereedschap wordt uitgeschakeld
of als het aan staat maar geen
daadwerkelijke werkzaamheden
uitvoert. Dit kan het blootstellingniveau
aanzienlijk verminderen gedurende de
totale arbeidsduur.
veiligheidsmaatregelen op om de
operator te beschermen tegen de
effecten van vibratie, zoals: onderhoud
het gereedschap en de accessoires,
houd de handen warm, organisatie van
werkpatronen.
DC
18
NL
53
Page 56

Defi nities: Veiligheidsrichtlijnen
De onderstaande definities beschrijven het
veiligheidsniveau voor ieder signaleringswoord.
Lees de gebruiksaanwijzing a.u.b. zorgvuldig door
en let op deze symbolen.
GEVAAR: Geeft een dreigend
gevaar aan dat, indien dit niet wordt
voorkomen, leidt tot de dood of
ernstig letsel.
WAARSCHUWING: Geeft een
mogelijk gevaar aan dat, indien dit niet
wordt voorkomen, kan leiden tot de
dood of ernstig letsel.
VOORZICHTIG: Geeft een mogelijk
gevaarlijke situatie aan die, indien dit
niet wordt voorkomen, zou kunnen
leiden tot gering of matig letsel.
OPMERKING: Geeft een handeling
aan waarbij geen persoonlijk letsel
optreedt die, indien niet voorkomen,
schade aan goederen kan
veroorzaken.
Wijst op het gevaar voor elektrische
schok.
Wijst op brandgevaar.
EG verklaring van overeenstemming
RICHTLIJN VOOR MACHINES
BF33, BF33-2
Bostitch verklaart dat deze producten zoals
beschreven onder Technische gegevens in
overeenstemming zijn met:
2006/42/EG, EN 60745-1, EN 60745-2-16.
Deze producten voldoen ook aan Richtlijn
2004/108/EG en 2011/65/EU. Neem voor meer
informatie contact op met Bostitch via het
volgende adres.
De ondergetekende is verantwoordelijk voor de
samenstelling van het technische bestand en legt
deze verklaring af namens Bostitch.
Colin Earl
Managing Director
Europa, Midden-Oosten & Afrika
54
Stanley Black & Decker bvba
Kanaalweg 112 IZ Ravenshout zone 3
3980 Tessenderlo, België
28.06.2013
WAARSCHUWING: Lees de
instructiehandleiding om het risico op
letsel te verminderen.
Algemene
veiligheidswaarschuwingen voor
elektrisch gereedschap
WAARSCHUWING! Lees alle
De term „elektrisch gereedschap“ in de
waarschuwingen verwijst naar uw (met een
snoer) op de netspanning aangesloten elektrische
gereedschap of naar (draadloos) elektrisch
gereedschap met een accu.
1) VEILIGHEID WERKPLAATS
a) Houd het werkgebied schoon en goed
b) Bedien elektrische gereedschappen niet
c) Houd kinderen en omstanders op
2) ELEKTRISCHE VEILIGHEID
a) Stekkers van elektrisch gereedschap
b) Vermijd lichamelijk contact met geaarde
veiligheidswaarschuwingen en alle
instructies. Het niet opvolgen van de
waarschuwingen en instructies kan
leiden tot een elektrische schok, brand
en/of ernstig persoonlijk letsel.
BEWAAR ALLE WAARSCHUWINGEN
EN INSTRUCTIES ALS TOEKOMSTIG
REFERENTIEMATERIAAL
verlicht. Rommelige of donkere gebieden
zorgen voor ongelukken.
in een explosieve omgeving, zoals in de
nabijheid van ontvlambare vloeistoffen,
gassen of stof. Elektrische gereedschappen
veroorzaken vonken die het stof of de
dampen kunnen doen ontbranden.
een afstand terwijl u een elektrisch
gereedschap bedient. Als u wordt afgeleid
kunt u de controle over het gereedschap
verliezen.
moeten in het stopcontact passen. Pas
de stekker nooit op enige manier aan.
Gebruik geen adapterstekkers samen
met geaard elektrisch gereedschap.
Niet aangepaste stekkers en passende
contactdozen verminderen het risico op een
elektrische schok.
oppervlaktes zoals buizen, radiatoren,
fornuizen en ijskasten. Er bestaat een
verhoogd risico op een elektrische schok als
uw lichaam geaard is.
Page 57

c) Stel elektrisch gereedschap niet bloot
aan regen of natte omstandigheden.
Als er water in een elektrisch gereedschap
terecht komt, verhoogt dit het risico op een
elektrische schok.
d) Behandel het stroomsnoer voorzichtig.
Gebruik het stroomsnoer nooit om het
elektrische gereedschap te dragen of te
trekken, of de stekker uit het stopcontact
te halen. Houd het snoer uit de buurt
van warmte, olie, scherpe randen, of
bewegende onderdelen. Beschadigde
snoeren of snoeren die in de war zijn
verhogen het risico op een elektrische
schok.
e) Als u een elektrisch gereedschap
buitenshuis gebruikt, gebruikt u een
verlengsnoer dat geschikt is voor
gebruik buitenshuis. Het gebruik van
een verlengsnoer dat geschikt is voor
buitenshuis, vermindert het risico op een
elektrische schok.
f) Als het gebruik van een elektrisch
gereedschap op een vochtige locatie
onvermijdelijk is, gebruikt u een
stroomvoorziening die beveiligd is met
een aardlekschakelaar. Het gebruik van
een aardlekschakelaar vermindert het risico
op een elektrische schok.
3) PERSOONLIJKE VEILIGHEID
a) Blijf alert, kijk wat u doet en gebruik uw
gezonde verstand als u een elektrisch
gereedschap bedient. Gebruik het
gereedschap niet als u vermoeid bent
of onder de invloed van drugs, alcohol
of medicatie bent. Een moment van
onoplettendheid tijdens het bedienen van
elektrische gereedschappen kan leiden tot
ernstig persoonlijk letsel.
b) Gebruik een beschermende uitrusting.
Draag altijd oogbescherming.
Beschermende uitrusting zoals een
stofmasker, antislip veiligheidsschoenen,
een helm, of gehoorbescherming gebruikt
in de juiste omstandigheden zal het risico
op persoonlijk letsel verminderen.
c) Vermijd onbedoeld starten. Zorg ervoor
dat de schakelaar in de ‚off‘ (uit) stand
staat voordat u het gereedschap aansluit
op de stroombron en/of accu, het
oppakt of ronddraagt. Het ronddragen
van elektrische gereedschappen met uw
vinger op de schakelaar of het aanzetten
van elektrische gereedschappen waarvan de
schakelaar aan staat, zorgt voor ongelukken.
d) Verwijder alle stelsleutels of
moersleutels voordat u het elektrische
gereedschap aan zet. Een moersleutel
of stelsleutel die in een ronddraaiend
onderdeel van het elektrische
gereedschap is achtergelaten kan
leiden tot persoonlijk letsel.
e) Rek u niet te ver uit. Blijf
altijd stevig en in balans
op de grond staan. Dit zorgt
voor betere controle van het
elektrische gereedschap in
onverwachte situaties.
f) Draag geschikte kleding.
Draag geen loszittende
kleding of sieraden. Houd uw haar,
kleding en handschoenen uit de buurt
van bewegende onderdelen. Loszittende
kleding, sieraden of lang haar kunnen door
bewegende delen worden gegrepen.
g) Als er in apparaten wordt voorzien voor
het aansluiten van stofverwijdering- of
verzamelapparatuur, zorg er dan voor
dat deze correct worden aangesloten
en gebruikt. Het gebruik van een
stofverzamelaar kan aan stof gerelateerde
gevaren verminderen.
4) GEBRUIK EN VERZORGING VAN ELEKTRISCH
GEREEDSCHAP
a) Forceer het gereedschap niet. Gebruik
het juiste elektrische gereedschap voor
uw toepassing. Het juiste elektrische
gereedschap voert de werkzaamheden
beter en veiliger uit waarvoor het is
ontworpen.
b) Gebruik het gereedschap niet als de
schakelaar het niet aan en uit kan
zetten. Ieder gereedschap dat niet met de
schakelaar kan worden bediend is gevaarlijk
en moet worden gerepareerd.
c) Haal de stekker uit het stopcontact en/
of neem de accu uit het gereedschap
voordat u aanpassingen uitvoert,
accessoires verwisselt, of het elektrische
gereedschap opbergt. Dergelijke
preventieve veiligheidsmaatregelen
verminderen het risico dat het elektrische
gereedschap per ongeluk opstart.
d) Bewaar gereedschap dat niet wordt
gebruikt buiten het bereik van kinderen
en laat niet toe dat personen die
onbekend zijn met het elektrische
gereedschap of deze instructies het
gereedschap bedienen. Elektrische
gereedschappen zijn gevaarlijk in handen
van ongetrainde gebruikers.
e) Onderhoud elektrische gereedschappen.
Controleer op verkeerde uitlijning en
het grijpen van bewegende onderdelen,
breuk van onderdelen en andere
omstandigheden die de werking van
het gereedschap nadelig kunnen
beïnvloeden. Zorg dat het gereedschap
NL
55
Page 58

voor gebruik wordt gerepareerd als het
beschadigd is. Veel ongelukken worden
veroorzaakt door slecht onderhouden
gereedschap.
f) Houd snijdgereedschap scherp
en schoon. Correct onderhouden
snijdgereedschappen met scherpe
snijdranden lopen minder snel vast en zijn
gemakkelijker te beheersen.
g) Gebruik het elektrische gereedschap, de
accessoires en gereedschapsonderdelen
enz. in overeenstemming met deze
instructies, waarbij u rekening houdt
met de werkomstandigheden en de
werkzaamheden die dienen te worden
uitgevoerd. Gebruik van het elektrische
gereedschap voor werkzaamheden die
anders zijn dan het bedoelde gebruik,
kunnen leiden tot een gevaarlijke situatie.
5) GEBRUIK EN VERZORGING VAN GEREEDSCHAP
OP ACCU
a) Gebruik alleen de lader die door de
fabrikant wordt opgegeven. Een lader
die geschikt is voor één accutype, kan een
risico op brand veroorzaken indien gebruikt
met een andere accu.
b) Gebruik elektrische gereedschappen
uitsluitend met speciaal omschreven
accu’s. Gebruik van andere accu’s kan
leiden tot letsel en brandgevaar.
c) Als de accu niet in gebruik is, dient u
deze uit de buurt te houden van andere
metalen voorwerpen zoals paperclips,
munten, sleutels, spijkers, schroeven of
andere kleine metalen voorwerpen die
een verbinding van het ene contactpunt
met het andere kunnen maken. Het
kortsluiten van de accucontactpunten
samen kan brandwonden of brand
veroorzaken.
d) Als het gereedschap te zwaar wordt
belast, kan er vloeistof uit de accu
lekken; vermijd contact hiermee. Als u
per ongeluk hier toch mee in contact
komt, spoelt u met water. Als de
vloeistof in contact met de ogen komt,
dient u daarnaast medische hulp in te
roepen. Vloeistof afkomstig uit de accu kan
irritatie of brandwonden veroorzaken.
6) SERVICE
a) Zorg dat u gereedschap wordt
onderhouden door een erkende
reparateur die uitsluitend identieke
vervangende onderdelen gebruikt. Dit
zorgt ervoor dat de veiligheid van het
gereedschap blijft gegarandeerd.
Veiligheidsvoorschriften voor
Accutackers
• Ga er altijd vanuit dat er nieten/
spijkers in het gereedschap zitten.
Wanneer onzorgvuldig met de tacker wordt
omgegaan, kan dat dat tot gevolg hebben
dat er onverwacht nieten/spijkers worden
afgeschoten en dat er daardoor persoonlijk
letsel ontstaat.
• Richt het gereedschap niet op uzelf of
op iemand die bij u staat. Wanneer de
trekker onverwacht wordt overgehaald, zullen
nieten/spijkers worden afgevuurd en dat kan
persoonlijk letsel tot gevolg hebben.
• Stel het gereedschap pas in werking als
het stevig tegen het werkstuk is geplaatst.
Als het gereedschap geen contact maakt met
het werkstuk, kunnen nieten/spijkers worden
weggeschoten in een onbedoelde richting.
• Neem de accu los van het gereedschap
wanneer er nieten/spijkers in het
gereedschap vast komen te zitten. Wanneer
u nieten/spijkers die vastzitten, losmaakt, kan
de tacker onbedoeld in werking treden als de
accu nog in het gereedschap zit.
• Gebruik deze tacker niet voor het
vastzetten van elektrische kabels. Dit
gereedschap is niet ontworpen voor het
installeren van elektrische kabels, de isolatie
kan beschadigd raken waardoor het gevaar
van een elektrische schok of van brand
ontstaat.
• Draag altijd een veiligheidsbril.
• Draag altijd gehoorbescherming.
• Gebruik alleen nagels van het soort dat
aangegeven staat in de handleiding.
• Gebruik geen stellingen om het werktuig te
bevestigen aan een steunpunt.
• Geen enkel onderdeel van de nagelmachine,
zoals het contactuitschakelingsmechanisme,
mag gedemonteerd of geblokkeerd worden.
• Controleer vóór elk gebruik of het veiligheidsen triggermechanisme goed werkt en of alle
bouten en moeren vastzitten.
• Gebruik de BF33 niet
– wanneer u bijvoorbeeld, dakspanten, enz.
verplaatst van de ene rijlocatie naar een
andere, waarbij u stellingmateriaal, trappen,
ladders of een op een ladder gelijkende
constructie gebruikt;
– wanneer u dozen of kratten sluit;
– bij het monteren van
transportveiligheidsystemen, bijv., op
voertuigen, wagons, enz.
56
Page 59

Zie voor vrijstellingen voor deze bepalingen
de in uw land geldende voorschriften voor de
werklocatie.
• Controleer altijd de ter plaatse geldende
voorschriften voor de werkplek.
• Gebruik het werktuig niet als hamer.
• Activeer de nagelmachine nooit in de open
ruimte.
• Draag het werktuig in het werkgebied naar
de werkplek met behulp van één handvat, en
nooit met een geactiveerde schakelaar.
• Beoordeel de omstandigheden in het
werkgebied. Spijkers kunnen dunne
werkstukken doorboren of van hoeken en
kanten van het werkstuk afglijden, en zo
mensen aan risico’s blootstellen.
• Sla geen nagels dicht bij de rand van het
werkstuk.
• Sla geen nagels bovenop andere nagels.
Overige risico’s
De volgende risico’s horen bij het gebruik van deze
apparaten:
– Letsel veroorzaakt door onjuiste behandeling
van het gereedschap.
– Verlies van controle over het gereedschap
wanneer het niet goed wordt vastgepakt.
– Vermoeidheid van de spieren van armen en
handen, vooral wanneer u boven uw hoofd
werkt. Neem altijd regelmatig een rustpauze
wanneer u lange tijd aan het werk bent.
Ondanks het toepassen van de relevante
veiligheidsvoorschriften en het toepassen van
veiligheidsapparaten kunnen sommige overige
risico’s niet worden vermeden. Dit zijn:
– Gehoorbeschadiging .
– Risico van persoonlijk letsel door
rondvliegende deeltjes.
– Risico van persoonlijk letsel als gevolg van
langdurig gebruik.
– Verlies van controle over het gereedschap
door terugslag.
– Risico van letsel door beknelling, scherpe
randen en onjuiste behandeling van het
werkstuk.
– Risico van letsel veroorzaakt door scherpe
randen bij het inzetten van andere nieten/
spijkers of het aanvullen van nieten/spijkers.
Markering op het
Gereedschap
De volgende pictogrammen staan op
het gereedschap vermeld:
Lees gebruiksaanwijzing voor
gebruik.
Draag gehoorbescherming.
Draag oogbescherming.
Smeer het gereedschap niet.
Magazijnhoek.
Lengte van de spijkers/
Dikte van de spijkers.
POSITIE DATUMCODE
De datumcode, die ook het jaar van fabricage
bevat, staat afgedrukt in de behuizing die het
verbindingsstuk tussen het gereedschap en de
accu vormt.
Voorbeeld:
2013 XX XX
Jaar van fabricage
Belangrijke veiligheidsinstructies
voor alle acculaders
BEWAAR DEZE INSTRUCTIES: Deze handleiding
bevat belangrijke instructies voor de veiligheid en
voor de bediening van de B-CB105-acculader.
• Lees voordat u de lader gebruikt, alle
instructies en aanwijzingen voor de veiligheid
op de lader, de accu en het product dat de
accu gebruikt.
WAARSCHUWING: Gevaar voor
elektrische schok. Laat geen vloeistof
in de lader dringen. Dit zou kunnen
leiden tot een elektrische schok.
VOORZICHTIG: Gevaar voor
brandwonden. Beperk het risico van
letsel, laad alleen oplaadbare accu’s op
van het merk Bostitch. Andere typen
batterijen kunnen te heet worden en
barsten wat leidt tot persoonlijk letsel
en materiële schade. Laad geen
niet-oplaadbare batterijen op.
NL
57
Page 60

VOORZICHTIG: Houd toezicht
op kinderen zodat zij niet met het
apparaat kunnen spelen.
OPMERKING: Onder bepaalde
omstandigheden kan er kortsluiting
in de lader ontstaan door vreemde
materialen, wanneer de stekker
van de lader in het stopcontact
zit. Houd vreemde materialen
die geleidende eigenschappen
hebben, zoals, maar niet uitsluitend,
slijpstof, metaalsnippers, staalwol,
aluminiumfolie of een ophoping van
metaaldeeltjes, weg uit de uitsparingen
in de lader. Trek altijd de stekker uit
het stopcontact wanneer er geen accu
in de lader zit. Trek de stekker van de
lader uit het stopcontact voordat u de
lader gaat reinigen.
• Probeer NIET de accu op te laden met
andere laders dan die in deze handleiding
worden beschreven. De lader en de accu zijn
speciaal voor elkaar ontworpen.
• Deze laders zijn niet bedoeld voor een
andere toepassing dan het opladen van
oplaadbare accu’s van Bostitch. Andere
toepassingen kunnen leiden tot het gevaar van
brand, elektrische schok of elektrocutie.
• Stel de lader niet bloot aan regen of
sneeuw.
• U kunt beter niet aan het snoer trekken
wanneer u de stekker van de lader uit het
stopcontact trekt. Er is dan minder risico
op beschadiging van het snoer en van de
stekker.
• Het is belangrijk dat u het snoer zo plaatst
dat niemand erop kan stappen of erover
kan struikelen, en het snoer niet op een
andere manier kan beschadigen of onder
spanning kan komen te staan.
• Gebruik alleen een verlengsnoer als het er
werkelijk niet anders kan. Gebruik van een
ongeschikt verlengsnoer kan het risico van
brand, elektrische schok of elektrocutie tot
gevolg hebben.
• Zorg, wanneer u buiten met de lader werkt,
altijd voor een droge locatie en gebruik
een verlengsnoer dat geschikt is voor
gebruik buitenshuis. Het gebruik van een
verlengsnoer dat geschikt is voor buitenshuis,
vermindert het risico van een elektrische
schok.
• Blokkeer de ventilatiesleuven van de lader
niet. De ventilatiesleuven bevinden zich
bovenop en opzij van de lader. Plaats de
lader niet in de buurt van een warmtebron.
58
• Gebruik de lader niet met een beschadigd
snoer of een beschadigde stekker — laat
deze onmiddellijk vervangen.
• Gebruik de lader niet als er hard op is
geslagen, als de lader is gevallen of op een
andere manier beschadigd is. Breng de lader
naar een erkend servicecentrum.
• Haal de lader niet uit elkaar; breng de lader
naar een erkend servicecentrum wanneer
service of reparatie nodig is. Onjuiste
montage kan leiden tot het risico van een
elektrische schok, elektrocutie of brand.
• Als het netsnoer is beschadigd, moet het
onmiddellijk worden vervangen door de
fabrikant, een servicemonteur van de fabrikant
of een dergelijk vakbekwaam persoon, zodat
risico is uitgesloten.
• Trek de stekker van de lader uit het
stopcontact voordat u de lader gaat
schoonmaken. Er is dan minder risico van
een elektrische schok. Het risico is niet
minder wanneer u de accu verwijderd.
• Probeer NOOIT 2 laders op elkaar aan te
sluiten.
• De lader is ontworpen voor de 230V
stroomvoorziening van een woning.
Probeer de lader niet te gebruiken op een
andere spanning. Dit geldt niet voor de
12V-lader.
BEWAAR DEZE INSTRUCTIES
Laders
De lader B-CB105 is geschikt voor de 18 V Li-Ionaccu (B-CB182).
Deze lader hoeft niet te worden afgeregeld en
is zo ontworpen dat hij zeer gemakkelijk in het
gebruik is.
Oplaadprocedure [afb. (fi g.) 2]
1. Steek de lader in een geschikt
230 V-stopcontact voordat u de accu plaats.
2. Plaats de accu (l) in de lader, en let er daarbij
op dat de accu geheel in de lader komt te
zitten. Het rode lampje (opladen) knippert
voortdurend en dat duidt erop dat het
laadproces is gestart.
3. Het voltooien van het opladen wordt
aangegeven doordat het rode lampje continu
AAN blijft. De accu is volledig opgeladen en
kan nu worden gebruikt of in de acculader
worden gelaten.
OPMERKING: U kunt maximale prestaties en
levensduur van Li-Ion-accu’s garanderen door de
accu’s volledig op te laden voordat u deze voor het
eerst in gebruik neemt.
Page 61

Oplaadproces
Zie voor de oplaadstatus van de accu de
onderstaande tabel.
Oplaadstatus
bezig met opladen –– –– ––
volledig opgeladen ––––––––––––
hete/koude
accuvertraging –– • –– • –– •
x probleem met
accu of lader • • • • • • • •
probleem
elektriciteitssnoer •• •• •• ••
Deze lader laadt een kapotte accu niet op. Het
lampje zal niet of onregelmatig gaan branden en
de lader geeft daarmee aan dat de accu kapot is.
OPMERKING: Dit kan ook betekenen dat er iets
mis is met de lader.
Als de lader laat zien dat er een probleem is,
laat de lader en de accu dan testen door een
geautoriseerd servicecentrum.
Hete/koude accuvertraging
Als de oplader detecteert dat een accu te heet
of te koud is, begint deze automatisch met een
hete/koude accuvertraging, waarbij het opladen
wordt uitgesteld totdat de accu een geschikte
temperatuur heeft bereikt. De oplader schakelt
vervolgens automatisch naar de oplaadmodus
voor de accu. Deze functionaliteit verzekert u van
maximale levensduur van de accu.
Li-Ion-gereedschap is ontworpen met een
Elektronisch Beveiligingssysteem dat ervoor zorgt
dat de accu niet te veel wordt geladen, niet te
heet wordt of te veel wordt ontladen.
Het gereedschap schakelt automatisch uit als het
elektronische beschermingssysteem in werking
treedt. Als dit gebeurt, plaatst u de Li-Ion accu in
de lader totdat deze volledig is opgeladen.
Een koude accu zal half zo snel opladen als een
warme accu. De accu zal minder snel opladen
gedurende de gehele laadcyclus en zal niet op
maximumsnelheid gaan opladen, ook niet als de
accu warmer wordt.
Belangrijke veiligheidsinstructies
voor alle accu’s
Als u vervangende accu’s bestelt, zorg er dan voor
dat u het catalogusnummer en voltage vermeldt.
Als u de accu uit de verpakking haalt is hij niet
geheel opgeladen. Lees, voordat u de accu en
de lader in gebruik neemt, de onderstaande
instructies voor een veilig gebruik en volg
vervolgens de vermelde laadprocedures.
LEES ALLE INSTRUCTIES
• Laad de accu niet op en gebruik
deze niet in een explosieve
omgeving, zoals in de nabijheid
van ontvlambare vloeistoffen,
gassen of stof. Wanneer u de accu
plaatst in of verwijdert uit de lader
kan het stof of de damp door een
vonk vlamvatten.
• Gebruik nooit geweld bij het
plaatsen van de accu in de lader.
Wijzig de accu op geen enkele manier als
deze niet past in een lader die niet geschikt
is, omdat de accu kan openbarsten
waardoor ernstig persoonlijk letsel kan
ontstaan.
• Laad de accu’s alleen op in de daarvoor
bestemde Bostitch laders.
• Spat NIET met water en dompel de accu niet
onder in water of andere vloeistoffen.
• Gebruik of bewaar het gereedschap en de
accu niet op plaatsen waar de temperatuur
40˚C of meer kan bereiken (bijvoorbeeld in
een schuurtje of een metalen loods in de
zomer).
• Voor het beste resultaat is het belangrijk dat u
de accu vóór ingebruikname volledig oplaadt.
WAARSCHUWING: Probeer nooit
om welke reden dan ook de accu
te openen. Als de behuizing van de
accu is gescheurd of beschadigd, zet
de accu dan niet in de lader. Klem
een accu niet vast, laat een accu
niet vallen, beschadig een accu niet.
Gebruik een accu of lader waar hard
op is geslagen, die is gevallen, waar
overheen is gereden of die op welke
manier dan ook is beschadigd (dat wil
zeggen, doorboord met een spijker,
geraakt met een hamer, vertrapt) niet.
Een elektrische schok of elektrocutie
kan het gevolg zijn. Breng beschadigde
accu’s terug naar het servicecentrum
zodat ze kunnen worden gerecycled.
VOORZICHTIG: Plaats het
gereedschap als het niet in gebruik
is op de zijkant op een stabiele
ondergrond waar er niet overheen
kan worden gestruikeld of het zelf
kan vallen. Sommige gereedschappen
met grote accu‘s staan rechtop op de
accu maar kunnen gemakkelijk worden
omgestoten.
NL
59
Page 62

SPECIEKE VEILIGHEIDSINSTRUCTIES VOOR LITHIUM
ION (Li-Ion)
• Verbrand de accu niet, zelfs niet als deze
ernstig beschadigd is of volledig verbruikt.
De accu kan in vuur exploderen. Als lithium
ion accu‘s worden verbrand, komen giftige
dampen en materialen vrij.
• Als de inhoud van de accu in contact met
de huid komt, wast u dit onmiddellijk
af met water en een milde zeep. Als
accuvloeistof in de ogen komt spoelt u 15
minuten met water in het geopende oog,
of totdat de irritatie stopt. Als medische
hulp nodig is dient u te vermelden dat de
accuelektrolyt is samengesteld uit een
mengsel van vloeibare organische carbonaten
en lithiumzouten.
• De inhoud van geopende accucellen kan
irritatie aan de luchtwegen veroorzaken.
Zorg voor frisse lucht. Zoek als de symptomen
aanhouden medische hulp.
WAARSCHUWING: Gevaar voor
brandwonden. Accuvloeistof kan
ontvlambaar zijn als deze aan een vonk
of vlam wordt blootgesteld.
Accu
ACCUTYPE
De BF33 en de BF33-2 werken op een 18 V-accu.
De accu’s van het type B-CB182 kunnen worden
gebruikt. Raadpleeg Technische Gegevens voor
meer informatie.
Aanbevelingen voor opslag
1. De beste plaats om het apparaat op te bergen
is koel en droog, uit direct zonlicht en niet
in overmatige hitte of koude. Voor optimale
accuprestaties en levensduur bergt u accu’s
op bij kamertemperatuur als deze niet in
gebruik zijn.
2. Wanneer u de accu lange tijd opbergt, kunt
u deze voor optimale resultaten het beste
volledig opgeladen opslaan op een koele,
droge plaats buiten de lader.
OPMERKING: Accu’s kunnen beter niet volledig
ontladen worden opgeslagen. De accu moet voor
gebruik weer worden opgeladen.
Labels op de oplader en accu
In aanvulling op de pictogrammen in deze
handleiding laten de labels op de oplader en de
accu de volgende pictogrammen zien:
Lees gebruiksaanwijzing voor gebruik.
Accu bezig met opladen.
Accu opgeladen.
Hete/koude accuvertraging.
Probleem met accu of lader.
x
Probleem elektriciteitssnoer.
Niet doorboren met geleidende
voorwerpen.
Laad geen beschadigde accu‘s op.
Gebruik uitsluitend Bostitch accu’s;
andere modellen kunnen uit elkaar
spatten en persoonlijk letsel of schade
veroorzaken.
Niet blootstellen aan water.
Zorg dat defecte snoeren onmiddellijk
worden vervangen.
Uitsluitend opladen tussen 4 ºC
en 40 ºC.
Bied de accu als chemisch afval aan en
houd rekening met het milieu.
Gooi de accu niet in het vuur.
Laad Li-Ion accu‘s op.
Zie Technische gegevens voor de
oplaadtijd.
Inhoud van de Verpakking
De verpakking bevat:
1 Spijkerpistool
1 Lader
2 Accu’s
1 Niet-krassende tip
1 Gereedschapskoffer
60
Page 63

1 Gebruiksaanwijzing
1 Uitvergrote tekening
• Controleer of het gereedschap, de onderdelen
of accessoires mogelijk zijn beschadigd tijdens
het transport.
• Neem de tijd om deze handleiding grondig
door te lezen en te begrijpen voordat u de
apparatuur gebruikt.
Beschrijving (afb. 1)
WAARSCHUWING: Pas het
gereedschap of een onderdeel ervan
nooit aan. Dit kan schade of persoonlijk
letsel tot gevolg hebben.
a. Trekker
b. Trekkerbeveiliging vergrendeling-uit
c. Contactschakelaar
d. Diepteafstellingswiel
e. Indicatielampje gering vermogen accu &
vastlopen
f. Vrijgaveknop bij vastlopen
g. Magazijn
h. Grendel aanduwmechanisme
i. Standenselectieschakelaar (alleen BF33)
j. Roterende balk-/riemhaak
k. Geïntegreerde inbussleutel
l. Accu
m. Niet-krassende tip
BEOOGD GEBRUIK
De BF33/BF33-2 accu-afwerkingstacker is
ontworpen voor het in houten werkstukken
schieten van spijkers/nieten.
De snoerloze frame-tacker BF33 is ontworpen
voor de stand sequentieel/stoot (niet-sequentieel).
Tackers die zijn ontworpen voor de stand
sequentieel/stoot MOGEN NIET worden gebruikt
voor stellingmateriaal, trappen, ladders of of een
ladder gelijkende constructie, bijv. raamwerk voor
daken. Zie voor vrijstellingen voor deze bepalingen
de in uw land geldende voorschriften voor de
werklocatie.
De snoerloze frame-tacker BF33-2 is ontworpen
voor alleen de stand sequentieel. Tackers die
zijn ontworpen voor alleen de stand sequentieel
MOGEN worden gebruikt voor stellingmateriaal,
trappen, ladders of of een ladder gelijkende
constructie, bijv. raamwerk voor daken.
GEBRUIK ZE NIET bij natte
omstandigheden of in de aanwezigheid
van ontvlambare vloeistoffen of gassen.
De accutackers zijn professioneel
elektrisch gereedschap.
LAAT GEEN kinderen in contact met
het gereedschap komen. Toezicht is
vereist als onervaren gebruikers dit
gereedschap bedienen.
• Dit product is niet bedoeld voor
gebruik door personen (waaronder kinderen)
die verminderde fysieke, sensorische of
psychische vermogens hebben of die het
ontbreekt aan ervaring en/of kennis of
bekwaamheden, als dat niet gebeurt onder
toezicht van een persoon die verantwoordelijk
is voor hun veiligheid. Kinderen mogen nooit
alleen worden gelaten met dit product zodat
ze ermee zouden kunnen spelen.
NL
Elektrische veiligheid
De elektrische motor is slechts voor één voltage
ontworpen. Controleer altijd of het voltage van
de accu overeenkomt met het voltage op het
typeplaatje. Zorg er ook voor dat het voltage
van uw oplader overeenkomt met dat van uw
stroomvoorziening.
Uw Bostitch oplader is dubbel
geïsoleerd in overeenstemming met EN
60335; daarom is geen aarding nodig.
Als het stroomsnoer is beschadigd, moet het
worden vervangen door een speciaal
geprepareerd snoer dat leverbaar is via
het Bostitch servicecentrum.
Een verlengsnoer gebruiken
U dient geen verlengsnoer te gebruiken, tenzij dit
absoluut noodzakelijk is. Gebruik een goedgekeurd
verlengsnoer dat geschikt is voor de stroominvoer
van uw oplader (zie Technische gegevens). De
minimale geleidergrootte is 1 mm2; de maximale
lengte is 30 m.
Als u een haspel gebruikt, dient u het snoer altijd
volledig af te rollen.
ASSEMBLAGE EN AANPASSINGEN
WAARSCHUWING: Verwijder altijd
WAARSCHUWING: Gebruik
eerst de accu voordat u het toestel
monteert of afstelt. Vergrendel altijd
het gereedschap voordat u de accu
insteekt of verwijdert.
uitsluitend Bostitch accu’s en opladers.
61
Page 64

De accu in het Gereedschap
Plaatsen of Eruit Verwijderen
(afb. 2)
WAARSCHUWING: Beperk het
gevaar op ernstig persoonlijk letsel
tot een minimum: vergrendel het
gereedschap en neem de accu los,
voordat u een aanpassing uitvoert
of hulpstukken of accessoires
verwijdert/installeert. Wanneer het
apparaat per ongeluk wordt gestart,
kan dat letsel tot gevolg hebben.
OPMERKING: Controleer dat uw accu (l) geheel
is opgeladen. De geleverde accu’s zijn niet altijd
volledig geladen.
DE ACCU IN DE HANDGREEP VAN HET GEREEDSCHAP
PLAATSEN
1. Richt de inkeping in de handgreep van het
gereedschap uit met de accu (l).
2. Schuif de accu stevig in de handgreep totdat u
het slot hoort dicht klikken.
DE ACCU UIT HET GEREEDSCHAP VERWIJDEREN
1. Druk op de ontgrendelknop (n) en schuif de
accu uit de handgreep van het gereedschap.
2. Plaats de accu in de acculader zoals
beschreven in de paragraaf over de acculader
in deze gebruiksaanwijzing.
ACCU’S MET VERMOGENMETER (AFB. 2, 2A)
Er zijn Bostitch-accu’s met een vermogenmeter en
deze bestaat uit drie groene LED-lampjes die een
aanduiding geven van de hoeveelheid lading die de
accu nog heeft.
U kunt de vermogenmeter activeren door de knop
(o) van de vermogenmeter ingedrukt te houden.
Een combinatie van de drie groene LED-lampjes
gaat branden en dat geeft een aanduiding van de
hoeveelheid lading die de accu nog heeft. Wanneer
de lading in de accu onder het bruikbare niveau
ligt, gaat de vermogenmeter niet branden en moet
de accu worden opgeladen.
OPMERKING: De brandstofmeter geeft slechts
een indicatie van de hoeveelheid lading die de
accu nog heeft. De meter geeft geen aanwijzingen
over de functionaliteit van het gereedschap en
is onderhevig aan schommelingen afhankelijk
van productcomponenten, temperatuur en de
toepassing door de eindgebruiker.
OPMERKING: Berg het gereedschap
niet op met de accu erin. Voorkom
beschadiging van de accu en zorg
ervoor dat de accu zo lang mogelijk
meegaat, berg de accu’s op, op
een koele, droge plaats, buiten het
gereedschap en de lader.
62
De roterende balk-/riemhaak (afb. 6)
De balk-/riemhaak (j) kan gemakkelijk rechts of
links van het gereedschap worden geplaatst voor
links- of rechtshandige gebruikers.
Als u de haak helemaal niet wilt gebruiken, kunt u
deze naar de voor- of achterzijde van de onderzijde
van de handgreep draaien.
Het Gereedschap Opladen (afb. 4)
WAARSCHUWING: Vergrendel altijd
het gereedschap in de uit-stand
en neem de accu los voordat u
hechtmateriaal plaatst of uitneemt.
1. Zet de van een veer voorziene grendel van het
aanduwmechanisme (h) vast door deze naar
de onderzijde van het magazijn te schuiven.
2. Selecteer de juiste rolnagels. (Zie Technische
Gegevens.) Bostitch adviseert u altijd
hechtnagels van het merk Bostitch te
gebruiken.
WAARSCHUWING: Aangezien
accessoires die niet door Bostitch zijn
aangeboden niet met dit product zijn
getest, kan het gebruik van dergelijke
accessoires met dit gereedschap
gevaarlijk zijn. Om het risico op letsel
te verminderen dient u uitsluitend door
Bostitch aanbevolen accessoires met
dit product te gebruiken.
3. Plaats de rolnagels in het laadslot aan de
zijkant van het magazijn. Zorg dat de spijkers
met de punt in het spijkerkanaal zijn geplaatst.
4. Sluit het magazijn door de grendel van het
aanduwmechanisme los te maken. Laat de
grendel voorzichtig naar voren schuiven zodat
de strook spijkers/nieten vast komt te zitten.
Uitschakeling bij leeg magazijn.
De tacker is voorzien van een functie voor
uitschakeling wanneer de nieten/spijkers opraken
en deze functie verhindert dat het gereedschap
werkt wanneer het magazijn bijna leeg is.
Wanneer er nog zo’n 7 tot 9 nieten/spijkers in
het magazijn over zijn, treedt de vergrendeling
voor een leeg magazijn in werking. RaadpleegHet
gereedschap laden voor het laden van een strook
aaneengehechte spijkers.
OPMERKING: Als veel kracht op het gereedschap
wordt uitgeoefend, kan de vergrendeling worden
opgeheven. Dit voorkomt dat het gereedschap
beschadigd raakt, wanneer het valt.
De inslagdiepte afstellen (afb. 5)
U kunt de inslagdiepte afstellen met het
diepteafstellingswiel.
Page 65

1. Als u de niet/spijker minder diep wilt inslaan,
draait u het diepteafstellingswiel (d) naar
links, in de richting van het pictogram van de
ondiepe spijker.
2. Als u de niet/spijker dieper wilt inslaan, draait
u het diepteafstellingswiel (d) naar rechts, in
de richting van het pictogram van de diepere
spijker.
De werkstand selecteren (afb. 1)
ALLEEN BF33
U selecteert de sequentiële werkstand door de
standenselectieschakelaar (i) zo te schuiven dat
het pictogram met de enkele spijker zichtbaar
wordt ( ).
U selecteert de snelvuurwerkstand door de
standenselectieschakelaar (i) zo te schuiven dat
het pictogram met de drie spijkers zichtbaar
wordt ( ).
OPMERKING: De maximale kracht voor het
slaan van lange nieten/spijkers wordt bereikt in
sequentiële stand, dus u kunt bij het slaan van
langer hechtmateriaal beter het gebruik van de
stootstand beperken.
BEDIENING
Instructies voor Gebruik
WAARSCHUWING: Houd u altijd
aan de veiligheidsinstructies en van
toepassing zijnde voorschriften. Er
kunnen ter plaatse voorschriften voor
de werkplek gelden die het gebruik
van de stootstand voor bepaalde
toepassingen verbieden.
WAARSCHUWING: Om het gevaar
op ernstig persoonlijk letsel te
verminderen, zet u het gereedschap
uit en ontkoppelt u de accu,
voordat u enige aanpassing maakt
of hulpstukken of accessoires
verwijdert/installeert. Het onbedoeld
opstarten kan letsel veroorzaken.
Juiste Positie van de Handen (afb. 7)
WAARSCHUWING: Om het risico
op ernstig persoonlijk letsel te
verminderen, dient u ALTIJD de
handen in de juiste positie te hebben,
zoals afgebeeld.
WAARSCHUWING: Om het risico
op ernstig persoonlijk letsel te
verminderen, houdt u het ALTIJD
stevig vast, anticiperend op een
plotseling reactie.
Voor de juiste handpositie zet u één
hand op de hoofdhandgreep (p), zoals
wordt afgebeeld.
Het Gereedschap
Voorbereiden (afb. 1)
1. Neem de accu (l) uit het
gereedschap en controleer dat het
gereedschap is vergrendeld in de
uit-stand.
2. Verwijder alle spijkers uit het magazijn (g).
3. Controleer of het contactmechnisme (c) vrij
kan bewegen.
4. Plaats de spijkers weer in het magazijn.
5. Plaats de accuset.
WAARCHUWING: Gebruik
het werktuig niet als het
contactmechanisme of de
nagelschuiver niet vrij kunnen
bewegen.
OPMERKING: NOOIT
smeermiddelen of
schoonmaakmiddelen in
het werktuig spuiten of
op een andere manier
aanbrengen. Dit kan
een grote invloed hebben op de
levensduur en de prestatie van het
werktuig.
NL
Het Werktuig Activeren (afb. 1)
Het werktuig kan gebruikt worden volgens één van
twee methodes: opeenvolgende actiemodus of
stotende actiemodus.
OPEENVOLGENDE ACTIEMODUS
De opeenvolgende actiemodus wordt gebruikt
om intermitterend te nagelen als erg nauwkeurige
plaatsing gewenst is. Zo wordt ook de maximale
afgifte van vermogen bereikt voor het slaan van de
langste nieten/spijkers.
1. Gebruik de methodeselectieknop (i) om de
opeenvolgende actiemodus te kiezen ( ).
2. Hef de veiligheidsvergrendeling van de trekker
(b) op.
3. Duw het contactmechanisme tegen het
werkoppervlak.
4. Haal de trekkerknop (a) over om het werktuig te
activeren.
5. Maak de trekker los en neem de tacker van
het werkoppervlak.
6. Herhaal de stappen 3–5 voor het in
gereedheid brengen van de volgende niet/
spijker.
63
Page 66

WERKSTAND SNELVUUR (ALLEEN BF33)
De stootactie wordt gebruikt voor het snel slaan
van nieten op vlakke, stationaire oppervlakken en
deze stand is in het algemeen het meest geschikt
voor het slaan van kortere nieten/spijkers.
1. Gebruik de methodeselectieknop (i) om de
stotende actiemodus te kiezen ( ).
2. Hef de veiligheidsvergrendeling van de trekker
(b) op.
3. Om één enkele nagel te slaan, gebruikt
u het werktuig zoals omschreven voor de
opeenvolgende actie:
a. Duw het contactmechanisme (c) tegen het
werkoppervlak.
b. Haal de trekkerknop (a) over om
het werktuig te activeren. Elke keer
dat u de trekkerknop gebruikt met
het contactmechanisme tegen het
werkoppervlak gedrukt, zal er één nagel
geslagen worden.
4. Om meerdere nagels te slaan, drukt u de
trekkerknop (a) in en houdt deze ingedrukt,
en drukt dan het contactmechanisme (c)
herhaaldelijk tegen het werkoppervlak.
WAARSCHUWING: Houd niet de
trekker ingedrukt wanneer u het
gereedschap niet gebruikt. Houd
de veiligheidsvergrendeling van de
trekker(b) in de vergrendelde stand
zodat wordt voorkomen dat het
gereedschap per ongeluk in werking
wordt gesteld, wanneer u het niet
gebruikt.
5. Wanneer u wisselt tussen de werkstand
Sequentieel en de werkstand Snelvuur, zult
u misschien de slagdiepte moeten afstellen.
Raadpleeg De slagdiepte afstellen voor
instructies.
Vergrendeling van de trekker
gebruiken (afb. 3)
Iedere Bostitch tacker is voorzien van een
vergrendeling van de trekker (b) die, wanneer
u deze naar rechts duwt, zoals Afbeelding 3
laat zien, voorkomt dat het gereedschap een
niet/spijker afvuurt doordat de trekker wordt
vergrendeld en de aandrijving van de motor wordt
onderbroken.
Wanneer u de vergrendeling van de trekker naar
links duwt, is het gereedschap volledig klaar
voor gebruik. De vergrendeling van de trekker
moet altijd in de vergrendelde stand staan,
wanneer u het gereedschap afstelt of wanneer
het gereedschap niet direct in gebruik is.
Niet-krassende tip (afb. 1)
Wanneer u dit gereedschap gebruikt op
materialen die u niet wilt beschadigen, zoals
houten afwerkingsmaterialen, gebruik dan
de kunststof niet-krassende tip (m) over de
contactschakelaar (c).
LED-indicatielampje (afb. 1)
Uw tacker is voorzien van twee LEDindicatielampjes (e), die zich aan de achterzijde
van het gereedschap, vlak onder de zwarte
kap, bevinden. Raadpleeg altijd Oplossen van
problemen voor verdere instructies.
GERING VERMOGEN
ACCU
Vervang de accu
door een opgeladen
exemplaar.
HETE ACCU
Laat de accu afkoelen of
vervang de accu door een
koel exemplaar.
VASTGELOPEN
Draai de vrijgaveknop
bij vastlopen zodat het
gereedschap weer
kan worden gebruikt.
Raadpleeg Vrijgave bij
vastlopen.
GEREEDSCHAP HEET
GEWORDEN
Laat het gereedschap
afkoelen voordat u het
weer gebruikt.
Vrijgave bij vastlopen (afb. 1, 3)
Als de tacker wordt gebruikt voor een zware
toepassing waarbij alle in de motor beschikbare
energie wordt gebruikt voor het inslaan van nieten/
spijkers, kan het gereedschap vastlopen. Het
aandrijfblad heeft niet de gehele aandrijfcyclus
voltooid en vastloopindicator(e) knippert. Draai
vrijgaveknop bij vastlopen (f) op het gereedschap
en het mechanisme komt vrij. Als het aandrijfblad
niet automatisch terugkeert in de uitgangspositie,
ga dan verder naar Een vastgelopen niet/spijker
verwijderen. Als de unit blijft vastlopen, kijk dan
welke stand is geselecteerd en kijk naar de lengte
van de nieten/spijkers zodat u er zeker van kunt
zijn dat deze niet te licht zijn voor de toepassing.
64
Page 67

Een vastgelopen niet/spijker
verwijderen (afb. 1, 3)
Als een niet/spijker komt vast te zitten in het
neusgedeelte, knippert het indicatielampje
vastlopen(e).
1. Haal de accu uit het gereedschap en schakel
de veiligheidsvergrendeling van de trekker
in(b).
2. Zet de van een veer voorziene grendel van het
aanduwmechanisme (h) vast door deze naar
de onderzijde van het magazijn te schuiven
en haal de strook nieten/spijkers uit het
gereedschap.
3. Maak met de meegeleverde inbussleutel (k)
de twee inbusbouten (q) aan de bovenzijde
van het magazijn los.
4. Draai het magazijn (g) naar voren.
5. Verwijder de vastgelopen/gebogen niet/spijker,
zo nodig met een tang.
6. Als het aandrijfblad omlaag staat, draai
dan de vrijgaveknop bij vastlopen (f) aan de
bovenzijde van de tacker.
OPMERKING: Als het aandrijfblad niet wordt
gereset, wanneer u de vrijgaveknop bij
vastlopen draait, zult u misschien het blad
met behulp van een lange schroevendraaier
moeten resetten.
7. Draai het magazijn terug in de stand onder
de neus van het gereedschap en zet de
inbusbouten (q) vast.
8. Zet de accu weer in.
OPMERKING: Het gereedschap zal zichzelf
uitschakelen en het kan pas worden gereset
als de accu is uitgenomen en weer is ingezet.
9. Zet de nieten/spijkers weer in het magazijn
(raadpleeg Het Gereedschap laden).
10. Hef de vergrendeling van het
aanduwmechanisme (h) op.
11. Schakel de veiligheidsvergrendeling van de
trekker (b) uit wanneer u de tacker weer kunt
gebruiken.
Laat, als er vaak nieten/spijkers in het
neusgedeelte vastlopen, het gereedschap nazien
door een officieel Bostitch-servicecentrum.
ONDERHOUD
Uw Bostitch gereedschap op stroom is ontworpen
om gedurende een lange tijdsperiode te
functioneren met een minimum aan onderhoud.
Het continu naar bevrediging functioneren hangt
af van de juiste zorg voor het gereedschap en
regelmatig schoonmaken.
Aan de lader en de accu kan geen onderhoud
worden verricht. Er zitten binnen in het apparaat
geen onderdelen die onderhoudswerkzaamheden
vereisen.
WAARSCHUWING: Om
het gevaar op ernstig
persoonlijk letsel te
verminderen, zet u
het gereedschap uit
en ontkoppelt u de
accu, voordat u enige
aanpassing maakt of
hulpstukken of accessoires
verwijdert/installeert. Het
onbedoeld opstarten kan
letsel veroorzaken.
Smering
Uw elektrische gereedschap heeft geen
aanvullende smering nodig.
OPMERKING: NOOIT
smeermiddelen of
schoonmaakmiddelen in
het werktuig spuiten of
op een andere manier
aanbrengen. Dit kan
een grote invloed hebben op de
levensduur en de prestatie van het
werktuig.
Reiniging
WAARSCHUWING: Blaas vuil en stof
WAARSCHUWING: Gebruik nooit
uit de hoofdbehuizing met droge lucht,
zo vaak u ziet dat vuil zich in en rond
de luchtopeningen ophoopt. Draag
goedgekeurde oogbescherming en een
goedgekeurd stofmasker als u deze
procedure uitvoert.
oplosmiddelen of andere bijtende
chemicaliën voor het reinigen van
niet-metalen onderdelen van het
gereedschap. Deze chemicaliën
kunnen het materiaal dat in deze
onderdelen is gebruikt verzwakken.
Gebruik een doek die uitsluitend met
water en milde zeep is bevochtigd.
Zorg dat er nooit enige vloeistof in het
gereedschap komt; dompel nooit enig
onderdeel van het gereedschap in een
vloeistof.
NL
65
Page 68

SCHOONMAAKINSTRUCTIES LADER
WAARSCHUWING: Gevaar
voor elektrische schok.
Ontkoppel de oplader van de
wisselstroomvoorziening voordat
u deze gaat reinigen. Vuil en vet
kunnen van de buitenzijde van de
acculader worden verwijderd met
een doek of een zachte, niet-metalen
borstel. Gebruik geen water of
schoonmaakmiddelen.
U kunt de locatie van de erkende reparateur die
het dichtste bij u in de buurt is opzoeken door
contact op te nemen met uw plaatselijke Bostitch
kantoor zoals vermeld in deze handleiding. Een
lijst van erkende Bostitch reparateurs en volledige
details over onze after sales service zijn ook te
vinden op internet via: www.2helpU.com.
Optionele accessoires
WAARSCHUWING: Aangezien
accessoires die niet door Bostitch zijn
aangeboden niet met dit product zijn
getest, kan het gebruik van dergelijke
accessoires met dit gereedschap
gevaarlijk zijn. Om het risico op letsel
te verminderen dient u uitsluitend door
Bostitch aanbevolen accessoires met
dit product te gebruiken.
Neem contact op met uw leverancier voor verdere
informatie over de geschikte accessoires.
Bescherming van het milieu
Gescheiden afvalinzameling. Dit
product mag niet bij het normale
huishoudelijke afval worden
aangeboden.
Als u op een dag bemerkt dat uw Bostitch product
vervangen dient te worden of dat u er verder
geen gebruik meer van maakt, mag u het niet als
normaal huishoudelijk afval aanbieden. Bied dit
product aan bij de gescheiden afvalinzameling.
Gescheiden inzameling van gebruikte
producten of verpakkingen maakt het
mogelijk dat materiaal kan worden
gerecycled en nogmaals gebruikt. Het
hergebruik van gerecycled materiaal
helpt milieuvervuiling te voorkomen en
vermindert de vraag naar grondstoffen.
Plaatselijke bepalingen voorzien mogelijk in
de gescheiden inzameling van elektrische
producten uit een huishouden, op stedelijke
inzamelingspunten of bij de detailhandelaar waar u
een nieuw product aanschaft.
Bostitch heeft een faciliteit voor het verzamelen
van recyclen van Bostitch producten als
ze eenmaal het einde van hun levensduur
hebben bereikt. Stuur om van deze service
gebruik te maken uw product a.u.b. terug naar
iedere erkende reparateur die namens ons de
verzameling op zich neemt.
Oplaadbare accu
Deze accu’s met lange levensduur dienen te
worden opgeladen als ze onvoldoende stroom
leveren bij werkzaamheden waarbij dat vroeger
wel het geval was. Aan het eind van de technische
levensduur dient u de accu’s als gescheiden afval
aan te bieden, met het oog op het milieu:
• Laat de accu geheel leeglopen en verwijder ze
vervolgens van het gereedschap.
• Li-Ion, NiCd en NiMH cellen kunnen worden
gerecycled. Breng ze naar uw dealer of een
plaatselijk inzamelingspunt. De ingezamelde
accu‘s zullen worden gerecycled of correct
worden verwerkt.
66
Page 69

GIDS OPLOSSEN VAN PROBLEMEN
VEEL VAN DE PROBLEMEN DIE ZICH VOORDOEN KUNNEN GEMAKKELIJK WORDEN
OPGELOST DOOR MIDDEL VAN ONDERSTAANDE TABEL.
Neem voor ernstiger problemen en problemen die zich blijven voordoen contact op met de
officiële BOstitch-reparateur bij u in de buurt, of neem contact op met het BOstitch-kantoor op
het adres dat in deze handleiding wordt vermeld.
WAARSCHUWING: Beperk het risico van ernstig persoonlijk letsel, neem ALTIJD
SYMPTOOM
Motor loopt niet
terwijl u de trekker
ingedrukt houdt
Motor loopt
niet terwijl de
contactschakelaar is
ingedrukt
de accu los van het gereedschap voordat u reparaties gaat uitvoeren.
OORZAAK OPLOSSING
Vergrendeling van de trekker is
ingeschakeld
Gereedschap is vastgelopen, waardoor
de motor niet kan roteren
Gereedschap staat in de sequentiële
stand
De interne elektronica van het
gereedschap moet worden gereset
Motor komt tot stilstand na 5 seconden Normale werking, laat schakelaar vrijkomen
Aansluitpunten zijn vuil of beschadigd Ga naar een officiële Bostitch-reparateur.
Beschadigde interne elektronica Ga naar een officiële Bostitch-reparateur.
Beschadigde trekker Ga naar een officiële Bostitch-reparateur.
Accu is heet Laat de accu afkoelen of vervang de accu
Gereedschap is heet Laat het gereedschap afkoelen voordat u
Vergrendeling van de trekker is
ingeschakeld
Vergrendeling bij leeg magazijn in
werking getreden, waardoor de
contactschakelaar zich niet vrij kan
verplaatsen
Gereedschap is vastgelopen, waardoor
de motor niet kan roteren
Verbogen contactschakelaar Ga naar een officiële Bostitch-reparateur.
Motor komt tot stilstand na 5 seconden Normale werking, laat contactschakelaar
Aansluitpunten zijn vuil of beschadigd Ga naar een officiële Bostitch-reparateur.
Beschadigde interne elektronica Ga naar een officiële Bostitch-reparateur.
Beschadigde trekker Ga naar een officiële Bostitch-reparateur.
Accu is heet Laat de accu afkoelen of vervang de accu
Gereedschap is heet Laat het gereedschap afkoelen voordat u
Hef de vergrendeling van de trekker op.
Draai vrijgaveknop bij vastlopen op
het gereedschap en het mechanisme
komt vrij. Als het aandrijfblad niet in de
uitgangspositie terugkeert, verwijder dan de
accu en duw met de hand het aandrijfblad
terug in de uitgangspositie.
Druk eerst de contactschakelaar in en stel
het gereedschap in werking of schakel over
naar de stand Snelvuren (alleen BF33).
Neem de accu uit, wacht 3 seconden en zet
de accu weer in.
en druk opnieuw in.
door een koel exemplaar.
het weer gebruikt.
Hef de vergrendeling van de trekker op.
Laad meer nieten/spijkers in het magazijn.
Draai vrijgaveknop bij vastlopen op
het gereedschap en het mechanisme
komt vrij. Als het aandrijfblad niet in de
uitgangspositie terugkeert, verwijder dan de
accu en duw met de hand het aandrijfblad
terug in de uitgangspositie.
vrijkomen van het werkstuk en druk
opnieuw in.
door een koel exemplaar.
het weer gebruikt.
NL
67
Page 70

GIDS OPLOSSEN VAN PROBLEMEN (vervolg)
SYMPTOOM
Gereedschap werkt
niet (motor loopt
maar schiet geen
nieten/spijkers af)
Motor start wel,
maar maakt veel
lawaai
Aandrijfblad blijft in
de onderste stand
vastzitten
Gereedschap werkt
wel maar drijft
nieten/spijkers niet
geheel in
OORZAAK OPLOSSING
Vergrendeling bij leeg magazijn in
werking getreden, waardoor de
contactschakelaar zich niet vrij kan
verplaatsen
Gering accuvermogen of beschadigde
accu
Vastgelopen niet/spijker / aandrijfblad
niet teruggekeerd in uitgangspositie
Beschadigd aandrijfblad/
retourmechanisme
Vastgelopen intern mechanisme Ga naar een officiële Bostitch-reparateur.
Beschadigde interne elektronica Ga naar een officiële Bostitch-reparateur.
Vastgelopen niet/spijker en aandrijfblad
zit vast in onderste stand
Beschadigd aandrijfblad/
retourmechanisme
Vastgelopen niet/spijker en aandrijfblad
zit vast in onderste stand
Beschadigd aandrijfblad/
retourmechanisme
Material and fastener length If the unit continues to stall (forcing the
Vuil in het neusgedeelte Maak neusgedeelte schoon en kijk goed of
Diepteafstelling te ondiep ingesteld Draai diepteafstellingsknop naar een
Gereedschap wordt niet stevig tegen
het werkstuk gezet
Stootstand geselecteerd met lange
spijkers/nieten (alleen BF33)
Lengte materiaal en nieten/spijkers Als het apparaat blijft vastlopen (waardoor
Beschadigde of versleten tip van het
aandrijfblad
Gereedschap gebruikt met nietkrassende tip
Beschadigd slagmechanisme Ga naar een officiële Bostitch-reparateur.
Laad nieten/spijkers in het magazijn.
Controleer laadniveau als accu laadtoestand
toont. Laad accu op of vervang de accu, als
dat nodig is.
Neem accu uit, haal vastgelopen niet/spijker
uit, beweeg de vrijgaveknop bij vastlopen
heen en weer, (duw zo nodig zelf het
aandrijfblad omhoog), zet de accu weer in.
Vervang aandrijfblad/retourmechanisme. Ga
naar een officiële Bostitch-reparateur.
Verwijder met behulp van de vrijgaveknop
bij vastlopen vastgelopen nieten/spijkers en
breng zo nodig zelf het aandrijfblad terug in
de uitgangspositie.
Vervang aandrijfblad/retourmechanisme. Ga
naar een officiële Bostitch-reparateur.
Verwijder met behulp van de vrijgaveknop
bij vastlopen vastgelopen nieten/spijkers en
breng zo nodig zelf het aandrijfblad terug in
de uitgangspositie.
Vervang aandrijfblad/retourmechanisme. Ga
naar een officiële Bostitch-reparateur.
need to rotate the Stall release lever)
choose the appropriate material and
fastener length that is not too rigorous an
application.
er misschien kleine stukjes afgebroken niet/
spijker in de baan zitten.
diepere instelling.
Oefen de juiste hoeveelheid druk uit door
het gereedschap stevig tegen het werkstuk
te drukken. Raadpleeg instructiehandleiding.
Selecteer sequentiële stand.
u steeds de vrijgaveknop bij vastlopen
moet draaien), kies dan de juiste lengte
van het materiaal en van nieten/spijkers en
let er daarbij op dat zij geschikt zijn voor de
toepassing.
Vervang aandrijfblad/retourmechanisme. Ga
naar een officiële Bostitch-reparateur
Verwijder de niet-krassende tip
68
Page 71

GIDS OPLOSSEN VAN PROBLEMEN (vervolg)
SYMPTOOM
Gereedschap werkt,
maar er worden
geen nieten/spijkers
ingedreven
Vastgelopen niet/
spijker
OORZAAK OPLOSSING
Geen nieten/spijkers in het magazijn Laad nieten/spijkers in het magazijn.
Onjuist formaat of onjuiste hoek nieten/
spijkers
Vuil in het neusgedeelte Maak neusgedeelte schoon en kijk goed of
Vuil in magazijn Maak magazijn schoon.
Versleten magazijn Vervang magazijn. Ga naar een officiële
Beschadigde of versleten tip van het
aandrijfblad
Beschadigde veer duwmechanisme Vervang veer; ga naar een officiële Bostitch-
Onjuist formaat of onjuiste hoek nieten/
spijkers
Schroeven van het magazijn zijn niet
vastgezet na de vorige vastloper/
inspectie
Beschadigde of versleten tip van het
aandrijfblad
Lengte materiaal en nieten/spijkers Als het apparaat blijft vastlopen (waardoor
Vuil in het neusgedeelte Maak neusgedeelte schoon en kijk goed of
Versleten magazijn Vervang magazijn. Ga naar een officiële
Beschadigde veer duwmechanisme Vervang veer. Ga naar een officiële Bostitch-
Vergrendeling bij leeg magazijn is
ingeschakeld met niet meer dan 7-9
nieten in het magazijn en de gebruiker
heeft uitzonderlijk veel kracht op de
contactschakelaar uitgeoefend zodat
de vergrendeling is opgeheven
Gebruik alleen de aanbevolen nieten/
spijkers. Raadpleeg Technische Gegevens.
er misschien kleine stukjes afgebroken niet/
spijker in de baan zitten.
Bostitch-reparateur.
Vervang aandrijfblad. Ga naar een officiële
Bostitch-reparateur.
reparateur.
Gebruik alleen de aanbevolen nieten/
spijkers. Raadpleeg Technische Gegevens.
Draai vooral de inbusbouten van het
magazijn goed vast met de bijgeleverde
inbussleutel.
Vervang aandrijfblad. Ga naar een officiële
Bostitch-reparateur.
u steeds de vrijgaveknop bij vastlopen
moet draaien), kies dan de juiste lengte
van het materiaal en van nieten/spijkers en
let er daarbij op dat zij geschikt zijn voor de
toepassing.
er misschien kleine stukjes afgebroken niet/
spijker in de baan zitten.
Bostitch-reparateur.
reparateur.
Plaats meer nieten/spijkers in het magazijn
zodat de vergrendeling bij leeg magazijn
wordt uitgeschakeld.
NL
69
Page 72

18V LI-ION BATTERIDREVET SØMPISTOL
BF33, BF33-2
Tillykke!
Bostitch værktøjer er præcisionsbygget og designet
til høj hastighed og høj volumenfastgørelse. De
vil levere en effektiv, pålidelig service, når de
anvendes korrekt og med omhu. Som med ethvert
fint elværktøj, skal producentens anvisninger følges
for de bedste resultater. Kontakt din Bostitch
repræsentant eller forhandler med alle spørgsmål
vedrørende værktøjet og dets brug.
Tekniske data
BF33 BF33-2
Spænding VDC 18 18
Type 1 1
Affyring Sekventiel/ Sekventiel/
stød Kun
Magasinvinkel 33° 33°
Søm
længde mm 50–90 50–90
sømdiameter mm 2,8–3,3 2,8–3,3
vinkel 30–34° 30–34°
hovedgeometri klippede eller klippede eller
offset runde offset runde
bearbejdningstype papir papir
Vægt (uden batteripakke) kg 3,53 3,53
Drevenergi J 105 105
LPA (lydtryk) dB(A) 84 84
KPA (lydtrykusikkerhed) dB(A) 3 3
LWA (lydeffekt) dB(A) 95 95
KWA (usikkerhed lydeffekt) dB(A) 3 3
Samlet vibrationsværdi (triaxvektorsum) bestemt i henhold til
EN 60745:
Vibrationsemissionsværdi ah
ah = m/s2 3,8 3,8
Usikkerhed K = m/s2 1,5 1,5
Vibrationsemissionsniveauet, der er angivet i dette
vejledningsark, er målt i overensstemmelse med
en standardiseret test, der er angivet i EN 60745
og kan anvendes til at sammenligne et værktøj
med et andet. Det kan anvendes til en foreløbig
eksponeringsvurdering.
ADVARSEL: Det angivne
vibrationsemissionsniveau
repræsenterer værktøjets
hovedanvendelsesområder. Hvis
værktøjet anvendes til andre formål,
med andet tilbehør eller vedligeholdes
dårligt, kan vibrationsemissionen
imidlertid variere. Det kan forøge
eksponeringsniveauet over den
samlede arbejdsperiode markant.
Et estimat af eksponeringsniveauet for
vibration bør også tage højde for de
gange, værktøjet slukkes, eller når det
kører men ikke bruges til at arbejde.
Det kan mindske eksponeringsniveauet
over den samlede arbejdsperiode
markant.
Identificér yderligere
sikkerhedsforanstaltninger for at
beskytte operatøren mod vibrationens
effekter, som f.eks.: vedligehold
værktøjet og tilbehøret, hold hænderne
varme, organisation af arbejdsmønstre.
Batteripakke B-CB182
Batteritype Li-Ion
Spænding VDC 18
Kapacitet Ah 4,0
Vægt kg 0,61
Oplader B-CB105
Forsyningsspænding VAC 230
Batteritype Li-Ion
Anslået opladningstid min 70
(4,0 Ah-batteripakker)
Vægt kg 0,49
Sikringer
Europa 230 V værktøj 10 ampere, strømforsyning
Defi nitioner: Sikkerhedsråd
Nedenstående definitioner beskriver
sikkerhedsniveauet for hvert signalord. Læs
vejledningen og læg mærke til disse symboler.
FARE: Angiver en overhængende farlig
situation, der – hvis den ikke undgås –
kan resultere i døden eller alvorlige
kvæstelser.
70
Page 73

ADVARSEL: Angiver en mulig farlig
situation, der - hvis den ikke undgås –
kan resultere i døden eller alvorlige
kvæstelser.
FORSIGTIG: Angiver en mulig farlig
situation, der – hvis den ikke undgås -
kan resultere i mindre eller moderat
personskade.
BEMÆRK: Angiver en handling,
der ikke er forbundet med
personskade, men som kan
resultere i produktskade.
Betyder fare for elektrisk stød.
Betyder risiko for brand.
EF-overensstemmelseserklæring
MASKINDIREKTIV
BF33, BF33-2
Bostitch erklærer, at produkterne beskrevet under
Tekniske data er udformet i overensstemmelse
med: 2006/42/EF, EN 60745-1, EN 60745-2-16.
Disse produkter overholder også direktivet
2004/108/EF og 2011/65/EU. Kontakt Bostitch på
følgende adresse for yderligere oplysninger.
Undertegnede er ansvarlig for kompilering af den
tekniske fil og udsteder denne erklæring på vegne
af Bostitch.
Colin Earl
Administrerende direktør
Europa, Mellemøsten & Afrika
Stanley Black & Decker bvba
Kanaalweg 112 IZ Ravenshout zone 3
3980 Tessenderlo, Belgien
28.06.2013
ADVARSEL: For at reducere risikoen
for personskade bør du læse
betjeningsvejledningen.
Generelle
sikkerhedsadvarsler for
elværktøjer
ADVARSEL! Læs alle
Termen “elværktøj” i advarslerne refererer til dit
elektroniske (ledning) eller batteribetjente (trådløse)
elværktøj.
1) SIKKERHED I ARBEJDSOMRÅDET
a) Sørg for, at arbejdsområdet er rent og
b) Undlad at benytte elektrisk værktøj i
c) Hold børn og omkringstående på
2) ELEKTRISK SIKKERHED
a) Stik på elektrisk værktøj skal passe
b) Undgå kropskontakt med jordforbundne
c) Undlad at udsætte elektrisk værktøj for
d) Undlad at udsætte ledningen for
sikkerhedsadvarsler og alle
instruktioner. Manglende
overholdelse af advarsler og
instruktioner kan medføre
elektrisk stød, brand og/eller
alvorlig personskade.
GEM ALLE ADVARSLER OG INSTRUKTIONER
TIL SENERE BRUG
godt oplyst. Rodede eller mørke områder
giver anledning til ulykker.
en eksplosionsfarlig atmosfære, som
f.eks. ved tilstedeværelsen af brændbare
væsker, gasser eller støv. Elværktøj danner
gnister, der kan antænde støv eller dampe.
afstand, når der anvendes elektrisk
værktøj. Distraktioner kan medføre, at du
mister kontrollen.
til stikkontakten. Stikket må aldrig
modificeres på nogen måde. Undlad
at bruge adapterstik sammen med
jordforbundet elektrisk værktøj.
Umodificerede stik og dertil passende
stikkontakter reducerer risikoen for elektrisk
stød.
overflader, såsom rør, radiatorer,
komfurer og køleskabe. Der er øget
risiko for elektrisk stød, hvis din krop er
jordforbundet.
regn eller våde forhold. Hvis der trænger
vand ind i et elektrisk værktøj, øges risikoen
for elektrisk stød.
overlast. Brug aldrig ledningen til at
bære, trække værktøjet eller trække
det ud af stikkontakten. Hold ledningen
borte fra varme, olie, skarpe kanter
og bevægelige dele. Beskadigede eller
sammenfiltrede ledninger øger risikoen for
elektrisk stød.
DK
71
Page 74

e) Når elektrisk værktøj benyttes udendørs,
skal der anvendes en forlængerledning,
som er egnet til udendørs brug. Brug af
en ledning, der er egnet til udendørs brug,
reducerer risikoen for elektrisk stød.
f) Hvis det ikke kan undgås at betjene et
elektrisk værktøj i et fugtigt område,
benyt en strømforsyning, der er
beskyttet af en fejlstrømsafbryder. Ved
at benytte en fejlstrømsafbryder reduceres
risikoen for elektrisk stød.
3) PERSONLIG SIKKERHED
a) Vær opmærksom, pas på hvad du
foretager dig, og brug sund fornuft, når
du benytter et elektrisk værktøj. Betjen
ikke værktøjet, hvis du er træt, påvirket
af narkotika, alkohol eller medicin. Et
øjebliks uopmærksomhed under anvendelse
af et elektrisk værktøj kan forårsage alvorlig
personskade.
b) Brug personligt sikkerhedsudstyr. Bær
altid beskyttelsesbriller. Sikkerhedsudstyr,
såsom støvmaske, skridsikre sikerhedssko,
sikkerhedshjelm eller høreværn, brugt
når omstændighederne foreskriver det,
reducerer omfanget af personskader.
c) Undgå utilsigtet start. Sørg for, at der er
slukket for kontakten, inden værktøjet
tilsluttes en strømkilde og/eller
batterienhed, samles op eller bæres. Når
elektrisk værktøj bæres med fingeren på
kontakten eller tilsluttes, når kontakten er
tændt, giver det anledning til ulykker.
d) Fjern eventuelle justerings- eller
skruenøgler, før det elektriske værktøj
startes. En skruenøgle eller anden nøgle,
der bliver siddende på en roterende del
af elektrisk værktøj, kan give anledning til
personskade
e) Undlad at række for langt. Hold hele
tiden en god fodstilling og balance. Dette
giver bedre kontrol af det elektriske værktøj,
når uventede situationer opstår.
f) Bær hensigtsmæssig påklædning. Bær
ikke løst tøj eller smykker. Hold dit hår,
tøj og handsker væk fra bevægelige dele.
Løstsiddende tøj, smykker eller langt hår
kan blive fanget i bevægelige dele.
g) Hvis der anvendes støvudsugnings-
eller støvopsamlingsudstyr, skal dette
tilsluttes og anvendes rigtigt. Anvendelse
af støvopsamlingsudstyr kan begrænse
farer forårsaget af støv.
4) ANVENDELSE OG VEDLIGEHOLDELSE AF ELEKTRISK
VÆRKTØJ
a) Undlad at bruge magt over for det
elektriske værktøj. Brug det værktøj, der
er bedst egnet til det arbejde, der skal
udføres. Værktøjet vil klare opgaven bedre
og mere sikkert med den ydelse, som det
er beregnet til.
b) Undlad at benytte elektrisk værktøj,
hvis kontakten ikke tænder og slukker
for det. Alt elektrisk værktøj, der ikke kan
kontrolleres med kontakten, er farligt og
skal repareres.
c) Træk stikket ud af stikkontakten og/eller
batterienheden fra det elektriske værktøj,
før det elektriske værktøj justeres,
dets tilbehør udskiftes, eller det stilles
til opbevaring. Sådanne forebyggende
sikkerhedsforanstaltninger mindsker
risikoen for, at værktøjet startes utilsigtet.
d) Opbevar elektrisk værktøj uden for
rækkevidde af børn, og tillad ikke
personer, som ikke er bekendt med
dette elektriske værktøj eller disse
instruktioner, at betjene værktøjet.
Elektrisk værktøj er farligt i hænderne på
personer, som ikke er instrueret i brugen
deraf.
e) Vedligeholdelse af elektrisk værktøj.
Undersøg om bevægelige dele sidder
skævt, binder eller er gået itu såvel
som andre forhold, der kan påvirke
betjeningen af værktøjet. Hvis det
elektriske værktøj er beskadiget, skal
det repareres før brug. Mange ulykker er
forårsaget af dårligt vedligeholdt værktøj.
f) Hold skæreværktøj skarpe og rene.
Ordentligt vedligeholdt skæreværktøj med
skarpe skærekanter har mindre tilbøjelighed
til at binde og er lettere at styre.
g) Brug elektrisk værktøj, tilbehør, bor,
osv. i overensstemmelse med disse
instruktioner, idet der tages hensyn til
arbejdsforholdene og den opgave, som
skal udføres. Brug af elektrisk værktøj til
andre opgaver end dem, det er beregnet til,
kan resultere i en farlig situation.
5) ANVENDELSE OG VEDLIGEHOLDELSE AF BATTERI
a) Må kun genoplades med den oplader,
som er angivet af fabrikanten. En
oplader, der er beregnet til en bestemt type
batteripakke, kan udgøre en brandrisiko,
hvis den bruges med en anden type
batteripakke.
b) Brug kun elektrisk værktøj med de
batteripakker, der er beregnet til hver
enkelt type. Brug af andre batteripakker
kan skabe risiko for personskade og brand.
c) Når en batteripakke ikke er i brug,
skal den holdes borte fra andre
metalgenstande, såsom papirclips,
mønter, nøgler, søm, skruer og andre
små metalgenstande, der kan danne
72
Page 75

forbindelse mellem to elektriske
kontaktflader. Kortslutninger mellem
batterikontakter kan forårsage forbrænding
eller brand.
d) Hvis en batteripakke udsættes for
overlast, kan der sive væske ud. Undgå
kontakt. Hvis væsken berøres ved et
tilfælde, skal der skylles med masser af
vand. Hvis der kommer væske i øjnene,
skal der desuden søges lægehjælp.
Batterivæske kan forårsage irritation eller
forbrænding.
6) SERVICE
a) Elektrisk værktøj skal serviceres
af en kvalificeret servicetekniker,
som udelukende benytter identiske
reservedele. Derved sikres det, at
værktøjets driftssikkerhed opretholdes.
Sikkerhedsinstruktioner for trådløse
sømpistoler
• Sørg altid for, at værktøjet er forsynet med
lukkemekanismer. Skødesløs håndtering af
sømpistolen kan medføre uventet udløsning
af lukkemekanismer og personskader.
• Ret ikke værktøjet imod dig selv eller
nogen i nærheden. Uventet udløsning
vil løsne lukkemekanismen og medføre
personskade.
• Aktivér kun værktøjet, når det er sikkert
placeret imod et arbejdsemne. Hvis
værktøjet ikke har kontakt til arbejdsemnet,
kan lukkemekanismen blive afledt væk fra dit
mål.
• Slå strømmen fra værktøjet, hvis
lukkemekanismen blokeres i værktøjet. Når
du frigør en blokeret lukkemekanisme, kan
sømpistolen blive aktiveret ved et uheld, hvis
strømmen er tilsluttet.
• Brug ikke denne strømpistol til fastgørelse
af kabler. Den er ikke designet til installation
af elkabler og kan beskadige isoleringen på
elkabler og kan fremkalde elektrisk chok eller
brandfare.
• Bær altid sikkerhedsbriller.
• Bær altid høreværn.
• Brug kun den type søm, der er angivet i
vejledningen.
• Undlad at montere værktøjet på noget stativ i
understøttelsesøjemed.
• Undlad at afmontere eller blokere nogen dele
af sømpistolen så som kontaktudløseren.
• Før udførelsen af en opgave skal
det kontrolleres, at sikkerheds- og
-aftrækkermekanismen fungerer
korrekt, og at alle bolte og møtrikker
er ordentligt fastspændt.
• Anvend ikke BF33
– ved skift fra et sted til et andet,
der involverer brug af stilladser,
trapper, stiger eller stige-lignende
konstruktioner, f.eks. taglægter
osv.;
– ved lukning æsker eller kasser;
– ved montering af transportsystemers
sikkerhedssystemer, f.eks. på køretøjer,
vogne, osv.
For undtagelser kontrollér de lokale
arbejdspladsregulativer.
• Kontrollér altid de lokale
arbejdspladsregulativer.
• Værktøjet må ikke bruges som hammer.
• Sømpistolen må aldrig affyres ud i luften.
• Når værktøjet bæres omkring i arbejdsområdet
må dette aldrig gøres med aftrækkeren
aktiveret.
• Tag hensyn til forholdene på arbejdsområdet.
Sømmene kan trænge igennem tynde
arbejdsemner eller smutte på arbejdsemnets
hjørner og kanter og derved forårsage fare for
personskade.
• Undlad at drive søm tæt på arbejdsemnets
kant.
• Undlad at drive søm oven på andre søm.
DK
Restrisici
De følgende risici er uløseligt forbundet med
brugen af disse maskiner:
– Skader som følge af ukorrekt håndtering af
værktøjet.
– Skader som følge af ukorrekt håndtering af
værktøjet.
– Stramning af muskler i arme og hænder,
især ved arbejde over hovedhøjde. Hold
altid regelmæssige pauser når du arbejder i
længere tid ad gangen.
På trods af overholdelsen af de relevante
sikkerhedsregler og brug af sikkerhedsudstyr kan
visse restrisici ikke undgås. Disse omfatter:
– Hørenedsættelse.
– Risiko for personskade som følge af flyvende
partikler.
73
Page 76

– Risiko for personskade som følge af forlænget
brug.
– Tab af kontrol som følge af tilbageslag.
– Risiko for personskade på grund af spidse
punkter, skarpe hjørner eller ukorrekt
håndtering af arbejdsemner.
– Risiko for personskade på grund af skarpe
hjørner ved udskiftning af søm eller
indsættelse af sømstokke.
Mærkning på Værktøjet
Følgende piktogrammer er vist på værktøjet:
Læs brugsvejledningen før brug.
Bær høreværn.
Brug øjeværn.
Brug ingen smørelse på værktøjet.
Magasinvinkel
Sømlængde/
Sømtykkelse.
PLACERING AF DATOKODEN
Datokoden, som også inkluderer fremstillingsåret,
er trykt ind i kabinetfladen, der danner
monteringssammenføjningen mellem værktøj og
batteri.
Eksempel:
2013 XX XX
Produktionsår
Vigtig sikkerhedsvejledning for alle
batteriopladere
GEM DISSE INSTRUKTIONER: Denne vejledning
indeholder vigtige sikkerheds- og driftsinstruktioner
for B-CB105 batterioplader.
• Før du bruger opladeren, læs alle instruktioner
og de sikkerhedsmæssige afmærkninger på
opladeren, batteripakken og produktet.
ADVARSEL: Risiko for chok. Lad ikke
nogen fl ydende væsker komme ind
i opladeren. Det kan resultere i et
elektrisk chok.
FORSIGTIG: Børn skal overvåges for
BEMÆRK: Under bestemte
• Forsøg ALDRIG at oplade batteripakken
• Disse opladere er ikke beregnet til
• Udsæt ikke opladeren for regn eller sne.
• Træk i stikket i stedet for ledningen, når
• Sørg for at ledningen er placeret, så den
• Anvend kun en forlængerledning, når det
• Når en oplader benyttes udendørs, find
• Blokér ikke ventilationshullerne på
FORSIGTIG: Risiko for brand. For
at reducere risikoen for kvæstelser,
oplad kun Bostitch genopladelige
batteripakker. Andre batterityper kan
blive overophedet og kan eksplodere
og medføre person- og produktskader.
Oplad ikke ikke-genopladelige batterier.
at sikre, at de ikke leger med udstyret.
forhold, når opladeren er tilsluttet
til strømforsyningen, kan den blive
kortsluttet af fremmede materialer.
Fremmede materialer af en ledende
art som for eksempel, men ikke
begrænset til slibestøv, metalspåner,
ståluld, aluminumsfolie eller anden
koncentration af metalliske partikler
skal holdes på afstand af opladerens
huller. Tag altid stikket til opladeren ud
fra kontakten, når der ikke er indsat en
batteripakke. Tag stikket til opladeren
ud før forsøg på at rengøre den.
med andre opladere end dem, der er
omtalt i denne manual. Opladeren og
batteripakken er specielt designet til at arbejde
sammen.
anden brug end opladning af Bostitch
genopladelige batterier. Al anden brug kan
medføre risiko for brand, elektrisk chok eller
livsfarlige elektriske stød.
opladeren frakobles. Dette vil reducere
risikoen for beskadigelse af elstikket og
ledningen.
ikke bliver trådt på, snublet over eller på
anden måde bliver genstand for skader
eller belastning.
er absolut nødvendigt. Anvendelse af en
ukorrekt forlængerledning kan resultere i
risiko for brand, elektrisk chok eller livsfarlige
elektriske stød.
altid et tørt sted og brug en passende
forlængerledning til udendørs brug. Brug
af en ledning, der er egnet til udendørs brug,
reducerer risikoen for elektrisk stød.
opladeren. Ventilationshullerne findes oven
på og på siderne af opladeren. Anbring
opladeren på afstand af alle varmekilder.
74
Page 77

• Brug ikke opladeren, hvis ledningen eller
stikket er beskadiget — få dem omgående
udskiftet.
• Brug ikke opladeren, hvis den har fået
et hårdt slag er blevet tabt eller blevet
beskadiget på anden vis. Tag den med til et
autoriseret værksted.
• Demontér ikke opladeren, tag den med
til et autoriseret værksted, når service
eller reparation er påkrævet. Ukorrekt
genmontering kan medføre risiko for elektrisk
chok, livsfarlige elektriske stød eller brand.
• Hvis ledningen beskadiges, skal den
omgående udskiftes af producenten, hans
forhandler eller lignende kvalificeret person for
at forebygge enhver risiko.
• Tag stikket til opladeren ud af kontakten før
forsøg på nogen form for rengøring. Dette
vil reducere risikoen for elektrisk chok.
Fjernelse af batteripakken vil ikke reducere
denne risiko.
• Forsøg ALDRIG at tilslutte 2 opladere til
hinanden.
• Opladeren er designet til at køre på
standard 230V husholdningsstrøm.
Forsøg ikke at bruge den med en anden
strømstyrke. Dette gælder ikke for opladere til
køretøjer.
GEM DISSE INSTRUKTIONER
Opladere
B-CB105 opladeren accepterer 18 V Li-Ion batterier
(B-CB182) batteripakke.
Denne oplader kræver ingen justering og er
designet til at være så brugervenlig som mulig.
Opladningsprocedure (fi g. 2)
1. Indsæt opladeren i en passende 230 V
udgang, før batteripakken indsættes.
2. Indsæt batteripakken (l) i opladeren og
kontrollér, at pakken sidder godt fast i
opladeren. Det røde (opladnings) lys vil blinke
hele tiden og angive, at opladningsprocessen
er startet.
3. Når batteriet er helt opladet, er den røde
lampe konstant på ON. Batteriet er helt
opladet og kan hermed anvendes eller
efterlades i opladeren.
BEMÆRK: For at sikre maksimal ydeevne og
levetid for Li-Ion batterier skal batteripakken lades
helt op, før den anvendes første gang.
Opladningsproces
Se batteripakkens opladningstilstand i
nedenstående skema.
Opladningstilstand
oplader –– –– ––
fuldt opladet –––––––––––––
forsinkelse ved
varmt/koldt batteri –– • –– • –– •
x problem pakke
eller oplader • • • • • • • •
problem
ledningsnet •• •• •• ••
Denne oplader vil ikke oplade en defekt
batteripakke. Opladeren vil angive defekt batteri
ved at nægte at lyse eller ved at vise problem
pakke eller oplader blinkmønster.
BEMÆRK: Dette kan også betyde et problem med
opladeren.
Hvis opladeren angiver et problem, tag opladeren
og batteripakken med hen til et autoriseret
servicecenter for at blive kontrolleret.
DK
Forsinkelse ved varmt/koldt batteri
Når opladeren registrerer et batteri, der er for
varmt eller for koldt, starter den automatisk en
forsinkelse for varmt/koldt batteri, der suspenderer
opladningen, indtil batteriet har nået en passende
temperatur. Derefter skifter opladeren automatisk
til batteriopladningstilstand. Denne funktion sikrer
maksimal batterilevetid.
Li-Ion værktøjerne er designet med et elektronisk
beskyttelsessystem, der vil beskytte batteriet imod
overbelastning, overopvarmning eller dyb afladning.
Værktøjet slukker automatisk, hvis det elektroniske
beskyttelsessystem aktiveres. Hvis det sker, skal
du anbringe Li-Ion-batteriet i opladeren, indtil det er
fuldt opladet.
En kold batteripakke vil oplade med ca. halvdelen
af hastigheden for en varm batteripakke.
Batteripakken vil oplade ved den lavere hastighed
gennem hele opladningscyklussen og vil ikke
vende tilbage til maksimal opladningshastighed,
selvom batteriet varmer.
Vigtig sikkerhedsvejledning for alle
batteripakker
Sørg for at oplyse katalognummer og spænding
ved bestilling af nye batteripakker.
Batteripakken er ikke fuldt opladet, når du køber
det. Før du bruger batteripakken og opladeren,
læs sikkerhedsinstruktionerne nedenfor og følg
derefter de angivne procedurer.
75
Page 78

LÆS ALLE INSTRUKTIONER
• Oplad ikke eller brug batteripakken i en
eksplosionsfarlig atmosfære, som f.eks.
ved tilstedeværelsen af brændbare væsker,
gasser eller støv. Isætning eller udtagning af
batteripakken fra opladeren kan antænde støv
eller dampe.
• Tving aldrig batteripakken ind i opladeren.
Foretag ikke nogen ændringer på
batteripakken, så den kan passe ind i en
ikke kompatibel oplader, da batteripakken
kan blive sprængt og kan medføre
personskader.
• Oplad kun batteripakker i Bostitch opladere.
• Sprøjt IKKE på den eller nedsænk den i vand
eller andre væsker.
• Opbevar eller brug ikke værktøjet og
batteripakken på steder, hvor temperaturen
kan nå op på eller overstige 40˚C
(105˚F) (som f.eks. uden for skure eller
metalbygninger om sommeren).
• For de bedste resultater kontrollér at
batteripakken er fuldt opladet før brug.
ADVARSEL: Forsøg aldrig at åbne
batteripakken. Hvis batteripakken er
revnet eller beskadiget, indsæt den
ikke i opladeren. Undgå at mase, tabe
eller beskadige batteripakken. Anvend
ikke en batteripakke eller oplader, der
har fået et hårdt slag, er blevet tabt,
kørt over eller blevet beskadiget på
anden vis (f.eks. stukket med en nål,
slået med en hammer, trådt på). Det
kan medføre elektriske chok eller
livsfarlige elektriske stød. Beskadigede
batteripakker skal returneres til
forhandleren for genanvendelse.
FORSIGTIG: Placér værktøjet på
siden på et fast underlag, hvor det
ikke medfører fare for at vælte eller
falde, når det ikke er i brug. Visse
værktøjer med store batteripakker kan
stå oprejst på batteripakken, men kan
være lette at vælte.
SPECIFIKKE SIKKERHEDSINSTRUKTIONER FOR
LITHIUM-ION (Li-Ion)
• Brænd ikke batteripakken, selv hvis den
er svært beskadiget eller helt opslidt.
Batteripakken kan eksplodere i åben ild.
Der dannes giftige dampe og stoffer ved
forbrænding af lithium-ion-batteripakker.
• Hvis batteriets indhold kommer i kontakt
med huden, skal området omgående
vaskes med mild sæbe og vand. Hvis
batterivæske kommer i øjnene, lad vand løbe
over det åbne øje i 15 minutter, eller indtil
irritationen ophører. Hvis det er nødvendigt at
søge lægehjælp, består batterielektrolytten af
en blanding af flydende organiske karbonater
og lithiumsalte.
• Indholdet af åbnede battericeller kan
forårsage luftvejsirritation. Sørg for frisk luft.
Søg lægehjælp, hvis symptomerne vedvarer.
ADVARSEL: Fare for forbrændinger.
Batterivæske kan være brændbar, hvis
den udsættes for gnister eller åben ild.
Batteripakke
BATTERITYPE
BF33 og BF33-2 kører på 18 volt batteripakker..
B-CB182 batteripakker kan bruges. Se Tekniske
data for flere informationer.
Anbefalet opbevaring
1. Det bedste opbevaringssted er køligt og
tørt, hvor den ikke udsættes for direkte
sollys og ekstrem varme eller kulde. For
optimal batteriydelse og -liv skal du opbevare
batteripakker ved stuetemperatur, når de ikke
er i brug.
2. For langtids opbevaring anbefales det at
opbevare en fuldt opladet batteripakke
et køligt, tørt sted uden for opladeren for
optimale resultater.
BEMÆRK: Batteripakker bør ikke opbevares helt
tømt for opladning. Batteripakken skal genoplades
før brug.
Mærkater på oplader og
batteripakke
Ud over de piktogrammer, der anvendes i denne
vejledning, viser mærkaterne på opladeren og
batteripakken følgende piktogrammer:
Læs brugsvejledningen før brug.
Batteri oplader.
Batteri opladt.
Forsinkelse ved varmt/koldt batteri.
Problem pakke eller oplader.
x
Problem ledningsnet.
76
Page 79

Berør aldrig kontaktflader med
strømførende genstande.
Beskadigede batteripakker må ikke
oplades.
Må kun anvendes med Bostitch-
batteripakker, andre kan eksplodere og
medføre person- og materielskader.
Må ikke udsættes for vand.
Defekte ledninger skal udskiftes
omgående.
Oplad kun mellem 4 °C og 40 °C.
Tag hensyn til miljøet ved bortskaffelse
af batteripakken.
Destruér ikke batteripakken.
Kan oplade Li-Ion-batteripakker.
Se Tekniske data vedrørende
opladningstid.
Pakkens indhold
Pakken indeholder:
1 Sømpistol
1 Oplader
2 Batteripakker
1 Ingen marspids
1 Værktøjskasse
1 Brugsvejledning
1 Eksplosionstegning
• Kontrollér for eventuelle skader på værktøjet,
dele og tilbehør, der kan være opstået under
transport.
• Tag dig tid til at læse denne vejledning
grundigt og forstå den før betjening.
Beskrivelse (fi g. 1)
ADVARSEL: Modificér aldrig elektrisk
værktøj eller nogen dele deraf. Det kan
medføre materiale- eller personskade.
a. Udløser
b. Udløsersikkerhedslås
c. Kontaktudløser
d. Hjul til justering af dybde
e. Indikatorlys for lavt batteri &
blokering/fastlåsning
f. Udløsergreb for fastlåsning
g. Magasin
h. Skubberlås
i. Funktionsvælger (kun BF33)
j. Roterende spær/bæltekrog
k. Indbygget sekskantnøgle
l. Batteripakke
m. Ingen marspids
TILTÆNKT BRUG
Den ledningsfrie BF33/BF33-2 sømpistol er blevet
designet til at drive søm ind i arbejdsemner af træ.
BF33 ledningsfrie sømpistol er designet til
sekventielle/stødvirkende funktioner. Sømpistoler
designet for sekventielle/stødvirkende funktioner
MÅ ALDRIG anvendes på stilladser, trapper,
stiger eller stige-lignende konstruktioner, f.eks.
taglægter osv. For undtagelser kontrollér de lokale
arbejdspladsregulativer.
BF33-2 ledningsfrie sømpistol er kun designet
til sekventiel/stødvirkende funktion. Sømpistoler
designet kun for sekventiel/stødvirkende funktion
MÅ anvendes på stilladser, trapper, stiger eller
stige-lignende konstruktioner, f.eks. taglægter osv.
MÅ IKKE anvendes under våde forhold eller i
nærheden af brændbare væsker eller gasser.
Disse ledningsfrie sømpistoler er professionelle
værktøjsmaskiner.
LAD IKKE børn komme i kontakt med værktøjet.
Overvågning er påkrævet, når uerfarne brugere
anvender dette værktøj.
• Dette produkt er ikke beregnet til anvendelse
af personer (inklusive børn) med nedsatte
fysiske, sensoriske eller mentale handicaps;
mangel på erfaringer, viden eller færdigheder,
medmindre de er under overvågning af en
person, der er ansvarlig for deres sikkerhed.
Børn må aldrig efterlades alene med dette
produkt.
Elektrisk sikkerhed
Den elektriske motor er konstrueret til bare
én spænding. Kontrollér altid, at batteripakken
svarer til spændingen på mærkepladen. Kontrollér
også, at spændingen på din oplader svarer til din
el-netspænding.
Din Bostitch-oplader er dobbeltisoleret
i overensstemmelse med EN 60335.
Derfor kræves der ingen jordledning.
DK
77
Page 80

Hvis strømledningen er beskadiget, skal den
erstattes af en specialfremstillet ledning, der fås
gennem Bostitch’s serviceorganisation.
Brug af forlængerledning
Der bør ikke benyttes en forlængerledning,
medmindre det er absolut nødvendigt. Brug
en godkendt forlængerledning, der er egnet til
strømforsyningen til din oplader (se Tekniske
data). Den minimale lederstørrelse er 1 mm2; den
maksimale længde er 30 m.
Ved brug af en kabeltromle skal kablet altid rulles
helt ud.
SAMLING OG JUSTERING
ADVARSEL: Fjern altid batteripakken
før samling og justering. Slå altid
værktøjet fra, før du indsætter eller
fjerner batteripakken.
ADVARSEL: Anvend kun Bostitch-
batteripakker og -opladere.
Isætning og Udtagning af
Batteripakken fra Værktøjet (fi g. 2)
ADVARSEL: For at mindske risikoen
for alvorlige personskader, skal
du slukke for værktøjet og tage
batteriet ud, før du foretager
justeringer eller fjerner/installerer
tilbehør. Start ved et uheld kan
medføre skader.
BEMÆRK: Kontrollér at din batteripakke (l) er
helt opladet. De leverede batteripakker er ikke
nødvendigvis helt opladede.
SÅDAN INSTALLERES BATTERIPAKKEN I VÆRKTØJETS
HÅNDTAG
1. Justér kærven indvendigt i værktøjets håndtag
med batteripakken (l).
2. Skub batteripakken helt ind i håndtaget, indtil
du hører låsen klikke på plads.
SÅDAN FJERNES BATTERIPAKKEN FRA VÆRKTØJET
1. Tryk på udløsningsknappen (n) og skub
batteripakken ud fra værktøjets håndtag.
2. Sæt batteripakken i opladeren som beskrevet i
opladerafsnittet i denne vejledning.
BATTERIPAKKER TIL BRÆNDSTOFMÅLER (FIG. 2, 2A)
Nogle Bostitch batteripakker indeholder en
brændstofmåler, som består af tre grønne LED lys,
som angiver niveauet for den resterende opladning
i batteripakken.
Du aktiverer brændstofmåleren ved at trykke på
og holde brændstofmålerknappen (o) nede. En
kombination af de tre grønne LED lys vil lyse og
angive niveauet for den resterende opladning. Når
niveauet for opladning i batteriet ligger under den
brugbare grænse, lyser brændstofmåleren ikke, og
batteriet skal genoplades.
BEMÆRK: Brændstofmåleren giver kun en
indikation af den opladning, der resterer i
batteripakken. Den angiver ikke værktøjets
funktionalitet og er underlagt variation baseret
på produktkomponenter, temperatur og
slutbrugeranvendelse.
BEMÆRK: Opbevar ikke værktøjet
med isat batteripakke. For at forebygge
beskadigelse af pakken og for at
sikre lang levetid for batteriet, skal
batteripakker tages ud af værktøjet
eller opladeren og skal opbevares på
et køligt, tørt sted.
Drejning af spær/bæltekrog (fi g. 6)
Spær/bæltekrog (j) kan nemt placeres til venstre
eller højre for værktøjet, så den passer til venstreeller højrehåndede brugere.
Hvis brug af krogen overhovedet ikke ønskes, kan
den drejes til forsiden eller bagsiden af håndtaget.
Ladning af Værktøj (fi g. 4)
ADVARSEL: Lås altid værktøjet og
frakobl batteripakken før ilægning og
udtagning af fastgørelseselementer.
1. Skub den fjederbelastede skubberlås (h) til
bunden af magasinet til at låse den på plads.
2. Vælg en passende sømtype. (Se Tekniske
data.) Bostitch vil altid anbefale, at du bruger
Bostitch søm af eget fabrikat.
ADVARSEL: Da andet tilbehør end det,
som stilles til rådighed af Bostitch, ikke
er afprøvet med dette produkt, kan det
være farligt at bruge sådant tilbehør
med dette værktøj. For at mindske
risikoen for personskade, må dette
produkt kun anvendes med tilbehør,
som anbefales af Bostitch.
3. Indsæt sømmene i ladningsspalten på siden
af magasinet. Kontroller at sømmene vender
spidsen fremad i sømkanalen.
4. Luk magasinet ved at udløse skubberlåsen.
Lad låsen glide forsigtigt fremad og aktivere
sømstrimlen.
Tør brandlås
Sømpistolen er udstyret med en tør brandlås,
som forhindrer værktøjet i at bliver aktiveret, når
magasinet næsten er tomt. Når der er ca. 7 til
9 søm tilbage i magasinet, aktiveres værktøjets
78
Page 81

tørre brandlås. SeFyldning af værktøjet for at
genopfylde en stok med kollationerede søm
BEMÆRK: Hvis der lægges kraftig vægt på
værktøjet er det muligt at tilsidesætte låsen. Dette
beskytter værktøjet fra mulig skade, hvis det
tabes.
Justering af indslåningsdybden
(fi g. 5)
Sømmets indslåningsdybde kan justeres ved hjælp
af dybdejusteringshjulet.
1. Til at drive sømmet fladt, drej
dybdejusteringshjuletl (d) mod venstre, imod
symbolet for fladt søm.
2. Til at drive sømmet dybere, drej
dybdejusteringshjuletl (d) mod højre, imod
symbolet for dybere søm.
Valg af funktion (fi g. 1)
KUN BF33
Du vælger den sekventielt virkende funktion ved at
skubbe funktionsvælgeren (i) til at vise symbolet
( ) for et enkelt søm .
Du vælger den stødvirkende funktion ved at
skubbe funktionsvælgeren (i) til at vise symbole
( ) for tre søm.
BEMÆRK: Maksimal strømstyrke til at drive lange
søm i opnås i sekventiel funktion, begræns derfor
brugen af stødfunktionen ved inddrivning af lange
søm.
BETJENING
Brugsvejledning
ADVARSEL: Overhold altid
sikkerhedsvejledningen og de
gældende regler. Der kan være lokale
arbejdspladsregulativer, der gælder,
som forbyder brugen af stødfunktionen
ved visse anvendelser.
ADVARSEL: For at reducere risikoen
for personskade, sluk og tag
batteripakken af, inden der foretages
justeringer eller afmontering/
installation af udstyr eller tilbehør.
Utilsigtet start kan medføre kvæstelser.
Korrekt Håndposition (fi g. 7)
ADVARSEL: For at reducere risikoen
for personskade skal du ALTID
anvende den rette håndposition som
vist.
Korrekt håndposition kræver en hånd på
hovedhåndtaget (p) som vist.
ADVARSEL: For at
reducere risikoen for alvorlig
personskade skal du ALTID
holde godt fast i tilfælde af
en pludselig reaktion.
Klargøring af Værktøjet
(fi g. 1)
1. Fjern batteripakken (l) fra værktøjet
og kontrollér, at værktøjet er låst.
2. Tag alle søm ud af magasinet (g).
3. Kontroller at kontaktudløseren (c) kan bevæges
frit.
4. Læg sømmene tilbage i magasinet.
5. Indsæt batteripakken.
ADVARSEL: Brug ikke værktøjet, hvis
kontaktudløseren eller sømskubberen
ikke kan bevæges frit.
BEMÆRK: Der må
IKKE sprøjtes eller på
nogen anden måde
påføres smøremidler
eller rengøringsmidler i
værktøjet. Dette kan
påvirke værktøjets levetid
og ydelse i alvorlig grad.
DK
Affyring af Sømpistolen (fi g. 1)
Værktøjet kan betjenes på to måder:
sekvensindstilling eller stødindstilling.
SEKVENSINDSTILLING
Sekvensindstillingen bruges til intermitterende
affyring, når der er brug for en omhyggelig og
meget nøjagtig placering. Det giver også den
maksimale strømstyrke til at drive de længste søm
ind.
1. Sekvensindstillingen vælges med
funktionsomskifteren (i) ( ).
2. Løsn udløsersikkerhedslåsen (b).
3. Skub kontaktudløseren (c) ind mod
arbejdsfladen.
4. Træk i aftrækkeren (a) for at aktivere værktøjet.
5. Udløs udløseren og hæv sømmet fra
arbejdsoverfladen.
6. Gentag trinene 3–5 for at aktivere det næste
søm.
STØDVIRKENDE FUNKTION (KUN BF33)
Stødfunktionen bruges til hurtig sømning på flade,
stationære overflader og er typisk mest effektiv
ved inddrivning af kortere søm.
79
Page 82

1. Vælg stødindstillingen med
funktionsomskifteren (I) ( ).
2. Løsn udløsersikkerhedslåsen (b).
3. Et enkelt søm kan drives ind ved at benytte
værktøjet som beskrevet for sekventiel brug:
a. Skub kontaktudløseren (c) ind mod
arbejdsfalden.
b. Træk i aftrækkeren (a) for at aktivere
værktøjet. Hver gang der trækkes i
aftrækkeren med kontaktudløseren presset
ind mod arbejdsfladen, drives et søm ind.
4. Flere søm drives ind ved at trykke og holde
aftrækkeren (a) inde og derefter skubbe
kontaktudløseren (c) gentagne gange mod
arbejdsfladen.
ADVARSEL: Hold ikke aftrækkeren
trykket ned, når værktøjet ikke er i
brug. Behold udløsersikkerhedslåsen
(b) i låst position for at undgå, at den
går i gang ved en fejltagelse, når
værktøjet ikke er i brug.
5. Ved skift mellem sekventielle og
stødvirkende funktioner, kan det være
nødvendigt at justere indslåningsdybden.
Se Justering af indslåningsdybden for
instruktioner.
Anvendelse af
udløsersikkerhedslåsen (fi g. 3)
Alle Bostitch sømpistoler er udstyret med en
udløsersikkerhedslås (b) som når den skubbes
til højre som vist i figur 3, forhindrer værktøjet i
at affyre et søm ved at låse udløseren og ved at
omlede strømmen til motoren.
Når udløsersikkerhedslåsen er trykket
til venstre, vil værktøjet være fuldt
funktionsdygtigt. Udløsersikkerhedslåsen skal
altid være slået til, når der foretages justeringer,
eller når værktøjet ikke er direkte i brug.
Intet-mærkespids (fi g. 1)
Når du bruger dette værktøj på materialer,
som du ikke ønsker at lave mærker på,
som fx træbeklædning, skal du bruge
intet mærkespidsen (m) af plastik over
kontaktspidsen(c).
Lysdiodeindikator(fi g. 1)
Din sømpistol er udstyret med to
lysdiodeindikatorlys (e) som er placeret bag
på værktøjet lige under bagdækslet. Se også
Fejlfinding for flere instruktioner.
LAVT BATTERI
Udskift batteriet med en
opladet pakke.
VARM PAKKE
Lad batteriet afkøle eller udskift
det med en kold pakke.
BLOKERINGS-/
FASTLÅSNINGSTILSTAND
Drej på udløsergrebet for
at udløse fastlåsningen. Se
Udløsning af fastlåsning.
VARMT VÆRKTØJ
Lad værktøjet afkøle før du
fortsætter med at bruge det.
Udløsning af fastlåsning (fi g. 1, 3)
Hvis sømpistolen anvendes i til en hård opgave,
hvor al tilgængelig energi i motoren bruges til
at drive en fastgørelse, kan værktøjet gå i stå.
Indslåningsbladet afsluttede ikke kørselscyklussen,
og indikatorlyset (e) for blokering/fastlåsning
vil blinke. Drej udløsergrebet (f) til at udløse
fastlåsningen på værktøjet, og mekanismen
udløses. Hvis indslåningsbladet ikke automatisk
vender tilbage til startpositionen, fortsæt til
Udtagning af fastklemte søm. Hvis enheden
fortsætter er fastlåst, skal du gennemgå
valgfunktionen, længden på materialet og
fastgørelseselementet for at sikre, at opgaven ikke
er for hård.
Udtagning af fastklemte søm
(fi g.1,3)
Hvis et søm sætter sig fast i spidsen, vil
indikatorlyset (e) for blokering/fastlåsning blinke.
1. Tag batteripakken ud af værktøjet og aktivér
udløsersikkerhedslåsen (b).
2. Skub den fjederbelastede skubberlås (h) til
bunden af magasinet til at låse den på plads
og tøm sømstrimlen.
3. Løsn ved hjælp af det medfølgende
unbracoværktøj (k) de to sekskantbolte (q)
øverst i magasinet.
4. Drej magasinet (g) fremad.
5. Tag det fastklemte/bøjede søm ud. Brug
eventuelt en tang.
6. Hvis indslåningbladet er i nedad position,
drej udløsergrebet (f) ovenpå sømmet.
BEMÆRK: Hvis indslåningsbladet ikke
nulstilles efter drejning af udløsergrebet til
at udløse fastlåsningen, manuel nulstilling af
bladet med en lang skruetrækker kan blive
nødvendig.
80
Page 83

7. Drej magasinet tilbage til positionen under
værktøjsnæsen og spænd sekskantboltene
(q).
8. Sæt igen batteripakken i.
BEMÆRK: Værktøjet vil deaktivere sig selv og
vil ikke nulstille, før batteripakken er taget ud
og genindsat.
9. Læg igen søm i magasinet (se Fyldning af
værktøjet).
10. Udløs skubberlåsen (h).
11. Deaktivér udløsersikkerhedslåsen (b) når du er
klar til at fortsætte med at sømme.
Hvis sømmene tit sidder fast i spidsen, få
værktøjet efterset af et autoriseret Bostitch
serviceværksted.
VEDLIGEHOLDELSE
Dit Bostitch-elværktøj er beregnet til langvarig
brug med minimal vedligeholdelse. Værktøjets
fortsatte tilfredsstillende drift afhænger af korrekt
vedligeholdelse og rengøring af værktøjet.
ADVARSEL: For at reducere risikoen
for alvorlig personskade skal
værktøjet slukkes og batteripakken
fjernes, før der foretages nogen
former for justering eller af-/
påmontering af værktøjsdele eller
tilbehør. Utilsigtet start kan forårsage
personskade.
Der kan ikke udføres service på opladeren eller
batteripakken. Der er ingen dele inden i, der kan
repareres.
Smøring
Dette elektriske værktøj skal ikke smøres
yderligere.
BEMÆRK: Der må
IKKE sprøjtes eller på
nogen anden måde
påføres smøremidler
eller rengøringsmidler i
værktøjet. Dette kan
påvirke værktøjets levetid
og ydelse i alvorlig grad.
Rengøring
ADVARSEL: Blæs støv og snavs
ud af hovedhuset med tør luft, lige
så snart der samler sig snavs i og
omkring luftaftrækket. Bær godkendte
beskyttelsesbriller og
godkendt støvmaske
ved udførelse af denne
procedure.
ADVARSEL: Brug aldrig
RENGØRINGSINSTRUKTIONER FOR OPLADEREN
ADVARSEL: Fare for elektrisk stød.
opløsningsmidler eller andre
kraftige kemikalier til at
rengøre værktøjets
ikke-metalliske dele. Disse
kemikalier kan svække de
materialer, der anvendes i
disse dele. Brug en klud, der
kun er fugtet med vand og
mild sæbe. Lad aldrig væske trænge
ind i værktøjet, og nedsænk aldrig
nogen del af værktøjet i væske.
Afbryd strømforsyningen til opladeren
før rengøring. Snavs og fedt kan
fjernes fra opladerens yderside med
en klud eller blød børste, der ikke
er af metal. Brug ikke vand eller
rengøringsmidler.
DK
Valgfrit tilbehør
ADVARSEL: Da andet tilbehør end det,
Kontakt forhandleren for yderligere oplysninger om
korrekt tilbehør.
som stilles til rådighed af Bostitch, ikke
er afprøvet med dette produkt, kan det
være farligt at bruge sådant tilbehør
med dette værktøj. For at mindske
risikoen for personskade, må dette
produkt kun anvendes med tilbehør,
som anbefales af Bostitch.
Miljøbeskyttelse
Særskilt bortskaffelse. Dette produkt
må ikke bortskaffes sammen med
almindeligt husholdningsaffald.
Hvis du på noget tidspunkt finder det nødvendigt
at udskifte dit Bostitch-produkt, eller hvis det ikke
længere tjener det tiltænkte formål, må det ikke
bortskaffes med almindeligt husholdningsaffald.
Sørg for, at dette produkt bortskaffes særskilt.
Særskilt bortskaffelse af brugte
produkter og emballage gør det muligt
at genbruge materialer og anvende
dem på ny. Genanvendelse af
genbrugsmaterialer bidrager til at
forhindre forurening af
miljøet og reducerer behovet for
råmaterialer.
81
Page 84

Lokale forskrifter muliggør i nogen tilfælde
særskilt bortskaffelse af elektriske produkter fra
husholdningen, ved kommunale affaldsdepoter
eller hos forhandleren i forbindelse med køb af et
nyt produkt.
Bostitch har stillet faciliteter til rådighed til
indsamling og genbrug af udslidte Bostitchprodukter. For at benytte sig af denne service kan
man returnere produktet til et hvilket som helst
autoriseret serviceværksted, der modtager det på
vore vegne.
Du kan finde ud af, hvor det nærmeste
autoriserede serviceværksted befinder sig ved
at kontakte dit lokale Bostitch-kontor på den
adresse, der er angivet i denne manual. Alternativt
findes der en liste over autoriserede Bostitchserviceværksteder og detaljerede oplysninger om
vores eftersalgsservice og kontakter på følgende
internetadresse: www.2helpU.com.
Genopladelig batteripakke
Denne batteripakke har en lang levetid, men
skal udskiftes, når den ikke afgiver tilstrækkelig
effekt ved opgaver, der før var lette at udføre. Ved
afslutningen af dens tekniske levetid skal den
bortskaffes under hensyntagen til miljøet.
• Brug batteripakken til den er helt tom, og fjern
den derefter fra værktøjet.
• Li-Ion-, NiCd- og NiMH-celler kan genbruges.
Indlever dem hos forhandleren eller en lokal
genbrugsstation. De indsamlede batteripakker
vil blive genbrugt eller bortskaffet på forsvarlig
vis.
82
Page 85

FEJLFINDINGSVEJLEDNING
MANGE ALMINDELIGE PROBLEMER KAN LET LØSES VED HJÆLP AF SKEMAET
NEDENFOR.
For mere alvorlige eller vedvarende problemer Kontakt din nærmeste autoriserede Bostitch
reparatør eller kontakt dit Bostitch kontor på adressen, der står i denne vejledning.
SYMPTOM ÅRSAG LØS
Motor kører ikke
med udløseren
trykket ind
Motor kører ikke
med kontaktspidsen
trykket ind
ADVARSEL: Du nedsætter risikoen for alvorlig personskade ved ALTID at frakoble
battteripakken fra værktøjet før alle reparationer
Udløserlås i låst position Lås udløserlåsen op.
Værktøjet sidder fast og
forhindrer motoren i at dreje
Værktøjet står i sekventiel
aktiveringsfunktion
Værktøjets interne elektronik skal
nulstilles
Motor stopper med at køre efter
5 sekunder
Poler er snavsede eller ødelagte Se autoriseret Bostitch reparatør.
Ødelagt intern elektronik Se autoriseret Bostitch reparatør.
Ødelagt udløser Se autoriseret Bostitch reparatør.
Batteriet er varmt Lad batteriet afkøle eller udskift det med en kold
Værktøjet er varmt Lad værktøjet afkøle før du fortsætter med at
Udløserlås i låst position Lås udløserlåsen op.
Tør brandlås aktiveret, blokerer
kontaktspidsen i fuld bevægelse
Værktøjet sidder fast og
forhindrer motoren i at dreje
Bøjet kontaktudløser Se autoriseret Bostitch reparatør.
Motor stopper med at køre efter
5 sekunder
Poler er snavsede eller ødelagte Se autoriseret Bostitch reparatør.
Ødelagt intern elektronik Se autoriseret Bostitch reparatør.
Ødelagt udløser Se autoriseret Bostitch reparatør.
Batteriet er varmt Lad batteriet afkøle eller udskift det med en kold
Værktøjet er varmt Lad værktøjet afkøle før du fortsætter med at
Drej udløsergrebet til at udløse fastlåsningen
på værktøjet, og mekanismen udløses. Hvis
indslåningsbladet ikke vender tilbage, tag
batteriet ud og skub manuelt indslåningsbladet
tilbage til startposition.
Tryk først på kontaktspidsen før affyring eller skift
til stødfunktion (kun BF33).
Udtag batteriet, vent 3 sekunder og sæt det i
igen.
Normal drift, udløs udløseren og tryk den igen
ned.
pakke.
bruge det.
Læg flere søm i magasinet.
Drej udløsergrebet til at udløse fastlåsningen
på værktøjet, og mekanismen udløses. Hvis
indslåningsbladet ikke vender tilbage, tag
batteriet ud og skub manuelt indslåningsbladet
tilbage til startposition.
Normal drift, udløs kontaktudløser og tryk den
igen ned.
pakke.
bruge det.
DK
83
Page 86

FEJLFINDINGSVEJLEDNING (fortsat)
SYMPTOM ÅRSAG LØS
Værktøjet aktiveres
ikke (motoren kører,
men vil ikke affyre)
Motoren starter, men
genererer en masse
støj
Indslåningsbladet
sidder fortsat fast i
nedad position
Værktøjet kører, men
slår ikke sømmene
helt i
Værktøjet kører,
men intet
fastgørelseselement
køres
84
Tør brandlås aktiveret, blokerer
kontaktspidsen i fuld bevægelse
Lavt batteri eller ødelagt batteri Kontrollér opladningsniveau, hvis pakken
Fastklemt søm/indslåningsbladet
er ikke vendt tilbage til
startposition
Ødelagt driver/retursamling Udskift driver/retursamling Se autoriseret
Fastklemt intern mekanisme Se autoriseret Bostitch reparatør.
Ødelagt intern elektronik Se autoriseret Bostitch reparatør.
Fastklemt søm og indslåningsblad
sidder fast i nedad position
Ødelagt driver/retursamling Udskift driver/retursamling Se autoriseret Bostitch
Fastklemt søm og indslåningsblad
sidder fast i nedad position
Ødelagt driver/retursamling Udskift driver/retursamling Se autoriseret Bostitch
Længde på materiale og
fastgørelseselement
Snavs i spidsen Rens spidsområdet og vær meget opmærksom
Dybdejusteringsindstillingen for
overfladisk
Værktøjet sidder ikke helt op til
arbejdsemnet
Stødfunktion valgt med lange
søm (kun BF33)
Længde på materiale og
fastgørelseselement
Ødelagt eller slidt spids på
indslåningsblad
Værktøj anvendt med intet-
mærke-spids
Ødelagt aktiveringsmekanisme Se autoriseret Bostitch reparatør.
Ingen søm i magasinet Læg søm i magasinet
Forkert størrelse eller vinkel på
søm
Snavs i spidsen Rens spidsområdet og vær meget opmærksom
Snavs i magasinet Rens magasinet.
Slidt magasin Udskift magasin. Se autoriseret Bostitch reparatør.
Ødelagt eller slidt indslåningsblad Udskift indslåningsbladet. Se autoriseret Bostitch
Ødelagt skubbefjeder Udskift fjeder, kontakt Se autoriseret Bostitch
Læg søm i magasinet.
viser ”state-of-charge”. Oplad eller udskift om
nødvendigt batteripakken.
Tag batteriet ud, frigør fastklemt søm, kør
udløsergrebet til at udløse fastlåsningen frem og
tilbage (skub om nødvendigt skubberbladet op
manuelt), sæt igen batteripakken i.
Bostitch reparatør.
Brug udløsergrebet til at udløse fastlåsningen,
udred om nødvendigt alle fastklemte søm og
returindslåningsbladet manuelt.
reparatør.
Brug udløsergrebet til at udløse fastlåsningen,
udred om nødvendigt alle fastklemte søm og
returindslåningsbladet manuelt.
reparatør.
Hvis enheden fortsætter med at gå i stå
(tvinger behovet for at dreje udløsergrebet for
fastlåsning) vælg passende længde på materiale
og fastgørelseselement, som ikke er for hård til
opgaven.
på små stykker brækket søm i stien.
Drej dybdeindstilling til en dybere indstilling.
Anvend tilstrækkelig kraft til at sikre, at
det sidder tæt op ad arbejdsemnet. Se
instruktionsvejledningen.
Vælg sekventiel funktion.
Hvis enheden fortsætter med at gå i stå
(tvinger behovet for at dreje udløsergrebet for
fastlåsning) vælg passende længde på materiale
og fastgørelseselement, som ikke er for hård til
opgaven.
Udskift driver/retursamling. Se autoriseret Bostitch
reparatør.
Fjern intet-mærke-spidsen.
Brug kun anbefalede søm. Se Tekniske data.
på små stykker brækket søm i stien
reparatør.
reparatør.
Page 87

FEJLFINDINGSVEJLEDNING (fortsat)
SYMPTOM ÅRSAG LØS
Fastklemt søm Forkert størrelse eller vinkel på
søm
Magasinskruer ikke sikret
efter foregående udredning af
fastklemning/inspektion
Ødelagt eller slidt indslåningsblad Udskift indslåningsbladet. Se autoriseret Bostitch
Længde på materiale og
fastgørelseselement
Snavs i spidsen Rens spidsområdet og vær meget opmærksom
Slidt magasin Udskift magasin. Se autoriseret Bostitch reparatør.
Ødelagt skubbefjeder Udskift fjeder. Se autoriseret Bostitch reparatør.
Den tørre brandlås er aktiveret
med kun 7-9 søm tilbage
i magasinet, og brugeren
anvender mange kræfter på
at tvinge kontatktspidsen til at
tilsidesætte låsen
Brug kun anbefalede søm. Se Tekniske data.
Sørg for at spænde sekskantbolte på magasinet
med den medfølgende skruenøgle.
reparatør.
Hvis enheden fortsætter med at gå i stå
(tvinger behovet for at dreje udløsergrebet for
fastlåsning) vælg passende længde på materiale
og fastgørelseselement, som ikke er for hård til
opgaven.
på små stykker brækket søm i stien.
Læg flere søm i magasinet for at deaktivere den
tørre brandlås.
DK
85
Page 88

18V LITIUMIONI LANGATON RUNKONAULAIN
BF33, BF33-2
Onnittelut!
Bostitch-työkalut on tarkkuusvalmistettu ja
suunniteltu korkean nopeuden suurivolyymiseen
kiinnittämiseen. Ne tarjoavat tehokkaan,
luotettavan palvelun, kun niitä käytetään oikein ja
huolellisesti. Kuten millä tahansa sähkötyökalulla,
valmistajan ohjeita tulee noudattaa parhaiden
tulosten saavuttamiseksi. Ota yhteyttä Bostitchedustajaan tai jälleenmyyjään, jos sinulla on
kysyttävää työkalusta ja sen käytöstä.
VAROITUS: Ilmoitettu tärinä esiintyy
Tärinä vähentyy, kun työkalusta
Tekniset Tiedot
BF33 BF33-2
Jännite VDC 18 18
Tyyppi 1 1
Käyttötila Sarja/ Vain
sku kertalaukaisu
Makasiinin kulma 33° 33°
Naulat
pituus mm 50–90 50–90
varren läpimitta mm 2,8–3,3 2,8–3,3
kulma 30–34° 30–34°
pään geometria kiinnitetty tai kiinnitetty tai
poikkeama poikkeama
vertailutyyppi paperi paperi
Paino (ilman
akkupakkausta) kg 3,53 3,53
Käyttöenergia J 105 105
LPA (äänenpaine)
KPA (äänenpaineen vaihtelu)
LWA (ääniteho)
KWA (äänitehon vaihtelu)
dB(A)
dB(A)
dB(A)
dB(A)
pyöreä
84 84
3 3
95 95
3 3
pyöreä
Työkalun käyttäjän altistumista tärinälle
Akkupakkaus B-CB182
Akkutyyppi Li-Ion
Jännite V
Kapasiteetti Ah 4,0
Paino kg 0,61
Laturi B-CB105
Verkkojännite VAC 230
Akkutyyppi Li-Ion
Arvioitu latausaika min 70
(4,0 Ah:n akut)
Paino kg 0,49
Sulakkeet
Eurooppa 230 voltin työkalut 10 ampeerin sulake
käytettäessä työkalua sen varsinaiseen
käyttötarkoitukseen. Jos työkalua
käytetään erilaiseen tarkoitukseen,
jos siihen on kiinnitetty erilaisia
lisävarusteita tai jos sitä on hoidettu
huonosti, tärinä voi lisääntyä. Tämä voi
vaikuttaa merkittävästi altistumiseen
työkalua käytettäessä.
katkaistaan virta tai se toimii
tyhjäkäynnillä. Tämä voi vähentää
tärinää merkittävästi työkalua
käytettäessä.
voidaan vähentää merkittävästi
pitämällä työkalu ja sen varusteet
kunnossa, pitämällä kädet lämpiminä
ja kiinnittämällä huomiota työn
jaksottamiseen.
DC
18
Tärinän kokonaisarvot (kolmiakselivektorisumma) EN 60745
-standardin mukaisesti:
Tärinän päästöarvo a
ah
=
Vaihtelu K
Tässä käyttöohjeessa ilmoitettu tärinäarvo on
mitattu EN 60745 -standardin mukaisesti. Sitä
voidaan käyttää verrattaessa työkaluja keskenään.
Sitä voidaan käyttää arvioitaessa altistumista.
86
h
m/s²
m/s² 3,8 3,8
1,5 1,5
Määritelmät: Turvallisuusohjeet
Alla näkyvät selitykset liittyvät turvallisuuteen. Lue
käyttöohje ja kiinnitä huomiota näihin symboleihin.
VAARA: Ilmaisee, että on
olemassa hengen- tai vakavan
henkilövahingon vaara.
VAROITUS: Ilmoittaa, että on
olemassa hengen- tai vakavan
vaaran mahdollisuus.
Page 89

HUOMIO: Tarkoittaa mahdollista
vaaratilannetta. Ellei tilannetta
korjata, saattaa aiheutua lievä tai
keskinkertainen loukkaantuminen.
HUOMAUTUS: Viittaa menettelyyn,
joka ei välttämättä aiheuta
henkilövahinkoa mutta voi aiheuttaa
omaisuusvahingon.
Tulipalon vaara.
Sähköiskun vaara!
EY-yhdenmukaisuusilmoitus
KONEDIREKTIIVI
BF33, BF33-2
Bostitch vakuuttaa, että nämä tuotteet täyttävät
seuraavat määräykset:
2006/42/EU, EN 60745-1, EN 60745-2-16.
Nämä tuotteet täyttävät myös direktiivin
2004/108/EU ja 2011/65/EU vaatimukset. Saat
lisätietoja ottamalla yhteyden Bostitchiin.
Allekirjoittaja vastaa Teknisistä tiedoista ja antaa
tämän vakuutuksen Bostitchin puolesta.
Colin Earl
Toimitusjohtaja
Europe, Middle East & Africa
Stanley Black & Decker bvba
Kanaalweg 112 IZ Ravenshout zone 3
3980 Tessenderlo, Belgium
28.06.2013
VAROITUS: Loukkaantumisriskin
vähentämiseksi lue tämä käyttöohje.
Sähkötyökalun yleiset
turvallisuusvaroitukset
VAROITUS! Lue kaikki
turvallisuusvaroitukset ja ohjeet Jos
varoituksia ja ohjeita ei noudateta, on
olemassa sähköiskun, tulipalon ja/tai
vakavan henkilövahingon vaara.
SÄILYTÄ KAIKKI VAROITUKSET JA
OHJEET MYÖHEMPÄÄ KÄYTTÖÄ
VARTEN
Näissä varoituksissa käytettävä
sähkötyökalu-ilmaus viittaa verkkovirtaan
yhdistettävään tai akkukäyttöiseen
työkaluun.
1) TYÖSKENTELYALUEEN TURVALLISUUS
a) Pidä työskentelyalue siistinä
ja kirkkaasti valaistuna.
Onnettomuuksia sattuu
herkemmin epäsiistissä
tai huonosti valaistussa
ympäristössä.
b) Älä käytä sähkötyökaluja, jos on
olemassa räjähdysvaara esimerkiksi
syttyvien nesteiden, kaasujen tai pölyn
vuoksi. Sähkötyökalujen aiheuttamat kipinät
voivat sytyttää pölyn tai kaasut.
c) Pidä lapset ja sivulliset kaukana
käyttäessäsi sähkötyökalua.
Keskittymiskyvyn herpaantuminen voi
aiheuttaa hallinnan menettämisen.
2) SÄHKÖTURVALLISUUS
a) Pistokkeen ja pistorasian on
vastattava toisiaan. Älä koskaan tee
pistokkeeseen mitään muutoksia. Älä
yhdistä maadoitettua sähkötyökalua
jatkojohtoon. Sähköiskun vaara vähenee,
jos pistokkeisiin ei tehdä muutoksia ja
ne yhdistetään vain niille tarkoitettuihin
pistorasioihin.
b) Älä kosketa maadoituksessa
käytettäviin pintoihin, kuten putkiin,
lämpöpattereihin ja jäähdytyslaitteisiin.
Voit saada sähköiskun, jos kehosi on
maadoitettu.
c) Älä altista sähkötyökaluja sateelle tai
kosteudelle. Sähkötyökaluun menevä vesi
lisää sähköiskun vaaraa.
d) Älä vaurioita sähköjohtoa. Älä kanna
työkaluja sähköjohdosta tai vedä
pistoketta pistorasiasta sähköjohdon
avulla. Pidä sähköjohto kaukana
kuumuudesta, öljystä, terävistä reunoista
tai liikkuvista osista. Vaurioituneet tai
sotkeutuneet johdot lisäävät sähköiskun
vaaraa.
e) Jos käytät sähkötyökalua ulkona,
käytä vain ulkokäyttöön tarkoitettua
jatkojohtoa. Ulkokäyttöön tarkoitetun
sähköjohdon käyttäminen vähentää
sähköiskun vaaraa.
f) Jos sähkötyökalua on käytettävä
kosteassa paikassa, käytä
vikavirtasuojaa. Tämä vähentää sähköiskun
vaaraa.
FI
87
Page 90

3) HENKILÖSUOJAUS
a) Käyttäessäsi sähkötyökalua pysy
valppaana, keskity työhön ja käytä
tervettä järkeä. Älä käytä tätä työkalua
ollessasi väsynyt tai alkoholin,
huumeiden tai lääkkeiden vaikutuksen
alaisena. Keskittymisen herpaantuminen
hetkeksikin sähkötyökalua käytettäessä voi
aiheuttaa vakavan henkilövahingon.
b) Käytä henkilösuojausvarusteita. Käytä
aina suojalaseja. Hengityssuojaimen,
liukumattomien turvajalkineiden, kypärän
ja kuulosuojaimen käyttäminen vähentää
henkilövahinkojen vaaraa.
c) Estä tahaton käynnistäminen. Varmista,
että virtakytkin on OFF-asennossa,
ennen kuin kytket sähkötyökalun
pistorasiaan, yhdistät siihen akun,
nostat työkalun käteesi tai kannat
sitä. Sähkötyökalun kantaminen sormi
virtakytkimellä lisää onnettomuusvaaraa.
d) Poista kaikki säätöavaimet tai vääntimet
ennen sähkötyökalun käynnistämistä.
Sähkötyökalun pyörivään osaan jäänyt
säätöavain tai väännin voi aiheuttaa
henkilövahingon.
e) Älä kurkottele. Seiso aina vakaasti
tasapainossa. Näin voit hallita
sähkötyökalua paremmin odottamattomissa
tilanteissa.
f) Pukeudu oikein. Älä käytä löysiä vaatteita
tai koruja. Pidä hiukset, vaatteet ja kädet
loitolla liikkuvista osista. Löysät vaatteet,
korut tai pitkät hiukset voivat tarttua
liikkuviin osiin.
g) Jos käytettävissä on laitteita pölyn
ottamiseksi talteen, käytä niitä. Pölyn
ottaminen talteen voi vähentää pölyn
aiheuttamia vaaroja.
4) SÄHKÖTYÖKALUISTA HUOLEHTIMINEN
a) Älä kohdista sähkötyökaluun liikaa
voimaa. Valitse käyttötarkoituksen
kannalta oikea sähkötyökalu.
Sähkötyökalu toimii paremmin ja
turvallisemmin, kun sitä käytetään sille
suunniteltuun käyttötarkoitukseen.
b) Älä käytä työkalua, jos virtakytkin ei
toimi. Jos sähkötyökalua ei voi hallita
kytkimen avulla, se on vaarallinen ja se on
korjattava.
c) Katkaise sähkötyökalusta virta ja irrota
sen pistoke pistorasiasta tai irrota akku
siitä ennen säätämistä, varusteiden
vaihtamista tai sähkötyökalun
asettamista säilytykseen. Näin voit
vähentää vahingossa käynnistymisen
aiheuttaman henkilövahingon vaaraa.
d) Varastoi sähkötyökaluja lasten
ulottumattomissa. Älä anna
sähkötyökaluihin tottumattomien tai
näihin ohjeisiin perehtymättömien
henkiöiden käyttää sähkötyökaluja.
Sähkötyökalut ovat vaarallisia
kouluttamattomien käyttäjien käsissä.
e) Pidä sähkötyökalut kunnossa. Tarkista
liikkuvat osat, niiden kiinnitys, osien
eheys ja muut toimintaan vaikuttavat
tekijät. Jos havaitset vaurioita, korjauta
sähkötyökalu ennen niiden käyttämistä.
Huonosti kunnossapidetyt sähkötyökalut
aiheuttavat onnettomuuksia.
f) Pidä leikkaavat pinnat terävinä ja
puhtaina. Kunnossa pidettyjen leikkaavia
teräviä reunoja sisältävien työkalut
todennäköisyys jumiutua vähenee, ja niitä
on helpompi hallita.
g) Käytä sähkötyökalua ja sen tarvikkeita,
kuten poranteriä, näiden ohjeiden
mukaisesti. Ota työskentelyolosuhteet ja
tehtävä työ huomioon. Jos sähkötyökalua
käytetään näiden ohjeiden vastaisesti, voi
syntyä vaaratilanne.
5) AKKUKÄYTTÖISTEN TYÖKALUJEN KÄYTTÄMINEN JA
NIISTÄ HUOLEHTIMINEN
a) Käytä ainoastaan valmistajan
suosittelemaa latauslaitetta.
Tietyntyyppiselle akulle soveltuva latauslaite
voi aiheuttaa tulipalon vaaran käytettynä
yhdessä toisen akun kanssa.
b) Käytä sähkötyökalussa vain siihen
tarkoitettuja akkuja. Muiden akkujen
käyttäminen voi aiheuttaa tulipalon tai
onnettomuuden vaaran.
c) Kun akku ei ole käytössä, pidä se poissa
muiden metalliesineiden läheltä, kuten
paperiliittimien, kolikoiden, avainten,
naulojen, ruuvien tai muiden pienten
esineiden läheltä. Ne voivat oikosulkea
akun navat. Akun napojen oikosulkeminen
voi aiheuttaa palovamman tai tulipalon.
d) Oikosulku voi aiheuttaa nesteen
vuotamisen akusta. Vältä koskemasta
tähän nesteeseen. Jos nestettä pääsee
vahingossa iholle, huuhtele vedellä.
Jos tätä nestettä pääsee silmään, ota
yhteys lääkäriin. Akkuneste voi ärsyttää tai
aiheuttaa palovamman.
6) HUOLTO
a) Korjauta työkalu valtuutetulla
asentajalla. Varaosina on käytettävä
vain alkuperäisiä vastaavia osia. Tämä
varmistaa sähkötyökalun turvallisuuden.
88
Page 91

Langattomien naulauskoneiden
turvallisuusohjeet
• Oleta aina, että työkalu sisältää nauloja.
Naulauskoneen huolimaton käsittely voi johtaa
naulojen odottamattomaan laukaisemiseen ja
henkilövahinkoihin.
• Älä kohdista työkalua itseesi tai muihin
päin. Odottamaton laukaisemisen yhteydessä
laitteesta sinkoaa naula, joka voi aiheuttaa
henkiövahinkoja.
• Älä kytke työkalua päälle, ellei se ole
tiukasti työkappaletta vasten. Jos työkalu
ei kosketa työkappaleeseen, naula voi singota
väärään suuntaan.
• Irrota työkalu sähköverkosta, jos naula jää
kiinni työkaluun. Kun poistat kiinni jääneen
naulan, naulauskone voi kytkeytyä vahingossa
päälle, jos se on liitetty sähköverkkoon.
• Älä käytä tätä naulauskonetta
sähköjohtojen kiinnittämiseen. Sitä ei ole
tarkoitettu sähköjohtojen asentamiseen ja se
voi vaurioittaa sähköjohtojen eristystä ja täten
aiheuttaa sähköiskuja tai tulipalovaaroja.
• Käytä aina suojalaseja.
• Käytä aina korvasuojaimia.
• Käytä vain käyttöohjeessa määriteltyä
naulatyyppiä.
• Älä käytä mitään asennustelineitä työkalun
tukemiseen.
• Älä irrota naulaimen mitään osaa, kuten
kärkilaukaisinta, tai estä sen toimintaa.
• Tarkista ennen jokaista työtä, että turva- ja
laukaisumekanismi toimii oikein ja että kaikki
mutterit ja pultit ovat tiukasti kiinni.
• Älä käytä BF33-laitetta
– kun vaihdat yhdestä työskentelykohteesta
toiseen ja joudut käyttämään
rakennustelineitä, portaita, tikkaita tai
tikkaiden kaltaisia rakenteita, esim.
kattoruoteita jne,
– laatikoiden tai kuljetuslaatikoiden
sulkemiseen,
– turvallisuusjärjestelmien kiinnittämiseen
kuljetuksen aikana, esim. ajoneuvoissa,
vaunuissa jne.
Tarkista poikkeukset paikallisista
työpaikkasäädöksistä.
• Tarkista aina paikallisen työpaikan määräykset.
• Älä käytä työkalua vasarana.
• Älä koskaan kohdista naulainta tyhjään
kohtaan.
• Kanna työkalua työskentelyalueella
aina vain yhdellä kädellä äläkä
koskaan liipaisimen ollessa
toimintavalmiina.
• Ota huomioon työskentelyalueen
olosuhteet. Naulat voivat tunkeutua
ohuen kappaleen läpi tai luiskahtaa
kappaleen nurkista tai reunoista ja
olla siten vaaraksi paikalla olijoille.
• Älä laukaise nauloja lähelle
työkappaleen reunaa.
• Älä laukaise nauloja toisten naulojen
päälle.
Vaarat
Seuraavat riskit liittyvät näiden koneiden käyttöön:
– Työkalun väärinkäytöstä aiheutuvat
henkilövahingot.
– Hallinnan menetys puutteellisen työkalun kiinni
pitämisen vuoksi.
– Käsivarsien ja käsien lihasrasitukset, erityisesti
pään yläpuolella työskennellessä. Pidä aina
säännöllisiä taukoja pitkien käyttöjaksojen
aikana.
Turvamääräysten noudattamisesta ja turvalaitteiden
käyttämisestä huolimatta tiettyjä vaaroja ei voida
välttää. Näitä ovat seuraavat:
– Kuulon heikkeneminen.
– Lentävien kappaleiden aiheuttamat
henkilövahingot.
– Pitkäaikaisen käyttämisen aiheuttamat
henkilövahingot.
– Takaiskun aiheuttama hallinnan menetys.
– Kiinnityskohdan aiheuttama
henkilövahinkovaara, terävät reunat ja
työkappaleen virheellinen käsittely.
– Terävien reunojen aiheuttama
henkilövahinkovaara nauloja vaihtaessa tai
naulayksiköitä asettaessa.
Työkalun Merkinnät
Seuraavat kuvakkeet näkyvät työkalussa:
Lue käyttöohjeet ennen käyttämistä.
Käytä kuulosuojaimia.
Käytä suojalaseja.
Älä käytä työkalussa voitelua.
FI
89
Page 92

Makasiinin kulma.
Naulojen pituus/aulojen
paksuus.
PÄIVÄMÄÄRÄKOODIN SIJAINTI
Päivämääräkoodi on merkitty kotelon pintaan
laitteen ja akun väliin. Se sisältää myös
valmistusvuoden.
Esimerkki:
2013 XX XX
Valmistusvuosi
Tärkeitä turvallisuusohjeita
latauslaitetta käytettäessä
SÄILYTÄ NÄMÄ OHJEET: Tässä ohjeessa on
tärkeitä turvallisuus- ja käyttöohjeita B-CB105akkulaturille.
• Lue kaikki laturin, akkuyksikön ja akkuyksikköä
käyttävän tuotteen ohjeet ja varoitusmerkinnät
ennen laturin käyttöä.
VAROITUS: Sähköiskun vaara. Älä
päästä nestettä laturin sisään. Se voi
aiheuttaa sähköiskun.
HUOMIO: Palovamman vaara.
Loukkaantumisriskin vähentämiseksi
lataa vain ladattavia Bostitch akkuja.
Muut akkutyypit voivat ylikuumentua
ja puhjeta ja aiheuttaa henkilö- ja
omaisuusvahinkoja. Älä lataa akkuja,
joita ei voi ladata uudelleen.
HUOMIO: Lapsia tulee valvoa ja
varmistaa, että he eivät leiki laitteella.
HUOMAUTUS: Tietyissä olosuhteissa
kun laturi on liitetty tehosyöttöön,
vieras materiaali voi aiheuttaa laturin
oikosulun. Johtavat materiaalit
kuten, mutta ei näihin rajoittuen,
hiomapöly, metallihiukkaset,
teräsvilla, alumiinifolio tai muu
metallipartikkeleiden kasaantuma,
tulee pitää poissa laturin aukoista.
Irrota laturi aina tehonsyötöstä, kun
laturissa ei ole akkuyksikköä. Irrota
laturi tehonsyötöstä ennen kuin yrität
puhdistaa sitä.
• ÄLÄ YRITÄ ladata akkuyksikköä millään
muulla laturilla kuin tässä käyttöohjeessa
mainituilla. Laturi ja akkuyksikkö on
suunniteltu erityisesti toimimaan yhdessä.
• Näitä latureita ei ole tarkoitettu
käytettäväksi mihinkään muuhun
tarkoitukseen kuin ladattavien Bostitch-
90
.
akkujen lataamiseen. Muu voi aiheuttaa
tulipalon tai jopa kuolettavan sähköiskun riskin.
• Älä jätä laturia sateeseen tai lumeen.
• Vedä pistokkeesta äläkä johdosta, kun
irrotat laturia verkkovirrasta. Tämä vähentää
pistokkeen ja sähköjohdon vahingoittumisen
riskiä.
• Varmista, että johto sijaitsee niin, että sen
päälle ei astuta, siihen ei kompastu tai että
siihen ei muuten kohdistu vaurioita tai
rasitusta.
• Älä käytä jatkojohtoa ellei se ole
ehdottoman välttämätöntä. Jatkojohdon
virheellinen käyttö voi aiheuttaa tulipalon tai
jopa kuolettavan sähköiskun riskin.
• Kun laturia käytetään ulkotilassa, aseta
se aina kuivaan paikkaan ja käytä
ulkokäyttöön sopivaa jatkojohtoa.
Ulkokäyttöön tarkoitetun sähköjohdon
käyttäminen vähentää sähköiskun vaaraa.
• Älä tuki laturin tuuletusaikkoja.
Tuuletusaukot sijaitsevat laturin yläosassa
ja sivuilla. Sijoita laturi pois lämpölähteiden
läheltä.
• Älä käytä laturia, jos johto tai pistoke on
vahingoittunut– vaihdata ne välittömästi.
• Älä käytä laturia, jos siihen on kohdistunut
terävä isku, se on pudotettu tai muuten
vahingoittunut millään tavalla. Vie se
valtuutettuun huoltoon.
• Älä pura laturia. Vie se valtuutettuun
huoltoon, jossa se huolletaan tai korjataan.
Virheellinen kokoaminen voi aiheuttaa tulipalon
tai jopa kuolettavan sähköiskun riskin.
• Jos virtajohto on vahingoittunut, valmistajan,
huollon tai vastaavan pätevän henkilön täytyy
vaihtaa se välittömästi.
• Irrota laturi pistorasiasta ennen kuin yrität
puhdistaa sitä. Tämä vähentää sähköiskun
vaaraa. Akkuyksikön poistaminen ei vähennä
riskiä.
• ÄLÄ KOSKAANyritä yhdistää kahta laturia
yhteen.
• Laturi on suunniteltu toimimaan tavallisella
230 V:n kotitalouden sähkövirralla. Älä yritä
käyttää mitään muuta kuin määritettyä
jännitettä. Tämä ei koske autolaturia.
SÄILYTÄ NÄMÄ OHJEET
Latauslaitteet
B-CB105-laturissa voi ladata 18 V:n litiumioniakkuja
(B-CB182).
Tämä laturi ei vaadi säätöä ja sen käyttö on
suunniteltu mahdollisimman helpoksi.
Page 93

Lataaminen [kuva (fi g.) 2]
1. Yhdistä laturi sopivaa 230 V pistorasiaan ennen
kuin laitat siihen akun.
2. Aseta akku (l) laturiin ja varmista, että se on
hyvin paikoillaan laturissa. Punainen (latauksen)
merkkivalo vilkkuu jatkuvasti ilmoittaen, että
latausprosessi on alkanut.
3. Kun akku on ladattu täyteen, punainen
latausvalo palaa jatkuvasti. Akku on nyt
ladattu, ja se voidaan ottaa käyttöön tai jättää
latauslaitteeseen.
HUOMAA: Jotta varmistat Li-Ion-akkujen
parhaimman mahdollisen suorituskyvyn ja pitkän
käyttöiän, akku tulee ladata täyteen ennen
ensimmäistä käyttöä.
Lataaminen
Alla näkyvässä taulukossa on lisätietoja akun
latautumisesta.
Lataustila
lataaminen –– –– ––
täyteen ladattu –––––––––––––
liian kuumaa tai
kylmää akkua
ei ladata –– • –– • –– •
ongelma akussa
x
tai laturissa • • • • • • • • • •
ongelma
virransyötössä •• •• •• •• ••
Tämä laturi ei lataa viallista akkua. Jos akku on
viallinen, merkkivalo ei syty tai laturi ilmoittaa
viallisesta akusta tai sen merkkivalo vilkkuu.
HUOMAA: Tämä voi tarkoittaa myös laturivikaa.
Jos laturi ilmoittaa ongelmasta, vie laturi ja akku
testattavaksi valtuutettuun huoltopalveluun.
Liian kuumaa tai kylmää akkua ei
ladata
Jos latauslaite tunnistaa, että akku on liian kuuma
tai kylmä, latautuminen aloitetaan vasta akun
saavutettua oikean lämpötilan. Kun oikea lämpötila
on saavutettu, latautuminen alkaa automaattisesti.
Tämä ominaisuus pidentää akun ikää.
Li-Ion -laitteissa on elektroninen suojausjärjestelmä,
joka suojaa akkua ylikuormitukselta,
ylikuumenemiselta tai suurelta purkautumiselta.
Jos elektroninen suojausjärjestelmä tulee käyttöön,
työkalu poistaa sen käytöstä automaattisesti. Jos
näin käy, lataa Li-Ion-akkua latauslaitteessa, kunnes
se on ladattu täyteen.
Kylmä akku latautuu puolet hitaammin lämpimään
akkuun verrattuna. Akku latautuu hitaammin koko
latausjakson ajan, sen latautumisnopeus
ei palaudu nopeaksi, vaikka akku
lämpenesi.
Tärkeitä turvallisuusohjeita
kaikkia akkuja käytettäessä
Kun tilaat uutta akkua, ilmoita
tuotenumero ja jännite.
Pakkauksen akkua ei ole ladattu täyteen.
Ennen akun ja akkulaturin käyttämistä
tulee alla olevat turvallisuusohjeet lukea
ja annettuja latausohjeita noudattaa.
LUE KAIKKI OHJEET
• Älä lataa tai käytä akkua räjähdysalttiissa
ympäristössä, esimerkiksi tilassa, jossa on
syttyviä nesteitä, kaasuja tai pölyä. Akun
laittaminen laturiin tai poistaminen laturista voi
sytyttää pölyn tai höyryt.
• Älä koskaan pakota akkua laturiin.
Älä muokkaa akkuyksikköä millään
tavalla saadaksesi sen sopimaan
yhteensopimattomaan laturiin, sillä
akkuyksikkö saattaa murtua ja aiheuttaa
vakavan henkilökohtaisen vaurion.
• Lataa akkuyksiköt vain määritetyillä Bostitch
latureilla.
• ÄLÄ roiskuta vettä tai upota veteen tai muihin
nesteisiin.
• Älä säilytä tai käytä työkalua ja
akkuyksikköä paikassa, jossa lämpötila voi
saavuttaa tai ylittää 40 ˚C (kuten kesällä
ulkokatoksissa tai metallirakennuksissa).
• Parhaiden tuloksien saavuttamiseksi on
varmistettava, että akku on ladattu täyteen
ennen käyttöä.
VAROITUS: Älä koskaan yritä avata
akkuyksikköä mistään syystä. Jos
akkuyksikön kotelo on murtunut tai
vahingoittunut, älä laita sitä laturiin.
Älä riko, pudota tai vahingoita
akkuyksikköä. Älä käytä akkuyksikköä
tai laturia, johon on osunut terävä isku,
joka on pudotettu tai vahingoittunut
millään tavalla (esim. lävistetty naulalla,
isketty vasaralla, astuttu päälle). Se voi
aiheuttaa jopa kuolettavan sähköiskun.
Vahingoittuneet akkuyksiköt tulee
palauttaa huoltoon kierrätystä varten.
HUOMIO: Kun työkalua ei käytetä,
aseta se vakaalle alustalle kyljelleen,
jotta se ei aiheuta putoamis- tai
kompastumisvaaraa. Kookkaalla
akulla varustetut työkalut voidaan jättää
pystyasentoon, mutta ne kaatuvat
helposti.
FI
91
Page 94

LITIUM-IONIAKKUJEN (Li-Ion) ERITYISET
TURVAOHJEET
• Älä hävitä akkua polttamalla, vaikka se olisi
vaurioitunut pahasti tai tullut elinkaarensa
päähän. Akku voi räjähtää poltettaessa.
Litium-ioniakkuja poltettaessa syntyy
myrkyllisiä kaasuja ja aineita.
• Jos akun sisältöä pääsee iholle, huuhtele
heti miedolla saippualla ja vedellä. Jos
akkunestettä pääsee silmään, huuhtele avointa
silmää vedellä 15 minuutin ajan kunnes ärsytys
lakkaa. Jos on hakeuduttava lääkärin hoitoon,
ilmoita, että akun elektrolyytti on nestemäisten
orgaanisten karbonaattien ja litiumsuolojen
seosta.
• Avatun akkukennon sisältö voi ärsyttää
hengitysteitä. Hakeudu raittiiseen ilmaan. Jos
oireet jatkuvat, ota yhteys lääkäriin.
VAROITUS: Palovamman vaara.
Akkuneste voi syttyä altistuessaan
kipinälle tai liekille.
Akkuyksikkö
AKKUTYYPPI
BF33 ja BF33-2 toimivat 18 voltin akulla.
B-CB182-akkuja voidaan käyttää. Katso lisätietoa
kohdasta Tekniset tiedot.
Säilytyssuositukset
1. On suositeltavaa säilyttää akku viileässä
ja kuivassa paikassa poissa suorasta
auringonpaisteesta sekä liiallisesta
kylmyydestä tai kuumuudesta. Akku toimii
mahdollisimman tehokkaasti ja pitkään, kun
sitä säilytetään huoneenlämpötilassa, kun se
ei ole käytössä.
2. Pitkän säilytyksen aikana täyteen ladattu akku
on suositeltavaa säilyttää viileässä ja kuivassa
paikassa irti laturista.
HUOMAA: Akkuja ei saa asettaa säilöön täysin
tyhjinä. Akku on ladattava ennen käyttöä.
Latauslaitteen ja akun tarrat
Tässä käyttöohjeessa käytettävien kuvakkeiden
lisäksi latauslaitteessa ja akussa käytetään
seuraavia kuvakkeita:
Lue käyttöohjeet ennen käyttämistä.
Akkua ladataan.
Akku on ladattu.
Liian kuumaa tai kylmää akkua ei ladata.
Ongelma akussa tai laturissa.
x
Ongelma virransyötössä.
Älä työnnä sähköä johtavia esineitä
laitteen sisään.
Älä lataa vaurioitunutta akkua.
Käytä vain Bostitch-akkuja. Muut akut
voivat räjähtää sekä aiheuttaa henkilö- ja
omaisuusvahinkoja.
Älä altista vedelle.
Vaihdata vialliset akut heti.
Lataa vain lämpötilassa 4–40 °C.
Toimita akku kierrätykseen
ympäristöystävällisellä tavalla.
Älä hävitä akkuyksikköä polttamalla.
Lataa Litium-ioniakkuja.
Latausajan tiedot ovat Teknisissä
tiedoissa.
Pakkauksen Sisältö
Pakkauksen sisältö:
1 Naulain
1 Laturi
2 Akut
1 Kärkisuoja
1 Välinepakkaus
1 Käyttöohje
1 Poikkileikkauspiirros
• Tarkista, onko työkalussa, osissa tai
tarvikkeissa kuljetusvaurioita.
• Lue tämä käyttöohje huolellisesti ennen
laitteen käyttämistä.
92
Page 95

Kuvaus (kuva 1)
VAROITUS: Älä tee työkaluun
tai sen osiin mitään muutoksia.
Tällöin voi aiheutua omaisuus- tai
henkilövahinkoja.
a. Liipaisin
b. Liipaisimen turvalukitus
c. Kärkilaukaisin
d. Syvyyden säätökiekko
e. Alhaisen akkuvirran ja kiinni jäämisen/
leikkautumisen merkkivalo
f. Kiinni leikkautumisen vapautusvipu
g. Naulakotelo
h. Työntökappaleen lukitus
i. Toimintatilan valintakytkin (vain BF33)
j. Kierrettävä tukirakenne/vyökoukku
k. Sisäänrakennettu kuusiokoloavain
l. Akku
m. Kärkisuoja
KÄYTTÖTARKOITUS
Langaton BF33/BF33-2 naulauskone on tarkoitettu
puukappaleiden naulaamiseen.
Langattomassa BF33-naulaimessa on kertalaukaisu
ja sarjakytkin. Naulaimia, joissa on kertalaukaisu
ja sarjakytkin, EI SAA käyttää rakennustelineillä,
portailla, tikkailla tai tikkaiden kaltaisilla rakenteilla,
esim. kattoruoteilla. Tarkista poikkeukset
paikallisista työpaikkasäädöksistä.
Langaton BF33-2-naulain on suunniteltu vain
kertalaukaisutilaa varten. Naulaimia, joissa on vain
kertalaukaisutila, SAA käyttää rakennustelineillä,
portailla, tikkailla tai tikkaiden kaltaisilla rakenteilla,
esim. kattoruoteilla.
ÄLÄ käytä kosteissa olosuhteissa tai jos laitteen
lähellä on syttyviä nesteitä tai kaasuja.
Nämä langattomat naulauskoneet ovat
ammattikäyttöön tarkoitettuja sähkötyökaluja.
ÄLÄ ANNA lasten koskea tähän työkaluun.
Kokemattomat henkilöt saavat käyttää tätä laitetta
vain valvotusti.
• Tämä tuote ei ole tarkoitettu henkilöiden
(mukaan lukien lapset) käytettäväksi, joiden
fyysiset, sensoriset tai henkiset kyvyt tai
kokemus ja/tai tietämys tai taidot ovat
rajalliset. Heidän turvallisuudestaan tulee
huolehtia heistä vastuussa oleva henkilö.
Lapsia ei koskaan saa jättää yksin tämän
tuotteen kanssa.
Sähköturvallisuus
Sähkömoottori toimii vain yhdellä
jännitteellä. Tarkista aina, että akun
jännite vastaa laitteen tyyppikilpeen
merkittyä jännitettä. Tarkista myös, että
latauslaitteen jännite vastaa sähköverkon
jännitettä.
Tämä Bostitch-latauslaite on
kaksoiseristetty EN 60335
-säädösten mukaisesti, joten
maadoitusjohtoa ei tarvita.
Jos virtajohto vaurioituu, se on
korvattava uudella johdolla, jonka voi
hankkia Bostitchin huolto-organisaation kautta.
Jatkojohdon käyttäminen
Jatkojohtoa saa käyttää vain, jos se on ehdottoman
välttämätöntä. Käytä latauslaitteen vaatimukset
täyttävää hyväksyttyä jatkojohtoa. Lisätietoja on
Teknisissä tiedoissa. Johdinten pienin koko on
1 mm2 ja suurin pituus 30 m.
Jos käytät johtokelaa, kelaa johto aina kokonaan
auki.
KOKOAMINEN JA SÄÄTÄMINEN
VAROITUS: Ennen kokoamista ja
säätöjä irrota akku aina työkalusta.
Lukitse työkalu aina ennen kuin
laitat akun paikalleen tai irrotat sen.
VAROITUS: Käytä vain Bostitch-akkuja
ja -latauslaitteita.
Akun Irrottaminen ja Asettaminen
Paikoilleen (kuva 2)
VAROITUS: Vakavan
henkilövahingon vaaran
vähentämiseksi lukitse työkalu
pois päältä asentoon ja irrota akku
ennen säätämistä tai varusteiden
irrottamista tai asentamista. Tahaton
käynnistyminen aiheuttaa vahingon.
HUOMAA: Varmista, että akku (l) on täysin ladattu.
Tuotteen mukana toimitetut akut eivät välttämättä
ole täyteen ladattuja.
AKUN ASETTAMINEN TYÖKALUN KAHVAAN
1. Kohdista akku työkalun kahvan sisällä olevaan
tappiin (l).
2. Työnnä akku kahvaan, kunne se napsahtaa
paikalleen.
AKUN IRROTTAMINEN TYÖKALUSTA
1. Paina vapautuspainiketta (n) ja liu’uta akku ulos
työkalun kahvasta.
FI
93
Page 96

2. Aseta akku latauslaitteeseen. Ohjeet ovat
lataamisesta kertovassa kohdassa.
TASOMITTARILLA VARUSTETUT AKUT (KUVA 2, 2A)
Joissakin Bostitch-akuissa on tasomittari, jossa
on kolme vihreää LED-merkkivaloa. Merkkivalot
osoittavat akun jäljelle jäävän virtatason.
Kytke tasomittari päälle painamalla ja pitämällä
tasomittarin painiketta (o) alhaalla. Jokin kolme
vihreän LED-merkkivalon valoyhdistelmä syttyy
osoittaen jäljelle jäävän virtatason. Kun akkuvirran
taso on käyttörajan alapuolella, tasomittari ei syty ja
akku on ladattava.
HUOMAA: Tasomittari osoittaa akkuvirran tason
ainoastaan viitteellisesti. Se ei osoita työkalun
toiminnallisuutta ja se voi vaihdella tuoteosien,
lämpötilan ja loppukäyttäjän käytön mukaan.
HUOMAUTUS: Älä säilytä työkalua
akku asennettuna. Säilytä akkuja
erillään työkalusta tai laturista viileässä
ja kuivassa paikassa, jotta akku ei
vaurioituisi ja jotta akun käyttöikä olisi
mahdollisimman pitkä.
Kierrettävä tukirakenne/vyökoukku
(kuva 6)
Tukirakenne/vyökoukku (j) voidaan asettaa helposti
työkalun vasemmalle tai oikealle puolelle vasen- ja
oikeakätisiä käyttäjiä varten.
Jos koukkua ei haluta käyttää lainkaan, se voidaan
kiertää kahvan jalustan etu- tai takaosaan.
Makasiinin Täyttäminen (kuva 4)
VAROITUS: Lukitse aina työkalu pois
päältä asentoon ja irrota akku ennen
kiinnittimien lataamista ja poistamista.
1. Liu’uta jousikuormitteinen työntökappaleen
lukitus (h) naulakotelon pohjaan sen
lukitsemiseksi paikoilleen.
2. Valitse sopiva yhteenliitetty naulasarja. (Katso
Teknisiä tietoja.) Bostitch suosittelee
aina Bostitch-merkkisten kiinnitysnaulojen
käyttämistä.
VAROITUS: Muita kuin Bostitch-
lisävarusteita ei ole testattu tämän
työkalun kanssa, joten niiden
käyttäminen voi olla vaarallista.
Käytä tämän laitteen kanssa vain
Bostitchin suosittelemia varusteita
vahingoittumisvaaran vähentämiseksi.
3. Työnnä yhteenliitetty naulasarja makasiinin
sivussa olevaan syöttöaukkoon. Varmista, että
naulat kulkevat kärki edellä naulakanavaan.
4. Sulje naulakotelo vapauttamalla
työntökappaleen lukitus. Anna lukituksen
liukua varoen eteenpäin ja lukitse
naulayksikkö.
Tyhjentymislukitus
Naulauskoneessa on tyhjentymislukitus, joka estää
työkalun käyttämisen, kun naulakotelo on lähes
tyhjä. Kun kotelossa on noin 7 - 9 naulaa, työkalun
tyhjentymislukitus aktivoituu. Katso Työkalun
lataaminen naulapatruunojen lataamiseksi.
HUOMAA: Jos työkaluun kohdistetaan voimakasta
voimaa, lukitus voidaan ohittaa. Tämä suojaa
työkalun mahdollisilta vaurioilta, jos se pudotetaan.
Naulaussyvyyden asettaminen
(kuva 5)
Naulaussyvyys voidaan asettaa syvyyden
säätökiekolla.
1. Kun haluat naulan menevän vähemmän
syvemmälle, kierrä syvyyden säätökiekkoa
(d) vasemmalle vähemmän syvän naulan
kuvakkeen suuntaan.
2. Kun haluat naulan menevän syvemmälle,
kierrä syvyyden säätökiekkoa (d) oikealle syvän
naulan kuvakkeen suuntaan.
Toimintatilan valitseminen (kuva 1)
VAIN BF33
Voit valita sarjakäyttötilan liu’uttamalla tilakytkimen
(i) yksittäisen naulakuvakkeen ( ) kohdalle.
Voit valita iskutilan liu’uttamalla tilakytkimen (i)
kolmen naulan kuvakkeen ( ) kohdalle.
HUOMAA: Pitkien naulujen maksimiteho
saavutetaan asteittain, joten vältä iskutilan
käyttämistä pitempiä nauloja ruuvatessa.
TOIMINTA
Käyttöohjeet
VAROITUS: Noudata aina turvaohjeita
ja määräyksiä.
There may be local workplace
regulations applicable which interdict
the use of the bump action mode for
certain applications.
VAROITUS: Vakavan
henkilövahingon vaaran
vähentämiseksi katkaise
työkalusta virta ja irrota akku
ennen säätämistä tai varusteiden
irrottamista tai asentamista. Jos laite
käynnistyy vahingossa, voi aiheutua
loukkaantuminen.
94
Page 97

Käsien Oikea Asento (kuva 7)
VAROITUS: Voit vähentää vakavan
henkilövahingon vaaraa pitämällä kädet
AINA oikeassa asennossa.
VAROITUS: Voit vähentää vakavan
henkilövahingon vaaraa pitelemällä
työkalua AINA tiukassa otteessa.
Käsien oikea asento tarkoittaa toisen käden
pitämistä pääkahvassa (p) kuten kuvassa
näytetään.
Työkalun Valmistelu (kuva 1)
1. Poista akku (l) työkalusta ja varmista, että
työkalu on lukittunut.
2. Ota kaikki naulat ulos makasiinista (g).
3. Tarkista, että kärkilaukaisin (c) voi liikkua
vapaasti.
4. Täytä makasiini uudelleen nauloilla.
5. Aseta akkuyksikkö paikoilleen.
VAROITUS: Älä käytä työkalua, jos
kärkilaukaisin tai naulantyönnin eivät
liiku vapaasti.
HUOMAUTUS: ÄLÄ
KOSKAAN suihkuta tai
muulla tavoin pane
voitelu- tai
puhdistusliuotteita
työkalun sisään. Tämä
voi vaikuttaa vakavasti työkalun
käyttöikään ja suorituskykyyn.
Työkalun Käyttö (kuva 1)
Työkalua voidaan käyttää yhdellä tai kahdella
toimintotavalla: yksittäisellä toimintotavalla tai
sarjatoiminnolla.
YKSITTÄISTOIMINTOTAPA
Yksittäistoimintotapaa käytetään keskeytyksiä
sisältävään naulaukseen, kun halutaan hyvin
huolellista ja tarkkaa kohdistusta. Se tarjoaa myös
maksimaalisen tehon pitempien naulojen kohdalla.
1. Valitse perättäinen toimintotapa ( )
toimintotavan valitsimesta (i).
2. Vapauta liipaisimen turvalukitus (b).
3. Työnnä kärkilaukaisin (c) työpintaa vasten.
4. Käytä työkalua vetämällä liipaisukytkintä (a).
5. Vapauta liipaisin ja nosta naulauskone
työkappaleen pinnasta.
6. Toista vaiheet 3–5 seuraavan naulan
kiinnittämiseksi.
ISKUTILA (VAIN BF33)
Iskutilaa käytetään nopeaan
naulaamiseen tasaisilla ja pysyvillä
alustoilla ja se on yleensä tehokkainta
lyhyempien naulojen kiinnittämiseen.
1. Valitse sarjatoimintotapa ( )
toimintotavan
valitsimesta (i).
2. Vapauta liipaisimen turvalukitus (b).
3. Laukaise yksittäinen naula
yksittäistoimintotavalla:
a. Työnnä kärkilaukaisin (c) työpintaa
vasten.
b. Käynnistä naulain vetämällä
liipaisukytkimestä (a). Jokainen
liipaisukytkimen veto kärkilaukaisimen
ollessa työpintaa vasten laukaisee yhden
naulan.
4. Kun laukaiset useita nauloja, paina
liipaisukytkin (a) ja pidä se painettuna. Työnnä
sitten kärkilaukaisin (c) toistuvasti työpintaa
vasten.
VAROITUS: Älä pidä liipaisinta
painettuna, kun työkalu ei ole
käytössä. Pidä liipaisimen lukitus (b)
lukitusasennossa estääksesi työkalun
laukeamisen vahingossa, kun sitä ei
käytetä.
5. Kun siirryt sarjakäyttö- ja iskutilan välillä,
naulaussyvyyden säätäminen voi olla tarpeen.
Katso ohjeet osiosta Naulaussyvyyden
asettaminen.
Liipaisimen lukituksen käyttäminen
(kuva 3)
Kaikissa Bostitch-naulauskoneissa on liipaisimen
lukitsin (b), joka painettaessa oikealle (kuva 3)
estää työkalun naulan laukeamisen lukitsemalla
liipaisimen ja katkaisemalla moottorin virran.
Kun liipaisimen lukitus painetaan vasemmalle,
täykalu on täysin käytettävissä. Liipaisimen
lukitus tulee aina lukita, kun työkaluun tehdään
säätöjä tai kun sitä ei käytetä heti.
Kärkisuoja (kuva 1)
Kun tätä työkalua käytetään materiaaleihin,
joihin et halua jäävän merkkejä, kuten
puisiin päällysteisiin, aseta kärkisuoja (m)
kärkilaukaisimeen (c).
LED-merkkivalo (kuva 1)
Naulauskoneessa on kaksi LED-merkkivaloa
(e) takaosassa pohjakannen alapuolella. Katso
lisäohjeita osiosta Vianmääritys.
FI
95
Page 98

ALHAINEN AKKUVIRTA
Vaihda akku ladatuun
akkuun.
KUUMA AKKU
Anna akun jäähtyä tai
vaihda se viileään akkuun.
KIINNI
JUUTTUMINEN/
LEIKKAUS
Käännä kiinni
leikkautumisen
vapautusvipua. Katso
Kiinni leikkautumisen
vapauttaminen.
KUUMA TYÖKALU
Anna työkalun jäähtyä
ennen käytön jatkamista.
Kiinni leikkautumisen
vapauttaminen (kuva 1, 3)
Jos naulauskonetta käytetään vaativissa toimissa,
joissa naulaamiseen käytetään muuttorin
kaikkea saatavilla olevaa energiaa, työkalu voi
leikkautua kiinni. Käyttöterä ei suorittanut loppuun
käyttöjaksoa ja kiinni jäämisen/leikkautumisen
merkkivalo(e) vilkkuu. Käännä työkalun kiinni
leikkautumisen vapautusvipua (f) ja mekanismi
avautuu. Jos käyttöterä ei palaa automaattisesti
lähtöasentoon, suorita osion Kiinni jääneen
naulan poistaminen ohjeet. Jos laite leikkautuu
edelleen kiinni, tarkista materiaali ja naulan pituus
varmistaaksesi, ettei käyttö ole liian vaativaa. Jos
laite leikkautuu edelleen kiinni, tarkista toimintatila,
materiaali ja naulan pituus varmistaaksesi, ettei
käyttö ole liian vaativaa.
Kiinni jääneen naulan poistaminen
(kuva 1, 3)
Jos naula juuttuu kärkikappaleeseen,
kiinni jäämisen/leikkautumisen merkkivalo (e)
vilkkuu.
1. Poista akku työkalusta ja kytke päälle
liipaisimen lukitus (b).
2. Liu’uta jousikuormitteinen työntökappaleen
lukitus (h) naulakotelon pohjaan sen
lukitsemiseksi paikoilleen ja naulayksikön
poistamiseksi.
3. Löysää tuotteen mukana toimitetulla
kuusiokoloavaimella (k) kahta naulakotelon
yläpuolella olevaa kuusiokolopulttia (q).
4. Käännä naulakoteloa (g) eteenpäin.
5. Poista kiinni jäänyt/taipunut naula tarpeen
mukaan pihtien avulla.
6. Jos käyttöterä on ala-asennossa, käännä
naulauskoneen yläosassa olevaa kiinni
leikkautumisen vapautusvipua (f).
HUOMAA: Jos käyttöterä ei palaa
lähtöasentoon kiinni leikkautumisen
vapautusvivun kääntämisen jälkeen, käyttöterä
voi olla tarpeen nollata pitkää ruuvimeisseliä
käyttäen.
7. Käännä naulakotelo takaisin lähtöasentoon
työkalun kärjen alapuolelle ja kiristä
kuusiokolopultit (q).
8. Aseta akku takaisin paikoilleen.
HUOMAA: Työkalu poistuu automaattisesti
käytöstä eikä se nollaudu ennen kuin akku on
poistettu ja asetettu uudelleen paikoilleen.
9. Aseta nauloja naulakoteloon (ks. Työkalun
lataaminen).
10. Vapauta työntökappaleen lukitus (h).
11. Kytke liipaisimen turvalukitus (b) pois, kun olet
valmis jatkamaan naulaamista.
Jos nauloja jää usein kiinni kärkikappaleeseen,
anna valtuutetun Bostitch-huoltopalvelun huoltaa
työkalu.
KUNNOSSAPITO
Bostitch-työkalusi on suunniteltu käytettäväksi
pitkään ja edellyttämään vain vähän kunnossapitoa.
Oikea käsittely ja säännöllinen puhdistus
varmistavat laitteen ongelmattoman toiminnan.
VAROITUS: Vakavan
henkilövahingon vaaran
vähentämiseksi katkaise
työkalusta virta ja irrota akku
ennen säätämistä tai varusteiden
irrottamista tai asentamista. Jos laite
käynnistyy vahingossa, voi aiheutua
loukkaantuminen.
Laturia tai akkua ei voida huoltaa. Sisällä ei ole
mitään huollettavia osia.
Voiteleminen
Tätä sähkötyökalua ei tarvitse voidella.
HUOMAUTUS: ÄLÄ
KOSKAAN suihkuta tai
muulla tavoin pane
voitelu- tai
puhdistusliuotteita
työkalun sisään. Tämä
voi vaikuttaa vakavasti työkalun
käyttöikään ja suorituskykyyn.
96
Page 99

Puhdistaminen
VAROITUS: Puhalla lika ja pöly
kotelosta kuivalla ilmalla, kun sitä
kertyy ilmanvaihtoaukkoihin tai niiden
ympärille. Käytä tällöin hyväksyttyjä
silmäsuojuksia ja hengityssuojainta.
VAROITUS: Älä koskaan puhdista
muita kuin metallipintoja liuottimien
tai muiden voimakkaiden kemikaalien
avulla. Nämä kemikaalit voivat
heikentää näissä osissa käytettyjä
materiaaleja. Käytä vain vedellä ja
miedolla pesuaineella kostutettua
kangasta. Älä päästä mitään nestettä
laitteen sisään. Älä upota mitään
laitteen osaa nesteeseen.
LATAUSLAITTEEN PUHDISTUSOHJEET
VAROITUS: Sähköiskun vaara. Irrota
pistoke sähköpistorasiasta ennen
puhdistamista. Voit poistaa lian ja
rasvan latauslaitteen ulkopinnasta
pyyhkimällä kankaalla tai harjaamalla
pehmeällä muulla kuin metallista
valmistetulla harjalla. Älä käytä vettä tai
puhdistusaineita.
Lisävarusteet
VAROITUS: Muita kuin Bostitch-
lisävarusteita ei ole testattu tämän
työkalun kanssa, joten niiden
käyttäminen voi olla vaarallista.
Käytä tämän laitteen kanssa vain
Bostitchin suosittelemia varusteita
vahingoittumisvaaran vähentämiseksi.
Saat lisätietoja jälleenmyyjältäsi.
Bostitch kierrättää Bostitch-tuotteet,
kun ne ovat tulleet elinkaarensa päähän.
Voit käyttää tätä palvelua palauttamalla
tuotteen valtuutettuun huoltokorjaamoon.
Se toimitetaan sieltä meille.
Saat lähimmän valtuutetun Bostitchhuoltokorjaamon tiedot ottamalla
yhteyden lähimpään Bostitchtoimipisteeseen. Yhteystiedot ovat tässä
käyttöohjeessa. Luettelo valtuutetuista
Bostitch-huoltokorjaamoista ja myynnin
jälkeisestä palvelusta on Internetsivustossa www.2helpU.com.
Ladattava akku
Jos akun teho heikkenee, se on ladattava. Kun
akku on tullut elinkaarensa päähän, toimita se
kierrätykseen ympäristöystävällisellä tavalla.
• Käytä laitetta, kunnes akku tyhjenee. Irrota
akku laitteesta.
• Li-Ion-, NiCd- ja NiMH-kennot voidaan
kierrättää. Vie ne jälleenmyyjälle tai
kierrätyskeskukseen. Ne toimitetaan
kierrätykseen.
FI
Ympäristön suojeleminen
Toimita tämä laite kierrätykseen. Tätä
tuotetta ei saa hävittää kotitalousjätteen
mukana.
Jos Bostitch-tuote on tullut elinkaarensa päähän
tai jos et enää tarvitse sitä, älä hävitä sitä
kotitalousjätteenä. Toimita se kierrätykseen.
Kierrätykseen toimitetut käytetyt
tuotteet ja pakkaus voidaan käyttää
uudelleen. Tämä suojelee ympäristöä
ja vähentää raaka-aineiden tarvetta.
Paikallisissa määräyksissä voidaan edellyttää, että
sähkölaitteet on toimitettava kierrätysasemalle tai
jälleenmyyjälle, jolta ostit uuden tuotteen.
97
Page 100

VIANMÄÄRITYSOPAS
MONET YLEISET ONGELMAT VOIDAAN RATKAISTA HELPOSTI ALLA OLEVAN TAULUKON
OHJEIDEN AVULLA.
Jos ongelma on vakavampi tai toistuu, ota yhteyttä paikalliseen valtuutettuun Bostitchkorjauspalveluun, tai Bostitch-edustajaan tämän ohjekirjan osoitetietoja käyttäen.
VAROITUS: Vakavan henkilövahinkovaaran vähentämiseksi akku tulee AINA poistaa
ONGELMA SYY KORJEUSTOIMENPIDE
Moottori ei
käynnisty,
kun liipaisinta
painetaan
Moottori ei
käynnisty, kun
kärkilaukaisinta
painetaan
työkalusta ennen korjaustoimenpiteitä.
Liipaisimen lukitus on
lukitusasennossa
Työkalu on leikkautunut kiinni,
moottori ei toimi
Työkalu on sarjakäyttötilassa Paina kärkilaukasinta ennen laukaisemista tai valitse
Työkalun sisäinen elektroniikka
tulee nollata.
Moottori pysähtyy 5 sekunnin
jälkeen
Liitännät ovat likaiset tai
vaurioituneet
Sisäinen elektroniikka on
vaurioitunut
Liipaisin on vaurioitunut Ota yhteyttä valtuutettuun Bostitch-
Akku on kuuma Anna akun jäähtyä tai vaihda se viileään akkuun.
Työkalu on kuuma Anna työkalun jäähtyä ennen käytön jatkamista.
Liipaisimen lukitus on
lukitusasennossa
Tyhjentymislukitus on aktivoitunut,
se estää kärkilaukaisimen
liikkumisen
Työkalu on leikkautunut kiinni,
moottori ei toimi
Kärkilaukaisin on taittunut Ota yhteyttä valtuutettuun Bostitch-
Moottori pysähtyy 5 sekunnin
jälkeen
Liitännät ovat likaiset tai
vaurioituneet
Sisäinen elektroniikka on
vaurioitunut
Liipaisin on vaurioitunut Ota yhteyttä valtuutettuun Bostitch-
Akku on kuuma Anna akun jäähtyä tai vaihda se viileään akkuun.
Työkalu on kuuma Anna työkalun jäähtyä ennen käytön jatkamista.
Avaa liipaisimen lukitus.
Käännä työkalun kiinni leikkautumisen
vapautusvipua ja mekanismi avautuu. Jos käyttöterä
ei palaa lähtöasentoon, poista akku ja paina
käyttöterä käsin takaisin lähtöasentoon.
iskutila (vain BF33).
Poista akku, odota 3 sekuntia ja aseta se takaisin
paikoilleen.
Normaali toiminta, vapauta laukaisin ja paina
uudelleen.
Ota yhteyttä valtuutettuun Bostitch-
korjauspalveluun.
Ota yhteyttä valtuutettuun Bostitch-
korjauspalveluun.
korjauspalveluun.
Avaa liipaisimen lukitus.
Lisää nauloja naulakoteloon.
Käännä työkalun kiinni leikkautumisen
vapautusvipua ja mekanismi avautuu. Jos käyttöterä
ei palaa lähtöasentoon, poista akku ja paina
käyttöterä käsin takaisin lähtöasentoon.
korjauspalveluun.
Normaali toiminta, vapauta kärkilaukaisin ja paina
uudelleen.
Ota yhteyttä valtuutettuun Bostitch-
korjauspalveluun.
Ota yhteyttä valtuutettuun Bostitch-
korjauspalveluun.
korjauspalveluun.
98
 Loading...