

Page 1
10 R - 02 0896
4
Page 2
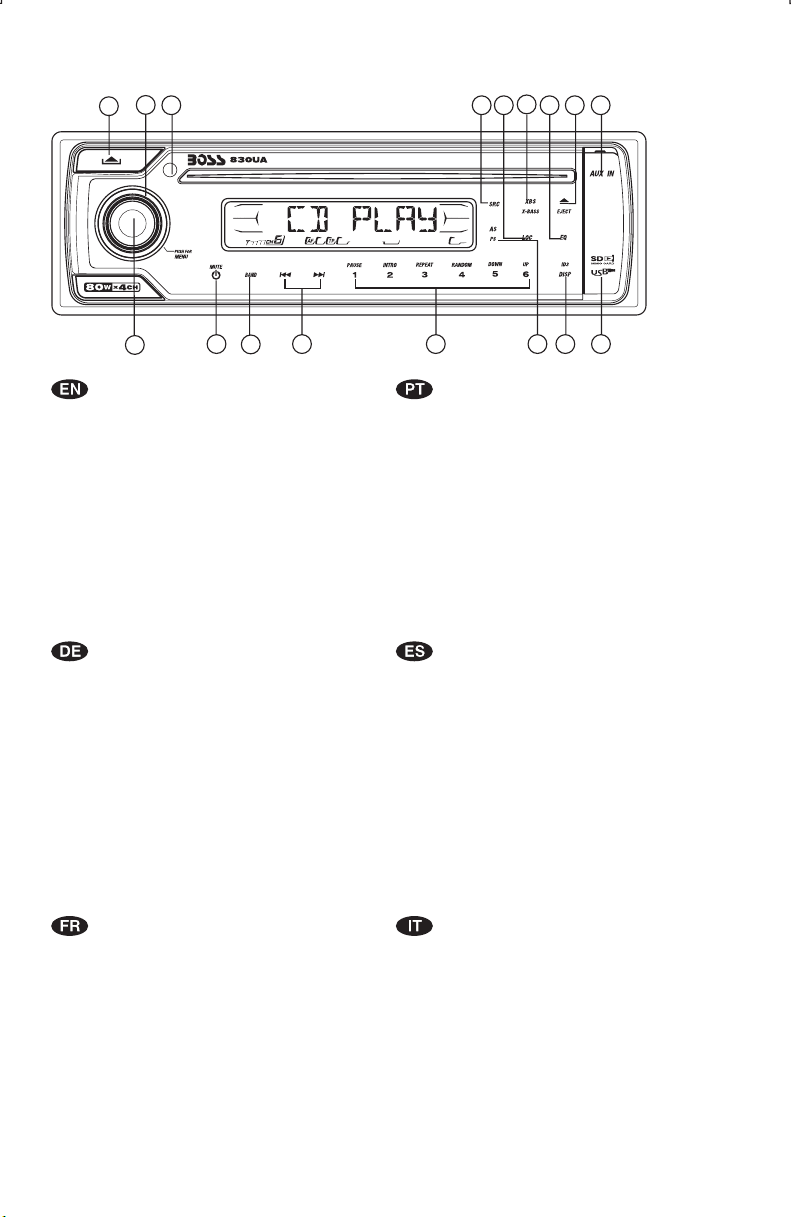
1. BUTTONS LOCATION AND FUNCTIONS
10
14
1
9 6
8
15 16
3
2
4
1. Panel ReleaseButton
2. Power /Mute Button
3. CD EjectButton
4. Audio Button
5. Display Button/ ID3 InformationButton
6. Local /Distant Button
7. Preset MemoryButtons
8. iX-BassButton
9. Source Button
10. Volume Knob
11. AutomaticallyStore / PresetScan Button
12. Band/LoudnessButton / MP3Enter Button
13. TuningUp/Down &Track Up / DownButtons
14. RemoteControl Receiver
15. PresetEqualizer Button
16. AuxIn Jack
17. USBSlot
1. Entriegel-Taste Bedienteil
2. Stumm-Taste /Einschalt-Taste
3. CD-Auswurftaste
4. Audio-Taste
5. Display-/ID3-Taste
6. Local/ Distant-Taste
7. Senderspeichertasten
8.
iX-Bass-Taste
9. Source-Taste
10. Lautstärkenregler
11. AMSTaste /MP3 Suchlauf Taste
12. Frequenzband-Taste /MP3 Eingabe-Taste
13.TitelAUF/AB-Taste
14. Fernbedienungs-Taste
15. PEQ-Taste
16. Front-Audio-Anschluss
17.
Ta st eUSB -
12
13 7 11 5
1.Teclapara removero painelfrontal
2.TeclaLigar/desligar &TeclaMute
3.Teclapara ejetaro disco
4.Teclade ajustede audio
5.TeclaDisplay /informação MP3-iD3
6.TeclaLocal/Distante
7.Teclasde memóriade estações
8.
FunçãoIX-BASS
9.TeclaSource
10.Controle devolume
11.Memorização automática(As) /PresetScan (Ps)
12.TeclaBanda /Loudness /MP3Enter
13.Teclasde sintonizaçãode estações/
14.TeclaEqualizador pré-programado
15.Sensor docontrole remoto
16.Entrada Auxiliar
17.
EntradaUSB
1. Extraccióndel panel frontal
2. Silenciamientorápido / Encendido/Apagado
3. Aperturadel panel motorizadoy expulsióndel disco
4. Tecla Audio
5. Seleccióninformación Display/ID3 TAGmuestra
6. BotónDistancia/Local
7. Botonesde estaciones memorizadas
8. BotóniX-Bass
9. Selecciónmodos Radio/CD/Entrada auxiliar
10. BotónDe Volumen
11. MemorizaciónAutomática de emisoras
/ selecciónde memorias
12. SelectorBandas / Bajos/MP3
13. Botónde selección deemisoras &banda de música
14. Receptorde control remoto
15. Tecla de ecualización
16. Entradade auxiliar
17.
Entrada deUSB
17
mudançade faixasde música
1. BoutonDe DéclenchementDu Panneau
2. BoutonD'assourdissement /Bouton D'alimentation
3. BoutonÉjection D'unCd
4. BoutonDe SélectionAudio /Entrée DeMP3
5. BoutonD'écran /Affichage D'informationSur LesDisques MP3
6. BoutonLocal/distant
7. BoutonsDes StationsPréréglées (m1~m6)
8.
BoutonDeiX-Bass
9. BoutonDe Régime
10.BoutonDeVolume
11.BoutonDeStockageDesStationsDansLa Mémoire
12.BoutonDeBande /Entrée DeMP3
13.BoutonDeRechercheDesStations/pistes:EnAvant/EnArrière
14.RécepteurDeLaCommandeÀDistance
15.BoutonDePEQ
16.AuxAJack
17.
USBSlot
1. Tasto Rilascio Frontalino
2. Tasto Mute /Tasto Power
3. Tasto Eject
4. AudioControlla
5. Tasto Display/ID3 (informazioni)
6. BottoneDistante Locale
7. Tasti Stazioni MemoriePreimpostate
8.
Bottone Bassi
9. Tasto Mode
10. Tasto Volume
11. Tasto Menu &AS/PS
12. Tasto Banda/Forte & EnterMP3
13. Tasto sintonizzazione su/gui& traccia su/gui
14. Destinatariodi controllo remoto
15. Bottonedi equilizzatore preprogrammato
16. EntradaAux
17.
Entrada USB
Page 3
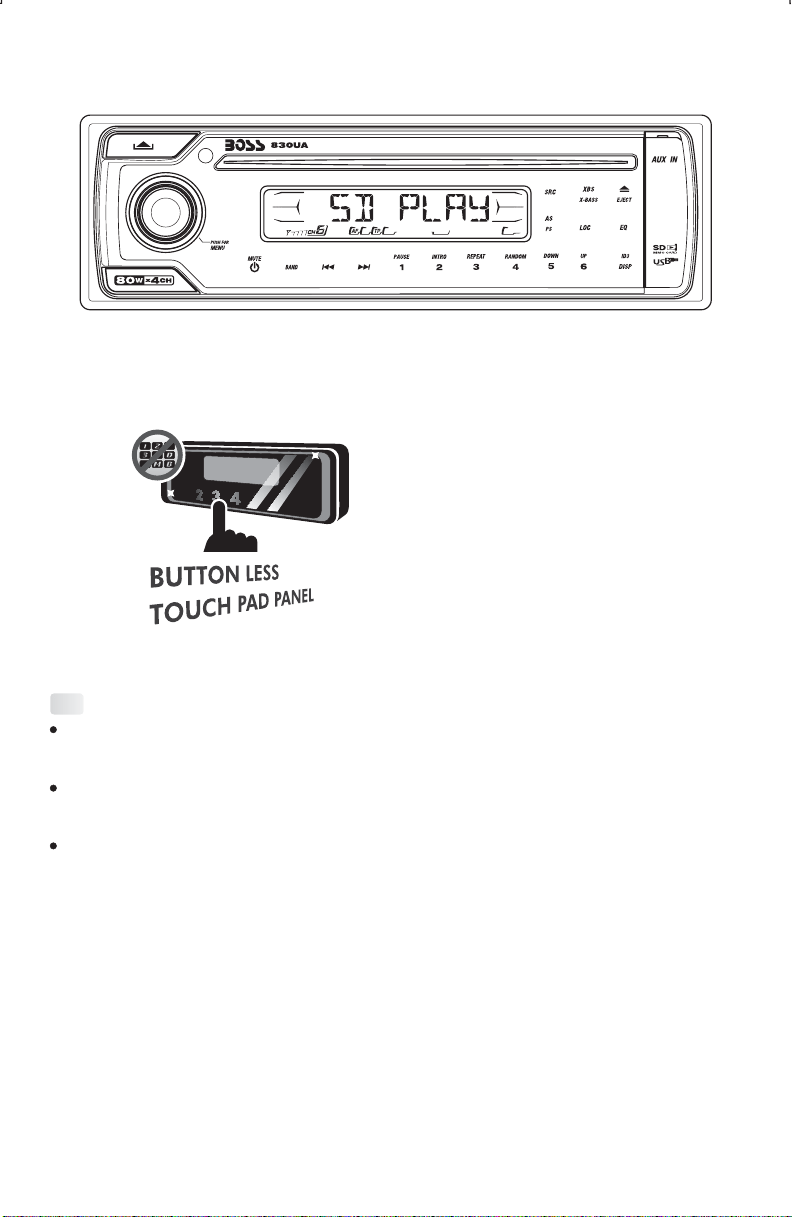
This radio is equipped with the most advanced "TOUCH SENSE PANEL", so that it is easy and
convenient to use while driving.
Here are some tips to show you how easy it is to use this touch sense panel:
Tips
Using a very light touch on the radio panel will activate that feature. You will not need to
"PRESS" hard onthe panelto make thisradio change features.
The power button along with some of the buttons that have dual functions, will need to be
"TOUCHED" from 2to 3 secondsto makethe change.
The best areato "TOUCH"on the panelto make itactivate isthe illuminated orlighted area.For
example, just touchfor 2to 3 secondsthe illuminatedpower symbol and the unitwill turn on or
off.
Page 4
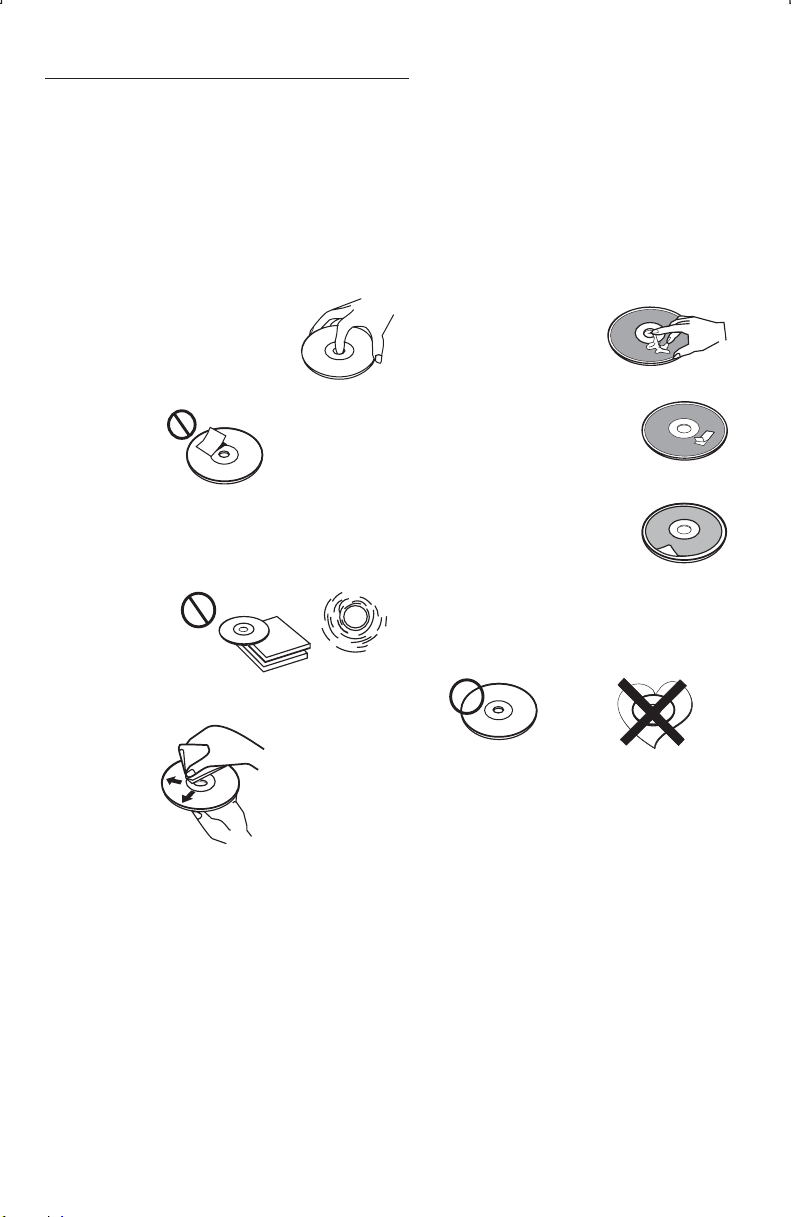
2. HANDLING COMPACT DISCS
MOISTURE CONDENSATION
On a rainy day or in a very damp area, moisture may condense on the lenses inside the unit.
Should this occur, the unit will not operate properly. In such a case, remove the disc and wait for
about an houruntil the moisturehas evaporated.
NOTES ON CDs
1.
A dirty or defective disc may cause sound
dropouts while playing. To enjoy optimum
sound, handle the disc as follows.
Handle the disc by its edge. To keep the
disc clean, do not touch the surface (P.1).
P. 1
Do not stickpaper or tapeon thedisc (P.2).
2.
P. 2
Do not expose the discs to direct sunlight or
3.
heat sources such as hot air-ducts, or leave
them in a car parked in direct sunlight where
there can be a considerable rise in
temperature inside the car (P.3).
Before playing, clean the discs with an
4.
optional cleaning cloth. Wipe each disc from
the centre out (P.4).
Do not use solvents such as benzine,
5.
thinner,commercially available cleaners, or
antistatic spray intended for analog discs.
P. 3
P. 4
NOTES ON DISCS
If you use the discs explained below, the
sticky residue can cause the CD to stop
spinning and may cause malfunction or
ruin your discs.
Do not use second-hand or rental CDs
that have a sticky residue on the surface
(for example, from peeled-off stickers or
from ink, or glue leaking from under the
stickers).
There are paste residue.
Inkissticky(P.5).
P. 5
Do not use rental CDs with old labels that
are beginning to peel off.
Stickers that are beginning
to peel away, leaving a
sticky residue (P.6).
P. 6
Do not use your CDs with labels or
stickers attached.
Labels are attached (P.7).
P. 7
Do Not Use Special Shape CDs
Be sure to use round shape CDs only for
this unit and do not use any special shape
CDs. Use of special shape CDs may
cause the unit to malfunction.(P.8).
P. 8
Be sure to use CDs with disc mark
CD-Rs and CD-RWs which have not
undergone finalization processing cannot
be played. (For more information on
finalization processing, refer to the manual
for your CD-R/CD-RW writing software or
CD-R/CD-RW recorder.) Additionally,
depending on the recording status, it may
prove impossible to play certain CDs
record on CD-R or CD-RW.
****
*******
*******
*******
*******
**************
*******
*******
*******
*******
*******
*******
*******
*******
E - 1
Page 5
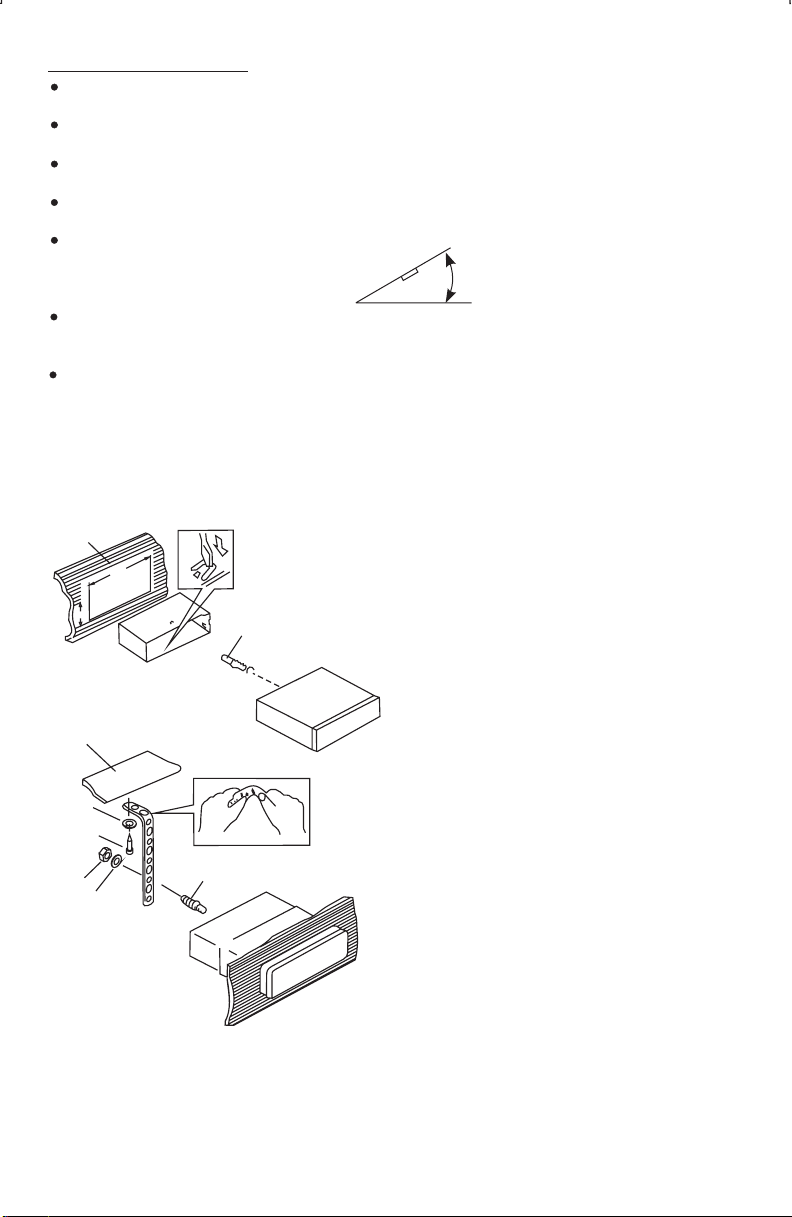
3. INSTALLATION
Before finally installingthe unit,connect the wiringtemporarily and make sureit isall connected
up properly andthe unit andsystem workproperly.
Use onlythe parts included withthe unit to ensureproper installation. The useof unauthorized
parts can causemalfunctions.
Consult with your nearest dealer if installation requires the drilling of holes or other
modifications of thevehicle.
Install the unitwhere it doesnot getin the driver'sway and cannotinjure the passenger ifthere is
a sudden stop,like an emergencystop.
If installation angle exceeds 30° from horizontal, the unit might not give its optimum
performance.
Avoid installing the unit where it would be subject to high temperature, such as from direct
sunlight, or from hot air, from heater, or where it would be subject to dust dirt or excessive
vibration.
Be sure toremove the frontpanel beforeinstalling the unit.
DIN FRONT/REAR-MOUNT
This unit canbe property installedeither from“Front”(conventional DINFront-mount) or“Rear”(DIN
Rear-mount installation, utilizing threaded screw holesat thesides ofthe unit chassis). For details,
refer to thefollowing illustrated installationmethods Aand B.
DIN FRONT-MOUNT (Method A)
Installation the unit
1
2
182
53
1. Dashboard
2. Holder
3
3. Screw
30°
After inserting the half sleeve into the
dashboard, select the appropriate tab
according to the thickness of the
dashboard material and bend them
inwards to secure the holder in place.
1
7
4
2
3
6
1. Dashboard
2. Nut (5mm)
3. Spring washer
4. Screw (4x12mm)
5
5. Screw
6. Support Strap
Be sure to use the support strap to secure
the back of the unit in place. The strap can
be bent by hand to the desired angle.
7. Plain washer
E - 2
Page 6
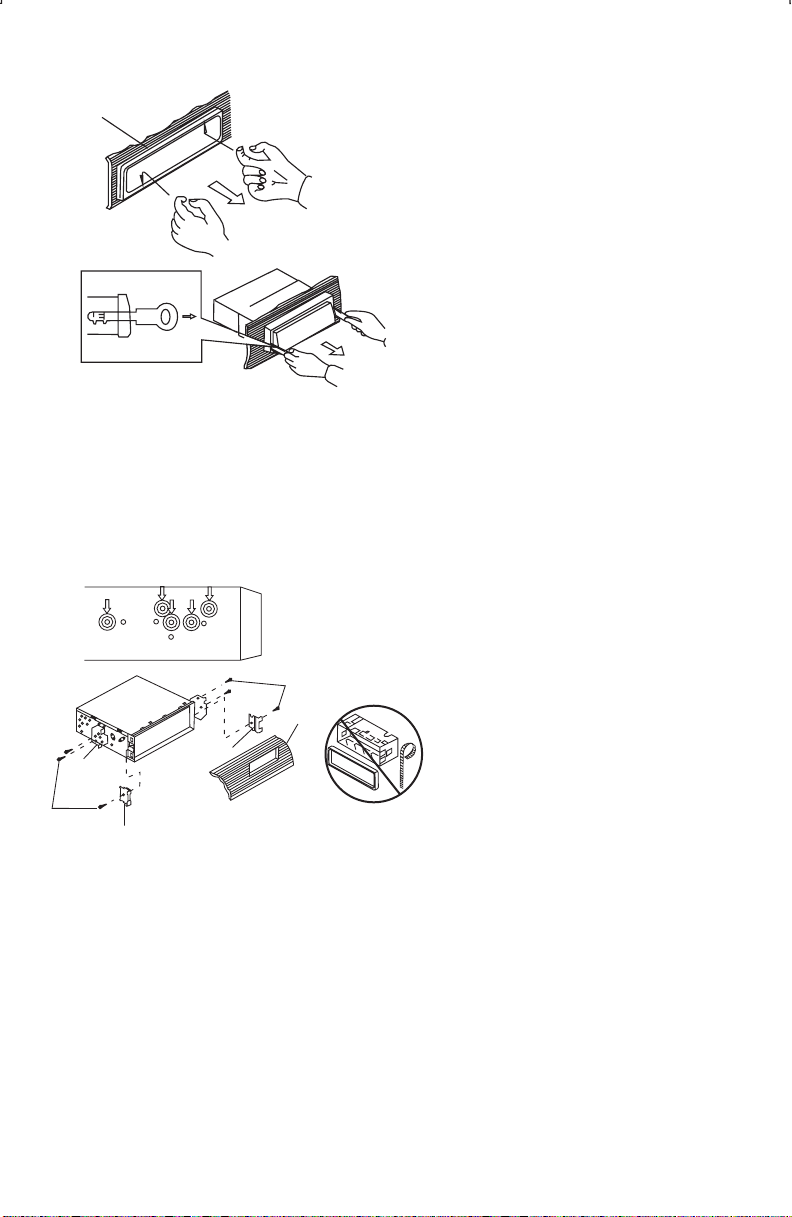
Removing the unit
a
a. Frame
b. Insert fingers into the groove in the
front of frame and pull out to remove
the frame. (When re-attaching the
b
c
Trim Plate Installation:
Push the trim plate against the chassis until it is fitted.
You must do this before you install the front panel, otherwise it can't be attached.
DIN REAR-MOUNT (METHOD B)
Installation using thescrew holes onthe sidesof the unit.
Fasteningthe unitto the factoryradio mounting bracket.
2
4
5
3
2
5
frame, point the side with a groove
down wards and attach it.)
c. Insert the levers supplied with the
unit into the grooves at both sides of
the unit as shown in figure until they
click. Pulling the levers makes it
possible to remove the unit from the
dashboard.
1. Select a position where the screw
holes of the bracket and the screw
holes of the main unit become
aligned (are fitted) and tighten the
screws at 2 places on each side.
2. Screw
3. Factory radiomounting bracket.
4. Dashboard orConsole
5. Hook (Removethis part)
Note: the mounting box, outer trim ring,
and half-sleeve are not used for method
B installation.
E - 3
Page 7
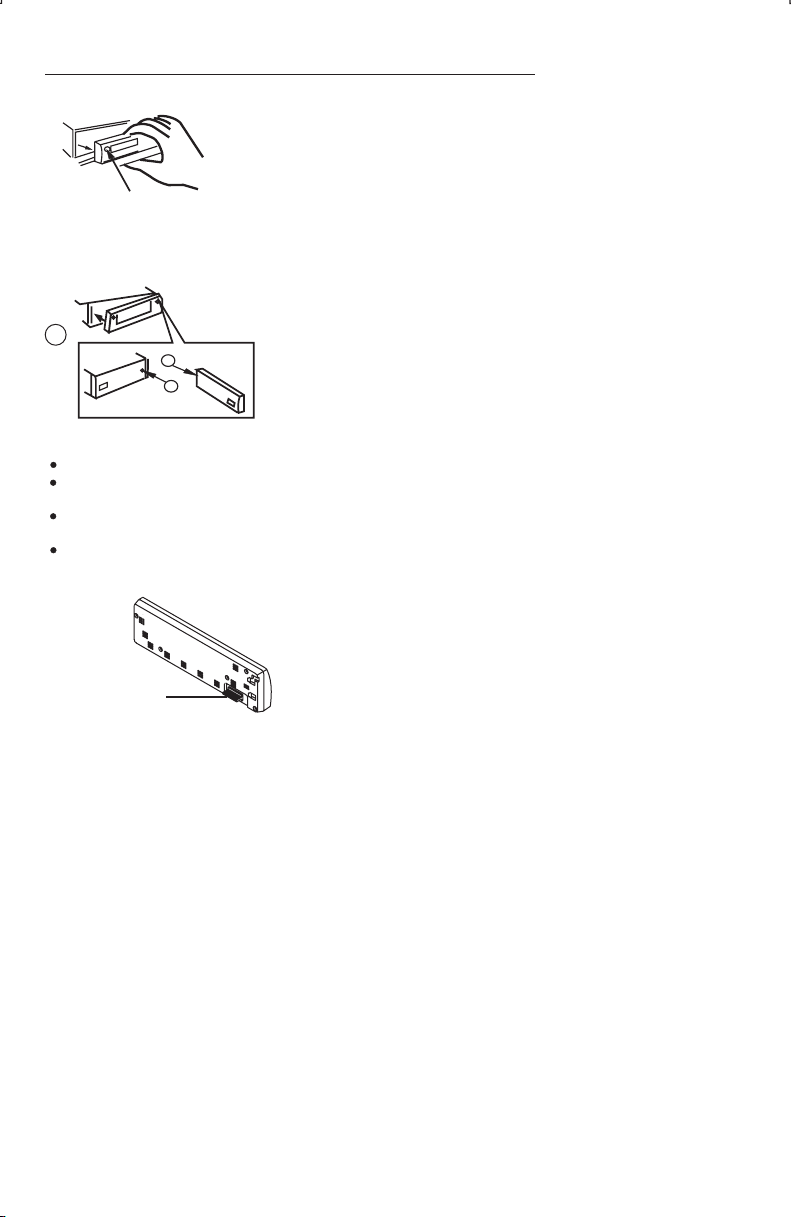
4. DETACHABLE CONTROL PANEL (D.C.P.)
Removing The Detachable Control Panel (D.C.P.).
1. Turn the power off
2. Press the D.C.P. release button
PANEL RELEASE
BUTTON
Attaching the DCP
3. Remove the D.C.P.
2
A
B
1. Attach the panel at the right side first, with
point B on the main unit touching point A on the
D.C.P. (Asshown on thedigram).
2. Then pressthe left sideof D.C.P. ontothe main
unit until a“click” sound isheard.
CAUTION
DO NOT insertthe D.C.P from theleft side. Doingso maydamage it.
The D.C.P can easilybe damaged byshocks. After removingit, placeit ina protectivecase andbe carefulnot
to drop itor subject itto strongshocks.
When the release button is pressed and the D.C.P is unlocked, the car's vibrations may cause it to fall. To
prevent damage tothe D.C.P, always storeitin aprotective caseafter detachingit.
The rear connectorthat connects themain unit andthe D.C.P isan extremely important part.Be careful notto
damage it bypressing on itwith fingernails,pens, screwdrivers,etc.
Note:
If the D.C.P is dirty, wipe off the dirt with soft,
dry cloth only. And use a cotton swab soaked
in isopropyl alcohol to clean the socket on the
Socket
back of the D.C.P.
E - 4
Page 8
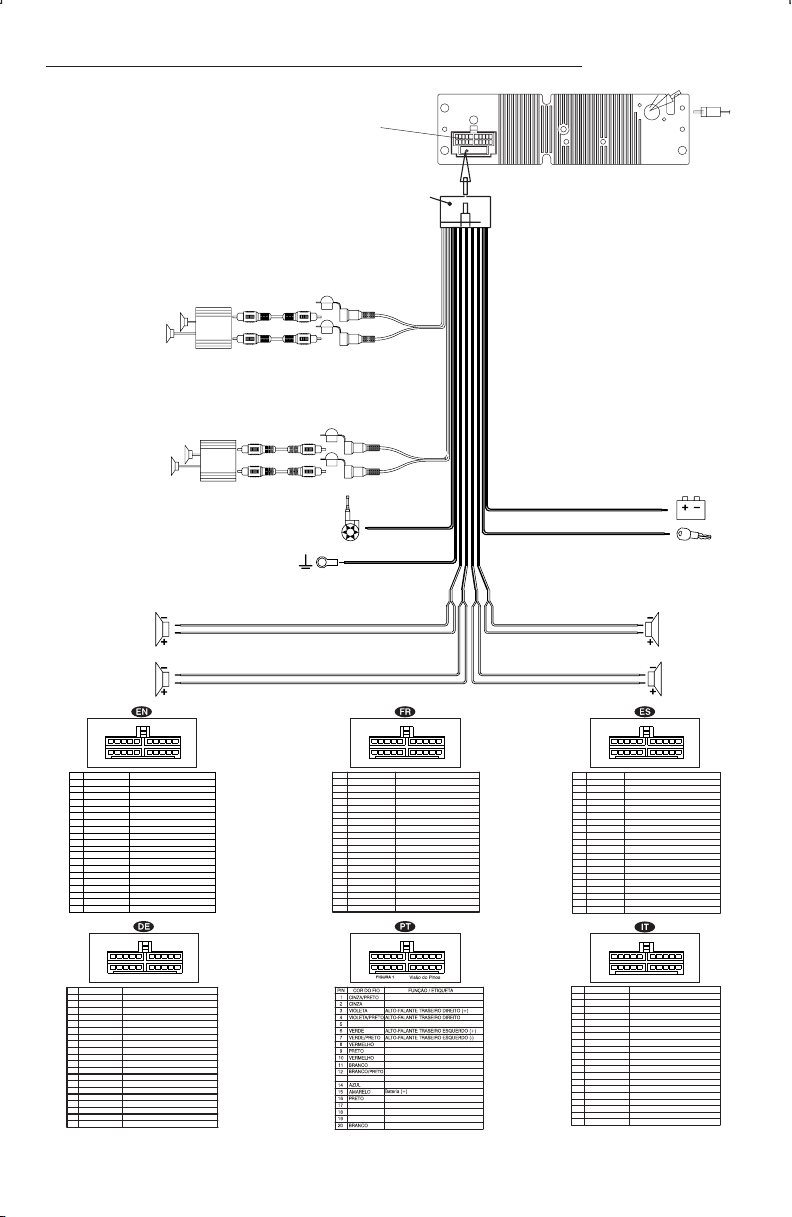
5. WIRING DIAGRAM (20 PIN HARNESS PLUG)
688A
REAR LINE OUT---GREY
SAIDATRASEIRA - CINZA
LINE OUT POSTERIORE---GRIGIO
RÜCKANSCHLUSS-AUS GRAU
SORTIE ARRIERE-GRIS
SALIDA DE LINEA TRASERA -GRIS
FRONT LINE OUT---GREY
SAÍDAFRONTAL - CINZA
LINE OUT POSTERIORE---GRIGIO
SORTIE ARRIERE-GRIS
SALIDA DE LINEA TRASERA -GRIS
VORDERER AUSGANG--SCHWARZ
Vue des fiches
FONCTION/ MARQUE
ENCEINTEAVANT DROIT (-)
ENCEINTEAVANT DROIT (+)
ENCEINTEARRIERE DROIT (+)
ENCEINTEARRIERE DROIT (-)
ENCEINTEARRIERE GAUCHE (+)
ENCEINTEARRIERE GAUCHE (-)
ALLUMAGE(ACC)
SORTIECOMMUNE ARRIERE PRE-AMP
SORTIEPRE-AMP ARRIERE DROITE
ENCEINTEAVANT GAUCHE (+)
ENCEINTEAVANT GAUCHE (-)
PUISSANCEANTENNE
BATTERIE(+)
CHASSISTERRE
SORTIEAVANT GAUCHE PRE-AMPLI
SORTIEAVANT DROITE PRE-AMPLI
SORTIEAVANT COMMUNE PRE-AMPLI
SORTIEPRE-AMP ARRIERE GAUCHE
6
5
3
4
7
9
8
10
14
13
15
16
20
18
17
19
ALTO-FALANTEDIANTEIRO DIREITO (-)
ALTO-FALANTEDIANTEIRO DIREITO (+)
IGNIÇÃO (ACC)
SAÍDAPRE-AMPTRASEIRA (FIOCOMUM)
SAÍDAPRE-AMP TRASEIRA DIREITA
ALTO-FALANTE DIANTEIRO ESQUERDO (+)
ALTO-FALANTE DIANTEIRO ESQUERDO (-)
ANTENA ELÉTRICA
MASSA (FIO TERRA)
SAIDA PRE-AMP FRENTE ESQ
SAIDA PRE-AMP FRENTE DIR.
SAIDA PRE-AMP FRENTE (FIO COMUM)
SAÍDA PRE-AMPTRASEIRA ESQUERDA
(-)
Memory/Battery
Connect to a constant 12 volt source. The radio will not work if this wire is not connected.
Geds/Batterie
VerbindenSie sich mit einer Konstanten12 Voltquelle. Das Radiowird nicht funktionieren, wenn
dieseLeitung nicht verbunden ist.
Mémoire/Pile
Connectez-vousà une sourceconstante du volt 12.La radio nefonctionnera pas sice fil n'est pas
connecté.
Memória/Bateria
Conectea uma fonte constante de12V. O radionao funcionara se este fionao estiver conectado.
Memoria/Batería
Conectea unorigen constantede 12volt. Laradio nofuncionará sieste alambreno estáconectado.
Memoria/Batteria
Collegatevia una 12sorgente di volt costante.La radio nonlavorerà se questofilo non ècollegato
YELLOW/YELLOW/YELLOW/AMARELO/AMARILLO/GIALLO
RED/RED/RED/VERMELHO/ROJO/ROSSO
Accessory/Ignition - Connect to a switched 12 volt source.
Zubehr/ Zündung - verbindet sich mit einer umgeschalteten 12 Voltquelle.
Accessoire/ Allumage - se Connecte à une source commutée du volt 12.
Acessorio/ Ignicao -Conecte a umafonte de 12Vchaveada.
Accesorio/ Ignición - Conecta a un origen conmutado de 12 volt.
L'accessorio/ L'accensione - si Collega a una 12 sorgente di volt commutata.
GREY-BLACK/GRAU-SCHWARZ/GRIS-NOIR/CINZA-PRETO
/GRIS-NEGRO/GRIGIO-NERO
GREY/GRAU/GRIS/CINZA/GRIS/GRIGIO
VIOLET-BLACK/
VIOLETT-SCHWARZ/VIOLET-NOIR/VIOLETA-PRETO
VIOLA-NERO
/VIOLETA-NEGRO/
VIOLET/VIOLETT/VIOLET/VIOLETA/VIOLETA/VIOLA
RCA-TO-RCA CABLES
(not supplied)
RCA-TO-RCA-KABEL
(nicht geliefert)
CABLES RCA-TO-RCA
(non fournis.)
CABOS RCA A RCA
(não fornecidos)
CABLES RCA A RCA
(no incluidos)
CAVO RCA A RCA
( non fornito)
AMP
RCA-TO-RCA CABLES
(not supplied)
RCA-TO-RCA-KABEL
(nicht geliefert)
CABLES RCA-TO-RCA
(non fournis.)
CABOS RCA A RCA
(não fornecidos)
CABLES RCA A RCA
(no incluidos)
CAVO RCA A RCA
( non fornito)
AMP
Power antenna wire and remote turn on lead.
TreibenSie Antennenleitung und entfernte Drehungsführung an.
Le fil de l'antenne de la puissance et l'éloignement mettent la conduite sous tension.
Ground Connect to ground terminal or Clean unpainted metal part of chassis
Ground verbindet sich mit Bodenendstation oder reinigt nichtgestrichenen Metallteil von Chassis
Le Ground se Connecte au terminal de la terre ou Lave la partie non peinte du métal du chssis
Terra-Conecte Ao Terminal Negativo Ou A Uma Superficie Metalica (sem Pintura) Do Chassi.
El Ground Conecta a terminal de tierra o Completamente despintó parte metálica de chasis
Il Ground si collega a terminale terrestre di parte di metallo non verniciare pulita di telaio
LEFTFRONT
LINKEVORDERSEITE
FACEAVANTGAUCHE
DIANTEIROESQUERDO
PARTEfrontalIZQUIERDA
PARTEanterioreSINISTRA
LEFT REAR
LINKE RÜCKSEITE
ARRIERE GAUCHE
TRASEIRO ESQUERDO
PARTEPOSTERIOR IZQUIERDA
RETRO SINISTRO
20-PIN AUDIO/POWER HARNESS
5 5
3 3
4 4
1 1
2 2
14 14
13 13
11 11
12 12
15 15
Figure1
WIRECOLOR
PIN
10
11
12
13
14
15
16
17
18
19
20
PIN
1
2
3
4
5
6
7
8
9
10
11
12
13
14
15
16
17
18
19
20
GREY/BLACK
1
GREY
2
VIOLET
3
VIOLET/BLACK
4
5
GREEN
6
GREEN/BLACK
7
RED
8
BLACK
9
RED
WHITE
WHITE/BLACK
BLUE
YELLOW
BLACK
WHITE
RED
BLACK
WHITE
20-PIN AUDIO/STROM-KABELGESCHIRR
KABELFARBE
GRAU/SCHWARZ
GRAU
VIOLETT
VIOLETT/SCHWARZ
GRÜN
GRÜN/SCHWARZ
ROT
SCHWARZ
ROT
WEISS
WEISS/SCHWARZ
BLAU
GELB
SCHWARZ
WEISS
ROT
SCHWARZ
WEISS
RIGHTFRONT SPEAKER (-)
RIGHTFRONT SPEAKER (+)
RIGHTREAR SPEAKER (+)
RIGHTREAR SPEAKER (-)
LEFTREAR SPEAKER (+)
LEFTREAR SPEAKER (-)
IGNITION(ACC)
REARPRE-AMP LINE OUT COMMON
RIGHTREAR PRE-AMP LINE OUT
LEFTFRONT SPEAKER (+)
LEFTFRONT SPEAKER (-)
POWERANTENNA
BATTERY(+)
CHASSISGROUND
LEFTFRONT PRE-AMP LINE OUT
RIGHTFRONT PRE-AMP LINE OUT
FRONTPRE-AMP LINE OUT COMMON
LEFTREAR PRE-AMP LINE OUT
141311 12 15 16
Figure1
RECHTER VORDERLAUTSPRECHER (-)
RECHTERVORDERLAUTSPRECHER (+)
RECHTERRÜCKLAUTSPRECHER (+)
RECHTERRÜCKLAUTSPRECHER (-)
LINKERRÜCKLAUTSPRECHER (+)
LINKERRÜCKLAUTSPRECHER (-)
ZÜNDUNG(ACC)
RÜCK-PRE-AMP-ANSCHLUSS-AUS
RECHTERRÜCK-PRE-AMP-ANSCHLUSS-AUS
LINKERVORDERLAUTSPRECHER (+)
LINKERVORDERLAUTSPRECHER (-)
MOTORISIERTEANTENNE
BATTERIE(+)
GEHÄUSEERDUNG
HINTERERVORVERSTÄRKERAUSGANG
RECHTERVORDERERVORVERSTÄRKERAUSGANG
VORDERERVORVERSTÄRKERAUSGANGNORMAL
LINKERRÜCK-PRE-AMP-ANSCHLUSS
Impulse alambre de antena y turno remoto en liderazgo.
Ilfilo di potenzadi antenna e ilremoto accendono comando.
WHITE-BLACK/WEISS-SCHWARZ/NOIR-BLANC/BRANCO-PRETO/BLANCO -NEGRO/BIANCO-NERO
GREEN-BLACK/ /VERT-NOIR/VERDE-PRETO/VERDE-NEGRO/VERDE-NEROGRÜN-SCHWARZ
6 6
7 7
9 9
8 8
10 10
16 16
20 20
18 18
17 17
19 19
PinView
FUNCTION/LABEL
653412
79810
201817 19
PinView
FUNKTION/ ETIKET T
FioPara Antena Eletrica.
WHITE/WEISS/BLAC/BRANCO/BLANCO/BLANCO
GREEN/GRÜN/VERT/VERDE/VERDE/VERDE
FUSE
SICHERUNG
FUSIBLE
FUSíVEL
FUSIBLE
FUSIBILE
20-PINAUDIO/POWER HARNESS (SeeFigure 1)
20-PIN AUDIO/STROM- KABELGESCHIRR
PLAQUE 20 FICHES AUDIO/ALIMENTATION
CONECTOR DE 20 PINOS PARA AUDIO E ALIMENTACAO
CONECTORDE AUDIO /POTENCIA DE 20PIN
CONNETTOREISO ( vedifigura 1)
WHITE
WEISS
BLANC
BRANCO
BLANCO
BIANCO
L-CH
R-CH
RED/ROT/ROUGE/VERMELHO/ROJO/ROSSO
WHITE
WEISS
BLANC
BRANCO
BLANCO
BIANCO
L-CH
R-CH
RED/ROT/ROUGE/VERMELHO/ROJO/ROSSO
BLUE/BLUE/BLUE/AZUL/AZUL/BLU
BLACK/BLACK/BLACK/PRETO/NEGRO/NERO
PLAQUE 20 FICHES AUDIO/ALIMENTATION
Schéma 1
COULEURDU CABLE
FICHE
1
GRIS/NOIR
2
GRIS
3
VIOLET
4
VIOLET/ NOIR
5
VERT
6
VERT/NOIR
7
8
ROUGE
9
NOIR
10
ROUGE
11
BLANC
NOIR/BLANC
12
13
14
BLEU
15
JAUNE
NOIR
16
BLANC
17
ROUGE
18
19
NOIR
BLANC
20
Conector de 20 pinos para audio e alimentação
1
2
11
12
13
BRANCO
VERMELHO
PRETO
CONECT OR DE AUD IO / POTE NCIA 20 P IN
1
2
11
12
Imagen 1
COLORDE CABLE
PIN
1
GRIS/NEGRO
GRIS
2
3
VIOLETA
VIOLETA/ NEGRO
4
5
6
VERDE
VERDE/ NEGRO
7
8
ROJO
9
NEGRO
10
ROJO
BLANCO
11
BLANCO/ NEGRO
12
13
AZUL
14
15
AMARILLO
16
NEGRO
BLANCO
17
ROJO
18
NEGRO
19
BLANCO
20
IDENTIFICAZIONE PIN
1
2
11
12
FIGURA 1
COLORECAVO
PIN
1
GRIGIO/NERO
2
GRIGIO
3
VIOLA
4
VIOLA/NERO
5
VERDE
6
VERDE/NERO
7
8
ROSSO
9
NERO
10
ROSSO
11
BIANCO
BIANCO/NERO
12
13
14
BLU
15
GIALLO
NERO
16
17
BIANCO
ROSSO
18
BLACK
19
BIANCO
20
ANTENNA CABLE INPUT
ANTENNENVERLÄNGERUNGSKABEL
CÂBLE D'EXTENSION D' ANTENNE
ENTRADA PARACABO DE ANTENA
CABLE DE ANTENA
CAVO ANTENNA ESTENDIBILE
RIGHTFRONT
RICHTIGEVORDERSEITE
FACEAVANTDROITE
DIANTEIRODIREITO
PARTEFRONTALADECUADA
PARTEANTERIOREGIUSTA
RIGHTREAR
RICHTIGERÜCKSEITE
ARRIEREDROIT
TRASEIRODIREITO
PARTEPOSTERIORADECUADA
RETROGIUSTO
6
5
3
4
7
9
8
10
14
13
15
16
20
18
17
19
Vista de los Pin
FUNCI
ALTAVOZFRONTAL DERECHO (-)
ALTAVOZFRONTAL DERECHO (+)
ALTAVOZTRASERO DERECHO (+)
ALTAVOZTRASERO DERECHO (-)
ALTAVOZTRASERO IZQUIERDO (+)
ALTAVOZTRASERO IZQUIERDO (-)
IGNICIÓN(ACC)
LINEADE SALIDA PRE-AMP TRASERA
LINEADE SALIDA PRE-AMP TRASERA DERECHA
ALTAVOZFRONTAL IZQUIERDO (+)
ALTAVOZFRONTAL IZQUIERDO (-)
ALIMENTACIÓNDE ANTENA
BATERÍA(+)
CHASISDE TIERRA
SALIDAL. PREAMP FRONTAL IZQUIERD
SALIDAL. PREAMP FRONTAL DERECHA
SALIDAL. PREAMP FRONTAL COMUN
LINEADE SALIDA PRE-AMP TRASERA IZQUIERDA
6
5
3
4
7
9
8
10
14
13
15
16
20
18
17
19
VISUALE PIN
FUNZIONE
CASSAANTERIORE DESTRA (-)
CASSAANTERIORE DESTRA(+)
CASSAPOSTER. DESTRA (+)
CASSAPOSTER. DESTRA (-)
CASSA POSTER. SINISTRA (+)
CASSA POSTER. SINISTRA (-)
ACCENSIONE(TAKE OUT NIEZIONE)
MESSAA TERRA
AMPLIFICATORECASSA POST.
CASSAANTERIORE SINISTRA (+)
CASSAANTERIORE SINISTRA (-)
ANTENNA
BATTERIA(+)
MESSAA TERRA
USCITAFRONTALE SINISTRO PRE-AMP
USCITAFRONTALE DESTRO PRE-AMP
USCITAFRONTALE COMUNE PRE-AMP
AMPLIFICATORECASSA POST.SX
DESTRA
E - 5
Page 9
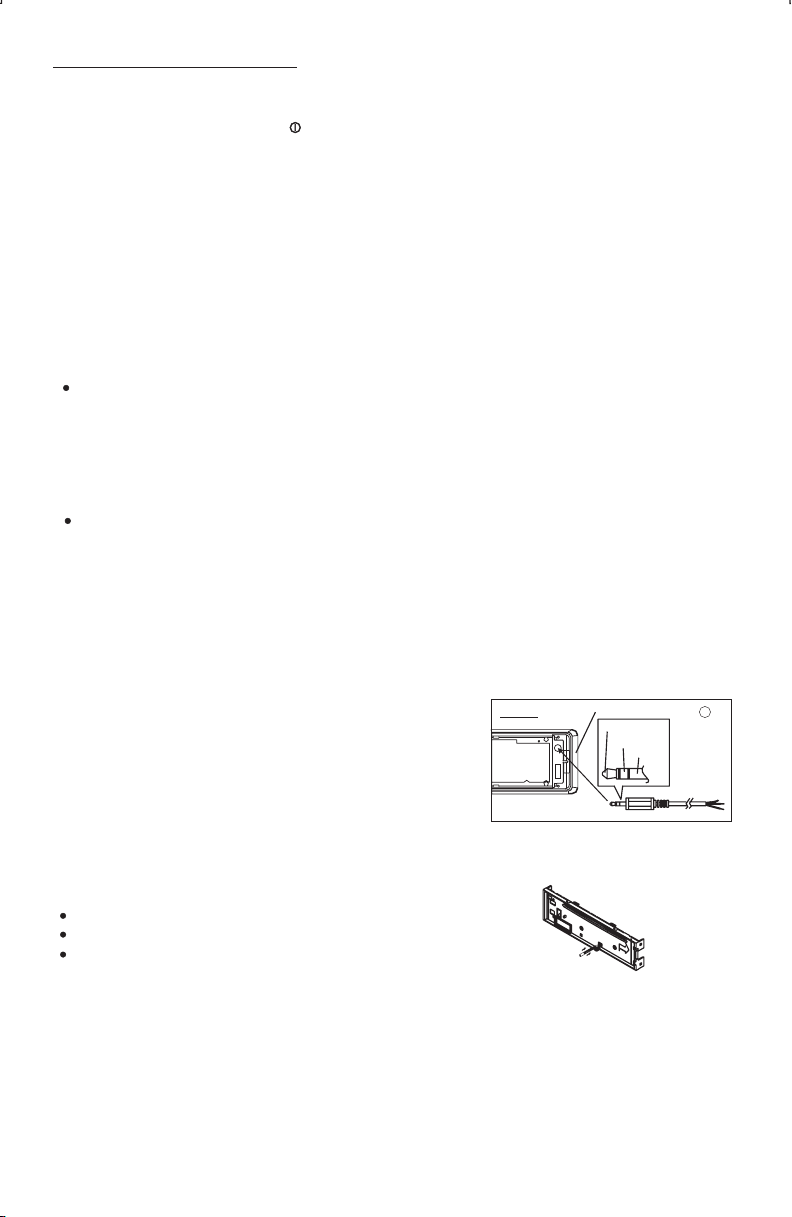
6. BASIC OPERATIONS
1) PANEL RELEASE BUTTON (REL)
Press this buttonto remove thecontrol panel.
13) POWER ON/OFF BUTTON ( )
Press the POWER button on the front of the unit to turn on the unit. Long press the POWER
button to turn Off the unit.
13) MUTE BUTTON (MUTE)
Short Press the MUTE button to mute the audio output, and “Mute” will appear on the
display. Press the mute button again to restore the audio output to the previous level.
11) DISP BUTTON(DISP)
Press this button briefly, the LCD will display the clock for about 5 seconds, then return to previous
displaymode.
2) ENCODER VOLUME KNOB
Turn this knobto adjust desiredvolume level.
12) SOURCEBUTTON (SOURCE)
Press this button to select different mode , sequence as follow:
A) Tuner mode (Radio)
B) CDP / MP3 (only if a CD or MP3 disc is inserted)
C) USB (only if a USB drive is inserted)
D) SD / MMC (Only if a SD or MMC card is inserted)
E) AUX IN (optional, only if this unit with this features)
SOURCE PRIORITY
Whenever a USB or SD/MMC is being inserted, unit will automatically switch to USB or
SD/MMC mode, does not matter the unit is currently in what mode.
When in USB or SD / MMC mode, if the USB or SD / MMC is being removed, unit will
automatically switch to radio mode.
17) FRONT PANEL AUX-IN JACK
Connect the external signal to AUX in jack located at the front of the panel , then press Mode
button to select Aux mode. Press Mode Button again to cancel Aux Mode and return to previous
mode.
AUX IN
FRONT CABINET
LEFT TRACK
RIGHT TRACK
GROUND
2
AUX IN
RESET BUTTON
The RESET button is located on the main unit (as shown on the diagram). To press it vertically
with a ballpoint pen or metal object will activate it. The reset button is to be activated for the
following reasons:
Initial installation ofthe unit whenall wiringis completed.
All the functionbuttons do notoperate.
Error symbol onthe display.
Note: If press RESET button, the unit still cannot function normally, please use a cotton swab
soaked in isopropylalcohol to cleanthe socketon the backof the controlpanel.
E - 6
Page 10

7. MENU OPERATIONS
To use this function keep press short AUDIO/MENU Button for few seconds, each time you press
this button the mode will move and the functions will shown on the display, turn the encoder volume
knob up/ down to set the desires functions ,the function states as following:
BASS ( Bass level )
Turn the encoder volume knob to adjust the desired Bass level range from -10 to +10, the
default is “0”.
TREBLE ( Treble level )
Turn the encoder volume knob to adjust the desired Treble level range from -10 to +10, the
default is “0”.
BALANCE
Rotate the encoder volume knob to adjust the Balance between the right and left speakers
from R10 to L10, the “C00” is default.
FADER
Rotate the encoder volume knob to adjust the Fader between the front and rear speakers
from F10 to R10, the “C00” is default.
TIME SET (CLK)
The time on the clock is set to “12:00” by default, Rotate the encoder volume knob to
adjust the minutes and hours.Press AUDIO/MENU button to select the hour or minute.
Note: Time format can not to set up, it should be follow the tunner area to change, when is
in U.S.A Latin then the time in 12H by default, when is in Europe Latin then the time in 24H
by default.
Programmable Turn-on Volume (P-VOL )
This option allows selection of the volume level the radio will automatically assume when
first turned on. " P - VOL 40 " is the default setting, which will turn the radio on at the volume
level selected when the unit was last turned off. To program a specific volume level for the
radio to turn on at, rotate the volume control to select "VOLUME LEVEL”. Within 5 seconds.
BEEP ON / OFF
Rotate the encoder volume knob to select Beep On / Off option.
Beep Off: disable audible beep tone when any function is accessed.
Beep On: enable audible deep tone.
16) PRESET EQUALIZER BUTTON (EQ)
Press this buttonto toggle thefollowing EQsetting:
POP -> JAZZ -> CLAS -> BEAT ->ROCK ->DSP OFF
At DSP OFFmode, EQ willbe controlledby Bass/Treblesetting.
15) iX-BASS BUTTON
Press the iX-BASS button to switch the loudness on or off. When Loudness is on,display will
show ‘Loud On’ fora few seconds.
E - 7
Page 11

8. RADIO OPERATIONS
9) RADIO SIGNAL STRENGTH METER (RSLM)
This is use to indicate the signal strength of current radio station broadcast. When you
choose RADIO mode, it will show on the display.
Best reception Worst reception
7) STATION PRESET BUTTONS (M1-M6)
1.Press these buttons briefly to recall the stored stations in the selected band.
2.Presetting stations manually, Press the BAND button to select the band for the station to
be preset. Use Tuning Up/Down to tune in the stations to be preset. Press the Preset
button at which you want to store the station for at least 2 second. The preset number will
appear on the display accompanied by a beep, this indicate that the station has been
stored into memory.
8) TUNING / SEEK UP AND TUNING / SEEK DOWN BUTTONS
1.Press these buttonsbriefly will operate AUTOSEARCH tuning mode,the radiowill tune upor
down to thenext station andremain onthefrequency.
2.Press these buttons more than 2 seconds,operate asMANUAL SEARCH buttons, under this
mode the tuningfrequency willadvance up ordown rapidlywhen the buttonis pressed.If the
buttons are notpressed within 3 seconds,they willreturn to autosearch mode.
5) LOCAL/DISTANT BUTTON (LO/DX)
During station tuning, this button allows you prior to access strong local station only (Local
mode), or to access a wider range of using distant mode (DX). When power up DX mode
will be selected automatically; Press LOC button briefly to select Local mode and “LOCAL”
symbol on the LCD will light up for a few seconds.
10) AUTO MEMORY STORE/PRESET SCAN BUTTON (AMS)
1.PRESET SCAN: Press AMS button briefly enter Preset Scan mode, it will scan all the
preset stations in the memories, you can hear that will stay on each station for about 5
seconds.
2.AUTO MEMORY STORE: Press AMS button long to enter Auto Store mode, this feature
will automatically scan the current band and enter up to 6 strongest stations into the 6
preset memories. To stop Auto Store & Scan, press the AMS button again.
14) BAND BUTTON (BAND)
Press BAND button to change between Fm1, FM2, FM3 & AM/MWbands.
DUAL FREQUENCY SWITCH
Unit is defaulted in U.S.A frequency, if EURO frequency is required, a sharp pen is needed to
switch the button on the left side of the chassis to EURO frequency.
E - 8
EU
US
Page 12

9.CD OPERATIONS
4) CD SLOT
Insert the discinto CD slot.The CDwill begin toplay.
M1) PAUSE BUTTON (PAU)
Press this buttonto pause CDplay,press again torelease pause.
M2) SCAN BUTTON (INT)
Press this button,the first10 secondsof eachtrack willbe playedsequentially untilthis button
is pressed again,then normal playwill resumeat the currenttrack.
M3) REPEAT BUTTON (RPT)
Press this button,the current trackwill beplayed repeatedly untilthis button ispressed again.
M4) RANDOM PLAY BUTTON(RDM)
Press this buttonto play alltracks onCD in random.Press again todeactivate it.
6) EJECT BUTTON ( )
Press this button to eject the CD from the unit. The receiver will switches to radio mode
automatically.
8) TRACK UP AND TRACK DOWN BUTTON
Press the Track Up Button to skip to the next track or previous track. Press the Track Down
button during play will return to the beginning of the current track, press it one more time to
skip to previousskip. Pressand holdTrackUp/Down Buttonto fastforward orfast reverse.CD
player starts whenyou release thebutton.
E - 9
Page 13

PLEASE READ THIS INSTRUCTION CAREFULLY
BEFORE OPERATING THE UNIT
10. USB DRIVE OPERATIONS
COMPATIBILITY
P. 1
P. 2
Due to the fast changing technology world, this unit may or may not
be compatible to all the USB drive / device available with all the future
technology, especially those USB drive / device which require to
install a driver. Always choose a compatible USB drive / device which
is compatible with this unit.
NOTE:
This unit is not compatible with portable Hard-Disk.
START THE USB DEVICE MODE
1.The USB socket is covered by the USB plastic cover as indicated in
picture 1 (P.1). Flip open the USB plastic cover, and the USB
socket will become accessible.
2. Plug inthe USBdrive / devicecompletely asindicated in picture2(P.2)
and display will show “USB PLAY” to indicate that the USB drive /
device is beingplugged in correctly& the downloadhas begun.
NOTE:
The unit may take a while to detect or download the USB files, detect &
download time mayvary depends onthe type of USB drive /device.
3.Does not matter the unit is in what mode (TUNER, CD, SD/MMC,
etc), once a USB drive / device is being plugged into the unit, unit
will automatically switch to USB mode.
4.All the USB files playback function is same as normal CD or MP3
disc playback.(Please refer to section CD operations & MP3
operations)
TO STOP USB PLAYBACK
1.The USB drive / device is unplugged, the unit automatically switch
to radio mode. Or user can use mode button to switch to other
P. 3
mode.
2.User can use the mode button to choose USB mode (only if USB
drive / device is inserted in the unit ) or any other modes, when they
are in any mode.
USB 1.1 > 320KBPS
FILE MANAGE: FAT12 / FAT16/ FAT 32
WARNING
1. Always unplugged the USB gently from the unit, excessive force
used will cause permanent & serious damage to the unit & the
USB drive / device.(P.3)
2. Please never intentionally or accidentally hit on the USB drive /
P. 4
device when it is plugged in. This will cause permanent & serious
damage to the unit & USB drive / device.(P4)
3. Please never try to plug in any USB drive / device with excessive
weight or excessive size into the unit. Please always use USB drive /
device withreasonable weight& sizewhich will not overload the unit,
which will not make performing normal operation on the front panel
impossible. Excessive weight or size USB drive / device may cause
permanent & serious damage to the unit. And may cause access to
the buttons /knobs on thefront panel impossible.
E - 10
Page 14

11. SD/MMC OPERATIONS
1.Press panel release button to release the front panel.(P.1)
2.The SD/MMC card slot is located on the unit as indicated in (P.2).
3. Insert the SD/MMC card into the card slot in the correct direction until a “CLICK” sound
is heard.(P.3)
4.Close the front panel.(P.4)
P. 1
P. 2
Face
Up
P. 3
Click
P. 4
Detach the
Front Panel
Insert the SD/MMC Card
with Label up side
Push in till heard a “click”
Close the front Panel
5. The display will show “SD PLAY” to indicate that the SD or MMC card is correctly inserted.
Once the SD or MMC card is inserted, the MP3 file will automatically loaded & playback will
also start.
6. Does not matter the unit is in what mode (Tuner, CD, USB,etc), once a SD or MMC card
is being inserted in the unit, unit will automatically switch to SD / MMC mode.
7. All the SD / MMC files playback function is same as normal CD or MP3 disc playback.
(Please refer to section CD operations & MP3 operations)
TO STOP SD/MMC CARD PLAYBACK
1.Push on the end of the SD or MMC card to eject the sd or MMC card. Once the SD or MMC
card is taken out, the unit will automatically switch to previous mode.(P.5-P.6)
2.User can use the mode button to choose SD / MMC mode (only if SD or MMC is inserted in the
unit ) or any other modes, when they are in any mode.
P. 5
Click
Push in till heard a “click”
Remove the Memory Card
P. 6
WARNING
1.Please make sure to insert the SD or MMC card in the correct direction / orientation as
indicated in picture (P.7). Wrong insert will cause permanent & serious damage to the unit &
the SD or MMC card.
2. Always makesure the SDor MMCcard is completelyinserted before re-attachingthe front panel.
P. 7
Front side
Back side
E - 11
Page 15
12.MP3/WMA OPERATIONS(ENCODER VERSION)
Notes :
This unit support :
MPEG1/2/2.5/ Layer 2/3
WMA Version 7/8/9
Sampling frequency
- MPEG1 : 32/44.1/48 KHz
- MPEG2 :16/22.05/24 KHz
- MPEG2.5 : 8/11.025/12KHz
- WMA : 22/32/44/48KHz
Sampling But rate
- MP3/WMA : 32~320Kbps & VBR
CDROM Mode 1 / 2
ISO9660 Level 1 / 2 & Joliet(unicode)
Max File/DIR. Count : 255
Max DIR. Depth : 255
Sorting Method : Tree sorting
Max File/DIR. Name : 64Byte
ID3 V1.0/1.1/2.0/2.3(Max 32Byte)
- An MP3 directory is shown in this manual as “Directory”, and an MP3 file is shown as “Track”.
- Maximum length of file name : 28 characters.
- Maximum length of directory : 16 characters.
- Supports Multi-Session recording.
- Supports CD, CDR and CDRW.
- Disc written by Packet Write (UDF) is not supported.
LOADING DISC
Insert the CD as usual, if it is an MP3 CD, the display will show “MP3 T01” then the message
“READING” will appear, when disc scanning completed, the first track on the first directory will play.
NOTE: 1) ICON turns on when a MP3 disc is playing.
2) ICON is blinking when under directory/Files search mode.
NAVIGATING THROUGH DIRECTORIES AND TRACKS
NOTE: MP3 Directory / Track selection can be done by Encoder Volume Knob or Tune Up / Down
Buttons Both operations will be described. But Encoder Volume Knob is available on some
models only. Please skip this description if your model is not equipped with this feature.
THERE ARE FOUR WAYS TO SELECT YOUR FAVORITE TRACK / DIRECTORY
A) SEARCHING TRACK DIRECTLY
Under MP3 play mode, press MP3 MENU BUTTON once, the display shows “MP3 T*”, enter the
desired track number directly, then press MP3 ENTER BUTTON to confirm.
SEARCH TRACK NUMBER BY USING ENCODER VOLUME KNOB
Rotate the ENCODER VOLUME KNOB to scroll through the numbers, then press MP3 ENTER BUTTON
to confirm.
B) SEACRCHING BY DIRECTORY OR TRACK NAME
(1) SEARCH DIRECTORY / TRACK NAME BY USING TUNE UP / DOWN BUTTON
Under MP3 Play Mode, press MP3 MENU BUTTON twice, the display shows “ * “ , enter the character
directly. The unit searches files and directories which have the same character which is inputted by the
user. The unit shows these sorted files and directories by TUNE UP / DOWN Button (TUNE DOWN
First). If the selected name is directory, the user can go into the selected directory by press Mp3
E - 12
Page 16

ENTER BUTTON and continue to search the directory or file name in the directory by
TUNE UP / DOWN Button (TUNE DOWN First). The selected file can be played by pressing MP3 Enter
Button
The distribution of alphabetical characters are listed as follow :
Button
Character
M1
A,B,C
M2
D,E,F
M3
G,H,I
M4
J,K,L
M5
M,N,O
M6
P, Q , R
MODE
S,T,U
TUNE DN
V,W , X
TUNE UP
Y,Z, Space
DISP
_,-,+
SEL
Move Cursor
VOL UP/DN
Next/Previous Character
(2) SEARCH DIRECTORY / TRACK NAME BY USING ENCODER VOLUME KNOB
Under MP3 Play Mode, press MP3 MENU BUTTON twice, the display shows “ * “. Rotate the
ENCODER VOLUME KNOB for selecting the character. In this Encoder Search mode, SELECT button
use as move cursor. Press BAND button use as MP3 CONFIRM BUTTON. The unit searches files and
directories which have the same character which is inputted by the user. The unit shows these sorted
files and directories by ENCODER VOLUME KNOB (ROTATE ANTI-CLOCKWISE First). If the selected
name is directory, the user can go into the selected directory by press MP3 CONFIRM BUTTON and
continue to search the directory or file name in the directory by ENCODER VOLUME KNOB (ROTATE
ANTI-CLOCKWISE First ) The selected file can be played by pressing MP3 ONFIRM BUTTON.
(C) SEARCHING FROM DIRECTORY
(1) SEARCH DIRECTORY BY USING TUNE UP / DOWN BUTTON.
Under MP3 play mode, press MP3 MENU BUTTON three times, Then the first Directory name is
shown. Press TUNE UP/DOWN (TUNE DOWN FIRST ) to navigate through the directory list, press
MP3 ENTER BUTTON to select the desired directory. The display will show “ \\ “. To select the tracks
under the selected directory, by pressing TUNE UP/DOWN Buttons (TUNE DOWN FIRST) then press
MP3 ENTER BUTTON to confirm when desired track is found.
(2) SEARCH
DIRECTORY BY USING ENCODER VOLUME KNOB
Under MP3 play mode, press MP3 MENU BUTTON three times, Then the first Directory name is
shown. Rotate ENCODER VOLUME KNOB (ROTATE ANTI-CLOCKWISE First ) to navigate through
the directory list, press MP3 ENTER BUTTON to select the desired directory. The display will show “ \\
“. To select the tracks under the selected directory, by Rotate ENCODER VOLUME KNOB (ROTATE
ANTI-CLOCKWISE First ) then press MP3 ENTER BUTTON to confirm when desired track is found.
(D) NAVIGATING THROUGH DIRECTORY BY USING M5/M6 BUTTON
Press directory up (M6) or directory down (M5) buttons to skip the current directory forward or
backward by one position.
In a multi-level directories disc, the movement will take place at the current level until the last directory
is reached. At this point press directory down (M5) again , it will move to the next level of directory.
ID3 TAG
Press DISPLAY button repeatedly to Display ID3 TAG information.
If the MP3 file is available with ID3 TAG, pressing the display button repeatedly will show information in
the following sequence:
SONG TITLE > ARTIST> ALBUM TITLE
If any of the ID3-TAG information is not available, pressing the DISPLAY button repeatedly will show
information in the following sequence:
UNKNOWN SONGNAME> UNKNOWN ARTIST> NO ALBUM TITLE
If the MP3 file is without ID3 TAG, pressing the DISPLAY button, & “NO ID3 TAG” will be displayed.
The file name & track number of the MP3 file will scroll repeatedly through the display during the
playing of the MP3 file.
E - 13
Page 17
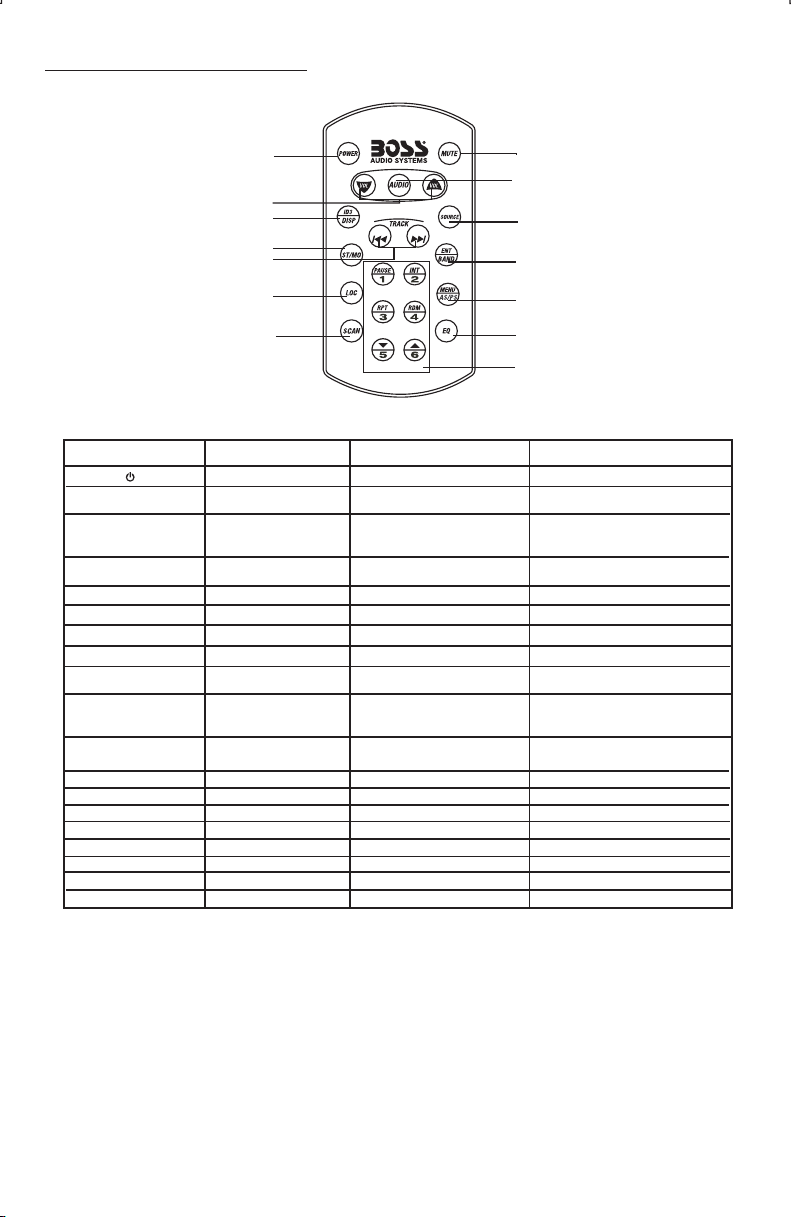
13.REMOTE CONTROL
OPERATIONS:
Key
()
1. Power
2. Volume Up/Down
3. ID3/DISP
4.Stereo/Mono
5. Tuning Up/Down
6. LOC
7. Scan
8. Mute
9. Audio
10. Source
11. Band/Enter
12. AS/PS
13. EQ
14. NumericKey(1)
Radio Mode
Power On/Off
Adjust Vol,Bas,
Tre,Fad,Bal
Display Clock
Tuning/SeekUp/Down
Local/Distant
Sation Scan
Mute
Bas,TreBal
Fad,P-vol,Beep
Change toCD/MP3 or
AUX IN
Band
Auto Store/PresetScan
Preset EQ
Preset station1
(2)
Preset station2
(3)
Preset station3
(4)
Preset station4
(5)
Preset station5
(6)
Preset station6
1
2
3
4
5
6
7
Stereo/FM Mono
8
9
10
11
12
13
14
CD Player Mode
Power On/Off
Adjust Vol,Bas,
Tre,Fad,Bal
Display Clock
No Function No Function
Tra ck U p/D own
No Function
No Function
Mute
Bas,TreBal
Fad,P-vol,Beep
Change toRadio or AUX IN Change toRadio or AUX IN/
No function
No function
Preset EQ
Pause
CD scan
Repeat
Shuffle
No Function
No Function
MP3/USB/SD Mode
Power On/Off
Adjust Vol,Bas,
Tre ,Fa d,B al
ID3 taginformation
Display Clock,
Numeric key0*
TrackUp/Down/ Numeric key8*9*
No Function
No Function
Mute
MP3 Enter
Preset EQ
Pause
CD scan
Repeat
Shuffle
Folder Down
Folder Up
Bas,TreBal
Fad,P-vol,Beep
Numeric key7*
E - 14
Page 18
14.SPECIFICATIONS
CD PLAYER
System
Usable disc
Sampling frequency
No ofquantization bits
Frequency
Number ofchannels
S/N Ratio
RADIO SECTION
FM
Frequency Range
Intermediate Frequency
Usable Sensitivity
Stereo Separation
S/N Ratio
AM/MW
Frequency Range
Intermediate Frequency
Usable Sensitivity
S/N Ratio
GENERAL
Power Supply
Polarity
Speaker impedance
Power Output
REMARK :
Specifications subjectto change withoutnotice.
CD PLAYER
System
Abspielbare Discs
Sampling-Frequenz
Anzahl Quantisierungsbits
Frequenz
Anzahl Kanäle
Signalrauschabstand
RADIOTEIL
FM
Frequenzbereich
Zwischenfrequenz
Nutzbare Empfindlichkeit
Stereotrennung
Signalrauschabstand
AM/MW
Frequenzbereich
Zwischenfrequenz
Nutzbare Empfindlichkeit
Signalrauschabstand
ALLGEMEINES
Stromversorgung
Polarität
Lautsprecherimpedanz
Ausgangsleistung
ANMERKUNG:
Technische Änderungen ohneMeldepflicht vorbehalten.
Compact discaudio system
Compact disc
44.1KHz
1bit
5-20,000Hz
2
channels
70dB
87.5-107.9MHz
87.5-108MHz
10.7 MHz
Better than15dB at S/N30 dB
25 dBat 1KHz
50 dB
530-1710KHz
522-1620KHz
450KHz
Better than45dB
40 dB
DC 11-14V
Negative Ground
4 ohms
4x 80Watts
Compact DiscAudio System
Compact Disc
44,1 kHz
1 bit
5-20.000Hz
2 Kanäle
70 dB
87.5-107.9MHz
87.5-108MHz
10.7 MHz
Besser als15 dB beieinem
Signalrauschabstand von30 dB
25 dBbei 1 kHz
50 dB
530-1710KHz
522-1620KHz
450KHz
Besser als45 dB
40 dB
DC 11-14 V
Erde negativ
4 Ohm
80 Wx 4
CD Player
Sistema:
Tipo de disco:
Frequência de Amostragem:
Conversor D/A:
Resposta de frequencia
Número de canais:
Relação sinal/ruído:
Rádio FM
Faixa de Frequencia:
Frequência Intermediária:
Sensibilidade útil:
Separação estéreo
Relação Sinal/Ruído
AM/MW
Faixa defrequencia:
Frequencia intermediária:
Sensibilidade útil:
Relação Sinal/Ruído:
Geral:
Alimentação:
Polaridade:
Impedancia alto-falantes:
Potência de saída:
Nota:
As especificações estão sujeitas a alterações sem prévio aviso.
CD PLAYER
Sistema:
Disco:
Frecuencia Muestreo:
Cuantificación:
Frecuencia:
Número decanales:
Relación señal/RuidoS/N Ratio
RADIO SECCIÓN
FM
Rango Frecuencia:
Frecuencia Intermedia:
Sensibilidad Útil:
Separación estereo:
S/N Ratio:
AM/MW
Rango Frecuencia:
Frecuencia Intermedia:
Sensibilidad útil:
S/N Ratio:
GENERAL
Alimentación:
Polaridad:
Impedancia altavoces:
Potencia desalida:
Nota:
Debido alrápido avance tecnológico,estas especificacionesestán
sujetas acambios sin previoaviso.
Sistema áudioCD
CD
44.1KHz
1bit
5-20,000Hz
2 canais
70dB
87.5-107.9MHz
87.5-108MHz
10.7 MHZ
melhor que15dB a S/N30dB
25 dBat 1KHz
50 dB
530-1710KHz
522-1620KHz
450KHz
Melhor doque 45dB
40dB
DC 11-14V
Terra negativo
4ohms
80w x 4
Compact discaudio system.
Compact Disc.
44.1KHz.
1bit.
5-20,000Hz.
2 canales.
70dB
87.5-107.9MHz
87.5-108MHz
10.7Mhz.
Mejor que15dB a S/N30dB.
25dB a1Khz.
50dB.
530-1710KHz
522-1620KHz
450KHz.
Mejor que45dB.
40dB.
DC 11-14V.
Negativo a masa.
4 Ohms.
4x80W.
LECTEUR CD
Système
Disques utilisables
Fréquence échantillonnage
Nbre dequantisation bits
Fréquence
Nombre decanaux
Ratio S/B
SECTION RADIO
FM
Gamme defréquences
Fréquence intermédiaire
Sensibilité utilisable
Séparation stéréo
Ratio S/B
AM/MW
Plage defréquences
Fréquence intermédiaire
Sensibilité utilisable
Rapport Signal/Bruit
GENERAL
Alimentation
Polarité
Résistance desenceintes
Puissance desortie
REMARQUE :
Les spécifications sont susceptibles d'être modifiées sans
préavis.
Compact discaudio system
Compact disc
44.1KHz
1bit
5-20,000Hz
2 canaux
70dB
87.5-107.9MHz
87.5-108MHz
10.7 MHz
Plus de 15dB à S/B30 dB
25 dBà 1KHz
50 dB
530-1710KHz
522-1620KHz
450KHz
Supérieure à45 dB
40 dB
11 -14VDC
Masse /négative
4 ohms
80W x4
LETTORE CD
Sistema
Tipo didisco
Frequenza dicampionatura
N° quantizzazioniBit
Frequenza
Numero diCanali
Rapporto S/N
SEZIONE RADIO
FM
Raggio diFrequenza
Frequenza intermedia
Sensibilità
Separazione Stereo
Rapporto S/N
AM/MW
Raggio diFrequenza
Frequenza intermedia
Sensibilità
Rapporto S/N
GENERALE
Alimentazione
Polarità
Impedenza altoparlanti
Potenza d'uscita
Le specifichesono soggette acambiamenti senza
alcun preavviso.
E - 15
Sistema di Audio CD
CD
44.1KHz
1 bit
5-20,000 Hz
2 Canali
70db
87.5-107.9MHz
87.5-108MHz
10.7 Mhz
migliore di15dB a S/N30 dB
25dB a1KHz
50dB
530-1710KHz
522-1620KHz
450Khz
migliore di45dB
40dB
Dc11 14V
Terranegativo
4 ohms
4x 80Watts
Page 19
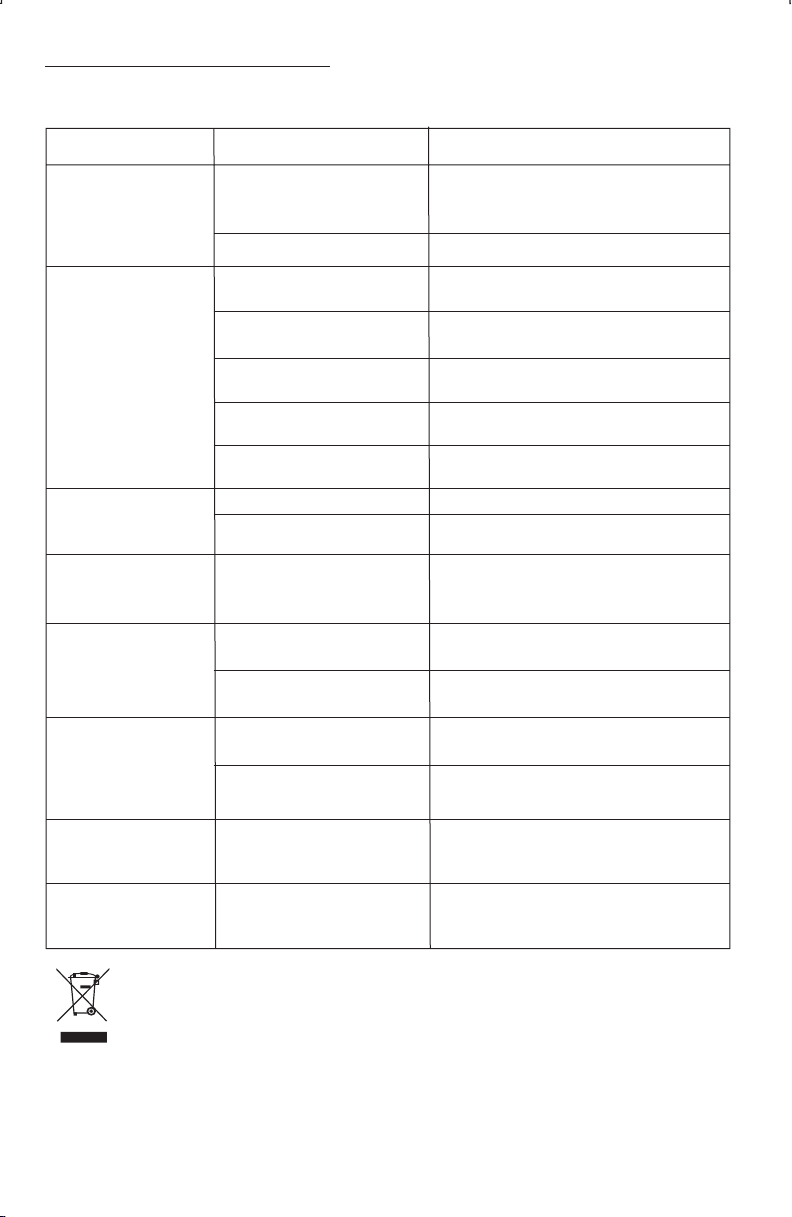
15.TROUBLE SHOOTING
Before going through the check list, check wiring connection. If any of the problems persist after
check list hasbeen made, consultyour nearestservicedealer.
Symptom
No power
Disc cannot be loaded
or ejected
No sound
The operation keys do
not work
Sound skips.
The radio does not
work.
The radio station
automatic selection
does not work.
ERROR 1
ERROR 2
Cause
The car ignition is not on.
The fuse is blown.
Presence of CD disc inside
the player.
Inserting the disc in reverse
direction.
Compact disc is extremely
dirty or defective disc.
Temperature inside the car is
too high.
Condensation.
Volume is in minimum.
Wiring is not properly
connected.
The built-in microcomputer is
not operating properly due to
noise.
The installation angle is
more than 30 degrees.
The disc is extremely dirt or
defective disc.
The antenna cable is not
connected.
The signals are too weak.
Mechanism Error
Servo Error
Solution
If the power supply is properly connected
to the car accessory terminal, switch the
ignition key to “ACC”
Replace the fuse.
Remove the disc in the player, then put a
new one.
Insert the compact disc with the label
facing upward.
Clean the disc or try to play a new one.
Cool off or until the ambient temperature
returns to normal.
Leave the player to off for an hour or so,
then try again.
Adjust volume to a desired level.
Check wiring connection.
Press the RESET button.
Front panel is not properly fixed into its
place
Adjust the installation angle to less than
30 degrees.
Clean the compact disc. Then try to play a
new one.
Insert the antenna cable firmly.
Select a station manually.
Press the reset button if the error code
does not disappear, consult your nearest
service dealer.
Press the reset button if the error code
does not disappear, consult your nearest
service dealer.
If at any time in the future you should need to dispose of this product, please noted that:
Waste electrical products should not be disposed of with household waste. Please
recycle where facilities exist. Check with your local Authority or retailer for recycling
advice. (Waste Electrical and Electronic Equipment Directive).
E - 16
 Loading...