

Page 1
Windows
Quick Start Guide
BOSS 120 & 220
Page 2
BOSS 120-220 Quickstart Guide Windows Page of 60011R051 6
120-220 Quickstart Guide for Windows
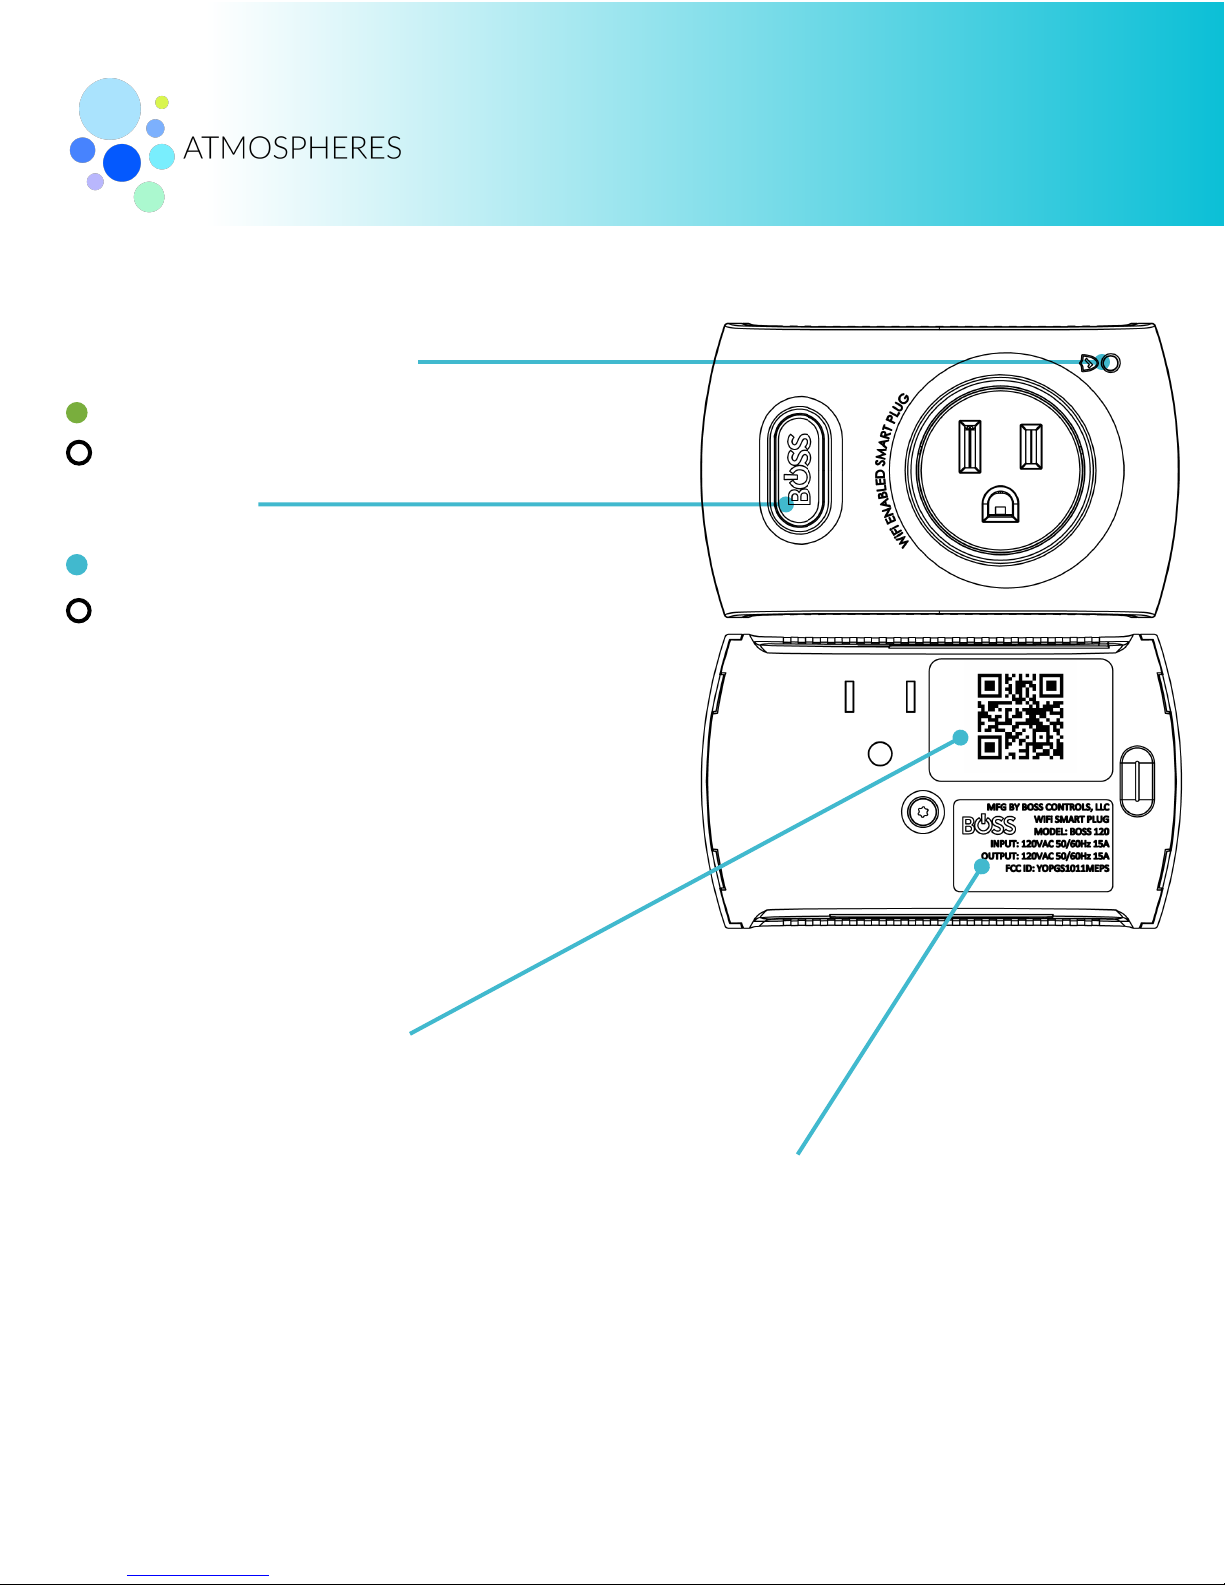
Surge Protection Indicator
Smart Plug 120
Power Button
(ON) Surge Protection is Working.
Smart Plug is ON and will power load.
Smart Plug is OFF and will not power load.
Press power button to manually turn Smart Plug ON-OFF.
Factory Reset:
•
Hold power button down firmly (≈ 10s) until blue light
flashes and release button.
•
Device will restart to factory settings (Factory Default
mode).
•
Device in Factory Default mode will have to be reconnected to your WiFi network but will not need to be readded to your BOSS account.
QR Code
Electrical Information
Important electrical information listing
voltage and max amperage information.
(OFF) Device has absorbed a surge and protection is off.
Use QR Code to add and provision Smart Plug
from a mobile device using iOS or Android.
Page 3

BOSS 120-220 Quickstart Guide Windows Page of 60011R052 6
120-220 Quickstart Guide for Windows
Surge Protection Indicator
Smart Plug 220
Power Button
Smart Plug is ON and will power load.
Smart Plug is OFF and will not power load.
Press power button to manually turn Smart Plug ON-OFF.
QR Code
Use QR Code to add and provision Smart Plug
from a mobile device using iOS or Android.
Electrical Information
Important electrical information listing voltage and
max amperage information.
Fastening Screw
Fastens 220 Smart Plug in 220V
socket to act as a theft deterrent.
To set Smart Plug to Factory Default Mode:
•
Hold power button down firmly (≈ 10s) until blue light flashes
and release button.
•
Device will restart to factory settings (Factory Default mode).
•
Device in Factory Default mode will have to be re-connected
to your WiFi network but will not need to be re-added to your
BOSS account.
(ON) Surge Protection is Working.
(OFF) Device has absorbed a surge and protection is off.
Page 4
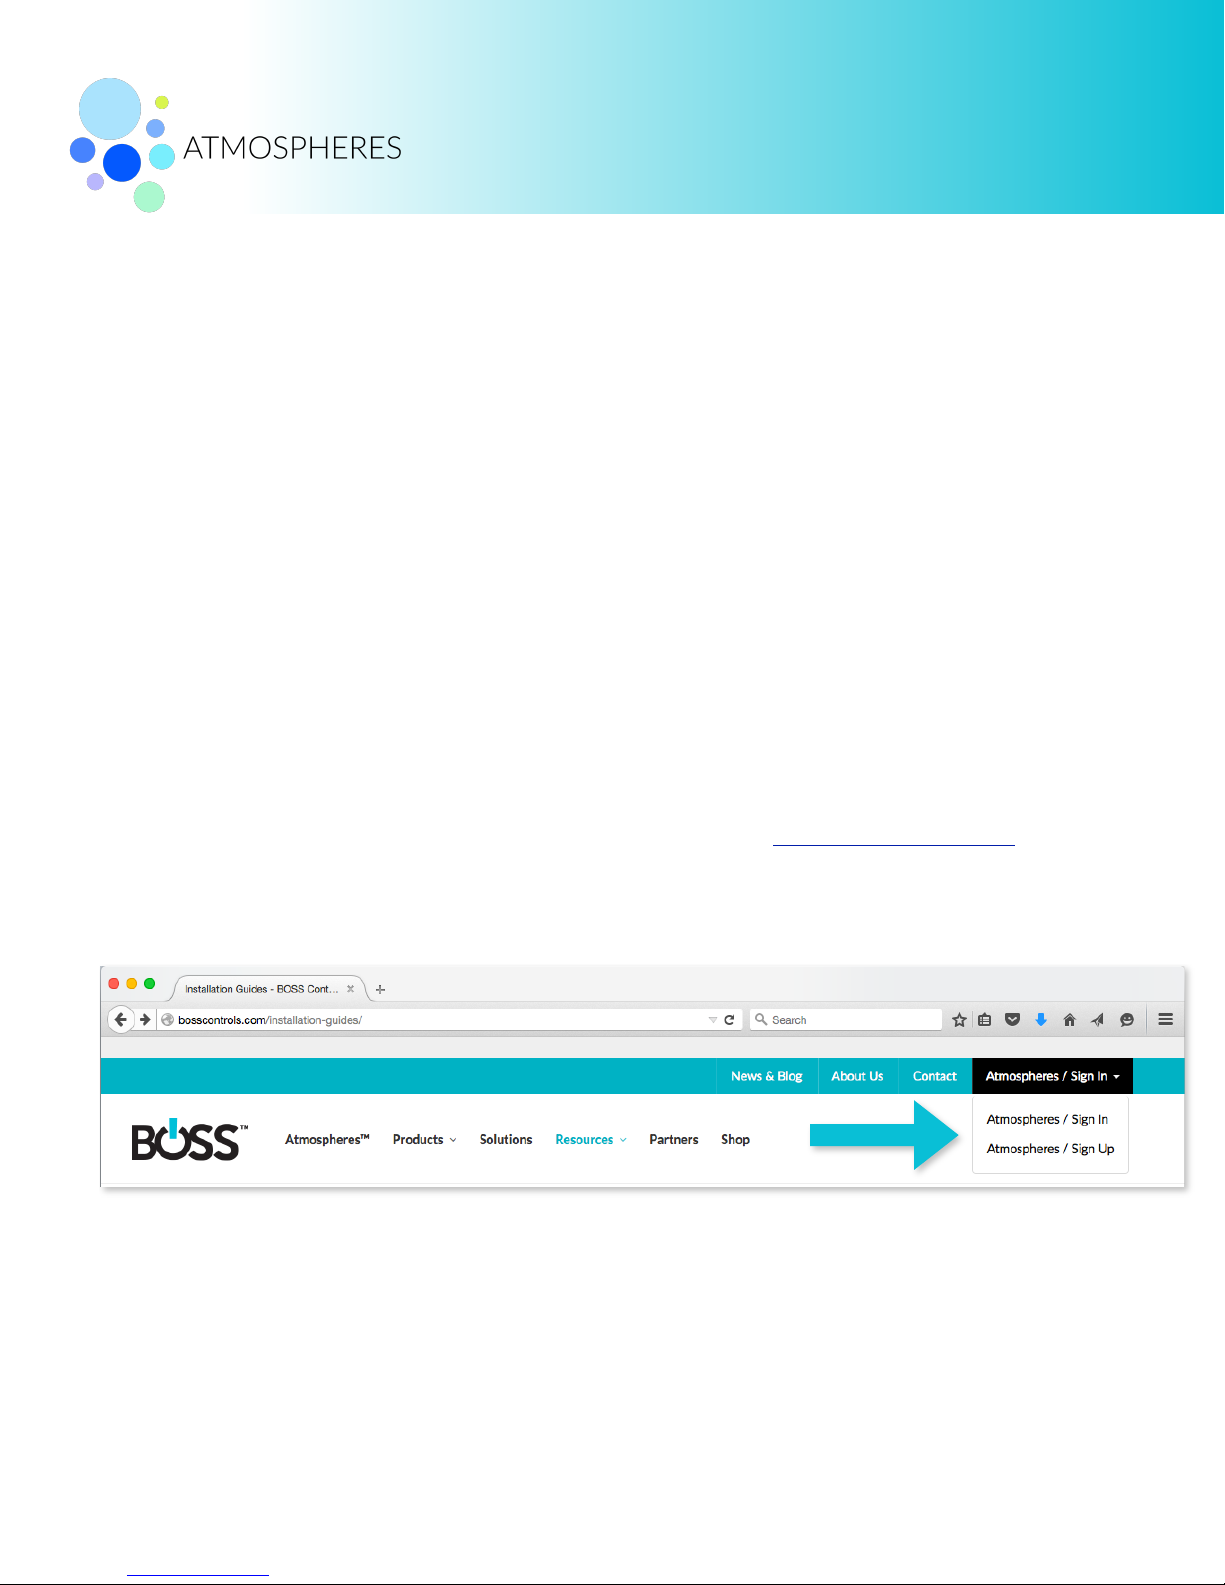
Installing your Smart Plug on a WiFi network is a simple two step process online via your web
browser or mobile app. This guide covers installation through Internet Explorer, Firefox, and
Google Chrome on Windows. To install your Smart Plug via iOS, Android, or Mac OS X,
please goto www.bosscontrols.com/support and choose the Quickstart Guide for your
system.
To install your Smart Plug on Windows, you will need:
1. The network name the Smart Plug will be installed on.
2. The network password the Smart Plug will be installed on.
3. A PC with a WiFi internet connection.
4. Windows 7 or later. Windows XP is not supported.
5. Web browser: Google Chrome, Mozilla Firefox, or Internet Explorer 8 (or later).
6. Please write down your network name and password now.
7. Sign in to your BOSS account. If you need an account, go to www.bosscontrols.com and
sign up for free. Click on Atmospheres / Sign In. Click Sign Up. Follow the on-screen
instructions.
First, the Smart Plug must be added to your BOSS account. Second, the Smart Plug must be
connected to your WiFi network.
BOSS 120-220 Quickstart Guide Windows Page of 60011R053 6
120-220 Quickstart Guide for Windows
Installing a BOSS Smart Plug using Windows.
Page 5
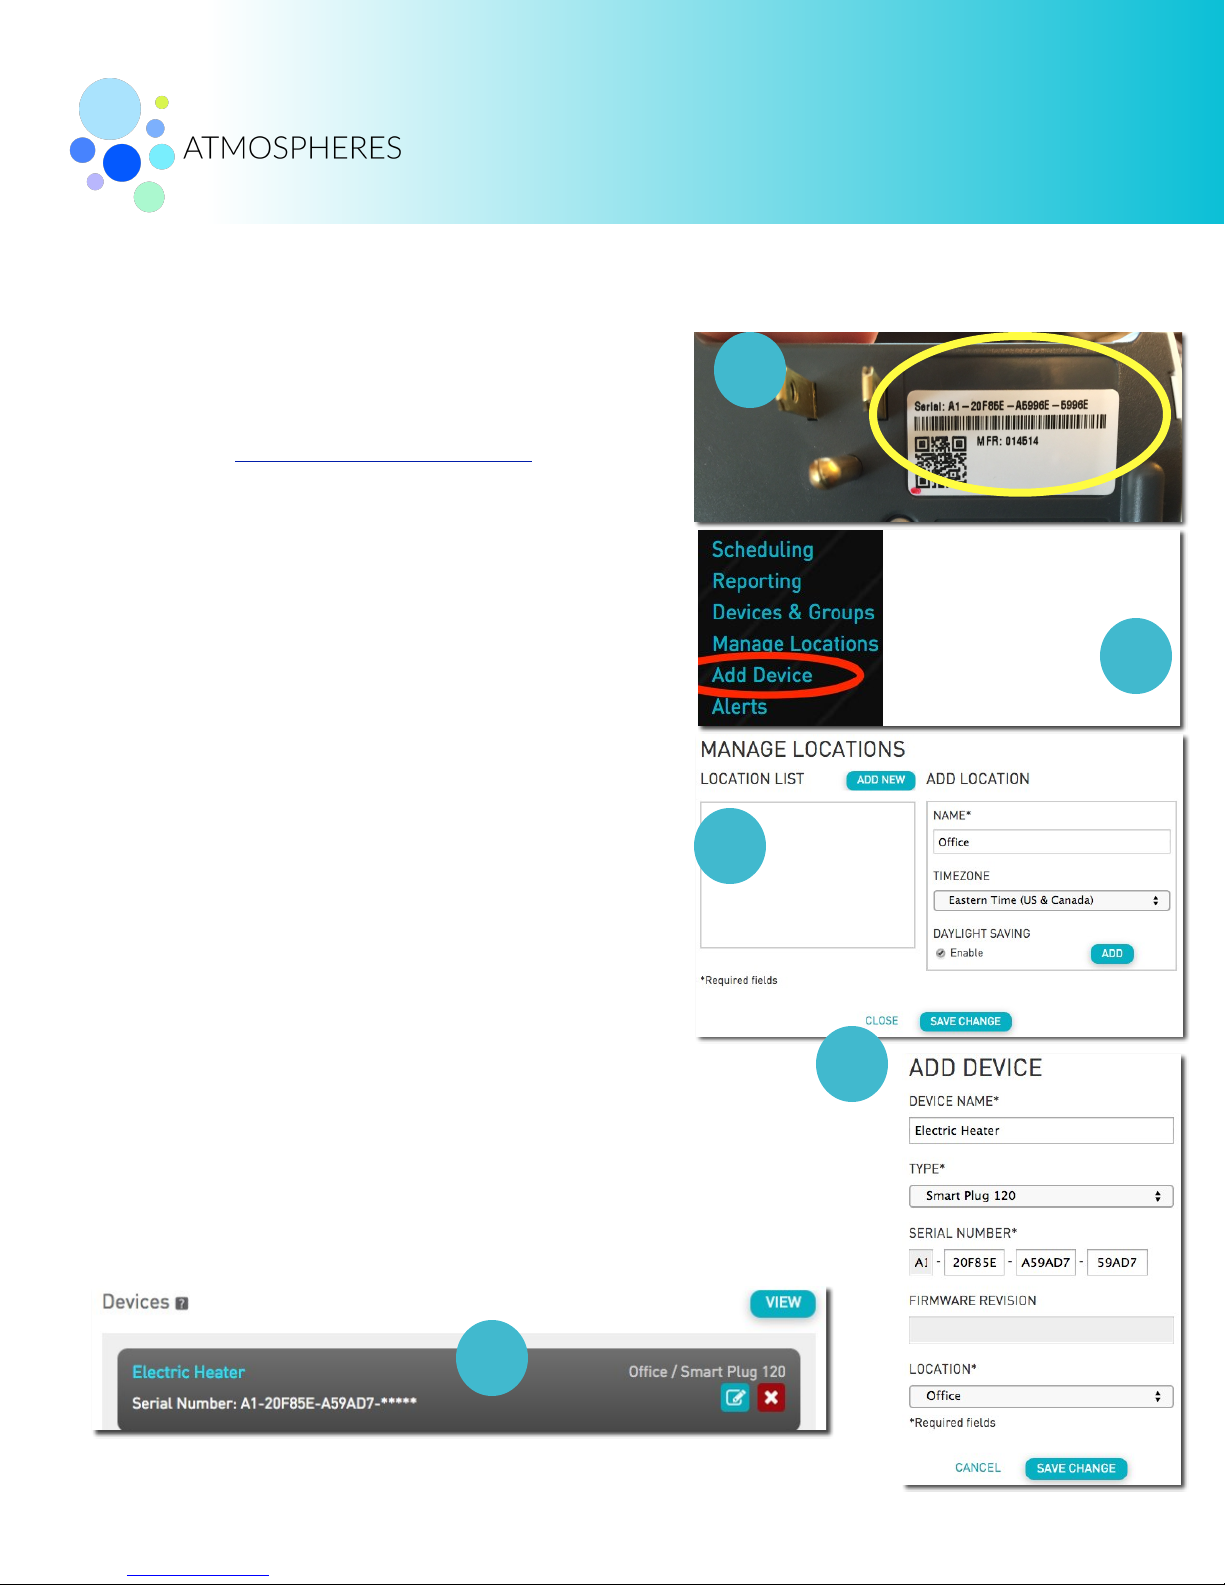
1. Look on the back of your BOSS Smart Plug.
Write down or take a picture of the serial
number on the back of the plug.
2. Login to account.bosscontrols.com
3. Click on Add Device. A Manage Locations popup window will appear if this is your first plug.
a. Enter Location Name, Select Timezone, and
Enable Daylight Saving. Note: If you select
the wrong timezone for your Smart Plug you
will have to delete the Smart Plug from your
account and re-install the plug to change the
timezone.
b. Click Add. Click Save Change. Click Close.
4. An ADD DEVICE pop-up window will appear
(first Smart Plug only). Otherwise click Add
Device from the Home Dashboard menu.
a. Enter in Device Name (Water Fountain,
Electric Heater, Window AC, etc.) Select
Plug Type. Enter Serial Number. Select
Location.
b. Click Save Change.
5. If your Smart Plug has been successfully added you will be
returned to the Devices and Groups page and you will see your
Smart Plug in your devices list.
6. Your Smart Plug must now be connected to your network.!
BOSS 120-220 Quickstart Guide Windows Page of 60011R054 6
120-220 Quickstart Guide for Windows
Add a Smart Plug to your BOSS Account
1
33a4
5
Page 6
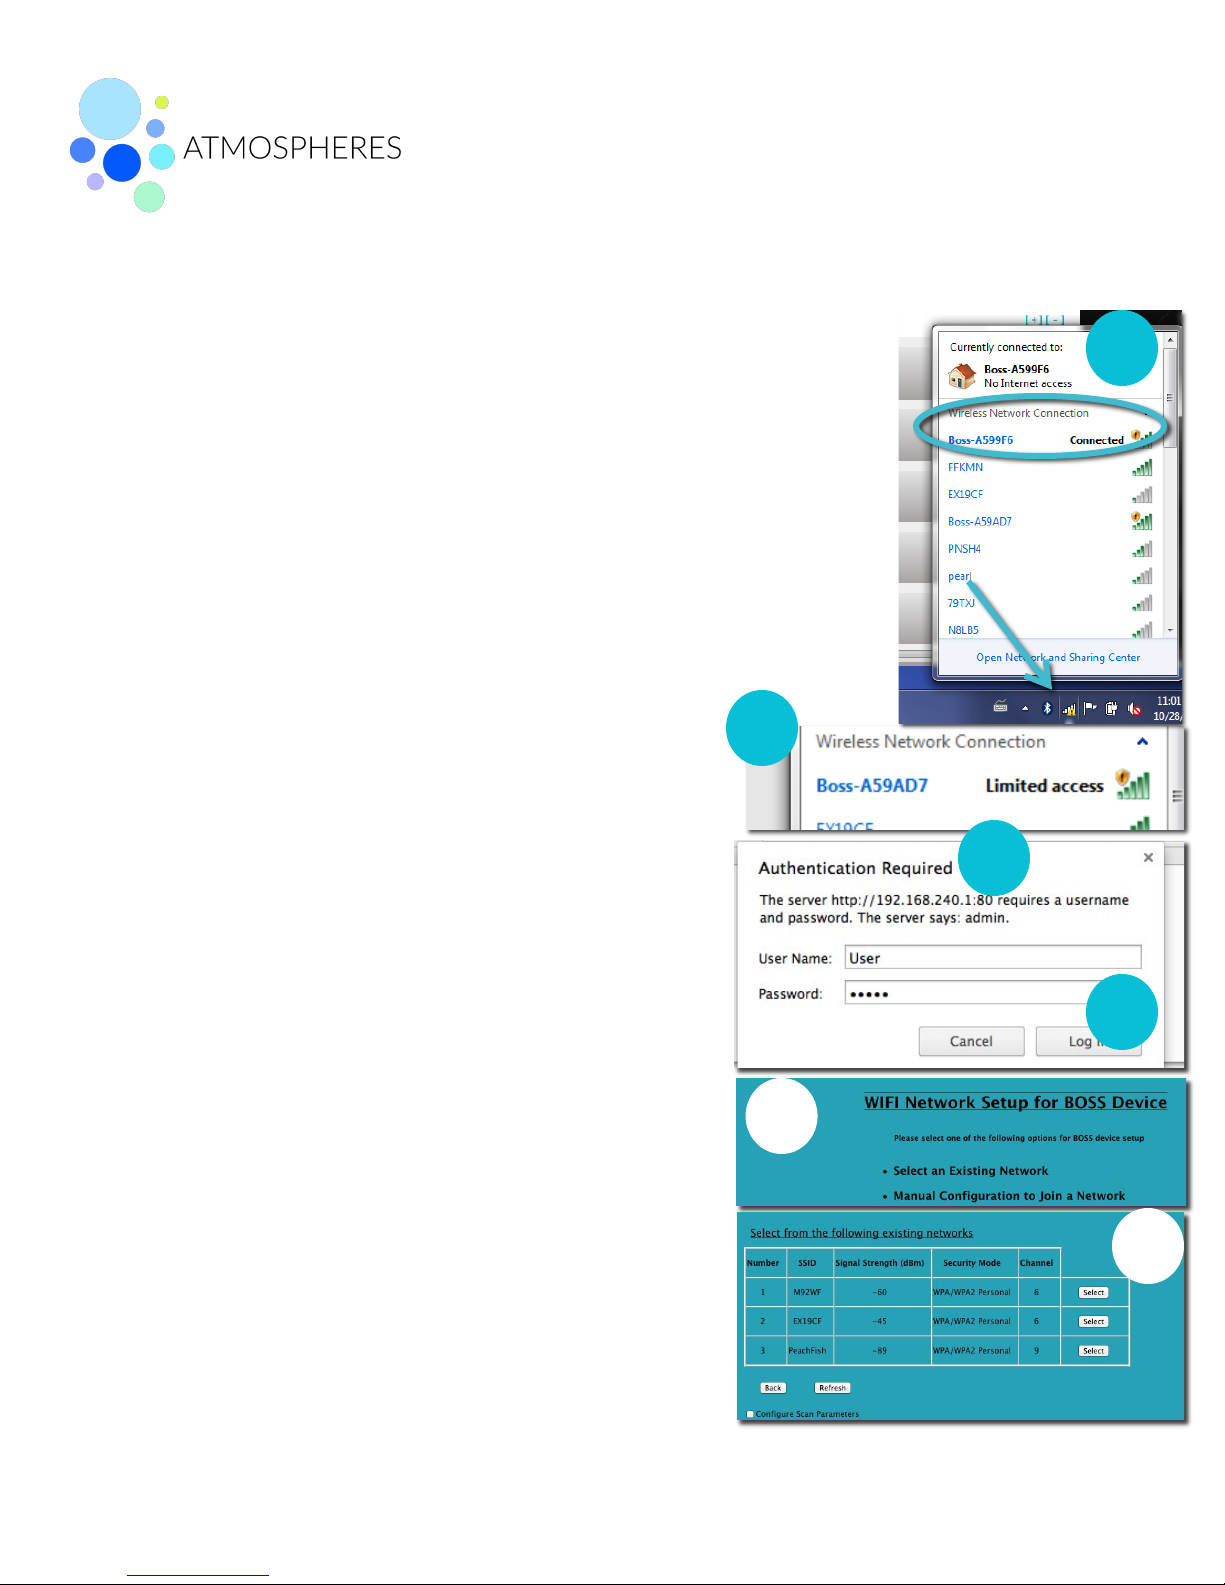
7. Plug-in your Smart Plug into a receptacle within range of your
WiFi router. The plug should power on within 20s. Once
powered, your Smart Plug will broadcast a WiFi signal and can
be found like any WiFi network.
8. From your computer, select the BOSS - XXXXXX network from
your Available Wireless networks in the lower right corner of
your desktop. The XXXXXX matches the middle 6 characters of
your Smart Plug serial number. If you do not see the BOSS XXXXXX network in your network list, set your Smart Plug back
to Factory Default Mode (see above).
9. If you receive the message “Limited access” you
are not connected to the BOSS network. Repeat
step #8.
10. If Set Network Location pop up window appears,
select Public Network and click close. Do not
Select Remember My Credentials.
11. Once the BOSS - XXXXXX network is connected,
open your web browser.
12. Type http://192.168.240.1/bossprov.html into the
address bar. A pop-up window will appear
requiring authentication.
13. For user name, type in: user. For password, type
in the last 5 characters of the Smart Plug serial
number. Click OK.
14. If successful, you will land on a WiFi Network
Setup page. Click Select for the the desired
existing network.
15. From WiFi Network Setup Page, select your
network from the list of available networks.
BOSS 120-220 Quickstart Guide Windows Page of 60011R055 6
120-220 Quickstart Guide for Windows
9
121314
15
Connect the Smart Plug to your network
8
Page 7
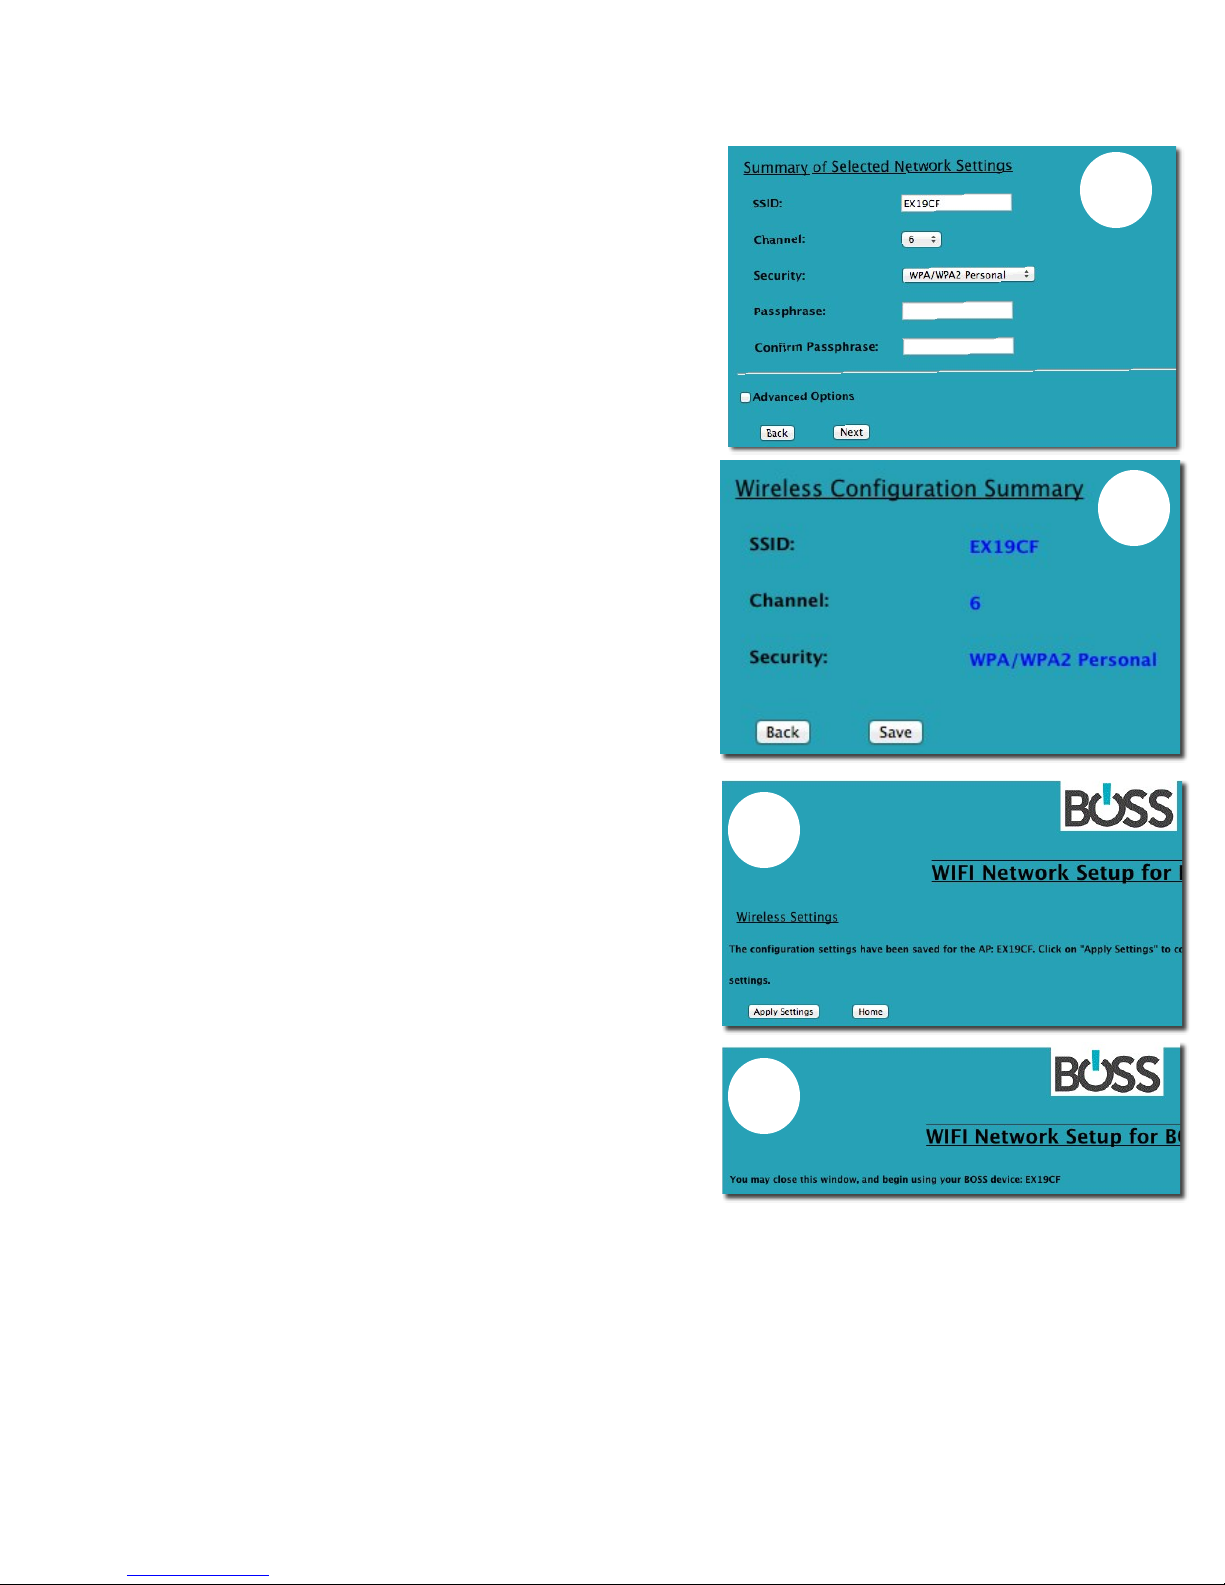
16. Enter and confirm the password for your
network. Click Next.
17. Click Save on the Wireless Configuration
Summary.
18. On the Wireless Settings page, click Apply
Settings.
19. Your Smart Plug is now installed.
20. Place your computer back on your WiFi
network.
BOSS 120-220 Quickstart Guide Windows Page of 60011R056 6
181917
16
 Loading...