


CONTENTS
Precautions................................................................................................................................................. 1
Lithium Battery Cell Warnings
Use Caution
Installation ..................................................................................................................................................
Installation Procedures .......................................................................................................................... 2
Installation Opening................................................................................................................................ 2
Wiring Connections ................................................................................................................................ 3
Uninstall the Main Unit
Operation
Power / SRC
Change the Source (SRC)
Store/Recall Preset Stations (1 - 6)
Play/Pause, Intro, Repeat, Random, Tracks playback
Track/Folder Navigation
Set the Clock (CLK)
Adjust Volume (VOL)
Switch Between US and EU Frequency
Manual Tuning (|<< / >>|)
Auto Seek Tuning (|<< / >>|)
Next/Previous Track
Fast Forward/Backward
Change Bands (BAND)
Automatic Music Search (AMS)
Track Search
Mute
Insert USB
AUX In Jack
Release Panel
Reset System (RESET)
Bluetooth Operation.................................................................................................................................... 7
Pair and Connect ................................................................................................................................... 7
Make a Call ............................................................................................................................................ 7
Redial Last Dialed Number ................................................................................................................... 7
Answer a Call ......................................................................................................................................... 7
End a Call .............................................................................................................................................. 7
Switch Audio Between Car and Phone .................................................................................................. 7
Adjust Talk Volume ................................................................................................................................. 7
Bluetooth Music (A2DP) ......................................................................................................................... 7
Remote Control
Remove Insulating Sheet .......................................................................................................................
Replace Lithium Battery Cell .................................................................................................................. 8
Remote Control Operation ..................................................................................................................... 8
Button Names and Locations ................................................................................................................. 9
Troubleshooting .........................................................................................................................................
............................................................................................................................................
...........................................................................................................................
...................................................................................................................................................
...........................................................................................................................................
........................................................................................................
..............................................................................................................................
.............................................................................................................................
.....................................................................................................................
...............................................................................................................................
..........................................................................................................................................
.......................................................................................................................................
.........................................................................................................................
.........................................................................................................................................
..............................................................................................................................
s ..........................................................................................................................................1
Control Panel Button Locations ..................................................................................................................
....................................................................................................................
..............................................................................
.........................................................................................................................
.................................................................................................
..................................................................................................................
........................................................................................................................
..........................................................................................................................
.............................................................................................................
......................................................................................................................................................
.............................................................................................................................................
..........................................................................................................................................
10
11
1
2
3
4
4
4
4
4
5
5
5
5
5
5
5
5
5
6
6
6
6
6
6
6
7
8
8
ii
PRECAUTIONS
Lithium Battery Cell Warnings
• Cell leakage may cause damage to the remote control.
• Do not throw cells into as this may cause an explosion.
• Keep battery cells out of reach of children.
Use cautions
•
•
Some MP3/WMA files may not be playable.
•
•
•
•
•
Be sure to lower the volume before switching off the unit or the ignition key.
•
1
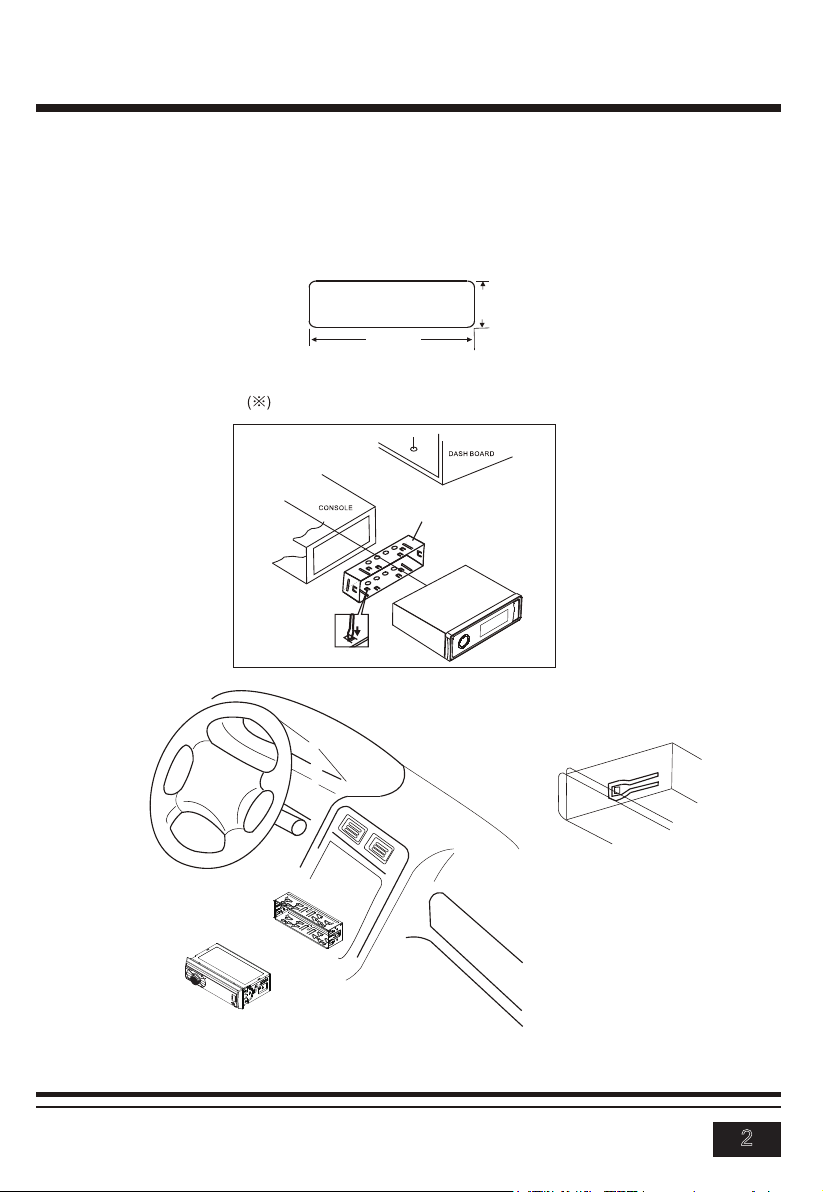
INSTALLATION
Installation Procedures
First complete the electrical connections and then check for correctness.
Installation Opening
This unit can be installed in any dashboard Having an opening as shown below.
2.05 inch
7.20 inch
Insert mounting collar into the dashboard and bend the mounting tabs out with a screwdriver.
Make sure that lock lever is flush with the mounting collar( not projecting outward).
MOUNTING SLEEVE
2

INSTALLATION(CONT.)
!
- Only use speakers with 4 ohms impedance.
- Do not attach the control panel to the chassis before wiring is complete.
- The maximum current of the Amp Remote trigger is 200mA.
Wiring Connections
WIRING
DIAGRAM
Radio Antenna
White:Front Left PRE-AMP Output
Red: Front Right PRE-AMP Output
Red: Rear Right PRE-AMP Output
White: Rear Left PRE-AMP Output
15
15A
CAUTION
+12V DC
NEGATIVE
GROUND
Rear Right Speaker
Front Right Speaker
Purple +
Purple/Black -
Gray +
Green +
Green/Black -
White +
White/Black -Gray/Black -
Rear Left Speaker
Front Left Speaker
ANT + (Blue)
Power B + (Yellow)
Uninstall the Main Unit
1.
Remove the plastic trim out from the main unit.
2. Insert a bracket key into the left and right side of the main unit and draw the unit out of
the mounting sleeve.
3
ACC + (Red)
GND - (Black)

CONTROL PANEL BUTTON LOCATIONS
REMOVE PANEL
OPERATION
1.POWER/SRC
RADIO, USB, BT, AUX IN,modes (if there are USB inside the unit).
radio , BT and Aux. When the user insert a USB flash driver,
their respective logos will illuminate on the display.
17
to turn off the unit.
4

OPERATION
During USB mode, press the ‘1/>||’ button to pause or resume music playback.
Press the ‘2/INT’ button to play the first 10 seconds of each track, press again to stop the introduction
scan, and play the current track.
Press the ‘3/RPT’ button to toggle between RPT ALL (Play all track), RPT FLR (Continuously repeats all
tracks in current folder) and RPT ONE (Continuously repeats current track).
Press the ‘4/RDM’ button to play all tracks in random order, press again to cancel random playback.
8. CLK
Press the CLK button once to display the real time, With time appearing on the display.Press and hold
CLK button for more than 2 seconds until the hour flashes. You can adjust the HOUR by pressing the
button and button. Then press the CLK button briefly, the minute will flash, you can adjust the
MINUTE by pressing the button and button.
Finally press the CLK button to confirm the time adjustments.
Rotate the volume knob to increase or decrese the volume level of the sound output.
Press the SEL button on the front panel or on the remote control repeatedly to cycle through the following
adjustable audio functions: BASS, TREBLE, BALANCE, FADER, EQ OFF, CLASS/ROCK/POP/FLAT,
LOUD ON/OFF, DX/LOC, STEREO/MONO, CLOCK 12/24, AREA US/EU, AUTO/ BLUE/RED/CYAN/
GREEN/ PURPLE / YELLOW/WHITE.
• Rotate the VOL knob on the front panel or press the VOL+ /VOL- button on the remote control
to adjust the selected item.
- BASS: -7, -6, ~, -1, 0, +1, ~, +6, +7
- TREBLE: -7, -6, ~, -1, 0, +1, ~, +6, +7
- BALANCE: L7, L6, ~, L1, 0, R1, ~, R6, R7
- FADER: R7, R6, ~, R1, 0, F1, ~, F6, F7
- EQ(Equalizer) Setting: OFF, CLASS, ROCK, POP, FLAT
- Loudness: LOUD ON/OFF
- DX/LOCAL: Enables or disables the local broadcast mode (LOCAL).
- Stereo/Mono: Switches between MONO and STEREO reception mode for radio frequencies.
- CLOCK 12/24: Select between 12 hours and 24 hours display.
Note: If 12 hour display is selected , AM= Morning; PM= Afternoon
- AREA US/EU: This car radio is equipped the USA / Europe frequency.
Rotate the volume knob to switch between USA and Europe frequency.
The system will change the frequency setting in about 3 seconds.
- 7 color-changing illumination in buttons:
This car radio device is equipped 7 color-changing illumination in buttons.
The illumination color can be preset Auto(color automatically change one by one), Blue, Red,
Cyan, Green, Purple, Yellow, White.
5

OPERATION
10.FF( ) &11.FB( )
In the radio mode:
Long press the or button for more than 2 seconds, the unit will switch to manual tuning
mode, briefly press the or button to search the next or previous frequency step by step.
Short press the or button, the automatic search will start, it will search upward or downward
for the strong signal radio station within the cuttent band. The auto searching will stop until find a
station.
In the USB mode:
Briefly press the or button to play the the next or previou track.
Press and hold the or button to fast forward or fast backward.
12.BND/AMS
In radio mode,short press the BND/AMS button repeatedly to select the one of the radio band : FM 1,
FM 2,FM 3, AM1,AM2 in a cycle sequence. When you select a band, the word F1、F2、F3 for FM band,
and A1, A2 for AM band will be shown on the LCD display.
Press the BND/AMS check
control to scan each preset station in each band.
During USB playback, press and hold the BND/AMS button to enter track search mode, the “TRK0000”
will appear on the display. Rotate VOL knob to select the “first number”. Then press the button to
move the “first number” to the left and enter the next number. Finally press the SEL button to
confirm and play the selected track. If no any operation in 5 seconds,it will play the current track.
13. MUTE
When the 6 strongest stations will be stored into
AMS button on the remote
flash on the LCD
14. USB PORT
15. AUX IN JACK
16.
17. RESET
To reset all parameters to factory default values. Press the button to detach the control panel form
the head unit and remove the control panel,then use a subject with a sharp point end to thrush the
RESET hole.
6

BLUETOOTH OPERATION
Pair and Connect
Prior to using the Bluetooth device as a handsfree system for a Bluetooth-enabled mobile
phone for the
1. In any mode, prior to pairing and connecting, the BT logo
that no device is connected. To begin pairing, enable BT mode on your mobile phone.
2. When the phone
3. Choose the “BOSS MR632UAB” from the device list to pair and connect with the car audio
audio system. Upon
4. When pairing is complete, the mobile phone audio will automatically transfer to the car
audio system whenever a call is made or received, or when the mobile phone plays
music.
Make a Call
• To make a call, dial the call directly from the paired mobile phone.
• To make a call with this Bluetooth handsfree system.
a) When linking up the Bluetooth mobile phone to this car audio handsfree system, press
the button to access the dial telephone number mode, then press the “0~9”, * and #
button on the remote control to input the telephone number, the entered number will be
shown on the LCD.
b) If a number has been incorrectly input, press the DEL button or button to delete it.
c) Press the button to make outgoing call.
Redial Last Dialed Number
Press and hold the button on the control panel to redial the last dialed phone number.
time, you must pair and connect the two devices as follows:
in the LCD indicating
the car audio system, the “BOSS MR632UAB” will be displayed.
the BT logo will stop
Answer a Call
• When the mobile phone is called, the incoming telephone number displays in the LCD.
• To receive the call, press the button on the control panel or remote control.
Reject or End a Call
To reject the call or end an active call, press the button.
Switch Audio Between Car and Phone
During a call, press the VOL knob/button to switch the audio source from the car audio
system back to your mobile phone.
Adjust Talk Volume
• During a call, use VOL knob or VOL + and VOL - buttons to adjust the volume level.
• Use the MUTE button to mute sound.
Audio Streaming (A2DP)
1. Press the /SRC button to enter BT mode and display pause in the LCD.
2. When a mobile device is paired, music played through that device will automatically be
heard through the car audio system.
3. Press the >>| or |<< button to play the next or previous
4. Press the >|| button to pause or resume music playback.
7
on the mobile phone.

REMOTE CONTROL
Button Names and Locations
1. (Power on/off) button
2. VOL+/VOL-(volume increase/decrease) button
3. Band button, (answer call) button
4. PREV: tune down, seek down;
Previous Track, fast reverse
5. SEL(selection) button
6. NEXT: tune up, seek up; Next Track, fast forward
7. Mute button, DEL(Delete) button
8. CLK(clock setting) button, (end call) button
9. button, preset station 1 button, keypad 1
10. INT(intro) button, preset station 2 button, keypad 2
11. RPT(repeat) button, preset station 3 button,
keypad 3
12. RDM (random), preset station 4 button, keypad 4
13. -10(previous 10 tracks), preset station 5 button,
keypad 5
14. +10(next 10 tracks), preset station 6 button,
keypad 6
15. ST(stereo) button, keypad 7
16. LOUD(loudness) button, keypad 8
17. AMS(automatic music search) button, keypad 9
18. SRC(Source) button, keypad *
19. EQ(Equalizer) button, keypad 0
20. LOC(local)/DX button, keypad #
1
4
7
9
10
12
13
15
18
19
3
5
6
8
11
14
16
17
20
2
Note: When using the remote control for the first time, you must pull out the portective plastic
tab from the battery compartment found on the back of the remote control.
9

REMOTE CONTROL
!
Remove Insulating Sheet
The remote control comes with an insulating sheet
attached to the underside of the remote control, as
illustrated on the right. The remote control will not
work until the insulating sheet is removed.
Replace Lithium Battery Cell
1. When the lithium cell battery becomes weak,
replace it as illustrated on the right.
2. Press and hold the movable block in the
direction indicated by arrow 1. At the same
time, pull the cell holder out of the remote
control in the direction indicated by arrow 2.
3. Replace the old cell with a new one, making
sure the (+) polarity is facing upward.
4. Re-insert the cell holder into the remote
control.
- Cell leakage may cause damage to the remote control.
- Do not throw cells into
- Keep battery cells out of reach of children.
as this may cause an explosion.
Remote Control Operation
Position the emitting window of the remote control
toward the sensor window of the unit.
• The operation angle for front panel remote control
reception is about 30 degrees.
• The distance between the emitting window of the remote control and the sensor window
of the unit should remain less than 5 meters.
8

TROUBLESHOOTING
If you suspect something is wrong, immediately switch power off. Do not use the unit in
abnormal condition, for example without sound, or with smoke or foul smell, can cause fire or
electric shock.
Immediately stop using it and call the store where you purchased it. Never try to repair the
unit by yourself because it is dangerous to d o so.
General
1) Car's engine switc
Turn you car's key to ACC or ON.
2) Cable is not correctly connected.
Check the connection.
3) Fuse is burnt.
Replace fuse.
4) Volume is in mute or minimum.
Check volume or mute on/off, adjust volume to a desired level.
5) Sound skips.
The installation angle is more than 30°. Adjust the installation angle less than 30°.
6) The operation keys do not work.
The built-in micro- computer is not operating properly due to noise. Press the RESET button
to restore the program to zero.
Radio
1) Much noise in broadcasts.
Station or signal is too weak. Select other stations of stronger signal level.
2) The antenna cable is not connected.
Insert the antenna cable firmly into the antenna socket of this car radio.
3) Preset station is reset.
Battery cable is not correctly connected. Connect the battery cable to the terminal that is
always live.
h is not on.
USB
USB is connecting but no sound
a) USB connection is not good. Take it out and insert again.
b) USB is damaged or no music file inside. Change t o another USB, or record music inside it.
10

SPECIFICATIONS
General
Power supply Requirement : DC 12V
Maximum power output : 50W X 4CH
Speaker impedance : 4 - 8 Ohm
Unit Dimensions(WxHxD) : 7.0 X 2.0 X 3.8 inch
Weight : 1.54 Lb (0.7 kg)
Fuse : 15 A
RADIO
FM
Frequency Range USA / EUROPE: 87.5 MHz - 107.9 MHz / 87.5 MHz - 108.0MHz
Channel step: 200 KHz / 50 KHz
AM
Frequency Range USA / EUROPE: 530 KHz - 1710 KHz / 522-1620 KHz
Channel step: 10 KHz / 9 KHz
USB
Usable Audio Formats
USB Port Type: 2.0
USB Charging: 5V/1A
Pre-amp Output
Frequency Response
S/N Ratio
:
:
:
:
MP3/WMA
Front and Rear
20 Hz - 20 KHz
60dB
BT
BT Profile supports
Range of frequency
11
:
:
Headset, Handsfree and A2DP & AVRCP
2.4GHz spectrum

 Loading...