

Page 1
KATANA-AIR
3 inch x 2 speaker
Transmitter
Owner’s Manual
Guitar Amplier
KATANA-AIR
Owner’s Manual
取扱説明書
Bedienungsanleitung
Mode d’emploi
Manuale dell'utente
Manual del usuario
Manual do Proprietário
Gebruikershandleiding
Page 2
For the U.K.
For the USA
WARNING:
IMPORTANT:
As the colours of the wires in the mains lead of this apparatus may not correspond with the coloured markings identifying
the terminals in your plug, proceed as follows:
The wire which is coloured GREEN-AND-YELLOW must be connected to the terminal in the plug which is marked by the
letter E or by the safety earth symbol or coloured GREEN or GREEN-AND-YELLOW.
The wire which is coloured BLUE must be connected to the terminal which is marked with the letter N or coloured BLACK.
The wire which is coloured BROWN must be connected to the terminal which is marked with the letter L or coloured RED.
THIS APPARATUS MUST BE EARTHED
THE WIRES IN THIS MAINS LEAD ARE COLOURED IN ACCORDANCE WITH THE FOLLOWING CODE.
GREEN-AND-YELLOW: EARTH, BLUE: NEUTRAL, BROWN: LIVE
DECLARATION OF CONFORMITY
Compliance Information Statement
Model Name :
Type of Equipment :
Responsible Party :
Address :
Telephone :
This transmitter must not be co-located or operated in conjunction with any other antenna or transmitter.
KTN-AIR
Guitar Amplier
Roland Corporation U.S.
5100 S. Eastern Avenue Los Angeles, CA 90040-2938
(323) 890-3700
For the USA
(FCC Part15 Subpart C §15.247, 15.253, 15.255)
This equipment complies with FCC radiation exposure limits set forth for an uncontrolled environment and meets the FCC radio
frequency (RF) Exposure Guidelines. This equipment has very low levels of RF energy that are deemed to comply without testing of
specic absorption ratio (SAR).
(FCC Part15 Subpart C §15.247, 15.253, 15.255)
For Canada
This device complies with Industry Canada licence-exempt RSSs. Operation is subject to the following two conditions:
(1) This device may not cause interference, and
(2) This device must accept any interference, including interference that may cause undesired operation of the device.
Le présent appareil est conforme aux CNR d’Industrie Canada applicables aux appareils radio exempts de licence.
L’exploitation est autorisée aux deux conditions suivantes :
1) l’appareil ne doit pas produire de brouillage;
2) l’utilisateur de l’appareil doit accepter tout brouillage radioélectrique subi, même si le brouillage est susceptible d’en
compromettre le fonctionnement.
(RSS-Gen §8.4)
The available scientic evidence does not show that any health problems are associated with using low power wireless devices.
There is no proof, however, that these low power wireless devices are absolutely safe. Low power Wireless devices emit low levels of
radio frequency energy (RF) in the microwave range while being used. Whereas high levels of RF can produce health eects (by
heating tissue), exposure of low-level RF that does not produce heating eects causes no known adverse health eects. Many studies
of low-level RF exposures have not found any biological eects. Some studies have suggested that some biological eects might
occur, but such ndings have not been conrmed by additional research. WL-T has been tested and found to comply with IC
radiation exposure limits set forth for an uncontrolled environment and meets RSS-102 of the IC radio frequency (RF) Exposure rules.
Les connaissances scientiques dont nous disposons n’ont mis en évidence aucun problème de santé associé à l’usage des appareils
sans l à faible puissance. Nous ne sommes cependant pas en mesure de prouver que ces appareils sans l à faible puissance sont
entièrement sans danger. Les appareils sans l à faible puissance émettent une énergie fréquence radioélectrique (RF) très faible
dans le spectre des micro-ondes lorsqu’ils sont utilisés. Alors qu’une dose élevée de RF peut avoir des eets sur la santé (en chauant
les tissus), l’exposition à de faibles RF qui ne produisent pas de chaleur n’a pas de mauvais eets connus sur la santé. De nombreuses
études ont été menées sur les expositions aux RF faibles et n’ont découvert aucun eet biologique. Certaines études ont suggéré
qu’il pouvait y avoir certains eets biologiques, mais ces résultats n’ont pas été conrmés par des recherches supplémentaires. WL-T
a été testé et jugé conforme aux limites d’exposition aux rayonnements IC énoncées pour un environnement non contrôlé et
respecte les règles d’exposition aux fréquences radioélectriques (RF) CNR-102 de l’IC.
(RSS-102 §2.6)
Page 3

KATANA-AIR
3 inch speaker x 2
Owner’s Manual
Guitar Amplier
KATANA-AIR
An “all-wireless” guitar amp that supports wireless for guitar
as well
The KATANA-AIR is a guitar amp that provides wireless connectivity
for your guitar as well as Bluetooth and battery operation, making
it an “all-wireless” guitar amp that lets you enjoy playing without
connecting any cables to it.
Transmitter
Main Features
5 Wireless transmitter for guitar achieves low latency.
Enjoy cable-free performance.
5 Four original amp types are provided: the edgy
“brown” inherited from the BOSS Waza Head, as well
as clean, crunch, and lead. Additionally provided is
a dedicated acoustic amp that you can also use with
an acoustic guitar.
5 Built-in BOSS eects are easy to operate and
provide high quality (up to three can be used
simultaneously).
If you connect the dedicated app via Bluetooth, you
can select from a total of 58 dierent types of eect.
5 You can use headphones to enjoy sound that’s as
powerful as though you were hearing it from a
speaker.
5 Stereo audio streaming via Bluetooth is also
supported.
5 Two-way power supply allows operation using
either eight AA batteries or an AC adaptor.
Standby/Wakeup-On function lets the batteries last
even longer.
Before using this unit, carefully read “USING THE UNIT SAFELY” and
“IMPORTANT NOTES” (the leaet “USING THE UNIT SAFELY” and the
Owner’s Manual (p. 11)). After reading, keep the document(s) where it
will be available for immediate reference.
Copyright © 2018 ROLAND CORPORATION
Page 4
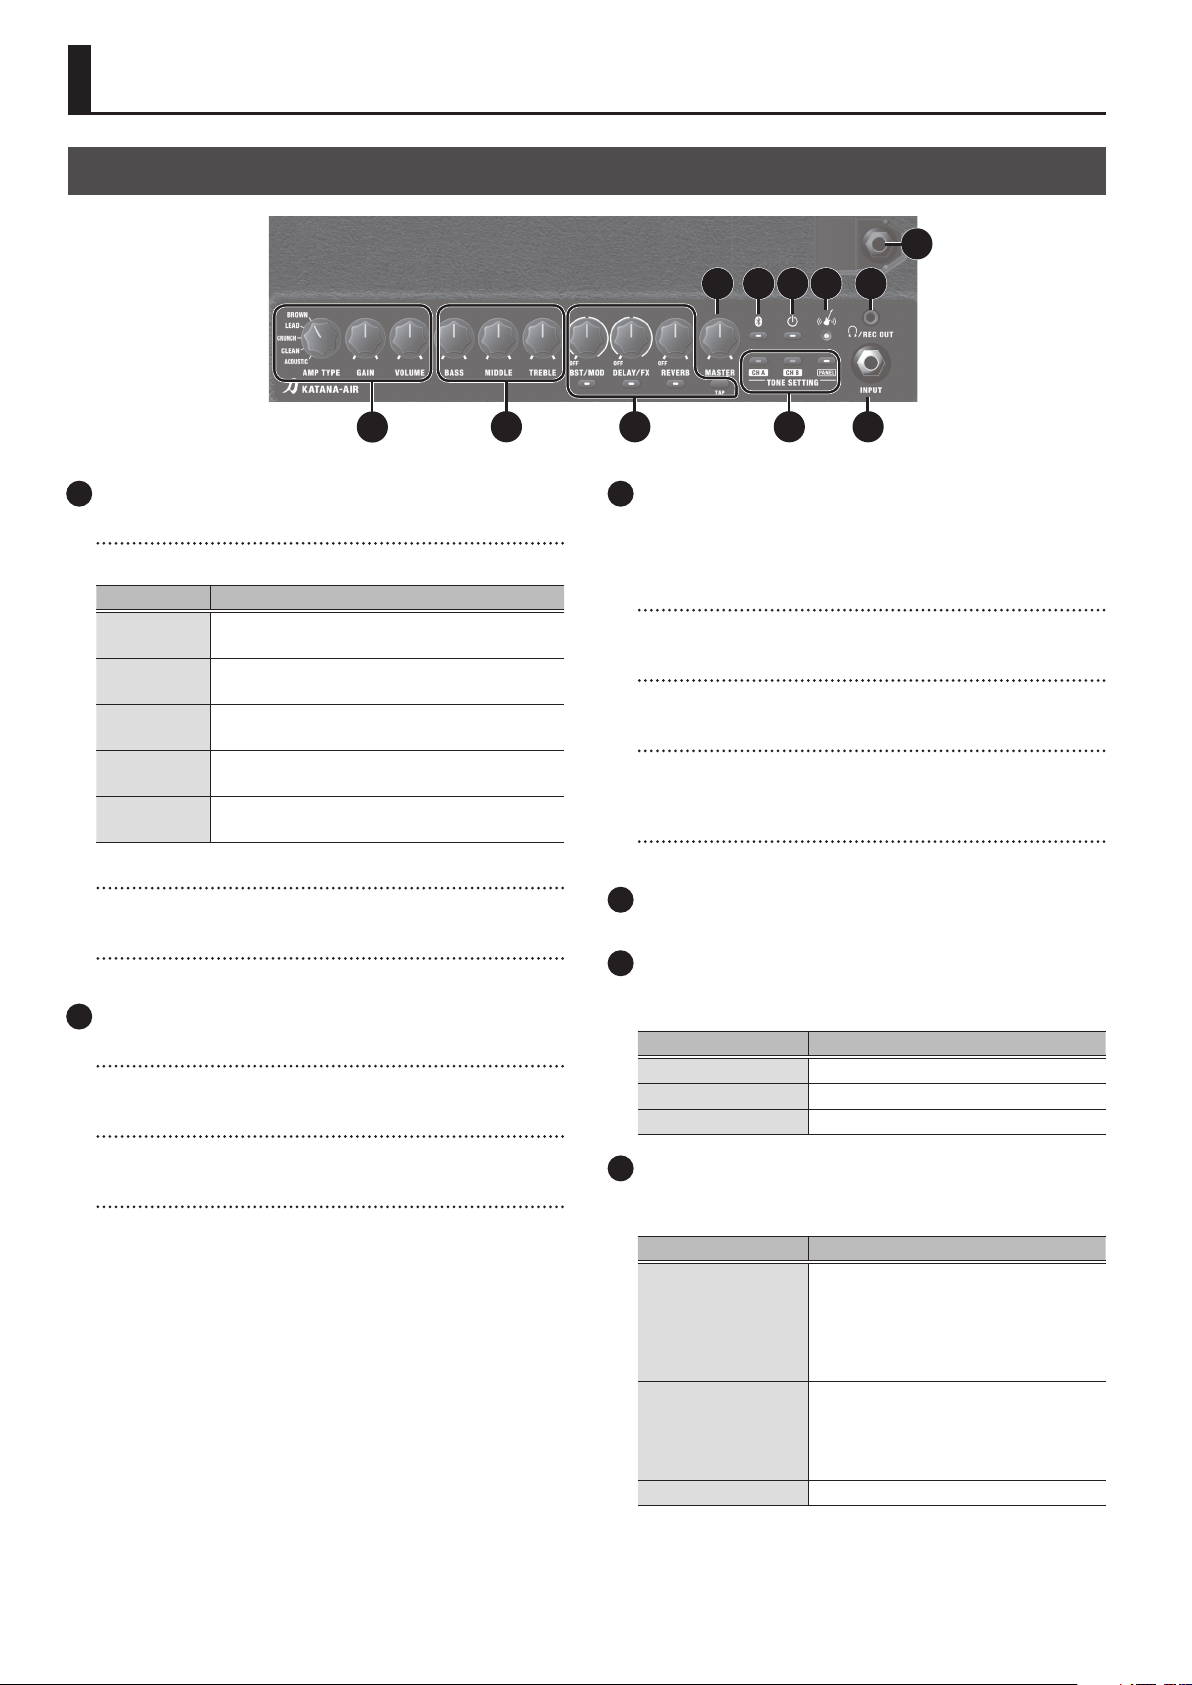
Panel Descriptions
Top Panel
4
5 6 7 9
11
1
1 AMPLIFIER
[AMP TYPE] knob
Selects the amp type. All provided amp types are original.
Type Explanation
BROWN
LEAD
CRUNCH
CLEAN
ACOUSTIC
[GAIN] knob
Adjusts the gain (amount of distortion).
[VOLUME] knob
Adjusts the volume.
A lead sound with an edge inherited from the
BOSS WAZA brown sound.
Dierent gain settings allow this sound to cover
a wide range from crunch to high-gain.
A fat crunch sound that faithfully responds to
the nuances of your picking.
A clean and natural sound. In conjunction with
BST (BOOSTER), it can be used for solo or lead.
A dedicated acoustic guitar amp that supports
connection of an acoustic guitar.
2 EQUALIZER
[BASS] knob
Adjusts the sound level of the low-frequency range.
[MIDDLE] knob
2 3
3 EFFECTS
4 [MASTER] knob
5 [Bluetooth] button/indicator
8 10
Here you can make settings for the built-in eects. For details on
the eect types and settings for each knob, refer to “Using the
Eects” (p. 6).
[BST/MOD] button/knob
Controls distortion-type eects and modulation eects.
[DELAY/FX] button/knob
Controls eects such as delay, wah, tremolo, and octave.
[TAP] button
Sets the delay time. When you press this button two or more
times, the delay time is set to the interval between presses.
[REVERB] button/knob
Controls the reverb.
Adjusts the overall volume.
Registers a Bluetooth Device (p. 8). And indicates the Bluetooth
connection status.
Indicator Explanation
Lit Connected
Blinking Pairing mode
Unlit Not connected
Adjusts the sound level of middle-frequency range.
[TREBLE] knob
Adjusts the sound level of the high-frequency range.
2
L
6 [
] (POWER) button/indicator
Turn the power on/o. This also indicates the state of the power
supply.
Indicator Explanation
On
To enter standby mode, long-press the
Lit green
Lit orange
Unlit O
[L] button.
To turn the unit o, enter standby mode
and then long-press the [L] button.
Standby mode
To turn the unit on, press the [L] button.
To turn the unit o, long-press the [L]
button.
Page 5

Panel Descriptions
MEMO
When the power is on, and a certain length of time
elapses since the unit was last played or operated, the unit
automatically enters standby mode. You can use a dedicated
app (subsequently referred to as BOSS Tone Studio) to
change the time after which the unit enters standby mode
(p. 7).
In standby mode, the power automatically turns on if the
transmitter plugged into the guitar detects vibration (p. 5).
7 (Guitar Wireless) indicator
Indicates the status of the connection with the transmitter.
Indicator Explanation
Connected with the transmitter
Lit white
Unlit
* If the guitar is connected to the INPUT jack, the sound of the
INPUT jack takes priority.
When you play the guitar, the sound is
heard from the speaker.
Not connected with the transmitter
Alternatively, the guitar is connected to the
INPUT jack
8 TONE SETTING
[CH A], [CH B] buttons
Each of these buttons stores three sets of settings for all top panel
knobs (except the [MASTER] knob) and buttons (p. 6). Each time
you press a button, the color alternates between green, red, and
orange, and the settings change accordingly. If you hold down
a button for one second, the settings of the sound that you’re
currently hearing are overwritten onto the previously-stored
settings.
* You can make the settings back to the factory state by turning
the power on while holding down the [PANEL] button (p. 9).
[PANEL] button
9 (PHONES)/REC OUT jack
Connect headphones here. You can obtain powerful guitar sounds
just as if you were playing through the speaker. By using BOSS
Tone Studio you can obtain the sound of dierent micing (LINE
OUT AIR FEEL, p. 7). To adjust the volume, use the [VOLUME] knob
along with the [MASTER] knob.
* If a plug is inserted in this jack, no sound will be output from
the KATANA’s own speaker. This is convenient if you don’t want
loud sound to be produced from the speaker, such as when
you’re practicing at night.
10 INPUT jack
You can directly connect your electric guitar here.
* To prevent malfunction and equipment failure, always turn
down the volume, and turn o all the units before making any
connections.
11 TRANSMITTER IN jack
You can insert the included transmitter (p. 4) here to charge it.
The rst time that you use the unit, power-on the KATANA-AIR and
insert the transmitter here to charge it.
NOTE
5 Do not insert anything other than a transmitter made by
BOSS.
If you connect headphones, high-volume sound might be
emitted, or the headphones might be damaged.
5 Ambient temperature range during charging: 5°C–35°C
However, in order to take full advantage of the rechargeable
lithium-ion battery’s performance, we recommend that you
charge it in a temperature range of 10°C–30°C.
If the temperature is outside the appropriate range, a
charging error might occur (the BATTERY indicator blinks
red) and the battery fail to charge (p. 10).
Makes the unit sound using the current settings of the panel
knobs.
Rear Panel
12 13 14
12
AUX IN jack
Here you can connect a CD player, audio player, electronic musical
instrument, or similar audio source, and listen to it while you play
your guitar.
13 DC IN jack
Connect the included AC adaptor (p. 5).
* Use only the AC adaptor that was included with the unit.
O
14
(USB) port
You can use a commercially available USB 2.0 cable to record the
sound of the KATANA-AIR into your computer.
You must install the USB driver when connecting the unit to
your computer.
Download the USB driver from the Roland website. For details,
refer to Readme.htm which is included in the download.
https://www.boss.info/
3
Page 6

Panel Descriptions
Bottom Panel
15
Transmitter
16
17
The transmitter has the following functions.
Function Explanation
When inserted in the guitar
Wireless
Wake up on
When inserted in the TRANSMITTER IN jack
AUTO BATTERY
CHARGE
AUTO WIRELESS
CONNECTION
By inserting the transmitter in the TRANSMITTER IN jack before
plugging it into your guitar, you can charge the transmitter and
also obtain a stable wireless connection.
When you play the guitar, the sound is
heard wirelessly from the KATANA-AIR.
If the power is on, and no vibrations are
detected for a certain length of time, the
unit automatically enters standby mode.
In standby mode, if the transmitter
plugged into the guitar detects
vibration, the power turns on
automatically (p. 5).
The transmitter is automatically
charged.
To ensure the most stable connection
between the KATANA-AIR and the
transmitter, nearby wireless usage in
the 2.4 GHz band is detected for ten
seconds, and adjustments are made
automatically.
16 DC IN 5 V port (USB Micro-B type)
You can use a commercially available USB cable to charge
the transmitter instead of inserting the transmitter in the
KATANA-AIR’s TRANSMITTER IN jack.
17 Input plug/Power button
When you insert the transmitter into your guitar, the transmitter
automatically powers-on.
NOTE
If you insert the transmitter into a guitar whose electrical
specications dier from those of a standard guitar, the
transmitter might not power-on. For details, refer to the
BOSS website’s KATANA-AIR support page.
18
15 Battery cover
Detach the cover and install batteries (p. 5).
18 BATTERY indicator
Indicates the status of the transmitter’s battery and the wireless
connection status.
Status Indicator Explanation
When inserted in the guitar
Remaining
battery
amount
When inserted in the TRANSMITTER IN jack
AUTO
WIRELESS
CONNECTION
AUTO
BATTERY
CHARGE
Overall
Lit green Sucient capacity remains.
Lit orange Capacity is becoming low.
Lit red
Blinking
orange
Lit orange
Unlit
Lit green
Rapid
blinking red
Little capacity remains. Charge
the battery.
To ensure the most stable
connection between the
KATANA-AIR and the transmitter,
nearby wireless usage in the 2.4
GHz band is detected for ten
seconds, and adjustments are
made automatically.
Charging.
* The charging time diers
depending on the remaining
battery charge and on the
charging environment.
Charging is completed.
* We recommend that you
disconnect the transmitter
after charging is completed. If
you leave it connected, a small
amount of power is used from
the battery, and the indicator
blinks green once every eight
seconds.
* If you have not used the
transmitter for a long time, one
charge might not be sucient.
Disconnect and reconnect
the transmitter to complete
charging.
When ve hours have passed
since charging started, charging
automatically stops in order to
protect the rechargeable lithiumion battery, even if charging was
not completed.
To charge completely, disconnect
and reconnect the transmitter.
A charging error occurred (p. 10).
4
Page 7

From Preparations to Performance
Battery Operation
The KATANA-AIR can be powered with eight AA batteries
(sold separately).
* If you handle batteries improperly, you risk explosion and uid
leakage. Make sure that you carefully observe all of the items
related to batteries that are listed in “USING THE UNIT SAFELY”
and “IMPORTANT NOTES” (the leaet “USING THE UNIT SAFELY”
and the Owner’s Manual (p. 11)).
Installing Batteries
This KATANA-AIR can be used with alkaline batteries or
rechargeable Ni-MH batteries. The operating time will depend on
the characteristics of the batteries.
1. Turn the KATANA-AIR over.
* When turning the unit over, be careful so as to protect the
buttons and knobs from damage. Also, handle the unit
carefully; do not drop it.
2. Remove the battery cover.
3. Insert the batteries, taking care
to orient them as shown in the
illustration.
+
+
+
+
Turning the Power On/O
1. Turn the [MASTER] knob and the [VOLUME] knob of
the KATANA-AIR to 0.
2. Minimize the volume of the devices connected to
the KATANA-AIR.
3. Turn on the power of the devices that are
connected to the INPUT jack and AUX IN jack of the
KATANA-AIR.
4. Turn on the power of the KATANA-AIR.
5. Turn on the power of the device that is connected
to the
6. Insert the transmitter into the TRANSMITTER IN
jack.
The wireless status is detected automatically.
7. When the BATTERY indicator stops blinking orange,
plug the transmitter into your guitar.
+
+
+
+
When turning the power o, turn the volume to 0 for all devices
that are connected to the KATANA-AIR and then turn o their
power; nally, turn o the power of the KATANA-AIR.
(PHONES)/REC OUT jack.
AC Adaptor Operation
Use only the AC adaptor included with the KATANA-AIR. Use
of other AC adaptors may damage the amp or result in other
problems.
Automatically Turning On from Standby Mode (Wake Up On)
When the KATANA-AIR and the transmitter are both in
standby mode (p. 2, p. 4), and the transmitter detects vibration
(for example, because you picked up the guitar), both will
automatically power-on (wake up on).
Standby
Pick up the guitar
Orange
Unlit
On
Green
Lit
5
Page 8

Using the Eects
The KATANA amp lets you switch between various types of eect
by using the buttons and knobs. You can use three types of eect
simultaneously.
Eects assigned to each knob when the unit is shipped
Knob Color of the button BST (BOOSTER) MOD
Green BLUES DRIVE CHORUS
Red OVERDRIVE FLANGER
Orange DISTORTION PHASER
Knob Color of the button DELAY FX
Green DIGITAL DELAY TREMOLO
Red ANALOG DELAY T.WAH
Orange TAPE ECHO OCTAVE
Knob Color of the button REVERB
Green PLATE REVERB
Red SPRING REVERB
Orange HALL REVERB
This table shows the eects when the [PANEL] button is on. Use
BOSS Tone Studio to see the eects that are assigned when the
[CH A] or [CH B] buttons are pressed.
1. Press the [BST/MOD], [DELAY/FX], or [REVERB]
button to select the eect that you want to use.
Each time you press the button, its color changes.
2. Turn the knob to adjust the depth of the eect.
* Either BST or MOD is selected depending on the position of the
knob.
BST depth MOD depth
* Either DELAY or FX is selected depending on the position of the
knob.
DELAY depth FX depth
REVERB
depth
About the Factory-Set Eects
Eect Explanation
BST
A crunch sound like the BOSS BD-2, creating
BLUES DRIVE
OVERDRIVE
DISTORTION A standard and highly usable distortion sound.
MOD
CHORUS
FLANGER
PHASER
DELAY
DIGITAL DELAY A clear digital delay sound.
ANALOG
DELAY
TAPE ECHO
FX
TREMOLO An eect that cyclically modulates the volume.
T.WAH
OCTAVE
distortion that faithfully reproduces the
nuances of your picking.
An overdrive sound like the BOSS OD-1,
producing sweet and mild distortion.
An eect that adds a slightly modulated
sound to the direct signal, creating beautiful
spaciousness and depth.
Produces a anging eect which applies
modulation that is reminiscent of a jet
airplane.
Produces a phasing eect which applies a
sense of rotation to the sound by adding a
slightly phase-shifted sound to the direct
signal.
A mild analog delay sound.
A sound with the distinctive modulation of a
tape echo unit.
A wah eect that modulates a lter according
to the volume of the guitar, producing a wah
eect.
Adds a sound one octave lower than the input,
generating a sense of low-frequency solidity.
6
Page 9

Eect Explanation
REVERB
Simulates a plate reverb (a reverb unit that
PLATE REVERB
SPRING
REVERB
HALL REVERB Simulates the reverberation of a concert hall.
uses the vibration of a metal plate), providing
a metallic resonance with an extended highfrequency range.
Simulates the spring reverb unit built into
some guitar amps.
Using the Eects
Controlling the KATANA-AIR from a smartphone
or tablet
By using BOSS Tone Studio, you can edit the eects of the
KATANA-AIR from a mobile device such as a smartphone or
tablet (subsequently referred to as “mobile device”).
You can download dedicated eects from BOSS Tone
Central (http://bosstonecentral.com/).
You can also back up the eects and internal settings, or
restore the settings that you previously backed-up.
Apps for iOS and Android are available. You can install these
on your mobile device from the App Store or Google Play.
7
Page 10

Listening to Sound via Wireless Connection with a Mobile Device
Bluetooth® Audio
By wirelessly connecting the KATANA-AIR to a mobile device that’s
equipped with Bluetooth audio functionality, you can do the
following things.
5 You can use the speakers of this unit to listen to music or music
videos played on your mobile device.
Registering a Mobile Device (Pairing)
“Pairing” is the procedure by which the mobile device that you
want to use is registered on this unit (the two devices recognize
each other).
Make settings so that music data saved on the mobile device can
be played wirelessly via this unit.
MEMO
The following explanation of the procedure is only one
example. For details, refer to the owner’s manual of your
mobile device.
1. Turn on the power of the KATANA-AIR.
2. Place the mobile device that you want to connect
nearby the KATANA-AIR.
3. Long-press the KATANA-AIR’s [Bluetooth] button.
NOTE
The Bluetooth indicator blinks, and the sound is muted.
Sound that is input from the AUX IN jack is also muted.
4. Turn on the Bluetooth
function of the mobile device.
MEMO
The explanation here uses the
iPhone as an example. For details, refer to the owner’s
manual of your mobile device.
Connecting an Already-Paired Mobile Device
1. With the KATANA-AIR’s [Bluetooth] indicator o,
press the [Bluetooth] button.
NOTE
The Bluetooth indicator blinks, and the sound is muted.
Sound that is input from the AUX IN jack is also muted.
2. Turn on the Bluetooth function of the mobile
device.
MEMO
5 If you were unable to establish a connection using the
procedure above, tap “KATANA-AIR Audio” that is displayed
in the Bluetooth device screen of the mobile device.
5 To disconnect, press the KATANA-AIR’s [Bluetooth] button to
make the Bluetooth indicator go dark, or turn o the mobile
device’s Bluetooth function.
Adjusting the Volume
1. Adjust the volume on the mobile device.
Adjust the volume of Bluetooth audio.
2. Turn the KATANA-AIR’s [MASTER] knob.
The [MASTER] knob adjusts the volume of both the Bluetooth
audio and the guitar. When you turn the [MASTER] knob, the
volume of the Bluetooth audio and the volume of the guitar will
both change.
5. Tap “KATANA-AIR Audio” that is shown in the
Bluetooth device screen of your mobile device.
This unit is paired with the mobile device. When pairing succeeds,
“KATANA-AIR Audio” is added to the list of “Paired Devices” on your
mobile device.
Controlling the KATANA-AIR from a Mobile Device App
You can use the BOSS Tone Studio app to edit sounds and manage
the sound library.
For details on BOSS TONE STUDIO, refer to the BOSS website.
https://www.boss.info/
Connecting to the App
Here’s how to make settings in order to use an app on your mobile
device.
1. Turn on the power of the KATANA-AIR.
2. Place the mobile device that you want to connect
nearby this unit.
3. Turn on the Bluetooth
function of the mobile device.
MEMO
The explanation here uses the
iPhone as an example. For details, refer to the owner’s
manual of your mobile device.
4. In the app, establish a connection with the
KATANA-AIR.
NOTE
Do not tap the “KATANA-AIR MIDI” that is shown in the
Bluetooth settings of the mobile device.
8
Page 11

Disabling the Bluetooth Functionality
If you want to disconnect the Bluetooth connection between the KATANA-AIR and your mobile device, disable the Bluetooth functionality.
1. Press the KATANA-AIR’s [Bluetooth] button.
The Bluetooth indicator goes dark.
Restoring the Factory Settings
Here’s how the settings stored in the KATANA-AIR can be returned to their factory-set condition (factory reset).
1. While holding down the [PANEL] button, turn the power on.
Each of the EFFECTS buttons continues blinking consecutively from the left. When the blinking stops, all of the KATANA’s settings return to the
factory-set state.
* It takes approximately 30 seconds for the factory reset to be completed. Don’t turn o the power while the factory reset is in progress.
Note when using an already-paired iOS device
After executing a factory reset, you’ll need to perform the following operations.
1
Disconnect “KATANA-AIR MIDI.”
KATANA-AIR MIDI
KATANA-AIR MIDI
For details, refer to the owner’s manual of your iOS device.
2
Turn o.
Block Diagram
INPUT
USB
-Secondary (Windows)
-Input/Output 3,4 (Mac)
+
PREAMP EFFECTS MASTER
USB
-Primary (Windows)
-Input 1,2/Stereo Out(1,2) (Mac)
POWER AMP
SPEAKER
OFF
WIRELESS
Bluetooth
+
+
AUX IN
MUTE
(PHONES)
/REC OUT
9
Page 12

Troubleshooting
Problem Items to check/Action Page
No sound from the KATANAAIR when you play the guitar
in which the transmitter is
inserted
The sound of a dierent
guitar is heard
Even though you recharged
the transmitter, the BATTERY
indicator immediately turns
red
The transmitter’s BATTERY
indicator blinks red
Could a guitar be connected to the INPUT jack? The guitar connected to the INPUT jack takes
priority.
Is the KATANA-AIR too far away from the guitar? Alternatively, are there obstructions between
them? Decrease the distance between the KATANA-AIR and the guitar.
Could there be a dierent KATANA-AIR unit or transmitter nearby?
Temporarily plug the transmitter into the TRANSMITTER IN jack, and wait for the BATTERY indicator
to stop blinking orange before you use it.
Could the KATANA-AIR be operating only on batteries?
The batteries installed in the KATANA-AIR have run low. Either replace the batteries or connect the
AC adaptor.
A charging error occurred.
5 If the transmitter’s internal temperature rises, charging might pause.
This occurs in order to protect the rechargeable lithium-ion battery. When the internal
temperature falls, the BATTERY indicator changes to be lit orange, and charging resumes.
5 Could the ambient temperature be above 35°C?
Charging might stop for a while in order to protect the rechargeable lithium-ion battery. Use the
unit in the recommended ambient temperature range of 10°C–30°C.
5 If the indicator continues blinking red even though you are charging in the recommended
temperature range (10°C–30°C)
Contact your dealer or a Roland customer service center.
–
–
p. 4
p. 5
–
Problems with Bluetooth functionality
Problem Items to check/Action Page
The Bluetooth function is enabled when you turn the
KATANA-AIR’s power on again.
This unit does not appear in
the Bluetooth device list of
your mobile device
Can’t connect to Bluetooth
audio
Can’t connect to an app
In your mobile device’s
Bluetooth setting screen, you
tap “KATANA-AIR MIDI” but
can’t connect to the app
You pressed the
KATANA-AIR’s [Bluetooth]
button, but can’t connect to
the app
Could the Bluetooth function
be turned “O”?
If this unit is visible as a
device in the mobile device’s
Bluetooth settings
If this unit is not visible as a
device
After unpairing the “KATANA-AIR MIDI” that is registered on the mobile device, turn the mobile
device’s Bluetooth function o and then on again, and reconnect it.
Make the connection from the app’s settings, not from your mobile device’s Bluetooth settings.
Make the connection from the app’s settings.
Bluetooth Audio function:
A device named “KATANA-AIR Audio” appears.
Connected to an app:
A device named “KATANA-AIR MIDI” appears.
You can check this from the settings inside an app such as BOSS
TONE STUDIO.
Delete the device’s registration, turn the Bluetooth Audio function
“O” and then “On” again, and establish pairing once again.
Turn the mobile device’s Bluetooth function o and then on again,
and initiate pairing from this unit to re-establish pairing.
p. 8
p. 8
p. 8
–
Can’t connect a paired
mobile device
MEMO
If checking these points does not solve the problem, please refer to the BOSS support website.
https://www.boss.info/support/
10
If the connection breaks immediately after it is established, turning the Bluetooth device’s
Bluetooth switch o and then on again may allow connection to occur.
Page 13

USING THE UNIT SAFELY
WARNING
Make sure that the power cord is
grounded
Connect mains plug of this model
to a mains socket outlet with a
protective earthing connection.
IMPORTANT NOTES
Power Supply: Use of Batteries
• Sounds may distort easily or may cut o
when played at high volume as the battery
power begins to fade, but this is normal
and does not indicate a malfunction. In
such instances, either replace the batteries
or use the AC adaptor included with the
unit.
• If operating this unit on batteries, please
use alkaline batteries or rechargeable NiMH batteries.
Placement
• Depending on the material and
temperature of the surface on which you
place the unit, its rubber feet may discolor
or mar the surface.
Repairs and Data
• Before sending the unit away for repairs, be
sure to make a backup of the data stored
within it; or you may prefer to write down
the needed information. Although we will
do our utmost to preserve the data stored
in your unit when we carry out repairs, in
some cases, such as when the memory
section is physically damaged, restoration
of the stored content may be impossible.
Roland assumes no liability concerning the
restoration of any stored content that has
been lost.
About the transmitter
• Do not use this device closer than 22 cm
(8-11/16 inches) from where a cardiac
pacemaker is implanted. Doing so
may aect the operation of the cardiac
pacemaker.
• The transmitter contains a lithium-ion
battery. If you need to dispose of the
transmitter, do not simply discard it with
your household waste; if the internal
lithium-ion battery becomes unusable, you
should dispose of it in compliance with
local regulations.
• Even if you do not use the transmitter for
an extended period of time, you should
charge it once every three months to
prevent the internal lithium-ion battery
from degrading.
WARNING
Use only the supplied AC adaptor and
the correct voltage
Be sure to use only the AC adaptor
supplied with the unit. Also,
make sure the line voltage at the
installation matches the input
voltage specied on the AC adaptor’s body.
Other AC adaptors may use a dierent
polarity, or be designed for a dierent
voltage, so their use could result in damage,
malfunction, or electric shock.
Additional Precautions
• Any data stored within the unit can be lost
as the result of equipment failure, incorrect
operation, etc. To protect yourself against
the irretrievable loss of data, try to make
a habit of creating regular backups of the
data you’ve stored in the unit.
• Roland assumes no liability concerning the
restoration of any stored content that has
been lost.
• Do not use connection cables that contain
a built-in resistor.
Caution Regarding Radio Frequency
Emissions
• The following actions may subject you to
penalty of law.
• Disassembling or modifying this device.
• Removing the certication label axed
to the back of this device.
Intellectual Property Right
• ASIO is a trademark and software of
Steinberg Media Technologies GmbH.
• This product contains eParts integrated
software platform of eSOL Co.,Ltd. eParts is
a trademark of eSOL Co., Ltd. in Japan.
• The Bluetooth® word mark and logos
are registered trademarks owned by
Bluetooth SIG, Inc. and any use of such
marks by Roland is under license.
• Roland, BOSS are either registered
trademarks or trademarks of Roland
Corporation in the United States and/or
other countries.
• Company names and product names
appearing in this document are registered
trademarks or trademarks of their
respective owners.
WARNING
Use only the supplied power cord
Use only the attached power cord.
Also, the supplied power cord must
not be used with any other device.
11
Page 14

Main Specications
BOSS KATANA-AIR: Guitar Amplier
30 W (15 W+15 W) (when using the AC
Rated Power
Output
Nominal Input
Level
Speakers 7.5 cm (3 inches) x 2
Controls
Indicators
Connectors
Power Supply
Current Draw 680 mA
adaptor)
20 W (10 W+10 W) (when using the
Alkaline batteries)
INPUT: -10 dBu (1 MΩ)
AUX IN: -10 dBu
[POWER] button
[Bluetooth] button
[MASTER] knob
<AMPLIFIER>
[AMP TYPE] knob
[GAIN] knob
[VOLUME] knob
<EQUALIZER>
[BASS] knob
[MIDDLE] knob
[TREBLE] knob
<MULTI EFFECT>
[BST/MOD] knob
[BST/MOD] button
[DELAY/FX] knob
[DELAY/FX] button
[TAP] button
[REVERB] knob
[REVERB] button
<TONE SETTING>
[CH A] button
[CH B] button
[PANEL] button
POWER
Bluetooth
Guitar Wireless
PANEL
CH A
CH B
BST/MOD
DELAY/FX
REVERB
TAP
Input jack: 1/4-inch phone type
AUX IN jack: Stereo miniature phone type
PHONES/REC OUT jack: Stereo miniature
phone type
TRANSMITTER IN jack: Stereo 1/4-inch
phone type
USB port: USB B type
DC IN jack
AC adaptor (DC 13 V)
Alkaline battery (AA, LR6) x 8
Rechargeable Ni-MH battery (AA, HR6) x 8
Expected battery
life under
continuous use
Dimensions
Weight
Accessories
Transmitter (WL-T)
Nominal Input
Level
Controls Power button
Indicators BATTERY
Connectors
Power Supply
Current Draw 47 mA
Expected battery
life under
continuous use
Dimensions
Weight
* 0 dBu = 0.775 Vrms
* This document explains the specications of the product at the
time that the document was issued. For the latest information,
refer to the Roland website.
Alkaline battery: Approximately 7 hours
Rechargeable Ni-MH battery:
Approximately 10 hours (When using
batteries having a capacity of 2,500 mAh.)
350 (W) x 144 (D) x 181 (H) mm
13-13/16 (W) x 5-11/16 (D) x7-1/8 (H)
inches
2.2 kg (excluding batteries)
4 lbs 14 oz
Owner’s manual
Leaet USING THE UNIT SAFELY
Transmitter
AC adaptor
Power cord
INPUT: -10 dBu (1 MΩ)
Input plug: Stereo 1/4-inch phone type
DC IN 5 V port: USB Micro-B type
Rechargeable lithium-ion battery
Supplied from the DC IN 5 V port
Approximately 12 hours
87 (W) x 22 (D) x 36 (H) mm
3-7/16 (W) x 7/8 (D) x 1-7/16 (H) inches
43 g
2 oz
12
Page 15

European Community Declaration of Conformity
Hereby, Roland Corporation declares that the radio equipment type wireless transmitter and Bluetooth are in compliance with Directive
English
Bulgarian
Czech
Danish
German
Estonian
Greek
Spanish
French
Italian
Latvian
Lithuanian
Croatian
Hungarian
Maltese
Dutch
Polish
Portuguese
Romanian
Slovak
Slovenian
Finish
Swedish
2014/53/EU.
The full text of the EU declaration of conformity is available at the following internet address.
С настоящото Roland Corporation декларира, че радиосъоръженията от типа безжичен предавател и типа Bluetooth, са в
съответствие с Директива 2014/53/ЕС.
Цялостният текст на ЕС декларацията за съответствие може да се намери на следния интернет адрес.
Společnost Roland Corporation tímto prohlašuje, že bezdrátový vysílač rádiového typu a Bluetooth splňují požadavky směrnice
2014/53/EU.
Úplné znění EU prohlášení o shodě je k dispozici na této internetové adrese.
Roland Corporation erklærer hermed, at den trådløse radioudstyrede type og Bluetooth er i overensstemmelse med direktiv 2014/53/
EU.
EU-overensstemmelseserklæringens fulde tekst kan ndes på følgende internetadresse.
Roland Corporation versichert hiermit, dass der Drahtlos-Sender und die Bluetooth-Schnittstelle der Verordnung 2014/53/EU
entsprechen.
Der vollständige Text der EU-Konformitätserklärung ist unter der folgenden Internetadresse verfügbar.
Käesolevaga deklareerib Roland Corporation, et käesolev raadioseadme tüüp juhtmeta saatja ja Bluetooth vastab Euroopa Parlamendi
ja nõukogu direktiivi 2014/53/EL nõuetele.
ELi vastavusdeklaratsiooni täielik tekst on kättesaadav järgmisel internetiaadressil.
Δια του παρόντος, η Roland Corporation δηλώνει ότι ο ασύρματος πομπός και το Bluetooth του ραδιοεξοπλισμού συμμορφώνονται με
την οδηγία 2014/53/EE.
Το πλήρες κείμενο της δήλωσης συμμόρφωσης ΕΕ διατίθεται στην ακόλουθη ιστοσελίδα στο διαδίκτυο.
Por la presente, Roland Corporation declara que el transmisor inalámbrico y el Bluetooth de tipo de equipo radioeléctrico cumplen con
la Directiva 2014/53/UE.
El texto completo de la declaración UE de conformidad está disponible en la dirección Internet siguiente.
Par la présente, Roland Corporation déclare que l’émetteur sans l et Bluetooth sont conformes à la Directive 2014/53/UE sur les
équipements radio.
Le texte complet de la déclaration UE de conformité est disponible à l’adresse internet suivante.
Roland Corporation dichiara che i dispositivi radio trasmettitore wireless e Bluetooth sono conformi alla Direttiva 2014/53/UE.
Il testo completo della dichiarazione di conformità UE è disponibile al seguente indirizzo Internet.
Ar šo „Roland Corporation” paziņo, ka radioiekārtas tipa bezvadu raidītājs un Bluetooth atbilst Direktīvai 2014/53/ES.
Pilns ES atbilstības deklarācijas teksts ir pieejams šādā interneta vietnē.
Šiuo „Roland Corporation“ patvirtina, kad radijo įrangos tipo belaidis siųstuvas ir „Bluetooth“ atitinka direktyvą 2014/53/ES.
Visas ES atitikties deklaracijos tekstas prieinamas šiuo interneto adresu.
Ovime tvrtka Roland Corporation izjavljuje da su radijski prijenosnik i Bluetooth u skladu s Direktivom 2014/53/EU.
Cjeloviti tekst EU izjave o sukladnosti dostupan je na sljedećoj internetskoj adresi.
A Roland Corporation ezennel kijelenti, hogy a rádióberendezés jellegű vezeték nélküli adó és Bluetooth megfelel a 2014/53/EU irányelv
előírásainak.
Az EU-megfelelőségi nyilatkozat teljes szövege elérhető a következő internetes címen.
B’dan, ir-Roland Corporation tiddikjara li t-tagħmir tar-radju tat-tip trażmettitur bla li u l-Bluetooth huma konformi mad-Direttiva
2014/53/UE.
It-test kollu tad-dikjarazzjoni ta’ konformità tal-UE huwa disponibbli f ’dan l-indirizz tal-Internet li ġej.
Hierbij verklaart Roland Corporation dat het type radioapparatuur draadloze transmitter en Bluetooth conform zijn met Richtlijn
2014/53/EU.
De volledige tekst van de EU-conformiteitsverklaring kan worden geraadpleegd op het volgende internetadres.
Firma Roland Corporation niniejszym oświadcza, że urządzenia radiowe w postaci nadajnika bezprzewodowego i modułu Bluetooth są
zgodne z dyrektywą 2014/53/UE.
Pełny tekst deklaracji zgodności UE jest dostępny pod następującym adresem internetowym.
Através deste documento, a Roland Corporation declara que o transmissor sem o do tipo equipamento de rádio e o Bluetooth estão
em conformidade com a Diretiva 2014/53/UE.
O texto integral da declaração de conformidade está disponível no seguinte endereço de Internet.
Prin prezenta, Roland Corporation declară că emițătorul fără r tip echipament radio și modulul Bluetooth se conformează Directivei
2014/53/UE.
Textul integral al declarației UE de conformitate este disponibil la următoarea adresă internet.
Spoločnosť Roland Corporation týmto vyhlasuje, že bezdrôtový vysielač s rádiovým zariadením a modul Bluetooth sú v súlade so
smernicou 2014/53/EÚ.
Úplné EÚ vyhlásenie o zhode je k dispozícii na tejto internetovej adrese.
Družba Roland Corporation izjavlja, da sta brezžični oddajnik in tehnologija Bluetooth radijske opreme skladna z Direktivo 2014/53/EU.
Celotno besedilo izjave EU o skladnosti je na voljo na naslednjem spletnem naslovu.
Roland Corporation vakuuttaa, että radiolaite tyyppiä langaton lähetin ja Bluetooth ovat direktiivin 2014/53/EU mukaiset.
EU-vaatimustenmukaisuusvakuutuksen täysimittainen teksti on saatavilla seuraavassa internetosoitteessa.
Roland Corporation intygar härmed att radioutrustningen av typen trådlös sändare och Bluetooth efterlever EU Direktivet 2014/53/EU.
Den fullständiga texten till EU-försäkran om överensstämmelse nns på följande webbadress.
For EU countries
The Declaration of Conformity may be consulted in Downloads menu of this product at the following internet address.
This unit has an RF transmitter(s) with the following specication.
5 Operating frequency: 2400–2483.5 MHz
5 Maximum RF transmit power: 2.5 mW (Bluetooth), 16.0 mW (wireless transmitter)
http://www.roland.com/
Page 16

* 5 1 0 0 0 6 0 4 7 7 - 0 2 *
 Loading...