

Page 1

English
Deutsch
Français
Italiano
Español
Português
Nederlands
Owner’s Manual / Bedienungsanleitung / Mode d’emploi
Manuale dell'utente / Manual de instrucciones
Manual do Proprietário / Gebruikershandleiding
Page 2

This product complies with the requirements of EMC Directive 2004/108/EC.
For EU Countries
This Class B digital apparatus meets all requirements of the Canadian Interference-Causing Equipment Regulations.
Cet appareil numérique de la classe B respecte toutes les exigences du Règlement sur le matériel brouilleur du Canada.
NOTICE
AVIS
For the USA
FEDERAL COMMUNICATIONS COMMISSION
RADIO FREQUENCY INTERFERENCE STATEMENT
This equipment has been tested and found to comply with the limits for a Class B digital device, pursuant to Part 15 of the
FCC Rules. These limits are designed to provide reasonable protection against harmful interference in a residential
installation. This equipment generates, uses, and can radiate radio frequency energy and, if not installed and used in
accordance with the instructions, may cause harmful interference to radio communications. However, there is no guarantee
that interference will not occur in a particular installation. If this equipment does cause harmful interference to radio or
television reception, which can be determined by turning the equipment off and on, the user is encouraged to try to correct the
interference by one or more of the following measures:
– Reorient or relocate the receiving antenna.
– Increase the separation between the equipment and receiver.
– Connect the equipment into an outlet on a circuit different from that to which the receiver is connected.
– Consult the dealer or an experienced radio/TV technician for help.
This device complies with Part 15 of the FCC Rules. Operation is subject to the following two conditions:
(1) this device may not cause harmful interference, and
(2) this device must accept any interference received, including interference that may cause undesired operation.
This equipment requires shielded interface cables in order to meet FCC class B limit.
Any unauthorized changes or modifications not expressly approved by the party responsible for compliance could void the user’s
authority to operate the equipment.
For Canada
WARNING
This product contains chemicals known to cause cancer, birth defects and other reproductive harm, including lead.
For C.A. US (Proposition 65
)
Page 3
English
Deutsch
Français
Italiano
Español
Português
Nederlands
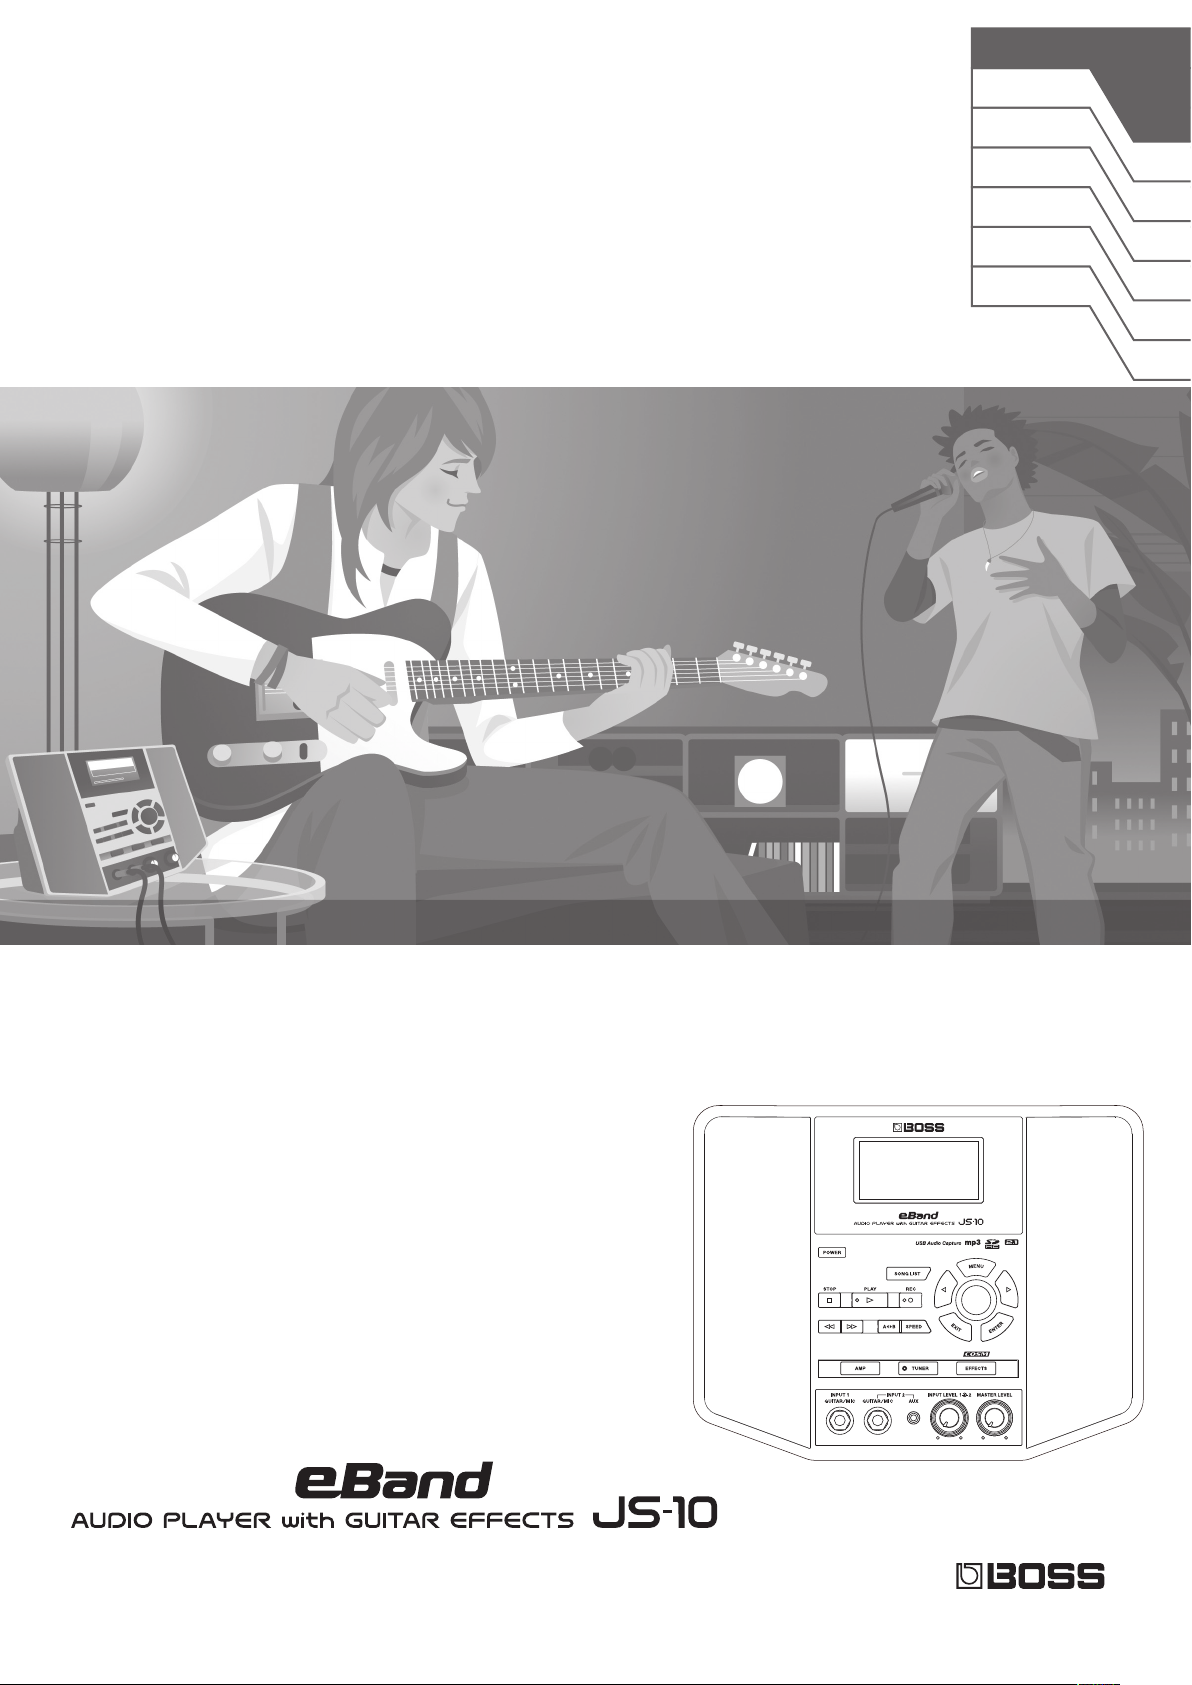
Play the guitar with your favorite songs as your backing
Owner’s Manual
Page 4

Contents
Panel Descriptions . . . . . . . . . . . . . . . . . . . . . . . . . . . . . . . . . . . . . . . . . . . . . . . 3
Front Panel . . . . . . . . . . . . . . . . . . . . . . . . . . . . . . . . . . . . . . . . . . . . . . . . . . . . . 3
Top Panel / Side Panels . . . . . . . . . . . . . . . . . . . . . . . . . . . . . . . . . . . . . . . . . . 4
Top Screen . . . . . . . . . . . . . . . . . . . . . . . . . . . . . . . . . . . . . . . . . . . . . . . . . . . . . . 4
Basic Operation . . . . . . . . . . . . . . . . . . . . . . . . . . . . . . . . . . . . . . . . . . . . . . . . . 5
Turning the Power On . . . . . . . . . . . . . . . . . . . . . . . . . . . . . . . . . . . . . . . . . . . 5
Turning the Power O . . . . . . . . . . . . . . . . . . . . . . . . . . . . . . . . . . . . . 5
Moving the Cursor . . . . . . . . . . . . . . . . . . . . . . . . . . . . . . . . . . . . . . . . . . . . . . 5
Selecting an Item . . . . . . . . . . . . . . . . . . . . . . . . . . . . . . . . . . . . . . . . . 5
Changing the Value . . . . . . . . . . . . . . . . . . . . . . . . . . . . . . . . . . . . . . . . . . . . .5
[MENU] Button . . . . . . . . . . . . . . . . . . . . . . . . . . . . . . . . . . . . . . . . . . . . . . . . . . 6
Play the Guitar with Songs as Your Backing . . . . . . . . . . . . . . . . . . . . . . . . 7
Selecting Songs . . . . . . . . . . . . . . . . . . . . . . . . . . . . . . . . . . . . . . . . . . . . . . . . . 7
Displaying Songs by Category . . . . . . . . . . . . . . . . . . . . . . . . . . . . .7
Registering Your 30 Favorite Songs (BEST 30) . . . . . . . . . . . . . . . 7
Selecting Songs on the USB Flash Drive . . . . . . . . . . . . . . . . . . . . 8
Deleting Songs . . . . . . . . . . . . . . . . . . . . . . . . . . . . . . . . . . . . . . . . . . .8
Playing a Guitar While Playing Back a Song . . . . . . . . . . . . . . . . . . . . . . . 8
Switching the Play Mode . . . . . . . . . . . . . . . . . . . . . . . . . . . . . . . . . .9
Tuning . . . . . . . . . . . . . . . . . . . . . . . . . . . . . . . . . . . . . . . . . . . . . . . . . . . . . . . . . . 9
Recording Performances . . . . . . . . . . . . . . . . . . . . . . . . . . . . . . . . . . . . . . .10
Switching Eects . . . . . . . . . . . . . . . . . . . . . . . . . . . . . . . . . . . . . . . . . . . . . . .10
Changing the Speed of Songs . . . . . . . . . . . . . . . . . . . . . . . . . . . . . . . . . .11
Changing the Pitch of Songs . . . . . . . . . . . . . . . . . . . . . . . . . . . . . . . . . . .11
Removing the Center Sound (Center Cancel) . . . . . . . . . . . . . . . . . . . .12
Repeating Playback of a Specied Segment (AB REPEAT ) . . . . . . . .12
Precise Adjustment of the AB REPEAT Segment . . . . . . . . . . .12
Importing Songs from a PC to the JS-10 (eBand Song List Editor) . .13
Before Using eBand Song List Editor . . . . . . . . . . . . . . . . . . . . . . . . . . . .13
Connecting the JS-10 to Your PC . . . . . . . . . . . . . . . . . . . . . . . . . .13
Installing eBand Song List Editor on Your PC . . . . . . . . . . . . . .13
Starting Up eBand Song List Editor . . . . . . . . . . . . . . . . . . . . . . .13
Using eBand Song List Editor . . . . . . . . . . . . . . . . . . . . . . . . . . . . . . . . . . .14
Ripping Songs from CD to the JS-10 (Ripping) . . . . . . . . . . . . .15
Editing Song Information . . . . . . . . . . . . . . . . . . . . . . . . . . . . . . . .16
Ending the Connection with the PC . . . . . . . . . . . . . . . . . . . . . . .16
Convenient Functions . . . . . . . . . . . . . . . . . . . . . . . . . . . . . . . . . . . . . . . . . . .17
Editing the Eects. . . . . . . . . . . . . . . . . . . . . . . . . . . . . . . . . . . . . . . . . . . . . .17
Visually Editing the Sound (EZ EDIT) . . . . . . . . . . . . . . . . . . . . . .17
Advanced Editing of Sounds (PATCH EDIT) . . . . . . . . . . . . . . . .18
MENU of an EFFECT screen . . . . . . . . . . . . . . . . . . . . . . . . . . . . . . .18
Saving Patches . . . . . . . . . . . . . . . . . . . . . . . . . . . . . . . . . . . . . . . . . . .19
Exchanging Two Patches (EXCHANGE) . . . . . . . . . . . . . . . . . . . .19
Initializing the Eect Settings (INITIALIZE) . . . . . . . . . . . . . . . . .19
Backing Up Data on an SD Card to a PC (BACK UP) . . . . . . . . . . . . . .20
Recovering Data Backed Up on a PC to the SD Card (RECOVERY) .20
Changing the Parameters of Songs . . . . . . . . . . . . . . . . . . . . . . . . . . . . .21
View the Song Information . . . . . . . . . . . . . . . . . . . . . . . . . . . . . . .21
Naming Songs . . . . . . . . . . . . . . . . . . . . . . . . . . . . . . . . . . . . . . . . . . . . . . . . .21
Writing Songs to a USB Flash Drive (Export) . . . . . . . . . . . . . . . . . . . . .22
Importing Songs in the USB Flash Drive to the JS-10 (Import) . . . .22
Changing the Patch When the Song is Switched (PATCH SYNC) . .22
Specifying Audio Settings . . . . . . . . . . . . . . . . . . . . . . . . . . . . . . . . . . . . . .23
Switching the INPUT Jack Sensitivity . . . . . . . . . . . . . . . . . . . . . .23
Adjusting the Balance of Low to High Frequency Ranges
(Global EQ) . . . . . . . . . . . . . . . . . . . . . . . . . . . . . . . . . . . . . . . . . . . . . .23
Turning O the JS-10 Speakers . . . . . . . . . . . . . . . . . . . . . . . . . . .23
System Settings for the JS-10 . . . . . . . . . . . . . . . . . . . . . . . . . . . . . . . . . . .24
Changing the Function of the USB COMPUTER Port . . . . . . .24
Allocating Functions to Footswitches . . . . . . . . . . . . . . . . . . . . .24
Backing Up Eect User Patches to an SD Card . . . . . . . . . . . . .24
Restoring Eect User Patches Backed Up on the SD Card . .25
Viewing Free Space on the SD Card and the USB Flash
Drive . . . . . . . . . . . . . . . . . . . . . . . . . . . . . . . . . . . . . . . . . . . . . . . . . . . .25
Adjusting Display Contrast . . . . . . . . . . . . . . . . . . . . . . . . . . . . . . .25
Enabling Auto O . . . . . . . . . . . . . . . . . . . . . . . . . . . . . . . . . . . . . . . .26
Listing the Files on the SD Card as a Song List . . . . . . . . . . . . .26
Selecting the Sound Output from the USB COMPUTER
Port . . . . . . . . . . . . . . . . . . . . . . . . . . . . . . . . . . . . . . . . . . . . . . . . . . . . .26
Initializing an SD Card (FORMAT) . . . . . . . . . . . . . . . . . . . . . . . . .26
Returning the JS-10’s Settings to Default Factory Settings .26
Using the JS-10 as a USB Audio Interfaces . . . . . . . . . . . . . . . . . . . . . . .27
Preparing a USB Driver . . . . . . . . . . . . . . . . . . . . . . . . . . . . . . . . . . .27
Installing the USB Driver. . . . . . . . . . . . . . . . . . . . . . . . . . . . . . . . . .27
Playing Songs on a PC Through the JS-10 . . . . . . . . . . . . . . . . .27
Using the Commercially Available SD Cards . . . . . . . . . . . . . . . . . . . . .28
Replacing the SD Card . . . . . . . . . . . . . . . . . . . . . . . . . . . . . . . . . . .28
Using Footswitches and Expression Pedals . . . . . . . . . . . . . . . . . . . . . .30
Allocating Functions to Footswitches . . . . . . . . . . . . . . . . . . . . .30
Before using this unit, carefully read the sections titled “USING THE
UNIT SAFELY” (p. 40) and “IMPORTANT NOTES” (p. 41). These sections
provide important information concerning the proper operation
of the unit. Additionally, in order to gain a good grasp of every
feature provided by your new unit, this owner’s manual should be
read in its entirety, and it should be saved and kept on hand as a
convenient reference.
Copyright © 2012 BOSS CORPORATION
All rights reserved. No part of this publication may be reproduced
in any form without the written permission of BOSS CORPORATION.
2
Appendices . . . . . . . . . . . . . . . . . . . . . . . . . . . . . . . . . . . . . . . . . . . . . . . . . . . .31
Eect Parameter List . . . . . . . . . . . . . . . . . . . . . . . . . . . . . . . . . . . . . . . . . . .31
Error Messages. . . . . . . . . . . . . . . . . . . . . . . . . . . . . . . . . . . . . . . . . . . . . . . . .36
Troubleshooting . . . . . . . . . . . . . . . . . . . . . . . . . . . . . . . . . . . . . . . . . . . . . . .37
Signal Flow . . . . . . . . . . . . . . . . . . . . . . . . . . . . . . . . . . . . . . . . . . . . . . . . . . . .38
Memory Conguration in the JS-10 . . . . . . . . . . . . . . . . . . . . . . . . . . . . .38
Specications . . . . . . . . . . . . . . . . . . . . . . . . . . . . . . . . . . . . . . . . . . . . . . . . . .39
USING THE UNIT SAFELY . . . . . . . . . . . . . . . . . . . . . . . . . . . . . . . . . . . . . . . .40
IMPORTANT NOTES . . . . . . . . . . . . . . . . . . . . . . . . . . . . . . . . . . . . . . . . . . . . .41
Index . . . . . . . . . . . . . . . . . . . . . . . . . . . . . . . . . . . . . . . . . . . . . . . . . . . . . . . . . .43
Page 5
Panel Descriptions
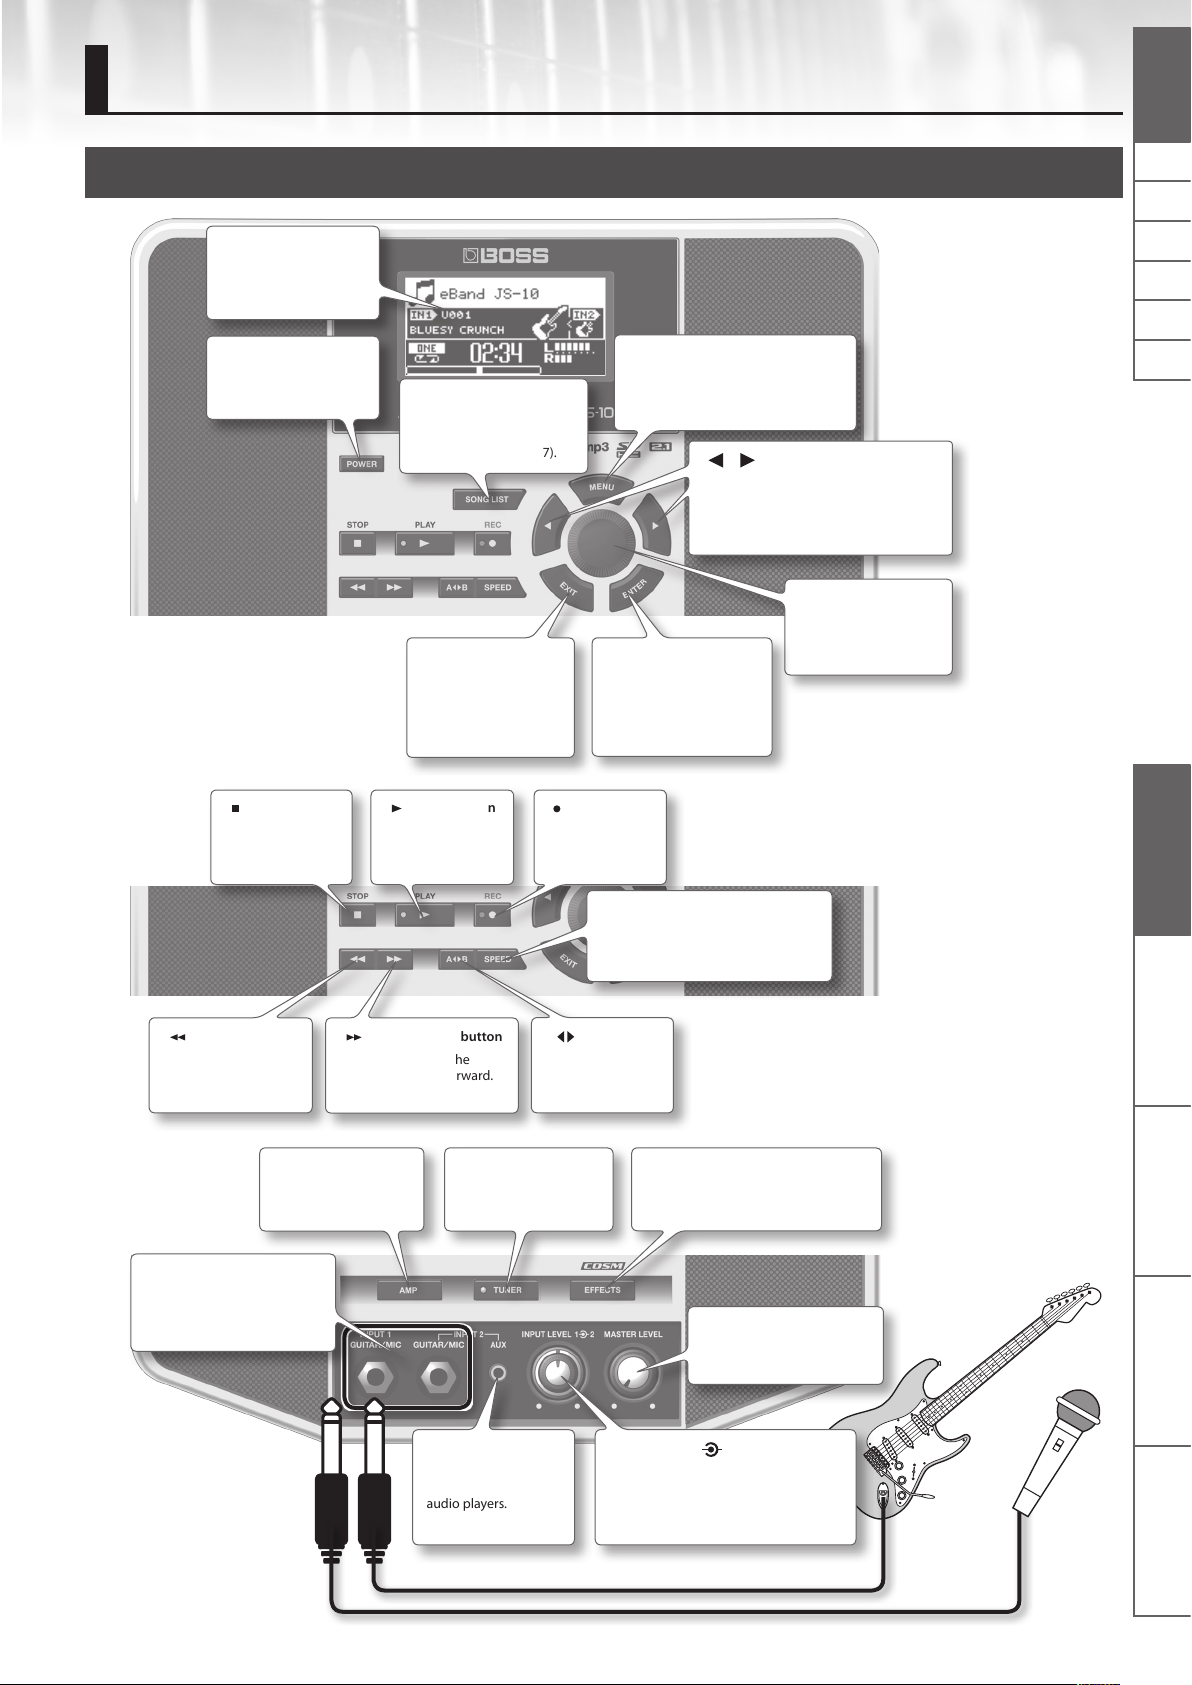
Front Panel
Display
Shows Song Name,
Eects Patch name and
other information.
[POWER] button
This button switches the
power on and o (p. 5).
[ ] (STOP) button
This button stops
song playback or
recording.
[SONG LIST] button
This button displays songs
stored in the SD card and
the USB ash drive (p. 7).
[EXIT] button
Press this button to
cancel settings and
return to previous
screens.
[ ] (PLAY) button
This button starts
song playback.
[MENU] button
This button calls up various dierent
functions depending on the screen
displayed (p. 6, p. 18).
[ENTER] button
Use this button to
conrm selection of an
item and to adjust/switch
the values of settings.
[ ] (REC) button
This button
records the
performance.
[SPEED] button
This button changes the speed/pitch
of the song or removes the center
sound (p. 11, p. 12).
NlPtEsItFrDeEnglish
[ ] [ ] (Cursor) buttons
These buttons move the position of the
cursor (highlighted part) in the display.
Use the Dial to adjust the value of
highlighted item (parameter).
Dial
Use this dial to change
values and settings.
Panel Descriptions Play the Guitar with Songs
as Your Backing
[ ] (Rewind) button
This button moves
the playback location
backward.
[AMP] button
This button displays
the AMP screen (p. 18).
INPUT 1 (GUITAR/MIC) jack,
INPUT 2 (GUITAR/MIC) jack
These jacks connect guitars or
microphones.
[ ] (Fast Forward) button
This button moves the
playback location forward.
[TUNER] button
This button displays the
TUNER screen (p. 9).
INPUT 2 (AUX) jack
This jack connects
devices such as digital
audio players.
[A B] button
This button repeats
the playback (p. 12).
eBand Song List Editor Convenient Functions Appendices
[EFFECTS] button
This button is used to select an eect
patch or to edit an eect (p. 10, p. 17).
[MASTER LEVEL] knob
This knob adjusts the overall
volume of the JS-10.
[INPUT LEVEL 1 2] knob
The center knob adjusts the volume
of devices connected to INPUT 1, and
the outer knob adjusts the volume of
devices connected to INPUT 2.
3
Page 6
Panel Descriptions
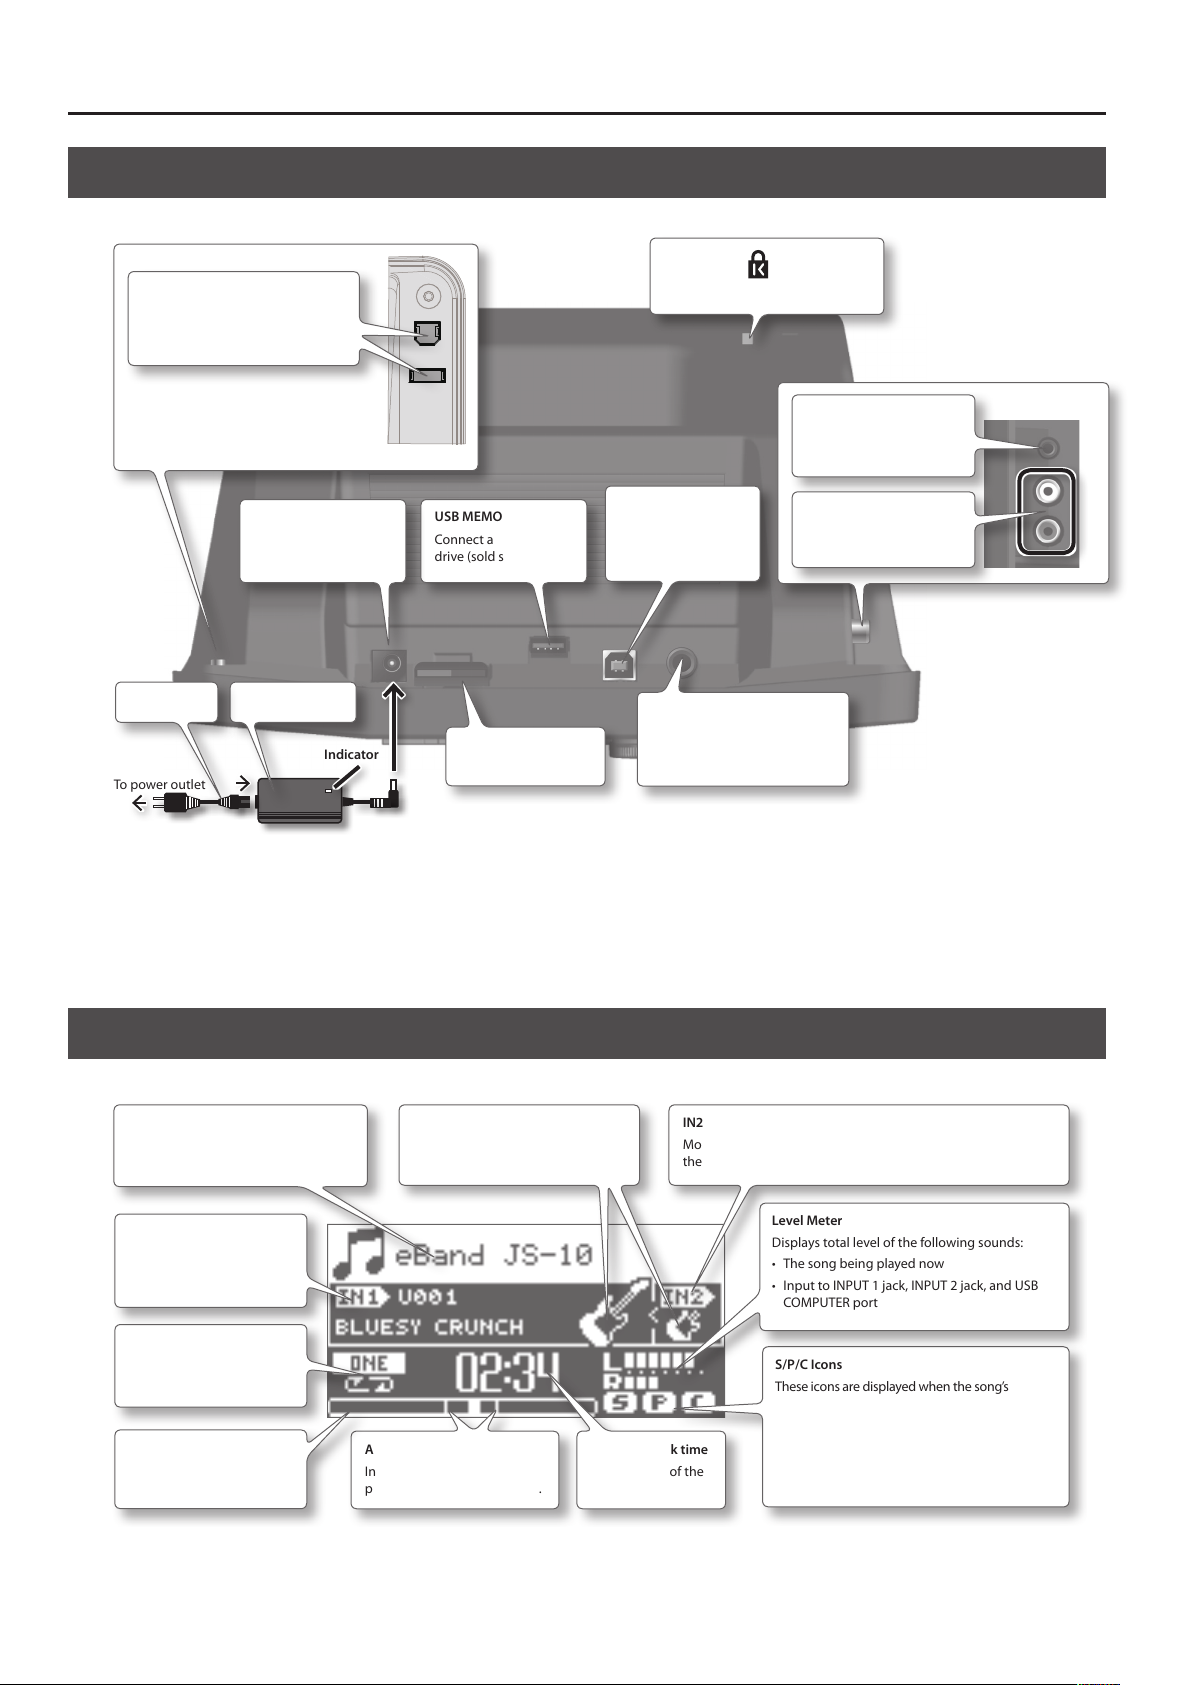
Top Panel / Side Panels
USB cap holders
Place caps detached from the USB
MEMORY port or USB COMPUTER
port here.
DC IN jack
Connect the supplied
AC adaptor.
AC adaptorPower cord
To power outlet
Indicator
USB MEMORY port
Connect a USB ash
drive (sold separately).
SD CARD slot
Insert an SD card.
Security slot ( )
http://www.kensington.com/
USB COMPUTER port
Connect the JS-10 to
a PC with a USB cable
(p. 13, p. 27).
EXP PEDAL/CTL 1, 2 jack
Connect a footswitch (sold
separately) or expression pedal
(sold separately) (p. 30).
PHONES jack
Connect headphones
(sold separately).
LINE OUT jacks
Connect external
speakers.
* To prevent malfunction and equipment failure, always turn down the volume, and turn o all the units before making any connections.
* Never insert or remove SD cards or SDHC cards while this unit is turned on. Doing so may corrupt the unit’s data or the data on the SD card or
SDHC card.
* Carefully insert the USB ash drive, SD card, or SDHC card all the way in – until they are rmly in place.
* Place the AC adaptor so the side with the indicator (see illustration) faces upwards and the side with textual information faces downwards.
The indicator will light when you plug the AC adaptor into an AC outlet.
Top Screen
This screen is the basic screen that appears when you turn on the power.
Key and Song Name
Displays the key (p. 21) and name (p. 21)
of the currently selected song.
IN1
Displays the eect patch
number and patch name for
INPUT 1 (GUITAR/MIC) jack.
Play Mode
Displays the type of
playback (p. 9).
Song playback location
Displays the current
location within the song.
Input Sensitivity Icons
Displays icons based on the GAIN
settings (p. 23).
AB REPEAT Segment
Indicates the segment to be
played back repeatedly (p. 12).
Song playback time
Displays time of the
song.
IN2
Move the cursor here and the patch number and patch name of
the eect for the INPUT 2 (GUITAR/MIC) jack will be displayed.
Level Meter
Displays total level of the following sounds:
• The song being played now
• Input to INPUT 1 jack, INPUT 2 jack, and USB
COMPUTER port
S/P/C Icons
These icons are displayed when the song’s
playback speed or pitch has been changed or
when Center Cancel is used.
S: Playback speed of the song has been changed
P: Pitch of the song has been changed
C: Center Cancel is turned on
The explanations in this manual include illustrations that depict what should typically be shown by the display.
Note, however, that your unit may incorporate a newer, enhanced version of the system (e.g., includes newer sounds), so what you actually see in the
display may not always match what appears in the manual.
4
Page 7
Basic Operation
This section introduces the basic operations for using the JS-10.
Turning the Power O
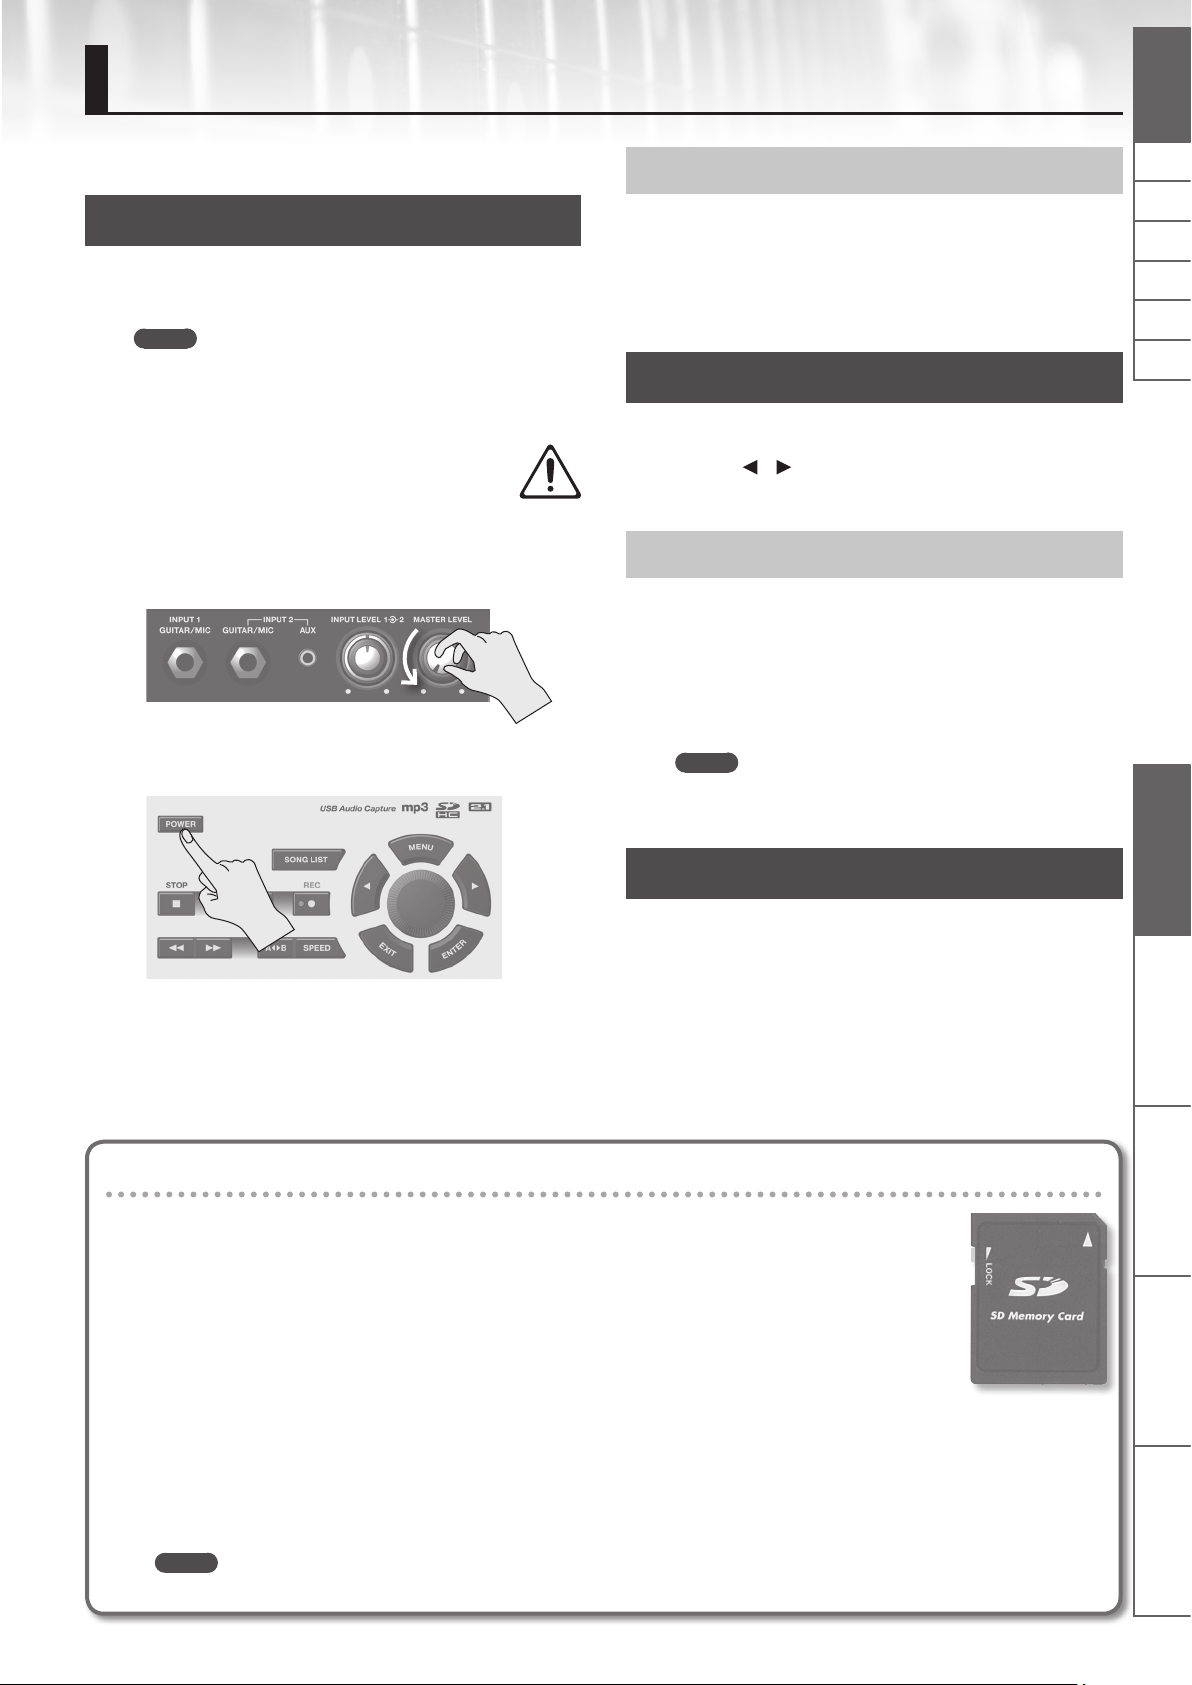
Turning the Power On
Once everything is properly connected (p. 4), be sure to follow the
procedure below to turn on the power. If you turn on equipment in
the wrong order, you risk causing malfunction or equipment failure.
MEMO
• Before turning the unit on/o, always be sure to turn the volume
down. Even with the volume turned down, you might hear some
sound when switching the unit on/o. However, this is normal
and does not indicate a malfunction.
• With the factory settings, the JS-10 will automatically
be switched o 30 minutes after you stop playing or
operating the unit. If you don’t want the unit to turn
o automatically, change the “AUTO OFF” setting to
“OFF” as described on p. 26.
1. Turn the [MASTER LEVEL] knob down to the minimum
level.
2. Press the [POWER] button to turn the unit on.
1. Turn the [MASTER LEVEL] knob down to the minimum
level.
2. Press the [POWER] button.
The power turns o.
Moving the Cursor
There are multiple parameters (settings) and selections on the
screen.
Press the [
The parameter value selected with the cursor will be highlighted.
Selecting an Item
To select a displayed item or icon, move the cursor to the item or
icon, and press the [ENTER] button.
This manual uses the following conventions to indicate the steps of
a procedure, such as pressing the [MENU] button in the Top screen,
selecting “SYSTEM,” and then pressing the [ENTER] button.
[MENU] button “SYSTEM” [ENTER] button
MEMO
Press the [EXIT] button several times until you return to the Top
screen.
] [ ] (Cursor) buttons to move the cursor.
NlPtEsItFrDeEnglish
Panel Descriptions Play the Guitar with Songs
Changing the Value
To change the parameter setting, move the cursor to the applicable
parameter value, then turn the Dial to change the value. The value
The unit’s display will be lit.
* This unit is equipped with a protection circuit. A brief interval (a
few seconds) after turning the unit on is required before it will
operate normally.
3. Turn the [MASTER LEVEL] knob and adjust the volume.
Files included on the supplied SD card
The supplied SD card is inserted into the JS-10 prior to being shipped from the factory.
The following les are included on the SD card.
eBand Song List Editor
This PC software can rip songs from CDs to JS-10 and add names to eBand songs.
Connect the JS-10 with your PC to use this software. For details, refer to “Importing Songs from a PC to the JS-10 (eBand
Song List Editor)” (p. 13).
USB driver
This PC driver (control software) is used for listening to your PC’s sound on the JS-10.
For details, refer to “Using the JS-10 as a USB Audio Interfaces” (p. 27).
increases when the Dial is turned clockwise and decreases when it
is turned counterclockwise.
as Your Backing
eBand Song List Editor Convenient Functions Appendices
ROLAND folder
Files needed for the operation of the JS-10 are saved in this folder. Make sure not to change or delete the contents of this folder.
MEMO
For details about the memory conguration in JS-10 or the data that is saved, refer to “Memory Conguration in the JS-10” (p. 38).
5
Page 8
Basic Operation
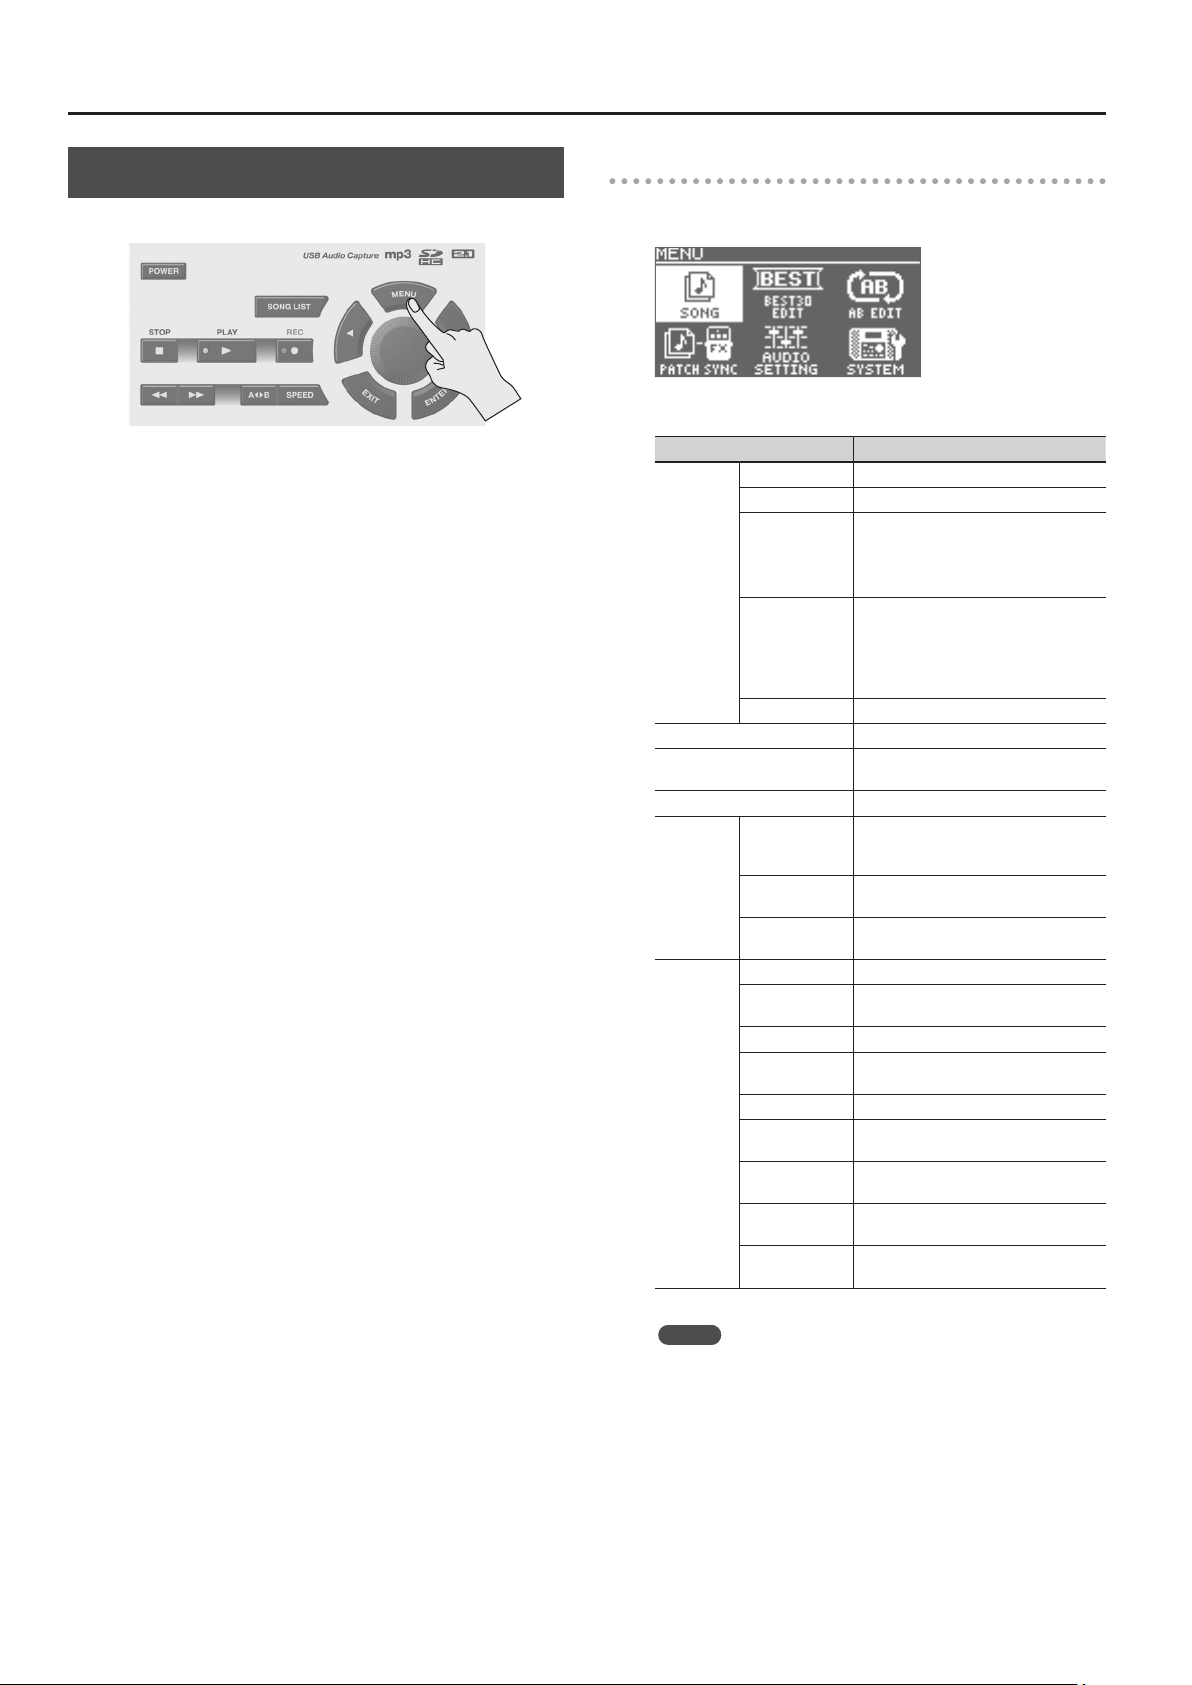
[MENU] Button
Press the [MENU] button to display a menu for each screen.
The JS-10 has the following menu screens.
• Menu in the Top screen (p. 6)
• Menu in the SONG LIST screen (p. 7)
• Menu in the EFFECT screen (p. 18)
Menu on the top screen
Press the [MENU] button in the top screen to display the MENU
screen.
You can access the JS-10’s settings from this screen.
MENU Explanation
SONG INFO Conrm song information (p. 21).
SONG NAME Change song names (p. 21).
Write the selected song to the USB ash
EXPORT
SONG
IMPORT
ERASE Delete the selected song (p. 8).
BEST 30 EDIT Add the current song to the BEST 30 (p. 7).
AB EDIT
PATCH SYNC Apply the setting in PATCH SYNC (p. 22).
INPUT
AUDIO
SETTING
SYSTEM
EQ
SPEAKER
USB MODE Switch the USB MODE (p. 24).
PEDAL
PATCH BACKUP Back up eects (p. 24).
PATCH RECOVER
SD INFO Check the free space on the SD card (p. 25).
USB MEMORY
SETTING
SD CARD
FORMAT (*)
FACTORY RESET
drive (p. 22).
* “EXPORT” is not displayed if the USB
ash drive has not been inserted.
Store the selected songs on the USB ash
drive to the SD card (p. 22).
* “IMPORT” is not displayed if a song
on the USB ash drive has not been
selected.
Make precise settings for the AB REPEAT
function (p. 12).
Select the input sensitivity and other
settings that match the device connected
to INPUT 1 and INPUT 2 jacks (p. 23).
Apply the equalizer on the overall sound
of the JS-10 and adjust its balance (p. 23).
Turns the JS-10’s built-in speakers on or
o (p. 23).
Assign functions to an externally
connected footswitch (p. 30).
Recover the eects that were backed
up (p. 25).
Check the free space on the USB ash
drive (p. 25).
Make a variety of the JS-10 settings
(p. 25 – p. 26).
Initialize (format) the SD card (p. 29).
Restore the JS-10 to its original default
factory settings (p. 26).
MEMO
(*) The SD card that is supplied with the JS-10 cannot be
initialized.
6
Page 9
Play the Guitar with Songs as Your Backing
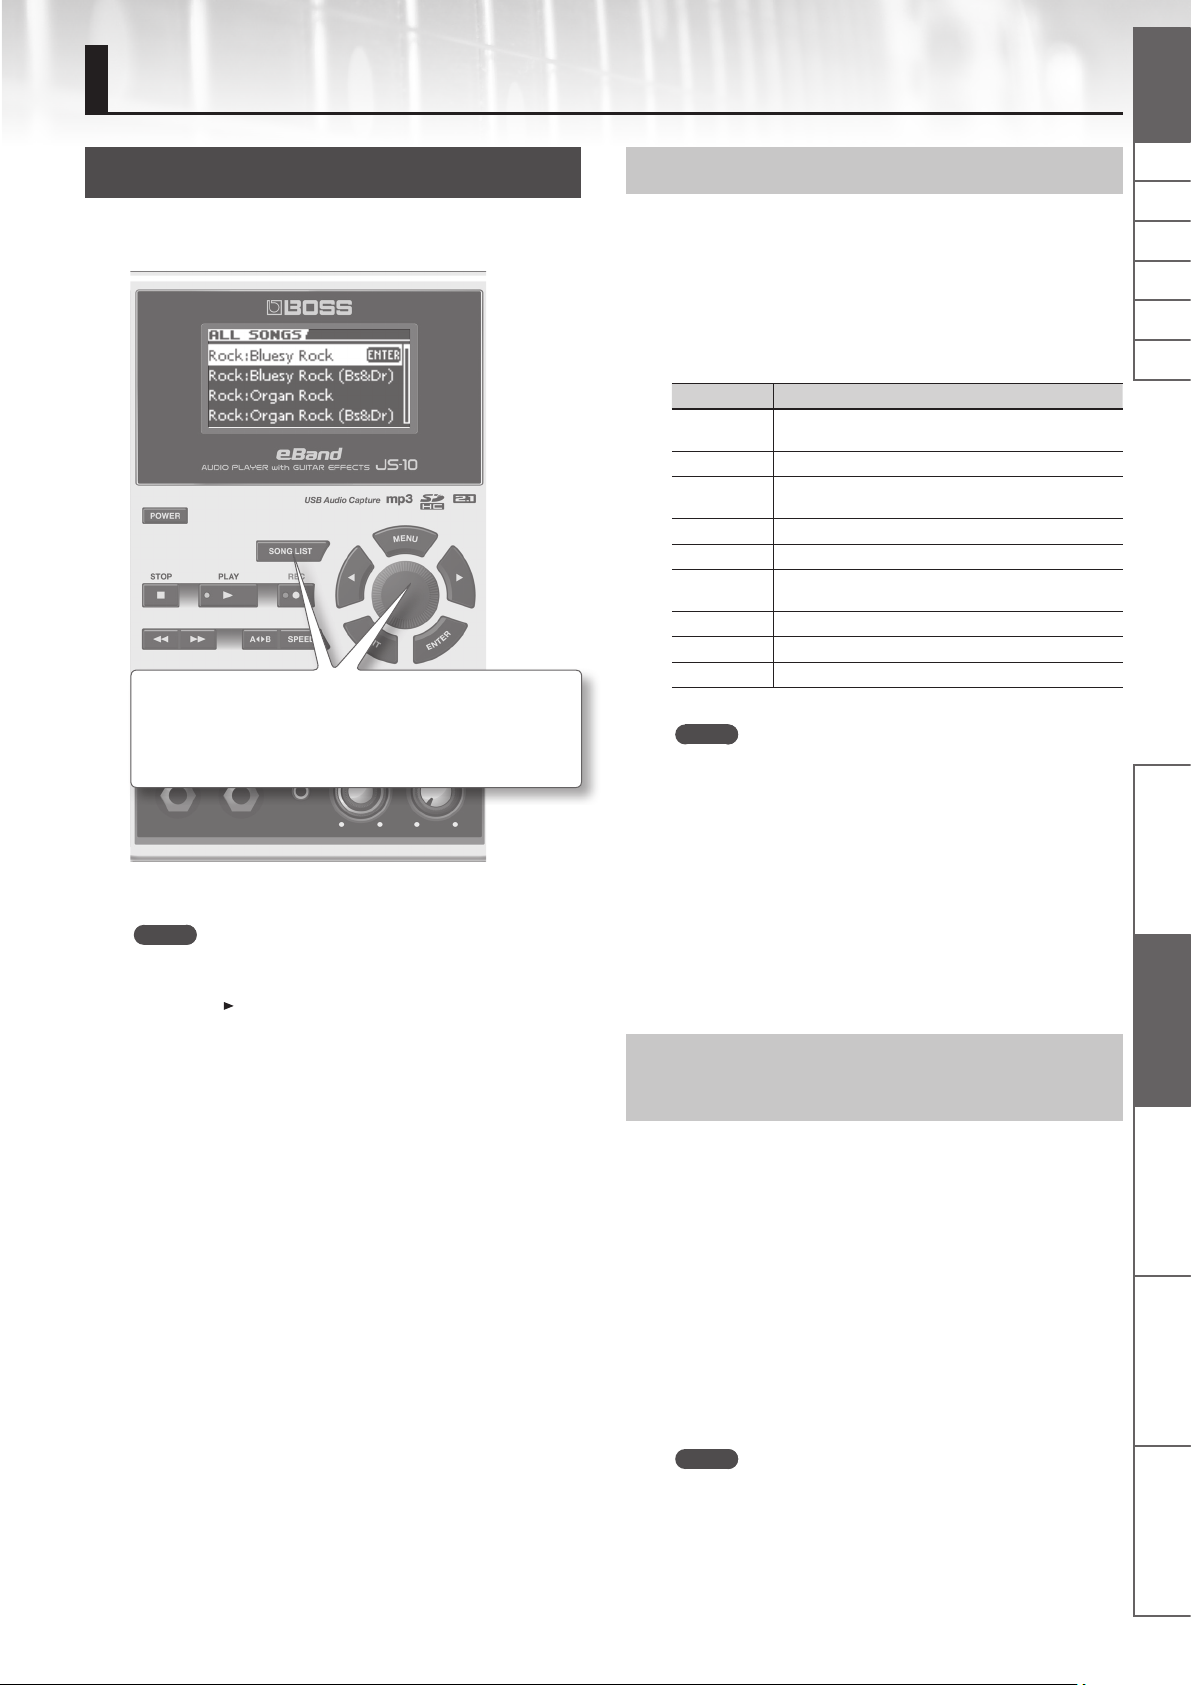
Selecting Songs
Here’s how to select the song you want to hear or the rhythm you
want played.
1. Press the [SONG LIST] button.
The SONG LIST screen appears.
2. Turn the Dial to select a song.
3. Press the [ENTER] button.
MEMO
• You can also select a song by turning the dial while a song name
is selected in the Top screen.
• Press the [
the selected song.
• The JS-10 can handle up to 4,000 songs.
] (PLAY) button in the SONG LIST screen to audition
Displaying Songs by Category
Here’s how to have songs be displayed according to a category you
select, such as the album title or artist name.
1. Follow this sequence of steps: [SONG LIST] button
[MENU] button.
The MENU popup appears.
2. Select a category.
MENU Explanation
ALL SONGS
USER Data recorded with the JS-10 is added to this category.
BEST 30
ALBUM Songs are listed by album title.
ARTIST Songs are listed by artist name.
RHYTHM
USB MEMORY Files stored in the USB ash drive are listed.
SD CARD Files stored in the SD card are listed.
REMOVE Removes the selected song from the BEST 30 list.
MEMO
• “ALBUM” and “ARTIST” are available when album titles or artist
names are registered with the songs.
• “SD CARD” is available when SD VIEW (p. 26) is ON.
• “REMOVE” is available when BEST 30 is displayed.
• By using the included eBand Song List Editor (p. 13), you can use
your computer to register and edit album titles and artist names.
Also, when you import an audio le, you can select the target
song list (Song, Rhythm, or User).
• Categorization of songs works on songs included with the JS-10
and songs stored with eBand Song List Editor (p. 13).
Songs recorded with the JS-10 and songs that have album
title and artist name registered are listed.
The thirty favorite songs are listed, if these songs have
already been ranked (1–30).
Rhythms contained on the SD card included with the
JS-10 are listed.
3. Press the [ENTER] button.
Registering Your 30 Favorite Songs (BEST
NlPtEsItFrDeEnglish
Panel Descriptions Play the Guitar with Songs
as Your Backing
30)
You can set the songs listed when BEST 30 is selected as the song
category.
Registering your favorite songs allows you to always have the songs
you want in song lists.
1. Before starting, select songs you want to list in the BEST
30.
2. Follow this sequence of steps: [MENU] button “BEST 30
EDIT” [ENTER] button.
The BEST 30 EDIT screen appears.
3. Select the rank.
4. Press the [ENTER] button.
MEMO
You cannot register songs in the USB ash drive as BEST 30.
eBand Song List Editor Convenient Functions Appendices
7
Page 10

Play the Guitar with Songs as Your Backing
Selecting Songs on the USB Flash Drive
You can select songs on the USB ash drive.
1. Follow this sequence of steps: [SONG LIST] button
[MENU] button “USB MEMORY” [ENTER] button.
2. Select the song you want to play.
3. Press the [ENTER] button.
File formats supported by the JS-10
eBand format
Roland/BOSS proprietary compression format
MP3 format
MP3 Format
Sampling rate 44.1 kHz
Bit rate 64 K – 320 Kbps
WAV format
WAV Format
Sampling rate 44.1 kHz
Quantization bit rate 16 bits
Encoding Uncompressed (Linear)
Playing a Guitar While Playing Back a Song
You can enjoy playing a guitar while playing back a favorite song as
your backing.
1. Press the [ ] (PLAY) button.
The playback of the song will start.
Deleting Songs
Here’s how to delete the selected song.
NOTE
You cannot restore songs once they are deleted.
1. Before starting, select the song you want to delete (p. 7).
2. Follow this sequence of steps: [MENU] button “SONG”
[ENTER] button “ERASE” [ENTER] button.
The message “Are you sure?” appears.
3. To delete a song, press [ENTER] button.
The song will be deleted.
8
2. Gradually turn the [MASTER LEVEL] knob clockwise until
you reach the desired volume level.
3. Turn the [INPUT LEVEL 1] knob and [INPUT LEVEL 2]
knob down to the minimum level (turn completely
counterclockwise).
4. While playing the guitar, gradually turn the [INPUT LEVEL
1] knob or [INPUT LEVEL 2] knob clockwise until you reach
the desired volume level.
5. Press the [ ] (STOP) button to stop the song.
MEMO
• Pressing the [
return the song playback location to the beginning (00:00).
• Press the [
button to move the song’s playback location back or forward.
• Howling (feedback) could be produced depending on the
location of microphones relative to speakers. This can be
remedied by:
1. Changing the orientation of the microphone(s).
2. Relocating microphone(s) at a greater distance from speakers.
3. Lowering volume levels.
* When you connect a microphone, select an eect from the
categories for microphones (p. 10). Also, switch the input
sensitivity of the INPUT jack to mic (p. 23).
] (STOP) button while the song is stopped will
] (Rewind) button or the [ ] (Fast Forward)
Page 11
Play the Guitar with Songs as Your Backing
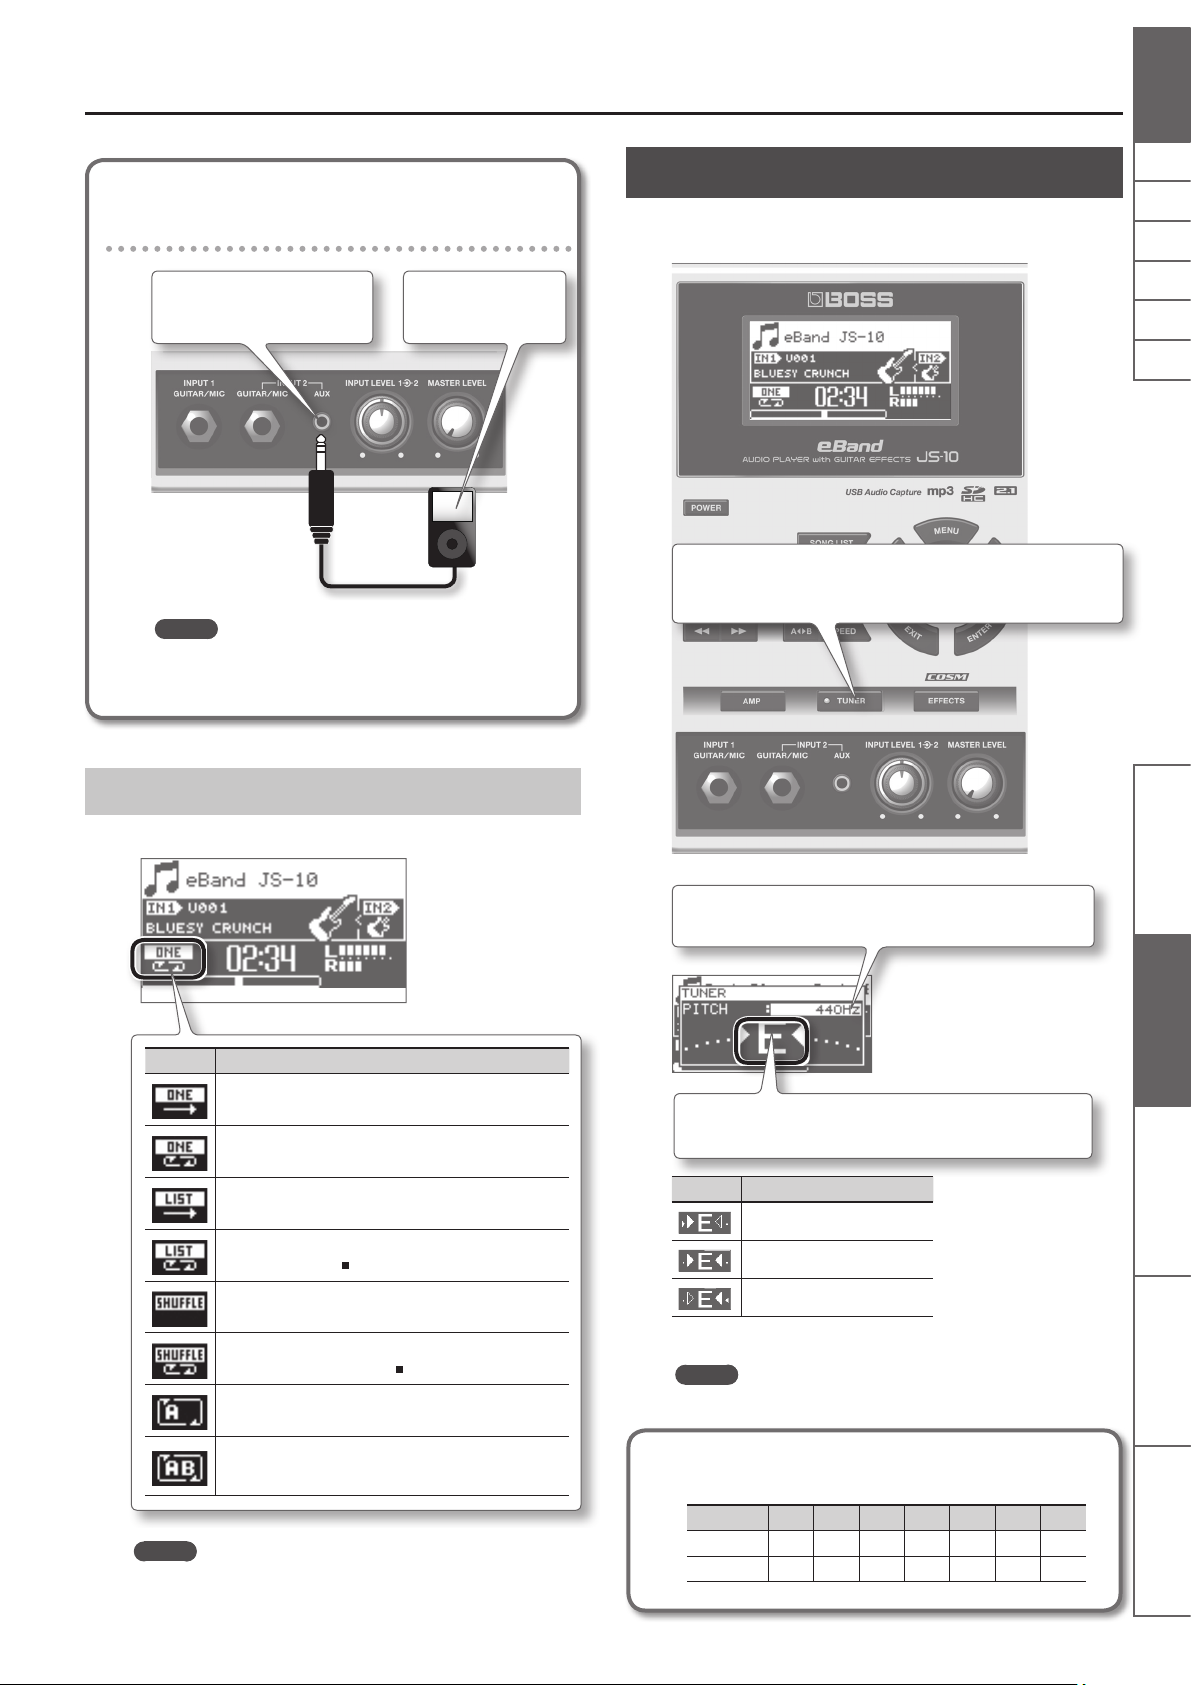
Playing a guitar while playing back a song
on audio players
Use a commercially available
stereo miniature plug cable that
is appropriate for the device.
MEMO
When instruments are connected to the INPUT 2 (GUITAR/
MIC) jack and the INPUT 2 (AUX) jack, only the instrument
connected to the INPUT 2 (AUX) jack can be used.
Digital audio player,
etc.
Tuning
Use the tuner in the JS-10 to tune the guitar or bass connected to
INPUT 1 or INPUT 2.
NlPtEsItFrDeEnglish
1. Press the [TUNER] button.
The TUNER screen appears.
Switching the Play Mode
You can change how the songs are played.
Display Explanation
The current song plays to the end and then stops.
Playback of the current song is repeated.
Songs in the song list are played back in order. *
Songs in the song list are played back in order. Playback
continues until the [
Songs in the song list are played back randomly. *
Songs in the song list are played back randomly.
Playback continues until the [
Time location “A” is registered (“Repeating Playback of a
Specied Segment (AB REPEAT)” (p. 12)).
Playback will repeat between time locations “A” and “B”
(“Repeating Playback of a Specied Segment (AB REPEAT)”
(p. 12)).
] (Stop) button is pressed. *
] (Stop) button is pressed. *
PITCH
Set the frequency of A4 (the middle A on a piano keyboard).
2. Adjust the tuning until the desired pitch is
shown and both triangles are lit.
Display Explanation
Too low
Tuned
Too high
MEMO
The [TUNER] button will be lit when it is tuned.
Standard tuning
Panel Descriptions Play the Guitar with Songs
as Your Backing
eBand Song List Editor Convenient Functions Appendices
MEMO
When you select a Play Mode marked with an asterisk (*), the
current song will be played to the end and stop if a screen other
than “Top Screen” (p. 4) is displayed.
7th 6th 5th 4th 3rd 2nd 1st
Guitar B E A D G B E
Bass B E A D G
9
Page 12
Play the Guitar with Songs as Your Backing
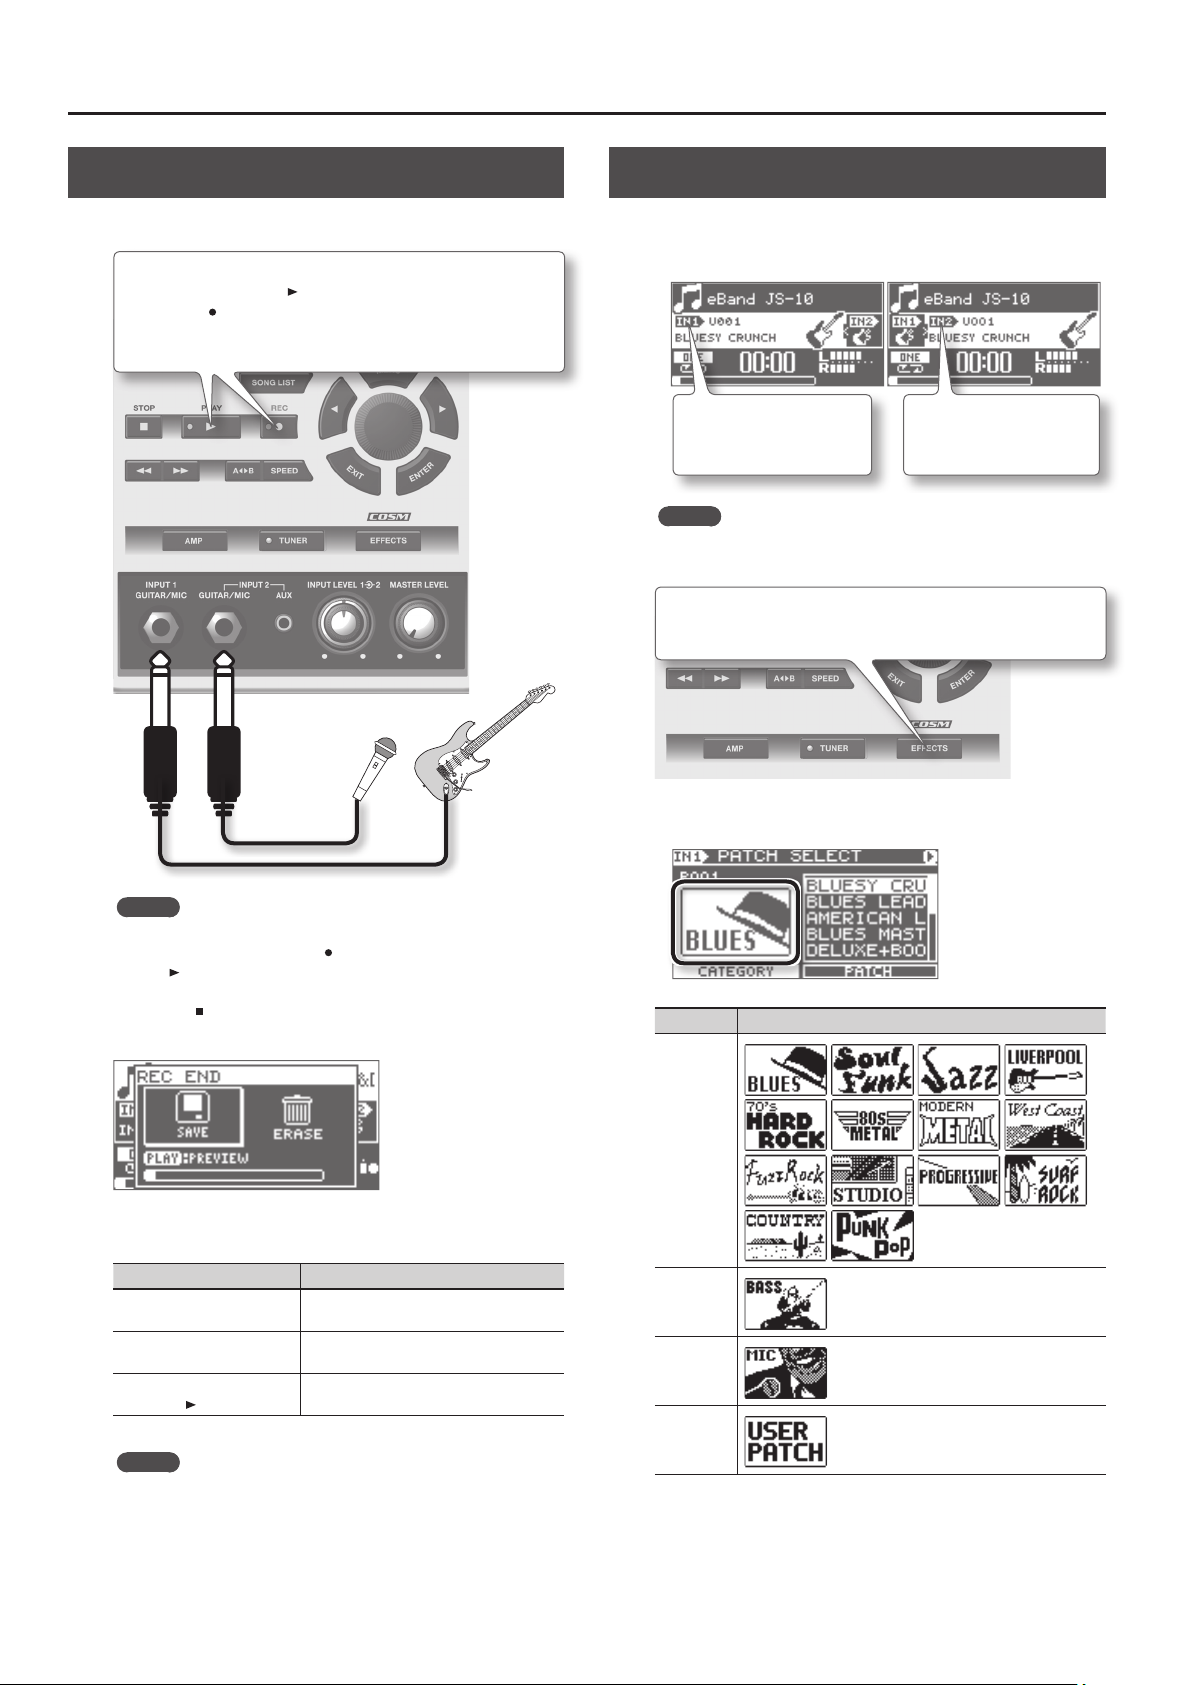
Recording Performances
You can record the sounds exactly as you hear them from the JS-10.
1. To record while the song is being played back,
rst press the [ ] (PLAY) button, and then press
the [ ] (REC) button.
The song will be played back and recorded along with
the sounds input to INPUT 1 jack and INPUT 2 jack.
Switching Eects
The internal eects can be switched.
1. Select either IN1 or IN2.
IN1
Eect on INPUT 1 (GUITAR/
MIC) jack
MEMO
The eect will not be applied on AUX jack.
2. Press the [EFFECTS] button.
The PATCH SELECT screen appears.
IN2
Eect on INPUT 2 (GUITAR/
MIC) jack
MEMO
In order to record only the sounds input to INPUT 1 jack and
INPUT 2 jack, just press the [
the [ ] (PLAY) button (i.e., do not play back the song).
] (REC) button without pressing
2. Press the [ ] (STOP) button to stop recording.
The REC END popup appears.
3. Decide what to do with the recording.
Icon Explanation
SAVE
ERASE
PREVIEW
(Press the [
MEMO
] (PLAY) button)
Recorded data (songs) are automatically assigned the name
“SONG****: (original song name)” (with **** indicating the
number). However, if the original song name was edited with
eBand Song List Editor, then it will be “SONG****.”
The recording is saved in “USER” category in
the song list.
The recording is discarded. (The recorded
content will not be saved.)
Listen to the recording.
3. Select a category.
Usage Category
For Guitar
For Bass
For
Microphone
For User
Patch
* When you connect a microphone, select an eect from the
categories for microphones (p. 10). Also, switch the input
sensitivity of the INPUT jack to mic (p. 23).
10
Page 13
4. Select a patch.
Play the Guitar with Songs as Your Backing
Changing the Pitch of Songs
You can change just the pitch without changing the playback speed
of songs.
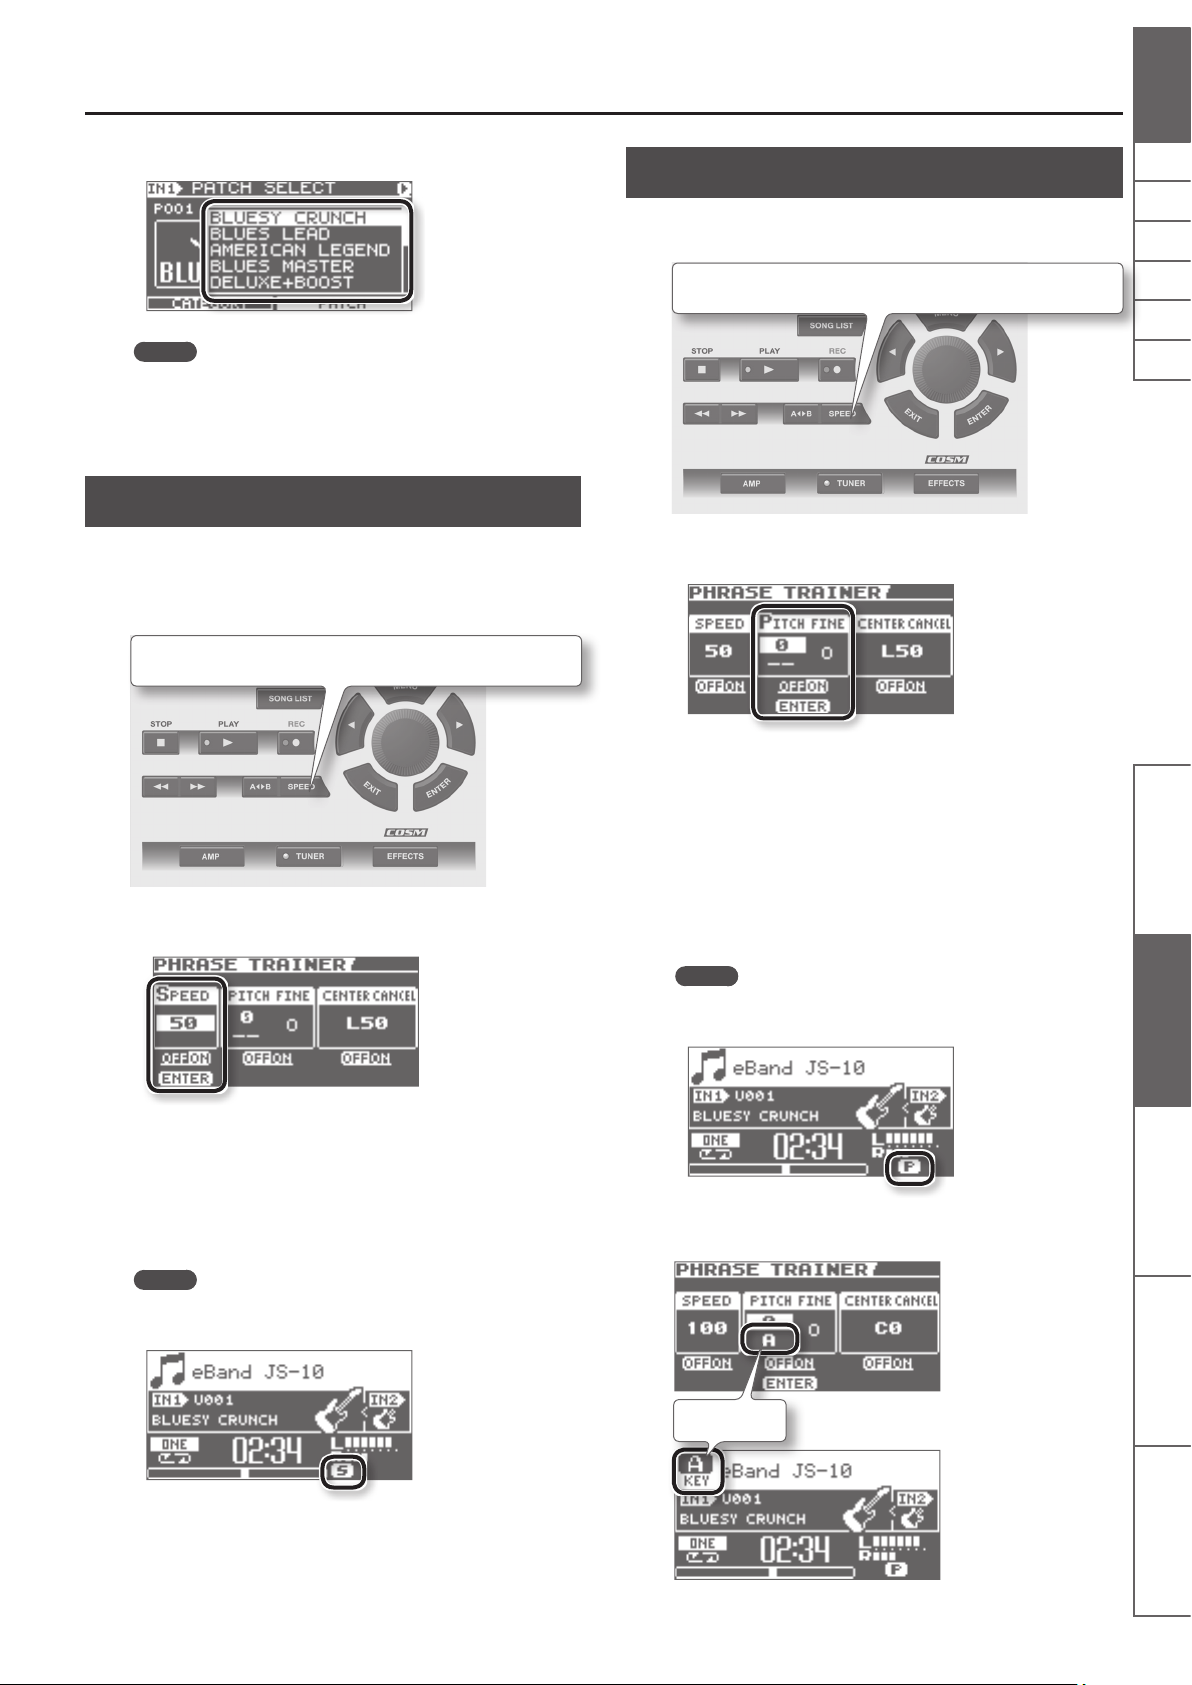
1. Press the [SPEED] button.
MEMO
In the default factory settings, appropriate eect patches are
assigned for each song on the supplied SD card. For details,
refer to “Changing the Patch When the Song is Switched (PATCH
SYNC)” (p. 22).
Changing the Speed of Songs
You can change the playback speed of songs.
This feature lets you slow down the song tempo to practice dicult
or fast passages. Changing the song’s speed will not have an eect
on the pitch.
1. Press the [SPEED] button.
2. Select SPEED.
2. Select PITCH or FINE.
3. Press the [ENTER] button.
PITCH FINE is turned “ON.” Pitch of the song can now be changed.
4. Apply the settings for PITCH or FINE.
The pitch is changed.
You can change the PITCH setting in the range from -6 through +7
(in semitone steps).
You can change the FINE setting in the range from -50 through +50
(in ne steps of 1 cent).
MEMO
• When the pitch is changed, the “P” icon that indicates the pitch
change appears on the top screen.
NlPtEsItFrDeEnglish
Panel Descriptions Play the Guitar with Songs
as Your Backing
3. Press the [ENTER] button.
Turn SPEED to “ON” to change the speed.
4. Set the playback speed.
You can set the speed in the range of 50 to 150 (%). Normally, the
speed is set to 100.
MEMO
When the speed is changed, the “S” icon that indicates the speed
change appears on the top screen.
eBand Song List Editor Convenient Functions Appendices
• If a KEY is set in the song parameters (p. 21), the KEY indicator
works according to the PITCH settings.
KEY indicator
11
Page 14
Play the Guitar with Songs as Your Backing
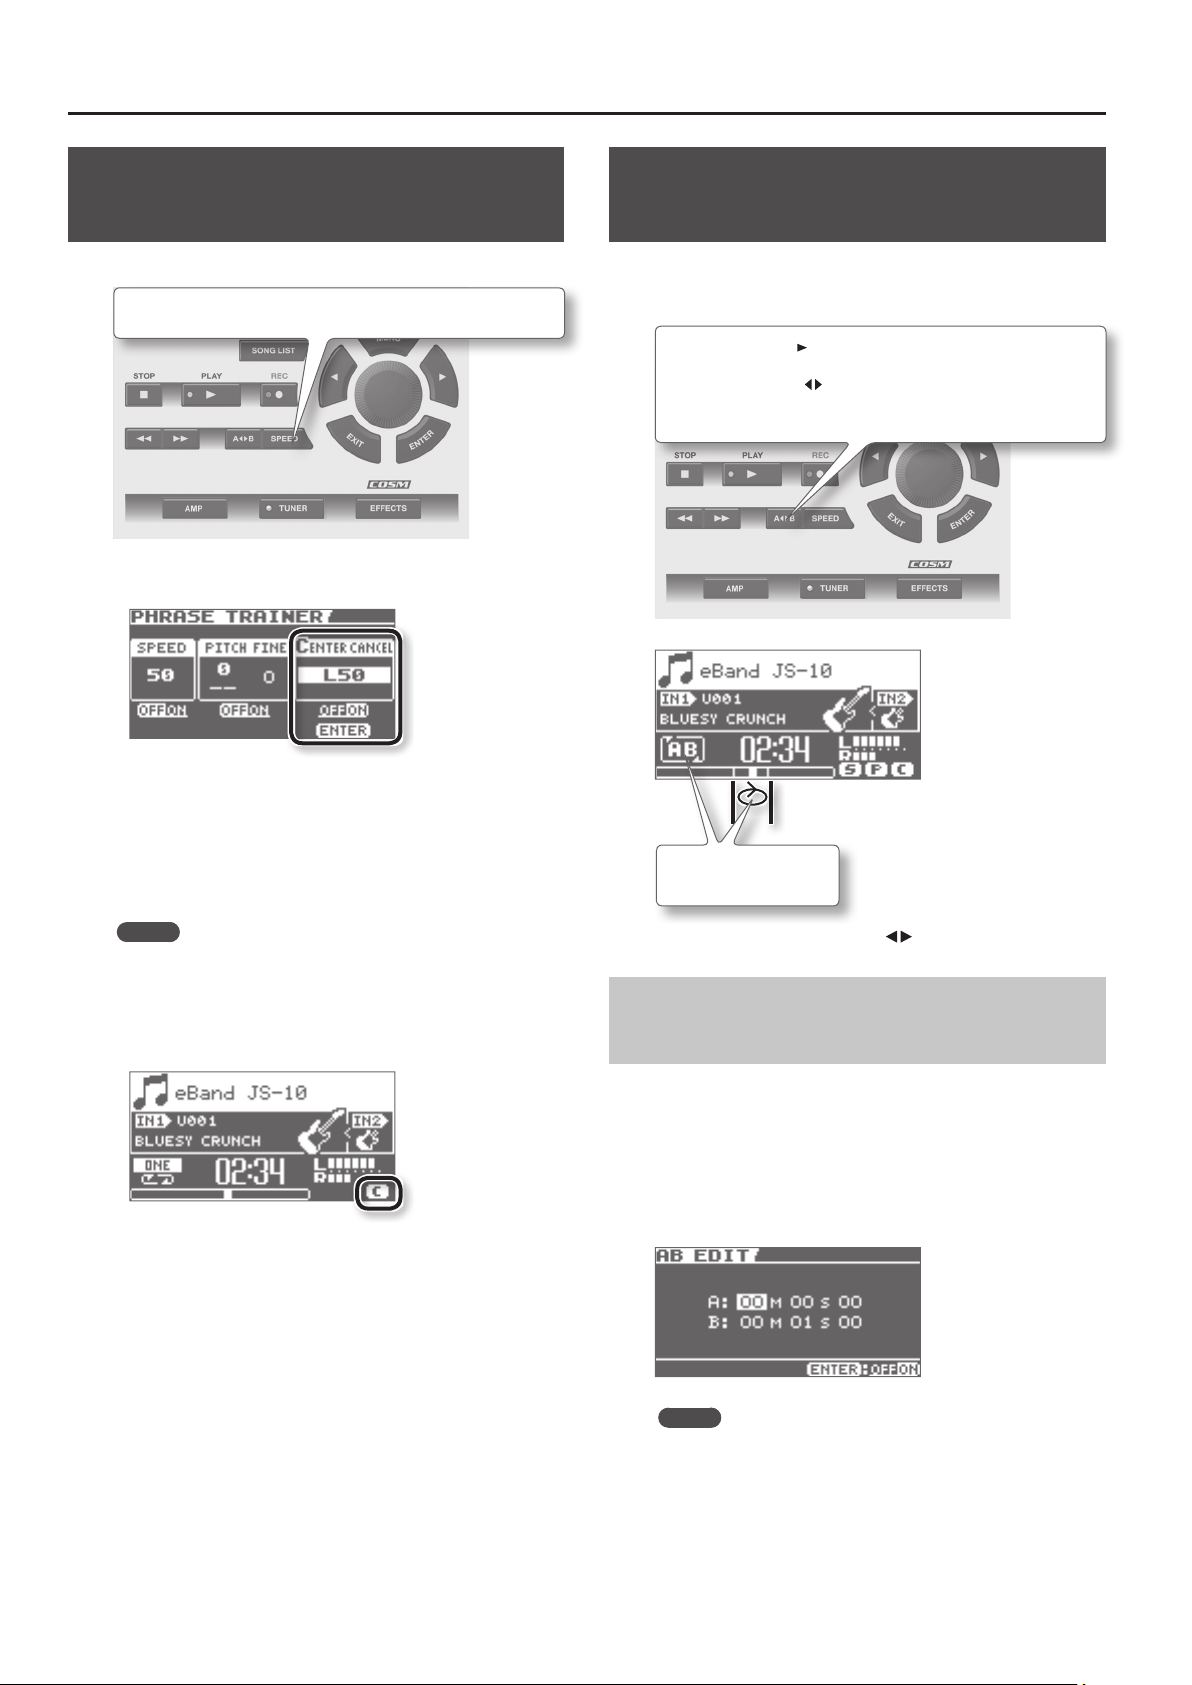
Removing the Center Sound (Center Cancel)
Songs can be played back with the center sound removed.
1. Press the [SPEED] button.
2. Select CENTER CANCEL.
Repeating Playback of a Specied
Segment (AB REPEAT)
Use this feature for guitar solo practice and in other situations
where you want to practice along with a single section as it plays
back repeatedly.
1. Press the [ ] (PLAY) button.
2. Press the [A B] button at the start point and
also at the end point of the repeat segment.
3. Press the [ENTER] button.
Turn CENTER CANCEL to “ON.”
4. Set the location of the sound you want to remove.
“C0” removes the center sound, while “L**” remove the left sound
and “R**” removes the right sound.
MEMO
• Center Cancel applies also to input sounds from the INPUT 2
(AUX) jack and USB COMPUTER port.
• Some sounds cannot be removed completely.
• When Center Cancel is turned on, the “C” icon indicating that it is
on appears on the top screen.
Playback of AB REPEAT
segment will be repeated.
To turn AB REPEAT o, press the [A B] button again.
Precise Adjustment of the AB REPEAT Segment
You can precisely adjust the start and end points of the segments to
be repeated.
1. Follow this sequence of steps: [MENU] button
“AB EDIT” [ENTER] button.
2. On the AB EDIT screen, adjust the start point (A) and the
end point (B).
12
MEMO
• You can press [ENTER] on the AB EDIT screen to alternately
switch the AB REPEAT function on and o.
• With MP3 data, you may be unable to play back from a specic
time (the performance starts near the specied time).
• The interval between A and B cannot be less than one second.
Page 15
Importing Songs from a PC to the JS-10
eBand Song List Editor is software that operates on the PC.
You can perform the following tasks by connecting the PC to the
JS-10 with a USB cable and starting eBand Song List Editor.
• Import songs on music CDs to the JS-10
• Import WAV les and MP3 les on your PC to the JS-10
• Edit song information of songs stored on the JS-10
MEMO
For information on how to use eBand Song List Editor, refer to
the Help in eBand Song List Editor.
Before Using eBand Song List Editor
Prepare to use eBand Song List Editor on your PC.
Installing eBand Song List Editor on Your PC
Install eBand Song List Editor on your PC. eBand Song List Editor is
included on the SD card that is supplied with the JS-10.
MEMO
• If the latest eBand Song List Editor is already installed in your PC,
proceed to “Starting Up eBand Song List Editor” (p. 13).
• The description of computer procedures will use My Computer
(or Computer) with Windows and Finder with the Mac OS.
1. Using your PC, locate the folders inside “JS-10 EBAND.”
2. Double-click one of the les shown below.
(eBand Song List Editor)
NlPtEsItFrDeEnglish
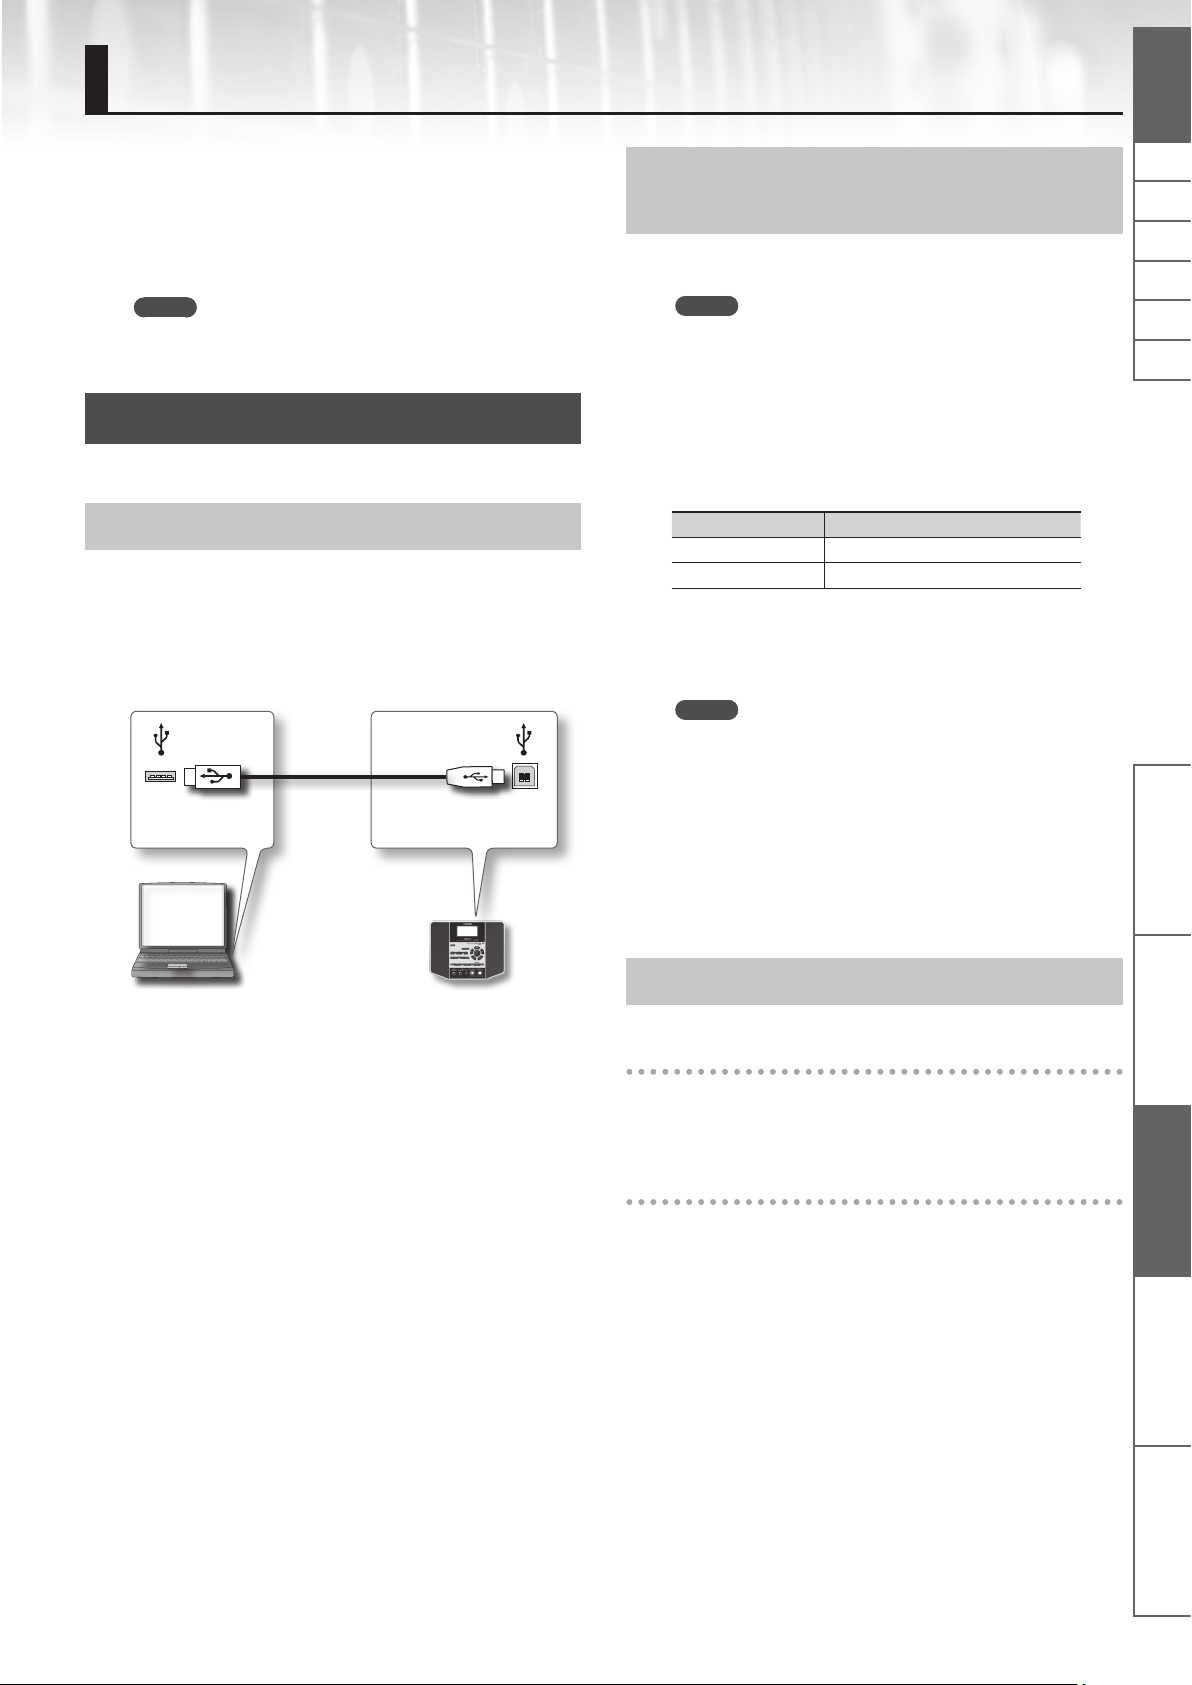
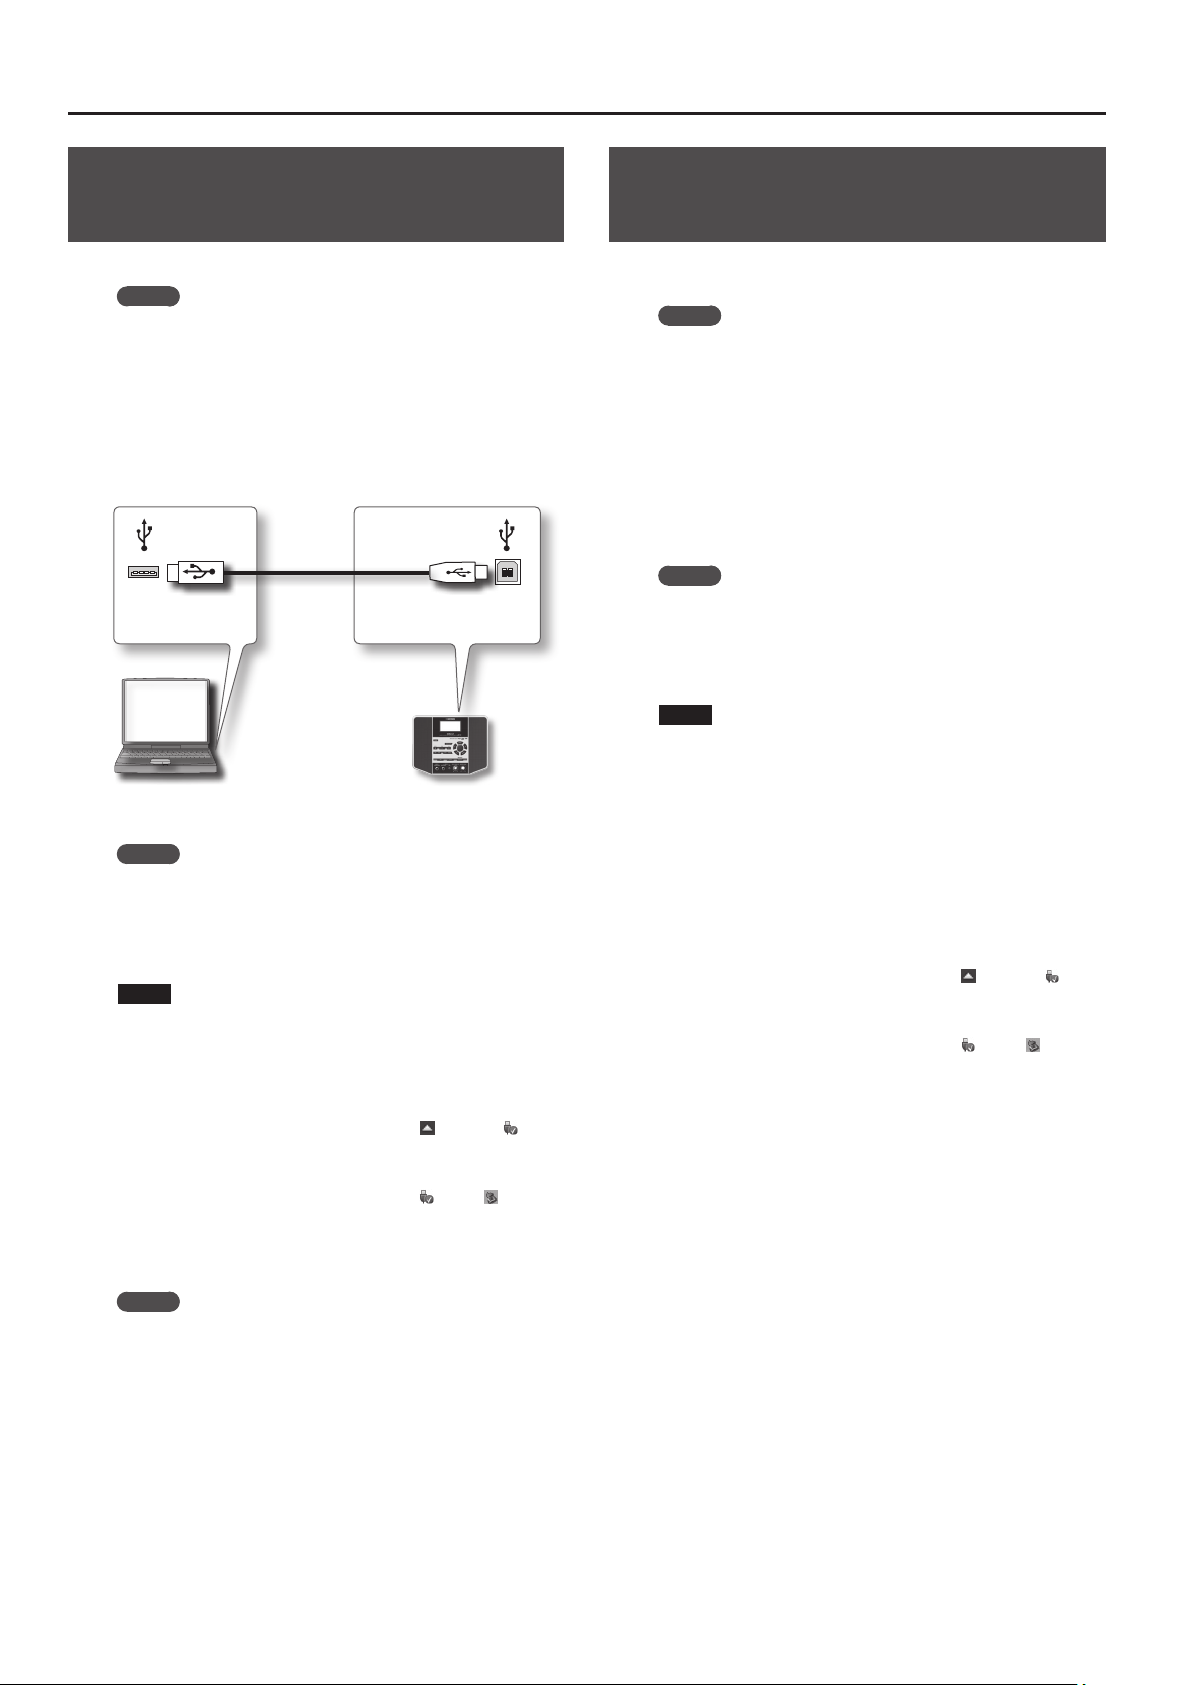
Connecting the JS-10 to Your PC
1. Follow this sequence of steps:
[ENTER] button “USB MODE” [ENTER] button
“eBand SONG LIST EDITOR” [ENTER] button.
2. Connect the PC and the JS-10 with the supplied USB
cable.
[MENU] button “SYSTEM”
USB COMPUTER portUSB port
File Name Supported OS
Win.zip Windows 7, Vista, or XP
Mac.dmg Mac OS
The contents of the le are displayed.
3. Copy the “Song List” folder to your PC.
MEMO
We recommend that you copy to a folder that will be easy to
locate afterward.
4. If you’re using Windows, close the “Win.zip” window.
If you’re using Mac OS, drag the “Mac” icon to the Eject
icon in the Dock.
5. Read the le ReadmeEN.txt in the “Song List” folder that
you copied to your PC, and then install eBand Song List
Editor.
Starting Up eBand Song List Editor
Windows users
Panel Descriptions Play the Guitar with Songs
as Your Backing
1. Click the PC’s [Start] button [All Programs]
“eBand Song List Editor” “eBand Song List Editor.”
Mac OS users
1. Double-click the Application folder Roland folder
eBand Song List Editor folder “eBand Song List Editor.”
eBand Song List Editor Convenient Functions Appendices
13
Page 16
Importing Songs from a PC to the JS-10 (eBand Song List Editor)
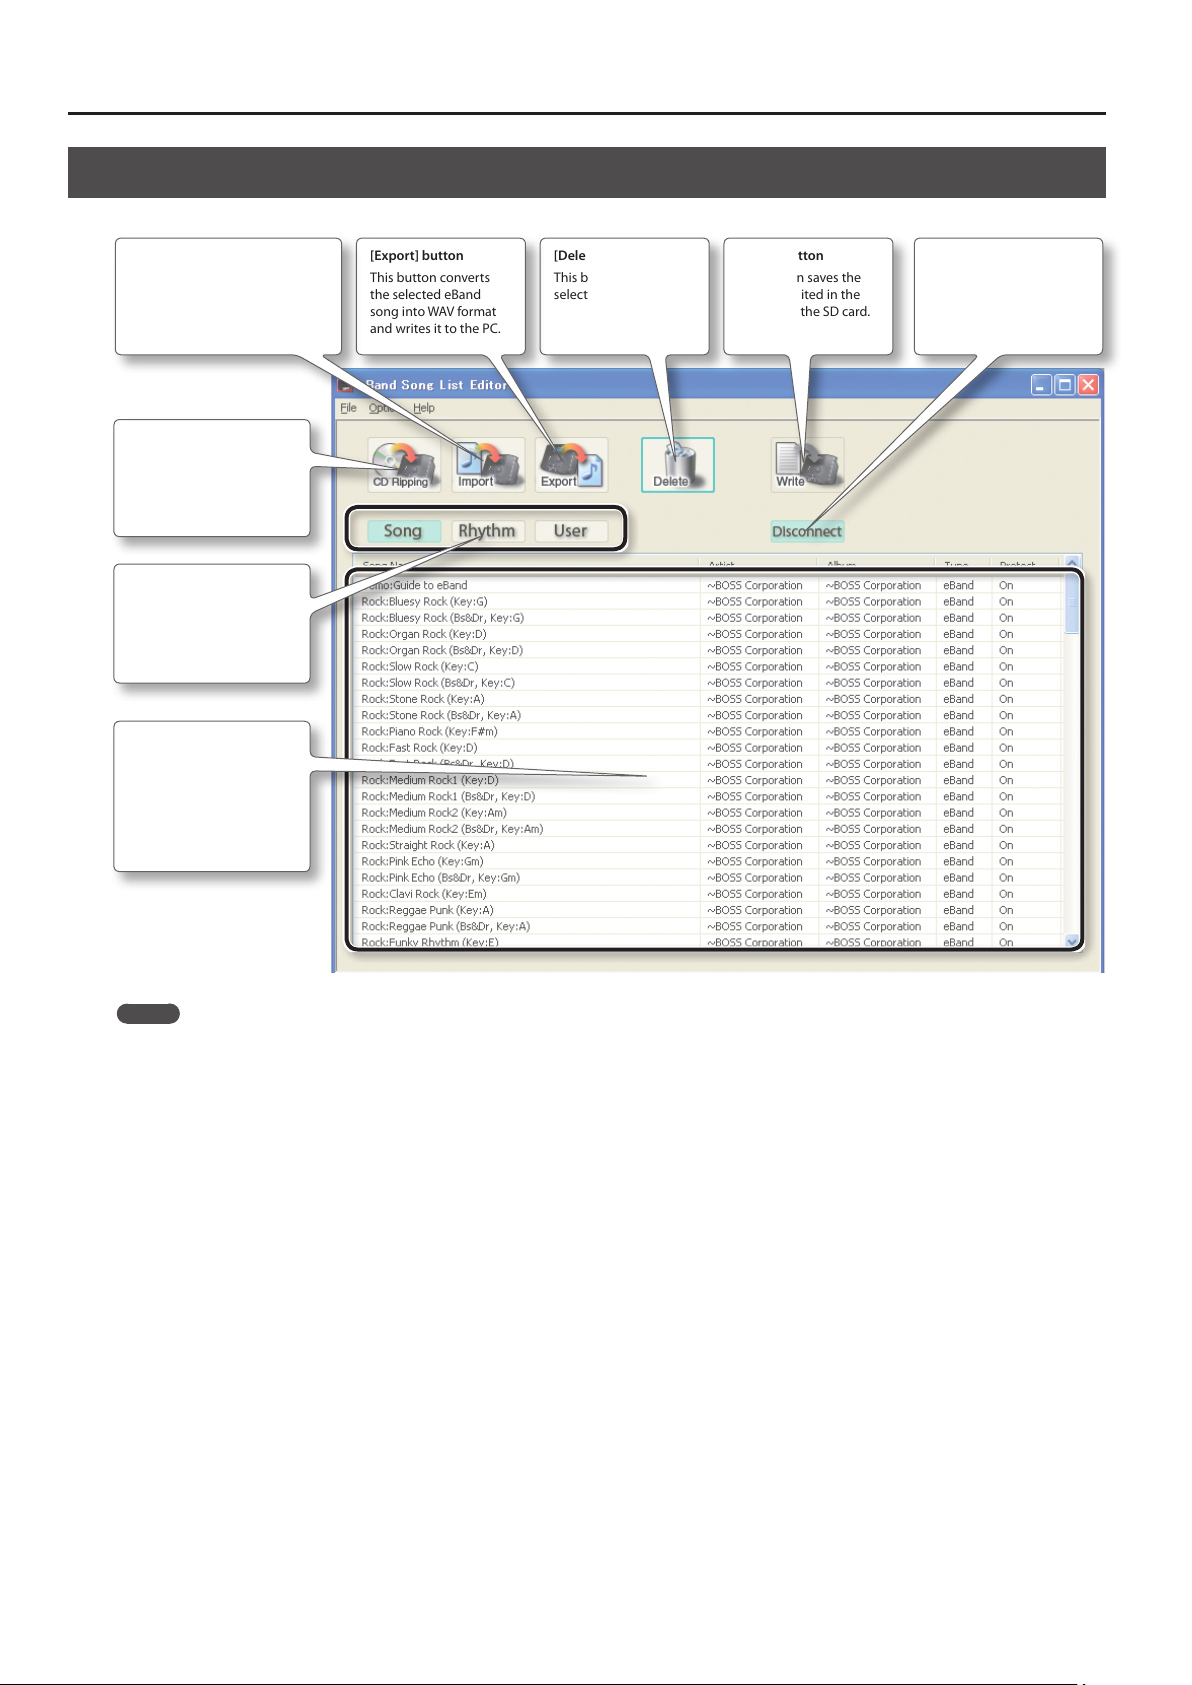
Using eBand Song List Editor
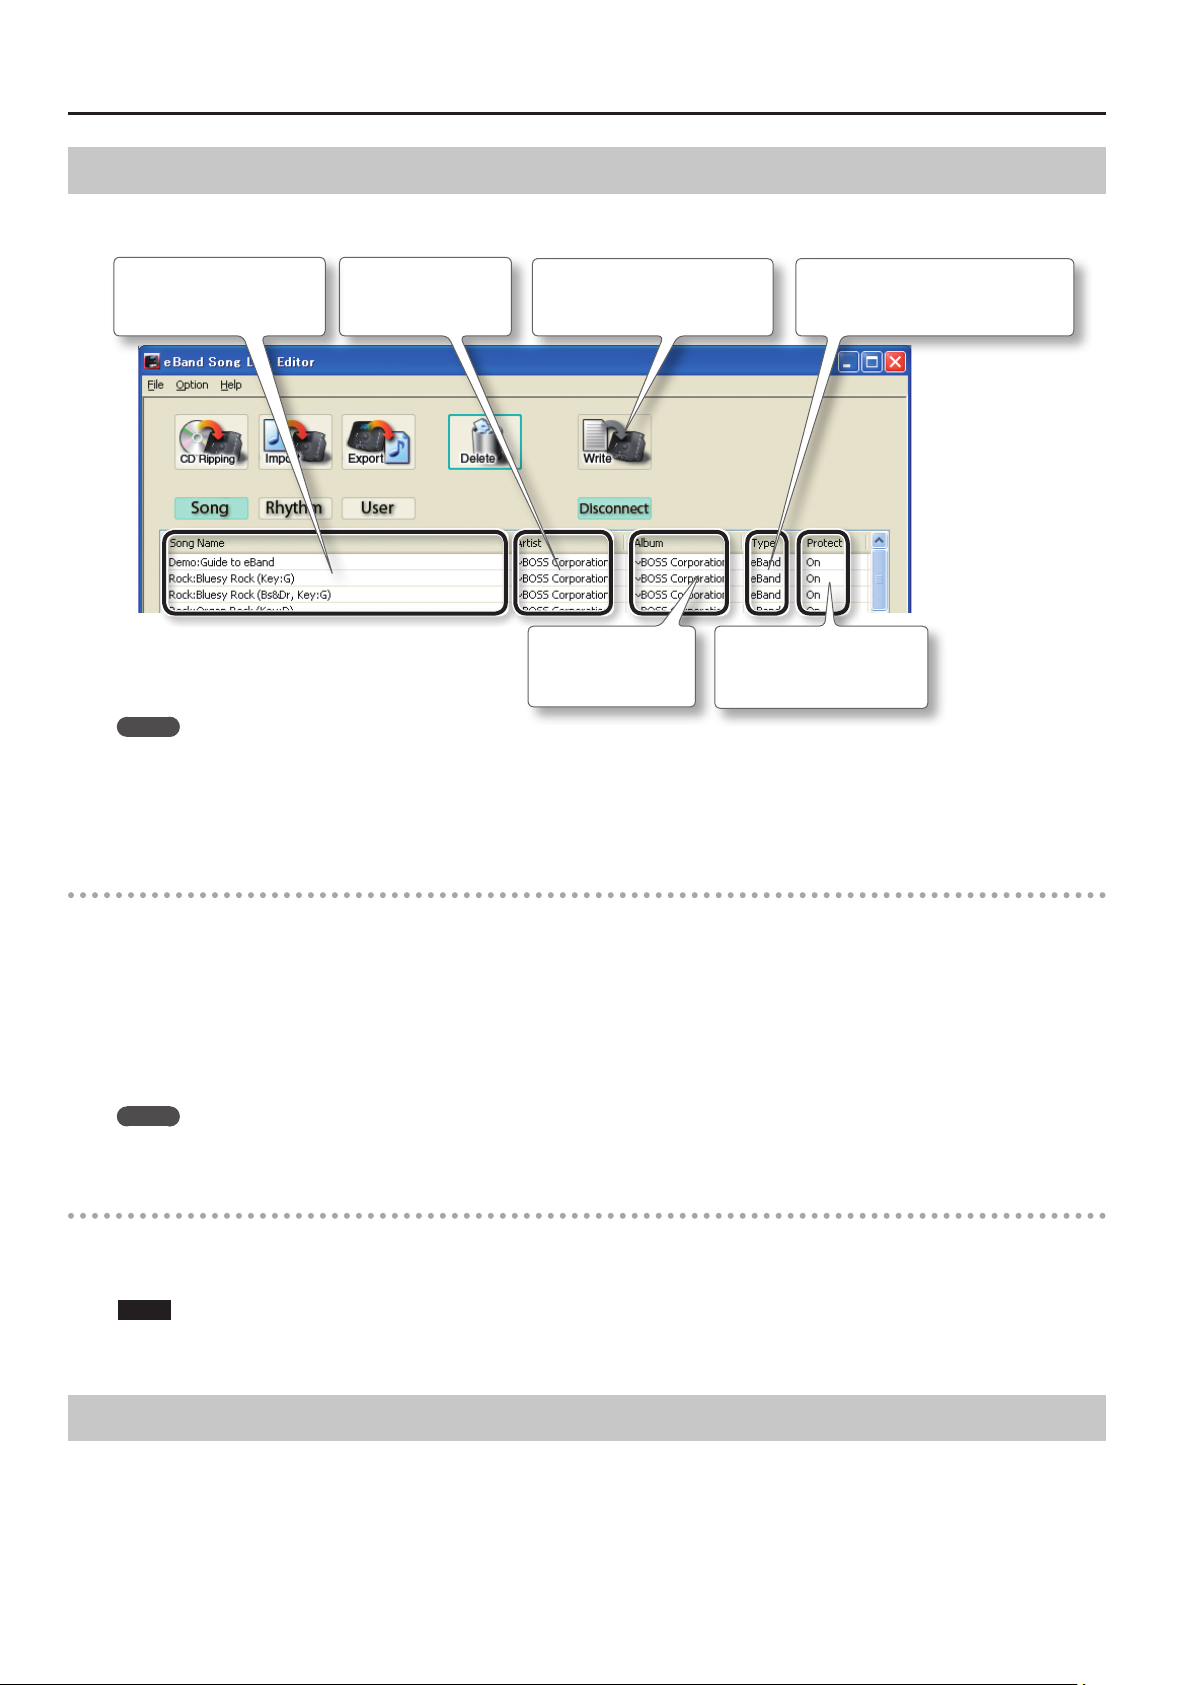
[Import] button
This button imports audio les
(WAV/MP3) from the PC to the
JS-10.
[CD Ripping] button
This button rips (reads and
saves) songs from an audio
CD (p. 15).
List Mode buttons
These buttons switch the
song list (Song/Rhythm/
User) for the “List area.”
[Export] button
This button converts
the selected eBand
song into WAV format
and writes it to the PC.
[Delete] button
This button deletes the
selected song.
[Write] button
This button saves the
content edited in the
list area to the SD card.
[Disconnect] button
This button disconnects
communication between
the JS-10 and the PC.
List area
You can edit the song
information in this area.
Clicking “List Mode buttons”
(Song/Rhythm/User) will
switch the content shown in
this area.
MEMO
• The JS-10 can handle up to 4,000 songs.
14
Page 17
Importing Songs from a PC to the JS-10 (eBand Song List Editor)
Ripping Songs from CD to the JS-10 (Ripping)
You can rip songs from music CDs to the JS-10. The ripped songs are
added to the song list selected with the “List Mode button” ([Song]
button, [Rhythm] button, or [User] button).
MEMO
In order to rip from a music CD, you will need administrator
privileges on your PC.
1. Click the List Mode button to select the song list to which
you want to add the song.
Decide which song list to add the ripped songs will go.
2. Insert the CD that you want to rip into your PC’s CD drive.
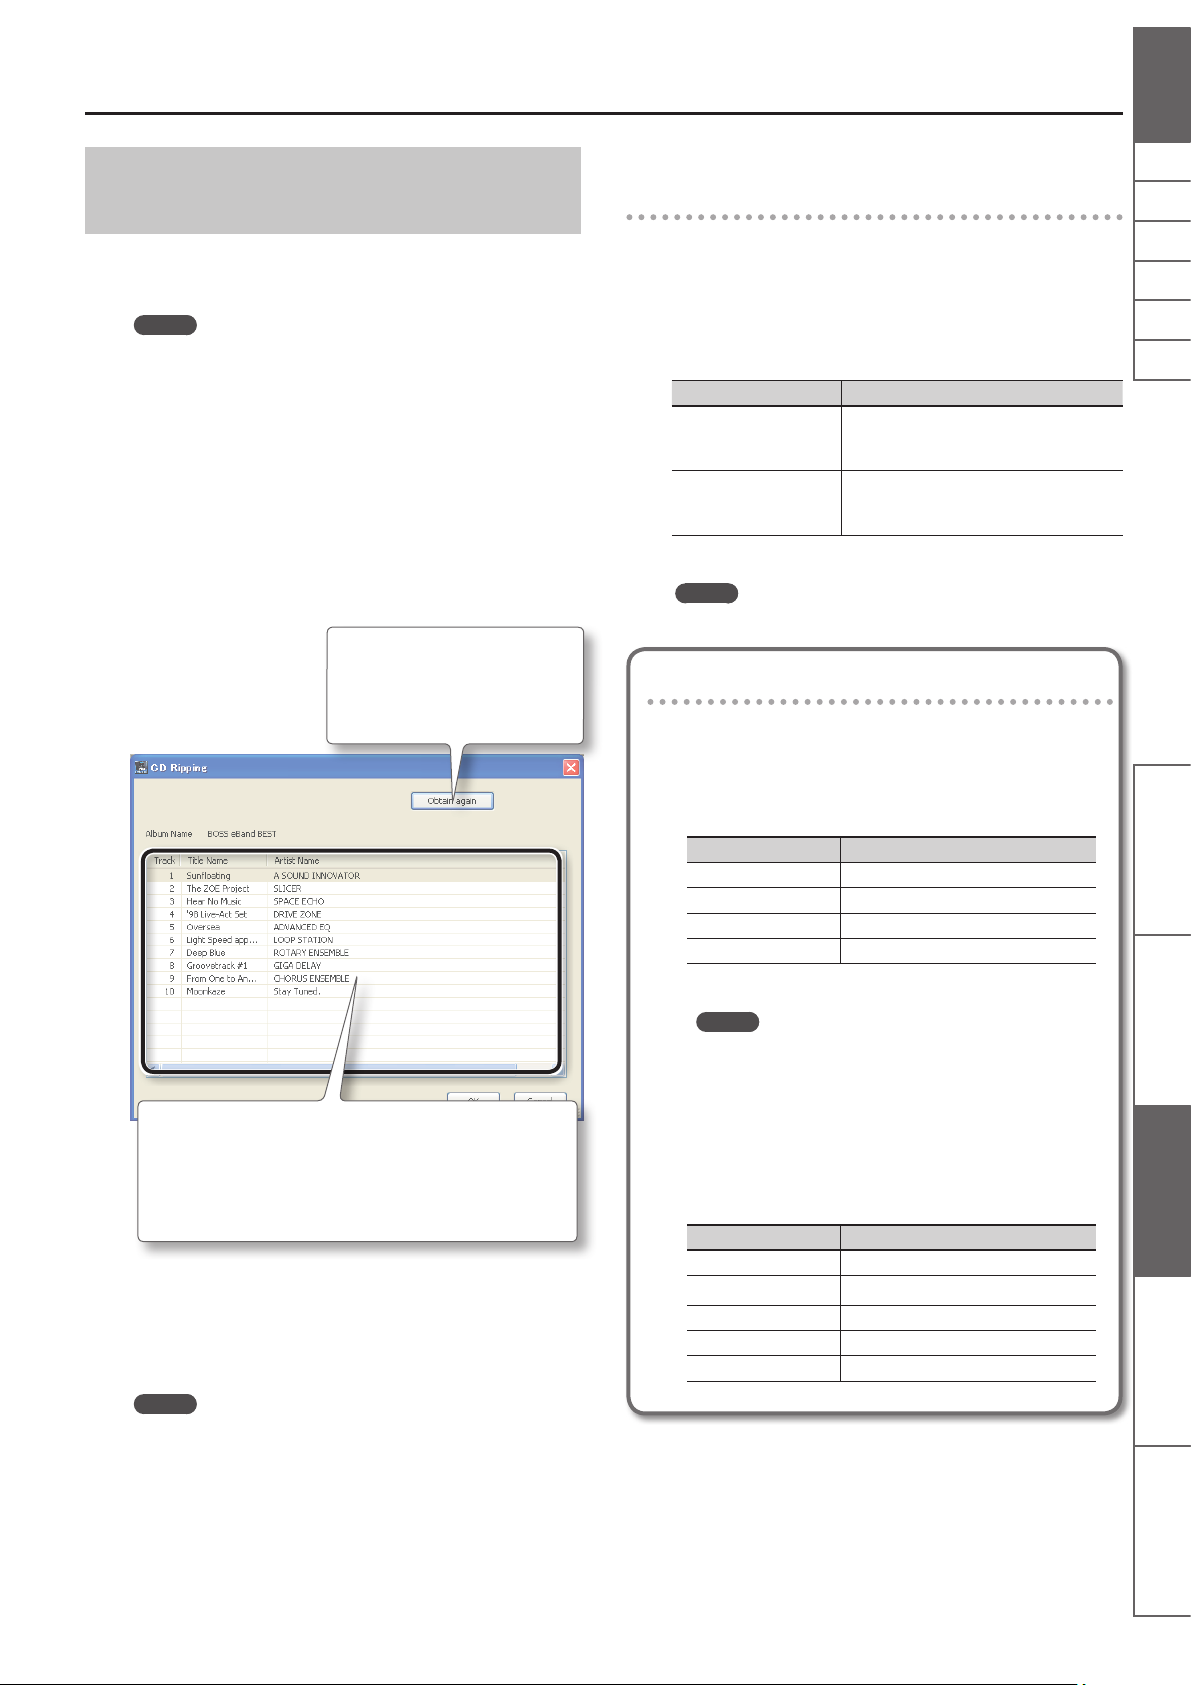
3. Click the [CD Ripping] button in eBand Song List Editor.
The CD Ripping screen appears on your PC.
[Obtain again] button
Downloads and re-displays the title
names and artist names.
Your PC must be connected to the
Internet.
Selecting the Song Format When Ripping
Songs
Here’s how to select the song format when ripping songs from CD
to the JS-10.
1. Make settings by clicking “Conserve Card Memory” in the
“Options” menu.
Conserve Card Memory Import format
ON (Selected)
OFF (Cleared)
MEMO
The default setting is “ON” (Conserve Card Memory).
eBand song format
Data is compressed and imported, placing
priority on the card capacity.
WAV format
Data is imported, placing priority on the audio
quality (uncompressed).
File formats that can be imported
The types and formats of les that can be imported using
eBand Song List Editor are as follows.
NlPtEsItFrDeEnglish
Track information
The track numbers of the songs on the music CD are displayed.
If the PC is connected to the Internet, Gracenote® MusicID obtains the
song names and artist names and displays them automatically.
However, the information that is available can vary depending on the
CD.
4. In eBand Song List Editor, select the song you want to rip.
5. Click the [OK] button.
The selected song will be ripped to the JS-10’s SD card. When the
ripping is complete, the song will be added to the song list.
MP3 format
Format Settings
Sampling rate 44.1 kHz
Bit rate 64 K – 320 Kbps
File name extension .mp3 (not case-sensitive)
Length One second or more
MEMO
• MP3 les are imported as MP3 format, regardless of the
“Conserve Card Memory” setting.
• If the MP3 le being imported contains ID3 tags for the
song name, artist name, and album title, this information
can also be imported.
WAV format
Format Settings
Sampling rate 44.1 kHz
Quantization bit rate 16 bits
Encoding Uncompressed (Linear)
File name extension .wav (not case-sensitive)
Length One second or more
Panel Descriptions Play the Guitar with Songs
as Your Backing
eBand Song List Editor Convenient Functions Appendices
MEMO
Do not rip a song while playing a music CD on your PC. Noise
may be mixed in with the ripped song.
15
Page 18
Importing Songs from a PC to the JS-10 (eBand Song List Editor)
Editing Song Information
You can edit song information (song information, artist name, and album title) for songs saved on the JS-10. The edited song information is shown on
the JS-10’s display.
Song Name / Rhythm Name
Song Name or Rhythm Name is
displayed.
MEMO
• (*1) When the song list displayed in the list area is “Rhythm” or “User,” then “Album” and “Artist” will not be shown.
• You can store up to 2,000 album titles and artist names combined on the JS-10.
• eBand Song List Editor allows you to use double-byte characters (such as Japanese) for song names, artist names, and album titles.
Also, you can display the double-byte song names, if these songs are imported to the JS-10 with eBand Song List Editor.
Artist (*1)
Artist name is displayed.
[Write] button
This button saves the content edited
in the list area to the SD card.
Album (*1)
Album title is displayed.
Protect
The song protection setting
(On/O) is displayed.
Type
The format of the song in the list is
displayed. This display cannot be changed.
Entering text
1. Select the cell that you want to edit.
If you are using Windows, right-click the appropriate cell with the mouse.
If you are using Mac OS, double-click the appropriate cell.
2. Enter text.
3. When you nish entering, press the [Enter] key (or the [return] key) on your PC’s keyboard.
The input is conrmed.
MEMO
For details on how to enter text, refer to “Using eBand Song List Editor” (PDF) from the Help menu in eBand Song List Editor.
Saving the edited information
1. Click the [Write] button.
The edited information will be saved on the JS-10’s SD card.
NOTE
After you have edited the song information, be sure to click the [Write] button. If you exit eBand Song List Editor without saving or disconnect
from the PC, the edited information will be lost.
Ending the Connection with the PC
1. Click the [Disconnect] button in eBand Song List Editor.
2. Press the [EXIT] button on the JS-10.
The message “Are you sure?” appears.
3. To end the connection, press the [ENTER] button on the JS-10.
* To use the eBand Song List Editor again, follow the procedure in “Connecting the JS-10 to Your PC” (p. 13).
16
Page 19
Convenient Functions
Editing the Eects
Here’s how to edit the JS-10’s built-in eects and create your own
favorite sound.
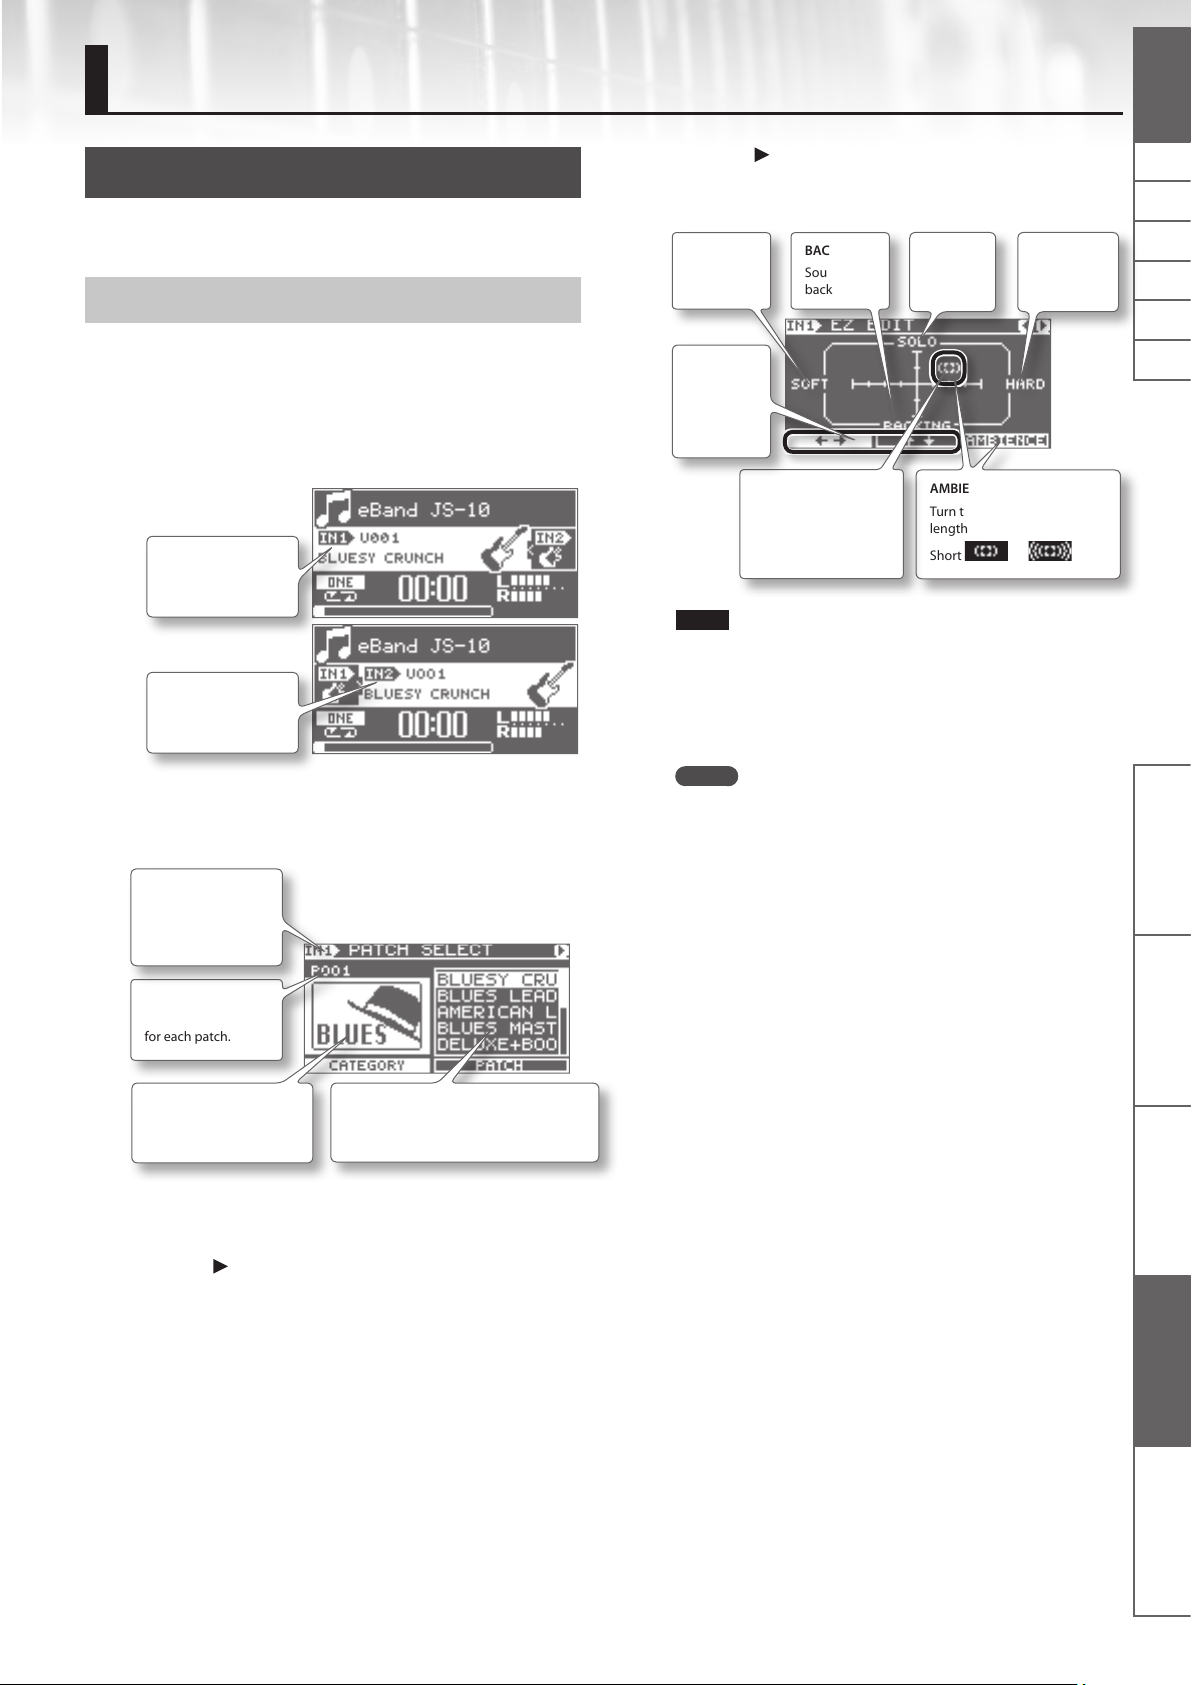
Visually Editing the Sound (EZ EDIT)
6. Press the [ ] (Cursor) button.
The EZ EDIT screen appears.
Set the parameters using the cursor and the Dial.
SOFT
Softens the
distortion.
BACKING
Sound for
backing.
SOLO
Sound for
solos.
HARD
Hardens the
distortion.
You can create sounds intuitively by using visual sound-shaping
grids (dual-axis graph), which allow you to adjust multiple
parameters with a single control.
1. Select which of the two available eects you want to edit.
Select “IN1” to edit the eect for the INPUT 1 jack and select “IN2” to
edit the eect for the INPUT 2 jack.
IN1
Eect for INPUT 1
jack.
IN2
Eect for INPUT 2
jack.
2. Press the [EFFECTS] button.
The PATCH SELECT screen appears.
IN1 / IN2
Displays the input
jack number for the
eect that is set.
Patch number
Displays the number
for each patch.
/
Select
which way
to move
the cursor.
Cursor
Turn the Dial to move
the cursor in the
direction selected with
/ .
NOTE
If you switch patches before saving an edited eect, the edited
information will be lost.
The edited information will also be lost if you switch songs with
the PATCH SYNC parameter set to ON, because the patches will
be switched at the same time.
To save the edited information, refer to “Saving Patches” (p. 19).
MEMO
You can edit patches even more precisely. Refer to “Advanced
Editing of Sounds (PATCH EDIT)” (p. 18).
AMBIENCE
Turn the Dial to adjust the
length of the reverb.
Short
. . . Long
NlPtEsItFrDeEnglish
Panel Descriptions Play the Guitar with Songs
as Your Backing
CATEGORY
Basic music style of the
eect.
PATCH
Combinations of multiple eects and
saved settings (patches).
3. Select the category of the sound you want to create from
CATEGORY.
4. Press the [ ] (Cursor) button.
The cursor moves to PATCH.
5. Select the sound that is similar to what you have in mind
from PATCH.
eBand Song List Editor Convenient Functions Appendices
17
Page 20
Convenient Functions
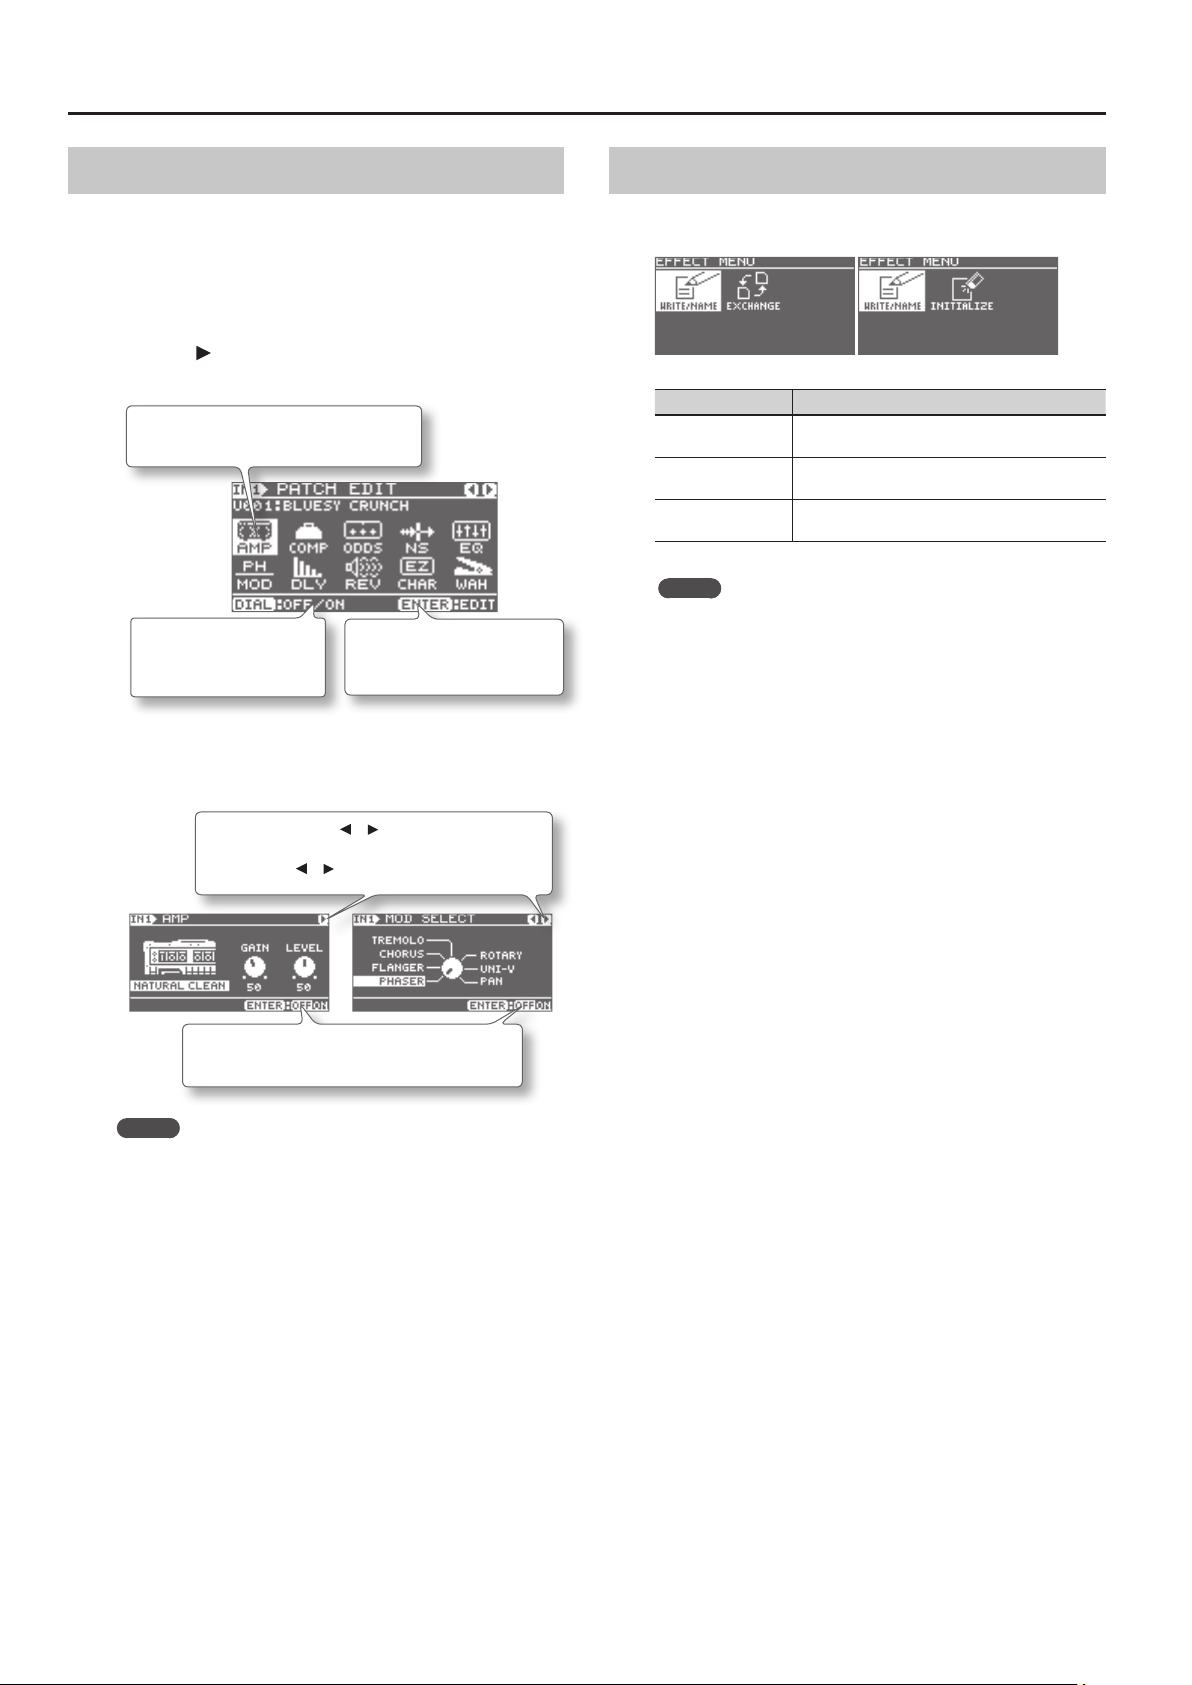
Advanced Editing of Sounds (PATCH EDIT)
Dierent combinations of multiple eects and settings are saved in
eect patches.
Here’s how to use PATCH EDIT to edit all parameters in these eects.
1. Follow the procedure in “Visually Editing the Sound (EZ
EDIT)” (p. 17) to display the EZ EDIT screen.
2. Press the [ ] (Cursor) button a number of times.
The PATCH EDIT screen appears.
Cursor
Select the eect that you want to edit.
DIAL
Turn the Dial to switch the
selected eect ON and OFF.
3. Press the [ENTER] button.
A screen for editing eects appears (screenshots below are the AMP
screen and the MOD SELECT screen).
ENTER
Conrms the selected eect
(proceeds to Step 3).
MENU of an EFFECT screen
In the eects-related screens such as PATCH SELECT or PATCH EDIT,
press the [MENU] button to display the EFFECT MENU screen.
EFFECT MENU Explanation
WRITE/NAME
EXCHANGE
INITIALIZE
MEMO
The displayed MENU items dier depending on the screen or
the location of the cursor.
Saves the patch currently being edited (or copies
the currently selected patch).
Exchanges the currently selected patch with
another patch.
Restores the eect settings to their default factory
state.
Move Page Symbols ( ) ( )
When these symbols are displayed, other edit screens
appear when [
ENTER
Switches the eect ON and OFF.
MEMO
• You can display the AMP screen by pressing the [AMP] button
on the front panel.
• For details on parameters in eects, refer to “Eect Parameter
List” (p. 31).
] [ ] (cursor) buttons are pressed.
18
Page 21
Convenient Functions
Saving Patches
Saving the eect settings as patches allows you to call them up
anytime.
NOTE
If you switch the edited eect settings without saving or switch
the songs, the edited information will be lost.
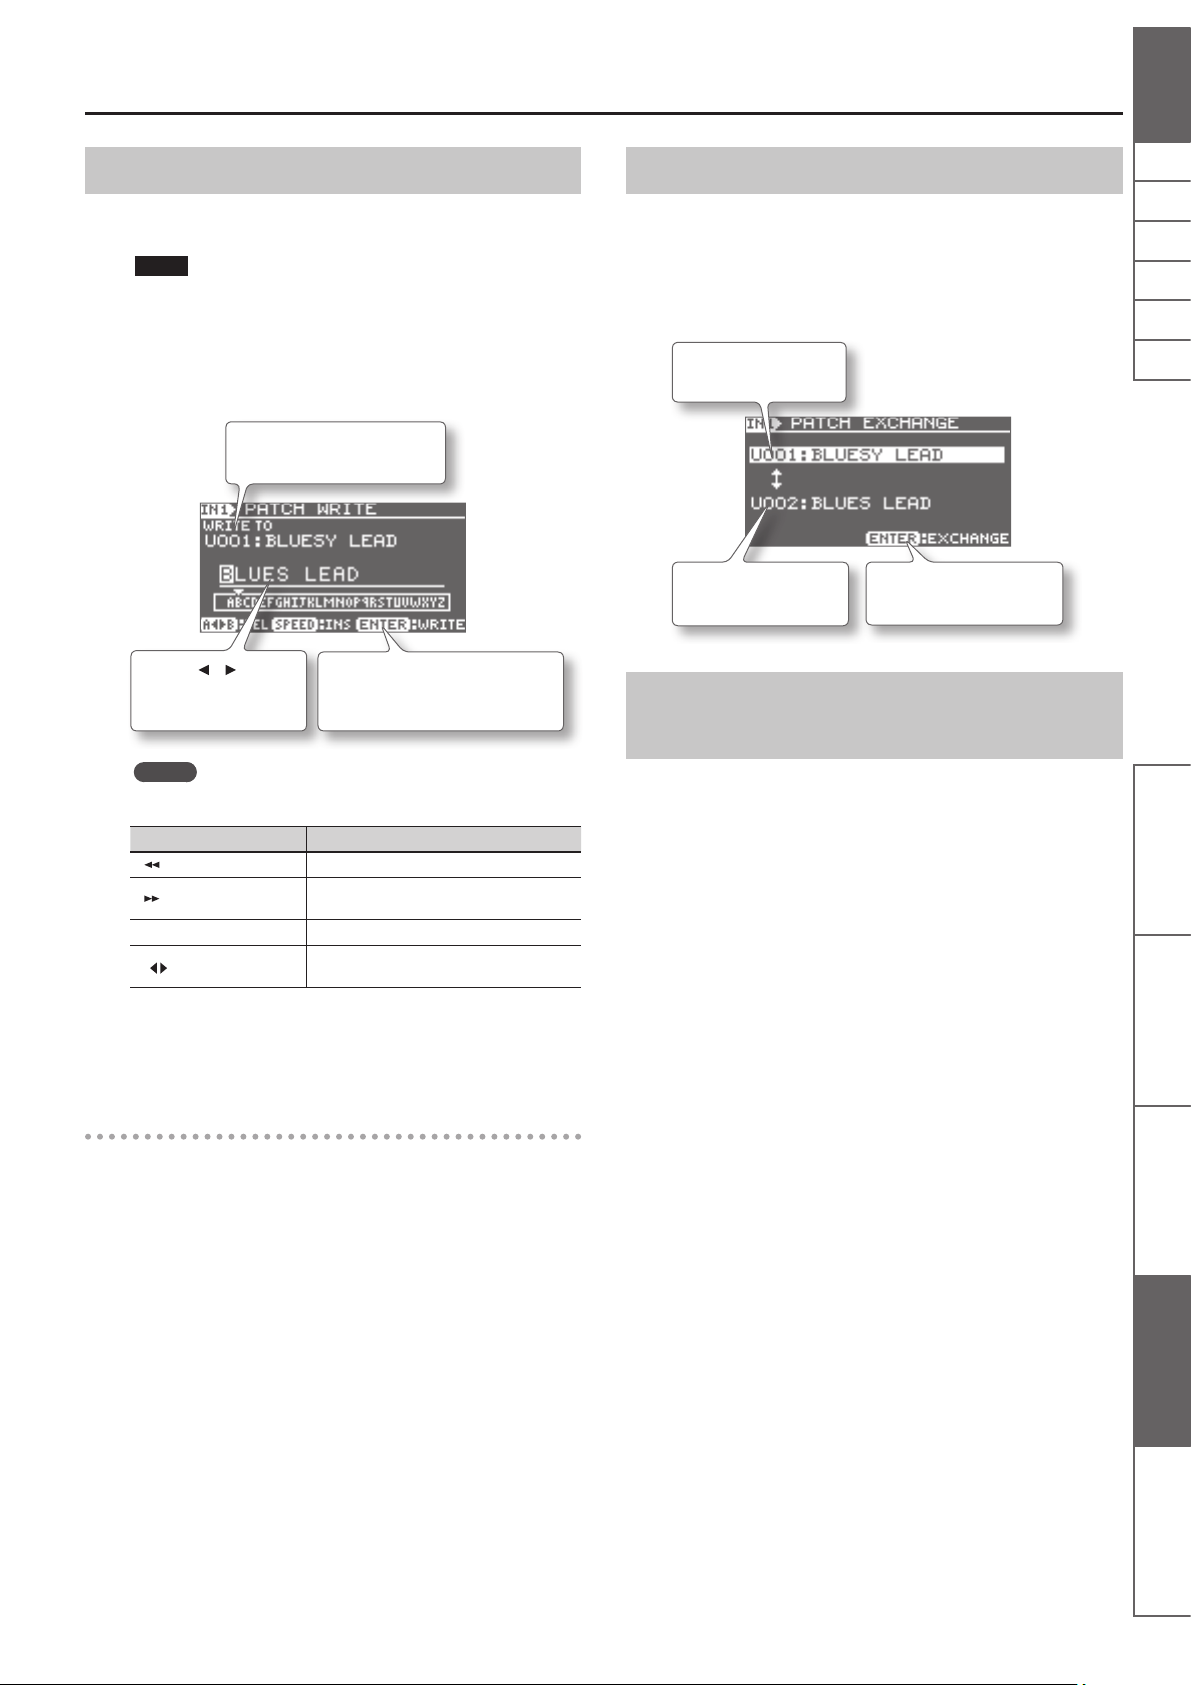
1. In a screen for editing eects, follow this sequence of
steps: [MENU] button “WRITE/NAME” [ENTER] button.
The PATCH WRITE screen appears.
Select the patch number (U001–
U100) of the save destination.
Use the [ ] [ ] (Cursor)
buttons and the Dial to
specify names.
MEMO
Use the following buttons to delete text or insert spaces.
Button Explanation
] (Rewind) button
[
[
] (Fast Forward) button
[SPEED] button Inserts a blank space at the cursor position.
B] button
[A
ENTER
Current eect settings will be saved
at the selected patch number.
Switch between uppercase and lowercase.
Switch the character type (letters/numbers/
symbols).
Deletes the character and shifts the
characters that follow to the left.
Exchanging Two Patches (EXCHANGE)
You can exchange the current patch number with another patch
number.
1. In the PATCH SELECT screen, follow this sequence of steps:
[MENU] button “EXCHANGE” [ENTER] button.
The PATCH EXCHANGE screen appears.
Select the patch number
you want to replace.
Patch number currently
selected
ENTER
Replaces the patch number.
Initializing the Eect Settings
(INITIALIZE)
Initializing an eect sets the eect settings to their standard values.
Use this function when you want to create an eect patch from
scratch.
1. In a screen for editing eects, follow this sequence of
steps: [MENU] button “INITIALIZE” [ENTER] button.
The message “Are you sure?” appears.
2. Press the [ENTER] button.
The eects settings will be set to standard values.
NlPtEsItFrDeEnglish
Panel Descriptions Play the Guitar with Songs
as Your Backing
2. Press the [ENTER] button.
The eect will be saved.
Copying a patch
Call up the patch (p. 10) you want to copy, and then save that patch
under a dierent patch number, as shown in “Saving Patches” (p. 19).
eBand Song List Editor Convenient Functions Appendices
19
Page 22
Convenient Functions
Backing Up Data on an SD Card to a PC (BACK UP)
Here’s how to back up data on an SD card to your PC.
MEMO
The description of computer procedures will use My Computer
(or Computer) with Windows and Finder with the Mac OS.
1. Follow the procedure in “Changing the Function of the
USB COMPUTER Port” (p. 24) and set USB MODE to “eBand
SONG LIST EDITOR.”
2. Connect the PC to the JS-10 with a USB cable.
USB COMPUTER portUSB port
3. Using your PC, locate the folders inside “JS-10 EBAND.”
MEMO
“Removable Disk (*:)” may appear instead of the “JS-10 EBAND”
icon.
4. Copy (drag and drop) the entire ROLAND folder within the
“JS-10 EBAND” icon to a folder on the PC.
NOTE
Copy the entire ROLAND folder. Copying only parts of the
ROLAND folder may render the data unusable as backup data.
5. Disconnect the JS-10 from the PC.
• For Windows 7
In the lower right of your screen, click the [
and then click “Eject JS-10 EBAND.”
• For Windows Vista/XP
In the lower right of your screen, click the [
and then click “Safely remove USB Mass Storage Device.”
• For Mac OS
Drag the “JS-10 EBAND” icon to the eject icon in the Dock.
] icon [ ] icon,
] icon ([ ] in XP)
Recovering Data Backed Up on a PC to the SD Card (RECOVERY)
Use this procedure to restore the JS-10 data previously backed up
on a PC to the SD card.
MEMO
The description of computer procedures will use My Computer
(or Computer) with Windows and Finder with the Mac OS.
1. Follow the procedure in “Changing the Function of the
USB COMPUTER Port” (p. 24) and set USB MODE to “eBand
SONG LIST EDITOR.”
2. Connect the PC to the JS-10 with a USB cable.
3. Open the “JS-10 EBAND” icon, and put the ROLAND folder
into the trash (delete it).
MEMO
“Removable Disk (*:)” may appear instead of the “JS-10 EBAND”
icon.
4. Copy (drag and drop) the entire backed up ROLAND folder
on the PC to the “JS-10 EBAND” icon and drop it there.
NOTE
• Recovering (copying) backed up data on PC to an SD card results
in the loss of the content of the card prior to the recovery,
restoring the card with the data at the time the data was backed
up.
• Copy the entire ROLAND folder. Copying only parts of the
ROLAND folder may render the data unusable as backup data.
• When recovering the backed up data, be sure to exit eBand
Song List Editor.
5. Disconnect the JS-10 from the PC.
• For Windows 7
In the lower right of your screen, click the [
and then click “Eject JS-10 EBAND.”
• For Windows Vista/XP
In the lower right of your screen, click the [
and then click “Safely remove USB Mass Storage Device.”
• For Mac OS
Drag the “JS-10 EBAND” icon to the eject icon in the Dock.
6. Press the [EXIT] button.
The message “Are you sure?” appears.
7. To end the connection, press the [ENTER] button on the
JS-10.
] icon [ ] icon,
] icon ([ ] in XP)
MEMO
You can back up eect patches to an SD card. For details, refer to
“Backing Up Eect User Patches to an SD Card” (p. 24).
6. Press the [EXIT] button.
The message “Are you sure?” appears.
7. To end the connection, press the [ENTER] button on the
JS-10.
20
Page 23
Convenient Functions
Changing the Parameters of Songs
Songs contain the information shown below in addition to audio
data.
• Playback volume settings
• Song protection settings
• Key settings
This information can be displayed or changed.
MEMO
You cannot change the parameters of songs saved on a USB
ash drive.
1. Select a song.
2. Follow this sequence of steps: [MENU] button “SONG”
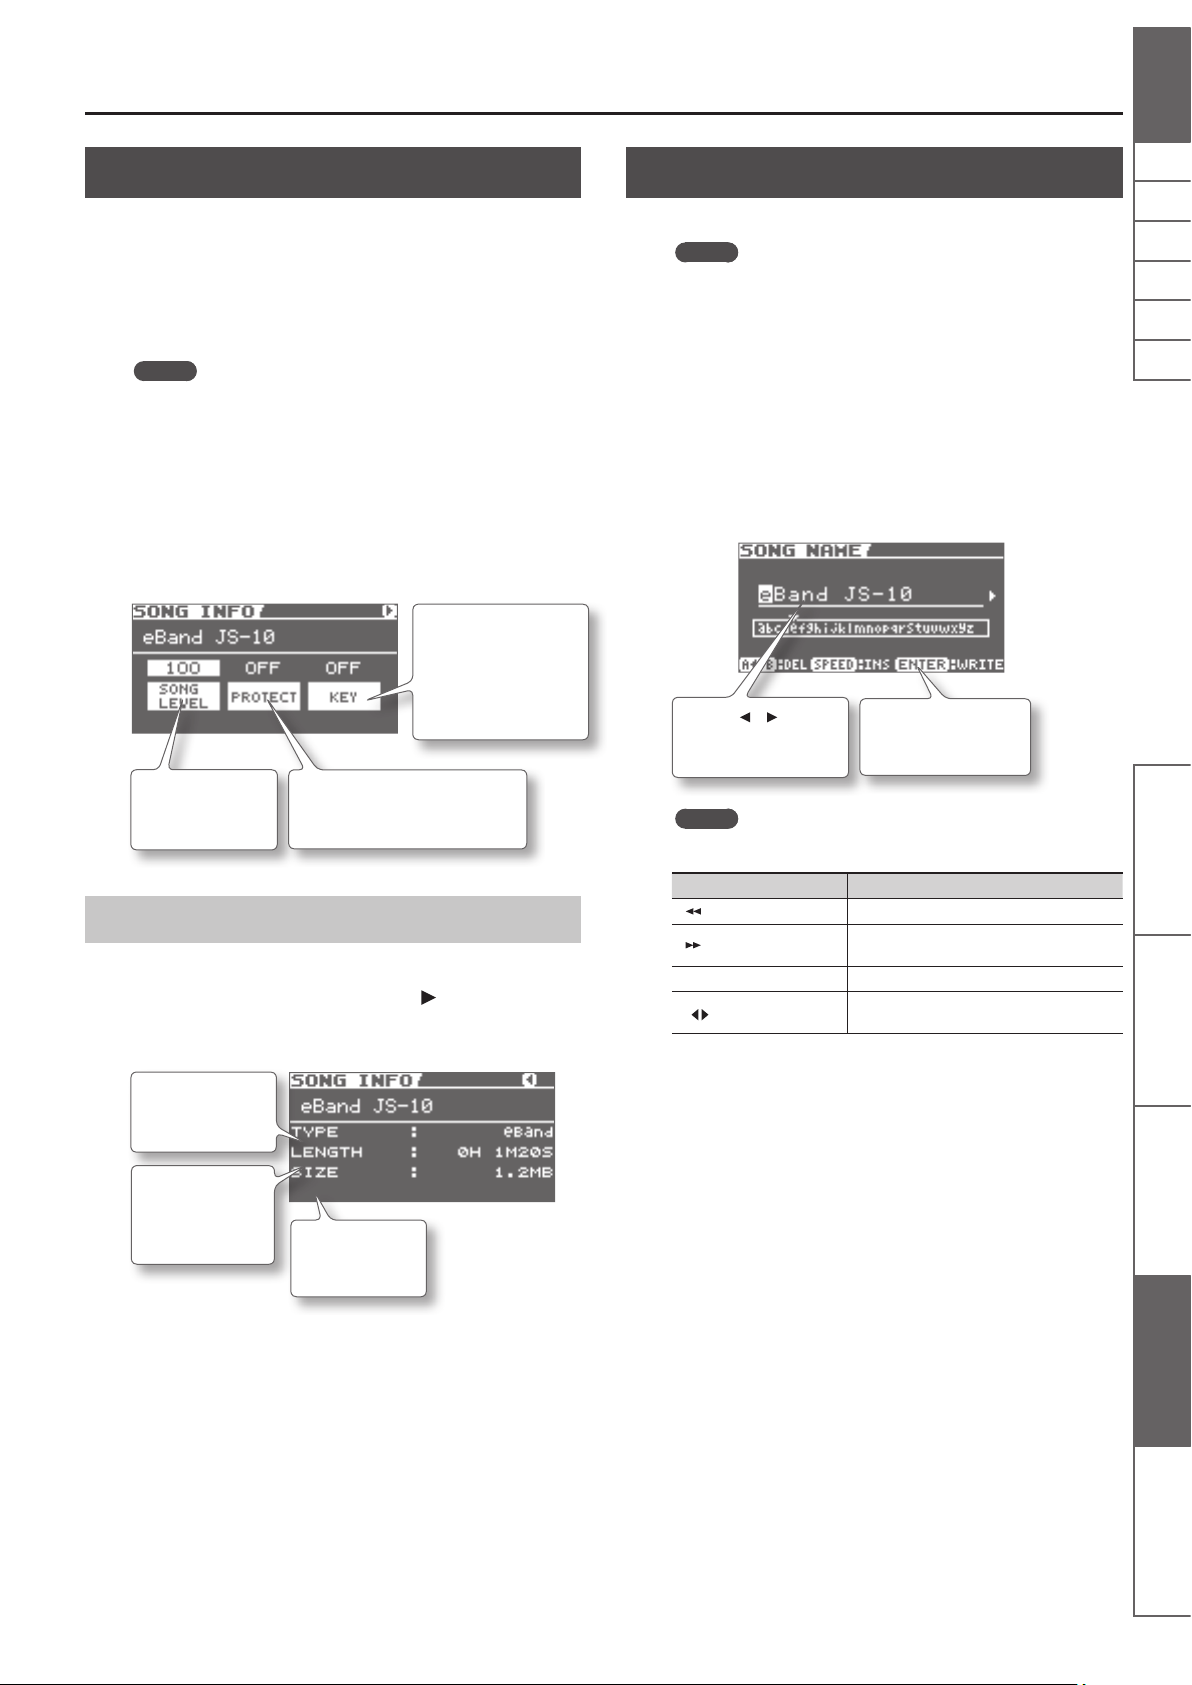
[ENTER] button “SONG INFO” [ENTER] button.
The SONG INFO screen appears.
3. Change the settings.
KEY
You can have the key be
displayed (p. 11) in front
of the song name. This
allows you to quickly
check the key of a song.
SONG LEVEL
Set the volume for
playing back songs.
PROTECT
If this is ON, you can protect songs
from changes or deletion.
Naming Songs
Here’s how to name songs or change their names.
MEMO
If you used the eBand Song List Editor to edit song information
(p. 16), rip songs (p. 15), or import songs (p. 22), then you cannot
add or change the name of these songs using the following
procedure. When you want to add or change the name of that
song, use eBand Song List Editor.
1. Select a song.
2. Follow this sequence of steps: [MENU] button “SONG”
[ENTER] button “SONG NAME” [ENTER] button.
The SONG NAME screen appears.
3. Name the song.
Use the [ ] [ ] (Cursor)
buttons and the Dial to
specify names.
MEMO
Use the following buttons to delete text or insert spaces.
ENTER
The song is given a new
name.
NlPtEsItFrDeEnglish
Panel Descriptions Play the Guitar with Songs
View the Song Information
You can display information for the selected song.
1. On the SONG INFO screen, press the [ ] (Cursor) button a
number of times.
The SONG INFO screen appears.
TYPE
Displays the type of
songs.
LENGTH
Displays the length
(hour:min:sec) of
songs.
SIZE
Displays the size
of songs.
Button Explanation
] (Rewind) button
[
[
] (Fast Forward) button
[SPEED] button Inserts a blank space at the cursor position.
B] button
[A
Switch between uppercase and lowercase.
Switch the character type (letters/numbers/
symbols).
Deletes the character and shifts the
characters that follow to the left.
4. Press the [ENTER] button.
The message “Are you sure?” appears.
5. Press the [ENTER] button to conrm the name.
The song now has a new name.
as Your Backing
eBand Song List Editor Convenient Functions Appendices
21
Page 24

Convenient Functions
Writing Songs to a USB Flash Drive (Export)
You can export eBand songs saved on an SD card to a USB ash
drive.
1. Connect the USB ash drive to the USB MEMORY port.
2. Select a song in the JS-10.
3. Follow this sequence of steps: [MENU] button “SONG”
[ENTER] button “EXPORT” [ENTER] button.
The SONG EXPORT screen appears.
MEMO
The “EXPORT” menu is not displayed if the USB ash drive has
not been inserted.
4. Press the [ENTER] button to export the songs.
The song will be written to the USB ash drive.
Importing Songs in the USB Flash Drive to the JS-10 (Import)
Changing the Patch When the Song is Switched (PATCH SYNC)
If a patch number is set for a song in advance, you can call up that
patch number automatically when the song is switched.
MEMO
The PATCH SYNC function cannot be used for songs in the USB
ash drive.
1. Follow this sequence of steps: [MENU] button “PATCH
SYNC” [ENTER] button.
The PATCH SYNC screen appears.
2. Apply the settings for PATCH SYNC.
Set the patch number at IN1 for INPUT 1’s eect, and IN2 for INPUT
2’s eect.
IN1/IN2 Explanation
OFF The patch will not change when you switch songs.
P***
U***
Calls up the specied preset patch number when the
song is switched.
Calls up the specied user patch number when the
song is switched.
You can import songs in the USB ash drive to the JS-10.
1. Connect the USB ash drive to the USB MEMORY port.
2. Select a song in the USB ash drive.
3. Follow this sequence of steps: [MENU] button “SONG”
[ENTER] button “IMPORT” [ENTER] button.
The SONG IMPORT screen appears.
MEMO
The “IMPORT” menu is not displayed if a song on the USB ash
drive has not been selected.
4. Press the [ENTER] button.
The song will be saved as USER on the SD card.
MEMO
For details about the memory conguration in the JS-10 or the
data that is saved, refer to “Memory Conguration in the JS-10”
(p. 38).
Disabling the PATCH SYNC function
You can switch the JS-10 PATCH SYNC function ON and OFF. Set it
to OFF if you want the patch number set in PATCH SYNC to always
be ignored.
1. Press the [ENTER] button on the PATCH SYNC screen.
Press the [ENTER] button to alternately switch it ON and OFF.
SYNC SW Explanation
OFF
ON
The PATCH SYNC function is disabled.
The patch number set in PATCH SYNC will be ignored,
and the current eect setting will be used.
The PATCH SYNC function is enabled.
When you switch a song, the patch changes to the
number set in PATCH SYNC.
Setting Current Patch in PATCH SYNC
You can set the patch number of the current eect in PATCH SYNC.
1. Align the cursor with either the IN1 patch number or the
IN2 patch number on the PATCH SYNC screen.
Align the cursor with the eect you want to add to PATCH SYNC.
22
2. Press the [SPEED] button.
The current patch number is set in PATCH SYNC. The next time
you switch to this song, the patch number set will be called up
automatically.
Page 25

Convenient Functions
Specifying Audio Settings
Here’s how to specify the settings related to the input and output
of audio.
Switching the INPUT Jack Sensitivity
Select the input sensitivity that matches the device connected to
the JS-10’s INPUT 1 and INPUT 2 (GUITAR/MIC) jacks.
1. Follow this sequence of steps: [MENU] button “AUDIO
SETTING” [ENTER] button “INPUT” [ENTER] button.
The INPUT screen appears.
PAN
Set the pan eect
for the input sound
to INPUT jack.
GAIN
Set the input sensitivity.
GAIN Explanation
Select when a guitar is connected to INPUT jack.
Select when a mic is connected to INPUT jack.
Adjusting the Balance of Low to High Frequency Ranges (Global EQ)
Here’s how to apply the equalizer to the overall sound of the JS-10
and adjust its balance.
1. Follow this sequence of steps: [MENU] button “AUDIO
SETTING” [ENTER] button “EQ” [ENTER] button.
The GLOBAL EQ screen appears.
2. Apply the GAIN setting for each band.
GLOBAL EQ Explanation
LOW GAIN Adjusts the low-end volume.
MID GAIN Adjusts the midrange volume.
HIGH GAIN Adjusts the high-end volume.
MEMO
Press the [ENTER] button in the GLOBAL EQ screen to turn the
equalizer on and o.
NlPtEsItFrDeEnglish
Panel Descriptions Play the Guitar with Songs
MEMO
The Input Sensitivity icon displayed on the top screen changes
according to the GAIN settings.
Input Sensitivity Icon
* When setting the GAIN to mic, be sure to check that the eect
from the microphone category is selected beforehand.
* Howling (feedback) is produced if you set the GAIN to mic while
a guitar eect is selected.
* Also, if you switch from a factory default song, the guitar eect
may change automatically to the eect set in PATCH SYNC (p. 22)
and produce sudden howling (feedback). If this is the case, set
the PATCH SYNC’s SYNC SW setting to OFF so that the patch is
not allowed to switch.
Turning O the JS-10 Speakers
You can output audio from the JS-10’s LINE OUT jacks to an external
playback device (e.g., component stereo system). When doing so,
you may want to turn o the JS-10’s internal speakers.
1. Follow this sequence of steps: [MENU] button “AUDIO
SETTING” [ENTER] button “SPEAKER” [ENTER]
button.
Apply the settings for SPEAKER SW.
SPEAKER SW Explanation
OFF No sound will be produced by the internal speakers.
ON The sound will be produced by the internal speakers.
MEMO
The tone quality of sound output from the OUTPUT jack
changes based on the SPEAKER SW settings. This does not
indicate a malfunction.
as Your Backing
eBand Song List Editor Convenient Functions Appendices
23
Page 26
Convenient Functions
System Settings for the JS-10
You can make a variety of settings for the JS-10 in the SYSTEM
screen.
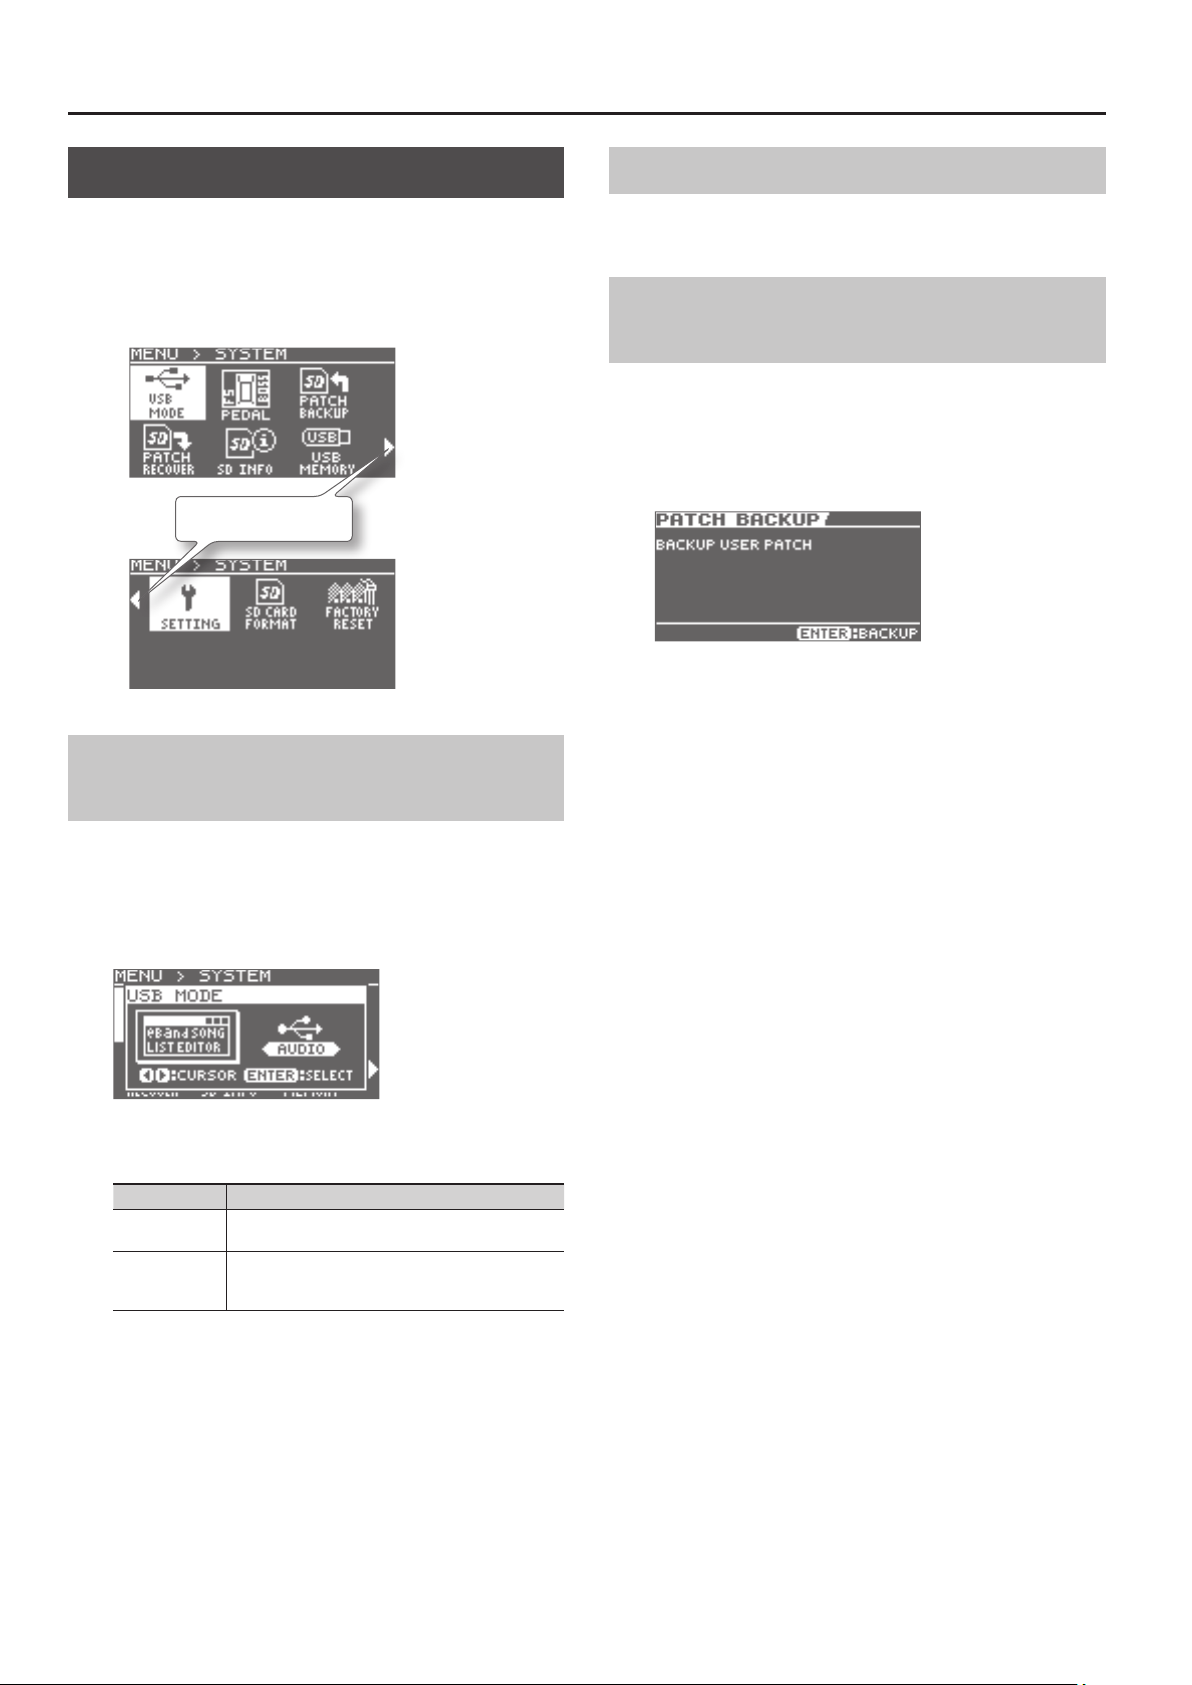
1. Follow this sequence of steps: [MENU] button
“SYSTEM” [ENTER] button.
The MENU > SYSTEM screen appears.
Switch the page display.
Changing the Function of the USB COMPUTER Port
Allocating Functions to Footswitches
You can assign functions to pedals connected to the JS-10.
Refer to “Using Footswitches and Expression Pedals” (p. 30).
Backing Up Eect User Patches to an SD
Card
You can back up eect user patches saved on the JS-10 to an SD
card.
1. On the MENU > SYSTEM screen, follow this sequence of
steps: “PATCH BACKUP” [ENTER] button.
The PATCH BACKUP screen appears.
2. Press the [ENTER] button.
The message “Are you sure?” appears.
3. Press the [ENTER] button to back up the patch.
The eect settings will be backed up.
Here’s how to select the function of the JS-10’s USB COMPUTER
port.
1. On the MENU > SYSTEM screen, follow this sequence of
steps: “USB MODE” [ENTER] button.
The USB MODE popup appears.
2. Specify the setting for USB MODE.
USB MODE Explanation
eBand SONG
LIST EDITOR
AUDIO
Select this option when using eBand Song List Editor
(p. 13).
Select this option when using the JS-10 to listen to PC
sound or when using PC software to record the JS-10
sound (p. 27).
3. Press the [ENTER] button.
24
Page 27
Convenient Functions
Restoring Eect User Patches Backed Up
on the SD Card
You can restore eect user patches backed up on the SD card.
1. On the MENU > SYSTEM screen, follow this sequence of
steps: “PATCH RECOVER” [ENTER] button.
The PATCH RECOVER screen appears.
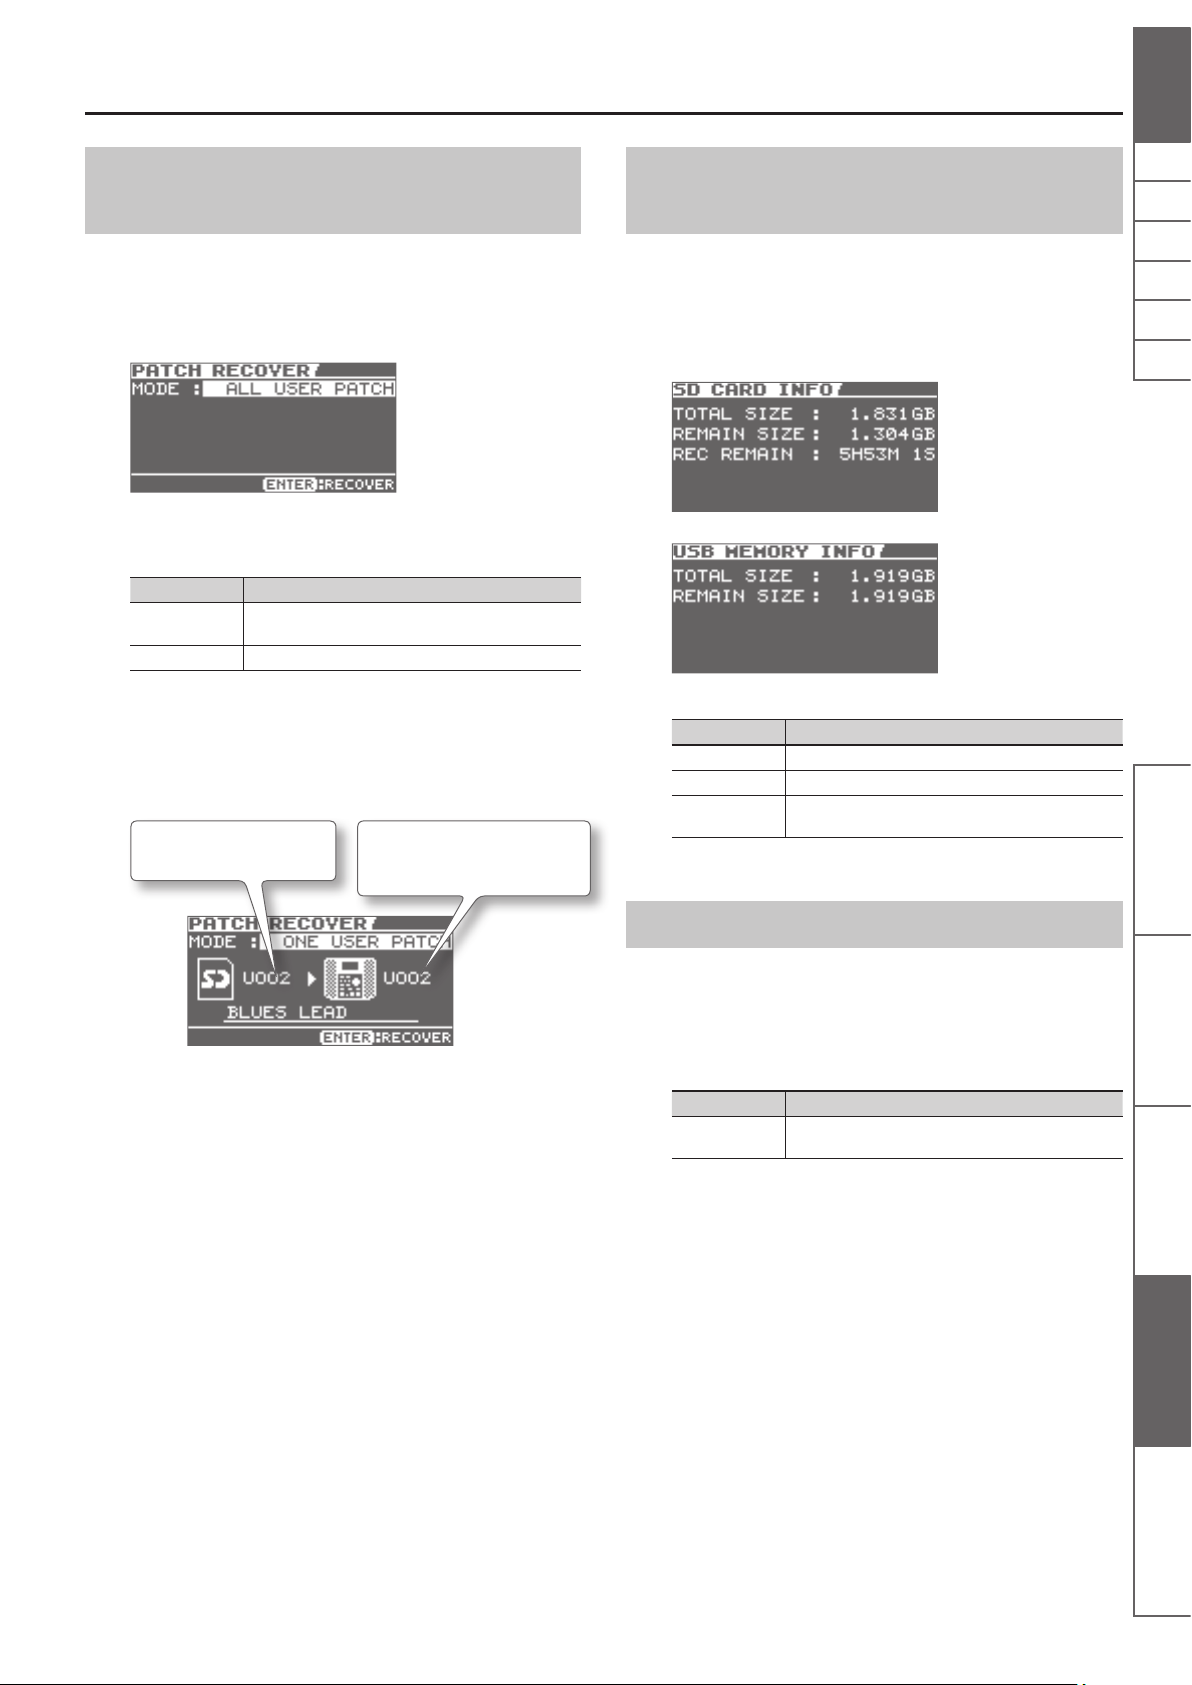
2. Specify the setting for MODE.
MODE Explanation
ALL USER PATCH
ONE USER PATCH Only the specied user patch is restored to the JS-10.
2-1. If you selected ONE USER PATCH, then select the
Select the patch number you
want to restore.
All user patches that were backed up will be restored to
the JS-10.
user patch number you want to restore and the
user patch number where you want it restored.
Select the patch number (restore
destination) in the JS-10 that you
want it restored to.
Viewing Free Space on the SD Card and the USB Flash Drive
You can check how much free space there is in the USB ash drive
and on the SD card inserted in the JS-10.
1. On the MENU > SYSTEM screen, follow this sequence of
steps: “SD INFO” or “USB MEMORY” [ENTER] button.
The SD CARD INFO (or the USB MEMORY INFO) screen appears.
Item Explanation
TOTAL SIZE Displays the total size of the memory.
REMAIN SIZE Displays the remaining free space in the memory.
REC REMAIN
Displays how much time you can record to the SD card
(applicable only in the SD INFO screen).
NlPtEsItFrDeEnglish
Panel Descriptions Play the Guitar with Songs
3. Press the [ENTER] button.
The message “Are you sure?” appears.
4. Press the [ENTER] button to restore the patch.
The user patch is restored to the JS-10.
Adjusting Display Contrast
You can adjust the contrast of the JS-10’s display.
1. On the MENU > SYSTEM screen, follow this sequence of
steps: “SETTING” [ENTER] button.
Specify the setting for LCD CONTRAST.
LCD CONTRAST Explanation
1–16
Adjusts the display contrast. The larger the number the
brighter the display becomes.
as Your Backing
eBand Song List Editor Convenient Functions Appendices
25
Page 28
Convenient Functions
Enabling Auto O
The JS-10 powers o automatically when there is no performance
or operation for 30 minutes (default factory setting). You can
change how long the JS-10 can remain inactive before it powers o
automatically.
NOTE
The settings will be lost if the power is turned o while editing.
Save the settings in advance to prevent this from happening.
1. On the MENU > SYSTEM screen, follow this sequence of
steps: “SETTING” [ENTER] button.
Specify the setting for AUTO OFF.
AUTO OFF Explanation
OFF Auto o is disabled.
10MIN, 30MIN,
240MIN
Set how long (in minutes) the JS-10 can remain inactive
before it powers o automatically.
Listing the Files on the SD Card as a Song List
You can change the setting to display the les saved on the SD card
as a list in the SONG LIST screen.
1. On the MENU > SYSTEM screen, follow this sequence of
steps: “SETTING” [ENTER] button.
Specify the setting for SD VIEW.
SD VIEW Explanation
OFF This setting is the default factory setting.
ON
“SD CARD” is displayed on the SEARCH screen in SONG
LIST. If you select “SD CARD,” les saved on the SD card
are displayed as a list.
Initializing an SD Card (FORMAT)
This procedure lets you the commercially available SD cards in
the JS-10.
Refer to “Initializing an SD card (FORMAT)” (p. 29).
Returning the JS-10’s Settings to Default Factory Settings
Here’s how to restore the parameters in the JS-10 to their original
default factory settings.
1. On the MENU > SYSTEM screen, follow this sequence of
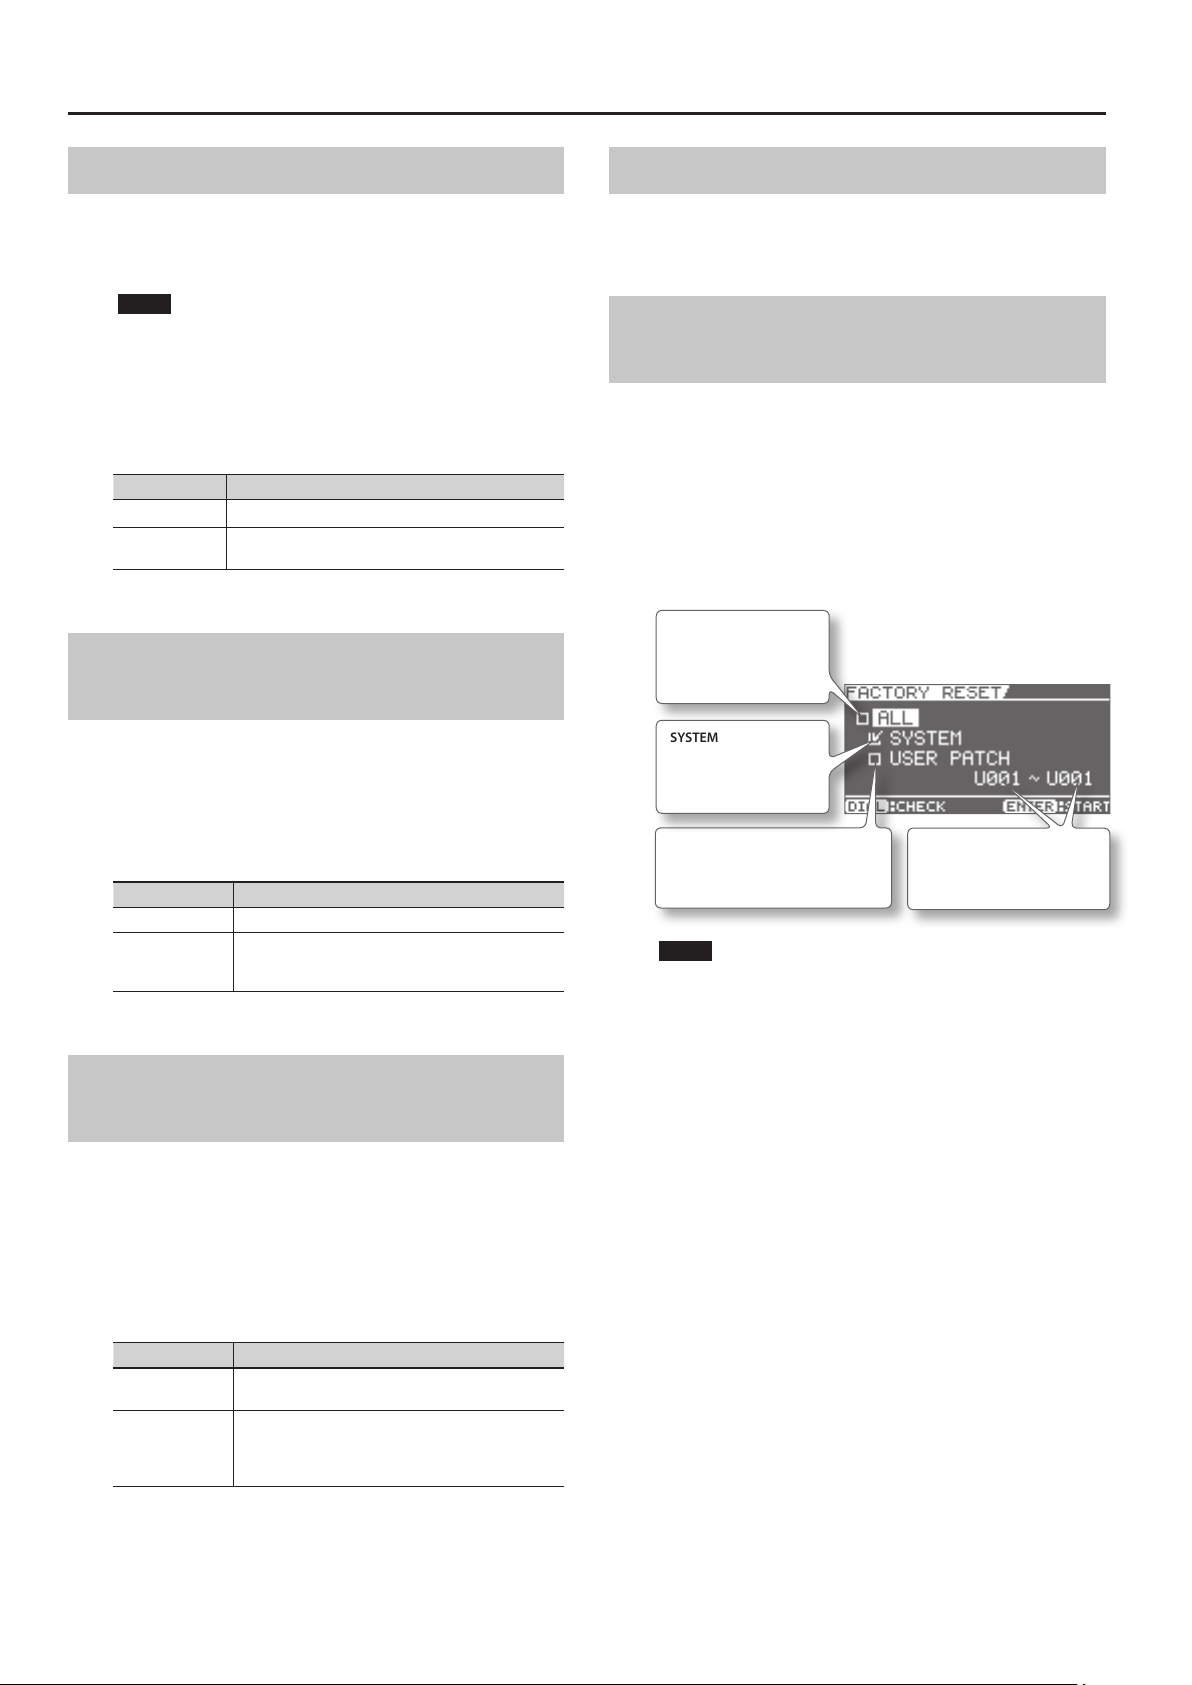
steps: “FACTORY RESET” [ENTER] button.
The FACTORY RESET screen appears.
2. Select the parameter (add checkmark) whose settings you
want to restore to the default factory settings.
ALL
Restores all parameters
to their default factory
settings.
SYSTEM
Restores the system
parameters to their
default factory settings.
USER PATCH
Restores the user eect patches to
their default factory settings.
NOTE
If you restore the default factory settings for the selected
parameters, previously saved settings will be lost.
Specify the range of user
patches to be restored to
their default factory settings.
Selecting the Sound Output from the USB COMPUTER Port
You can choose to output only the sound input from the INPUT 1
(GUITAR/MIC) jack or the INPUT 2 (GUTAR/MIC) jack from the USB
COMPUTER port or to output a mixed sound created by input from
the INPUT 2 (AUX) jack and the USB COMPUTER port (p. 38).
1. On the MENU > SYSTEM screen, follow this sequence of
steps: “SETTING” [ENTER] button.
Specify the setting for USB AUDIO OUT.
USB AUDIO OUT Explanation
INPUT
ALL
Outputs sound that is input to the INPUT 1 (GUITAR/
MIC) jack or the INPUT 2 (GUITAR/MIC) jack only.
Mixes and outputs all sounds that are input to the
INPUT 1 (GUITAR/MIC) jack, the INPUT 2 (GUITAR/MIC)
jack, the INPUT 2 (AUX) jack, and the USB COMPUTER
port.
3. Press the [ENTER] button.
The message “Are you sure?” appears.
4. To return to the default factory settings, follow this
sequence of steps: “OK” [ENTER] button.
The settings will return to the default factory settings.
26
Page 29
Using the JS-10 as a USB Audio Interfaces
You can use the JS-10 to listen to PC sound via USB and also use the
software on your PC to record the JS-10’s sound via USB.
Preparing a USB Driver
Convenient Functions
6. Disconnect the JS-10 from the PC.
• For Windows 7
In the lower right of your screen, click the [
and then click “Eject JS-10 EBAND.”
• For Windows Vista/XP
In the lower right of your screen, click the [
and then click “Safely remove USB Mass Storage Device.”
• For Mac OS
Drag the “JS-10 EBAND” icon to the eject icon in the Dock.
] icon [ ] icon,
] icon ([ ] in XP)
NlPtEsItFrDeEnglish
Save the USB driver les to your PC.
MEMO
• It is only necessary to install the USB driver on the PC the rst
time the driver is used.
• The USB driver le is included on the supplied SD card. The
latest version of the USB driver can be found on the Roland
website.
http://www.roland.com/support/
• You can install the driver on a Mac computer, but it needs to be
a model with an Intel processor.
• If the latest USB driver le is stored on your PC, proceed to
“Installing the USB Driver” (p. 27).
• The description of computer procedures will use My Computer
(or Computer) with Windows and Finder with the Mac OS.
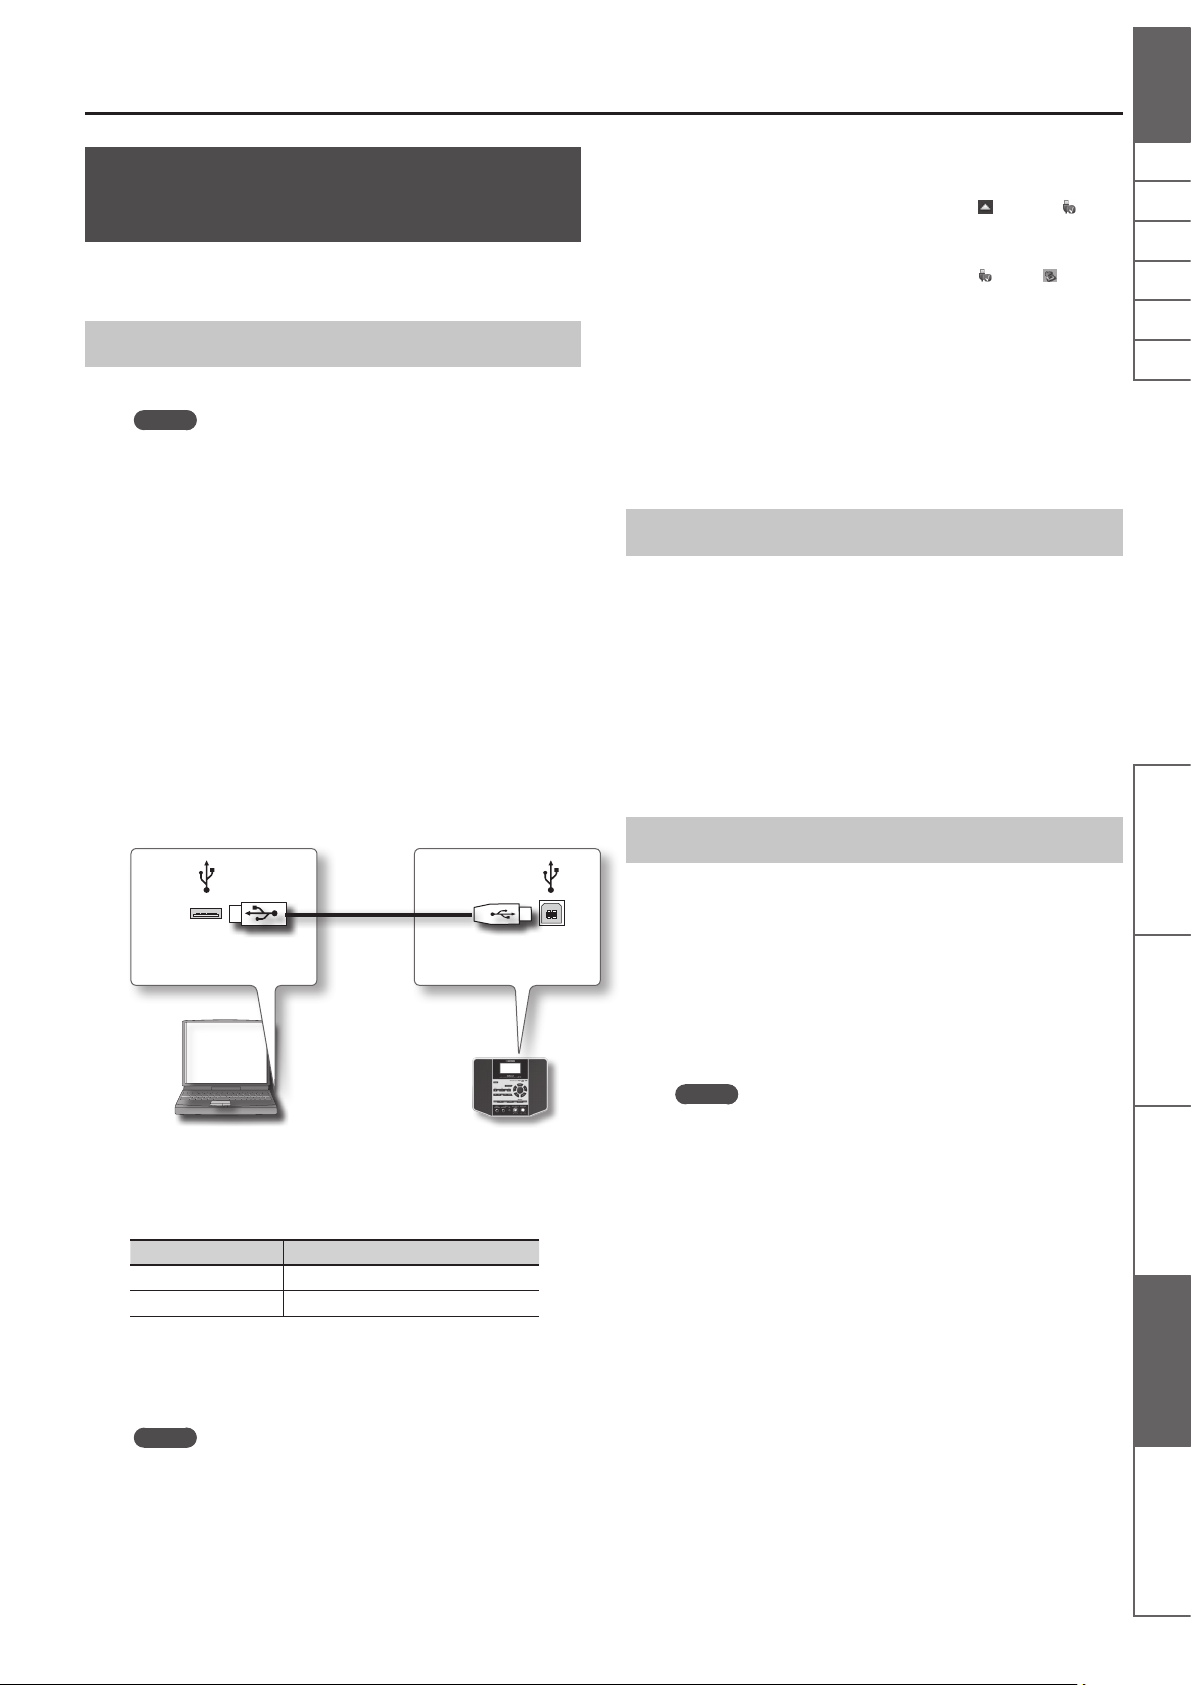
1. Follow the procedure in “Changing the Function of the
USB COMPUTER Port” (p. 24) and set USB MODE to “eBand
SONG LIST EDITOR.”
2. Connect the PC to the JS-10 with a USB cable.
USB COMPUTER portUSB port
7. Press the JS-10’s [EXIT] button.
The message “Are you sure?” appears.
8. To end the connection, press the [ENTER] button on the
JS-10.
Installing the USB Driver
Installation of the USB driver is done by using the USB driver le
stored in your PC.
1. Disconnect the USB cable from the JS-10.
2. Follow the procedure in “Changing the Function of the
USB COMPUTER Port” (p. 24) and set USB MODE to “AUDIO.”
A folder containing the USB driver will be created.
3. Read the “Readme.htm” le found in the created folder
and install the driver as directed.
Playing Songs on a PC Through the JS-10
You can play songs on a PC and use the JS-10’s speakers to listen to
them.
1. Follow the procedure in “Changing the Function of the
USB COMPUTER Port” (p. 24) and set USB MODE to “AUDIO.”
2. Connect the PC to the JS-10 with a USB cable.
Panel Descriptions Play the Guitar with Songs
as Your Backing
3. Using your PC, locate the folders inside “JS-10 EBAND.”
4. Double-click one of the les shown below.
File Name Supported OS
Win.zip Windows 7, Vista, or XP
Mac.dmg Mac OS
The contents of the le are displayed.
5. Copy a “Drivers” folder to your PC.
MEMO
We recommend that you copy to a folder that will be easy to
locate afterward.
3. Set the JS-10 as the output destination for audio played
back by the PC’s audio playback software.
MEMO
For instructions on how to switch the audio output destination,
refer to the user’s guide for the software you are using.
eBand Song List Editor Convenient Functions Appendices
27
Page 30
Convenient Functions
Using the Commercially Available SD Cards
In addition to the supplied SD card, you can also use commercially
available SD cards.
Specications for SD cards usable with the
JS-10
The JS-10 supports SD cards meeting the following specications.
• Capacity: 1–32 GB
• SD/SDHC standard
SD cards veried to work with the JS-10
Information on SD cards conrmed to work with the JS-10 can be
found on the Roland website.
http://www.roland.com/support/
MEMO
• The JS-10 supports SDHC cards.
• Some SD card types or SD cards from some manufacturers may
not record or play back properly on the JS-10.
SD card capacity and recording time
Replacing the SD Card
Here’s how to replace the supplied SD card with a dierent SD card.
NOTE
Never insert or remove an SD card or SDHC card while this unit
is turned on. Doing so may corrupt the unit’s data or the data on
the SD cards or SDHC cards.
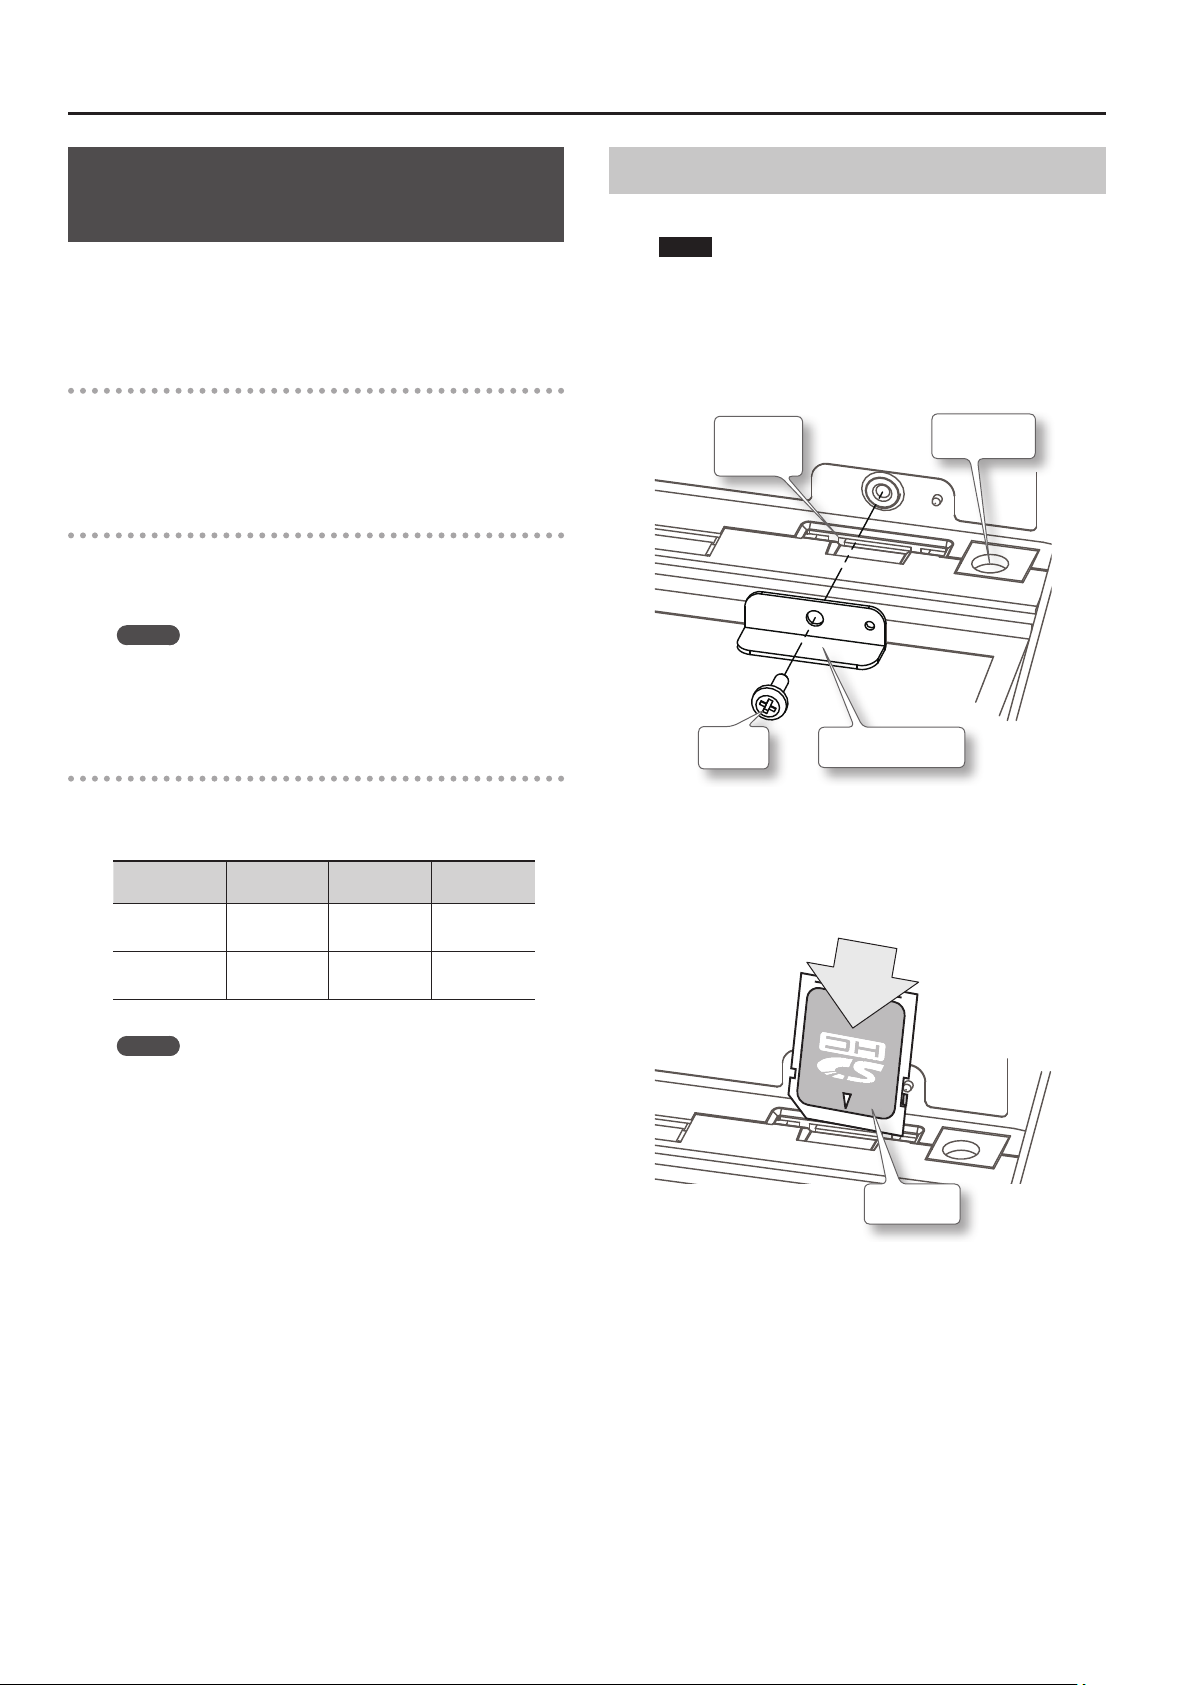
1. Press the [POWER] button to turn o the JS-10.
2. Remove the SD CARD slot cover.
SD CARD
slot
Screw
SD CARD slot cover
DC IN jack
The following table shows the approximate number of songs that
can be recorded on the JS-10 depending on the capacity of the SD
card.
Size
Songs per GB
32 GB
MEMO
• Figures in the table above are based on a song length of ve
minutes.
• Songs, USB drivers, and other data are stored on the supplied SD
card. Because of this, the number of songs that can be recorded
on the card is less than the numbers in the table above.
• MP3 songs are calculated as data encoded at a sampling rate of
44.1 kHz and a bit rate of 128 Kbps.
• WAV songs are based on stereo data with a sampling rate of
44.1 kHz and a quantization bit rate of 16 bits.
• The number of songs you can record may vary according to the
songs included.
• Regardless of the amount of free space available, the JS-10 can
only store a maximum of 4,000 songs.
With eBand
songs
50 songs
(4 hours)
1,700 songs
(130 hours)
With WAV With MP3
20 songs
(1.5 hours)
600 songs
(50 hours)
200 songs
(17 hours)
4,000 songs
(550 hours)
3. Push in the SD card and release your nger.
4. Remove the SD card.
5. Insert the new SD card into the JS-10.
Push inward.
SD card
6. Put the SD CARD slot cover back on.
28
Page 31

About the SD card write protect function (LOCK)
Convenient Functions
The contents of the SD card can be
protected by write protecting it. To write
protect a card, slide the write protect
switch on the side of the SD card to
the “LOCK” position. To use the JS-10
functions, release the LOCK.
Write protect switch
Initializing an SD card (FORMAT)
This procedure lets use the commercially available SD cards in the
JS-10.
NOTE
• The supplied SD card cannot be initialized (formatted) using the
JS-10, to protect its content. If you initialize the supplied SD card
with your PC, songs, USB drivers, and eBand Song List Editor on
the card will all be lost. Song protection settings will be ignored.
• Since there is no way to recover data after initialization, be sure
to back up any important data before initializing the card (p. 20).
1. Follow this sequence of steps: [MENU] button
“SYSTEM” [ENTER] button “SD CARD FORMAT”
[ENTER] button.
The SD CARD FORMAT screen appears.
2. Press the [ENTER] button.
The message “Are you sure?” appears.
NlPtEsItFrDeEnglish
Panel Descriptions Play the Guitar with Songs
3. To initialize the SD card, follow this sequence of steps:
“OK” [ENTER] button.
The SD card will be initialized.
MEMO
Follow the procedure below to copy data from one SD card to
another freshly initialized SD card.
3-1. Back up the rst SD card (p. 20).
3-2. Restore the backed up data to the new SD card
(p. 20).
as Your Backing
eBand Song List Editor Convenient Functions Appendices
29
Page 32

Convenient Functions
Using Footswitches and Expression Pedals
You can connect two BOSS FS-5U (sold separately), a BOSS FS-6 (sold separately), or a Roland EV-5, etc. (sold separately) to perform a variety of
operations with your foot.
One of these can
be connected.
EXP PEDAL/CTL 1,2 jack
Stereo 1/4-inch phone type Stereo 1/4-inch phone type
Tip of the stereo 1/4-inch phone type
TIP
RING
1/4-inch phone type
1/4-inch phone type
When you connect an
EV-5, etc.
MEMO
• Never connect or disconnect a footswitch or expression pedal while this unit’s power is on.
• Use only the specied expression pedal (Roland EV-5; sold separately). By connecting any other expression pedal, you risk causing malfunction
and/or damage to the unit.
When you connect one FS-5U
OR OR
CTL1 CTL2CTL1 CTL1
POLARITY switch
When you connect two FS-5Us When you connect an FS-6
OR
CTL2
Stereo 1/4-inch phone type
MODE and POLARITY switches
1/4-inch phone type
x 2
Allocating Functions to Footswitches
1. Follow this sequence of steps: [MENU] button “SYSTEM”
[ENTER] button “PEDAL” [ENTER] button.
Set a function to CTL 1 or CTL 2.
CTL 1 / CTL 2 Explanation
PLAY/STOP Operate the player (Play/Stop).
REC/STOP Operate the recorder (Rec/Stop).
IN1 PATCH +1
IN1 PATCH -1
IN2 PATCH +1
IN2 PATCH -1
30
Switch the eect patch number for INPUT 1 (GUITAR/
MIC) jack (+1).
Switch the eect patch number for INPUT 1 (GUITAR/
MIC) jack (-1).
Switch the eect patch number for INPUT 2 (GUITAR/
MIC) jack (+1).
Switch the eect patch number for INPUT 2 (GUITAR/
MIC) jack (-1).
Functions you can control with expression
pedals
The function of the expression pedal (sold separately) changes
depending on whether the WAH eect for INPUT 1 is ON or OFF.
MEMO
Controls from the expression pedal work on the sound input to
the INPUT 1 jack.
WAH eect (p. 35 ) Expression pedal’s function
ON Operates as wah pedal for INPUT 1.
OFF Operates as volume pedal for INPUT 1.
Page 33

Appendices
Eect Parameter List
The product names mentioned in this document are registered
trademarks or trademarks of their respective owners. In this manual,
these names are used because it is the most practical way of
describing the sounds that are simulated using COSM technology.
AMP
COSM technology simulates dierent preamp characteristics,
speaker sizes, and cabinet shapes.
Parameter/
Range
ON/OFF
OFF, ON Turns the AMP eect on/o.
TYPE
This sets the type of the preamp.
NATURAL CLEAN
FULL RANGE
COMBO CRUNCH
STACK CRUNCH
HiGAIN STACK
POWER DRIVE
EXTREME LEAD
CORE METAL
JC-120 This models the sound of the Roland JC-120.
CLEAN TWIN This models a Fender Twin Reverb.
PRO CRUNCH This models a Fender Pro Reverb.
TWEED This models a Fender Bassman 4 x 10” Combo.
DELUXE CRUNCH This models a Fender Deluxe Reverb.
VO DRIVE
VO LEAD This models the lead sound of the VOX AC-30TB.
MATCH DRIVE
BG LEAD
BG DRIVE
MS1959 I
MS1959 I+II
R-FIER VINTAGE
Explanation
An unembellished, clean sound that minimizes the
amp’s idiosyncrasies, such as its trebly character and
boomy low end.
An amp with a broad frequency range and an extremely
at response.
Good for acoustic guitar.
Crunch sound that allows the nuances of your picking to
be expressed even more faithfully than on conventional
combo amps.
Great-feeling crunch sound that responds well to
picking dynamics while retaining all the dening
characteristics of a 4 x 12” speaker cabinet.
High-gain sound of a vintage Marshall specially
revamped in a way that is possible only with COSM
modeling technology.
A straight drive sound that works well in a broad range
of situations, from backing to lead. A sound like this
cannot be obtained from any existing combo amp or
stack amp.
A new type of sound that smoothes out the uneven
frequency response that is typical of existing large stack
amps.
A large stack sound that has been tweaked extensively
in the pursuit of the ultimate metal sound.
This models the drive sound of a VOX AC-30TB.
This is a sound that it suited to sixties-style British rock.
This models the sound input to left input on a Matchless
D/C-30. A simulation of the tube amp widely used in
styles from blues rock to fusion.
This models the lead sound of a MESA/Boogie combo
amp.
The sound of a tube amp typical of the late ‘70s to ‘80s.
This models a MESA/Boogie combo amp with TREBLE
SHIFT SW on.
This models the sound input to Input I on a Marshall
1959.
This is a trebly sound suited to hard rock.
The sound of connecting inputs I and II of the guitar
amp in parallel, creating a sound with a stronger low
end than I.
Models the sound of the Channel 2 VINTAGE Mode on
the MESA/Boogie DUAL Rectier.
Parameter/
Range
R-FIER MODERN
T-AMP LEAD This models a Hughes & Kettner Triamp AMP3.
SLDN
5150 DRIVE This models the lead channel of a Peavey EVH 5150.
BASS CLEAN Clean sound that is great for use with bass guitars.
BASS CRUNCH
BASS HIGAIN A high-gain sound suitable for use with bass guitars.
GAIN
0–120 Adjusts the distortion of the amp.
LEVEL
0–100
BASS
0–100 Adjusts the tone for the low frequency range.
MIDDLE
0–100 Adjusts the tone for the middle frequency range.
TREBLE
0–100 Adjusts the tone for the high frequency range.
PRESENCE
0–100 Adjusts the tone for the ultra high frequency range.
BRIGHT
Turns the bright setting on/o.
* The BRIGHT parameter setting is available only with certain PREAMP
TYPEs.
OFF Bright is not used.
ON Bright is switched on to create a lighter and crisper tone.
T-COMP
-10–+10 Adjusts the sense of tube compression of the amp.
Explanation
Models the sound of the Channel 2 MODERN Mode on
the MESA/Boogie DUAL Rectier.
This models a Soldano SLO-100. This is the typical sound
of the eighties.
Crunch sound with natural distortion that sounds great
with bass guitars.
Adjusts the volume of the entire preamp.
* Be careful not to raise the Level setting too high.
NlPtEsItFrDeEnglish
Panel Descriptions Play the Guitar with Songs
as Your Backing
eBand Song List Editor Convenient Functions Appendices
31
Page 34

Appendices
COMP/LIMITER
This is an eect that produces a long sustain by evening out the
volume level of the input signal. You can switch it to a limiter to
suppress only the sound peaks and prevent distortion.
Parameter/
Range
ON/OFF
OFF, ON Turns the COMP/LIMITER eect on/o.
TYPE
COMP The eect operates as a compressor.
LIMITER The eect operates as a limiter.
SUSTAIN *1
0–100
ATTACK *1
0–100
THRESHOLD *2
0–100
RELEASE *2
0–100
TONE
-50–+50 Adjusts the tone.
LEVEL
0–100 Adjusts the volume.
*1. Setting available when TYPE is set to COMP.
*2. Setting available when TYPE is set to LIMITER.
Explanation
Adjusts the range (time) over which low-level signals are
boosted. Larger values will result in longer sustain.
Adjusts the strength of the picking attack when the
strings are played. Higher values result in sharper attack,
creating a more clearly dened sound.
Adjust this as appropriate for the input signal from
your guitar. When the input signal level exceeds this
threshold level, limiting will be applied.
Adjusts the time from when the signal level drops below
the threshold until when limiting is removed.
OD/DS (Overdrive/Distortion)
This eect distorts the sound to create long sustain.
Parameter/
Range
ON/OFF
OFF, ON Turns the OD/DS eect on/o.
TYPE
Selects the type of distortion.
CLN BOOST
BLUES OD
OD-1
T-SCREAM This models an Ibanez TS-808.
DISTORTION This gives a basic, traditional distortion sound.
RAT This models a Proco RAT.
GUV DS This models a Marshall GUV’ NOR.
DST+ This models a MXR DISTORTION+.
METAL ZONE
‘60s FUZZ
OCT FUZZ This models an ACETONE FUZZ.
MUFF FUZZ This models an Electro-Harmonix big Mu π
DRIVE
0–120 Adjusts the depth of distortion.
BOTTOM
-50–+50
TONE
-50–+50 Adjusts the tone.
EFFECT LEVEL
0–100 Adjusts the volume of the eect sound.
Explanation
This not only functions as a booster, but also produces a
clean tone that has punch even when used alone.
This is a crunch sound of the BOSS BD-2.
This produces distortion that faithfully reproduces the
nuances of picking.
This is the sound of the BOSS OD-1.
This produces sweet, mild distortion.
This is the sound of the BOSS MT-2.
It produces a wide range of metal sounds, from old style
to slash metal.
This models a FUZZFACE.
It produces a fat fuzz sound.
Adjusts the tone for the low frequency range. Turning
this to the left (counterclockwise) produces a sound
with the low end cut; turning it to the right boosts the
low end in the sound.
32
Page 35

Appendices
NS (Noise Suppressor)
This eect reduces the noise and hum picked up by guitar pickups.
Since it suppresses the noise in synchronization with the envelope
of the guitar sound (the way in which the guitar sound decays over
time), it has very little eect on the guitar sound, and does not
harm the natural character of the sound.
Parameter/
Range
ON/OFF
OFF, ON Turns the NOISE SUPPRESSOR eect on/o.
THRESHOLD
0–100
Explanation
Adjust this parameter as appropriate for the volume of
the noise.
If the noise level is high, a higher setting is appropriate.
If the noise level is low, a lower setting is appropriate.
Adjust this value until the decay of the guitar sound is as
natural as possible.
* High settings for the threshold parameter may result
in there being no sound when you play with your
guitar volume turned down.
EQ (Equalizer)
This adjusts the tone as a equalizer. A parametric type is adopted
for the high-middle and low-middle range.
Parameter/
Range
ON/OFF
OFF, ON Turns the EQUALIZER eect on/o.
LOW GAIN
-20–+20dB Adjusts the low frequency range tone.
HIGH GAIN
-20–+20dB Adjusts the high frequency range tone.
LEVEL
-20–+20dB Adjusts the overall volume level of the equalizer.
LO-MID FREQ (Low Middle Frequency)
20.0Hz–10.0kHz
LO-MID Q (Low Middle Q)
0.5–16
LO-MID GAIN (Low Middle Gain)
-20–+20dB Adjusts the low-middle frequency range tone.
HI-MID FREQ (High Middle Frequency)
20.0Hz–10.0kHz
HI-MID Q (High Middle Q)
0.5–16
HI-MID GAIN (High Middle Gain)
-20–+20dB Adjusts the high-middle frequency range tone.
LOW CUT (Low Cut Filter)
FLAT, 20Hz–
800Hz
HIGH CUT (High Cut Filter)
630Hz–12.5kHz,
FLAT
Explanation
Species the center of the frequency range that will be
adjusted by the LO-MID GAIN.
Adjusts the width of the area aected by the EQ
centered at the LO-MID FREQ.
Higher values will narrow the area.
Species the center of the frequency range that will be
adjusted by the HI-MID GAIN.
Adjusts the width of the area aected by the EQ
centered at the HI-MID FREQ.
Higher values will narrow the area.
This sets the frequency at which the low cut lter begins
to take eect.
When “FLAT” is selected, the low cut lter will have no
eect.
This sets the frequency at which the high cut lter
begins to take eect. When “FLAT” is selected, the high
cut lter will have no eect.
MODULATION
Use MOD SELECT to select the eect that you want to use.
Parameter/
Range
ON/OFF
OFF, ON Turns the MODULATION eect on/o.
MOD SELECT (Modulation Select)
Select the modulation type.
PHASER Phaser p. 33
FLANGER Flanger p. 34
CHORUS Chorus p. 34
TREMOLO Tremolo p. 34
ROTARY Rotary p. 34
UNI-V Uni-Vibe p. 34
PAN Pan p. 34
PHASER
By adding varied-phase portions to the direct sound, the phaser
eect gives a whooshing, swirling character to the sound.
Parameter/
Range
TYPE
Selects the number of stages that the phaser eect will use.
4 STAGE
8 STAGE This is an eight-phase eect. It is a popular phaser eect.
12 STG
BI-PH.
RATE
0–100 (*) This sets the rate of the phaser eect.
DEPTH
0–100 Determines the depth of the phaser eect.
RESONANCE
0–100
Setting parameters with Tap Tempo
The values for the parameters marked with an asterisk (*) can
be set so they match the timing you use when pressing the
[SPEED] button (Tap Tempo).
Tap the [SPEED] button two or more times in succession to
specify a tempo for the parameter.
Explanation
Explanation
This is a four-phase eect. A light phaser eect is
obtained.
This is a twelve-phase eect. A deep phase eect is
obtained.
This is the phaser with two phase shift circuits
connected in series.
Determines the amount of resonance (feedback).
Increasing the value will emphasize the eect, creating
a more unusual sound.
NlPtEsItFrDeEnglish
Panel Descriptions Play the Guitar with Songs
as Your Backing
eBand Song List Editor Convenient Functions Appendices
33
Page 36
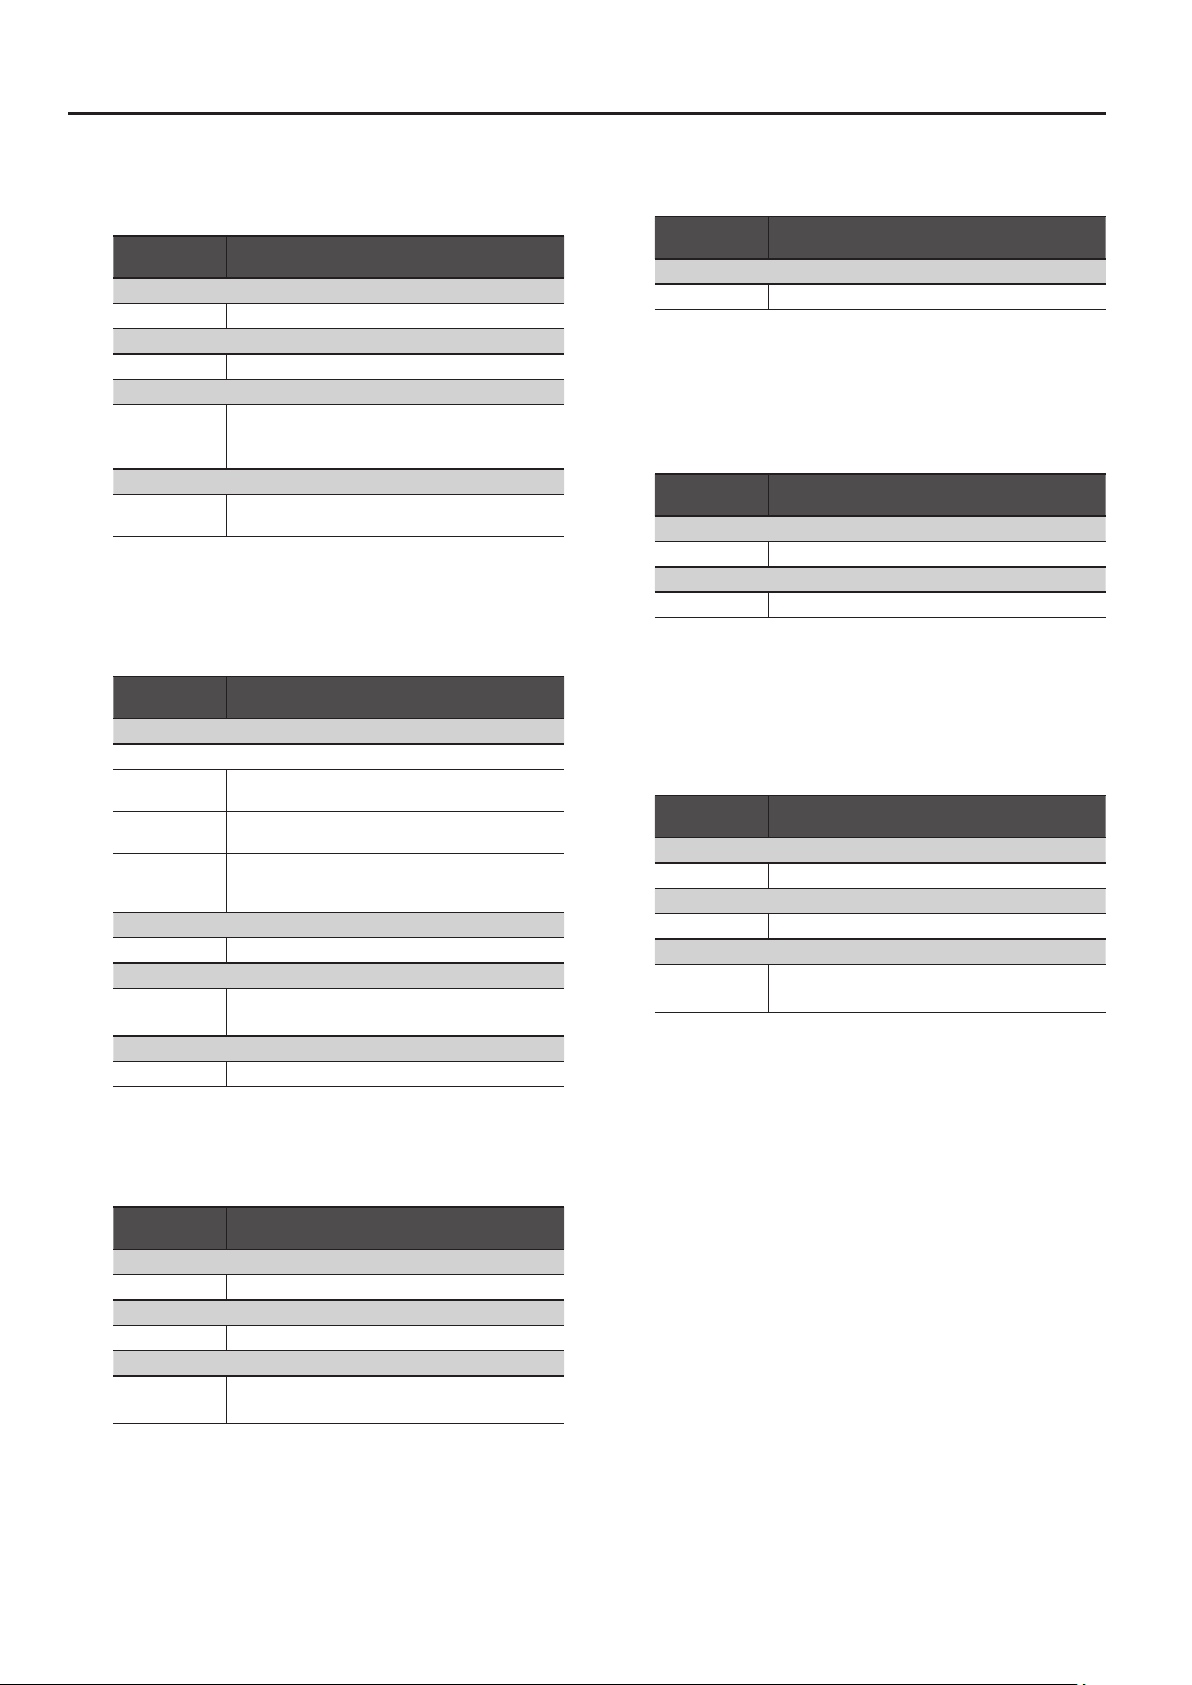
Appendices
FLANGER
The anging eect gives a twisting, jet-airplane-like character to
the sound.
Parameter/
Range
RATE
0–100 (*) This sets the rate of the anging eect.
DEPTH
0–100 Determines the depth of the anging eect.
RESONANCE
0–100
MANUAL
0–100
Explanation
Determines the amount of resonance (feedback).
Increasing the value will emphasize the eect, creating
a more unusual sound.
Adjusts the center frequency at which to apply the
eect.
CHORUS
In this eect, a slightly detuned sound is added to the original
sound to add depth and breadth.
Parameter/
Range
MODE
Selection for the chorus mode.
MONO
ST1
ST2
RATE
0–100 (*) Adjusts the rate of the chorus eect.
DEPTH
0–100
EFFECT LEVEL
0–100 Adjusts the volume of the eect sound.
Explanation
This chorus eect outputs the same sound from both L
channel and R channel.
This is a stereo chorus eect that adds dierent chorus
sounds to L channel and R channel.
This stereo chorus uses spatial synthesis, with the direct
sound output in the L channel and the eect sound
output in the R channel.
Adjusts the depth of the chorus eect.
To use it for doubling eect, set the value to 0.
ROTARY
This produces an eect like the sound of a rotary speaker.
Parameter/
Range
RATE
0–100 (*) Adjust the rotation speed.
Explanation
UNI-V (Uni-Vibe)
This models a Uni-Vibe.
Although this resembles a phaser eect, it also provides a unique
undulation that you can’t get with a regular phaser.
Parameter/
Range
RATE
0–100 (*) Adjusts the rate of the UNI-V eect.
DEPTH
0–100 Adjusts the depth of the UNI-V eect.
Explanation
PAN
With the volume level of the left and right sides alternately
changing, when playing sound in stereo, you can get an eect that
makes the guitar sound appear to y back and forth between the
speakers.
Parameter/
Range
RATE
0–100 (*) Adjusts the frequency (speed) of the change.
DEPTH
0–100 Adjusts the depth of the eect.
WAVE SHAPE
0–100
Explanation
Adjusts changes in volume level.
A higher value will steepen wave’s shape.
TREMOLO
Tremolo is an eect that creates a cyclic change in volume.
Parameter/
Range
RATE
0–100 (*) Adjusts the frequency (speed) of the change.
DEPTH
0–100 Adjusts the depth of the eect.
WAVE SHAPE
0–100
34
Explanation
Adjusts changes in volume level.
A higher value will steepen wave’s shape.
Page 37
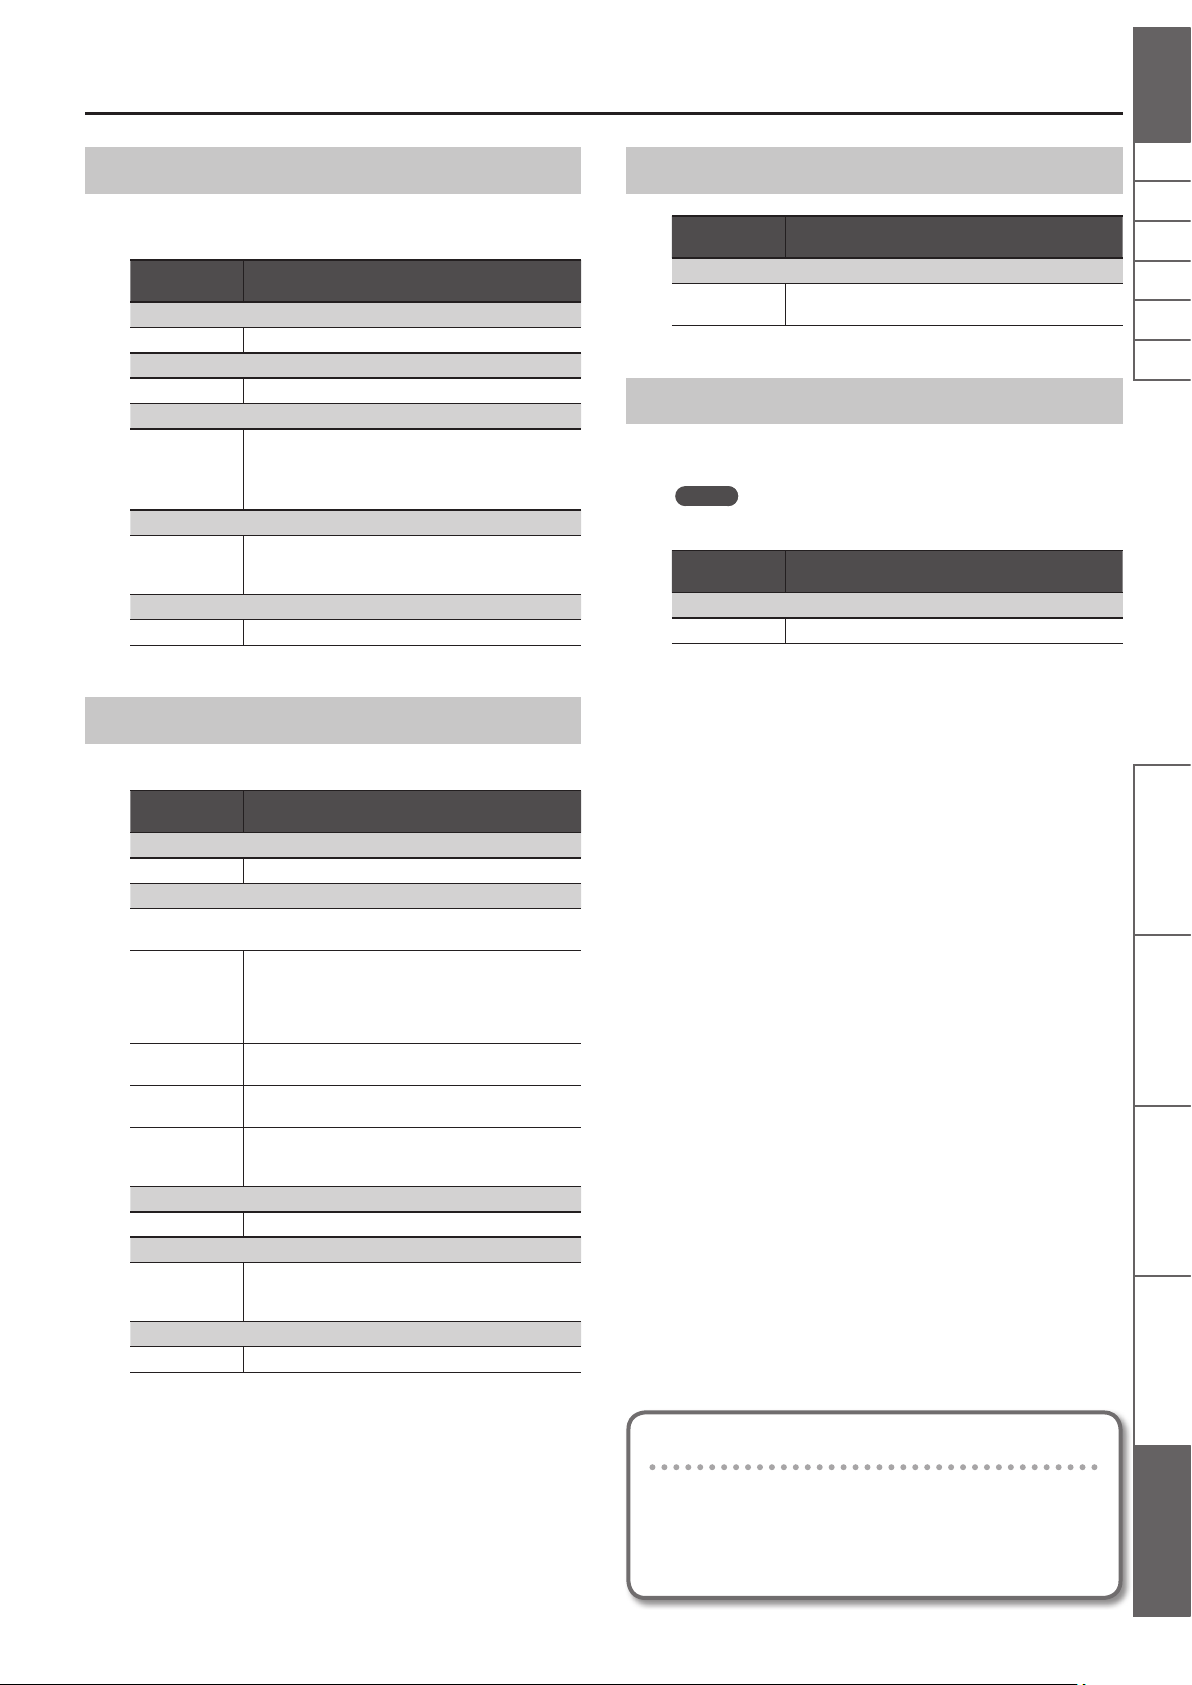
Appendices
DELAY
This eect adds delayed sound to the direct sound, giving more
body to the sound or creating special eects.
Parameter/
Range
ON/OFF
OFF, ON Turns the DELAY eect on/o.
DELAY TIME
1ms–1000ms (*) This determines the delay time.
FEEDBACK
0–100
HIGH CUT (High Cut Filter)
630Hz–12.5kHz,
FLAT
EFFECT LEVEL
0–120 Adjusts the volume of the delay sound.
Explanation
This sets the amount of delay sound returned to the
input.
A higher value will increase the number of the delay
repeats.
This sets the frequency at which the high cut lter
begins to take eect. When “FLAT” is selected, the high
cut lter will have no eect.
REVERB
EZ CHAR
Parameter/
Range
EZ CHAR (EZ Character)
-20–+20
Explanation
Increasing the value makes the tone suitable for solos
and decreasing it makes the tone suitable for backing.
WAH
You can control the wah eect in real time by stepping on the
expression pedal connected to the EXP PEDAL/CTL 1, 2 jack.
MEMO
WAH can be used in eects for the INPUT 1 jack.
Parameter/
Range
ON/OFF
OFF, ON Turns the WAH eect on/o.
Explanation
NlPtEsItFrDeEnglish
This eect adds reverberation to the sound.
Parameter/
Range
ON/OFF
OFF, ON Turns the REVERB eect on/o.
TYPE
This selects the reverb type. Various dierent simulations of space are
oered.
AMBI.
(AMBIENCE)
ROOM
HALL
PLATE
REV TIME (Reverb Time)
0.1 s–10.0 s Adjusts the length (time) of reverberation.
HIGH CUT (High Cut Filter)
630Hz–12.5kHz,
FLAT
EFFECT LEVEL
0–100 Adjusts the volume of the reverb sound.
Explanation
Simulates an ambience mic (o-mic, placed at a
distance from the sound source) used in recording
and other applications. Rather than emphasizing the
reverberation, this reverb is used to produce a sense of
openness and depth.
Simulates the reverberation in a small room. Provides
warm reverberations.
Simulates the reverberation in a concert hall. Provides
clear and spacious reverberations.
Simulates plate reverberation (a reverb unit that uses
the vibration of a metallic plate). Provides a metallic
sound with a distinct upper range.
This sets the frequency at which the high cut lter
begins to take eect. When “FLAT” is selected, the high
cut lter will have no eect.
Panel Descriptions Play the Guitar with Songs
as Your Backing
eBand Song List Editor Convenient Functions Appendices
Setting parameters with Tap Tempo
The values for the parameters marked with an asterisk (*)
can be set so they match the timing you use when pressing
the [SPEED] button (Tap Tempo).
Tap the [SPEED] button two or more times in succession to
specify a tempo for the parameter.
35
Page 38

Appendices
Error Messages
Message Explanation Page
Cannot Edit Song Name!
Card Full!
Card Locked! The SD card’s write protection is activated. Turn o the write protection. p. 29
Card Read Error!
Card Write Error!
Data Not Found! There is no eect data backed up on the SD card. —
Data Too Long! Playback/Recording is not possible because the song is too long (big). —
Data Too Short! Playback/Recording is not possible because the song is too short. —
Disconnect USB Cable! USB cable is connected to the JS-10. Disconnect the USB cable from the JS-10. —
Drive Busy!
No Card! No SD card is inserted in the JS-10. p. 28
No File! Song Erased! The selected song does not exist on the SD card. Erase the song that caused the error. p. 8
Preset Data Exists! You cannot format the SD card supplied with the JS-10. p. 29
Protected! The song is protected. Turn o the write protection. p. 21
Stop Player!
System Error!
Too Many Songs!
Unformatted Card!
Unformatted USB Memory!
Unsupported Card!
Unsupported USB Memory!
Unsupported Format! The song cannot be played back because it is in a format not supported by the JS-10. —
USB Memory Full!
USB Memory Read Error!
USB Memory Write Error!
The song name cannot be edited. Use eBand Song List Editor to edit the name.
A song name edited using eBand Song List Editor can be viewed but not edited on the JS-10.
There is no free space on the SD card.
Either delete unnecessary songs from this card or use a dierent SD card with free space.
The SD card cannot be read. Format the SD card.
* Be aware that formatting an SD card will erase all data stored on that card.
Cannot write to the SD card. Format the SD card.
* Be aware that formatting an SD card will erase all data stored on that card.
The data could not be read or written fast enough.
If this error message appears when you’re playing back a song from a USB ash drive, use IMPORT to
import that song onto the SD card before using it.
You cannot operate while the JS-10’s recorder is recording or playing back. Press the [
button and stop the recording or playback.
Data could not be written to the internal memory of JS-10. The JS-10 may be malfunctioning.
Contact Roland Service Center or an authorized Roland distributor.
The limit on the number of songs that can be recorded on an SD card (4,000) has been reached.
Either delete unnecessary songs from this card or use a dierent SD card with free space.
Either the SD card (or USB ash drive) is not formatted, or it is formatted in a format that the JS-10
cannot recognize. Use the JS-10 to format the SD card. Use your PC to initialize the USB ash drive.
* Formatting will erase all content stored on the SD card (or USB ash drive).
This SD card (or USB ash drive) cannot be used by the JS-10. Use an SD card (or USB ash drive)
that Roland has veried as working with the JS-10.
Before using a commercially available SD card, please refer to the Roland website.
http://www.roland.com/support/
There is no free space on the USB ash drive.
Either delete unnecessary songs from this USB ash drive or use a dierent USB ash drive with free
space.
The USB ash drive cannot be read. Use your PC to initialize the USB ash drive.
* Be aware that formatting the USB ash drive will erase all data stored on that USB ash drive.
Cannot write to the USB ash drive. Use your PC to initialize the USB ash drive.
* Be aware that formatting the USB ash drive will erase all data stored on that USB ash drive.
] (STOP)
p. 13
p. 8, p. 28
p. 29
p. 29
p. 22
—
—
p. 8, p. 28
p. 29
—
p. 8, p. 28
—
—
36
Page 39

Troubleshooting
Problem Points to check Page
Power not turning on Make sure the JS-10’s AC adaptor is properly connected to the power outlet and the JS-10. p. 4
Could the MASTER LEVEL knob be turned down? p. 3
No sound
Are the headphones connected to the PHONES jack? p. 4
Could the SPEAKER switch be set to OFF? p. 23
Are there any songs on the SD card? p. 7
Are the [INPUT LEVEL 1] knob and [INPUT LEVEL 2] knob turned up to an excessive level?
Appendices
NlPtEsItFrDeEnglish
Recorded sound is distorted
Can’t play MP3/WAV le
Can’t set AB REPEAT segment times correctly
The volume level of the instrument
connected to INPUT 1 jack or INPUT 2 jack is
too low.
Can’t run the unit
Can’t record
Can’t import songs
Can’t write to the SD card
Data write operation from eBand Song List
Editor to the JS-10 fails
“Unsupported Card” displayed
SD card may be broken
Adjust the INPUT LEVEL 1/2
knobs or SONG LEVEL so that
“” does not light.
p. 3
Are the MP3 le’s sampling rate and bit rate or the WAV le’s sampling rate and quantization bit rate
supported by the JS-10?
Time locations A and B cannot be set less than one second apart. You must leave at least one
second between them.
Are you using a connection cable that contains a resistor?
Use connection cables that do not contain resistors.
Is the external device’s volume properly adjusted? —
Are the [INPUT LEVEL 1] knob and [INPUT LEVEL 2] knob turned down? p. 3, p. 8
Is a mic connected with INPUT GAIN switched to the guitar setting? Adjust the INPUT GAIN. p. 23
Is the message “IDLING...” displayed on the JS-10’s screen?
Run the unit after disconnecting the USB connection.
Is the SD card completely inserted into the JS-10? p. 28
Are you sure the write protection switch on the SD card in the JS-10 is not in the LOCK position? p. 29
Does the SD card have too little free space available? p. 28
Are you using an SD card that is veried to work with the JS-10? p. 28
Do you have more than 4,000 songs (including WAV and MP3 les)?
Delete any songs you don’t need.
The JS-10 only handles up to 2,000 artists and albums combined. Delete any unneeded artists or
albums.
Is the SD card completely inserted into the JS-10?
Are you using an SD card that is known to work with the JS-10?
The following causes may be possible if the data on the SD card is corrupted.
• Could the power have been turned o during recording or while the JS-10 was connected via USB
to your PC?
• Did you disconnect the USB cable while the JS-10 was connected to your PC?
• Did you remove the SD card while the JS-10 was still turned on?
• Could the SD card have been subjected to strong impact?
p. 8
p. 12
p. 3
—
p. 8
p. 8
p. 28
p. 29
Panel Descriptions Play the Guitar with Songs
as Your Backing
eBand Song List Editor Convenient Functions Appendices
USB ash drive is not recognized
Cannot export to USB ash drive
Can’t connect to the PC
Reinitialize the SD card.
Is the USB ash drive completely inserted into the JS-10?
The JS-10 supports FAT-formatted USB ash drive. If the USB ash drive is not FAT-formatted, use a
PC to reformat the USB ash drive in FAT format.
Is the USB ash drive write protected?
Does the USB ash drive have too little free space available?
Is the USB cable properly connected? p. 13, p. 27
Is the PC turned on? —
Are you using an OS supported by the JS-10? p. 13
Is the SD card completely inserted? p. 28
Are you using an SD card that is veried to work with the JS-10? p. 28
—
—
37
Page 40
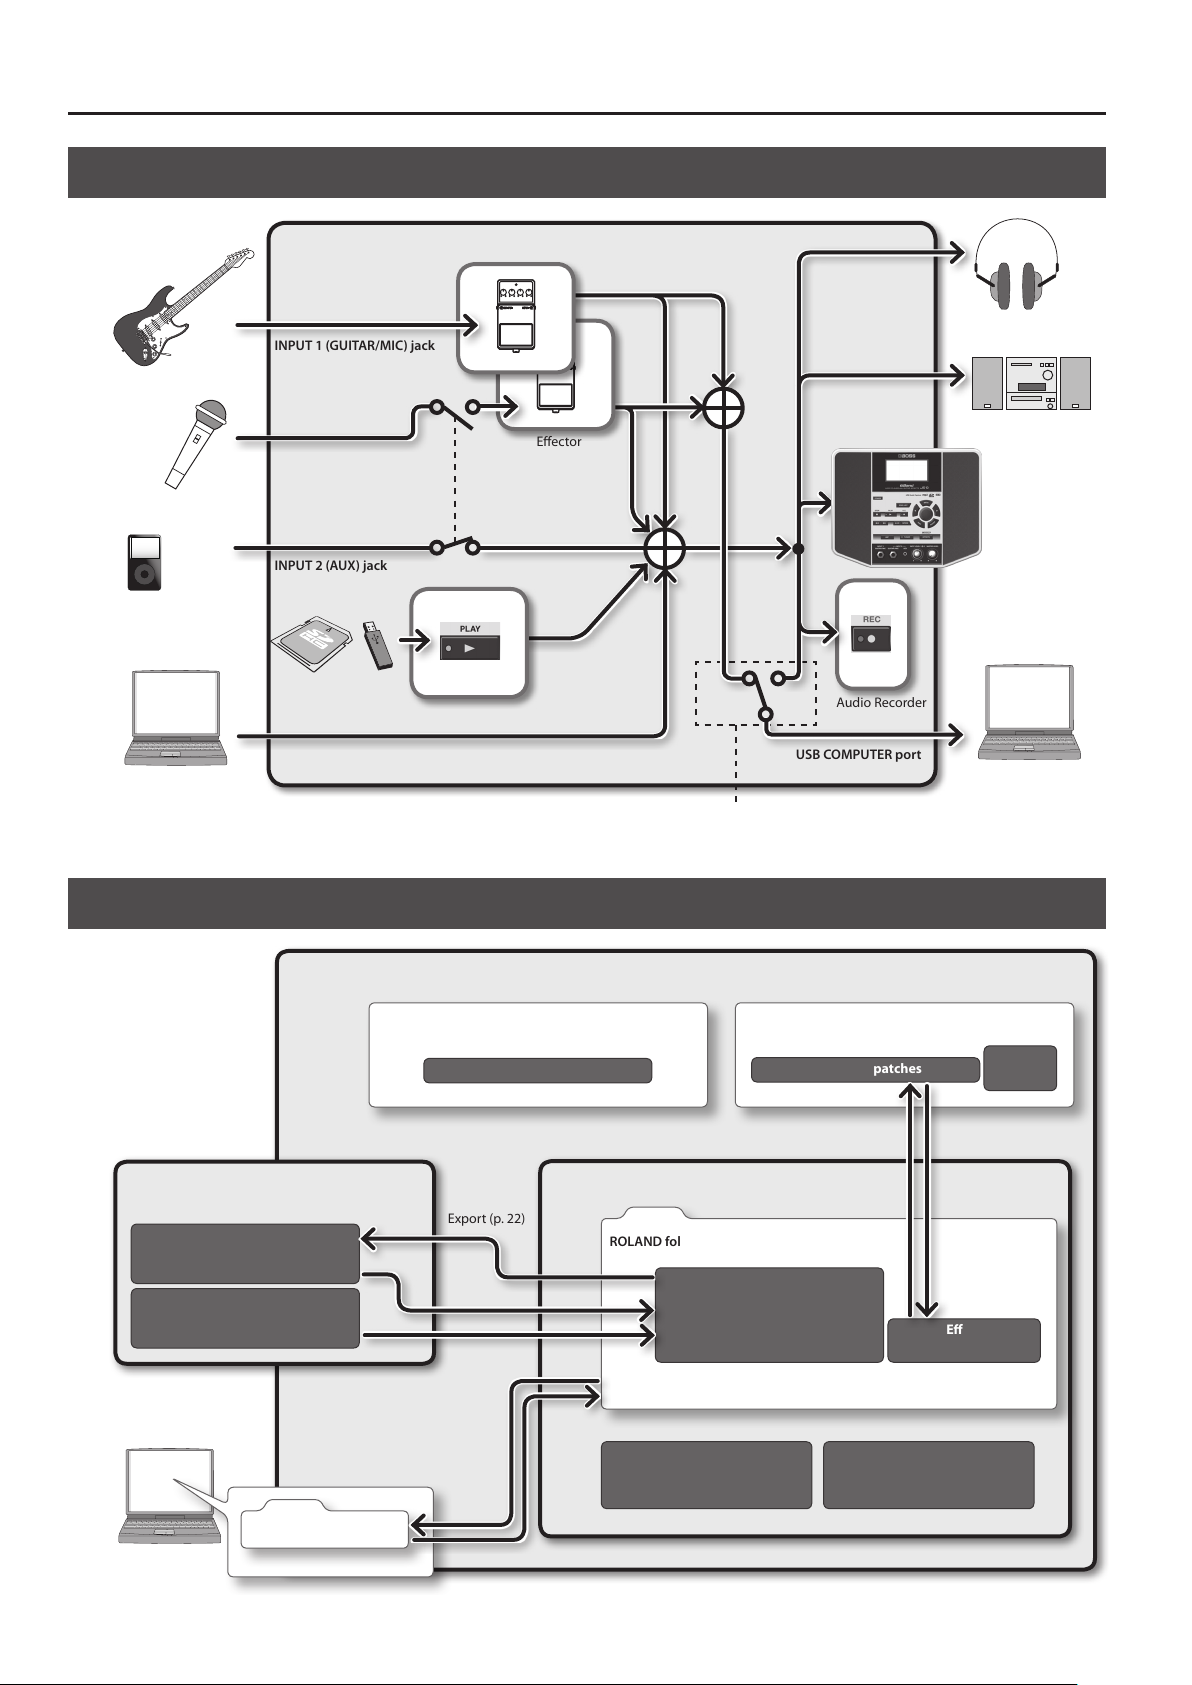
Appendices
Signal Flow
PHONES jack
Guitar
Microphone
Audio Player
PC
INPUT 1 (GUITAR/MIC) jack
INPUT 2 (GUITAR/MIC) jack
INPUT 2 (AUX) jack
Songs
USB COMPUTER port
Song Player
IN1
Eector
IN2
LINE OUT jacks
JS-10 Internal Speaker
INPUT ALL
USB AUDIO OUT: [MENU] ¨ “SYSTEM” ¨ “SETTING”
Audio Recorder
USB COMPUTER port
Headphones
Stereo, other
equipment
PC
Memory Conguration in the JS-10
JS-10
Non-writable memory
Eect preset patches
USB ash drive
Export (p. 22)
Audio les (WAV)
Audio les (MP3)
Import (p. 22)
Backup (p. 20)
SD card
ROLAND folder
Win.zip
USB driver for Windows
eBand Song List Editor
Rewritable memory
Eect user patches
eBand Songs
Recover (p. 20)
USB driver for Mac OS
eBand Song List Editor
Backup (p. 20)
user patches
Mac.dmg
Eect
System
settings
38
ROLAND folder
PC
Recover (p. 20)
Page 41

Specications
BOSS eBand JS-10: AUDIO PLAYER with GUITAR EFFECTS
Capacity SD/SDHC Card: 1 G–32 GB
eBand Songs (Recording/Playback)
Data Types
External Memory
AD Conversion 24 bits + AF method
DA Conversion 24 bits
Sampling Frequency 44.1 kHz
Eect Patches
Data Capacity
* These recording times
are approximate. Times
may be slightly shorter
depending on the
number of songs that
were created.
Nominal Input Level
Input Impedance
Nominal Output Level LINE OUT: -10 dBu
Output Impedance LINE OUT: 1 kΩ
Internal Speakers 2.1 channels (2-channel Stereo and Woofer)
Rated Power Output 12 W (Stereo Speaker 3.5 W x 2 + Woofer 5 W)
Display Graphic LCD 132 x 64 dots
Connectors
Current Draw 700 mA
Dimensions
Weight
Accessories
Options (sold separately)
WAV (Quantization bit rate: 16 bits, Playback only)
MP3 (Bit rate: 64 K–320 Kbps, Playback only)
USB Flash Memory (sold separately)
* Use USB Flash Memory sold by Roland. We cannot guarantee operation if other products are used.
Preset: 130
User: 100
eBand Songs
WAV/16 bits/Stereo
MP3/128 Kbps/Stereo
INPUT 1 jack (GUITAR/MIC)
INPUT 2 jack (GUITAR/MIC)
INPUT 2 jack (AUX) -20 dBu
INPUT 1 jack (GUITAR/MIC)
INPUT 2 jack (GUITAR/MIC)
INPUT 2 (AUX) 47 kΩ
INPUT 1 (GUITAR/MIC) jack (1/4 inch phone type)
INPUT 2 (GUITAR/MIC) jack (1/4 inch phone type)
INPUT 2 (AUX) jack (Stereo miniature phone type)
PHONES jack (Stereo miniature phone type)
LINE OUT jacks (RCA phono type)
EXP PEDAL/CTL1, 2 jack (1/4 inch TRS phone type)
USB MEMORY port (USB Type A)
USB COMPUTER port (USB Type B)
DC IN jack
264 (W) x 169 (D) x 209 (H) mm
10-7/16 (W) x 6-11/16 (D) x 8-1/4 (H) inch
1.8 kg
4 lbs
(excluding AC adaptor)
AC adaptor
SD card (Inserted into the JS-10 prior to being shipped from the factory.)
USB cable
Owner’s Manual
Footswitch (BOSS FS-5U)
Dual Footswitch (B0SS FS-6)
Expression Pedal (Roland EV-5, BOSS FV-500L, BOSS FV-500H)
USB Flash Memory
* Use USB Flash Memory sold by Roland. We cannot guarantee operation if other products are used.
Hours per GB: 4 hours
32GB: 130 hours
Hours per GB: 1.5 hours
32GB: 50 hours
Hours per GB: 17 hours
32GB: 550 hours
-10 dBu (INPUT GAIN = GUITAR)
-32 dBu (INPUT GAIN = MIC)
1 MΩ
Appendices
NlPtEsItFrDeEnglish
Panel Descriptions Play the Guitar with Songs
as Your Backing
eBand Song List Editor Convenient Functions Appendices
0dBu = 0.775Vrms
In the interest of product improvement, the specications and/or appearance of this unit are subject to change without prior notice.
* AF method (Adaptive Focus method)
This is a proprietary method from Roland & BOSS that vastly improves the signal-to-noise (S/N) ratio of the A/D and D/A converters.
39
Page 42

USING THE UNIT SAFELY
About WARNING and CAUTION Notices
Used for instructions intended to alert the
user to the risk of death or severe injury
should the unit be used improperly.
Used for instructions intended to alert the
user to the risk of injury or material
damage should the unit be used
improperly.
* Material damage refers to damage or
other adverse effects caused with
respect to the home and all its
furnishings, as well to domestic animals
or pets.
ALWAYS OBSERVE THE FOLLOWING
WARNING
Do not disassemble or modify by yourself
Do not open (or modify in any way)
the unit or its AC adaptor.
Do not repair or replace parts by yourself
Do not attempt to repair the unit,
or replace parts within it (except
when this manual provides specic
instructions directing you to do so).
Refer all servicing to your retailer,
the nearest Roland Service Center, or
an authorized Roland distributor, as
listed on the “Information” page.
Do not use or store in the following types of
locations
• Subject to temperature extremes
(e.g., direct sunlight in an enclosed
vehicle, near a heating duct, on top
of heat-generating equipment);
or are
• Damp (e.g., baths, washrooms, on
wet oors); or are
• Exposed to steam or smoke; or are
• Subject to salt exposure; or are
• Humid; or are
• Exposed to rain; or are
• Dusty or sandy; or are
• Subject to high levels of vibration
and shakiness.
Do not place in an unstable location
Make sure you always have the
unit placed so it is level and sure
to remain stable. Never place it on
stands that could wobble, or on
inclined surfaces.
Use only the included AC adaptor and the correct
voltage
Be sure to use only the AC adaptor
included with the unit. Also,
make sure the line voltage at the
installation matches the input
voltage specied on the AC adaptor’s
body. Other AC adaptors may use a
dierent polarity, or be designed for
a dierent voltage, so their use could
result in damage, malfunction, or
electric shock.
Use only the included power cord
Use only the attached power-supply
cord. Also, the included power cord
must not be used with any other
device.
Do not bend the power cord or place heavy objects
on it
Do not excessively twist or bend the
power cord, nor place heavy objects
on it. Doing so can damage the cord,
producing severed elements and
short circuits. Damaged cords are re
and shock hazards!
Avoid extended use at high volume
This unit, either alone or in
combination with an amplier and
headphones or speakers, may be
capable of producing sound levels
that could cause permanent hearing
loss. Do not operate for a long period
of time at a high volume level, or
at a level that is uncomfortable. If
you experience any hearing loss
or ringing in the ears, you should
immediately stop using the unit, and
consult an audiologist.
About the Symbols
The symbol alerts the user to important instructions or
warnings.The specific meaning of the symbol is
determined by the design contained within the triangle. In
the case of the symbol at left, it is used for general
cautions, warnings, or alerts to danger.
The symbol alerts the user to items that must never be
carried out (are forbidden). The specific thing that must
not be done is indicated by the design contained within
the circle. In the case of the symbol at left, it means that
the unit must never be disassembled.
The symbol alerts the user to things that must be
carried out. The specific thing that must be done is
indicated by the design contained within the circle. In the
case of the symbol at left, it means that the power-cord
plug must be unplugged from the outlet.
WARNING
WARNING
Don’t allow foreign objects or liquids to enter unit
Never allow foreign objects (e.g.,
ammable objects, coins, wires) or
liquids (e.g., water or juice) to enter
this product. Doing so may cause
short circuits, faulty operation, or
other malfunctions.
Turn o the unit if an abnormality or malfunction
occurs
Immediately turn the unit o,
remove the AC adaptor from the
outlet, and request servicing by
your retailer, the nearest Roland
Service Center, or an authorized
Roland distributor, as listed on the
“Information” page when:
• The AC adaptor, the powersupply cord, or the plug has been
damaged; or
• If smoke or unusual odor occurs; or
• Objects have fallen into, or liquid
has been spilled onto the unit; or
• The unit has been exposed to rain
(or otherwise has become wet); or
• The unit does not appear to
operate normally or exhibits a
marked change in performance.
Adults must provide supervision in places where
children are present
When using the unit in locations
where children are present, be
careful so no mishandling of the
unit can take place. An adult should
always be on hand to provide
supervision and guidance.
Do not drop or subject to strong impact
Protect the unit from strong impact.
(Do not drop it!)
40
Page 43

IMPORTANT NOTES
WARNING
Do not share an outlet with an unreasonable
number of other devices
Do not force the unit’s powersupply cord to share an outlet with
an unreasonable number of other
devices. Be especially careful when
using extension cords—the total
power used by all devices you have
connected to the extension cord’s
outlet must never exceed the power
rating (watts/amperes) for the
extension cord. Excessive loads can
cause the insulation on the cord to
heat up and eventually melt through.
Do not use overseas
Before using the unit in a foreign
country, consult with your retailer,
the nearest Roland Service Center, or
an authorized Roland distributor, as
listed on the “Information” page.
CAUTION
Place in a well ventilated location
The unit and the AC adaptor should
be located so their location or
position does not interfere with their
proper ventilation.
CAUTION
Grasp the plug when connecting or disconnecting
the AC adaptor
Always grasp only the plug on the
AC adaptor cord when plugging into,
or unplugging from, an outlet or this
unit.
Periodically clean the AC adaptor’s plug
At regular intervals, you should
unplug the AC adaptor and clean
it by using a dry cloth to wipe all
dust and other accumulations away
from its prongs. Also, disconnect the
power plug from the power outlet
whenever the unit is to remain
unused for an extended period of
time. Any accumulation of dust
between the power plug and the
power outlet can result in poor
insulation and lead to re.
Manage cables for safety
Try to prevent cords and cables from
becoming entangled. Also, all cords
and cables should be placed so they
are out of the reach of children.
Avoid climbing on top of the unit, or placing heavy
objects on it
Never climb on top of, nor place
heavy objects on the unit.
CAUTION
Do not connect or disconnect the AC adaptor with
wet hands
Never handle the AC adaptor or
its plugs with wet hands when
plugging into, or unplugging from,
an outlet or this unit.
Disconnect everything before moving the unit
Before moving the unit, disconnect
the AC adaptor and all cords coming
from external devices.
Unplug the AC adaptor from the outlet before cleaning
Before cleaning the unit, turn it o
and unplug the AC adaptor from the
outlet (p. 4).
If there is a possibility of lightning strike, disconnect
the AC adaptor from the outlet
Whenever you suspect the possibility
of lightning in your area, disconnect
the AC adaptor from the outlet.
Keep small items out of the reach of children
To prevent accidental ingestion
of the parts listed below, always
keep them out of the reach of small
children.
• Included Parts
SD Card (p. 28)
• Removable Parts
USB caps (p. 4),
SD CARD slot cover (p. 28),
screw (p. 28)
NlPtEsItFrDeEnglish
Panel Descriptions Play the Guitar with Songs
IMPORTANT NOTES
Power Supply
• Do not connect this unit to same electrical
outlet that is being used by an electrical
appliance that is controlled by an
inverter or a motor (such as a refrigerator,
washing machine, microwave oven, or air
conditioner). Depending on the way in which
the electrical appliance is used, power supply
noise may cause this unit to malfunction
or may produce audible noise. If it is not
practical to use a separate electrical outlet,
connect a power supply noise lter between
this unit and the electrical outlet.
• The AC adaptor will begin to generate heat
after long hours of consecutive use. This is
normal, and is not a cause for concern.
• To prevent malfunction and equipment
failure, always make sure to turn o the
power on all your equipment before you
make any connections.
• With the factory settings, the JS-10 will
automatically be switched o 30 minutes
after you stop playing or operating the
unit. If you don’t want the unit to turn o
automatically, change the “AUTO OFF” setting
to “OFF” as described on p. 26.
* The settings you were editing will be lost when the
unit is turned o. If you want to keep your settings,
you must save your settings before turning the
unit o.
Placement
• Using the unit near power ampliers (or
other equipment containing large power
transformers) may induce hum. To alleviate
the problem, change the orientation of this
unit; or move it farther away from the source
of interference.
• This device may interfere with radio and
television reception. Do not use this device
in the vicinity of such receivers.
• Noise may be produced if wireless
communications devices, such as cell
phones, are operated in the vicinity of this
unit. Such noise could occur when receiving
or initiating a call, or while conversing.
Should you experience such problems, you
should relocate such wireless devices so they
are at a greater distance from this unit, or
switch them o.
• Do not expose the unit to direct sunlight,
place it near devices that radiate heat, leave
it inside an enclosed vehicle, or otherwise
subject it to temperature extremes. Excessive
heat can deform or discolor the unit.
• When moved from one location to another
where the temperature and/or humidity is
very dierent, water droplets (condensation)
may form inside the unit. Damage or
malfunction may result if you attempt to use
the unit in this condition. Therefore, before
using the unit, you must allow it to stand for
several hours, until the condensation has
completely evaporated.
• Depending on the material and temperature
of the surface on which you place the unit, its
rubber feet may discolor or mar the surface.
You can place a piece of felt or cloth
under the rubber feet to prevent this from
happening. If you do so, please make
sure that the unit will not slip or move
accidentally.
• Avoid the use of insecticides, perfumes,
alcohol, nail polish, spray cans, etc., near the
unit. Swiftly wipe away any liquid that spills
on the unit using a dry, soft cloth.
as Your Backing
eBand Song List Editor Convenient Functions Appendices
41
Page 44

IMPORTANT NOTES
Maintenance
• For everyday cleaning wipe the unit with a
soft, dry cloth or one that has been slightly
dampened with water. To remove stubborn
dirt, use a cloth impregnated with a mild,
non-abrasive detergent. Afterwards, be sure
to wipe the unit thoroughly with a soft, dry
cloth.
• Never use benzine, thinners, alcohol or
solvents of any kind, to avoid the possibility
of discoloration and/or deformation.
Repairs and Data
• Please be aware that all data contained in
the unit’s memory may be lost when the unit
is sent for repairs. Important data should
always be backed up SD cards, SDHC cards,
computers, USB ash drives, or written down
on paper (when possible). During repairs,
due care is taken to avoid the loss of data.
However, in certain cases (such as when
circuitry related to memory itself is out of
order), we regret that it may not be possible
to restore the data, and Roland assumes no
liability concerning such loss of data.
Additional Precautions
• Please be aware that the contents of memory
can be irretrievably lost as a result of a
malfunction, or the improper operation of
the unit. To protect yourself against the risk
of loosing important data, we recommend
that you periodically save a backup copy
of important data you have stored in the
unit’s memory on SD cards, SDHC cards,
computers, or USB ash drives.
• Unfortunately, it may be impossible to
restore the contents of data that was stored
in the unit’s memory, SD cards, SDHC cards,
computers, or USB ash drives once it has
been lost. Roland Corporation assumes no
liability concerning such loss of data.
• Use a reasonable amount of care when using
the unit’s buttons, sliders, or other controls;
and when using its jacks and connectors.
Rough handling can lead to malfunctions.
• Never strike or apply strong pressure to the
display.
• When disconnecting all cables, grasp the
connector itself—never pull on the cable.
This way you will avoid causing shorts, or
damage to the cable’s internal elements.
• To avoid disturbing others nearby, try to
keep the unit’s volume at reasonable levels.
You may prefer to use headphones, so you
do not need to be concerned about those
around you.
• When you need to transport the unit,
package it in the box (including padding)
that it came in, if possible. Otherwise, you
will need to use equivalent packaging
materials.
• Use only the specied expression pedal
(Roland EV-5, BOSS FV-500L, BOSS FV500H; sold separately). By connecting any
other expression pedals, you risk causing
malfunction and/or damage to the unit.
• Some connection cables contain resistors.
Do not use cables that incorporate resistors
for connecting to this unit. The use of such
cables can cause the sound level to be
extremely low, or impossible to hear. For
information on cable specications, contact
the manufacturer of the cable.
Before Using External Memories
• Carefully insert the USB ash drives, SD cards,
or SDHC cards all the way in—until it is rmly
in place.
• Never touch the terminals of the USB ash
drives, SD cards, or SDHC cards. Also, avoid
getting the terminals dirty.
• USB ash drives, SD cards, or SDHC cards are
constructed using precision components;
handle the memories or cards carefully,
paying particular note to the following.
• To prevent damage to the cards from
static electricity, be sure to discharge
any static electricity from your own body
before handling the cards.
• Do not touch or allow metal to come into
contact with the contact portion of the
cards.
• Do not bend, drop, or subject cards to
strong shock or vibration.
• Do not keep cards in direct sunlight, in
closed vehicles, or other such locations.
• Do not allow cards to become wet.
• Do not disassemble or modify the cards.
Copyrights / Licenses / Trademarks
• It is forbidden by law to make an audio
recording, video recording, copy or
revision of a third party’s copyrighted work
(musical work, video work, broadcast, live
performance, or other work), whether
in whole or in part, and distribute, sell,
lease, perform, or broadcast it without the
permission of the copyright owner.
• Do not use this product for purposes that
could infringe on a copyright held by a
third party. We assume no responsibility
whatsoever with regard to any infringements
of third-party copyrights arising through
your use of this product.
• The copyright of content in this product
(the sound waveform data, style data,
accompaniment patterns, phrase data,
audio loops and image data) is reserved by
Roland Corporation and/or Atelier Vision
Corporation.
• Purchasers of this product are permitted
to utilize said content for the creating,
performing, recording and distributing
original musical works.
• Purchasers of this product are NOT permitted
to extract said content in original or modied
form, for the purpose of distributing
recorded medium of said content or making
them available on a computer network.
• MMP (Moore Microprocessor Portfolio)
refers to a patent portfolio concerned with
microprocessor architecture, which was
developed by Technology Properties Limited
(TPL). Roland has licensed this technology
from the TPL Group.
• MPEG Layer-3 audio compression technology
is licensed from Fraunhofer IIS Corporation
and THOMSON Multimedia Corporation.
• CD and music-related data from Gracenote,
Inc., copyright © 2000-2012 Gracenote.
• Gracenote Software, copyright © 2000-2012
Gracenote.
• This product and service may practice
one or more of the following U.S. Patents:
#5,987,525; #6,061,680; #6,154,773,
#6,161,132, #6,230,192, #6,230,207,
#6,240,459, #6,330,593, and other patents
issued or pending. Some services supplied
under license from Open Globe, Inc. for U.S.
Patent: #6,304,523.
• Gracenote and CDDB are registered
trademarks of Gracenote.
• The Gracenote logo and logotype, and the
“Powered by Gracenote” logo are trademarks
of Gracenote.
• The SD logo ( ) and SDHC logo
( ) are trademarks of SD-3C, LLC.
• ASIO is a trademark of Steinberg Media
Technologies GmbH.
• This product contains eCROS integrated
software platform of eSOL Co.,Ltd. eCROS is a
trademark of eSOL Co., Ltd. in Japan.
• MP3 codec is Copyright © 1995-2010, SPIRIT.
• Roland, BOSS, COSM, and eBand are either
registered trademarks or trademarks of
Roland Corporation in the United States and/
or other countries.
• Company names and product names
appearing in this document are registered
trademarks or trademarks of their respective
owners.
42
Page 45

Index
A
[A B] button . . . . . . . . 3, 12, 19, 21
AB EDIT . . . . . . . . . . . . . . . . . . . . . . . . . . 12
AB REPEAT . . . . . . . . . . . . . . . . . . . . . . . 12
AB REPEAT Segment . . . . . . . . . . . . . . 4
AC Adaptor . . . . . . . . . . . . . . . . . . . . . . . 4
AF method . . . . . . . . . . . . . . . . . . . . . . 39
ALBUM . . . . . . . . . . . . . . . . . . . . . . . . . . . 7
ALL SONGS . . . . . . . . . . . . . . . . . . . . . . . 7
AMP . . . . . . . . . . . . . . . . . . . . . . . . . . . . . 31
[AMP] button . . . . . . . . . . . . . . . . . . . . . 3
ARTIST . . . . . . . . . . . . . . . . . . . . . . . . . . . . 7
AUDIO SETTING . . . . . . . . . . . . . . . . . . 23
AUTO OFF . . . . . . . . . . . . . . . . . . . . . . . 26
B
BACKING . . . . . . . . . . . . . . . . . . . . . . . . 17
BEST 30 . . . . . . . . . . . . . . . . . . . . . . . . . . . 7
BEST 30 EDIT . . . . . . . . . . . . . . . . . . . . . . 7
Bit Rate . . . . . . . . . . . . . . . . . . . . . . . . 8, 15
C
Capacity
SD card . . . . . . . . . . . . . . . . . . . . . . 28
CD Ripping screen . . . . . . . . . . . . . . . 15
Center Cancel . . . . . . . . . . . . . . . . . . . . 12
CHORUS . . . . . . . . . . . . . . . . . . . . . . . . . 34
C icon . . . . . . . . . . . . . . . . . . . . . . . . . 4, 12
COMP . . . . . . . . . . . . . . . . . . . . . . . . . . . 32
Contrast . . . . . . . . . . . . . . . . . . . . . . . . . 25
Cursor buttons . . . . . . . . . . . . . . . . . . . . 3
D
Data Capacity . . . . . . . . . . . . . . . . . . . . 39
DC IN jack . . . . . . . . . . . . . . . . . . . . . . . . 4
DELAY . . . . . . . . . . . . . . . . . . . . . . . . . . . 35
delete
SONG . . . . . . . . . . . . . . . . . . . . . . . . . 8
Dial . . . . . . . . . . . . . . . . . . . . . . . . . . . . . . . 3
Display . . . . . . . . . . . . . . . . . . . . . . . . . . . 3
Distortion. . . . . . . . . . . . . . . . . . . . . . . . 32
DS . . . . . . . . . . . . . . . . . . . . . . . . . . . . . . . 32
E
eBand Song List Editor . . . . . . . . . . . 13
eBand Songs . . . . . . . . . . . . . . . . . . . . . 39
Eect
Edit . . . . . . . . . . . . . . . . . . . . . . . . . . 17
INITIALIZE . . . . . . . . . . . . . . . . . . . . 19
Parameters. . . . . . . . . . . . . . . . . . . 31
Select . . . . . . . . . . . . . . . . . . . . . . . . 10
EFFECT MENU screen. . . . . . . . . . . . . 18
[EFFECTS] button . . . . . . . . . . 3, 10, 17
[ENTER] button . . . . . . . . . . . . . . . . . 3, 5
EQ . . . . . . . . . . . . . . . . . . . . . . . . . . . 23, 33
Equalizer . . . . . . . . . . . . . . . . . . . . 23, 33
ERASE
SONG . . . . . . . . . . . . . . . . . . . . . . . . . 8
EXCHANGE . . . . . . . . . . . . . . . . . . . . . . 19
[EXIT] button . . . . . . . . . . . . . . . . . . . . . 3
EXPORT . . . . . . . . . . . . . . . . . . . . . . . . . . 22
EXP PEDAL/CTL 1, 2 jack . . . . . . . . 4, 30
Expression Pedal . . . . . . . . . . . . . . . . . 30
EZ CHAR . . . . . . . . . . . . . . . . . . . . . . . . . 35
EZ EDIT screen . . . . . . . . . . . . . . . . . . . 17
F
FACTORY RESET . . . . . . . . . . . . . . . . . . 26
[
] (Fast Forward) button . . . . . . . . 3
FLANGER . . . . . . . . . . . . . . . . . . . . . . . . 34
Footswitch . . . . . . . . . . . . . . . . . . . . . . . 30
FORMAT
SD Card . . . . . . . . . . . . . . . . . . . . . . 29
G
GAIN . . . . . . . . . . . . . . . . . . . . . . . . . . . . 23
Global EQ . . . . . . . . . . . . . . . . . . . . . . . . 23
H
HARD . . . . . . . . . . . . . . . . . . . . . . . . . . . . 17
I
IMPORT . . . . . . . . . . . . . . . . . . . . . . . . . . 22
IN1/IN2 . . . . . . . . . . . . . . . . . . . . 4, 10, 17
INITIALIZE
Eect . . . . . . . . . . . . . . . . . . . . . . . . 19
JS-10 . . . . . . . . . . . . . . . . . . . . . . . . 26
SD Card . . . . . . . . . . . . . . . . . . . . . . 29
INPUT . . . . . . . . . . . . . . . . . . . . . . . . . . . 23
INPUT 1 (GUITAR/MIC) jack, INPUT 2
(GUITAR/MIC) jack . . . . . . . . . . . . . . . . . 3
INPUT 2 (AUX) jack . . . . . . . . . . . . . . . . 3
[INPUT LEVEL 1
INPUT screen . . . . . . . . . . . . . . . . . . . . 23
2] knob. . . . . . . . 3
K
Key . . . . . . . . . . . . . . . . . . . . . . . . . . . . . . . 4
KEY . . . . . . . . . . . . . . . . . . . . . . . . . . . . . . 21
L
LCD CONTRAST . . . . . . . . . . . . . . . . . . 25
LENGTH . . . . . . . . . . . . . . . . . . . . . . . . . 21
Level Meter . . . . . . . . . . . . . . . . . . . . . . . 4
LIMITER . . . . . . . . . . . . . . . . . . . . . . . . . . 32
LINE OUT jacks . . . . . . . . . . . . . . . . . 4, 23
LOCK . . . . . . . . . . . . . . . . . . . . . . . . . . . . 29
M
[MASTER LEVEL] knob . . . . . . . . . . . . . 3
Memory Conguration . . . . . . . . . . . 38
[MENU] button . . . . . . . . . . . . . . . . . . 3, 6
MENU screen . . . . . . . . . . . . . . . . . . . . . 6
MENU > SYSTEM screen . . . . . . . . . . 24
MODE . . . . . . . . . . . . . . . . . . . . . . . . . . . 25
MODULATION . . . . . . . . . . . . . . . . . . . 33
MP3 . . . . . . . . . . . . . . . . . . . . . . . 8, 15, 39
N
Noise Suppressor . . . . . . . . . . . . . . . . 33
NS . . . . . . . . . . . . . . . . . . . . . . . . . . . . . . . 33
O
OD . . . . . . . . . . . . . . . . . . . . . . . . . . . . . . 32
Overdrive . . . . . . . . . . . . . . . . . . . . . . . . 32
P
PAN . . . . . . . . . . . . . . . . . . . . . . . . . 23, 34
PATCH BACKUP . . . . . . . . . . . . . . . . . . 24
PATCH EDIT screen . . . . . . . . . . . . . . . 18
PATCH EXCHANGE screen . . . . . . . . 19
PATCH RECOVER . . . . . . . . . . . . . . . . . 25
PATCH SELECT screen . . . . . . . . 10, 17
PATCH SYNC . . . . . . . . . . . . . . . . . . . . . 22
PATCH WRITE screen . . . . . . . . . . . . . 19
PEDAL . . . . . . . . . . . . . . . . . . . . . . . . . . . 30
PHASER . . . . . . . . . . . . . . . . . . . . . . . . . . 33
PHONES jack . . . . . . . . . . . . . . . . . . . . . . 4
P icon. . . . . . . . . . . . . . . . . . . . . . . . . . 4, 11
Pitch
SONG . . . . . . . . . . . . . . . . . . . . . . . . 11
[
] (PLAY) button . . . . . . . . . . . . . . 3, 8
Play Mode . . . . . . . . . . . . . . . . . . . . . . 4, 9
[POWER] button . . . . . . . . . . . . . . . . 3, 5
Power Cord . . . . . . . . . . . . . . . . . . . . . . . 4
PROTECT . . . . . . . . . . . . . . . . . . . . . . . . 21
Q
Quantization Bit Rate. . . . . . . . . . . 8, 15
R
[ ] (REC) button . . . . . . . . . . . . . . . 3, 10
REC END popup . . . . . . . . . . . . . . . . . . 10
Recording . . . . . . . . . . . . . . . . . . . . . . . 10
REC REMAIN . . . . . . . . . . . . . . . . . . . . . 25
REMAIN SIZE . . . . . . . . . . . . . . . . . . . . . 25
REMOVE . . . . . . . . . . . . . . . . . . . . . . . . . . 7
REVERB . . . . . . . . . . . . . . . . . . . . . . . . . . 35
[
] (Rewind) button . . . . . . . . . . . . . 3
RHYTHM . . . . . . . . . . . . . . . . . . . . . . . . . . 7
Ripping . . . . . . . . . . . . . . . . . . . . . . . . . . 15
ROTARY . . . . . . . . . . . . . . . . . . . . . . . . . . 34
S
Sampling Rate . . . . . . . . . . . . . . . . . 8, 15
SD CARD. . . . . . . . . . . . . . . . . . . . . . . 7, 28
Initialize . . . . . . . . . . . . . . . . . . . . . 29
SD CARD FORMAT . . . . . . . . . . . . . . . . 29
SD CARD slot . . . . . . . . . . . . . . . . . . 4, 28
SD INFO . . . . . . . . . . . . . . . . . . . . . . . . . 25
SD VIEW . . . . . . . . . . . . . . . . . . . . . . . . . 26
Security slot . . . . . . . . . . . . . . . . . . . . . . 4
S icon . . . . . . . . . . . . . . . . . . . . . . . . . . 4, 11
Signal . . . . . . . . . . . . . . . . . . . . . . . . . . . 38
SIZE . . . . . . . . . . . . . . . . . . . . . . . . . . . . . 21
SOFT . . . . . . . . . . . . . . . . . . . . . . . . . . . . 17
SOLO . . . . . . . . . . . . . . . . . . . . . . . . . . . . 17
SONG
ERASE . . . . . . . . . . . . . . . . . . . . . . . . 8
Pitch . . . . . . . . . . . . . . . . . . . . . . . . . 11
Speed . . . . . . . . . . . . . . . . . . . . . . . 11
SONG EXPORT screen . . . . . . . . . . . . 22
SONG IMPORT screen . . . . . . . . . . . . 22
SONG INFO . . . . . . . . . . . . . . . . . . . . . . 21
SONG LEVEL . . . . . . . . . . . . . . . . . . . . . 21
[SONG LIST] button . . . . . . . . . . . . . 3, 7
Song List Editor . . . . . . . . . . . . . . . . . . 13
Song Name . . . . . . . . . . . . . . . . . . . . . . . 4
SONG NAME . . . . . . . . . . . . . . . . . . . . . 21
Song playback location . . . . . . . . . . . 4
Song playback time . . . . . . . . . . . . . . . 4
SPEAKER SW . . . . . . . . . . . . . . . . . . . . . 23
Speed
SONG . . . . . . . . . . . . . . . . . . . . . . . . 11
[SPEED] button . . . . . 3, 11, 12, 19, 21
[
] (STOP) button. . . . . . . . . . . . . . . . . 3
SYNC SW . . . . . . . . . . . . . . . . . . . . . . . . 22
SYSTEM . . . . . . . . . . . . . . . . . . . . . . . . . . 24
T
TOTAL SIZE . . . . . . . . . . . . . . . . . . . . . . 25
TREMOLO . . . . . . . . . . . . . . . . . . . . . . . . 34
[TUNER] button . . . . . . . . . . . . . . . . . 3, 9
TUNER screen . . . . . . . . . . . . . . . . . . . . . 9
Tuning . . . . . . . . . . . . . . . . . . . . . . . . . . . . 9
TYPE . . . . . . . . . . . . . . . . . . . . . . . . . . . . . 21
U
UNI-V . . . . . . . . . . . . . . . . . . . . . . . . . . . . 34
Uni-Vibe . . . . . . . . . . . . . . . . . . . . . . . . . 34
USB AUDIO OUT . . . . . . . . . . . . . . . . . 38
USB cap holder . . . . . . . . . . . . . . . . . . . 4
USB COMPUTER port 4, 13, 20, 24, 27
USB MEMORY . . . . . . . . . . . . . . . 7, 8, 25
USB MEMORY port . . . . . . . . . . . . . . . . 4
USB MODE . . . . . . . . . . . . . . . . . . . 13, 24
USER . . . . . . . . . . . . . . . . . . . . . . . . . . . . . 7
V
volume pedal . . . . . . . . . . . . . . . . . . . . 30
W
WAH . . . . . . . . . . . . . . . . . . . . . . . . . 30, 35
WAV . . . . . . . . . . . . . . . . . . . . . . . 8, 15, 39
WRITE/NAME . . . . . . . . . . . . . . . . . . . . 19
NlPtEsItFrDeEnglish
Panel Descriptions Play the Guitar with Songs
as Your Backing
eBand Song List Editor Convenient Functions Appendices
43
Page 46

Page 47

English
Deutsch
Français
Italiano
Español
Português
Nederlands
Gitarre spielen und zu Song-Playbacks üben
Bedienungsanleitung
Page 48

Contents
Die Bedienoberäche und Anschlüsse . . . . . . . . . . . . . . . . . . . . . . . . . . . . 3
Die Bedienoberäche . . . . . . . . . . . . . . . . . . . . . . . . . . . . . . . . . . . . . . . . . . . 3
Die Anschlüsse oben und an der Seite . . . . . . . . . . . . . . . . . . . . . . . . . . . 4
Das Haupt-Display . . . . . . . . . . . . . . . . . . . . . . . . . . . . . . . . . . . . . . . . . . . . . . 4
Die grundsätzliche Bedienung . . . . . . . . . . . . . . . . . . . . . . . . . . . . . . . . . . . 5
Einschalten . . . . . . . . . . . . . . . . . . . . . . . . . . . . . . . . . . . . . . . . . . . . . . . . . . . . . 5
Ausschalten. . . . . . . . . . . . . . . . . . . . . . . . . . . . . . . . . . . . . . . . . . . . . . .5
Bewegen des Cursors . . . . . . . . . . . . . . . . . . . . . . . . . . . . . . . . . . . . . . . . . . . 5
Auswahl eines Parameters . . . . . . . . . . . . . . . . . . . . . . . . . . . . . . . . . 5
Verändern eines Wertes . . . . . . . . . . . . . . . . . . . . . . . . . . . . . . . . . . . . . . . . . 5
Der [MENU]-Taster . . . . . . . . . . . . . . . . . . . . . . . . . . . . . . . . . . . . . . . . . . . . . .6
Spielen der Gitarre mit Song-Playback . . . . . . . . . . . . . . . . . . . . . . . . . . . .7
Auswählen eines Songs . . . . . . . . . . . . . . . . . . . . . . . . . . . . . . . . . . . . . . . . . 7
Anzeigen der Songs nach Kategorien . . . . . . . . . . . . . . . . . . . . . .7
Registrieren eines Songs in der TOP 30-Liste (BEST 30) . . . . . . 7
Auswahl eines Songs eines USB Flash-Speichers . . . . . . . . . . . . 8
Löschen eines Songs . . . . . . . . . . . . . . . . . . . . . . . . . . . . . . . . . . . . . .8
Spielen zu einem Song-Playback . . . . . . . . . . . . . . . . . . . . . . . . . . . . . . . . 8
Auswahl des Abspiel-Modus . . . . . . . . . . . . . . . . . . . . . . . . . . . . . . . 9
Stimmen der Gitarre . . . . . . . . . . . . . . . . . . . . . . . . . . . . . . . . . . . . . . . . . . . . 9
Aufnehmen des Spiels . . . . . . . . . . . . . . . . . . . . . . . . . . . . . . . . . . . . . . . . .10
Auswahl eines Eektes . . . . . . . . . . . . . . . . . . . . . . . . . . . . . . . . . . . . . . . . .10
Verändern der Abspielgeschwindigkeit eines Songs . . . . . . . . . . . . .11
Verändern der Tonhöhe eines Songs . . . . . . . . . . . . . . . . . . . . . . . . . . . .11
Die Center Cancel-Funktion . . . . . . . . . . . . . . . . . . . . . . . . . . . . . . . . . . . .12
Einstellen eines Wiederholbereiches (AB REPEAT) . . . . . . . . . . . . . . .12
Justieren der AB REPEAT-Positionen . . . . . . . . . . . . . . . . . . . . . .12
Importieren von Songs in den JS-10 (eBand Song List Editor) . . . . .13
Vorbereitungen . . . . . . . . . . . . . . . . . . . . . . . . . . . . . . . . . . . . . . . . . . . . . . . .13
Anschließen des JS-10 an den Rechner . . . . . . . . . . . . . . . . . . .13
Installieren der eBand Song List Editor-Software . . . . . . . . . .13
Starten des eBand Song List Editor . . . . . . . . . . . . . . . . . . . . . . .13
Anwendung der eBand Song List Editor-Software . . . . . . . . . . . . . . .14
Übertragen von Songs einer CD in den JS-10 (Ripping) . . . .15
Editieren der Song-Informationen . . . . . . . . . . . . . . . . . . . . . . . .16
Beenden der Verbindung mit dem PC . . . . . . . . . . . . . . . . . . . . .16
Verschiedene Funktionen . . . . . . . . . . . . . . . . . . . . . . . . . . . . . . . . . . . . . . .17
Editieren der Eekt-Parameter . . . . . . . . . . . . . . . . . . . . . . . . . . . . . . . . . .17
Visuelles Editieren (EZ EDIT) . . . . . . . . . . . . . . . . . . . . . . . . . . . . . .17
Editieren der Sounds im Detail (PATCH EDIT) . . . . . . . . . . . . . .18
Das MENU eines Eekt-Displays . . . . . . . . . . . . . . . . . . . . . . . . . .18
Sichern eines Patches . . . . . . . . . . . . . . . . . . . . . . . . . . . . . . . . . . . .19
Vertauschen zweier Patches (EXCHANGE) . . . . . . . . . . . . . . . . .19
Initialisieren der Eekt-Einstellungen (INITIALIZE) . . . . . . . . .19
Erstellen einer Kopie der Daten einer SD-Karte (BACK UP) . . . . . . .20
Übertragen der Backup-Daten vom Rechner auf die SD-Karte
(RECOVER) . . . . . . . . . . . . . . . . . . . . . . . . . . . . . . . . . . . . . . . . . . . . . . . . . . . . .20
Verändern der Song-Einstellungen . . . . . . . . . . . . . . . . . . . . . . . . . . . . .21
Abrufen der Song-Information . . . . . . . . . . . . . . . . . . . . . . . . . . .21
Benennen eines Songs . . . . . . . . . . . . . . . . . . . . . . . . . . . . . . . . . . . . . . . . .21
Sichern von Songs auf einen USB Flash-Speicher (Export) . . . . . . .22
Importieren von Songs des USB Flash-Speichers in den JS-10
(Import) . . . . . . . . . . . . . . . . . . . . . . . . . . . . . . . . . . . . . . . . . . . . . . . . . . . . . . .22
Umschalten der Eekt-Patches bei Wechseln des Songs
(PATCH SYNC) . . . . . . . . . . . . . . . . . . . . . . . . . . . . . . . . . . . . . . . . . . . . . . . . . .22
Die Audio-Einstellungen . . . . . . . . . . . . . . . . . . . . . . . . . . . . . . . . . . . . . . .23
Auswahl der Eingangsimpedanz der INPUT-Buchsen . . . . . .23
Einstellen des allgemeinen Equalizers (Global EQ) . . . . . . . . .23
Ausschalten der Lautsprecher des JS-10 . . . . . . . . . . . . . . . . . .23
Die Systemeinstellungen des JS-10 . . . . . . . . . . . . . . . . . . . . . . . . . . . . .24
Bestimmen der Funktion des
USB COMPUTER-Anschlusses . . . . . . . . . . . . . . . . . . . . . . . . . . . . .24
Auswahl der Funktion des Fußschalters . . . . . . . . . . . . . . . . . . .24
Sichern der User-Patches auf die SD-Karte . . . . . . . . . . . . . . . .24
Übertragen der auf der SD-Karte gesicherten User
Eekt-Patches in den JS-10 . . . . . . . . . . . . . . . . . . . . . . . . . . . . . . .25
Überprüfen des noch freien Speichers der SD-Karte und
des USB Flash-Speichers . . . . . . . . . . . . . . . . . . . . . . . . . . . . . . . . . .25
Einstellen des Display-Kontrasts . . . . . . . . . . . . . . . . . . . . . . . . . .25
De-Aktivieren der „Auto O“-Funktion . . . . . . . . . . . . . . . . . . . .26
Anzeigen der Songs der SD-Karte in der Songliste . . . . . . . . .26
Auswählen der Klangausgabe vom
USB COMPUTER-Anschluss . . . . . . . . . . . . . . . . . . . . . . . . . . . . . . .26
Initialisieren einer SD-Karte (FORMAT) . . . . . . . . . . . . . . . . . . . .26
Abrufen der Werksvoreinstellungen des JS-10 . . . . . . . . . . . . .26
Der JS-10 als USB Audio-Interface . . . . . . . . . . . . . . . . . . . . . . . . . . . . . .27
Der USB-Treiber . . . . . . . . . . . . . . . . . . . . . . . . . . . . . . . . . . . . . . . . . .27
Installieren des USB-Treibers . . . . . . . . . . . . . . . . . . . . . . . . . . . . . .27
Abspielen von Sounds des Rechners über den JS-10 . . . . . .27
Verwenden von handelsüblichen SD- bzw. SDHC-Karten . . . . . . . .28
Austauschen der SD-Speicherkarte . . . . . . . . . . . . . . . . . . . . . . .28
Verwendung von Fußschaltern und Expression-Pedalen . . . . . . . . .30
Auswahl der Funktion des Fußschalters . . . . . . . . . . . . . . . . . . .30
Lesen Sie zuerst die Abschnitte „SICHERHEITSHINWEISE“ (S. 40)
und „WICHTIGE HINWEISE“ (S. 41). Lesen Sie dann diese Anleitung
ganz durch, um sich mit allen Funktionen des Gerätes vertraut zu
machen. Bewahren Sie die Anleitung zu Referenzzwecken auf.
Copyright © 2012 BOSS CORPORATION
Alle Rechte vorbehalten. Vervielfältigung als Print oder
elektronische Datei, auch auszugsweise, bedarf einer
ausdrücklichen, schriftlichen Genehmigung von BOSS
CORPORATION.
2
Anhang . . . . . . . . . . . . . . . . . . . . . . . . . . . . . . . . . . . . . . . . . . . . . . . . . . . . . . . .31
Liste der Eekt-Parameter . . . . . . . . . . . . . . . . . . . . . . . . . . . . . . . . . . . . . .31
ehlermeldungen . . . . . . . . . . . . . . . . . . . . . . . . . . . . . . . . . . . . . . . . . . . . . . .36
Mögliche Fehlerursachen . . . . . . . . . . . . . . . . . . . . . . . . . . . . . . . . . . . . . .37
Signaluss-Diagramm . . . . . . . . . . . . . . . . . . . . . . . . . . . . . . . . . . . . . . . . . .38
Die Speicherstruktur des JS-10 . . . . . . . . . . . . . . . . . . . . . . . . . . . . . . . . .38
Technische Daten . . . . . . . . . . . . . . . . . . . . . . . . . . . . . . . . . . . . . . . . . . . . . .39
Sicherheitshinweise . . . . . . . . . . . . . . . . . . . . . . . . . . . . . . . . . . . . . . . . . . . .40
WICHTIGE HINWEISE . . . . . . . . . . . . . . . . . . . . . . . . . . . . . . . . . . . . . . . . . . . .41
Index . . . . . . . . . . . . . . . . . . . . . . . . . . . . . . . . . . . . . . . . . . . . . . . . . . . . . . . . . .43
Page 49
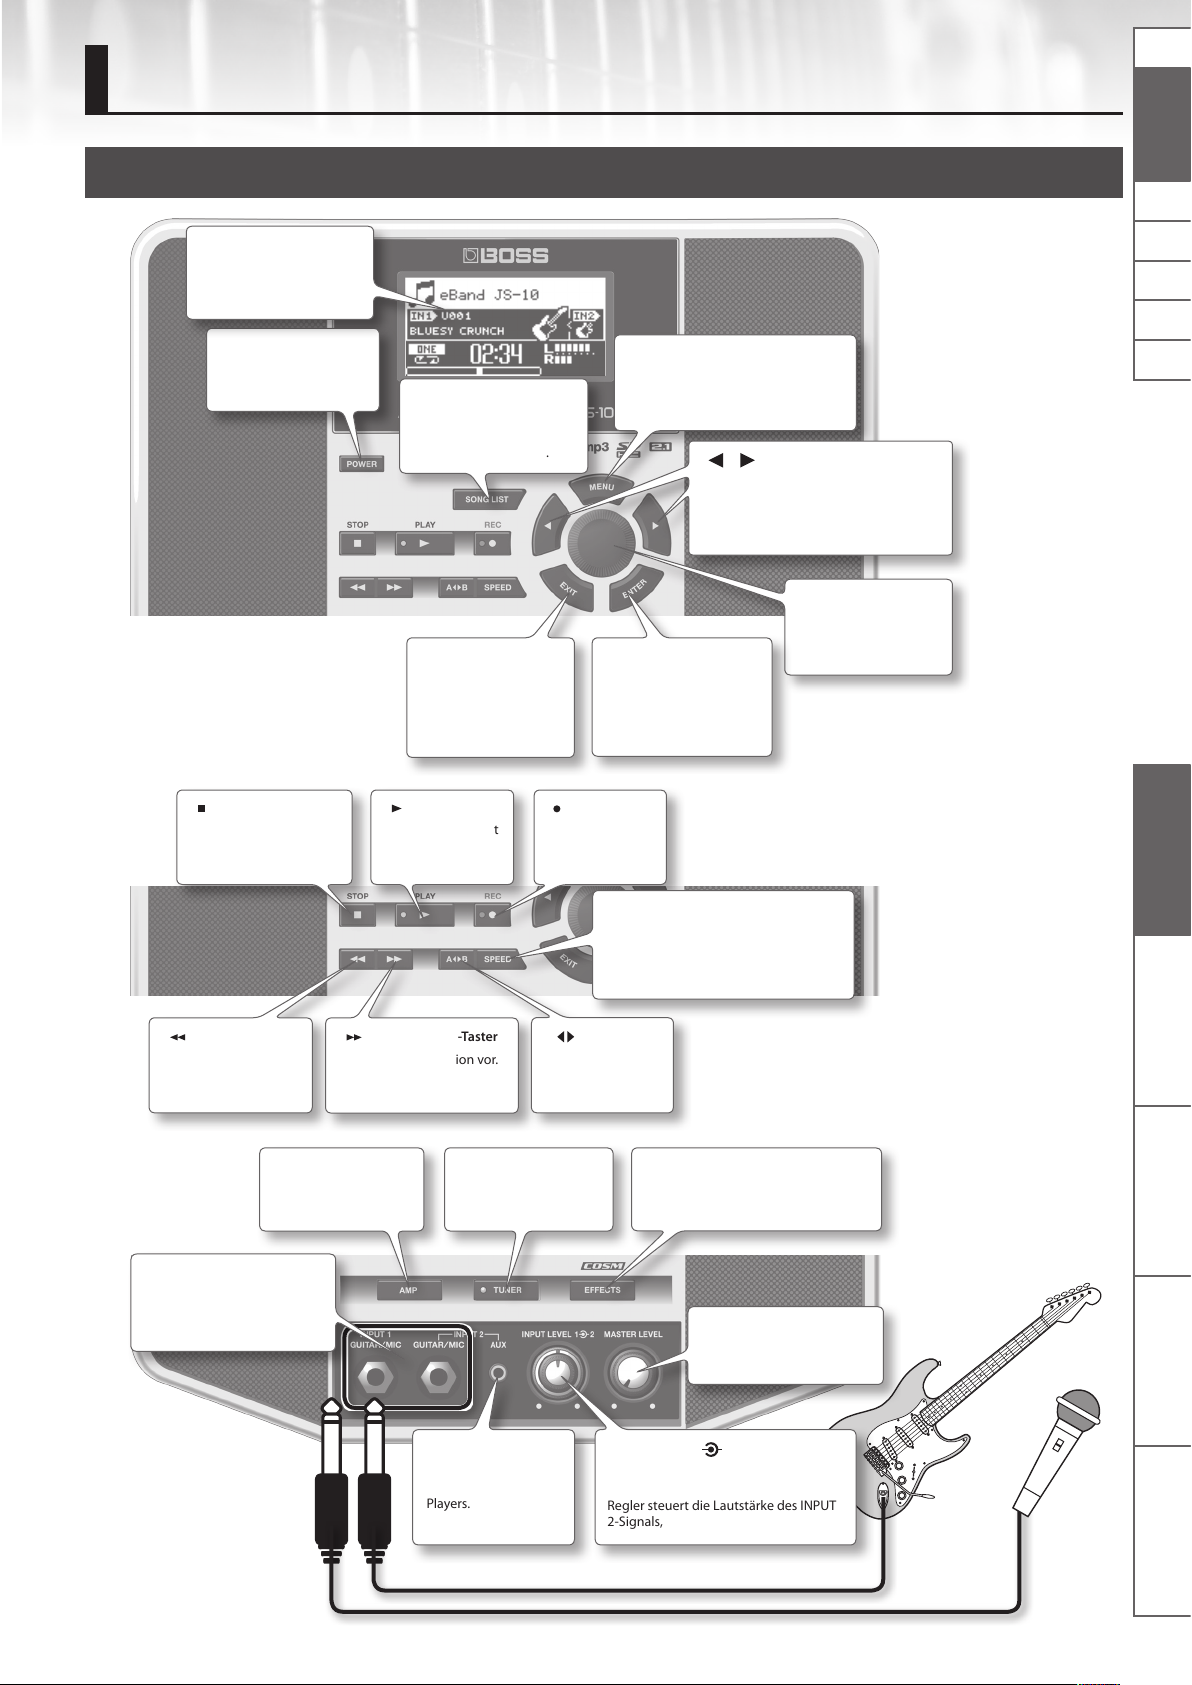
Die Bedienoberäche und Anschlüsse
Die Bedienoberäche
Display
Zeigt den Song-Namen,
Eect Patch-Namen und
andere Informationen an.
[POWER]-Taster
Schaltet das Gerät ein
bzw. aus (S. 5).
[ ] (STOP)-Taster
Dieser Taster beendet
die Wiedergabe oder die
Aufnahme des Songs.
[SONG LIST]-Taster
Zeigt die Song der
SD-Karte bzw. des
USB-Speichers an (S. 7).
[EXIT]-Taster
Bricht einen Vorgang
ab und wählt wieder
das vorherige Display
aus.
[ ] (PLAY)-Taster
Dieser Taster startet
die Wiedergabe
des Songs.
[MENU]-Taster
Ruft verschiedene Funktionen auf,
abhängig vom aktuell gewählten
Display (S. 6, S. 18).
[ ] [ ] (Cursor)-Taster
Mit diesen Tastern wird der Cursor im
Display bewegt und der gewünschte
Parameter ausgewählt (dieser wird
hervorgehoben angezeigt).
[ENTER]-Taster
Bestätigt die Eingabe
eines Wertes bzw. schaltet
eine Einstellung um.
[ ] (REC)-Taster
Aktiviert die
Aufnahme.
[SPEED]-Taster
Verändert die Geschwindigkeit bzw. die
Tonhöhe des Songs bzw. blendet das
Signal in der Mitte des Stereofeldes aus
(S. 11, S. 12).
Drehregler
Mit diesem wird der
Wert des ausgewählten
Parameters verändert.
NlPtEsItFrEn Deutsch
Bedienoberäche und
Anschlüsse
Spielen der Gitarre mit
Songs als Backing
[ ] (Rewind)-Taster
Setzt die SongPosition zurück.
INPUT 1/2 (GUITAR/MIC)Buchsen
Zum Anschluss der Gitarre
bzw. des Mikrofons.
[ ] (Fast Forward)-Taster
Setzt die Song-Position vor.
[AMP]-Taster
Ruft das AMP-Display
auf (S. 18).
[TUNER]-Taster
Ruft das TUNER-Display
auf (S. 9).
INPUT 2 (AUX)-Buchse
Zum Anschluss
eines externen Audio
Players.
[A B]-Taster
Aktiviert die
Wiederholfunktion
(S. 12).
eBand Song List Editor Verschiedene Funktionen Anhang
[EFFECTS]-Taster
Wählt ein Eekt-Patch bzw. das Eekt
Edit-Display aus (S. 10, S. 17).
[MASTER LEVEL]-Regler
Bestimmt die Gesamtlautstärke.
[INPUT LEVEL 1 2]-Regler
Der innere Regler steuert die Lautstärke
des INPUT 1-Signals, der äußere
Regler steuert die Lautstärke des INPUT
2-Signals,
3
Page 50

Die Bedienoberäche und Anschlüsse
Die Anschlüsse oben und an der Seite
USB-Anschluss-Kappen
Diese Anschlüsse sind mit Kappen
geschützt. Bewahren Sie diese
sorgfältig auf.
Stromversorgung
DC IN-Buchse
Zum Anschluss des
AC-Adapters.
AC-AdapterNetzkabel
Anzeige
USB MEMORY-Anschluss
Zum Anschluss eines
USB Flash-Speichers.
SD CARD-Schacht
Für die SD-Karte.
Anschluss für eine Kette ( )
http://www.kensington.com/
USB COMPUTER-Port
USB-Verbindung zu
einem Rechner (S.
13, S. 27).
EXP PEDAL/CTL 1, 2-Buchse
Anschlüsse für Fußschalter und
Expression-Pedal (S. 30).
PHONES-Buchse
Zum Anschluss eines
Kopfhörers.
LINE OUT-Buchsen
Zum Anschluss an externe
Lautsprecher.
* Lassen Sie die Geräte ausgeschaltet, wenn Sie neue Kabelverbindungen vornehmen. Damit beugen Sie eventuellen Fehlfunktionen bzw.
Beschädigungen vor.
* SD- bzw. SDHC-Karten dürfen nur bei ausgeschaltetem Gerät eingesetzt bzw. herausgenommen werden, ansonsten können die Daten der Karte
beschädigt werden.
* Stellen Sie sicher, dass der USB-Speicher bzw. die SD/SDHC-Karte fest eingesteckt ist.
* Der AC-Adapter besitzt eine Leuchtanzeige, die aktiviert wird, wenn die verwendete Steckdose Strom führt.
Das Haupt-Display
Dieses ist das Haupt-Display, das nach Einschalten des Gerätes erscheint.
Tonart und Song-Name
Zeigt die Tonart (S. 21) und den Namen
(S. 21) des zurzeit ausgewählten Songs an.
IN1
Zeigt die Eekt Patch-Nr.
und Patch-Namen der
INPUT 1 (GUITAR/MIC)Buchse an.
Play Mode
Zeigt den Typ der
Wiedergabe an (S. 9).
Song-Zeitleiste
Zeigt die aktuelle
Songposition an.
Eingangsempndlichkeits-Anzeige
Diese GAIN-Anzeige schlägt abhängig von der
Lautstärke des Eingangssignals aus (S. 23).
AB REPEAT-Bereich
Zeigt den Wiederholbereich
an ( S. 12).
Song-Playbackzeit
Zeigt die Abspielzeit
an.
IN2
Wenn Sie den Cursor hierher bewegen, wird die
Patch-Nummer und der Patch-Name des Eekts für
die INPUT 2-Buchse (GUITAR/MIC) angezeigt.
Level Meter
Zeigt den Gesamtpegel an für:
• das aktuelle Song-Playback
• die Eingangssignale (INPUT 1, INPUT 2, USB
COMPUTER-Signal)
S/P/C-Symbole
Diese Symbole erscheinen, wenn die Geschwin-
digkeit bzw. die Tonhöhe verändert oder die
Center Cancel-Funktion eingesetzt wird.
S: Abspiel-Geschwindigkeit
P: Tonhöhenveränderung
C: Center Cancel-Funktion eingeschaltet
Die in dieser Anleitung verwendeten Display-Abbildungen dienen nur als Beispiele und müssen nicht zwangsläug mit den Display-Abbildungen
Ihres Gerätes übereinstimmen.
4
Page 51

Die grundsätzliche Bedienung
Einschalten
Wenn Sie alle Geräte korrekt miteinander verbunden haben (S. 4),
schalten Sie die Geräte immer in der vorgeschriebenen Reihenfolge
ein bzw. aus, um eventuellen Fehlfunktionen bzw. Beschädigungen
vorzubeugen.
HINWEIS
• Regeln Sie immer die Lautstärke auf Minimum, bevor Sie die
Geräte ein- oder ausschalten. Auch bei minimaler
Lautstärkeeinstellung ist bei Ein- und Ausschalten ein Geräusch
hörbar. Dieses ist normal und keine Fehlfunktion.
• In der Werksvoreinstellung wird der JS-10 nach ca. 30
Minuten ohne Betätigung automatisch ausgeschaltet.
Wenn Sie die automatische Abschaltung de-aktivieren
möchten, stellen Sie den Parameter „AUTO OFF“ auf
„OFF“ (siehe S. 26).
1. Drehen Sie den [MASTER LEVEL]-Regler ganz nach links.
2. Drücken Sie den [POWER]-Taster, um das Gerät
einzuschalten.
Ausschalten
1. Drehen Sie den [MASTER LEVEL]-Regler ganz nach links.
2. Drücken Sie den [POWER]-Taster.
Das Gerät wird ausgeschaltet.
Bewegen des Cursors
In einem Display werden immer mehrere Parameter angezeigt.
Mit den [
gewünschten Parameter bewegen. Der ausgewählte Wert wird im
Display hervorgehoben angezeigt.
Auswahl eines Parameters
Bewegen Sie den Cursor auf den gewünschten Parameter bzw. das
gewünschte Symbol. und drücken Sie den [ENTER]-Taster, um die
Auswahl zu bestätigen.
In diesem Handbuch werden die folgenden Konventionen
zur Kennzeichnung der Schritte eines Verfahrens verwendet,
beispielweise Drücken des [MENU]-Tasters im Haupt-Display,
Auswählen von „SYSTEM” und Drücken des [ENTER]-Tasters.
[MENU]-Taster „SYSTEM“ [ENTER]-Taster
HINWEIS
] [ ] (Cursor)-Tastern können Sie den Cursor auf den
Drücken Sie wiederholt den [EXIT]-Taster, um zum HauptDisplay zurückzukehren.
NlPtEsItFrEn Deutsch
Bedienoberäche und
Anschlüsse
Verändern eines Wertes
Die Display-Anzeige leuchtet.
* Dieses Gerät besitzt einen Schutzschaltkreis, der nach
Einschalten überbrückt wird. Daher ist das Gerät erst nach
einigen Sekunden betriebsbereit.
3. Drehen Sie den [MASTER LEVEL]-Regler langsam nach
rechts, um die gewünschte Lautstärke einzustellen.
Auf der SD-Karte gespeicherte Dateien
Die mitgelieferte SD-Karte wird vor der Auslieferung in den JS-10 eingesetzt.
Die SD-Karte besitzt ab Werk die folgenden Daten.
eBand Song List Editor
Mithilfe dieser PC-Software können Sie Songs einer CDs in den JS-10 übertragen und die eBand-Songs benennen.
Weitere Informationen nden Sie unter „Importieren von Songs in den JS-10 (eBand Song List Editor)“ (S. 13).
USB-Treiber
Dieser Treiber ermöglich das Abhören des Audiosignals des Rechners mithilfe des JS-10.
Weitere Informationen nden Sie unter „Der JS-10 als USB Audio-Interface“ (S. 27).
Bewegen Sie den Cursor auf den gewünschten Parameterwert, und
drehen Sie den Drehregler nach links (Verringern des Wertes) bzw.
nach rechts (Erhöhen des Wertes).
Songs als Backing
Spielen der Gitarre mit
eBand Song List Editor Verschiedene Funktionen Anhang
ROLAND-Ordner
Die Daten des JS-10 werden in diesem Ordner abgelegt. Die Inhalte dieses Ordners dürfen nicht verändert bzw. gelöscht werden.
HINWEIS
Lesen Sie zu diesem Thema auch den Abschnitt „Die Speicherstruktur des JS-10“ (S. 38).
5
Page 52

Die grundsätzliche Bedienung
Der [MENU]-Taster
Drücken Sie den [MENU]-Taster, um eines der MENU-Displays
aufzurufen.
Der JS-10 besitzt die folgenden Menu-Displays.
• Menu im Haupt-Display (S. 6)
• Menu im SONG LIST-Display (S. 7)
• Menu im EFFECT-Display (S. 18)
Das Menu im Haupt-Display
Drücken Sie bei ausgewähltem Haupt-Display den [MENU]-Taster,
um das folgende MENU-Display anzuwählen.
Im diesem Display können Sie die folgenden Funktionen des JS-10
aufrufen.
MENU Beschreibung
SONG INFO Song-Informationen lesen (S. 21).
SONG NAME Songnamen eingeben (S. 21).
Song auf den USB Flash-Speicher sichern
EXPORT
SONG
IMPORT
ERASE Löschen des ausgewählten Songs (S. 8).
BEST 30 EDIT
AB EDIT
PATCH SYNC PATCH SYNC-Einstellungen (S. 22).
INPUT
AUDIO
SETTING
SYSTEM
EQ
SPEAKER
USB MODE Auswahl des USB MODE (S. 24).
PEDAL
PATCH BACKUP Sichern der Eekt-Einstellungen (S. 24).
PATCH RECOVER
SD INFO
USB MEMORY
SETTING
SD CARD
FORMAT (*)
FACTORY RESET
(S. 22).
* „EXPORT” wird nicht angezeigt,
wenn der USB Flash-Speicher nicht
angeschlossen wurde.
Übertragen des Songs des USB FlashSpeichers auf die SD-Karte (S. 22).
* „IMPORT” wird nicht angezeigt, wenn
auf dem USB Flash-Speicher kein Song
ausgewählt wurde.
Hinzufügen des Songs zu den BEST 30
(S. 7).
Einstellen der Wiederhol-Positionen für
die AB REPEAT-Funktion (S. 12).
Einstellungen für die Eingangsempndlichkeit und die INPUT 1- und INPUT
2-Buchsen (S. 23).
Aktivieren des Equalizers für das
Gesamtsignal (S. 23).
Schaltet den internen Lautsprecher des
JS-10 ein/aus (S. 23).
Auswahl einer Funktion für den externen
Fußschalter (S. 30).
Zurückübertragen der gesicherten
Eekt-Einstellungen (S. 25).
Überprüfen des freien Speichers der
SD-Karte (S. 25).
Überprüfen des freien Speichers des USB
Flash-Speichers (S. 25).
Verändern allgemeiner Einstellungen des
JS-10 (S. 25 – S. 26).
Initialisieren (formatieren) der SD-Karte
(S. 29).
Abrufen der Werksvoreinstellungen des
JS-10 (S. 26).
HINWEIS
(*) Die mit dem JS-10 gelieferte SD-Karte kann nicht initialisiert
werden.
6
Page 53
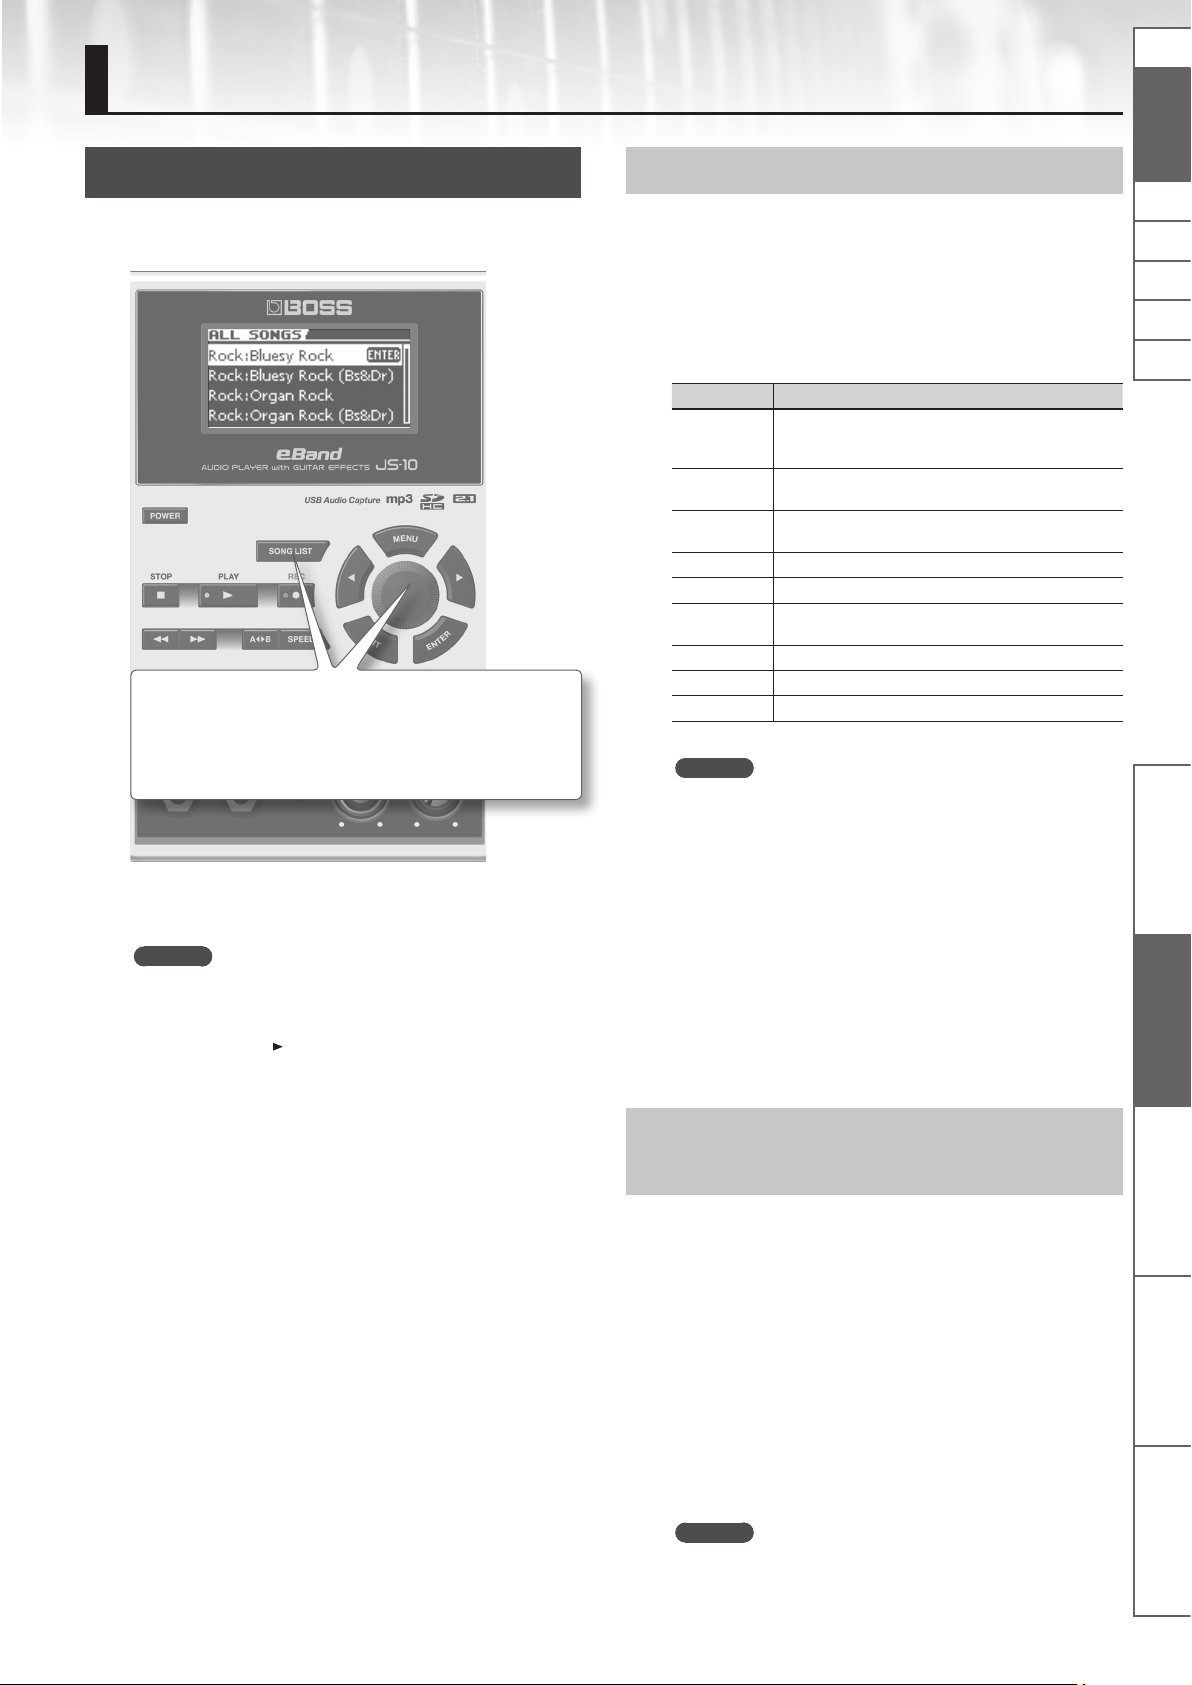
Spielen der Gitarre mit Song-Playback
Auswählen eines Songs
Sie können einen Song bzw. einen Rhythmus auswählen, zu dem
Sie Gitarre spielen möchten.
1. Drücken Sie den [SONG LIST]-Taster.
Das SONG LIST-Display erscheint.
Anzeigen der Songs nach Kategorien
Sie können die Songs nach Kategorien anzeigen lassen, z.B.
„Albumtitel“ oder „Künstlername“.
1. Drücken Sie nacheinander die Taster [SONG LIST]
[MENU].
Das MENU-Fenster wird angezeigt.
2. Wählen Sie die gewünschte Kategorie aus.
MENU Beschreibung
ALL SONGS
USER
BEST 30
ALBUM Die Songs werden nach Albumtitel sortiert.
ARTIST Die Songs werden nach Künstlernamen sortiert.
RHYTHM
USB MEMORY Die Dateien des USB Flash-Speichers werden angezeigt.
SD CARD Die Dateien der SD-Karte werden angezeigt.
REMOVE Entfernt den ausgewählten Song aus der BEST 30-Liste.
Die mit dem JS-10 aufgenommenen Songs sowie die
Songs, die einen Albumtitel bzw. Künstlernamen besitzen,
werden angezeigt.
Die mit dem JS-10 aufgenommenen Songs werden
angezeigt.
Die 30 als „Favorite“-Songs registrierten Songs werden
angezeigt.
Die auf der im JS-10 installierten SD-Karte gespeicherten
Rhythmen werden angezeigt.
NlPtEsItFrEn Deutsch
2. Drehen Sie den Drehregler, um einen Song
auszuwählen.
3. Drücken Sie den [ENTER]-Taster, um die Auswahl zu
bestätigen.
HINWEIS
• Sie können einen Song auch auswählen, indem Sie den
Drehregler drehen, während ein Song-Name im Haupt-Display
ausgewählt ist.
• Drücken Sie den [
den ausgewählten Song wiederzugeben.
• Der JS-10 kann bis zu 4.000 Songs verwalten.
]-Taster (PLAY) im Display SONG LIST, um
HINWEIS
• „ALBUM“ und „ARTIST“ sind nur verfügbar, wenn Albumtitel bzw.
Künstlernamen mit einem Song registriert sind.
• „SD CARD“ ist verfügbar, wenn SD VIEW (S. 26) auf ON gestellt ist.
• „REMOVE“ ist verfügbar, wenn BEST 30 ausgewählt ist.
• Mithilfe der eBand Song List Editor-Software (S. 13) können Sie die
gewünschten Albumtitel bzw. Künstlernamen eintragen. Wenn
Sie eine Audiodatei importieren, können Sie die Ziel-Songliste
bestimmen (Song, Rhythm oder User).
• Die Kategorisierung von Songs funktioniert mit Songs, die mit
dem JS-10 aufgezeichnet wurden, und für Songs, die mit der
eBand Song List Editor-Software (S. 13) bearbeitet wurden.
3. Drücken Sie den [ENTER]-Taster, um die Auswahl zu
bestätigen.
Registrieren eines Songs in der TOP 30-Liste (BEST 30)
Sie können häug verwendete Songs in einer Favorite-Liste
registrieren und dann über die Rubrik „BEST 30“ direkt anwählen.
1. Prüfen Sie, welche Songs als BEST 30 markiert werden
sollen.
2. Führen Sie die folgenden Bedienschritte aus: [MENU]-
Taster „BEST 30 EDIT“ [ENTER]-Taster.
Das BEST 30 EDIT-Display erscheint.
Bedienoberäche und
Anschlüsse
Spielen der Gitarre mit
Songs als Backing
eBand Song List Editor Verschiedene Funktionen Anhang
3. Registrieren Sie die bei Schritt 1 vorgewählten Songs als
BEST 30-Songs.
4. Drücken Sie den [ENTER]-Taster, um den Vorgang
auszuführen.
HINWEIS
Es ist nicht möglich, Songs eines USB Flash-Speichers in der
Rubrik „BEST 30“ zu registrieren.
7
Page 54
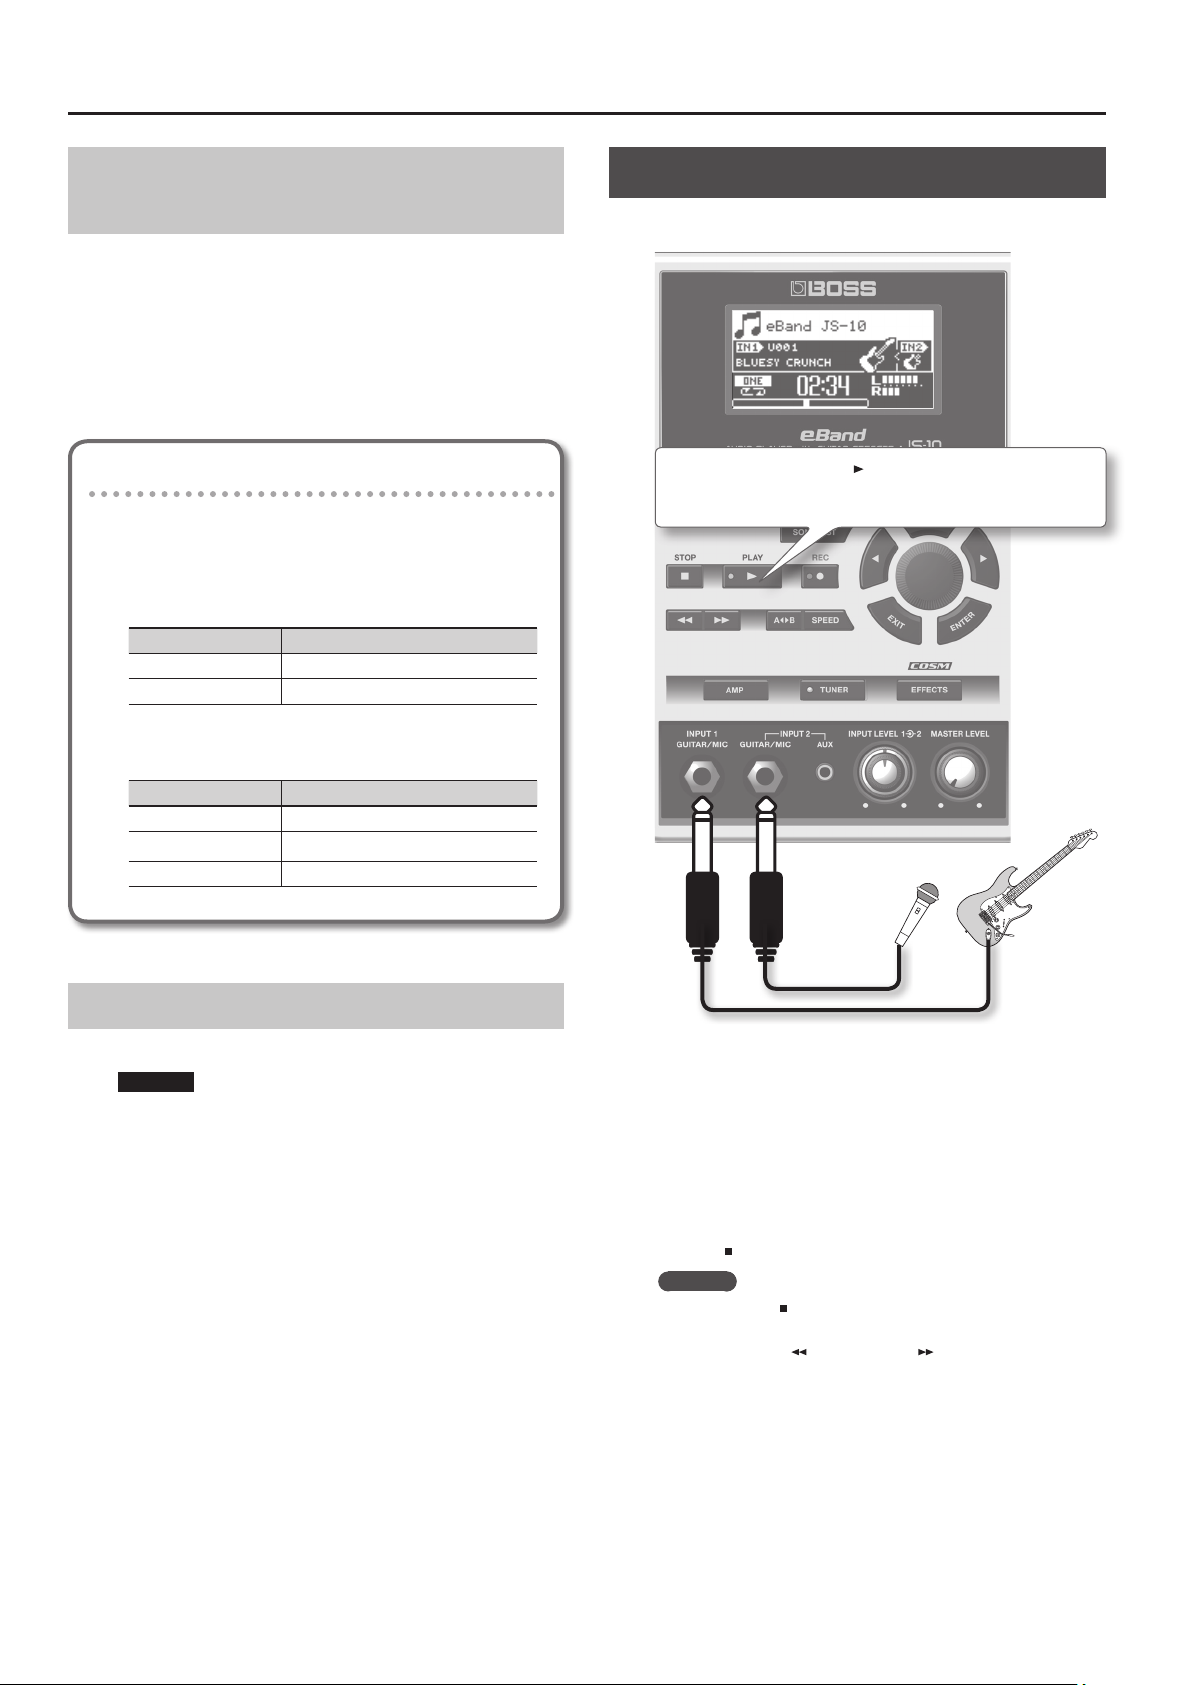
Spielen der Gitarre mit Song-Playback
Auswahl eines Songs eines USB FlashSpeichers
Sie können Songs eines USB Flash-Speichers direkt auswählen.
1. Führen Sie die folgenden Bedienschritte aus: [SONG LIST]-
Taster [MENU]-Taster „USB MEMORY“ [ENTER]Taster.
2. Wählen Sie den gewünschten Song aus.
3. Drücken Sie den [ENTER]-Taster.
Dateiformate, die der JS-10 erkennt
eBand-Format
Roland/BOSS-eigenes Format für kodierte Audiodaten
MP3-Format
MP3 Format
Sampling Rate 44.1 kHz
Bit Rate 64 K – 320 Kbps
Spielen zu einem Song-Playback
Sie können zu einem Song-Playback Gitarre spielen und üben.
1. Drücken Sie den [ ] (PLAY)-Taster.
Das Song-Playback wird gestartet.
WAV-Format
WAV Format
Sampling Rate 44.1 kHz
Bitbreite 16 bits
Kodierung linear
Löschen eines Songs
Sie können den aktuell ausgewählten Song löschen.
HINWEIS
Dieser Vorgang kann nicht rückgängig gemacht werden.
1. Wählen Sie den Songs aus, der gelöscht werden soll (S. 7).
2. Führen Sie die folgenden Bedienschritte aus: [MENU]-
Taster „SONG“ [ENTER]-Taster „ERASE“ [ENTER]Taster.
Die Meldung „Are you sure?“ erscheint.
3. Drücken Sie den [ENTER]-Taster, um den Song zu löschen.
8
2. Stellen Sie mit dem [MASTER LEVEL]-Regler die
gewünschte Lautstärke ein.
3. Drehen Sie den [INPUT LEVEL 1]-Regler und [INPUT LEVEL
2]-Regler ganz nach links (minimale Lautstärke).
4. Spielen Sie auf der Gitarre, und stellen Sie mit dem
[INPUT LEVEL 1]-Regler bzw. [INPUT LEVEL 2]-Regler die
gewünschte Lautstärke für die Gitarre ein.
5. Wenn Sie das Song-Playback stoppen möchten, drücken
Sie den [
HINWEIS
• Wenn Sie den [
• Mit den Tastern [
• Je nach Aufstellort und -position von Mikrofonen im Verhältnis
* Wählen Sie einen Eekt aus den Kategorien für Mikrofon aus,
] (STOP)-Taster.
] (STOP)-Taster im Stop-Zustand drücken, wird
der Anfang des Songs angewählt (Position „00:00“).
] (Rewind) und [ ] (Fast Forward) können
Sie die Song-Position verschieben.
zu Lautsprechern können Rückkopplungen (Heultöne)
entstehen. Dies kann im Allgemeinen folgendermaßen
vermieden werden:
1. Verändern Sie die Richtung des Mikrofons.
2. Vergrößern Sie den Abstand zwischen Mikrofon und den
Lautsprechern des JS-10.
3. Reduzieren Sie die Lautstärke.
wenn Sie ein Mikrofon anschließen (S. 10). Stellen Sie zudem die
Eingangsempndlichkeit der INPUT-Buchse auf Mikrofon (S. 23).
Page 55

Spielen zum Playback eines externen
Players
Anschluss über ein
Stereo-Miniklinkenk
HINWEIS
Wenn sowohl die INPUT 2 (GUITAR/MIC)-Buchse als auch INPUT 2
(AUX)-Buchse verkabelt sind, kann nur das an der INPUT 2 (AUX)Buchse angeschlossene Gerät verwendet werden.
abel
Externer Audio
Player
Spielen der Gitarre mit Song-Playback
Stimmen der Gitarre
Sie können mithilfe des internen Stimmgerätes die am INPUT 1
oder INPUT 2 angeschlossene Gitarre bzw. den angeschlossenen
Bass stimmen.
NlPtEsItFrEn Deutsch
1. Drücken Sie den [TUNER]-Taster.
Das TUNER-Display erscheint.
Auswahl des Abspiel-Modus
Sie können bestimmen, wie ein Song abgespielt wird.
Display Beschreibung
Der ausgewählte Song wird einmal bis zum Ende
abgespielt.
Der ausgewählte Song wird wiederholt abgespielt.
Die in der Liste aufgeführten Songs werden der Reihe nach
abgespielt. Nach Ende des letzten Songs wird das Playback
gestoppt. *
Die in der Liste aufgeführten Songs werden der Reihe nach
abgespielt. Nach Ende des letzten Songs wird das Playback
mit dem ersten Song in der Liste fortgesetzt. Um das
Playback zu stoppen, drücken Sie den [ ] (Stop)-Taster. *
Die in der Liste aufgeführten Songs werden in willkürlicher
Reihenfolge abgespielt. *
Die in der Liste aufgeführten Songs werden in willkürlicher
Reihenfolge abgespielt. Um das Playback zu stoppen,
drücken Sie den [ ] (Stop)-Taster. *
Die Zeitposition „A“ ist registriert („Einstellen eines
Wiederholbereiches (AB REPEAT)“ (S. 12)).
Das Playback wird zwischen den Positionen „A“ und „B“
wiederholt („Einstellen eines Wiederholbereiches (AB
REPEAT)“ (S. 12)).
PITCH
Bestimmt die Frequenz des Referenztons „A4“.
2. Stimmen Sie die Saite so, dass die korrekte
Note und beide Dreieck-Symbole erscheinen.
Display Beschreibung
zu niedrig gestimmt
korrekt gestimmt
zu hoch gestimmt
HINWEIS
Der [TUNER]-Taster leuchtet, wenn das Stimmgerät ausgewählt
ist.
Bedienoberäche und
Anschlüsse
Spielen der Gitarre mit
Songs als Backing
eBand Song List Editor Verschiedene Funktionen Anhang
HINWEIS
Wenn Sie einen mit [*] bezeichneten Modus auswählen, wird
der Song nach Erreichen der End-Position gestoppt, wenn ein
anderes Display als das „Haupt-Display“ (S. 4) ausgewählt ist.
Standard-Stimmung
Saite 7. 6. 5. 4. 3. 2. 1.
Gitarre B E A D G B E
Bass B E A D G
9
Page 56

Spielen der Gitarre mit Song-Playback
Aufnehmen des Spiels
Sie können Ihr Spiel so aufnehmen, wie Sie es über die Lautsprecher
des JS-10 hören.
1. Um zu einem Song-Playback aufzunehmen,
drücken Sie zuerst den [ ] (PLAY)-Taster und
danach den [ ] (REC)-Taster.
Ihr Spiel wird zusammen mit dem Song-Playback
aufgenommen.
Auswahl eines Eektes
Sie können für beide Eingänge (IN 1 und IN 2) einen Eekt
auswählen.
1. Wählen Sie entweder IN1 oder IN2.
IN1
Eekt für INPUT 1 (GUITAR/
MIC)-Buchse
HINWEIS
Der Eekt wird nicht auf die AUX-Buchse angewendet.
2. Drücken Sie den [EFFECTS]-Taster.
Das PATCH SELECT-Display erscheint.
IN2
Eekt für INPUT 2 (GUITAR/
MIC)-Buchse
HINWEIS
Wenn Sie nur Ihr Spiel (ohne Song-Playback) aufnehmen
möchten, drücken Sie nur den [
den [ ] (PLAY)-Taster.
] (REC)-Taster und nicht vorher
2. Drücken Sie den [ ] (STOP)-Taster, um die Aufnahme zu
stoppen.
Das REC END-Fenster erscheint.
3. Entscheiden Sie, was mit Ihrer Aufnahme passieren soll.
Symbol Beschreibung
SAVE
ERASE Löschen.
PREVIEW
] (PLAY)-Taster drücken)
([
HINWEIS
Neu aufgenommene Songs erhalten automatisch die
Bezeichnung „SONG**** (originaler Songname****; ****
bezeichnet die Nummer). Wenn der originale Songname einmal
mit der eBand Song List Editor-Software geändert wurde, ist die
Bezeichnung „SONG****“.
Sichern in der Kategorie „USER“ der
Songliste.
Abhören.
3. Wählen Sie die gewünschte Kategorie aus.
Anwendung
Für eine
Gitarre
Für einen
Bass
Für ein
Mikrofon
User Patch
* Wählen Sie einen Eekt aus den Kategorien für Mikrofon aus,
wenn Sie ein Mikrofon anschließen (S. 10). Stellen Sie zudem die
Eingangsempndlichkeit der INPUT-Buchse auf Mikrofon (S. 23).
Kategorie
10
Page 57

4. Wählen Sie das gewünschte Eekt-Patch aus.
Spielen der Gitarre mit Song-Playback
Verändern der Tonhöhe eines Songs
Sie können die Tonhöhe eines Songs verändern, ohne dass sich
parallel die Abspiel-Geschwindigkeit ändert.
1. Drücken Sie den [SPEED]-Taster.
HINWEIS
In der Werksvoreinstellung sind auf der beigefügten SD-Karte
für jeden Song entsprechend passende Eekte voreingestellt.
Lesen Sie zu diesem Thema den Abschnitt „Umschalten der
Eekt-Patches bei Wechseln des Songs (PATCH SYNC)“ (S. 22).
Verändern der Abspielgeschwindigkeit eines Songs
Sie können die Abspiel-Geschwindigkeit eines Songs reduzieren
und dadurch schwierige bzw. schnelle Passagen besser üben.
Durch diesen Vorgang wird nicht die Tonhöhe des Songs verändert.
1. Drücken Sie den [SPEED]-Taster.
2. Wählen Sie die Option SPEED aus.
2. Wählen Sie die Option PITCH FINE aus.
3. Drücken Sie den [ENTER]-Taster.
Dadurch wird die PITCH FINE-Funktion aktiviert („ON“).
4. Wählen Sie die gewünschte Geschwindigkeit aus.
5. Stellen Sie die gewünschten Werte für PITCH bzw. FINE
ein.
Der Einstellbereich für PITCH ist [-6] bis [+7] (Halbtöne).
Der Einstellbereich für FINE ist [-50] bis [+50] (in Schritten von 1
Cent).
HINWEIS
• Wenn die Tonhöhe verändert wurde, erscheint unten im HauptDisplay das „P“-Symbol.
NlPtEsItFrEn Deutsch
Bedienoberäche und
Anschlüsse
Spielen der Gitarre mit
Songs als Backing
3. Drücken Sie den [ENTER]-Taster.
Dadurch wird die SPEED-Funktion aktiviert („ON“).
4. Wählen Sie die gewünschte Geschwindigkeit aus.
Der Einstellbereich ist „50–150“ (%). Die normale Einstellung ist
„100“.
HINWEIS
Wenn die Geschwindigkeit verändert wurde, erscheint unten im
Haupt-Display das „S“-Symbol.
eBand Song List Editor Verschiedene Funktionen Anhang
• Wenn bei den Song-Parametern die Einstellung für KEY (S.
21) gesetzt wurde, entspricht die KEY-Einstellung der PITCHEinstellung.
KEY-Anzeige
11
Page 58

Spielen der Gitarre mit Song-Playback
Die Center Cancel-Funktion
Sie können das Signal an einer zu wählenden Position im Stereofeld
in der Lautstärke reduzieren bzw. im Idealfall komplett ausblenden.
1. Drücken Sie den [SPEED]-Taster.
2. Wählen Sie die Option CENTER CANCEL.
Einstellen eines Wiederholbereiches (AB REPEAT)
Sie können einen Abschnitt auswählen, der wiederholt wird, und zu
dieser Passage spielen bzw. üben.
1. Drücken Sie den [ ] (PLAY)-Taster.
2. Drücken Sie den [A B]-Taster jeweils 1x an der
gewünschten Start- bzw. End-Position.
3. Drücken Sie den [ENTER]-Taster.
Dadurch wird die CENTER CANCEL-Funktion aktiviert („ON“).
4. Wählen Sie die gewünschte Position im Stereofeld aus.
„C0“ entspricht der Mittel-Position, „L**“ entspricht einer Position
auf der linken Seite und „R**“ einer Position auf der rechten Seite.
HINWEIS
• Die Center Cancel-Funktion wirkt auch auf das Signal der INPUT
2 (AUX)-Buchse und das über den USB COMPUTER-Anschluss
eingehende Signal.
• Abhängig von der Struktur der Audiodatei ist es möglich, dass
der Sound nicht wie gewünscht vollständig ausgeblendet
werden kann.
• Wenn die Center Cancel-Funktion aktiviert wurde, erscheint
unten im Haupt-Display das „C“-Symbol.
Der AB-Bereich wird
wiederholt abgespielt.
Um die AB REPEAT-Funktion wieder auszuschalten, drücken Sie
erneut den [A B]-Taster.
Justieren der AB REPEAT-Positionen
Sie können die für A und B eingegebenen Positionen in
Feinschritten justieren.
1. Führen Sie die folgenden Bedienschritte aus:
[MENU]-Taster „AB EDIT“ [ENTER]-Taster.
2. Stellen Sie im AB EDIT-Display die Startposition (A) und
End-Position (B) wie gewünscht ein.
12
HINWEIS
• Wenn Sie im AB EDIT-Display wiederholt den [ENTER]-Taster
drücken, können Sie damit die AB REPEAT-Funktion ein- bzw.
ausschalten.
• Bei MP3-Daten sind die A- und B-Positionen eventuell nicht
präzise einstellbar.
• Der Abstand zwischen „A“ und „B“ muss mindestens eine
Sekunde betragen.
Page 59

Importieren von Songs in den JS-10
Mit der „eBand Song List Editor“-Software besitzen Sie die
folgenden Optionen:
• Importieren von Songs einer CD in den JS-10
• Importieren von WAV- und MP3-Dateien auf Ihrem PC auf den
JS-10
• Editieren von Informationen der im JS-10 gespeicherten Songs.
HINWEIS
Lesen Sie zu diesem Thema auch die „Help“-Datei der eBand
Song List Editor-Software.
Vorbereitungen
Anschließen des JS-10 an den Rechner
1. Führen Sie die folgenden Bedienschritte aus:
Taster „SYSTEM“ [ENTER]-Taster „USB MODE“
[ENTER]-Taster „eBand SONG LIST EDITOR“ [ENTER]Taster.
2. Verbinden Sie den Rechner und den JS-10 mithilfe des
dem JS-10 beigefügten USB-Kabels.
[MENU]-
Installieren der eBand Song List EditorSoftware
Die „eBand Song List Editor“-Software nden Sie auf der im JS-10
installierten SD-Karte.
HINWEIS
• Wenn Sie die eBand Song List Editor-Software bereits installiert
• Die Beschreibung des PC-Verfahrens basiert auf dem
1. Suchen Sie mit dem Computer die Ordner innerhalb von
„JS-10 EBAND“.
2. Doppelklicken Sie auf eine der unten dargestellten
Dateien.
Dateiname Unterstützte Betriebssysteme
Win.zip Windows 7, Vista, XP
Mac.dmg Mac OS
Die Inhalte der Datei werden angezeigt.
3. Kopieren Sie den Ordner „Song List“ auf den PC.
(eBand Song List Editor)
haben, fahren Sie fort mit dem Abschnitt „Starten des eBand
Song List Editor“ (S. 13).
„Arbeitsplatz“ (Windows) und dem „Finder“ (Mac OS).
NlPtEsItFrEn Deutsch
HINWEIS
USB COMPUTER-AnschlussUSB-Anschluss
Es wird empfohlen, die Dateien in einen Ordner zu kopieren, der
später leicht aufzunden ist.
Bedienoberäche und
Anschlüsse
4. Wenn Sie Windows verwenden, schließen Sie das Fenster
„Win.zip“. Wenn Sie Mac OS verwenden, ziehen Sie das
„Mac“-Symbol auf das Auswerfen-Symbol im Dock.
5. Lesen Sie die Datei ReadmeEN.txt im Ordner „Song List“,
den Sie auf den Computer kopiert haben, und installieren
Sie dann die Software eBand Song List Editor.
Songs als Backing
Spielen der Gitarre mit
Starten des eBand Song List Editor
Windows-Anwender
1. Klicken Sie am Rechner auf [Start] [All Programs]
„eBand Song List Editor“ „eBand Song List Editor“.
Mac OS-Anwender
1. Dopelklicken Sie auf den Ordner Application Roland-
Ordner eBand Song List Editor-Ordner „eBand Song
List Editor“.
eBand Song List Editor Verschiedene Funktionen Anhang
13
Page 60

Importieren von Songs in den JS-10 (eBand Song List Editor)
Anwendung der eBand Song List Editor-Software
[Import]-Taster
Importiert Audiodaten (WAV/
MP3) vom Rechner in den JS-10.
[CD Ripping]-Taster
Liest den gewählten Song
einer Audio-CD aus (S. 15).
List Mode-Taster
Schalten die Anzeige
der Songliste um (Song/
Rhythm/User).
[Export]-Taster
Konvertiert den eBand-
Song in das WAV-Format
und überträgt diesen
auf den Rechner.
[Delete]-Taster
Löscht den ausgewählten Song.
[Write]-Taster
Sichert die Änderungen
in der Liste auf die
SD-Karte.
[Disconnect]-Taster
Unterbricht die USBVerbindung zwischen JS-10
und dem Rechner.
Listenbereich
Hier können Sie die SongInformationen verändern.
Klicken auf einen der
„List Mode-Taster“ (Song/
Rhythm/User) schaltet diese
Listenanzeige um.
HINWEIS
• Der JS-10 kann bis zu 4.000 Songs verwalten.
14
Page 61

Importieren von Songs in den JS-10 (eBand Song List Editor)
Übertragen von Songs einer CD in den JS-10 (Ripping)
Sie können Songs einer Audio-CD auf den JS-10 übertragen. Diese
Songs werden in die aktuell gewählte Songliste eingefügt („List
Mode“-Taster [Song], [Rhythm] oder [User]).
HINWEIS
Sie müssen für diesen Vorgang Administrator-Rechte für den
verwendeten Rechner besitzen.
1. Klicken Sie auf den gewünschten List Mode-Taster (Song,
Rhythm oder User).
Legt fest, in welche Songliste die Songs übertragen werden.
2. Legen Sie die gewünschte Audio-CD in das DVD/CD-
Laufwerk des Rechners.
3. Klicken Sie im eBand Song List Editor auf den [CD
Ripping]-Taster.
Der CD Ripping-Bildschirm erscheint.
[Obtain again]-Taster
Ruft über die Internet-Verbindung die
Titelnamen und Künstlernamen der
Songs auf. Der Rechner muss dafür
„online“ sein.
Auswahl des Songformats
So wählen Sie das Songformat aus, wenn Sie Songs von CD zum
JS-10 übertragen.
1. Klicken Sie im „Options“-Menü auf „Conserve Card
Memory“.
Conserve Card Memory Import-Format
eBand Song-Format
ON (aktiviert)
OFF (abgeschaltet)
HINWEIS
Die Standardeinstellung ist „ON“ (Conserve Card Memory).
Die Daten werden kodiert und benötigen
weniger Speicher als eine vergleichbare
WAV-Datei.
WAV-Format
Die Daten werden linear (nicht kodiert)
übertragen.
Dateiformate, die importiert werden
können
Mit dem eBand Song List Editor können die folgenden
Dateiformate für Audiodaten importiert werden.
MP3-Format
NlPtEsItFrEn Deutsch
Bedienoberäche und
Anschlüsse
Track-Information
Hier werden die Track-Nummern der Songs der Audio-CD angezeigt.
Wenn der Rechner mit dem Internet verbunden ist, werden über die
Datenbank „Gracenote® MusicID“ die Songnamen und Künstlernamen
automatisch abgerufen und im Monitor angezeigt.
• Die Einträge können bei einigen CDs unvollständig sein. Für die
Richtigkeit der abgerufenen Daten kann keine Garantie übernommen werden.
4. Wählen Sie im eBand Song List Editor den gewünschten
Song der CD aus.
5. Klicken Sie auf den [OK]-Taster.
Der Song wird von der CD auf die SD-Karte des JS-10 übertragen.
Nach Abschluss des Vorgangs ist der entsprechende Song in der
aktuell gewählten Songliste zu sehen.
Format Einstellungen
Sampling Rate 44.1 kHz
Bit Rate 64 K – 320 Kbps
Dateinamenerweiterung
Länge
HINWEIS
• MP3-Daten werden immer im MP3-Format importiert,
unabhängig von der „Conserve Card Memory“Einstellung.
• Wenn eine MP3-Datei „ID3-Tags“ für Songnamen,
Künstlernamen und Albumtitel besitzt, werden diese
Informationen ebenfalls importiert.
.mp3 (keine Unterscheidung bei Großoder Kleinschreibung)
Mindestens eine Sekunde
WAV-Format
Format Einstellungen
Sampling Rate 44.1 kHz
Bitbreite 16 bits
Enkodierung unkomprimiert (linear)
Dateinamenerweiterung
Länge
.wav (keine Unterscheidung bei Großoder Kleinschreibung)
Mindestens eine Sekunde
Songs als Backing
Spielen der Gitarre mit
eBand Song List Editor Verschiedene Funktionen Anhang
HINWEIS
Spielen Sie während der Datenübertragung keine CD
am Rechner ab, ansonsten können Nebengeräusche mit
aufgezeichnet werden.
15
Page 62

Importieren von Songs in den JS-10 (eBand Song List Editor)
Editieren der Song-Informationen
Sie können verschiedene Song-Informationen (Song-Information, Künstlername, Albumtitel) für im JS-10 bendliche Songs verändern. Die
geänderten Song-Informationen werden im Display des JS-10 angezeigt.
Song-Name / Rhythmus-Name
Der Song-Name bzw. RhythmusName wird angezeigt.
HINWEIS
• (*1) Wenn Sie als Songliste „Rhythm“ oder „User“ gewählt haben, werden die Einträge für „Album“ und „Artist“ nicht angezeigt.
• Der JS-10 kann bis zu 2.000 Albumtitel+Künstlernamen verwalten.
• Der eBand Song List Editor ermöglicht die Benutzung von Doppelbyte-Zeichen (z.B. Japanisch) für Songnamen, Künstlernamen und Albumtitel.
• Wenn Songs mithilfe der eBand Song List Editor-Software in den JS-10 importiert werden, werden die Doppelbyte-Zeichen der Songnamen im
Display des JS-10 angezeigt.
Artist (*1)
Der Künstlername wird
angezeigt.
[Write]-Taster
Sichert die geänderten
Einträge auf der SD-Karte.
Album (*1)
Der Albumtitel wird
angezeigt.
Type
Dateiformat des Songs. Diese Angabe kann nicht verändert werden.
Protect
Der Schreibschutz-Schalter
(On/O) wird angezeigt.
Eingabe von Textdaten
1. Wählen Sie das gewünschte Textfeld aus, dessen Inhalt Sie ändern möchten.
Windows: Klicken Sie mit der rechten Maustaste auf das gewünschte Textfeld.
Mac OS: Doppelklicken Sie auf das gewünschte Textfeld.
2. Geben Sie den gewünschten Text ein.
3. Drücken Sie auf der Computer-Tastatur den [Enter]-Taster (oder [Return]-Taster), um die Eingabe zu bestätigen.
HINWEIS
Lesen Sie zu diesem Thema auch den Abschnitt „Using eBand Song List Editor“ (PDF) im Help-Menü der eBand Song List Editor-Software.
Sichern der geänderten Informationen
1. Klicken Sie auf den [Write]-Taster.
Die geänderten Informationen werden auf der SD-Karte des JS-10 gesichert.
HINWEIS
Wenn Sie die eBand Song List Editor-Software beenden bzw. die USB-Verbindung zwischen JS-10 und Rechner unterbrechen, ohne vorher die
geänderten Informationen gesichert zu haben, gehen alle bis dahin nicht gesicherten Daten verloren.
Beenden der Verbindung mit dem PC
1. Klicken Sie in eBand Song List Editor auf die Schaltäche [Disconnect].
2. Drücken Sie auf dem JS-10 den [EXIT]-Taster.
Die Meldung „Are you sure?“ wird angezeigt.
3. Zum Beenden der Verbindung drücken Sie auf dem JS-10 den [ENTER]-Taster.
* Um den eBand Song List Editor erneut zu verwenden, verwenden Sie das unter „Anschließen des JS-10 an den Rechner” (S. 13) erläuterte Verfahren.
16
Page 63

Verschiedene Funktionen
Editieren der Eekt-Parameter
Sie können die Eekt-Einstellugen editieren und damit Ihre eigenen
Sounds erstellen.
Visuelles Editieren (EZ EDIT)
6. Drücken Sie den [ ] (Cursor)-Taster.
Das EZ EDIT-Display erscheint.
Stellen Sie die Parameter mit dem Cursor und dem Drehregler ein.
SOFT
wenig
Verzerrung
BACKING
Sound für
Backing.
SOLO
Sound für
Soli.
HARD
starke
Verzerrung.
Sie können den Sound intuitiv mithilfe einer zweidimensionalen
Graphik verändern. Dabei werden mehrere Parameter gleichzeitig
verändert.
1. Wählen Sie Eingangsbuchse aus, deren Eekt verändert
werden soll.
„IN1“=INPUT 1-Buchse, „IN2“=INPUT 2-Buchse.
IN1
Eekt der INPUT
1-Buchse.
IN2
Eekt der INPUT
2-Buchse.
2. Drücken Sie den [EFFECTS]-Taster.
Das PATCH SELECT-Display erscheint.
IN1 / IN2
Anzeige der
aktuell gewählten
Input-Buchse.
/
Bestimmt
die Richtung
des Cursors.
Cursor
Drehen Sie den Drehregler,
um den Cursor in die mit
/ ausgewählte
Richtung zu bewegen.
HINWEIS
Wenn Sie die geänderten Einstellungen behalten möchten,
müssen Sie diese in einem Patch sichern, da ansonsten bei
Umschalten des Patches die bis dahin nicht gesicherten
Einstellungen verloren gehen.
Dieses ist auch der Fall, wenn der PATCH SYNC-Parameter auf
ON steht und Songs ausgewählt werden, weil dann gleichzeitig
auch die zum jeweiligen Song zugehörige Patches ausgewählt
werden.
Lesen Sie dazu auch den Abschnitt „Sichern eines Patches“ (S. 19).
HINWEIS
Sie können die Einstellungen der Eekt-Patches auch im Detail
verändern. Siehe „Editieren der Sounds im Detail (PATCH EDIT)“
(S. 18).
AMBIENCE
Drehen Sie den Drehregler, um die
Länge des Hall-Eekts einzustellen.
kurz
. . . lang
NlPtEsItFrEn Deutsch
Bedienoberäche und
Anschlüsse
Spielen der Gitarre mit
Songs als Backing
Patch-Nummer
Zeigt die Nummer
des Patches an.
CATEGORY
Die Musikstilrichtung.
PATCH
Die Auswahl der Eekt-Pogramme.
3. Wählen Sie bei CATEGORY die gewünschte
Musikstilrichtung aus.
4. Drücken Sie den [ ] (Cursor)-Taster.
Der Cursor wird auf das PATCH-Feld bewegt.
5. Wählen Sie das gewünschte Eekt-Programm (PATCH)
aus.
eBand Song List Editor Verschiedene Funktionen Anhang
17
Page 64

Verschiedene Funktionen
Editieren der Sounds im Detail (PATCH EDIT)
In einem Eekt-Patch werden die Einstellungen der verschiedenen
Eekte der Eektkette gesichert. Sie können im PATCH EDIT-Menü
alle verfügbaren Eekt-Parameter einstellen.
1. Folgen Sie den unter „Visuelles Editieren (EZ EDIT)“ (S. 17)
beschriebenen Bedienschritten, um das EZ EDIT-Display
anzuwählen.
2. Drücken Sie mehrmals den [ ]-Taster (Cursor).
Das PATCH EDIT-Display erscheint.
Cursor
Wählt den Einzeleekt aus.
DREHREGLER
Drehen Sie den Drehregler, um den
ausgewählten Eekt auf ON oder OFF
zu stellen.
ENTER
Bestätigt die Auswahl
des Eektes.
Das MENU eines Eekt-Displays
Sie können in Eekt-bezogenen Displays wie PATCH SELECT oder
PATCH EDIT durch Drücken des [MENU]-Tasters das EFFECT MENUDisplay aufrufen.
EFFECT MENU Beschreibung
WRITE/NAME
EXCHANGE
INITIALIZE
HINWEIS
Die angezeigten MENU-Parameter sind abhängig vom aktuell
gewählten Display bzw. der Position des Cursors.
Sichert die Einstellungen des aktuell gewählten
Patches bzw. kopiert das aktuell gewählte Patch.
Vertauscht die Speicherplätze des aktuell gewählten
Patches mit einem anderen Patch.
Setzt die Einstellungen der Eekte auf deren
Werksvoreinstellungen zurück.
3. Drücken Sie den [ENTER]-Taster.
Ein Display mit den einzelnen Parametern des ausgewählten
Eektes erscheint (nachfolgend gezeigte Beispiele: Das AMPDisplay und das MOD SELECT-Display).
Page-Symbole ( ) ( )
Wenn diese angezeigt werden, können Sie mit den [
[ ]-Tastern die Display-Seiten umblättern.
ENTER
Schaltet den Eekt ein bzw. aus.
HINWEIS
• Das AMP-Display wird durch Drücken des [AMP]-Tasters auf der
Bedienoberäche aufgerufen.
• Lesen Sie zu diesem Thema auch die „Liste der Eekt-Parameter“
(S. 31).
]
18
Page 65
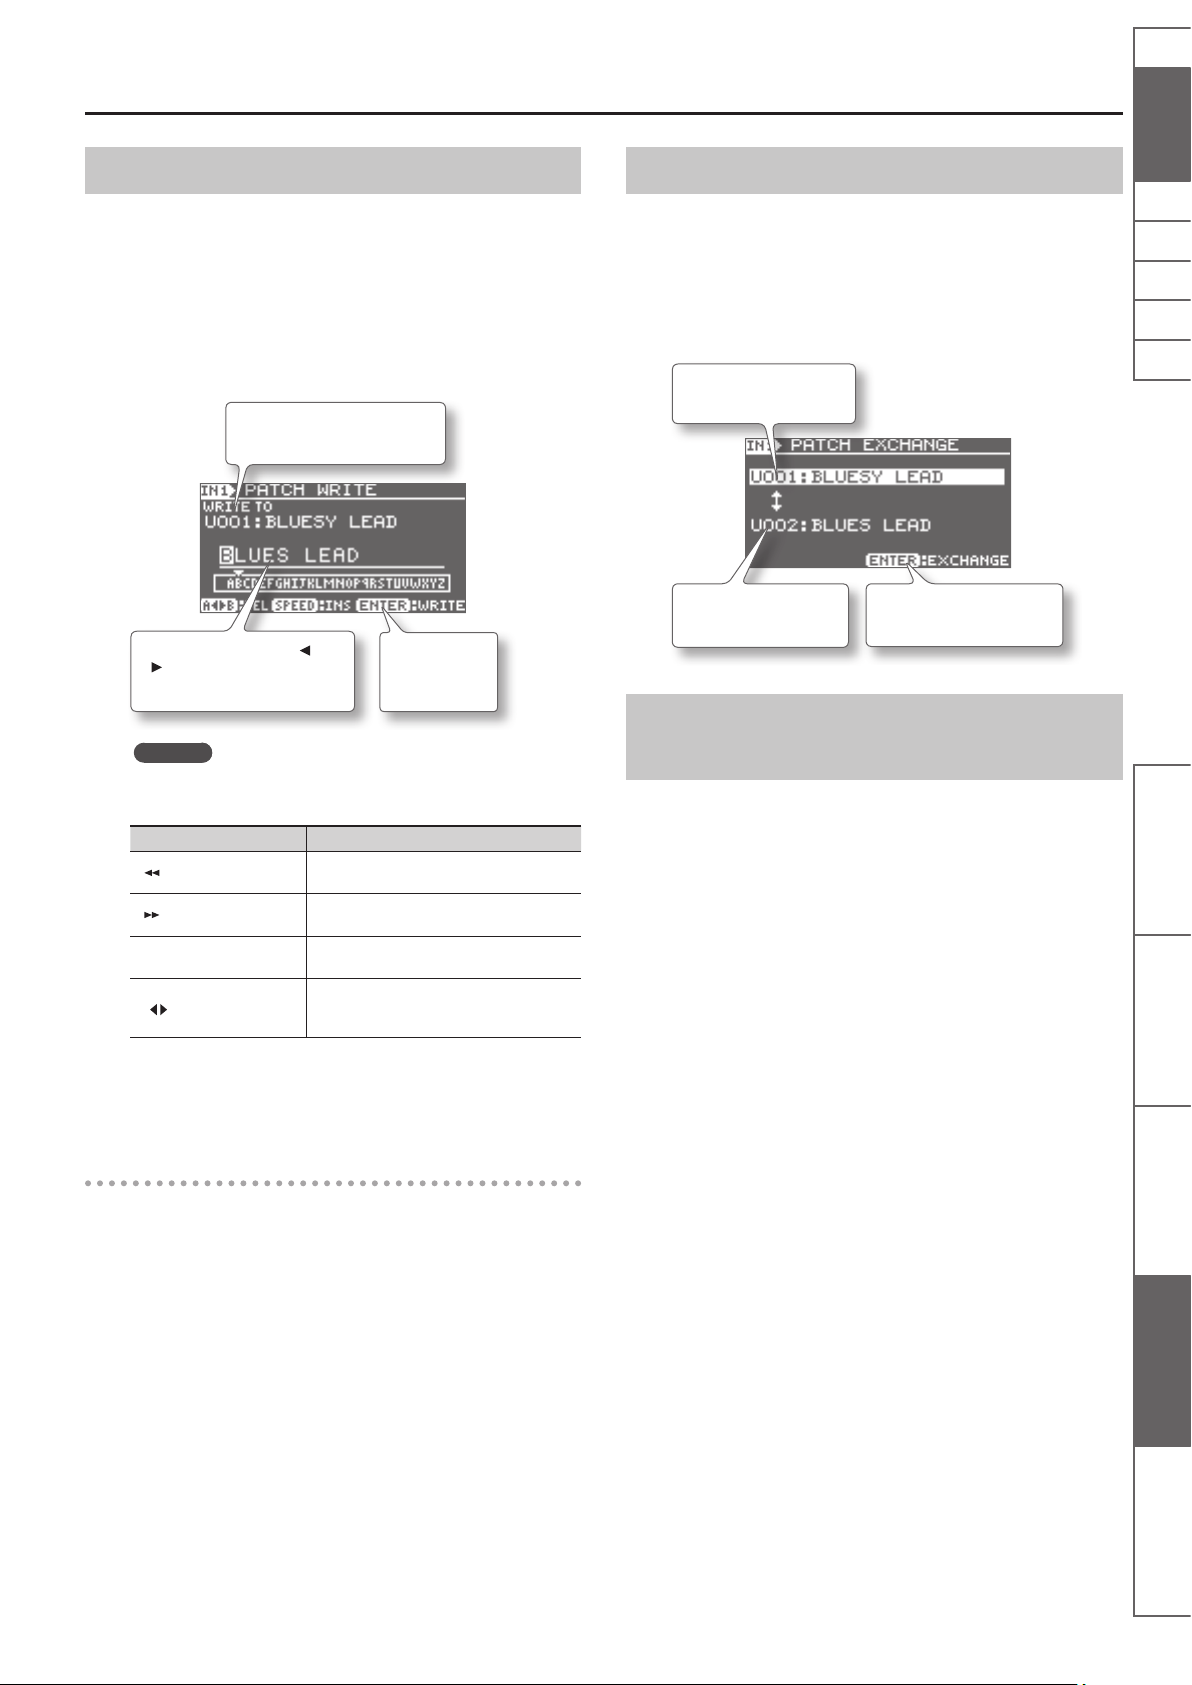
Verschiedene Funktionen
Sichern eines Patches
Wenn Sie die geänderten Einstellungen behalten möchten, müssen
Sie diese in einem Patch sichern, da ansonsten bei Umschalten
des Patches die bis dahin nicht gesicherten Einstellungen verloren
gehen.
1. Führen Sie in einem Edit Eect-Display die folgenden
Bedienschritte aus: [MENU]-Taster „WRITE/NAME“
[ENTER]-Taster.
Das PATCH WRITE-Display erscheint.
Auswahl der Ziel Patch-Nummer
(U001–U100)
Verwenden Sie die Taster [ ]
[ ] (Cursor) und den Drehregler,
um die Namen anzugeben.
HINWEIS
Verwenden Sie die folgenden Taster für die Eingabe des
Namens.
Taster Beschreibung
[
] (Rewind)-Taster
[
] (Fast Forward)-Taster
[SPEED]-Taster
B]-Taster
[A
Umschalten zwischen Groß- und Kleinschreibung.
Umschalten des Zeichensatzes (Buchstaben/
Ziern/Symbole).
Einfügen eines Leerzeichens an der
Cursor-Position.
Löschen des ausgewählten Zeichens und
Verschieben der nachfolgenden Zeichen
nach links.
ENTER
Speichern der
Einstellungen.
Vertauschen zweier Patches (EXCHANGE)
Sie können die Speichernummer des aktuell gewählten Patches mit
der Speichernummer eines anderen Patches vertauschen.
1. Führen Sie im PATCH SELECT-Display die folgenden
Bedienschritte aus: [MENU]-Taster „EXCHANGE“
[ENTER]-Taster.
Das PATCH EXCHANGE-Display erscheint.
Auswahl der Nummer des
gewünschten Patches
Nummer des aktuell
gewählten Patches
ENTER
Ausführen des Vorgangs
Initialisieren der Eekt-Einstellungen
(INITIALIZE)
Sie können die Einstellungen eines Eekt-Patches auf dessen
Werksvoreinstellungen zurück setzen. Dieses ermöglicht Ihnen, ein
eigenes Eekt-Patch auf Grundlage von neutralen Einstellungen zu
erstellen.
1. Führen Sie in einem Edit Eect-Display die folgenden
Bedienschritte aus: [MENU]-Taster „INITIALIZE“
[ENTER]-Taster.
Die Meldung „Are you sure?“ erscheint.
2. Drücken Sie den [ENTER]-Taster.
Die Eekt-Einstellungen werden auf ihre jeweiligen Standardwerte
zurück gesetzt
NlPtEsItFrEn Deutsch
Bedienoberäche und
Anschlüsse
Spielen der Gitarre mit
Songs als Backing
2. Drücken Sie den [ENTER]-Taster, um die
Eekteinstellungen zu sichern.
Kopieren eines Patches
Wählen Sie das gewünschte Patch aus (S. 10), und sichern Sie dieses
unter einer anderen Ziel-Speichernummer. Siehe „Sichern eines
Patches“ (S. 19).
eBand Song List Editor Verschiedene Funktionen Anhang
19
Page 66

Verschiedene Funktionen
Erstellen einer Kopie der Daten einer SD-Karte (BACK UP)
Sie können die Daten einer SD-Karte auf einen Rechner übertragen
und damit Sicherheitskopien Ihrer Daten und Einstellungen erstellen.
HINWEIS
Die Beschreibung des PC-Verfahrens basiert auf dem
„Arbeitsplatz“ (Windows) und dem „Finder“ (Mac OS).
1. Verwenden Sie das unter „Bestimmen der Funktion
des USB COMPUTER-Anschlusses“ (S. 24) beschriebene
Verfahren, und legen Sie für USB MODE die Option „eBand
SONG LIST EDITOR“ fest.
2. Verbinden Sie den Rechner und den JS-10 mithilfe eines
USB-Kabels.
USB COMPUTER-AnschlussUSB-Anschluss
7. Zum Beenden der Verbindung drücken Sie auf dem JS-10
den [ENTER]-Taster.
Übertragen der Backup-Daten vom Rechner auf die SD-Karte (RECOVER)
Mit diesem Vorgang werden die auf dem Rechner gespeicherten
Daten der SD-Karte auf die im JS-10 installierte SD-Karte
übertragen.
HINWEIS
Die Beschreibung des PC-Verfahrens basiert auf dem
„Arbeitsplatz“ (Windows) und dem „Finder“ (Mac OS).
1. Verwenden Sie das unter „Bestimmen der Funktion
des USB COMPUTER-Anschlusses“ (S. 24) beschriebene
Verfahren, und legen Sie für USB MODE die Option „eBand
SONG LIST EDITOR“ fest.
2. Verbinden Sie den Rechner und den JS-10 mithilfe eines
USB-Kabels.
3. Önen Sie das Symbol „JS-10 EBAND“, und ziehen Sie den
Ordner ROLAND in den Papierkorb (löschen Sie ihn).
3. Suchen Sie mit dem Computer die Ordner innerhalb von
„JS-10 EBAND“.
HINWEIS
Es ist möglich, dass anstelle des JS-10 Symbols dieses als
„Removable Disk (*:)“ angezeigt wird.
4. Kopieren (Ziehen) Sie den gesamten Ordner ROLAND
innerhalb des Symbols „JS-10 EBAND“ in einen Ordner auf
dem Computer.
HINWEIS
Kopieren Sie immer nur den gesamten ROLAND-Ordner. Nur dann
ist gewährleistet, dass die Datenkopie auch funktionsfähig ist.
5. Unterbrechen Sie die USB-Verbindung zwischen JS-10
und Rechner.
• Für Windows 7
Klicken Sie unten rechts auf dem Bildschirm auf die Symbole
[
] [ ] und anschließend auf „JS-10 EBAND auswerfen“.
• Für Windows Vista/XP
Klicken Sie unten rechts auf dem Bildschirm auf das Symbol
[
] ([ ] in XP) und anschließend auf „USB-Massenspeichergerät
sicher entfernen“.
• Für Mac OS
Ziehen Sie das Symbol „JS-10 EBAND“ auf das Auswerfen-
Symbol im Dock.
HINWEIS
Es ist möglich, dass anstelle des JS-10 Symbols dieses als
„Removable Disk (*:)“ angezeigt wird.
4. Kopieren (Ziehen) Sie den gesamten gesicherten Ordner
ROLAND auf dem PC zum Symbol „JS-10 EBAND“.
HINWEIS
• Dadurch werden die vorherigen Inhalte der SD-Karte gelöscht.
• Kopieren Sie immer nur den gesamten ROLAND-Ordner. Nur
dann ist gewährleistet, dass die Datenkopie auch funktionsfähig
ist.
• Beenden Sie vor dem Wiederherstellen der gesicherten Daten
eBand Song List Editor.
5. Unterbrechen Sie die USB-Verbindung zwischen JS-10
und Rechner.
• Für Windows 7
Klicken Sie unten rechts auf dem Bildschirm auf die Symbole
[
] [ ] und anschließend auf „JS-10 EBAND auswerfen“.
• Für Windows Vista/XP
Klicken Sie unten rechts auf dem Bildschirm auf das Symbol
[
] ([ ] in XP) und anschließend auf „USB-Massenspeichergerät
sicher entfernen“.
• Für Mac OS
Ziehen Sie das Symbol „JS-10 EBAND“ auf das Auswerfen-
Symbol im Dock.
6. Drücken Sie den [EXIT]-Taster
Die Meldung „Are you sure?“ wird angezeigt.
7. Zum Beenden der Verbindung drücken Sie auf dem JS-10
den [ENTER]-Taster.
HINWEIS
Sie können eine Sicherheitskopie der Eekt-Patches auf der
SD-Karte erstellen. Lesen Sie dazu den Abschnitt „Sichern der
User-Patches auf die SD-Karte“ (S. 24).
6. Drücken Sie den [EXIT]-Taster.
Die Meldung „Are you sure?“ wird angezeigt.
20
Page 67

Verschiedene Funktionen
Verändern der Song-Einstellungen
Ein Song besitzt außer seinen Audiodaten zusätzlich die folgenden
Informationen:
• Abspiellautstärke
• Einstellung „Song schreibgeschützt ja/nein“
• Tonart
Diese Informationen können angezeigt und verändert werden.
HINWEIS
Diese Einstellungen können für Songs eines USB Flash-Speichers
nicht verändert werden.
1. Wählen Sie den gewünschten Song aus.
2. Gehen Sie folgendermaßen vor: [MENU]-Taster „SONG“
[ENTER]-Taster „SONG INFO“ [ENTER]-Taster.
Das SONG INFO-Display erscheint.
3. Verändern Sie die Einstellungen.
KEY
Sie können erreichen,
dass die Tonart vor dem
Songnamen im Display
angezeigt wird (S. 11).
Benennen eines Songs
Sie können einen Song benennen bzw. den eingegebenen Namen
nachträglich verändern.
HINWEIS
Wenn Sie eBand Song List Editor zum Bearbeiten von
Song-Informationen (S. 16), Übertragen von Songs (S. 15) oder
Importieren von Songs (S. 22), verwendet haben, können Sie
die Namen dieser Songs unter Verwendung des folgenden
Verfahrens weder hinzufügen noch ändern. Sie müssen dann
den Namen immer mithilfe des eBand Song List Editors ändern.
1. Wählen Sie den gewünschten Song aus.
2. Führen Sie die folgenden Bedienschritte aus: [MENU]-
Taster „SONG“ [ENTER]-Taster „SONG NAME“
[ENTER]-Taster.
Das SONG NAME-Display erscheint.
3. Benennen Sie den Song.
NlPtEsItFrEn Deutsch
SONG LEVEL
Bestimmt die
Lautstärke des Songs.
PROTECT
Bei ON kann der Song weder
verändert noch gelöscht werden.
Abrufen der Song-Information
Sie können im Display verschiedene Informationen über den aktuell
gewählten Song anzeigen lassen.
1. Drücken Sie bei angezeigtem SONG INFO-Display den
[ ] (Cursor)-Taster so oft, bis das nachfolgend gezeigte
Display erscheint.
TYPE
Format des Songs.
LENGTH
Länge des Songs
(Stunden:Min:Sek.).
SIZE
Datengröße des
Songs.
[ ][ ]-Taster: Auswahl
der Position. Drehregler:
Auswahl des Zeichens.
HINWEIS
Sie können bei Eingabe des Namens auch die folgenden Taster
verwenden.
Taster Beschreibung
[
] (Rewind)-Taster
[
] (Fast Forward)-Taster
[SPEED]-Taster
B]-Taster
[A
ENTER
Bestätigen der Eingabe.
Umschalten zwischen Groß- und Kleinschreibung.
Umschalten des Zeichensatzes (Buchstaben,
Ziern, Symbole).
Einfügen eines Leerzeichens an der
Cursor-Position.
Löschen des ausgewählten Zeichens und
verschieben der nachfolgenden Zeichen
nach links.
4. Drücken Sie den [ENTER]-Taster, um die Eingabe bzw.
Änderung des Namens zu bestätigen.
Die Meldung „Are you sure?“ wird angezeigt.
5. Drücken Sie die [ENTER]-Taste, um den Namen zu
bestätigen.
Der Song besitzt jetzt einen neuen Namen.
Bedienoberäche und
Anschlüsse
Spielen der Gitarre mit
Songs als Backing
eBand Song List Editor Verschiedene Funktionen Anhang
21
Page 68

Verschiedene Funktionen
Sichern von Songs auf einen USB Flash-Speicher (Export)
Sie können Songs im eBand-Format, die auf der SD-Karte
aufgenommen wurden, auf einen externen USB-Speicher sichern.
1. Schließen Sie den USB Flash-Speicher an den USB
MEMORY-Anschluss an.
2. Wählen Sie im JS-10 den gewünschten Song aus.
3. Führen Sie die folgenden Bedienschritte aus: [MENU]-
Taster „SONG“ [ENTER]-Taster „EXPORT“
[ENTER]-Taster.
Das SONG EXPORT-Display erscheint.
HINWEIS
Das „EXPORT”-Menü wird nicht angezeigt, wenn der USB FlashSpeicher nicht angeschlossen wurde.
Umschalten der Eekt-Patches bei
Wechseln des Songs (PATCH SYNC)
Wenn einem Song über die PATCH SYNC-Funktion ein Eekt-Patch
zugeordnet ist, können Sie erreichen, dass mit Wechseln des Songs
das entsprechend zugehörige Eekt-Patch automatisch aufgerufen
wird.
HINWEIS
Die PATCH SYNC-Funktion kann für Songs eines USB FlashSpeichers nicht genutzt werden.
1. Führen Sie die folgenden Bedienschritte aus: [MENU]-
Taster „PATCH SYNC“ [ENTER]-Taster.
Das PATCH SYNC-Display erscheint.
2. Wählen Sie die gewünschte Einstellung für PATCH SYNC
aus.
IN1= Eekt für INPUT 1, IN2 = Eekt für INPUT 2.
4. Drücken Sie den [ENTER]-Taster, um den Song auf dem
USB-Speicher zu sichern.
Importieren von Songs des USB FlashSpeichers in den JS-10 (Import)
Sie können auf einem USB Flash-Speicher gesicherte Songs im
eBand-Format zurück in den JS-10 übertragen.
1. Schließen Sie den USB Flash-Speicher an den USB
MEMORY-Anschluss an.
2. Wählen Sie den gewünschten Song des USB Flash-
Speichers aus.
3. Führen Sie die folgenden Bedienschritte aus: [MENU]-
Taster „SONG“ [ENTER]-Taster „IMPORT“
[ENTER]-Taster.
Das SONG IMPORT-Display erscheint.
IN1/IN2 Beschreibung
OFF
P***
U***
Das Eekt-Patch wird bei Wechseln des Songs nicht
umgeschaltet.
Ruft bei Wechseln des Songs die angegebene Preset
Patch-Nummer auf.
Ruft bei Wechseln des Songs die angegebene User
Patch-Nummer auf.
Ein- und Ausschalten der PATCH SYNC-Funktion
Sie können die PATCH SYNC-Funktion nach Bedarf ein- bzw.
ausschalten.
1. Drücken Sie bei angezeigtem PATCH SYNC-Display
wiederholt den [ENTER]-Taster.
SYNC SW Beschreibung
OFF Die PATCH SYNC-Funktion ist ausgeschaltet.
ON Die PATCH SYNC-Funktion ist eingeschaltet.
Auswahl des aktuell gewählten Eekt-Patches
HINWEIS
Das „IMPORT”-Menü wird nicht angezeigt, wenn auf dem USB
Flash-Speicher kein Song ausgewählt wurde.
4. Drücken Sie den [ENTER]-Taster, um den Song auf die im
JS-10 installierte SD-Karte zu übertragen.
HINWEIS
Lesen Sie zu diesem Thema auch den Abschnitt „Die
Speicherstruktur des JS-10“ (S. 38).
22
für die PATCH SYNC-Funktion
Sie können das aktuell gewählte Eekt-Patch für die PATCH SYNCFunktion auswählen.
1. Bewegen Sie den Cursor im PATCH SYNC-Display auf die
IN1 Patch-Nummer oder die IN2 Patch-Nummer.
2. Drücken Sie den [SPEED]-Taster.
Beim nächsten Auswählen des aktuell gewählten Songs wird das
hier zugewiesene Eekt-Patch automatisch aufgerufen.
Page 69

Verschiedene Funktionen
Die Audio-Einstellungen
Sie können Einstellungen für die Audio-Eingänge und AudioAusgänge vornehmen.
Auswahl der Eingangsimpedanz der INPUT-Buchsen
Sie können die Empndlichkeit der INPUT 1- und INPUT 2 (GUITAR/
MIC)-Buchsen auf das anliegende Eingangssignal anpassen.
1. Führen Sie die folgenden Bedienschritte aus: [MENU]-
Taster „AUDIO SETTING“ [ENTER]-Taster „INPUT“
[ENTER]-Taster.
Das INPUT-Display erscheint.
PAN
Stellt die
Stereo-Position des
Eingangssignals
ein.
GAIN
Bestimmt die Empndlichkeit der ausgewählten INPUT-Buchse.
Einstellen des allgemeinen Equalizers (Global EQ)
Sie können die Frequenzen des Equalizers, der den Gesamtsound
bestimmt, einstellen.
1. Führen Sie die folgenden Bedienschritte aus: [MENU]-
Taster „AUDIO SETTING“ [ENTER]-Taster „EQ“
[ENTER]-Taster.
Das GLOBAL EQ-Display erscheint.
2. Stellen Sie die Lautstärken (GAIN) der drei
Frequenzbänder ein.
GLOBAL EQ Beschreibung
LOW GAIN Bestimmt die Lautstärke der tiefen Frequenzen.
MID GAIN Bestimmt die Lautstärke der mittleren Frequenzen.
HIGH GAIN Bestimmt die Lautstärke der hohen Frequenzen.
NlPtEsItFrEn Deutsch
GAIN Beschreibung
Bei Anschluss einer Gitarre.
Bei Anschluss eines Mikrofons.
HINWEIS
Das Input Sensitivity-Symbol im Haupt-Display wird
entsprechend umgeschaltet.
Input Sensitivity Symbol
HINWEIS
Wiederholtes Drücken des [ENTER]-Tasters im GLOBAL EQDisplay schaltet den Equalizer abwechselnd ein bzw. aus.
Ausschalten der Lautsprecher des JS-10
Sie können das Audiosignal des JS-10 über dessen LINE OUTBuchsen ausgeben und z.B. über ein externes PA-System verstärken.
Wenn Sie die internen Lautsprecher des JS-10 abschalten möchten,
gehen Sie wie folgt vor:
1. Führen Sie die folgenden Bedienschritte aus: [MENU]-
Taster „AUDIO SETTING“ [ENTER]-Taster „SPEAKER“
[ENTER]-Taster.
SPEAKER SW Beschreibung
OFF Die internen Lautsprecher sind abgeschaltet.
ON Die internen Lautsprecher sind eingeschaltet.
HINWEIS
Der Klangcharakter des über die OUTPUT-Buchsen
ausgegebenen Audiosignals kann unterschiedlich sein,
abhängig von der SPEAKER SW-Einstellung. Dieses ist normal
und keine Fehlfunktion.
Bedienoberäche und
Anschlüsse
Spielen der Gitarre mit
Songs als Backing
eBand Song List Editor Verschiedene Funktionen Anhang
* Wenn Sie GAIN auf Mikrofon einstellen, müssen Sie sicherstellen,
dass zuvor der Eekt aus der Mikrofonkategorie ausgewählt wurde.
* Wenn Sie GAIN auf Mikrofon einstellen, während ein
Gitarreneekt ausgewählt ist, treten Heulgeräusche
(Rückkopplungen) auf.
* Auch wenn Sie von einem werkseitig voreingestellten Song
wechseln, kann der Gitarreneekt automatisch zu den Eekten
in PATCH SYNC (S. 22) wechseln, wodurch ein plötzliches
Heulgeräusch (Rückkopplung) entsteht. Stellen Sie in diesem Fall
die SYNC SW-Einstellung unter PATCH SYNC auf OFF, damit kein
Wechsel des Patches erfolgt.
23
Page 70

Verschiedene Funktionen
Die Systemeinstellungen des JS-10
Sie können verschiedene allgemeine Einstellungen für den JS-10 im
SYSTEM-Display vornehmen.
1. Führen Sie die folgenden Bedienschritte aus: [MENU]-
Taster „SYSTEM“ [ENTER]-Taster.
Das MENU > SYSTEM-Display erscheint.
Display-Seiten umschalten.
Bestimmen der Funktion des USB
Auswahl der Funktion des Fußschalters
Sie können für den am JS-10 angeschlossenen Fußschalter eine
Funktion auswählen. Siehe „Verwendung von Fußschaltern und
Expression-Pedalen“ (S. 30).
Sichern der User-Patches auf die SD-Karte
Sie können die im JS-10 gesicherten User Eekt-Patches auf die
SD-Karte übertragen.
1. Gehen Sie in das MENU > SYSTEM-Display, und führen Sie
die folgenden Bedienschritte aus:
„PATCH BACKUP“ [ENTER]-Taster.
Das PATCH BACKUP-Display erscheint.
2. Drücken Sie den [ENTER]-Taster.
Die Meldung „Are you sure?“ erscheint.
3. Drücken Sie den [ENTER]-Taster, um den Vorgang
auszuführen.
COMPUTER-Anschlusses
Sie können die Funktion des USB COMPUTER-Anschlusses
umschalten.
1. Gehen Sie in das MENU > SYSTEM-Display, und führen Sie
die folgenden Bedienschritte aus:
„USB MODE“ [ENTER]-Taster.
Das USB MODE-Fenster erscheint.
2. Wählen Sie die gewünschte Einstellung für den USB
MODE.
USB MODE Beschreibung
eBand SONG
LIST EDITOR
AUDIO
Wählen Sie diese Einstellung, wenn Sie die eBand Song
List Editor-Software verwenden (S. 13).
Wählen Sie diese Einstellung, wenn Sie den JS-10 als
USB Audio-Interface für einen Rechner nutzen möchten
(S. 27).
3. Drücken Sie den [ENTER]-Taster, um die Auswahl zu
bestätigen.
24
Page 71
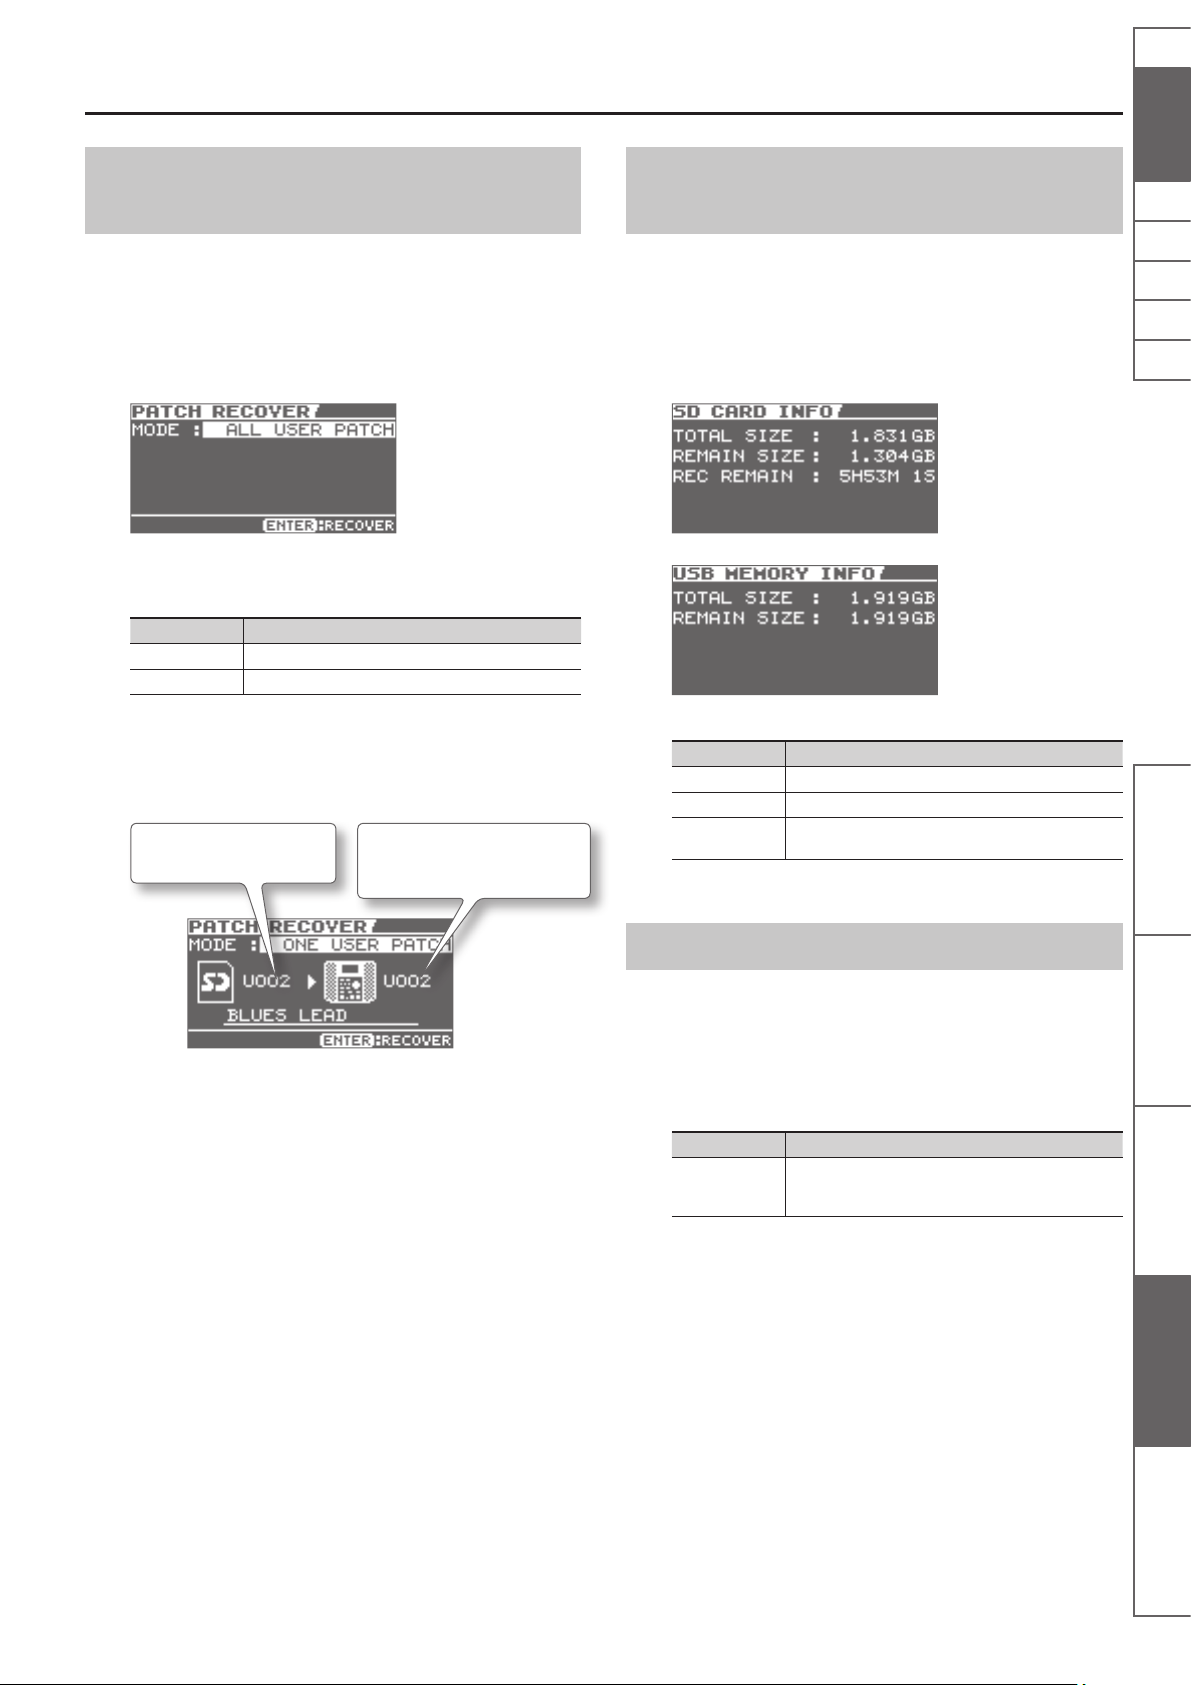
Verschiedene Funktionen
Übertragen der auf der SD-Karte gesicherten
User Eekt-Patches in den JS-10
Sie können die auf der SD-Karte gesicherten User Eekt-Patches
wieder in den JS-10 zurück übertragen.
1. Gehen Sie in das MENU > SYSTEM-Display, und führen Sie
die folgenden Bedienschritte aus:
„PATCH RECOVER“ [ENTER]-Taster.
Das PATCH RECOVER-Display erscheint.
2. Wählen Sie die gewünschte Einstellung für MODE.
MODE Beschreibung
ALL USER PATCH Alle User-Patches werden in den JS-10 übertragen.
ONE USER PATCH Nur ein User-Patch wird in den JS-10 übertragen.
2-1. Wählen Sie bei Auswahl von ONE USER PATCH die
Quell- und Ziel User Patch-Nummern aus.
Diese Patch-Nummer wird
übertragen ->
-> in diesen Speicherplatz des
JS-10.
Überprüfen des noch freien Speichers der SD-Karte und des USB Flash-Speichers
Sie können im Display anzeigen lassen, wie groß der noch freie
Speicher der SD-Karte bzw. des USB-Speichers ist.
1. Gehen Sie in das MENU > SYSTEM-Display, und führen Sie
die folgenden Bedienschritte aus:
„SD INFO“ oder „USB MEMORY“ [ENTER]-Taster.
Das SD CARD INFO- (bzw. USB MEMORY INFO)-Display erscheint.
Parameter Beschreibung
TOTAL SIZE Gesamt-Speicherplatz.
REMAIN SIZE Noch freier Speicher.
REC REMAIN
Noch verfügbare Aufnahmezeit auf der SD-Karte
(wird nur im SD INFO-Display angezeigt).
NlPtEsItFrEn Deutsch
Bedienoberäche und
Anschlüsse
3. Drücken Sie den [ENTER]-Taster.
Die Meldung „Are you sure?“ erscheint.
4. Drücken Sie den [ENTER]-Taster, um den Vorgang
auszuführen.
Einstellen des Display-Kontrasts
Wenn die Symbole im Display des JS-10 schwer zu lesen sind,
versuchen Sie, den Kontrast des Displays nachzuregeln.
1. Gehen Sie im Display MENU > SYSTEM folgendermaßen
vor: „SETTING“ [ENTER]-Taster.
Specify the setting for LCD CONTRAST.
LCD CONTRAST Beschreibung
1–16
Je höher der Wert, desto dunkler wird die DisplayAnzeige. Umso größer die Zahl ist, desto heller wird das
Display.
Songs als Backing
Spielen der Gitarre mit
eBand Song List Editor Verschiedene Funktionen Anhang
25
Page 72
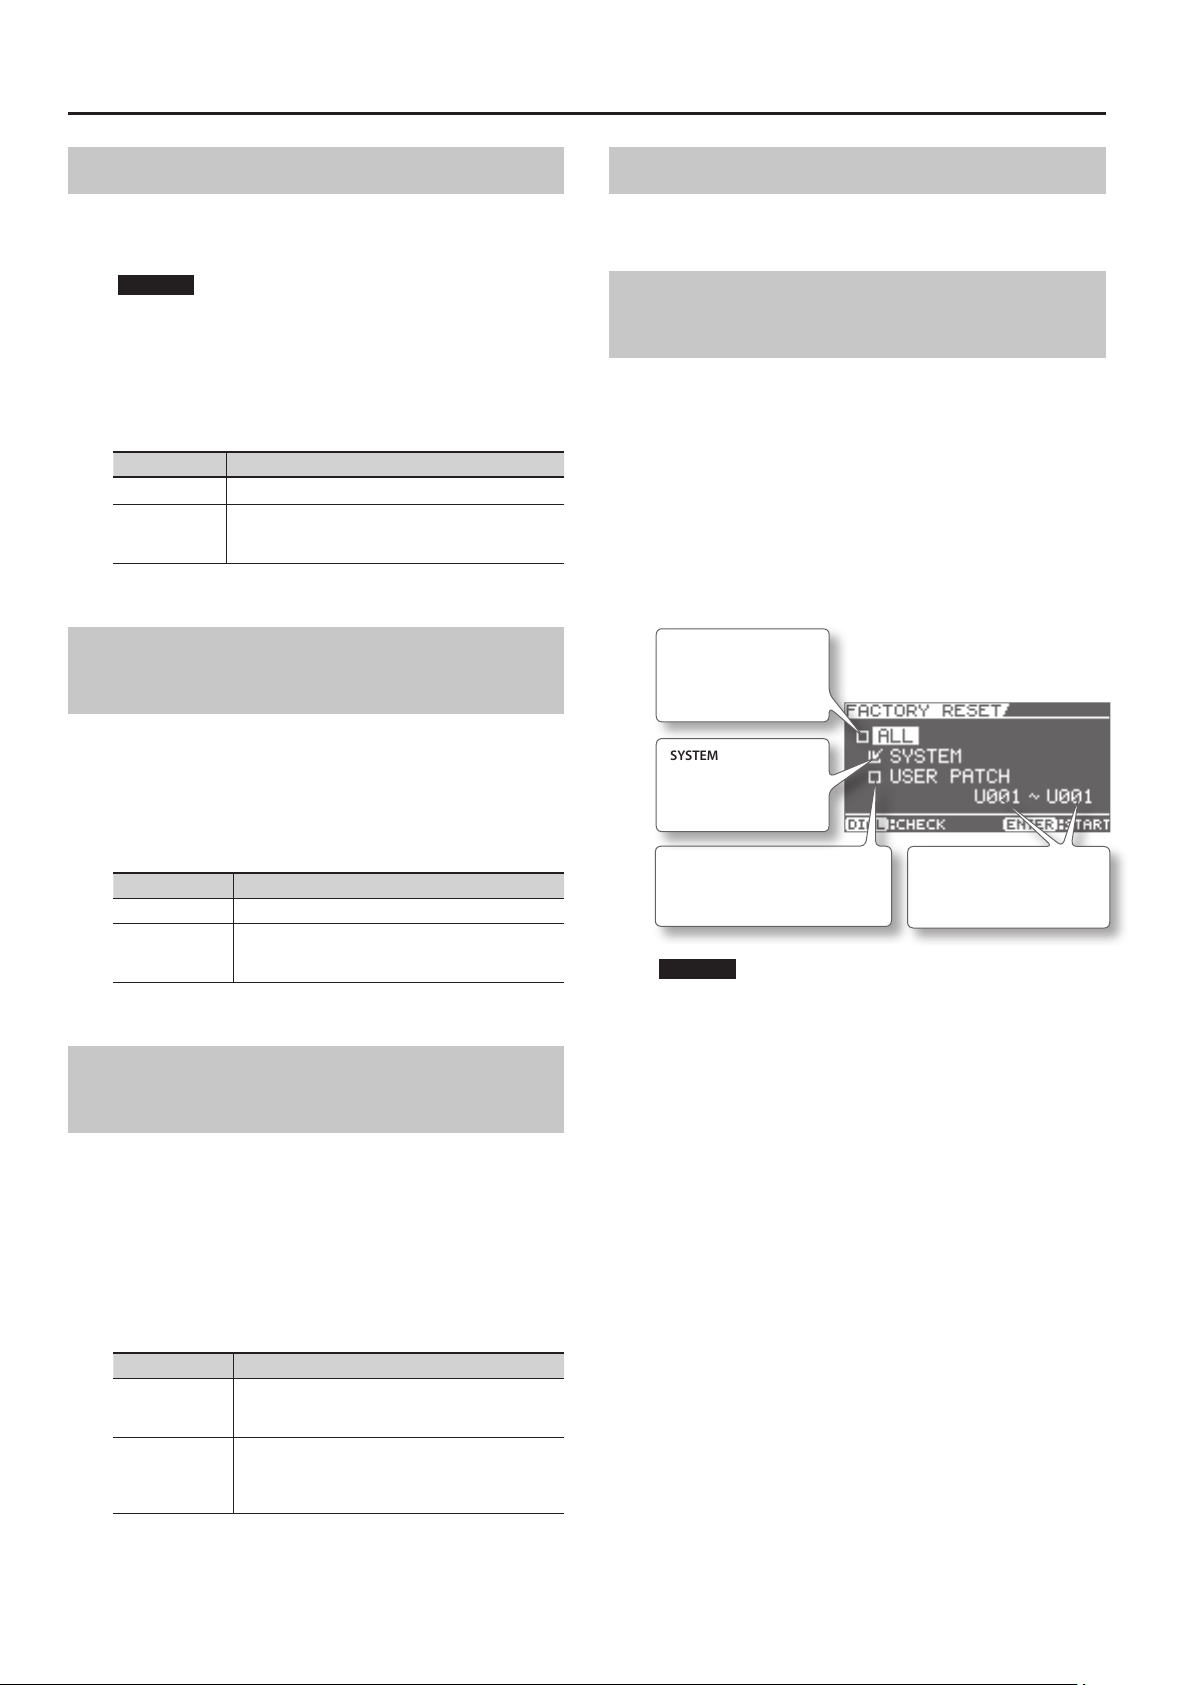
Verschiedene Funktionen
De-Aktivieren der „Auto O“-Funktion
Der JS-10 wird automatisch ausgeschaltet, wenn das Gerät für
ca. 30 Minuten nicht bedient wurde. Sie können diesen Zeitraum
verkürzen, verlängern bzw. diese Funktion ausschalten.
HINWEIS
Wenn Sie die geänderte Einstellung behalten möchten, müssen
Sie diese aktiv sichern.
1. Gehen Sie in das MENU > SYSTEM-Display, und führen Sie
die folgenden Bedienschritte aus:
„SETTING“ [ENTER]-Taster.
AUTO OFF Beschreibung
OFF Die „Auto O“-Funktion ist ausgeschaltet.
10MIN, 30MIN,
240MIN
Der JS-10 wird nach der eingestellten Zeit automatisch
ausgeschaltet, wenn dieser in der Zwischenzeit nicht
bedient wurde.
Anzeigen der Songs der SD-Karte in der Songliste
Sie können bestimmen, dass die Songs der SD-Karte im SONG LISTDisplay angezeigt werden.
1. Gehen Sie in das MENU > SYSTEM-Display, und führen Sie
die folgenden Bedienschritte aus:
„SETTING“ [ENTER]-Taster.
SD VIEW Beschreibung
OFF Dieses ist die Werksvoreinstellung.
ON
„SD CARD“ wird bei SONG LIST im SEARCH-Display
angezeigt. Wenn Sie „SD CARD“ anwählen, werden die
auf der SD-Karte gespeicherten Songs angezeigt.
Initialisieren einer SD-Karte (FORMAT)
Sie können handelsübliche SD-Karten mit dem JS-10
formatieren. Siehe „Initialisieren einer SD-Karte (FORMAT)“ (S. 29).
Abrufen der Werksvoreinstellungen des JS-10
Sie können die Parameter des JS-10 auf deren jeweilige
Werksvoreinstellungen zurück setzen lassen.
1. Gehen Sie in das MENU > SYSTEM-Display, und führen Sie
die folgenden Bedienschritte aus:
„FACTORY RESET“ [ENTER]-Taster.
Das FACTORY RESET-Display erscheint.
2. Wählen Sie durch Aktivieren der jeweiligen Checkbox die
Parameter aus, die auf die Werksvoreinstellungen zurück
gesetzt werden sollen.
ALL
Alle Parameter werden
initialisiert.
SYSTEM
Die System-Parameter
werden initialisiert.
USER PATCH
Die User Eekt-Patches werden
initialisiert.
HINWEIS
Durch diesen Vorgang werden die entsprechend vorherigen
Einstellungen gelöscht.
Bestimmt den Bereich der
User Eekt-Patches, die
initialisiert werden.
Auswählen der Klangausgabe vom USB COMPUTER-Anschluss
Sie können nur den über die INPUT 1-Buchse (GUITAR/MIC), die
INPUT 2-Buchse (GUTAR/MIC) oder den USB COMPUTER-Anschluss
eingehenden Klang ausgeben oder einen Klang ausgeben, der
aus dem über die INPUT 2-Buchse (AUX) und den USB COMPUTERAnschluss (S. 38) eingehenden Klang gemischt wird.
1. Gehen Sie im Display MENU > SYSTEM folgendermaßen
vor: „SETTING” [ENTER]-Taster.
Legen Sie die Einstellung für USB AUDIO OUT fest.
USB AUDIO OUT Erklärung
INPUT
ALL
26
Gibt nur Klang aus, der über die INPUT 1-Buchse
(GUITAR/MIC) oder die INPUT 2-Buchse (GUITAR/MIC)
eingeht.
Mischt alle Klänge, die über die INPUT 1-Buchse
(GUITAR/MIC) die INPUT 2-Buchse (GUITAR/MIC) die
INPUT 2-Buchse (AUX) und den USB COMPUTERAnschluss eingehen und gibt diese aus.
3. Drücken Sie den [ENTER]-Taster.
Die Meldung „Are you sure?“ erscheint.
4. Führen Sie die folgenden Bedienschritte aus:
„OK“ [ENTER]-Taster.
Damit wird der Vorgang ausgeführt.
Page 73
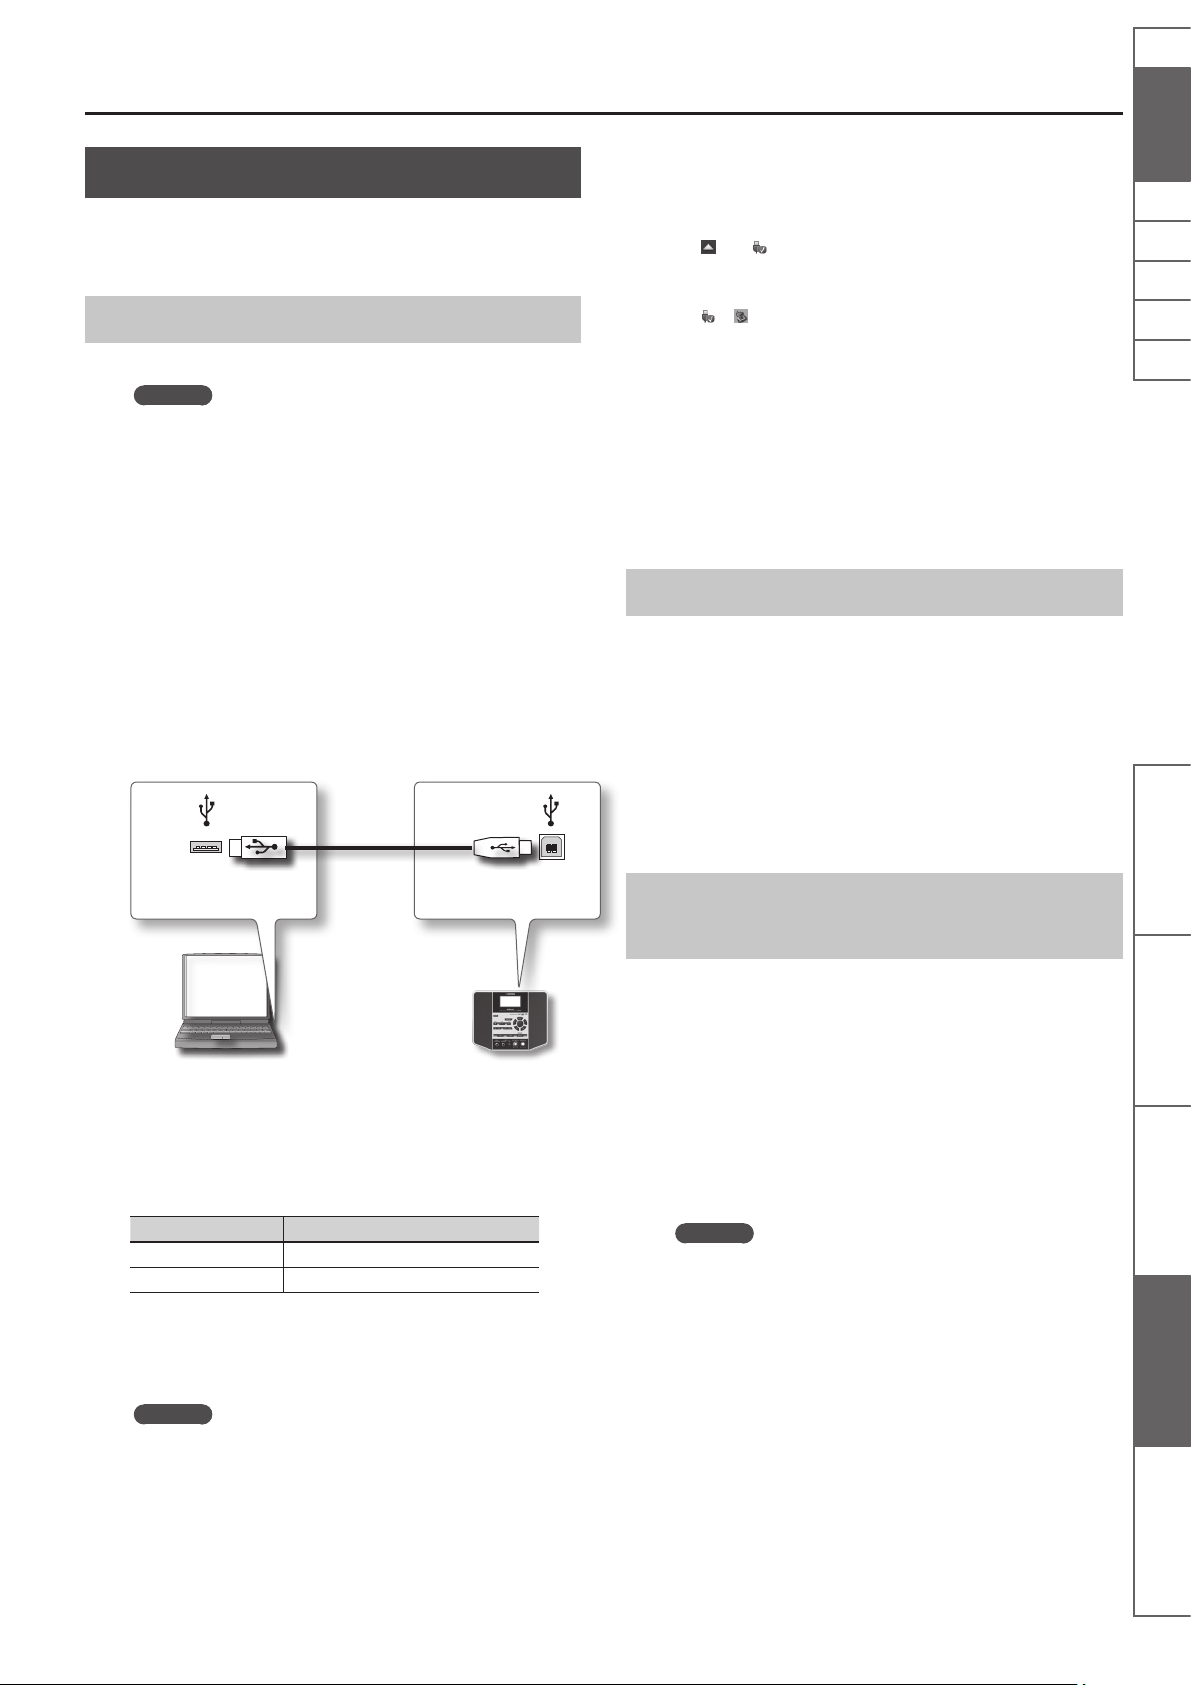
Der JS-10 als USB Audio-Interface
Je nach Aufstellort und -position von Mikrofonen im Verhältnis zu
Lautsprechern können Rückkopplungen (Heultöne) entstehen.
Dies kann im Allgemeinen folgendermaßen vermieden werden:
Der USB-Treiber
Übertragen Sie die USB- Treiberdaten auf den Rechner.
HINWEIS
• Der USB-Treiber muss nur einmal auf dem Rechner installiert
werden.
• Den USB-Treiber nden Sie auf der im JS-10 installierten SDKarte bzw. auf der Roland-Internetseite:
http://www.roland.com/support/
• Der USB-Treiber für Mac OS ist nur kompatibel zu Mac-Rechnern,
die einen Intel-Prozessor besitzen.
• Die Beschreibung des PC-Verfahrens basiert auf dem
„Arbeitsplatz“ (Windows) und dem „Finder“ (Mac OS).
Verschiedene Funktionen
6. Unterbrechen Sie die USB-Verbindung zwischen JS-10
und Rechner.
• Für Windows 7
Klicken Sie unten rechts auf dem Bildschirm auf die Symbole
[
] [ ] und anschließend auf „JS-10 EBAND auswerfen“.
• Für Windows Vista/XP
Klicken Sie unten rechts auf dem Bildschirm auf das Symbol
[
] ([ ] in XP) und anschließend auf „USB-Massenspeichergerät
sicher entfernen“.
• Für Mac OS
Ziehen Sie das Symbol „JS-10 EBAND“ auf das Auswerfen-
Symbol im Dock.
7. Drücken Sie auf dem JS-10 den [EXIT]-Taster.
Die Meldung „Are you sure?“ wird angezeigt.
8. Zum Beenden der Verbindung drücken Sie auf dem JS-10
den [ENTER]-Taster.
Installieren des USB-Treibers
NlPtEsItFrEn Deutsch
1. Folgen Sie den Bedienschritten unter „Bestimmen der
Funktion des USB COMPUTER-Anschlusses“ (S. 24), und
stellen Sie USB MODE auf „eBand SONG LIST EDITOR“.
2. Verbinden Sie den Rechner und den JS-10 über ein USB-
Kabel.
USB-Anschluss
USB COMPUTER-Anschluss
3. Suchen Sie mit dem Computer die Ordner innerhalb von
„JS-10 EBAND“.
4. Doppenklicken Sie auf eine der nachfolgend aufgeführten
Dateien.
Dateiname Betriebsystem
Win.zip Windows 7, Vista, XP
Mac.dmg Mac OS
1. Ziehen Sie das USB-Kabel vom JS-10 ab.
2. Verwenden Sie das unter „Bestimmen der Funktion
des USB COMPUTER-Anschlusses“ (S. 24) beschriebene
Verfahren, und legen Sie für USB MODE die Option
„AUDIO“ fest.
3. Lesen Sie vor der Installation die Datei „Readme.htm“,
und führen Sie dann die Installation wie vorgeschrieben
durch.
Abspielen von Sounds des Rechners über den JS-10
Sie können am Rechner Audiodaten abspielen und über die
Lautsprecher des JS-10 abhören.
1. Folgen Sie den Bedienschritten unter „Bestimmen der
Funktion des USB COMPUTER-Anschlusses“ (S. 24), und
stellen Sie USB MODE auf „AUDIO“.
2. Verbinden Sie den Rechner und den JS-10 über ein USB-
Kabel.
3. Stellen Sie im Rechner und/oder der benutzten DAW-
Software den JS-10 als Audio-Ausgabegerät ein.
HINWEIS
Lesen Sie zu diesem Thema die Anleitung des verwendeten
Rechners bzw. der benutzten DAW-Software.
Bedienoberäche und
Anschlüsse
Spielen der Gitarre mit
Songs als Backing
eBand Song List Editor Verschiedene Funktionen Anhang
Die Inhalte der Datei werden angezeigt.
5. Kopieren Sie den Drivers-Ordner auf den Rechner.
HINWEIS
Kopieren Sie diesen Ordner in einen weiteren Ordner, den Sie
eindeutig benannt haben und später schnell aunden können.
27
Page 74

Verschiedene Funktionen
Verwenden von handelsüblichen SDbzw. SDHC-Karten
Sie können mit dem JS-10 nicht nur die beigefügte SD-Karte,
sondern auch handelsübliche SD/SDHC-Karten benutzen.
Eigenschaften der SD/SDHC-Karten
Der JS-10 unterstützt SD/SDHC-Karten mit den folgenden
technischen Eigenschaften:
• Kapazität: 1–32 GB
• SD/SDHC-Standard
SD-Karten, die mit dem JS-10 funktionieren
Informationen über SD-Karten, die von Roland mit dem JS-10
geprüft und für funktionsfähig befunden wurden, nden Sie auf der
Roland-Internetseite:
http://www.roland.com/support/
HINWEIS
• Bei einigen im Handel erhältlichen SD/SDHC-Karten kann
es vorkommen, dass die Aufnahme bzw. das Playback von
Audiodaten nicht korrekt funktioniert.
Austauschen der SD-Speicherkarte
So tauschen Sie die mitgelieferte SD-Speicherkarte gegen eine
andere aus.
HINWEIS
Eine SD/SDHC-Karte sollte immer nur eingesteckt bzw.
herausgenommen werden, wenn der JS-10 ausgeschaltet ist,
da ansonsten die Daten im JS-10 bzw. auf der Karte beschädigt
werden können.
1. Drücken Sie den [POWER]-Taster, um den JS-10
auszuschalten.
2. Entfernen Sie die SD CARD-Abdeckung.
DC IN-Buchse
SD CARDSchacht
Die verfügbaren Aufnahmezeiten
Die nachfolgende Tabelle beschreibt die verfügbare Aufnahmezeit
in Bezug auf die jeweilige Speicherkapazität einer SD-Karte.
Datengröße eBand-Songs WAV-Daten MP3-Daten
Songs pro GB
32 GB
HINWEIS
• Die oben angegebenen Zahlen basieren auf einer Songlänge
von ca. 5 Minuten.
• Auf der SD-Karte sind außer den Songs auch die USB-Treiber
und andere Daten gesichert, daher kann die Anzahl der zu
speichernden Songs geringer sein als oben angegeben.
• Die oben angegebenen Zahlen für MP3-Songs basieren auf der
Sampling Rate „44,1 kHz“ und Bit Rate „128 Kbps“.
• Die oben angegebenen Zahlen für WAV-Songs basieren auf der
Sampling Rate „44,1 kHz“ und Bitbreite „16 bit“.
• Die Anzahl der insgesamt zu speichernden Songs ist abhängig
von der jeweiligen Länge der Songs.
• Unabhängig vom noch verfügbaren, freien Aufnahmespeicher
kann der JS-10 maximal 4.000 Songs verwalten.
50 Songs
(ca. 4 Std.)
1.700 Songs
(ca. 130 Std.)
20 Songs
(ca. 1,5 Std.)
600 Songs
(ca. 50 Std.)
200 Songs
(ca. 17 Std.)
4.000 Songs
(ca. 550 Std.)
Schraube
SD CARD-Abdeckung
3. Drücken Sie auf die SD-Karte, und lassen Sie diese dann
los.
4. Setzen Sie eine andere SD-Karte ein.
5. Setzen Sie die neue SD-Speicherkarte in den JS-10 ein.
eindrücken
SD-Karte
28
6. Schrauben Sie die SD CARD-Abdeckung wieder fest.
Page 75

Der Schreibschutz der SD-Karte (LOCK)
Verschiedene Funktionen
SD-Karten besitzen einen SchreibschutzSchalter, der verhindert, dass
versehentlich Daten der Karte
modiziert bzw. gelöscht werden. Die
Position „LOCK“ entspricht dem Status
„geschützt“.
Wenn Sie die Funktionen des JS-10
nutzen möchten (z.B. Aufnahme),
müssen Sie die Position „UNLOCK“ (nicht
geschützt) wählen.
Write Protect-Schalter
Initialisieren einer SD-Karte (FORMAT)
Wenn Sie eine neue SD-Karte mit dem JS-10 verwenden möchten,
wird empfohlen, diese mit dem JS-10 zu formatieren.
HINWEIS
• Die dem JS-10 beigefügte SD-Karte ist schreibgeschützt und
kann zunächst mit dem JS-10 nicht initialisiert (formatiert)
werden. Bevor Sie den Schreibschutz-Schalter auf die Position
UNLOCK (nicht geschützt) setzen, sollten Sie alle Daten der
SD-Karte (Songs, USB-Treiber, eBand Song List Editor) auf Ihren
Rechner kopieren, damit Sie auf diese Daten zurückgreifen
können. Auch geschützte Songs würden bei Initialisieren der
SD-Karte gelöscht werden.
• Verwenden Sie für die Datenübertragung zum Rechner die
Funktion BACKUP (S. 20).
1. Führen Sie die folgenden Bedienschritte aus:
[MENU]-Taster „SYSTEM“ [ENTER]-Taster „SD CARD
FORMAT“ [ENTER]-Taster.
Das SD CARD FORMAT-Display erscheint.
NlPtEsItFrEn Deutsch
Bedienoberäche und
Anschlüsse
2. Drücken Sie den [ENTER]-Taster.
Die Meldung „Are you sure?“ erscheint.
3. Um die SD-Karte zu initialisieren, führen Sie die folgenden
Bedienschritte aus:
„OK“ [ENTER]-Taster.
HINWEIS
Sie können die Daten einer SD-Karte auf eine neue SD-Karte
übertragen. Gehen Sie dafür wie folgt vor:
3-1. Erstellen Sie eine Sicherheitskopie der Daten der
gewünschten SD-Karte (S. 20).
3-2. Übertragen Sie die Sicherheitskopie der Daten
auf die neue SD-Karte (S. 20).
Songs als Backing
Spielen der Gitarre mit
eBand Song List Editor Verschiedene Funktionen Anhang
29
Page 76

Verschiedene Funktionen
Verwendung von Fußschaltern und Expression-Pedalen
Sie können zwei BOSS FS-5U (separat erhältlich), einen BOSS FS-6 (separat erhältlich) oder einen Roland EV-5 usw. (separat erhältlich) anschließen,
sodass Sie zahlreiche Bedienungen mit dem Fuß vornehmen können.
Es kann ein Pedal
angeschlossen werden.
EXP PEDAL/CTL 1,2-Buchse
Stereoklinke Stereoklinke
Belegung des Stereoklinken-Anschlusses
TIP
RING
Monoklinke
Monoklinke
Anschluss eines EV-5
HINWEIS
• Ein Fußschalter bzw. Expression-Pedal sollte nur bei ausgeschaltetem Gerät angeschlossen bzw. abgezogen werden.
• Verwenden Sie nur das empfohlene Expression-Pedal (z.B. Roland EV-5, zusätzliches Zubehör). Bei Benutzung von Expression-Pedalen anderer
Hersteller können Fehlfunktionen auftreten.
Anschluss eines FS-5U
ODER ODER
CTL1 CTL2CTL1 CTL1
POLARITY-Schalter
Anschluss zweier FS-5U Anschluss eines FS-6
ODER
CTL2
Stereoklinke
MODE und POLARITY-Schalter
Monoklinke
x 2
Auswahl der Funktion des Fußschalters
1. Führen Sie die folgenden Bedienschritte aus: [MENU]-
Taster „SYSTEM“ [ENTER]-Taster „PEDAL“
[ENTER]-Taster.
Wählen Sie für CTL 1 bzw. CTL 2 die gewünschte Funktion aus.
CTL 1 / CTL 2 Beschreibung
PLAY/STOP Starten/Stoppen des Song-Players.
REC/STOP Starten/Stoppen der Aufnahme.
IN1 PATCH +1
IN1 PATCH -1
IN2 PATCH +1
IN2 PATCH -1
30
Heraufschalten der Eekt Patch-Nummer für die INPUT 1
(GUITAR/MIC)-Buchse.
Herabschalten der Eekt Patch-Nummer für die INPUT 1
(GUITAR/MIC)-Buchse.
Heraufschalten der Eekt Patch-Nummer für die INPUT 2
(GUITAR/MIC)-Buchse.
Herabschalten der Eekt Patch-Nummer für die INPUT 2
(GUITAR/MIC)-Buchse.
Die Funktion des Expression-Pedals
Die Funktion des Expression-Pedals ist abhängig davon, ob der
WAH-Eekt für INPUT 1 auf ON oder OFF steht.
HINWEIS
Das Expression-Pedal wirkt nur auf das Eingangssignal der
INPUT 1-Buchse.
WAH-Eekt (S. 35) Funktion des Expression-Pedals
ON Arbeitet als Wah-Pedal für INPUT 1.
OFF Arbeitet als Lautstärkepedal für INPUT 1.
Page 77

Anhang
Liste der Eekt-Parameter
Die aufgeführten Markennamen in dieser Anleitung sind
eingetragene Warenzeichen der jeweiligen Hersteller. Die
Markennamen werden in dieser Liste genannt, um den im JS-10
erzeugten Sound möglichst genau zu beschreiben.
AMP
Die COSM-Technologie simuliert unterschiedliche
Amp-Charakteristiken, Lautsprecherboxen und deren
Klangeigenschaften.
Parameter/
Einstellung
ON/OFF
OFF, ON Schaltet den AMP-Eekt ein bzw. aus.
TYPE
Bestimmt den Typ des Preamp.
NATURAL CLEAN Warmer Clean-Sound.
FULL RANGE Linearer Verstärker, ideal für Akustik-Gitarre.
COMBO CRUNCH Crunch-Sound eines Combo-Verstärkers.
STACK CRUNCH Crunch-Sound eines Amps mit 4 x 12“ Lautsprechern.
HiGAIN STACK High-Gain-Sound eines Vintage Marshall-Verstärkers.
POWER DRIVE Drive-Sound für Backing- und Lead-Gitarre.
EXTREME LEAD Lead-Sound eines großen Stack Amps.
CORE METAL Metal Stack-Sound.
JC-120 Sound des Roland JC-120.
CLEAN TWIN Simulation des Fender Twin Reverb.
PRO CRUNCH Simulation des Fender Pro Reverb.
TWEED Simulation des Fender Bassman 4 x 10“ Combo.
DELUXE CRUNCH Simulation des Fender Deluxe Reverb.
VO DRIVE Simulation des Drive-Sounds des VOX AC-30TB.
VO LEAD Simulation des Lead-Sounds desVOX AC-30TB.
MATCH DRIVE
BG LEAD Lead Sound eines MESA/Boogie Combo Amps.
BG DRIVE
MS1959 I Input I eines Marshall 1959.
MS1959 I+II Marshall 1959 mit parallel geschaltetem Input I und II.
R-FIER VINTAGE Kanal 2 ( VINTAGE) eines MESA/Boogie DUAL Rectier.
R-FIER MODERN Kanal 2 eines MESA/Boogie DUAL Rectier.
T-AMP LEAD Modell eines Hughes&Kettner Triamp AMP3.
Beschreibung
Linker Eingangskanal eines Matchless D/C-30. Eine
Simulation eines für Blues Rock bis zu Fusion häug
verwendeten Röhrenverstärkers.
Sound eines MESA/Boogie mit eingeschaltetem TREBLE
SHIFT-Schalter.
Parameter/
Einstellung
MIDDLE
0–100 Bestimmt den Anteil der mittleren Frequenzen.
TREBLE
0–100 Bestimmt den Anteil der hohen Frequenzen.
PRESENCE
0–100 Bestimmt den Anteil der ultra-hohen Frequenzen.
BRIGHT
Schaltet die Bright-Einstellung ein bzw. aus.
* Der BRIGHT-Parameter steht nicht für alle PREAMP-Typen zur Verfügung.
OFF Die Bright-Einstellung ist ausgeschaltet.
ON Die Bright-Einstellung ist eingeschaltet.
T-COMP
-10–+10 Passt die Röhrenkomprimierung des Verstärkers an.
Beschreibung
NlPtEsItFrEn Deutsch
Bedienoberäche und
Anschlüsse
Spielen der Gitarre mit
Songs als Backing
eBand Song List Editor Verschiedene Funktionen Anhang
SLDN Modell eines Soldano SLO-100.
5150 DRIVE Lead-Kanal des Peavey EVH 5150.
BASS CLEAN Clean-Sound für Bass-Gitarren.
BASS CRUNCH Crunch-Sound für Bass-Gitarren.
BASS HIGAIN High-Gain Sound für Bass-Gitarren.
GAIN
0–120 Bestimmt die Stärke der Verzerrung.
LEVEL
0–100
BASS
0–100 Bestimmt den Anteil der tiefen Frequenzen.
Bestimmt die Lautstärke des Preamp.
* Stellen Sie diesen Wert nicht zu hoch ein.
31
Page 78

Anhang
COMP/LIMITER
Der Compressor senkt laute Töne ab und hebt leise Töne an.
Dadurch wird der Sound fetter und klingt länger aus (Sustain).
Sie können auch eine „Limiter“ Funktion einstellen, so dass
nur Lautstärke-Spitzen abgeschnitten werden, um ungewollte
Verzerrungen bei der Aufnahme zu vermeiden.
Parameter/
Einstellung
ON/OFF
OFF, ON Schaltet den COMP/LIMITER-Eekt ein bzw. aus.
TYPE
COMP Der Eekt arbeitet als Compressor.
LIMITER Der Eekt arbeitet als Limiter.
SUSTAIN *1
0–100
ATTACK *1
0–100
THRESHOLD *2
0–100
RELEASE *2
0–100
TONE
-50–+50 Bestimmt die Klangfarbe.
LEVEL
0–100 Bestimmt die Lautstärke.
*1. Verfügbar bei TYPE=COMP.
*2. Verfügbar bei TYPE= LIMITER.
Beschreibung
Bestimmt den Zeitraum, in dem sich der Sound auf
einem stabilen Lautstärkepegel bendet. Je höher der
Wert, desto länger ist die Sustain-Dauer.
Bestimmt die Stärke des Saiten-Attack bei Spielen der
Saiten. Je höher der Wert, desto schärfer das Attack.
Der Compressor-Eekt setzt oberhalb des hier
eingestellten Pegels ein.
Bestimmt die Zeit, die vergeht, wenn das Signal den
Threshold Level unterschreitet. Je niedriger der Wert,
desto schneller hört der Compressor auf zu wirken.
OD/DS (Overdrive/Distortion)
Mit diesem Eekt wird der Gitarrensound verzerrt.
Parameter/
Einstellung
ON/OFF
OFF, ON Schaltet den OD/DS-Eekt ein bzw. aus.
TYPE
Bestimmt den Distortion-Typ.
CLN BOOST Produziert einen klaren Sound, arbeitet auch als Booster.
BLUES OD Angezerrter Sound eines BOSS BD-2.
OD-1 Simulation eines BOSS OD-1.
T-SCREAM Simulation eines Ibanez TS-808.
DISTORTION Verzerrter Sound.
RAT Simulation eines Proco RAT.
GUV DS Simulation eines Marshall GUV’ NOR.
DST+ Simulation eines MXR DISTORTION+.
METAL ZONE Simulation eines BOSS MT-2.
‘60s FUZZ Simulation eines FUZZFACE.
OCT FUZZ Simulation eines ACETONE FUZZ.
MUFF FUZZ Simulation eines Electro-Harmonix big Mu.
DRIVE
0–120 Bestimmt die Stärke der Verzerrung.
BOTTOM
-50–+50
TONE
-50–+50 Bestimmt die Klangfarbe.
EFFECT LEVEL
0–100 Bestimmt die Lautstärke des Eektsounds.
Beschreibung
Bestimmt die Klangfarbe für die tiefen Frequenzen.
Drehen des Reglers nach links ltert die BassFrequenzen, Drehen des Reglers nach rechts verstärkt
die Bass-Frequenzen.
32
Page 79

Anhang
NS (Noise Suppressor)
Dieser Eekt blendet Rauschen und Brummen aus. Da sich der
Noise Suppressor automatisch der Hüllkurve des Sounds anpasst,
wird das Originalsignal nur sehr gering beeinusst.
Parameter/
Einstellung
ON/OFF
OFF, ON Schaltet den NOISE SUPPRESSOR-Eekt ein bzw. aus.
THRESHOLD
0–100
Beschreibung
Bestimmt den Pegel, ab dem Nebengeräusche geltert
werden. Stellen Sie den Wert nicht zu hoch ein, so dass
der Sound normal ausklingen kann. Wenn der Pegel
des Nebengeräusches hoch ist, stellen Sie den Wert
entsprechend höher ein.
* Wenn der Threshold zu hoch eingestellt ist, ist
eventuell kein Sound hörbar, wenn das Eingangssignal zu leise ist.
EQ (Equalizer)
Klangeinstellung mit einem 4-bändigen Equalizer mit
parametrischem Mittenbereich.
Parameter/
Einstellung
ON/OFF
OFF, ON Schaltet den Equalizer-Eekt ein bzw. aus.
LOW GAIN
-20–+20dB Regelt den Anteil der tiefen Frequenzen.
HIGH GAIN
-20–+20dB Regelt den Anteil der hohen Frequenzen.
LEVEL
-20–+20dB Bestimmt die Lautstärke des Equalizers.
LO-MID FREQ (Low Middle Frequency)
20.0Hz–10.0kHz
LO-MID Q (Low Middle Q)
0.5–16
LO-MID GAIN (Low Middle Gain)
-20–+20dB Regelt den Anteil der tiefen Mitten-Frequenzen.
HI-MID FREQ (High Middle Frequency)
20.0Hz–10.0kHz
HI-MID Q (High Middle Q)
0.5–16
HI-MID GAIN (High Middle Gain)
-20–+20dB Regelt den Anteil der hohen Mitten-Frequenzen.
LOW CUT (Low Cut Filter)
FLAT, 20Hz–
800Hz
HIGH CUT (High Cut Filter)
630Hz–12.5kHz,
FLAT
Beschreibung
Bestimmt die Frequenz, die mit LO-MID GAIN abgesenkt
bzw. angehoben wird.
Bestimmt die Bandbreite der Veränderung für LO-MID
FREQ. Je höher der Wert, desto enger ist dieser Bereich.
Bestimmt die Frequenz, die mit HI-MID GAIN abgesenkt
bzw. angehoben wird.
Bestimmt die Bandbreite der Veränderung für HI-MID
FREQ. Je höher der Wert, desto enger ist dieser Bereich.
Bestimmt die Frequenz, ab der die tiefen Frequenzen
geltert werden. Bei „FLAT“ ist der Low Cut -Filter
ausgeschaltet.
Bestimmt die Frequenz, ab der die hohen Frequenzen
geltert werden. Bei „FLAT“ ist der High Cut-Filter
ausgeschaltet.
MODULATION
Für MOD SELECT können Sie verschiedene Eekt auswählen.
Parameter/
Einstellung
ON/OFF
OFF, ON Schaltet den Modulations-Eekt ein bzw. aus.
MOD SELECT (Modulation Select)
Bestimmt den Modulationstyp.
PHASER Phaser S. 33
FLANGER Flanger S. 34
CHORUS Chorus S. 34
TREMOLO Tremolo S. 34
ROTARY Rotary S. 34
UNI-V Uni-Vibe S. 34
PAN Pan S. 34
PHASER
Durch die verzögerte, phasenverschobene Ausgabe des
Originalsignals erzeugt der Phaser einen rotierenden ModulationsSound.
Parameter/
Einstellung
TYPE
Bestimmt die Anzahl der Stufen des Phaser-Eektes.
4 STAGE 4 Stufen
8 STAGE 8 Stufen
12 STG 12 Stufen
BI-PH. Zwei Phaser sind in Reihe geschaltet.
RATE
0–100 (*) Bestimmt die Modulations-Geschwindigkeit.
DEPTH
0–100 Bestimmt die Stärke des Phaser-Eektes.
RESONANCE
0–100
Eingabe des Tempowertes mit Tap Tempo
Parameter, die mit dem Symbol [*] gekennzeichnet sind,
sind Tempo-abhängig. Das Tempo kann durch mehrfaches
Drücken (mindestens 2x) des [SPEED]-Tasters (Tap Tempo)
eingegeben werden.
Beschreibung
Beschreibung
Bestimmt die Stärke der Rückkopplung (FeedbackEekt). Je höher der Wert, desto stärker ist die
Rückkopplung.
NlPtEsItFrEn Deutsch
Bedienoberäche und
Anschlüsse
Spielen der Gitarre mit
Songs als Backing
eBand Song List Editor Verschiedene Funktionen Anhang
33
Page 80
Anhang
FLANGER
Der Flanger ist eine Weiterentwicklung des Chorus, ist aber
extremer („Jet“-Simulation).
Parameter/
Einstellung
RATE
0–100 (*) Bestimmt die Modulations-Geschwindigkeit.
DEPTH
0–100 Bestimmt die Stärke des Eektes.
RESONANCE
0–100
MANUAL
0–100 Bestimmt die Mittel-Frequenz für den Flanger-Eekt.
Beschreibung
Bestimmt die Stärke der Rückkopplung (FeedbackEekt). Je höher der Wert, desto stärker ist die
Rückkopplung.
CHORUS
Der Chorus ist ein Eekt, der die Breite des Sounds im Stereofeld
bestimmt.
Parameter/
Einstellung
MODE
Bestimmt die Betriebsart des Chorus-Eektes.
MONO
ST1
ST2
RATE
0–100 (*) Bestimmt die Modulations-Geschwindigkeit.
DEPTH
0–100
EFFECT LEVEL
0–100 Bestimmt die Lautstärke des Eektsounds.
Beschreibung
Auf dem linken (L) und dem rechten (R) Kanal wird das
gleiche Signal ausgegeben.
Stereo-Chorus. Auf dem linken (L) und dem rechten (R)
Kanal werden unterschiedliche Signale ausgegeben.
Stereo-Chorus. Auf dem linken Kanal (L) wird das
Direktsignal, auf dem rechten Kanal (R) Kanal das
Eektsignal ausgegeben.
Bestimmt die Stärke des Eektes.
Bei „0“ erzielen Sie einen „Doubling“-Eekt.
ROTARY
Erzeugt den Eekt eines sich drehenden Lautsprechers.
Parameter/
Einstellung
RATE
0–100 (*) Bestimmt die Modulations-Geschwindigkeit.
Beschreibung
UNI-V (Uni-Vibe)
Dieses ist eine Simulation des berühmten UNI-VIBE Pedals. Der
Eekt ist dem Phaser sehr ähnlich.
Parameter/
Einstellung
RATE
0–100 (*) Bestimmt die Modulations-Geschwindigkeit.
DEPTH
0–100 Bestimmt die Stärke des Eektes.
Beschreibung
PAN
Bei Stereobetrieb dreht dieser Eekt die Lautstärke abwechselnd
auf der linken und auf der rechten Seite auf bzw. herunter. So
scheint der Sound im Stereobild hin- und herzuwandern.
Parameter/
Einstellung
RATE
0–100 (*) Bestimmt die Modulations-Geschwindigkeit.
DEPTH
0–100 Bestimmt die Stärke des Eektes.
WAVE SHAPE
0–100
Beschreibung
Bestimmt die Stärke der Änderung der Lautstärke. Je
höher der Wert, desto stärker sind die Lautstärkeunterschiede.
TREMOLO
Das Tremolo bewirkt eine zyklische Veränderung der Lautstärke.
Parameter/
Einstellung
RATE
0–100 (*) Bestimmt die Modulations-Geschwindigkeit.
DEPTH
0–100 Bestimmt die Stärke des Eektes.
WAVE SHAPE
0–100
34
Beschreibung
Bestimmt die Stärke der Änderung der Lautstärke. Je
höher der Wert, desto stärker sind die Lautstärkeunterschiede.
Page 81

Anhang
DELAY
Dieses ist ein Echo-Eekt, den Sie auch für ein breiteres Klangbild
verwenden können.
Parameter/
Einstellung
ON/OFF
OFF, ON Schaltet den DELAY-Eekt ein bzw. aus.
DELAY TIME
1ms–1000ms (*) Bestimmt die Verzögerungszeit.
FEEDBACK
0–100
HIGH CUT (High Cut Filter)
630Hz–12.5kHz,
FLAT
EFFECT LEVEL
0–120 Bestimmt die Lautstärke des Delaysignals.
Beschreibung
Bestimmt die Anzahl der Signalwiederholungen.
Je höher der Wert, desto höher ist die Anzahl der
wiederholten Signale.
Bestimmt die Frequenz, ab der die hohen Frequenzen
geltert werden. Bei „FLAT“ ist der High Cut-Filter
ausgeschaltet.
REVERB
Das Reverb erzeugt einen Raumhall-Eekt.
Parameter/
Einstellung
ON/OFF
OFF, ON Schaltet den REVERB-Eekt ein bzw. aus.
TYPE
Bestimmt den Reverbtyp.
AMBI.
(AMBIENCE)
ROOM Simulation des Halls eines normal großen Raumes.
HALL Simulation des Halls einer Konzerthalle.
PLATE
REV TIME (Reverb Time)
0.1 s–10.0 s Bestimmt die Hallzeit.
HIGH CUT (High Cut Filter)
630Hz–12.5kHz,
FLAT
EFFECT LEVEL
0–100 Bestimmt die Lautstärke des Eektsignals.
Beschreibung
Simulation eines Raum-Mikrofons, aufgestellt in einiger
Entfernung von der Signalquelle (o-mic).
Simulation des Halleektes einer schwingenden
Metallplatte.
Bestimmt die Frequenz, ab der die hohen Frequenzen
geltert werden. Bei „FLAT“ ist der High Cut-Filter
ausgeschaltet.
EZ CHAR
Parameter/
Einstellung
EZ CHAR (EZ Character)
-20–+20
Beschreibung
Je höher der Wert in den positiven (+) Bereich, desto
besser lässt sich der Sound für Soli einsetzen.
Je niedriger der Wert in den negativen (-) Bereich, desto
besser lässt sich der Sound für Backings einsetzen.
WAH
Sie können den Wah-Eekt in Echtzeit über ein an der EXP PEDAL/
CTL 1, 2-Buchse angeschlossenes Expression-Pedal steuern.
HINWEIS
Der WAH-Eekt ist nur für das an der INPUT 1-Buchse
anliegende Signal nutzbar.
Parameter/
Einstellung
ON/OFF
OFF, ON Schaltet den WAH-Eekt ein bzw. aus.
Beschreibung
NlPtEsItFrEn Deutsch
Bedienoberäche und
Anschlüsse
Spielen der Gitarre mit
Songs als Backing
eBand Song List Editor Verschiedene Funktionen Anhang
Eingabe des Tempowertes mit Tap Tempo
Parameter, die mit dem Symbol [*] gekennzeichnet sind,
sind Tempo-abhängig. Das Tempo kann durch mehrfaches
Drücken (mindestens 2x) des [SPEED]-Tasters (Tap Tempo)
eingegeben werden.
35
Page 82

Anhang
Fehlermeldungen
Meldung Beschreibung Seite
Der Songname kann am Gerät nicht verändert werden. Verwenden Sie dafür die eBand Song List
Cannot Edit Song Name!
Card Full!
Card Locked!
Card Read Error!
Card Write Error!
Data Not Found! Auf der SD-Karte bendet sich keine Backup-Datei für Eekt-Patches. —
Data Too Long! Das Playback bzw. die Aufnahme ist nicht möglich, weil der Song zu lang ist. —
Data Too Short! Das Playback bzw. die Aufnahme ist nicht möglich, weil der Song zu kurz ist. —
Disconnect USB Cable! Ziehen Sie das USB-Kabel vom JS-10 ab. —
Drive Busy!
No Card! Im JS-10 ist keine SD-Karte installiert. S. 28
No File! Song Erased!
Preset Data Exists! Die mit dem JS-10 gelieferte SD-Karte kann nicht formatiert werden. S. 29
Protected! Der ausgewählte Song ist schreibgeschützt. Entriegeln Sie bei Bedarf den Schreibschutz. S. 21
Stop Player!
System Error!
Too Many Songs!
Unformatted Card!
Unformatted USB Memory!
Unsupported Card!
Unsupported USB Memory!
Unsupported Format! Der Song besitzt ein Format, das der JS-10 nicht erkennen kann. —
USB Memory Full!
USB Memory Read Error!
USB Memory Write Error!
Editor-Software.
Ein mit dem eBand Song List Editor eingegebener Name wird im Display des JS-10 angezeigt.
Die SD-Karte besitzt keinen freien Speicher mehr. Löschen Sie nicht mehr benötigte Songs von der
Karte, oder verwenden Sie eine andere SD-Karte mit ausreichend freiem Speicher.
Der Schreibschutz-Schalter der SD-Karte ist aktiviert. Setzen Sie diesen Schalter auf die Position
„nicht schreibgeschützt“ (unlock).
Die Daten der SD-Karte können nicht gelesen werden. Sie müssen die SD-Karte formatieren.
* Dadurch werden alle vorherigen Daten der SD-Karte gelöscht.
Es können keine Daten auf die SD-Karte geschrieben werden. Sie müssen die SD-Karte formatieren.
* Dadurch werden alle vorherigen Daten der SD-Karte gelöscht.
Die Daten konnten nicht schnell genug gelesen bzw. geschrieben werden.
Wenn diese Meldung erscheint, während Sie einen Song von einem USB Flash-Speicher abspielen,
importieren Sie den Song mit dem IMPORT-Vorgang auf die im JS-10 installierte SD-Karte.
Der ausgewählte Song ist auf der SD-Karte nicht vorhanden. Löschen Sie diesen Songeintrag von
der SD-Karte.
Der Bedienvorgang kann nicht ausgeführt werden, solange das Playback bzw. die Aufnahme läuft.
Drücken Sie den [
Die Einstellungen konnten nicht im internen Speicher des JS-10 gesichert werden. Es liegt eventuell
ein technischer Fehler vor. Benachrichtigen Sie Ihr Roland Service Center bzw. Ihren Roland/BOSSVertragspartner.
Der JS-10 kann maximal 4.000 Songs auf einer SD-Karte verwalten. Löschen Sie nicht mehr
benötigte Songs von der Karte, oder verwenden Sie eine andere SD-Karte mit ausreichend freiem
Speicher.
Entweder ist die SD-Karte (bzw. der USB Flash-Speicher) nicht formatiert, oder der Speicher besitzt
ein Format, das der JS-10 nicht erkennen kann. Die SD-Karte muss mit dem JS-10 formatiert werden,
der USB Flash-Speicher muss mit einem Rechner formatiert werden.
* Dadurch werden alle vorherigen Daten der SD-Karte bzw. des USB Flash-Speichers gelöscht.
Die SD-Karte (bzw. der USB Flash-Speicher) kann mit dem JS-10 nicht verwendet werden.
Verwenden Sie eine SD-Karte (bzw. USB Flash-Speicher), die /der kompatibel zum JS-10 ist.
Informationen zu den zum JS-10 kompatiblen SD-Karten nden Sie auf der Roland-Internetseite:
http://www.roland.com/support/
Der USB Flash-Speicher besitzt keinen freien Speicher mehr. Löschen Sie nicht mehr benötigte
Songs vom USB Flash-Speicher, oder verwenden Sie einen anderen USB Flash-Speicher mit
ausreichend freiem Speicher.
Die Daten des USB Flash-Speichers können nicht gelesen werden. Sie müssen den USB FlashSpeicher mithilfe eines Rechners formatieren.
* Dadurch werden alle vorherigen Daten des USB Flash-Speichers gelöscht.
Es können keine Daten auf den USB Flash-Speicher geschrieben werden. Sie müssen den USB
Flash-Speicher mithilfe eines Rechners formatieren.
* Dadurch werden alle vorherigen Daten des USB Flash-Speichers gelöscht.
] (STOP)-Taster, um das Playback bzw. die Aufnahme zu stoppen.
S. 13
S. 8, S. 28
S. 29
S. 29
S. 29
S. 22
S. 8
—
—
S. 8, S. 28
S. 29
—
S. 8, S. 28
—
—
36
Page 83

Mögliche Fehlerursachen
Problem Überprüfung Seite
Das Gerät lässt sich nicht einschalten. Stellen Sie sicher, dass der beigefügte AC-Adapter korrekt am JS-10 angeschlossen ist. S. 4
Ist der MASTER LEVEL-Regler zu niedrig eingestellt? S. 3
Es ist kein Sound hörbar.
Ist an der PHONES-Buchse ein Kopfhörer angeschlossen? S. 4
Ist der SPEAKER-Schalter auf OFF gesetzt? S. 23
Sind auf der SD-Karte Songs gespeichert? S. 7
Sind der [INPUT LEVEL 1]-Regler bzw. [INPUT LEVEL 2]-Regler zu hoch eingestellt?
Anhang
NlPtEsItFrEn Deutsch
Das aufgenommene Signal ist verzerrt.
Eine MP3/WAV-Datei kann nicht abgespielt
werden.
Der AB REPEAT-Bereich kann nicht eingestellt
werden.
Die Lautstärke des in der INPUT 1-Buchse
bzw. INPUT 2-Buchse angeschlossenen
Gerätes ist zu gering.
Das Gerät ist nicht funktionsfähig.
Die Aufnahme ist nicht möglich.
Es können keine Songs importiert werden.
Es können keine Daten auf die SD-Karte
geschrieben werden.
Die Datenübertragung vom eBand Song List
Editor zum JS-10 ist fehlgeschlagen.
Die Anzeige „Unsupported Card“ erscheint.
Die SD-Karte funktioniert nicht mehr.
Die INPUT LEVEL 1/2-Regler
bzw. der SONG LEVEL müssen
so eingestellt sein, dass die
„“-Anzeige nicht erscheint.
S. 3
Werden die entsprechende Sampling Rate und Bit Rate /Bitbreite vom JS-10 unterstützt? S. 8
Der Abstand zwischen den Positionen „A“ und „B“ muss mindestens eine Sekunde betragen. S. 12
Besitzt das verwendete Audiokabel einen integrierten Widerstand?
Verwenden Sie nur Audiokabel ohne eingebauten Widerstand.
Ist die Ausgangslautstärke des externen Gerätes hoch genug eingestellt? —
Ist der [INPUT LEVEL 1]-Regler bzw. [INPUT LEVEL 2]-Regler zu niedrig eingestellt? S. 3, S. 8
Ist ein Mikrofon angeschlossen, aber der entsprechende INPUT GAIN noch auf „Gitarre“ gestellt? S. 23
Wird die Meldung „IDLING...“ auf dem Display des JS-10 angezeigt?
Unterbrechen Sie die USB-Verbindung, um den JS-10 wieder im Normalbetrieb nutzen zu können.
Ist die SD-Karte vollständig im JS-10 eingesteckt? S. 28
Ist der Schreibschutz-Schalter der SD-Karte noch auf der Position LOCK (schreibgeschützt)? S. 29
Besitzt die SD-Karte noch genügend freien Speicher? S. 28
Ist die verwendete SD-Karte kompatibel zum JS-10? S. 28
Ist die maximal mögliche Anzahl der zu verwaltenden Songs (4.000, inkl. WAV- und MP3-Daten)
erreicht?
Der JS-10 kann maximal 2.000 Einträge für Künstler/Alben verwalten. S. 8
Ist die SD-Karte vollständig im JS-10 eingesteckt?
Ist die verwendete SD-Karte kompatibel zum JS-10?
Die Daten der SD-Karte sind beschädigt. Mögliche Gründe sind:
• Der JS-10 wurde während der laufenden Aufnahme bzw. aktiver USB-Verbindung zum Rechner
ausgeschaltet.
• Das USB-Kabel wurde abgezogen, während die USB-Verbindung zum Rechner noch hergestellt
war.
• Die SD-Karte wurde aus dem JS-10 heraus genommen, während der JS-10 noch eingeschaltet
war.
• Die SD-Karte ist beschädigt (durch z.B. Feuchtigkeit, Biegen der Karte, beschädigte Kontakte).
S. 3
—
S. 8
S. 28
S. 29
Bedienoberäche und
Anschlüsse
Spielen der Gitarre mit
Songs als Backing
eBand Song List Editor Verschiedene Funktionen Anhang
Der USB Flash-Speicher wird nicht erkannt.
Es können keine Daten auf dem USB
Flash-Speicher gesichert werden.
Die USB-Verbindung zum Rechner kann nicht
hergestellt werden.
Sie müssen versuchen, die SD-Karte neu zu formatieren. Gelingt dieses nicht, verwenden Sie eine
andere, zum JS-10 kompatible SD-Karte.
Ist der USB Flash-Speicher vollständig im JS-10 eingesteckt?
Der JS-10 unterstützt das Dateiformat „FAT“. Sie müssen den zu verwendenden USB Flash-Speicher
am Rechner mit der Einstellung FAT formatieren.
Ist der USB Flash-Speicher schreibgeschützt?
Besitzt der USB Flash-Speicher noch genügend freien Speicher?
Ist das USB-Kabel korrekt angeschlossen? S. 13, S. 27
Ist der Rechner eingeschaltet? —
Verwenden Sie im Rechner ein Betriebssystem, das der JS-10 erkennen kann? S. 13
Ist die SD-Karte vollständig im JS-10 eingesteckt? S. 28
Ist die verwendete SD-Karte kompatibel zum JS-10? S. 28
—
—
37
Page 84

Anhang
Signaluss-Diagramm
PHONES-Buchse
Gitarre
Mikrofon
Audio Player
INPUT 1 (GUITAR/MIC)-
Buchse
INPUT 2 (GUITAR/MIC)Buchse
INPUT 2 (AUX)-Buchse
Songs
Song Player
USB COMPUTER-Port USB COMPUTER-Port
IN1
Eektgerät
IN2
LINE OUTBuchsen
INPUT ALL
USB AUDIO OUT: [MENU] ¨ „SYSTEM“ ¨ „SETTING“
Audio Recorder
Kopfhörer
Externe
Verstärkeranlage
JS-10 Lautsprecher
PCPC
Die Speicherstruktur des JS-10
JS-10
Nicht-überschreibbarer Speicher
USB Flash-Speicher
Export (S. 22)
Audiodaten (WAV)
Audiodaten (MP3)
Import (S. 22)
Backup (S. 20)
Preset Eekt-Patches
SD-Karte
ROLAND-Ordner
Win.zip
USB-Treiber für Windows
eBand Song List Editor
eBand Songs
Überschreibbarer Speicher
User Eekt-Patches
Eekt-Patches
Mac.dmg
Backup (S. 20)
User
Recover (S. 20)
USB-Treiber für Mac OS
eBand Song List Editor
System-
Parameter
38
ROLAND-Ordner
PC
Recover (S. 20)
Page 85

Technische Daten
BOSS eBand JS-10: AUDIO PLAYER MIT GITARRENEFFEKTEN
Anhang
Speichermedium/
Kapazität
Datenformate
Externer Speicher
AD-Konvertierung 24 bit + AF-Methode
DA-Konvertierung 24 bit
Sampling-Frequenz 44.1 kHz
Eekt-Patches
Datenkapazität
* Die angegebenen Zeiten
sind Näherungswerte.
Je nach Anzahl und
Datengröße der Songs
auf der Speicherkarte
kann dieser Wert
geringer sein.
Nominaler Eingangspegel
Eingangswiderstand
Nominaler Ausgangspegel LINE OUT: -10 dBu
Ausgangswiderstand LINE OUT: 1 kΩ
Interne Lautsprecher 2.1 System (2-Kanal Stereo und Woofer)
Ausgangsleistung 12 W (Stereolautsprecher 3.5 W x 2 + Woofer 5 W)
Display Grak-LCD, 132x64 Bildpunkte
Anschlüsse
Stromverbrauch 700 mA
Abmessungen
Gewicht
Beigefügtes Zubehör
Zusätzliches Zubehör
SD/SDHC-Karte 1 G–32 GB
eBand Songs (Aufnahme/Playback)
WAV (Bitbreite: 16 bit, nur Playback)
MP3 (Bit Rate: 64 K–320 Kbps, nur Playback)
USB Flash-Speicher (zusätzliches Zubehör)
* Verwenden Sie nur die von Roland empfohlenen USB Flash-Speicher. Nur für diese kann ein reibungsloser Betrieb gewährleistet werden.
Preset: 130
User: 100
eBand Songs
WAV/16 bit/stereo
MP3/128 Kbps/stereo
INPUT 1-Buchse (GUITAR/MIC)
INPUT 2-Buchse (GUITAR/MIC)
INPUT 2-Buchse (AUX) -20 dBu
INPUT 1-Buchse (GUITAR/MIC)
INPUT 2-Buchse (GUITAR/MIC)
INPUT 2 (AUX) 47 kΩ
INPUT 1 (GUITAR/MIC)-Buchse (Klinke)
INPUT 2 (GUITAR/MIC)-Buchse (Klinke
INPUT 2 (AUX)-Buchse (Stereo-Miniklinke)
PHONES-Buchse (Stereo-Miniklinke)
LINE OUT-Buchsen (Cinch)
EXP PEDAL/CTL1, 2-Buchse (Stereoklinke)
USB MEMORY-Anschluss (USB Typ A)
USB COMPUTER-Anschluss (USB Typ B)
DC IN-Buchse
264 (W) x 169 (D) x 209 (H) mm
10-7/16 (W) x 6-11/16 (D) x 8-1/4 (H) inch
ca. 1,8 kg
4 lbs
(ohne AC-Adapter)
AC-Adapter
SD-Karte (Vor der Auslieferung in den JS-10 eingesetzt.)
USB-Kabel
Bedienungsanleitung (dieses Handbuch)
Fußschalter (BOSS FS-5U), Doppel-Fußschalter (B0SS FS-6)
Expression Pedal (Roland EV-5, BOSS FV-500L, BOSS FV-500H)
USB Flash-Speicher
* Verwenden Sie nur die von Roland empfohlenen USB Flash-Speicher. Nur für diese kann ein reibungsloser Betrieb gewährleistet werden.
Stunden pro GB: 4 Stunden
32 GB: 130 Stunden
Stunden pro GB: 1,5 Stunden
32 GB: 50 Stunden
Stunden pro GB: 17 Stunden
32 GB: 550 Stunden
-10 dBu (INPUT GAIN = GUITAR)
-32 dBu (INPUT GAIN = MIC)
1 MΩ
NlPtEsItFrEn Deutsch
Bedienoberäche und
Anschlüsse
Spielen der Gitarre mit
Songs als Backing
eBand Song List Editor Verschiedene Funktionen Anhang
0dBu = 0.775Vrms
Änderungen der technischen Daten und des Designs sind möglich. Für Druckfehler wird keine Haftung übernommen.
* Die AF-Methode (Adaptive Focus) ist eine von Roland entwickelte Methode der AD-Wandlung. Sie eliminiert praktisch jedes Quantisierungs-
Rauschen und verbessert erheblich die gesamte Dynamik-Bandbreite.
39
Page 86

SICHERHEITSHINWEISE
Sicherheitshinweise
Hinweise zur Vermeidung von Feuer, elektrischen Schlägen oder Verletzungen von Personen
Diese Warnungen sollen auf die Gefahren
WARNUNG
hinweisen, die bei unsachgemäßem
Gebrauch des Gerätes bestehen.
Dieses Zeichen wird verwendet, um auf
das Risiko von Verletzungen oder
Materialschäden hinzuweisen, die bei
unsachgemäßem Gebrauch des Gerätes
VORSICHT
entstehen können.
* Die o.g. Faktoren beziehen sich sowohl
auf häusliches Inventar als auch auf
Haustiere.
WARNUNG
Gerät bzw. Netzadapter nicht modizieren
Das Gerät bzw. der Netzadapter
darf nicht geönet oder in
irgendeiner Weise verändert
werden.
Reparaturen nicht selbst ausführen
Nehmen Sie keine eigenen
Reparaturversuche vor. Überlassen
Sie dieses einem qualizierten
Techniker eines Roland Service
Centers ( siehe „RolandVertretungen“).
Keine unverträglichen Umgebungen
Vermeiden Sie Umgebungen mit:
• extremen Temperaturen (z.B.
direkte Sonneneinstrahlung,
direkte Nähe zu einem Heizkörper)
• zu hoher Luftfeuchtigkeit
• Rauchentwicklung
• zu hohem Salzgehalt in der Luft
• Regen
• starker Staubentwicklung
• starker Vibration.
Keine instabilen Flächen
Sorgen Sie dafür, dass das Gerät
auf einer ebenen, stabilen
Unterlage aufgestellt wird, auf der
es nicht wackeln kann.
Nur den beigefügten Netzadapter benutzen
und auf eine korrekte Stromversorgung
achten
Verwenden Sie nur den
dem Gerät beigefügten
Netzadapter. Benutzen Sie den
Netzadapter nicht mit anderen
Geräten. Stellen Sie sicher,
dass die Stromversorgung
zum Netzadapter des Gerätes
passt. Achten Sie generell
auf eine korrekte und stabile
Stromversorgung.
Dieses Symbol macht auf wichtige Hinweise und
Warnungen aufmerksam. Das Zeichen im Dreieck gibt
eine genaue Denition der Bedeutung (Beispiel: Das
Zeichen links weist auf allgemeine Gefahren hin).
Dieses Symbol weist auf Dinge hin, die zu unterlassen
sind. Das Symbol im Kreis deniert dieses Verbot
näher (Beispiel: Das Zeichen links besagt, dass das
Gerät nicht geönet bzw. auseinandergenommen werden
darf.)
Dieses Symbol weist auf Dinge hin, die zu tun sind.
Das Symbol im Kreis deniert diese Aktion näher
(Beispiel: Das Zeichen links besagt, dass der
Netzstecker des Gerätes aus der Steckdose zu ziehen
ist).
WARNUNG
Nur das beigefügte Netzkabel benutzen
Verwenden Sie nur das dem Gerät
beigefügte Netzkabel. Benutzen
Sie das Netzkabel nicht mit
anderen Geräten.
Netzkabel nicht belasten bzw. beschädigen
Vermeiden Sie Beschädigungen
des Netzkabels. Knicken Sie es
nicht, treten Sie nicht darauf
und stellen Sie keine schweren
Gegenstände auf das Kabel.
Keine zu hohen Lautstärken
Dieses Gerät kann hohe
Lautstärkepegel erzeugen. Falls
Sie eine Beeinträchtigung Ihres
Gehörs feststellen, suchen Sie
sofort einen Gehörspezialisten auf.
Keine Flüssigkeiten bzw. kleine Gegenstände
in der Nähe des Gerätes
Achten Sie darauf, dass keine
Gegenstände bzw. Flüssigkeit in
das Gehäuse gelangen. Stellen Sie
keine Gegenstände mit Flüssigkeit
auf das Gerät.
Ausschalten bei Fehlfunktionen
Schalten Sie das Gerät sofort
aus, trennen Sie es von
der Stromversorgung, und
benachrichtigen Sie Ihren Roland/
BOSS-Vertragspartner, wenn
• das Netzteil bzw. das Netzkabel
beschädigt ist
• sich Rauch entwickelt
(Netzteilschaden)
• Gegenstände bzw. Flüssigkeit in
das Instrument gelangt sind
• das Gerät nass geworden ist
• das Gerät nicht wie gewohnt
funktioniert
• der Sound unnormal klingt.
WARNUNG
Aufsichtpicht von Erwachsenen
In Haushalten mit Kindern
sollte ein Erwachsener
solange für Aufsicht sorgen,
bis das betreende Kind das
Instrument unter Beachtung
aller Sicherheitsvorschriften zu
bedienen weiß.
Beschädigungen vermeiden
Bewahren Sie das Instrument vor
heftigen Stößen und lassen Sie es
nicht fallen.
Nicht zu viele Geräte an einer Steckdose
Vermeiden Sie es, das Gerät mit
vielen anderen Geräten zusammen
an derselben Steckdose zu
betreiben. Ganz besonders
vorsichtig sollten Sie bei der
Verwendung von Verlängerungen
mit Mehrfachsteckdosen sein:
der Gesamtverbrauch aller an
sie angeschlossenen Geräte
darf niemals die in Watt oder
Ampère angegebene zulässige
Höchstbelastung überschreiten!
Einsatz des Gerätes im Ausland
Bevor Sie das Gerät im Ausland
benutzen, sollten Sie Ihren Roland/
BOSS-Vertragspartner zu Rate
ziehen.
40
Page 87
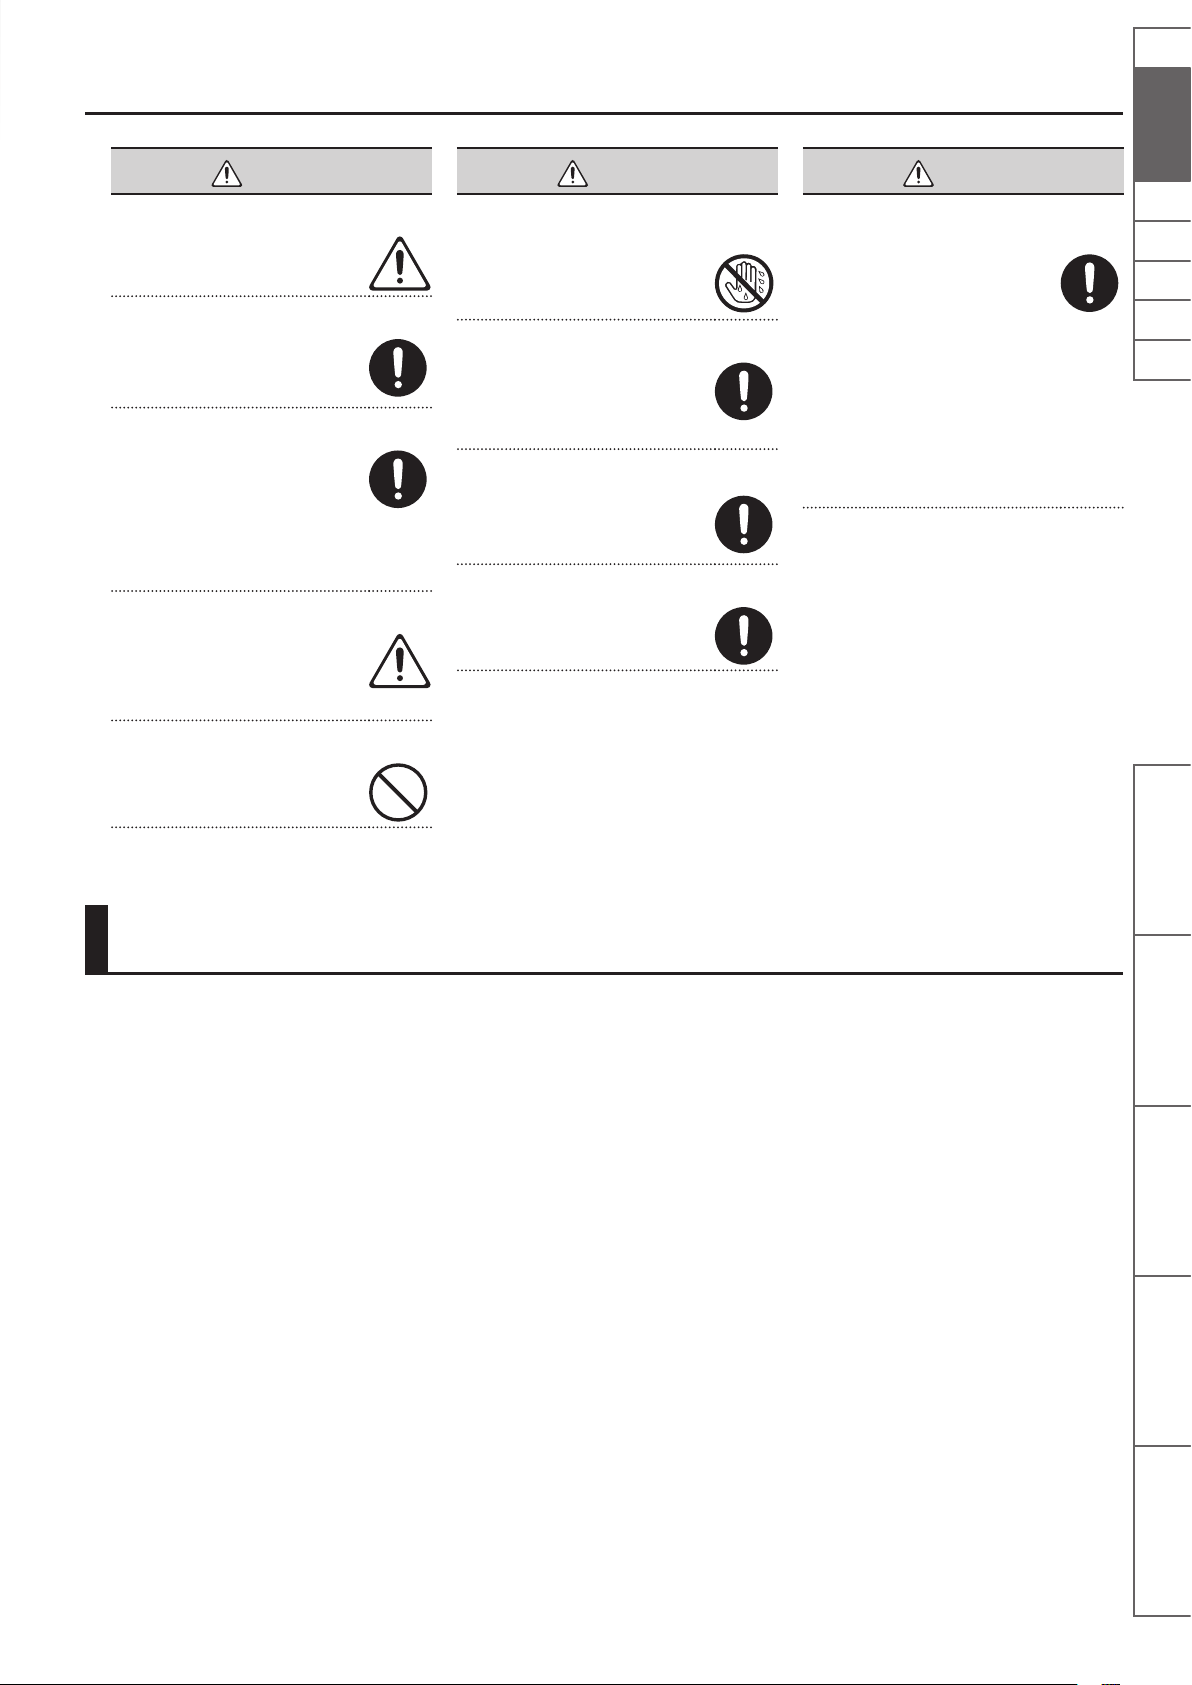
WICHTIGE HINWEISE
VORSICHT
Für ausreichende Belüftung sorgen
Achten Sie darauf, dass das Gerät
und der Netzadapter ausreichend
belüftet werden.
Nur am Stecker ziehen, nicht am Kabel
Ziehen Sie nie am Kabel, sondern
fassen Sie beim Aus- und
Einstöpseln des Netzkabels immer
nur den Stecker.
Staubpartikel entfernen
Achten Sie darauf, dass sich
am Netzkabel, Netzstecker
bzw. Netzadapter kein Staub
bendet. Entfernen Sie
Staubpartikel regelmäßig.
Trennen Sie das Netzkabel von der
Stromversorgung, wenn Sie das
Gerät längere Zeit nicht benutzen.
Sicherheitsmaßnahmen für Kabel
Achten Sie darauf, dass die Kabel
nicht durcheinandergeraten.
Verlegen Sie die Kabel außerdem
so, dass Kinder nicht an sie
herankommen.
Gerät nicht belasten
Stellen Sie sich nicht auf das Gerät,
und belasten Sie es nicht mit
schweren Gegenständen.
VORSICHT
Netzteil/Netzkabel nicht mit nassen Händen
anfassen
Fassen Sie das Netzkabel bzw.
den Netzadapter niemals mit
nassen Händen an.
Hinweise für den Transport
Trennen Sie vor einem Transport
nicht nur das Netzkabel/Netzteil
vom Gerät, sondern auch alle
zu externen Geräten führenden
Kabel.
Vor der Reinigung vom Stromnetz trennen
Wenn Sie das Gerät reinigen
wollen, schalten Sie es vorher aus
und trennen es vom Stromnetz
(S. 4).
Maßnahmen bei Gewitter
Bei Gewitter sollten Sie das Gerät
vom Stromnetz trennen.
VORSICHT
Kleine Gegenstände außerhalb der
Reichweite von Kindern aufbewahren
Bewahren Sie kleine Gegenstände
immer ausserhalb der Reichweite
von Kindern auf, um Unfällen
wie z.B. das Verschlucken solcher
Gegenstände vorzubeugen. Bei
diesem Gerät sind dieses folgende
Gegenstände:
• Eingebaute Teile:
SD-Karte (S. 28)
• Abnehmbare Teile:
Kappen der USB-Anschlüsse (S. 4),
SD CARD-Abdeckung (S. 28),
Schraube (S. 28)
NlPtEsItFrEn Deutsch
Bedienoberäche und
Anschlüsse
WICHTIGE HINWEISE
Stromversorgung
• Verwenden Sie keine Stromkreise, durch
die auch Geräte gespeist werden, die
störende Geräusche erzeugen (z.B. Motoren,
Lichtsysteme, Waschmaschinen, MikrowellenHerd etc.), da ansonsten Nebengeräusche
oder auch Beschädigungen auftreten können.
Benutzen Sie bei Bedarf ein GeräuschlterSystem.
• Der AC-Adapter erwärmt sich bei längerem
Betrieb. Dieses ist normal und keine
Fehlfunktion.
• Schalten Sie alle beteiligten Geräte aus, bevor
Sie neue Kabelverbindungen vornehmen,
um eventuellen Beschädigungen oder
Fehlfunktionen vorzubeugen.
• In der Werksvoreinstellung wird das
JS-10 nach ca. 30 Minuten automatisch
ausgeschaltet, wenn das Gerät in der
Zwischenzeit nicht betätigt wurde. Um die
automatische Abschaltung zu verhindern,
stellen Sie den Parameter „AUTO OFF“ auf
„OFF“ (siehe S. 26).
* Bei Ausschalten des Gerätes werden alle bis dahin
geänderten, aber nicht gesicherten Einstellungen
gelöscht. Speichern Sie daher alle wichtigen
Änderungen aktiv vor Ausschalten des Gerätes.
• Die Positionierung in der Nähe von großen
• Stellen Sie dieses Gerät nicht in der direkten
• Schnurlose Telefone und Funktelefone
• Setzen Sie das Gerät keinen
• Wenn das Gerät Temperatur-Unterschieden
Positionierung
Verstärkern kann Brummgeräusche zur Folge
haben. Vergrößern Sie in diesem Fall den
Abstand zwischen Gerät und Verstärker.
Nähe von Fernsehern oder Radiogeräten auf,
da ansonsten deren Empfang beeinträchtigt
werden kann.
können, sobald Sie in der Nähe des
Gerätes betrieben werden, Störgeräusche
verursachen. Betreiben Sie daher Telefone
nicht in der Nähe des Gerätes.
Temperaturextremen aus, z.B. durch direkte
Sonneneinstrahlung, Aufstellung direkt
neben einem Heizkörper oder direkte
Bestrahlung durch eine starke Lichtquelle.
In diesem Fall kann die Oberäche abfärben
bzw. das Gehäuse verformt werden.
ausgesetzt war (z.B. nach einem Transport),
warten Sie, bis sich das Instrument der
Raumtemperatur angepasst hat, bevor Sie
es einschalten, ansonsten können durch
Kondensierungs-Flüssigkeit Schäden
verursacht werden.
• Die an der Unterseite des Gerätes befestigten
Gummifüße können die Oberäche
beschädigen, auf der das Gerät abgestellt
wird. Legen Sie bei Bedarf ein rutschfestes
Tuch unter das Gerät.
• Vermeiden Sie, dass das Gerät Kontakt mit
Spray, Parfüm etc. in Berührung kommt, da
ansonsten die Oberäche beschädigt werden
kann. Wischen Sie feuchte Stellen mit einem
weichen, trockenen Tuch ab.
Songs als Backing
Spielen der Gitarre mit
eBand Song List Editor Verschiedene Funktionen Anhang
41
Page 88

WICHTIGE HINWEISE
Reinigung
• Verwenden Sie ein trockenes Tuch, welches
bei Bedarf mit Wasser leicht angefeuchtet
werden darf. Drücken Sie das Tuch nicht zu
fest auf die Oberäche.
• Verwenden Sie kein Benzin, Verdünner,
Alkohol o.ä., da ansonsten die Oberäche
abfärben bzw. das Gehäuse verformt werden
kann.
Reparaturen und Datensicherung
• Bei einer Reparatur kann vorkommen, dass
die Daten im internen Speicher gelöscht
werden, weil eine Initialisierung des
Gerätes erforderlich ist. Um jedes Risiko zu
vermeiden, sichern Sie Ihre Daten vor einer
technischen Überprüfung bzw. Reparatur
mithilfe einer SD-Karte, SDHC-Karte, eines
USB Flash-Speichers oder/und Rechners.
Roland übernimmt keine Haftung für jegliche
Art von Datenverlusten.
• Erstellen Sie von den gesicherten Daten
regelmäßig Sicherheitskopien, idealerweise
auf mehreren, unterschiedlichen
Speichermedien (z.B. Festplatte eines
Rechners, auf CD-R etc.). Roland übernimmt
keine Haftung für Datenverluste, die sich
aufgrund von beschädigten Datenträgern
ergeben können.
Zusätzliche Hinweise
• Behandeln Sie die Bedienelemente und
Anschlüsse des Gerätes mit der notwendigen
Sorgfalt.
• Drücken bzw. schlagen Sie nicht auf das
Display.
• Wenn Sie Kabelverbindungen trennen, fassen
Sie das Kabel immer am Stecker, und ziehen
Sie nie am Kabel selbst. Dadurch beugen Sie
Beschädigungen der Kabel vor.
• Spielen Sie das Instrument immer mit einer
angemessenen Lautstärke. Verwenden Sie bei
Bedarf einen Kopfhörer.
• Wenn Sie das Gerät transportieren
möchten, verwenden Sie entweder die
Originalverpackung oder ein stabiles
Hardcase.
• Verwenden Sie nur das empfohlene
Expression-Pedal (Roland EV-5, BOSS FV-500L,
BOSS FV-500H, zusätzliches Zubehör). Bei
Benutzung von Expression-Pedalen anderer
Hersteller können Fehlfunktionen auftreten.
• Verwenden Sie nur Audiokabel ohne
eingebauten Widerstand. Bei der Benutzung
von Kabeln mit integriertem Widerstand wird
die Lautstärke deutlich herabgesetzt.
Hinweise zu Speichermedien
• Stellen Sie sicher, dass der USB Flash-Speicher
bzw. die SD/SDHC-Karte fest eingesteckt ist.
• Berühren Sie nicht die elektrischen Kontakte
des Speichers. Achten Sie darauf, dass die
Kontakte nicht verschmutzen.
• Beachten Sie die folgenden Hinweise
bezüglich der Behandlung von
Speichermedien:
• Um eine Beschädigung durch statische
Elektrizität vorzubeugen, entladen
Sie diese durch Berühren eines
metallischen Gegenstandes, bevor Sie das
Speichermedium berühren.
• Berühren Sie nicht die Kontakte des
Speichermediums.
• Biegen Sie das Speichermedium nicht,
lassen Sie dieses nicht fallen, und
setzen Sie das Speichermedium keinen
Erschütterungen bzw. Vibrationen aus.
• Setzen Sie das Speichermedium keiner
direkten Hitzestrahlung aus.
• Achten Sie darauf, dass das
Speichermedium nicht nass wird.
• Das Speichermedium darf nicht geönet
bzw. modiziert werden.
Hinweise zum Copyright, Lizenzen
und Warenzeichen
• Das Aufzeichnen, Vertreiben, Verkaufen,
Verleihen, Auühren oder Senden von
geschütztem Audio- und Videomaterial
(vollständig oder in Ausschnitten) unterliegt
den gesetzlichen Copyright-Bestimmungen
und ist ohne Genehmigung des CopyrightInhabers nicht gestattet.
• Dieses Gerät besitzt keinen Kopierschutz, um
die Arbeit mit eigenen Daten nicht unnötig
zu erschweren. Beachten Sie dennoch
immer die Copyright-Vorschriften, wenn Sie
mit Copyright-geschützten Daten arbeiten
möchten.
• Das Copyright auf den Inhalt dieses Gerätes
(Sound-Wellenformen, Styledaten, Patterns,
Phrasen, Audio Loops, Bilddaten) liegt bei der
Roland Corporation und/oder Atelier Vision
Corporation.
• Als Besitzer dieses Gerätes sind Sie
Lizenznehmer für die Nutzung der Inhalte
dieses Instrumentes für Ihre eigene Arbeit.
• Es ist nicht gestattet, den Inhalt dieses
Gerätes zu kopieren, zu modizieren und
zu verbreiten, weder als Ganzes noch
in Ausschnitten, weder auf physischen
Datenträgern noch über ComputerNetzwerke.
• MMP (Moore Microprocessor Portfolio)
ist ein Patent für die Architektur von
Mikroprozessoren, entwickelt von der
Technology Properties Limited (TPL). Roland
ist ein Lizenznehmer der TPL-Gruppe.
• Die MPEG Layer-3 Audio CompressionTechnologie wurde lizensiert von der
Fraunhofer IIS Corporation und THOMSON
Multimedia Corporation.
• CD und Musikdaten von Gracenote,
Gracenote, Inc., Copyright © 2000-2012
Gracenote.
• Gracenote Software, Copyright © 2000-2012
Gracenote.
• Dieses Produkt unterliegt den folgenden U.S.Patenten: #5,987,525; #6,061,680; #6,154,773,
#6,161,132, #6,230,192, #6,230,207,
#6,240,459, #6,330,593, und Weitere. Einige
Dienstleistungen wurden lizensiert von
der Open Globe, Inc. für das U.S. Patent:
#6,304,523.
• Gracenote und CDDB sind eingetragene
Warenzeichen von Gracenote.
• Die „Gracenote“- und „Powered by
Gracenote“-Logos sind Warenzeichen von
Gracenote.
• Die Logos ) und sind
Warenzeichen von SD-3C, LLC.
• ASIO ist eine Marke der Steinberg Media
Technologies GmbH.
• Dieses Produkt verwendet eCROS-integrierte
Software der eSOL Co. Ltd. eCROS ist ein
Warenzeichen der eSOL Co. Ltd. in Japan.
• MP3 Codec Copyright © 1995-2010, SPIRIT.
• Roland, BOSS, COSM, und eBand sind
Warenzeichen bzw. eingetragene
Warenzeichen der Roland Corporation in den
USA und/oder anderen Ländern.
• Die in dieser Anleitung erwähnten
Firmennamen und Produktbezeichungen
sind Warenzeichen bzw. eingetragene
Warenzeichen des jeweiligen Herstellers bzw.
Namen-Inhabers.
42
Page 89

Index
A
[A B]-Taster . . . . . . . . . 3, 12, 19, 21
AB EDIT . . . . . . . . . . . . . . . . . . . . . . . . . . 12
AB REPEAT . . . . . . . . . . . . . . . . . . . . . . . 12
AB REPEAT-Bereich . . . . . . . . . . . . . . . . 4
AC-Adapter . . . . . . . . . . . . . . . . . . . . . . . 4
AF-Methode . . . . . . . . . . . . . . . . . . . . . 39
ALBUM . . . . . . . . . . . . . . . . . . . . . . . . . . . 7
ALL SONGS . . . . . . . . . . . . . . . . . . . . . . . 7
AMP . . . . . . . . . . . . . . . . . . . . . . . . . . . . . 31
[AMP]-Taster . . . . . . . . . . . . . . . . . . . . . . 3
ARTIST . . . . . . . . . . . . . . . . . . . . . . . . . . . . 7
AUDIO SETTING . . . . . . . . . . . . . . . . . . 23
Aufnahme . . . . . . . . . . . . . . . . . . . . . . . 10
Aufnahmezeit . . . . . . . . . . . . . . . . . . . . 39
AUTO OFF . . . . . . . . . . . . . . . . . . . . . . . 26
B
BACKING . . . . . . . . . . . . . . . . . . . . . . . . 17
BEST 30 . . . . . . . . . . . . . . . . . . . . . . . . . . . 7
BEST 30 EDIT . . . . . . . . . . . . . . . . . . . . . . 7
Bit Rate . . . . . . . . . . . . . . . . . . . . . . . . 8, 15
C
CD Ripping-Display . . . . . . . . . . . . . . 15
Center Cancel . . . . . . . . . . . . . . . . . . . . 12
CHORUS . . . . . . . . . . . . . . . . . . . . . . . . . 34
COMP . . . . . . . . . . . . . . . . . . . . . . . . . . . 32
Contrast . . . . . . . . . . . . . . . . . . . . . . . . . 25
C-Symbol . . . . . . . . . . . . . . . . . . . . . . 4, 12
Cursor-Taster . . . . . . . . . . . . . . . . . . . . . . 3
D
Datenkapazität . . . . . . . . . . . . . . . . . . 39
DC IN-Buchse . . . . . . . . . . . . . . . . . . . . . 4
DELAY . . . . . . . . . . . . . . . . . . . . . . . . . . . 35
Display . . . . . . . . . . . . . . . . . . . . . . . . . . . 3
Distortion. . . . . . . . . . . . . . . . . . . . . . . . 32
DS . . . . . . . . . . . . . . . . . . . . . . . . . . . . . . . 32
E
eBand Song List Editor . . . . . . . . . . . 13
eBand Songs . . . . . . . . . . . . . . . . . . . . . 39
EFFECT MENU-Display. . . . . . . . . . . . 18
[EFFECTS]-Taster . . . . . . . . . . . 3, 10, 17
Eekt
auswählen . . . . . . . . . . . . . . . . . . . 10
editieren . . . . . . . . . . . . . . . . . . . . . 17
INITIALIZE . . . . . . . . . . . . . . . . . . . . 19
Parameter . . . . . . . . . . . . . . . . . . . 31
[ENTER]-Taster . . . . . . . . . . . . . . . . . . 3, 5
EQ . . . . . . . . . . . . . . . . . . . . . . . . . . . 23, 33
Equalizer . . . . . . . . . . . . . . . . . . . . 23, 33
ERASE
SONG . . . . . . . . . . . . . . . . . . . . . . . . . 8
EXCHANGE . . . . . . . . . . . . . . . . . . . . . . 19
[EXIT]-Taster . . . . . . . . . . . . . . . . . . . . . . 3
EXPORT . . . . . . . . . . . . . . . . . . . . . . . . . . 22
EXP PEDAL/CTL 1, 2-Buchse . . . . 4, 30
Expression Pedal . . . . . . . . . . . . . . . . . 30
EZ CHAR . . . . . . . . . . . . . . . . . . . . . . . . . 35
EZ EDIT-Display . . . . . . . . . . . . . . . . . . 17
F
FACTORY RESET . . . . . . . . . . . . . . . . . . 26
[
] (Fast Forward)-Taster . . . . . . . . . 3
FLANGER . . . . . . . . . . . . . . . . . . . . . . . . 34
FORMAT
SD-Karte . . . . . . . . . . . . . . . . . . . . . 29
Fußschalter . . . . . . . . . . . . . . . . . . . . . . 30
G
GAIN . . . . . . . . . . . . . . . . . . . . . . . . . . . . 23
Geschwindigkeit
SONG . . . . . . . . . . . . . . . . . . . . . . . . 11
Global EQ . . . . . . . . . . . . . . . . . . . . . . . . 23
H
HARD . . . . . . . . . . . . . . . . . . . . . . . . . . . . 17
I
IMPORT . . . . . . . . . . . . . . . . . . . . . . . . . . 22
IN1/IN2 . . . . . . . . . . . . . . . . . . . . 4, 10, 17
INITIALIZE
Eekte . . . . . . . . . . . . . . . . . . . . . . . 19
JS-10 . . . . . . . . . . . . . . . . . . . . . . . . 26
SD-Karte . . . . . . . . . . . . . . . . . . . . . 29
INPUT . . . . . . . . . . . . . . . . . . . . . . . . . . . 23
INPUT 1 (GUITAR/MIC)-Buchse,
INPUT 2 (GUITAR/MIC)-Buchse . . . . . 3
INPUT 2 (AUX)-Buchse . . . . . . . . . . . . . 3
INPUT-Display. . . . . . . . . . . . . . . . . . . . 23
[INPUT LEVEL 1
2]-Regler . . . . . . 3
K
Kapazität
SD-Karte . . . . . . . . . . . . . . . . . . . . . 28
KEY . . . . . . . . . . . . . . . . . . . . . . . . . . . . . . 21
L
Lautstärke-Pedal . . . . . . . . . . . . . . . . . 30
LCD CONTRAST . . . . . . . . . . . . . . . . . . 25
LENGTH . . . . . . . . . . . . . . . . . . . . . . . . . 21
Level Meter . . . . . . . . . . . . . . . . . . . . . . . 4
LIMITER . . . . . . . . . . . . . . . . . . . . . . . . . . 32
LINE OUT-Buchsen . . . . . . . . . . . . . 4, 23
LOCK . . . . . . . . . . . . . . . . . . . . . . . . . . . . 29
Löschen
SONG . . . . . . . . . . . . . . . . . . . . . . . . . 8
M
[MASTER LEVEL]-Regler . . . . . . . . . . . 3
[MENU]-Taster . . . . . . . . . . . . . . . . . . 3, 6
MENU-Display . . . . . . . . . . . . . . . . . . . . 6
MENU > SYSTEM-Display . . . . . . . . . 24
MODE . . . . . . . . . . . . . . . . . . . . . . . . . . . 25
MODULATION . . . . . . . . . . . . . . . . . . . 33
MP3 . . . . . . . . . . . . . . . . . . . . . . . 8, 15, 39
N
Netzkabel. . . . . . . . . . . . . . . . . . . . . . . . . 4
Noise Suppressor . . . . . . . . . . . . . . . . 33
NS . . . . . . . . . . . . . . . . . . . . . . . . . . . . . . . 33
O
OD . . . . . . . . . . . . . . . . . . . . . . . . . . . . . . 32
Overdrive . . . . . . . . . . . . . . . . . . . . . . . . 32
P
PAN . . . . . . . . . . . . . . . . . . . . . . . . . 23, 34
PATCH BACKUP . . . . . . . . . . . . . . . . . . 24
PATCH EDIT-Display . . . . . . . . . . . . . . 18
PATCH EXCHANGE-Display . . . . . . . 19
PATCH RECOVER . . . . . . . . . . . . . . . . . 25
PATCH SELECT-Display . . . . . . . 10, 17
PATCH SYNC . . . . . . . . . . . . . . . . . . . . . 22
PATCH WRITE-Display . . . . . . . . . . . . 19
PEDAL . . . . . . . . . . . . . . . . . . . . . . . . . . . 30
PHASER . . . . . . . . . . . . . . . . . . . . . . . . . . 33
PHONES-Buchse . . . . . . . . . . . . . . . . . . 4
[
] (PLAY)-Taster . . . . . . . . . . . . . . . 3, 8
Play Mode . . . . . . . . . . . . . . . . . . . . . . 4, 9
[POWER]-Taster . . . . . . . . . . . . . . . . . 3, 5
PROTECT . . . . . . . . . . . . . . . . . . . . . . . . 21
P-Symbol . . . . . . . . . . . . . . . . . . . . . . 4, 11
Q
Quantization Bit Rate. . . . . . . . . . . 8, 15
R
[ ] (REC)-Taster . . . . . . . . . . . . . . . . 3, 10
REC END-Anzeige . . . . . . . . . . . . . . . . 10
REC REMAIN . . . . . . . . . . . . . . . . . . . . . 25
REMAIN SIZE . . . . . . . . . . . . . . . . . . . . . 25
REMOVE . . . . . . . . . . . . . . . . . . . . . . . . . . 7
REVERB . . . . . . . . . . . . . . . . . . . . . . . . . . 35
[
] (Rewind)-Taster . . . . . . . . . . . . . . 3
RHYTHM . . . . . . . . . . . . . . . . . . . . . . . . . . 7
Ripping . . . . . . . . . . . . . . . . . . . . . . . . . . 15
ROTARY . . . . . . . . . . . . . . . . . . . . . . . . . . 34
S
Sampling Rate . . . . . . . . . . . . . . . . . 8, 15
SD CARD. . . . . . . . . . . . . . . . . . . . . . . 7, 28
Initialize . . . . . . . . . . . . . . . . . . . . . 29
SD CARD FORMAT . . . . . . . . . . . . . . . . 29
SD CARD-Schacht . . . . . . . . . . . . . . 4, 28
SD INFO . . . . . . . . . . . . . . . . . . . . . . . . . 25
SD VIEW . . . . . . . . . . . . . . . . . . . . . . . . . 26
Sicherheitskette. . . . . . . . . . . . . . . . . . . 4
Signal . . . . . . . . . . . . . . . . . . . . . . . . . . . 38
SIZE . . . . . . . . . . . . . . . . . . . . . . . . . . . . . 21
SOFT . . . . . . . . . . . . . . . . . . . . . . . . . . . . 17
SOLO . . . . . . . . . . . . . . . . . . . . . . . . . . . . 17
SONG
ERASE . . . . . . . . . . . . . . . . . . . . . . . . 8
Pitch . . . . . . . . . . . . . . . . . . . . . . . . . 11
Speed . . . . . . . . . . . . . . . . . . . . . . . 11
Song-Abspielzeit . . . . . . . . . . . . . . . . . . 4
SONG EXPORT-Display . . . . . . . . . . . 22
SONG IMPORT-Display . . . . . . . . . . . 22
SONG INFO . . . . . . . . . . . . . . . . . . . . . . 21
SONG LEVEL . . . . . . . . . . . . . . . . . . . . . 21
[SONG LIST]-Taster . . . . . . . . . . . . . . 3, 7
Song Name . . . . . . . . . . . . . . . . . . . . . . . 4
SONG NAME . . . . . . . . . . . . . . . . . . . . . 21
Song-Position . . . . . . . . . . . . . . . . . . . . . 4
SPEAKER SW . . . . . . . . . . . . . . . . . . . . . 23
[SPEED]-Taster . . . . . . 3, 11, 12, 19, 21
Speicherstruktur . . . . . . . . . . . . . . . . . 38
S-Symbol . . . . . . . . . . . . . . . . . . . . . . 4, 11
Stimmen. . . . . . . . . . . . . . . . . . . . . . . . . . 9
[
] (STOP)-Taster . . . . . . . . . . . . . . . . . 3
SYNC SW . . . . . . . . . . . . . . . . . . . . . . . . 22
SYSTEM . . . . . . . . . . . . . . . . . . . . . . . . . . 24
T
Tonhöhe
SONG . . . . . . . . . . . . . . . . . . . . . . . . 11
TOTAL SIZE . . . . . . . . . . . . . . . . . . . . . . 25
TREMOLO . . . . . . . . . . . . . . . . . . . . . . . . 34
[TUNER]-Taster . . . . . . . . . . . . . . . . . . 3, 9
TUNER-Display . . . . . . . . . . . . . . . . . . . . 9
TYPE . . . . . . . . . . . . . . . . . . . . . . . . . . . . . 21
U
UNI-V . . . . . . . . . . . . . . . . . . . . . . . . . . . . 34
Uni-Vibe . . . . . . . . . . . . . . . . . . . . . . . . . 34
USB-Abdeckung . . . . . . . . . . . . . . . . . . 4
USB AUDIO OUT . . . . . . . . . . . . . . . . . 38
USB COMPUTER-Anschluss
. . . . . . . . . . . . . . . . . . . . . 4, 13, 20, 24, 27
USB MEMORY . . . . . . . . . . . . . . . 7, 8, 25
USB MEMORY-Anschluss . . . . . . . . . . 4
USB MODE . . . . . . . . . . . . . . . . . . . 13, 24
USER . . . . . . . . . . . . . . . . . . . . . . . . . . . . . 7
W
WAH . . . . . . . . . . . . . . . . . . . . . . . . . 30, 35
WAV . . . . . . . . . . . . . . . . . . . . . . . 8, 15, 39
WRITE/NAME . . . . . . . . . . . . . . . . . . . . 19
NlPtEsItFrEn Deutsch
Bedienoberäche und
Anschlüsse
Spielen der Gitarre mit
Songs als Backing
eBand Song List Editor Verschiedene Funktionen Anhang
43
Page 90

Page 91

English
Deutsch
Français
Italiano
Español
Português
Nederlands
Jouez de la guitare avec vos morceaux favoris en accompagnement
Mode d’emploi
Page 92

Table des matières
Description de l’appareil . . . . . . . . . . . . . . . . . . . . . . . . . . . . . . . . . . . . . . . . . 3
Face avant . . . . . . . . . . . . . . . . . . . . . . . . . . . . . . . . . . . . . . . . . . . . . . . . . . . . . . 3
Face supérieure / Faces latérales . . . . . . . . . . . . . . . . . . . . . . . . . . . . . . . . . 4
Écran supérieur . . . . . . . . . . . . . . . . . . . . . . . . . . . . . . . . . . . . . . . . . . . . . . . . . 4
Opérations de base . . . . . . . . . . . . . . . . . . . . . . . . . . . . . . . . . . . . . . . . . . . . . . 5
Mise sous tension . . . . . . . . . . . . . . . . . . . . . . . . . . . . . . . . . . . . . . . . . . . . . . .5
Mise hors tension . . . . . . . . . . . . . . . . . . . . . . . . . . . . . . . . . . . . . . . . . 5
Déplacement du curseur . . . . . . . . . . . . . . . . . . . . . . . . . . . . . . . . . . . . . . . .5
Sélection d’un élément . . . . . . . . . . . . . . . . . . . . . . . . . . . . . . . . . . . . 5
Modication de la valeur . . . . . . . . . . . . . . . . . . . . . . . . . . . . . . . . . . . . . . . .5
Bouton [MENU] . . . . . . . . . . . . . . . . . . . . . . . . . . . . . . . . . . . . . . . . . . . . . . . . . 6
Jouez de la guitare avec vos morceaux favoris
en accompagnement . . . . . . . . . . . . . . . . . . . . . . . . . . . . . . . . . . . . . . . . . . . . 7
Sélection de morceaux . . . . . . . . . . . . . . . . . . . . . . . . . . . . . . . . . . . . . . . . . . 7
Achage des morceaux par catégorie . . . . . . . . . . . . . . . . . . . . .7
Enregistrement de vos 30morceaux favoris (BEST30) . . . . . . 7
Sélection des morceaux sur la cléUSB . . . . . . . . . . . . . . . . . . . . . 8
Suppression de morceaux . . . . . . . . . . . . . . . . . . . . . . . . . . . . . . . . . 8
Accompagnement d’un jeu de guitare avec un morceau de
musique . . . . . . . . . . . . . . . . . . . . . . . . . . . . . . . . . . . . . . . . . . . . . . . . . . . . . . . . 8
Modication du mode de jeu . . . . . . . . . . . . . . . . . . . . . . . . . . . . . . 9
Accordage . . . . . . . . . . . . . . . . . . . . . . . . . . . . . . . . . . . . . . . . . . . . . . . . . . . . . . 9
Enregistrement de représentations . . . . . . . . . . . . . . . . . . . . . . . . . . . . .10
Permutation des eets . . . . . . . . . . . . . . . . . . . . . . . . . . . . . . . . . . . . . . . . .10
Modication de la vitesse des morceaux . . . . . . . . . . . . . . . . . . . . . . . .11
Modication du diapason des morceaux . . . . . . . . . . . . . . . . . . . . . . . .11
Suppression de la composante centrale du son (Center Cancel) . .12
Lecture en boucle d’un extrait spécié (AB REPEAT) . . . . . . . . . . . . .12
Réglage précis de l’extrait AB REPEAT . . . . . . . . . . . . . . . . . . . . .12
Importation de morceaux d’un ordinateur vers le JS-10 (eBand
Song List Editor) . . . . . . . . . . . . . . . . . . . . . . . . . . . . . . . . . . . . . . . . . . . . . . . .13
Avant d’utiliser eBand Song List Editor . . . . . . . . . . . . . . . . . . . . . . . . . .13
Connexion du JS-10 à votre ordinateur . . . . . . . . . . . . . . . . . . .13
Installation d’eBand Song List Editor sur votre ordinateur . .13
Lancement du logiciel eBand Song List Editor . . . . . . . . . . . . .13
Utilisation d’eBand Song List Editor . . . . . . . . . . . . . . . . . . . . . . . . . . . . .14
Importation de morceaux d’un CD vers le JS-10
(Importation) . . . . . . . . . . . . . . . . . . . . . . . . . . . . . . . . . . . . . . . . . . . .15
Modication des informations sur le morceau . . . . . . . . . . . . .16
Déconnexion de l’ordinateur . . . . . . . . . . . . . . . . . . . . . . . . . . . . .16
Fonctions pratiques . . . . . . . . . . . . . . . . . . . . . . . . . . . . . . . . . . . . . . . . . . . .17
Modication des eets . . . . . . . . . . . . . . . . . . . . . . . . . . . . . . . . . . . . . . . . .17
Modication visuelle du son (EZ EDIT) . . . . . . . . . . . . . . . . . . . .17
Modication avancée des sons (PATCH EDIT) . . . . . . . . . . . . .18
MENU d’un écran EFFECT. . . . . . . . . . . . . . . . . . . . . . . . . . . . . . . . .18
Enregistrement des patchs . . . . . . . . . . . . . . . . . . . . . . . . . . . . . . .19
Échange de deux patchs (EXCHANGE) . . . . . . . . . . . . . . . . . . . .19
Initialisation des réglages d’eet (INITIALIZE) . . . . . . . . . . . . . .19
Sauvegarde des données d’une carteSD sur un ordinateur
(BACK UP) . . . . . . . . . . . . . . . . . . . . . . . . . . . . . . . . . . . . . . . . . . . . . . . . . . . . .20
Récupération de données sauvegardées sur un ordinateur
vers la carteSD (RECOVERY) . . . . . . . . . . . . . . . . . . . . . . . . . . . . . . . . . . . .20
Modication des paramètres des morceaux . . . . . . . . . . . . . . . . . . . . .21
Achage des informations sur le morceau . . . . . . . . . . . . . . . .21
Dénomination des morceaux . . . . . . . . . . . . . . . . . . . . . . . . . . . . . . . . . . .21
Exportation de morceaux vers une cléUSB (Export) . . . . . . . . . . . . .22
Importation de morceaux stockés sur la cléUSB vers le JS-10
(Import) . . . . . . . . . . . . . . . . . . . . . . . . . . . . . . . . . . . . . . . . . . . . . . . . . . . . . . .22
Modication du patch lors de la permutation d’un morceau
(PATCH SYNC) . . . . . . . . . . . . . . . . . . . . . . . . . . . . . . . . . . . . . . . . . . . . . . . . .22
Spécication des réglages audio. . . . . . . . . . . . . . . . . . . . . . . . . . . . . . . .23
Modication du gain d’entrée de la prise INPUT . . . . . . . . . . .23
Réglage de l’équilibre des plages de fréquences hautes
et basses (Global EQ) . . . . . . . . . . . . . . . . . . . . . . . . . . . . . . . . . . . . .23
Désactivation des haut-parleurs du JS-10 . . . . . . . . . . . . . . . . .23
Paramètres système du JS-10 . . . . . . . . . . . . . . . . . . . . . . . . . . . . . . . . . . .24
Modication de la fonction du port USB COMPUTER . . . . . .24
Attribution de fonctions aux commutateurs au pied. . . . . . .24
Sauvegardes des patchs d’eet utilisateur sur une
carteSD . . . . . . . . . . . . . . . . . . . . . . . . . . . . . . . . . . . . . . . . . . . . . . . . .24
Restauration des patchs d’eet utilisateur sauvegardés
sur une carteSD . . . . . . . . . . . . . . . . . . . . . . . . . . . . . . . . . . . . . . . . .25
Achage de l’espace libre sur la carteSD et la cléUSB . . . . .25
Réglage du contraste de l’écran . . . . . . . . . . . . . . . . . . . . . . . . . . .25
Activation de la fonction AUTO OFF . . . . . . . . . . . . . . . . . . . . . . .26
Établissement d’une liste de morceaux à partir des
chiers stockés sur la carteSD . . . . . . . . . . . . . . . . . . . . . . . . . . . .26
Sélection de la sortie à partir du port USB COMPUTER . . . . .26
Initialisation d’une carte SD (FORMAT) . . . . . . . . . . . . . . . . . . . .26
Restauration des réglages d’usine par défaut
sur le JS-10 . . . . . . . . . . . . . . . . . . . . . . . . . . . . . . . . . . . . . . . . . . . . . .26
Utilisation du JS-10 comme interface USB Audio . . . . . . . . . . . . . . . .27
Préparation d’un pilote USB . . . . . . . . . . . . . . . . . . . . . . . . . . . . . .27
Installation du piloteUSB . . . . . . . . . . . . . . . . . . . . . . . . . . . . . . . . .27
Lecture de morceaux sur un ordinateur via le JS-10 . . . . . . . .27
Utilisation des cartesSD disponibles dans le commerce . . . . . . . . .28
Remplacement de la carte SD . . . . . . . . . . . . . . . . . . . . . . . . . . . .28
Utilisation de commutateurs au pied et de pédales
d’expression . . . . . . . . . . . . . . . . . . . . . . . . . . . . . . . . . . . . . . . . . . . . . . . . . . .30
Attribution de fonctions aux commutateurs au pied. . . . . . .30
Avant d’utiliser cet appareil, lisez attentivement les sections
suivantes: «CONSIGNES DE SÉCURITÉ» (p. 40) et «REMARQUES
IMPORTANTES» (p. 41). Ces sections fournissent des informations
importantes relatives au bon fonctionnement de l’appareil. En
outre, pour être sûr de bien maîtriser chacune des fonctionnalités
de votre nouvel appareil, il est nécessaire de lire le présent mode
d’emploi dans son intégralité, de le sauvegarder et de le conserver
sous la main an de pouvoir vous y reporter au besoin.
Copyright © 2012 BOSS CORPORATION
Tous droits réservés. Toute reproduction intégrale ou partielle de
cette publication est interdite sous quelque forme que ce soit sans
l’autorisation écrite de BOSS CORPORATION.
2
Annexes. . . . . . . . . . . . . . . . . . . . . . . . . . . . . . . . . . . . . . . . . . . . . . . . . . . . . . . .31
Liste des paramètres d’eets . . . . . . . . . . . . . . . . . . . . . . . . . . . . . . . . . . .31
Messages d’erreur . . . . . . . . . . . . . . . . . . . . . . . . . . . . . . . . . . . . . . . . . . . . . .36
Guide de dépannage . . . . . . . . . . . . . . . . . . . . . . . . . . . . . . . . . . . . . . . . . . .37
Flux du signal . . . . . . . . . . . . . . . . . . . . . . . . . . . . . . . . . . . . . . . . . . . . . . . . . .38
Conguration de la mémoire dans le JS-10 . . . . . . . . . . . . . . . . . . . . . .38
Caractéristiques techniques . . . . . . . . . . . . . . . . . . . . . . . . . . . . . . . . . . . .39
CONSIGNES DE SÉCURITÉ . . . . . . . . . . . . . . . . . . . . . . . . . . . . . . . . . . . . . . .40
REMARQUES IMPORTANTES . . . . . . . . . . . . . . . . . . . . . . . . . . . . . . . . . . . . .41
Index . . . . . . . . . . . . . . . . . . . . . . . . . . . . . . . . . . . . . . . . . . . . . . . . . . . . . . . . . .43
Page 93

Description de l’appareil
Face avant
Achage
Ache le titre du morceau,
le nom du patch d’eet
et d’autres informations.
Bouton [POWER]
Permet de mettre
l’appareil sous tension et
hors tension (p. 5).
Bouton [SONG LIST]
Permet d’acher les
morceaux stockés sur la
carte SD et la clé USB (p. 7).
Bouton [EXIT]
Permet d’annuler les
réglages et de revenir
aux écrans précédents.
Bouton [MENU]
Permet de faire appel à diérentes
fonctions selon l’écran aché
(p. 6, p. 18).
Touches (curseur) [ ] [ ]
Permettent de déplacer le curseur (portion
mise en surbrillance) à l’écran. Utilisez la
molette pour régler la valeur de l’élément
mis en surbrillance (paramètre).
Molette
Permet de modier les
valeurs et les réglages.
Bouton [ENTER]
Permet de conrmer la
sélection d’un élément, de
régler les valeurs des réglages
et de passer de l’un à l’autre.
NlPtEsItEn De Français
Description de l’appareil
Bouton (STOP) [ ]
Permet d’interrompre la
lecture ou l’enregistrement
du morceau.
Bouton (PLAY) [ ]
Permet de
commencer la
lecture du morceau.
Bouton (REC) [ ]
Permet
d’enregistrer la
prestation.
Bouton [SPEED]
Permet de modier la vitesse/
le diapason du morceau ou de supprimer
la composante centrale (p. 11, p. 12).
Jouez de la guitare avec vos morceaux
favoris en accompagnement
Bouton (de recul) [ ]
Permet de faire reculer
l’emplacement de
lecture.
Bouton [AMP]
Permet d’acher
l’écran AMP (p. 18).
prise INPUT 1 (GUITAR/MIC),
prise INPUT 2 (GUITAR/MIC)
Ces prises permettent de
connecter des guitares ou des
microphones.
Bouton (d’avance rapide)
[ ]
Permet de faire avancer
l’emplacement de lecture.
Bouton [TUNER]
Permet d’acher l’écran
TUNER (p. 9).
Prise INPUT 2 (AUX)
Permet de brancher
des périphériques
comme des lecteurs
audio numériques.
Bouton [A B]
Permet de répéter
la lecture (p. 12).
eBand Song List Editor Fonctions pratiques Annexes
Bouton [EFFECTS]
Permet de sélectionner un patch d’eet
ou de modier un eet (p. 10, p. 17).
Commande [MASTER LEVEL]
Permet de régler le volume
global du JS-10.
Commande [INPUT LEVEL 1 2]
La commande centrale règle le volume
des périphériques connectés à la prise
INPUT 1, et la commande extérieure
règle le volume des périphériques
connectés à la prise INPUT 2.
3
Page 94

Description de l’appareil
Face supérieure / Faces latérales
Supports de capuchon USB
Placez les capuchons que vous
avez retirés du port USB MEMORY
ou du port USB COMPUTER ici.
Prise DC IN
Permet de brancher
l’adaptateur secteur
fourni.
Cordon
d’alimentation
Vers la prise
secteur
Adaptateur
secteur
Témoin
Port USB MEMORY
Permet de brancher
une clé USB (vendue
séparément).
Connecteur de carte SD
Permet d’insérer une
carte SD.
Emplacement de sécurité ( )
http://www.kensington.com/
Port USB COMPUTER
Permet de brancher
le JS-10 à un PC à
l’aide d’un câble USB
(p. 13, p. 27).
Prise EXP PEDAL/CTL 1, 2
Permet de brancher un commutateur
au pied (vendu séparément) ou
une pédale d’expression (vendue
séparément) (p. 30).
Prise PHONES
Permet de brancher un
casque (vendu séparément).
Prises LINE OUT
Permet de brancher des
haut-parleurs externes.
* Pour éviter tout dysfonctionnement et toute panne de l’appareil, baissez toujours le volume au minimum et mettez tous les appareils hors tension
avant tout branchement.
* N’insérez et n’extrayez jamais de carte SD ou SDHC lorsque l’appareil est sous tension. Vous risqueriez d’endommager les données de l’appareil ou
de la carte SD ou SDHC.
* Insérez prudemment la cléUSB, la carte SD ou SDHC jusqu’au bout: elle doit être maintenue en place fermement.
* Installez l’adaptateur secteur de sorte que le côté comportant le témoin (voir illustration) soit orienté vers le haut et le texte vers le bas.
Le témoin s’allume lorsque vous branchez l’appareil sur secteur.
Écran supérieur
Cet écran est l’écran de base qui s’ache à la mise sous tension.
Paramètre et titre du morceau
Permet d’acher les paramètres
(p. 21) et le titre (p. 21) du morceau
sélectionné.
IN1
Permet d’acher le numéro
de patch d’eet et le nom
du patch pour la prise
INPUT 1 (GUITAR/MIC).
Mode de lecture
Ache le type de lecture
(p. 9).
Emplacement de lecture du
morceau
Permet d’acher l’emplacement
actuel au sein du morceau.
Icônes de gain d’entrée
Permet d’acher des icônes en fonction des
réglages GAIN (p. 23).
Extrait AB REPEAT
Permet d’indiquer l’extrait à
lire de manière répétée ( p. 12).
Durée de lecture du morceau
Permet d’acher la durée
du morceau.
IN2
Déplacez le curseur ici pour acher le numéro de patch
d’eet et le nom du patch pour la prise INPUT 2 (GUITAR/MIC).
Indicateur de niveau
Permet d’acher le niveau total des sons suivants:
• Le morceau en cours de lecture.
• Entrée vers la prise INPUT 1, INPUT 2 et le port
USB COMPUTER
Icônes S/P/C
Ces icônes s’achent après la modication de la
vitesse de lecture du morceau ou du diapason, ou
en cas d’utilisation de la fonction Center Cancel.
S: La vitesse du morceau a été modiée.
P: Le diapason du morceau a été modié.
C: La fonction Center Cancel est activée.
Les explications fournies dans le présent manuel comprennent des illustrations des messages qui s’achent normalement à l’écran.
Notez toutefois que votre appareil peut intégrer une version plus récente ou améliorée du système (comme par exemple de nouveaux sons). Dans ce
cas, les messages achés sur votre écran ne correspondent pas toujours aux illustrations de ce mode d’emploi.
4
Page 95

Opérations de base
Cette section présente les opérations de base pour l’utilisation du
JS-10.
Mise hors tension
Mise sous tension
Lorsque tous les branchements ont été eectués correctement
(p. 4), assurez-vous de suivre la procédure ci-dessous pour la mise
sous tension. Si vous ne respectez pas cet ordre, vous risquez de
provoquer des dysfonctionnements ou une panne d’équipement.
MÉMO
• Avant la mise sous tension ou hors tension de l’appareil,
assurez-vous toujours de baisser le volume au minimum. Même
si le volume est au minimum, il se peut que vous entendiez un
son lors de la mise sous tension/hors tension. C’est toutefois
normal et n’indique en rien un dysfonctionnement.
• Avec les réglages d’usine, le JS-10 est
automatiquement mis hors tension 30minutes après
que vous ayez cessé de jouer ou d’utiliser l’appareil.
Si vous ne souhaitez pas que l’appareil s’arrête
automatiquement, modiez le réglage «AUTO OFF»
sur «OFF» comme décrit à la p. 26.
1. Tournez le bouton [MASTER LEVEL] vers le niveau minimal.
2. Appuyez sur le bouton [POWER] pour allumer l’appareil.
1. Tournez la commande [MASTER LEVEL] vers le niveau
minimal.
2. Appuyez sur le bouton [POWER].
L’appareil s’éteint.
Déplacement du curseur
De nombreux paramètres (réglages) et sélections s’achent à
l’écran.
Appuyez sur les touches (curseur) [
curseur.
La valeur du paramètre sélectionnée à l’aide du curseur s’ache en
surbrillance.
Sélection d’un élément
Pour sélectionner un élément ou une icône qui s’ache, déplacez
le curseur vers l’élément ou l’icône, puis appuyez sur le bouton
[ENTER].
Le présent mode d’emploi utilise les conventions suivantes pour
indiquer les étapes consistant à appuyer sur le bouton [MENU] dans
l’écran supérieur, à sélectionner « SYSTEM », puis à appuyer sur le
bouton [ENTER].
Bouton [MENU] «SYSTEM» Bouton [ENTER]
] [ ] pour déplacer le
NlPtEsItEn De Français
Description de l’appareil
MÉMO
Appuyez plusieurs fois sur le bouton [EXIT] pour revenir à l’écran
supérieur.
Modication de la valeur
L’écran de l’appareil s’allume.
* Cet appareil est équipé d’un circuit de protection. Un bref intervalle
(quelques secondes) est nécessaire à la mise sous tension avant
que l’appareil ne puisse fonctionner normalement.
3. Tournez la commande [MASTER LEVEL] et ajustez le volume.
Fichiers inclus sur la carte SD fournie
La carte SD fournie est insérée dans le JS-10 avant le départ de l’appareil de l’usine.
Les chiers suivants sont inclus sur la carteSD.
eBand Song List Editor
Ce logiciel PC permet d’importer les morceaux d’un CD vers le JS-10 et d’ajouter des noms aux morceaux eBand.
Connectez le JS-10 à votre ordinateur pour utiliser ce logiciel. Pour en savoir plus, reportez-vous à la section «Importation
de morceaux d’un ordinateur vers le JS-10 (eBand Song List Editor)» (p. 13).
Pilote USB
Ce pilote PC (logiciel de contrôle) permet d’écouter le son de votre PC sur le JS-10.
Pour en savoir plus, reportez-vous à la section «Utilisation du JS-10 comme interface USB Audio» (p. 27).
Pour modier le réglage du paramètre, déplacez le curseur sur
la valeur du paramètre à appliquer, puis tournez la molette pour
modier la valeur. La valeur augmente lorsque vous tournez la
molette dans le sens des aiguilles d’une montre et diminue dans le
sens contraire.
Jouez de la guitare avec vos morceaux
favoris en accompagnement
eBand Song List Editor Fonctions pratiques Annexes
Dossier ROLAND
Les chiers nécessaires à l’utilisation du JS-10 sont enregistrés dans ce dossier. Assurez-vous de ne pas modier ni supprimer le contenu de ce dossier.
MÉMO
Pour plus d’informations sur la conguration mémoire du JS-10 ou sur les données enregistrées, reportez-vous à la section «Conguration
de la mémoire dans le JS-10» (p. 38)
5
Page 96

Opérations de base
Bouton [MENU]
Appuyez sur le bouton [MENU] pour acher un menu pour chaque
écran.
Le JS-10 dispose des écrans de menu suivants:
• menu de l’écran supérieur (p. 6)
• menu de l’écran SONG LIST (p. 7)
• menu de l’écran EFFECT (p. 18)
Menu de l’écran supérieur
Appuyez une fois sur le bouton [MENU] de l’écran supérieur pour
acher l’écran MENU.
Vous pouvez accéder aux réglages du JS-10 à partir de cet écran.
MENU Explication
Permet de conrmer les informations sur
le morceau (p. 21).
Permet de modier les titres des
morceaux (p. 21).
Permet d’écrire le morceau sélectionné
sur la clé USB (p. 22).
* « EXPORT » ne s’ache pas si la clé USB
n’a pas été insérée.
Permet d’enregistrer sur la carte SD des
morceaux sélectionnés sur la clé USB
(p. 22).
* « IMPORT » ne s’ache pas si aucun
morceau n’a été sélectionné sur la clé
USB.
Permet de supprimer le morceau
sélectionné (p. 8).
Permet d’ajouter le morceau actuel à la
liste BEST30 (p. 7).
Permet de congurer précisément la
fonction AB REPEAT (p. 12).
Permet d’appliquer le réglage dans
PATCH SYNC (p. 22).
Permet de sélectionner le gain d’entrée
et d’autres réglages qui correspondent
au périphérique connecté aux prises
INPUT1 et INPUT 2 (p. 23).
Permet d’appliquer l’égaliseur sur
l’ensemble du son du JS-10 et de régler la
balance (p. 23).
Permet d’activer ou de désactiver les
haut-parleurs intégrés du JS-10 (p. 23).
Permet d’aecter des fonctions à un
commutateur au pied externe (p. 30).
Permet de récupérer les eets
sauvegardés (p. 25).
Permet de vérier l’espace libre sur la
carteSD (p. 25).
Permet de vérier l’espace libre sur la
cléUSB (p. 25).
Permet de régler diérents paramètres
du JS-10 (p. 25 – p. 26).
Permet d’initialiser (formater) la carteSD
(p. 29).
Permet de rétablir les réglages d’usine
par défaut du JS-10 (p. 26).
SONG
BEST 30 EDIT
AB EDIT
PATCH SYNC
AUDIO
SETTING
SYSTEM
SONG INFO
SONG NAME
EXPORT
IMPORT
ERASE
INPUT
EQ
SPEAKER
USB MODE Permet d’activer le mode USB MODE (p. 24).
PEDAL
PATCH BACKUP Permet de sauvegarder les eets (p. 24).
PATCH RECOVER
SD INFO
USB MEMORY
SETTING
SD CARD
FORMAT (*)
FACTORY RESET
MÉMO
(*) La carteSD fournie avec le JS-10 ne peut pas être initialisée.
6
Page 97
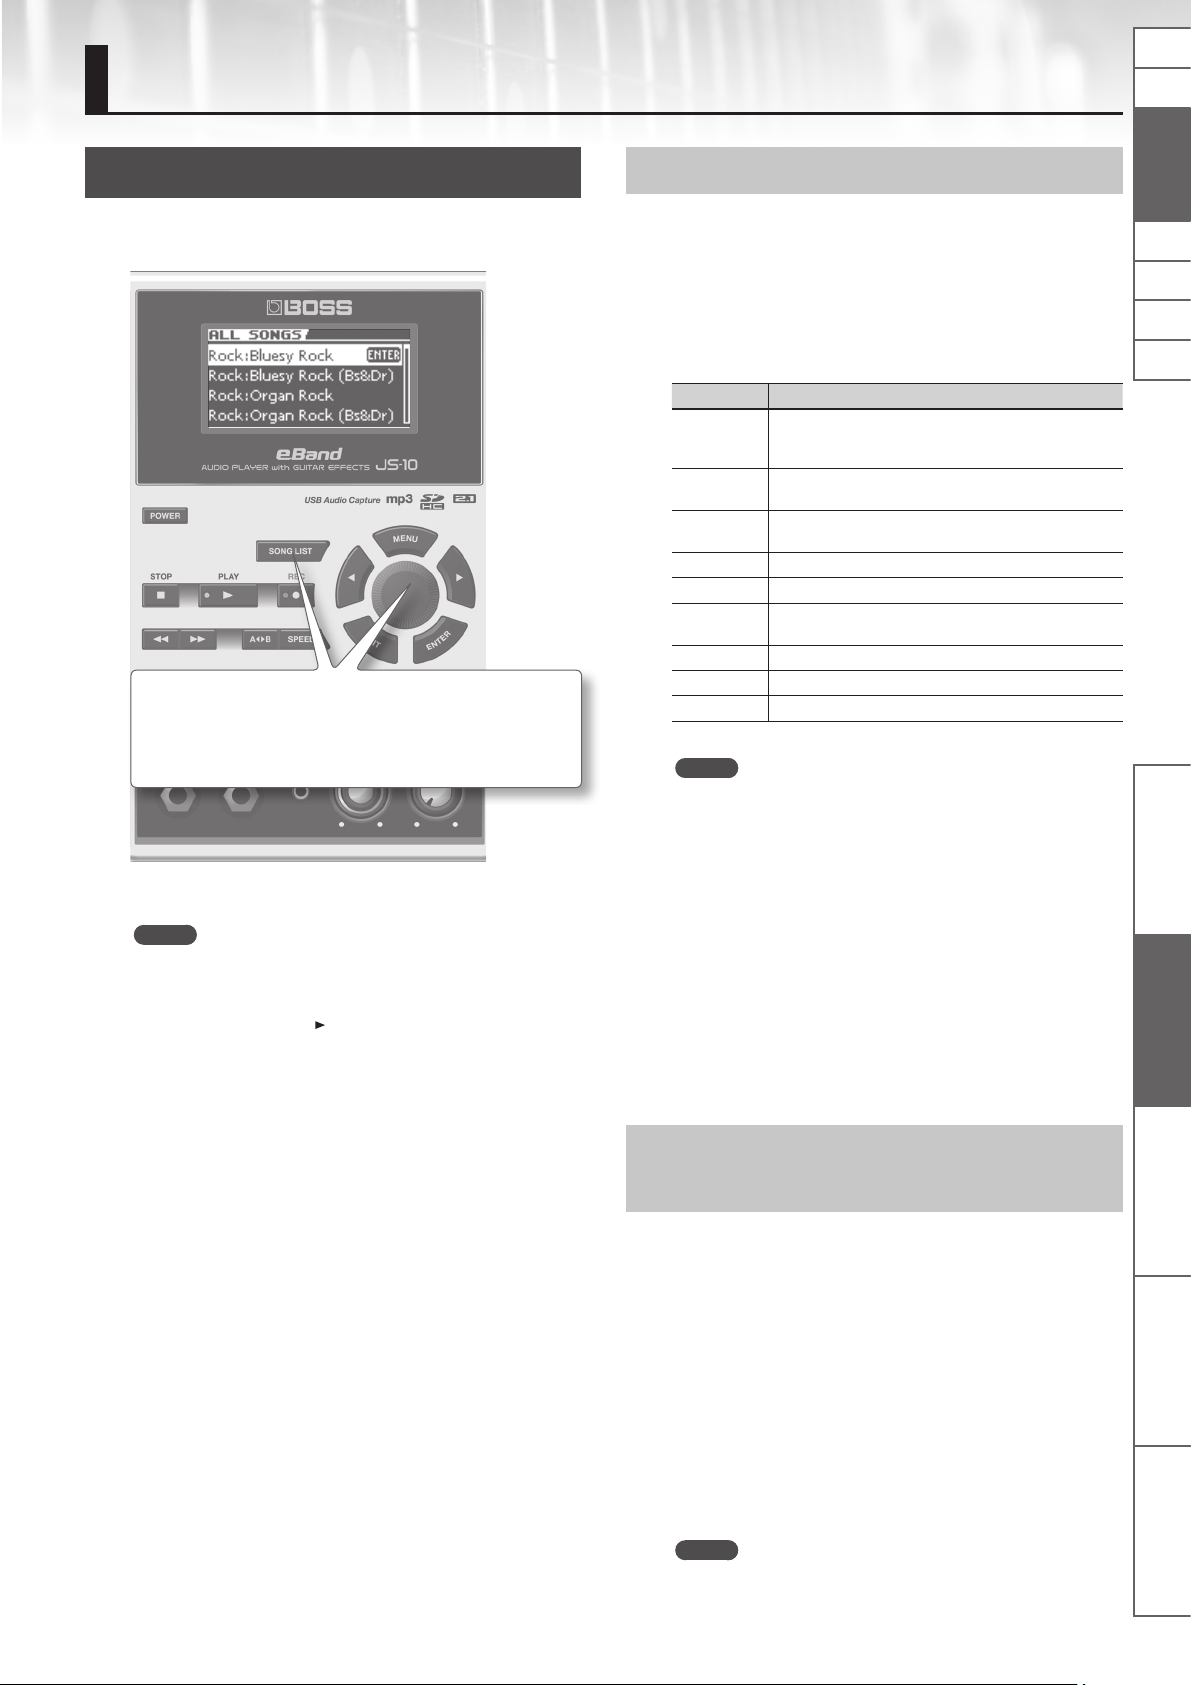
Jouez de la guitare avec vos morceaux favoris en accompagnement
Sélection de morceaux
Pour sélectionner le morceau ou le rythme que vous souhaitez
écouter, procédez comme suit.
1. Appuyez sur le bouton [SONG LIST].
L’écran SONG LIST s’ache.
Achage des morceaux par catégorie
Voici comment acher des morceaux selon la catégorie
sélectionnée, par exemple par titre d’album ou par nom d’artiste.
1. Procédez comme suit: Bouton [SONG LIST] Bouton
[MENU].
L’écran MENU s’ache.
2. Sélectionnez une catégorie.
MENU Explication
ALL SONGS
USER
BEST 30
ALBUM Les morceaux sont classés par titre d’album.
ARTIST Les morceaux sont classés par nom d’artiste.
RHYTHM
USB MEMORY Les chiers stockés sur la cléUSB sont pris en compte.
SD CARD Les chiers stockés sur la carteSD sont pris en compte.
REMOVE Permet de retirer le morceau sélectionné de la liste BEST30.
Les morceaux enregistrés avec le JS-10, ainsi que les
morceaux disposant d’un titre d’album ou d’un nom
d’artiste enregistrés sont pris en compte.
Les données enregistrées à l’aide du JS-10 sont ajoutées à
cette catégorie.
Les 30morceaux favoris apparaissent, à condition d’avoir
été classés (de 1 à 30).
Les rythmes contenus sur la carte SD fournie avec le JS-10
sont pris en compte.
NlPtEsItEn De Français
2. Tournez la molette pour sélectionner un morceau.
3. Appuyez sur le bouton [ENTER].
MÉMO
• Vous pouvez aussi sélectionner un morceau en tournant la
molette alors que le nom d’un morceau est sélectionné dans
l’écran supérieur.
• Appuyez sur le bouton [
écouter le morceau sélectionné.
• Le JS-10 est capable de prendre en charge jusqu’à
4000morceaux.
] (PLAY) dans l’écran SONG LIST pour
MÉMO
• Les rubriques «ALBUM» et «ARTIST» sont disponibles lorsque
les morceaux comportent un titre d’album ou un nom d’artiste.
• La fonction «SD CARD» est uniquement disponible si le réglage
SD VIEW (p. 26) est activé.
• La fonction «REMOVE» est disponible lorsque BEST30 s’ache.
• Le logiciel Song List Editor fourni (p. 13) vous permet d’enregistrer
et de modier des titres d’albums et des noms d’artistes à partir
de votre ordinateur. En outre, lorsque vous importez un chier
audio, vous pouvez sélectionner la liste de morceaux cible
(Song, Rhythm ou User).
• La répartition par catégorie des morceaux fonctionne pour les
morceaux fournis avec le JS-10 et les morceaux stockés dans
eBand Song List Editor (p. 13).
3. Appuyez sur le bouton [ENTER].
Enregistrement de vos 30morceaux
favoris (BEST30)
Vous pouvez dénir les morceaux qui apparaissent lorsque BEST30
est sélectionné comme catégorie de morceaux.
L’enregistrement de vos morceaux favoris vous permet de toujours
faire gurer les morceaux souhaités dans les listes de morceaux.
1. Avant de commencer, sélectionnez les morceaux que vous
souhaitez intégrer au classement BEST30.
Description de l’appareil
Jouez de la guitare avec vos morceaux
favoris en accompagnement
eBand Song List Editor Fonctions pratiques Annexes
2. Procédez comme suit: Bouton [MENU] «BEST 30 EDIT»
Bouton [ENTER].
L’écran BEST 30 EDIT s’ache.
3. Sélectionnez le classement.
4. Appuyez sur le bouton [ENTER].
MÉMO
Vous ne pouvez pas enregistrer des morceaux de la clé USB
comme BEST 30.
7
Page 98

Jouez de la guitare avec vos morceaux favoris en accompagnement
Sélection des morceaux sur la cléUSB
Vous pouvez sélectionner des morceaux sur la cléUSB.
1. Procédez comme suit: Bouton [SONG LIST] Bouton
[MENU] «USB MEMORY» Bouton [ENTER].
2. Sélectionnez le morceau que vous souhaitez lire.
3. Appuyez sur le bouton [ENTER].
Formats de chier pris en charge par le JS-10
Format eBand
Format propriétaire de compression Roland/BOSS
Format MP3
Format MP3
Fréquence d’échantillonnage 44,1kHz
Débit binaire 64 – 320Kbps
Format WAV
Format WAV
Fréquence d’échantillonnage 44,1kHz
Débit binaire de quantication 16bits
Codage Non compressé (linéaire)
Accompagnement d’un jeu de guitare avec un morceau de musique
Vous pouvez jouer de la guitare tout en utilisant l’un de vos
morceaux favoris comme accompagnement.
1. Appuyez sur le bouton [ ] (PLAY).
La lecture du morceau commence.
Suppression de morceaux
Pour supprimer le morceau sélectionné, procédez comme suit.
REMARQUE
Vous ne pouvez pas restaurer des morceaux après leur
suppression.
1. Avant de commencer, sélectionnez le morceau que vous
souhaitez supprimer (p. 7).
2. Procédez comme suit: Bouton [MENU] «SONG»
Bouton [ENTER] «ERASE» Bouton [ENTER].
Le message «Are you sure?» (Êtes-vous sûr?) s’ache.
3. Appuyez sur [ENTER] pour supprimer un morceau.
Le morceau est alors supprimé.
8
2. Tournez progressivement la commande [MASTER LEVEL]
dans le sens des aiguilles d’une montre jusqu’à obtenir le
volume souhaité.
3. Tournez les commandes [INPUT LEVEL 1] et [INPUT LEVEL 2]
au niveau de volume minimum (tournez complètement
dans le sens inverse des aiguilles d’une montre).
4. Tout en jouant de la guitare, tournez progressivement la
commande [INPUT LEVEL 1] ou [INPUT LEVEL 2] dans le
sens des aiguilles d’une montre jusqu’à obtenir le volume
souhaité.
5. Appuyez sur le bouton [ ] (STOP) pour arrêter le morceau.
MÉMO
• À l’arrêt, appuyez sur le bouton [
l’emplacement de lecture au début du morceau (00:00).
• Appuyez sur le bouton [
rapide) pour faire avancer ou reculer l’emplacement de lecture
du morceau.
• Un mauvais positionnement des micros par rapport aux hautparleurs peut créer un eet Larsen. Pour y remédier:
1. Changez l’orientation du ou des microphones.
2. Éloignez le ou les microphones des haut-parleurs.
3. Réduisez le volume.
* Lorsque vous connectez un microphone, sélectionnez un eet
dans les catégories destinées aux microphones (p. 10). Réglez
également le gain d’entrée de la prise INPUT sur mic (p. 23).
] (STOP) pour rétablir
] (Recul) ou le bouton [ ] (Avance
Page 99

Jouez de la guitare avec vos morceaux favoris en accompagnement
Accompagnement d’un jeu de guitare avec
un morceau de musique sur des lecteurs audio
Utilisez un câble mini-stéréo
disponible dans le commerce
adapté à l’appareil.
MÉMO
Lorsque des instruments sont branchés aux prises
INPUT2 (GUITAR/MIC) et INPUT2 (AUX), seul l’instrument
connecté à la prise INPUT2 (AUX) peut être utilisé.
Lecteur audio
numérique, etc.
Accordage
Utilisez l’accordeur du JS-10 pour accorder la guitare ou la basse
connectée à la prise INPUT 1 ou INPUT 2.
NlPtEsItEn De Français
1. Appuyez sur le bouton [TUNER].
L’écran TUNER s’ache.
Modication du mode de jeu
Vous pouvez modier la façon dont les morceaux sont joués.
Achage Explication
La lecture du morceau actuel se poursuit jusqu’à la n, puis
s’arrête.
La lecture du morceau actuel est répétée.
Les morceaux de la liste sont lus dans l’ordre. *
Les morceaux de la liste sont lus dans l’ordre. La lecture se
poursuit jusqu’à ce que le bouton [
Les morceaux de la liste sont lus dans un ordre aléatoire. *
Les morceaux de la liste sont lus dans un ordre aléatoire.
La lecture se poursuit jusqu’à ce que le bouton [
soit enfoncé. *
La position temporelle «A» a été enregistrée («Lecture en
boucle d’un extrait spécié (AB REPEAT)» (p. 12)).
La lecture est répétée entre les positions temporelles
«A» et «B» («Lecture en boucle d’un extrait spécié (AB
REPEAT)» (p. 12)).
MÉMO
Lorsque vous sélectionnez un mode de jeu marqué d’un
astérisque (*), le morceau en cours est joué jusqu'à la n et
s’arrête si un écran diérent de «l’écran supérieur» (p. 4) s’ache.
] (Stop) soit enfoncé. *
] (Stop)
PITCH
Dénissez la fréquence correspondant au La3 (le La central sur un
clavier de piano).
2. Accordez l’instrument jusqu’à ce que le
diapason recherché soit obtenu et que les
deux symboles triangulaires soient allumés.
Achage Explication
Trop bas
Accordé
Trop haut
MÉMO
Le bouton [TUNER] s’allume lorsqu’il est accordé.
Accordage standard
7ème 6ème 5ème 4ème 3ème 2ème 1ère
Guitare B (Si) E (Mi) A (La) D (Ré) G (Sol) B (Si) E (Mi)
Basse B (Si) E (Mi) A (La) D (Ré) G (Sol)
Description de l’appareil
Jouez de la guitare avec vos morceaux
favoris en accompagnement
eBand Song List Editor Fonctions pratiques Annexes
9
Page 100

Jouez de la guitare avec vos morceaux favoris en accompagnement
Enregistrement de représentations
Le JS-10 vous permet d’enregistrer le son exactement tel qu’il l’émet.
1. Pour enregistrer alors qu’un morceau est en
cours de lecture, appuyez d’abord sur le bouton
[ ] (PLAY), puis appuyez sur le bouton [ ] (REC).
Le morceau est lu et enregistré en même temps que les
sons en entrée sur les prises INPUT1 et INPUT2.
Permutation des eets
Il est possible de permuter les eets internes.
1. Sélectionnez IN1 ou IN2.
IN1
L’eet est appliqué à la prise
INPUT1 (GUITAR/MIC).
MÉMO
L’eet n’est pas appliqué à la prise AUX.
2. Appuyez sur le bouton [EFFECTS].
L’écran PATCH SELECT s’ache.
IN2
L’eet est appliqué à la prise
INPUT2 (GUITAR/MIC).
MÉMO
An de n’enregistrer que les sons en entrée sur les prises
INPUT 1 et INPUT 2, appuyez sur le bouton [
appuyer sur le bouton [ ] (PLAY) (n’utilisez pas le morceau en
accompagnement).
] (REC) sans
2. Appuyez sur le bouton [ ] (STOP) pour arrêter
l’enregistrement.
Le menu contextuel REC END s’ache.
3. Décidez ce que vous souhaitez faire de l’enregistrement.
Icône Explication
SAVE
ERASE
PREVIEW
(Appuyez sur le bouton [
(PLAY)).
L’enregistrement est enregistré dans la
catégorie «USER» de la liste de morceaux.
Le morceau est supprimé. (Le contenu
enregistré n’est pas sauvegardé.)
]
Écoutez l’enregistrement.
3. Sélectionnez une catégorie.
Utilisation Catégorie
Pour la
guitare
Pour la
basse
Pour un
microphone
Pour un
patch
utilisateur
10
MÉMO
Les données enregistrées (morceaux) sont automatiquement
nommées «SONG****»: (nom original du morceau) (les étoiles
«***» indiquent le numéro). Cependant, si le nom du morceau
original a été modié à l’aide d’eBand Song List Editor, la
dénomination se présente sous la forme «SONG****».
* Lorsque vous connectez un microphone, sélectionnez un eet
dans les catégories destinées aux microphones (p. 10). Réglez
également le gain d’entrée de la prise INPUT sur mic (p. 23).
 Loading...