

Page 1
Owner’s Manual
Copyright © 2017 ROLAND CORPORATION
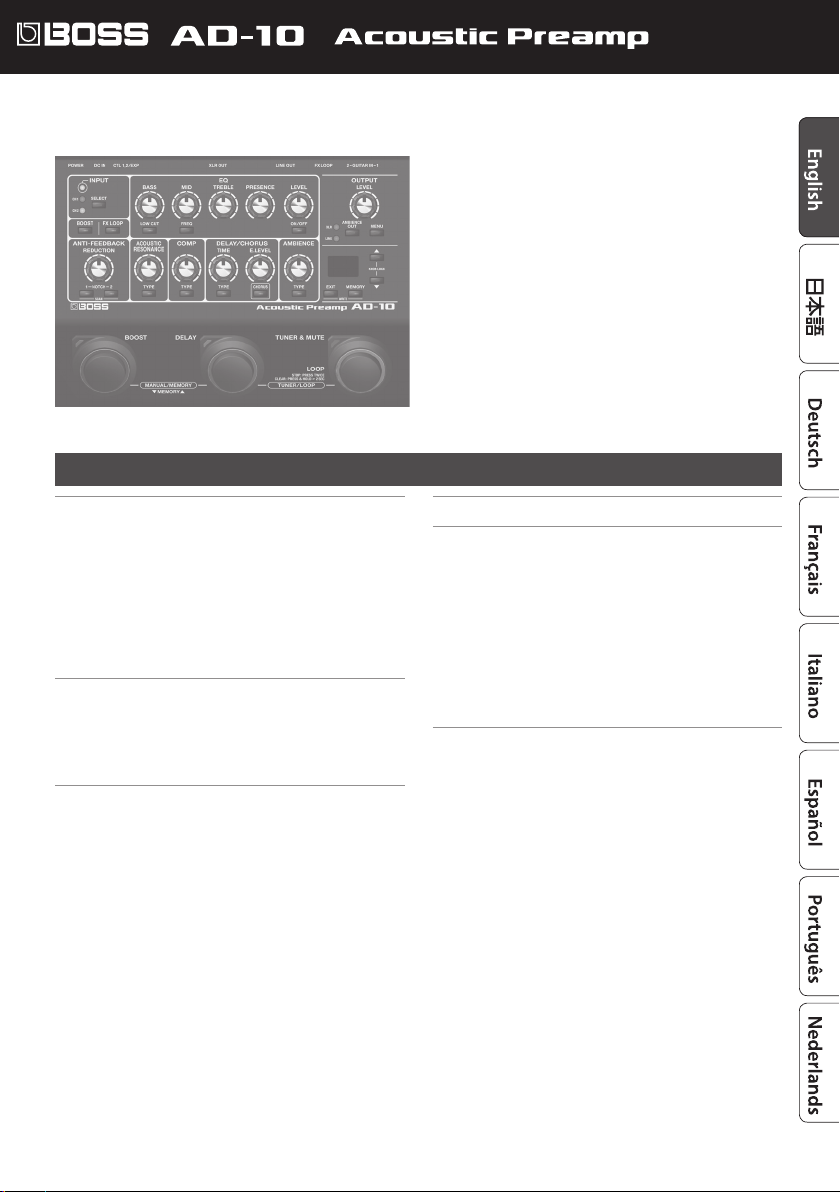
The AD-10 is designed for the acoustic guitarist who performs live; in a single unit, it combines a preamp, eects, looper, and
direct box.
Contents
Getting Ready . . . . . . . . . . . . . . . . . . . . . . . . . . . . . . 2
Connecting the Equipment . . . . . . . . . . . . . . . . . . . . 2
Connecting a Footswitch or an Expression Pedal . . . . 3
Turning On/O the Power . . . . . . . . . . . . . . . . . . . . . 3
Input Settings . . . . . . . . . . . . . . . . . . . . . . . . . . . . . . 4
Adjusting the Input Sensitivity . . . . . . . . . . . . . . . 4
Switching Between GUITAR IN 1/2 and
Adjusting the Balance
Tuning the Guitar (Tuner) . . . . . . . . . . . . . . . . . . . . . 4
. . . . . . . . . . . . . . . . . . . . . . 4
Manual/Memory Mode . . . . . . . . . . . . . . . . . . . . . . 5
Manual Mode . . . . . . . . . . . . . . . . . . . . . . . . . . . . . . 5
Memory Mode . . . . . . . . . . . . . . . . . . . . . . . . . . . . . . 5
Saving a Memory . . . . . . . . . . . . . . . . . . . . . . . . . 5
Initializing Memory Settings . . . . . . . . . . . . . . . . . 5
Editing the Eects . . . . . . . . . . . . . . . . . . . . . . . . . . . 6
EQ (Equalizer) . . . . . . . . . . . . . . . . . . . . . . . . . . . . . . 6
BOOST . . . . . . . . . . . . . . . . . . . . . . . . . . . . . . . . . . . . 6
FX LOOP . . . . . . . . . . . . . . . . . . . . . . . . . . . . . . . . . . 6
ANTI-FEEDBACK. . . . . . . . . . . . . . . . . . . . . . . . . . . . . 7
ACOUSTIC RESONANCE . . . . . . . . . . . . . . . . . . . . . . . 7
COMP (Compressor) . . . . . . . . . . . . . . . . . . . . . . . . . 7
DELAY/CHORUS . . . . . . . . . . . . . . . . . . . . . . . . . . . . . 7
AMBIENCE . . . . . . . . . . . . . . . . . . . . . . . . . . . . . . . . . 7
Sub-Parameter Settings . . . . . . . . . . . . . . . . . . . . . . . 8
Looper . . . . . . . . . . . . . . . . . . . . . . . . . . . . . . . . . . . . . 9
Advanced Settings . . . . . . . . . . . . . . . . . . . . . . . . . . 10
Output Setting . . . . . . . . . . . . . . . . . . . . . . . . . . . . . 10
Ambience Output Settings . . . . . . . . . . . . . . . . . . 10
Stomp Pedal Setting . . . . . . . . . . . . . . . . . . . . . . . . . 11
System Settings . . . . . . . . . . . . . . . . . . . . . . . . . . . . . 11
Making Independent EQ Settings for GUITAR
IN 1 and 2
. . . . . . . . . . . . . . . . . . . . . . . . . . . . . . . 11
Assigning the Functions of the Pedals. . . . . . . . . . 12
Other Functions . . . . . . . . . . . . . . . . . . . . . . . . . . 12
Restoring the Factory Settings (Factory Reset) . . . . . . 13
Appendices . . . . . . . . . . . . . . . . . . . . . . . . . . . . . . . . 14
Main Specications . . . . . . . . . . . . . . . . . . . . . . . . . . 14
USING THE UNIT SAFELY . . . . . . . . . . . . . . . . . . . . . . 14
IMPORTANT NOTES . . . . . . . . . . . . . . . . . . . . . . . . . . 14
Before using this unit, carefully read “USING THE UNIT SAFELY” and “IMPORTANT NOTES” (the leaet “USING THE UNIT SAFELY” and the Owner’s
Manual p. 14)). After reading, keep the document(s) where it will be available for immediate reference.
Page 2
Getting Ready
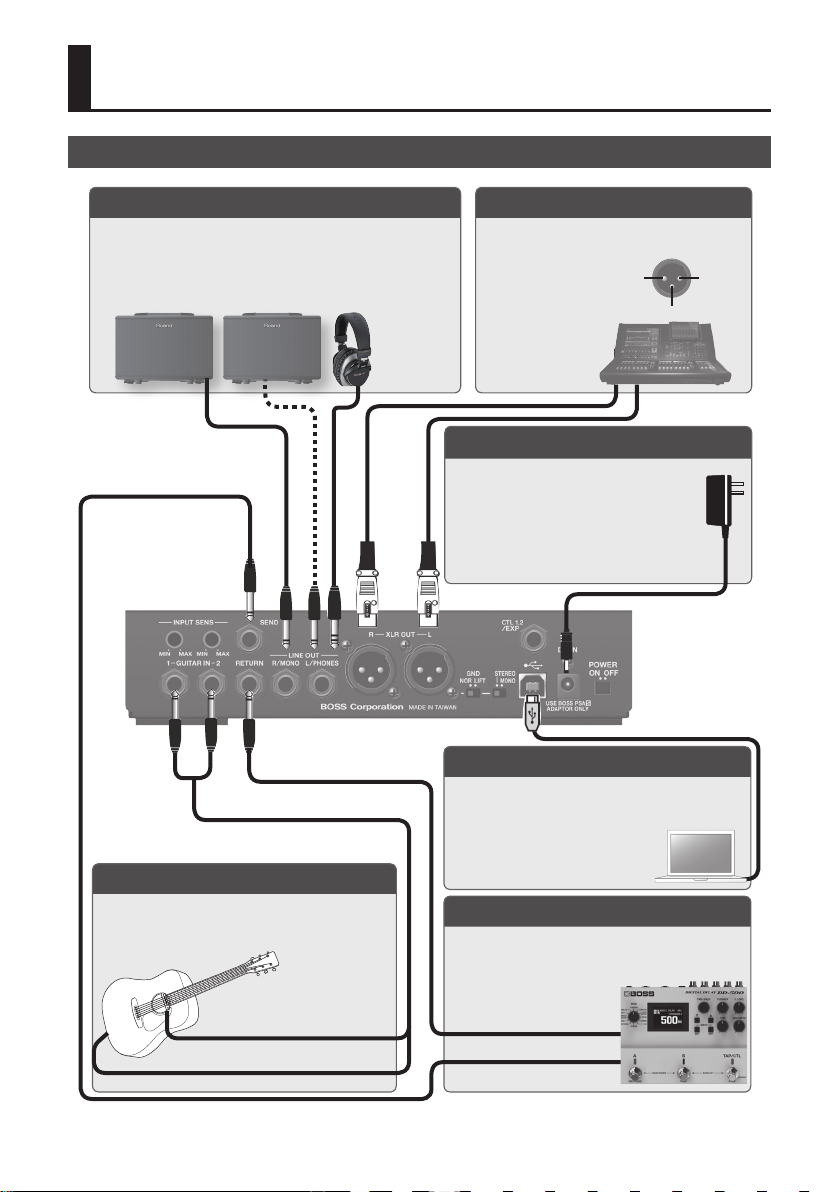
Connecting the Equipment
LINE OUT (L/PHONES, R/MONO) jacks
Connect these jacks to your guitar amp or headphones.
* Connect your headphones to the L/PHONES jack.
* If using a mono connection, use only the R/MONO jack.
Rear Panel
GUITAR IN (1, 2) jacks
Connect your guitar.
You can use the two jacks to blend two dierent types of
pickups, or to connect two guitars.
XLR OUT (L, R) jacks
Connect to the PA etc.
* Pin assignment of XLR OUT (L, R) jack.
1 GND 2 HOT
3 COLD
DC IN jack
Connect the included AC adaptor here.
* We recommend that you keep batteries
installed in the unit even though you’ll be
powering it with the AC adaptor. That way,
you’ll be able to continue a performance even
if the cord of the AC adaptor gets accidentally
disconnected from the unit.
USB COMPUTER port
Use a commercially available USB 2.0 cable to connect
this port to your computer so that audio can be sent and
received between the AD-10 and the computer. You can
record the AD-10’s sound into your
computer, or output sound from your
computer via the AD-10’s output jacks.
SEND, RETURN jacks
Connect an external eect device (mono).
Connect the SEND jack to the input of your external eect
device, and connect the output of your external eect
device to the RETURN jack.
Subsequently attached pickup
Built-in pickup
* To prevent malfunction and equipment failure, always turn down the volume, and turn o all the units before making any connections.
RETURN1OUTPUT
SEND0INPUT
2
Page 3
Getting Ready
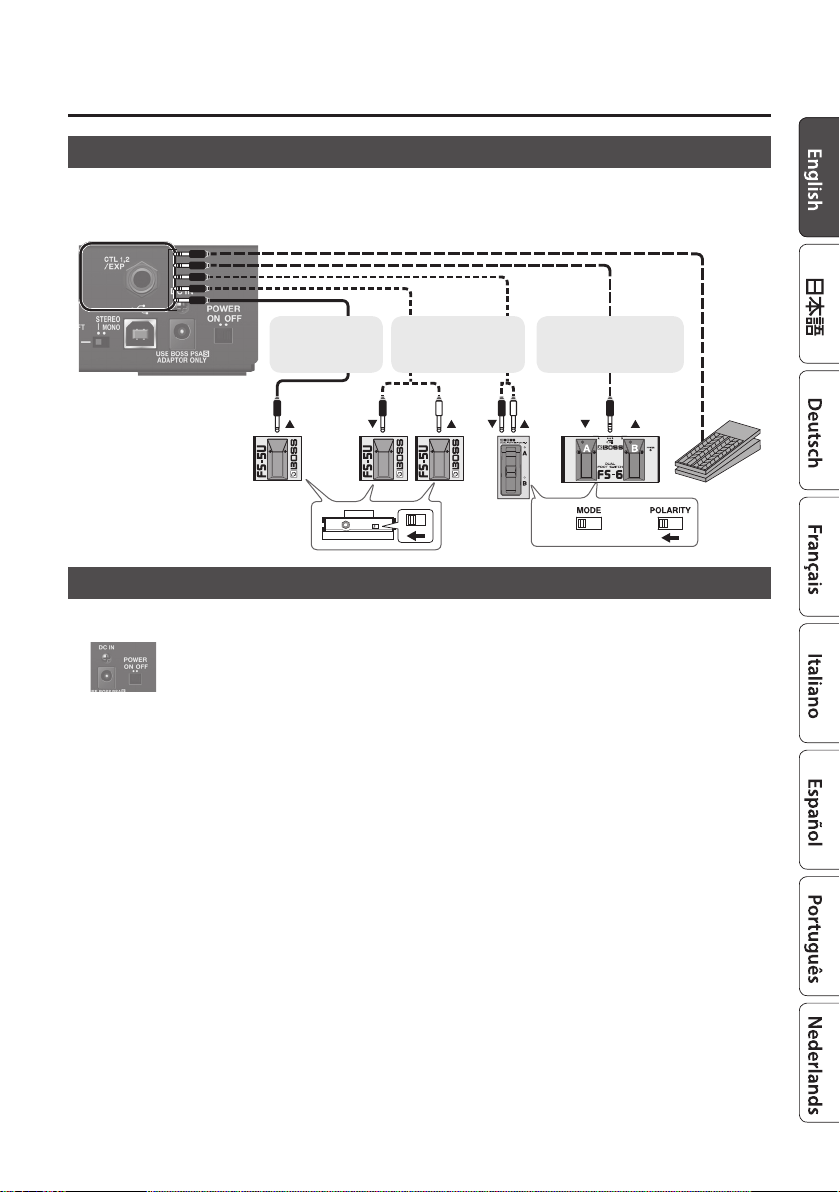
Connecting a Footswitch or an Expression Pedal
If you connect a footswitch (FS-5U, FS-6, FS-7: sold separately) or expression pedal (FV-500H, FV-500L, EV-30, Roland EV-5: sold separately)
to the CTL1,2/EXP jack, you'll be able to assign a variety of functions to it. “Assigning the Functions of the Pedals” (p. 12)
* Use only the specied expression pedal. By connecting any other expression pedals, you risk causing malfunction and/or
damage to the unit.
1/4” phone type
10
1/4” phone type
FS-5U
Stereo 1/4” phone type
10
1/4” phone type x 2
Stereo 1/4” phone type
10
Stereo 1/4” phone
FS-6 EV-30, EV-5FS-5U
FS-7
Turning On/O the Power
Before you make connections, make sure that the input gain or volume of your mixer or amplier is turned down.
By turning on devices in the wrong order, you risk causing malfunction and/or damage to speakers and other devices.
* Before turning the unit on/o, always be sure to turn the volume down. Even with the volume turned down, you might hear
some sound when switching the unit on/o. However, this is normal and does not indicate a malfunction.
* When the batteries run low, the display indicates “Bt” When this occurs, install fresh batteries.
3
Page 4
Getting Ready
Input Settings
The AD-10 is equipped with two channels of
input jack (GUITAR IN 1, 2). You can use these to
blend two dierent types of pickup, such as piezo
+ magnetic, in the desired balance, or to switch
between two connected guitars that you’re using
in a live performance.
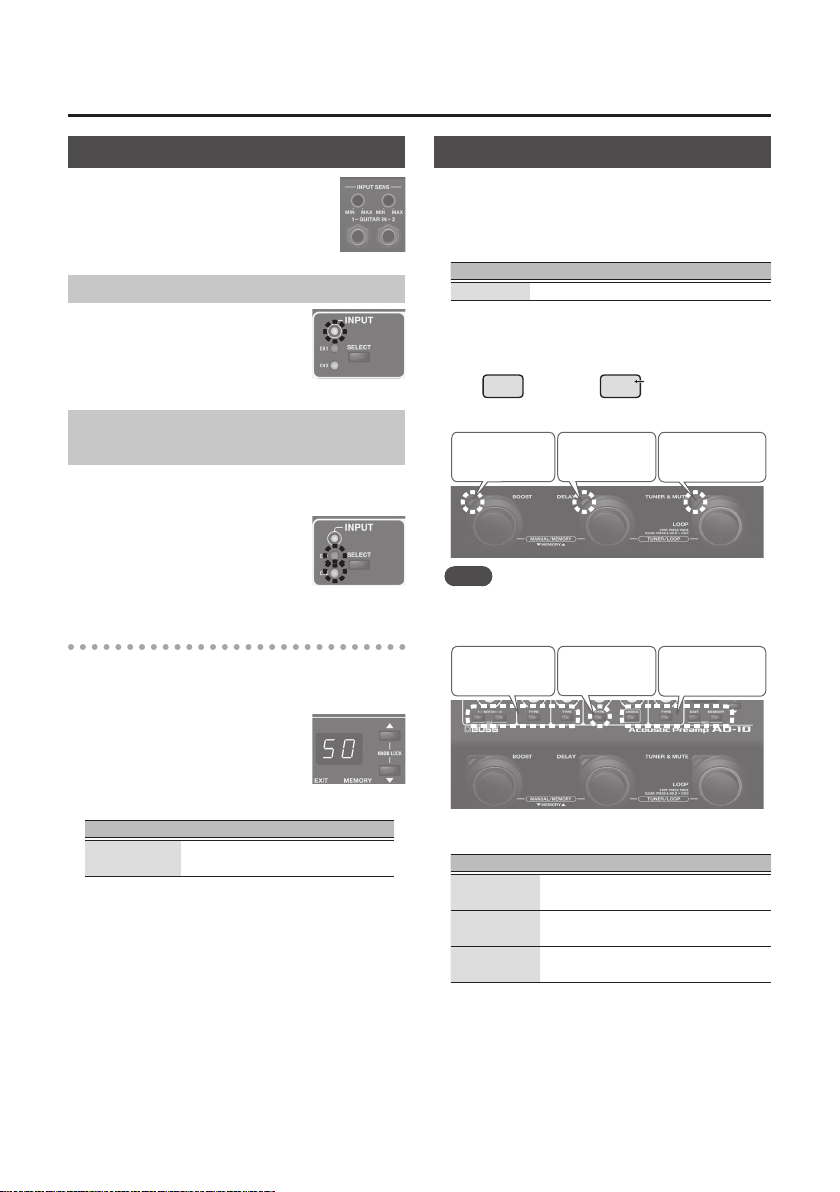
Adjusting the Input Sensitivity
Use the rear panel [INPUT SENS] knobs
to adjust the input sensitivity. Adjust the
sensitivity so that the top panel INPUT
indicators light orange when the maximum
input occurs. If the input level is excessive,
the INPUT indicators light red.
Switching Between GUITAR IN 1/2 and Adjusting the Balance
If you’re using both the GUITAR IN 1 and 2 jacks, you can switch
jacks 1 and 2 on/o, or turn them both on and adjust the mix
balance.
1. Press the [SELECT ] button.
Each time you press this button, the input
selection switches between 1, 2, and 1+2
(MIX). The indicator (CH1, CH2) of an input
that’s on is lit.
Adjusting the CH1/CH2 balance
If you select 1+2 (MIX), the CH1 and CH2 indicators are both lit,
and you can adjust the balance.
1. Press the [SELECT ] button several times to select 1+2
(MIX).
The CH1 and CH2 indicators are both lit.
The display shows the value of the balance
setting between inputs 1 and 2.
2. Use the [?] [=] buttons to adjust
the value.
Display CH1: CH2 mix balance
0–50–gg
100: 0–50: 50–0: 100
(Default: 50)
Tuning the Guitar (Tuner)
1. Press the [TUNER & MUTE] pedal.
Guitar is muted, the tuner is switched on.
2. Change the reference pitch by using the [?] [=]
buttons.
Display Pitch
35–45 435–445 Hz (default: 440 Hz)
3. Play a single open note on the string to be tuned.
The name of the note closest to the pitch of the string played
appears in the display.
E
* Ex. (E)
(C#)
4. Tune so that the [DELAY] pedal light up.
Too low Too highTuned
MEMO
When the tuner is on, you can press the [MENU] button to
switch the tuner’s display mode. The tuning status can also
be shown by the buttons located above the pedals.
TunedToo low Too high
Each time you press the [MENU] button, the display mode
changes as follows.
Display mode Explanation
PP
PANEL & PEDAL
Pd
PEDAL
Pn
PANEL
The pedal LEDs and the buttons both
indicate the pitch.
Only the pedal LEDs indicate the pitch.
Only the buttons indicate the pitch.
C#
# symbol
5. To turn the tuner o, press any of the pedals.
4
Page 5
Manual/Memory Mode
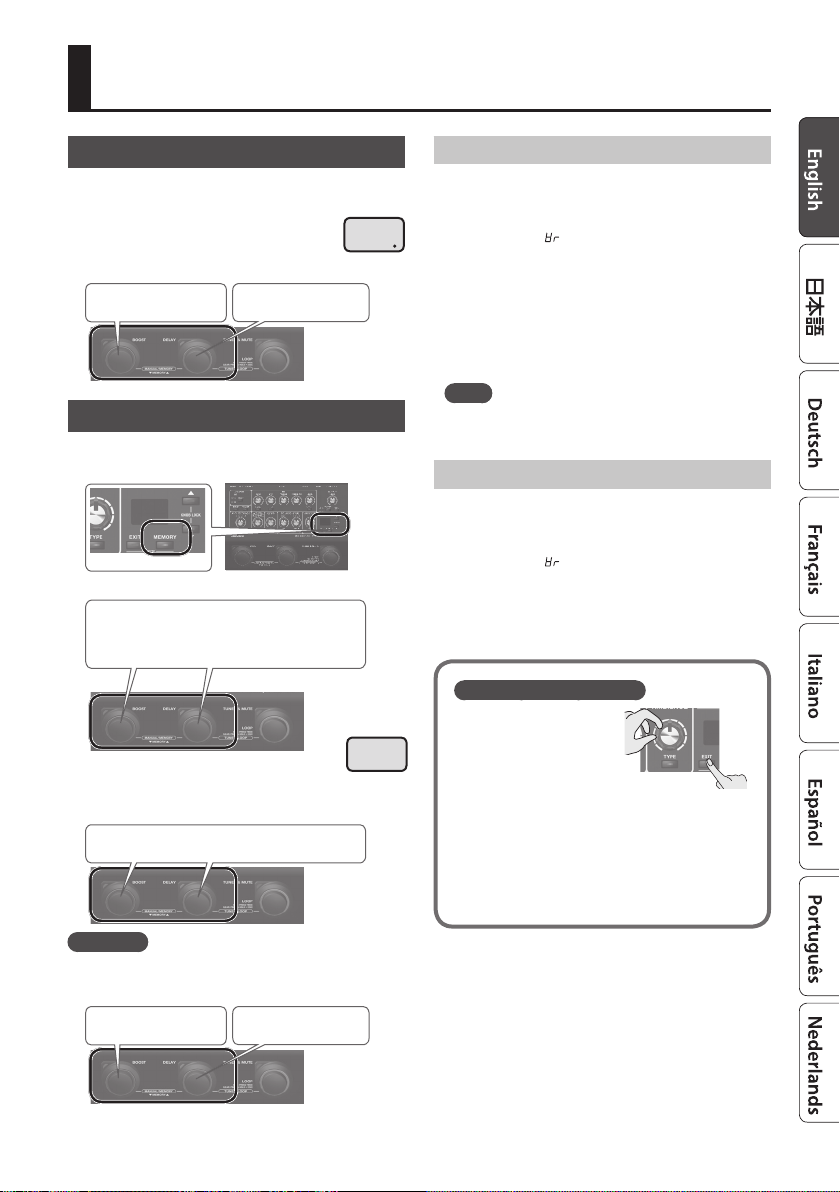
Manual Mode
When you start up the AD-10, it is in Manual mode. In this mode
the sound and eects are applied according to the position of
the panel knobs.
5 A dot is shown in the display. When you move a
knob, the value of its setting is shown.
5 You can turn the eects on and o by using the
pedals (blue LED).
BOOST ON/OFF
DELAY ON/OFF
Memory Mode
When you press the [MEMORY] button to make it light red, the
AD-10 is in Memory mode. In this mode you can save and recall
10 combinations of eects and settings (sounds) as “memories.”
You can also press the two pedals simultaneously
to switch between Manual and Memory modes.
5 The memory number is shown in the display.
* When you edit the setting, a dot appears in the
display.
5 You can switch memories by using the pedals (red LED).
Memory number ?/
=
01
Saving a Memory
Here’s how to save settings that you want to keep.
1. Hold down the [EXIT] button and press the
[MEMORY] button.
The display blinks “ " (Write).
2. Press the [MEMORY] button.
The display indicates the memory number.
3. Use the [?] [=] buttons to choose the memory
number where you’d like to save the memory.
4. Press the [MEMORY] button.
The [MEMORY] button and display indications blink rapidly.
MEMO
For each eect, you can specify whether to save it in
memory or use it manually (knob positions) (p. 12).
Initializing Memory Settings
Initializes the settings of the currently selected memory.
1. Hold down the [EXIT] button and press the
[MEMORY] button.
The display blinks “ ” (Write).
2. Press the [=] button to choose “in” (Initialize).
The [MEMORY] button blinks red.
* If you decide to cancel, press the [EXIT] button.
3. Press the [MEMORY] button.
Checking the Knob/Button Values
5 By operating a knob or
button while you hold
down the [EXIT] button, you
can see its current value in
the display without actually
changing the setting of that
knob or button.
5 When you recall settings (sounds) in Memory mode,
the values of the settings do not match the positions of
the physical knobs. For example, if the value of a knob’s
setting is 12 o’clock, but the physical knob is turned to
the far left, the value will not change until you turn the
knob through the 12 o’clock position.
* When you edit the setting, a dot appears in the display.
Stomp Mode
In Memory mode, simultaneously long-pressing the two pedals
shown in the illustration switches to Stomp mode. You can turn
the eects on and o by using the pedals (blue LED).
BOOST ON/OFF
DELAY ON/OFF
5
Page 6

Editing the Eects
EQ (Equalizer)
Adjusts the tone.
[BASS] knob
Adjusts the sound level of the low-frequency range.
[LOW CUT] button
When this is on, the region below the specied frequency is cut.
When you press this button, the display shows the specied
frequency. Use the [?] [=] buttons to change the setting.
Value Explanation
1–gg
[MID] knob
Adjusts the sound level of middle-frequency range.
[FREQ] button
Species the frequency region that is adjusted by the [MID]
knob. When you press this button, the display shows the
specied frequency. Use the [?] [=] buttons to change the
setting.
Value Explanation
20–5.0
[TREBLE] knob
Adjusts the sound level of the high-frequency range.
[PRESENCE] knob
Adds lustrous outline to the mid- and high-frequency range.
This is eective when you want to improve the denition of
the sound.
[LEVEL] Knob
Adjusts the overall volume level of the equalizer.
6
10–990 Hz
200 Hz–5.0 kHz
[ON/OFF] button
Switches the equalizer on/o.
MEMO
You can specify EQ independently for GUITAR IN 1 and 2.
For details, refer to “Making Independent EQ Settings for
GUITAR IN 1 and 2” (p. 11).
BOOST
Turning this on raises the level. This is convenient
when you want to increase the level above the
backing sound such as when playing a solo, or
when you want to lower the level during a specic
section in a song.
[BOOST] button
Switches the booster on/o. If this is on, the display shows the
gain setting. Use the [?] [=] buttons to change the setting.
Value Explanation
0–50–gg
At a setting of 50, the on and o levels are
the same.
FX LOOP
Switches on/o an external eect that is connected
to the SEND, RETURN jacks (p. 2).
[FX LOOP] button
Switches the external eect on/o. If this is on, the display
shows the return level setting. Use the [?] [=] buttons to
change the setting.
Page 7

Editing the Eects
ANTI-FEEDBACK
This suppresses the acoustic feedback (the whine or squeal)
that can occur depending on the position of the guitar and
amp, or depending on the surrounding
environment.
[REDUCTION] knob
This is a suppression function that is
designed to have a minimal eect on the
tonal quality, and is optimized for the lowfrequency feedback that often occurs with
an acoustic guitar. Use the knob to adjust
the strength of the reduction eect.
When feedback occurs, the reduction is automatically applied
only at the specic frequency at which feedback occurs.
[NOTCH1], [NOTCH2] button
Set this to the point (notch frequency) at which you want to
reduce feedback. The AD-10 lets you specify two dierent
points: [NOTCH1] and [NOTCH2]. You can also set the notch
frequency automatically when feedback occurs.
1. Press the [NOTCH1] or [NOTCH2] button to turn it on.
Each time you press a button, it turns on/o.
2. Use the [?] [=] buttons to specify the note name of
the point at which feedback is occurring.
* If you press [NOTCH1] and [NOTCH2] simultaneously, the
point at which feedback is occurring is scanned and specied
automatically.
Value Explanation
A.1-F7
A#1–F7. “#” (sharp sign) is indicated by “.”
(decimal point).
ACOUSTIC RESONANCE
Use this knob to adjust the balance between the
body resonance eect of the acoustic guitar and
the direct sound of the pickup.
[TYPE] button
Adjusts the tonal character appropriately for the
guitar or settings you’re using.
Display Button Explanation
oF
OFF Unlit OFF
nA
NATURAL Green A natural and uncolored sound.
WIDE Orange
br
BRIGHT Red
Mellow sound that emphasizes the
body resonance
Brilliant sound with an extended
high-frequency range
COMP (Compressor)
This makes the volume of the input signal more
consistent. By suppressing the peak of the attacks,
it prevents distortion even when the input
sensitivity is raised.
Turning the knob toward the right makes the
eect stronger.
[TYPE] Button
Each time you press this button, the setting switches between
o/soft/hard.
DELAY/CHORUS
DELAY is an echo-like eect. It adds a
delayed sound to the original sound,
creating a spatially expansive feeling.
In CHORUS eect, a slightly detuned
sound is added to the original sound
to add depth and breadth.
[TIME] knob
Adjusts the delay time.
[E.LEVEL] knob
Adjusts the delay volume.
[TYPE] Button
Each time you press this button, the setting switches between
o/delay/modulation delay/reverse delay.
[CHORUS] button
Turns chorus on/o, and species the chorus type.
Display
oF
OFF Unlit OFF
nR
NORMAL Green A lustrous sound
NL
MILD
BR
BRIGHT Red
Button
Explanation
Orange
A soft sound that blends well
A chorus sound with brilliant string
resonance
AMBIENCE
This eect adds reverberation to the sound.
[E.LEVEL] knob
Adjusts the volume of the reverberation.
[TYPE] Button
Selects the length of reverberation.
Display Button Explanation
oF
OFF Unlit OFF
Sh
SHORT Green Short reverberation
ND
MID Orange Medium reverberation
LG
LONG Red Long reverberation
7
Page 8

Editing the Eects
Sub-Parameter Settings
By long-pressing one of the eect buttons, you can access
additional settings.
1. Long-press a button.
The display indicates the
parameter/value.
2. Use the [?] [=] buttons
to select a value.
Button Parameter Value Explanation
INPUT
SELECT
BOOST
BOOST
FX LOOP
FX LOOP
ANTI-FEEDBACK
NOTCH
1, 2
ACOUSTIC RESONANCE
TYPE
COMP
TYPE
DELAY
TYPE
CHORUS
CHORUS
AMBIENCE
TYPE
LU
LEVEL
tn
TONE
ds
DIRECT
dp
DEPTH
tn
TONE
At
AT TACK
fb
FEEDBACK
nt
NOTE
* To switch between FEEDBACK and NOTE, use the
[TYPE] button to enter the sub-parameter setting
mode, and then use the [TYPE] button again to
switch.
LU
LEVEL
tn
TONE
0–50–gg
-10–0–10
oF, on
* You can set this if an external
1–20
-10–0–10
0–50–gg
0–gg
d
,
0–gg
-10–0–10
Output level of the
input selector. If CH1
and 2 are blended,
this changes the
volume of both
channels.
Species the tonal
character when the
booster is on.
Mixes the direct
sound.
device is connected to the
RETURN jack.
Adjusts the depth of
the notch lter.
Adjusts the tonal
character when
acoustic resonance
is on.
Adjusts the strength
of the attack when
picking.
Adjusts the number
of delay repeats.
Sets the note for the
delay sound.
d =¸
(Quarter Note)
=˚
=
note)
Adjusts the level of
the eect sound.
Adjusts the tonal
character of the eect
sound.
(dotted 8th
Button Parameter Value Explanation
EQ
ON/OFF
FREQ
ns
NOISE
SUPPRESSOR
NQ
MID Q
0–gg
0.5–16
Adjusts the noise
suppressor.
Adjusts the width
of the area aected
by the EQ centered
at the frequency
specied by this
button (p. 6). Higher
values will narrow
the area.
8
Page 9

Looper
When you press the [DELAY] pedal and the [TUNER & MUTE] pedal simultaneously, the looper
starts.
When the looper starts, you can use the [TUNER & MUTE] pedal to record your guitar and create
a loop performance.
Recording
Recording will start immediately
when you press the [TUNER &
MUTE] pedal.
At the point where you want to
loop, press the pedal to switch to
playback.
Loop Playback Level Setting
If you set the playback level at 50 (default value), the volume of
the performance and that of the loop playback will be identical.
If you set the playback level to a value lower than 50, the
volume of the playback will be lower than that of the
performance. As a result, the sound of the performance won’t
get buried by the loop playback sound, even if you record a
multiple number of times.
For details on the settings, refer to “Output Setting” (p. 10).
[LOOP] Pedal Color
[LOOP] Pedal
Color
Red
Green
Orange
Green (blink)
Red (blink)
Display indication Status
RC
PL
DB
ST
CL
Recording
Playback
Overdub
Stopped (phrase exists)
Stopped (no phrase)
Loop Playback
Play back the loop.
Pressing the [TUNER & MUTE]
pedal will switch to overdubbing.
Press Twice
Overdub
Record additional layers while
playing back the loop.
Press the [TUNER & MUTE] pedal to
switch to playback.
Stop/Clear
To stop, press the [TUNER & MUTE] pedal
twice.
To clear the phrase, hold down the [LOOP]
pedal for at least two seconds while
stopped.
9
Page 10

Advanced Settings
Output Setting
Here's how to set the output level of the XLR OUT (L, R) jacks
and LINE OUT (L/PHONES, R/MONO) jacks, and how to specify
the way in which ambience (p. 7) is output.
1. Press the [MENU] button.
The AD-10 is in output setting mode.
2. Press the [MEMORY] button to select a parameter .
Each time you press the button, the setting changes as follows.
“PL” (PHONES LEVEL) 0 “XL” (XLR LEVEL) 0 “LL”
(LOOP LEVEL) 0 “LP” (LOOP ACTION) 0 “XS” (XLR) 0
“LS” (LINE) 0 “2b” (GUITAR INPUT 2 FX BYPAS)
MEMO
To return to the previous parameter, hold down the [EXIT]
button and press the [MEMORY] button.
3. Use the [?] [=] buttons to select a value.
Parameter Value Explanation
PL
(PHONES LEVEL)
XL
(XLR LEVEL)
LL
(LOOP LEVEL)
LP
(LOOP ACTION)
Sets the volume of the PHONES jack.
0–gg
Ln
(OUTPUT
LEVEL)
Species the volume of the XLR jacks.
0–gg
Ln
(OUTPUT
LEVEL)
0–gg
Species the switching order of the Looper.
rP
(REC0PLAY)
rd
(REC0DUB)
If this is set to OUTPUT LEVEL,
the level corresponds to the
,
knob position
0–99 is a xed value
(Default: OUTPUT LEVEL)
If this is set to OUTPUT LEVEL,
the level corresponds to the
,
knob position
0–99 is a xed value
(Default: OUTPUT LEVEL)
Species the playback level of
the looper.
REC0 PLAY0DUB (default)
REC0DUB0PLAY
Parameter Value Explanation
Selects the sound that is output from the XLR
XS
(XLR),
LS
(LINE)
2B
(GUITAR INPUT
2 FX BYPASS)
and LINE jacks.
NX
(MIX)
PP
(PRE/POST)
CH
oF, on
The sound processed by the
eects is output.
The USB AUDIO playback
sound is also mixed and
output.
L: The sound before eects
are applied (the output of the
input selector) is output.
R: The sound with eects
applied is output.
L: The sound of GUITAR IN 2
is output.
R: The sound of GUITAR IN 1
is output.
Species whether the sound
being input from GUITAR
INPUT 2 is processed through
the eects or bypasses the
eects.
If this is on, the eects are
bypassed; only the looper and
ambience eects are applied.
Instead of a guitar, you could
connect a dierent instrument
to GUITAR IN 2, letting you
perform with layered loops.
Ambience Output Settings
Here’s how to specify the way in which ambience is output. It
can be output to both XLR OUT and LINE OUT, or to either XLR
OUT or LINE OUT.
1. Press the [AMBIENCE OUT] button to specify the
output method.
Each time you press the button, the setting alternates between
XLR+LINE, XLR only, LINE only, and both o. The indicators light
to indicate the jacks from which the ambience is output.
MEMO
When you press the [AMBIENCE OUT] button, the display shows
the ambience level of the entire AD-10. Use the [?] [=] buttons
to specify the level.
This is convenient when you want to make a ne adjustment
to the amount of ambience, for example to compensate for the
acoustics of the venue in which you’re performing.
10
Page 11

Advanced Settings
Stomp Pedal Setting
For each memory, you can specify which eect turns on/o
when you press a pedal in Manual mode or Stomp mode (p. 5).
1. Hold down the [MEMORY] button and press the
pedal that you want to use to turn eects on/o.
The [MEMORY] button and the corresponding pedals are lit red;
the AD-10 is in Stomp pedal setting mode.
At the same time, the button of each eect blinks.
* Stomp pedal settings can be made for the pedal to which FX
ON/OFF function is assigned in “Assigning the Functions of the
Pedals” (p. 12).
2. Press the button of each eect several times to
specify the eect’s on/o status when the pedal is
operated.
Status Explanation
Lit Eect is on when the pedal is on.
Blink Eect is o when the pedal is on.
Blink slowly Pedal operation does not switch the eect on/o.
System Settings
Settings that are shared by the entire AD-10 are called "system
settings."
Making Independent EQ Settings for GUITAR IN 1 and 2
EQ settings can be made independently for GUITAR IN 1 and
2. This lets you set the EQ appropriately for the response of
dierent pickups or for dierent performance venues.
1. Hold down the [EXIT] button and press the [TUNER &
MUTE] pedal.
The [MEMORY] button is lit red, and the [TUNER & MUTE] pedal
is lit purple.
2. Use the [SELECT ] button to select the channel whose
EQ you want to set.
3. Use the knobs to adjust the EQ.
MEMO
5 By long-pressing the [ON/OFF] button you can make noise
suppressor settings. The display shows the value. Use the [?]
[=] buttons to edit the value.
5 You can use the [FX LOOP] button to change the phase. Each
time you press the button, the phase is reversed.
4. Press the [EXIT] button to exit the settings.
3. Press the [EXIT] button to exit setting mode.
Memory/Stomp mode
4. Save the setting by following “Saving a Memory”
(p. 5).
11
Page 12

Advanced Settings
Assigning the Functions of the Pedals
You can specify the function of each of the AD-10’s pedals, and
of a footswitch or expression pedal connected to the CTL1, 2/
EXP jack.
&
“Connecting a Footswitch or an Expression Pedal” (p. 3)
1. Hold down the [EXIT] button and press the [BOOST]
pedal.
The [MEMORY] button is lit red, and the [BOOST] pedal is lit
purple.
2. Press the [MEMORY] button to select the parameter
that you want to edit.
3. Use the [?] [=] buttons to select a value.
4. Press the [EXIT] button to exit setting mode.
Parameter Value Explanation
EF
(Exp Function)
1F
(CTL1 Function),
2F
(CTL2 Function),
BF
(BOOST Pdl Function),
dF
(DELAY Pdl Function),
tF
(TUNER & MUTE Pdl
Function)
ov
OUTPUT LEVEL
AN
AMBIENCE LEVEL
LP
LOOP LEVEL
NN
MEMORY/MANUAL
Tv
TUNER & MUTE ON/OFF
TUNER & MUTE ON/OFF
TA
(HOLD:ANTI-FB SCAN)
ANTI-FB SCAN
AT
(HOLD:TUNER&MUTE ON/
OFF)
FX
FX ON/OFF
TT
TapTempo
in
InSelect
LOOP REC/PLAY/DUB
LP
(PRESS TWICE: STOP, HOLD:
CLEAR)
LOOP STOP
LS
(HOLD: CLEAR)
LC
LOOP CLEAR
ANTI-FB SCAN
AS
(HOLD: CLEAR)
Ni
MEMORY = (CTL1: default)
Nd
MEMORY ? (CTL2: default)
Other Functions
1. Hold down the [EXIT] button and press the [DELAY]
pedal.
The [MEMORY] button is lit red, and the [DELAY] pedal is lit
purple.
2. Press the [MEMORY] button to select a parameter
(refer to table).
MEMO
To return to the previous parameter, hold down the [EXIT]
button and press the [MEMORY] button.
3. Use the [?] [=] buttons to select a value.
4. Press the [EXIT] button to exit settings mode.
Parameter Value Explanation
USB monitor setting
vd
(USB direct
out)
vi
(USB INPUT
LEVEL)
vo
(USB
OUTPUT LEVEL)
Auto O Setting
Ao
(Auto O)
STARTUP MODE
SN
(STARTUP
MODE)
Switches the output of the AD-10 sound to the
XLR and LINE jacks.
* You must install the USB driver when
connecting the AD-10 to your computer.
Download the USB driver from the BOSS
website. For details, refer to Readme.htm
which is included in the download.
&
https://www.boss.info/support/
The sound of the AD-10 is not
output from the XLR and LINE jacks;
it is output only to the computer
of
on
0–55–gg
0–55–gg
With the factory settings, the AD-10 will
automatically be switched o 10 hours after you
stop playing or operating the unit.
of
on
Selects the mode at power-on.
1
2
3
(USB).
Use this when you want to use your
DAW to apply a plug-in eect to the
sound of the AD-10, and output the
result from the output jacks.
The sound of the AD-10 is output to
the XLR and LINE jacks (default).
Input level of USB AUDIO
Output level of USB AUDIO
* If you don’t want the unit to turn o
automatically, change this setting to “oF”
(OFF).
The power will not turn o
automatically.
The power will automatically turn o
after 10 hours. (default)
MANUAL MODE (default)
MEMORY MODE
MEMORY STOMP MODE
Memory settings for each eect
For each eect, you can specify whether its settings are
switched according to the selected MEMORY, or always use
settings that correspond to the position of its knobs (MANUAL).
For example, you can specify that the input/output settings and
EQ always use the same settings, but delay and ambience will
be switched as you select a dierent memory.
12
Page 13

In the state of step 1, you can press each eect button to switch
it between blinking and lit.
Status Explanation
Lit Switch according to each MEMORY.
Blink Always use the knob positions.
Restoring the Factory Settings (Factory Reset)
Here’s how to return the AD-10 to its factory-set state.
1. While holding down the NOTCH [1] and [2] buttons,
turn the power on.
“Fr” appears in the display, and the [MEMORY] button blinks.
* If you decide to cancel the factory reset, turn o the power.
2. Press the [MEMORY] button.
The display ashes and the factory reset is executed.
* Never turn o the power while Factory Reset is in progress.
3. Once “ ” appears in the display, you can turn o
the power.
Advanced Settings
13
Page 14

Appendices
Main Specications
BOSS AD-10: Acoustic Preamp
Power
Supply
Current
Draw
Expected
battery
life under
continuous
use
Dimensions
Weight
Accessories
Options
(sold
separately)
* This document explains the specications of the product at the
AC adaptor, Alkaline battery (AA, LR6) x 6
300 mA
Alkaline battery:
Approx. 6 hours
* These gures will vary depending on the actual
conditions of use.
217 (W) x 161 (D) x 65 (H) mm
8-9/16 (W) x 6-3/8 (D) x 2-9/16 (H) inches
1.3 kg
2 lbs 14 oz
Owner’s manual, Leaet “USING THE UNIT SAFELY,”
AC Adaptor
Expression Pedal: FV-500H, FV-500L, EV-30, Roland
EV-5
Footswitch: FS-5U
Dual Footswitch: FS-6, FS-7
time that the document was issued. For the latest information,
refer to the Roland website.
USING THE UNIT SAFELY
WARNING
Concerning the Auto O function
The power to this unit will be turned o automatically
after a predetermined amount of time has passed
since it was last used for playing music, or its buttons
or controls were operated (Auto O function). If
you do not want the power to be turned o automatically,
disengage the Auto O function (p. 12).
Use only the supplied AC adaptor and the correct voltage
Be sure to use only the AC adaptor supplied with
the unit. Also, make sure the line voltage at the
installation matches the input voltage specied on
the AC adaptor’s body. Other AC adaptors may use a
dierent polarity, or be designed for a dierent voltage, so their
use could result in damage, malfunction, or electric shock.
IMPORTANT NOTES
Power Supply: Use of Batteries
• If you handle batteries improperly, you risk explosion and
uid leakage. Make sure that you carefully observe all of the
items related to batteries that are listed in“USING THE UNIT
SAFELY” and “IMPORTANT NOTES” (leaet “USING THE UNIT
SAFELY” and Owner’s manual (p. 14))
• If operating this unit on batteries, please use alkaline
batteries
• When turning the unit over, be careful so as to protect the
buttons and knobs from damage. Also, handle the unit
carefully; do not drop it.
Repairs and Data
• Before sending the unit away for repairs, be sure to write
down the needed information. Although we will do our
utmost to preserve the data stored in your unit when we
carry out repairs, in some cases, such as when the memory
section is physically damaged, restoration of the stored
content may be impossible. Roland assumes no liability
concerning the restoration of any stored content that has
been lost.
Additional Precautions
• Any data stored within the unit can be lost as the result
of equipment failure, incorrect operation, etc. To protect
yourself against the irretrievable loss of data, try to make a
habit of writing down the important data on paper.
• Roland assumes no liability concerning the restoration of any
stored content that has been lost.
• Do not use connection cables that contain a built-in resistor.
Intellectual Property Right
• It is forbidden by law to make an audio recording, video
recording, copy or revision of a third party’s copyrighted
work (musical work, video work, broadcast, live performance,
or other work), whether in whole or in part, and distribute,
sell, lease, perform or broadcast it without the permission of
the copyright owner.
• Do not use this product for purposes that could infringe on a
copyright held by a third party. We assume no responsibility
whatsoever with regard to any infringements of third-party
copyrights arising through your use of this product.
• ASIO is a trademark and software of Steinberg Media
Technologies GmbH.
• This product contains eParts integrated software platform of
eSOL Co.,Ltd. eParts is a trademark of eSOL Co., Ltd. in Japan.
• Roland and BOSS are either registered trademarks or
trademarks of Roland Corporation in the United States and/
or other countries.
• Company names and product names appearing in this
document are registered trademarks or trademarks of their
respective owners.
14
 Loading...