

Page 1
Page 2
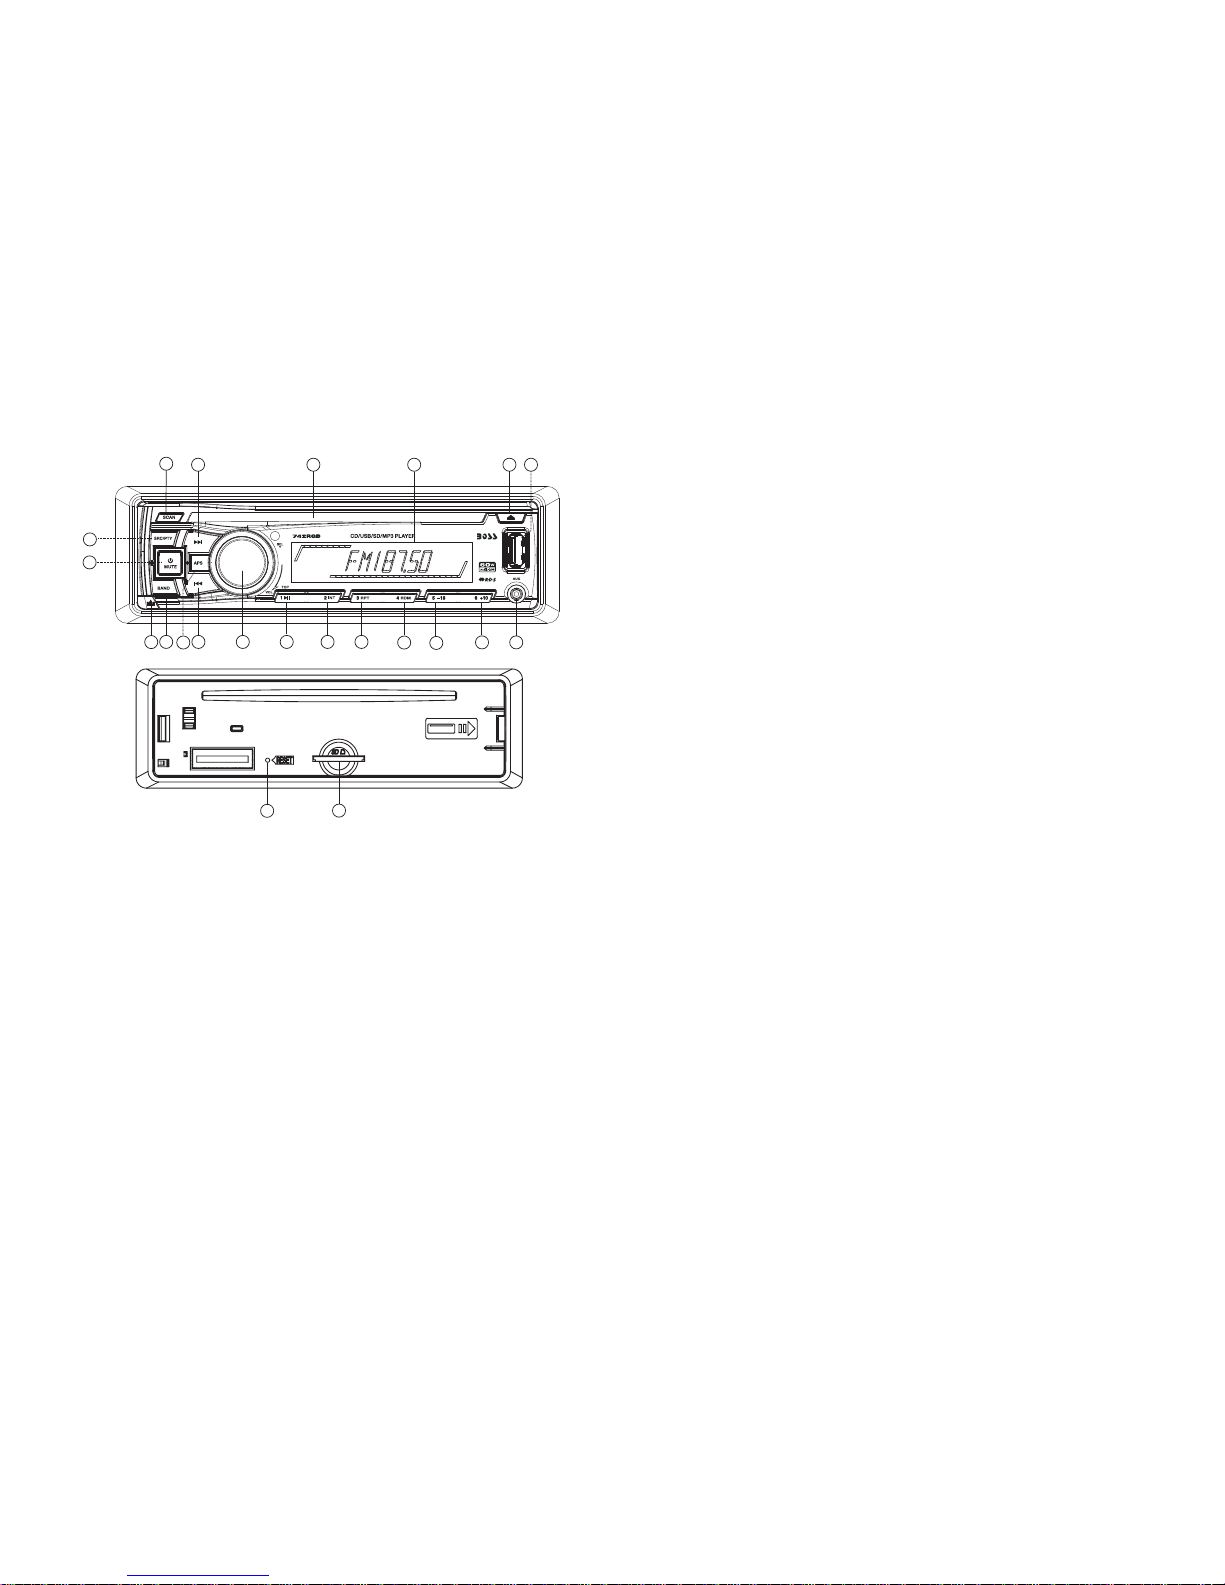
LOCATION AND FUNCTION OF CONTROLS
Page 1
1. RELEASE BUTTON
Press the REL but to n to r el ea se t he f ro nt c on tr ol p an el f ro m th e un it c ha ss is ,
then pull it up a little to remove from the unit chassis.
2.POWER ON/OFF & MUTE
When the unit is power off, t he u ni t co me s to o n by p re ss in g an y bu tt on e xc ep t
the EJECT and t he R EL EA SE b ut to n.
When the unit is power on, press and hold the power button for more than 1
second, the unit goes into power off mo de .
When the unit is power on, press the power to switch the MUTE state on/off.
3. CD SLOT
4. LCD Display
5.EJECT KEY
In the power on state, the loaded disc can be ejected by pressing the EJ key.
6&7. TUNE, SEEK, TRACK, SKIP UP / D OW N BU TTONS
a) During RADIO mode:
Press the >>| or |<< button briefly to manual tune up/down for the desired radio
station frequency step by step.
Press and hold the >>| or |<< button for longer 1 second to automatically
tune up/down for the radio station frequency.
16 14
13
12
111098
1
18
19
7
6
20
4
5 173
2
15
21
22
Page 3
Page 11 Page 2
b) During disc, USB playback mode:
Press the >>| button briefly to play next track.
Press the |<< button briefly to play the current track from the beginning of it
if the playing time is more than 2 seconds.
Press the |<< button briefly to play the previous track if the playing time is
less than 2 seconds.
Press the >>| or |<< button and hold to skip forwards or backwards, release
to resume normal playback.
8.SEL(MENU) BUTTO N AND VOLUME UP ( + )/ DN ( - ) K ON B
a) Press the SEL bu tt on b ri ef ly, it is activated as selecting each mode of E. VOL.
->BASS ->TREBLE -> BALANCE -> FADER -> VOLUME->
When selecting a desired audio mode, rotate the VOL kno b to a dj us t th e
audio eff ec t.
In each mode, the waiting time is about 5 seconds, and when the waiting time
is over, it returns to the last display mode of tuner or CD mode.
The c on tr ol m od e of E .V OL is operated with following numeric display.
- VOL: (MIN)00, 01,......46, 47(MAX).
- BASS/TRE: -7, -6,...,0,...+6,+7
- BAL: L,I,...,I,...,I,R
- FAD: F,I,...,I,...,I,R
b) When pressed longer 2 seconds, it show the time then it is activated as
cyclical mode of following functions for user’s selection.
->CLK 00:00->TA( ON /O FF ) -> AF (O N/ OF F) - > TA (ALARM/SEEK)
->PI (SOUND/MUTE)->RETUNE (LONG/SHORT )- >M AS K( DP I/ AL L)
->BEEP (O N/ OF F) - > US ER S ET (F LAT /C LA SS IC /R OC K/ PO P)
->VOL(LAST/DEFA) -> EUROPE/AMERICA ->MONO/STEREO
(only for FM mode) ->LOUD(ON/OFF) ->LOCAL/DX(only for FM mode)
->BL AUTO(WHITE,ORA NG E, YE LL OW, RE D PU RP LE ,B LU E, CYA N, GR EE N)
->CLK(ON/OFF) ->CLK(12/24)mode->CL ADJ 0 0’ 00 (y ou c an a dj us t HO UR or
MINUTE by r ot at e th e VO L knob).
After selecting the desired mode, rotate the VOL kno b to s el ec t on e se tu p
item of the desired mode.
1) TA [TR AF FI C ANN OU NC EM EN T]
When TA mod e is o n( TA is displayed on LCD), it will begin to seek TA sta ti on
and TA SEEK w il l be d is pl ay ed o n LC D fo r a wh il e.
When traffi c an no un ce me nt i s tr an sm it te d:
(1)If the unit is in USB or disc mode, it will switch to radio mode temporarily.
Tempo ra ri ly s wi tc h ov er t o an E ON l in ke d st at io n wh en E ON d et ec ts a t ra ff ic
announcement on that other program, and TP wi ll b e di sp la ye d on L CD
(2)If volume level is below 20, volume level is raised to 20, and returns to its
previous mode and volume level when the traff ic a nn ou nc em en t is o ve r.
(3)If volume is adjusted during traff ic a nn ou nc em en t, o nl y th e tr af fi c
announcement volume is valid.
* TA inte rr up ti on f un ction:
The c ur re nt t ra ffic announceme nt i s ca nc el le d by p re ss in g th is k ey. But the
TA mode w il l no t be o ff.
* When TA is on , SE EK , (S CAN), AUTO M EM OR Y fun ct io n ca n be r ec ei ve d or
saved onl y wh en t ra ff ic p ro gr am i de nt if ication code ha s be en r ec ei ve d.
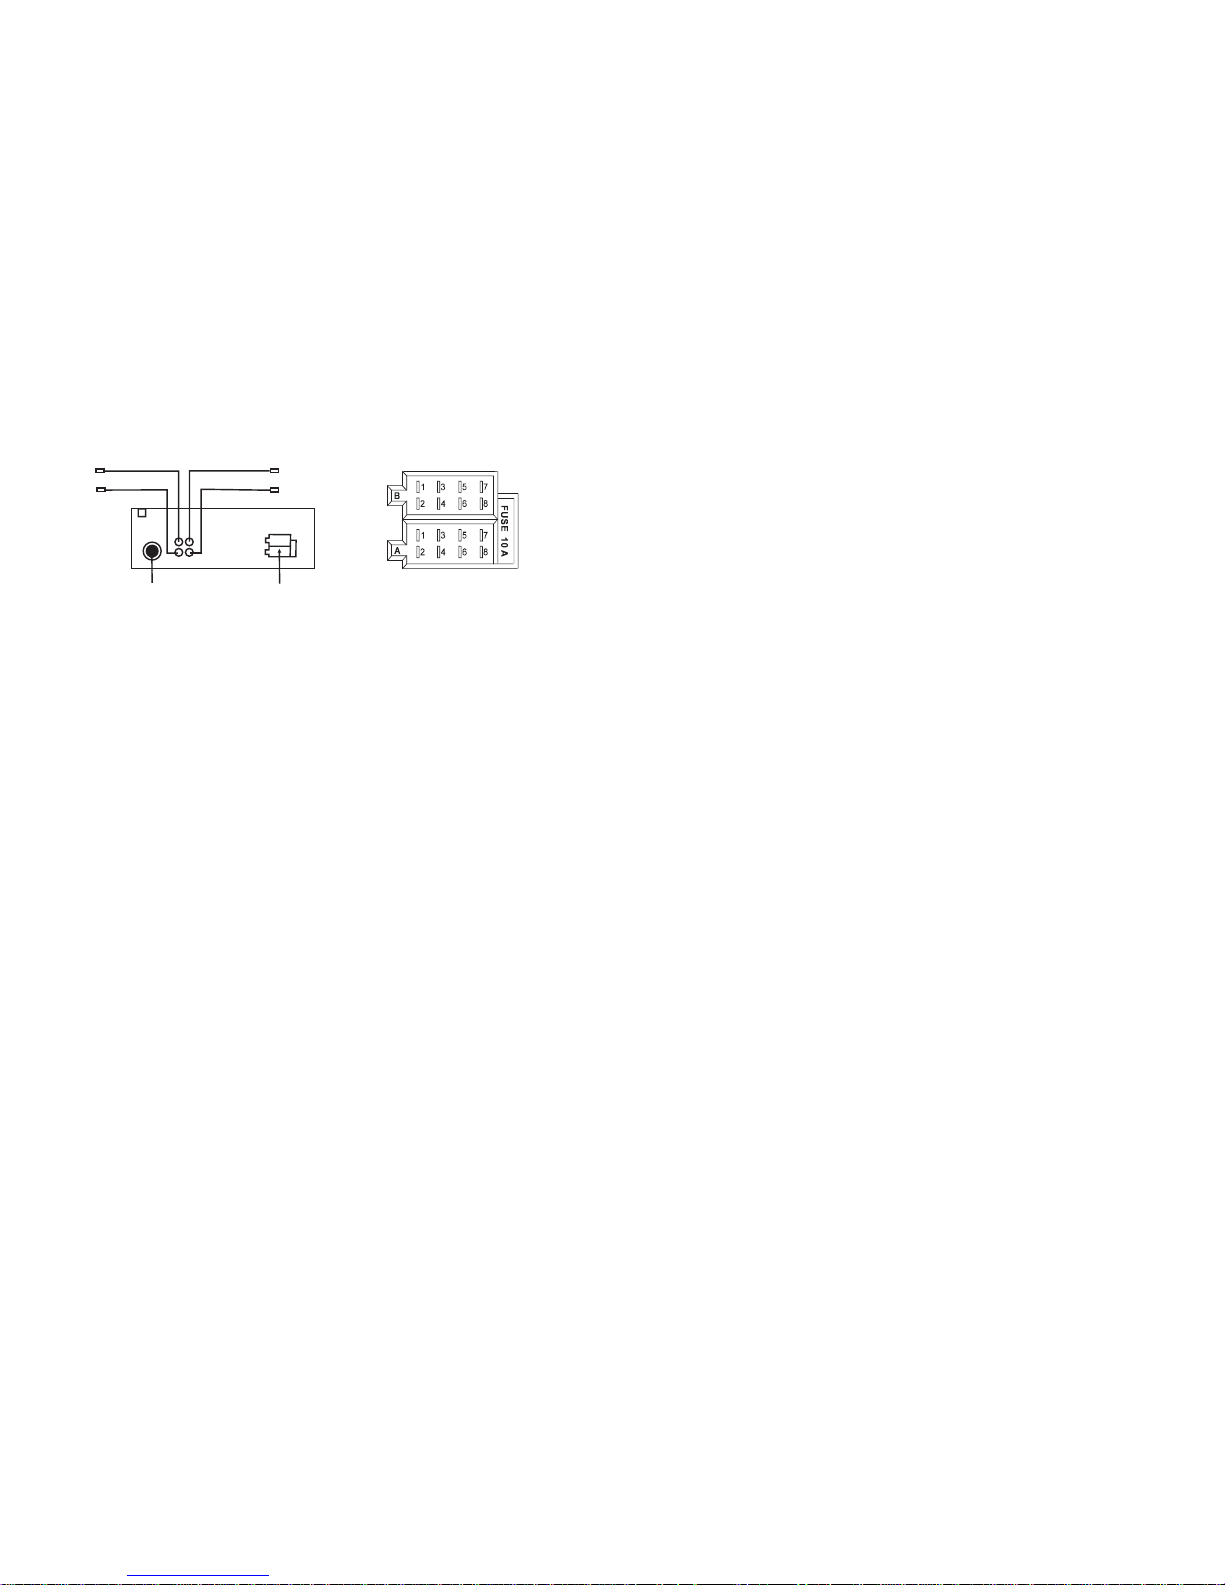
CONNECTOR A
1.
2.
3.
4. Memory +12 V
5. Auto AntennaOutput
6.
7. 12V (To Ignition Key)
8. GROUND
CONNECTOR B
1. Rear Righ t Speaker (+)
2. Rear Righ t Speaker (-)
3. Front Rig ht Speaker (+)
4. Front Rig ht Speaker (-)
5
7. Rear Left S peaker (+)
8. Rear Left S peaker (-)
. Front Left S peaker (+)
6. Front Left S peaker (-)
ISO SOCKET SKETCH
WIRI NG
FIX DE-IS O CONNE CTOR
ANT ENNA IN PUT
WHITE
WHITE
RED
RED
RCA OUTPUT
RCA OUTPUT
RCA OUTPUT
RCA OUTPUT
FRONT LEFT SPEAKER JACK REAR LEFT SPEAKER JACK
FRONT RIGHT SPEAKER JACK REAR RIGHT SPEAKER JACK
SPECIFICATION
GENERAL
Supply Voltage DC 12 V
Current Consumption Max.10A
Power Output 4 X 60W
Number of channels 2 STEREO channels.
Unit Dimensions 178[W] X 165[D] X 50[H] mm.
7" X6.5" X1.97"
FM SECTION
Frequency range
Effective sensitivity 3uV.
I.F Frequency 10.7MHz.
AM SECTION
Frequency range 530KHz - 1710KHz(US)
522KHz - 1620KHz(EU)
Effective sensitivity 40dB.
I.F Frequency 450KHz
RCA LINE OUT
Pre-Amp Output 1 V
CD PLAYER
System MP3 Audio System.
Suitable CDs MP3, CD,CD-R,CD-RW Disc
Frequency characteristics 20Hz-100Hz <\5dB
10KHz-20KHz <\5dB.
S/N Ratio to CD 50dB [1KHz]
[W] [D] [H]
87.5MHz - 107.9MHz(US)
87.5MHz -108.0MHz(EU)
Output
Page 4

Page 3 Page 10
2) AF [ALTE RN ATI VE F REQUENCIES]
When AF swit ch in g mo de i s se le ct ed a nd t he s ta te o f AF sw it ch in g mo de i s
display ed b y AF se gm en t in d is pl ay.
Segment o ff : AF sw it ch in g mo de o ff.
Segment o n: AF s wi tc hi ng m od e on , an d ha s RD S in fo rm at io n.
Segment f la sh in g: AF s wi tc hi ng m od e on , bu t RD S in fo rm at io n is n ot
receive d ye t.
When AF swit ch in g mo de i s se le ct ed , th e ra di o ch ec ks t he s ig na l st rength of
AF all the tim e. T he i nt er va l of c he ck in g ti me o f each AFs depends o n th e
signal st re ng th o f cu rr en t st at io n, f ro m a fe w mi nu te f or s tr on g station to a few
seconds f or w ea k st at io n. E ve ry t im e th at n ew AF i s st ro ng er t ha n cu rrent
station , it s wi tc he s ov er t o th at f re qu en cy f or v er y sh or t ti me, and
NEW FREQU EN CY i s di sp la ye d fo r 1- 2 se co nd s. Because the mu te t im e of AF
switchi ng o r ch ec ki ng t im e is v er y sh or t, i t is a lm os t in au di bl e in case of
normal pr og ra m.
During FM m od e, w he n AF is o n, S EE K, ( SC AN ), AU TO-MEMORY f un ct io n ca n
only rece iv e an d sa ve R DS p ro gr am .
3) TA SEE K/ TA AL AR M:
TA SEEK m od e: w he n ne wl y tuned station d oe s no t re ce iv e TP informat io n fo r
5 seconds , th e ra di o re tu ne s to n ex t st at io n wh ic h ha s a di ffe re nt P I to t he l as t
station , bu t ha s th e TP informatio n.
When TP i nf or ma ti on gets lost at the c ur re nt s ta ti on f or r et un e ti me w hi ch i s
set by RETU NE S HO RT (6 0 se co nd s) o r RE TU NE LONG(90 second s) , th e
radio sta rt s to r et un e to n ex t sa me P I st at io n. W he n sa me P I st at ion does not
receive i n 1 cy cl ic s ea rc h, t he r ad io r et un es t o ne xt s ta ti on w it h TP in fo rm at io n.
TA ALARM mode: whe n th is m od e is s el ec te d, a ny a ut om at ic r et un e mo de i s
not activ at ed . On ly d ou bl e be ep s ou nd (A LA RM ) wi ll b e he ar d.
When newl y tu ne d st at io n do es n ot h av e TP in fo rm at io n fo r 5 se co nd s, b ee ps
are sound ed .
When TP i nf or ma ti on gets lost at the c ur re nt s ta ti on f or r et un e ti me , th e be ep
sound wil l be h ea rd .
When newl y tu ne d st at io n ha s no R DS s ig na l, P I SE EK i s su pp re ss ed .
4) PI SOUND / PI M UT E:
PI SOUND mo de : if a c ar c ru is es b et we en b ui ld in gs t ha t co ul d ca us e
reflect in g si gn al s, a p he no me no n ma y oc cu r, du e to d ifferen t PI c od es b ei ng
receive d fr om t he s am e AF so ur ce . wh en d if ferent PI sounds (D IP ) ar e he ar d
occassi on al ly, t hi s wi ll h ap pe n fo r le ss t han 1 second.
PI MUTE mod e: u nd er a bo ve s am e si tu at io n, a m ut e so un d wi ll b e he ar d for
less than 1s ec on d.
5) RETUNE L / R ET UN E S:
The i ni ti al t im e of a ut om at ic TA sea rc h or P I SE AR CH m od e is s el ec te d.
When PI inf or ma ti on i s no t re ce iv ed f or r et un e in te rv al , t he r ad io starts to
retune to n ex t sa me P I st at io n.
When same P I st at io n do es n ot r ec ei ve 1 c yc li c se ar ch , th e ra di o go es to last
station a nd w ai ts f or 4 -5 m in ut es u nt il P I co de i s re ce iv ed .
RETUNE L mo de : se lected as 90 second s.
RETUNE S mo de : se le ct ed a s 60 s ec on ds .
TROUBLESHOOTING
Before using the check list please make all the connections first.
If you still have questions after going through the checklist, please consult
your local customer service representative.
Common Symptoms
There is no power.
The CDs cannot
be loaded.
Cause
The fuse has blown.
Presence of CD disc inside the player
Inserting the disc in upside down
The surface of CD is extremely dirty
or it is damaged.
Temperature inside the car is too
high.
The volume control is set too low.
There is no sound.
The operation keys
do not work
The sound of the
CD player skips
The antenna cable is not connected. Insert the antenna cable firmly into the
antenna socket of the device.
No radio reception.
1.The built-in microcomputer is not
operating properly due to noise
2.Front panel is not properly fix into
its place
1. Switch the device off and on again. Or press
the RESET button to resume the program.
2. Reinstall the front panel
The device has not been correctly
connected.
The installation angle is more than
30 degrees
Wait until the road becomes smoother before
playing the CD.
Adjust the installation angle to less than 30
degrees
Turn up the volume properly.
Check the power and earth connection
according to the wiring diagram.
Cool off until the ambient temperature returns
to normal
Clean the CD or try another CD, if this works
correctly, the first CD is properly damaged.
Insert the compact disc with the label facing
upward
Remove the disc in the player then put a new
upward
Replace another fuse according to the wiring
diagram.
The car ignition is switched off.
If the power supply is properly connected to
the car accessory, switch the ignition key to
" ON " or " ACC " .
Solution
The device does
not work correctly
(EJECT, LOAD,
PLAY)
In automatic search
mode the radio does
not stop at a transmitting station.
Tune in to a radio station manually.The transmission signals are too
weak.
The CDs are loaded
only halfway into
the CD tray.
The transport screws have not been
removed.
Remove the transport screws before using.
The surface of the road is uneven.
The surface of CD is extremely dirty
or it is damaged.
Clean the CD or try another CD, if this works
correctly, the first CD is properly damaged.
Page 5

6) MASK DPI /M AS K ALL :
MASK DPI mo de : ma sk s on ly t he AF w hi ch h as d if ferent PI.
MASK ALL mod e: m as ks the AF which has diff er en t PI a nd N O RD S si gn al
with high f ie ld s tr en gt h.
7)BEEP ON /B EE P OFF
BEEP ON m od e: T he b eep is generated wh en a ny k ey i s pr es se d.
BEEP OF F mo de : Th e beep sound is disab le d. .
8)VOL LAS T/ VO L DEFA
VOL LAS T: The ra di o sw it ch es o n at t he a ct ua l vo lu me i t ha d wh en i t wa s la st
swi tc he d of f.
VOL DEFA : Aft er p re ssing SEL but to n, AVOL w il l be d isplayed. The n yo u ca n
pre -s el ec t a co ns ta nt s wi tc h- on v ol um e by u si ng t he V OL kn ob .
9)BL AUTO(WHITE,ORA NG E, YE LL OW, RE D PU RP LE ,B LU E, CYA N, GR EE N)
Thi s Me nu i s fo r se le ct in g th e ba ck li gh t co lo r mo de o f yo ur d es ir ed .
You can select the single color backlig ht m od e or B L AUTO m od e.
When selecting BL AUTO mode, th e 8 ba ck li gh t co lo rs w il l be c ha ng in g
automatically in certain or de r.
10)CLK ON /O FF
CLK ON: Clo ck w il l al wa ys s ho w on t he d is pl ay w he n po we r off.
CLK OFF: Cl oc k wi ll d is ap pe ar o n th e di sp la y wh en p ow er o ff.
9-14. PRESET STATIO N ME MO RY AND T OP /> || , IN T, RPT, RD M BU TTONS
a) During radio mode:
Go to any preset station by pressing one of the 6 preset station buttons (1-6).
If one of these buttons is pressed for more than 2 seconds, the station
currently being listened to will be memorized into the selected preset button.
b) During disc, MMC/SD or USB mode:
1) Press the TO P/ > || b ut to n br ie fl y to i nt er ru pt t he p la yb ac k of t he d is c, M MC /S D
or USB. Press again to resume normal playback of the disc, MMC/SD or USB.
Press the TOP /> || b ut to n an d ho ld f or a pp ro xi ma te ly 1 s ec on d to p la y th e
first track of the disc, MMC/SD or USB.
2) Press the INT bu tt on t o sa mp le t he f ir st 1 0 se co nd s pa rt o f ea ch t ra ck , an d th e
INTRO will be visible on the LCD display.
In the process of INT, press INT bu tt on a ga in t o st op s am pl in g an d to c on ti nu e
playing the current track, and the LCD will display INTRO.
3) Press the RPT bu tt on o nc e to p la y th e cu rr en t tr ac k re pe at ed ly, a nd t he R PT
ONE will be visible on the LCD display.
During MP3/WMA disc, MMC/SD or USB mode, press the RPT but to n tw ic e
continuously to play the current folder repeatedly, an d th e RP T DI R wi ll b e
visible on the LCD display.
In the process of RPT, press RPT bu tt on a ga in t o st op p la yi ng r ep ea te dl y
mode and the LCD will display OFF.
4) Press the RDM button to play all tracks on disc in random order, and the
RANDOM will be visible on the LCD display.
In the process of RDM, press RDM button again to stop playing in random
order and the LCD will display OFF.
Page 9 Page 4
MUTE
DN
UP
CLK
SELECT
-
A.P.
AF
5
6
SCN
TA
PTY
BAND
SRC
1
2
3
4
TOP/
RDM
INT
RPT
4
6
8
14
16
18
20
7
11
15
19
21
1
5
3
13
12
10
9
17
2
1. Po wer On/ Off
2. Mu te Butt on
3. TA But ton
4. SE L/MEN U Butto n
5&6 . VOL UP/ DOW N Butto n
7. AF Bu tton
8. A.P B ut to n
Pre ss the A.P b ut to n to pr eview t he
pre set sta tions .(18s tatio ns in FM )
hol d the AP but to n to a cti vate
fun ction . Th e un it s can s
wit h stron gest
sig nal.( 18sta tions i n FM )
9. Ba nd Butt on
10. S RC Butt on
11. Tun e/ Se ek Up An d Tra ck Skip U p/FF Bu tton
12. Tu ne/Se ek Down An d Tra ck Skip D own/R EW Butt on
13. S CAN BUT TON
Pre ss the SC AN butt on to sca n the rad io freq uency. I f a va li d sig na l ha s de tec ted, th e curre nt
fre quenc y will be h old and b linki ng for 5 se conds , then pr ess SCA N again t o stop sc an and
rem ain the c urren t frequ ency; o therw ise, th e radio w ill go on t o scan th e other r adio fr equen cy
5 sec onds la ter.
14. C LOCK bu tton
15. P TY Butt on
16. Tr ack TOP />| |/Rad io Pres et 1
17. Tr ack INT /Radi o Prese t 2
18. Tr ack RPT /Radi o Prese t 3
19. Tr ack RDM /Radi o Prese t 4
20. R adio Pr eset 5 an d USB/C ARD DIR -
21. R adio Pr eset 6 an d USB/C ARD DIR +
cur rent
Pre ss and
the a uto sto rage
and p reset t he stat ions
REMOTE CONTROL OP ER ATION
Page 6

5) Press the 5 and 6 bu tt on t o mo ve u p an d do wn 10 t ra ck s at a t im e.
When the rema in ed t ot al t ra ck s is l ac k of 1 0, t he b ot h bu tt on s ar e in ac ti ve ly.
Press and hol d th e 5 an d 6 bu tt on t o se le ct n ex t or p re vi ou s fo ld er t o be p la ye d.
15. SRC A ND P TY (P RO GR AM T YP E) B UT TON
Press t he S RC b ut to n to c ha ng e am on g tuner (ra di o) , di sc ( wh en a d is c is
loade d) , US B (w he n an U SB s ti ck i s in serted) ,C AR D (w he n a CA RD i s in se rt ed )
and AUX mo de .
In Radi o mo de , Pr es s MO DE /P TY bu tt on l on ge r to s el ec t on e of t he followin g
mode: P OP M - - NE WS
While s el ec ti ng P TY TY PE , it s se le ct io n is i mp le mented by p re se t bu tt on s as
descr ib ed i n pr es et k ey. ( pre ss o ne o f th e 6 pr es et butt on s sh or tl y an d rep eated ly
to se le ct t he P TY TY PE i n th e pr eset bu tt on )
Whe n turni ng on a PTY p ro gra m, the PT Y pr og ra m is fl ashed o n the LCD .
Afte r selec ting a de sired P TY prog ra m and n o opera tion fo r 2 secon ds, it wi ll sear ch
for t he stat ion of th e PTY pro gr am. D uring 1 l oop, if t he desi red sta tion of t he PTY
pro gram is n ot foun d, PTY NO NE i s dis playe d, then r eturn s to prev ious no rmal ra dio.
16.AU X IN PU T JA CK
Press t he m od e bu tt on t o se le ct a ux iliary in pu t pl ay in g mo de . Then you ca n
conne ct a ny m at ch ed e xt er na l au dio devic e to t hi s so ck et . Us e th e vo lu me
knob to a dj us t vo lu me .
17.US B SO CK ET
In orde r to p la y th e fi le i n th e US B st ic k, insert t he U SB s ti ck i nt o th e US B
socke t. T he s ys te m wi ll change i nt o th e US B mo de a ut om at ic al ly and play
the fir st f il e in t he U SB .
18. B AND BUT TON
1)I n Radio m ode:
Pre ss this b utton b riefl y to sele ct the ra dio bro adcas ting ba nd you wo uld lik e to
lis ten to. The AM/F M band is t oggle d cycli cally t hroug h the tun ing ban ds:
->F M 1-> FM 2 -> F M 3 -> AM 1- >A M2 - >.
2) Du ring MP 3 file in d isc, or U SB/SD m ode:
Pre ss the BA ND butt on, it is a ctiva ted as cy clica l selec ting so ng mode a s follo ws:
-> TR AC K SE RIAL NU MBER SE AR CH - > FI RS T CHA RA CT ER S EAR CH
-> DI RECTO RY SE AR CH
A) In T RA CK S ER IAL N UM BER S EA RC H mo de , th e LCD w il l di sp la y “T RK 00 0”
(If t he numb er of tra cks is le ss than 1 00 a nd m or e th an 9 , it wi ll d is pl ay “ TR K 00” )
and f lash th e bigge st digi t 0 that th e SD card , USB or MP 3/ WM A dis c co nt ain s.
Rot ate the V OL knob t o se lec t the num ber of th e fl as hi ng d ig it fr om 0 ~ 9 .
The n press S EL butt on t o con firm an d flash n ext sma ll er d ig it 0 .
Wit h the sam e means , selec t the num be r of t he f la sh ing d ig it .
Aft er fini shing i nputt ing the n umber o f all fla shing d igit, p ress SE L bu tton to p la y
the t rack of t he corr espon ding nu mber.
B) In F IRST CH AR AC TE R SEA RC H mo de , th e LC D wil l di sp la y “A -- SEA RC H”
(Ro tate th e VOL Kno b to s ele ct your d esire d first c harac ter wit h A~Z o r 0~ 9) a nd
the u nit beg ins to se arch fo r the son gs name d with th e first c ha ra ct er “ A”
(If t here ar e no song s named w ith fir st char acter “ A” , th e LC D wi ll d isp la y “A -- NO NE ”).
The n brief ly pres s the >>| o r |<< but ton to se le ct y ou r de si red s on g an d pr es s th e SEL
but ton to pl aybac k.
Page 8
Page 5
Care W hen Usi ng Di scs:
1. To keep the disc clean:
Do not attach any sticker or adhesive tape on the disc.
Handle the disc by its edge to keep the disc clean and do not touch the surface.
Before playing a disc, wipe it off with a clean, dust-free cleaning cloth.
Wipe the disc outwards from the disc center.
2. When inserting a disc upside down, thus may damage the unit. Insert a disc
with labeled surface up, or it will damage the unit.
3. Do not expose the disc to direct sunlight or nearby heat sources such as heating
vents, caliduct which can cause the disc to warp.
Do not leave disc in a car if it is parked in direct sunlight as that will lead to a
considerable rise in the temperature inside the car.
4. Do not use any secondhand or rented disc, usually, there is glue on the surface of
those discs, it will stop the unit working and damage it.
5. Always store the disc in its case for protection. Scratched up discs will produce poor
sound performance and cause CD player to skip.
6. In raining day or wet area, the moisture may form on the disc or the optical parts,
the playback may not be possible. If moisture forms on the disc, wipe it off with a
soft cloth.
If moisture forms on the optical parts of the unit, allow the unit to sit for about one
hour with power on.
7. Do not use solvents such as benzine or thinners. Commercially available cleaners
or anti-static spray will damage the unit.
About CD-R/CD-R/W discs:
In addition to commercially-recorded audio CD's, this unit can play CD-R and
CD-R/W discs. In some cases, particularly when recorded on older CD burners,
some CD-R and CD-R/W discs may not play. Also , wh en ev er y ou a re r ec or di ng
a CD for playback in this receiver, it is recommended that you record at 24x or
slower speed for CD-R and 4x or slower for CD-R/W to achieve higher signal
quality and better playback performance.
Page 7

C) In DIREC TO RY SE AR CH m od e, t he L CD w il l di sp la y th e ro ot f older
(if the re i s no r oo t fo ld er, i t wil l fi nd a r oo t fo ld er n am ed RO OT ).
Rotat e th e VO L kno b to s el ec t yo ur d esire d fo ld er a nd p re ss S EL bu tt on t o play
the fir st t ra ck i n th e se lecte d fo ld er.
19. APS B UTTON
In Radi o mo de
A) Pres s an d ho ld f or m or e th an 1 se co nd , th e ra di o se ar che s fr om t he c ur re nt
frequ en cy a nd c he ck s th e signa l st re ng th l ev el u nti l 6 st at io ns a re f ou nd .
And the n th e 6 st at io ns f reque nc y ar e pr es et t o th e corre sp on di ng p re se t memor y
numbe re d ba nk .T he a ut o-sto ra ge o pe ra ti on i s imp le me nt ed i n th e ea ch s ele ct ed b an d.
When th e au to -s to ra ge o perat io n is f in is he d, t he ra di o ex ec ut e th e Pr es et Sc an .
B) Pres s th e APS b ut to n to s ca n all p re se t st at io ns i n the mem or y of t he c ur re nt
band an d st ay o n ea ch m em or y stati on s fo r ab ou t 5 se co nds. To sto p pr es et s can,
press t hi s bu tt on a ga in .
20. SCAN BUTT ON
During ra di o mo de ,p re ss t he S CA N bu tt on t o au to ma ti ca ll y tu ne f or t he r ad io
station frequency of strong signal from the current frequency.
After search for a station it will sta y on the st ation f or abou t 5 secon ds then c ontin ue
to tu ne for th e next st rong si gnal.
To stop s ca n, p res s this bu tton ag ain.
21. RESET B UT TO N
Before op er at in g th e un it f or t he f ir st t im e, o r af te r re pl ac in g the car battery o r
changin g th e co nn ec ti on s yo u mu st r es et t he u ni t.
Press thi s bu tt on w it h a cu sp id al o bj ec t. T his operation w il l er as e th e cl oc k
setting a nd s om e st or ed c on te nt s.
22. MMC /S D CA RD S LO T
Whe n yo u ne ed t o pl ay t he f il e in the MM C/ SD c ar d, i ns er t th e MMC/S D ca rd i nt o th e
MMC /S D ca rd s lo t. The sy st em w il l ch an ge i nt o the MMC /S D mo de a ut om at ic ally,
and the n pl ay t he f ir st f il e in the MM C/ SD .
Note:
Whe n MM C/ SD c ar d an d US B st ick are b ot h in se rt ed i nt o th eir slo t or s oc ke t, t he
sys te m wi ll c ha ng e in to t he play ba ck m od e of t he l at te r one.
Page 7 P ag e 6
METAL
SUPP ORT STR AP
To raise the anti-skip capability of the unit,
please ensure the metal support strap is
connected firmly to the car chassis.
To properly fix the metal mounting
sleeve, bend the tabs of the sleeve
against the DASH BOARD with a
screwdriver.
DASHBOARD
METAL MOUNTING SLEEVE
PLAS TIC TRI M RING
FRON T PANEL
To remove the CD player out of the mounting sleeve,
insert the two supplied keys into the left and right side
slots of the chassis at the same time.
UNIT C HASSI S
INSTALLATION METHOD
This is an anti-theft installation method.
The main unit wears a METAL MOUNTING SLEEVE.
Please connect the wiring, eg, the Power supply, the Speakers and the Antenna
according to the requirements of this Instruction Manual, then install the metal mounting
sleeve into the car as per the diagram illustrated below.
To attach the removable faceplate, insert the
right side of the faceplate into the right of the
CD player chassis first. Then push the left side
of the faceplate into the chassis until you hear
it “click”.
Remo ve the tw o screw s that pr otect
the CD p layer d uring t ransp ortat ion
befo re oper ating t he play er.
Befo re inst allin g and op erati ng
the CD p layer, r emov e the met al
moun ting sl eeve il lust rated b y
the ar rows.
NOTE
 Loading...