

Page 1
Bose^ Home Theater Speakers
Model V-100 video speaker
V-300 “ home theater speaker set
Owner’s Guide
Brugervejiedning
Bedienungsanleitung
Guía del usuario
Notice d’utilisation
Manuale di istruzioni
Gebruiksaanwijzing
Bruksanvisningen
Page 2

Contents
Where to find...
Setting Up
Before you begin...............................................................3
Unpack the carton.............................................................4
Center the video speaker..................................................5
Position your surround speakers
Connect the speakers.......................................................7
For the Model V-100 speaker, choose cord......................7
For V-300™ speakers, use the supplied cord
Be sure to use the cord properly.......................................7
Make the connections.......................................................8
Check the connections......................................................9
Completing Your Surround Sound Setup
Use your receiver to vary the sound
Test each speaker
Expand your home theater system
...........................................................
......................................
...............................
................................
..................
6
7
10
10
11
Maintaining Your Home Theater Speakers
Cleaning speakers
Troubleshooting
Customer service.............................................................12
Warranty period................................................................13
Product Information
Technical information.......................................................13
Declaration of conformity
Appendix...............................................................................ii - vi
Bose'’ Corporation
...........................................................
...............................................................
.................................................
..........................................
inside back cover
For your records
A serial number and a date of manufacture (DOM) are
located on the back of your video speaker. A DOM is also
located on the back of each surround speaker.
Video speaker serial number:
Video speaker DOM:
Surround speaker DOM:
_________
12
12
13
Dealer name:
Dealer phone:
Purchase date:
We suggest you keep your sales slip and warranty card
together with this owner’s guide.
__________
___________________________________
Page 3

Before you begin
you for choosing Bose'’ home theater speakers. Both
^Pyiodel V-100 video speaker and the V-300"^ home theater
speaker set are engineered specifically for use with video
sound tracks. They are designed to make the most of audio
for video (AA/) surround sound receivers or amplifiers with
five amplified speaker outputs.
The StarOriver”"' full-range driver in each speaker makes
these Bose home theater products well-suited for movie
dialogue or surround sound effects.
in either package you purchased, there is a single video
speaker. Its magnetic shielding allows you to put this speaker
close to your video screen without causing interference.
There it will deliver clear, crisp soundtrack reproduction from
the center channel. Other speakers at the front of your room
provide the left and right video sound.
In additon to one video speaker, the V-300 set contains two
unshielded surround speakers. They are designed for use at
the rear of your room. Advanced design brackets included in
this package make the surround speakers simple to mount
on a wall or ceiling.
Please read and follow the Instructions in this guide. They will
help you set up and use your new home theater speakers for
the fullest listening, and viewing, enjoyment.
Setting Up
Page 4
Setting Up
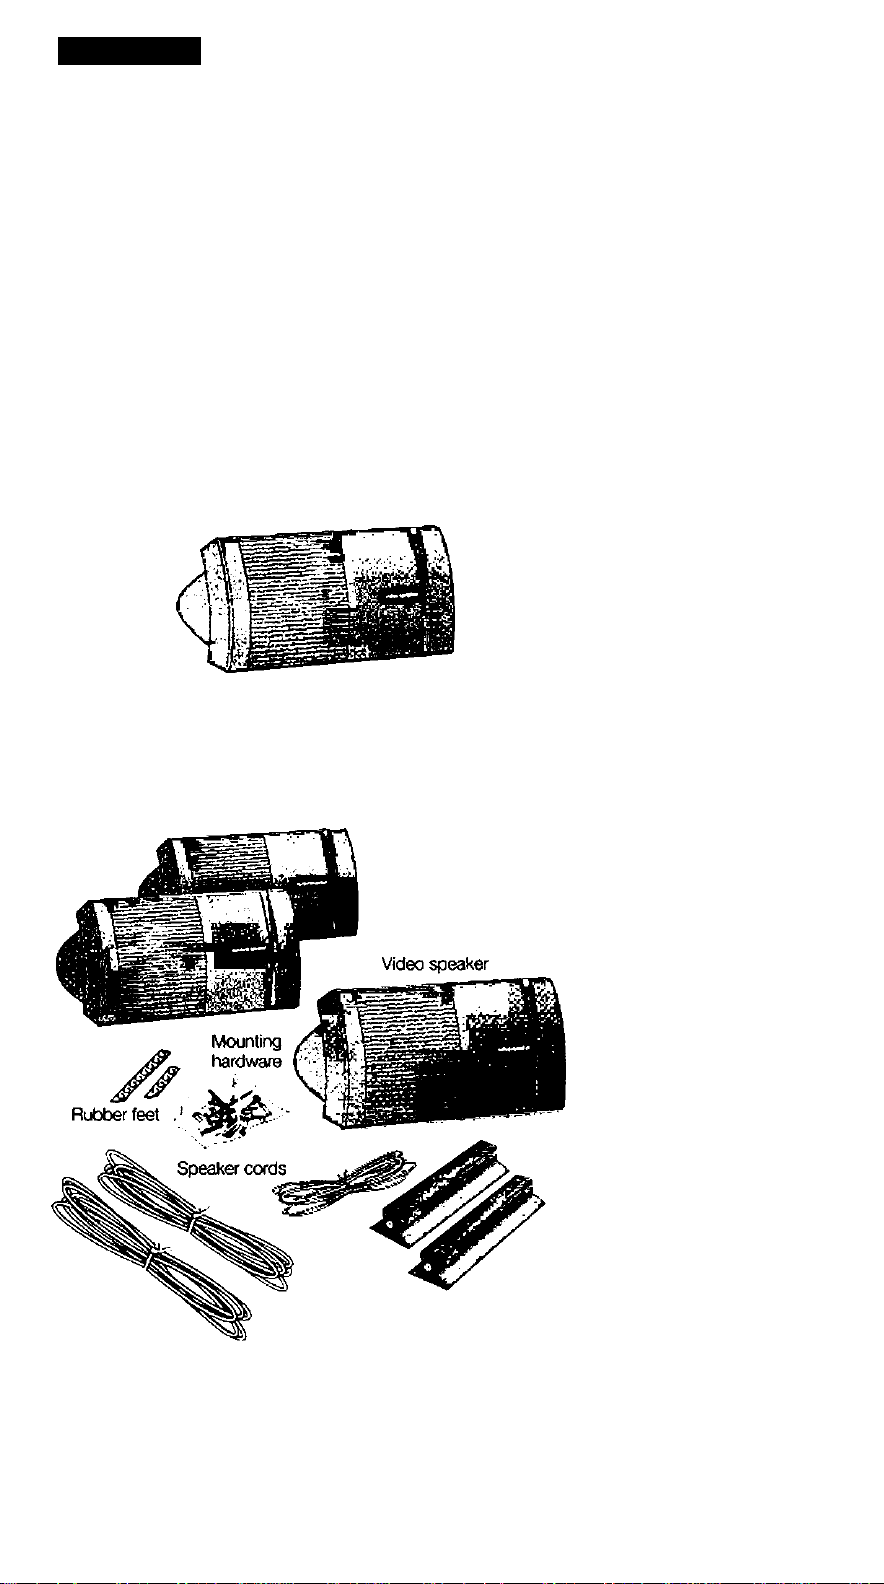
Unpack the carton
Carefully unpack the carton and save all packing materials
for possible future use. Inspect the contents (Figure 1a
or 1b).
If any speaker appears damaged, do not use it. Instead,
repack all parts in the original carton and notify Bose* *' or your
authorized Bose dealer immediately.
Note: Now is a good time to record the numbers found on
the back of each speaker. Write them on your warranty card
and on page 2 of this owner’s guide.
Model V-100 speaker
carton
Video speaker
Rubber feet
CAUTION:
To a void danger of
suffocation, keep
plastic bags that wraj^
these speakers out of
the reach of children.
Figure ia
The Model V-100 speaker
carton contains:
• Video speaker
• 4 self-adhesive rubber
feet
V-300 speaker carton
Surround speakers
Figure 1b
The V-300~ speaker
carton contains:
• Video speaker
• 2 surround
speakers
• 12 self-adhesive
rubber feet
• 2 mounting brackets
(assembled)
• Mounting
hardware kit
• 3 speaker cords:
1 20-foot cord for
video speaker
2 50-foot cords for
surround speakers
Mounting
brackets
Page 5
Setting Up
i
\l
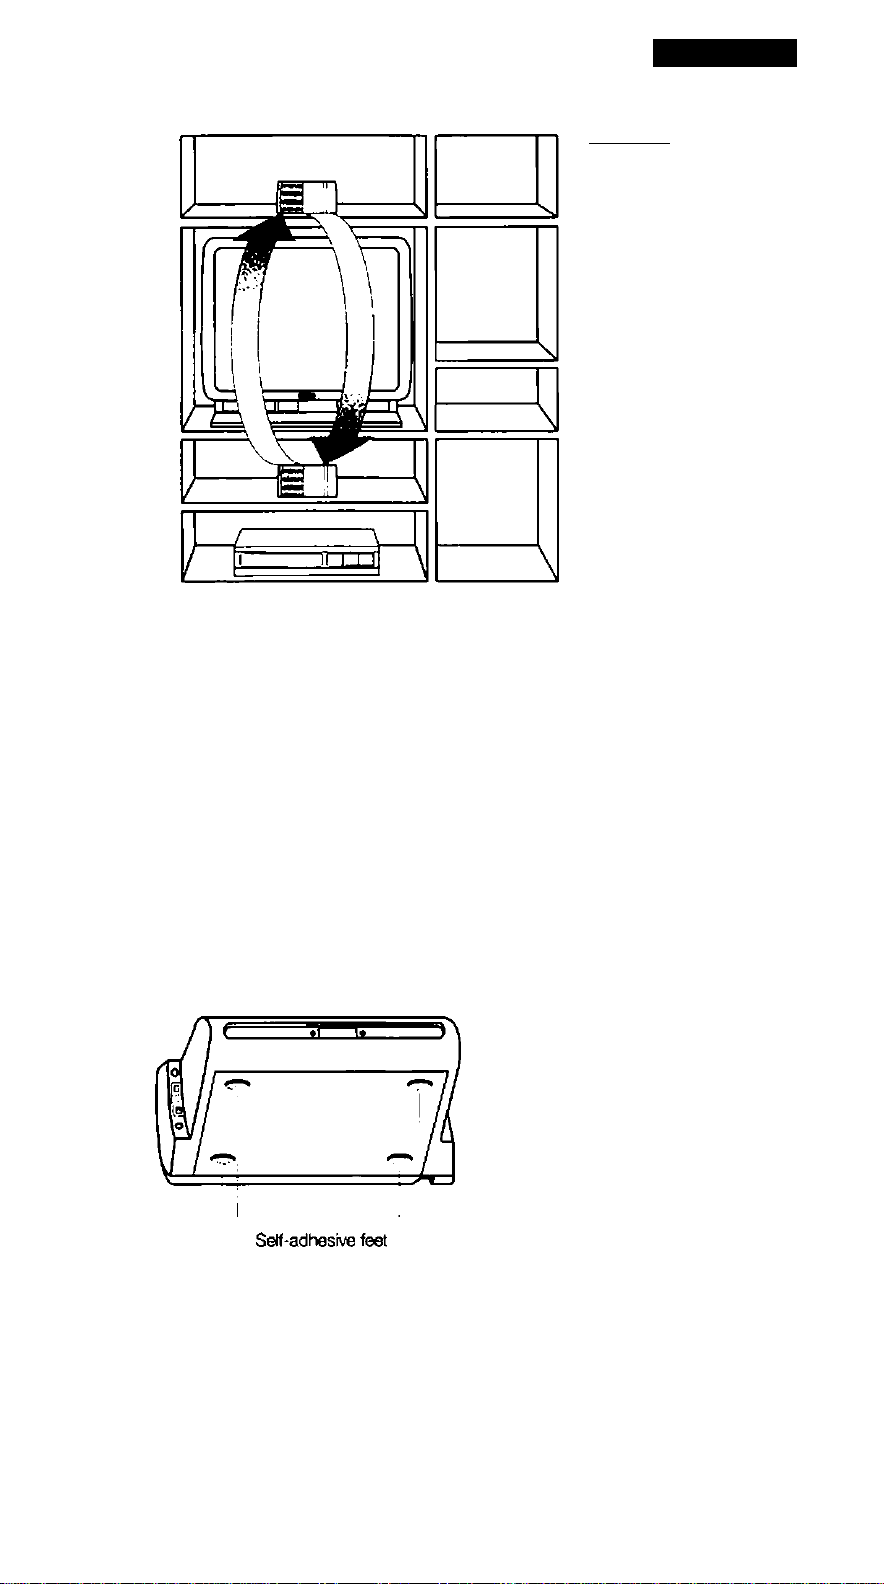
Center the video speaker
The video speaker provides center channel surround sound
performance while taking up very little space. In its horizontal
position, it fits easily on a shelf or table. You can also set the
speaker directly above or below your television (Figure 2) for
li ic dialogue. Magnetic shielding prevents video interfer-
For full enjoyment, follow these placement guidelines:
• Place the speaker very close to your television set.
• Be sure to set it on a level surface.
• Apply the supplied rubber feet to the bottom surface of
the speaker (Figure 3).
Figure 2
Alternate choices for
placing the center channel
video speaker
CAUTION:
Check for the Video
Speaker label on the
front of your speaker.
That indicates the
speaker is magnetically
shielded, and can be
placed close to your
video screen.
________
Figure 3
Self-adhesive feet on the
bottom of the video
speaker
Page 6

Setting Up
Figure 4
Alternate choices for
placing the surround
speakers
Position your surround speakers
Surround speakers In the V-300'” speaker set provide
surround sound effects from the rear of your vie\wing area
(Figure 4).
Brackets that come with these speakers allow you to mount
them on the wall or ceiling. If you use the supplied brackets,
refer to the bracket Instructions in the Appendix. Do not
connect the speakers before reading those Instructions.
If you prefer, set the speakers on a table or shelf in a horizon
tal or vertical position.
For accurate surround sound:
• Place these speakers behind the general viewing area,
along the rear wall or to the rear of side walls.
• Make sure they are at least 2 feet (.6 m) from your video
screen.
• Place both speakers at the same height.
• Place the speakers as far apart as your room allows.
• To mount the speakers on brackets, be sure to leave
room to tighten the bracket screw.
• To stand the speakers horizontally or vertically, apply the
rubber feet to their bottom surface (Figure 5).
CAUTION:
Do not place the
surround speakers
within two feet of your
video screen. They
are not magnetically
shielded and will cause
serious video interii
ence if placed too
to the screen.
CAUTION:
The bracket screw must
be inserted from the
bottom on a vertically
mounted bracket.
Self-adhesive feet
Figure 5
Self-adhesive feet on the
bottom of a surround
speaker in horizontal or
vertical position
Page 7

Setting Up
Connect the speakers
jr receiver’s center channel is not amplified, you must
rect an amplifier to the receiver. Use an RCA cable to
connect the center channel RCA-type output on the receiver
to the RCA-type input on the amplifier. The speaker will then
connect directly to the amplifier instead of to the receiver.
Note: Before running speaker cord through a wall or under
a floor, check your local building code requirements and
safety regulations. You may want to contact an electrical
installer for this information.
For the Model V-100 speaker, choose cord
It is important to use the proper gauge (thickness) of speaker
cord. Standard zip cord (2-conductor, 18-gauge wire) works
for most applications. You can find this wire at electrical and
hardware stores.
At the ends of each cord, strip approximately 1/2 inch
(12 mm) of insulation from both wires. Twist the bare end of
each wire, so loose strands will not touch across terminals.
For V-30O'' speakers, use the supplied
cord
Use the supplied 20-foot cord to connect the video speaker
that is close to your television. Use the two 50-foot cords to
connect the surround speakers placed at the rear of your
CAUTION:
Before making any
connections, turn off
your receiver or amplifier
and unplug it from the
AC power (mains) outlet.
Not doing so may result
in damage to your
system.
CAUTION:
Never use broken or
frayed wiring, which can
result in damage to your
components.
_ To place the surround speakers more than 50 feet
from the receiver or amplifier, splice in 18-gauge (0.75 mrrf)
or thicker wire. Make sure to attach the wires positive to
positive and negative to negative.
Be sure to use the cord properly
Speaker cord consists of two insulated wires. The insulation
around one wire is marked (striped, collared, or ribbed). This
marked wire is always positive (+). The plain wire is always
negative (-). These wires correspond to the red (+) and black
(-) terminals on the speaker and the receiver or amplifier.
Note: It is sometimes difficult to distinguish wire markings.
Inspect both wires carefully.
Page 8

Setting Up
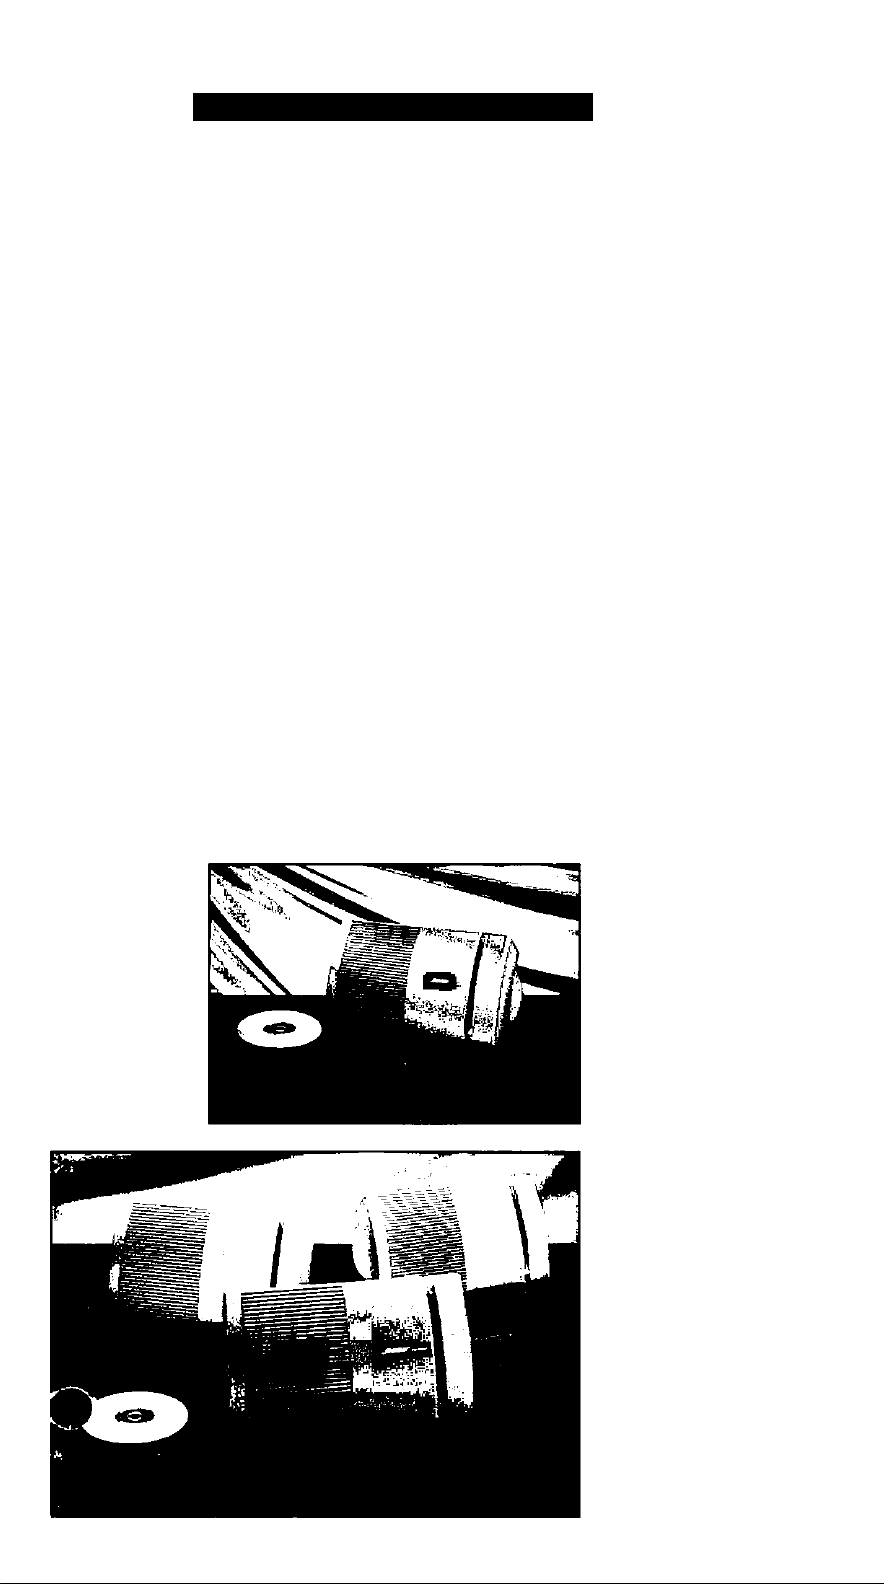
Make the connections
At the connection end of the speaker, slide one terminal lever
aside and insert the appropriate wire (Figure 6).
1. Connect one end of the speaker cord to your speaker.
a. Attach the marked wire to the red (+) terminal.
b. Attach the plain wire to the black (-) terminal.
2. Connect the other end of the same cord to your receiver
or amplifier (Figure 7).
a. Attach the marked wire to the red (+) terminal.
b. Attach the plain wire to the black (-) terminal.
• The video speaker connects to the CENTER
SPEAKER outputs. Some surround sound receivers
have two sets of center channel speaker outputs.
Use either set.
• The left surround speaker connects to the LEFT
SURROUND SPEAKER outputs.
• The right surround speaker connects to the RIGHT
SURROUND SPEAKER outputs.
I
Red terminal
lever
Figure 6
How to make terminal
connections
Page 9

Check the connections
sure each connection is made positive to positive (+ to
negative to negative (- to -). Check to be sure that no
loose strands of wire touch across terminals. Bridged wires
»
can short circuit and damage the electrical components.
Tighten any loose connections before you plug in the receiver
or amplifier and turn it on.
Setting Up
Surround speaker
Video speaker
Surround speaker
Figuie 7
Completed connections
Page 10

Completing Your Surround Sound Setup
Use your receiver to vary the sound
To use the video speaker in surround sound mode, be sure
to set your receiver to NORMAL (Figure 8). That is important,
no matter what brand or model of receiver you own.
Different surround sound receivers select the various speak
ers and adjust their volume In different ways. Some direct
sound to all channels during CD or tape operation, as well as
in the video mode. Others allow you to use the center and
surround (rear) channels only for video sound.
The owner’s guide that came with your specific receiver will
explain how to adjust sound coming from the center and
surround speakers.
Figure 8
The receiver or amplifier set
for NORMAL surround
sound mode
Test each speaker
Before testing for proper operation, plug your receiver or
amplifier into the AC power (mains) outlet and turn it on.
1. Set your receiver to NORMAL surround sound mode.
2. Refer to your receiver or amplifier owner’s guide and
follow the test procedure as described for that product.
If there is a problem with the speaker performance, check the
connections once more. Review “Connect the speakers” on
page 7.
10
Page 11

Completing Your Surround Sound Setup
Expand your home theater system
ffective home theater sound, you will place other
<ers to the left and right of your video speaker (Figure 9).
They connect to the LEFT and RIGHT FRONT SPEAKER
»
channels of your receiver or amplifier. Together with your
video speaker, these front speakers deliver the main audio
for video performance.
The surround speakers, placed near the rear of your viewing
room, deliver special sound effects that bring you the full
impact of movies. If you need to add them, they will connect
to the LEFT and RIGHT SURROUND SPEAKER channels on
your receiver or amplifier.
Bose* offers a selection of speakers well-suited to complet
ing your surround sound setup. These include the Bose
Acoustimass*-5, Acoustimass-3. and Model 100 speakers,
as well as Bose 201*, 301*, 2.2*. or 4.2* Direct/Refiecting'"
speakers. See your Bose dealer or contact Bose directly for
more information.
Left front
speaker
Left
surround
Speyer
\Ajeo speaker
Right front
speaker
Figure 9
Where to place speakers in
a complete surround sound
setup
11
Page 12

Maintaining Your Home Theater Speakers
Cleaning speakers
Clean the outside of your Model V-100 or V-OOO'“ speakers
by wiping the speaker with a damp cloth. If necessary, use a
mild detergent, like dish soap, being careful not to allow any
liquid to spill through the grille into the speaker. No other
maintenance is required.
T^ubleshooting
Problem What to do
No sound
Video speaker
does not work
Surround
speakers
do not work
Sound is
distorted
• Make sure the amplifier or receiver is
plugged in and turned on.
• Check the volume control.
• Check the mute button. It should not
be selected.
• Make sure headphones are not
connected to the receiver or amplifier.
• Make sure your receiver or amplifier has
an amplified center channel.
• Be sure your receiver or amplifier is
set properly (refer to page 10).
• Check the audio source material to be
sure it is encoded for surround sound.
• Check the speaker connections. Refer
to “Make the connections” on page 8.
• Be sure your receiver or amplifier is
set properly (refer to page 10).
• Check the audio source material to be
sure it is encoded for surround sound.
• Check the speaker connections. Refer
to “Make the connections" on page 8.
• Make sure the speaker cord is not
damaged.
• Reduce the output level from your
TV or other components connected to
the receiver or amplifier.
Customer service
If the troubleshooting guidelines above do not solve your
problem, contact your authorized Bose" dealer to arrange for
service. To obtain information or service directly from Bose,
refer to the listing at the end of this guide. Bose Corporation
will make every effort to correct any problem within the terms
of your warranty.
Warranty period
Bose* Mode! V-100 and V-300™ speakers are covered by a
limited 5-year transferable warranty. Details of the coverage
are provided on the warranty card that came with your
12
Page 13

speakers. Please fill out the information section on that card,
and mail it to Bose\
Technical information
Features
Syncom* computer quality control
Magnetically shielded video speaker
Driver complement per speaker
One (1) StarDriver''"' 4.5" (11.4 cm) full-range driver
Compa tibili ty
Compatible with amplifiers or receivers rated 10-80 watts
per channel; rated 4-8 ohm
Enclosure
Gray, molded polymer with a tuned port
Size/Weight
Each speaker: 5 x 11 "W x 6 //D
(14.6 X 28.0 X 16.5 cm)
Video speaker, unpacked: 3.9 lb (1.77 kg)
Surround speaker, unpacked: 3.2 lb (1.47 kg)
el V-100 speaker, packed in carton: 4.7 lb (2.13 kg)
0 speaker set, packed in carton: 12.5 lb (5.7 kg)
■
Produci Information
Declaration
of Conformity
We, the offerer:
Bose” Corporation, The Mountain
Framingham. MA 01701-9168 USA
acknowledge our sole responsibility, that the product:
Kind of equipment: Loudspeakers
Type designation: Model V-100, V-300
in accordance with EMC Directive 89/336/EEC and Article
10(1) of the Directive, is in compliance with the following
notm(s) or document(s):
Technical regulations: EN50081-1, EN50082-1
Accredited by Bose Corporation
August 1995
e B.V., NijveftiekJstraat 8
1135 GE Edam, Tha Netherlands
Paul CHean, General Manager,
Bose 6.V., Manutacturer's
authorized EU representative
13
Page 14

Bose* Corporation
USA
Bose Corporation, The Mountain
mingham, MA 01701-9168
00-367-4008
'eekdays 9 a.m. to 8 p.m.
vVei
Saturdays 9 a.m. to 3 p.m.
ET (eastern time)
Canada
Bose Ltd.
8-35 East Beaver Creek Road
Richmond Hill, Ontario L4B 1B3
1-800-444-BOSE (444-2673)
Weekdays 9 a.m. to 5 p.m.
ET (eastern time)
European Office
Bose B.V., Nijverheidstraat 8
1135 GE Edam, Nederland
TEL 0299-371055
FAX 0299-368163
Australia
Bose Australia. Inc.,1 Sorrell Street
Parramatta. N.S.W. 2150
TEL 02 204-6111
FAX 02 204-6122
Belgique/België
^^se N.V.. Limesweg 2, B-3700 Tongeren
i^.L 012-390800
FAX 012-390840
Italia
Bose S.p.A., Via Luigi Capucci, 12
00147 Roma
TEL 06-5127641
FAX 06-5115438
Japan
Bose K.K., Shibuya YT Building
28-3 Maruyama-cho
Shibuya-ku, Tokyo 150
TEL 3-5489-1052
FAX 3-5489-0591
Nederland
Bose B.V., Nijverheidstraat 8
1135 GE Edam
TEL 0299-366661
FAX 0299-368166
Norge
Bose A/S, Solheimsgate 11
N-2001, Lillestrom
TEL 63-817380
FAX 63-810819
Österreich
Bose Ges.m.b.H.
Vienna Buisness Park
Wienerbergstrasse 7 (10.OG)
A-1100 Vienna
TEL 01-60404340
FAX 01-604043423
Danmark
Bose A/S, Industrivej 7, 2605 Brondby
TEL 43437777
FAX 43437818
Deutschland
Bose GmbH, Max-Planck-Stra6e 36d
D-61381 Friedrichsdorl
TEL 06172-71040
FAX 06172-710419
France
Bose S.A., 6, rue Saint Vincent
78100 Saint Germain en Laye
TEL 01 30616363
FAX 01 30614105
India
Bose Corporation India Private Limited
W-16, Greater Kailash-ll
New Delhi 110 048
TEL (011)648 4462
FAX (011)648 4463
iand
Bose Corporation
Carrickmacross, Co Monaghan
TEL 042-61988
FAX 042-61998
Schweiz
Bose A.G.. Rünenbergerstrasse 13
4460-Gelterkinden
TEL 061-9815544
FAX 061-9815502
Sverige
Bose A/S, Bfandsädsgatan 2D
S-43146 Mölndal
TEL 031-878850
FAX 031-274891
United Kingdom
Bose Limited. Unit G2
Trinity Trading Estate
Sittingbourne, Kent MEIO 2PD
TEL 01795-475341
FAX 01795-427227
Other Locations
Bose Service. 1 New York Avenue
Framingham. MA 01701-9168 USA
TEL (508) 229-8484
FAX (508) 229-3891
Page 15

€>1996 Bose Corporation
The Mountain, Framingham, MA
01701-9168 USA JN95447
PN184207-Rev. 01
AM 184207-Rev. 01
 Loading...