

Page 1
SoundDock
®
Digital Music System
with original Firewire charging
2004-2008
This Service Manual applies to original SoundDock systems built before 8/8/08, DOM 8221. For SoundDock systems built after 8/8/08, use the new SoundDock manual with “USB iPod Charging” part number 277378-SM_USB.
To determine the SoundDock version, use the date of manufacture (DOM) encoded within the serial number located
on the product label
Serial Number example 0402509
Characters 8 to 11 identifiy the DOM - 7342
7342 = the 342nd day of 2007
Both products share the same name and most of the same mechanical assemblies. However, the electronics are
not interchangeable.
©2008 Bose Corporation
73420105AE
Service Manual
Reference Number 277378-SM Rev. 12
Electronic Copy Only
Page 2

CONTENTS
Safety Information .............................................................................................................................3
Specifications....................................................................................................................................4
Product Description ......................................................................................................................... 5
Part List Notes ..................................................................................................................................6
Electrostatic Discharge Sensitive (ESDS) Device Handling ....................................................... 6
Warranty .............................................................................................................................................6
USB Update Procedure ................................................................................................................... 7
New iPod Charging Circuit ..............................................................................................................8
Packaging Part List ........................................................................................................................... 9
Figure 1. Packaging Part List ............................................................................................................ 9
MAIN PART LIST, SoundDock
Figure 2. Speaker Assembly ............................................................................................................ 10
MAIN PART LIST, Welded Enclosure Assembly ........................................................................... 11
Figure 3. Welded Enclosure Assembly ........................................................................................... 11
MAIN PART LIST, Docking Cradle Assembly ............................................................................... 12
Figure 4. Docking Cradle Assembly ................................................................................................12
Electrical Part Lists .................................................................................................................. 13-19
Disassembly Procedures ......................................................................................................... 20-23
Test Procedures .............................................................................................................................24
Revision History .............................................................................................................................25
®
Speaker Assembly...................................................................... 10
2
Page 3

SAFETY INFORMATION
1. Parts that have special safety characteristics are identified by the symbol on schematics
or by special notes on the parts list. Use only replacement parts that have critical characteristics
recommended by the manufacturer.
2. Make leakage current or resistance measurements to determine that exposed parts are
acceptably insulated from the supply circuit before returning the unit to the customer.
Use the following checks to perform these measurements:
A. Leakage Current Hot Check-With the unit completely reassembled, plug the AC line cord
directly into a 120V AC outlet. (Do not use an isolation transformer during this test.) Use a
leakage current tester or a metering system that complies with American National Standards
Institute (ANSI) C101.1 “Leakage Current for Appliances” and Underwriters Laboratories (UL)
UL6500 / UL60065 / IEC 60065 paragraph 9.1.1. With the unit powered on, measure from a
known earth ground (metal water pipe, conduit, etc.) to all exposed metal parts of the unit
(antennas, handle bracket, metal cabinet, screw heads, metallic overlays, control shafts, etc.),
especially any exposed metal parts that offer an electrical return path to the chassis. Any current measured must not exceed 0.5 milliamp. Reverse the unit power cord plug in the outlet and
repeat test. ANY MEASUREMENTS NOT WITHIN THE LIMITS SPECIFIED HEREIN INDICATE
A POTENTIAL SHOCK HAZARD THAT MUST BE ELIMINATED BEFORE RETURNING THE
UNIT TO THE CUSTOMER.
B. Insulation Resistance Test Cold Check-(1) Unplug the power supply and connect a jumper
wire between the two prongs of the plug. (2) Turn on the power switch of the unit. (3) Measure
the resistance with an ohmmeter between the jumpered AC plug and each exposed metallic
cabinet part on the unit. When testing 3 wire products, the resistance measured to the product
enclosure should be between 2 and infinite MOhms. Also, the resistance measured to exposed
input/output connectors should be between 4 and infinite MOhms. When testing 2 wire products, the resistance measured to exposed input/output connectors should be between 4 and
infinite MOhms. If it is not within the limits specified, there is the possibility of a shock hazard,
and the unit must be repaired and rechecked before it is returned to the customer.
CAUTION: The Bose® SoundDock® Digital Music System contains
no user-serviceable parts. To prevent warranty infractions,
refer servicing to warranty service stations or factory service.
PROPRIETARY INFORMATION
THIS DOCUMENT CONTAINS PROPRIETARY INFORMATION OF
BOSE CORPORATION WHICH IS BEING FURNISHED ONLY FOR
THE PURPOSE OF SERVICING THE IDENTIFIED BOSE PRODUCT
BY AN AUTHORIZED BOSE SERVICE CENTER OR OWNER OF
THE BOSE PRODUCT, AND SHALL NOT BE REPRODUCED OR
USED FOR ANY OTHER PURPOSE.
3
Page 4

SPECIFICATIONS
Electrical
Power Supply Input:
Voltage: 100VAC to 240VAC (universal), 50-60Hz
Current Consumption: 1 A (rms) max for 115VAC
.5 A (rms) max for 230VAC
Power Supply Output:
Voltage: 20V
Current: 2A (max)
®
SoundDock
Voltage: ±18VDC-10%, +15%
Current Consumption: 1A (max)
Power Consumption: 36W (max, continuous)
Drivers: 2 - 2.25” Full Range Twiddler™ speakers
Nominal Impedance: 3.6 Ohms
Port Tuning: 80 HZ
Input:
+/- 1V
Acoustic
Physical Description
Mechanical Specifications: 6.65”H x 11.91”W x 6.48”D (16.89 cm x 30.26 cm x 16.47 cm)
Weight: 4.56 lb (2.1 kg)
Enclosure: Ultrasonically welded PC/ABS plastic
4
Page 5

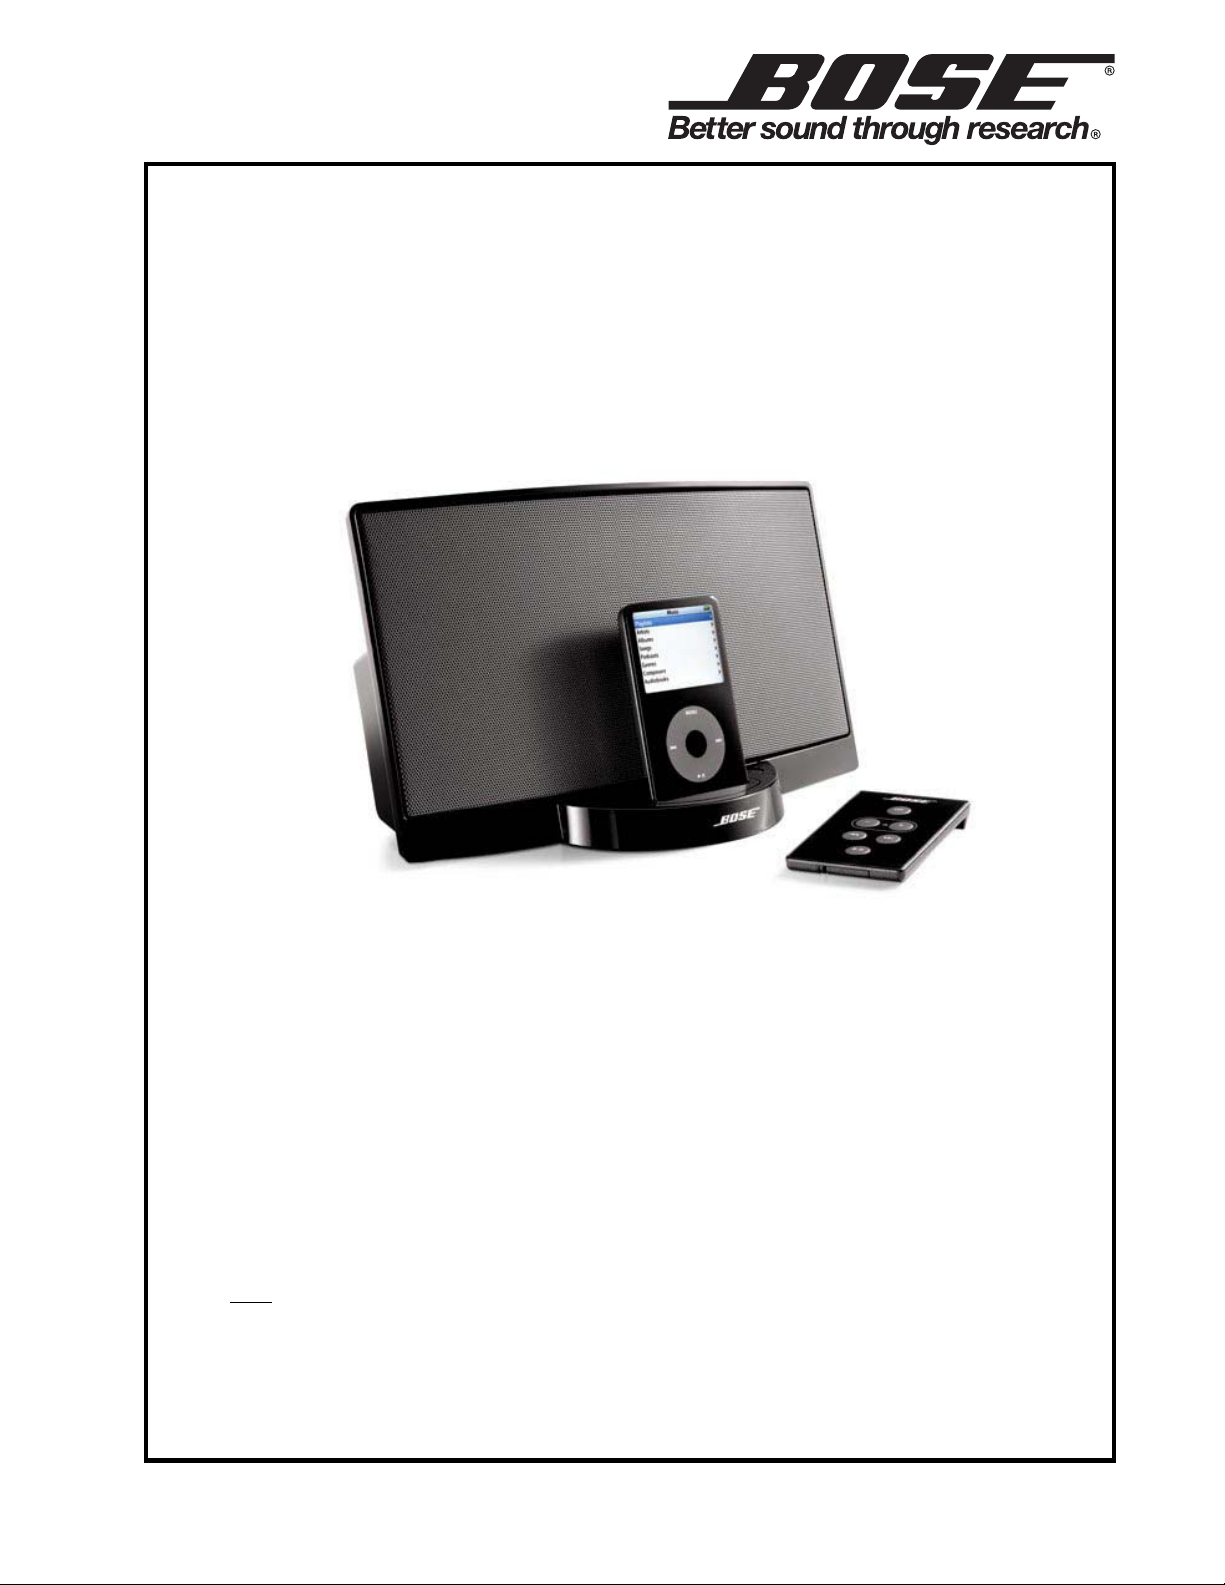
PRODUCT DESCRIPTION
SoundDock®is a powered acoustic package for current and future versions of Apple’s iPod portable
MP3 player. It takes the design form of a “picture frame” - a rectangular speaker package that allows
the iPod to dock into the middle. SoundDock with docked iPod is an elegant, highly functional, and
great-sounding system for use in the living room, kitchen, or bedroom. Bose
factured the product with input from Apple. Apple and Bose will advertise and sell the product.
There are 4 adapters shipped with the product.
®
developed and manu-
1
2
3
1
1
Item
Number
1 Kit, Inserts, iPod, 2pcs, WHT
2 Insert, iPod, Nano, 1pcs, WHT
3 *Universal Insert, iPod, Adapter, 1pcs, WHT
1
*The universal insert (Item number 3 above) allows an Apple Dock adapter to work with the
SoundDock. Some of the new iPods players will require the following set up:
Description Part Number QTY Note
Kit, Inserts, iPod, 2pcs, BLK
Insert, iPod, Nano, 1pcs, BLK
*Universal Insert, iPod, Adapter, 1pcs, BLK
.
.
.
285755-002
285755-012
292498-001
292498-002
042246
042399
1
1
1
1
2
1
Apple Dock adapter (included with with an iPod)
2
Universal insert for use with Apple Dock adapters
5
Page 6

ELECTROSTATIC DISCHARGE SENSITIVE (ESDS)
DEVICE HANDLING
This unit contains ESDS devices. We recommend the following precautions when repairing,
replacing or transporting ESDS devices:
• Perform work at an electrically grounded work station.
• Wear wrist straps that connect to the station or heel straps that connect to conductive
floor mats.
• Avoid touching the leads or contacts of ESDS devices or PC boards even if properly
grounded. Handle boards by the edges only.
• Transport or store ESDS devices in ESD protective bags, bins, or totes. Do not insert
unprotected devices into materials such as plastic, polystyrene foam, clear plastic bags,
bubble wrap or plastic trays.
WARRANTY
The Bose
®
SoundDock® Digital Music System is covered by a limited 1-year transferable warranty.
PART LIST NOTES
1. This part is not normally available from Customer Service. Approval from the Field Service
Manager is required before ordering.
2. The individual parts located on the PCBs are listed in the Electrical Part List.
3. This part is critical for safety purposes. Failure to use a substitute replacement with the
same safety characteristics as the recommended replacement part might create shock, fire
and/or other hazards.
4. This part is referenced for informational purposes only. It is not stocked as a repair part. Refer
to the next higher assembly for a replacement part.
6
Page 7
USB UPDATE PROCEDURE
The SoundDock Digital Music System changed
the way it charges the iPod in October of 2008.
The system now charges via the USB charge
pins on the iPod.
This change was based on information received
from Apple describing a change to the iPod
charge circuit. iPods manufactured before 8/08
have the ability to charge via Firewire and USB,
some new iPods introduced in November of
2008 will not support the Firewire charge circuit.
It is possible to upgrade SoundDock systems
built before 8/08 from Firewire to USB charging
by replacing the Dock and DSP boards with the
upgraded versions. Use this procedure to upgrade older systems to USB charging.
Equipment Required
a. DSP board / Cradle Assy -
Black - 279103-008
White - 279103-010
b. Phillips-head screw driver
c. Bose Logo
Black - 277381-002
White - 277381-001
2. Grille and Amplifier board Removal
2.1 Remove the grille by pushing upward as
shown above.
2.2 Remove the four Phillips-head screws
securing the amp board to the acoustic
enclosure.
3. Install the DSP/Cradle Upgrade Assembly
1. Original Dock Removal
1.1 Remove the four Phillips-head screws
securing the bottom cradle cover.
3.2 Connect the flex cable to J300 on the new
upgrade assembly and install the cradle along
with the amplifier board.
3.3 Install Bose logo on the front of the cradle.
3.4 Fully test with iPod to confirm correct
operation.
1.2 Remove cable connected to J300.
7
Page 8
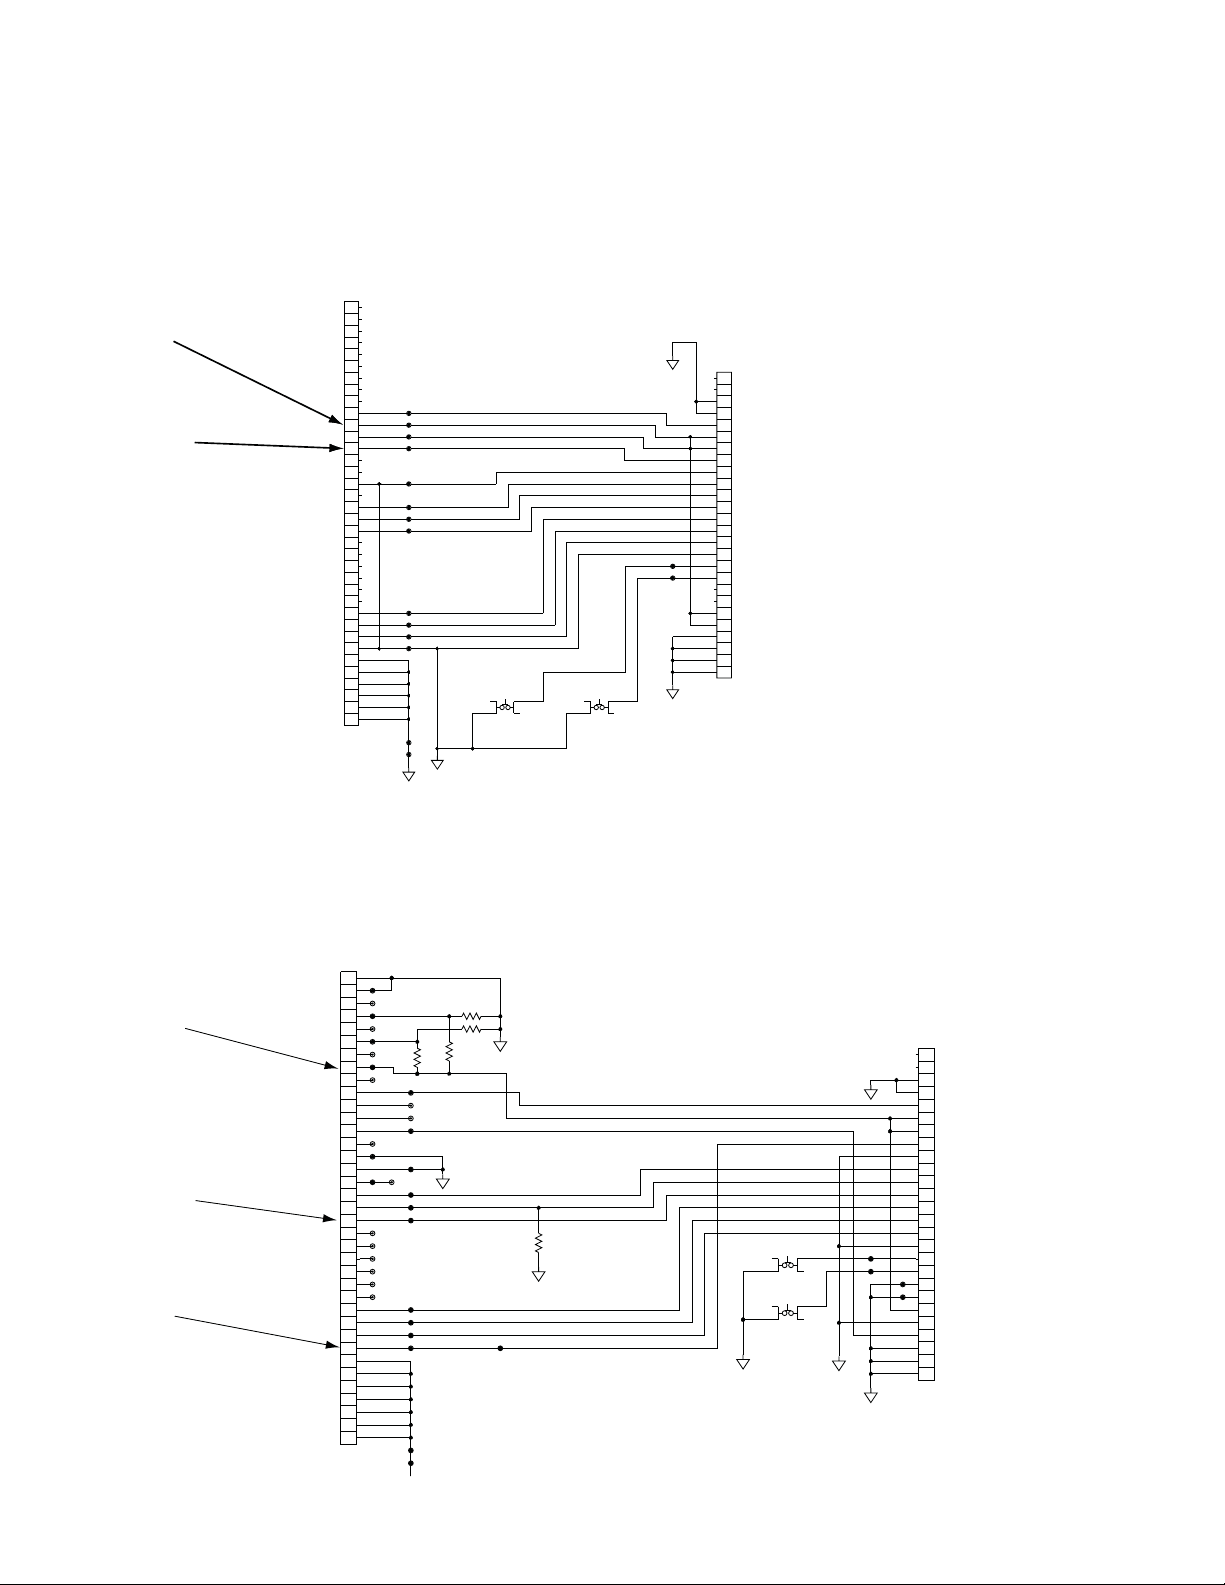
NEW IPOD CHARGING CIRCUIT
The original SoundDock® Digital Music System charges the iPod with the Firewire connection pins
on the dock assembly. Pin 11 of the Dock connector is used to charge the iPod Battery and pin 13 is
used to detect the iPod is placed on the cradle.
BatteryCharge
Pin 11
Always Present
iPod Detect,
Pin 13
Goes High
IPOD DOCK
277316-001
J202
10
11
12
13
14
15
16
17
18
19
20
21
22
23
24
25
26
27
28
29
30
MTG
MTG
32
MTG
33
MTG
34
MTG
35
MTG
36
1
2
3
4
5
6
7
8
9
TP212
TP213
TP215
TP217
TP220
TP222
TP223
TP224
TP225
TP226
TP227
TP228
31
TP230
TP231
GND
ACC-IDENT
+VIPOD
ACC-PWR
DGND
TXD1
RXD1
ACC-DETECT
LINE-OUT-L
LINE-OUT-R
AUDIO-REF
DGND
DGND
2004-2008
Original
Dock Board
123
4
S200
TL3301E
B2
123
S201
TL3301E
GND
MTH
26
MTH
25
24
23
22
21
20
19
18
17
16
15
CABLE TO DSP
14
13
12
11
TP233
10
TP232
9
8
7
6
5
4
3
B3
4
2
1
J201
GND
255130-024
The SoundDock Digital Music System with USB iPod Charging is the new version and charges the
iPod via the USB pins. Pin 8 is used to charge the iPod battery and pins 20 and 30 are used to
detect the iPod is placed on the cradle.
BatteryCharge
Pin 8
ACC-DETECT
Pin 20
Goes High
iPOD DET
Pin 30
Goes Low
IPOD DOCK
277316-002
J202
1
2
3
4
5
6
7
8
9
10
11
12
13
14
15
16
17
18
19
20
21
22
23
24
25
26
27
28
29
30
MTG
31
MTG
32
MTG
33
MTG
34
MTG
35
MTG
36
MTG
37
TP235
TP236
TP237
TP238
TP239
TP240
TP241
TP242
DGND
TP245
TP243
TP244
TP255
TP246
TP247
TP248
TP249
TP250
TP251
TP212
TP213
TP215
TP217
43.2K
R1
TP220
+VIPOD
TP222
TP223
TP224
TP225
TP226
TP227
TP228
TP230
TP231
75.0K
R3
49.9K
R4
DGND
49.9K
R2
DGND
TP254
DGND
2008 New
Dock Board
ACC-IDENT
+5_USB
TXD1
RXD1
ACC-DETECT
R5
100K
S200
DGND
PT307693-002
S201
PT307693-002
LINE-OUT-L
LINE-OUT-R
AUDIO-REF
iPOD_DET
GND
TP233
B2
TP232
B3
DGND
GND
+5_USB
TP252
TP253
26
25
24
23
22
21
20
19
18
17
16
15
14
13
12
11
10
9
8
7
6
5
4
3
2
1
J201
255130-024
MTH
MTH
CABLE TO DSP
8
Page 9

1
1
111
Item
Number
1 Kit, Inserts, iPOD, 2pcs, WHT
2 Insert, iPOD, Nano, 1pcs, WHT
3 Universal Insert, iPOD, Adapter, 1pcs, WHT (see pg. 4)
4 Remote Control, IR, 6 Function, WHT
5 Packing Foam, EPS, CRV 280063
6 Packing, Tray, EPS, Foam 277752
7 Line Cord, 120V, Non-Polarized, Detachable, WHT
- Line Cord, 100V, Non-Polarized, JPN, Det, WHT
- Line Cord, 220V, Non-Polarized, EUR, Det, WHT
- Line Cord, 230V, Non-Polarized, UKS, Det, WHT
- Line Cord, 240V, Non-Polarized, AUS, Det, WHT
8 Carton, D-C, 13-63X8-13X6-5, WHT 277751 1
- Carton, D-C, SPCTOP, BLK 294676 1 4
9 Speaker Assembly, 120V, WHT
10 Power Supply, Universal, Switching, WHT
- Power Supply, Universal, Switching, BLK
- Power Supply, Universal, Switching, WHT
11 Literature Kit, 120V 285757-001 1
Description Part Number QTY Note
Kit, Inserts, iPOD, 2pcs, BLK
Insert, iPOD, Nano, 1pcs, BLK
Universal Insert, iPOD, Adapter, 1pcs, BLK (see pg. 4)
Remote Control, IR, 6 Function, BLK
Line Cord, 120V, Non-Polarized, Detachable, BLK
Line Cord, 100V, Non-Polarized, JPN, Det, BLK
Line Cord, 220V, Non-Polarized, EUR, Det, BLK
Line Cord, 230V, Non-Polarized, UKS, Det, BLK
Line Cord, 240V, Non-Polarized, AUS, Det, BLK
Speaker Assembly, 120V, BLK
(Round Connector, DOM greater than 5151)
(Round Connector, ALL)
(Square Connector, DOM less than 5150)
PACKAGING PART LIST
285755-002
285755-012
044371
044370
042246
042399
277379-001
277379-002
279101-002
279101-001
280136-002
280136-001
280135-002
280135-001
280138-002
280138-001
284243-002
284243-001
278412-002
278412-004
293247-005 1
293247-006
See Safety
Bulletin
277378-SB1
1
1
1
1
3
1
3
1
3
1
3
1
3
1
3
3
3
1
.
1
12
.
.
2
3
4
5
.
.
.
6
.
.
.
.
11
10
9
.
7
.
Figure 1. Packing Exploded View
8
9
Page 10

SPEAKER ASSEMBLY
Item
Number Description Part Number QTY Note
1 GRILLE, .024” CRS , SLVR
GRILLE, .024” CRS , GRY
2 TAPE, FOAM, 30X75X3MM 280225-001 1
3 CABLE, FLEX, 4 CONDUCTOR 277640-004 1
4 SCREW, HILO, 4-16x.375, Pan
SCREW, HILO, 4-16x.375, Pan, BLK
5 IR RECEIVER PCB
IR RECEIVER PCB RoHS
6 TWIDDLER™ w/ HARNESS ASSEMBLY
TWIDDLER™ w/ HARNESS, RoHS
7 FOAM, ACOUSTIC, 2.5X2.5X.75 273518-002 2
8 *MOD ASSY, CRADLE, WHT (original Firewire charging)
*MOD ASSY, CRADLE, BLK (original Firewire charging)
9 BOTTOM, CRADLE REAR, PC/ABS, WHT
BOTTOM, CRADLE REAR, PC/ABS, BLK
10 *UPGRADE DSP BOARD / CRADLE ASSEMBLY, BLK
*UPGRADE DSP BOARD / CRADLE ASSEMBLY, WHT
11 MOD ASSY, WELDED ENCLOSURE, WHT
MOD ASSY, WELDED ENCLOSURE, BLK
12 MOD ASSY AMPLIFIER, RoHs 297428-003 1 2
13 SCREW, TAPP, 6-13X.625, PAN, BLK 288374-010 16
14 FOAM, GRILLE ARRAY 272036-001 7
*The Cradle module assembly does not include the Bose Logo. Order the Bose logo separately when replacing the Cradle module assembly.
Logo part number White - 277381-001
Logo part number Black - 277381-002
5X
14
277366-001
277366-041
181621-06
288372-006
290378-001
290352-001
273488-001
273488-004
279103-003
279103-005
313592-001
313592-002
279103-008
279103-010
279104-006S
279104-007S
1
1
1 2
2
1 3
1 3,4
1 2
1 4
1
16X
13
2
3
4
5
2X
6
2X
7
.
12
11
Upgrade DSP / Cradle
10
with USB charging
NOTE: this DSP board is not
compatable with the Firewire Cradle
9
.
8
Original Cradle
with Firewire
charging
Figure 2. Speaker Assembly
10
Page 11

WELDED ENCLOSURE ASSEMBLY
(See Figure 3)
Item
Number Description Part Number QTY Note
1 Tape, PE, 3112C, Cut, 3MIL, CLR 279105-001 1
2 Packing, Tray, EPS, Foam 277752 1
3 Foot, Bump-on, PUR, Dome, GRY
Foot, Bump-on, PUR, Dome, BLK
4 Screw, Tapp, 6-13X.625, Pan, AS, SQ 172783-10 2
*Note: The rear enclosure is ultrasonically welded together, the individual pieces do not come apart and are not available for
replacement.
277371-001
277371-002
4
.
.
1
.
.
2X
4X
2
3
4
Figure 3. Welded Enclosure Assembly
11
Page 12

DOCKING CRADLE ASSEMBLY
.
.
X4
.
X3
.
X2
(Original / Firewire charging, see page 6)
Item
Number Description Part Number QTY Note
1 TOP, CRADLE, PC/ABS, WHT
TOP, CRADLE, PC/ABS, BLK
2 GROMMET, ISOLATION 278192-001 4
3 BUTTON, VOL, WHT/GRY, UP
BUTTON, VOL, BLK/GRY, UP
4 BUTTON, VOL, WHT/GRY, DN
BUTTON, VOL, BLK/GRY, DN
5 CABLE, FFC, 24COND, DOCK/DSP 278233-124 1
6 *MOD ASSY, CRADLE, WHT (original Firewire charging)
*MOD ASSY, CRADLE, BLK (original Firewire charging)
7 *UPGRADE, CRADLE, BLK (USB charging circuit)
*UPGRADE, CRADLE, WHT (USB charging circuit)
8 SCREW, THDF, 2-6X.312, BRASS, HEX 278329-04 3
9 FOOT, DOME, GRY
FOOT, DOME, BLK
10 *MOD ASSY, DOCK, PCB, WHT (original Firewire charging)
*MOD ASSY, DOCK, PCB, BLK (original Firewire charging)
11 PAD, INSULATOR, CRADLE, BLK 277670-001 1
12 LOGO, CAST, METAL, DIAMOND CUT, WHT
LOGO, CAST, METAL, DIAMOND CUT, BLK
13 FLEXIBLE FLAT CABLE (FFC), 20 COND, DSP/AMP 278324-020
*The Cradle module assembly does not include the Bose Logo. Order the Bose logo separately when replacing the Cradle module assembly.
Logo part number White - 277381-001
Logo part number Black - 277381-002
277901-001
277901-002
279107-001
279107-003
279107-002
279107-003
279103-003
279103-005
279103-008
279103-010
277371-001
277371-002
282931-003
282931-004
277381-001
277381-002
1
1
1
-
-
2
1 2
1
13
1
2
3
4
5
6
12
11
10
9
8
7
Original Cradle with
Firewire charging
Figure 4. Docking Cradle Assembly
Upgrade DSP / Cradle
with USB charging
NOTE: this DSP board is not
compatable with the Firewire Cradle
12
Page 13

ELECTRICAL PART LIST
DSP PCB Assembly
Resistors
Reference
Designator
R45 1.5K, 0805, 1/10W, 5% 133626-1525
R7002 4.7K, 0603, .1W, 5% 199403-472
R7003 4.7K, 0603, .1W, 5% 199403-472
R7004 4.7K, 0603, .1W, 5% 199403-472
R7005 4.7K, 0603, .1W, 5% 199403-472
R7006 100K, 0603, .1W, 5% 199403-104
R7008 100K, 0603, .1W, 5% 199403-104
R7011 4.7K, 0603, .1W, 5% 199403-472
R7012 4.7K, 0603, .1W, 5% 199403-472
R7019 1K, 0603, .1W, 5% 199403-102
R7021 1K, 0603, .1W, 5% 199403-102
R7022 100K, 0603, .1W, 5% 199403-104
R7023 5.6K, 0603, .1W, 5% 199403-562
R7024 100K, 0603, .1W, 5% 199403-104
R7025 909 OHM, 0603, .1W, 1% 191465-9090
R7028 1.00K, 0805, 1/10W, 5% 133626-1025
R7029 1.00K, 0805, 1/10W, 5% 133626-1025
R7034 1.00K, 0805, 1/10W, 5% 133626-1025
R7035 1.00K, 0805, 1/10W, 5% 133626-1025
R7037 100K, 0603, .1W, 5% 199403-104
R7038 100K, 0603, .1W, 5% 199403-104
R7039 100K, 0603, .1W, 5% 199403-104
R7042 10K, 0603, .1W, 1% 191465-1002
R7043 10K, 0603, .1W, 1% 191465-1002
R7044 10K, 0603, .1W, 1% 191465-1002
R7050 10K, 0603, .1W, 1% 191465-1002
R7051 10K, 0603, .1W, 1% 191465-1002
R7052 10K, 0603, .1W, 1% 191465-1002
R7054 19.1K, 0603, .1W, 1% 191465-1912
R7055 19.1K, 0603, .1W, 1% 191465-1912
R7056 17.4K, 0603, .1W, 1% 191465-1742
R7057 1K, 0603, .1W, 1% 191465-1001
R7058 150 OHMS, 0603, .1W, 1% 191465-1500
R7059 150 OHMS, 0603, .1W, 1% 191465-1500
R7060 10K, 0603, .1W, 5% 199403-103
R7064 10 OHM, 0603, .1W, 5% 199403-100
R7065 1K, 0603, .1W, 5% 199403-102
R7066 1K, 0603, .1W, 5% 199403-102
R7067 130 OHM, 2512, 1W, 5% 181895-1300
R7068 1K, 0603, .1W, 1% 191465-1001
R7069 549k OHM, 0603, .1W, 1% 191465-5493
R7071 200 OHM, 2512, 1W, 5% 181895-2000
R7072 1.00K, 0805, 1/10W, 5% 133626-1025
Description Part Number Notes
13
Page 14

ELECTRICAL PART LIST
DSP PCB Assembly
Resistors (continued)
Reference
Designator
R7073 1K, 0603, .1W, 1% 191465-1001
R7074 5.6K, 0603, .1W, 5% 199403-562
R7077 619 OHM, 0603, .1W, 1% 191465-6190
R7078 200 OHM, 2512, 1W, 5% 181895-2000
R7079 1.20 OHMS, 2512, 1W, 5% 181895-1R20
R7080 2.49K, 0603, .1W, 1% 191465-2491
R7081 5.6K, 0603, .1W, 5% 199403-562
R7082 100K, 0805, 1/10W, 5% 133626-1045
R7084 1.20 OHMS, 2512, 1W, 5% 181895-1R20
R7085 19.1K, 0603, .1W, 1% 191465-1912
R7100 5.6K, 0603, .1W, 5% 199403-562
R7101 10K, 0603, .1W, 5% 199403-103
R7102 100K, 0805, 1/10W, 1% 133625-1003
R7103 100K, 0805, 1/10W, 1% 133625-1003
Reference
Designator
C45 .1uF, 1206, X7R, 50V, 20% 173763-104
C7002 0.001uF, 0603, X7R, 5%, 25V 196999-102
C7003 10uF EL, 85C, 16V, 20% 177902-100C
C7004 330pF, 0603, X7R, 50V 191470-331
C7005 33000pF, X7R SMD, 0603, 25V 257154-333K25
C7006 33000pF, X7R SMD, 0603, 25V 257154-333K25
C7007 10uF EL, 85, 16V, 20% 177902-100C
C7008 33000pF, X7R SMD, 0603, 25V 257154-333K25
C7009 33000pF, X7R SMD, 0603, 25V 257154-333K25
C7010 33000pF, X7R SMD, 0603, 25V 257154-333K25
C7011 33000pF, X7R SMD, 0603, 25V 257154-333K25
C7012 33000pF, X7R SMD, 0603, 25V 257154-333K25
C7013 33000pF, X7R SMD, 0603, 25V 257154-333K25
C7014 33000pF, X7R SMD, 0603, 25V 257154-333K25
C7015 33000pF, X7R SMD, 0603, 25V 257154-333K25
C7016 10uF, EL, 85C, 25V, 20% 177902-101E
C7017 10uF, EL, 85C, 25V, 20% 177902-101E
C7018 1000pF, 0603, X7R, 50V 191470-102
C7019 33000pF, X7R SMD, 0603, 25V 257154-333K25
C7020 22pF, 0603, COG, 50V, 5% 188454-220
C7021 33000pF, X7R SMD, 0603, 25V 257154-333K25
C7022 22pF, 0603, COG, 50V, 5% 188454-220
C7024 330pF, 0603, X7R, 50V 191470-331
C7025 330pF, 0603, X7R, 50V 191470-331
Description Part Number Notes
Capacitors
Description Part Number Notes
14
Page 15

ELECTRICAL PART LIST
DSP PCB Assembly
Capacitors (continued)
Reference
Designator
C7028 330pF, 0603, X7R, 50V 191470-331
C7029 .033uF, 0603, X7R, 50V, 10% 191470-333
C7030 100pF, 0805, COG, 50V, 5% 133622-101
C7031 330pF, 0603, X7R, 50V 191470-331
C7034 33000pF, X7R SMD, 0603, 25V 257154-333K25
C7036 10uF EL, 85C, 16V, 20% 177902-100C
C7038 100pF, 0603, X7R, 50V 191470-101
C7039 100pF, 0603, X7R, 50V 191470-101
C7040 100pF, 0603, X7R, 50V 191470-101
C7045 .01uF, 0603, X7R, 50V 191470-103
C7046 .47 uF, EL, 85C, 50V, 20% 177902-R47H
C7047 .47 uF, EL, 85C, 50V, 20% 177902-R47H
C7048 .01uF, 0603, X7R, 50V 191470-103
C7049 .01uF, 0603, X7R, 50V 191470-103
C7050 .01uF, 0603, X7R, 50V 191470-103
C7053 10uF, EL, 85C, 25V, 20% 177902-100E
C7054 330pF, 0603, X7R, 50V 191470-331
C7055 33000pF, X7R SMD, 0603, 25V 257154-333K25
C7058 10uF EL, 85C, 16V, 20% 177902-100C
C7059 33000pF, X7R SMD, 0603, 25V 257154-333K25
C7060 10uF EL, 85C, 16V, 20% 177902-100C
C7062 2200PF, 0603, X7R, 50V 191470-222
C7063 2200PF, 0603, X7R, 50V 191470-222
C7064 10uF, EL, 85C, 25V, 20% 177902-100E
C7065 10uF, EL, 85C, 25V, 20% 177902-100E
C7066 330pF, 0603, COG, 50V, 5% 188454-331
C7067 47uF, EL, 85C, 6.3V, 20% 177902-470J
C7068 10uF, EL, 85C, 25V, 20% 177902-100E
C7069 10uF EL, 85C, 16V, 20% 177902-100C
C7070 10uF, EL, 85C, 25V, 20% 177902-470E
C7101 330pF, 0603, X7R, 50V 191470-331
C7102 330pF, 0603, X7R, 50V 191470-331
C7103 330pF, 0603, X7R, 50V 191470-331
C7104 330pF, 0603, X7R, 50V 191470-331
C7105 330pF, 0603, X7R, 50V 191470-331
C7106 100pF, 0603, COG, 50V, 5% 188454-101
C7107 100pF, 0603, COG, 50V, 5% 188454-101
C7200 330pF, 0603, X7R, 50V 191470-331
C7201 330pF, 0603, X7R, 50V 191470-331
Description Part Number Notes
15
Page 16

ELECTRICAL PART LIST
DSP PCB Assembly
Inductors
Reference
Designator
L1 400 OHMS, INDUCTOR, CHIP, 0805 188587-401
L7000 Inductor, 0.26A, 100uH +/-20%, SMT 275344-101T
L7002 100uH, SMT 178370-101
Reference
Designator
D7001 SOT-23, BAV 99 147239
D7002 SOT-23, BAV 99 147239
D7005 SOT-23, BAV 99 147239
D7007 SOT-23, BAV 99 147239
D7008 SOT-23, BAV 99 147239
D7009 RECTIFYING, MINI-DIODE 188455-001
D7010 RECTIFYING, MINI-DIODE 188455-001
D7011 SCHTKY, SOD123, 0.5A, 20V 275425-002
ZR1 ZEN, 5.6V, SOT-23, 225mW, 5% 135247-5232
Description Part Number Notes
Diodes
Description Part Number Notes
Transistors
Reference
Designator
Q7000 BPLR, N, 40V, 200mA, SOT23 146819
Q7003 BPLR, N, 40V, 200mA,SOT23 146819
Reference
Designator
U1 SENSOR, IR, RCVR, 38kHz, SMT 278346-001
U7001 ET, SOT-23, MAX809, 2.63V 191158-06
U7002 FLASH, 8Mbit, 3.3V 273503-003
U7003 INVERTER, SMD 266582-001
U7004 VOLT REG, NEG, 7908, SOT89 260688-08
U7007 OP AMP, DUAL, TL072 187619-001
U7009 CODEC, WM8734 276290-001
U7010 VOLT REG, ADJ, 500MA, DPAK 258496-001
U7011 VOLT REG, ADJ, 500MA, DPAK 258496-001
U7012 UC, SCF5249, QFP 269326-001
U7013 VOLT REG, ADJ, 500MA, DPAK 258496-001
Description Part Number Notes
Integrated Circuits
Description Part Number Notes
4
16
Page 17

ELECTRICAL PART LIST
DSP PCB Assembly
Miscellaneous
Reference
Designator
J100 CONN, HDR, DUAL ROW, R/A,BLK 278156-104
J200 CONN, SMT, LIF, 24 POS, SIDE 255130-024
J300 CONN, 20 POS, TOP ENTRY, SM 253356-T20
J501 CONN, SMT, LIF, 4 POS, SIDE 255130-004
JP7003 JUMPER, CHIP, 0603 196042
JP7004 JUMPER, CHIP, 0603 196042
Y7000 XTAL, SMD, 105C, AT41CD2, 16.9344MZ 269923-16R9C16
Description Part Number Notes
17
Page 18

ELECTRICAL PART LIST
Amplifier Module PCB Assembly
Resistors
Reference
Designator
R01 9.1K , 0603, .1W, 5% 199403-912
R02
R03 5.6K, 0603, .1W, 5% 199403-562
R04 5.6K, 0603, .1W, 5% 199403-562
R05 5.6K, 0603, .1W, 5% 199403-562
R06 5.6K, 0603, .1W, 5% 199403-562
R07 30K, 0603, .1W, 5% 199403-303
R08 1K, 0603, .1W, 5% 199403-102
R10 10 OHM, 0603, .1W, 5% 199403-100
R11 10 OHM, 0603, .1W, 5% 199403-100
R12 22 OHM, 2512, 1W, 5% 181895-22R0
R13 22 OHM, 2512, 1W, 5% 181895-22R0
R14 6.2K, 0603, .1W, 5% 199403-622
R15 6.2K, 0603, .1W, 5% 199403-622
R16 10 OHM, 0603, .1W, 5% 199403-100
R17 10 OHM, 0603, .1W, 5% 199403-100
9.1K , 0603, .1W, 5%
Description Part Number Notes
199403-912
Capacitors
Reference
Designator
C01 .033uF, 0603, X7R, 50V, 10%, FAIL OPEN 304991-333
C02 .033uF, 0603, X7R, 50V, 10%, FAIL OPEN 304991-333
C03 470uF, EL, 85C, 35V, 20% 197313-471V
C04 470uF, EL, 85C, 35V, 20% 197313-471V
C05 220pF, 0603, X7R, 50V 191470-221
C06 47uF, EL, 85C, 35V, 20% 149948-470V
C07 47uF, EL, 85C, 35V, 20% 149948-470V
C08 .47uF, BOX, 85C, 50V, 5% 137127-474
C09 .47uF, BOX, 85C, 50V, 5% 137127-474
C10 .47uF, BOX, 85C, 50V, 5% 137127-474
C11 .47uF, BOX, 85C, 50V, 5% 137127-474
C12 330pF, 0603, COG, 50V, 5% 188454-331
C13 330pF, 0603, COG, 50V, 5% 188454-331
C14 220pF, 0603, X7R, 50V 191470-221
C15 .033uF, 0603, X7R, 50V, 10%, FAIL OPEN 304991-333
C17 .47uF, BOX, 85C, 50V, 5% 137127-474
C19 .033uF, 0603, X7R, 50V, 10%, FAIL OPEN 304991-333
C20 .1uF, BOX, 85C, 50V, 5% 137127-104
C21 .1uF, BOX, 85C, 50V, 5% 137127-104
C22 .015uF, 0603, X7R, 50V, 10% 191470-153
C23 .033uF, 0603, X7R, 50V, 10%, FAIL OPEN 191470-333
Description Part Number Notes
18
Page 19

ELECTRICAL PART LIST
Amplifier Module PCB Assembly
Capacitors (continued)
Reference
Designator
C25 .033uF, 0603, X7R, 50V, 10%, FAIL OPEN 304991-333
C27 22uF, EL, 85C, 50V, 20% 149948-220H
C29 .033uF, 0603, X7R, 50V, 10%, FAIL OPEN 304991-333
C30 .015uF, 0603, X7R, 50V, 10% 191470-153
C31 .015uF, 0603, X7R, 50V, 10% 191470-153
C32 220pF, 0603, X7R, 50V 191470-221
C33 220pF, 0603, X7R, 50V 191470-221
C34 .68uF, BOX, 85C, 63V, 5% 137127-684
C35 .68uF, BOX, 85C, 63V, 5% 137127-684
C36 .22uF, BOX, 85C, 50V, 5% 137127-224
C37 .22uF, BOX, 85C, 50V, 5% 137127-224
C38 .015uF, 0603, X7R, 50V, 10% 191470-153
C39 .015uF, 0603, X7R, 50V, 10% 191470-153
C40 .01uF, 0603, X7R, 50V, FAIL OPEN 304991-103
C41 .01uF, 0603, X7R, 50V, FAIL OPEN 304991-103
C42 .01uF, 0603, X7R, 50V, FAIL OPEN 304991-103
C43 .01uF, 0603, X7R, 50V, FAIL OPEN 304991-103
Description Part number Note
Inductors
Reference
Designator
L1 BEAD, FERRITE, CHIP, 1806 256116-181
L2 BEAD, FERRITE, CHIP, 1806 256116-181
L6 INDUCTOR, 270uH, 4.5A, RADIAL 277046-270
Reference
Designator
U1 POWER AMP, 2X25W, SOT-411 277612-001
Reference
Designator
J500 CONN ,SMT, LIF, 4 POS. ,SIDE 255130-004
J600 CONN, SMT, LIF, 20 POS, SIDE 255130-020
J700 CONN, SHROUDER HEADER, W/BOSS 273437-02
Description Part number Note
Integrated Circuits
Description Part Number Notes
Miscellaneous
Description Part Number Notes
19
Page 20

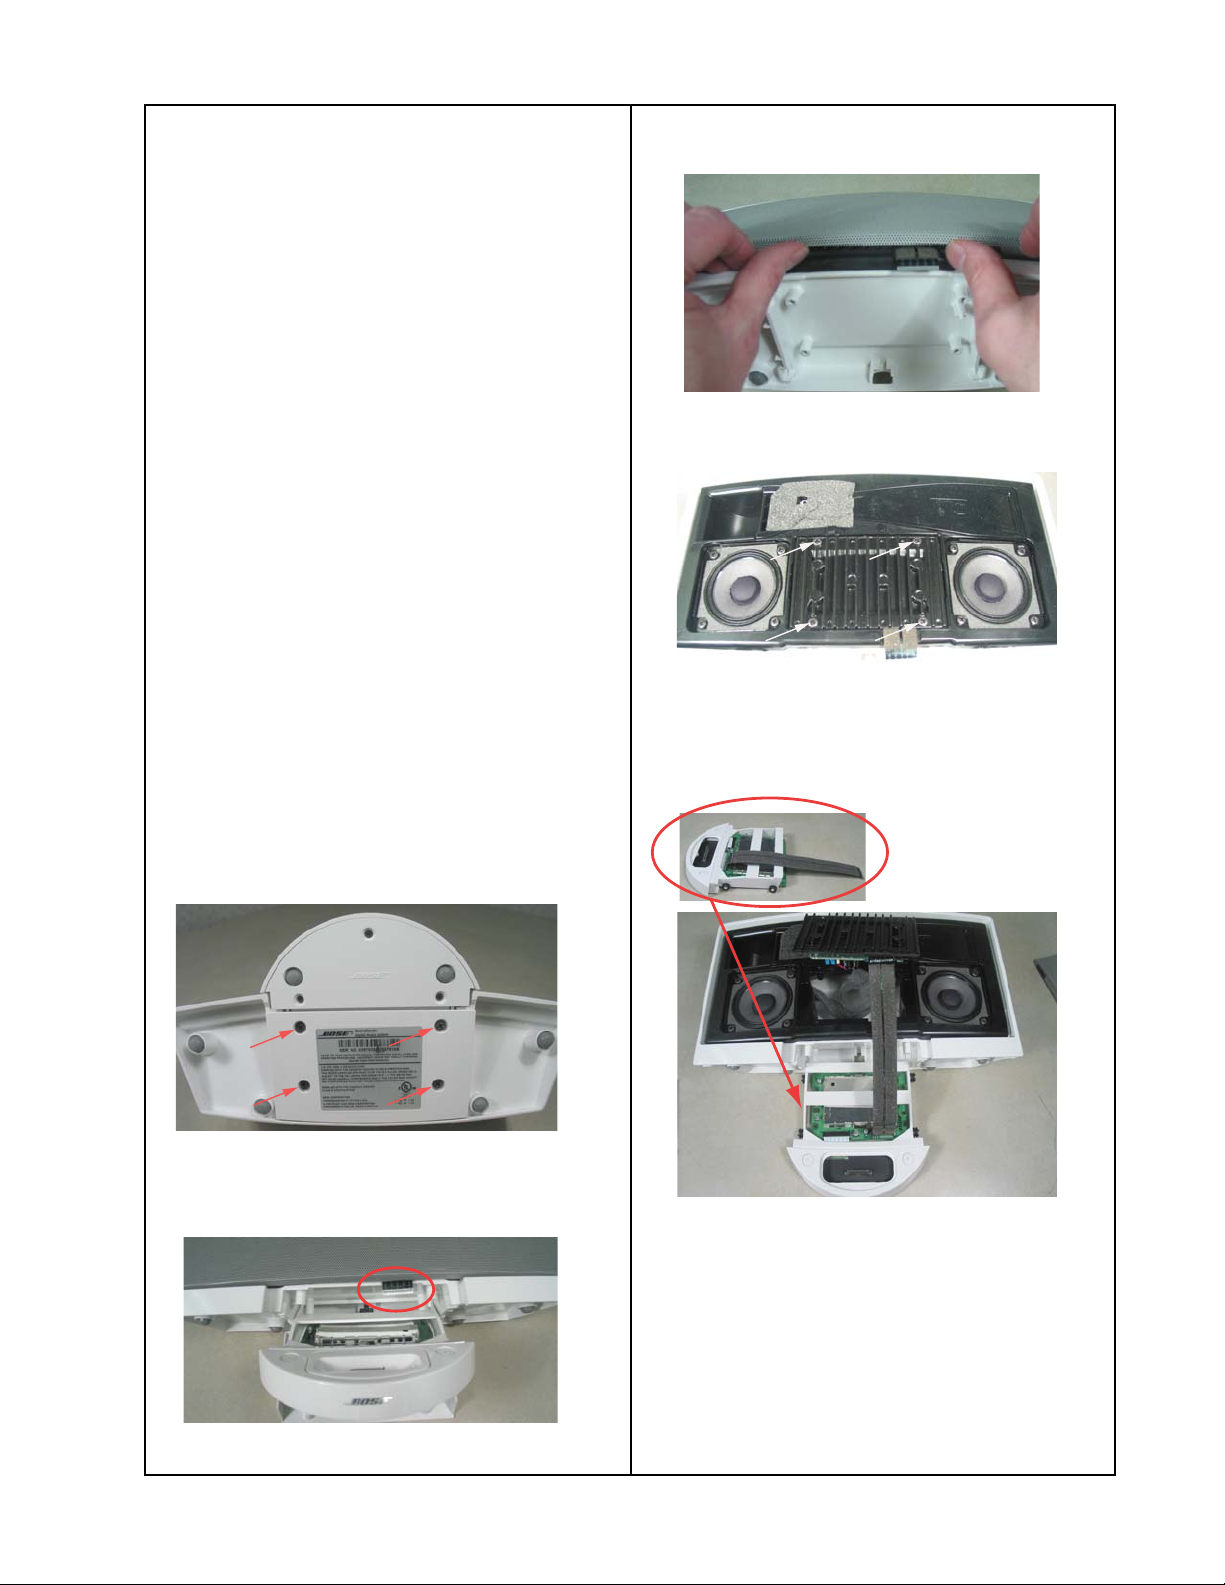
DISASSEMBLY PROCEDURES
1. Docking Cradle Assy Removal
1.1 Remove the four Phillips-head screws
located on the bottom side of the docking
cradle assembly. See figure 5.0.
1.1 Lift the docking cradle assembly slightly
away from the speaker enclosure and
disconnect the 20 conductor flexible flat
cable (FFC) before removing the cradle Assy
completely.
Note: This cable provides signal paths
between the amplifier and digital signal
processor PCB’s.
2. DSP PCB Removal
Figure 5.0
2.1 Remove the cover from the Cradle Assy
and note the orientation of the 24 conductor
FF cable prior to disconnecting it from the
Digital Signal Processor (DSP) PCB. Ensure
that the foam protection on the cable is
facing the cradle cover upon reinstallation.
See figure 5.1.
2.2 Slide the DSP PCB out of the cradle
housing and disconnect the 24 conductor FF
cable. See figure 5.1.
Foam
Protection
Figure 5.1
Isolation
Grommet
X4
20
Page 21

DISASSEMBLY PROCEDURES
3. Docking PCB removal
3.1 Remove three torx-head (T7) screws as
shown in figure 5.2.
3.2 Inspect the docking connector for signs
of excessive wear and replace if necessary.
Figure 5.2
4. Grille Removal
4.1 Carefully push the bottom edge of the
grille up using your thumbs while pushing
down on the speaker housing with your index
fingers as shown in figure 5.4.
4.2 Work the remaining sides of the grille up
until it is completely disengaged from the
SoundDock.
4.3 Inspect the grille for damage and replace
it if necessary.
Figure 5.3
Figure 5.4
21
Page 22

DISASSEMBLY PROCEDURES
5. Amplifier PCB Assy Removal
5.1 Remove the four Phillips-head screws
securing the Amplifier PCB Assy to the
speaker housing as shown in figure 6.0.
5.2 Using the heatsink fins and FF cable,
carefully lift the Amplifier PCB Assy away
from the speaker housing.
5.3 Disconnect the IR Receiver PCB FF
cable and the Left & Right driver cables from
the Amplifier PCB.
5.4 Amplifier PCB, see figure 6.1.
5.5 Position the left and right driver harness
as shown in figure 6.2. This will ensure that
you don’t confuse the phasing of the drivers
when reconnecting them to the PCB.
Figure 6.0
Figure 6.1
Figure 6.2
22
Page 23

DISASSEMBLY PROCEDURES
6. Infrared Receiver PCB Removal
6.1 Peel back the foam tape concealing the
IR Receiver PCB. See figure 7.0 for details
6.2 Remove the Phillips-head screw securing the PCB in place
6.3 Disconnect the four conductor FF cable
from the IR PCB.
Note: This cable provides signals to the
DSP IC via the Amplifier PCB.
Figure 7.0
7. Driver removal
7.1 Remove four phillips-head screws
securing the driver to the speaker housing.
See Figure 8.0.
7.2 Note the routing of the driver harness
before fully extracting the driver. See figure
8.0.
7.3 Ensure acoustic foam is positioned
behind the driver. See figure 8.3.
Figure 7.1
Figure 8.0
Figure 8.1
23
Page 24

TEST PROCEDURES
SoundDock Functional Tests
Equipment Required
2.2 Reduce generator output to zero volts.
2.3 Repeat step 2.1 for the Right channel.
Digital Multi-meter
Audio Signal Generator
iPod Eliminator PCB, P/N 287089
Notes:
1. Begin the test with no power applied to
the SoundDock.
2. Confirm the audio signal generator output
is set to zero volts before connecting it to
the SoundDock.
3. Remove the input signal before removing
power from the SoundDock.
1. Air Leak Test
1.1 Install the iPod Eliminator board into
SoundDock’s docking cradle and connect
the audio signal generator to the eliminator
board via a 3.5mm minijack cable.
1.2 Apply power to the SoundDock.
(Note: This will cause SoundDock to ramp
to a suitable volume level for the test.)
2.4 Reduce Input signal to zero volts and
reconnect SoundDock’s right channel.
3. Frequency Sweep Test
3.1 Set audio signal generator to:
A. Voltage = 750mV
B. Sweep Range = 40HZ - 5KHz +10%.
3.2 Execute the sweep for a minimum of five
seconds up and then down the range.
3.3 Listen for any extraneous noises such as
buzzes, rattles, ticks, and distortion.
PASS if no noise can be
heard at a distance
FAIL if any noise can be
heard at a distance of > 1ft (0.3M).
3.4 Reduce the input signal to zero volts.
+10%.
> 1ft 0.3M).
1.3 Set the signal generator output to:
A. Voltage = 750mV
B. Frequency = 80Hz
1.4 Listen for potential air leaks around all
the cabinet seams, joints, and wire harness
through-holes.
PASS if no audible air leaks can be heard at a
distance
the enclosure.
FAIL if any air leaks can be heard at a distance
>1ft (0.3M) from any exterior surface of the
enclosure.
1.5 Reduce the input signal to zero volts.
2. Left Right Driver Test
2.1 Apply the input signal to SoundDock’s left
channel only. Set Generator as in step
1.3, except set the frequency to 800Hz and
confirm that only the left driver plays.
>1ft 0.3M) from any exterior surface of
+10%.
+10%
4. Button & Remote Control Test
4.1 Set Audio Signal generator to:
A. Voltage = 100mV
B. Frequency = 100Hz
4.2 Using the Volume Down button, momentarily
press & hold the Volume Down button.
Verify that the SoundDock responds to the
commands.
4.3 Using the Volume Up button, momentarily
press & hold the Volume Up button.
Verify that the SoundDock responds to the
command.
4.4 Using the Remote control, turn the
volume down. Verify that the SoundDock
responds to the command.
4.5 Adjust the generator to zero volts and
disconnect it from the SoundDock.
+10%.
24
Page 25

SERVICE MANUAL REVISION HISTORY
Revision
Level
00 9/2004 Document released at revision Service Manual All
00 to 01 Unknown C3 & C4 part number changed from 149948-471V to ECN 35595 18
01 to 02 Unknown 1. Screw part number changed from 250816-10 to 172783-10.
02 to 03 Unknown Pcb Assy, DSP part number changed from 278059-801 to 282669-
03 to 04 Unknown 1. Both 2 & 3 piece insert kits p/ns 282111-002 & 282110-003
04 to 05 7/2005 1. Updated manual to include both versions of the power supply part
05 to 06 11/2005 1. Changed the following Part numbers: From TO
06 to 07 4/2006 Added part numbers for Black variant Black
07 to 08 11/2006 Change to Lit Kit part number
08 to 09 12/2006 Product description added
09 to 10 4/4/07 New power supply part numbers –
10 to 11 9/21/07
11 to 12 10/1/08 USB update procedure
1
Date Description of Change Change
2. iPod Eliminator PCB part number changed from 279574-001 to
287089.
3. Test Frequency in step 2 changed from 80Hz to 800Hz.
001.
replaced by new 2 piece insert kit p/n 285755-002.
2. Added Note 4 to Amplifer PCB\Heatsink Assembly
3. R7025 value changed from 1k, 5% to 909, 1%. The new part
number is 191465-9090.
numbers 277646-004 and 277646-006. (Note: 006 version of power
supply is not back wards compatable with SoundDocks
manufactured with DOM before 5151.)
2. Add to foam pieces to grille.
3. Corrected error in manual. Part numbers called out for the Eur and
UKS power cords were reversed.
4. Added AUS power cord to manual.
a. DSP PCB Assy 282669-001 290348-002
b. AMP Mod Assy 278544-001 290349-001
c. Dock PCB Assy 282931-001 290350-001
d. IR Receiver PCB 282670-001 290378-001
.
2. Updated manual to include insert, Part number 292498-001. This
insert is needed to accommodate the Nano iPod.
Power supply part number change
Universal adapters added
Updated Amp board part number
Adapter description added
Page 10 deleted, added amp flex cable part number to speaker
assembly diagram.
Software used to generate this manual was changed from InDesi gn to
PageMaker.
Updated parts list on pg 6. Added black carton 294676
Added Foam part numbers (for grille assy)
Deleted part numbers for the Mod Assy, Welded Enclosure and added
a 4 in the notes column.
12/03/07
5/15/08
6/10/08
New DSP board part number (new software). 297427-004
Changed Nano insert part number, now using insert to accommodate
gen 1 and 2 Nano’s.
Added packing Foam part numbers 280063, 277752 and carton kit
277751-KC
Dock PCB part number change to 282931-003
Deleted square type Power Supply part number
Changed Cradle Assembly part numbers from 279103-002 and -004
to 279103-003 and -005.
Charging circuit diagram added
Upgrade DSP/Cradle part number added
Original DSP board part number deleted
Updated disassembly procedure.
Changed Capacitors to fail open part numbers
C1, C2, C15, C19, C23, C25, C29, C40, C41, C42, C43
25
Driven
ECN 36577
ECN 36300
ECN 35899 6
These changes
resulted from the
singulation
process
SoundDock
Available
Charging circuit
changed from
Firewire to USB.
See front cover
for details.
By
7,9
7
®
6
4
6
6
Pages
Affected
25
25
6
11
12
6
6
6
7
7
10
7
6
6,7,8,9,10,11
10, 7
ALL
6
7
7
7
6
10
7
8
7
8
10
10,12
20
18,19
Page 26

SPECIFICATIONS AND FEATURES SUBJECT TO CHANGE WITHOUT NOTICE
Bose Corporation
The Mountain
Framingham Massachusetts USA 01701
P/N: 277378-SM Rev. 12 10/2008 (H)
http://serviceops.bose.com
 Loading...