

Page 1

SLEEPBUDS™ II
Page 2

IMPORTANT SAFETY INSTRUCTIONS
Please read and keep all safety, security, and use instructions.
Bose Corporation hereby declares that this product is in compliance with the essential requirements and
other relevant provisions of Directive 2014/53/EU and all other applicable EU directive requirements.
The complete declaration of conformity can be found at: www.Bose.com/compliance
Important Safety Instructions
1. To avoid accidental ingestion, keep Sleepbuds™ away from children and pets. Sleepbuds™ contain a nickel-metal
hydride (NiHM) battery, and may be hazardous if swallowed. If ingested, seek immediate medical attention.
When not in use, store Sleepbuds™ in the charging case with the charging lid closed, and keep out of the reach
of children and pets.
2. Do NOT allow children to use Sleepbuds™.
3. Clean Sleepbuds™ and charging case only with a dry cloth. For additional cleaning instructions, see page 27.
4. Only use attachments/accessories specified by the manufacturer.
WARNINGS/CAUTIONS
• When using this product, basic precautions should always be followed, including the following:
– Read all the instructions before using the charging case.
– To reduce the risk of injury, close supervision is necessary when the charging case is used near children.
– Do not expose charging case to water, rain, liquids or snow.
– Do not use the charging case in excess of its output rating. Overload outputs above rating may result in a risk of
fire or injury to persons.
– Do not use a charging case that is damaged or modified. Damaged or modified batteries may exhibit
unpredictable behavior resulting in fire, explosion or risk of injury.
– Do not disassemble the charging case. Take it to a qualified service person when service or repair is required.
Incorrect re-assembly may result in risk of fire or injury to persons.
– Do not open, crush or expose a charging case to fire or excessive temperature. Exposure to fire or temperature
above 212° F, 100° C may cause explosion.
– Have servicing performed by a qualified repair person using only identical replacement parts. This will ensure that
the safety of the product is maintained.
• Sleepbuds™ are designed to mask sounds. Do NOT use Sleepbuds™ in a way that may interfere with sounds you
need to hear for your safety or the safety of others.
• Use this product only with an agency-approved power supply that meets local regulatory requirements (e.g., UL,
CSA, VDE, CCC).
• Remove Sleepbuds™ immediately if you experience a warming sensation or loss of audio.
• Do NOT submerge Sleepbuds™ in water. Do NOT expose Sleepbuds™ to moving water (e.g., from a faucet, etc.).
Do NOT wear Sleepbuds™ while showering or bathing, or when participating in water sports, e.g., swimming,
waterskiing, surfing, etc.
2
ENG
|
Page 3

IMPORTANT SAFETY INSTRUCTIONS
Contains small parts which may be a choking hazard. Not suitable for children.
This product contains magnetic material. Consult your physician on whether this might aect your
implantable medical device.
• Do NOT expose this product to dripping or splashing, and do not place objects filled with liquids, such as vases,
on or near the product.
• Keep the product away from fire and heat sources. Do NOT place naked flame sources, such as lighted candles,
on or near the product.
• Do NOT make unauthorized alterations to this product.
• If the battery leaks, do not allow the liquid to come in contact with the skin or eyes. If contact is made,
seek medical advice.
• Do not expose products containing batteries to excessive heat (e.g. from storage in direct sunlight, fire or the like).
3
ENG
|
Page 4

REGULATORY INFORMATION
NOTE: This equipment has been tested and found to comply with the limits for a Class B digital device, pursuant to
Part 15 of the FCC Rules. These limits are designed to provide reasonable protection against harmful interference in a
residential installation. This equipment generates, uses, and can radiate radio frequency energy and, if not installed
and used in accordance with the instructions, may cause harmful interference to radio communications. However,
there is no guarantee that interference will not occur in a particular installation. If this equipment does cause harmful
interference to radio or television reception, which can be determined by turning the equipment o and on, the user
is encouraged to try to correct the interference by one or more of the following measures:
• Reorient or relocate the receiving antenna.
• Increase the separation between the equipment and receiver.
• Connect the equipment into an outlet on a circuit dierent from that to which the receiver is connected.
• Consult the dealer or an experienced radio/TV technician for help.
Changes or modifications not expressly approved by Bose Corporation could void the user’s authority to operate
this equipment.
This device complies with part 15 of the FCC Rules and with ISED Canada license-exempt RSS standard(s). Operation
is subject to the following two conditions: (1) This device may not cause harmful interference, and (2) this device must
accept any interference received, including interference that may cause undesired operation.
This device complies with FCC and ISED Canada radiation exposure limits set forth for general population.
This transmitter must not be co-located or operating in conjunction with any other antenna or transmitter.
Right Bud; FCC ID: A94432893R
Left Bud; FCC ID: A94432893L
Right Bud; IC ID: 3232A-432893R
Left Bud; IC ID: 3232A-432893L
CAN ICES-3(B)/NMB-3(B)
For Europe:
Frequency bands of operation 2400 to 2483.5 MHz.
Maximum transmit power less than 20 dBm EIRP.
Maximum transmit power is below regulatory limits such that SAR testing is not necessary and exempt per
applicable regulations.
This symbol means the product must not be discarded as household waste, and should be delivered to an
appropriate collection facility for recycling. Proper disposal and recycling helps protect natural resources,
human health and the environment. For more information on disposal and recycling of this product, contact
your local municipality, disposal service, or the shop where you bought this product.
Management Regulation for Low-power Radio-frequency Devices
Article XII
According to “Management Regulation for Low-power Radio-frequency Devices” without permission granted by
the NCC, any company, enterprise, or user is not allowed to change frequency, enhance transmitting power or alter
original characteristic as well as performance to an approved low power radio-frequency devices.
Article XIV
The low power radio-frequency devices shall not influence aircraft security and interfere legal communications; If
found, the user shall cease operating immediately until no interference is achieved. The said legal communications
means radio communications operated in compliance with the Telecommunications Act.
The low power radio-frequency devices must be susceptible with the interference from legal communications or ISM
radio wave radiated devices.
DON’T attempt to remove the rechargeable nickel-metal hydride (NiHM) battery from this product. Contact your local
Bose retailer or other qualified professional for removal.
4
ENG
|
Page 5
REGULATORY INFORMATION
Please dispose of used batteries properly, following local regulations. Do not incinerate.
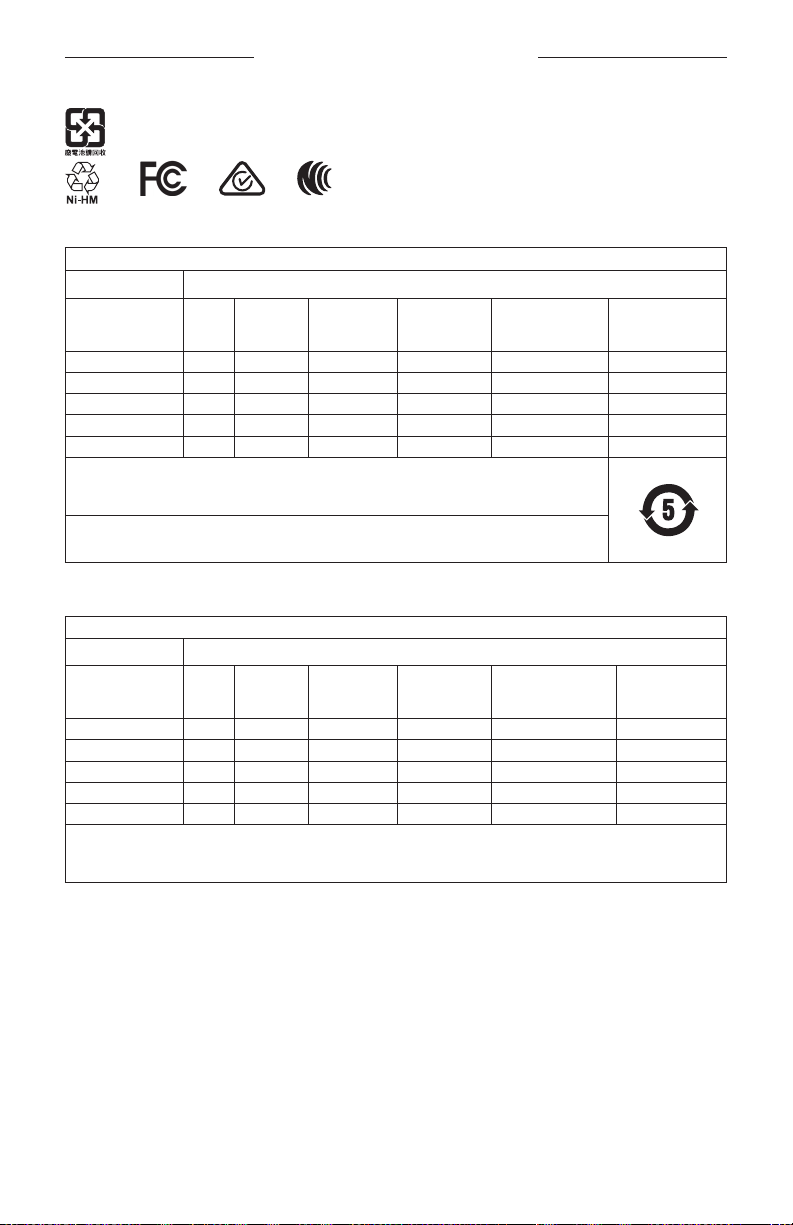
China Restriction of Hazardous Substances Table
Names and Contents of Toxic or Hazardous Substances or Elements
Toxic or Hazardous Substances and Elements
Lead
Part Name
PCBs X O O O O O
Metal Parts X O O O O O
Plastic Parts O O O O O O
Speakers X O O O O O
Cables X O O O O O
This table is prepared in accordance with the provisions of SJ/T 11364.
O: Indicates that this toxic or hazardous substance contained in all of the homogeneous materials for this
part is below the limit requirement of GB/T 26572.
X: Indicates that this toxic or hazardous substance contained in at least one of the homogeneous materials
used for this part is above the limit requirement of GB/T 26572.
(Pb)
Mercury
(Hg)
Cadmium
(Cd)
Hexavalent
(CR(VI))
Polybrominated
Biphenyl
(PBB)
Polybrominated
diphenylether
(PBDE)
Taiwan Restriction of Hazardous Substances Table
Equipment name: Bose Sleepbuds™ II, Type designation: 432893
Restricted substances and its chemical symbols
Unit
PCBs
Metal Parts
Plastic Parts
Speakers
Cables
Note 1: “○” indicates that the percentage content of the restricted substance does not exceed the percentage of reference value
of presence.
Note 2: The “−” indicates that the restricted substance corresponds to the exemption.
Lead
Mercury (Hg) Cadmium (Cd)
(Pb)
- ○ ○ ○ ○ ○
- ○ ○ ○ ○ ○
○ ○ ○ ○ ○ ○
- ○ ○ ○ ○ ○
- ○ ○ ○ ○ ○
Hexavalent
chromium (Cr+6)
Polybrominated
biphenyls (PBB)
Polybrominated
diphenyl ethers
(PBDE)
5
ENG
|
Page 6

REGULATORY INFORMATION
Date of Manufacture: The eighth digit in the serial number indicates the year of manufacture; “0” is 2010 or 2020.
China Importer: Bose Electronics (Shanghai) Company Limited, Part C, Plant 9, No. 353 North Riying Road, China
(Shanghai) Pilot Free Trade Zone
EU Importer: Bose Products B.V., Gorslaan 60, 1441 RG Purmerend, The Netherlands
Taiwan Importer: Bose Taiwan Branch, 9F-A1, No. 10, Section 3, Minsheng East Road, Taipei City 104, Taiwan
Phone Number: +886-2-2514 7676
Mexico Importer: Bose de México, S. de R.L. de C.V., Paseo de las Palmas 405-204, Lomas de Chapultepec, 11000
México, D.F. Phone Number: +5255 (5202) 3545
Output Rating: 2V, 10mA x 2
Input Rating: 5V p 150mA
Charging Temperature Range: 50° F – 104° F (10° C – 40° C)
Discharging Temperature Range: 41° F – 113° F (5° C – 45° C)
The CMIIT ID is located under the charging case lid.
The Bose Privacy Policy is available on the Bose website.
Please complete and retain for your records
The serial and model numbers are located under the charging case lid.
Serial number: ____________________________________________________________________
Model number: 432893
Please keep your receipt with your owner’s guide. Now is a good time to register your Bose product.
You can easily do this by going to global.Bose.com/register
6
ENG
|
Page 7

LEGAL INFORMATION
Security Information
This product is capable of receiving security updates from Bose when connected to the Bose Sleep app. In
order to receive security updates via the mobile application, you must complete the product setup process
in the Bose Sleep app.
Apple and the Apple logo are trademarks of Apple Inc., registered in the U.S. and other countries. App Store is a
service mark of Apple Inc.
The Bluetooth® word mark and logos are registered trademarks owned by Bluetooth SIG, Inc. and any use of such
marks by Bose Corporation is under license.
Android and Google Play are trademarks of Google LLC.
Bose, Bose Sleep, and Sleepbuds are trademarks of Bose Corporation.
Bose Corporation Headquarters: 1-877-230-5639
©2020 Bose Corporation. No part of this work may be reproduced, modified, distributed, or otherwise used without
prior written permission.
7
ENG
|
Page 8

CONTENTS
WHAT’S IN THE BOX
Contents ............................................................................................................................. 10
STAY AWARE OF YOUR SURROUNDINGS
Set an appropriate volume.......................................................................................... 11
Tips for maintaining awareness ................................................................................. 11
BOSE SLEEP APP
Download the Bose Sleep app ................................................................................. 12
POWER
Open the charging case ............................................................................................... 13
Power on ............................................................................................................................ 14
Power o ............................................................................................................................ 14
HOW TO WEAR
Insert Sleepbuds™ ........................................................................................................... 15
Check the fit ...................................................................................................................... 16
Make adjustments ................................................................................................... 17
Locate the eartip size .................................................................................................... 17
Change the eartips ......................................................................................................... 18
BATTERY
Charge Sleepbuds™........................................................................................................ 19
Charging time........................................................................................................... 20
Check Sleepbuds™ battery level ............................................................................... 20
While using Sleepbuds™ ...................................................................................... 20
While charging Sleepbuds™ ............................................................................... 20
Charge the case ............................................................................................................... 21
Charging time........................................................................................................... 21
Check the case battery level .............................................................................. 22
Battery protection .......................................................................................................... 22
8
ENG
|
Page 9

CONTENTS
SLEEPBUDS™ AND CHARGING CASE STATUS
Sleepbuds™ charging lights ........................................................................................ 23
Charging case battery lights ...................................................................................... 24
BLUETOOTH® CONNECTIONS
Connect your mobile device....................................................................................... 25
Disconnect a mobile device ........................................................................................ 25
Reconnect a mobile device ......................................................................................... 25
ADVANCED FEATURES
Phone Call Alerts ............................................................................................................. 26
Phone-Free Mode ........................................................................................................... 26
CARE AND MAINTENANCE
Store Sleepbuds™ ........................................................................................................... 27
Clean Sleepbuds™ and charging case .................................................................... 27
Replacement parts ........................................................................................................ 28
Limited warranty ............................................................................................................. 28
Reset the charging case ............................................................................................... 28
Update Sleepbuds™ ....................................................................................................... 28
TROUBLESHOOTING
Try these solutions first ................................................................................................ 29
Other solutions ................................................................................................................ 29
9
ENG
|
Page 10
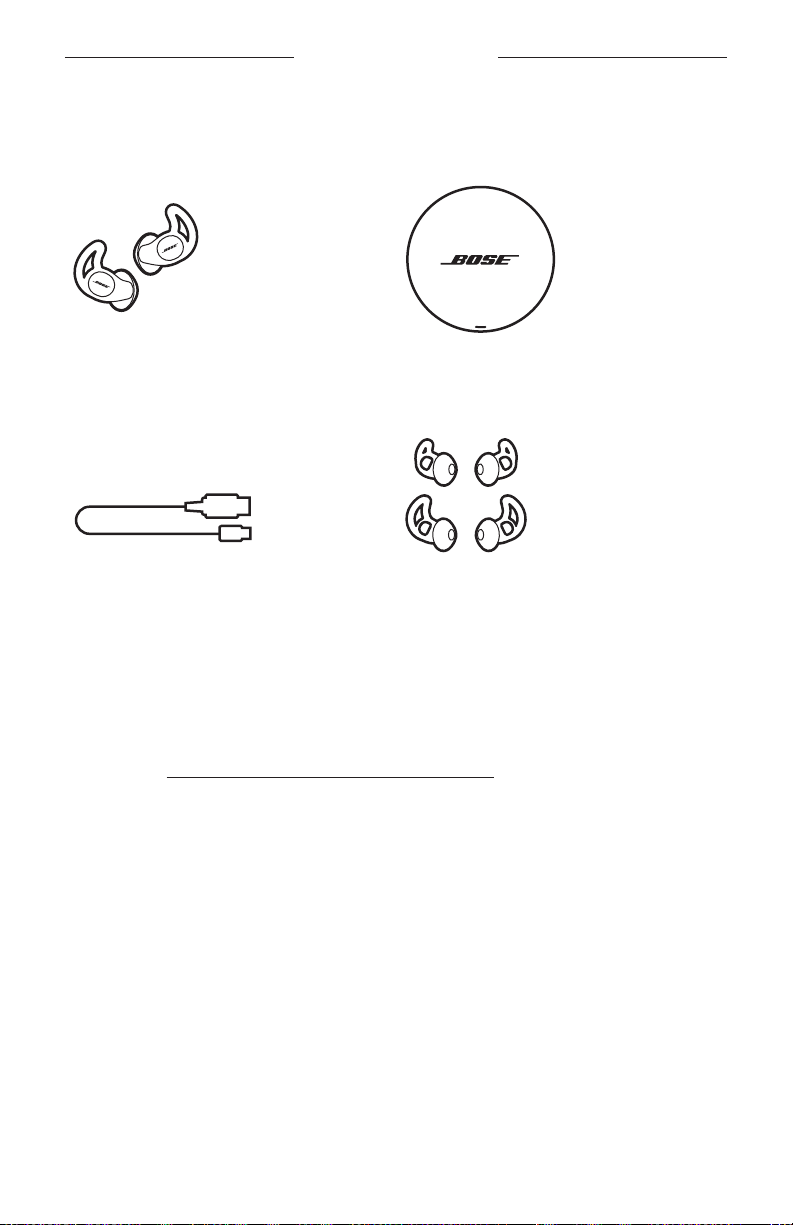
WHAT’S IN THE BOX
CONTENTS
Confirm the following parts are included:
Bose Sleepbuds™ II Charging case
USB-C to USB-A cable Eartips (sizes 1 and 3)
NOTE: Size 2 eartips are attached to your
Sleepbuds™. For help identifying the
eartip sizes, see “Locate the eartip size”
on page 17.
NOTE: If any part of your product is damaged, don’t use it. Contact your authorized
Bose dealer or Bose customer service.
Visit: worldwide.Bose.com/Support/Sleepbuds2
10 | ENG
Page 11

STAY AWARE OF YOUR SURROUNDINGS
Sleepbuds™ are designed to mask noise and disturbances while you sleep. Because
of this, they can aect your ability to hear other sounds, such as alarms, warning
systems, people, and pets.
SET AN APPROPRIATE VOLUME
To balance the levels of noise masking and awareness you want, set an appropriate
volume level for your needs. The volume should be high enough to mask noises that
are disturbing your sleep, but not so high that you can’t hear the sounds you want
to hear.
In the Bose Sleep app, set the volume to the lowest level, then increase it gradually
until you reach an appropriate level. The lower the volume, the more likely it is that
you’ll be able to hear the sounds you want or need to hear.
TIPS FOR MAINTAINING AWARENESS
If you sleep with a partner, consider relying on your partner to help you stay aware of
your surroundings while wearing Sleepbuds™. If you sleep alone and are concerned
about your ability to hear sounds while wearing Sleepbuds™, try the following tips:
• Wear only one of your Sleepbuds™.
• Set your current masking sound so that it stops after a certain amount of time
instead of playing all night. You can do this by setting a sleep timer for your current
masking sound in the Bose Sleep app.
NOTE: These tips make Sleepbuds™ less eective at masking noise, but further
increase your awareness of your surroundings.
11 | ENG
Page 12

BOSE SLEEP APP
The Bose Sleep app lets you set up and control Sleepbuds™ from your mobile device.
Using the app, you can select masking sounds, set wake-up alarms, and manage
Sleepbuds™ settings.
DOWNLOAD THE BOSE SLEEP APP
1. On your mobile device, get the Bose Sleep app at app.Bose.com/Sleep or
download from your device app store.
2. Follow the app instructions.
12 | ENG
Page 13

POWER
OPEN THE CHARGING CASE
With the Bose logo facing you, slide the lid of the charging case away from you
to open.
The lights on the inside rim of the case glow to show the current battery level and
charging status of the case and Sleepbuds™ (see page 24).
13 | ENG
Page 14

POWER
POWER ON
Remove Sleepbuds™ from the charging case to power on.
NOTE: We highly recommend that you fully charge Sleepbuds™ before using them for
the first time. For more information about charging Sleepbuds™ see “Charge
Sleepbuds™” on page 19.
POWER OFF
Place Sleepbuds™ in the charging case to power o.
The charging lights for your Sleepbuds™ blink (see page 23).
14 | ENG
Page 15

HOW TO WEAR
INSERT SLEEPBUDS™
1. Insert Sleepbuds™ so the eartips gently rest at the openings of your ear canals.
NOTE: Each eartip is marked with either an L (left) or an R (right).
R
2
2. Slightly rotate Sleepbuds™ back until the eartips create a comfortable seal at your
ear canals.
NOTE: Rotating Sleepbuds™ too far back may impact comfort and sound quality.
3. Tuck the eartip wings under your ear ridges.
4. Check the fit (see page 16).
15 | ENG
Page 16

HOW TO WEAR
CHECK THE FIT
Use a mirror to make sure you have successfully rotated Sleepbuds™ back, tucked the
eartip wings, and that you’re using the best eartip size for each ear.
FIT WHAT TO CHECK
When the eartip fits:
• The eartip gently rests at the opening of your ear
canal to create a seal. Your voice and background
Proper fit
Too big
noise should sound mued.
• The eartip wing is tucked under your ear ridge.
• The eartip wing doesn’t look or feel squished.
• The eartip wing doesn’t stick out of your ear.
When the eartip is too big:
• The eartip feels squished in your ear canal.
• The eartip wing doesn’t fit under your ear ridge.
• The eartip wing is sticking out of your ear.
When the eartip is too small:
• The eartip feels too far into your ear canal.
Too small
16 | ENG
• The eartip wing doesn’t reach your ear ridge.
• The eartip feels loose in your ear and falls out when
you move your head.
Page 17

HOW TO WEAR
Make adjustments
Wear Sleepbuds™ for an extended period of time. If you start to feel any discomfort or
pressure in your ear, make some adjustments.
• Rotate Sleepbuds™ back farther so they create a tighter seal at your ear canals.
• Make sure the Bose logo is visible and right-side up.
• Tuck the eartip wing under your ear ridge.
• Try another eartip size.
LOCATE THE EARTIP SIZE
R
1
1
The size is marked on the side of each eartip with a 1 (small), 2 (medium),
or 3 (large).
The size 2 (medium) eartips come attached to Sleepbuds™. If size 2 feels too loose, try
size 3 (large). If it feels too tight, try size 1 (small).
NOTE: You may need to try all three eartip sizes or use a dierent size eartip for
each ear.
R
2
2
R
3
3
17 | ENG
Page 18

HOW TO WEAR
CHANGE THE EARTIPS
1. Holding one of your Sleepbuds™, gently stretch the eartip base and peel it away.
Stretch Peel Separate
Eartip base
CAUTION: To prevent tearing, do NOT pull on the eartip wing.
2. Choose a new eartip size (see page 17).
3. Align the opening of the eartip with your Sleepbuds™ nozzle, and slide the nozzle
into the eartip opening.
Nozzle
Eartip opening
4. Gently stretch the base of the eartip around your Sleepbuds™.
5. Insert Sleepbuds™ into your ears (see page 15).
6. Check the fit (see page 16).
18 | ENG
Page 19

BATTERY
CHARGE SLEEPBUDS™
We highly recommend that you fully charge Sleepbuds™ before using them for the
first time.
1. Align the charging contacts on Sleepbuds™ with the charging pins on the case.
Charging contacts
Charging pins
2. Place Sleepbuds™ in the case until they magnetically snap into place.
The charging lights for your Sleepbuds™ blink.
NOTE: If the charging lights don’t blink when you place Sleepbuds™
in the case, you may have placed Sleepbuds™ in the case incorrectly
or your case battery may be depleted. Place Sleepbuds™ in the case
again, then charge the case (see page 21). If the issue persists, see
“Sleepbuds™ don’t charge” on page 30.
19 | ENG
Charging light
Page 20

BATTERY
Charging time
Allow up to 6 hours to fully charge Sleepbuds™.
NOTE: A full charge powers Sleepbuds™ for up to 10 hours.
CHECK SLEEPBUDS™ BATTERY LEVEL
While using Sleepbuds™
In the Bose Sleep app, check the center of the home screen to see Sleepbuds™ current
battery level.
NOTE: If each of your Sleepbuds™ has a dierent battery level, the home screen
shows the lowest level.
While charging Sleepbuds™
When you place Sleepbuds™ in the charging case, the corresponding charging lights
blink according to charging status (see page 23).
20 | ENG
Page 21

BATTERY
CHARGE THE CASE
The charging case stores and charges your Sleepbuds™ when you’re not using them.
NOTES:
• Keep the case connected to AC (mains) power when possible to make sure that
Sleepbuds™ are always fully charged. You can also use the case battery to charge
Sleepbuds™ while traveling.
• Before charging, make sure Sleepbuds™ are at room temperature, between
50° F (10° C) and 104° F (40° C).
1. Connect the small end of the USB cable to the USB-C port on the back of
the case.
2. Connect the other end to a USB-A power supply.
3. Plug the power supply into an AC (mains) outlet.
Charging time
When Sleepbuds™ are outside the case, allow up to 3 hours to fully charge the case.
When Sleepbuds™ are inside the case, charging time varies.
NOTE: When the case is fully charged and operating on battery power, you can fully
charge Sleepbuds™ 3 times. A single charge powers Sleepbuds™ for up to
10 hours.
21 | ENG
Page 22

BATTERY
Check the case battery level
The charging case battery lights are located under the lid and show the charge status
and battery level of the case.
Case battery lights
For more information, see “Charging case battery lights” on page 24.
BATTERY PROTECTION
The battery protection feature conserves the batteries of Sleepbuds™ during
long-term storage. Sleepbuds™ enter battery protection mode when they have been
left in the case for a week.
To wake Sleepbuds™, connect the case to power (see page 21), then remove
Sleepbuds™ from the case.
22 | ENG
Page 23

SLEEPBUDS™ AND CHARGING CASE STATUS
SLEEPBUDS™ CHARGING LIGHTS
The lights on the rim of the charging case next to Sleepbuds™ show the charging
status of each of your Sleepbuds™.
Left
charging
light
LIGHT ACTIVITY CHARGING STATUS
Blinking white Charging
Solid white Fully charged
Right
charging
light
NOTE: If the case isn’t connected to power, the lights turn o after 2 minutes
of inactivity.
23 | ENG
Page 24

SLEEPBUDS™ AND CHARGING CASE STATUS
CHARGING CASE BATTERY LIGHTS
The five battery lights on the inside front rim of the case show the battery level and
charging status of the charging case.
Case battery
lights
LIGHT ACTIVITY CHARGING PERCENTAGE
0% – 20%
21% – 40%
41% – 60%
61% – 80%
81% – 100%
Charging error
(see “Charging case shows charging error” on page 32)
Updating case
NOTE: The battery lights glow white, then fade from left to right. This
pattern is repeated until the update is complete.
24 | ENG
Page 25

BLUETOOTH CONNECTIONS
Bluetooth Low Energy wireless technology lets you control Sleepbuds™ using the
Bose Sleep app on your mobile device. Before you can control Sleepbuds™, you must
download the app and connect your device with Sleepbuds™.
CONNECT YOUR MOBILE DEVICE
Download the Bose Sleep app and follow the app instructions.
DISCONNECT A MOBILE DEVICE
Use the Bose Sleep app to disconnect a device.
TIP: You can also disable the Bluetooth feature on your device to disconnect.
Disabling the Bluetooth feature on your device disconnects all other devices.
RECONNECT A MOBILE DEVICE
When Sleepbuds™ power on, the most recently-connected device automatically
reconnects with Sleepbuds™.
NOTE: The device must be within range (6 ft or 2 m) and powered on.
25 | ENG
Page 26

ADVANCED FEATURES
PHONE CALL ALERTS
Phone Call Alerts notify you of incoming calls while using Sleepbuds™. You can enable
Phone Call Alerts in the Bose Sleep app.
NOTE: Use your mobile device to answer calls. You can’t answer phone calls with
your Sleepbuds™.
PHONE-FREE MODE
Enabling Phone-Free Mode in the Bose Sleep app lets you use Sleepbuds™ with a
limited set of features without having to interact with the app.
You may want to enable this feature if:
• You prefer sleeping without electronics nearby.
• You don’t need to set a wake-up alarm or hear notifications.
NOTE: Because Sleepbuds™ are disconnected from your device, they can’t play
alarms or receive notifications when Phone-Free Mode is enabled.
When you enable Phone-Free Mode, your Sleepbuds™ begin playing a selected
masking sound as soon as you remove them from the charging case. They continue
to play that sound for a set amount of time or until you return them to the case,
depending on your settings.
26 | ENG
Page 27

CARE AND MAINTENANCE
STORE SLEEPBUDS™
To store Sleepbuds™, place them in the charging case.
The status lights for your Sleepbuds™ glow according to the charging status
(see page 23).
CLEAN SLEEPBUDS™ AND CHARGING CASE
Your Sleepbuds™ and charging case may require periodic cleaning.
COMPONENT CLEANING PROCEDURE
Remove the eartips from your Sleepbuds™ and wash them with a
Eartips
Sleepbuds™ nozzles
Case charging pins
and Sleepbuds™
charging contacts
Charging case Clean only with a dry, soft cotton swab or equivalent.
27 | ENG
mild detergent and water.
NOTE: Make sure you thoroughly rinse and dry the eartips before
reattaching them to your Sleepbuds™.
Clean only with a dry, soft cotton swab or equivalent. Never insert
any cleaning tool into the nozzle.
Regularly pat dry with a dry soft cotton swab or equivalent.
CAUTION: Do NOT clean the charging pins using a wiping motion,
as this can bend the charging pins or force moisture into
gaps in the case.
Page 28

CARE AND MAINTENANCE
REPLACEMENT PARTS
Replacement parts can be ordered through Bose customer service.
Visit: worldwide.Bose.com/Support/Sleepbuds2
LIMITED WARRANTY
Sleepbuds™ are covered by a limited warranty. Visit our website at
global.Bose.com/warranty for details of the limited warranty.
To register your product, visit global.Bose.com/register for instructions. Failure to
register will not aect your limited warranty rights.
RESET THE CHARGING CASE
Resetting the charging case powers the case o and then on. This can help resolve
charging issues.
To reset the charging case, insert a thin paper clip into the hole on the back of the
case near the USB-C port and press until you feel a click.
UPDATE SLEEPBUDS™
Your Sleepbuds™ and charging case update when connected to the Bose Sleep app.
Follow the app instructions.
28 | ENG
Page 29

TROUBLESHOOTING
TRY THESE SOLUTIONS FIRST
If you experience problems with Sleepbuds™, try these solutions first:
• Place Sleepbuds™ in the charging case and remove them (see page 14).
• Close and open the charging case, then check the charging case and Sleepbuds™
status (see page 23).
• Charge the charging case (see page 21) and Sleepbuds™ (see page 19).
• Move your mobile device closer to Sleepbuds™ (within 6 ft or 2 m) and away from
any interference or obstructions.
• Make sure that your device supports Bluetooth Low Energy (also called
Bluetooth Smart). All devices that are compatible with iOS 10 and newer
and most devices that are compatible with Android 5.0 and newer support
Bluetooth Low Energy.
• Check the Bose Sleep app to make sure that the software for Sleepbuds™ is
up to date.
• Make sure that you are using the Bose Sleep app, not a dierent app, to control
Sleepbuds™ (see page 12). Sleepbuds™ don’t work with any other Bose app.
• Try connecting another device (see page 25).
OTHER SOLUTIONS
If you could not resolve your issue, see the table below to identify symptoms and
solutions to common problems. If you are unable to resolve your issue, contact Bose
customer service.
Visit: worldwide.Bose.com/contact
SYMPTOM SOLUTION
No power
Charging case
doesn’t charge
29 | ENG
The batteries of Sleepbuds™ may be in battery protection mode (see
page 22) or depleted. Connect the charging case to power (see
page 21), then charge Sleepbuds™ (see page 19).
Secure both ends of the USB cable.
Connect the USB cable to a dierent USB power supply.
Use a dierent USB cable.
Connect to a dierent AC (mains) power source.
Check the charging case battery lights to make sure that there isn’t a
charging error (see page 24).
If Sleepbuds™ have been exposed to high or low temperatures and
all of the status lights are blinking, let Sleepbuds™ return to room
temperature. Charge again.
Reset the charging case (see page 28).
Page 30

TROUBLESHOOTING
SYMPTOM SOLUTION
On your device:
• Disable and then enable the Bluetooth feature.
• Disconnect your device from Sleepbuds™ (see page 25).
Connect again (see page 25).
Connect the charging case to power (see page 21), then remove
Sleepbuds™ don’t
connect with
mobile device
Sleepbuds™ from the case.
Place Sleepbuds™ in the charging case and check your Sleepbuds™
charging lights (see page 23). Charge Sleepbuds™.
Restart your device. Connect again (see page 25).
Connect a dierent device (see page 25).
Visit: worldwide.Bose.com/Support/Sleepbuds2 to see how-to videos.
Reset the charging case (see page 28).
Make sure Sleepbuds™ are properly placed in the charging case
(see page 27).
Check the charging case battery lights to make sure that the case
battery isn’t depleted (see page 24).
Make sure that the charging contacts for each of your Sleepbuds™ are
Sleepbuds™ don’t
charge
visible through the back of each eartip (see page 19).
Make sure there is no debris or wax buildup covering the charging
contacts on Sleepbuds™ or the charging pins in the case.
If Sleepbuds™ have been exposed to high or low temperatures and
all of the status lights are blinking, let Sleepbuds™ return to room
temperature. Charge again.
Reset the charging case (see page 28).
Make sure that you’re placing your Sleepbuds™ in your ears correctly.
Remember to rotate your Sleepbuds™ back and tuck the eartip wings
under your ear ridges (see page 16).
Make sure that you’re using the right size eartip for each of your
Sleepbuds™ (see page 17). You may need a dierent size for
each ear.
Sleepbuds™ are
uncomfortable
Be gentle when placing Sleepbuds™ in your ears. The eartip should be
deep enough in your ear to create a seal but not so deep that it feels
uncomfortable (see page 16).
Make sure Sleepbuds™ are correctly oriented in the eartips. The Bose
logo on your Sleepbuds™ should be visible and right-side up, and the
charging contacts should be visible through the backs of the eartips.
Your ears may need time to adjust to Sleepbuds™. If they are still
uncomfortable after a few days, contact Bose customer service at
worldwide.Bose.com/contact
30 | ENG
Page 31

TROUBLESHOOTING
SYMPTOM SOLUTION
In the Bose Sleep app, increase the volume of the current
masking sound.
Place Sleepbuds™ in the charging case and check the charging lights
for your Sleepbuds™ (see page 23). Fully charge Sleepbuds™.
No sound
Clear any debris or wax buildup from the eartips and
Sleepbuds™ nozzles (see page 27).
Make sure that you’re placing Sleepbuds™ in your ears correctly.
Remember to rotate Sleepbuds™ back and tuck the eartip wings under
your ear ridges (see page 16).
Connect a dierent device (see page 25).
Check that Sleepbuds™ are creating a seal in your ears to block noise.
Try speaking aloud. Your voice should sound mued. Shake your
head. Sleepbuds™ should stay secure.
Adjust the volume in the Bose Sleep app.
Make sure that you’re placing Sleepbuds™ in your ears correctly.
Remember to rotate Sleepbuds™ back and tuck the eartip wings under
your ear ridges (see page 16).
Make sure that you’re using the right size eartip for each of your
Poor sound quality
Sleepbuds™ (see page 17). You may need a dierent size for
each ear.
Make sure that Sleepbuds™ are correctly oriented in the eartips. The
Bose logo on Sleepbuds™ should be visible and right-side up, and the
charging contacts should be visible through the backs of the eartips.
Clear any debris or wax buildup from the eartips and Sleepbuds™
nozzles (see page 27).
Try a dierent masking sound. Some sounds are tailored to be more
eective for masking noise, so they may sound dierent than what
you’re used to.
Check that Sleepbuds™ fit securely in your ears. Try speaking aloud.
Your voice should sound mued. Shake your head. Sleepbuds™
should stay secure.
Sleepbuds™ falling
out of ears
Make sure that you’re placing Sleepbuds™ in your ears correctly.
Remember to rotate Sleepbuds™ back and tuck the eartip wings under
your ear ridges (see page 16).
Make sure that you’re using the right size eartip for each of your
Sleepbuds™ (see page 17). You may need a dierent size for
each ear.
31 | ENG
Page 32

TROUBLESHOOTING
SYMPTOM SOLUTION
Check that Sleepbuds™ are creating a seal in your ears to block noise.
Try speaking aloud. Your voice should sound mued. Shake your
head. Sleepbuds™ should stay secure.
Make sure that you’re placing Sleepbuds™ in your ears correctly.
Remember to rotate Sleepbuds™ back and tuck the eartip wings under
your ear ridges (see page 16).
Make sure that you’re using the right size eartip for each of your
Sleepbuds™
don’t mask noise
eectively
Sleepbuds™ (see page 17). You may need a dierent size for
each ear.
In the Bose Sleep app, increase the volume of the current masking
sound. To be eective, the masking sound should be slightly louder
than the noise in your environment.
Try a dierent masking sound. No sound is equally eective in all
environments, so you should try each to find the one that’s most
eective for you.
Add new masking sounds using the Sound Library. In the Bose Sleep
app, from the home screen tap the banner on the bottom >
Sound Library.
Securely attach the eartips to Sleepbuds™ (see page 18).
Eartips falling o
Make sure that Sleepbuds™ are correctly oriented in the eartips. The
Bose logo on Sleepbuds™ should be visible and right-side up, and the
charging contacts should be visible through the backs of the eartips.
Remove Sleepbuds™ from the charging case, then place them in the
Charging case
shows charging
error
case again.
Reset the charging case (see page 28).
If the error persists, contact Bose customer service at
worldwide.Bose.com/contact
32 | ENG
Page 33

©2020 Bose Corporation, 100 The Mountain Road, Framingham, MA 01701-9168 USA
AM842815-0010 Rev. 02
 Loading...