

Page 1
Owner's Guide
Page 2
Safety
Please take the time to follow the instructions in this owner's guide carefully. It will help you set up and operate your
system properly and enjoy its advanced features. Please save this guide for future reference.
All Bose products must be used in accordance with local, state, federal, and industry regulations.
The lightning ash with arrowhead symbol within an equilateral triangle alerts the user to the presence of
uninsulated, dangerous voltage within the system enclosure that may be of sufcient magnitude to
constitute a risk of electrical shock.
The exclamation point within an equilateral triangle, as marked on the system, is intended to alert the user
to the presence of important operating and maintenance instructions in this owner’s guide.
WARNINGS:
• To reduce the risk of re or electrical shock, do not expose the product to rain or moisture.
• Do not expose this apparatus to dripping or splashing. Do not place objects lled with liquids, such as
vases, on or near the apparatus. As with any electronic products, use care not to spill liquids into any part
of the system. Liquids can cause a failure and/or a re hazard.
• Keep battery (or batteries) away from children. May cause a re or chemical burn if mishandled. Do not
recharge, disassemble, heat above 212°F (100°C), or incinerate. Dispose of used batteries promptly.
Replace only with a battery of the correct type and model number.
• Danger of explosion if battery (or batteries) is incorrectly replaced. Use only AA batteries (IEC LR06).
• Do not place any naked ame sources, such as lighted candles, on or near the apparatus.
WARNING: Contains small parts which may be a choking hazard. Not suitable for children under age 3.
WARNING: This product contains magnetic material. Please contact your physician if you have any
questions on whether this might affect the operation of your implantable medical device.
Please dispose of used batteries properly, following any local regulations. Do not incinerate.
CAUTIONS:
• To prevent electric shock, match the wide blade of the line cord plug to the wide slot of the AC (mains)
receptacle. Insert the plug fully into the receptacle.
• The product must be used indoors. It is neither designed nor tested for use outdoors, in recreation
vehicles, or on boats.
• Make no modications to the system or accessories. Unauthorized alterations may compromise safety,
regulatory compliance, and system performance.
NOTES:
• A personal computer is required for system setup. A home Wi-Fi
• Where the mains plug or appliance coupler is used as the disconnect device, such disconnect device shall
remain readily operable.
• The product label is located on the bottom of the product.
• The speaker wire and interconnect cables included with the system are not approved for in-wall installation.
Please check your local building codes for the correct type of wire and cable required for in-wall installation.
• Changes or modications not expressly approved by Bose Corporation could void the user’s authority to
operate this equipment.
• Operate this product within the temperature range of 32° F to 104° F (0° C to 40° C).
2 - English
®
network and Internet access are required.
Page 3

Safety
Important Safety Instructions
1. Read these instructions.
2. Keep these instructions.
3. Heed all warnings.
4. Follow all instructions.
5. Do not use this apparatus near water or moisture.
6. Clean only with a dry cloth.
7. Do not block any ventilation openings. Install in accordance with the manufacturer’s instructions.
8. Do not install near any heat sources such as radiators, heat registers, stoves, or other apparatus (including
ampliers) that produce heat.
9. Do not defeat the safety purpose of the polarized or grounding-type plug. A polarized plug has two blades
with one wider than the other. A grounding type plug has two blades and a third grounding prong. The wide
blade or the third prong are provided for your safety. If the provided plug does not t into your outlet, consult
an electrician for replacement of the obsolete outlet.
10. Protect the power cord from being walked on or pinched particularly at plugs, convenience receptacles,
and the point where they exit from the apparatus.
11. Use only attachments/accessories specied by the manufacturer.
12. Unplug this apparatus during lightning storms or when unused for long periods of time.
13. Refer all servicing to qualied personnel. Servicing is required when the apparatus has been damaged
in a way, such as power-supply cord or plug is damaged, liquid has been spilled or objects have fallen
into the apparatus, the apparatus has been exposed to rain or moisture, does not operate normally,
or has been dropped.
Important USA and Canada compliance Information
• This device complies with part 15 of the FCC rules and Industry Canada license-exempt RSS standard(s).
Operation is subject to the following two conditions: (1) This device may not cause harmful interference, and (2)
this device must accept any interference received, including interference that may cause undesired operation.
• This device complies with FCC and Industry Canada RF radiation exposure limits set forth for general population.
• This device must not be co-located or be operating in conjunction with any other antennas or transmitters.
• This device complies with Industry Canada license-exempt RSS standard(s). Operation is subject to the following
two conditions: (1) This device may not cause interference, and (2) this device must accept any interference,
including interference that may cause undesired operation.
• This equipment complies with FCC and Industry Canada radiation exposure limits set forth for an uncontrolled
environment. This equipment should be installed and operated with a minimum distance of 8 inches (20 cm)
between radiator and your body. This transmitter must not be co-located or operating in conjunction with any
other antenna or transmitter.
CAN ICES-3 (B)/NMB-3(B)
This Class B digital apparatus complies with Canadian ICES-003.
Information about products that generate electrical noise
This equipment has been tested and found to comply with the limits for a Class B digital device, pursuant to Part
15 of the FCC Rules. These limits are designed to provide reasonable protection against harmful interference in a
residential installation. This equipment generates, uses, and can radiate radio frequency energy and, if not installed
and used in accordance with the instructions, may cause harmful interference to radio communications. However,
there is no guarantee that interference will not occur in a particular installation. If this equipment does cause harmful interference to radio or television reception, which can be determined by turning the equipment off and on, the
user is encouraged to try to correct the interference by one or more of the following measures:
• Reorient or relocate the receiving antenna.
• Increase the separation between the equipment and receiver.
• Connect the equipment into an outlet on a circuit different from that to which the receiver is connected.
• Consult the dealer or an experienced radio/TV technician for help.
Bose Corporation hereby declares that this product is in compliance with the essential requirements and
other relevant provisions of Directive 1999/5/EC and all other applicable EU directive requirements. The
complete Declaration of Conformity can be found at www.Bose.com/compliance.
English - 3
Page 4

Safety
Names and Contents of Toxic or Hazardous Substances or Elements
Toxic or Hazardous Substances and Elements
Lead
Part Name
PCBs X O O O O O
Metal parts X O O O O O
Plastic parts O O O O O O
Speakers X O O O O O
Cables X O O O O O
O: Indicates that this toxic or hazardous substance contained in all of the homogeneous materials for this part is below the limit
requirement in SJ/T 11363-2006.
X: Indicates that this toxic or hazardous substance contained in at least one of the homogeneous materials used for this part is
above the limit requirement in SJ/T 11363-2006.
(Pb)
Mercury
Please complete and retain for your records.
The serial and model numbers can be found on the bottom of the system.
SA-4 amplifier serial and model numbers: ___________________________________________
Wireless adapter serial and model numbers: _________________________________________
SoundTouch™ controller serial and model numbers: ___________________________________
Purchase date: ___________________________________________________________________
We suggest you keep your receipt with this owner's guide.
(Hg)
Cadmium
(Cd)
Hexavalent
(CR(VI))
Polybrominated
Biphenyl (PBB)
Polybrominated
diphenylether (PBDE)
AirPlay works with Apple iPhone, iPad, and iPod touch with iOS 4.3.3 or later, Mac with OS X Mountain
Lion, and Mac and PC with iTunes 10.2.2 or later.
AirPlay, Apple iPad, iPhone, iPod touch, iTunes, Mac, and OS X are trademarks of Apple Inc., registered in
the U.S. and other countries.
“Made for iPod,” “Made for iPhone,” and “Made for iPad” mean that an electronic accessory has been
designed to connect specifically to iPod, iPhone, or iPad, respectively, and has been certified by the
developer to meet Apple performance standards. Apple is not responsible for the operation of this device
or its compliance with safety and regulatory standards. Please note that the use of this accessory with iPod,
iPhone, or iPad may affect wireless performance.
The Bluetooth
marks by Bose is under license.
Android and Google Play are trademarks of Google, Inc.
SoundTouch and the wireless note design are trademarks of Bose Corporation in the U.S. and other
countries.
Wi-Fi is a registered mark of the Wi-Fi Alliance.
Windows is a registered trademark of Microsoft Corporation in the United States and other countries.
© 2013 Bose Corporation. No part of this work may be reproduced, modified, distributed, or otherwise used
without prior written permission.
4 - English
®
word mark and logos are registered trademarks of Bluetooth SIG, Inc. and any use of such
Page 5

Contents
Introducing SoundTouch™ from Bose
Key Benefits ................................................................................................ 7
®
Introduction
About your SoundTouch™ SA-4 amplifier ..................................................... 8
System features ......................................................................................... 8
Setting up the System
Unpacking the system ...................................................................................... 9
Adding the system to your Wi-Fi® network ................................................... 10
Installing the SoundTouch™ app ............................................................. 10
Connecting the system to your home Wi-Fi® network ........................ 1 1
Installing the SoundTouch™ SA-4 amplifier ................................................. 13
Installing the SoundTouch™ wireless adapter...................................... 13
Connecting speakers to the SA-4 amplifier ................................................. 14
Controlling the System using the App
Using the SoundTouch™ app ........................................................................... 15
Getting help ................................................................................................. 15
Downloading the app for your mobile device ............................................... 16
Controlling the system from another computer ......................................... 16
Using the System
Playing music with the SoundTouch™ controller ........................................ 17
Using the the SoundTouch™ controller ................................................. 17
Wall mounting the SoundTouch™ controller ........................................ 18
Playing an AirPlay stream ................................................................................ 19
Status indicators ............................................................................................... 19
SoundTouch™ SA-4 amplifier status indicator ..................................... 19
SoundTouch™ wireless adapter Wi-Fi® status indicator ..................... 20
Advanced Features
Alternate setup method ................................................................................... 2 1
Disable/enable Wi-Fi® capability ..................................................................... 22
Power Saving mode .......................................................................................... 22
English - 5
Page 6

Contents
Personalizing your Presets
How presets work .............................................................................................. 23
What you need to know ............................................................................. 23
Playing a preset ................................................................................................. 23
Presets with the SoundTouch™ controller .................................................... 23
To set a preset ............................................................................................ 23
To change a preset ..................................................................................... 23
Care and Maintenance
Adding a Wi-Fi® network ................................................................................... 24
Troubleshooting ................................................................................................ 24
Cleaning ............................................................................................................... 26
Customer service ............................................................................................... 26
Limited warranty information ......................................................................... 26
Technical Information
SoundTouch™ SA-4 amplifier .......................................................................... 27
SoundTouch™ wireless adapter ...................................................................... 28
SoundTouch™ controller .................................................................................. 28
Appendices
Appendix A: SA-4 amplifier connector panel ............................................... 29
Appendix B: Wall mounting the SoundTouch™ SA-4 amplifier ................ 30
Appendix C: Wall mounting the SoundTouch™ wireless adapter ............. 32
Appendix D: Using a desktop computer to connect to the network ........ 33
6 - English
Page 7

Introducing SoundTouch™ from Bose
®
With SoundTouch™, you can stream Internet radio, music services, and your music
library. If you have Wi-Fi
®
at home, you’re ready to enjoy your favorite music in any
room or outdoor space that you want.
Key Benefits
• Enjoy wireless access to Internet radio, music services, and your music library.
• Stream your favorite music easily with personalized presets.
• Works with your existing home Wi-Fi network.
• Free SoundTouch
powerful control.
• Simply add additional systems at any time for a multi-room listening experience.
• Wide selection of Bose
for any room or outdoor space.
™
app for your computer, smartphone, or tablet provides more
®
audio systems lets you choose the right solution
English - 7
Page 8

Introduction
About your SoundTouch™ SA-4 amplifier
The SoundTouch™ SA-4 amplifier is an elegant way to deliver high-quality sound
into any room or outdoor space streamed wirelessly over your home Wi-Fi
network. Use the free SoundTouch
See “Adding the system to your Wi-Fi
™
app to set up and control your system.
®
network” on page 10.
®
System features
• Easily connects to your choice of speakers for powerful sound anywhere
around your home – even connects to outdoor speakers. (Although the
amplifier itself must remain inside and dry.)
• Bose
• SoundTouch
• Six presets deliver your music with just one touch.
• An Ethernet connector enables wired access to your home network.
• Stream your music via AirPlay for your Apple
• USB connectors for network setup.
*
®
patented signal processing automatically adjusts the tonal balance,
enabling full, rich lows at nearly all listening levels.
™
controller provides control from up to 70 feet (21 m) away.
®
devices.
*
The USB connectors on the back of the system (SETUP A and SETUP B) are for setup only.
The connectors are not designed to charge smartphones, tablets, or similar devices.
8 - English
Page 9
Setting up the System
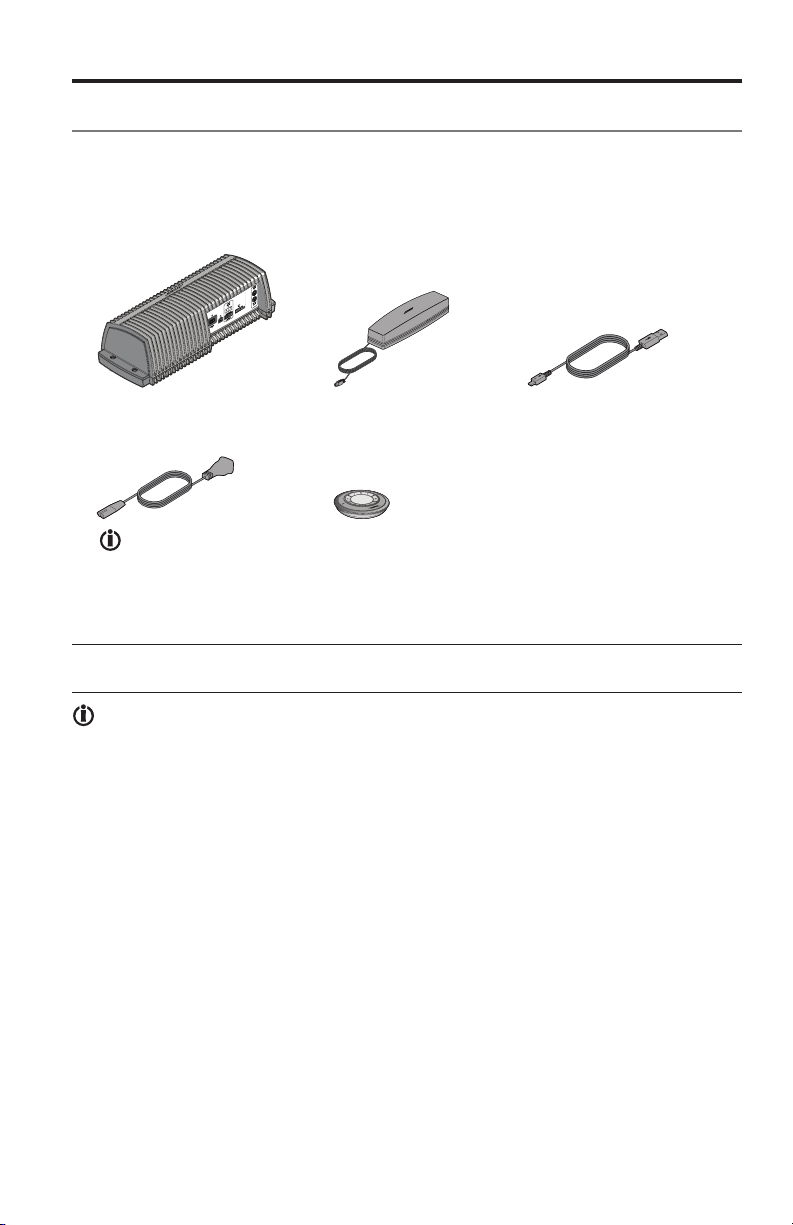
Unpacking the system
Carefully unpack the carton and confirm that the following parts are included.
Note: Do not connect any cables to the system until after you have launched
the SoundTouch™ app. See “Connecting the system to your home Wi-Fi
network” on page 11.
®
SoundTouch
SA-4 amplifier
AC (mains) power cord
™
SoundTouch™
wireless adapter
SoundTouch™ controller
USB cable
Save the carton and packing materials for transporting or storing the system.
CAUTION: To avoid danger of suffocation, keep the plastic bags out of the reach
of children.
The SoundTouch
™
SA-4 amplifier includes the appropriate AC (mains) power
cord for your region. Use only the supplied AC (mains) power cord. If it does
not fit your AC power (mains) outlet, DO NOT alter the plug in any way.
Contact Bose customer service for assistance.
Note: If part of the system is damaged, do not use it. Contact your authorized
®
Bose
dealer or Bose customer service. Please refer to the contact list in
the carton for contact information.
English - 9
Page 10
Setting up the System
Adding the system to your Wi-Fi® network
Tip: A laptop is the preferred method for connecting to the network. If you
must use a desktop computer, see “Appendix D: Using a desktop computer
to connect to the network” on page 33.
Before you can use SoundTouch
a computer that is on your home network. Next, you will use the app to connect
the system to the network. The app guides you through the setup process.
Make sure you follow the instructions on your computer.
Note: If you have already set up SoundTouch
app and click EXPLORE > SETTINGS > Systems > ADD SYSTEM to add
another system.
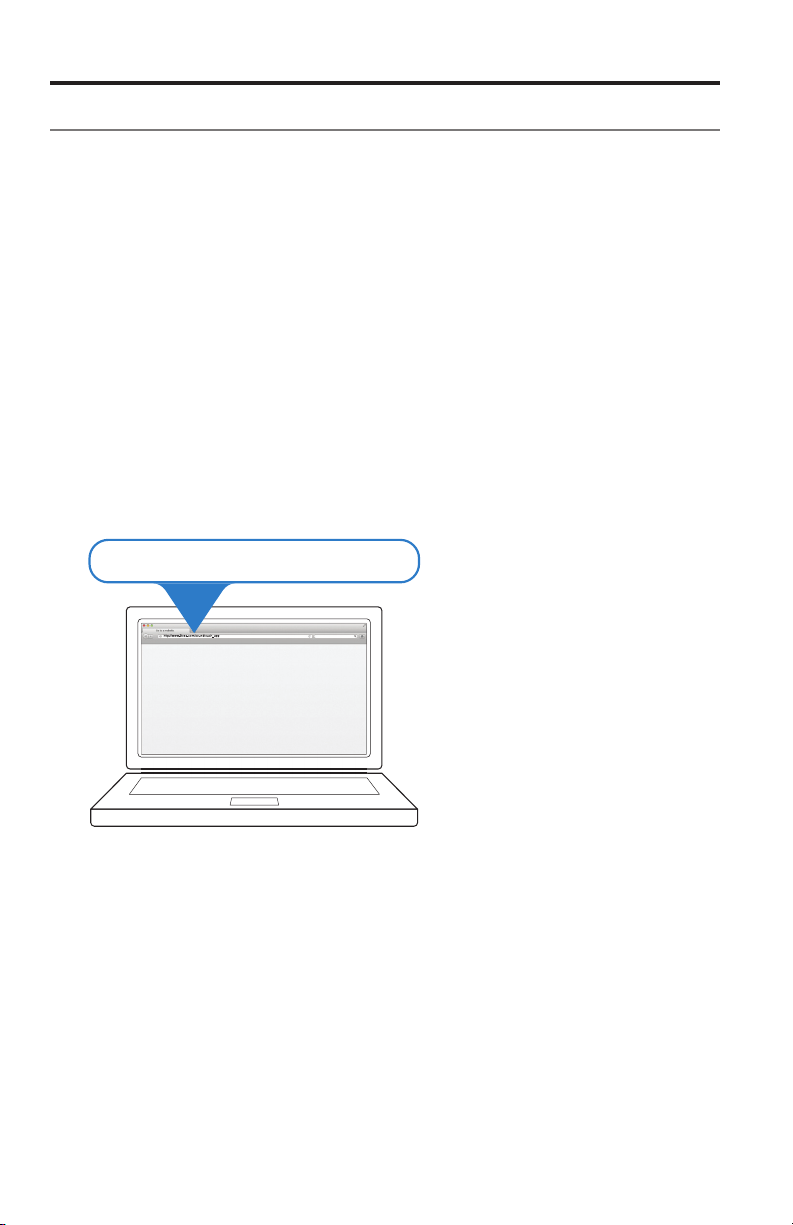
Installing the SoundTouch™ app
1. From a computer that is on your Wi-Fi® network, open a browser and go to:
http://www.Bose.com/soundtouch_app
Tip: If you want SoundTouch
music library, use the computer where your music library is stored.
http://www.Bose.com/soundtouch_app
™
you must install the SoundTouch™ app onto
™
for another system, just launch the
™
to play your iTunes® or Windows Media® Player
2. Download and install the SoundTouch™ app onto your computer.
You are now ready to connect the system to your network.
Note: Do not connect any cables to the system until the app instructs
you to connect the cables.
10 - English
Page 11
Setting up the System
Connecting the system to your home Wi-Fi® network
1. Launch the app by double-clicking the SoundTouch™ app icon.
The first time the app launches, it guides you through setting up the system
on your Wi-Fi network. The app instructs you to connect the system.
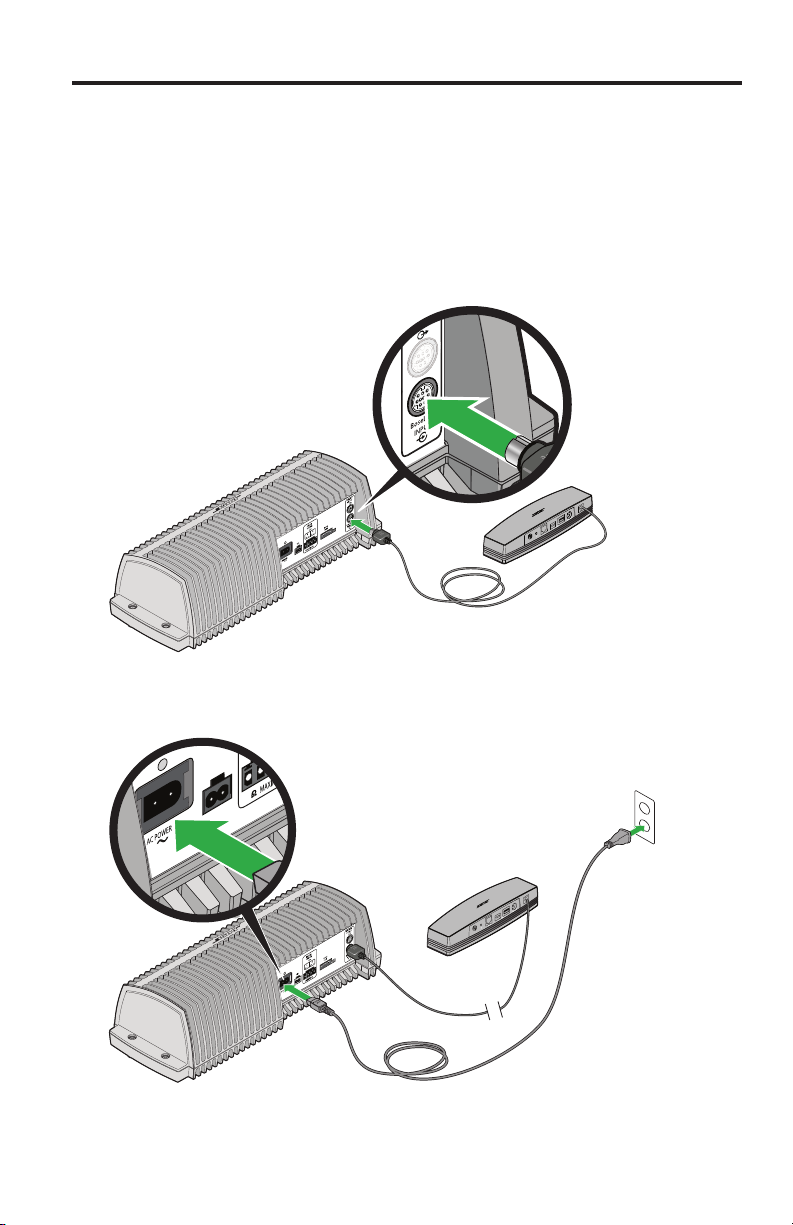
2. Place the SA-4 amplifier on a sturdy surface, close to an AC (mains) power
source.
3. Connect the wireless adapter to the BoseLink INPUT connector on the back
of the SA-4 amplifier.
4. When prompted by the app, plug the power cord into the AC POWER
connector on the back of the SoundTouch
5. Plug the other end of the power cord into AC (mains) power.
™
SA-4 amplifier.
English - 11
Page 12

Setting up the System
6. When prompted by the app, plug the small end of the USB cable into the
SETUP A connector on the SoundTouch
™
wireless adapter.
SoundTouch™ wireless
adapter SETUP A connector
7. Plug the larger end of the USB cable into a USB port on your computer.
When the SoundTouch
on the rear panel of the SoundTouch
™
app detects your system, the Wi-Fi® status indicator
™
wireless adapter lights solid amber.
The app instructs you to enter your network credentials.
8. When prompted to remove the USB cable, disconnect the USB cable from
the SoundTouch
™
wireless adapter and from the computer.
Note: Leave the wireless adapter connected to the SA-4 amplifier,
and the amplifier connected to AC (mains) power.
9. Follow the instructions on your computer to complete setup, including
creating a SoundTouch
™
account, locating your music library, signing
in to music services, exploring music, and personalizing your presets.
Note: During this process, you will be prompted to install the provided
batteries into the SoundTouch
™
controller.
10. When finished, disconnect the SA-4 amplifier from AC (mains) power and
prepare to connect the speakers.
If the amplifier is not in its permanent location, install the SA-4 amplifier and
the SoundTouch
™
wireless adapter. When you reconnect the system to AC
(mains) power, it reconnects to your network.
12 - English
Page 13

Setting up the System
Installing the SoundTouch™ SA-4 amplifier
Locate the SA-4 amplifier indoors, close to an AC (mains) power outlet. It does not
need to be close to your speakers.
The SoundTouch
on a shelf, or mounted on a wall. See page 30 for wall mounting instructions.
Consider the following caution statements when selecting a location for your
SA-4 amplifier.
CAUTIONS:
• The SA-4 amplifier must be used indoors. It is neither designed nor tested for
use outdoors, in recreational vehicles, or on boats.
• DO NOT mount the SA-4 amplifier on a surface that is not sturdy enough,
or that has hazards concealed behind it, such as electrical wiring or plumbing.
• The wireless adapter connects to the SA-4 amplifier with a 6 foot (1.8 m) cable.
Place the SA-4 amplifier so that the wireless adapter is within range of your
®
Wi-Fi
router or network access point.
• Place the SA-4 amplifier and wireless adapter in an area where the maximum
ambient temperature is less than 104°F (40°C).
• For optimum performance, place the SA-4 amplifier in a well-ventilated area.
• DO NOT place the SA-4 amplifier in a completely enclosed area. If adequate
ventilation is not provided, the amplifier automatically protects itself by
reducing its volume level in order to limit its temperature.
• DO NOT place the SA-4 amplifier on any heat-sensitive surface, such as the
finished surface of fine furniture. Like all electrical equipment, it generates
some heat.
• DO NOT use the SA-4 amplifier in a damp location. It is important to prevent
moisture from getting into the system.
™
SA-4 amplifier weighs 11 lbs (5 kg). It can be placed on a floor,
Installing the SoundTouch™ wireless adapter
The SoundTouch™ wireless adapter provides the network input for the
SA-4 amplifier. It must remain in range of the Wi-Fi router, and within
70 feet (21 m) of the SoundTouch
To keep interference to a minimum and to increase the strength of the Wi-Fi
signal, install the wireless adapter outside of and away from metal cabinets,
away from other audio/video components, and away from direct heat sources.
See page 32 for wall mounting instructions.
Note: If you experience interference with your network connection, place
the SoundTouch
™
wireless adapter outside of any cabinet or enclosure
and away from metal objects. If problems persist, see “Troubleshooting”
on page 24.
™
controller.
English - 13
Page 14

Setting up the System
Connecting speakers to the SA-4 amplifier
CAUTIONS:
• Use only unpowered speakers. DO NOT connect any make or model of
powered speakers. Doing so may cause damage to the equipment.
• The SoundTouch
Speaker cables consist of two insulated wires. Often, one wire is marked (striped,
colored, or ribbed), indicating it should be connected to the positive (+) terminal.
The plain wire should be connected to the negative (–) terminal. For recommended
wire sizes and lengths, see “Speaker cable recommendations” on page 27.
1. Disconnect the SA-4 amplifier from AC (mains) power.
2. Remove the terminal block connector from the SPEAKER OUTPUTS
connector on the rear panel of the SA-4 amplifier.
3. Use a small, flat-head screwdriver to connect the left speaker cable to the
L positive (+) and minus (–) terminals of the 4-pin terminal block connector,
and the right speaker cable to the R positive (+) and minus (–) terminals.
™
SA-4 amplifier requires a 6-ohm minimum load.
Bose 251® Environmental Speakers
shown for illustration only.
4. Plug the terminal block connector into the SPEAKER OUTPUTS connector.
14 - English
Page 15

Controlling the System using the App
5. Follow the operating instructions for your unpowered speakers to connect
the other end of the cables to the speakers. Make sure to connect the marked
wires to the positive terminals.
6. Install the speakers in their permanent location.
7. Reconnect the SA-4 amplifier to AC (mains) power.
Tip: Use a silicone caulking material such as RTV adhesive to protect
speaker wire connections. It is commonly available at hardware stores.
Using the SoundTouch™ app
The SoundTouch™ app is a software application that enables you to control the
system from your computer, smartphone, or tablet. Using the app, your smart
device acts as a rich remote for your SoundTouch
The app enables you to manage your system settings, explore local and global
Internet radio stations, set and change presets, stream music to the system,
view what is playing, plus much more.
After you set up the system on your network using the SoundTouch
you are ready to explore streaming music and to personalize your presets.
Getting help
If you need more information on using the system, use Help Tips or Online help.
™
system.
™
app,
Help Tips
After setup is complete, helpful tips appear on the screen, based on the task you
are trying to complete. These tips instruct you how to use the system, including
how to personalize your presets.
To activate the tips
If you have deactivated tips, follow these instructions to re-activate tips.
1. Launch the SoundTouch
2. Slide the SHOW TIPS slider to ON.
™
app and click EXPLORE > SETTINGS > Help Tips.
Online help
For information about using SoundTouch™:
1. Click EXPLORE > HELP in the app.
2. Browse through the help topics.
English - 15
Page 16

Controlling the System using the App
Downloading the app for your mobile device
Bose® offers a free mobile version of the SoundTouch™ app so you can control
the system from your smartphone or tablet.
To install the app for your smartphone or tablet:
• For iOS users: download the SoundTouch
• For Android
Google Play
™
users: download the SoundTouch™ controller app from the
™
Store.
Controlling the system from another computer
Once you set up the SoundTouch™ system on your home Wi-Fi® network, you
can control the system from any computer on the same network.
1. On the computer where you want to control the system, open a browser
and go to:
http://www.Bose.com/soundtouch_app
2. Download, install, and launch the SoundTouch
The sign-in screen appears.
You are ready to sign in to your SoundTouch
™
controller app from the App Store.
™
app.
™
account.
16 - English
Page 17

Using the System
Playing music with the SoundTouch™ controller
During the app set up process, the SoundTouch™ controller was activated and a
wireless connection was established. You can use the SoundTouch
™
controller to
play and manage your presets.
Note: The SoundTouch
SoundTouch
™
controller must be within 70 feet (21 m) of the
™
wireless adapter in wood-construction homes.
In concrete, stucco or brick homes, the range will likely be less and
may vary. The number of other active wireless devices in the home
may affect range. Ideally, there should be no more than one wall or
ceiling between the controller and the wireless adapter.
SoundTouch™ icon
Skip backward
Screen
Presets ring
Skip forward
Volume ring
Using the SoundTouch™ controller
• Press a preset to play it. Press and hold a preset to personalize it.
• Move your finger around the Presets ring to view presets.
• Turn the Volume ring to adjust the volume.
• Touch
• Press and hold the screen to turn the SoundTouch
• Press the screen to play or pause music.
• Touch and hold the SoundTouch
system. To connect to another system, refer to the help system in the app.
Note: If the controller is in power saving mode, wave your hand
or to skip through content.
™
system on and off.
™
icon to disconnect the controller from a
within 6 in. (15 cm) above the screen to turn it on.
English - 17
Page 18

Using the System
Wall mounting the SoundTouch™ controller
WARNING: The wall mount bracket contains magnetic material. Please
contact your physician if you have any questions whether this might
affect the operation of your implantable medical device.
Follow these instructions to wall mount your SoundTouch
™
controller. Use the
bracket as a template to mark the holes.
Tab
Bracket
Wallboard (anchors and screws supplied):
1. Use a ³/16 in. (5 mm) drill bit to drill two holes into ³/8 in. (9.5 mm)
or thicker wallboard.
2. Insert the provided anchors into the holes and tap lightly to secure.
3. Align the bracket (tab at top) to the anchors. Tighten the provided screws into
the holes.
4. Align the latch to the bracket's tab. Attach the controller.
Wood:
1. Purchase two #6x1 in. (25.4 mm) flat-head wood screws.
2. Use a
3. Align the bracket (tab at top) to the holes. Tighten the screws into the holes.
4. Align the latch to the bracket's tab. Attach the controller.
7
/64 in. (2.78 mm) drill bit to drill 2 holes into ³/4 in. (19 mm)
or thicker wood.
18 - English
Page 19

Using the System
Playing an AirPlay stream
In addition to playing content from Internet radio, music services, and your
music library, you can also stream audio from an AirPlay device on the same
®
Wi-Fi
network.
1. Start a music app on your AirPlay device.
Tip: Adjust the volume on the AirPlay device to 75 percent of maximum to
ensure optimal volume control from the SA-4 amplifier system.
2. On the device, tap or click
(assigned during setup).
3. Start playing music from a music app.
Note: To set up your system as an AirPlay device only, see “Alternate setup
method” on page 24.
and select the SoundTouch™ system name
Status indicators
SoundTouch™ SA-4 amplifier status indicator
The SoundTouch™ SA-4 amplifier has a green status indicator on the
connector panel.
SA-4 amplifier
status indicator
Indicator activity System status
Solid On and ready to receive data
Slow blinking: 1 sec on, 3 sec off In standby
Fast blinking On and receiving data
English - 19
Page 20
Using the System
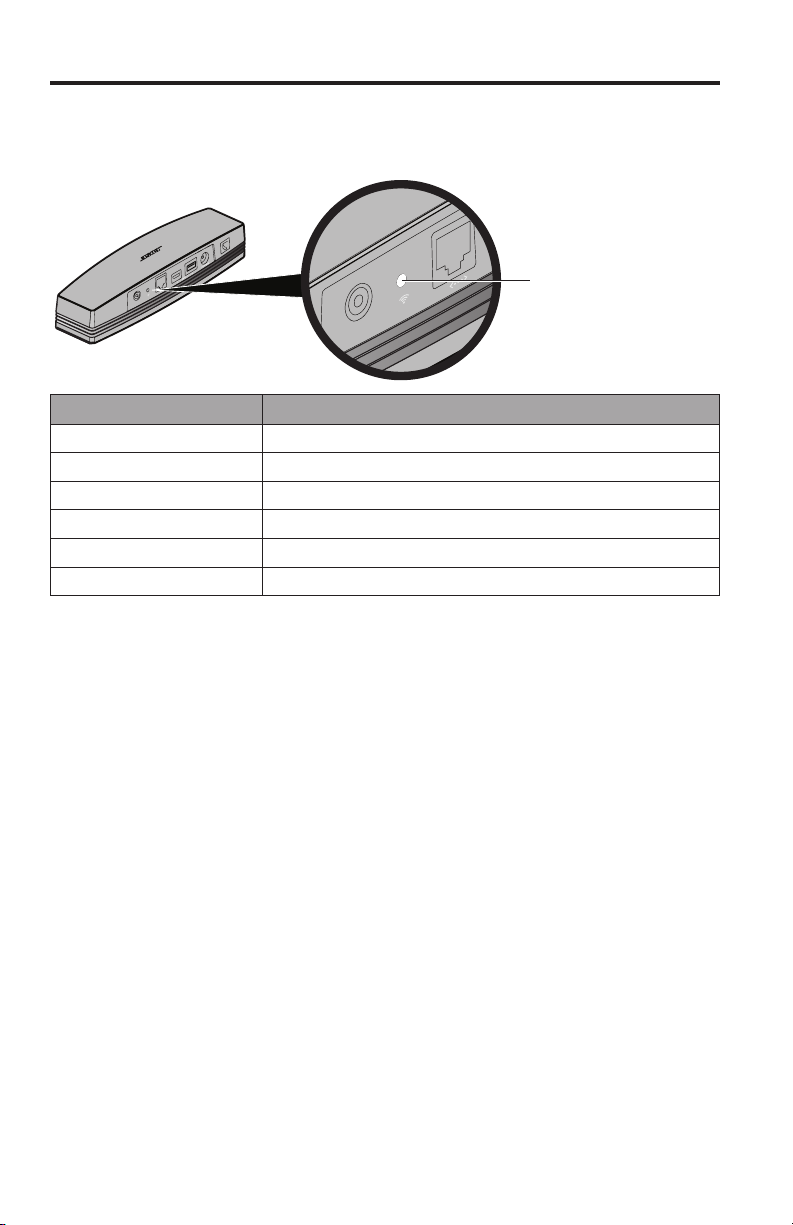
SoundTouch™ wireless adapter Wi-Fi® status indicator
The SoundTouch™ wireless adapter is powered by the SA-4 amplifier. The Wi-Fi
status indicator is located on the back panel.
SoundTouch™ wireless
adapter Wi-Fi status
indicator
Indicator activity System status
Blinking white Connecting to Wi-Fi network
Solid white System on and connected to Wi-Fi network
Solid amber System in setup mode (page 12 and page 24)
Blinking slow amber Disconnected from Wi-Fi network
Blinking fast amber Firmware error - call Bose service
Off Networking disabled or system connected to Ethernet
20 - English
Page 21

Alternate setup method
Advanced Features
Using this method you can set up your SoundTouch™ system by first joining its
own built-in Wi-Fi
1. On the back of the SoundTouch
®
network, and then connecting to your home Wi-Fi network.
™
wireless adapter, press and hold the Control
button for 2-6 seconds.
2. When the Wi-Fi status indicator blinks amber once and lights solid amber,
release the Control button.
Wi-Fi status indicator
Control button
3. On your computer, tablet or smartphone, activate Wi-Fi and join
the Bose
®
SoundTouch™ Wi-Fi network.
Note: It may take several moments for the network to appear on your device.
4. Open a browser and type: http://192.168.1.1 in the address field.
The Wi-Fi setup window appears on the screen.
5. Select your home Wi-Fi network from the drop-down list.
6. Enter your password (if required) and tap or click Connect.
The SoundTouch
™
wireless adapter Wi-Fi status indicator blinks rapidly while
the system connects to your home Wi-Fi network.
7. On your computer, tablet, or smartphone, return to the Wi-Fi control panel
and rejoin your home Wi-Fi network.
8. Once the system is on the network, follow these steps to complete setup:
A. Download and launch the SoundTouch
B. On the SOUNDTOUCH
™
SYSTEM SETUP screen, select this option:
™
app.
IT IS ALREADY CONNECTED.
English - 21
Page 22

Advanced Features
Disable/enable Wi-Fi® capability
The SoundTouch™ wireless adapter has built-in Wi-Fi capability that enables it to
wirelessly connect to your home Wi-Fi network. The Wi-Fi capability is disabled
when the SoundTouch wireless adapter is placed in the Power Saving mode.
Power Saving mode
The SoundTouch™ wireless adapter has a low-power standby mode in which it
consumes a minimum amount of power. This can be used to reduce the power
consumed in your home while you are away.
To place the SoundTouch
disable the Wi-Fi capability, press and hold the Control button on the back of the
SoundTouch
turns off, release the Control button.
To wake up the SoundTouch
again, press and release the Control button. The Wi-Fi status indicator blinks white
as it reconnects to the Wi-Fi network.
™
wireless adapter for 6-10 seconds. When the Wi-Fi status indicator
™
wireless adapter in the Power Saving mode and
™
wireless adapter and enable the Wi-Fi capability
22 - English
Page 23

Personalizing your Presets
How presets work
You can personalize six presets to your favorite streaming music services, stations,
playlists, artists, albums, or songs from your music library. You can access your
music at any time with a simple touch of a button on the SoundTouch
Tip: You can also access your presets using the SoundTouch
computer, smartphone, or tablet. See “Using the SoundTouch
™
controller.
™
app on your
™
app” on
page 15.
What you need to know
• You can set presets from the app, or from the SoundTouch™ controller.
• If the preset source is your iTunes
ensure the computer storing your music library is on and connected to the
same network as the SoundTouch™ system.
®
or Windows Media Player® music library,
Playing a preset
Once you personalize your presets using the app, press a preset on the
SoundTouch
™
controller to play it. If you have not set your presets, launch
the app and set your presets. For help, refer to the Help system in the app.
Information appears on the screen, which may include an icon, song, or station
depending on the source.
Presets with the SoundTouch™ controller
This section describes how to set and change a preset from the
SoundTouch
Note: For information on using the SoundTouch
To set a preset
1. Stream music to the system using the app.
2. While the music is playing, press and hold a preset on the
SoundTouch
A New Preset Assigned message appears on the screen.
To change a preset
Follow the instructions in “To set a preset.”
™
controller Presets ring.
™
app to set and
change your presets, refer to the Help system in the app.
™
controller (about 2 seconds).
English - 23
Page 24

Care and Maintenance
Adding a Wi-Fi® network
If your network information has changed, or to connect your system to another
network, you must add the new network information in the app and then connect
the system.
1. Launch the SoundTouch
™
app.
2. Click EXPLORE > SETTINGS > Systems.
3. Select the system.
4. Click CONNECT TO A WI-FI NETWORK.
5. Follow the instructions on your computer.
Troubleshooting
For more troubleshooting information, refer to the Help system in the
SoundTouch
™
app.
Problem What to do
™
Cannot complete
network setup
Cannot connect to
network
Intermittent or
no audio from
SoundTouch™
Cannot hear an
AirPlay device
• Make sure the SoundTouch
BoseLink INPUT connector and the SA-4 amplifier is connected
to AC (mains) power.
• Ensure network name and password are correct.
• Ensure network service is available and system and computer are
on the same network.
• Move system closer to wireless router or network access point.
• Stop other audio or video streaming applications.
• Close app, disconnect all cables, and restart setup process.
• If your network has changed or to connect your system to another
network, see “Adding a Wi-Fi® network” on page 24.
• Try connecting to the network using an Ethernet cable.
• Make sure the SoundTouch
BoseLink INPUT connector.
• Move the SoundTouch™ wireless adapter away from possible
interference such as microwaves, cordless phones, metal cabinets,
or other metal objects, etc.
• Stop other audio or video streaming applications.
• Ensure system is powered and connected to the same network as
the computer.
• Move system or audio source closer to wireless router or network
access point.
• Ensure system volume is not muted or too low.
• Unplug the power cord; reconnect after one minute.
• Ensure system and AirPlay device are connected to the same
network.
• Ensure AirPlay device is playing; increase its volume.
• Ensure system is selected in the AirPlay menu of the device.
• Move AirPlay device away from possible interference and closer to
the wireless router or network access point.
Note: Proximity of the AirPlay device to the system is not important,
only to the wireless router or network access point.
wireless adapter is plugged into the
™
wireless adapter is plugged into the
24 - English
Page 25

Care and Maintenance
Problem What to do
Neither speaker
plays
Only one speaker
plays
One speaker still
does not play
Right and left
stereo channels are
heard on the wrong
speakers
Bass or treble is
weak
Interference • Make sure the speaker cables are firmly inserted in the terminals
SoundTouch
™
controller does not
adjust the volume
Volume suddenly
decreases
Wireless adapter
does not awaken
from power saving
mode.
• Make sure the amplifier is connected to AC (mains) power.
• Make sure the plug is inserted fully and the AC (mains) power
outlet is powered.
• Make sure content is selected via the SoundTouch
• Disconnect the SoundTouch
™
wireless adapter cable from the
™
app.
amplifier. Disconnect AC power from the SA-4 amplifier for three
minutes. Reconnect the SoundTouch™ wireless adapter. Reconnect
power to the SA-4 amplifier.
Make sure the cables are in good condition and are firmly
connected at both ends for the speaker that does not play.
Try connecting the speaker that does not play to the other speaker
cable. If the speaker still does not play, the problem may be with
the speaker. If the speaker now plays, you know the speaker and
the cable are both good. Disconnect the cable from the amplifier terminal, and connect it to the other terminal connector. If the
speaker now plays, the problem is likely in the other speaker cable.
Replace it. If the speaker does not play, the problem may be in that
channel of the amplifier.
• Make sure the cable connected to the SPEAKER OUTPUTS L
at the amplifier are connected to the speaker on the left in your
listening area, and the cable connected to the SPEAKER
OUTPUTS R at the amplifier are connected to the speaker
on the right in your listening area.
Check the speaker cable connections. Make sure the individual
wires are connected + to + and – to –.
on the back of the speakers and on the amplifier rear panel. Check
to be sure no individual wires are touching across terminals.
• Make sure the SoundTouch
objects, other audio/video components, and direct heat sources.
™
wireless adapter is away from metal
• Replace the batteries in the SoundTouch™ controller.
• If you are using a local volume control (VCA), turn it to the off
position.
• Lower the volume setting to see if the level returns to normal. If so,
the sudden loss of volume was an intentional action of the amplifier’s overload protection feature. This engages automatically if the
volume is set too high and is overdriving the speakers. Choosing a
lower setting should ensure continuous, even volume.
• Disconnect the amplifier from AC (mains) power and allow it to
cool. Increase ventilation. Reconnect to power. If the volume level
returns to normal, the sudden loss of volume was an intentional
action of the amplifier's thermal overload protective feature. This
engages automaticaly if the amplifier overheats. Increasing ventilation should ensure continuous, even volume.
™
Disconnect the SoundTouch
amplifier. Disconnect AC power from the SA-4 amplifier for three
wireless adapter cable from the
minutes. Reconnect the SoundTouch™ wireless adapter. Reconnect
power to the SA-4 amplier.
English - 25
Page 26

Care and Maintenance
Cleaning
CAUTION: Disconnect the power cord from the AC (mains) power outlet before
cleaning.
To clean the SA-4 amplifier, use only a soft, dry cloth to remove dust from the
outside of the enclosure. You may use a brush attachment on a vacuum cleaner
to clean the hard-to-reach areas. DO NOT use any solvents, chemicals, or
cleaning solutions containing alcohol, ammonia, or abrasives.
Customer service
For additional help using the system, contact Bose customer service. See the
address and phone number list included with your SoundTouch
™
system.
Limited warranty information
Your SoundTouch™ system is covered by a limited warranty. Details of the
limited warranty are provided on the product registration card that is included
in the carton. Please refer to the card for instructions on how to obtain warranty
service and register your product. Failure to register will not affect your limited
warranty rights.
26 - English
Page 27

Technical Information
SoundTouch™ SA-4 Amplifier
Features
• Bose® proprietary digital signal processing technology
• Built-in digital volume control
• Thermal overload protection
Dimensions and Weight
• 14¼ in. wide x 5½ in. deep x 4¼ in. high (36.2 cm x 14.0 cm x 10.8 cm)
• 11.0 lb (5 kg)
Power rating
• USA/Canada: 120V 60 Hz, 400W
• International: 220-240V
Input sensitivity
0.5 Vrms @ 1 kHz
Signal to Noise ratio (S/N)
90 dB
Output power (continuous average)
100W / channel minimum into 6 ohms, from 30 to 15 kHz,
with no more than 0.5% THD.
50/60 Hz, 400W
Temperature range
32° F to 104° F (0° C to 40° C)
Speaker cable recommendations
Maximum Length Gauge
30 ft (9 m) 18 (0.82 mm2)
45 ft (14 m) 16 (1.3 mm2)
70 ft (21 m) 14 (2.0 mm2)
English - 27
Page 28

Technical Information
SoundTouch™ wireless adapter
Dimensions and weight
• 2½ in. wide x 9⅜ in. long x 2 in. high (6.4 cm x 23.8 cm x 5.1 cm)
• 12.0 oz (.34 kg)
Temperature range
32° F to 104° F (0° C to 40° C)
SoundTouch™ controller
Dimensions and weight
• 4⅛ in. diameter x 1⅛ in. high (10.5 cm x 2.8 cm)
• 8.0 oz (.23 kg)
Temperature range
32° F to 104° F (0° C to 40° C)
28 - English
Page 29

Appendices
Appendix A: SA-4 amplifier connector panel
AC
POWER
VCA
ROOM CODE switches
BoseLink
OUTPUT
connector
BoseLink
INPUT
connector
SPEAKER
OUTPUTS
Connector Description
AC
POWER
VCA
SPEAKER
OUTPUTS
ROOM
CODE
switches
Status
indicator
BoseLink
INPUT
BoseLink
AC power cord connector. Power is applied when the power cord is
inserted and plugged into an AC (mains) outlet. There is no on/off switch
on the SoundTouch™ SA-4 amplifier.
Local volume control connector. Allows you to control the volume using
a wall-mounted control. Contact your Bose dealer or call Bose customer
service for information on installing this feature. See the contact list
enclosed in the carton.
Left and right speaker outputs. Connect only unpowered speakers. A
6-ohm minimum load is required. To determine the correct speaker wire
size, see “Speaker cable recommendations” on page 27.
Only switch A is used for SoundTouch™ systems.
The output of the SoundTouch™ SA-4 amplifier can
be set to stereo (Switch A up) or mono (Switch A
down). The mono output mode feeds left and right
channel audio to both the left and right outputs. This
is useful in situations where a stereo output isn’t
feasible such as when outdoor speakers are used in
a large area.
The remaining six switches should remain in the
default configuration:
The green indicator shows the operational state of the SA-4 amplifier.
See “SoundTouch™ SA-4 amplifier status indicator” on page 19.
Used for connecting the SoundTouch
SA-4 amplifier.
Not used.
OUTPUT
Status indicator
™
wireless adapter to the
Switch B Down
Switch C Down
Switch 6 Down
Switch 7 Down
Switch 8 Down
Switch 9 Up
English - 29
Page 30

Appendices
Appendix B: Wall mounting the
SoundTouch™ SA-4 amplifier
Vertical
orientation
Connector
panel is
facing left.
Follow these instructions to wall mount your SoundTouchTM SA-4 amplifier.
Install either vertically with the connector panel facing left, or horizontally
with the connector panel facing up.
1. Remove rubber feet from the SA-4 amplifier. Use these holes to mount the
amplifier on the wall.
2. To mark mounting hole locations, hold the SA-4 amplifier in position and mark
the wall through the holes in the housing.
Horizontal
orientation
Connector panel
is facing up.
3. Drill holes.
4. Insert and tighten screws (and anchors, if used).
30 - English
Page 31

Appendices
Note: Mounting hardware must be purchased separately. If the mounting
hardware instructions differ from these instructions, follow the mounting
hardware instructions.
• Wood Mounting: Mount to 1 in. (25.4 mm) or thicker wood. Drill pilot
hole with a ³/
pan-head wood screws.
• Wallboard Mounting: Mount to ⅜ in. (9.5 mm) or thicker wallboard.
Drill pilot hole with a ½ in. (12.7 mm) drill. Use (4) #10 x 2½ in.
(M5 x 63.5 mm) pan head machine screws and (4) #10 (M5) spring anchors.
32 in. (2.38 mm) drill. Use (4) #10 x 1½ in. (M5 x 38 mm)
Wood
1 in. (25.4 mm) minimum
Wallboard
³/8 in. (9.5 mm) minimum
English - 31
Page 32

Appendices
Appendix C: Wall mounting the
SoundTouch™ wireless adapter
Vertical
orientation
Connector
panel is
facing left.
Horizontal
orientation
Connector panel
is facing up.
Follow these instructions to wall mount your SoundTouch™ wireless adapter. Install
either vertically with the connector panel facing left, or horizontally with the connector panel facing up.
Note: Mounting hardware must be purchased separately. If the mounting
hardware instructions differ from these instructions, follow the mounting
hardware instructions.
• Wood Mounting: Mount to 1 in. (25.4 mm) or thicker wood. Drill hole with
a ⅛ in. (3.17 mm) drill. Use (2) #8x1¼ in. (32 mm) pan-head wood screws.
• Wallboard Mounting: Mount to ⅜ in. (9.5 mm) or thicker wallboard. Drill
pilot hole with a ³/
16 in. (4.76 mm) drill. Use (2) #6-8x1 in. (25.4 mm) plastic
wall anchors, and (2) #8x1¼ in. (32 mm) pan-head wood screws.
Wood
Wallboard
¼ in. (6.35 mm)
above surface
¼ in. (6.35 mm)
above surface
1. Mark holes on the wall 6¼ in. (158.7 mm) center-to-center.
2. Drill holes. Insert anchors (if used).
3. Install screws. Leave the screw heads ¼ in. (6.35 mm) above wall surface.
™
4. Position SoundTouch
32 - English
wireless adapter onto screws. Press firmly into place.
Page 33

Appendices
Appendix D: Using a desktop computer to
connect to the network
If you have a desktop computer, temporarily move the SA-4 amplifier near the
computer to set up the network connection.
The diagram below shows how to temporarily set up your SA-4 amplifier and
SoundTouch
Once you have the components in place, follow the procedures in this guide to
connect to your network using the desktop computer. After making the network
connection, you can test the system to make sure everything works.
When you are done, disconnect the amplifier from your computer and AC (mains)
power and permanently install the SA-4 amplifier. When you reconnect the system
to AC (mains) power, it reconnects to your network.
See “Installing the SoundTouch
™
wireless adapter near your desktop computer.
™
SA-4 amplifier” on page 13.
BoseLink
cable
AC power
cord
USB cable
Note: Connect the USB cable to the SoundTouch™ wireless adapter only
when the app instructs you to do so.
English - 33
Page 34

©2013 Bose Corporation, The Mountain,
Framingham, MA 01701-9168 USA
AM625304 Rev. 00
 Loading...