

Page 1

Bose® FreeSpace® 3 Series II Loudspeaker
Installation Guide*
Installationsvejledning*
Installationsanleitung*
Guía de instalación*
Guide d’installation*
Guida all’installazione*
Installatiehandleiding*
Installationsanvisning*
*For use by trained installers only
*Kun til brug for erfarne installatører
*Montage ausschließlich durch
ausgebildetes Installationspersonal
*Para uso exclusivo de instaladores capacitados
*Réservé aux installateurs ayant suivi une formation
*Solo per l’uso da parte di installatori professionisti
*Uitsluitend voor gebruik door ervaren installateurs
*Ska endast användas av utbildade installatörer
AM263579_00 _V.pdf • December 5, 2002
1
Page 2

I stallatio av 802 ögtalare................forts. på sid 11
Maintaining Your Product
DECLARATION OF CONFORMITY
We, the offerer:
Bose® Corporation, The Mountain, Framingham, MA 01701-9168 USA
acknowledge our sole responsibility, that the product:
Kind of equipment: Loudspeaker
Type designation: FreeSpace® 3 Series II Acoustimass
module
In accordance with EMC Directive 89/336/EEC and Article 10(1) of the Directive,
is in compliance with the following norm(s) or document(s):
Technical regulations: EN50081-1, EN50082-1
Accredited by:
Bose Corporation, The Mountain, Framingham, MA 01701-9168 USA
®
15 April 2002
Bose Products B.V.
Nijverheidstraat 8, 1135 GE Edam
The Netherlands
Manufacturer’s authorized EU representative
Vice President Europe
Nic Merks
U.S. Regulatory information
The Bose Freespace 3 Series II Acoustimass® module and flush-mount satellite have been certified as
General Purpose Loudspeakers, in accordance with UL1480.
The Bose Freespace 3 Series II Acoustimass Module and Flush-Mount Satellite also comply with the
requirements of NFPA 70, National Electric Code 2002, Article 300-22(c) and UL2043 for use in air
handling spaces, and NFPA 90A-1996 Installation of Air Conditioning and Ventilation Systems, Section
2-3.10.1(a), exception 3 when used with the PC-FreeSpace 3B and PC-FreeSpace 3F Plenum Cover
Accessories.
Nederlands
2
AM263579_00 _V.pdf • December 5, 2002
Page 3

Package
contents
Kassen
indeholder
Packungsinhalt
El paquete
contiene
Contenu
de l’emballage
Contenuto
della confezione
Inhoud van
de verpakking
Paketets innehåll
Installation/Instalación/Installazione/Installatie
or
eller
oder
o
ou
o
of
eller
Dimensions
Mål
Abmessungen
Dimensiones
Dimensions
Dimensioni
Afmetingen
Dimensioner
Optionen/Opciones/Au choix/
Front
AM263579_00 _V.pdf • December 5, 2002
Choices/Valgmuligheder/
Opzioni/Keuzes/Alternativ
3
Page 4

Installation/Instalación/Installazione/Installatie
Dimensions
Mål
Abmessungen
Dimensiones
Dimensions
Dimensioni
Afmetingen
Dimensioner
Rear
Side
4
AM263579_00 _V.pdf • December 5, 2002
Page 5

Dimensions
Mål
Abmessungen
Dimensiones
Dimensions
Dimensioni
Afmetingen
Dimensioner
Installation/Instalación/Installazione/Installatie
Front
Rear
Side
Side
AM263579_00 _V.pdf • December 5, 2002
5
Page 6

Installation/Instalación/Installazione/Installatie
Choices
Valgmuligheder
Optionen
Opciones
Au choix
Opzioni
Keuzes
Alternativ
®
FreeSpace® 3F Cosmetic
Bose
Cover
Bose FreeSpace 3F Rough-in
Pan
Bose 8/32 Junction Box
Bose FreeSpace® 3F Tile Bridge
PC-FreeSpace 3F
Plenum Cover
6
AM263579_00 _V.pdf • December 5, 2002
Page 7

Installation/Instalación/Installazione/Installatie
S
T
E
R
E
O
C
H
1
(M
O
N
O
, U
S
E
JU
M
PE
R
S
)
S
T
E
R
E
O
C
H
2
7
0
V
/
1
0
0
V
I
N
P
U
T
+100V
+
70V
COM
NC
D
I
R
E
C
T
C
O
U
P
L
E
I
N
P
U
T
S
A
T
1
S
A
T
2
S
A
T
3
S
A
T
4
S
A
T
1
S
A
T
2
S
A
T
E
L
L
I
T
E
C
O
N
N
E
C
T
I
O
N
S
®
Bose
FreeSpace 3B Pendant
Mount Kit
Bose FreeSpace 3B Rough-in Pan
Required
Påkræves
Erforderlich
Se requiere
+
Nécessite
È necessario
Verplicht
Krävs
or
eller
oder
o
ou
o
of
eller
Bose FreeSpace 3B Surface
Mount Kit
Bose FreeSpace 3B
Tile Bridge
PC-FreeSpace 3B Plenum
Cover
Bose 8/32 Junction Box
AM263579_00 _V.pdf • December 5, 2002
7
Page 8

Installation/Instalación/Installazione/Installatie
Amplifier output
connection
Tilslutning til
forstærkerudgang
Anschluss des
Verstärkerausgangs
Conexión de
salida del
amplificador
Raccordement aux
sorties de
l’amplificateur
Connessione di
uscita
dell’amplificatore
Uitgangsverbinding
van de versterker
Anslutning
från
förstärkare
STEREO
CH 1
(MONO, USE
JUMPERS)
PA
DIRECT
COUPLE
INPUT
100V
STEREO
CH 2
COM
70V/100V
INPUT
+70V
+100V
NC
STEREO
CH 1
(MONO, USE
JUMPERS)
DIRECT
COUPLE
INPUT
SAT 1
STEREO
CH 2
SAT 2 SAT 3 SAT 4
SAT 1 SAT 2
SATELLITE CONNECTIONS
COM
70V/100V
INPUT
+70V
+100V
70V
PA
NC
+70V
70V/100V
INPUT
+100V
COM
NC
STEREO
(MONO, USE
JUMPERS)
CH 1
DIRECT
COUPLE
INPUT
STEREO
CH 2
70V parallel
PA
NC
+70V
70V/100V
INPUT
+100V
STEREO
CH 1
(MONO, USE
JUMPERS)
DIRECT
COUPLE
INPUT
STEREO
CH 2
COM
8
AM263579_00 _V.pdf • December 5, 2002
Page 9

Installation/Instalación/Installazione/Installatie
Transformer tap
setting
Transformer
tapsætning
Einstellen der
Transformatorabgriffe
Ajuste del
cambiador
de la relación de
transformación
Position des
réglages du
transformateur
Trasformatore:
impostazione
delle potenze
intermedie
Aftakkingsinstelling van
de transformator
Tappinställning
för transformator
• Lower Wattage: The transformer tap is set at the factory for 200W use. To set it for lower wattage,
remove the end of the + jumper wire that is connected to 200W and reattach it to the appropriate tap
(100W, 50W, or 25W).
• Lavere watt: Transformer tapsætningen indstilles på fabrikken til anvendelse ved 200 W. Hvis den skal
indstilles til lavere watt, skal enden af kablet mærket+, der er sluttet til 200 W, flyttes til den passende
omskifter (100 W, 50 W, eller 25 W).
• Niedrige Wattzahl: Der Transformatorabgriff ist ab Werk für 200W eingestellt. Wenn Sie eine niedrigere
Wattzahl benötigen, entfernen Sie das Ende des +Verteilerdrahts vom 200W Abgriff und befestigen es
am gewünschten Abgriff (100W, 50W bzw. 25W).
• Vatiaje más bajo: La relación de transformación viene establecida de fábrica para el uso de 200 W.
Para cambiar a un vatiaje más bajo, retire el extremo del hilo de puente+ que está conectado a 200 W y
vuelva a acoplarlo a la relación de transformación apropiada (100 W, 50 W o 25 W).
• Puissance plus faible : le réglage du transformateur est effectué en usine pour une puissance de 200
W. Si l’on souhaite utiliser une puissance plus faible, retirer l’extrémité du strap + raccordé sur la borne
200 W et replacer celui-ci sur la borne appropriée (100, 50, ou 25 W).
• Potenze intermedie: il trasformatore è impostato in fabbrica sulla potenza di 200 W. Per impostare una
potenza inferiore, rimuovere l’estremità del ponticello + inserita nel connettore da 200 W e inserirla nel
connettore della potenza desiderata (100, 50 o 25 W).
• Lager wattage: De transformatoraftakking is in de fabriek ingesteld op 200 W. Om een lager wattage in
te stellen verwijdert u het uiteinde van de + overbruggingsdraad die aangesloten is op de 200 W
aansluiting en bevestigt u deze op de juiste aftakking (100 W, 50 W of 25 W).
• Lägre watt: Transformatortappen är inställd på fabriken för 200W. För lägre wattal, avlägsna änden av +
bygeltråden som är ansluten till 200W och anslut den till lämplig tapp (100W, 50W eller 25W).
TRANSFORMER SETTINGS
25W
200W
100W
50W
NC
+
Dansk
Español
STEREO
CH 1
(MONO, USE
JUMPERS)
AM263579_00 _V.pdf • December 5, 2002
DIRECT
COUPLE
INPUT
SAT 1
SAT 2 SAT 3 SAT 4
SAT 1 SAT 2
SATELLITE CONNECTIONS
COM
STEREO
CH 2
70V/100V
INPUT
+70V
+100V
Italiano
Nederlands
NC
9
Page 10

Installation/Instalación/Installazione/Installatie
Direct
(transformer
bypass) use
Direkte
(transformer
bypass) lavohms
DirektAuslegung
(Umgehung des
Transformators)
Uso directo
(desviación del
transformador)
Utilisation
directe
(transformateur
shunter)
Collegamento
diretto
(esclusione del
trasformatore)
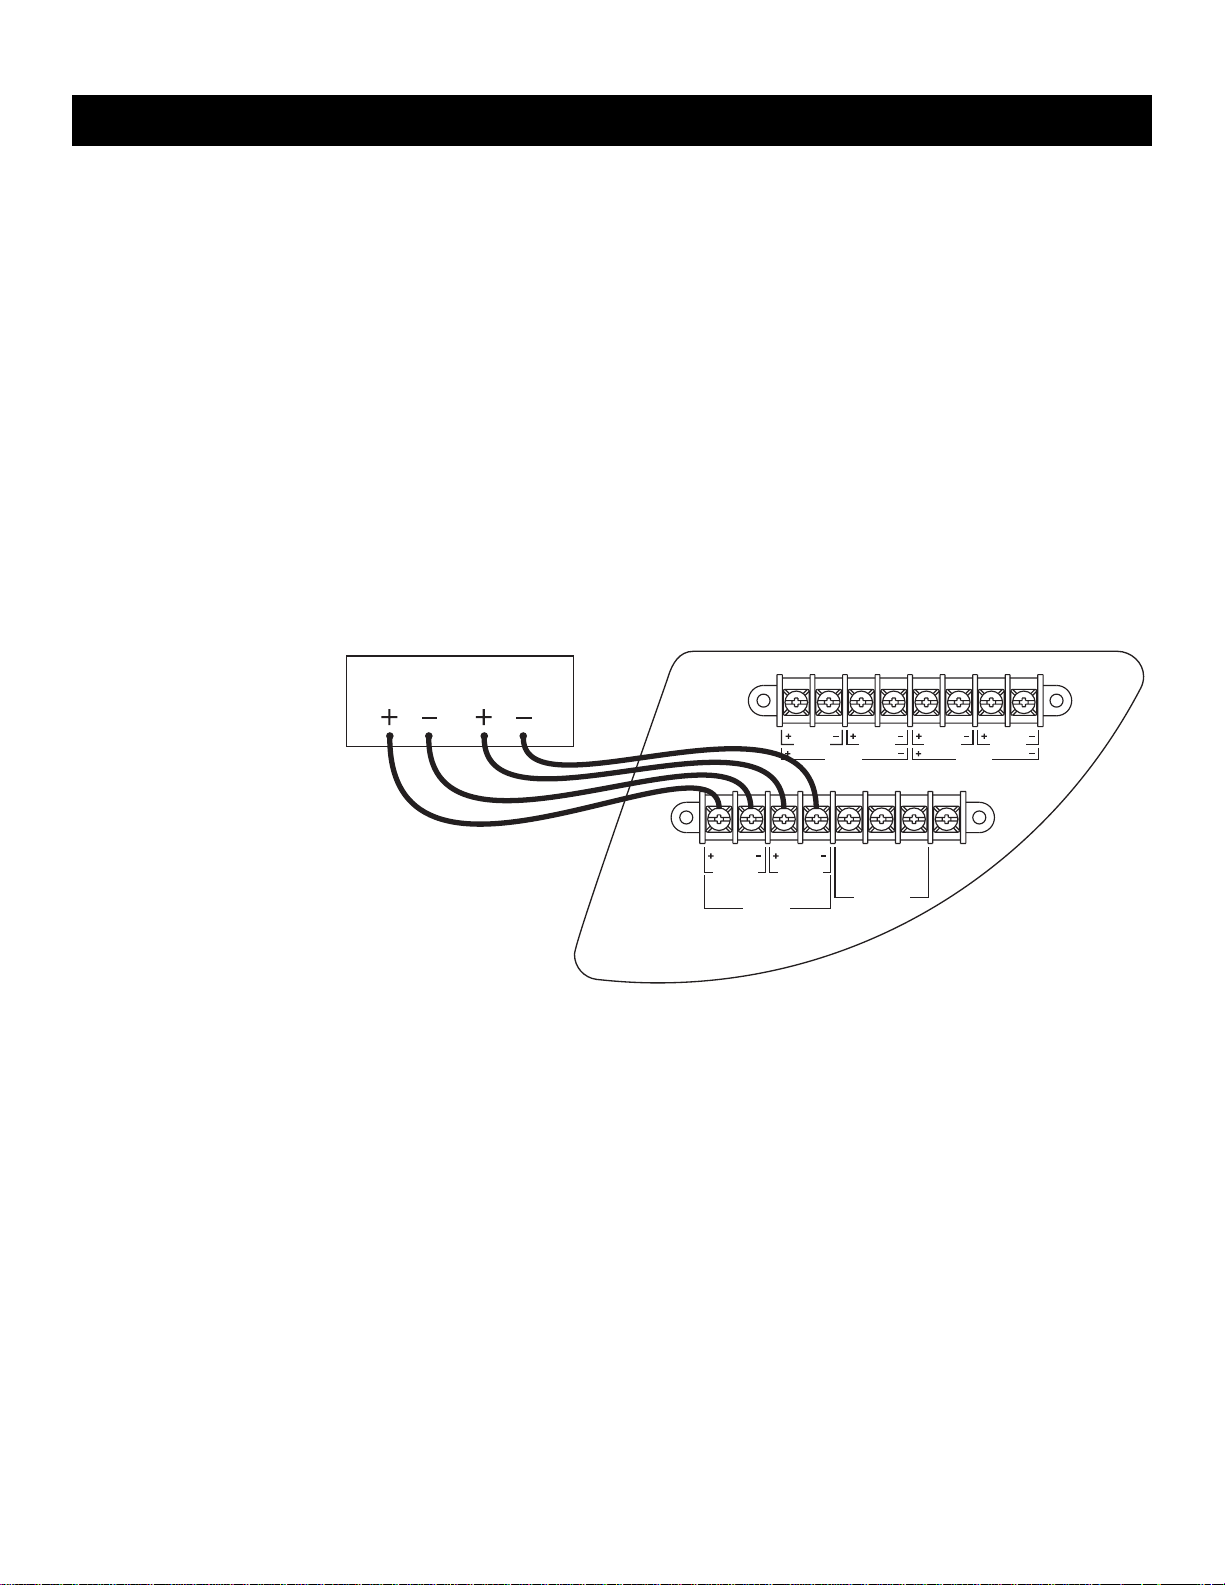
• Mono Direct: To bypass the transformer and prepare the loudspeaker for 4Ω use and mono sound
input, remove the two jumpers from the transformer settings on the front of the loudspeakers. Leave the
CH1 and CH2 input jumpers on the back of the loudspeaker as they are.
• Mono direkte: Fjern de to jumpere fra transformerindstillingerne på forsiden af højttalerne for at foretage
bypass af transformeren og forberede højttalerne til anvendelse ved 4 Ω og mono lydindgang. Lad CH1
og CH2 koblingskablerne sidde på bagsiden af højttalerne som de er.
• Mono-Direkt: Wenn Sie den Transformator umgehen möchten und den Lautsprecher für 4Ω und Mono-
Soundeingang vorbereiten möchten, entfernen Sie die beiden Transformatorverteilerdrähte auf der
Vorderseite der Lautsprecher. Die Verteilerdrähte für CH1- und CH2-Eingang auf der Rückseite der
Lautsprecher bleiben unverändert.
• Mono Directo: Para desviar (bypass) el transformador y preparar el altavoz para uso de 4Ω y entrada de
sonido en mono, retire únicamente los dos hilos de puente del transformador en la parte frontal de los
altavoces. Deje los puentes de entrada CH1 y CH2 en la parte trasera del altavoz tal y como están.
• Mode mono direct : si l’on souhaite shunter le transformateur et préparer l’enceinte pour une utilisation
4 Ω en mode mono, retirer les 2 straps du système de réglage du transformateur situé à l’avant des
enceintes. Laisser cependant les straps d’entrée CH1 et CH2, présents à l’arrière de l’enceinte, dans
leur position initiale.
• Mono, diretto: per escludere il trasformatore e utilizzare l’altoparlante in configurazione 4Ω ingresso
mono, rimuovere i due ponticelli del trasformatore sulla parte frontale degli altoparlanti. Non toccare i
ponticelli di ingresso CH1 e CH2 sul retro dell’altoparlante.
• Mono direct: Om de transformator over te slaan en de luidspreker voor te bereiden op gebruik van 4Ω
en mono verwijdert u alleen de twee overbruggingsdraden van de transformatorinstellingen voorop de
luidsprekers. Laat de overbruggingsdraden van CH1 en CH2 achterop de luidspreker zoals ze zijn.
• Monodirekt: Gå förbi transformatorn och förbered högtalaren för 4Ω-användning och monoljud genom
att avlägsna de två bygeltrådarna för transformatorn på högtalarnas framsida. Låt ingångstrådarna CH1
och CH2 sitta kvar på högtalarens baksida.
Direct
(transformator
bypass) gebruik
Direkt
(transformator
-avledning)
användning
MONO SOURCE
– +
STEREO
CH 1
(MONO, USE
JUMPERS)
DIRECT
COUPLE
INPUT
SAT 1
STEREO
CH 2
SAT 2 SAT 3 SAT 4
SAT 1 SAT 2
SATELLITE CONNECTIONS
COM
70V/100V
INPUT
+70V
+100V
NC
10
AM263579_00 _V.pdf • December 5, 2002
Page 11
Installation/Instalación/Installazione/Installatie
• Stereo Direct: To bypass the transformer and prepare the loudspeaker for 6Ω use and stereo sound
input, remove all jumper wires.
• Stereo direkte: Fjern alle koblingskabler ved benyttelse af lavohm på transformeren og forberedelse af
højttaleren til anvendelse med 6 Ω og stereo lydindgang.
• Stereo-Direkt: Wenn Sie den Transformator umgehen möchten und den Lautsprecher für 6Ω und
Stereo-Soundeingang vorbereiten möchten, entfernen Sie alle Verteilerdrähte.
• Estéreo Directo: Para desviar (bypass) el transformador y preparar el altavoz para uso de 6Ω y
entrada de sonido en estéreo, retire los dos hilos de puente.
• Mode stéréo direct : si l’on souhaite shunter le transformateur
et préparer l’enceinte pour une utilisation 6 Ω en mode stéréo, retirer tous les straps.
• Stereo, diretto: per escludere il trasformatore e utilizzare l’altoparlante in configurazione 6Ω ingresso
stereo, rimuovere tutti i ponticelli.
• Stereo direct: Om de transformator over te slaan en de luidspreker voor te bereiden op gebruik van
6Ω en stereo verwijdert u alle overbruggingsdraden.
• Stereodirekt: Gå förbi transformatorn och förbered högtalaren för 6Ω-användning och stereoljud
genom att avlägsna alla bygeltrådar.
Stereo Source
L R
STEREO
CH 1
(MONO, USE
JUMPERS)
DIRECT
COUPLE
INPUT
SAT 1
STEREO
CH 2
SAT 2 SAT 3 SAT 4
SAT 1 SAT 2
SATELLITE CONNECTIONS
COM
70V/100V
INPUT
+70V
+100V
NC
AM263579_00 _V.pdf • December 5, 2002
11
Page 12
Installation/Instalación/Installazione/Installatie
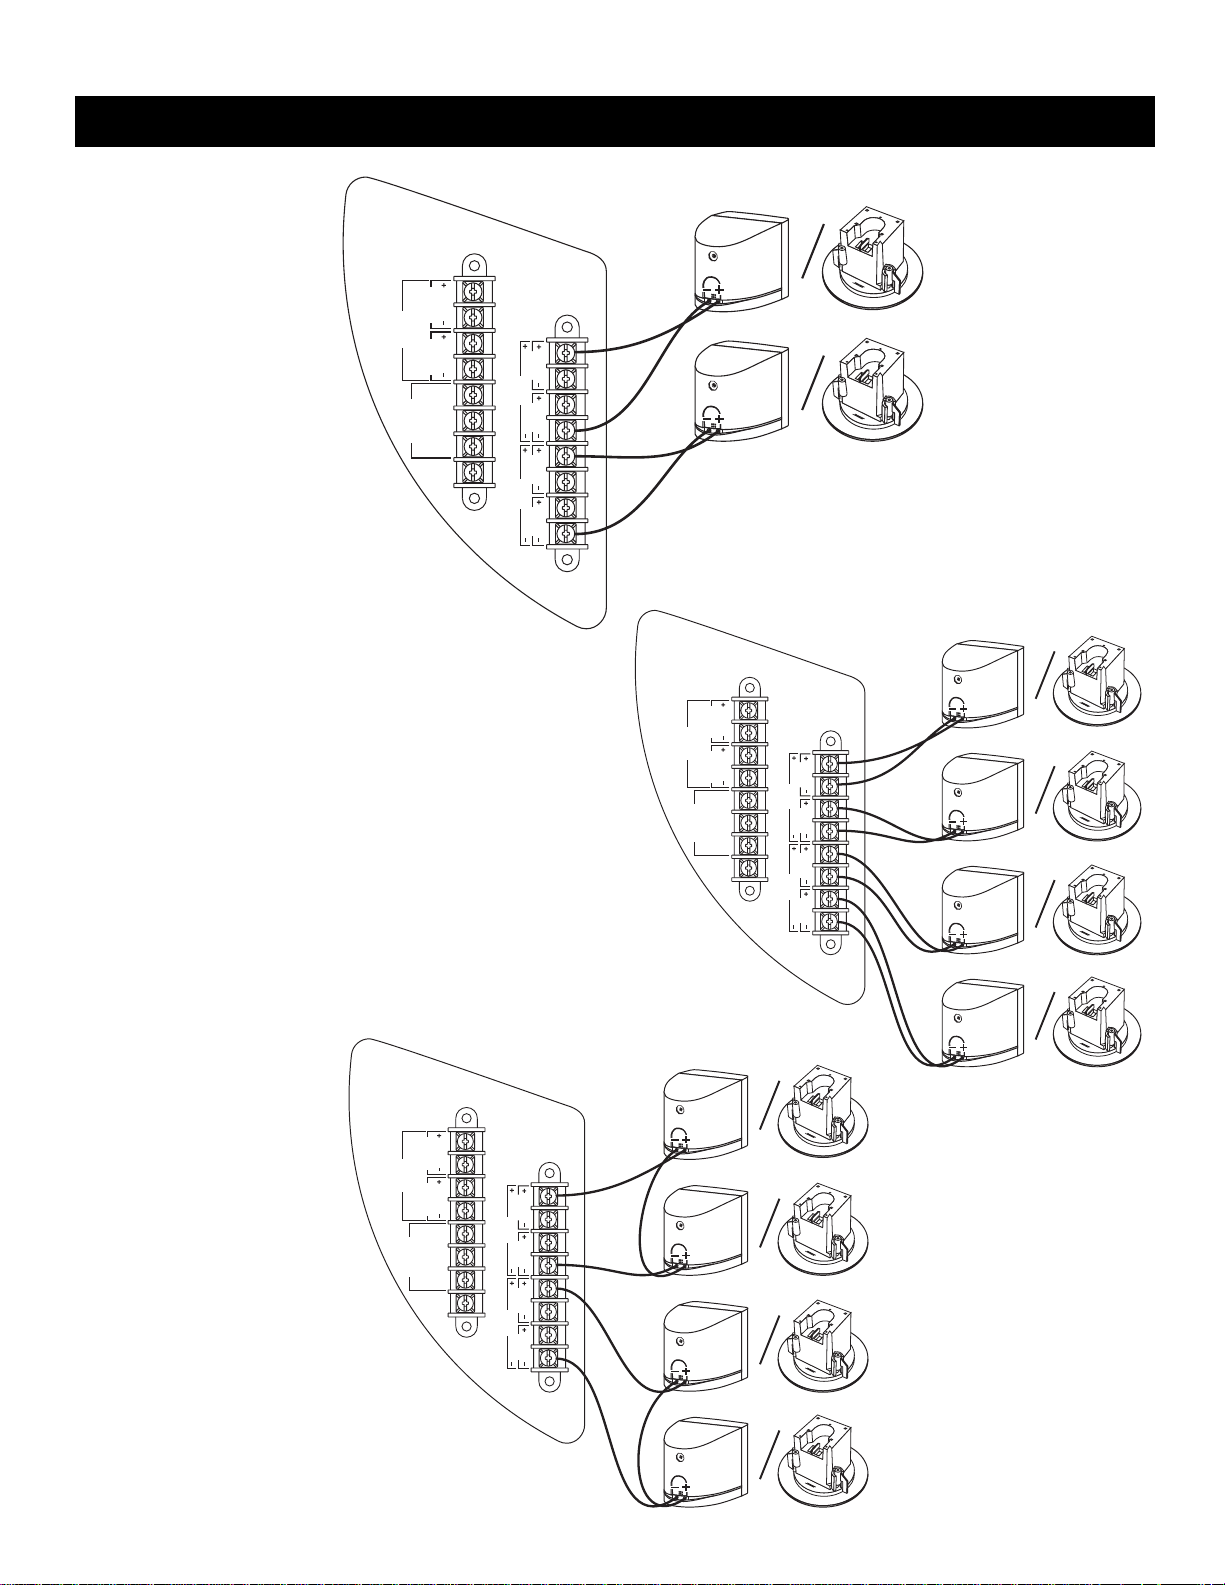
Satellite
speaker
connection
(MONO, USE
STEREO
COUPLE
INPUT
JUMPERS)
DIRECT
70V/100V
INPUT
CH 1
STEREO
CH 2
COM
+70V
+100V
NC
SAT 1 SAT 2 SAT 3 SAT 4
SAT 1 SAT 2
SATELLITE CONNECTIONS
Tilslutning af
Satellithøjttaler
Anschluss des
SatellitenLautsprechers
Conexión del
altavoz satélite
Channel 2
in Stereo
Channel 1
in Stereo
Raccordement
des cubes
Collegamento
dei diffusori a
cubetto
Verbinding
van de satellietluidsprekers
Anslutning av
satellithögtalare
2 speaker
(MONO, USE
STEREO
JUMPERS)
CH 1
COUPLE
DIRECT
INPUT
STEREO
CH 2
COM
70V/100V
INPUT
+70V
+100V
NC
SAT 1 SAT 2 SAT 3 SAT 4
SAT 1 SAT 2
SATELLITE CONNECTIONS
Channel 2
in Stereo
Channel 1
in Stereo
12
(MONO, USE
STEREO
JUMPERS)
CH 1
COUPLE
DIRECT
INPUT
70V/100V
INPUT
STEREO
CH 2
COM
+70V
+100V
NC
SAT 1 SAT 2 SAT 3 SAT 4
SAT 1 SAT 2
SATELLITE CONNECTIONS
Channel 2
in Stereo
Channel 1
in Stereo
AM263579_00 _V.pdf • December 5, 2002
4 speaker
4 speaker in series
Page 13

Installation/Instalación/Installazione/Installatie
Using other
compatible
Bose
®
speakers
Anvendelse af
andre
kompatible Bose
højttalere
Verwendung von
anderen
kompatiblen
Lautsprechern
von Bose
Uso de otros
altavoces
compatibles con
Bose
Utilisation
d’autres
enceintes Bose
compatibles
Impiego di altri
diffusori
compatibili della
Bose
Gebruik van
andere
compatibele
luidsprekers
van Bose
Användning av
andra Bosekompatibla
högtalare
• You can use the FreeSpace® 3 System Series II Acoustimass® module with other Bose® speakers, such
as the FreeSpace Model 16, Model 32, Model 32SE, Panaray
be sure to connect both the speakers and the module directly to the amplifier, using separate
channels or connect speakers that do not need equalization in parallel with the Acoustimass module
on the same channel.
Caution: Do not connect any speakers, other than FreeSpace 3 satellite speakers, directly to the
module.
• FreeSpace 3, serie II Acoustimass modulet kan anvendes med andre Bose højttalere, såsom
FreeSpace Model 816, Model 32, Model 32SE, Panaray 302 eller FreeSpace 6 højttalere. Sørg blot for
at tilslutte både højttalerne og modulet direkte til forstærkeren via separate udgange eller tilslutte
højttalere, som ikke behøver equalizer i parallel med Acoustimass-modulet på den samme kanal.
Advarsel: Der må ikke sluttes andre højttalere end FreeSpace 3 satellithøjttalere direkte til modulet.
• Das FreeSpace 3 Series II Acoustimass Modul kann mit anderen Bose Lautsprechern eingesetzt
werden, wie zum Beispiel dem FreeSpace Modell 16, Modell 32, Modell 32SE, Panaray 302 oder dem
FreeSpace 6 Lautsprecher. Stellen Sie jedoch sicher, dass sowohl die Lautsprecher als auch das
Modul direkt an den Verstärker angeschlossen und separate Känäle benutzt werden, oder schließen
Sie Lautsprecher, bei denen keine Entzerrung erforderlich ist, parallel zum Acoustimass Modul an
denselben Kanal an.
Vorsicht: Schließen Sie nur FreeSpace 3 Satelliten-Lautsprecher direkt an das Modul an.
• Puede utilizar el módulo Acoustimass FreeSpace 3 Serie II con otros altavoces Bose, como los
altavoces FreeSpace Modelo 16, Modelo 32, Modelo 32SE, Panaray 302 o FreeSpace 6. Asegúrese
de conectar ambos altavoces y el módulo directamente al amplificador, utilizando canales separados,
o, si son altavoces que no necesitan ecualizador en paralelo, conéctelos al módulo Acoustimass en el
mismo canal.
Precaución: No conecte directamente al módulo ningún altavoz que no sea altavoz satélite
FreeSpace 3.
• Il est possible de raccorder d’autres enceintes Bose sur le module Acoustimass, FreeSpace 3 série II,
notamment les FreeSpace Model 16, Model 32, Model 32SE, Panaray 302 ou FreeSpace 6. S’assurer
uniquement de raccorder directement les enceintes et le module sur des canaux séparés de
l’amplificateur ou connecter les enceintes qui ne nécessitent pas d’égalisation en parallèle avec le
module Acoustimass sur le même canal.
Attenion : ne jamais connecter d’enceintes, autres que les cubes FreeSpace 3, directement sur le
module.
• Il modulo Acoustimass FreeSpace 3 Serie II può essere usato con altri diffusori Bose come FreeSpace
Modello 16, Modello 32, Modello 32SE, Panaray 302 o FreeSpace 6, purché il collegamento
all’amplificatore sia diretto e vengano utilizzati due canali separati: uno per il modulo ed uno per i
diffusori. In alternativa, i diffusori che non richiedono equalizzazione possono essere collegati in
parallelo con il modulo Acoustimass sullo stesso canale.
Attenzione: non collegare altri diffusori, eccetto i diffusori a cubetto FreeSpace 3, direttamente al
modulo.
• U kunt de FreeSpace 3 Series II Acoustimass Module met andere luidsprekers van Bose gebruiken
zoals FreeSpace Model 16, Model 32, Model 32SE, Panaray
er wel voor dat u zowel de luidsprekers als de module rechtstreeks op de daarvoor geschikte
versterker aansluit d.m.v. aparte ingangen of dat u luidsprekers die niet gelijkgesteld hoeven te worden
parallel met de Acoustimass Module op dezelfde ingang aansluit.
Opgelet: Sluit andere luidsprekers, met uitzondering van de FreeSpace 3 satellietluidsprekers niet
rechtstreeks op de module aan.
• Du kan använda FreeSpace 3 Series II Acoustimass-modulen med andra Bose-högtalare, t ex
FreeSpace Model 16, Model 32, Model 32SE, Panaray 302 eller FreeSpace 6. Se till att du ansluter
både högtalarna och modulen direkt till förstärkaren på separata kanaler, eller ansluter högtalare som
inte behöver utjämning parallellt med Acoustimass-modulen på samma kanal.
Varning: Anslut aldrig några högtalare förutom FreeSpace 3-satellithögtalarna direkt till modulen.
®
302TM, or FreeSpace 6 speakers. Just
®
302TM of FreeSpace 6 luidsprekers. Zorg
AM263579_00 _V.pdf • December 5, 2002
13
Page 14

Installation/Instalación/Installazione/Installatie
Mounting the
module
Montering til
modulet
Aufbau des
Moduls
Montaje del
módulo
Fixation du
module
Installazione
Monteren van de
module
Montering för
modulen
• Choose a mounting position, method, and hardware consistent with local building codes and regulations.
• Vælg monteringssted, -metode og tilbehør, der er i overens-stemmelse med lokale byggevedtægter.
• Wählen Sie hierzu mit den örtlich gültigen Vorschriften übereinstimmende Befestigungspositionen, methoden und materialien.
• Elija una posición y un método de montaje, y accesorios de acuerdo a los códigos y las regulaciones
para edificios de su localidad.
• Choisir une position, une méthode et des accessoires de montage conformes aux règles et normes en
vigueur pour ce type d’installation dans un bâtiment.
• Scegliere la posizione, il metodo e la ferramenta di montaggio in conformità alle normative edilizie e
sugli impianti elettrici vigenti.
• Kies een montagepositie, -methode en schroeven e.d. die overeenkomen met plaatselijke
bouwverordeningen en regulaties.
• Välj en monteringsposition, metod och hårdvara som uppfyller lokal byggkod och bestämmelser.
14
AM263579_00 _V.pdf • December 5, 2002
Page 15

A.
Installation/Instalación/Installazione/Installatie
B.
C.
D.
AM263579_00 _V.pdf • December 5, 2002
15
Page 16

D.
Installation/Instalación/Installazione/Installatie
E.
F.
G.
16
AM263579_00 _V.pdf • December 5, 2002
Page 17

Mounting and
wiring satellite
speakers
Montering
og ledningsfremføring til
satellithøjttalere
Aufbau
und Verdrahtung
von SatellitenLautsprechern
Montaje
y cableado
de altavoces
satélite
Fixation
et câblage
des cubes
Installazione
e collegamento
dei diffusori
a cubetto
Installation/Instalación/Installazione/Installatie
FM
• Choose a position and mounting method consistent with local building codes and regulations.
• Vælg monteringsted, -metode der er i overensstemmelse med lokale byggevedtægter.
• Wählen Sie hierzu eine mit den örtlich gültigen Vorschriften übereinstimmende Befestigungsposition und
-methode.
• Elija una posición y un método de montaje de acuerdo a los códigos y las regulaciones para edificios de
su localidad.
• Choisir une position et une méthode de montage conformes aux règles et normes en vigueur pour ce
type d’installation dans un bâtiment.
• Scegliere la posizione e il metodo di montaggio in conformità alle normative edilizie e sugli impianti
elettrici vigenti.
• Kies een positie en montagemethode die overeenkomt met plaatselijke bouwverordeningen en
regulaties.
• Välj en plats och en monteringsmetod som uppfyller byggkod och bestämmelser.
FM a.
SM a.
SM
Monteren en
bedraden
van de satellietluidsprekers
Montering och
kabeldragning
för satellithögtalare
FM b.
SM c.
SM b.
SM d.
PN 18188
7
AM263579_00 _V.pdf • December 5, 2002
17
Page 18

+
+
+
+
+
+
+
+
+
+
–
–
–
–
–
–
–
–
–
–
Installation/Instalación/Installazione/Installatie
FM c.
FM e.
FM d.
FM g.
FM f.
FM h.
18
AM263579_00 _V.pdf • December 5, 2002
Page 19

Installation/Instalación/Installazione/Installatie
• Use four screws per bracket.
• Brug fire skruer per beslag.
• Benutzen Sie vier Schrauben
pro Halter.
• Utilice cuatro tornillos por
abrazadera.
• Chaque support doit être fixé
par 4 vis.
• Usare quattro viti per ogni
staffa.
• Gebruik vier schroeven per
beugel.
• Använd fyra skruvar per
konsol.
SM e.
SM f.
SM g.
SM h.
SM i.
SM k.
SM j.
AM263579_00 _V.pdf • December 5, 2002
19
Page 20

©2002 Bose Corporation, The Mountain
Framingham, MA 01701-9168 USA
263579 AM Rev.01 JN30604
20
AM263579_00 _V.pdf • December 5, 2002
 Loading...