

Bose Aviation X Owner's Manual
AVIATION HEADSET
Owner’s Guide
DECLARATION OF CONFORMITY
We, the offerer:
Bose Corporation,
The Mountain, Framingham, MA 01701-9168 USA
Acknowledge our sole responsibility, that the product:
Kind of equipment: Bose
®
Aviation Headset
Type Designation: AHX-32-0# and AHX-34-0#
In accordance with EMC Directive 89/336/EEC
and Article 10(1) of the Directive,
is in compliance with the following
norm(s) or documents(s)
Technical regulations:EN55013, EN55020
Accredited by:
Bose Corporation, The Mountain, Framingham, MA
01701-9168 USA
Bose Products B.V. Vice President, Europe
Nijverheidstraat 8, 1135 GE Edam Manufacturer’s authorized
The Netherlands EU representative
15 June 2003 Nic Merks
2
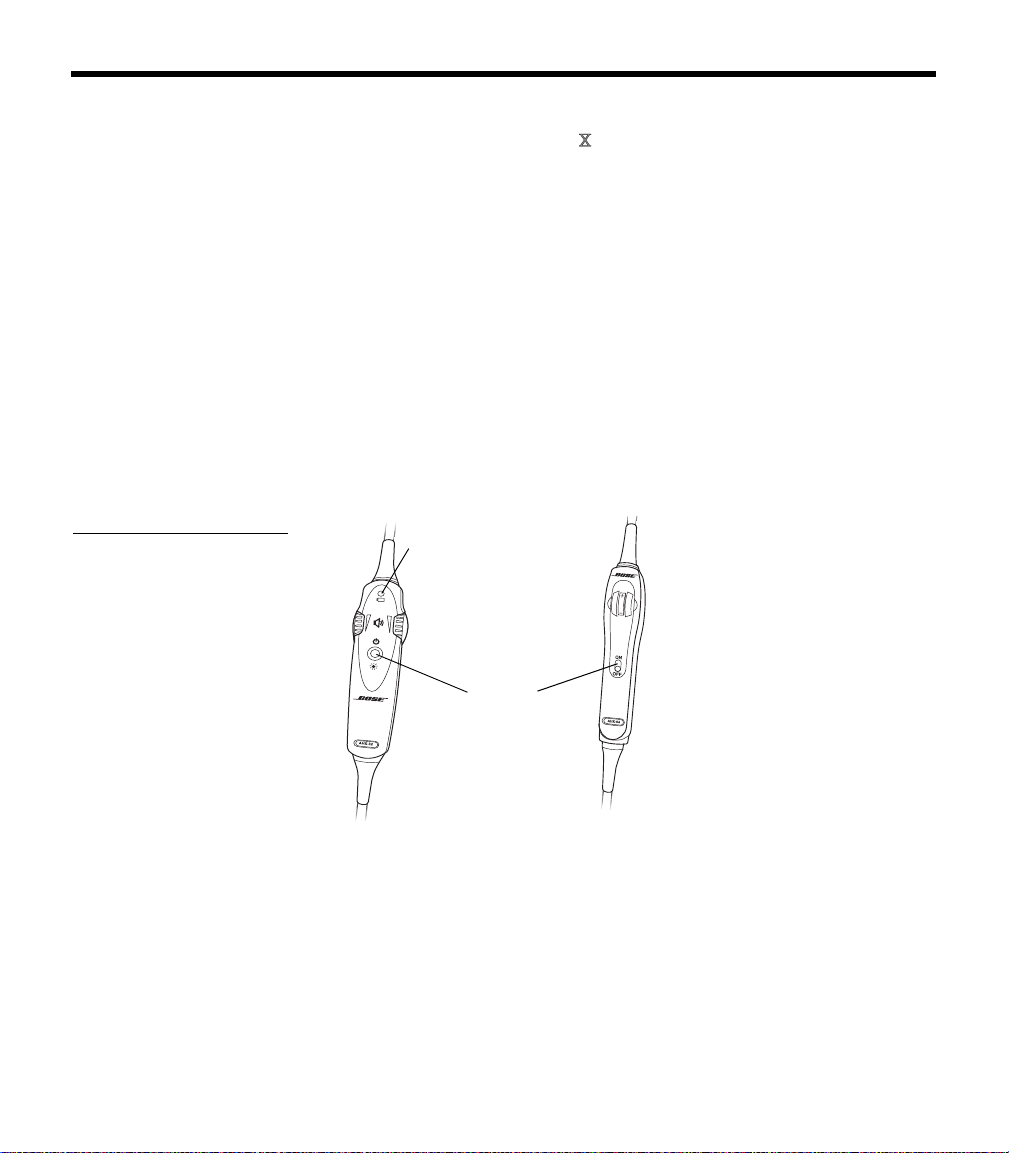
Operational advisory
(b)
(a)
Battery power
indicator
Power
switch
The Bose® Aviation Headset is an active noise reducing (ANR)
headset. As with any complex electronic device, it
headset to fail during operation. Symptoms of failure may include
loud tones, distortion, and loss of communications signal in the
headset when used in the ANR mode.
Note: Th
failures and allow for continued use of the headset in the
ANR mode.
If you experience loud tones and the related loss of communications,
n off the power switch. The headset will continue to provide com-
tur
munications in the passive noise-reducing mode.
ANR mode is active when the headset control module power switch
is
set to ON (Figure 1) or when the battery power indicator is lit. The
headset is in the passive mode when the
or when the battery power indicator is unlit.
Figure 1
On/Off switch on (a) the
battery powered headset
and (b) the aircraft powered
headset
CAUTIONS AND ADVISORIES
is possible for this
e headset includes redundant circuitry to reduce the effects of such
power switch is set to OFF,
Power source
Your headset is one of two types: battery powered, or aircraft
powered.
If your headset is battery powered, make sure it is connected only to
bat
tery power. If your headset is aircraft powered, connect the head-
set to the aircraft power sources only as described in this guide.
An aircraft powered headset will not operate
Bose Series II Aviation Headset battery pack or with any commercial
battery pack.
properly if used with a
3

C
AUTIONS AND ADVISORIES
How use of the headset affects hearing safety
The headset is intended for use with ANR turned on. Noise reduction
and communications performance are reduced with ANR turned off.
Volume control
Make sure your aircraft communications system volume control is
easily accessible. This control affects the strength of the communications signal coming into the headset, whether ANR is on or off.
As pilot in command, you must be sure you can understand critical
co
mmunications even with ANR off. In this case, you may need to
turn up the aircraft communications system volume.
Other cautions
Avoid setting the volume controls at levels
your hearing during extended periods of headset use.
high enough to impair
Listening to the sounds of your aircraft
With the headset’s active and passive noise reduction, typical aircraft
sounds (from engines, propellers, warning alarms, and other sound
sources) may not sound familiar. We strongly advise you to make
sure you can hear and recognize these sounds when using the Bose
Aviation Headset
while operating any aircraft.
Using entertainment audio sources
When listening to in-flight entertainment or a home audio source
through a Bose Aviation Headset
safe levels that do not interfer
sounds and warning alarms, such as stall warnings or gear up, while
piloting.
, be sure to limit the volume to
e with your ability to hear informational
TriPort® headset earcup requirements
Proper headset operation requires that the TriPort headset openings
on the earcup are kept free of debris. The TriPort headset openings
(Figure 2 on page 5) are located on the outside of each earcup and
are comprised of two holes and a screen.
®
4
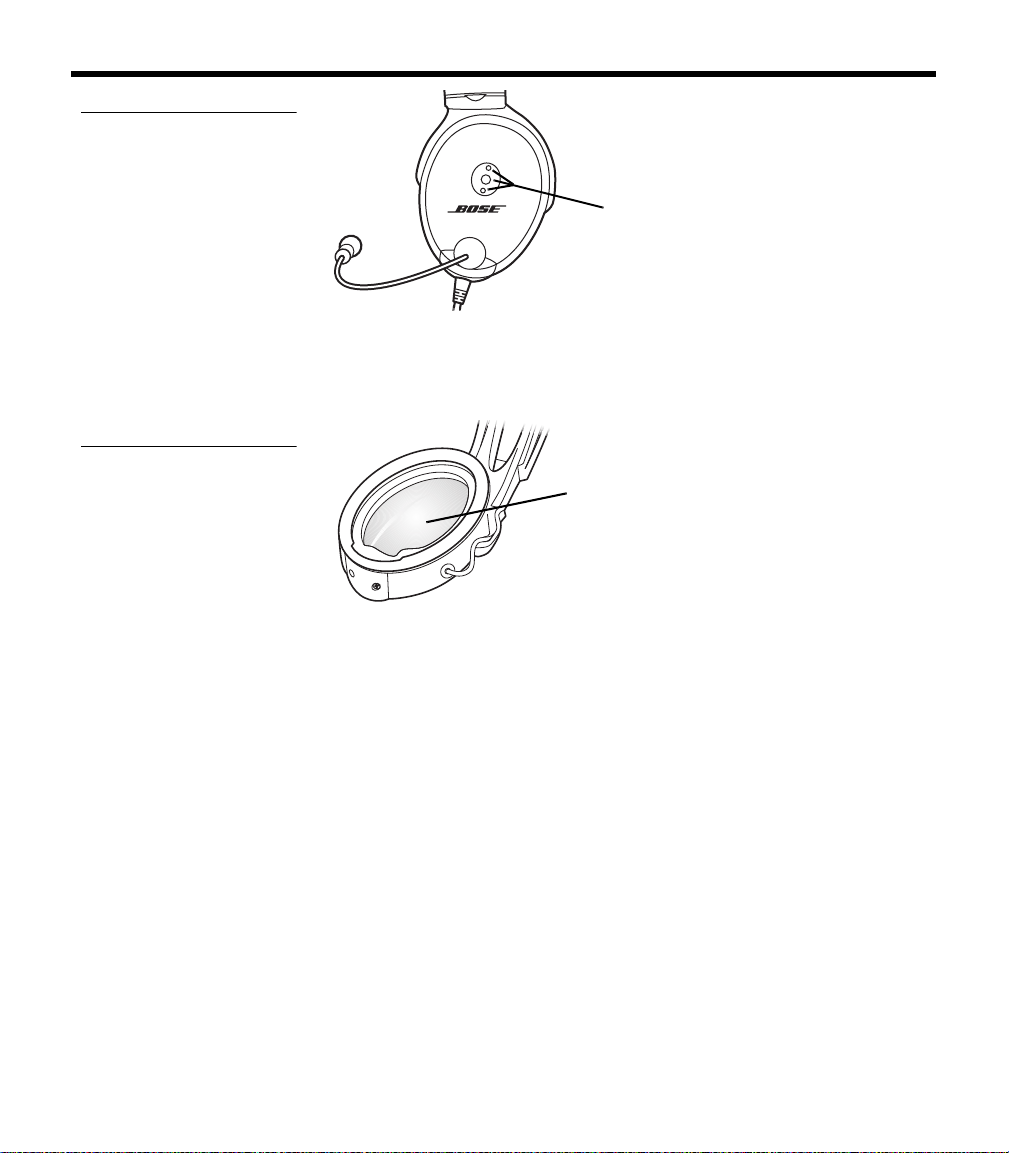
Figure 2
TriPort
headset
openings
Earcup inner screen
TriP ort® headset openings
Figure 3
Protective inner screen
inside the earcup
C
AUTIONS AND ADVISORIES
Earcup inner screen
The protective inner screen is critical to the headset’s ability to
reduce noise (Figure 3).
Do not attempt to remove, replace, or repair this screen. If operating
problems indicate the need for screen replacement, contact the
®
Bose
Aviation Headset Department. Refer to “Contact information”
on page 34.
If the screen gets wet or any foreign objects become lodged
on or adjacent to it, follow the ins
tructions in “Headset Care and
Maintenance” on page 25.
Storage
Do not store the headset in an unventilated area or in direct sunlight.
If your headset is battery powered, remove the batteries before
storing the headset for extended periods.
5

CONTENTS
Cautions and Advisories . . . . . . . . . . . . . . . . . . . . . . . . . . . . . . . . . . . . . . 3
Operational advisory . . . . . . . . . . . . . . . . . . . . . . . . . . . . . . . . . . . . . . 3
Power source . . . . . . . . . . . . . . . . . . . . . . . . . . . . . . . . . . . . . . . . . 3
How use of the headset affects hearing safety . . . . . . . . . . . . . . . . . . 4
Volume control . . . . . . . . . . . . . . . . . . . . . . . . . . . . . . . . . . . . . . . . 4
Listening to the sounds of your aircraft . . . . . . . . . . . . . . . . . . . . . 4
Using entertainment audio sources . . . . . . . . . . . . . . . . . . . . . . . . 4
Other cautions . . . . . . . . . . . . . . . . . . . . . . . . . . . . . . . . . . . . . . . . . . . 4
TriPort® headset earcup requirements . . . . . . . . . . . . . . . . . . . . . . 4
Earcup inner screen . . . . . . . . . . . . . . . . . . . . . . . . . . . . . . . . . . . . 5
Storage . . . . . . . . . . . . . . . . . . . . . . . . . . . . . . . . . . . . . . . . . . . . . . 5
Contents . . . . . . . . . . . . . . . . . . . . . . . . . . . . . . . . . . . . . . . . . . . . . . . . . . . 6
Introduction . . . . . . . . . . . . . . . . . . . . . . . . . . . . . . . . . . . . . . . . . . . . . . . . 8
We appreciate your choice . . . . . . . . . . . . . . . . . . . . . . . . . . . . . . . . . . 8
Headset and cable variations . . . . . . . . . . . . . . . . . . . . . . . . . . . . 8
Getting Your Headset Ready for Use . . . . . . . . . . . . . . . . . . . . . . . . . . . 10
Locate the serial number for your product registration card . . . . . . . 10
Date of manufacture . . . . . . . . . . . . . . . . . . . . . . . . . . . . . . . . . . 10
Decide where you want the boom microphone . . . . . . . . . . . . . . 10
Removing an attached boom microphone cable . . . . . . . . . . . . . 11
Attaching the boom microphone cable . . . . . . . . . . . . . . . . . . . . 11
Clothing clip . . . . . . . . . . . . . . . . . . . . . . . . . . . . . . . . . . . . . . . . . 12
Preparing to use battery power . . . . . . . . . . . . . . . . . . . . . . . . . . . . . 13
Changing the optional operation switches . . . . . . . . . . . . . . . . . 13
Inserting batteries . . . . . . . . . . . . . . . . . . . . . . . . . . . . . . . . . . . . 14
Preparing the aircraft powered headset for use . . . . . . . . . . . . . . . . . 14
Attaching and removing the cable . . . . . . . . . . . . . . . . . . . . . . . . 14
Mounting the connector . . . . . . . . . . . . . . . . . . . . . . . . . . . . . . . . 15
Details on making the connections . . . . . . . . . . . . . . . . . . . . . . . 16
Use proper adhesives . . . . . . . . . . . . . . . . . . . . . . . . . . . . . . 17
Mono, stereo, and helicopter connection diagrams . . . . . . . 18
Using Your Headset . . . . . . . . . . . . . . . . . . . . . . . . . . . . . . . . . . . . . . . . . 19
Wearing it properly . . . . . . . . . . . . . . . . . . . . . . . . . . . . . . . . . . . . . . . 19
Conditions related to fit . . . . . . . . . . . . . . . . . . . . . . . . . . . . . . . . 19
Microphone placement . . . . . . . . . . . . . . . . . . . . . . . . . . . . . . . . 20
Operating the battery powered headset . . . . . . . . . . . . . . . . . . . . . . 20
Power button . . . . . . . . . . . . . . . . . . . . . . . . . . . . . . . . . . . . . . . . 21
Volume control . . . . . . . . . . . . . . . . . . . . . . . . . . . . . . . . . . . . . . . 21
Notice the individual earcup controls . . . . . . . . . . . . . . . . . . 21
Controlling the volume of a single battery powered headset 22
Volume control using multiple headsets . . . . . . . . . . . . . . . . 22
Battery power indicator . . . . . . . . . . . . . . . . . . . . . . . . . . . . . . . . 22
6

C
ONTENTS
Operating the aircraft powered headset . . . . . . . . . . . . . . . . . . . . . . . 23
Power switch . . . . . . . . . . . . . . . . . . . . . . . . . . . . . . . . . . . . . . . . 23
Volume control . . . . . . . . . . . . . . . . . . . . . . . . . . . . . . . . . . . . . . . 23
Notice the individual earcup controls . . . . . . . . . . . . . . . . . . 24
Controlling the volume of a single aircraft powered headset 24
Volume control using multiple headsets . . . . . . . . . . . . . . . . 24
Headset Care and Maintenance . . . . . . . . . . . . . . . . . . . . . . . . . . . . . . . 25
Instructions for continued airworthiness . . . . . . . . . . . . . . . . . . . . . . 25
Cleaning the headset . . . . . . . . . . . . . . . . . . . . . . . . . . . . . . . . . . . . . 25
General cleaning . . . . . . . . . . . . . . . . . . . . . . . . . . . . . . . . . . . . . 25
Earcup TriPort® headset openings . . . . . . . . . . . . . . . . . . . . . . . . 25
Ear cushions . . . . . . . . . . . . . . . . . . . . . . . . . . . . . . . . . . . . . . . . 26
Microphone windscreen . . . . . . . . . . . . . . . . . . . . . . . . . . . . . . . 26
Earcup inner screen . . . . . . . . . . . . . . . . . . . . . . . . . . . . . . . . . . . 26
Replacement parts . . . . . . . . . . . . . . . . . . . . . . . . . . . . . . . . 26
Headband cushion . . . . . . . . . . . . . . . . . . . . . . . . . . . . . . . . . . . . 27
Removing environmental moisture . . . . . . . . . . . . . . . . . . . . 27
Replacing parts . . . . . . . . . . . . . . . . . . . . . . . . . . . . . . . . . . . . . . . . . 27
Microphone windscreen replacement . . . . . . . . . . . . . . . . . . . . . 27
Ear cushion replacement . . . . . . . . . . . . . . . . . . . . . . . . . . . . . . . 27
Battery replacement . . . . . . . . . . . . . . . . . . . . . . . . . . . . . . . . . . . 28
Battery door replacement . . . . . . . . . . . . . . . . . . . . . . . . . . . . . . 29
Headband cushion replacement . . . . . . . . . . . . . . . . . . . . . . . . . 29
Boom microphone cable
or connector access cover replacement . . . . . . . . . . . . 29
Troubleshooting . . . . . . . . . . . . . . . . . . . . . . . . . . . . . . . . . . . . . . . . . . . . 30
In case of difficulty . . . . . . . . . . . . . . . . . . . . . . . . . . . . . . . . . . . . . . . 30
Technical Information . . . . . . . . . . . . . . . . . . . . . . . . . . . . . . . . . . . . . . . . 32
FAA Technical Standards Order . . . . . . . . . . . . . . . . . . . . . . . . . . . . . 33
Service & Warranty Information . . . . . . . . . . . . . . . . . . . . . . . . . . . . . . . . 34
Warranty period . . . . . . . . . . . . . . . . . . . . . . . . . . . . . . . . . . . . . . . . . 34
Service . . . . . . . . . . . . . . . . . . . . . . . . . . . . . . . . . . . . . . . . . . . . . . . . 34
To return your headset to Bose for repair . . . . . . . . . . . . . . . . . . 34
Contact information . . . . . . . . . . . . . . . . . . . . . . . . . . . . . . . . . . . . . . 34
Ordering parts and accessories . . . . . . . . . . . . . . . . . . . . . . . . . . . . . 35
7

INTRODUCTION
We appreciate your choice
Congratulations on your purchase of a Bose® Aviation Headset .
This headset combines Bose Acoustic Noise Cancelling
technology to electronically reduce unwanted aircraft noise, and
Bose TriPort
comfortable headset that delivers full-spectrum noise reduction.
We believe it is the finest aviation headset you can own.
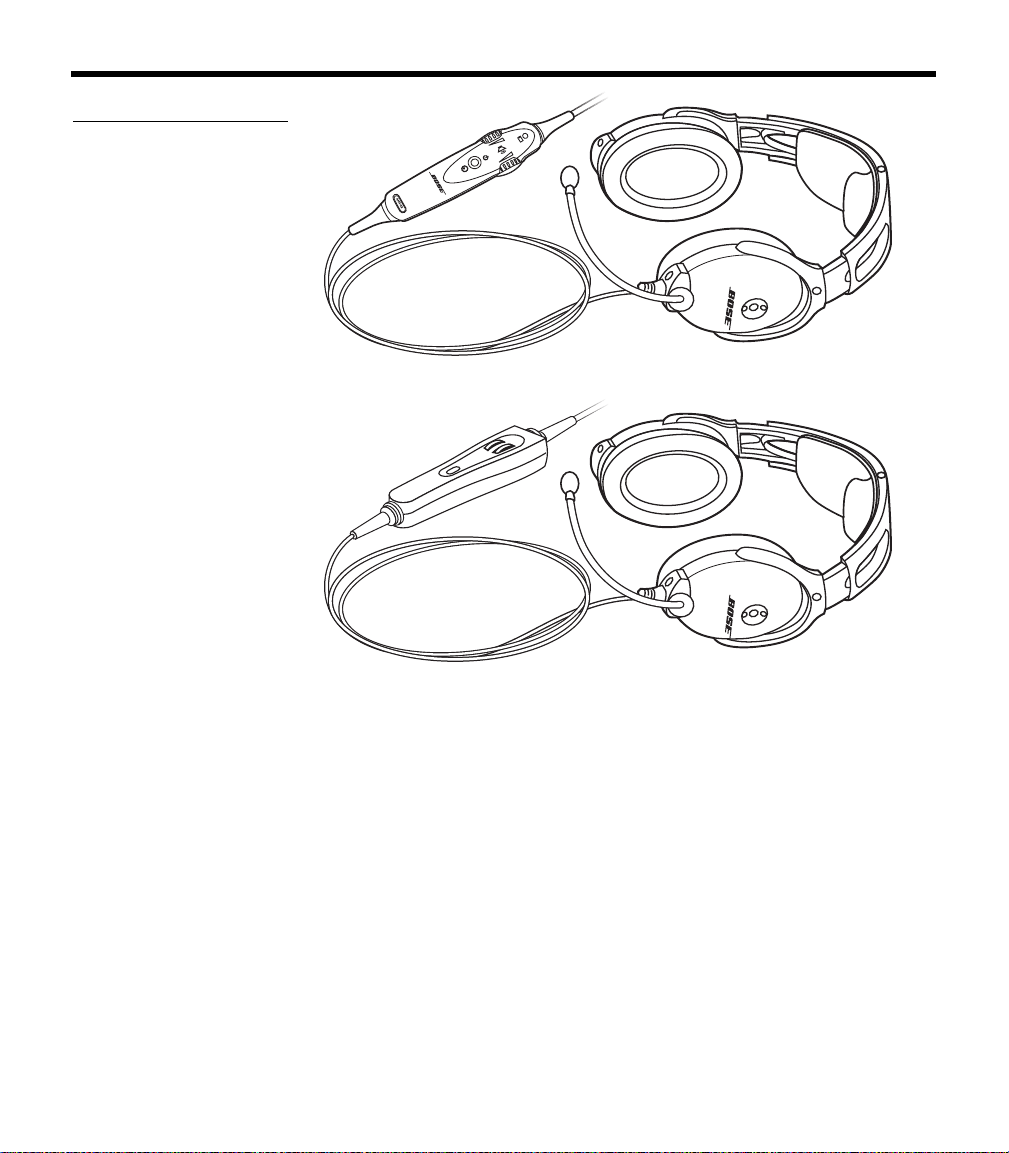
Headset and cable variations
The Bose Aviation Headset is available in variations designed for
general aviation and helicopter use. There are also battery powered
and air
craft powered versions (Figure 4 on page 9).
The communications cable for your headset may be either straight or
c
oiled, depending on the headset configuration you have purchased.
Features common to most variations:
• Acoustic Noise Cancelling headset technology
• TriPort headset technology
• Communications cable with integrated control module
• Flexible microphone boom with continuous position adjustments
• Adjustable headband
®
headset
®
headset technology for a smaller, lighter, more
• Replaceable ear cushions
• Replaceable fleece headband cushion
• Replaceable windscreen
• Cable-mounted clothing clip
8
I
NTRODUCTION
Figure 4
The (a) battery powered
and (b) aircraft powered
versions of the headset
(a)
(b)
9
GETTING YOUR HEADSET READY FOR USE
Serial number
Headband
cushion
Locate the serial number for your product registration card
The Bose® Aviation Headset includes a product registration card in
the carton.
Please fill in the requested information
use this information to provide you with appropriate advisories and
updates. Be sure to include your headset serial number, which can
be found on teh barcode label located on the underside of the
magnesium headband, underneath the headband cushion.
Figure 5
Locating the serial
number under the headband cushion
After locating your headset serial number, be sure to properly replace
the headband cushion by pressing down firmly. For more information
on replacing the headband cushion, see “Headband cushion
replacement” on page 29.
and mail it to Bose. We will
10
Date of manufacture
Your headset’s date of manufacture is an important part of your serial
number. It is the underlined, four-digit number that begins just after
the first alphabetic letter in the serial number.
Example: 031963E
In this example, the date of manufacture is 3192. The first digit, 3,
efers to the year of manufacture (200
r
refer to the day of the year (the 192
31920040E
3). The last three digits, 192,
nd
day of 2003).
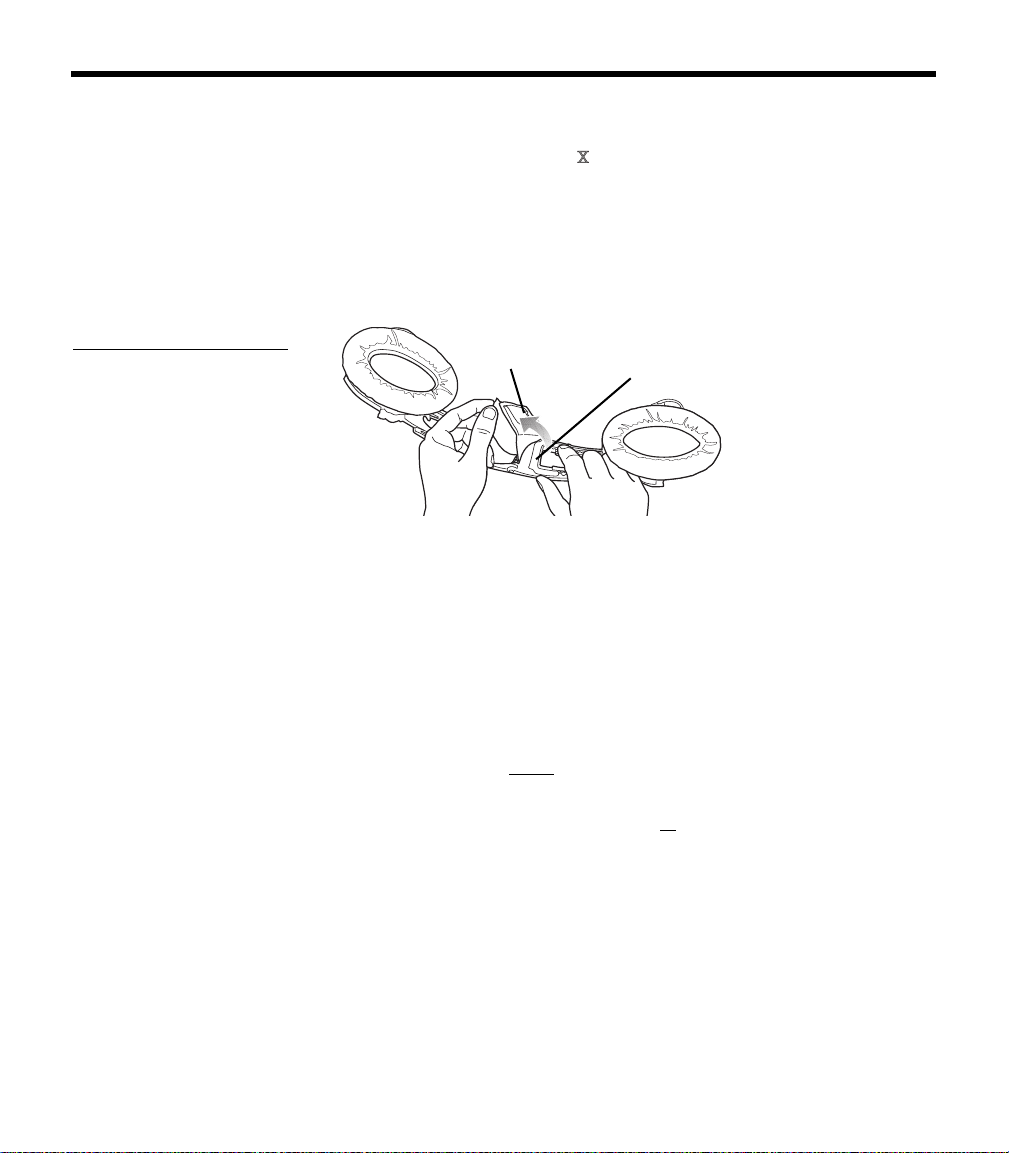
Decide where you want the boom microphone
Depending on the headset configuration you purchased, your headset may arrive with the boom microphone cable attached to the left
ea
rcup or packed separately in the carton.
In either case, you can attach the boom microphone cable to either
ea
rcup, as preferred.
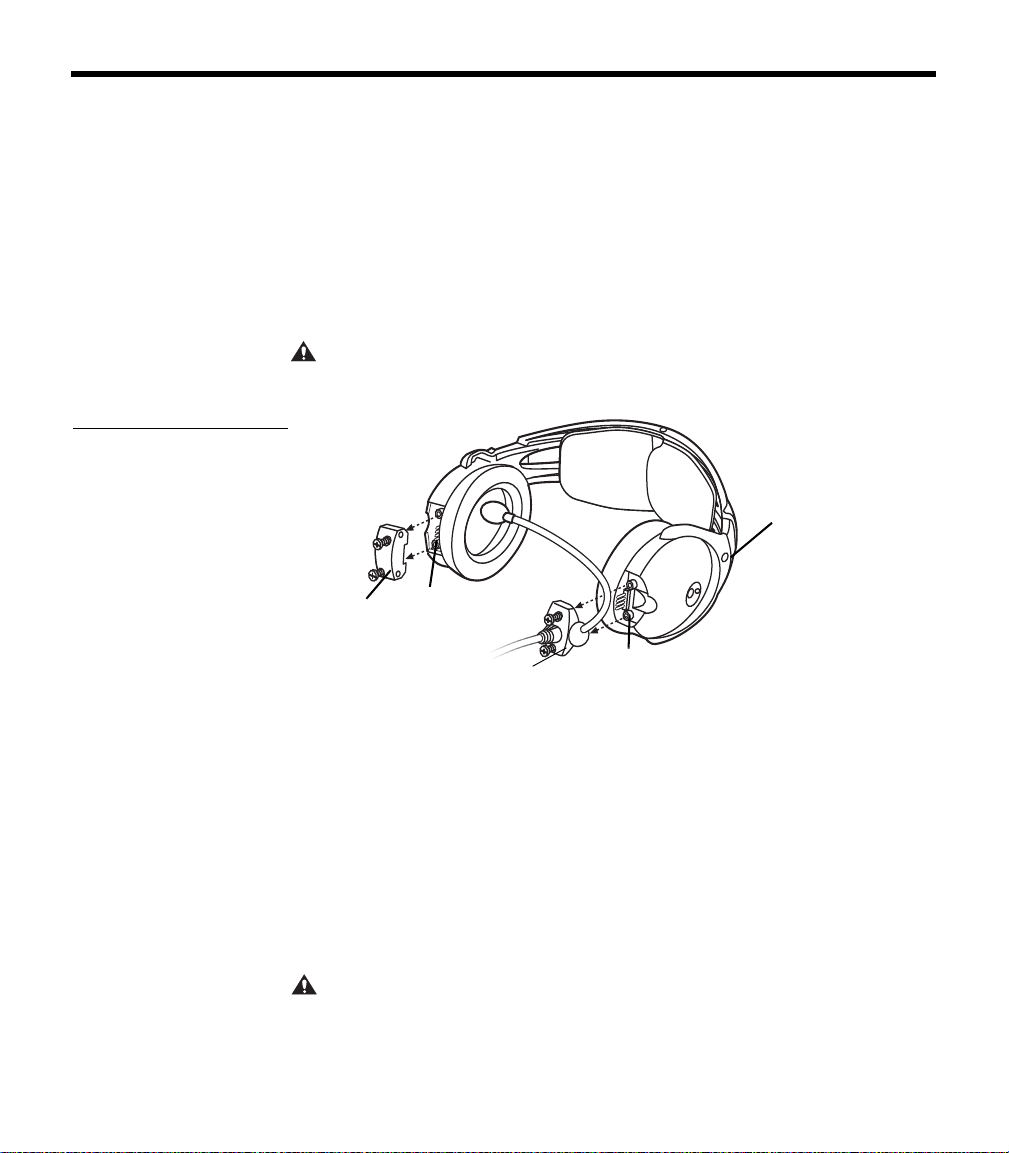
Figure 6
Access
cover
Connector
pins
Cable
assembly
Connector
pins
L for left
Pulling the cable assembly
straight out from the earcup
G
ETTING YOUR HEADSET READY FOR USE
Before you remove or attach the microphone, however, be sure to
note the important markings for left (L) and right (R) above each
earcup. These markings indicate which ear each earcup is intended
to fit over.
Removing an attached boom microphone cable
1. Use a Phillips or straight blade screwdriver to loosen the two
screws at the base of the boom microphone cable assembly.
2. Pull the cable assembly straight out from the earcup to which it
is
attached (Figure 6).
CAUTION:
Twisting can damage the connector pins.
Do not twist the boom microphone cable while disconnecting it.
Attaching the boom microphone cable
Before you attach the boom microphone, make sure that the cable
connector and its earcup connector are clean and free of debris.
1. Use a Phillips or straight blade
screws on the access cover near the bottom of the earcup where
you want to attach the boom microphone.
2. Remove the cover to reveal the connector pins on the earcup.
3. Carefully line up the connector to the small connector pins on
th
e panel (Figure 7 on page 12).
CAUTION:
An improperly aligned connector will not make the connections
necessary for proper operation, and may cause damage.
screwdriver to loosen the two
11
 Loading...