

Page 1
Bosé^ Acoustimas^’3 Series IN Speaker System
Owner’s Guide
Bedienungsanleitung
Guía del usuario
Notice d’utilisation
Manuale di istruzioni
Page 2

Customer information / contents
For your records
The Acoustimass'-3 system serial number appears on the back of the bass module.
Serial Number__________________________________________________________
Date Of Purchase.
Retailer’s Name.
Retailer’s Address.
City State
Telephone
Zip
Where youli find...
Introduction
Your Acoustimass' system.............................................................................................................. 3
Unpack the system........................................................................................................................ 3
Placement
Where to place the cube speakers................................................................................................... 4
Where to place the Acoustimass bass module................................................................................... 4
Connections
Use the cables correctly..................................................................................................................5
Connect the cube speakers.............................................................................................................5
Connect the bass module............................................................................................................... 5
Check your connections..................................................................................................................6
Check the system.......................................................................................................................... 7
Maintenance
Cleaning your speakers.................................................................................................................. 7
Automatic system protection............................................................................................................7
Problems and causes.....................................................................................................................8
Warranty period............................................................................................................................. 8
Product information.............................................................................................................................9
Service............................................................................................................................................43
Deutsch
.....................................
Espaftol
.....................................
Fran^ais
...................................
10
18
ItalisuTO.................................34
Page 3
Your Acoustimass system
ik you for purchasing the Bose' Acoustimass-3 Series III speaker system. Its quality
struction and advanced technologies result from years of ongoing research at Bose.
Bose patented Acoustimass speaker technology, for instance, delivers full, natural audio
performance. And, for all of the sound it produces, this Virtually Invisible’ system takes up very
little space. The tiny cube speakers fit almost anywhere, while the Acoustimass module is
designed to be hidden behind drapes, under furniture, or in the corner of the room.
Your Acoustimass-3 system is significantly different from conventional speakers. So it is
important to read all of the instructions on positioning and connecting the speakers arxl the
module. This is the best way to get the fullest enjoyment from your new system.
Introduction
Unpack the system
Unpack the system carefully. Avoid setting the the bass module down on its connection panel,
which could scratch a surface. (Save the carton and packing materials in case you ever want
to ship the system.) If any parts appear damaged, do not attempt to use the system. Repack
all parts in the original carton and notify your authorized Bose dealer immediately.
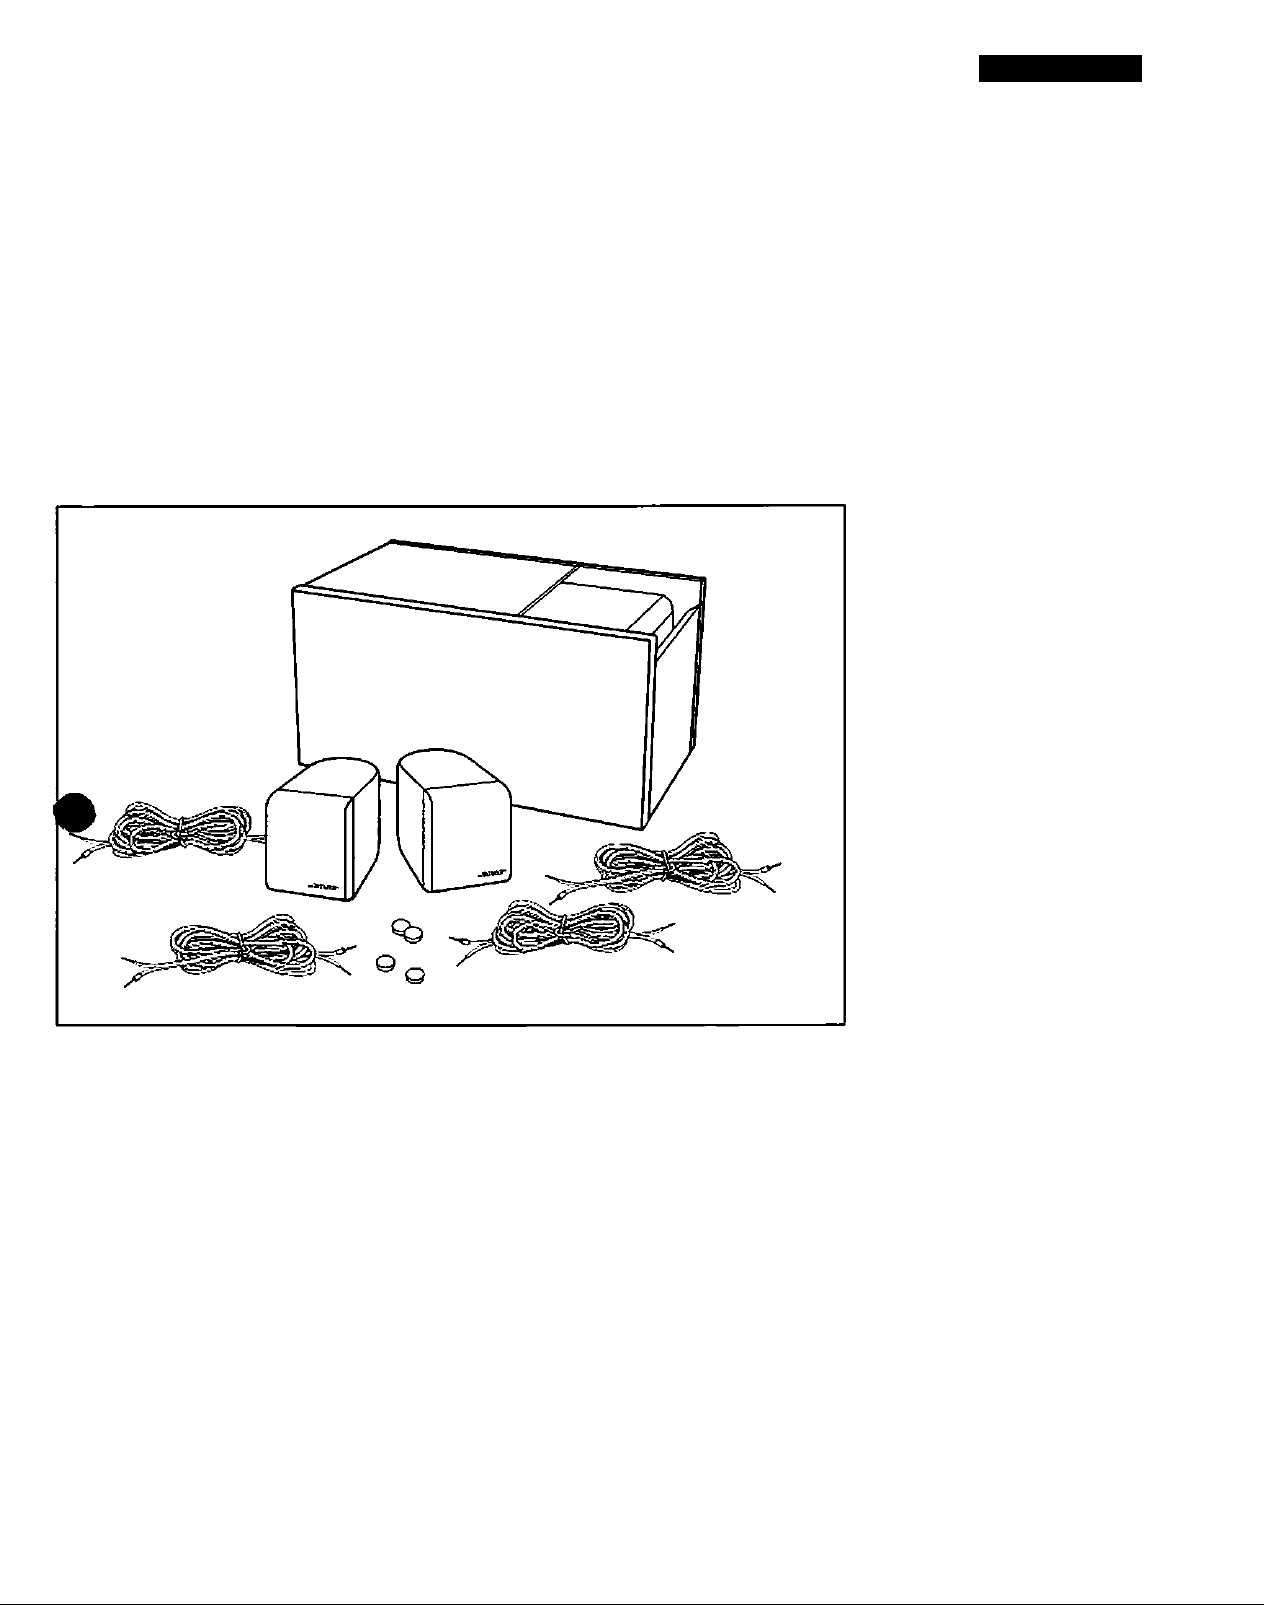
Figure 1
What the carton contains.
• Two (2) cube speakers
• One (1) Acoustimass bass
module
• Four (4) speaker cables, 20
feet lor>g
• Four (4) adhesive-backed
rubber feet
Page 4
Placement
Where to place the
cube speakers
You can place cube speakers
anywhere from 3 to 15 feet (.9 -
4.6 m) apart. For the most natural
sourd in average sized rooms, place
them 6 to 12 feet (1.8-3.7 m) apart.
Magnetic shielding allows you to
place them close to a video screen
without causing interference.
Bose* mounting accessories,
including wall/ceiling mounting
brackets, floor star>ds, and table
starxis, add to your choice of where
to place the cube speakers. For more information or to order accessories, contact your Bose
dealer or call Bose directly at the "Service" number listed on the inside back page.
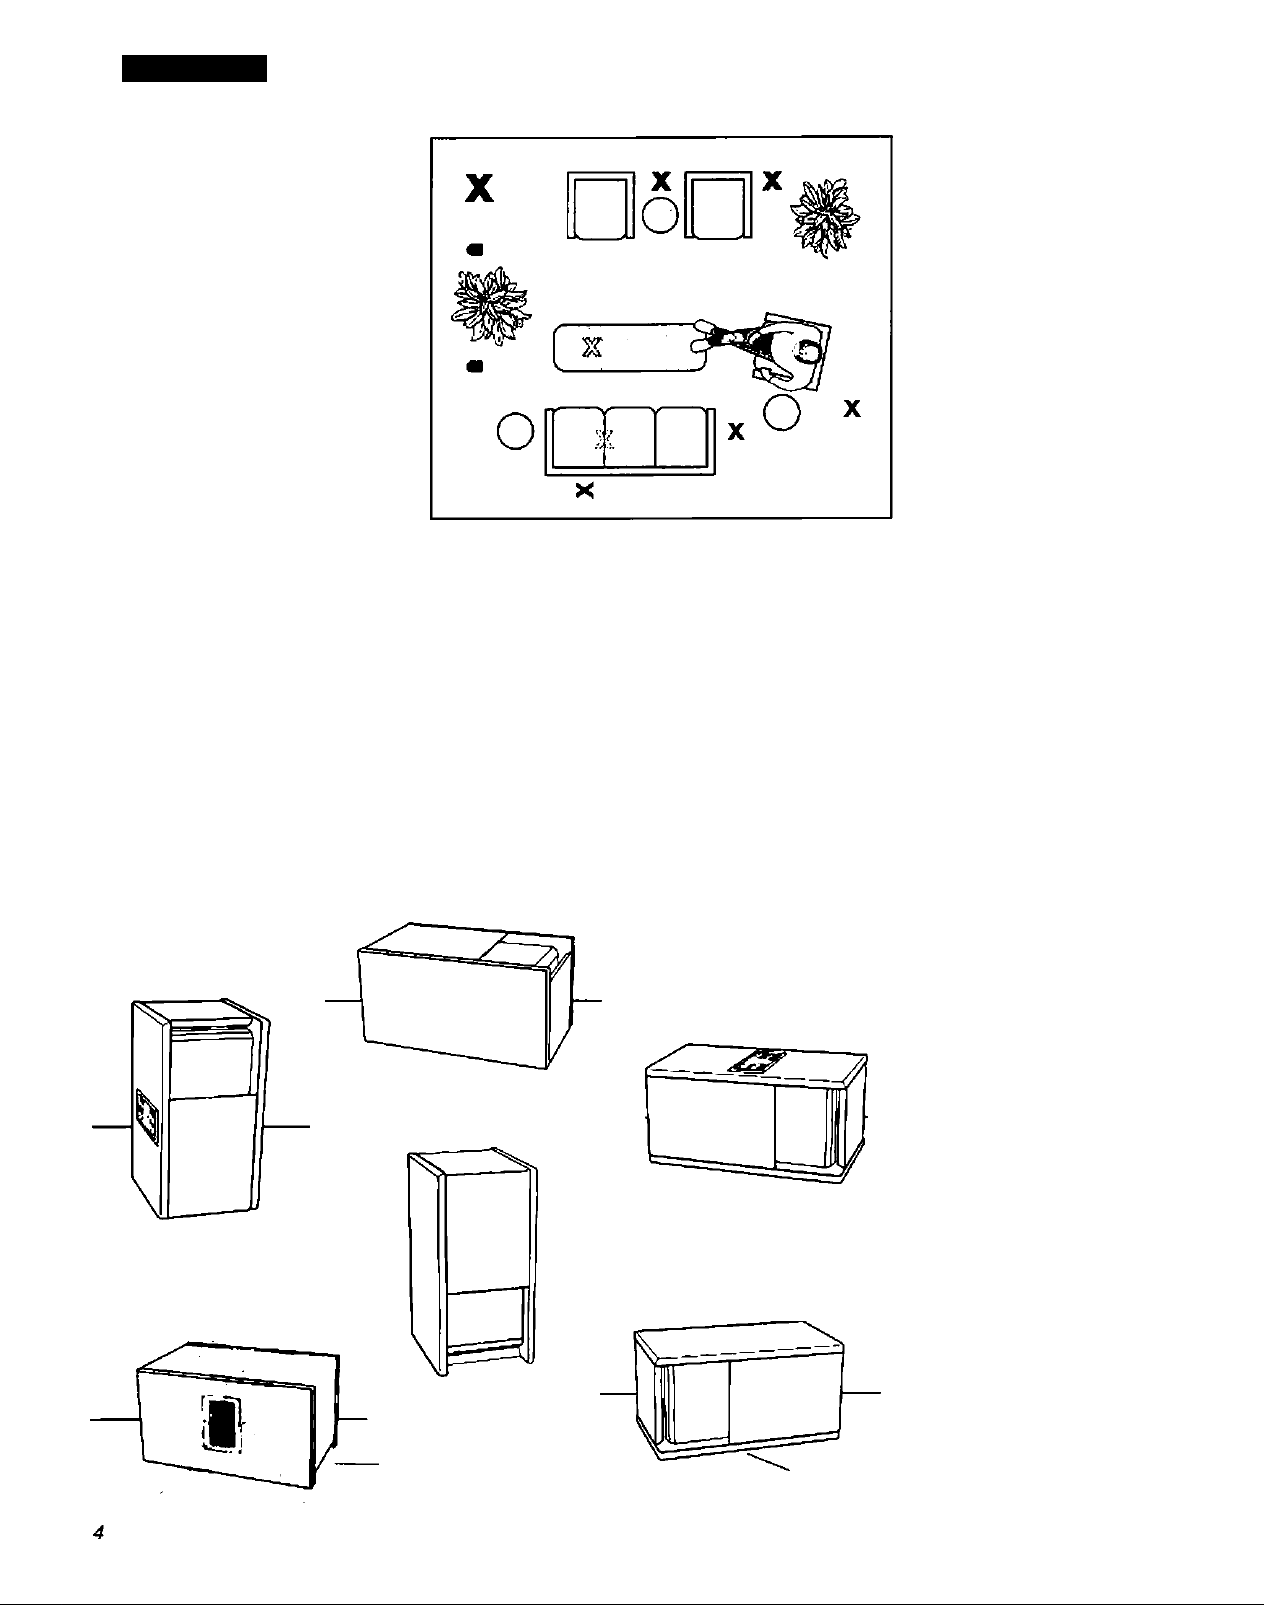
Figure 2
Placement of cube speakers and
options pg for placing the bass
module in your room.
Where to place the Acoustimass bass module
The Acoustimass bass module can be hidden almost anywhere in a room (Figure 2). Use your
sound preference and convenience as a guide. Leave at least 2 inches (5 cm) of space be
tween the openings (ports) and the wall. And, to prevent interference, keep the module at least
2 feet (.6 m) from any video screen.
For a baiarrced sound in most rooms, place the module along a wall within 6 feet (1.5 m) of the
comer. To increase bass response, move the module closer to a comer without blocking the
openings (Figure 3). To decrease the bass, place the module farther from the comer.
Figure 3
Choices on how to position the bass
module.
Openings
(ports)
Note:
When you decide how you will
position the bass module, attach
the rubber feet to the bottom
surface to protect the module
and the floor.
Connection
panel
Page 5

Connections
Use the cables conectly
the supplied cables to connect the cube speakers to the module and the module to your
lifier or receiver.
I
To place these components more than 20 feet (6.2-9.2 m) apart, you will need to splice in a
length of standard zip cord (2 conductor, 18-gauge wire found at electrical and hardware
stores). To place them more than 30 feet (9.2 m) apart, you will need heavier gauge wire. See
the wire recommendations on page 9. Or check with your authorized Bose dealer.
Speaker cable consists of two Insulated wires. The insulation around or^ wire Is mart<ed with a
band or stripe. This marked wire is always positive (+). The plain wire is always negative (-).
These correspond to the red (+) and black (-) terminals on the back of the speaker, amplifier, or
receiver. Be sure to connect each wire to the proper terminal (positive to positive, negative to
negative).
Connect the cube speakers
1. Attach the end of one speaker cable to
the terminals on the back of a cube
speaker. Just press the terminal tab and
insert each wire.
2. Use a second speaker cable to repeat
step 1 for the second cube speaker.
3. Connect the free end of the first cable to
the LEFT OUTPUTS TO CUBE SPEAK
ERS terminals on the bass module.
•
Cube speakers do not attach directly to
your amplifier or receiver (Rgure 4).
CAUTION:
Be sure all components are turned
off and unplugged from the power
outlet before making the connec
tions.
Figure 4
Do not connect cube speakers
directly to the amplifier or receiver.
4
. Repeat step 3 for the second cord,
connecting it to the bass module’s
RIGHT OUTPUTS TO CUBE SPEAK
ERS terminals.
5. Position the speakers so the cube connected to the LEFT terminals is on your left as you
face it to listen, and the cube speaker connected to the RIGHT terminals is on your right.
Connect the bass module
1. Attach one of the the remaining cables to the LEFT INPUTS FROM RECEIVER OR
AMPLIFIER terminals on the Acoustimass' bass module.
2. Attach the final cable to the module’s RIGHT INPUTS FROM RECEIVER OR MIPUFIER
terminals.
3. Connect the free end of the LEFT INPUTS cable to your amplifier or receiver’s LEFT
SPEAKER terminals.
4
. Connect the free end of the RIGHT INPUTS cable to the RIGHT SPEAKER terminals.
CAUTION:
Correct wiring is important.
Incorrect wiring will result in little
or no bass output and could
potentially damage the system.
Page 6

Connections
Cube Speakers
S— —0
OUTPUTS o-m
TO CUBE SPEAKERS
Bass
Modiie
+ LEFT-
^£1
mOM RECEIVER OR MVlinER
INPUTS-®
Ampifier/Receiver Outputs
Check your connections (Figure 5)
To avoid damaging your speakers, check all connections and correct any problems before
plugging in and turning on the amplifier or receiver. Make sure the cube speakers are con
nected to the bass module and not directly to the amplifier or receiver.
Figure 5
Make sure the wires of all cables are
connected positive to positive (-i- to
+) and negative to negative (- to -).
Check to be sure ail connections are made positive to positive and negative to negative. Be
sure wires do not touch across terminals.
Page 7

Check the system
1^1^ sure your system is working properly by following these steps:
1. Turn on your amplifier or receiver.
2. Turn the balance control on your ampliHer all the way to the left. You should hear music
from the left cube speaker only. You may detect a faint sound from the other cube
speaker. (You will also hear the bass module.)
3
. Turn the balance control all the way to the right. Now you should hear music from the right
cube speaker only. You may also hear a faint sound from the left cube speaker, as well as
the bass module.
4
. Now play music that includes some deep bass passages. Listen with the balance control
in the center position. Compare that sound to what you hear with the balance control in
the far left position. Then compare the sound in the center balance position with sound
when the control is in the right position. The bass should be the same or louder with the
control in the center. Be sure to return the balance control to the center position when you
are done.
If your system does not respond as described, check all the wires for proper positive to
positive and negative to negative connections. If your system still doesn't respond properly,
see “Problems and causes” on page 8.
Connections/ Maintenance
Cleaning your speakers
C^n the cabinets of your Acoustimass*-3 system using a damp cloth. If necessary, use a
^Hdetergent such as dish soap. Do not use any solvents, chemicals, or cleaning solutions
containing alcohol, ammonia, or abrasives. Do not allow liquids to spill through the speaker
grilles or enter the Acoustimass module.
You can vacuum the speaker grilles. To avoid damaging the drivers located directly behind the
grille cloth, use light pressure only.
Automatic system protection
When played at high volume, the Acoustimass-3 system’s automatic protection circuit acti
vates to prevent damage to the system from electrical stress or overload. When this happens,
you may notice a slight decrease in volume, which Is normal. It indicates that the power input
may have exceeded safe levels. Setting the volume at or above this level for sustained periods
is not recommended.
Page 8

Maintenance
Problems and causes
you have a problem with your Acoustimass' -3 speaker system, turn off the amplifier or
receiver and check all the connections between the cube speakers, bass module, and amplifier
or receiver. Since problems are likely to originate with components other than speakers, you
may want to refer to your amplifier or receiver owner’s guide.
Problem Possible Cause
The left cube
speaker
doesn't play
or sounds
distorted.
The right cube
speaker doesn't
play or sounds
distorted.
The entire
Acoustimass-3
system does not
play or sounds
distorted.
Defective left
amplifier or receiver
channel.
Defective right
amplifier or receiver
channel.
Defective amplifier
or receiver.
How To Rnd Out
Disconnect both speaker cables from the amplifier
or receiver. Reconnect the cable from the bass
module’s LEFT INPUTS to the amplifier or
receiver’s RIGHT SPEAKER terminals. Set the
amplifier or receiver’s balance control all the way
to the right and turn on the power.
If the left cube speaker now plays properly, your
amplifier or receiver’s left speaker channel is
probably defective.
Follow the above steps, reconnecting the cable
from the module's RIGHT INPUTS to the amplifier
or receiver’s LEFT SPEAKER terminals.
Disconnect the amplifier or receiver from the bass
module. Reconnect the module to another
amplifier or receiver that is working properly.
If the system now works, the problem is in your
amplifier or receiver. Refer to your receiver or
amplifier owner’s guide for further suggestions.
Do not connect the other cube
speaker to the channel in question.
If №e channel is defective, it could
damage your Acoustimass-3
system.
If your problem is still not solved, contact your local Bosedealer to arrange for service. Or refer
to “Service” on the inside back page. Bose Corporation will make every effort to remedy any
problem within terms of your limited warranty.
Warranty period
Tbe Bose' Acoustimass -3 Series III speaker system is covered by a limited five-year transfer
able warranty.
Details of the coverage are provided on the warranty card that came with your speakers. Please
fill out the information section on that card, detach, and mail it to Bose.
Page 9

Features
^^rlually Invisible' speaker design
• Acoustimass* speaker technology
• Identical magnetically shielded cube speakers
• Syncom' computer quality control
• Automatic system protection circuitry
• Acoustimass rrxidule: Saatch-resistant black or white satin finish
• Cube speakers: Black or white polymer finish, cloth grilles
Driver Complement
• One 5.25" (13.3 cm) dual voice coil low-frequency driver in bass module
• Two 2.5" (6.4 cm) magr>etically shielded wide-range drivers in cube speakers
Compatibility/Impeilance
Product information
• Compatible with receivers or amplifiers rated from 10 to 100 watts per channel; rated
4 to 8 ohms
• lEC rating: 50 watts per channel
Recommendations
^^as<
ased on maximum frequency response deviation of ±0.5 dB.
Gauge Length
18 (0.75 mm^ 30 ft (9 m) maximum
16(1.5 mm') 45 ft (14 m) maximum
14 (2.0 mm') 70 ft (21 m) maximum
Size
• Acoustimass module: 7.5"H x 14.2-W x 8.0"D (19.0 x 36.1 x 20.3 cm)
• Cube speaker: 3.1"H x 3.1 "W x 4.8"D (7.9 x 7.9 x 12.1 cm)
• System weight: 16.5 lb (7.5 kg) in shipping carton
Page 10

To contact Bose
Bose Corporation, The Mountain
Framingham. MA 01701-9168
1-800-288-BOSE (1 -800-288-2673)
Weekdays 9 a.m. to 8 p.m.
Saturdays 9 a.m. to 3 p.m.
ET (eastern time)
Ireland
Bose Corporation
Carrickmacross, Co Monaghan
TEL 042-61988 FAX 042-61998
Italia
Bose S.p.A., Via Luigi Capucci, 12
00147 Roma
TEL 06-5127641 FAX 06-5115438
Canada
Bose Ltd., 8-35 East Beaver Creek Road
Richmond Hill. Ontario L4B 1B3
1-800-444-BOSE (1-800-444-2673)
9 a.m. to 5 p.m. ET (eastern time)
European Office
Bose B.V., Nijverheidstraat 8
1135 GE Edam, Nederland
TEL 0299-390190 FAX 0299-390109
Australia
Bose Australia, Inc., 1 Sorrell Street
Parramatta, N.S.W. 2150
TEL 02 204-6111 FAX 02 204-6122
Igique/België
Ф
Bose N.V., Limesweg 2, B-3700 Tongeren
TEL 012-390800 FAX 012-390840
Danmark
Bose A/S, Industrivej 7, 2605 Brondby
TEL 43437777 FAX 43437818
Deutschland
Bose GmbH, Max-Planck-Stra6e 36d
D-61381 Friedrichsdorf
TEL 06172-71040 FAX 06172-710419
France
Bose S.A., 6, rue Saint Vincent
78100 Saint Germain en Laye
TEL 01 -30616363 FAX 01 -30614105
India
Bose Corporation India Private Limited
W-16, Greater Kailash-II
New Delhi 110 048
TEL (011) 648 4462 FAX (011) 648 4463
Japan
Bose K.K.. Shibuya YT Building
28-3 Maruyama-cho
Shibuya-ku, Tokyo 150
TEL 3-5489-1052 FAX 3-5489-0591
Nederland
Bose B.V., Nijverheidstraat 8
1135GE Edam
TEL 0299-366661 FAX 0299-368166
Norge
Bose A/S, Solheimsgate 11
N-2001, Lillestrom
TEL 63-817380 FAX 63-810819
Österreich
Bose Ges.m.b.H., Vienna Business Park
Wienerbergstrasse 7 (10.OG)
A-1100 Vienna
TEL 01-60404340 FAX 01 -604043423
Schweiz
Bose AG, Rünenbergerstrasse 13
4460-Gelterkinden
TEL 061 -9815544 FAX 061 -9815502
Sverige
Bose A/S, Blandsädsgatan 2D
S-43146 Mölndal
TEL 31 -878850 FAX 31-274891
United Kingdom
Bose Limited, Unit G2
Trinity Trading Estate
Sittingbourne, Kent ME10 2PD
TEL 01795-475341 FAX 01795-427227
Other Locations
Bose Service, 1 New York Avenue
Framingham, MA 01701-9168 USA
TEL (508)766-1900 FAX (508)766-1919
43
Page 11

©1997 Bose Corporation, The Mountain, Framingham, MA 01701-9168 USA
JN98809 PN172825 Rev. 03 AM172825 Rev. 03
Better sound through research
 Loading...