

Page 1

The Bose® 251TM Environmental Speakers
Owner’s Guide
Brugervejledning
Bedienungsanleitung
Guía del usuario
Notice d’utilisation
Manuale di istruzioni
Gebruiksaanwijzing
Bruksanvisning
Page 2

2
English
For your records…
Serial numbers are located on the label on the back of each 251TM environmental speaker.
Serial numbers: and
Dealer name:
Dealer phone: Purchase date:
We suggest you keep your sales slip and warranty card together with this owner’s guide.
Page 3

3
English
Contents
Where to nd…
Setting Up
Before you begin ...........................................................................................................4
Unpacking the carton .................................................................................................... 4
Tools required ................................................................................................................4
Selecting the location for your speakers ....................................................................... 5
Installing Your 251TM Speakers
Choosing the speaker wire ............................................................................................ 6
Installing the mounting brackets ...................................................................................6
Attaching the speakers to the brackets ........................................................................8
Making the connections ................................................................................................ 9
Maintaining Your 251TM Speakers
Troubleshooting ........................................................................................................... 12
Warranty period ........................................................................................................... 12
Customer service ........................................................................................................12
Cleaning your speakers ............................................................................................... 12
Protecting the speaker wire.........................................................................................12
Product Information
Technical information .................................................................................................. 13
Bose® Corporation .....................................................................................inside back cover
Dansk
Deutsch
Español Français Italiano
Nederlands
Svenska
Page 4
4
English
Setting Up
Before you begin…
Unpacking the carton
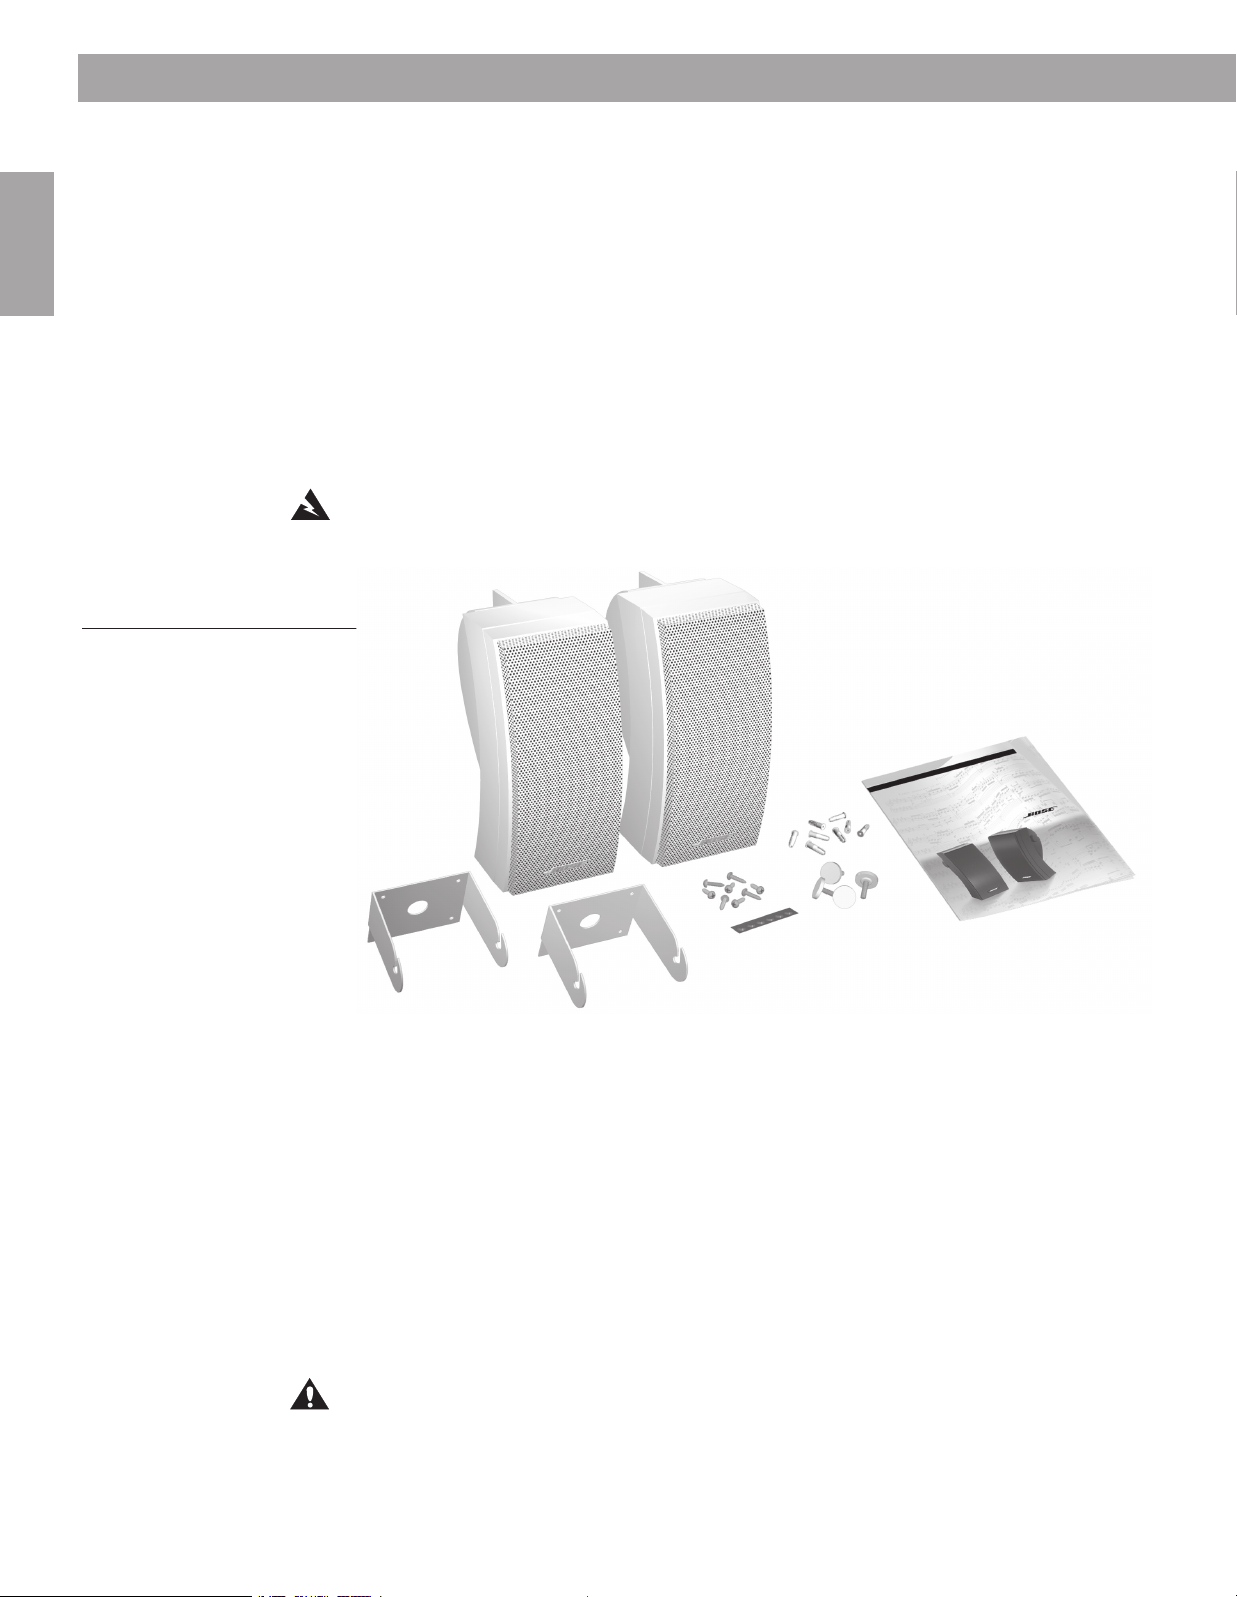
Figure 1
Packaging contents:
• Two 251 speakers
• Two mounting brackets
• Mounting hardware (8 screws
and 8 plastic anchors)
• Six rubber feet
• Four knobs
• One owner’s guide
Thank you for purchasing Bose® 251TM environmental speakers. These high-performance outdoor speakers are engineered to provide sound quality far beyond that of other environmental
speakers. The 251 environmental speakers are designed to withstand nature’s elements – so
you can be confident they will perform for years to come.
Carefully unpack your speakers and save all packing materials for possible future use. Check
that your system contains the parts identified in Figure 1. Do not attempt to use your speakers if any part of them appears damaged. Instead, notify Bose Corporation or your authorized
Bose dealer immediately.
WARNING: To avoid danger of suffocation, keep the plastic bags out of the reach of children.
Tools required
You need the following items to complete this installation:
• Speaker wire (see “Wire recommendations” on page 13)
• Phillips-head screwdriver (#2)
• A drill with the following bits:
- A 3⁄32 inch diameter (2,5 mm) bit is preferred, or you can use a 1⁄8 inch diameter (3,0 mm)
bit. For concrete, a 1⁄
• Eye and ear protection
• Dust mask
CAUTION: Failure to follow the instructions in this owner’s guide voids all warranties on your
speakers. If you are unsure of your ability to complete this process, consult a professional installer.
Please read this owner’s guide completely before beginning installation.
inch (6,0 mm) diameter masonry bit can be used.
4
Page 5
5
English
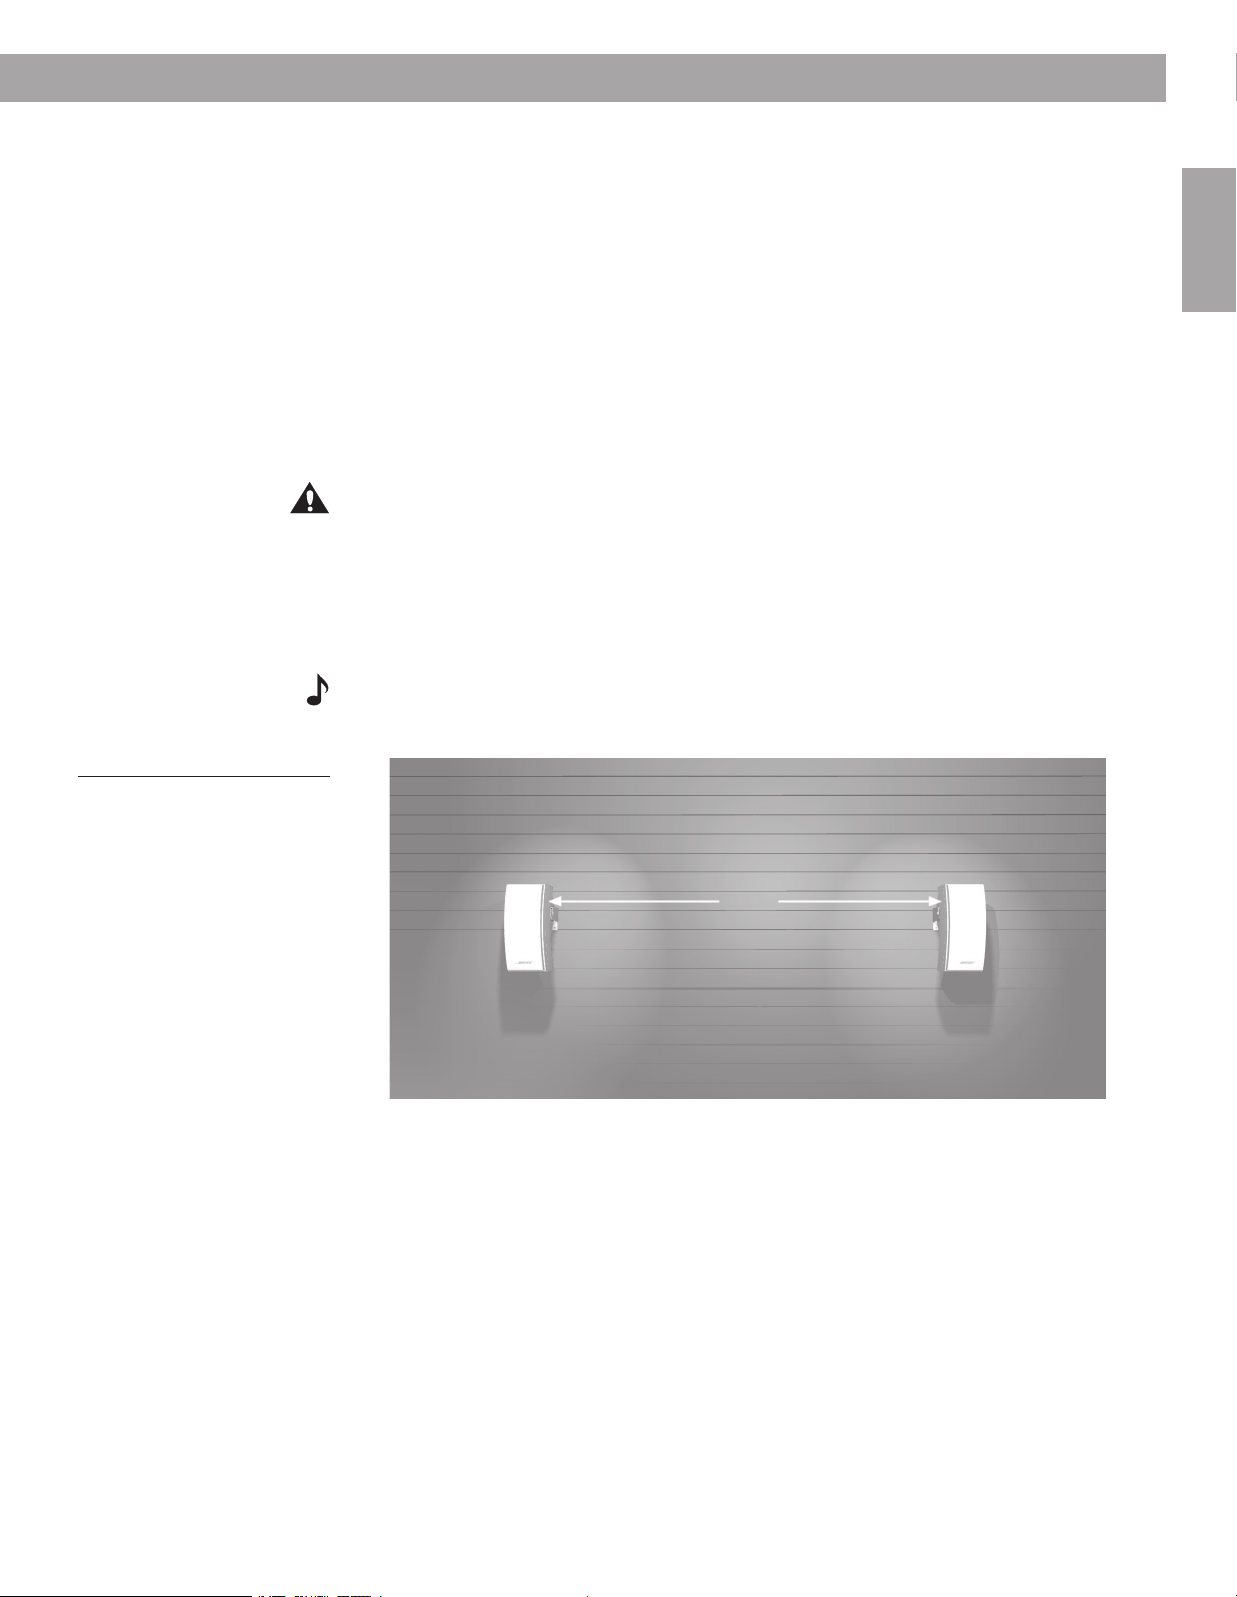
Selecting the location for your speakers
For best results, mount both speakers on the same wall, facing the listening area. Make sure
they do not face each other. (Outdoors, if you are not using an existing wall, consider the
length of your listening area as your “wall.”)
The 251TM speakers should be placed at least 7 feet (2 m) apart.
Please consider the following before mounting your speakers:
• Measure the length of speaker wire you need to connect each speaker to your receiver
or amplier. To determine the wire gauge you will need, refer to the “Wire recom-
mendations” on page 13.
• It is important that the speaker wire not be tripped over, pinched, or pulled. Determine
the best route to protect the wire.
CAUTION: Do not mount on surfaces that are not sturdy enough, or that have hazards concealed
behind them, such as plumbing or electrical wire. If you are unsure about installing these speakers,
contact a qualified professional installer.
• Regardless of where you place your speakers, make sure they cannot fall and cause
injuries.
• Bose® 251 speakers are not magnetically shielded. Keep them at least 9 inches (23 cm)
from any video screen or monitor.
Note: This product is not intended for use in areas where it will be subject to high vibration. If you
are unsure about installing these speakers, contact a qualified professional installer.
Setting Up
Figure 2
Speaker placement guidelines
7 ft (2 m)
minimum space between
speakers
Page 6

6
English
Installing Your 251TM Speakers
Choosing the speaker wire
Be sure to use the proper gauge (thickness) of speaker wire. Standard zip cord (2-conductor,
18-gauge wire found at electrical and hardware stores) works for most applications. If your
speakers will be more than 30 feet (9 m) from the receiver or amplier, see the “Wire recommendations” under “Technical Information” on page 13. Or check with your authorized Bose®
dealer.
If you decide to run the speaker wire through a wall or underground, check your local building
code requirements, or contact an electrical installer before proceeding.
Note: Be sure to cut enough wire to reach from the receiver to each speaker.
CAUTION: Before making any connections, turn off your receiver or amplier and unplug it from
the outlet (the AC power mains).
Installing the mounting brackets
The 251TM speakers should be mounted using the supplied brackets. They can be mounted
onto the exterior of a house or onto a deck railing or table. If you choose not to use the supplied brackets, be sure to position your 251 speakers on a sturdy surface.
CAUTION: If you do not use the supplied brackets, choose a level surface for the speakers. Vibration can cause the speakers to move, so it is important that you install the supplied rubber feet
before using the speakers on a surface. Refer to “Attaching the rubber feet” on page 11.
Figure 3
251 environmental speaker
mounted onto the exterior of a
house
Figure 4
Marking four holes on the exterior
of a house
Installing the brackets onto the exterior of a house
The 251 speakers should be mounted in a vertical position to achieve the best musical
performance. Figure 3 illustrates how the mounted speaker will look once the installation is
complete. To begin, mark four holes to indicate where you want to install the speaker bracket
(Figure 4). For wood, drill four starter holes using a 3⁄32 inch (2,5 mm) drill bit (Figure 5). For cement, drill four starter holes using a 1⁄4 inch (6,0 mm) drill bit (Figure 5).
Figure 5
Drilling four holes on the exterior
of a house
Page 7

7
English
Installing Your 251
TM
Speakers
Installing the mounting brackets (cont.)
Installing the brackets onto the exterior of a house (cont.)
For mounting onto wood, install the supplied screws using a Phillips-head screwdriver (Figure 6A). For concrete use, first install the supplied plastic inserts. Then, using a Phillips-head
screwdriver, install the screws (Figure 6B).
Figures 6A and 6B
Installing the hardware
A. Wood
B. Concrete
Figure 7
251 environmental speaker
mounted onto a deck railing or
table
A. B.
3
⁄32 inch (2.25 mm)
1
⁄2 inch (2.25 mm)
1
3
⁄32 inch (2.25 mm)
1
⁄2 inch (2.25 mm)
1
Installing the brackets onto a deck railing or table
The 251TM speakers should be mounted in a vertical position to achieve the best musical
performance. Figure 7 illustrates how the mounted speaker will look once the installation is
complete. To begin, mark four holes to indicate where you want to install the speaker bracket
(Figure 8). Then, drill four starter holes using a 3⁄32 inch (2,5 mm) drill bit (Figure 9).
1
⁄4 inch (6.35 mm)
1
1
⁄2 inch (2.25 mm)
1
⁄4 inch (6.35 mm)
1
1
⁄2 inch (2.25 mm)
Figure 8
Marking four holes on a deck
railing or table
Figure 9
Drilling four holes on a deck railing or table
Page 8

8
English
Installing Your 251TM Speakers
Installing the mounting brackets (cont.)
Installing the brackets onto a deck railing or table (cont.)
Finally, install the four screws using a Phillips-head screwdriver (Figure 10).
Figure 10
Installing the bracket onto a deck
railing or table
Note: If you are mounting your 251TM speakers on a deck railing or table, you will need to rotate the
Bose logo. Refer to “Rotating the Bose logo” on page 11 for instructions on how to do this.
Attaching the speakers to the brackets
Once the brackets are installed, carefully follow these steps to attach the speakers to the
brackets. First, insert the knobs into each side of the speakers. Be sure to turn each knob two
full rotations (Figure 11). Then, carefully slide the speakers into the brackets (Figure 12). Finally,
temporarily tighten the speaker in a position that will allow you to easily connect the speaker
wire (Figures 13A and 13B).
Figure 11
Installing the knobs
Figure 12
Sliding the speakers into the
brackets
two full rotations
Page 9

9
English
Installing Your 251TM Speakers
Attaching the speakers to the brackets (cont.)
Figures 13A and 13B
Temporarily tighten the speakers
to the brackets
A. Exterior of the house
B. Deck railing or table
A.
Making the connections
Preparing the speaker wire (not provided)
Speaker cord consists of two insulated wires. The insulation around one wire is striped,
collared, or ribbed. This marked wire is positive (+). The plain wire is negative (–). These
correspond to the red (+) and black (–) terminals on the back of the speaker, receiver, or
amplifier. Be sure to connect each wire to the proper terminal (positive to positive, negative
to negative).
B.
Figure 14
Preparing the ends of each wire
Figures 15
Unscrewing the hex knob
1
⁄2 inch (1.3 cm)
At the ends of each cord, strip approximately 1⁄2 inch (1.3 cm) of insulation from both wires
(Figure 14). Next, twist the ends of each wire so there are no loose strands.
Connecting the speaker wire to the speakers
At the back of your speaker, unscrew the hex knobs on the terminal posts. This reveals a
small opening through each post (Figure 15). Using the wire guides, insert the marked wire
into the red (+) terminal. Then insert the plain wire into the black (–) terminal. Tighten the
knobs to secure the wires. See Figures 16A and 16B on page 10.
Page 10

10
English
Installing Your 251TM Speakers
Attaching the speakers to the brackets (cont.)
Figures 16A & 16B
Connecting the speaker wire
A. Exterior of a house
B. Deck railing or table
A.
B.
Connecting the speaker wire to the receiver or amplier
1. Connect the speakers on the left side of the listening area to the left channel of your
receiver or amplifier (Figure 17).
a. Attach the marked wire to the red (+) terminal.
b. Attach the plain wire to the black (–) terminal.
2. Connect the speaker on the right side of the listening area to the right channel of your
receiver or amplifier, following the same procedure above (Figure 17).
Note: If your 251
or amplier, be sure to make the appropriate connections to the “B” channel.
TM
speakers are being connected as a secondary set of speakers to your receiver
Figure 17
Connecting the speaker wire
Checking the connections
Check the speaker connections carefully. Make sure no loose strands of wire touch across
terminals. This could create short circuits that can damage an amplifier or receiver.
Tighten any loose connections before you plug in the receiver or amplifier.
Testing the connections
To make sure your speakers operate correctly, follow these steps:
1. Set the balance control on your receiver or amplifier to normal (centered).
2. Play some deep bass passages of music through the speakers.
The sound should seem to come from a point between the two speakers. The bass should
be full and natural. If not, your connections may be reversed, causing the speakers to play
out of phase. Refer to “Making the connections” on page 9. To correct the problem, make
sure all the wires are connected positive to positive (+ to +) and negative to negative (– to –).
Then repeat steps 1 and 2 to re-test the speakers.
Page 11

11
English
Installing Your 251TM Speakers
Making the connections (cont.)
Putting the speakers in the nal location
Loosen the knobs on each speaker to rotate the speakers into the desired position. Then,
tighten the knobs to secure the speaker in its final position (Figures 18A and 18B).
Figures 18A and 18B
Putting the speaker in the final
position
A. Exterior of the house
B. Deck railing or table
Figure 19
Attaching the rubber feet
A.
Attaching the rubber feet
If you do not plan to use the supplied brackets to mount your 251 environmental speakers, you
can place them on a sturdy, level surface. They should be standing in the vertical position. Be
sure to attach the rubber feet before using your speakers. For proper balance be sure to place
the feet in the position shown in Figure 19.
B.
Figure 20
Rotating the Bose logo
Rotating the Bose logo
Mounting the speakers on a deck railing or table will require you to rotate the Bose logo. Using
your fingers, gently lift the logo, taking care not to detach it from the speaker, about 1⁄4 inch (.24
cm) and turn it 180º.
Page 12

12
English
Maintaining Your 251
TM
Speakers
Troubleshooting
Problem What to do
Neither speaker plays • Check the settings on your receiver or amplier. Refer to the owner’s guide that came with
The bass or treble is weak • Check the tonal balance setting on your receiver or amplier.
Only one speaker plays • Check the balance control on your receiver or amplier and make sure it’s centered.
• Check the wires connected to the speaker that does not play. Make sure the wires are in
Only one speaker still plays • Disconnect the working speaker from the receiver or amplier.
it for instruction on settings.
• If your 251TM speakers are connected as a second set of speakers to your receiver or
amplier, check that the connections have been made to the “B” terminals and that
the “B” speakers are selected to play.
good condition and are rmly connected. Review the “Making the connections” section on
page 9.
• Switch the cord of the “faulty” speaker from its original receiver or amplier jacks to the
other set of jacks (the working speaker was originally attached to those jacks).
- If the speaker now works, the problem is in your receiver or amplier. Reconnect your
speakers to a working unit.
- If there is still no sound from the speaker, continue below.
• Remove the cord from the working speaker and connect it to the “faulty” speaker.
- If the speaker now works, the problem was in the original speaker cord.
- If there is still no sound, the problem is in the speaker.
• If trouble persists, contact your authorized Bose
contact Bose customer service. See the inside back cover of this owner’s guide for a list of
phone numbers.
®
dealer, who will arrange for service. Or,
Warranty period
Bose 251 environmental speakers are covered by a limited five-year transferable warranty.
Details of coverage are on the warranty card that came with your speakers. Please fill out the
information section, detach, and mail it to Bose.
Customer service
For additional help in solving problems, contact Bose Customer Service. See the inside back
cover for offices and phone numbers.
Cleaning your speakers
Use a cloth dampened in mild detergent and water to remove dust or dirt from the outside
of your 251 speakers. Or use a hose to rinse them thoroughly with fresh water. Do not use
enough pressure to force water behind the grille and into the drivers or the acoustic ports.
Protecting the speaker wire
The bare ends of the speaker cord can be affected by exposure to the elements. This is
especially true of saltwater exposure. You may use a silicone caulking material, such as RTV
adhesive, to protect the connections. It is commonly available at hardware stores. If you do
use caulking, apply it only after the wires are connected and the knobs tightened down.
Check the connections annually, and reapply as needed.
Page 13

13
English
Product Information
Technical Information
Protective features
• Galvanized powder coated steel grille
• Environmentally resistant hardware
• Polymer ber composite drivers
• Nickel-plated brass connection terminals
• Syncom® computer quality control
Driver complement
• Two (2) 21⁄2” environmental TwiddlerTM drivers per speaker
• One (1) 51⁄4” environmental woofer per speaker
Enclosure
• Dual-port molded polypropylene composite
• Black or white
Dimensions
• 131⁄2” H x 53⁄4” W x 8” D (34.29 cm x 14.6 cm x 20.32 cm)
Compatibility
• Compatible with ampliers or receivers rated 10-200 watts per channel/rated 4 to 8 ohms
• 100W IEC continuous power handling; rated 6 ohms
Environmental Capabilities
• Designed to withstand:
– salt fog, sun, high humidity (100%RH)
– temperature extremes (-40°F to 158°F; -40°C to 70°C)
Wire recommendations
• Based on a maximum frequency response deviation of ±0.5 dB
Gauge Length
18 (0.75 mm2) 30 ft (9 m) maximum
16 (1.5 mm2) 45 ft (14 m) maximum
14 (2.0 mm2) 70 ft (21 m) maximum
Weight
• 8 lb (3.63 kg) each
Page 14

© 2008 Bose Corporation, The Mountain
Framingham, MA 01701-9168 USA
AM250811 Rev.06
 Loading...