

Page 1
LIFESTYLE
®
18 DVD Home Entertainment System
Installation Guide
Page 2
W
Safety Information
ARNING: T o reduce the risk of fire or electric shock, do not expose the system to rain or moisture.
r
English
CAUTION
RISK OF ELECTRICAL SHOCK
DO NOT OPEN
CAUTION: TO REDUCE THE RISK OF ELECTRIC SHOCK,
DO NOT REMOVE COVER (OR BACK).
NO USER-SERVICABLE PARTS INSIDE.
REFER SERVICING TO QUALIFIED PERSONNEL.
These CAUTION marks ar e located on your LIFESTYLE
RISQUE DE CHOC ÉLECTRIQUE
AFIN DE PRÉVENIR UN CHOC ÉLECTRIQUE NE PAS ENLEVER
LE COUVERCLE ARRIÈRE. IL NE SE TROUVE À L’INTÉRIEUR
AUCUNE PIÈCE POUVANT ÊTRE RÉPARÉE PAR
L’USAGER. S’ADRESSER À UN RÉPARATEUR COMPÉTENT.
®
media center and Acoustimass
AVIS
NE PAS OUVRIR
®
module enclosur es:
The lightning flash with arrowhead symbol, within an equilateral triangle, is intended to alert the user to the presence of
uninsulated dangerous voltage within the system enclosure that may be of sufficient magnitude to constitute a risk of
electric shock.
The exclamation point within an equilateral triangle, as marked on the system, is intended to alert the user to the presence of important operating and maintenance instructions in this owner’s guide.
CAUTION: T o prevent electric shock, match wide blade of plug to wide slot, insert fully.
Class 1 laser product
The DVD player contained within the media center is classifi ed as a CLASS 1 LASER PRODUCT according to EN 60825-1:1994 + A11. The CLASS 1 LASER PRODUCT label is located
on the bottom of the media center.
CLASS 1 LASER PRODUCT
KLASSE 1 LASER PRODUKT
LUOKAN 1 LASER LAITE
KLASS 1 LASER APPARAT
CAUTION: Use of contr ols or adjustments or performance of procedures other than
those specified herein may result in hazardous radiation exposure. The compact disc player should not be adjusted
or repaired by anyone except properly qualified service personnel.
Class B emissions limits
This Class B digital apparatus meets all r equirements of the Canadian Interference-Causing Equipment Regulations.
Batteries
Please dispose of used batteries pr operly, following any local regulations. Do not incinerate.
Additional safety information
See the additional instructions on the Important Safety Information sheet enclosed in the shipping carton.
Please read this owner ’s guide
Please take the time to follow this owner’ s guide carefully. It will help you set up and operate your system properly, and enjoy all
of its advanced features. Save your owner’s guide for future reference.
CAUTION: No naked fl ame sources, such as lighted candles, should be placed on the apparatus.
For your records
Serial numbers ar e located on the bottom of the media center and the bottom panel of the Acoustimass module.
Media center serial number: _____________________
Dealer name: ___________________________ Dealer phone: ___________________ Pur chase date: ____________
®
Bose
©2003 Bose Corporation. No part of this work may be reproduced, modifi ed, distributed or otherwise used without prior written permission.
Manufactured under license from Dolby Laboratories. “Dolby” and the double-D symbol are trademarks of Dolby Laboratories. Confi dential
Unpublished W orks. ©1992-1997 Dolby Laboratories. All rights reser ved.
“DTS” and “DTS Digital Surround” are registered trademarks of Digital Theater Systems, Inc.
MPEG Layer -3 audio compression technology licensed by Fraunhofer IIS and THOMSON multimedia.
This product incorporates copyright protection technology that is protected by method claims of certain U.S. patents and other intellectual prop -
erty rights owned by Macrovision Corporation and other rights owners. Use of this copyright protection technology must be authorized by Mac rovision Corporation, and is intended for home and other limited viewing uses only unless otherwise authorized by Macrovision Corporation.
Reverse engineering or disassembly is prohibited.
This product incorporates copyright protected technology and other intellectual property rights owned by Cirrus Logic, Inc. and is subject to the
copyright protection of the U.S. as well as other licensing restrictions and protections. Use of this copyright protected technology is limited solely
to use with the Cirrus Logic integrated circuits incorporated in this product. Reverse engineering or disassembly is prohibited.
ecommends that you keep your sales slip and warranty car d together with this guide.
2
Acoustimass module serial number: ___________________
Page 3

Where to fi nd …
Introduction . . . . . . . . . . . . . . . . . . . . . . . . . . . . . . . . . . . . . . . . . . . . . . . . . . . . . . . . . . . . . . . . . . . . . . . 4
System Installation . . . . . . . . . . . . . . . . . . . . . . . . . . . . . . . . . . . . . . . . . . . . . . . . . . . . . . . . . . . . . . . . . 5
Reference . . . . . . . . . . . . . . . . . . . . . . . . . . . . . . . . . . . . . . . . . . . . . . . . . . . . . . . . . . . . . . . . . . . . . . . . 21
Contents
Welcome . . . . . . . . . . . . . . . . . . . . . . . . . . . . . . . . . . . . . . . . . . . . . . . . . . . . . . . . . . . . . . . . . . . 4
Region numbers . . . . . . . . . . . . . . . . . . . . . . . . . . . . . . . . . . . . . . . . . . . . . . . . . . . . . . . . . . . . . 4
Types of discs you can play . . . . . . . . . . . . . . . . . . . . . . . . . . . . . . . . . . . . . . . . . . . . . . . . . . . . 4
Symbols used in this guide . . . . . . . . . . . . . . . . . . . . . . . . . . . . . . . . . . . . . . . . . . . . . . . . . . . . 4
Getting started . . . . . . . . . . . . . . . . . . . . . . . . . . . . . . . . . . . . . . . . . . . . . . . . . . . . . . . . . . . . . . 5
Cables and accessories . . . . . . . . . . . . . . . . . . . . . . . . . . . . . . . . . . . . . . . . . . . . . . . . . . . . . . . 6
Placing your speakers . . . . . . . . . . . . . . . . . . . . . . . . . . . . . . . . . . . . . . . . . . . . . . . . . . . . . . . . 7
Left and right front speaker placement . . . . . . . . . . . . . . . . . . . . . . . . . . . . . . . . . . . . . . . . 7
Center speaker placement . . . . . . . . . . . . . . . . . . . . . . . . . . . . . . . . . . . . . . . . . . . . . . . . . . 8
Surround speaker placement . . . . . . . . . . . . . . . . . . . . . . . . . . . . . . . . . . . . . . . . . . . . . . . . 8
Acoustimass
Placing your media center . . . . . . . . . . . . . . . . . . . . . . . . . . . . . . . . . . . . . . . . . . . . . . . . . . . . . 10
Connecting the speakers to the Acoustimass module . . . . . . . . . . . . . . . . . . . . . . . . . . . . . . . 10
Connecting the Acoustimass module to the media center . . . . . . . . . . . . . . . . . . . . . . . . . . . . 12
Connecting the antennas . . . . . . . . . . . . . . . . . . . . . . . . . . . . . . . . . . . . . . . . . . . . . . . . . . . . . . 13
Connecting an FM antenna . . . . . . . . . . . . . . . . . . . . . . . . . . . . . . . . . . . . . . . . . . . . . . . . . 13
Connecting the AM antenna . . . . . . . . . . . . . . . . . . . . . . . . . . . . . . . . . . . . . . . . . . . . . . . . 13
Connecting to a cable radio provider . . . . . . . . . . . . . . . . . . . . . . . . . . . . . . . . . . . . . . . . . 13
Connecting your TV to the system . . . . . . . . . . . . . . . . . . . . . . . . . . . . . . . . . . . . . . . . . . . . . . . 14
Making audio connections . . . . . . . . . . . . . . . . . . . . . . . . . . . . . . . . . . . . . . . . . . . . . . . . . . 14
Making video connections . . . . . . . . . . . . . . . . . . . . . . . . . . . . . . . . . . . . . . . . . . . . . . . . . . 14
Connecting your VCR to the system (optional) . . . . . . . . . . . . . . . . . . . . . . . . . . . . . . . . . . . . . 15
Connecting your cable/satellite box to the system (optional) . . . . . . . . . . . . . . . . . . . . . . . . . . 16
Installing the TV on/off detector (optional) . . . . . . . . . . . . . . . . . . . . . . . . . . . . . . . . . . . . . . . . . 17
Turning off the internal speakers in your TV . . . . . . . . . . . . . . . . . . . . . . . . . . . . . . . . . . . . . . . . 17
Connecting the system to power . . . . . . . . . . . . . . . . . . . . . . . . . . . . . . . . . . . . . . . . . . . . . . . . 18
Installing the remote control batteries . . . . . . . . . . . . . . . . . . . . . . . . . . . . . . . . . . . . . . . . . . . .19
Finishing the installation . . . . . . . . . . . . . . . . . . . . . . . . . . . . . . . . . . . . . . . . . . . . . . . . . . . . . . . 19
Using alternate system connections . . . . . . . . . . . . . . . . . . . . . . . . . . . . . . . . . . . . . . . . . . . . . 21
To play VCR audio (not TV audio) through your system . . . . . . . . . . . . . . . . . . . . . . . . . . . 21
To play TV audio through your system with VCR audio fed to the TV . . . . . . . . . . . . . . . . . 22
Setting up a second listening zone . . . . . . . . . . . . . . . . . . . . . . . . . . . . . . . . . . . . . . . . . . . . . . 23
What is a zone? . . . . . . . . . . . . . . . . . . . . . . . . . . . . . . . . . . . . . . . . . . . . . . . . . . . . . . . . . . 23
What do I need for setting up a second zone? . . . . . . . . . . . . . . . . . . . . . . . . . . . . . . . . . . 23
How do I set up a speaker system in a second zone? . . . . . . . . . . . . . . . . . . . . . . . . . . . . 23
Connecting external equipment . . . . . . . . . . . . . . . . . . . . . . . . . . . . . . . . . . . . . . . . . . . . . . . . . 24
Connecting record/playback equipment . . . . . . . . . . . . . . . . . . . . . . . . . . . . . . . . . . . . . . . 24
Connecting other playback equipment . . . . . . . . . . . . . . . . . . . . . . . . . . . . . . . . . . . . . . . . 25
Using digital audio connections . . . . . . . . . . . . . . . . . . . . . . . . . . . . . . . . . . . . . . . . . . . . . . . . .25
Using optical digital audio connections . . . . . . . . . . . . . . . . . . . . . . . . . . . . . . . . . . . . . . . . . . . 25
Connecting the optional IR emitter cable . . . . . . . . . . . . . . . . . . . . . . . . . . . . . . . . . . . . . . . . . . 26
Accessories . . . . . . . . . . . . . . . . . . . . . . . . . . . . . . . . . . . . . . . . . . . . . . . . . . . . . . . . . . . . . . . . 26
Warranty . . . . . . . . . . . . . . . . . . . . . . . . . . . . . . . . . . . . . . . . . . . . . . . . . . . . . . . . . . . . . . . . . . . 26
Contacting customer service . . . . . . . . . . . . . . . . . . . . . . . . . . . . . . . . . . . . . . . . . . . . . . . . . . .26
Technical information . . . . . . . . . . . . . . . . . . . . . . . . . . . . . . . . . . . . . . . . . . . . . . . . . . . . . . . . . 27
®
module placement . . . . . . . . . . . . . . . . . . . . . . . . . . . . . . . . . . . . . . . . . . . . 9
English
Espanol
Francais
3
Page 4
Introduction
elcome
English
Region numbers
W
T
•
Thank you for pur chasing a LIFESTYLE
If you have successfully installed your new LIFESTYLE
Set Up Guide, congratulations! You can now skip to “Finishing the installation” on
page 19.
If not, the information provided on the following pages will guide you through the
installation.
Region numbers ar e assigned to DVD players and discs according to where they are sold.
Look for the region number marked on the carton or on the bottom of the media center.
For example, a region 1 DVD player should be marked like this:
Your system can play only DVD discs marked with the same region number.
®
home entertainment system.
®
system using the Quick
ypes of discs you can play
The DVD player in your system can play the following types of discs:
Video DVDs
•Video CDs (VCDs)
• Audio CDs
• CD-Rs or CD-R/Ws
•MP3 CDs
Symbols used in this guide
The symbols that appear in this guide ar e intended to aid in your understanding of this
material. Those symbols include:
A box with dotted lines identifies what parts may vary with different systems or in different
countries.
4
Page 5
System Installation
Getting started
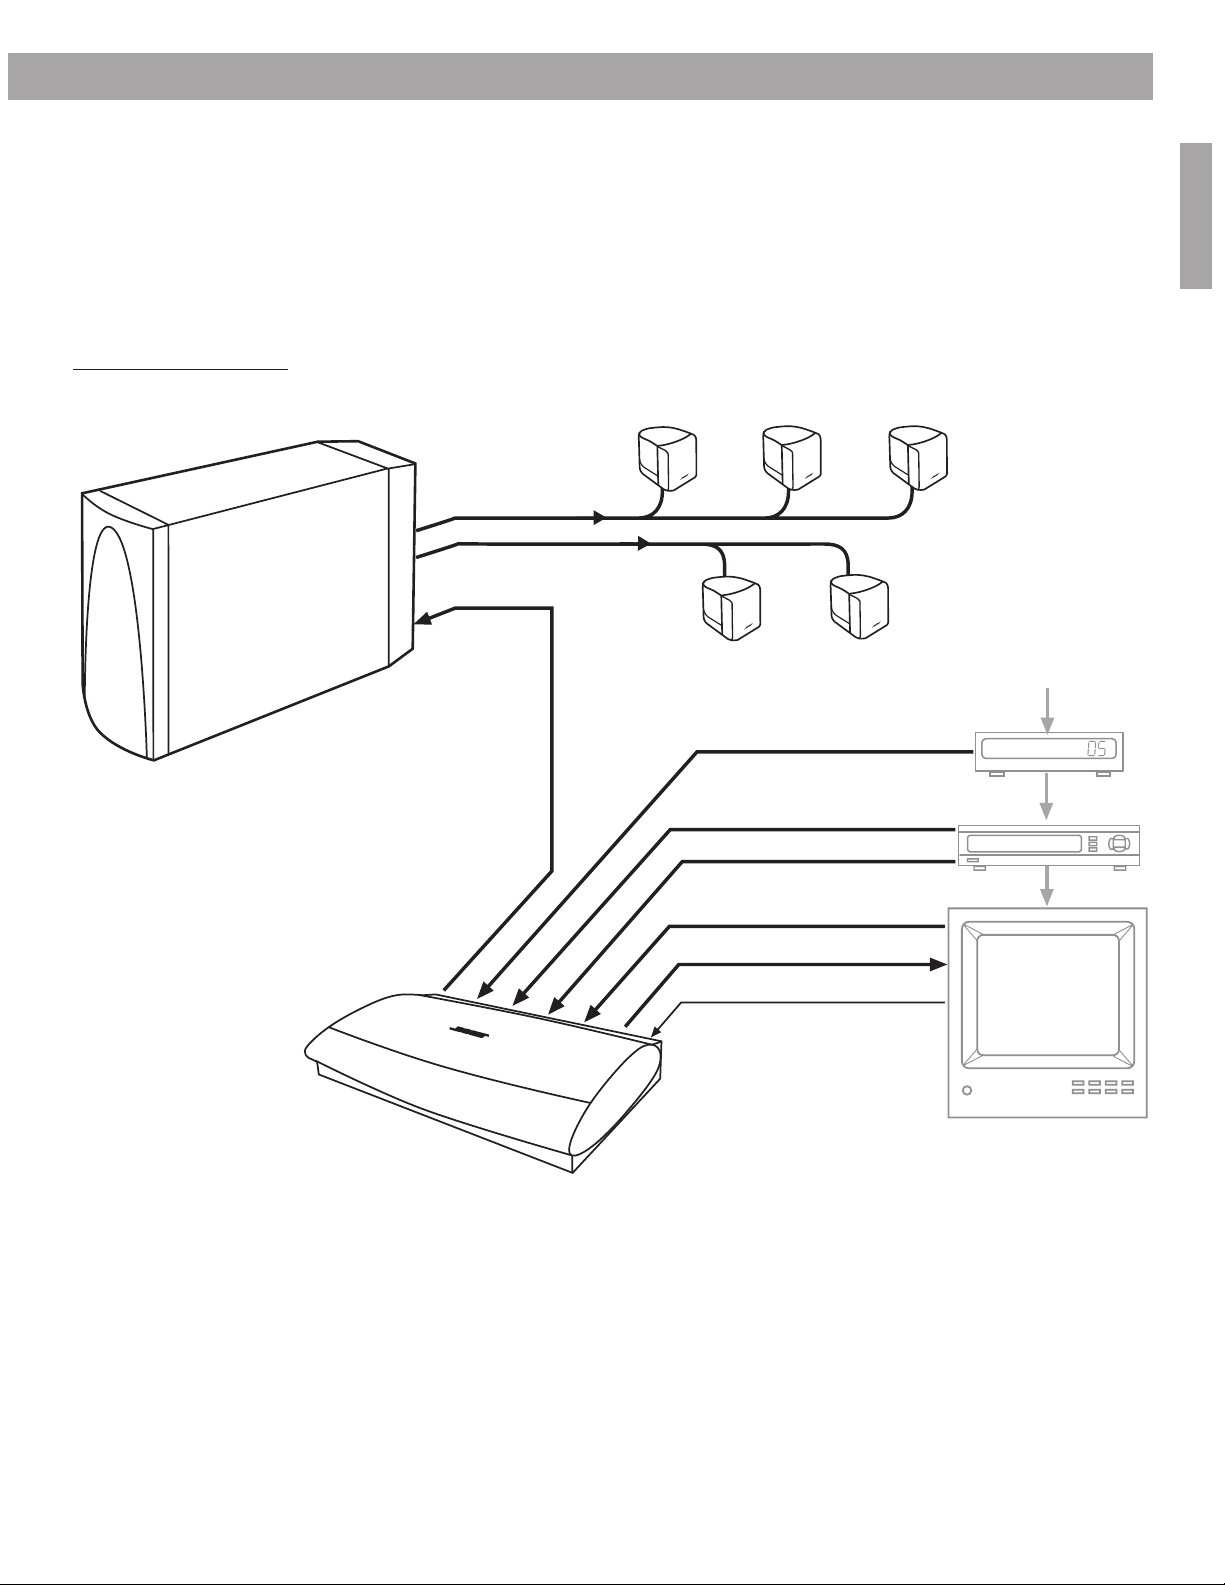
Figure 1
System connection diagram
Acoustimass® module
After unpacking your new system, save all packing materials. The original packing materials
provide the safest way to transport your system if necessary. If any part of your system is
missing or appears damaged, contact your authorized Bose
®
dealer immediately , or contact
Bose directly. Refer to the Bose address list included with your system.
The instructions in this section tell you how to connect your system as shown in Figure 1. For
alternate system connections, see “Using alternate system connections” on page 21.
Front speaker
outputs
Rear speaker
outputs
Speaker
zone 1
output
Left front
speaker
Left surround
AUX left & right audio (if available)
Center front
speaker
Right surround
speaker
Right front
speaker
speaker
Cable TV or
satellite input
Cable/satellite box
English
Media center
VCR left & right audio
VCR video
TV left & right audio
Video output
TV power detector
™
Cable TV or
satellite video
VCR
Cable TV video
TV
5
Page 6
System Installation
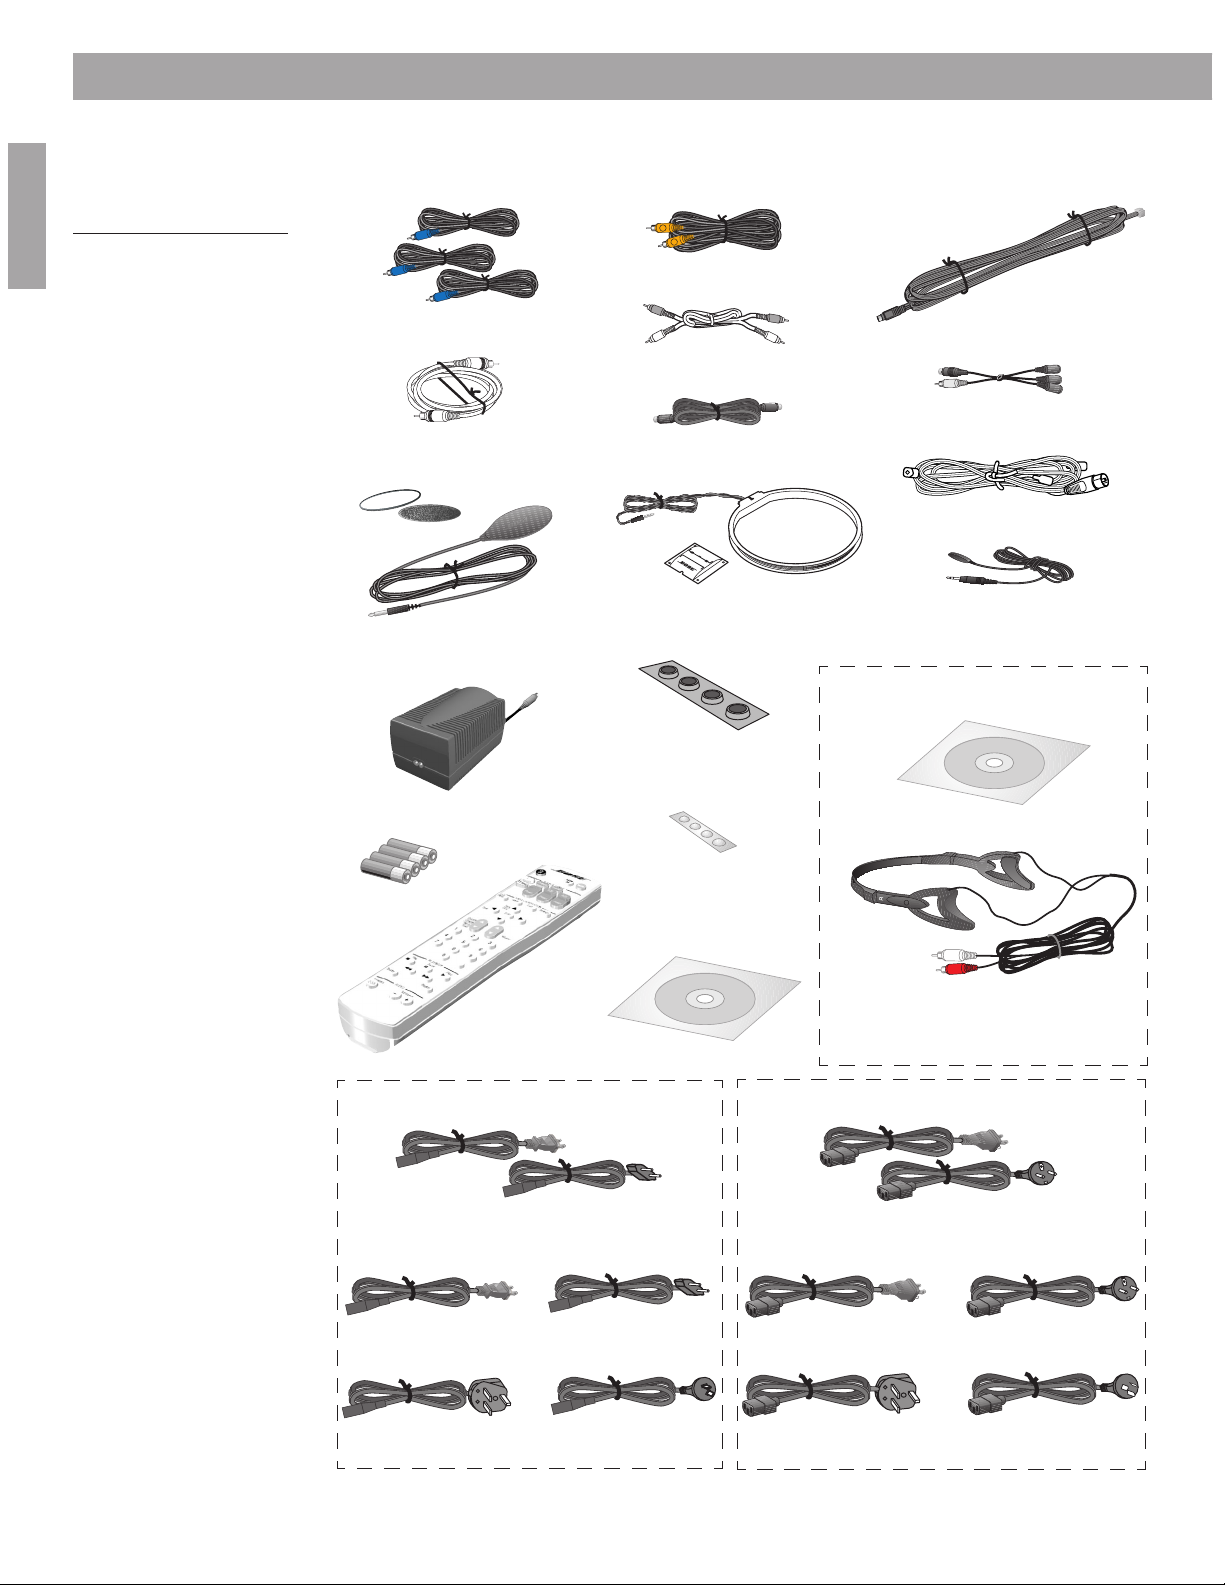
L
R
Remote control
Batteries
Media center power supply
AM loop antenna
FM antenna
Acoustimass module AC power cord
TV on/off detector
Video cable (6 ft)
Stereo audio cable
Mounting strip
S-Video cable
Front speaker cables
Surround speaker cables
Audio input cable
Component video adapter
Setup disc 1
Media center power supply AC power cord
120 VAC power cord
(US/Canada)
240 VAC power cord
(Australia)
230 VAC power cord
(UK/Singapore)
ADAPTiQ™ headset
230 VAC power cord
(Europe)
120 VAC power cord
(US/Canada)
240 VAC power cord
(Australia)
230 VAC power cord
(UK/Singapore)
Rubber feet for
Acoustimass® module
Rubber feet for
cube speakers
Optional IR emitter cable
115/230 VAC
dual power cords
(US/Europe)
230 VAC power cord
(Europe)
115/230 VAC
dual power cords
(US/Europe)
Setup disc 2
ADAPTiQ™ audio calibration system*
* May not be included with your LIFESTYLE®
system. Contact your Bose® dealer.
Cables and accessories
Figure 2
Cables and accessories
English
included with your system
The following items ar e included with your system.
6
Page 7
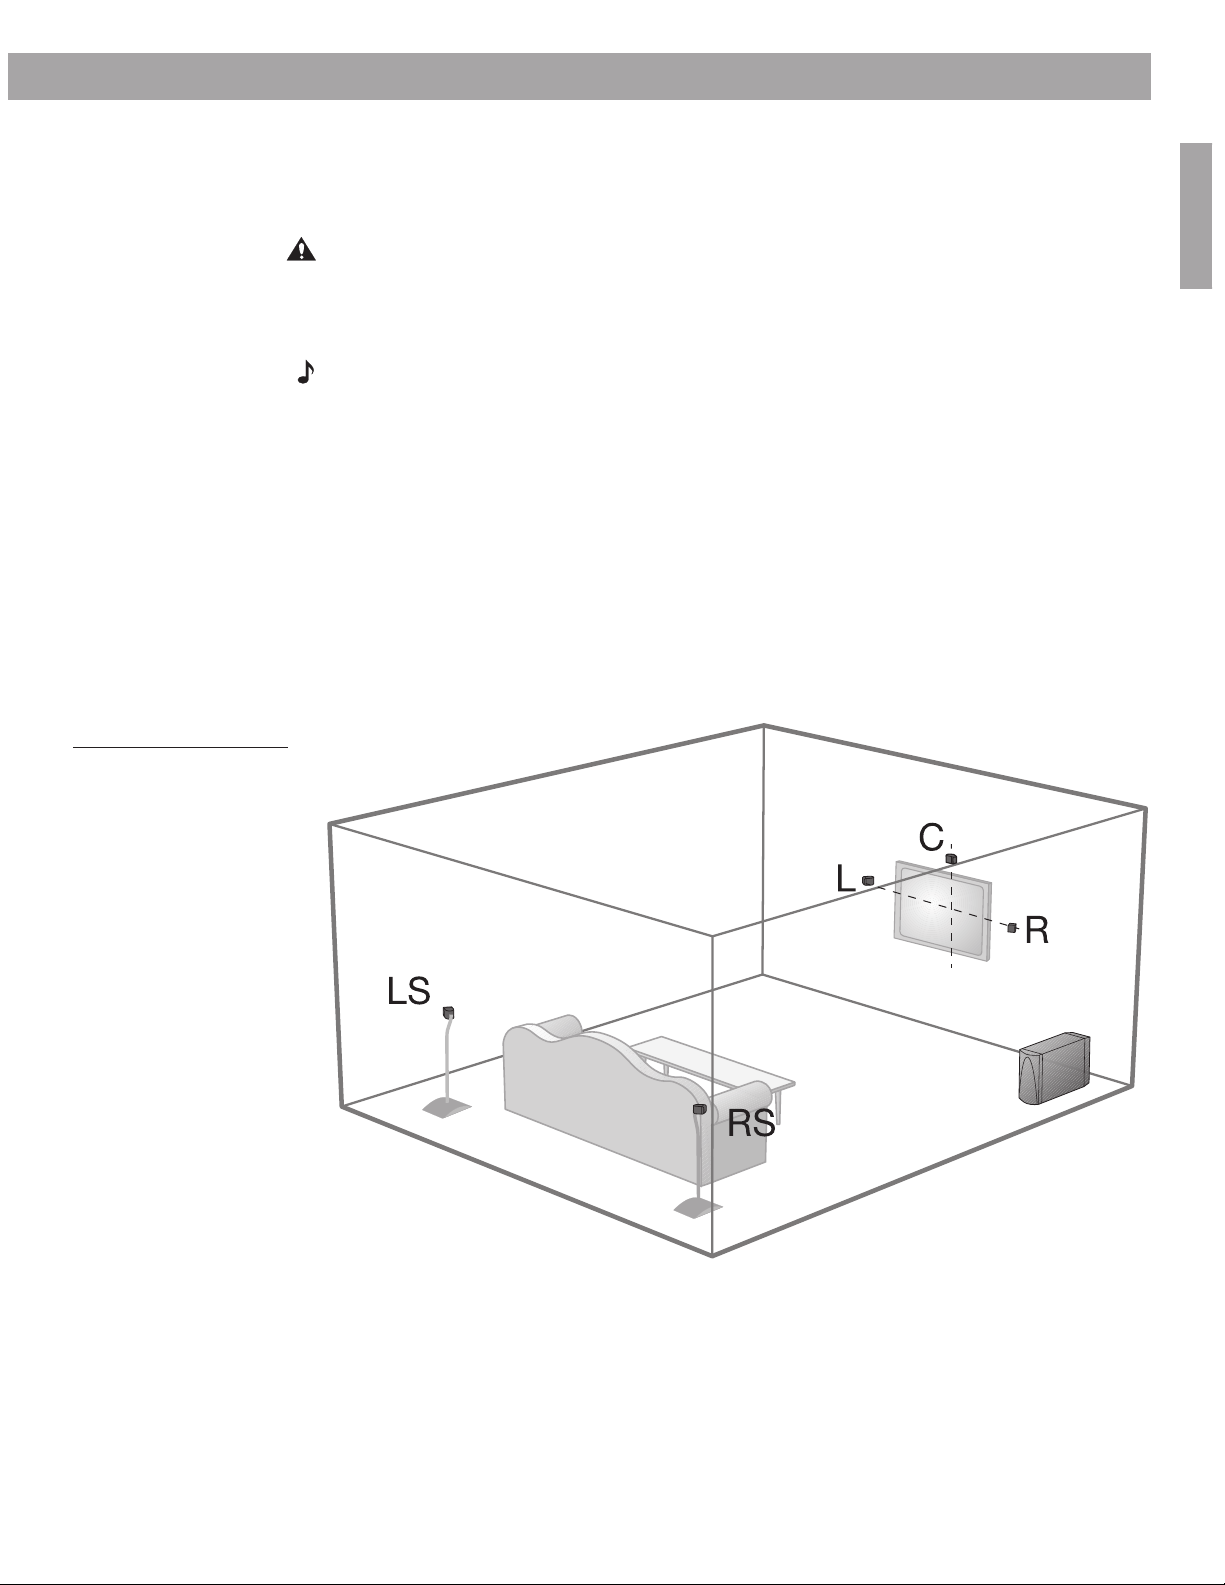
Placing your speakers
Left
front
Right
front
Center
Left surround
Right surround
When you place your speakers according to the guidelines below, they provide the audio
atmosphere of a home theater. You may experiment with the placement and orientation of the
speakers to produce the sound most pleasing to you.
CAUTION: Choose a stable and level surface for your speakers. Vibration can cause the
speakers to move, particularly on smooth surfaces like marble, glass, or highly polished
wood. If you are placing the center speaker on top of the television, attach the rubber feet
provided to the bottom of the speaker. You may obtain additional rubber feet by contacting
Bose
Note: Do not place a cube speaker on its side, as this diminishes performance.
Left and right front speaker placement
To best match sound and picture, the left and right front speakers should be placed at the
edge of the TV picture (Figure 3).
• Place the speakers up to 3 feet (1 m) from the edge of the TV screen and line them up with
the center of the TV screen.
Bose recommends a maximum distance of 3 feet (1 m) from the edge of the TV screen so
that the sound does not become too separated from the picture. You may wish to vary this
distance based on room conditions and personal preference. The front cables allow the
cube speakers to be placed up to 20 feet (6.1 m) from the Acoustimass® module.
• Direct the cube toward the wall or in a different direction to create reflected sound. See the
illustration of reflected sound patterns in Figure 4 on page 8.
System Installation
®
customer service. Refer to the Bose address list included with your system.
English
Figure 3
Recommended speaker
locations
7
Page 8
System Installation
Left
front
Right
front
Center
Acoustimass®
module
Right
surround
Left
surround
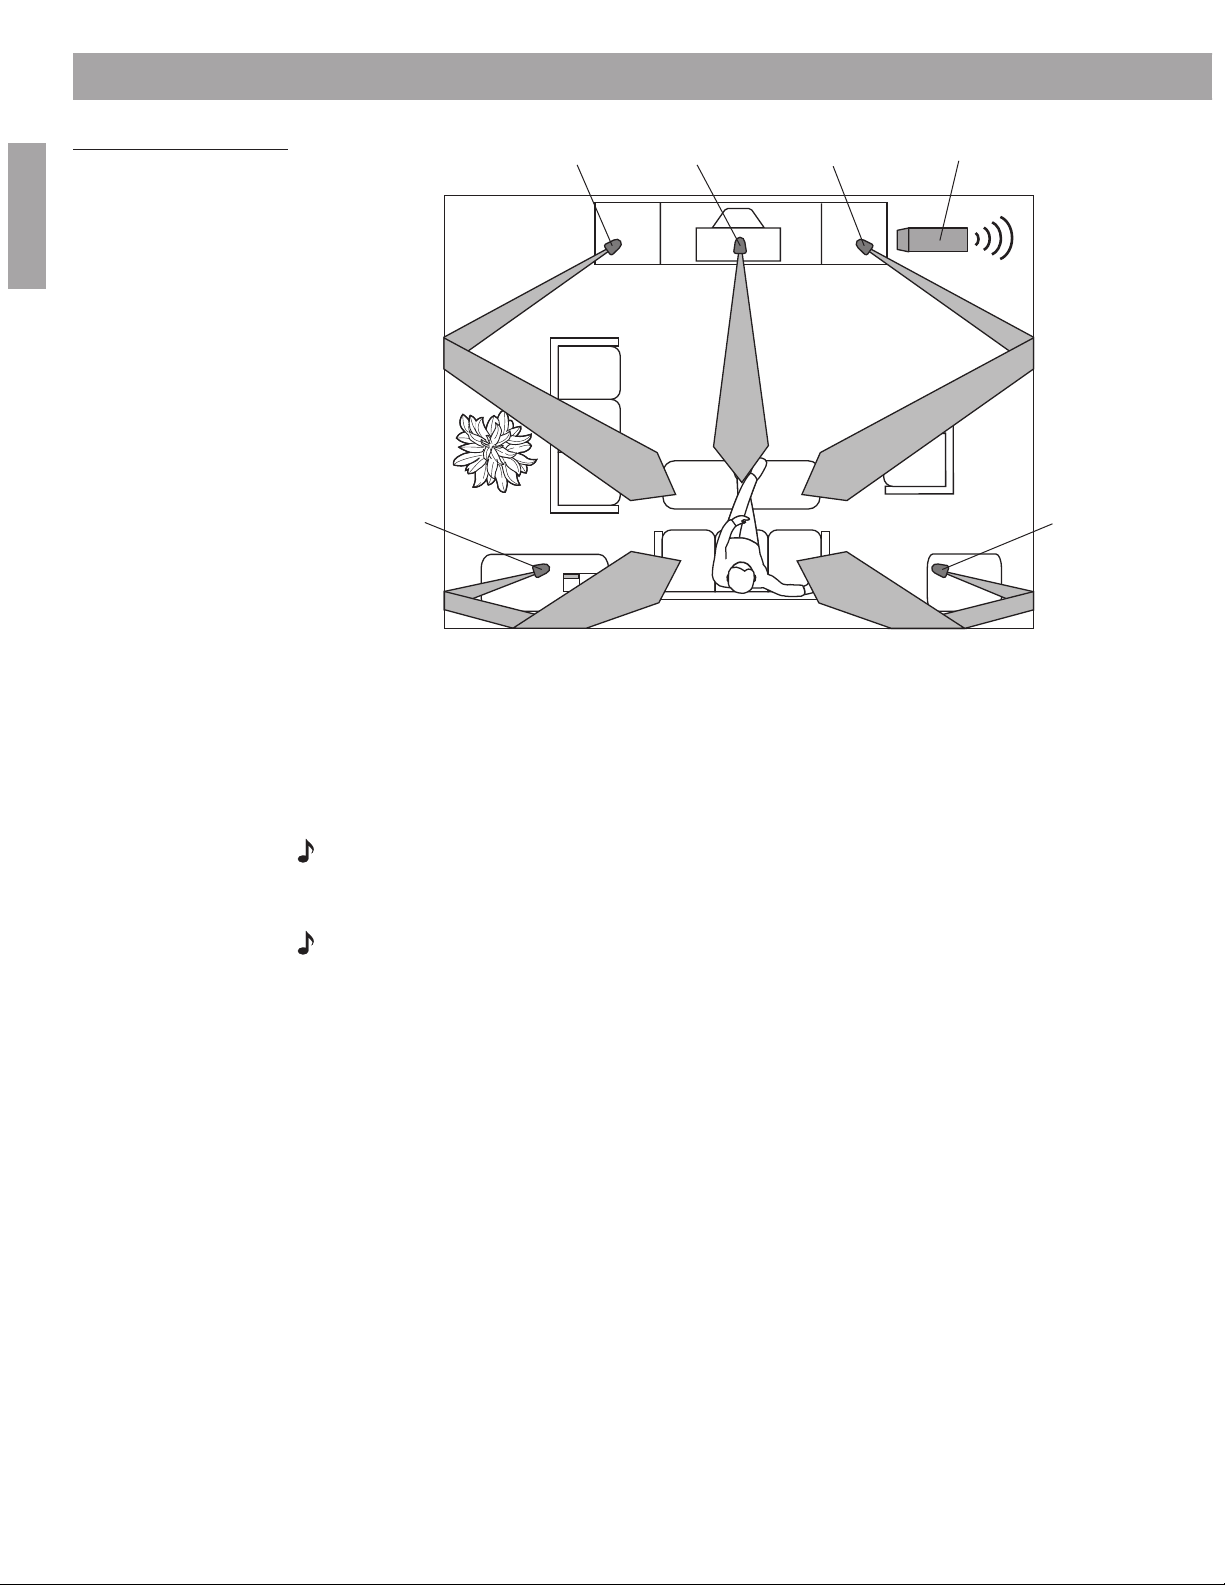
Figure 4
Speaker placement and
reflection rays
English
Center speaker placement
The sound from the center speaker should appear to come directly from the center of the picture. The center speaker cable allows up to 20 feet (6.1 m) distance from the Acoustimass
module.
1. Place the center speaker directly above or below the center of the TV screen, or at the
closest convenient location.
Note: If it will sit directly on the TV, be sure to attach the protective rubber feet to the bottom
of the center speaker.
2. Align the speaker with the front of the TV screen (not pushed to the back of the TV).
Note: If you put the speakers in a bookcase unit, be sure to place them at the front edge of
the shelf. Placing speakers in an enclosed space can change the tonal quality of the sound.
Surround speaker placement
The rear surround speakers create an area of sound around the listener. Place them in the back
half of your room. Direct the cubes slightly away from the listeners so that you cannot pinpoint the
exact location of the sound source. The surround cables allow up to 50 feet (15.2 m) distance
from the Acoustimass module.
1. Place the speakers at ear height (when seated) or higher, if possible.
2. Adjust the rear surround speakers to reflect sound off one or more surfaces. The longer
the path from the speaker to your ear, the better.
3. Do not direct the sound straight at the listener.
8
Page 9
System Installation
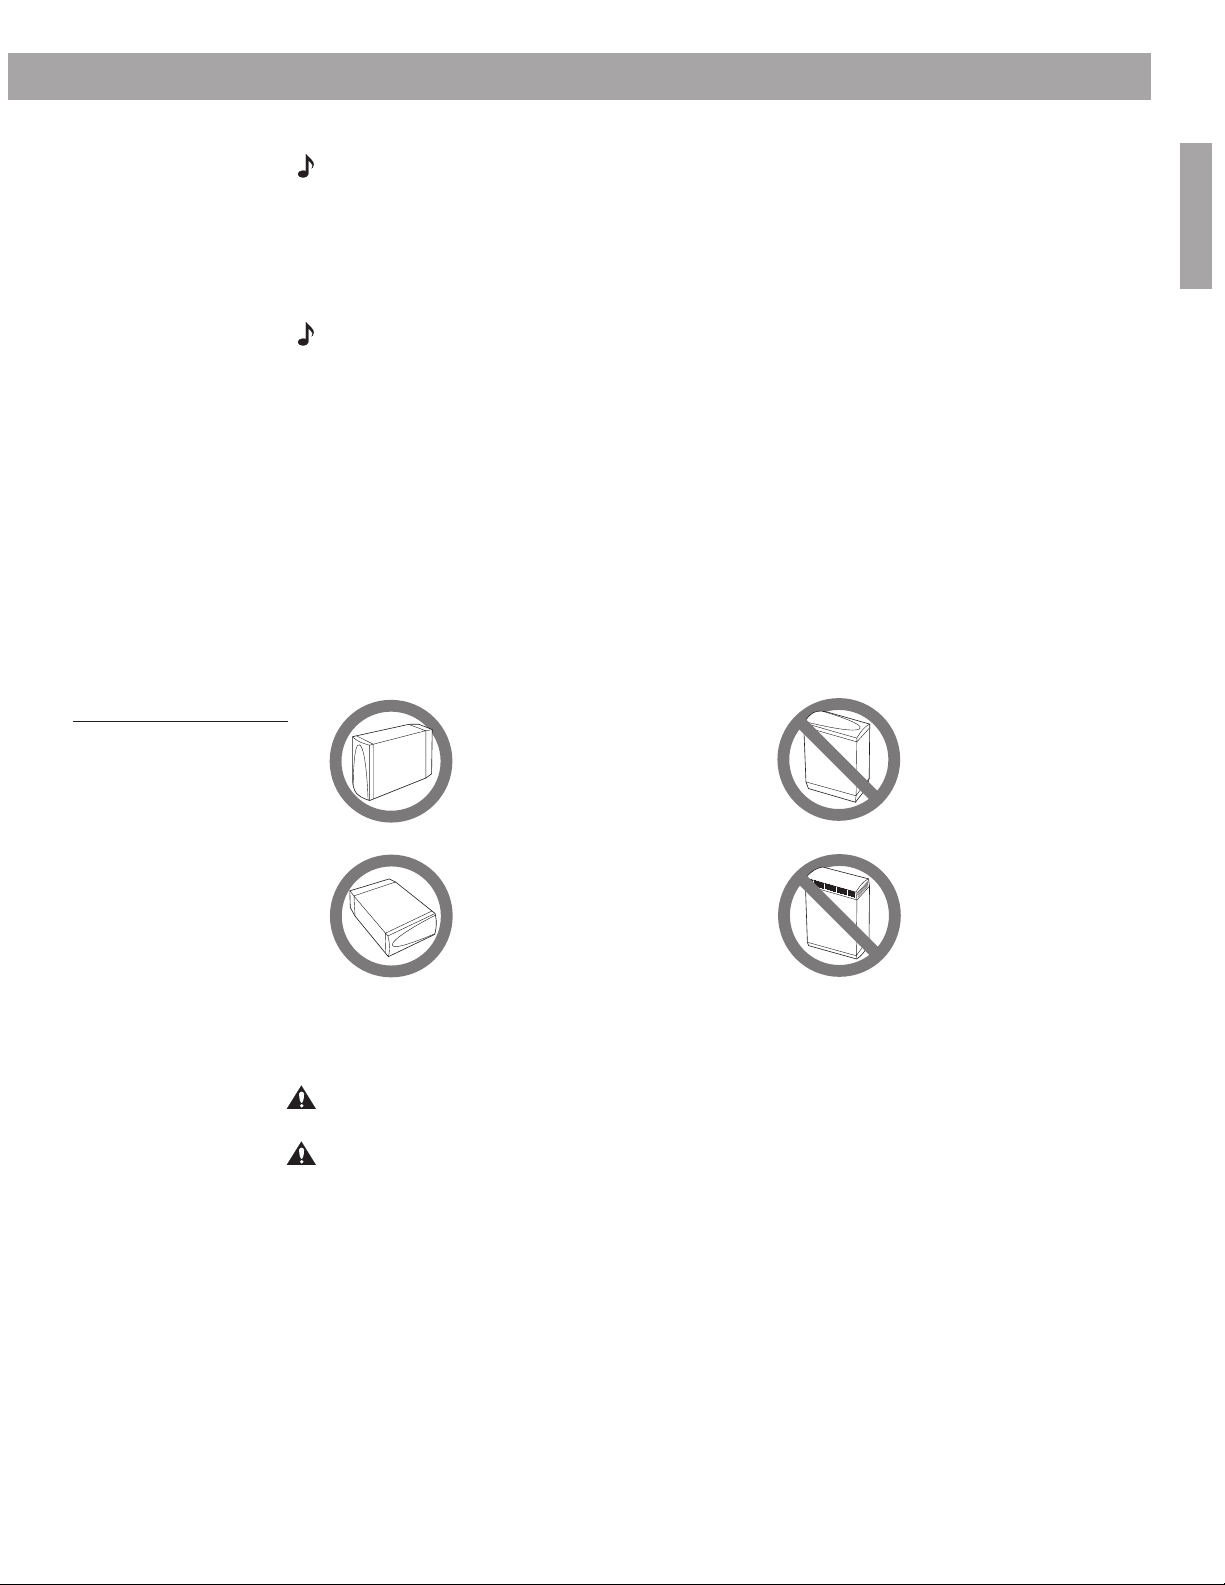
BEST
For best ventilation,
place it on the long
edge, with connectors
facing the floor.
ALTERNATE
Place it on its largest
side.
DO NOT
stand the module on the
back end. This surface is
slightly curved and the
module may tip over.
DO NOT
stand the module on
the front grille. The
weight of the module
can damage the grille.
Acoustimass® module placement
Note: Now is a good time to find the serial number on the bottom of the module, before you
proceed. Copy that number onto your warranty card and in the space provided on page 2 of
this guide.
Follow these guidelines to select a location for the Acoustimass module:
• Place the Acoustimass module along the same wall as the TV, or close to the same end of
the room as the front speakers (see Figure 4).
Note: To avoid interference with the TV picture, place the Acoustimass module at least
18 inches (45 cm) from the TV.
• Place the Acoustimass module so that the grille with the Bose® emblem faces into the room
or along the wall to avoid blocking the sound output or creating too much bass.
• For best bass performance, DO NOT place the Acoustimass module at equal distances
from any two walls or from a wall and the ceiling.
• For convenience, you may want to slide the Acoustimass module under a table or behind a
cabinet. However, DO NOT allow furniture or drapes to block the ventilation openings of the
module.
• Place the Acoustimass module within reach of the audio input cable, speaker cables, and
an AC power (mains) outlet.
• Place the Acoustimass module on the floor on its long edge or lay it down on its largest
side. DO NOT stand it on either end. See Figure 5.
English
Figure 5
Right and wrong placements for the Acoustimass
module
• Once you have selected a position for the module, place the four self-adhesive rubber feet
near the corners of the bottom surface. The rubber feet provide increased stability and protection from scratches.
CAUTION: DO NOT cover the ventilation openings of the Acoustimass module. The slots on
the end provide ventilation for the built-in electronic circuitry, and should not be blocked.
CAUTION: The magnetic field from the Acoustimass module is not an immediate risk to your
video tapes, audio tapes, and other magnetic media. However, you should not store tapes
directly on or near the Acoustimass module.
9
Page 10

System Installation
Front door – Make sure you have
enough room to lift up this door.
Disc tray – Make sure nothing blocks this tray as it slides
open for you to insert a disc.
Display window – Make sure you can view
this information while using your system.
™
Placing your media center
Note: Now is a good time to find the serial number on the bottom of the media center, before
you proceed. Copy that number onto your warranty card and in the space provided on
page 2 of this guide.
English
Figure 6
Front features of media
center
Select a location for the media center, keeping in mind the following guidelines:
• Do not block the front of the media center. Make sure you allow enough room to lift up the
front cover and open the CD tray of the CD/DVD player. Also, position the media center so
that you can clearly view the display window to the right of the CD tray cover. See Figure 6
for a description of the front of the media center.
• Place the media center close enough to other sound sources (TV and VCR) to allow for easy
cable connections. If you need additional audio and/or video cables to connect all of your
components, see your dealer or call Bose® customer service. Refer to the Bose address list
included with your system.
• Place the media center within 30 feet (9.1 m) of the Acoustimass® module (the length of the
audio input cable).
Note: For convenience, until your system is completely installed and tested, keep the media
center where you have easy access to its rear connection panel.
Connecting the speakers to the Acoustimass® module
10
Note: Before you start making system connections, make sure that the media center, the
Acoustimass module, and any additional equipment are not connected to AC power.
Note: To lengthen the speaker cables, use heavy-duty RCA extension cables, or splice in 18gauge or thicker cord (connecting + to + and – to –). To purchase extension cables, see your
dealer or electronics store, or call Bose
included with your system.
®
customer service. Refer to the Bose address list
In Figure 7, the wire marked with a red collar is positive (+) and the plain one is negative (–).
These wires match the positive (red) and negative (black) terminals on the back of each
speaker.
Note: The surround speaker cables are joined together for your convenience, providing an
easy-to-use cable for connecting the surround speakers. To run the cables in different directions from the Acoustimass module, simply pull apart the cables as needed.
Page 11

Figure 7
OUTPUTS TO
CUBE SPEAKERS
AUDIO
INPUT
POWER
FRONT SURROUND
100-120/200-240V AC
50/60 Hz
350W MAX.
L
C
R
L
R
Front speakers
Left Center Right
Surround speakers
Left Right
FRONT L FRONT C FRONT R SURROUND L SURROUND R
Connecting speaker cables
to the cube speakers
System Installation
Terminal tab
Red (+) wire
1. Match the correct cable to the corresponding speaker location. Front speaker cables
have blue connectors at one end, with L (left), R (right), or C (center) molded into the connectors. The red collars on the + wire are labeled LEFT, RIGHT, and CENTER. Surround
speaker cables have orange connectors at one end, with L (left) or R (right) molded into
the connectors. The red collars on the + wire are labeled LEFT and RIGHT.
2. Connect the wire end of one speaker cable to the terminals on the rear of the matching
speaker. Press the terminal tab on the back of the speaker and insert the marked wire (+)
into the red terminal and the plain wire (–) into the black terminal. Release the tab to
secure the wire. Repeat this step for each of the five speakers.
3. Connect each cable to the corresponding jack on the Acoustimass® module (Figure 8).
Plug the blue connectors into the matching left front, center, and right front jacks. Plug
the orange connectors into the matching left surround and right surround jacks.
English
Figure 8
Speaker connections to the
Acoustimass module
11
Page 12

System Installation
TV
SENSOR
IR
EMITTER
SERIAL
DATA
SPEAKER
ZONES
1
2
1.1A
33V DC POWER
AM
FM 75
ANTENNA
OPTICAL OPTICAL
INPUT
OUTPUT
AUDIO OUTPUTS
DIGITAL DIGITAL
R
L
RECORD
DIGITAL
R
L
DIGITAL
R
L
DIGITAL
R
L
DIGITAL
R
L
TAPE
AUDIO INPUTS
AUX VCR TV
VIDEO INPUTS
COMPOSITE S-VIDEO
COMPOSITE S-VIDEO
VIDEO OUTPUTS
OUTPUTS TO
CUBE SPEAKERS
AUDIO
INPUT
POWER
FRONT SURROUND
100-120/200-240V AC
50/60 Hz
350W MAX.
L
C
R
L
R
1
Audio input cable
Acoustimass module
connector panel
Note: Press tab to release cable connector.
When fully inserted into the jack, the connector
locks in place.
Connecting the Acoustimass® module to the media center
Connect the Acoustimass module to the media center with the audio input cable (Figure 9).
Note: Be sure that each connector is fully inserted into each jack.
English
Figure 9
Acoustimass connection to
media center
1. Plug the small black multi-pin connector (flat side facing up) into the SPEAKER ZONES
jack labeled “1” on the back of the media center.
2. Insert the telephone-style RJ-45 connector on the other end of the audio input cable into
the AUDIO INPUT jack on the Acoustimass module. When properly connected, it should
lock in place.
Note: Refer to “Setting up a second listening zone” on page 23 for information on connecting
a second zone.
12
CAUTION: Do not place strain on the audio input cable, especially on the connection to the
Acoustimass module. Placing excessive strain on the cable may cause damage to the cable
connection at the Acoustimass module. When disconnecting the cable from the Acoustimass
module, be sure to press the tab on the connector.
Page 13

Connecting the antennas
TV
SENSOR
IR
EMITTER
SERIAL
DATA
SPEAKER
ZONES
1
2
1.1A
33V DC POWER
AM
FM 75
ANTENNA
OPTICAL OPTICAL
INPUT
OUTPUT
AUDIO OUTPUTS
DIGITAL DIGITAL
R
L
RECORD
DIGITAL
R
L
DIGITAL
R
L
DIGITAL
R
L
DIGITAL
R
L
TAPE
AUDIO INPUTS
AUX VCR TV
VIDEO INPUTS
COMPOSITE S-VIDEO
COMPOSITE S-VIDEO
VIDEO OUTPUTS
AM antenna
lead
FM dipole
antenna lead
The rear panel of the media center provides connections for AM and FM antennas (Figure 10).
Be sure to unwrap the bundled antenna wires and straighten them as much as possible to
ensure the best reception.
Note: Outdoor antennas may be used. To install an outdoor antenna, consult a qualified
installer. Follow all safety instructions supplied with the antenna.
Figure 10
Connections for the AM
and FM antennas
System Installation
English
Connecting an FM antenna
Plug the connector on the FM dipole antenna lead into the FM antenna jack. Spread out the
antenna arms. Change the orientation of the antenna arms to get optimum FM reception.
Place the antenna as far from the media center and other components as possible.
Connecting the AM antenna
Note: To mount the AM antenna on a wall, follow the instructions enclosed with the antenna.
1. Plug the connector on the AM antenna lead into the AM antenna jack.
2. Stand the loop antenna on the base, following the instructions enclosed with the AM
3. Move the AM loop antenna as far as possible, at least 20 inches (50 cm), from the media
Connecting to a cable radio provider
Some cable TV providers make FM radio signals available through the cable service to your
home. This connection is made to the external FM jack on the back panel of the media center.
To connect to this service, contact your cable TV provider for assistance.
Note: Make sure that the cable radio installation includes a signal splitter so that only the FM
radio band, not the cable TV band, is received by the media center. If necessary, contact a
qualified installer.
antenna.
center, and at least 2 feet (60 cm) from the Acoustimass® module. Experiment with the
orientation of the loop for optimum AM reception.
13
Page 14

System Installation
R
L
VIDEO
IN
AUDIO
OUT
TV
SENSOR
IR
EMITTER
SERIAL
DATA
SPEAKER
ZONES
1
2
1.1A
33V DC POWER
AM
FM 75
ANTENNA
OPTICAL OPTICAL
INPUT
OUTPUT
AUDIO OUTPUTS
DIGITAL DIGITAL
R
L
RECORD
DIGITAL
R
L
DIGITAL
R
L
DIGITAL
R
L
DIGITAL
R
L
TAPE
AUDIO INPUTS
AUX VCR TV
VIDEO INPUTS
COMPOSITE S-VIDEO
COMPOSITE S-VIDEO
VIDEO OUTPUTS
TV connector
panel
TV
Connecting your TV to the system
The media center provides audio and video connections for your TV. See Figure 11.
Making audio connections
English
Using the supplied stereo audio cable, connect the left (L) and right (R) audio outputs on the
rear panel of your TV to the L and R TV audio inputs on the rear panel of the media center
(Figure 12).
Making video connections
These connections will vary according to the type of cable you use as described below.
Composite video
Using the supplied video cable (with yellow connectors), connect the COMPOSITE video output on the rear panel of the media center to the VIDEO INPUT on the rear panel of your TV
(Figure 12).
S-video
The S-VIDEO OUTPUT provides a higher quality picture on your TV than the COMPOSITE
VIDEO OUTPUT. This jack is provided on many TVs. To make this connection you will need to
use the S-video cable included with your system.
Component video
Some newer televisions are equipped with component video input jacks. Component video
consists of three separate video signals (Y, Pb, and Pr) which deliver a very high quality picture to your TV.
Figure 11
Media center-to-TV video
and audio connections
14
Page 15

To make component video connections, you will need video-grade cables for the Y, Pb,
S-VIDEO OUTPUT
COMPOSITE VIDEO OUTPUT
Pr (Red)
Y (Green)
Pb (Blue)
Your TV
Media Center
Component video adapter
R
L
VIDEO
OUT
AUDIO
OUT
TV
SENSOR
IR
EMITTER
SERIAL
DATA
SPEAKER
ZONES
1
2
1.1A
33V DC POWER
AM
FM 75
ANTENNA
OPTICAL OPTICAL
INPUT
OUTPUT
AUDIO OUTPUTS
DIGITAL DIGITAL
R
L
RECORD
DIGITAL
R
L
DIGITAL
R
L
DIGITAL
R
L
DIGITAL
R
L
TAPE
AUDIO INPUTS
AUX VCR TV
VIDEO INPUTS
COMPOSITE S-VIDEO
COMPOSITE S-VIDEO
VIDEO OUTPUTS
VCR
VCR connector panel
and Pr jacks and the Bose® component video adapter (Figure 12). This adapter plugs into the
S-VIDEO and COMPOSITE outputs. Your system will send the correct signals to these jacks
when you change the video output setting to YPbPr. See your LIFESTYLE® 18 system operating guide for instructions on how to change system settings.
Note: Component video jacks are often color-coded and it is essential that you match the
color-coded connections with the cables.
Figure 12
Component video adapter
connections
Connecting your VCR to the system (optional)
The type of video connection used with your TV must match the type of connection used with
your VCR, if you choose to connect it to the system. If you connected your TV to the COMPOSITE VIDEO OUTPUT, connect your VCR output to the COMPOSITE VIDEO INPUT. If you
connected your TV to the S-VIDEO OUTPUT, connect your VCR to the S-VIDEO INPUT. If
your VCR does not have an S-VIDEO output, you may be able to connect your VCR composite video output directly to your TV.
Note: If your VCR did not come with the stereo audio and video cables required to connect it
to your LIFESTYLE® system, contact your local electronics store or authorized Bose dealer.
The rear panel of the media center provides audio and video connections for your VCR.
1. Using the supplied stereo audio cable, connect the left (L) and right (R) audio outputs on
the rear panel of your VCR to the L and R VCR audio inputs on the rear panel of the
media center.
2. Using the supplied video cable, connect the COMPOSITE video input on the rear panel of
the media center to the VIDEO OUT on the rear panel of your VCR.
System Installation
English
Figure 13
Media center-to-VCR video
and audio connections
Note: You should not connect the video output of your LIFESTYLE ® system to a VCR, since
playing copy-protected DVDs may result in poor picture quality.
15
Page 16

System Installation
TV
SENSOR
IR
EMITTER
SERIAL
DATA
SPEAKER
ZONES
1
2
1.1A
33V DC POWER
AM
FM 75
ANTENNA
OPTICAL OPTICAL
INPUT
OUTPUT
AUDIO OUTPUTS
DIGITAL DIGITAL
R
L
RECORD
DIGITAL
R
L
DIGITAL
R
L
DIGITAL
R
L
DIGITAL
R
L
TAPE
AUDIO INPUTS
AUX VCR TV
VIDEO INPUTS
COMPOSITE S-VIDEO
COMPOSITE S-VIDEO
VIDEO OUTPUTS
R
L
VIDEO
OUT
AUDIO
OUT
Cable/satellite box
Cable/satellite
box connector
panel
Connecting your cable/satellite box to the system (optional)
The type of video connection used with your TV and VCR must match the type of connection
used with your cable/satellite box, if you choose to connect it to the system. If you connected
your TV to the COMPOSITE VIDEO OUTPUT, connect your cable/satellite box output to the
English
COMPOSITE VIDEO INPUT. If you connected your TV to the S-VIDEO OUTPUT, connect your
cable/satellite box to the S-VIDEO INPUT.
Note: If your cable/satellite box did not come with the stereo audio and video cables required
to connect it to your LIFESTYLE® system, contact your local electronics store or authorized
Bose dealer.
The rear panel of the media center provides audio and video connections for your cable/satellite box.
1. Using a stereo audio cable, connect the left (L) and right (R) audio outputs (if available) on
the rear panel of your cable/satellite box to the L and R AUX audio inputs on the rear
panel of the media center.
Note: For convenience, until your system is completely installed and tested, you may want to
postpone making this connection to the media center AUX jacks. The AUX jacks are required
for use with a temporary headset connection during the final installation steps.
2. Using a video cable, connect the VIDEO OUT on the rear panel of your cable/satellite box
to the COMPOSITE video input on the rear panel of your VCR. If your VCR is already connected there, you may instead connect the VIDEO OUT from your cable/satellite box
directly to your media center’s COMPOSITE video input (as shown in Figure 14).
Figure 14
Media center-to-cable/satellite box video and audio
connections (if VCR not
used)
16
Page 17

Installing the TV on/off detector (optional)
TV
SENSOR
IR
EMITTER
SERIAL
DATA
SPEAKER
ZONES
1
2
1.1A
33V DC POWER
AM
FM 75
ANTENNA
OPTICAL OPTICAL
INPUT
OUTPUT
AUDIO OUTPUTS
DIGITAL DIGITAL
R
L
RECORD
DIGITAL
R
L
DIGITAL
R
L
DIGITAL
R
L
DIGITAL
R
L
TAPE
AUDIO INPUTS
AUX VCR TV
VIDEO INPUTS
COMPOSITE S-VIDEO
COMPOSITE S-VIDEO
VIDEO OUTPUTS
Back of TV
TV SENSOR
jack
TV on/off detector
Media center rear panel
Mounting the detector
using the mounting strip
The TV on/off detector senses whether your TV is on or off. This enables the media center to
automatically switch the TV on, as needed, when another video source (DVD, cable/satellite
box, etc.) is selected. If you choose not to use the sensor, you will need to turn the TV on separately each time it is needed.
Note: This device will not work with LCD and plasma TVs, so you may want to skip these
steps.
1. Plug the connector on the end of the cord into the TV SENSOR jack on the back of the
media center.
2. Position the TV on/off detector on the back of your TV as shown in Figure 15.
Note: DO NOT use the mounting strip yet to affix the detector. Wait until your system is operating and you can determine that the sensor is working properly from this location. Refer to
“Testing the TV on/off detector” in your LIFESTYLE® Operating Guide.
Figure 15
TV on/off detector installed
on your TV
System Installation
English
Note: If you have a projection TV, the bottom rear of the enclosure is the best location for
mounting the detector.
Turning off the internal speakers in your TV
When you listen to TV sound through your LIFESTYLE® system, the speakers in your TV
should not be on. Use the on-screen menus in your TV to select “Internal Speakers: Off” (your
on-screen message may be different). You can also lower the volume of your TV to its lowest
setting. Refer to your TV owner’s guide for detailed instructions.
17
Page 18

System Installation
OUTPUTS TO
CUBE SPEAKERS
AUDIO
INPUT
POWER
FRONT SURROUND
100-120/200-240V AC
50/60 Hz
350W MAX.
L
C
R
L
R
Connector panel
Power switch
DC power jack
Power supply
Rear panel
Connecting the system to power
Connect the two AC power (mains) cords in the following order:
1. Plug the small end of the Acoustimass® module power cord into the AC power jack on the
connector panel of the Acoustimass module (Figure 16). Plug the other end of the power
English
Figure 16
Power connection of the
Acoustimass module
cord into an AC (mains) outlet.
2. Turn the Acoustimass module POWER switch to on ( l ).
Figure 17
Power connection of the
media center
CAUTION: For dual voltage units, make sure the voltage setting on the bottom of the media
center power supply matches the local power rating. Check with local electrical authorities if
you are not sure about appropriate power rating.
Plug the small round connector of the media center power supply cable into the DC POWER
jack on the back of the media center (Figure 17). Insert the power supply line cord connector
into the power supply and plug the cord into an AC (mains) outlet.
18
Page 19

Installing the remote control batteries
ADAPTiQ headset
Setup Disc 2
Note: The ADAPTiQ audio
calibration system may not be
included with your LIFESTYLE®
system. Contact your Bose®
dealer.
• Setup Disc 2 leads you through the ADAPTiQ™ audio calibration process, which tailors
the sound of your LIFESTYLE® system to the acoustics of your listening area.
ADAPTiQ audio calibration system
• The special headset, referred to by Setup Disc 2, enables you to take acoustic
measurements in your room during the ADAPTiQ audio calibration process. Put
it on only when the disc indicates.
Slide the battery compartment cover off of the back of the remote. Find the polarity markings
(+ and –) inside the compartment and install the four batteries accordingly. Slide the cover
back on the remote and snap it closed.
Replace the batteries when the remote control stops operating or its range seems reduced.
Alkaline batteries are recommended.
Note: Do not change the settings of the factory-preset miniature switches. See your Operating Guide for information on how to prevent conflicts with other LIFESTYLE ® music systems.
System Installation
English
Figure 18
Remote control battery
installation
Four (4) AAA (IEC-LR3)
Battery
compartment
cover
Finishing the installation
• Setup Disc 1 verifies that your system’s speakers
are connected correctly and ensures complete performance from your new system.
batteries
+
+
+
+
Setup Disc 1
• Play these discs after you have set up your system and made all of the connections. Allow
approximately 20 minutes to complete the process. You may want to do it when the acoustic measurements will not disturb anyone else.
19
Page 20

System Installation
TV
SENSOR
IR
EMITTER
SERIAL
DATA
SPEAKER
ZONES
1
2
1.1A
33V DC POWER
AM
FM 75
ANTENNA
OPTICAL OPTICAL
INPUT
OUTPUT
AUDIO OUTPUTS
DIGITAL DIGITAL
R
L
RECORD
DIGITAL
R
L
DIGITAL
R
L
DIGITAL
R
L
DIGITAL
R
L
TAPE
AUDIO INPUTS
AUX VCR TV
VIDEO INPUTS
COMPOSITE S-VIDEO
COMPOSITE S-VIDEO
VIDEO OUTPUTS
R
Temporarily remove the
cable/satellite box cable
if it is connected
AUX
English
To get started
1. Tu rn your television on.
2. Lift up the media center front cover and press the Open/Close button.
3. Insert Setup Disc 1 into the tray (label side up) and press the Open/Close button again.
4. On the remote control, press the CD/DVD button.
5. As the disc begins to play, listen carefully and follow the instructions given to you. The
instructions will tell you when to play Disc 2.
Using the ADAPTiQ™ audio calibration system
Note: The ADAPTiQ audio calibration system may not be included with your LIFESTYLE ®
system. Contact your Bose® dealer.
Note: Disc 2 will indicate when you should put on the special headset. For the greatest
comfort during the ADAPTiQ audio calibration process, the headset is specifically designed
to be worn above your ears.
Connect the ADAPTiQ headset to the AUX jacks on the rear panel of the media center.
20
Save the headset for possible future use
When you have played both discs and followed their instructions, the installation of your
LIFESTYLE® DVD system is completed and its performance is tailored to your particular listening area.
Moving the system to another room or significantly changing the arrangement of the room
(relocating seating, furniture, speakers or the Acoustimass® module) will change your listening
environment. At that time, then, be sure to repeat the steps in “Finishing your installation” on
page 19 to customize the system for the altered listening environment.
Keep the headset and discs together in their original carton and store them in a safe location.
You are now ready to enjoy the performance!
Page 21

Reference
Using alternate system connections
The following describes alternate ways to connect your VCR and TV to your LIFESTYLE®
home entertainment system.
To play VCR audio (not TV audio) through your system
Connect the VCR audio outputs to the TV or VCR inputs of the media center as in Figure 1 on
page 5, but do not connect the TV audio outputs.
In this configuration, your VCR audio is played through your system, but the TV audio is
played directly from the TV. You must have the VCR turned on to hear any surround sound
effects.
Figure 19
Diagram of a typical system
Acoustimass® module
Front speaker outputs
Rear speaker outputs
Left front
speaker
Center front
speaker
English
Right front
speaker
Media center
Speaker
zone 1
output
Left surround
speaker
AUX left & right audio (if available)
VCR left & right audio
TV power detector
™
Right surround
speaker
VCR video
Video output
Cable TV or
satellite input
Cable/satellite box
Cable TV or
satellite video
VCR
Cable TV video
TV
21
Page 22

Reference
English
Figure 20
Diagram of a typical system
To play TV audio through your system with VCR audio fed to the TV
Connect the VCR audio outputs to the audio inputs of the TV. Connect the TV audio outputs
to the TV inputs on the media center.
In this configuration, the LIFESTYLE® system TV source must always be selected.
Acoustimass® module
Media center
Front speaker outputs
Rear speaker outputs
Speaker
zone 1
output
Left front
speaker
Left surround
AUX left & right audio (if available)
Center front
speaker
Right surround
speaker
VCR video
VCR left & right audio
TV left & right audio
Video output
TV power detector
Right front
speaker
speaker
Input from cable
provider
Cable/satellite box
VCR
TV
22
™
Page 23

Setting up a second listening zone
TV
SENSOR
IR
EMITTER
SERIAL
DATA
SPEAKER
ZONES
1
2
1.1A
33V DC POWER
AM
FM 75
ANTENNA
OPTICAL OPTICAL
INPUT
OUTPUT
AUDIO OUTPUTS
DIGITAL DIGITAL
R
L
RECORD
DIGITAL
R
L
DIGITAL
R
L
DIGITAL
R
L
DIGITAL
R
L
TAPE
AUDIO INPUTS
AUX VCR TV
VIDEO INPUTS
COMPOSITE S-VIDEO
COMPOSITE S-VIDEO
VIDEO OUTPUTS
Right channel
Zone 2 output connection
Zone 2 stereo adapter kit cable
(Mini-DIN connector is marked “FIX”)
Left
channel
Control
Note: Before using
your zone 2 speakers, you may need to
change the “Zone 2
Protocol” setting for
the zone 2 speakers
you are using. See
“Changing the System
Setup” in your operating guide.
Zone 2 speaker connections
Your LIFESTYLE® home entertainment system can direct sound from one or two sound
sources (such as CD, AM/FM tuner, TAPE, or AUX) to two different listening zones at the
same time.
What is a zone?
Each listening area, whether a room or a group of rooms (including outdoor areas), is called a
zone. Your primary listening area is set up as zone 1.
What do I need for setting up a second zone?
• A Bose® powered speaker system that is compatible with your home entertainment system.
An existing stereo system can also be connected (special adapter required).
• The appropriate LIFESTYLE® system cable to connect the zone 2 speaker system to the
SPEAKER ZONES 2 connector on the rear panel of the media center.
•A second LIFESTYLE® system remote control to operate the zone 2 sound.
See your dealer or contact Bose for information on obtaining additional powered speakers,
remote controls, cables, and adapters for connecting additional equipment.
How do I set up a speaker system in a second zone?
1. Choose a location for the speaker system in zone 2.
2. Connect the audio input cable from the zone 2 system to the SPEAKER ZONES 2 output
on the rear panel of the media center.
3. When power is connected and you are ready to set up your second remote control, see
“Setting up a second listening zone” in your LIFESTYLE® system operating guide.
Reference
English
Figure 21
Media center-to-zone 2
connections
Note: For zone 2, use only cables that have a mini-DIN connector marked “FIX”. Cables
marked “VAR” should not be used, unless specified in the owner’s guide for the product.
23
Page 24

Reference
R
L
RECORD
INPUT
PLAY
OUTPUT
R
L
TV
SENSOR
IR
EMITTER
SERIAL
DATA
SPEAKER
ZONES
1
2
1.1A
33V DC POWER
AM
FM 75
ANTENNA
OPTICAL OPTICAL
INPUT
OUTPUT
AUDIO OUTPUTS
DIGITAL DIGITAL
R
L
RECORD
DIGITAL
R
L
DIGITAL
R
L
DIGITAL
R
L
DIGITAL
R
L
TAPE
AUDIO INPUTS
AUX VCR TV
VIDEO INPUTS
COMPOSITE S-VIDEO
COMPOSITE S-VIDEO
VIDEO OUTPUTS
Media center connector panel
Record/playback component
Connecting external equipment
Other equipment can be connected to your system using standard RCA audio cables. Be
sure to match the red connector to the R (right) channel and the white (or black) connector to
the L (left) channel. A Y adapter can be used to connect mono sources. The appropriate
English
Figure 22
Record/playback connections
cables are available at most electronic stores.
Connecting record/playback equipment
The rear panel of the media center provides input (TAPE) and output (RECORD) connections
for a cassette tape deck.
24
Page 25

Figure 23
R
L
AUDIO
OUT
TV
SENSOR
IR
EMITTER
SERIAL
DATA
SPEAKER
ZONES
1
2
1.1A
33V DC POWER
AM
FM 75
ANTENNA
OPTICAL OPTICAL
INPUT
OUTPUT
AUDIO OUTPUTS
DIGITAL DIGITAL
R
L
RECORD
DIGITAL
R
L
DIGITAL
R
L
DIGITAL
R
L
DIGITAL
R
L
TAPE
AUDIO INPUTS
AUX VCR TV
VIDEO INPUTS
COMPOSITE S-VIDEO
COMPOSITE S-VIDEO
VIDEO OUTPUTS
CD changer or other playback equipment
AUX input connections
Reference
Connecting other playback equipment
Other playback components such as an audio CD changer can be connected to the AUX
inputs on the rear panel of the media center.
English
Using digital audio connections
If your TV, VCR, tape deck, or AUX component has electrical digital audio connections, you
may connect them to the media center using the corresponding DIGITAL connector. You will
need a 75Ω cable with RCA connectors (such as a video cable).
Note: Your system’s DTS decoding is limited to playing back CDs and DVDs with DTS audio
tracks. DTS decoding of bitstreams from external sources is not supported, and your system
cannot provide DTS bitstreams to external devices.
Using optical digital audio connections
If your TV, VCR, tape deck, or AUX component has an optical digital audio connection, you
may connect it to the media center using the OPTICAL INPUT/OUTPUT connectors. You will
need an optical digital cable to make this connection.
Note: Before you can listen to a source through the OPTICAL input, you need to assign the
OPTICAL connection to TV, VCR, TAPE or AUX. See your operating guide for instructions on
using the system settings menus.
25
Page 26

Reference
TV
SENSOR
IR
EMITTER
SERIAL
DATA
SPEAKER
ZONES
1
2
1.1A
33V DC POWER
AM
FM 75
ANTENNA
OPTICAL OPTICAL
INPUT
OUTPUT
AUDIO OUTPUTS
DIGITAL DIGITAL
R
L
RECORD
DIGITAL
R
L
DIGITAL
R
L
DIGITAL
R
L
DIGITAL
R
L
TAPE
AUDIO INPUTS
AUX VCR TV
VIDEO INPUTS
COMPOSITE S-VIDEO
COMPOSITE S-VIDEO
VIDEO OUTPUTS
IR EMITTER
jack
Connecting the optional IR emitter cable
The IR (infrared) emitter cable is designed for optional use with system components that are
connected to the media center, but placed where they cannot receive IR signals from it. This
can resolve the problem when a particular component does not respond to LIFESTYLE®
English
Figure 24
Optional IR emitter cable
connection to the media
center
remote control commands.
By plugging an emitter into the media center and placing it near the component, you can
make sure that the LIFESTYLE
To use the emitter:
1. Insert the 3.5 mm plug into the IR EMITTER jack on the rear of the media center
(Figure 24).
®
remote control signals reach that component.
2. Place the flat side at the other end of the cable against the IR receiver window on the
front of the component.
Note: There is a procedure you must follow to program the LIFESTYLE® remote so that it
works with your other components. Refer to the LIFESTYLE® Operating Guide for details on
how to do that.
3. Confirm that IR signals now work to control that component. Move the emitter around, as
necessary, to find the best position.
4. Use the double-sided tape enclosed with the emitter to affix it in the proper position.
Note: If you have questions, or need to obtain a replacement emitter, contact Bose® cus-
tomer service. Refer to the Bose address list included with your system.
Accessories
For information on speaker mounting brackets and stands, additional remote controls, and
connecting additional Bose powered loudspeakers, contact your Bose dealer or call Bose
customer service.
Warranty
Your LIFESTYLE® home entertainment system is covered by a transferable limited warranty.
See your warranty card for details. Please be sure to fill out the information section on the
card and mail it to Bose.
Contacting customer service
For additional help in solving problems, contact Bose customer service. See the address and
phone number list provided with your system.
26
Page 27

Technical information
Media Center power pack power rating
USA/Canada: 120V 0.55A 50/60 Hz 33VDC 1.1A
International: 220-240V 0.30A 50/60 Hz 33VDC 1.1A
Dual voltage: 115/230V 0.55A 50/60 Hz 33VDC 1.1A
Speaker system power rating
USA/Canada: 100-120V 50/60 Hz 350W
International: 220-240V 50/60 Hz 350W
Dual voltage: 100-120/220-240V 50/60 Hz 350W
Media center inputs
TAPE: 2Vrms, maximum
AUX: 2Vrms, maximum
VCR: 2Vrms, maximum
TV: 2Vrms, maximum
DIGITAL: SPDIF (1 each for TV, VCR, TAPE, and AUX)
COMPOSITE VIDEO: NTSC or PAL format 1V
S-VIDEO: Luminance 1V
OPTICAL INPUT: SPDIF digital, mapped to input
FM antenna: 75 Ω
AM antenna: 12µH
TV SENSOR: Scan frequency sensing
Media center outputs
SPEAKER ZONES 1 and 2: Variable audio, user selectable
RECORD L and R: Fixed audio
RECORD DIGITAL: SPDIF
OPTICAL OUTPUT: SPDIF, –15 to –21 dbm
COMPOSITE VIDEO: NTSC or PAL 1V
S-VIDEO: Luminance 1V
Component video: NTSC or PAL 1V
Remote control range
65 ft (20 m)
Dimensions/Weights
Media Center: 15.8" W x 11.0" D x 3.5" H
Cube speakers: 3.1" W x 4.0" D x 3.1" H
Acoustimass® module: 8.0" W x 24.5" D x 16.0" H
with sync 75 Ω
p-p
, Chrominance 0.3V
p-p
p-p
, Chrominance 0.3V
p-p
with sync on Y
p-p
p-p
with sync 75 Ω
p-p
(40.1 cm x 27.9 cm x 8.9 cm)
(7.9 cm x 10.2 cm x 7.9 cm)
(20.3 cm x 62.2 cm x 40.6 cm)
Reference
English
8.2 lb (3.7 kg)
1.1 lb (0.5 kg)
35.9 lb (16.3 kg)
Finish
Media center: Aluminum
Cube speakers: Polymer painted
Acoustimass module: Vinyl veneer, Polymer
27
Page 28

©2003 Bose Corporation, The Mountain,
Framingham, MA 01701-9168 USA
269712 AM Rev.00 JN31014
 Loading...