

Bosch WOR16152AR User Manual

Washing machine
Instruction manual
Read these instructions before operating the washing machine.
en

2
Contents
In addition, the following symbols indicate:
safety measures (for you, the machine or the laundry) that must be carried out without
fail,
electrical danger,
tips and important information.
Page
Safety instructions .................................................................................................... 4
Protection of the environment/Hints and tips........................................................ 4
Disposal information .................................................................................................. 4
Introducing your washing machine ........................................................................ 5
1 - Installation instructions
Removing transport securing devices .................................................................... 6 and 7
Moving the washing machine .................................................................................. 7
Connections - Water-inlet .......................................................................................... 8
Connections - Water drainage .................................................................................. 8
Electrical connections .............................................................................................. 9
Replacement of mains cable .................................................................................... 9
Installation .................................................................................................................. 9
2 - Operating instructions
International laundry care symbols.......................................................................... 10
Before the first wash .................................................................................................. 10
Treating stubborn stains............................................................................................ 11
Preparing the laundry ................................................................................................ 12
Loading the laundry.................................................................................................... 13
Putting in detergent.................................................................................................... 13
Setting the programme / Adding wash + Changing programme........................ 14
and 15
Selecting the programme.......................................................................................... 16
Spin speed selector.................................................................................................... 17
Additional function buttons ...................................................................................... 18
Special applications .................................................................................................. 19
Safety features ............................................................................................................ 19
3 - Cleaning and care
Cabinet ........................................................................................................................ 20
Control panel, base, etc. interior components ...................................................... 20
Detergent dispenser .................................................................................................. 20
Cleaning the filter........................................................................................................ 21
or 22
4 - Display lights.............................................................................................................. 23
5 - What to do if .............................................................................................................. 25
6 - Customer Service .................................................................................................... 26
7 - Programme chart ...................................................................................................... 28

3
The new washing machine that you have just purchased is a modern, high-quality
household appliance.
Your washing machine is distinguished by its economical consumption of energy, water
and detergent.
Every washing machine that leaves our factory is carefully checked to ensure that it is
functioning properly and is free of defects. If there are any questions - especially in
regards to installing and connecting the washing machine - our Customer Service is
at your disposal.
For further information about products, accessories, spare parts and services visit
our web site www.bosch-home.com or contact our after-sales service centres.
Please read and follow these operating and installation instructions and all other
information supplied.
These operating and installation instructions describe various models. Differences
are indicted in the appropriate places.
Retain all documentation for subsequent use or for the next owner of the appliance.

4
Safety Instructions
Protection of the environment/Hints and tips
Your washing machine uses water, energy
and detergent efficiently. This protects our
environment and reduces your household
costs.
To use your washing machine in an efficient
and environmentally friendly manner:
•
Do not exceed recommended loads.
Cottons and Coloureds ....................5.5 kg
Easy Care............................................2.5 kg
Delicates/Silk......................................1.0 kg
Woollens..............................................1.5 kg
Automatic load sensing reduces the water
and energy consumption, as well as the
programme duration, for smaller loads.
•
Instead of ”Cottons 90°C”, select the
”60°C” programme + the ”Intensive”*
pushbutton. The extended washing time of
this 60°C programme achieves a cleaning
result comparable to that of the 90°C
programme, but uses considerably less
energy.
•
Do not use Prewash* for lightly to normally
soiled washing.
•
Use detergent according to Pollution
index, amount of laundry and water
hardness and follow the manufacturer's
directions.
* Depending upon the model.
Intended use
Your washing machine is intended
•
strictly for household use
•
for washing machine washable fabrics in
water
•
for use with cold drinking water and
standard commercial washing and
cleaning products that are suitable for use
in washing machines.
Safety Instructions
Do not leave children unsupervised near the
washing machine.
Keep pets away from the washing machine.
Do not insert/pull out the mains plug with
wet hands.
Do not pull out the mains plug by tugging on
the cable.
Exercise care when draining the hot water.
Do not climb onto the washing machine.
Follow the installation instructions.
Danger of suffocation!
Keep children away from shipping carton
and packaging components. Danger of
suffocation from folding cartons and plastic
film.
Danger!
On out-of-service appliances, unplug mains
plug. Cut off power chord and discard with
mains plug. Break the lock on the lid as this
will prevent children from locking themselves
in and suffocating.
Packaging and discarded appliances
Environmentally friendly disposal
• Dispose of packaging in an environmentally
friendly manner.
• This appliance meets European guideline
2002/96/EG for discarded electrical and
electronic appliances (waste electrical and
electronic equipment - WEEE).
• The guideline provides an EU wide valid
framework for recycling of discarded appliances.
5
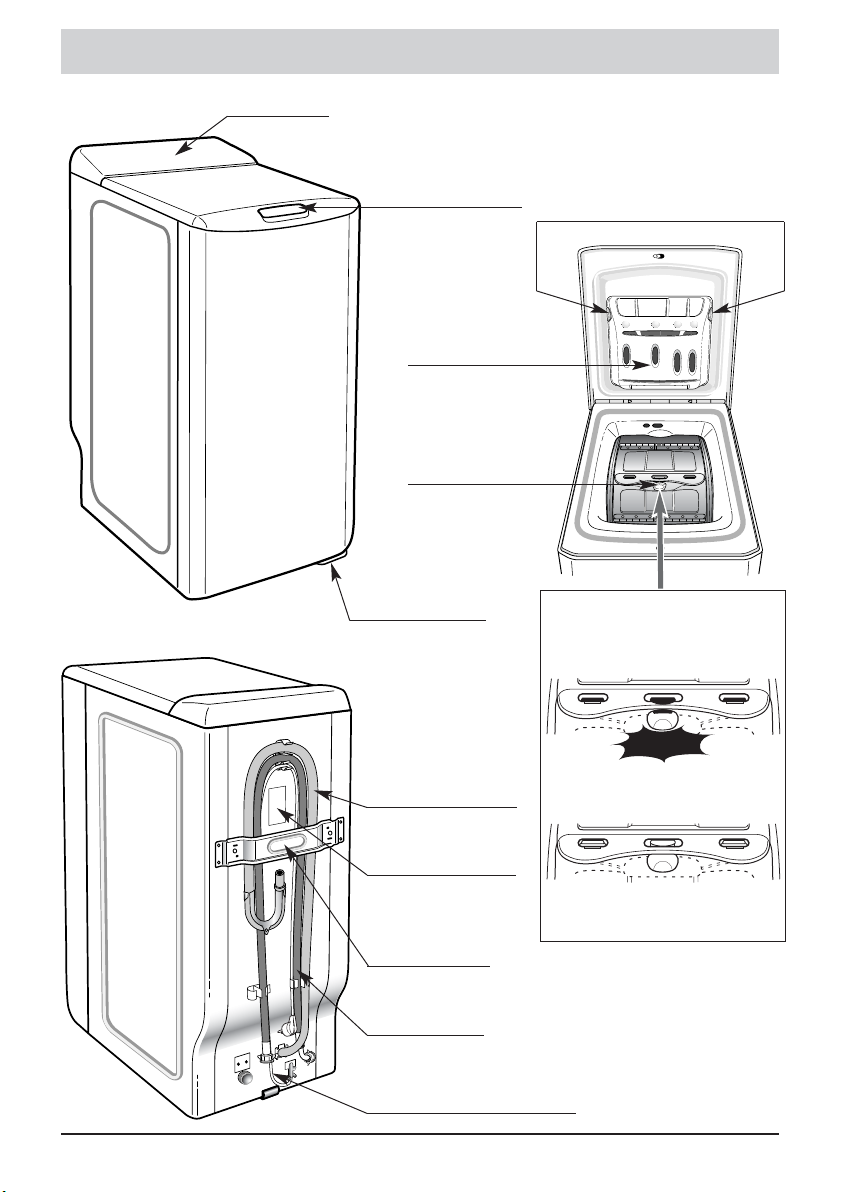
Introducing your washing machine
Control panel
Lid handle (remains
locked during
the programme)
Unlocking of detergent
dispenser
Removable detergent
dispenser
Button for opening
the drum lids
Locking lever
(depending upon
the model)
Water drainage hose
Water inlet hose
(not connected)
Mains connection with plug
Securing bar for
transport
Identification plate
(appliance and
production number)
click!
Properly close drum lids!
YYYYEEEESS
SS
NNNNOO
OO

6
Figure 2.1
Figure 2.2
Figure 2.3
13
1
1
2
2
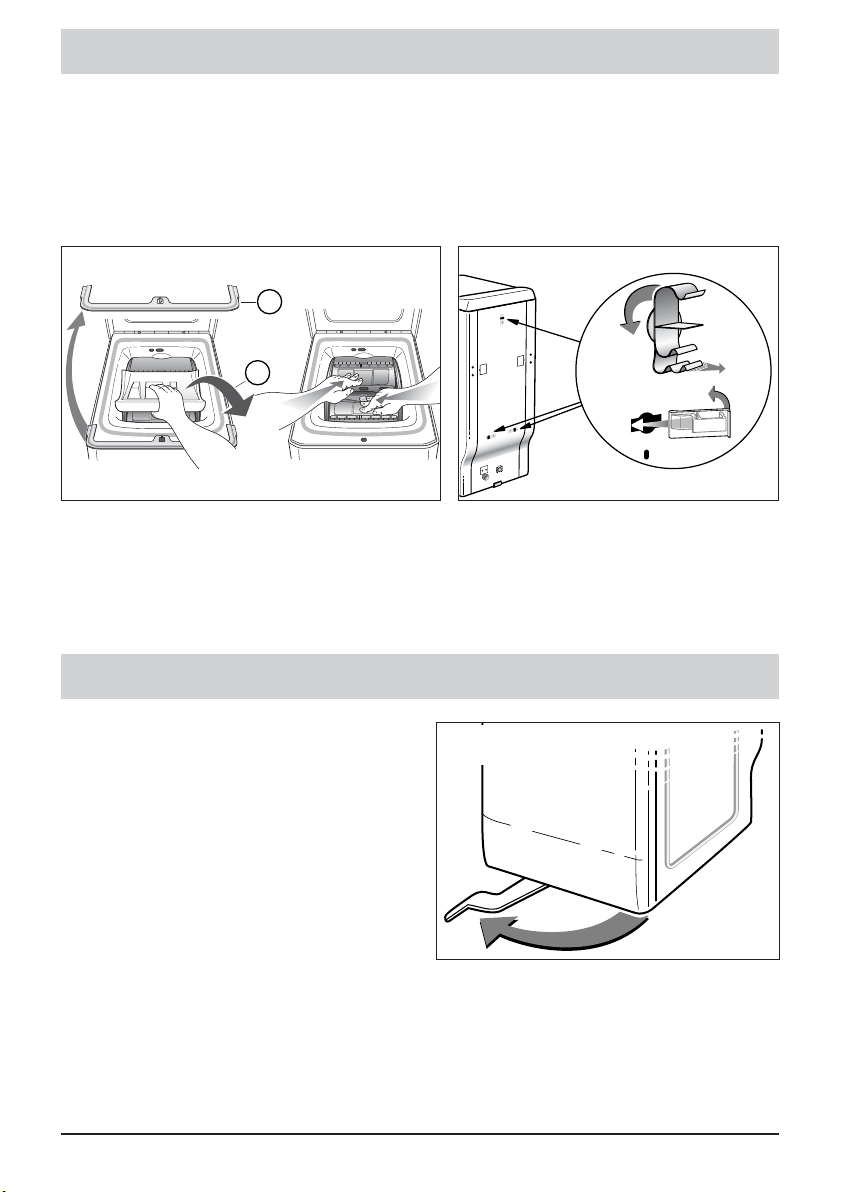
Removing the transport securing devices
1 Remove the machine from the transport
base.
Remove
wedge
훽
(Figure 1
).
2
Remove the 4 screws훾with a screwdriver
(Figure 2.1
).
3 Remove transport securing device
훿
Remove both screws
(Figure 2.2
)
using
a number 10 or 13 spanner (depending upon
the model).
Check to see that both plastic inserts on
the connecting carrier have also been
removed.
Reinstall screws훾in their original positions.
4
Both holes must be covered with the
caps provided
(found in the accessories
package)
(
Figure 2.3
)!
Before the machine is used for the first time, all transport securing devices from
the back of the appliance must be removed and stored for any later transport
(i.e., relocation).
Figure 1
A
7
Removing the transport securing devices
5
Remove thesecuring device
(Figure 3)
.
To do this:
- Remove
securing device
- R
emove securing device
-
Release the drum doors, locked in the
lower position, by pressing down on
both eaves simultaneously.
6
Remove hose bracket➀and cover the
holes with the caps provided
➁
(found in
the accessories package)
(Figure 4)!
a
b
a
b
➀
➁
Figure 4
We recommend retaining all transport
securing devices since these will have to
be reinstalled for any later possible
transport of the appliance
.
Before leaving the factory, the washing
machine was carefully inspected. It is
possible that some water from testing
remains in the appliance or in the
detergent compartments.
(depending upon the model)
If the machine is fitted with hidden castors,
it can easily be moved.
To place the machine on the castors, turn
the lever on the bottom to the left until it
encounters a limit stop
(Figure 5)
.
During operation, the machine must
always rest firmly on its feet (lever to the
right).
Figure 5
Moving the appliance
Figure 3
F
G
8
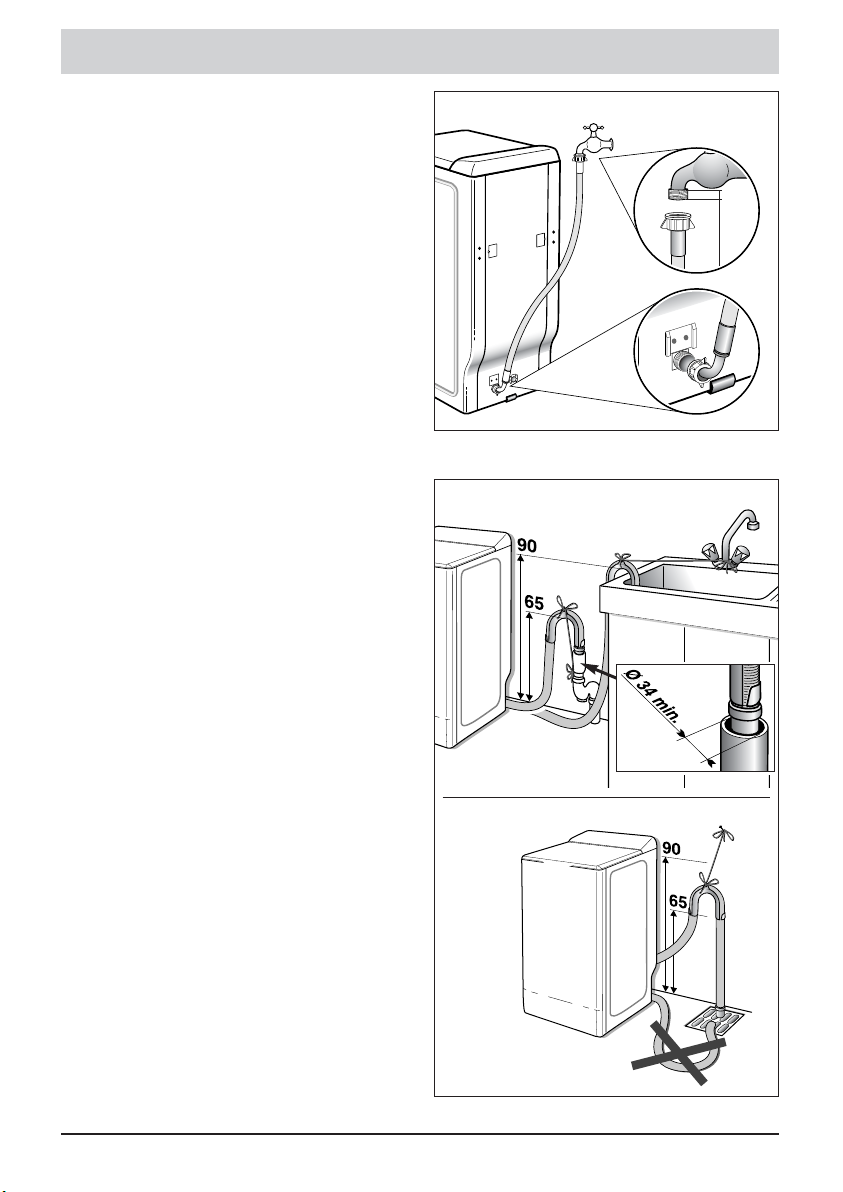
Connections
Figure 6
Figure 7.1
Figure 7.2
Drain
Mount drain hose with the supplied elbow,
connect to a vented drain
(Figure 7.1 / 7.2)
.
The elbow must be between 65 and 90 cm
above the floor.
Secure drain hose against slipping off.
Replacing the water-inlet hose
After replacement, check to ensure
connections are tight and that there are
seals on both ends.
Regularly check the condition of the
water-inlet and drain hose. Replace
damaged hoses only with original
replacement parts which are available
through Customer Service.
Cold water supply
Connect water-inlet hose
(Figure 6).
- Minimum water pressure: 0.1 MPa or 1 bar
- Maximum water pressure: 1 MPa or 10 bar
min. 10 mm
3/4”
9
Connections
Electrical connections
Connect the washing machine only to
alternating current via a properly installed
earthed socket.
The mains voltage must correspond to the
voltage specification on the washing
machine (identification plate).
Connection specifications as well as the
required fuses are stipulated on the
appliance identification plate.
Ensure that:
• the mains plug and socket are compatible,
• the cable cross-section is adequate,
• the earthing system has been installed
correctly.
Do not use multiple plugs/sockets or
extension cables.
If a residual current circuit breaker is used,
only use one that has this symbol:
.
Only this symbol can guarantee compliance
with all applicable regulations.
Do not insert/pull out the mains plug with
wet hands.
Do not pull out the mains plug by tugging the
cable.
Installation
Safety Instructions
Risk of Injury!
The washing machine is very heavy. Take
care when lifting it.
Frozen hoses may tear or burst. Do not
install the washing machine in an area
where there is a risk of freezing or
outdoors.
Do not lift up on any protruding components.
The washing machine may be damaged.
In addition to the safety information listed here,
the local water and electricity supplier may
have special requirements.
If in doubt, have the appliance connected by
a specialist.
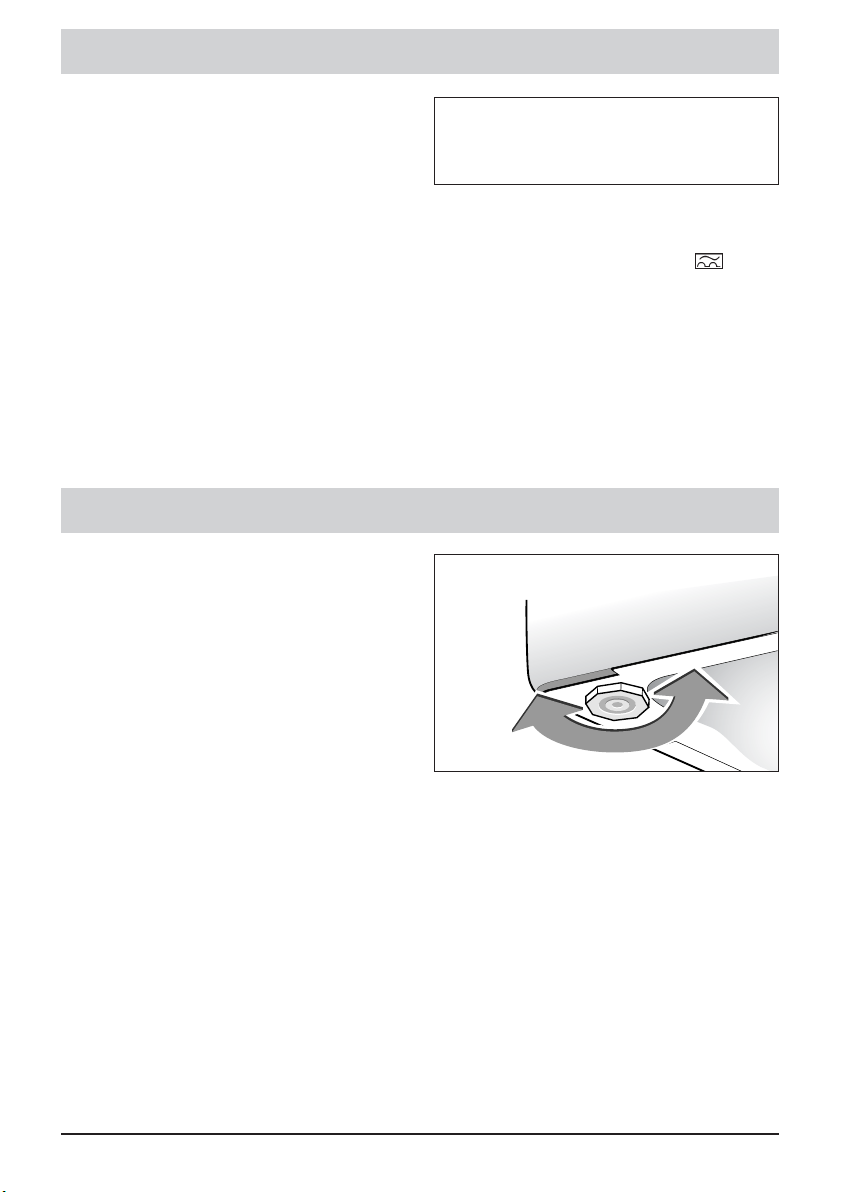
Installation surface
Stability is important so that the washing
machine does not "wander" during spin
cycles.
Surfaces used for installation must be solid
and even.
Soft floor coverings are not recommended,
i.e. carpets or floors with foam
backing.
Adjustable feet:
(depending upon the model)
Some appliances have two adjustable feet
available at the front with can be used to
correct for surface unevenness. Level and
stabilise the machine in the following
manner:
- Tip the washing machine gently
backwards.
- Depending upon the type of floor, rotate the
foot or feet in or out
(Figure 8)
.
- Check the washing machine for stability.
Figure 8
Changing the mains lead
For reasons of safety, the mains lead is only
to be replaced by Customer Service which
is authorised to do so.
 Loading...