

Page 1
Washer-Dryer
WKD28351GC
en
Instruction Manual and Installation Instruction
Page 2

Your new washer-dryer
You have chosen a Bosch washer dryer.
Please take a few minutes to read and become familiar
with the advantages of your washer dryer.
To meet the high quality demands required by Bosch,
every washer dryer that leaves our factory is carefully
checked to ensure that it functions correctly and is in
perfect condition.
For more information on our products, accessories,
replacement parts and services, see our website
www.bosch-home.comor contact our after-sales service
centres.
If the operating and installation instructions describe
different models, any differences will be pointed out at the
relevant points in the text.
Read these operating and installation instructions before
switching on the washer dryer.
2
Page 3

Contents
Operating instructions
Installation instructions
Appendix
General safety information ......................................................... 4
Environmental protection/economy tips .................................. 6
Your new washer-dryer ............................................................... 7
Before washing for the first time ................................................ 9
Preparing and sorting the laundry ............................................. 9
Detergents and Care Products.................................................11
Programmes.................................................................................13
Washing and drying options .................................................15
Washing and drying ..................................................................17
Cleaning and care ......................................................................19
What to do if... ............................................................................21
After-sales service ......................................................................24
Installation instructions ........................................................25
Table of programmes.................................................................30
Consumption rates......................................................................31
Index ..............................................................................................32
3
Page 4

General safety information
– For private domestic use only.
Intended use
This washer-dryer complies with the relevant safety regulations.
Electrical safety
– The washer dryer is suitable for machine washable textiles and hand
washable wool and for drying certain types of textiles according to care
instructions.
– The appliance is suitable for operation with cold mains water and
commercially available detergents and care products which are
suitable for use in a washer dryer.
– Always follow the manufacturer's instructions when dosing
all detergents, cleaning aids, cleaning products and cleaning agents.
– The washer dryer may be operated by children from 8 years of age, by
persons who have limited physical, sensory or mental abilities and by
persons who have inadequate experience or knowledge, provided
they are supervised or have been instructed by a responsible
person.Children must not perform any cleaning or maintenance work
without supervision.
– Keep children under the age of 3 years away from the washer dryer.
– Keep pets away from the washer dryer.
– Install and operate the washer dryer in a room which has an outflow.
Warning Danger of death!
Danger of death if live parts are touched.
– When disconnecting the mains plug, always pull the plug
itself and not the cable, otherwise the cable could be
damaged.
– Never touch or hold the mains plug with wet hands.
Risk of injury
Warning Risk of injury!
– If the washer dryer is lifted using projecting parts (e.g. the
washer dryer door), these components may break off and
cause injuries.
– Do not lift the washer dryer by its projecting parts.
– If you climb onto the washer dryer, the worktop may break and
cause injuries.
– Do not climb onto the washer dryer.
– If you lean/support yourself on the open door, the washer
dryer may overturn and cause injuries.
– Do not lean on the open washer dryer door.
– If you reach into the rotating drum, you may injure your hands.
– Do not grip the rotating drum. Wait until the drum stops
rotating.
Warning Risk of scalding!
– When washing at high temperatures, you may be scalded
if you touch the hot washing water (e.g. if draining hot
washing water into a washbasin).
– Do not touch the hot washing water.
– If a drying programme was interrupted, the washer dryer
and laundry may be very hot. Select Intensive Dry Ù or
Low Heat Dry ^ and select 15 min drying time to cool
down the washing and then remove.
4
Page 5

Safety for children
Warning
Danger of death!
If children play with the washer dryer, they may get into lifethreatening situations or injure themselves.
– Do not leave children unattended near the washer dryer.
– Do not let children play with the washer dryer.
Warning
Danger of death!
Children may lock themselves in appliances, putting their
lives at risk.
For appliances that have reached the end of their service
life:
– Disconnect the mains plug.
– Cut through the mains cable and remove it, along with plug.
– Destroy the lock on the washer dryer door.
Warning
Risk of choking!
Children may become wrapped in packaging/film or packing
parts if allowed to play with them, or they may pull them over
their heads and suffocate.
Keep packaging, film and packaging parts out of the reach
of children.
Warning
Risk of poisoning!
Detergents and care products may be poisonous if
consumed.
Keep detergents and care products out of the reach of
children.
Warning
Eye / skin irritation!
Detergents and care products may cause irritation if they
come into contact with the eyes or skin.
Keep detergents and care products out of the reach of
children.
Warning
Risk of injury!
When you wash/dry at high temperatures, the glass in the
washer dryer door gets hot.
Do not let children touch the hot washer dryer door.
5
Page 6

Environmental protection/economy tips
– Separate out the various waste materials of the packaging and take
them to the nearest collection point.
– Always fill the washer-dryer with the maximum load for the relevant
programme.
– Wash normally soiled laundry without a prewash.
– Instead of Cottons 90 °C, select the Cottons 60 °C, @ Intensiv
programme. This gives comparable results, but uses less energy.
– Measure the detergent according to the manufacturer's instructions
and in line with the local water hardness.
This appliance is labelled in accordance with European Directive 2012/
WEEE
19/EU concerning used electrical and electronic appliances (waste
electrical and electronic equipment - WEEE). The guideline determines
the framework for the return and recycling of used appliances as
applicable throughout the EU.
)
6
Page 7

Your new washer-dryer
The washer-dryer can be used
Description of the washer-dryer
in 3 ways –> page17:
– washing only
– drying only
– successive washing and drying.
The successive wash-dry programme automatically shifts from the wash
cycle to the dry cycle without further intervention.
Drying is achieved using the condensation principle. The condensate that
is produced during drying runs via the Drain hose into the Drain tank.
Caution: the water supply hose and water Drain hose must be correctly
connected during washing and drying –> page28. The tap must be open.
Door
A safety device prevents the door from being opened during operation.
Before opening
Make sure that there is no water in the drum and that the drum is not
moving.
Emergency release
In the event of a power cut, the door can be released mechanically
–> page23.
7
Page 8
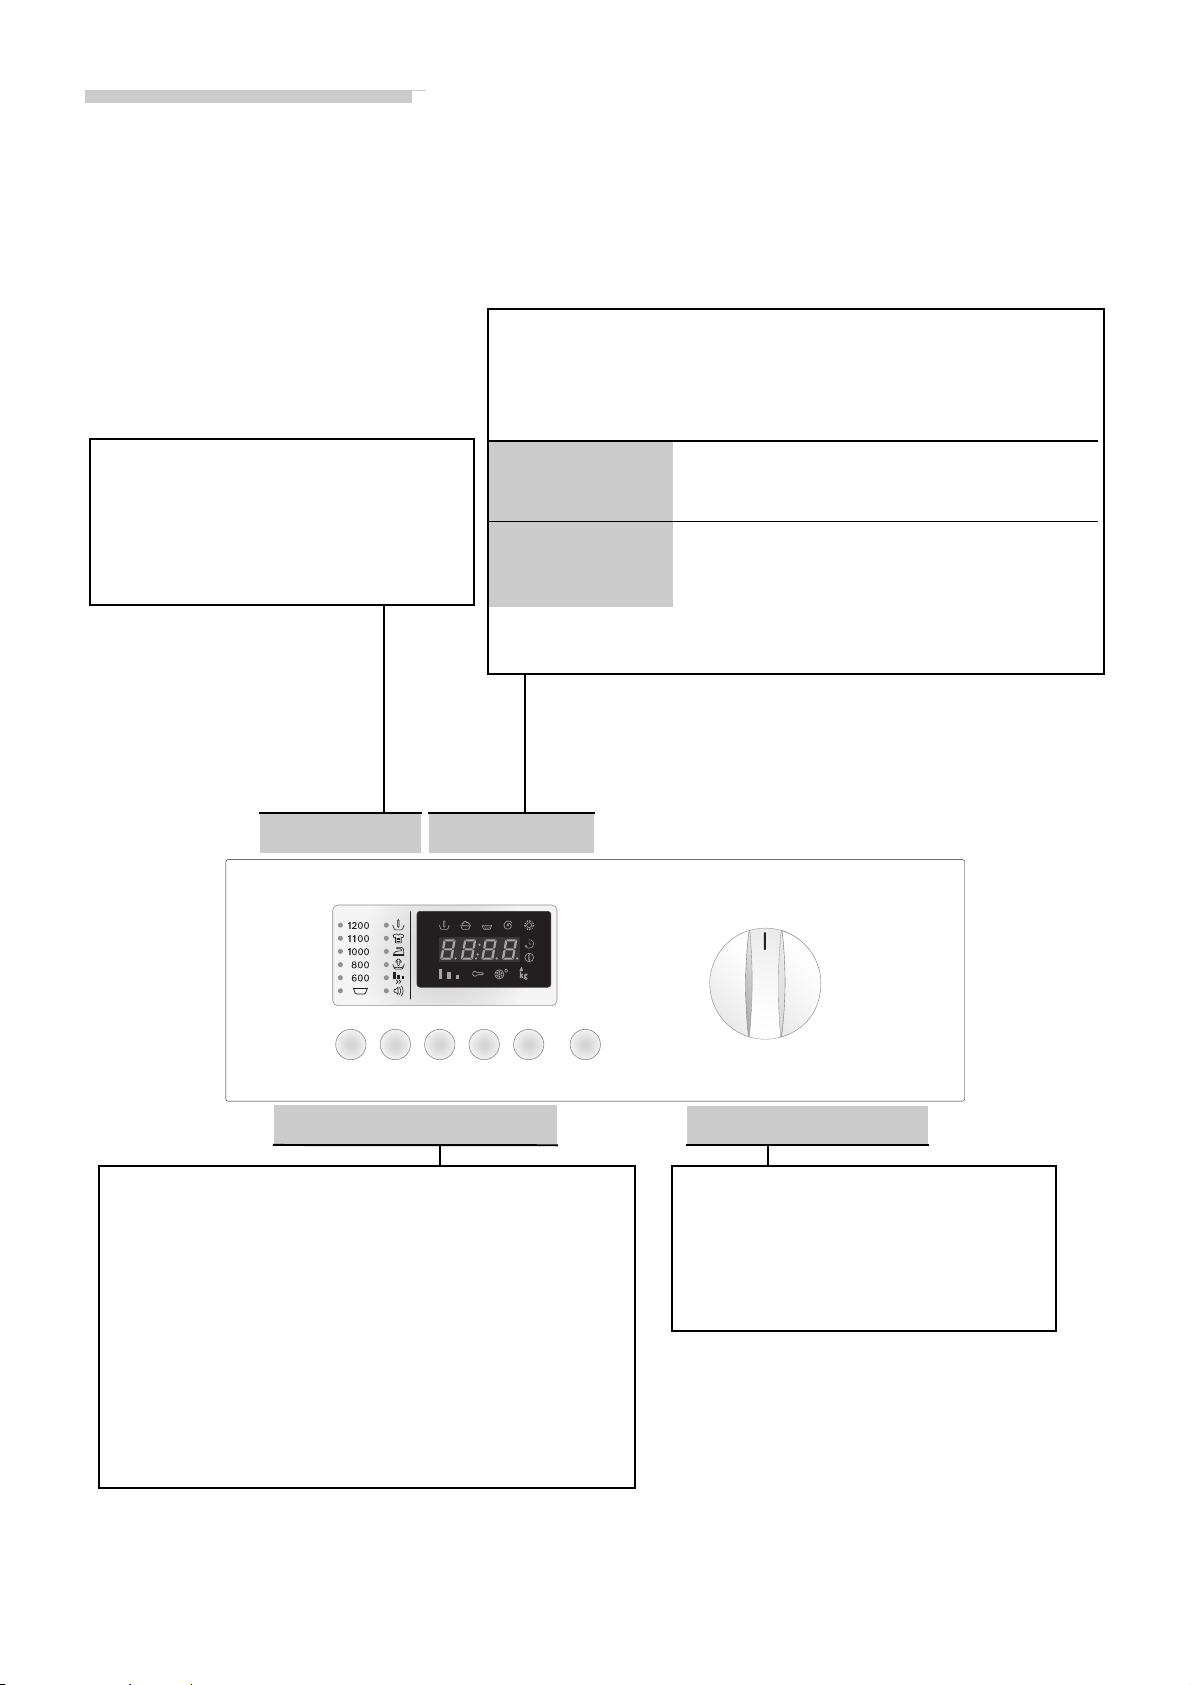
Control panel
Indicator lamp
Indicates the settings that have been
selected for:
– Spin speed: $ - 1400 rpm.
– Options/signal.
Indicator lamp Display panel
Display panel
Shows the settings that have been selected (e.g. spin speed,
drying time), the progress of the current programme and the
programme status.
Programme progress
T N '
0 ‘
Auxiliary displays
2 % E
l kg
Pre-wash, Main wash, Rinse, Final spin,
Drying.
Finished in time, Programme start, Childproof
lock, Fluff removal cycle, recommended load.
Buttons
Washing and drying options –> page15
– 0 (Spin speed): individual adjustment of the spin
speed.
– option button: sets washing options.
– set: activation/deactivation of the selected
washing options.
– 0 (Finished in time) : delays the Programme start.
– 5 (Drying): sets the drying options
A (Start/Pause):
starts and stops the washing programme –> page16.
Programme selector
Programme selector –> page13
For switching the washer-dryer on and
off and for selecting the programme, can
be turned in both directions. Do not
adjust the programme selector while
washing/drying is in progress.
8
Page 9
Before washing for the first time
The washer-dryer was tested before leaving the factory.
To remove any water that may be left over from the test, do not load any
laundry the first time that you run a wash programme.
Make sure that the transport safety bolts on the rear of the washer-
dryer have been removed –> page26.
Do not load any laundry.
Close the door.
Turn on the tap.
Pull out the detergent drawer.
Add ½ a measuring cup of detergent to compartment II –> page11.
Do not use detergents for wool or delicates (these cause foam to be
created).
Close the detergent drawer.
Turn the programme selector to the 60°C programme.
Press the A (Start/Pause) button.
At the end of the programme, turn the programme selector to Off.
Open the door.
Leave the door open to allow the inside of the washer-dryer to dry.
Preparing and sorting the laundry
– Wash white laundry separately from coloureds.
Sorting laundry for washing
Sorting laundry
according to the
information on the
care labels
– Unhemmed or torn items should not be washed in the washer-dryer, as
they may fray.
– The laundry may be damaged if you do not observe the fabric care
symbols.
Only wash laundry with the following care labels:
Care label Type of laundry
<;
:98
BA>
:FAE>
Laundry with care symbol Do not wash.
Cottons 90 °C.
Coloureds 60 °C, 40 °C, 30 °C.
Easy-care 60 °C, 40 °C, 30 °C.
Hand- and machine-washable silk, 40 °C, 30 °C,
cold.
9
Page 10

Sorting laundry for drying
Sorting laundry
according to the
information on the
care labels
Preparing laundry for washing
Only dry laundry that is labelled "suitable for tumble-drying" or which
has the following care symbols:
Care label Type of laundry
a
`
Do not wash the following fabrics in the washer-dryer:
– Do not machine dry laundry with the b care symbol.
– Airtight fabrics (e.g. rubber-coated fabrics).
– Delicate materials (silk, curtains made from synthetic fabrics) -
they may crease.
– Dripping-wet laundry - high energy consumption
– Wool or fabrics containing wool.
Loose foreign bodies (e.g. coins, paper-clips, needles, nails) may damage
the laundry and components of the washer-dryer (e.g. the drum).
Drain the pockets of all items.
Brush any sand out of pockets and collars.
Pretreat any stains.
Close zips, do up cover buttons.
Remove curtain fittings or place curtains in a laundry bag.
Wash the following in a laundry bag/pillowcase:
– Delicates, e.g. tights, curtains,
– Small items, e.g. socks or handkerchiefs,
– Underwired bras (the underwiring may come loose during the
washing process and cause damage).
Turn trousers, knitwear and knitted fabrics, e.g. jerseys,
T-shirts or sweatshirts inside out.
Dry at normal temperature.
Dry at low temperature (delicate drying).
Preparing laundry for drying
Loading the laundry
Only dry fabrics that have already been washed, rinsed and spun.
Also spin easy-care fabrics before drying.
Sort the items for washing according to material and desired level of
dryness to ensure even drying.
Before loading the washer-dryer, make sure that there are no foreign
bodies or pets in the drum.
Risk of explosion. items that have been treated with cleaning agents
containing solvents, e.g. stain remover or, must be carefully rinsed out
before they are loaded into the washer-dryer, otherwise there is the risk
of an explosion.
Unfold the laundry and place it loosely in the drum. Load a mixture of
small and large items.
Observe the maximum drum loads,
Programme table –> page30.
Take care not to trap items of laundry between the door and the rubber
seal.
Close the door. You will hear it click shut.
Measure out and add detergent and care products for only a washing
programme or a combined washing and drying programme.
Turn on the tap.
10
Page 11
Detergents and Care Products
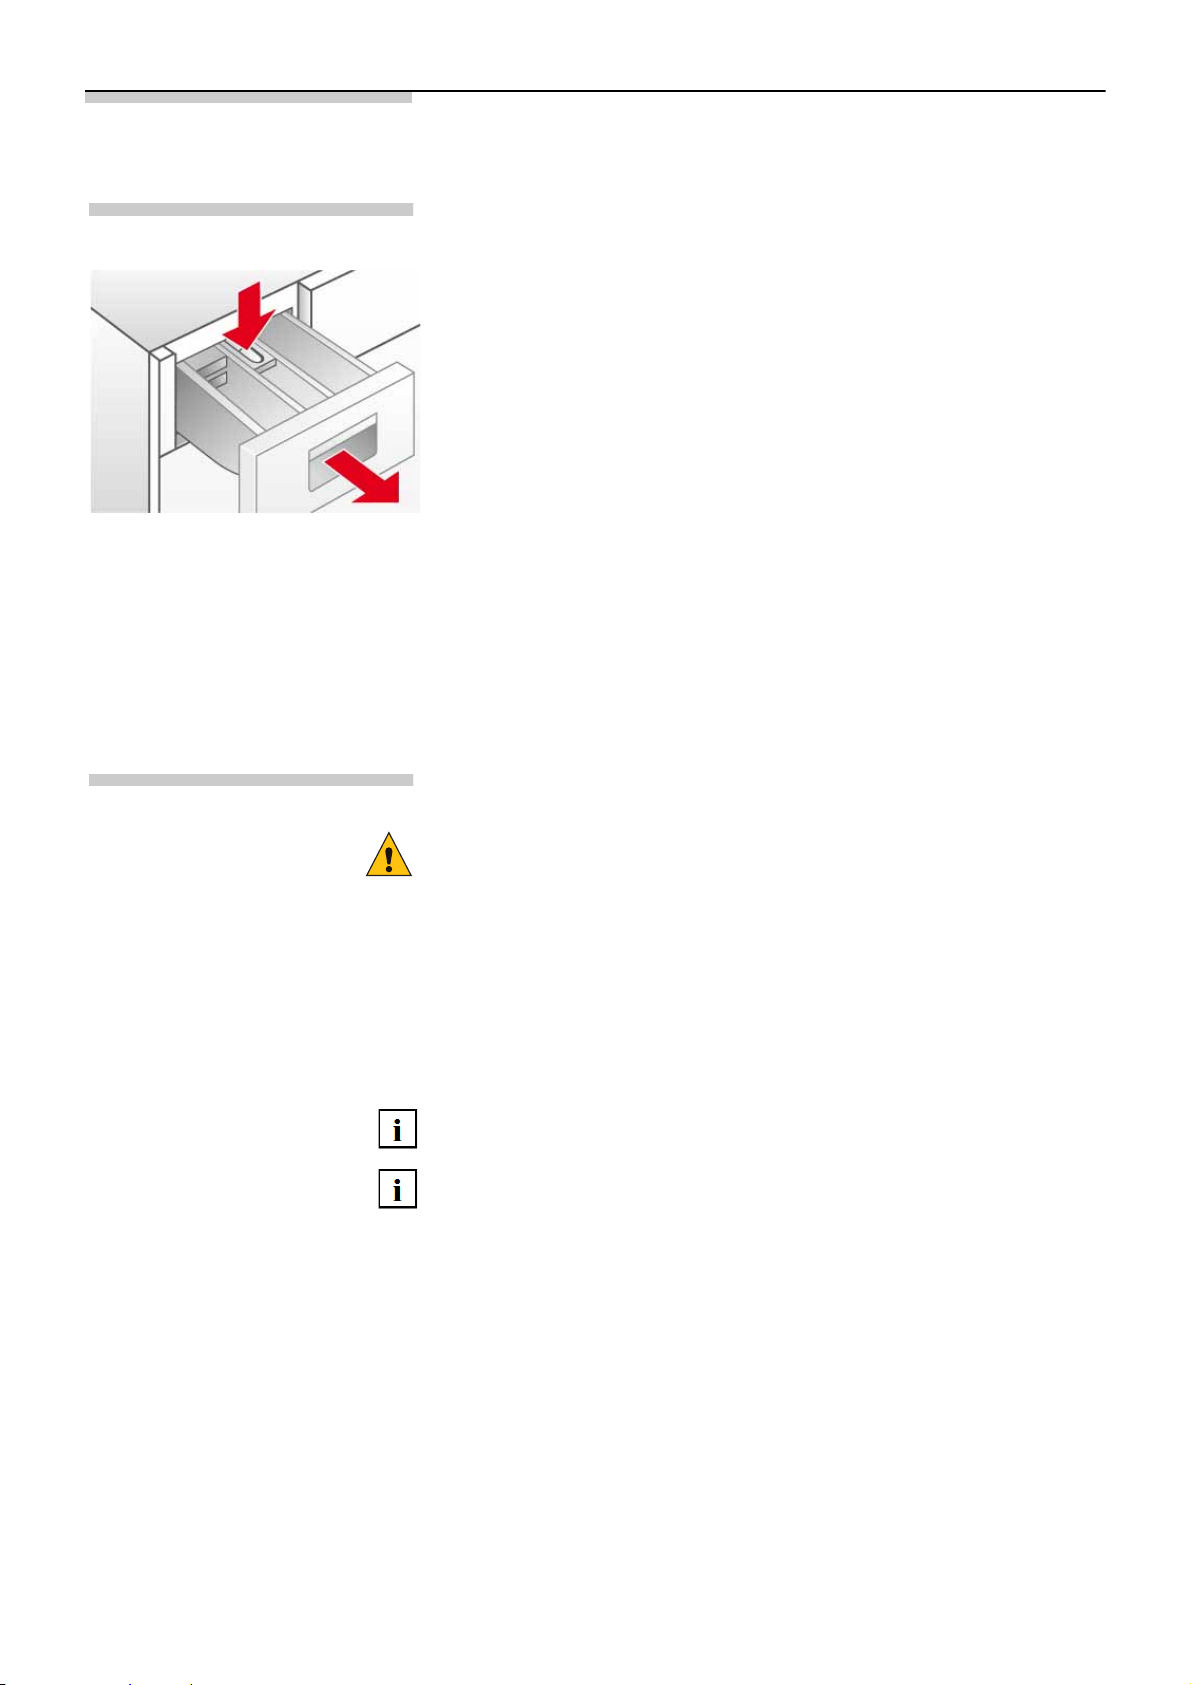
The detergent drawer is divided into three compartments
Detergent drawer
Compartment I : detergent for pre-wash.
Compartment II : detergent for main wash,
Compartment i : Liquid additives, such as starch or fabric softener.
I
i
II
Additives are automatically dispensed during the final rinse cycle.
– Do not exceed the maximum capacity, otherwise compartment i may
be emptied too early.
– Dilute viscous additives with water to prevent blockages.
Liquid detergent insert: this must be inserted before liquid detergents
are used.
To do this:
Pull out the detergent drawer as far as the stop.
Press on the zone labelled PUSH and take out the detergent drawer.
Pull the insert in compartment II forwards as far as the stop and push
it down.
Insert the detergent drawer.
Descaler
Detergents and care products
Descaler can be added to compartments I and II according to the manufacturer's instructions. Add detergent first, followed by the descaler.
Risk of poisoning
Keep detergents and care products out of the reach of children.
Risk of chemical burns
Take care when opening the detergent drawer. There may still be detergent residues in the drawer.
Select the correct dosage for the detergent according to:
– the size of the load,
– the instructions of the detergent manufacturer,
– how dirty the laundry is,
– the water hardness. You can find out about water hardness in your area
from your local waterworks.
Using the correct dosage reduces the impact on the environment and
gives a good washing result.
Only use pH-neutral wool detergent for woollens programmes.
11
Page 12

Measuring washing powder
Normally soiled laundry
Set the programme.
Do not select ! (Pre-wash) –> page15.
Add all the detergent, according to the manufacturer's instructions, to
compartment II of the detergent drawer.
Heavily soiled laundry
Set the programme.
Select ! (Pre-wash) –> page15.
Add 1/4 of the recommended amount of detergent to compartment I
of the detergent drawer and 3/4 of the detergent to compartment II.
Measuring liquid detergent
Only use liquid detergent for the main wash cycle with no prewash.
To do this:
Add the recommended amount of detergent to a liquid detergent
measuring aid and place it in the drum.
or
After folding down the liquid detergent insert, pour the detergent into
compartment II of the detergent drawer.
The scale on the liquid detergent insert helps to measure the correct
dosage of liquid detergent.
If compartment II is used for washing powder, the
liquid detergent insert must be folded up.
12
Page 13

Programmes
Programme selector
Washing programmes*
*depends on the model
The programme selector is used to set the washing and drying
programmes.
The time remaining until the end of the programme and the
Beladungsmenge (Load) are shown on the display panel.
Cottons
Suitable for hard-wearing fabrics, heat-resistant fabrics made from cotton
or linen.
– Coloureds up to 60 °C.
– Whites 60 °C to 90 °C.
Easy-Care
Washing programme for less hard-wearing fabrics made from cotton,
linen, synthetic fibres or blended fabrics. It is advisable to sort the laundry
by colour.
Delicate/Silk
Gentle programme for delicate, washable fabrics, e.g. silk, satin,
synthetics or blended fabrics (e.g. curtains). Gentle spinning between the
rinse cycles and reduced final spin speed.
Drying programmes
Wool :
Wool becomes matted when subjected to heat, moisture and movement.
The woollens programme takes these qualities into account and finds a
compromise between standing still and movement.
Suitable for hand- or machine-washable fabrics made from wool or a wool
blend.
Mixed Load
For mixed items of laundry made of various hard-wearing and easy-care
fabrics.
Intensive Dry 5
Intensive drying for a (robust fabrics), at 90°C.
Gentle Dry ‰
Gentle drying for ` (easy-care fabrics), 60°C.
13
Page 14

Special programmes
Fluff Clean l
The drum must be empty.
This programme is designed to clean the drying cycle of any fluff
deposits. The washer-dryer uses the flashing symbol l (Fluff removal
cycle) in the display panel to show that this programme must be run. The
electronic cycle counter is then automatically reset.
The l (Fluff Clean) symbol goes out after the programme starts.
To run the Fluff Clean l, proceed as follows:
Make sure that the drum is completely empty and close the door.
Turn the programme selector to Fluff Clean l.
Press the A (Start/Pause) button.
The Fluff Clean l programme can also be run at any time without
prompting by the appliance.
' + 0 Rinse + Spin:
An additional rinse cycle with a final spin. If the laundry is to be removed
dripping wet, set the Schleuderdrehzahl (Spin speed) to $ (Rinse hold)
before Programme start –> page15.
[ + 0 Drain + Spin:
Drain the rinsing water following a programme with
$ (Rinse hold) –> page15.
Turn the programme selector to [ + 0 Drain + Spin.
Set the spin speed to $ (Rinse hold).
Press the A (Start/Pause) button.
or
Drain and spin at the desired spin speed:
Turn the programme selector to [ + 0 Drain + Spin.
Press the 0 (Spin) button repeatedly until the desired spin speed is
set.
Press the A (Start/Pause) button.
14
Page 15
Washing and drying options
The spin speed can be individually adjusted for each programme.
Spin speed button 0
To set the spin speed, press the 0 (Spin) button repeatedly until the
required spin speed is displayed.
Rinse hold
Unbalanced load detection
system
option button
set button
$ (Rinse hold) deactivates the spin function. The laundry remains in the
rinsing water.
The automatic unbalanced load detection system ensures that the laundry
is evenly distributed using several initial spins. If the laundry is extremely
unevenly distributed, the speed of the final spin is reduced or the spin
cycle is not performed for safety reasons.
The set programmes can be individually adjusted.
To choose the required option:
Press the option button repeatedly until the required option is selected
(indicator lamp flashes).
Press the set button to switch the option on/off (indicator lamp lights
up/does not light up).
If you press and hold the option ~ button, all the options scroll through.
Options
T Pre-wash Prewash at 35 °C. Suitable for heavily soiled laundry.
@ Intensive Prolonged washing time. Suitable for particularly heavily soiled laundry
with dried-on stains. Cannot be combined with R Flexi Time
Q Easy-iron Special spin sequence with subsequent fluffing. Gentle final spin at
reduced speed. Slightly increased residual moisture in the laundry.
Reduces creasing and laundry is easier to iron.
Z Water Plus Increased water level and additional rinse cycle. For regions with very soft
water or for further improving the rinsing result. Any detergent residues
are removed.
R Flexi Time Sets the washing time. normal-medium-short.
C Signal Activates or deactivates the audible signal.
You can postpone Programme start before it begins. Using the Remaining
0 Finished in button
Drying button 5
time, you can determine when the selected programme is to end. The
remaining time can be set in one-hour increments, up to a maximum of
24 hours. Press the 0 (Finished in) button repeatedly until the required
number of hours is displayed.
Then press the A (Start/Pause) button, the programme will start after a
delay according to the set (Remaining time). The required time to the end
of the programme is shown on the display panel.
The drying programmes –> page13 can be individually adapted by
selecting the drying options.
– Press the 5 (Drying) button repeatedly until the required drying option
is shown on the display panel.
– To deactivate, press the 5 (Drying) button repeatedly until is
shown on the display.
Drying options
0 Time-controlled
drying
The drying time can be set to between 2:40 and 0:00 by repeatedly pressing the
5 (Drying) button.
15
Page 16
Start/Pause button
Press the A (Start/Pause) button to start the selected programme.
The 2 (Remaining time) is shown on the display panel. The
% (Programme start) symbol is lit.
Programme progress
Changing the programme
Pausing the programme
Cancelling the programme
The programme progress is shown on the display panel:
! - Pre-wash
N - Main wash
' - Rinse
0 - Final spin
‘ - Drying
To change the programme:
Select a new programme.
Press the A (Start/Pause) button.
The new programme starts.
Press and hold the A (Start/Pause) button while the programme is in
progress until appears on the display panel. and the
Restzeit (Remaining time) 2 appear alternately on the display while the
programme is paused.
Press the (Start/Pause) button to continue with the programme.
Press and hold button A (Start/Pause) until is displayed.
For washing programmes at high temperatures:
– Cooling down laundry: choose ' + 0 Rinse + Spin.
– Press the A (Start/Pause) button.
For programmes at low temperatures:
– choose [ + 0 Drain + Spin.
– Select the A (Start/Pause) button.
If you cancel the Drying programme, the laundry may still be very hot.
16
Page 17
Washing and drying
Turn the programme selector to the desired programme,
Washing only
Drying only
e.g. Cottons 60°C.
– The display panel alternately shows 2 (Remaining time) and the
recommended load in kg. The % symbol flashes.
If necessary, adjust the temperature and the spin speed and select any
options for your individualised programme, –> page15.
– The 5 (Drying) function must not be activated.
Load the laundry –> page10.
– Observe the maximum load,
Programme table –> page30.
Press the A (Start/Pause) button.
– 2 (Remaining time) is shown on the display panel.
The % (Programme start) symbol lights up.
– The washing programme starts.
Turn the programme selector to the desired drying programme.
– The display panel alternately shows 2 (Remaining time) and the
recommended load in kg.
Press the 5 (Drying) button to set the drying options
–> page15
– If you do not make a selection, the e (Cupboard-dry) option is set.
Washing and drying
Load the laundry –> page10.
– Observe the maximum load,
Programme table –> page30.
Press the A (Start/Pause) button.
– 2 (Remaining time) is shown on the display panel and the
5 (Drying) and % (Programme start) symbols light up.
– The drying programme starts.
Successive washing and drying.
Set the programme selector to the desired programme,
e.g. Cottons 60°C.
– 2 (Remaining time) and the recommended load in kg are shown
alternately on the display panel. The % symbol flashes.
If necessary, adjust the temperature and the spin speed and select any
options for your individualised programme, –> page15.
Press the 5 (Drying) button to set the drying options
–> page15
Load the laundry –> page10.
– Observe the maximum load in kg,
Programme table –> page30.
Press the A (Start/Pause) button.
The drying programme that is carried out is automatically determined by
the washing programme, see the Programme table –> page30.
17
Page 18
End of the programme
The washing and drying programmes are ended automatically.
appears on the display panel.
Turn the programme selector to Off.
Remove the washing from the drum.
Leave the door open to allow the inside of the washer-dryer to dry out.
Turn off the tap (not necessary on models with Aqua-Stop).
Rinse hold
If the spin function was deactivated at the start of the wash cycle,
$ (no final spin = laundry remains in last rinsing water), the washing
programme is automatically stopped after the final rinse. The display
panel shows alternating with .
In order to Drain the rinsing water and, if required, spin the laundry:
Press the 0 (Spin) button repeatedly until the required spin speed is
set. The water is Drained and the washer-dryer spins the laundry. The
programme is completed when appears in the display field.
The maximum spin speed depends on the selected wash programme.
If you do not wish to spin the laundry:
Press the 0 (Spin) button (remaining time for Draining is displayed).
The water is Drained, but the washer-dryer does not spin the laundry.
The programme is complete when appears on the display
panel.
Set the programme selector to Off.
Remove the laundry.
Leave the door open to allow the inside of the washer-dryer to dry out.
Turn off the tap (not necessary on models with Aqua-Stop).
Childproof lock
For preventing the washer-dryer functions that you have set from being
changed inadvertently.
Activate/Deactivate: Press the option and set buttons at the same time
to activate or deactivate the Childproof lock. When the childproof lock is
activated, @ lights up on the display.
18
Page 19
Cleaning and care
Risk of electric shock
Safety information
Housing and control panel
Drum
You must disconnect the appliance from the mains first. Never clean the
washer-dryer with a water jet.
Risk of explosion.
Never clean the washer-dryer with solvents.
Risk of scalding
Hot washing water must be cooled before Draining.
Wipe with a soft, damp cloth.
Remove detergent and cleaning agent residue immediately.
Do not clean with a jet of water.
Remove any foreign bodies from the drum and rubber seals.
Descaling the drum:
– Only use a proprietary brand of descaler with corrosion inhibitor for
washing machines for descaling the washer-dryer.
– Observe the manufacturer's instructions regarding use and dosage.
– After descaling and removing rust from the drum,
run the ' + 0 Rinse + Spin programme several times to remove any
remaining acid.
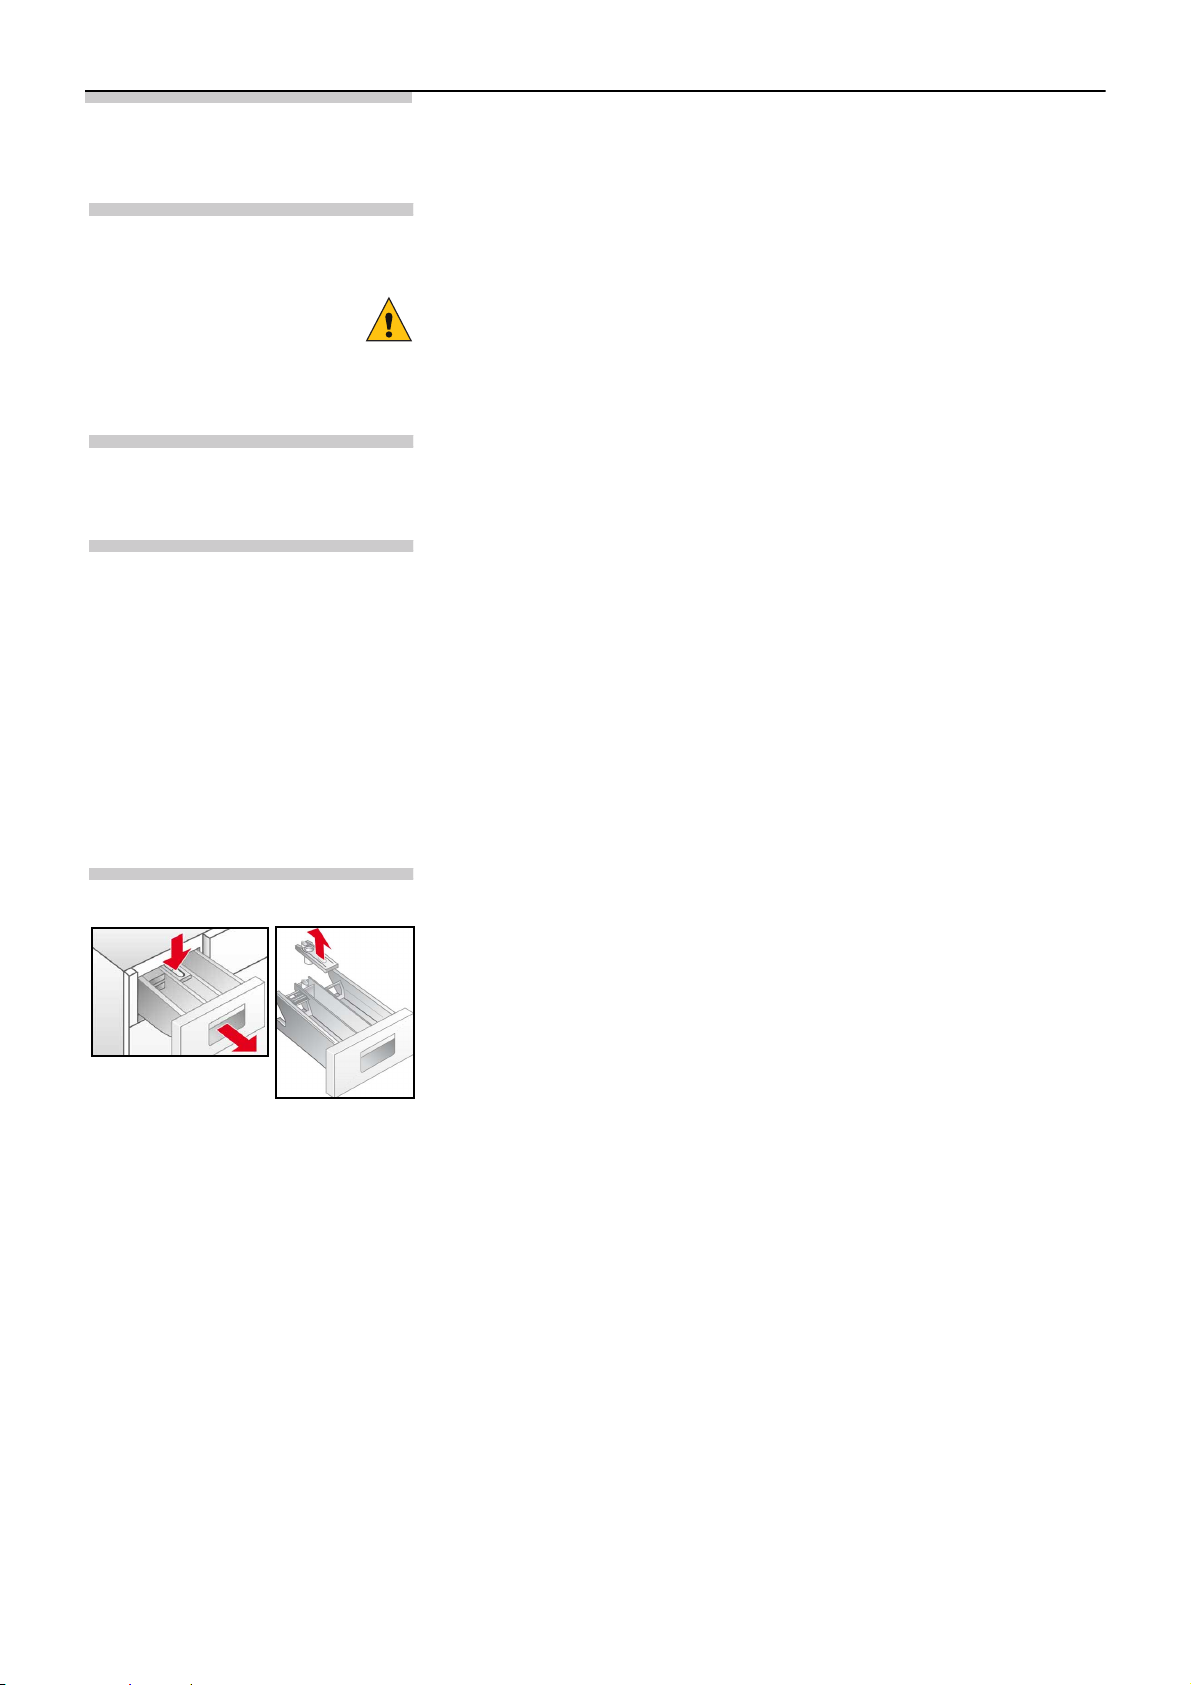
Detergent drawer
If any remaining metal objects (e.g. coins, paper clips, needles, nails)
have caused rust spots:
– Use chlorine-free cleaning agents; observe the manufacturer's
instructions. Never use steel wool.
If there are detergent or care product residues:
Pull out the detergent drawer as far as the stop.
Press on the blue zone labelled PUSH and take out the detergent
drawer.
Clean the detergent drawer guide.
Remove the blue fabric softener compartment insert.
Clean the detergent drawer and fabric softener compartment insert
under running water.
Insert the fabric softener compartment insert.
Insert the detergent drawer.
19
Page 20
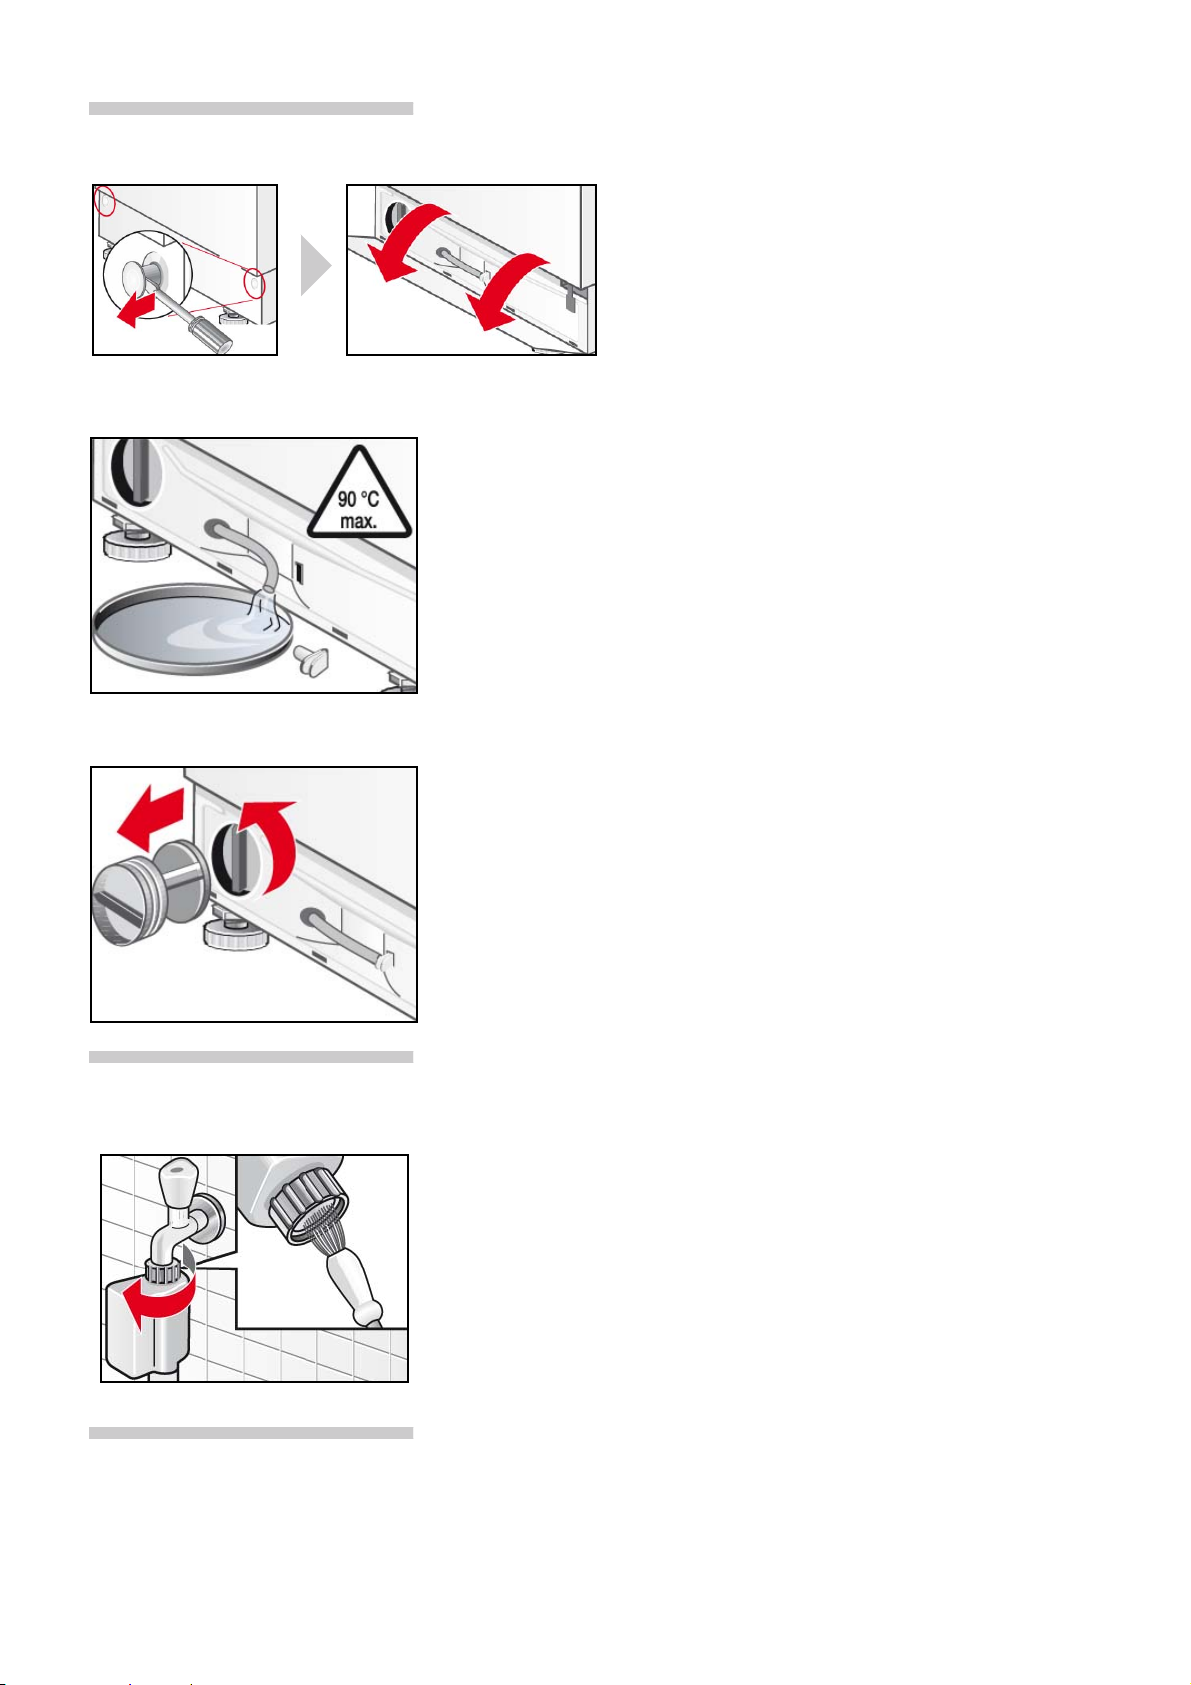
Drain pump
Draining the water
Set the programme selector to Off.
Use a screwdriver to release the lock pins.
Tip the kick panel and pull upwards to remove.
Take the Drain hose out of the retainer.
Remove the plug from the Drain hose and release the washing water.
– The container for the Drained water may have to be emptied several
times.
– When no more water runs out, replace the plug.
Place the Drain hose into the retainer.
Cleaning the Drain pump
Filter in the water supply hose
Unscrew the pump cover.
– Clean the pump housing and remove any foreign objects.
– Make sure that the impeller can turn freely.
Replace the pump cover and screw firmly in place.
Place the kick panel in the 4 clip-in slots and secure to the housing
using the lock pins.
If no water runs into the washer-dryer, or only an insufficient amount, you
must first reduce the water pressure in the supply hose:
Turn off the tap.[ + 0 Drain + Spin).
Press the A (Start/Pause) button.
Allow the programme to run for approximately 40 seconds.
Set the programme selector to Off.
Unplug the mains plug from the socket.
Unscrew the water supply hose from the tap.
Clean the filter with a small brush.
Reconnect the hose.
Turn on the tap.
Check whether water comes out of the end of the hose.
If water is escaping, check that the filter is correctly seated.
Descaling the washer-dryer
This should not be necessary if the correct detergent dosage has been
used. If it is necessary, however, proceed according to the descaling
agent manufacturer's instructions. Suitable descalers can be obtained via
our website or from our after-sales service –> page24.
20
Page 21
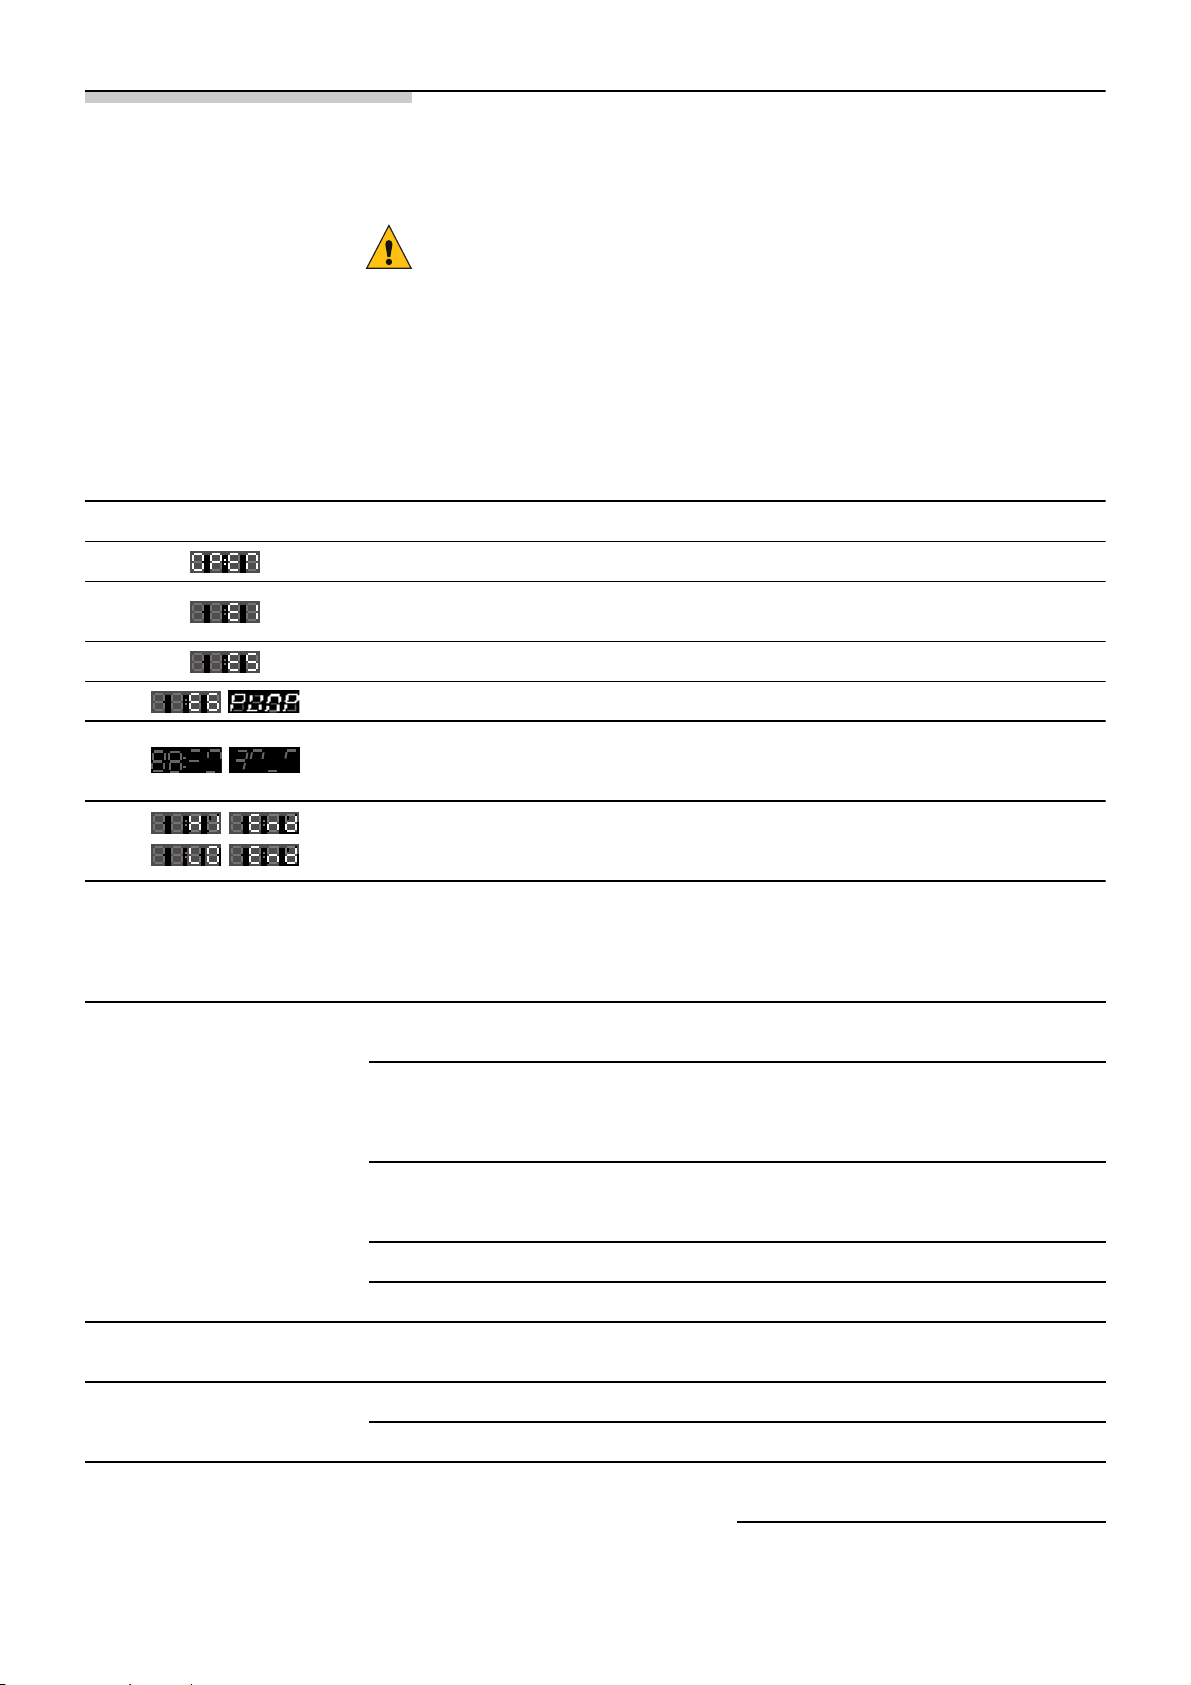
What to do if...
—
Risk of electric shock.
Repairs must only be carried out by customer services or authorised
technicians.
If repairs are needed, or if you cannot rectify a fault yourself with the help
of the following table:
Set the programme selector to Off.
Disconnect the washer-dryer from the power supply.
Turn off the tap.
Call the after-sales service –> page24.
Fault code
The door is not properly closed. Close the door.
The water control system has been activated. Disconnect the appliance from
the mains, turn off the tap and advise the after-sales service.
Water is not entering the appliance. See the fault Water is not flowing in.
The water is not Drained. See the fault Water is not Drained.
Not a fault! The unbalanced load detection system has detected an unbalanced
–©‘š
Ÿ
Other fault codes are only for use by the after-sales service. Make a note of the fault code to inform the aftersales service.
Fault Possible cause Remedial action
Programme does not start. The A (Start/Pause) button has not
load caused by laundry items. The fluff removal cycle cannot start. Remove the
laundry.
Maximum or minimum drying load not taken into account. HI/End or LO/End
flash alternately in the display. See information for the Drying result not
satisfactory fault.
Press the A (Start/Pause) button.
been pressed.
A delayed start time has been
selected.
Power cut.
The delayed start time that was
selected has been cleared.
The door is not properly closed. Close the door.
Plug not inserted properly into socket. Insert plug correctly.
Washer dryer starts on completion of
the delay period.
Change the “finished in time” if
necessary –> page15.
Reselect the delayed start time or start
the programme immediately.
Press the A (Start/Pause) button.
The maximum spin speed
cannot be set.
The water is not Drained. Drain hose is twisted. Fit the Drain hose correctly.
Detergent residues in the
detergent drawer.
The maximum spin speed depends on
the programme selected.
Detergent pump is blocked. Clean the Drain pump –> page20.
Damp or lumpy detergent. Clean and dry the detergent drawer –
Change programme as required.
> page19.
Use the measuring aid for liquid
detergent.
21
Page 22
Water is not flowing in. The mains plug is not correctly
plugged in.
The door is not properly closed. Close the door.
The tap is not turned on. Turn on the tap.
Plug in the mains plug correctly.
Intense vibrations during
spinning.
Washer-dryer fills with
water and continuously
Drains it away.
No water can be seen in the
drum.
Water leaks from the bottom
of the appliance.
Foam escapes from
detergent drawer.
The filter in the water supply hose is
blocked.
The water supply hose is pinched or
kinked.
The washer-dryer is not correctly
levelled.
The transport safety bolts have not
been removed.
Drain hose fitted too low. Fit the Drain hose correctly
Not a fault. During certain programmes the water
Supply hose screw connection is
leaking.
Drain hose is leaking. Have the Drain hose replaced by the
Too much detergent has been used. Only use detergent which is correct for
Clean the filter in the water supply hose
–> page20.
Check the water inlet hose.
Level the washer-dryer –> page27.
Remove the transport safety bolts
–> page26.
–> page28.
level is below the visible range.
Tighten the screw connection.
after-sales service.
textiles, and suitable for use in
automatic washing machines.
Make sure that you use the correct
dosage.
Several attempts to start
spinning.
Washing is not spun
properly.
Washing results not
satisfactory.
Detergent residues on the
washing.
Grey residues on the
washing.
Not a fault.
The unbalanced load detection system
attempts to redistribute an unbalanced
load by starting to spin several times.
Large items of laundry are not evenly
distributed in the drum. The spin speed
is automatically reduced for safety
reasons.
Uncleaned areas worse than expected. Select a suitable programme, e.g. a
Too little or incorrect detergent used. Use the correct dosage of a suitable
Maximum load exceeded. Select the load appropriate for the
Some phosphate-free detergents
contain water-insoluble residues which
appear on washing as light specks.
Soiling caused by ointments, grease or
oil.
Always wash large and small items
together.
Always wash large and small items
together.
programme with Pre-wash.
Pretreat stains if necessary.
detergent, in accordance with the
manufacturer's instructions.
programme.
Rinse the laundry again or change to
using liquid detergent. Brush the
laundry after it has dried.
Wash the laundry using the maximum
detergent dosage and the maximum
permissible temperature – see the
care label.
Programme terminated
unexpectedly.
Spinning during drying No fault "Thermo spin", which is for energy-effi-
The A (Start/Pause) button was
selected accidentally.
Press the button again to restart the
programme.
cient drying, starts after a drying time
of approx. 10 minutes.
22
Page 23
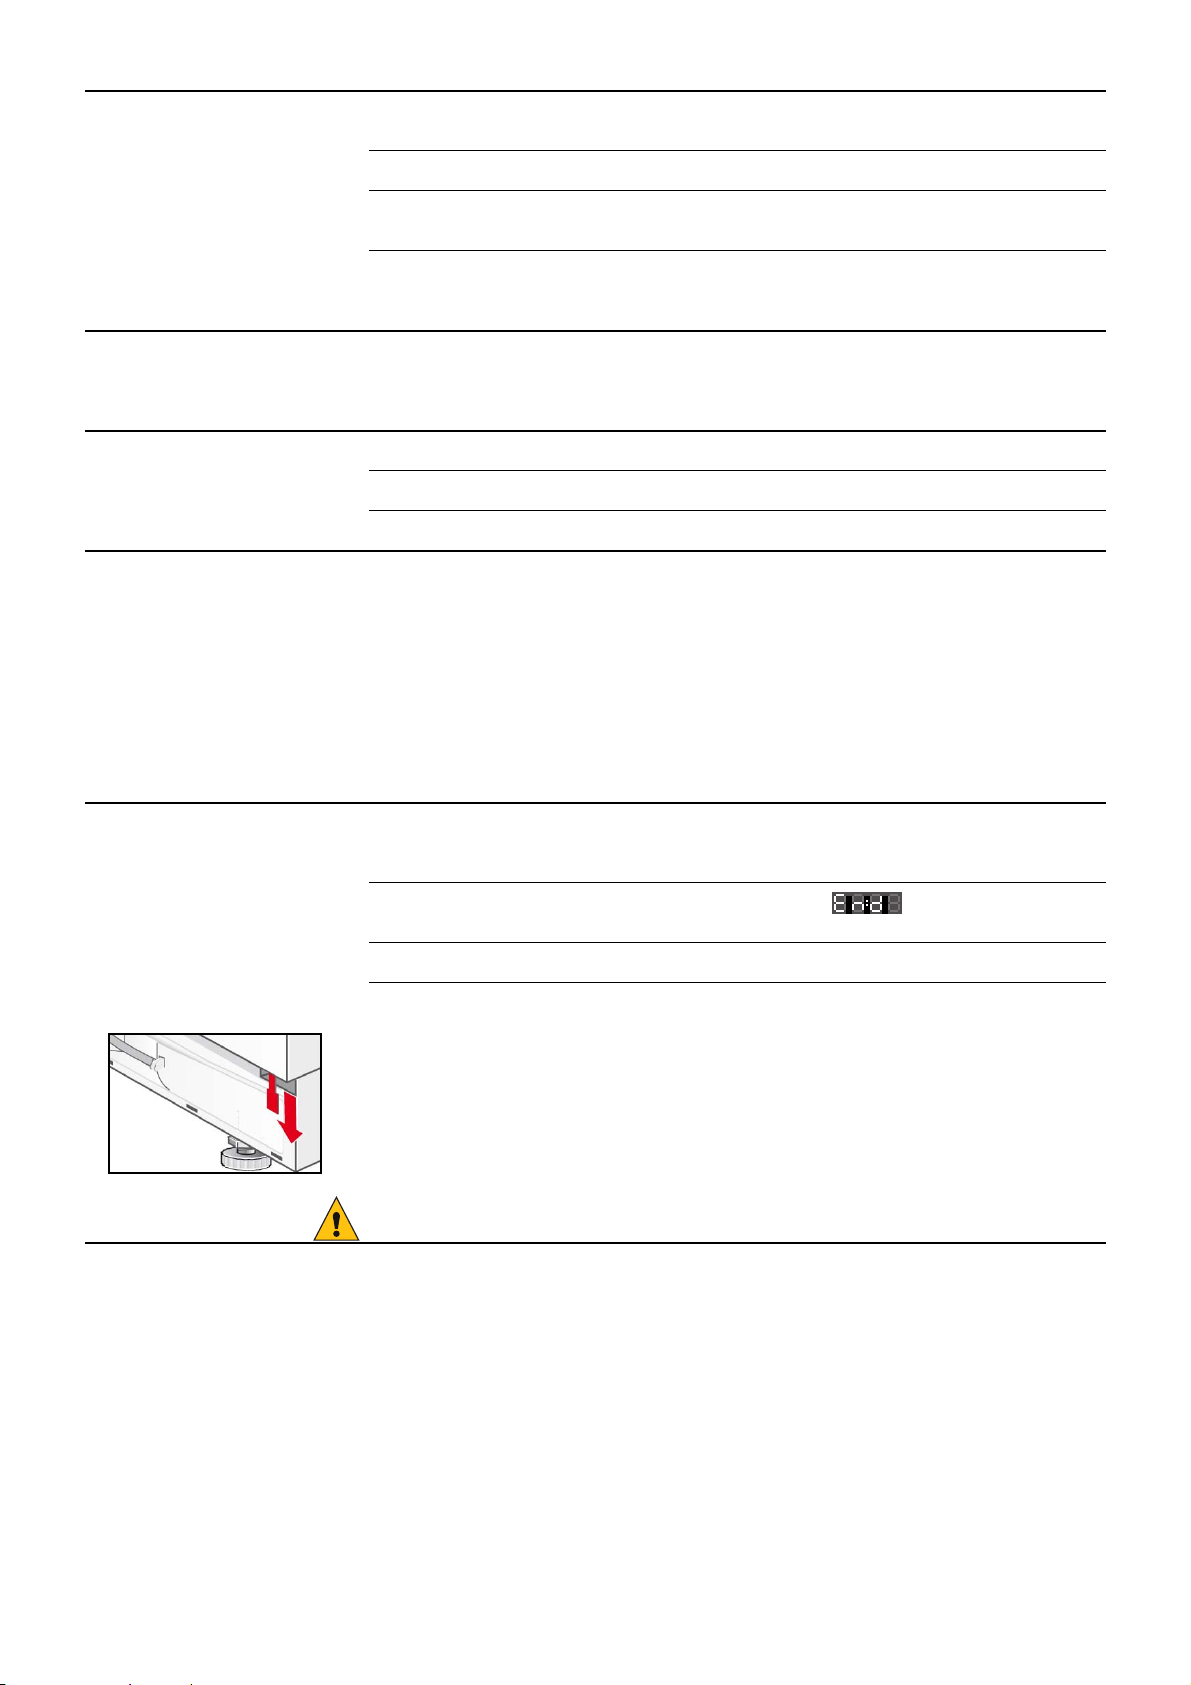
Drying result not
satisfactory.
The laundry clings to the sides of the
drum after being spun.
Closed tap Turn on the tap.
Selected drying time too short. Select the drying time according to the
Loosen up the laundry by hand; start
the drying programme –> page17.
Load.
Maximum or minimum load not taken
into account –> page30
The fabric softener is not
completely flushed in or too
much water remains in the
compartment i.
The laundry is not dried. The tap is turned off. Turn on the tap.
No display on the display
panel.
The door cannot be opened. $ (Rinse hold) has been selected. Select the programme [ + 0 Drain +
The fabric softener compartment insert
is not correctly attached or is blocked.
The load is too large. Reduce the load size.
The drying time is too short. Select a suitable drying time.
Power cut. The programme continues when power
Once the programme has ended:
adjust the load quantity, select a
suitable drying programme and restart.
If necessary, clean the fabric softener
compartment insert and fit it correctly
in compartment i –> page19.
is restored. If you wish to remove the
laundry during a power cut, you must
first Drain out the water
–> page20.
Check whether:
– the plug is plugged into the socket
correctly.
– the circuit breaker (fuse) has
tripped; if it has, call the after-sales
service –> page24.
Spin and press the A (Start/Pause)
button.
The programme is running or the door
is locked for safety reasons.
Power cut. Unlock the door mechanically.
Emergency release To release the door mechanically in the event of a power cut:
turn the programme selector to Off and unplug the mains plug from the
socket.
open the base panel and Drain out the water –> page20.
pull the emergency release downwards and open the door at the same time.
Before opening the door, make sure that there is no water or hot detergent
solution in the washer dryer.
Under no circumstances open the door with the emergency release while the
drum is still turning.
If you cannot correct a fault yourself (switching on/off) or a repair is required:
– Turn the programme selector to Off and unplug the mains plug from the socket.
– Turn off the tap and call the after-sales service –> page24.
Wait until appears on the
display panel.
23
Page 24

After-sales service
Before you call the after-sales service, please check whether you can correct the fault yourself –> page21.
You will be charged if a technician is called out, even during the warranty
period.
You can find information about your nearest after-sales service here or in
the After-sales service directory (depending on the model).
Please give the after-sales service the product number (E-Nr.) and production number (FD) of the appliance.
Enter the number of your appliance here.
You can find this information on the rating plate in the frame of the door.
Please help us to avoid unnecessary call-outs by quoting the product and
production numbers. This will also save you the associated additional
costs.
You can rely on the competence of the manufacturer. Please contact us.
This way, you can ensure the repair is carried out by trained service technicians who are equipped with genuine spare parts.
24
Page 25
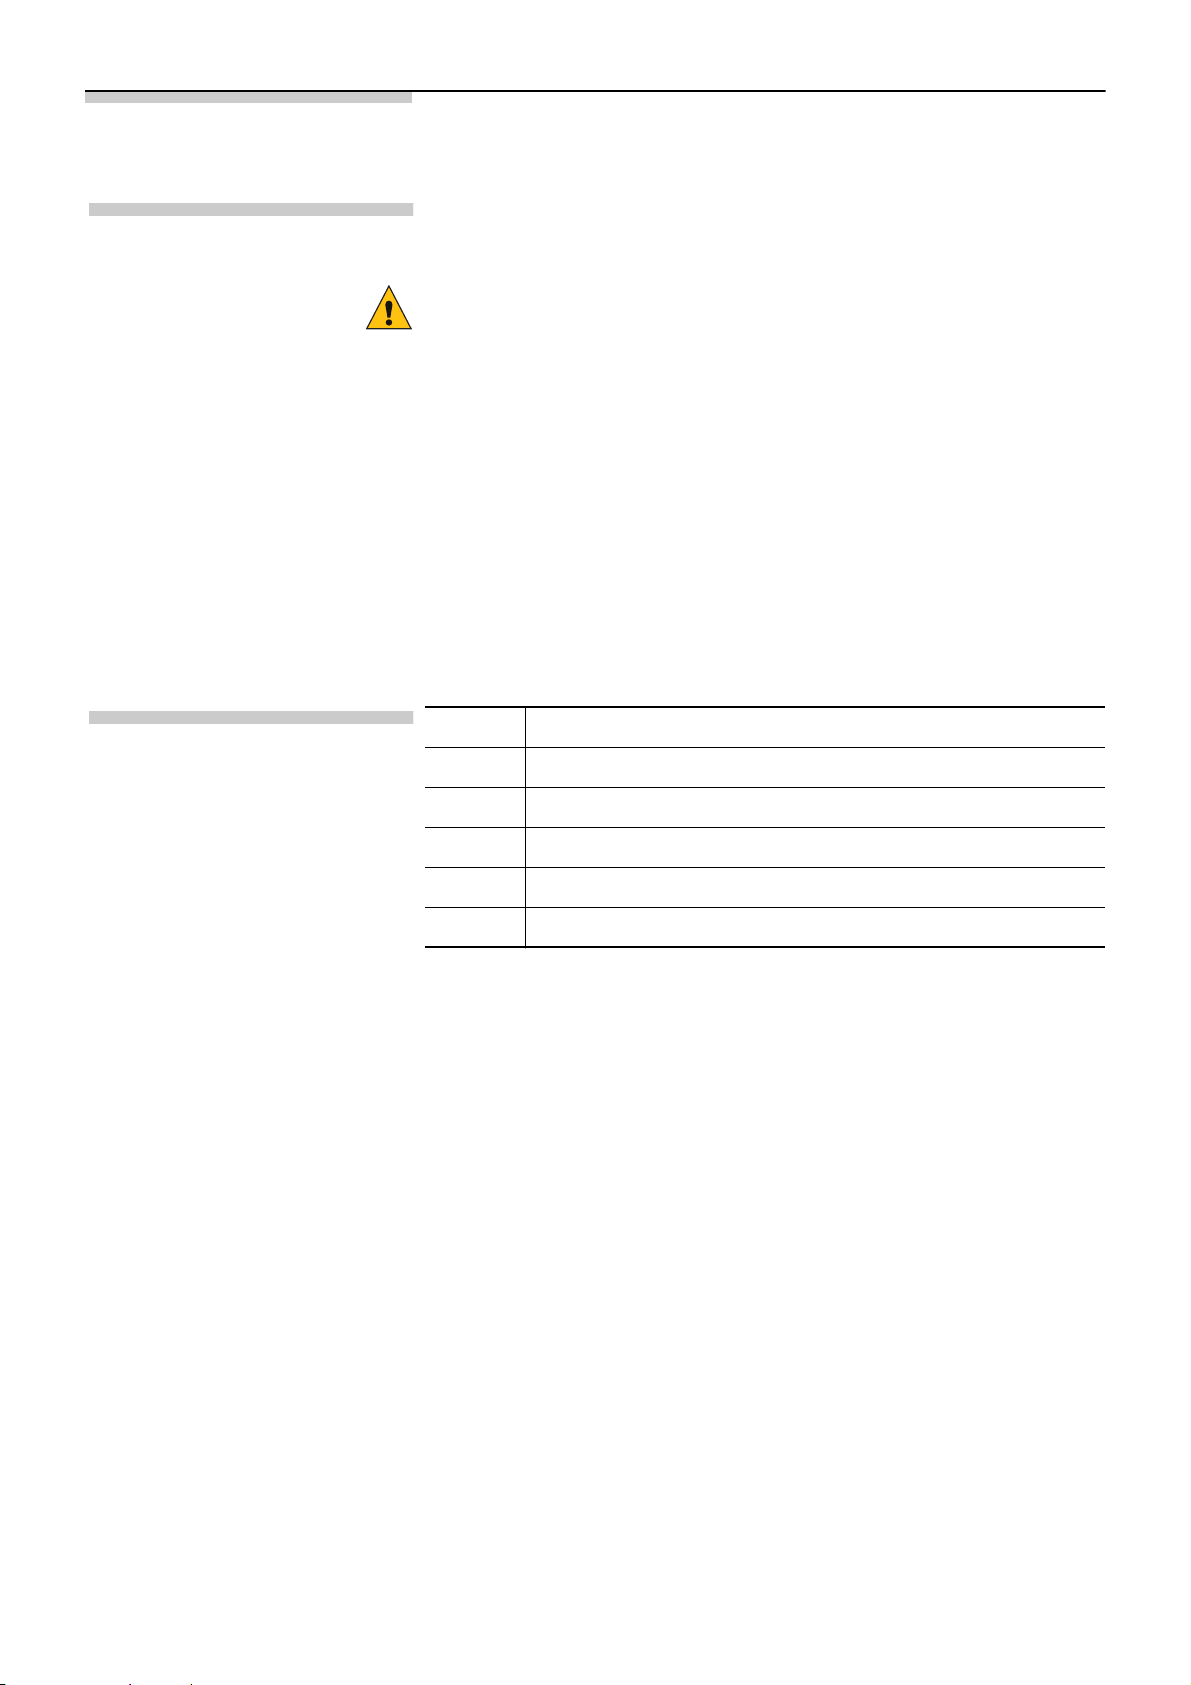
Installation instructions
The washer-dryer is very heavy. Take care when lifting it.
Safety information
Do not operate the washer-dryer if it has any visible damage. If you are in
any doubt, please consult our after-sales service or your retailer.
Do not install the washer-dryer outdoors or in areas exposed to frost.
Frozen hoses can crack or burst. As a result, the washer-dryer could be
damaged.
Do not stand the washer-dryer upside down or on its side. Do not lift the
washer-dryer by protruding parts (e.g. door).
Do not place the washer-dryer behind a door or a sliding door which
could prevent the washer-dryer door from being opened. This will prevent
children from locking themselves in and putting their lives in danger.
Remove the transport braces and cross connectors and store in a safe
place.
In addition to the instructions provided in this document, special
regulations from the relevant water and electric utility companies may
apply.
If in doubt, have a technician connect the appliance.
Included with the appliance
Number Description
5 Covers for openings left after removing the transport bolts.
1 Spanner
1 24-40 mm dia. hose clamp for connection to a siphon.
1 Door template
2 Door hinges with screws
On the back of the washer-dryer:
– Water Drain hose
– Water supply hose
– Mains cable with plug
– Instruction manual and booklet containing after-sales service
addresses
Moisture may remain in the drum following the final inspection which
every washer-dryer undergoes before leaving the factory.
25
Page 26
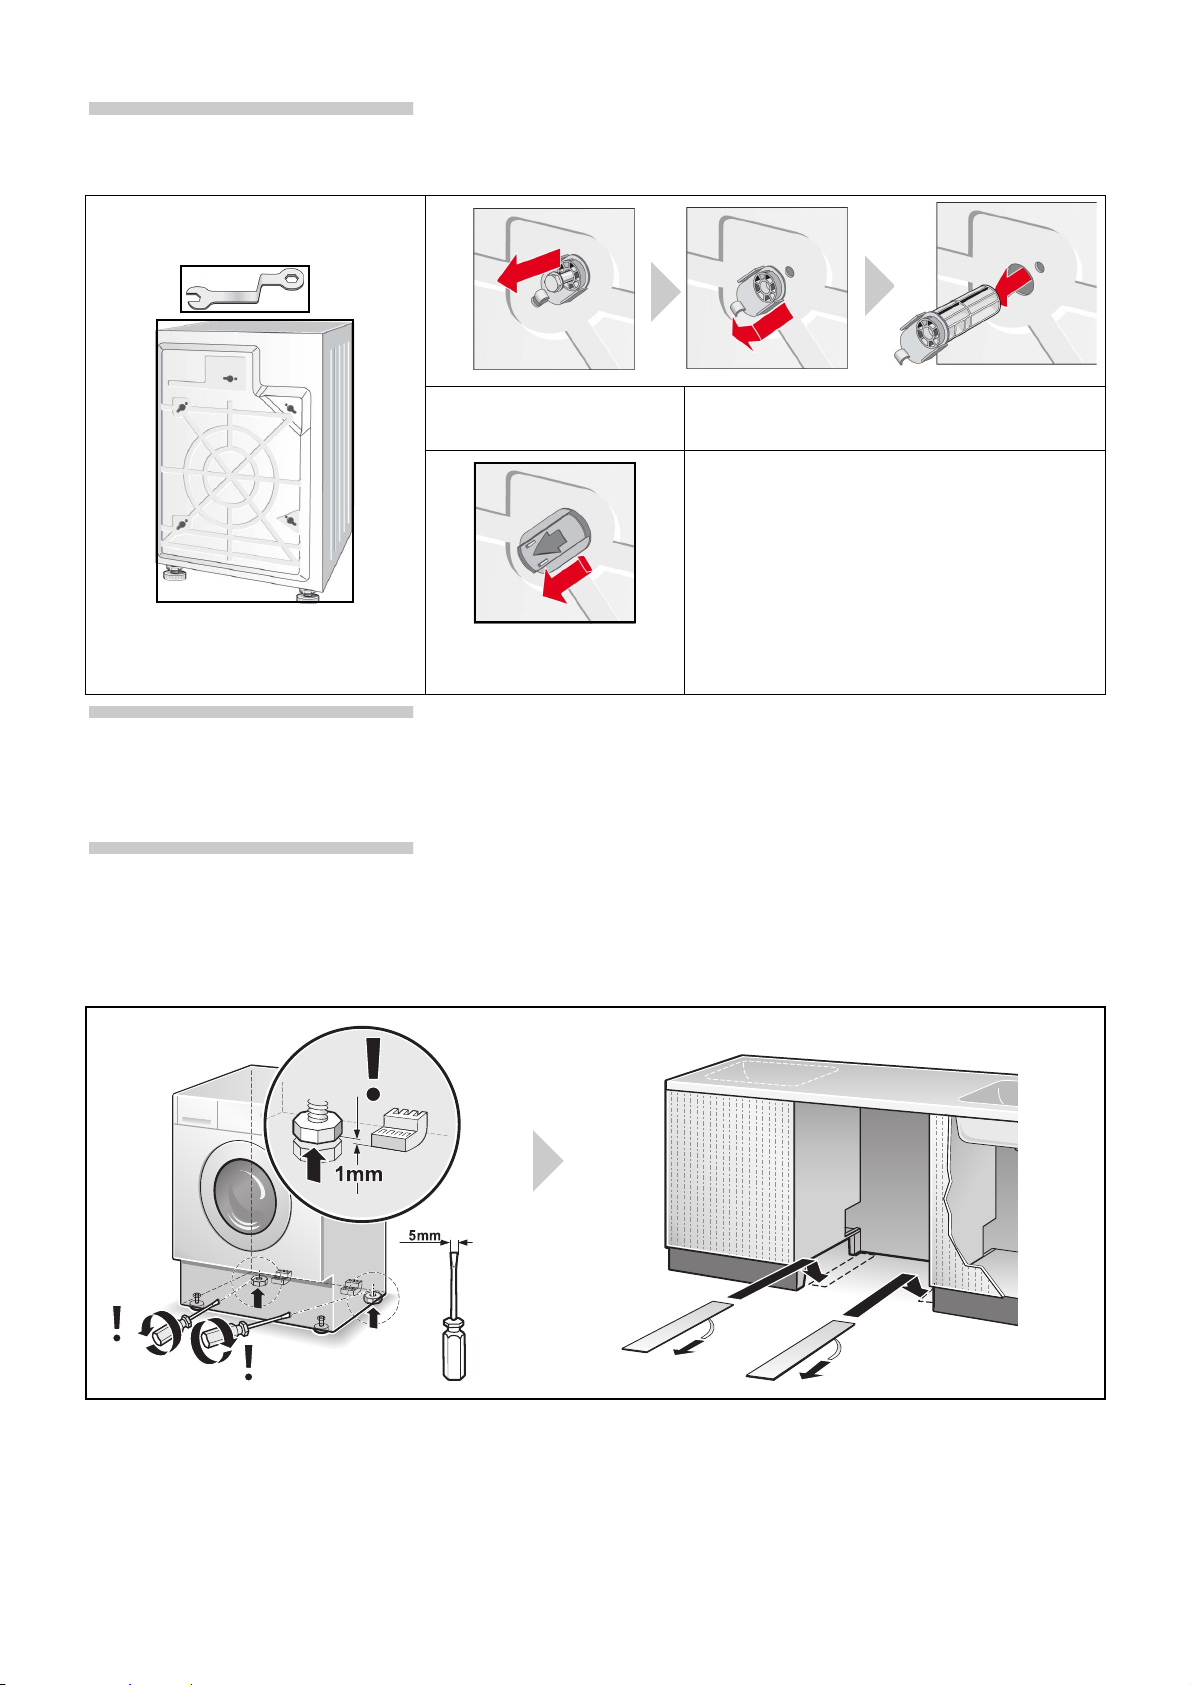
Removing the transport safety bolts
Positioning and levelling
Positioning
Unscrew all screws using
the spanner supplied.
Insert the protective
covers.
– Appliance stability is essential to ensure that the washer-dryer does not
“creep” during spin cycles.
– The installation area must be firm, clean and level.
– Parquet floors and soft floor coverings, e.g. carpets or foam-backed
floor coverings, are unsuitable.
Slide sheets make it easier to slide the washing machine into the
installation recess.
– Can be ordered from the after-sales service, spare part no. 66 1827.
– Moisten the slide sheets with a mixture of water and washing-up liquid
before sliding the washer-dryer into place. Do not use grease and/or
oil.
Remove all transport safety bolts completely
and take the mains cable out of the retainers.
– Before using the appliance for the first
time, you must make sure that all
transport safety bolts have been removed
and kept safe for any subsequent
transport.
– If you need to transport the appliance at a
later date, always refit the transport safety
bolts to prevent damage to the washerdryer.
26
Page 27
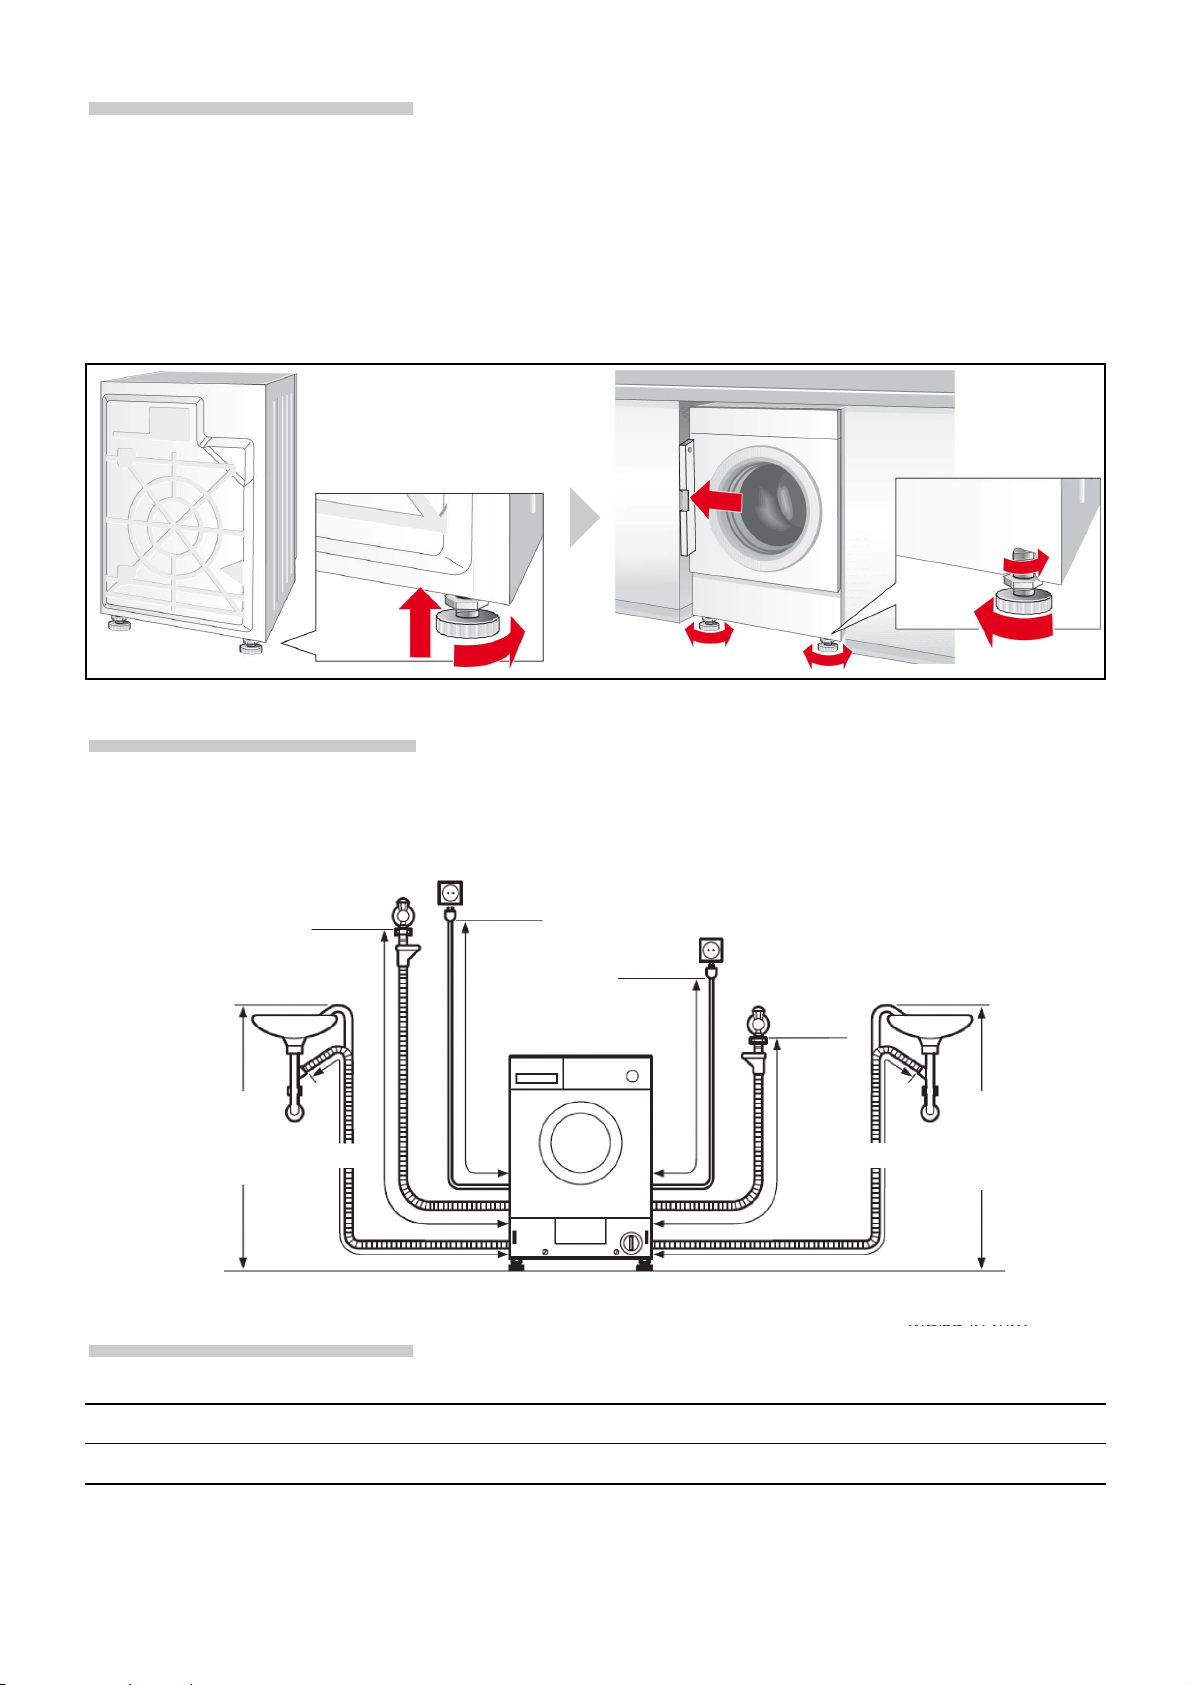
Levelling
.
Intense noise, vibrations and “wandering” may be the result of incorrect
levelling.
– All four appliance feet must stand firmly on the ground.
– The washer-dryer must not wobble.
– Check the levelness of the washer-dryer with a spirit level and correct
if necessary.
– The washer-dryer must not rest against the sides of the installation
recess.
– The lock nuts of the front appliance feet must be screwed tightly
against the housing.
Hose and cable lengths
Left-hand connection
approx. 1150
min.
500
max.
approx. 1400
900
or
approx. 1200
approx. 800
Right-hand connection
approx.
750
min.
500
approx. 950
Dimensions in mm
max.
900
Dimensions
Width x depth x height 595 mm x 584 mm x 820 mm
Weight 85 kg
27
Page 28
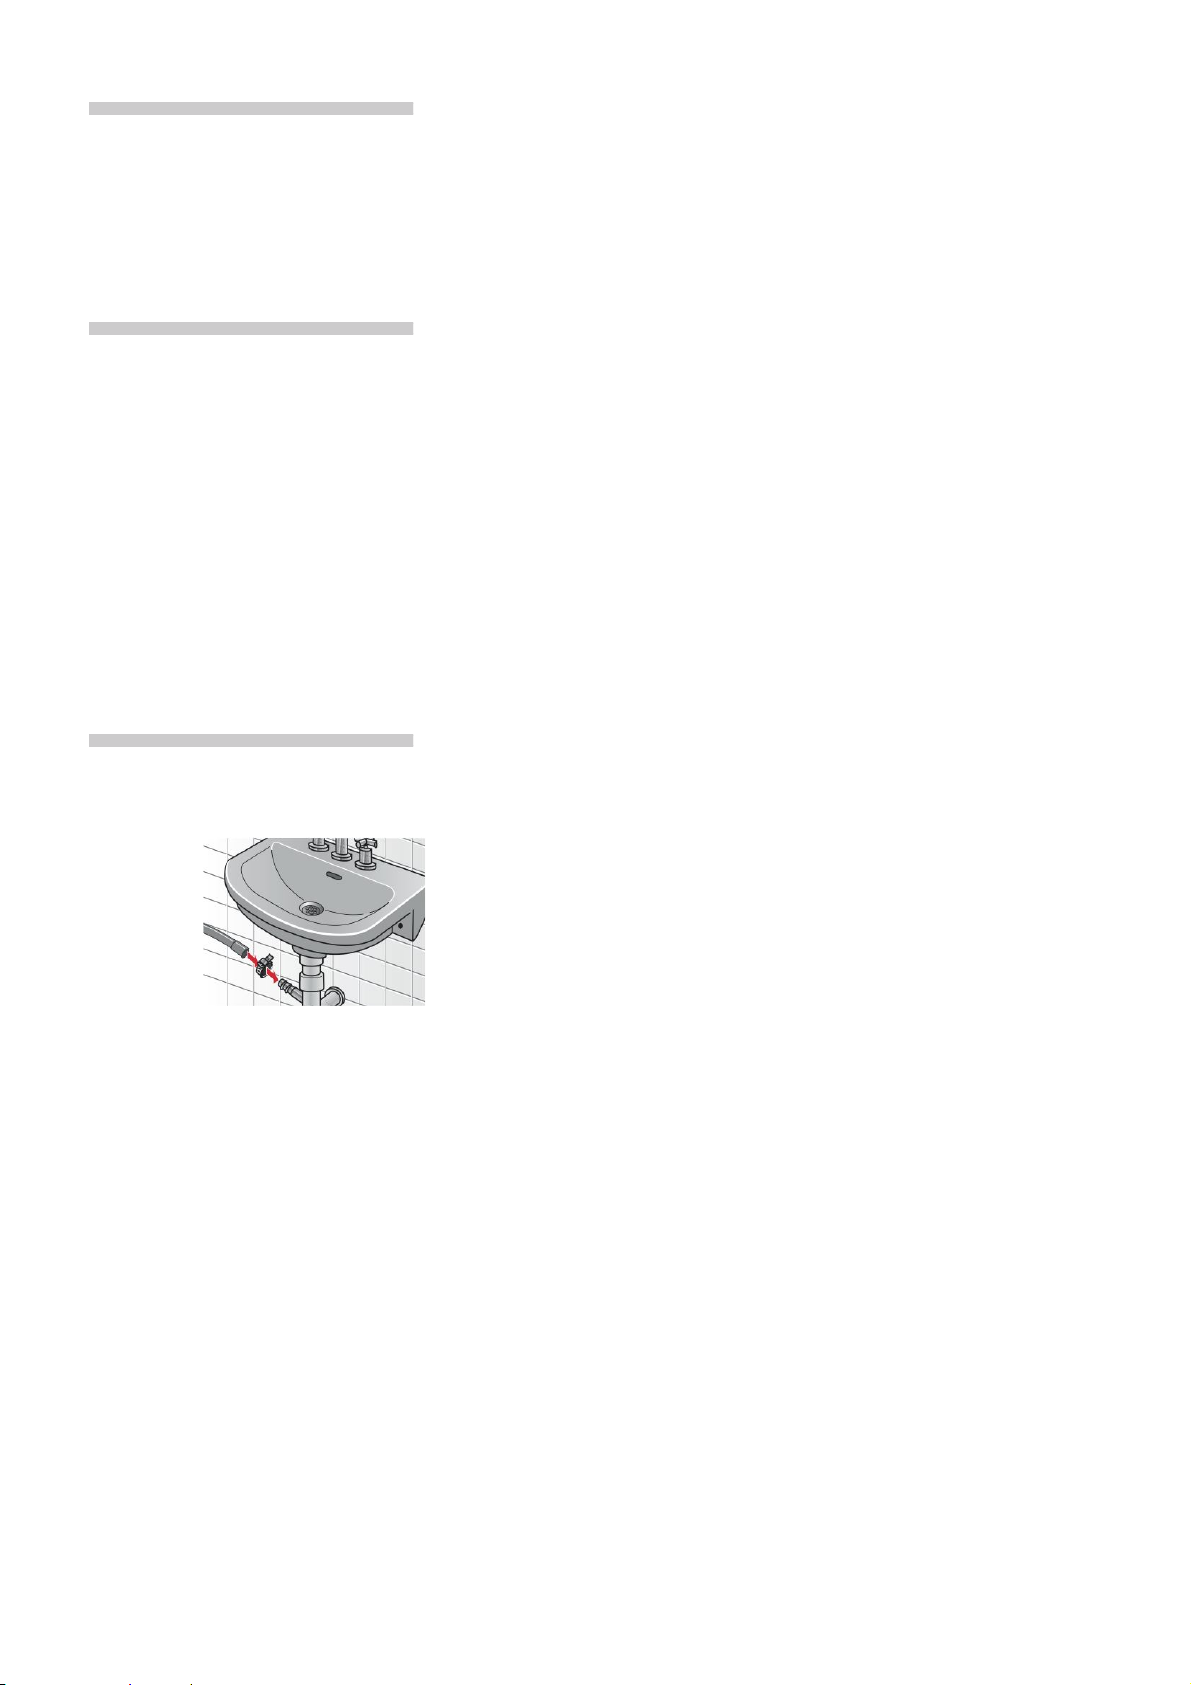
Water connection
Water supply
To prevent leaks or water damage, you must observe the instructions in
this section.
If in doubt, have a technician connect the appliance.
The water supply and Drain hoses can be routed to the left of right,
depending on installation conditions.
Do not use a used inlet hose. Only use the inlet hose supplied or one
which was purchased from an authorised specialist retailer.
Do not allow the water supply hose to be:
– kinked or squashed,
– altered or cut (strength no longer guaranteed).
Note the water pressure in the mains supply:
The water pressure should be between 50-900 kPa (0.5-9 bar) (at least
8 litres of water flow out per minute when the tap is turned on).
If the water pressure is higher, a pressure reducing valve must be fitted.
Connect the cold-water supply hose (blue union nut) to the cold water tap
with ¾" pipe thread.
Only tighten plastic screw connections by hand.
Do not remove the filter from the supply hose.
After connecting the water supply hose:
– Turn the tap on fully.
– Check the connections for leaks.
Water Drainage
Drainage into a siphon
– Do not kink the Drain hose or pull it lengthways.
– Height difference between the installation surface and the Drain:
max. 90 cm, min. 50 cm.
Secure the connection with the 24-40 mm hose clamp (included with the
appliance).
28
Page 29
Electrical connection
The washer-dryer must only be connected to an alternating current supply
via a properly installed earthed socket.
If a residual current circuit breaker is used, only use a type which displays
this symbol: ‚.
Only this symbol guarantees compliance with the currently applicable
regulations.
The mains voltage must match the voltage specifications on the washerdryer (rating plate).
The connected load and fuse required are shown on the rating plate.
Make sure that:
– the mains plug fits the socket.
– the cable cross-section is adequate.
– the earthing system is properly installed.
– the appliance is not standing on the mains cable.
– the mains plug is accessible at all times.
Changes to the mains cable may only be carried out by an electrician.
Do not use multiple plugs/adapters or extension cables.
Do not plug in or unplug the mains plug with wet hands.
Only pull the mains plug out by the plug itself.
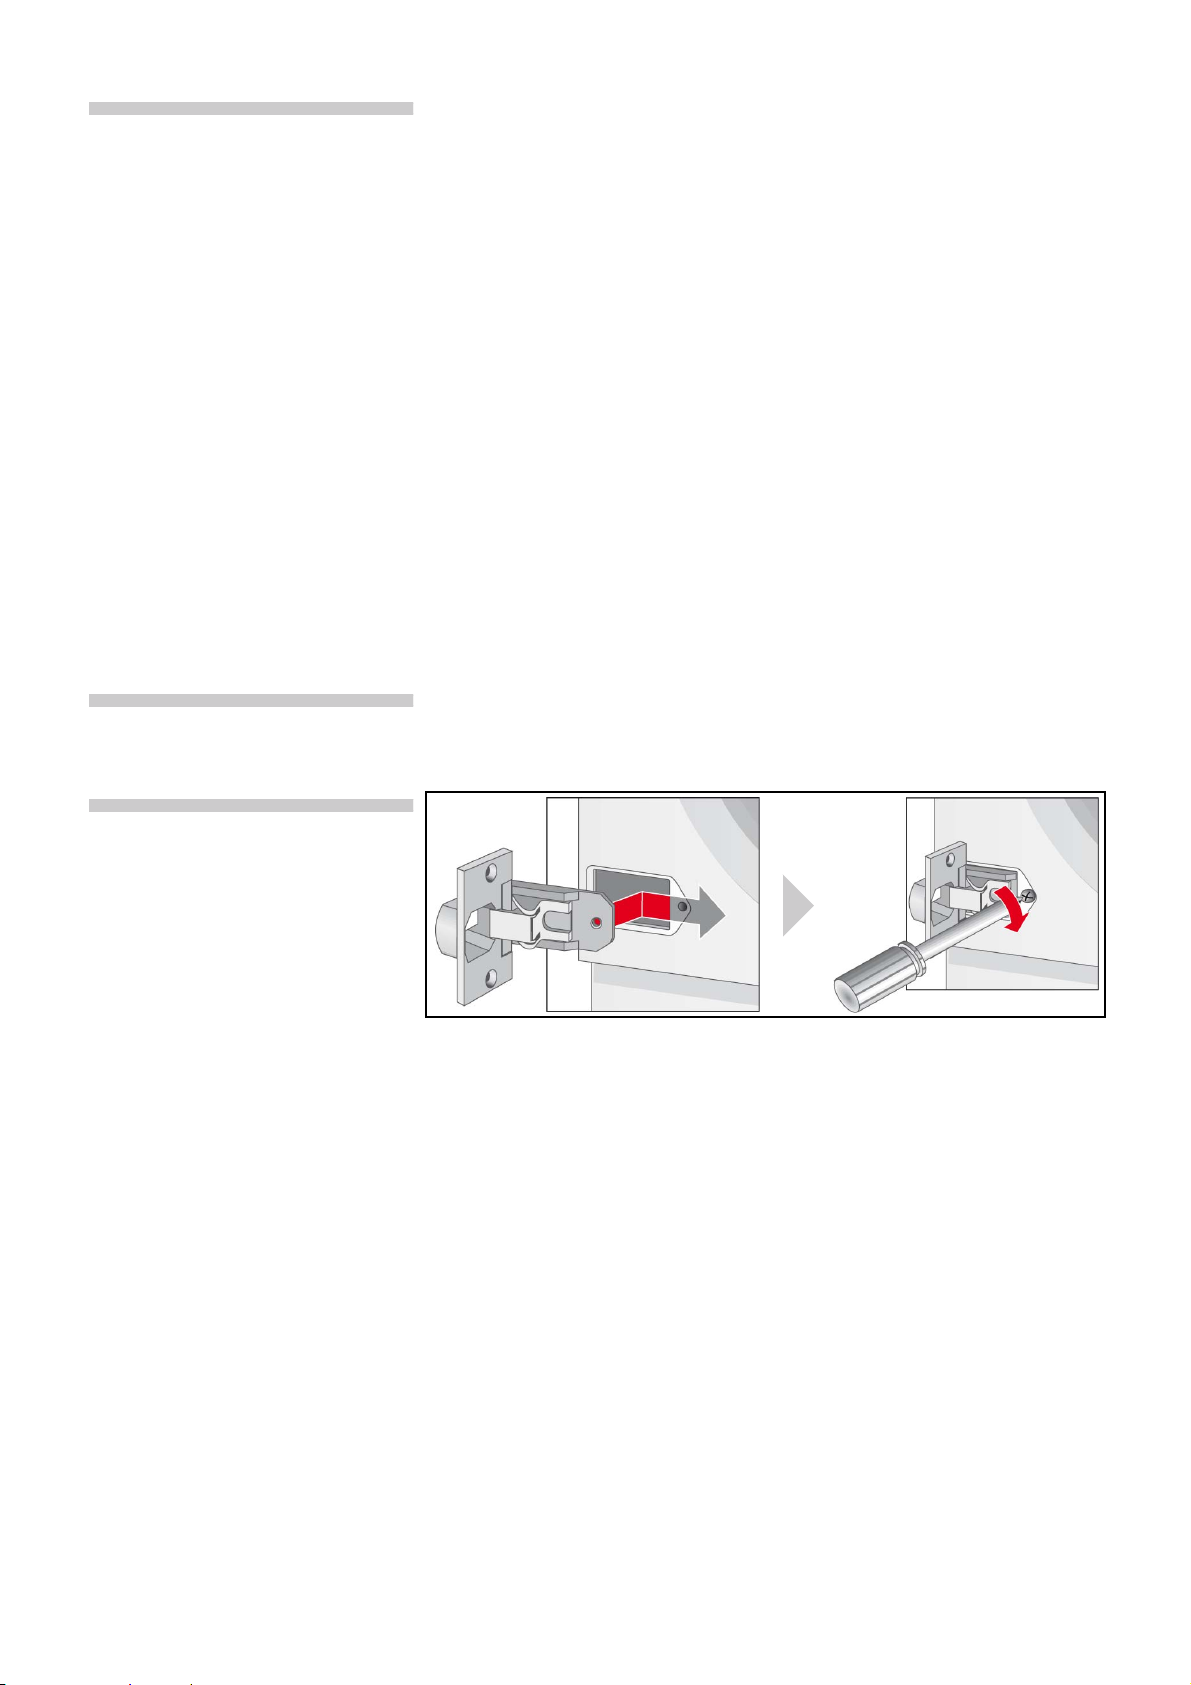
Fitting the door hinges to the washer-dryer
Once the washer-dryer has been installed in a kitchen unit, it can be
concealed with a door. If you wish to do this, you must fit the hinges
supplied to the washer-dryer.
29
Page 30
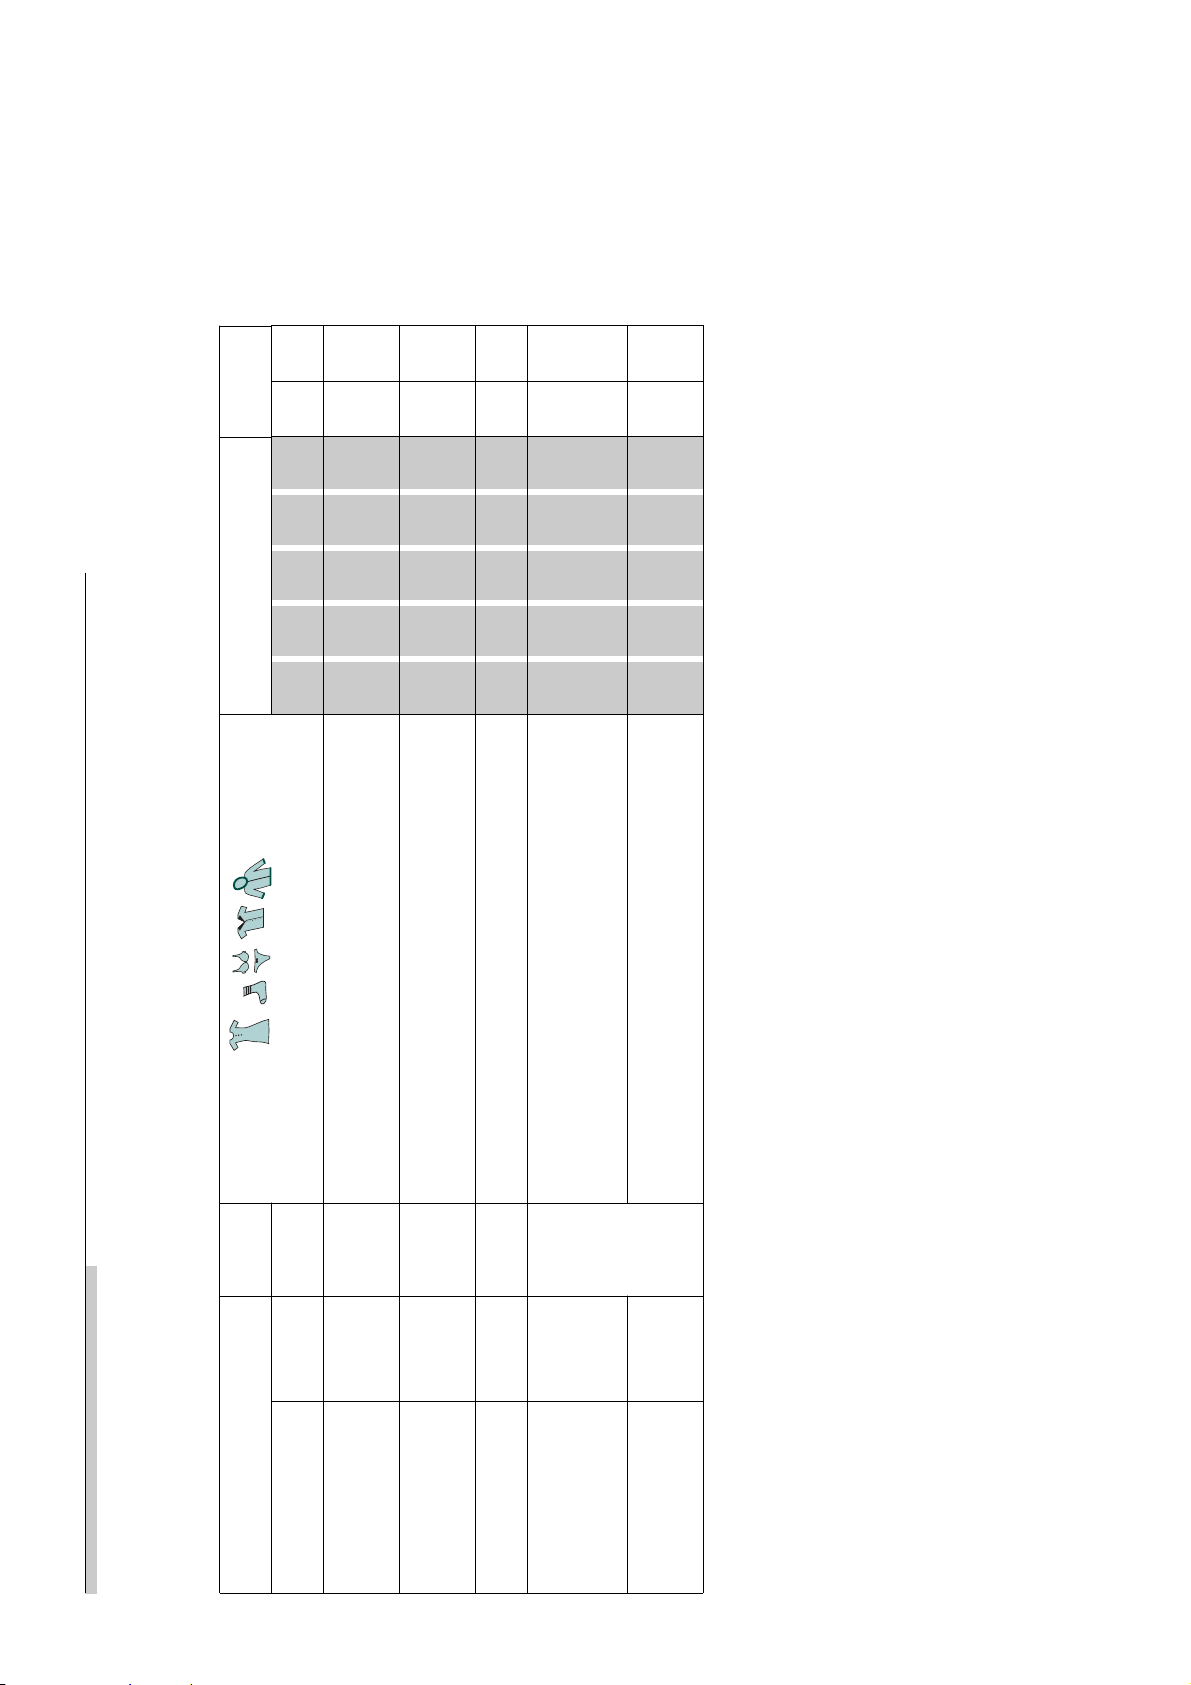
G G G G GG A
G G A G GAG
A G A G AAA
A A A A AAA
Type of laundry Options* Drying
Table of programmes
Observe the information on care labels, fabric type and load quantity.
Hard-wearing fabrics, heat-resistant fabrics made of
cotton or linen.
Easy-care fabrics made of cotton, linen, synthetic
4 kg**
30-90 7 kg/
Cottons
Programmes* °C max. ! @ Q Z R ˆ‰
ic
fibres or blended fabrics.
3.5 kg
30-40
f Easy-Care
For delicate, washable fabrics, e.g. made of silk,
satin, synthetic fibres or blended fabrics (e.g.
curtains).
2 kg
30 3 kg Fabrics made from cotton or easy-care fabrics. G G G G GAG
30
Mixed Load m
“ Delicate/Silk
made from wool or a wool blend.
cold-30 Suitable for hand or machine-washable fabrics
: Wool
*Programmes and options depend on the model
**Reduced load quantity for successive washing and drying programme
30
Page 31
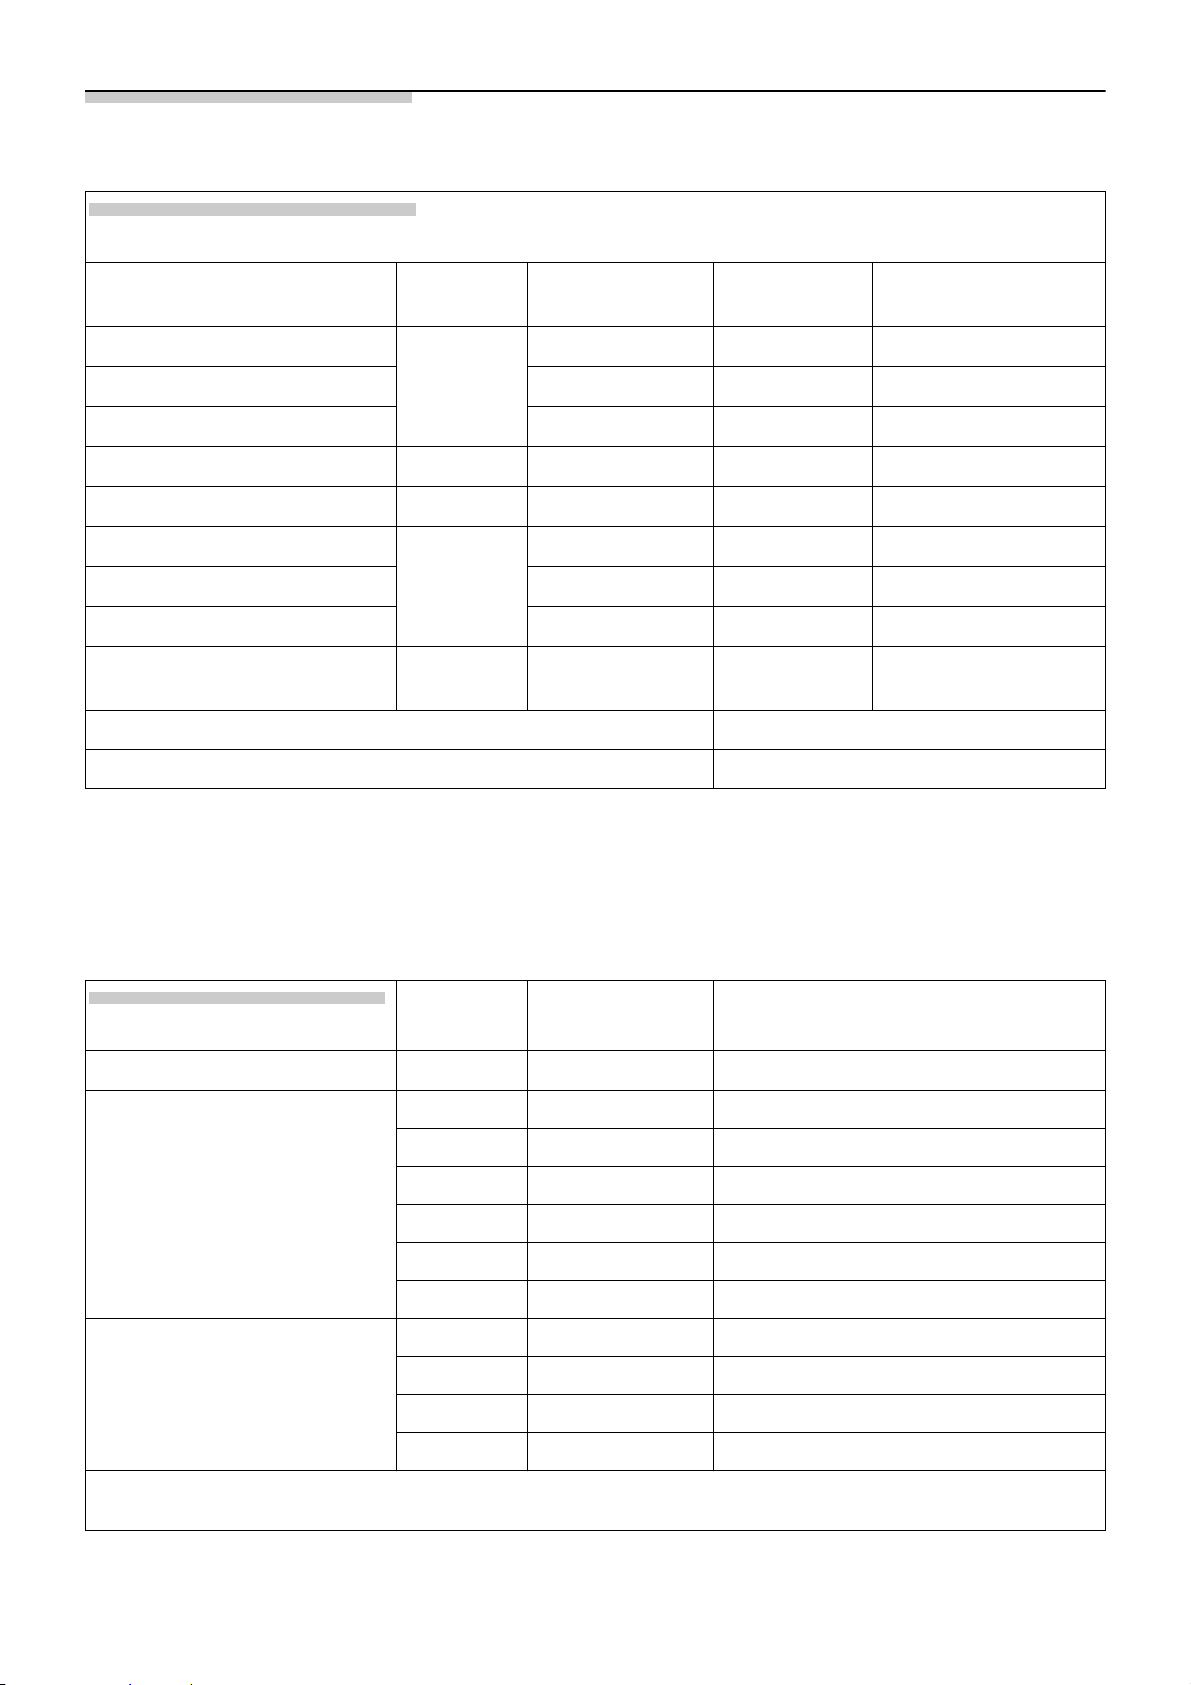
Consumption rates
Washing
Programme Load Energy*** Water*** Programme dura-
tion***
Cottons 30 °C
Cottons 40 °C
7 kg
Cottons 60 °C, @ Intensiv*
Mixed Load 30 °C
Easy-Care 40 °C
3 kg
3.5 kg
Delicate/Silk 30 °C
Wool W Ž (cold)
2 kg
Wool W 30 °C
Cottons 60 °C, @ Intensiv, inten-
sive dry 5 (2 cycles)**
Power consumption when switched off 0.20 W
Power consumption when left on 0.80 W
* Programme setting for tests according to currently valid EU standard EN60456. For comparison test, please test the programmes with specified load and maximum spin speed.
** EU energy label drying performance tests are conducted according to EN50229. Maximum washing load is divided into
2 drying cycles (4 kg - 130 min/ 3 kg - 110 min) , and each drying load is dried by using Cottons 60 °C, @ Intensiv, intensive
dry 5.
*** The values may deviate from the stated values depending on the following factors: water pressure and hardness, inlet
temperature, ambient temperature, type and amount of laundry, type and amount of detergent used, fluctuations of power
supply, and additional functions selected.
7 kg/4+3 kg
0.44kWh 62 l 1:51 h
0.83 kWh 62 l 1:51 h
1.27 kWh 52 l 2:45 h
0.30 kWh 44 l 0:49 h
0.62 kWh 45 l 1:43 h
0.20 kWh 49 l 0:36 h
0.10 kWh 49 l 0:47 h
0.20 kWh 49 l 0:47 h
5.50 kWh 99 l 7:00 h
Drying*
Programme Load Cupboard dry Iron dry
1.5 kg 90 min 60 min
2 kg 90 min 60 min
Intensive Dry 5
Gentle Dry ‰
*)The values may diverge from those specified depending on over and undervoltage, fabric type, composition of the laundry
to be dried, residual moisture in the fabric and the amount of the load.
2.5 kg 100 min 90 min
3 kg 110 min 95 min
3.5 kg 120 min 105 min
4 kg 130 min 115 min
1.5 kg 90 min 60 min
2 kg 100 min 60 min
2.5 kg 110 min 90 min
3 kg 130 min 100 min
31
Page 32

Index
Numerics
0 ................................................ 8
C
Care information
-Drying ............................. 10
-Washing ........................... 9
Care product ........................ 11
Childproof lock ..................... 18
-Display panel ................... 8
Cleaning
-Control panel .................19
-Detergent drawer .......... 19
-Drain pump .................... 20
-Drum ............................... 19
-Housing .......................... 19
-Water supply hose ....... 20
Connection fittings .............. 28
Conservation information ..... 6
Consumption rates .............. 31
Control panel .......................... 8
-Cleaning ......................... 19
D
Delicate/Silk ......................... 31
Descaling .............................. 20
Detergent .............................. 11
-Liquid detergent insert
..................................... 11, 12
Liquid detergent insert .12
Detergent drawer
-Cleaning ......................... 19
-Description ..................... 11
Dimensions ........................... 27
Display
-Fault message .............. 21
Door ................................... 7, 18
Door hinges .......................... 29
Drain ....................................... 14
Drain pump
-Cleaning ......................... 20
Draining the water ............... 20
Draining water ...................... 18
Drum
-Cleaning ......................... 19
Drying ............................... 15, 17
-Button ................................ 8
-Display panel ................... 8
-Options ........................... 15
-Synthetics ....................... 10
-Woollens ......................... 10
Drying programmes ............ 13
E
Electrical connection ........... 29
Emergency release ............. 23
End of the programme ....... 18
Energy .................................... 31
Environment
-Energy consumption .... 10
-Protection ......................... 6
F
Fabric softener compartment
insert ....................................... 19
Fault message ...................... 21
Faults ...................................... 21
Filter
-Water supply hose ....... 20
Final spin
-Display panel ................... 8
Finished in
-Button ................................ 8
Finished in button .................. 8
First wash ................................ 9
Fluff-removal cycle
-Display panel ................... 8
H
Hazard warnings
-Detergent ........................ 11
Housing
-Cleaning ......................... 19
I
Included with the appliance
..................................................25
Installation surface ...............25
L
Laundry
-Creasing ..........................10
-Loading ...........................10
-Preparing for drying ......10
-Preparing for washing ..10
-Sorting for drying ..........10
-Sorting for washing .........9
Levelling .................................27
-Washer-dryer ..................26
Liquid detergent insert ........11
M
Main wash
-Display panel ...................8
O
Option .....................................15
Options .....................................8
-Button ................................8
-Drying options ...............15
-Washing options ...........15
P
Positioning
-Washer-dryer ..................26
Pre-wash
-Display panel ...................8
-Programme .....................15
Programme
-Cancelling .......................16
-Changing ........................16
-Pausing ...........................16
32
Page 33

-Progress ......................... 16
Programme selector ....... 8, 13
Programme start
-Display panel ................... 8
R
Remedial action ................... 21
Rinse
-Display panel ................... 8
Rinse hold ....................... 15, 18
S
Safety information 4, 19, 21, 25
Set .......................................... 15
-Button ............................... 8
Signal
-Indicator lamp ................. 8
Special programmes .......... 14
Spin ........................................ 14
Spin speed ............................ 15
-Button ............................... 8
-Indicator lamp ................. 8
Start/Pause ............................. 8
Positioning and levelling ..
........................................... 26
Washing ................................. 17
and drying ....................... 17
-Washing options ........... 15
Washing options
-Indicator lamp ................. 8
Washing programmes ........ 13
Water ...................................... 31
Water drainage ..................... 28
Water supply ......................... 28
Water supply hose
-Cleaning ......................... 20
WEEE ....................................... 6
Wool ....................................... 31
T
Time-controlled drying
-Drying options ............... 15
Transport safety bolts ......... 26
U
Unbalanced load detection
system ................................... 15
Use ......................................... 17
W
Washer-dryer
33
Page 34

Page 35

Page 36

Robert Bosch Hausgeräte GmbH
Carl-Wery-Straße 34
81739 München
DEUTSCHLAND
WKD28351GC
09.2016
8001062014
19291032100
 Loading...