

Page 1
en-us Use and Care Manual, Installation Instructions
Washer
WAW285H2UC
Page 2

Welcome to Your New Washer!
Congratulations on your selection of a new Bosch washer
for your laundry needs. We are confident you will enjoy the
superior performance and reliability.
Please do not hesitate to contact our Customer Service
department if you have any questions or comments with
your new washer.
Thank you for choosing Bosch.
Visit our website at www.bosch-home.com/us for more
information and to view a selection of our products.
2
Page 3

Table of contents
en-us Use and Care Manual, Installation Instructions
Important information ................................................... 4
Purchase information ........................................................... 4
Customer service ................................................................. 5
Your washing machine is intended for ........................ 6
Safety Definitions .......................................................... 6
IMPORTANT SAFETY INSTRUCTIONS ........................ 7
Introduction to your new washer ................................. 9
Standard features and helpful information ...................... 9
Special features .................................................................... 9
Environmentally friendly use of your washer ................... 9
Dimensions and clearances required ........................ 10
Appliance dimensions ...................................................... 10
Length of power cord and water supply hoses ........... 10
Installation types ................................................................ 10
Installation instructions .............................................. 12
Introduction ......................................................................... 12
Tools needed ..................................................................... 12
Waste disposal .................................................................. 12
Parts provided with your washer .................................... 13
Set up on a pedestal with drawer .................................. 13
Installation checklist .......................................................... 14
Importance of installing on a solid, level floor ............. 14
Remove the transport bolts ............................................. 14
Water connections ............................................................ 15
Leveling the washer .......................................................... 17
Electrical connection ........................................................ 18
Transporting the washer .................................................. 19
Getting to know your appliance ................................. 20
Control panel ...................................................................... 20
Display area ....................................................................... 21
Operating Instructions ................................................ 23
Before using the washer for the first time .................... 23
Before loading your first load of laundry ...................... 23
Using the program selector to choose a wash
program ............................................................................... 23
Selecting optional program settings .............................. 23
Loading the laundry .......................................................... 23
Filling the detergent and additives compartments ..... 24
Starting the program ......................................................... 25
Selecting a different program ......................................... 25
Pausing/Adding a garment to the cycle ....................... 25
Cancel program ................................................................. 25
Program end ...................................................................... 25
Removing laundry/switching the appliance off ........... 26
Home Connect............................................................. 27
Connecting to your home network automatically ....... 27
Connecting to your home network manually ............... 28
Connecting to the Home Connect app ......................... 28
Activating/deactivating Wi-Fi ........................................... 29
Resetting your network settings ..................................... 29
Updating the software ...................................................... 30
Information on data protection ....................................... 30
Declaration of Conformity ................................................ 30
Wi-Fi® Module FCC/IC Statements ............................... 30
Laundry ........................................................................ 31
Preparing the laundry ....................................................... 31
Sorting the laundry ............................................................ 31
Identifying and treating stains ......................................... 32
Laundry detergents and additives ............................. 33
Adding the correct amount of HE detergent ............... 33
Program selection table ............................................. 34
Starching ............................................................................. 35
Dyeing/bleaching .............................................................. 35
Soaking ............................................................................... 35
Optional program settings ......................................... 36
EcoPerfect .......................................................................... 36
Prewash .............................................................................. 36
Rinse Plus ........................................................................... 36
Remote Start ...................................................................... 36
Finish in ............................................................................... 36
Spin Speed ......................................................................... 36
Temperature ....................................................................... 36
SpeedPerfect ..................................................................... 36
Stains ................................................................................... 36
Appliance settings ...................................................... 37
Child lock ............................................................................ 37
Activating setting mode ................................................... 37
Exiting setting mode ......................................................... 37
Cleaning and maintenance ......................................... 38
Cleaning the housing and control panel ...................... 38
Cleaning the drum ............................................................ 38
Descaling the washer ....................................................... 38
Cleaning the detergent dispenser tray ......................... 38
Cleaning the water inlet strainers .................................. 38
Cleaning the drain pump ................................................. 39
Troubleshooting .......................................................... 41
Emergency door lock release ........................................ 41
General Troubleshooting ................................................. 41
Information on the display area ...................................... 44
STATEMENT OF LIMITED PRODUCT WARRANTY .. 45
Bosch Clothes Washer .................................................... 45
3
Page 4
Additional information on products, accessories, replacement parts and services can be found at www.bosch-home.com/us and in the online shop www.bosch-home.com/us/store
4XHVWLRQV"
ZZZERVFKKRPHFRPXV
0DLQ6WUHHW6XLWH
,UYLQH&$
:HORRNIRUZDUGWRKHDULQJIURP\RX
Important information
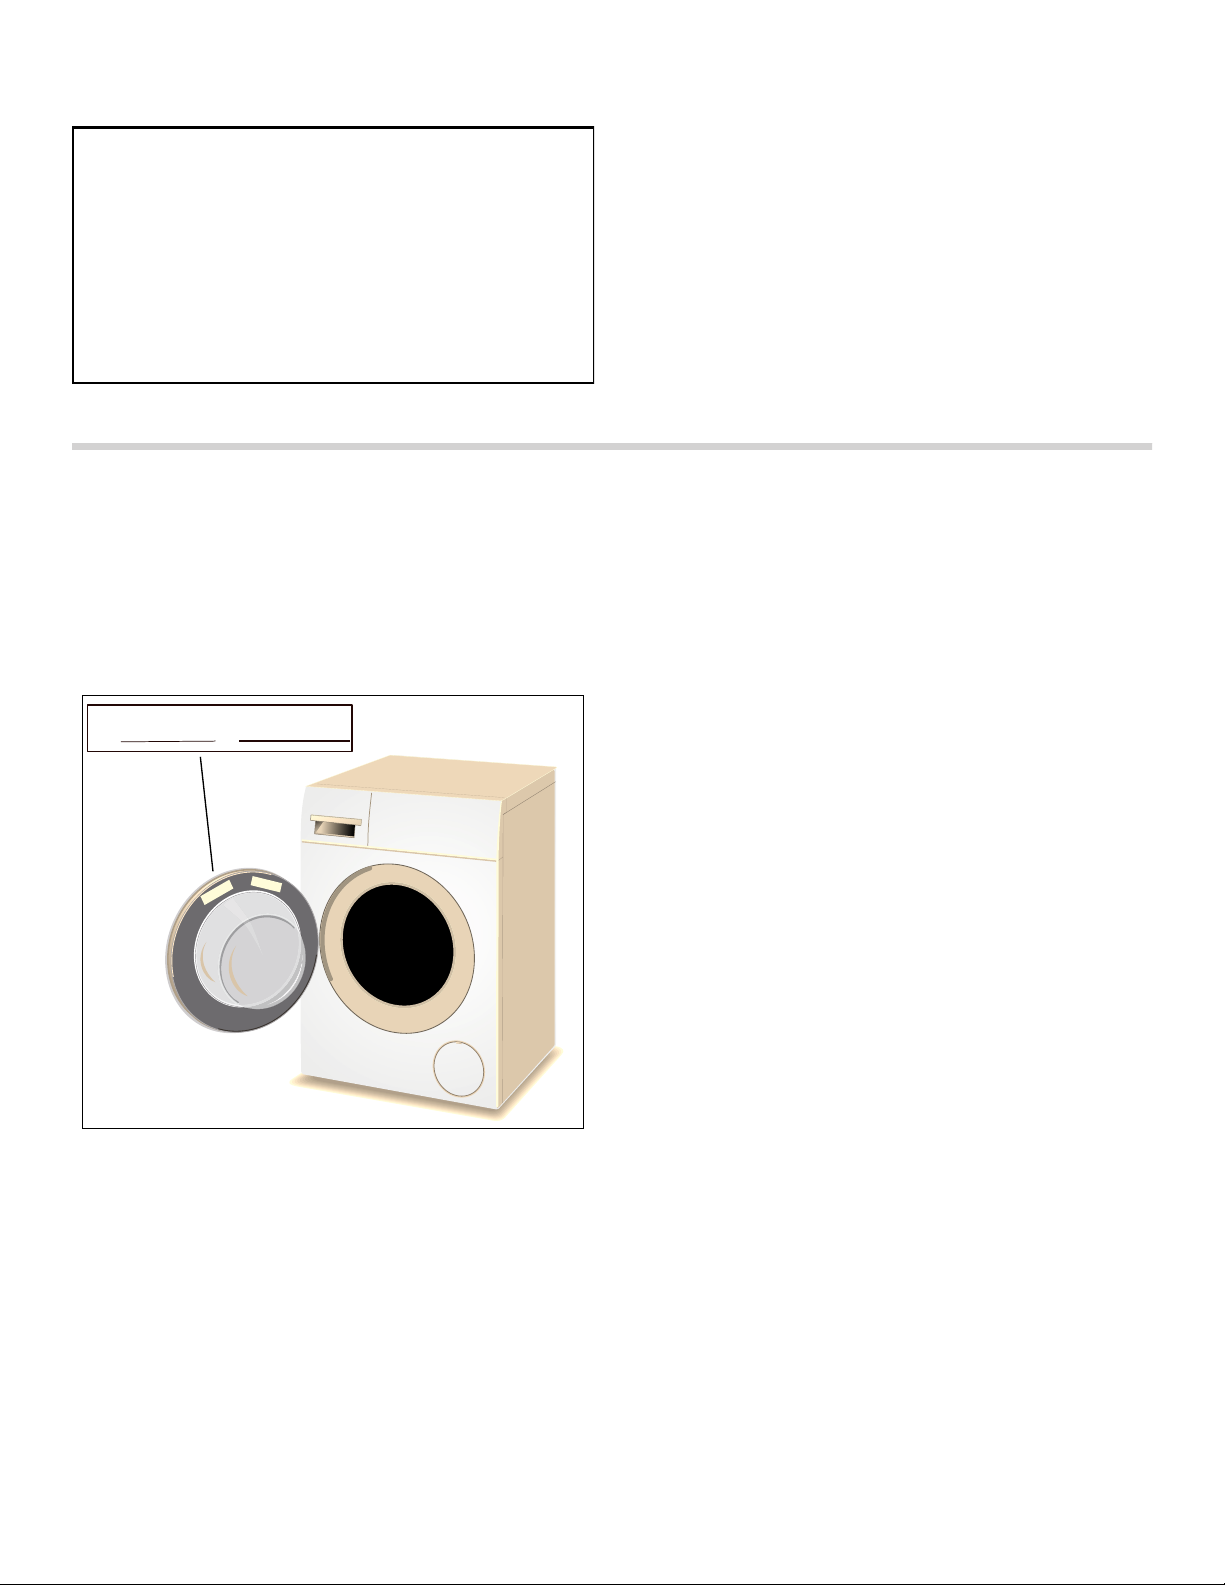
Purchase information
Please take a moment to record the following basic information about your new Bosch washer.
This information will be helpful in the event you need to contact Customer Service or would like to order accessories or replacement parts.
(1U )'
The E-Nr. (model number) and the FD (serial) number are found on the rating plate label.
see illustration
The model number includes the slash and a two digit number (e.g. "/27"). Please be sure to include the final 2 digit number when filling in your model number. This helps make sure any parts you may need are correctly matched to your specific machine.
Date of Purchase:___/___/_____
Where Purchased:___________________________
E-Nr. :_________/____ (ex: WAW285H2UC/01)
FD :_______-_______ (ex: 9709|90007)
The manufacturer reserves the right to make changes in the product or manual without notification.
4
Page 5

Customer service
Your washer does not require any special care other than the maintenance and care mentioned in this manual. If you have a problem with your washer, please consult.
~ Troubleshooting; Page 41
This may save you money. If a technician comes out to advise you of information that is in the Troubleshooting table you may be charged.
If problems persist and service becomes necessary, contact your dealer, installer or an authorized service center. Do not attempt to repair the appliance yourself. Any work performed by unauthorized personnel may void the warranty.
If you are having a problem with your washing machine and are not pleased with the service you have received, please follow these steps:
1.
Contact your installer or the Authorized Service Provider in your area and explain to them why you are not satisfied. This will usually correct the problem.
2.
If after working with your installer or service technician
the problem still has not been resolved to your
satisfaction, please let us know either by writing to us
at:
BSH Home Appliances Corporation
1901 Main Street, Suite 600
Irvine, CA 92614
or calling us at:
1-800-944-2904
When writing or calling please have the following information available:
▯ E-Nr. (model number, example: WAW285H2UC/01)
▯ FD (serial number, example: 9709|90007)
▯ Date of Original Purchase (receipt required)
▯ Date Problem Occurred
▯ Explanation of Problem
If writing, please also include a daytime telephone number and a copy of the sales invoice.
When calling Customer Service, please be ready to provide the model number E-Nr. and FD serial number. This information will help provide the best support for your washer.
Additional information is available at our website.
www.bosch-home.com/us
5
Page 6

Your washing machine is intended for
▯ Only household use and in a non-commercial
environment.
▯ Use with machine washable textiles only.
▯ Washing with common cold and hot (maximum
140 °F/60 °C) tap water and commercially available
detergents and cleaning products suitable for use in
washing machines.
▯ We recommend HE (High Efficiency) detergents
because they are designed to deliver optimum
performance from your front-loading washer. Not
using HE detergent could cause problems such as
oversudsing, extended cycle periods, or a decrease
in wash performance.
NOTICE: Do not use chlorine bleach! ~ Operating Instructions; Page 23
Safety Definitions
Important safety information is contained in this manual and on the warning labels located on your washer.
Standard symbols and headings are used to identify areas where you should take precautions to avoid injury or damage. Please take a moment to become familiar with each of these symbols and what they mean before proceeding.
▯ When measuring all detergents/stain removers/
laundry care products be sure to follow the
manufacturer's instructions.
▯ Children must not do any laundry without supervision.
▯ Keep pets away from the washer.
▯ Set-up conditions:
Ambient temperature: 32-104 °F/0-40 °C
Relative humidity: under 95%
▯ Installation by qualified installers.
▯ Installation in accordance with all regulatory
requirements; if in doubt have the appliance installed
by a specialist familiar with these requirements.
Read the use and installation instructions and all other information included with the washer and act accordingly.
Keep all documents for future use.
9 WARNING
This indicates that death or serious injuries may
occur as a result of non-observance of this warning.
9 CAUTION
This indicates that minor or moderate injuries may
occur as a result of non-observance of this warning.
NOTICE: This indicates that damage to the appliance or property may occur as a result of non-observance of this warning.
Tip: This symbol is used to draw the user's attention to important matters.
6
Page 7

9 IMPORTANT SAFETY INSTRUCTIONS
READ AND SAVE THESE INSTRUCTIONS
IMPORTANT SAFETY I NST RUCT I ONSREAD AND SAVE THESE INSTRUCTIONS
WARNING
When properly cared for, your new appliance has been
designed to be safe and reliable. Read all instructions
carefully before use. These precautions will reduce the
risk of burns, electric shock, fire, and injury to persons.
When using appliances, basic safety precautions must
be followed, including those in the following pages.
Examine the appliance after unpacking it. In the event of
transport damage, do not plug it in.
WARNING
TO REDUCE THE RISK OF FIRE, ELECTRIC SHOCK,
SERIOUS INJURY OR DEATH WHEN USING YOUR
WASHING MACHINE, FOLLOW BASIC PRECAUTIONS
INCLUDING THE FOLLOWING
▯ Bosch washers are provided with an Use and Care and
Installation Instruction manual. Read and understand
all instructions before using the washing machine.
▯ Do not wash articles that have been previously
cleaned, washed, soaked, or spotted with gasoline, dry
cleaning solvents, other flammable or explosive
substances as they give off vapors that could ignite or
explode.
▯ Do not add gasoline, dry cleaning solvents, or other
flammable or explosive substances to the wash water.
These substances give off vapors that could ignite or
explode.
▯ Under certain conditions hydrogen gas may be
produced in a hot water system that has not been used
for 2 weeks or more. HYDROGEN GAS IS EXPLOSIVE.
If the hot water system has not been used for this
length of time, turn on all hot water faucets and let the
water flow out of each faucet for several minutes before
using the washing machine. This will release any
accumulated hydrogen gas. As the gas is flammable,
do not smoke or use an open flame while carrying out
this procedure.
▯ Before the appliance is removed from service or
discarded, remove the door to prevent children from
playing or hiding inside. Also remove the power cord/
plug.
▯ Do not allow anyone to climb, lean or hang on any part
of the washer including any protruding components
such as the appliance door or a pullout shelf.
▯ Use caution when draining hot water from the washer
drum such as during pump maintenance or when using
the emergency door open procedure.
▯ Do not reach into the appliance if the wash drum is
moving.
▯ Do not tamper with the controls.
▯ Do not repair or replace any part of the appliance or
attempt any service unless specifically recommended
in the user manual or in Bosch published user repair
instructions that you understand and have the skills to
carry out.
▯ Always unplug the washing machine from the power
supply before attempting any service. Disconnect the
power cord by grasping the plug, not the cord.
▯ Do not machine wash fiberglass materials (such as
curtains and window coverings that use fiberglass
materials). Small particles may remain in the washing
machine and stick to fabrics in subsequent wash loads
causing skin irritation.
▯ Do not install or store the washer where it will be
exposed to the weather. Hoses and internal parts may
be damaged if exposed to freezing temperatures.
▯ Do not use the washing machine if it has a worn power
cord or loose plug.
▯ The washing machine must only be used for its
intended purpose.
▯ Always follow the fabric care instructions
recommended by the clothing manufacturer.
▯ Make sure all water connections to the washing
machine have shut-off valves that are readily
accessible during normal operation of the washer. Turn
off both valves during periods in which the washer is
not in use and before leaving for extended periods
such as vacations to reduce the risk of water damage
in the event of a leak. Turn the valves back on prior to
resuming use of the washer.
▯ Do not operate the washing machine if parts are
missing or broken.
▯ Do not operate the washing machine until you are sure
that:
▯ the washing machine has been installed according
to the Installation Instructions.
▯ all water, drain, power and grounding connections
are in compliance with all local regulations and/or
other applicable regulations and requirements.
▯ Certain internal parts are intentionally not grounded
and may present a risk of electric shock during
servicing. Service Personnel – DO NOT CONTACT the
following parts while the appliance is energized: inlet
valves, drain pump, heat sink of the motor controller,
PCBs.
▯ See the installation instructions in this manual for
grounding requirements.
~ Electrical connection; Page 18
7
Page 8

9 IMPORTANT SAFETY INSTRUCTIONS
READ AND SAVE THESE INSTRUCTIONS
IMPORTANT SAFETY I NST RUCT I ONSREAD AND SAVE THESE INSTRUCTIONS
WARNING
WARNINGS FOR CHILDREN
▯ Do not allow children to play on or in the appliance.
Close supervision of children is necessary when the
appliance is used near children.
▯ Make sure to utilize all child lock/safety features of your
appliance, and be sure to turn the appliance Off when
not in use.
▯ Appliances are not intended for use by children,
however when children become old enough to operate
the appliance, it is the responsibility of the parents or
legal guardians to ensure they are instructed in safe
practices by qualified persons.
▯ Keep all laundry aids (including detergents, bleach,
fabric softener, etc.) out of the reach of children.
WARNING
STATE OF CALIFORNIA PROPOSITION 65 WARNINGS
This product can expose you to chemicals including vinyl
chloride, which is known to the State of California to
cause cancer and birth defects or other reproductive
harm. For more information go to
www.p65warnings.ca.gov
SAVE THESE INSTRUCTIONS!
Keep these instructions for future reference and in case
of change of ownership, manual should be conveyed
with the washer.
8
Page 9

Introduction to your new washer
9 WARNING
RISK OF FIRE, ELECTRIC SHOCK OR INJURY
To reduce the risk of fire, electric shock or injury to
persons, read the IMPORTANT SAFETY
INSTRUCTIONS of this manual before installing or
operating this appliance.
~ IMPORTANT SAFETY INSTRUCTIONS; Page 7
Standard features and helpful information
Thank you for choosing Bosch for your laundry appliance needs.
Please read and follow the use and care, important safety instructions and troubleshooting information contained in this manual. Please retain this manual for future reference.
Standard features
▯ 17.6 lb (8 kg) large drum capacity (for regular cotton
loads).
▯ Low washing and spinning noise levels.
▯ Large door opening featuring 180º opening angle.
Quality tested
Every Bosch washer is thoroughly tested before leaving
the factory. As a result, a small amount of residual water
may remain in the washer drum. We recommend running
the Drum Clean cycle to remove this water prior to
washing your first load of laundry.
~ Before loading your first load of laundry; Page 23
Website
Visit our website at www.bosch-home.com/us for more information and to view a selection of our products.
About this manual
These operating and installation instructions may apply to more than one model of washer. Illustrations used may show details that differ from your particular model.
Read your user manual. It contains valuable information about safety, installation and operation of your new appliance.
This can save you time, make it easier to correctly install and use your washer, and improve your overall satisfaction with your new appliance.
Special features
▯ Load adjust matches the water and power
consumption to each program according to the
amount of laundry sensed in the drum and the type of
fabric.
The load adjust function runs automatically to keep
energy and water consumption as low as possible.
The water level sensor ensures the water level is
correct for the laundry and the program selected.
▯ The automatic unbalanced load detection system
spins the laundry several times to ensure even
distribution.
If the laundry is not evenly distributed, the spin speed
is reduced, or the laundry may not be spun for
reasons of safety.
In the Wool program, the spin cycle is attempted only
twice in order to prevent felting.
Environmentally friendly use of your washer
Your new Bosch washing machine is designed to use water, energy and detergent in a highly efficient way to help reduce operating costs, conserve resources and protect the environment.
▯ Utilize the maximum amount of laundry for the
appropriate program.
▯ Avoid using too much detergent.
▯ Wash normally soiled laundry without a prewash.
▯ Save energy and detergent when washing lightly and
normally soiled laundry.
▯ Information about the energy consumption:
The display provides information about the relative
energy consumption in the selected program.
The more indicator lamps light up, the higher the
program's consumption.
This enables you to compare the consumption levels
of the different programs when choosing your program
settings and to decide on an energy- and water-saving
program setting for the selected program.
▯ Energy-saving mode: The display panel lighting goes
out after a few minutes and Start/Pause flashes. To
activate the display, press any button.
Energy-saving mode is not activated if a program is
running.
If Wi-Fi is activated the appliance will not automatically
switch off (automatic switch-off function is
deactivated).
▯ If the laundry will be dried in a dryer afterwards, select
spin speed according to the dryer manufacturer’s
instruction.
9
Page 10
Dimensions and clearances required
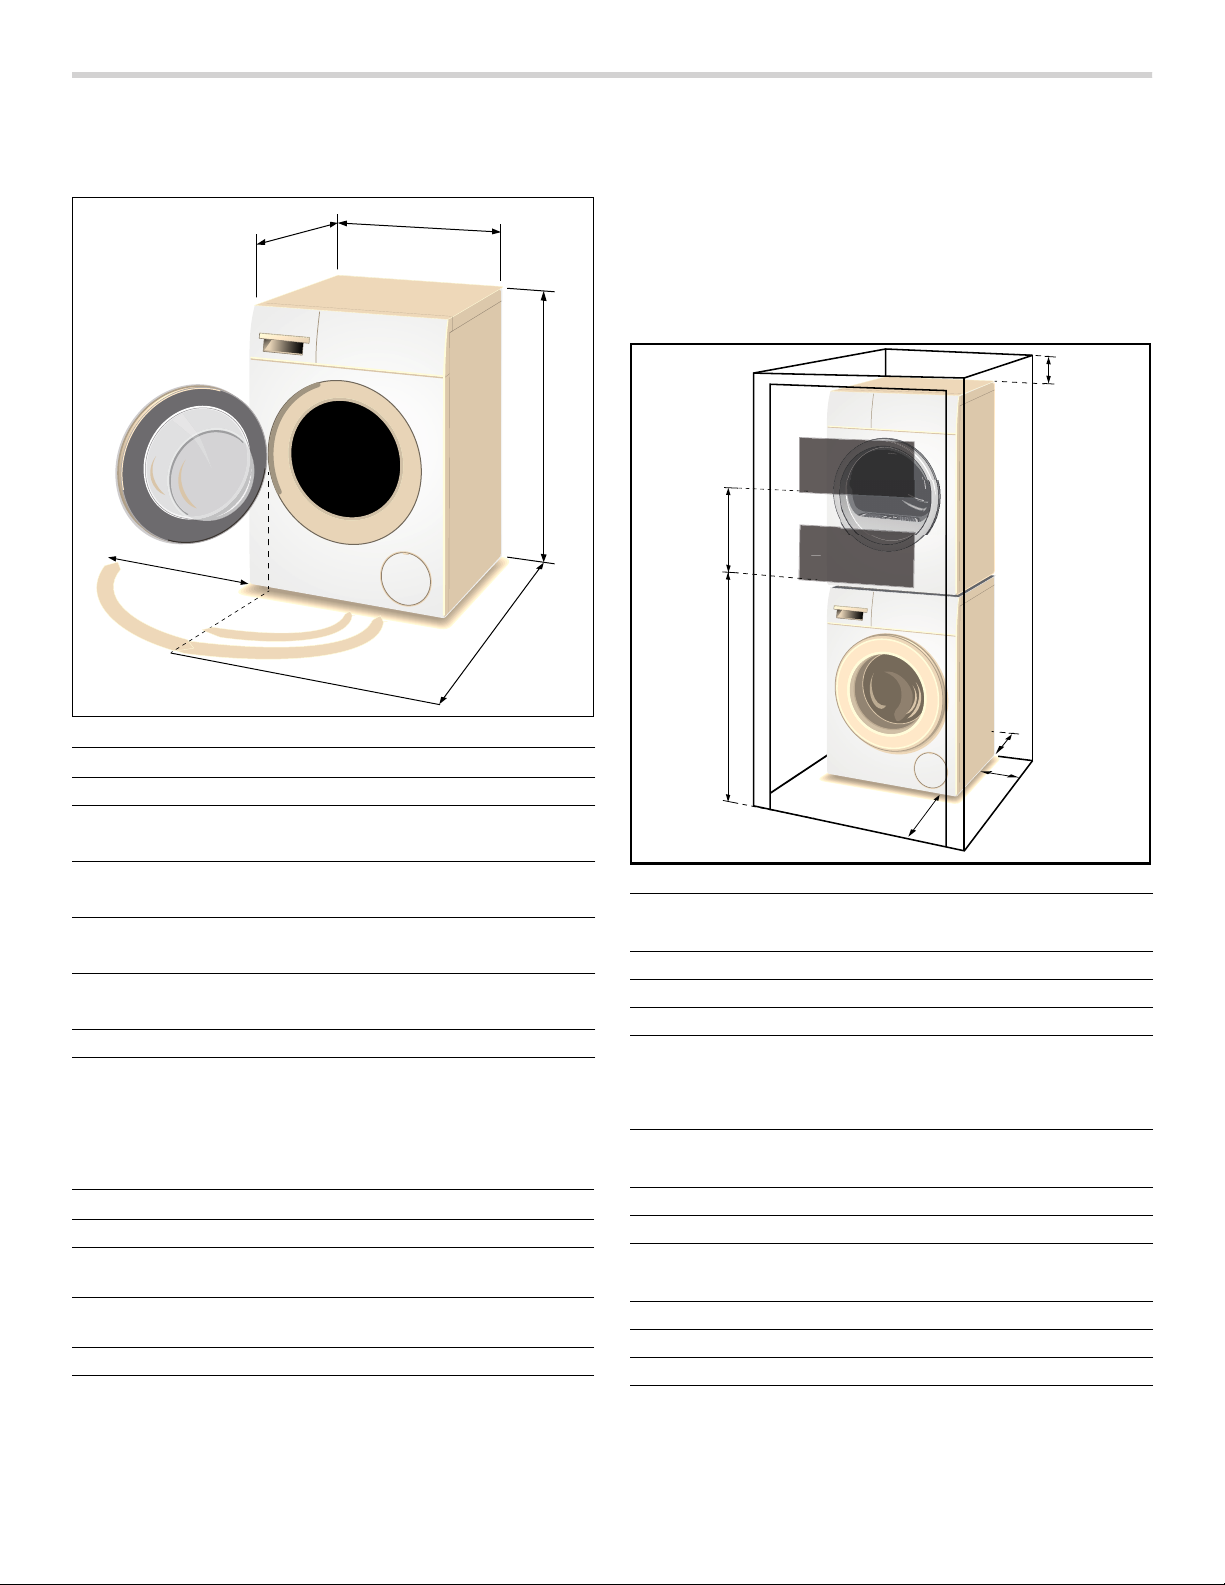
Appliance dimensions
E
D
F
G
Label Dimension U.S. Metric
a width 23.6 in. 60 cm
b depth
(to front of door)
c height (minimum*)
height (maximum*)
d side clearance
(door open 180°)
e depth
(door open 90°)
Weight approximate gross 164 lbs. 77.2 kg
* height of appliance depends on the extension of the
height adjustable appliance feet.
H
25 in. 64 cm
33.2 in.
33.8 in.
15.8 in. 40 cm
42.5 in. 108 cm
85 cm
86 cm
Length of power cord and water supply hoses
To left of washer* To right of washer*
U.S. Metric U.S. Metric
Electric power
cord
Water supply
hoses
Drain Hose 27 in. 69 cm 46 in. 117 cm
* All distances are measured from indicated side when
facing front of washer.
40 in. 100 cm 55 in. 140 cm
43 in. 109 cm 28 in. 71 cm
Installation types
Stacked washer and dryer
A Bosch dryer of the same dimensions can be placed on top of the washer to save space.
Use the special washer-dryer stacking kits (noted in Bosch Dryer User Manuals) which can be purchased from customer service or your local dealer.
%
(
+
)
*
&
$
'
Clearance requirements (Minimum)
A Both Sides 0.6 in. 1.5 cm
B Top 6.3 in. 16 cm
C Rear* 2.5 in. 6.4 cm
D Front 2.4 in. 6.1 cm
* Rear clearance as close to wall as venting or water
connection will allow. For a stacked installation arrangement a greater rear clearance for the dryer venting is
required.
Ventilation area (Minimum)
E Top 63 sq. in. 404 sq. cm
F Bottom 63 sq. in. 404 sq. cm
Vent spacing (actual not minimum dimensions)
G 37 in. 94 cm
H 26 in. 66 cm
J 3 in. 7.6 cm
K 29 in. 73 cm
10
Page 11
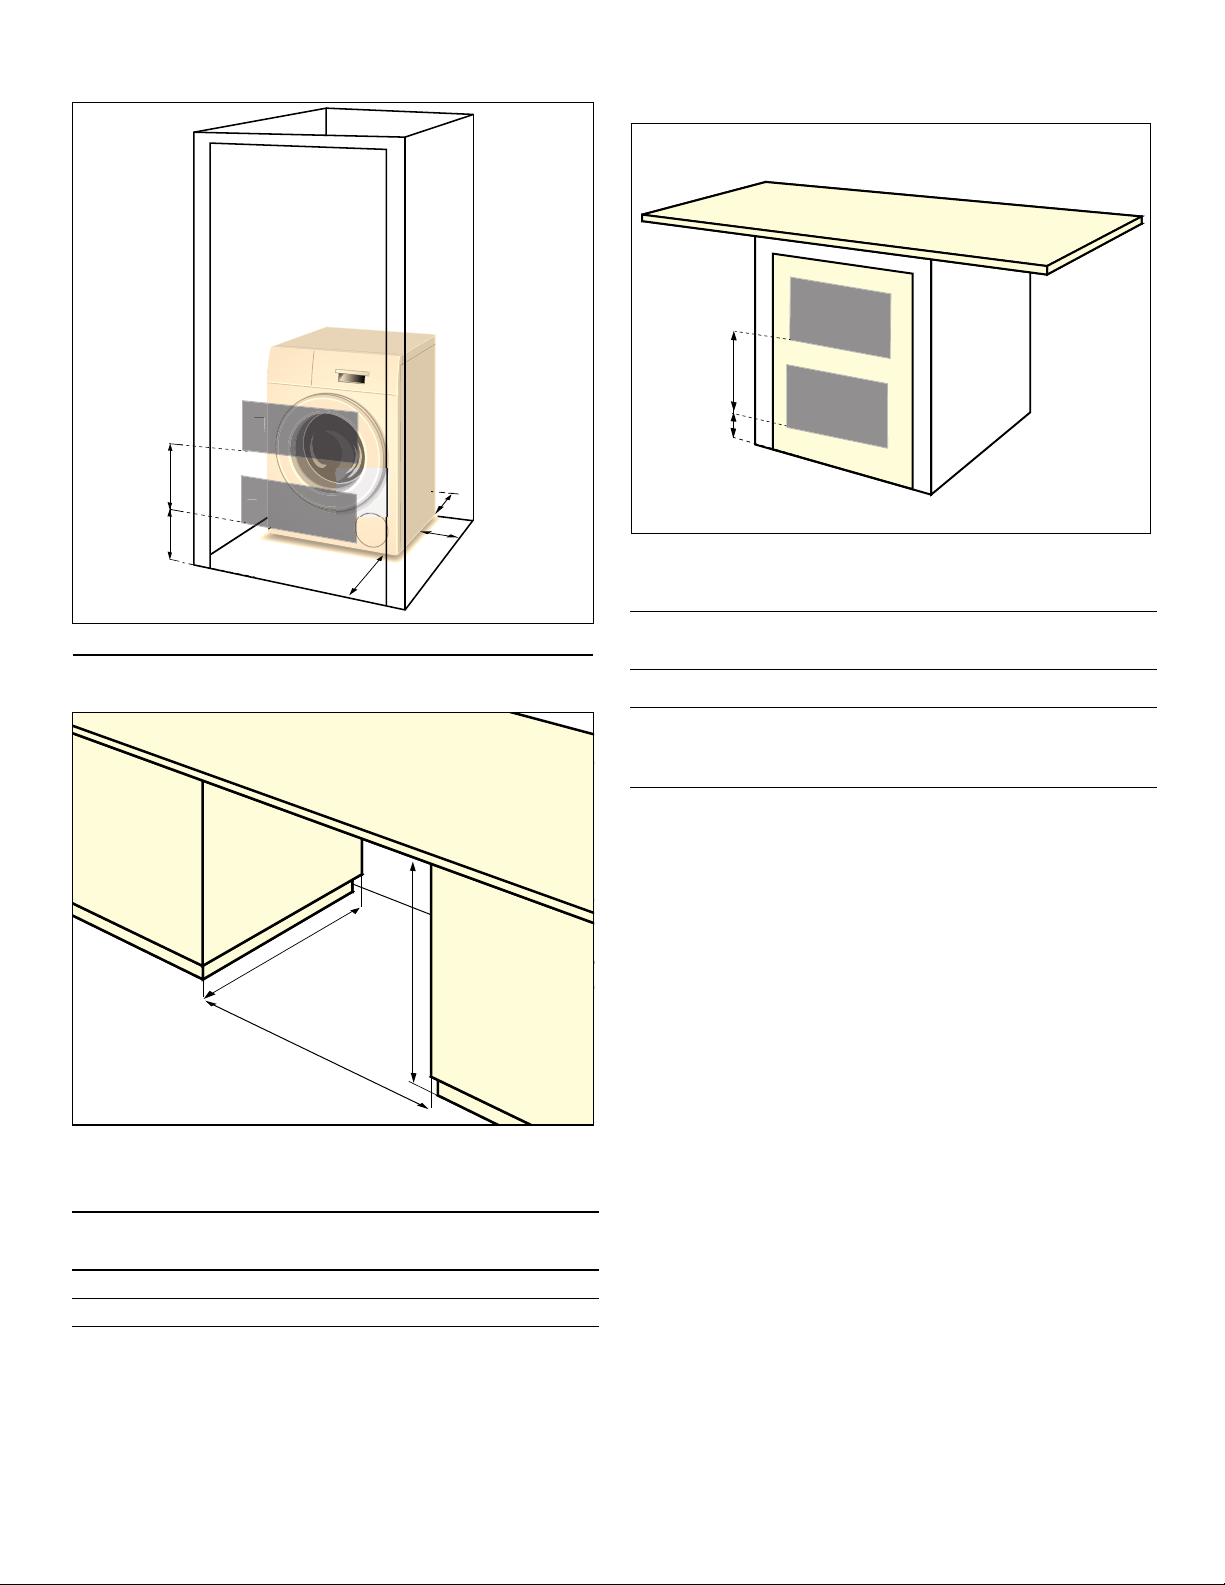
Stand alone (shown) or Side-by-Side
Under counter (Less Desirable)
(
+
(
.
-
Under counter (Preferred)
)
$
*
)
&
$
'
If front of the appliance is covered ventilation openings must be installed.
E & F are minimum area sizes
E 63 sq.in. 404 sq.cm
F 63 sq.in. 404 sq.cm
G & H actual spacing dimensions for min. open area
sizes
G 3 in. 7.6 cm
H 14 in. 35.6 cm
&
%
Front of the appliance fully open.
No doors or coverings.
Minimum opening dimensions
A 28 in. 71.1 cm
B 23.8 in. 60.5 cm
C 35.5 in. 90.2 cm
11
Page 12
Installation instructions
9 WARNING
RISK OF FIRE, ELECTRICAL SHOCK OR INJURY TO PERSONS
To reduce the risk of fire, electric shock or injury to
persons, read the Important Safety Instructions at
the front of this manual before installing or operating
this appliance.
9 CAUTION
WASHING MACHINE IS HEAVY
Use additional help and care when lifting and
positioning.
Introduction
Read these installation instructions completely and
carefully before starting to install your new washing
machine. The information contained can save you time
and effort and will help to ensure optimum performance
of your new washer. Be sure to observe all warnings and
cautions.
NOTICES
▯ Frozen hoses can tear or burst. Do not install the
washing machine outdoors or in an area exposed to
freezing conditions.
▯ If the washing machine is located in a room which will
be exposed to temperatures below freezing, or if it is
located in a cabin that is being shut down for the
winter, any residual water in the pump or water inlet
hose(s) must be drained.
▯ Take care not to damage the washing machine. Do
not hold on to protruding parts (e.g. door) when lifting.
Do not push against the appliance door glass due to
risk of damage.
▯ In addition to the safety information listed here, the
local water and electric authorities may have special
requirements that must be followed.
▯ If in doubt, have the appliance installed by an
authorized technician.
▯ Hidden surfaces may have sharp edges. During
service use caution when reaching inside the washer
housing.
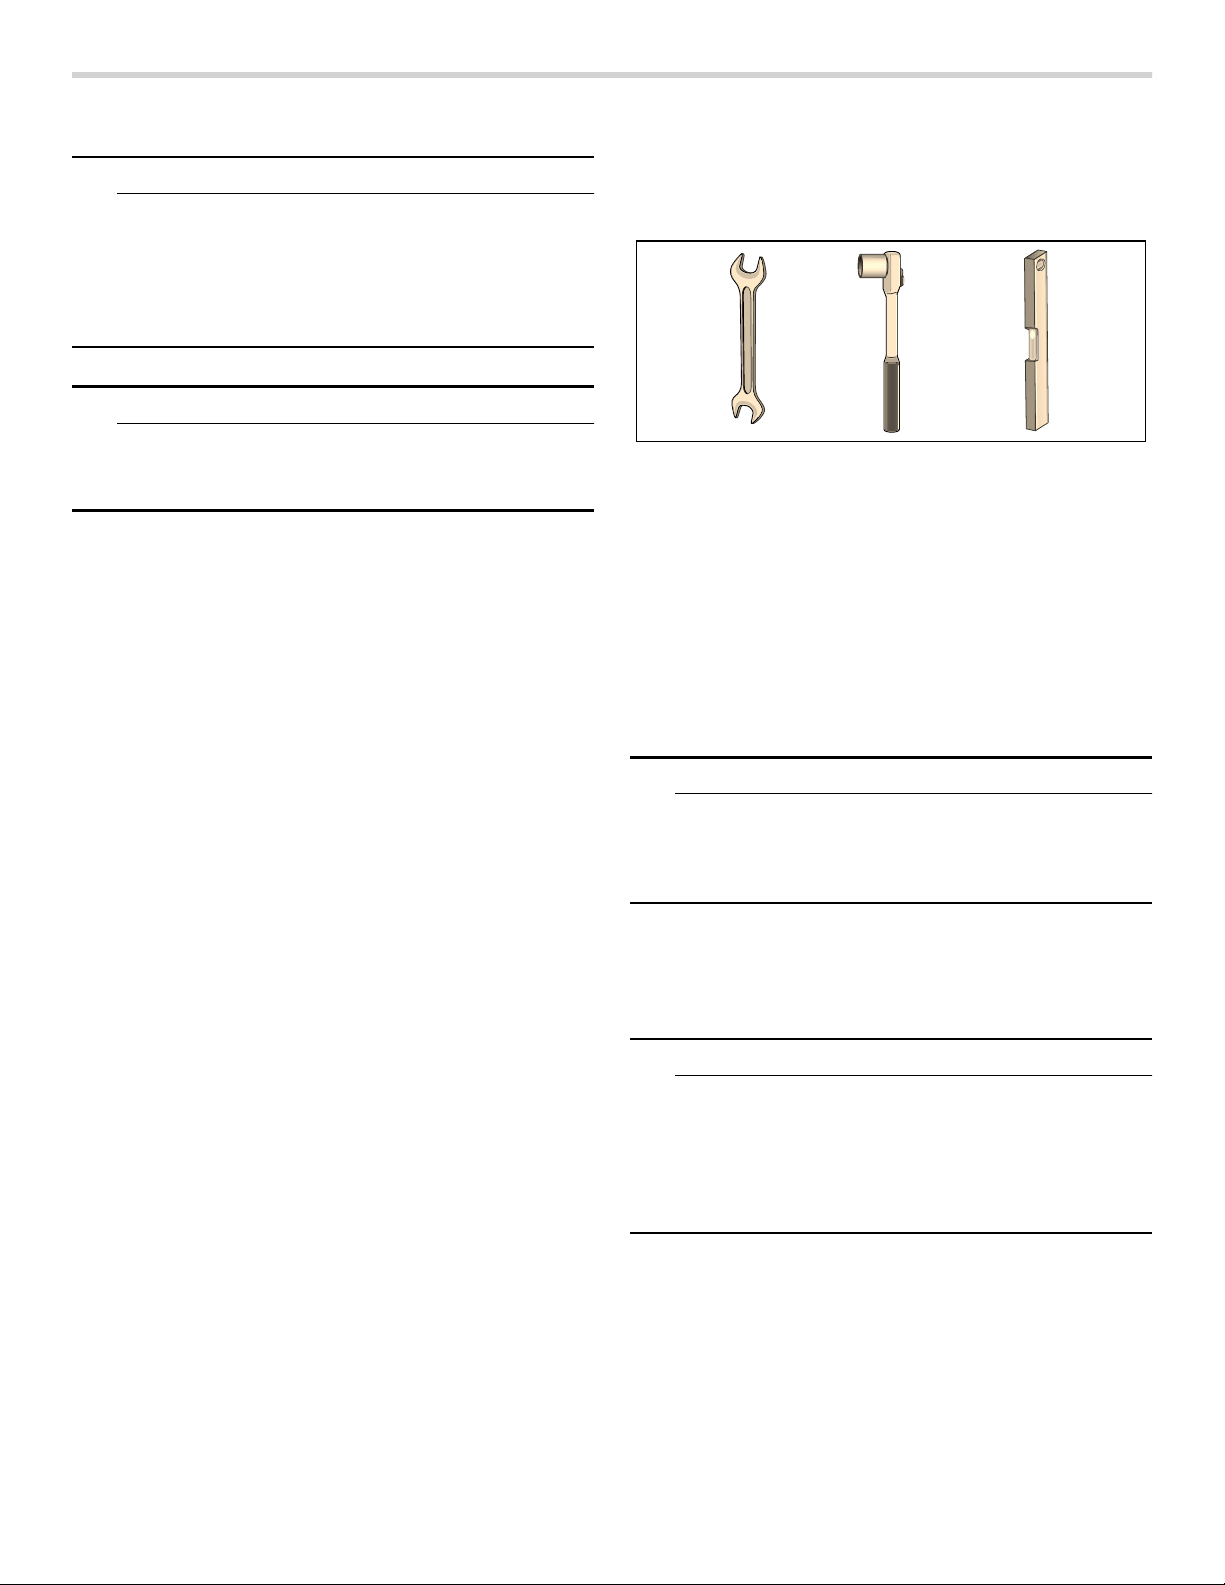
Tools needed
The following tools may be helpful during installation of your washer.
▯ 13mm socket for removing the transport bolts.
▯ 17mm wrench for adjusting the appliance feet.
▯ Bubble level for leveling the appliance.
Waste disposal
Disposal of Packaging Materials
After unpacking your new appliance dispose of the protective packaging materials in an environmentally friendly way. Ask your dealer or inquire with your local authority regarding currently acceptable means of disposal.
9 WARNING
WARNINGS FOR CHILDREN
Do not let children play with packaging and
associated parts to avoid risk of choking or
suffocation.
Disposal of Your Old Appliance
Your old appliance can be recycled if it is no longer to be used. Prior to disposing of your old appliance observe the following precautions to reduce safety risks.
9 WARNING
TO AVOID RISK OF INJURY OR DEATH, DO THE FOLLOWING
- after unplugging the old appliance, remove the
electric power cord and dispose of properly.
- remove the door or permanently disable the door
lock to prevent children from being locked inside.
These installation instructions are intended for use by qualified installers. In addition to these instructions, the installation must comply with:
- for the United States - National Electrical Code, ANSI/ NFPA70 - and latest editions of the State and municipal and/or local regulations.
- for Canada - Canadian Electrical Code C22.1 - and the latest editions of the Provincial, Municipal and/or local regulations.
12
Page 13
Parts provided with your washer
Back side of the washing machine
Washer drum contents
Two AquaShield ® water supply hoses are shipped in the washer drum. Be sure to remove each of these and use these new hoses for the installation.
#
+
Power cord with plug
(
Literature pack; contents:
0
▯ User manual
▯ Covers
Drain hose
8
Elbow to form the hose to fit the drain pipe
@
3
Hot water AquaShield ® hose
H
Cold water AquaShield ® hose
P
NOTICE: If any parts are missing please notify your dealer immediately.
Set up on a pedestal with drawer
Pedestal item number: WMZ 20490
Mount washer on the pedestal according to the
instructions in the installation kit.
13
Page 14
Installation checklist
Review the following list and check off each step as it is completed during installation.
Remove the transport bolts
9 CAUTION
è
Installation Step Page
If installing to a pedestal (base), com-
14
plete the base installation before
removing the transport bolts
Completely remove all four shipping
14
bolts keeping the bolt and bushing
assemblies intact
Connect the water supply hose and
15
drain hose
Connect the electrical power 18
Slide the washing machine into its final
location
Level the washing machine (as low as
17
possible)
Before washing laundry, run the Drum
23
Clean program
Importance of installing on a solid, level floor
Your new Bosch washing machine utilizes high spin
speeds to achieve superior water removal from your
laundry resulting in reduced drying time. It is important to
install your washing machine on a floor that will provide
firm support. This prevents the washer from experiencing
excess vibration during spinning that could cause the
washer to move or be noisy.
The installation surface must be solid and level in both directions. Avoid installing your washer on soft surfaces such as floors with carpet or foam backed covering material.
If installing the washer on a wooden floor, observe the following:
▯ install the washer in a corner for better support if
possible.
▯ if necessary, reinforce the floor by screwing a water
resistant wooden board to the floor (minimum of
1.18 in./30 mm thick).
DAMAGE TO THE APPLIANCE OR INJURY POSSIBLE
▯ The machine is secured for transport with
transport bolts.
Transport bolts that are not removed can damage
the drum during operation of the machine, the
washer will vibrate, and it will be much noisier
during spin cycles if the transport bolts are not
removed before use.
Be sure to remove all 4 transport bolts
completely before first use. Keep the transport
bolts.
If a pedestal was purchased with the washer, it
must be installed first, prior to removing the
transport bolts. Please consult the pedestal
installation instructions.
▯ In order to prevent transport damage during later
transport, be sure to re-install the bolts before
transport.
1.
Remove drain hose from all brackets.
2.
Loosen and remove all 4 transport bolts. Remove the sleeves. Take the power cable out of the brackets.
14
Page 15
3.
Place covers over the transport bolt holes.
Four plastic covers are provided in the small parts bag
included with your washer. Separate these covers and
install one in each hole where the transport bolts were
removed.
Lock covers firmly by pressing on the snap hook.
NOTICE: Keep the assemblies together and store them for later use such as when moving the washer.
▯ The water supply pressure must be between 14.5 to
145 psi (1 - 10 bar) with a minimum of 2.2 U.S. gallons
(8 liters) of flow per minute. A pressure regulator valve
must be installed if the maximum water pressure is
exceeded.
▯ Make sure the water supply faucet is easily accessible
when the washer is in use. The faucet should be
turned off if the washer is going to be unused for
extended periods of time.
▯ Make sure rubber washers are in place at both ends of
the water supply hose. Missing washers could cause
leaks.
▯ The connection points are under full water pressure.
Turn on the water tap and check for leaks.
▯ Periodically inspect the water supply hose and replace
with a new hose if cuts, kinks or leaks are observed.
Water connections
Water supply hose connections
NOTICES
▯ The washing machine must only be operated with cold
and hot (max. 140 °F/60 °C) tap water. Do not
connect the appliance to the mixer tap of a
pressurized hot-water boiler.
▯ To prevent water damage, the hot and cold water
valves should be accessible when the washing
machine is in place and should always be turned off
when the washing machine is not in use.
▯ If installing the washing machine in a new building or a
building in which the plumbing system was recently
installed or upgraded, flush the lines before installing
the washing machine to remove any sand, dirt or
residue.
▯ To prevent leakage or water damage, follow the
instructions in this chapter.
▯ If in doubt, have the appliance installed by an
authorized technician.
Connect your washer to the wall faucets using the included AquaShield® water supply hose.
Observe each of the following:
▯ Only use the new water supply hose shipped with your
washer. Never use old used hoses.
▯ The water supply hoses must not be kinked, bent, or
pinched causing hose damage or restricting water
flow.
Water connection hoses
▯ red - Hot water-hose
▯ blue - Cold water-hose
PD[
PD[
Attach this end to water tap. Hand tighten only.
Attach this end of the hose to the back of the washing
machine as shown in the following pictures. Be sure to
use clamps and route hoses as instructed. Hand
tighten only.
15
Page 16

Position hoses as shown when routing hoses to right side of washer (facing from front).
About the AquaShield® Hose
The AquaShield® hose prevents potential flooding in the
event the hose develops an internal leak. If the hose
leaks, the indicator turns red and water flow is blocked.
Once the internal valve in the hose activates (indicator is
red) the hose must be discarded. Contact customer
service to purchase a replacement.
AquaStop® Plus
The AquaStop® Plus feature detects water leaks on the
internal base, shuts down operation and automatically
pumps out water so it cannot make contact with the floor.
This feature along with the internal mechanical valve of
the double-walled AquaShield® hose makes AquaStop®
Plus one of the most comprehensive water safety
systems available.
Position hoses as shown when routing hoses to left side of washer (facing from front).
Water drain hose connection
NOTICES
▯ Do not reuse an old drain hose. Only use the drain
hose and parts included with your washer.
▯ Do not kink or modify the water drain hose.
Height of drain point
Height difference between the floor and drainage point: max. 39 in. (100 cm).
Types of drainage hookups
Standpipe
GUDLQ
LQ
SLSH
FDEOHWLH
Attach the drain hose to the elbow included with your washer.
Position the elbow on the drain hose 4" from end of hose
as shown. Insert this section of the drain hose into the
drain pipe. Secure the elbow and hose with a nylon tie
strap or the equivalent to keep the hose from coming out
of the drain pipe during use.
16
Page 17

Sink siphon
Secure the drain hose to the sink siphon using a Ø 0.9 -
1.6 in. (20-44 mm) hose clip (available from a hardware
store).
Wash Basin
9 WARNING
SCALDING
When washing at high temperatures, there is a risk
of scalding if you touch hot suds, e.g. when
pumping out hot suds into a wash basin.
Do not reach into the hot suds.
NOTICE: Appliance damage/damage to textiles
If the end of the drain hose touches the discharge water
(water drained from washer) it (the discharge water) can
be sucked back into the appliance and may damage the
appliance or textiles.
Make sure that:
▯ There is no stopper in the sink drain.
▯ The end of the hose does not touch the discharge
water.
▯ The sink drain is free flowing and not partially
clogged.
Leveling the washer
Importance of leveling the washer
Your new washer uses high spin speeds to remove water
at the end of the wash cycle. It is important that your
washer is level and that all four washer feet press with
equal pressure against the floor. This will help assure the
quietest, most vibration-free use of your washer.
Follow these steps:
1.
Install the washer on a level and solid surface, preferably in a corner of a room.
2.
If the floor is uneven (or unlevel) adjust the washer feet as required to level the washer. Do not place anything under the washer feet to help level the washer.
3.
Extend the washer feet no more than is necessary. The more the feet are extended, the more vibration the washer will experience. Start with the washer feet turned all the way in and adjust each foot as necessary.
4.
Use a bubble level to check the top of the washer to make sure it is level side to side and front to rear.
5.
Press down on each corner of the washer top to make
sure the washer doesn’t “wobble“. There should be no
"give" or movement. All four washer feet should press
equally against the floor. This is just as important as
the washer being level to prevent vibration.
6.
When the washer is level and does not wobble, lock the washer feet in place by tightening the locknuts against the washer bottom. Be sure to do this without changing the height of the foot (hold the foot while tightening the locknut).
Procedure for adjusting the washer feet:
1.
After determining which washer feet need to be extended, have someone lift up on the washer slightly to take pressure off the foot to be adjusted.
2.
Turn the grey plastic foot to extend it downward as far as necessary to raise the corner of the washer the correct amount to level the washer.
3.
When the height of the foot is correct, use a 17 mm open end wrench to tighten the locknut against the washer bottom. The locknut should be tight against the bottom of the washer to lock the foot in place.
Attach the drain hose securely to the wash basin.
NOTICE: In any multi-story installation, the washer should be installed on a drained floor to prevent water damage to rooms below in the event of a leak.
17
Page 18

Electrical connection
9 WARNING
ELECTRICAL SHOCK HAZARD
Improper connection of the equipment-grounding
conductor may result in electric shock. Have the
appliance checked by a qualified technician or
licensed electrician if you are in doubt as to whether
the washer has been properly grounded.
▯ The household electrical supply must be suitable for
the voltage specification shown on the washer rating
plate (located inside the washer door, immediately
below the drum opening).
~ Purchase information; Page 4
See the table below for connection specifications and
fuse/breaker requirements.
Volts Hertz Ampers Watts
240 60 10.5 2,520 max.
9 WARNING
ELECTRICAL SHOCK HAZARD
To reduce the risk of fire or electrical shock, DO
NOT use an extension cord or an adapter to
connect the washing machine to the power supply.
9 WARNING
ELECTRICAL SHOCK HAZARD
To reduce the risk of electrical shock:
▯ Only pull out the power cord by the plug end and
never by the cable, as this could damage it.
▯ Never touch or hold the plug end or power cord
with wet hands.
▯ Never unplug the plug end or power cord during
operation.
Grounding Instructions
9 WARNING
ELECTRICAL SHOCK HAZARD
This appliance must be grounded. In the event of
malfunction or breakdown, grounding will reduce
the risk of electric shock by providing a path of least
resistance for the electric current. This appliance is
equipped with a cord that has an equipment
grounding conductor and a grounding plug. The
plug must be plugged into an appropriate outlet that
is properly installed and grounded in accordance
with all local codes and ordinances.
▯ The wiring for the electrical outlet circuit must be
sufficient to meet the appliance requirements. Use of a
Ground Fault Circuit Interrupter (GFCI) is
recommended.
▯ Protect the power cord from physical damage, such as
being twisted, kinked, pinched, caught in a door, or
walked upon.
▯ If the power cord is damaged, it must be replaced by a
qualified technician to avoid a fire/shock hazard.
Replacement power cords can be purchased through
Customer Service.
~ Customer service; Page 5
▯ The washing machine must only be connected to an
individual branch circuit via a receptacle which has
been properly installed and grounded.
▯ Make sure that:
- the power plug fits into the receptacle
- the wire size is sufficient
- the grounding system is properly installed
▯ The power cord may be replaced by an electrician
only. Replacement power cords can be purchased
from Customer Service. To reduce the risk of fire or
electrical shock, DO NOT use an extension cord or an
adapter to connect the washing machine to the power
supply. If a ground fault circuit breaker is to be used,
only use the types marked with the following symbol:
z. Only this symbol can assure compliance with all
current regulations.
▯ Do not modify the plug provided with the appliance. If
the plug will not fit into the outlet have a properly
grounded outlet installed by a qualified electrician. Do
not cut, remove or bypass the grounding prong on the
washer power cord plug.
▯ The washer power cord plug must be easily
accessible when the washer is operating.
▯ When unplugging or plugging in the washer power
cord, grasp the plug end. Do not pull on the cable to
unplug the washer.
18
Page 19

Transporting the washer
Before transporting the washer
1.
Disconnect the washer power cord from the wall outlet.
2.
Turn off the water supply to the washer.
3.
Disconnect water supply lines from the tap.
4.
Disconnect the drain hose from the drain location.
5.
Install the transport bolt assemblies as shown in the following images.
Remove the transport bolt hole covers
1.
Remove all four transport bolt hole covers.
2.
Pull the tip of the arrow on the cover out slightly to disengage the locking tab.
3.
Rotate the cover counterclockwise to remove. Repeat for all 4 transport bolt hole covers.
Insert the transport bolt assemblies
1.
Each assembly consists of a plastic bushing and a bolt that extends through the bushings. Unscrew the bolt until the threaded end is flush with the end of the plastic bushing.
2.
Insert the transport bolt and bushing assembly as
shown. The metal housing slides around the bolt
through the slot in the plastic bushing as the bushing
is slid into place. The open part of the bushing slot
should be facing the direction shown to allow the
assembly to slide fully into place.
3.
When the bolt is in place screw it in until the bolt
threads engage the drum. Double check and ensure
bolts are screwed into threaded holes and not into
cracks or crevices. Repeat the process for all 4
transport bolt assemblies before tightening any all the
way. Complete tightening all 4 bolt assemblies until
they are each snug in place.
19
Page 20

Getting to know your appliance
Control panel
3HU PDQHQW 3UHVV
3H U P 3+ HD Y \ 6 R L
'HOLFDWHV
6XSHU 4XL FN
4XLFN
5L Q VH
6SLQ'UDLQ
Programs
(
Program Selector
0
O
&RWWRQ1RUPDO
7RZ HOV
:KL W HVW :KLW HV
6DQLW L]H
+DQG:DVK :RRO
%XON\ /DUJH,WHPV
'UXP&OHDQ
Center is pressed to power the appliance ON or
OFF and dial turns in both directions to select a
program.
Display Panel with Buttons
8
Eco3HUIHFW
6WDLQV
Speed3HUIHFW
3UHZDVK 5LQVH3OXV 5HPRWH6WDUW
)LQLVKLQ
7HP S HUDW X U H
6SL Q6SHHG
²
&KL OG ORF N VHF
6WDUW
3DXVH
20
Page 21

Display area
Eco3HUIHFW
3UHZDVK 5LQVH3OXV 5HPRW H6WDUW
#
6WDUW
+
6WDLQV
§
)LQLVKLQ
Speed3HUIHFW
K
Buttons
Button Description Indicator
(
0
8
@
H
P
X
`
h
)"
For a detailed description, see ~ Optional program settings; Page 36
Select EcoPerfect.
Select Prewash.
Select Rinse Plus.
Select Remote Start.
Remote start and Home Connect settings
Select Start/Pause.
▯ starts or pauses the selected cycle;
▯ indicator lamp on (steady) - cycle running, can be paused (if Child lock is not
activated);
▯ indicator lamp blinking - option settings can be changed; Ready state (door
closed, cycle can be started); cycle is paused (press to restart).
Select Finish in.
End of program (“Finish in” time) after...h (hours)
Press Finish in M and N at once for approximately 3 seconds to activate or deac-
tivate Child lock.
Select Spin Speed. High
Select Temperature. Extra Hot
Select SpeedPerfect.
Select Stains.
7HP S HU DW XU H
C
6SLQ6SHHG
;
²
&KL OG O RF N VH F
3
3DXVH
{
{
{
{
A
e.g. ñ‚ œ
E
Medium
Low
No Spin
Hot
Warm
Cold
{
Ê (Oils, food based)
¶ (Blood)
º (Red wine)
· (Grass)
21
Page 22

Other indicators
Indicator Description
E
r
ÿ
|
Information on energy and water consumption:
X { { { { {
þ { { { { {
Washing cycle status sequence:
!
N
O
0
e.g. ‚:…‹
- ˜-
- ‹Further information:
Å
e.g. “: ‹‹ <-> - ‹‹
e.g. •: ‹‹
Lit: Child lock activated
Flashing: A change to the programs or options is not allowed because Child lock is activated.
Flashing will stop after a few seconds.
Flashing: Tap not turned on, no water pressure
Lit: The appliance door can be opened.
Flashing: Door locking or unlocking is ongoing.
OFF: Wi-Fi is off.
Flashing: The appliance is trying to connect to your home network or broadcasting “Home
Connect” hot-spot.
Lit: Wi-Fi is on and the appliance is connected to your home network.
Water consumption display
Energy consumption display
Prewash
Wash
Rinse
Spin
Expected program duration in hours and minutes
Pause
Shown when Start/Pause button is pressed on control panel, Pause is activated from App.
Program end
Lit: Excess foam detected
Fault display
Hint display
22
Page 23

Operating Instructions
9 WARNING
To reduce the risk of fire, electric shock, or injury to
persons, read the Important Safety Instructions and
Operating Instructions before operating this
appliance.
Before using the washer for the first time
Check to make sure your washer has been installed properly by following the installation instructions in this manual.
~ Installation instructions; Page 12
Check the machine. Never connect the utilities (power or water) to or start a damaged machine! Contact customer service!
Check to be sure your household electrical system voltage and the voltage specifications on the washing machine rating plate correspond.
Check to be sure the washer hot and cold water supply taps are turned on.
Turning the washing machine on and off
Center of the program selector is pressed to turn the appliance on or off.
Before loading your first load of laundry
Your new washing machine was tested before leaving
the factory. This process involves running various wash
cycles. As a result, a small amount of water may remain
in the tub and drainage system. Run a Drum Clean cycle
with no laundry to clean the system before your first load
of laundry.
First add 1 to 2 tablespoons of detergent to the mainwash chamber II. Then run the Drum Clean cycle.
Selecting optional program settings
By selecting the optional program settings, you can adjust the washing process to better suit the items you are washing.
The optional program settings can be selected and/or deselected depending if they are allowed (not all settings are allowed for all programs) and the cycle’s progress.
The indicator lamps of the buttons light up if the setting is active.
~ Program selection table; Page 34
~ Optional program settings; Page 36
Loading the laundry
9 WARNING
To avoid risk of explosion! Laundry items that have
been pretreated with any material containing
solvents (e.g. stain remover, cleaner’s solvent) must
be rinsed out thoroughly by hand before they are
placed in the washing machine.
Loosen the laundry being loaded and mix small and large items
Unfold the sorted items and place them loosely in the drum. Mix small and large items to help them better distribute in the drum during the spin cycle.
Tip: Do not exceed the maximum load recommended for the type of wash. Overloading will cause poor wash results and will cause wrinkles.
Recommended Load Size
Recommended maximum load size can be found:
~ Standard features and helpful information; Page 9
Wait for the cycle to finish.
Using the program selector to choose a wash program
NOTICE: If the Child lock is activated, you must deactivate it before you can select a program.
~ Child lock; Page 37
Use the program selector to select the desired wash program. The dial turns in both directions and when a cycle is selected its time duration appears in the display. The related preset options (temperature, spin speed, etc.) lights are activated.
F
E
D
a 1/3 Load - woolens, delicates, silk
b 1/2 Load - cotton, synthetic fabrics, or knitted textiles
c Full Load - cotton and linen
23
Page 24

Tips
After loading, close the door carefully so as not to trap
any items between the door and the rubber seal. The
door should close easily and should not be forced to
close.
Pour the detergent and laundry care product into the appropriate chambers:
Foreign objects left in the drum may damage laundry.
Before inserting any laundry, check to make sure no
foreign objects are in the drum.
Filling the detergent and additives compartments
NOTICE: Damage to the appliance Detergent and laundry pre-treatment aids (e.g. spot
remover, pre-wash sprays, etc.) can cause damage if
they come into contact with the surfaces of the washer.
Do not let these substances touch the surfaces of the
washer. If necessary, wipe off spray traces and other
traces/drops immediately with a soft cloth.
Measuring
Measure out the detergent and laundry care products according to:
▯ the water hardness; consult your water utility company
for details
▯ the manufacturer's instructions on the packaging
▯ quantity of laundry
▯ amount of soiling (heavy, normal, light)
Liquid detergent insert A
Pre-wash
chamber I
Softener
chamber i
Main-wash
chamber II
for liquid detergent
Detergent for pre-wash
Fabric softener, starch
Do not exceed max
Tips
Do not pour fabric softener directly into
the wash load.
Fabric softener is automatically dispensed during the last rinse cycle.
Dilute concentrated or thick fabric softener or fabric conditioner with water. Use
2/3 water to the amount of softener to
prevent blockage of the siphon.
Detergent for main wash, water softener,
spot remover
NOTICE: Do not use Chlorine based or
color safe bleaches as these could
damage the washer. Detergents and/or
solid bleaching agents based on Oxygen
(like Sodium Percarbonate) are safe to
use.
Filling
9 WARNING
IRRITATION OF EYES/SKIN!
When opening the detergent drawer during
operation, detergent or laundry care products may
splash out.
Open the drawer carefully.
In case of contact with detergent or laundry care
products, rinse the eyes or skin thoroughly.
In case of accidental ingestion, consult a doctor.
24
1.
Open the detergent dispenser tray.
2.
Add detergent or additive.
Avoid overfilling the compartment to prevent early
dispensing.
3.
Close the detergent dispenser tray completely before starting the wash cycle.
Tip: DO NOT operate the washer without the detergent compartment in place and fully closed.
Page 25

Liquid detergent insert
To measure liquid detergent:
1.
Pull out the detergent dispenser tray.
2.
Push the liquid detergent insert forward and down as shown.
3.
Pour liquid detergent into the chamber and do not exceed the maximum mark.
4.
Reinsert the tray into its compartment.
NOTICE: Do not use the liquid detergent insert with geltype detergents and powdered detergents or for cycles with pre-wash or selected "Finish in" time.
Starting the program
Press the Start/Pause button. Indicator lamp lights up and the program starts.
NOTICE: If you want to protect the cycle against inadvertent adjustment, select the Child lock.
~ Child lock; Page 37
The display panel shows the "Finish in" time before the program starts or the program length and the program progress symbols when the washing program has started.
~ Display area; Page 21
Foam detection
If you use too much detergent, too much foam may be
formed during the wash cycle. The symbol Å lights up.
Foam may be also leaking out from the detergent
drawer. In order to remove the foam, the appliance
automatically activates additional rinse cycles. This
extends program duration.
NOTICE: To prevent excess foaming use less detergent in subsequent wash loads.
Pausing/Adding a garment to the cycle
Pausing the wash cycle can be useful for several purposes.
e.g. for soaking ~ Soaking; Page 35
Press Start/Pause. The indicator lamp
Wash load will soak in water until continued by pressing
Start/Pause.
For adding a garment after the cycle begins.
1.
Press Start/Pause. Door will unlock when safe to do so.
2.
Open door carefully and add or remove laundry item.
NOTICE: You can do this as long as the Start/Pause indicator flashes and it is safe to do so.
3.
Close door.
4.
Press Start/Pause.
The cycle continues.
NOTICE: If the cycle is paused but the door will not unlock it could be for safety reasons (high water level, water temperature or drum speed).
A is blinking.
Cancel program
For cycles with a high temperature:
1.
Press Start/Pause.
2.
Cool the laundry off: Select Rinse.
3.
Press Start/Pause.
For cycles with a low temperature:
1.
Press Start/Pause.
2.
Select Spin/Drain and Spin Speed option to No Spin.
3.
Press Start/Pause.
Program end
- ‹- appears in the display field and the Start/Pause
button indicator lamp is off. NOTICE: If this symbol Åappears in the display, the
washer has detected too much foam and it automatically
adds an additional rinse cycles to remove the foam.
Use less detergent the next time you run the washer with
the similar load.
Selecting a different program
If you have inadvertently started the wrong program, you can change this as follows:
1.
Press Start/Pause.
2.
Select another program.
3.
Press Start/Pause. The new cycle starts from the beginning.
25
Page 26

Removing laundry/switching the appliance off
1.
Open the front door of the washer and remove the laundry.
2.
Press the center of Program Selector to switch off the appliance.
3.
Turn off the water taps.
NOTICES
▯ Do not leave any laundry in the drum. It can shrink or
become discolored by the next laundry load.
▯ Remove any remaining items from the drum and
rubber gasket.
▯ Leave the front door and detergent drawer open so
that any remaining water can dry.
▯ Always wait for the end of the cycle before switching
off the appliance; otherwise the appliance may still be
locked. If locked, switch the appliance on and wait
until it unlocks.
▯ If the display panel switches off and the Start/Pause
button indicator is blinking at the end of a program,
the Energy-saving mode is active. To activate the
display, press any button.
26
Page 27

Home Connect
This appliance is Wi-Fi enabled and can be controlled remotely via a smartphone or tablet PC.
With the Home Connect app, you can use your smartphone or tablet PC to do the following on this appliance:
▯ Select and start programs.
▯ Change program settings.
▯ Query program status.
▯ Change appliance settings.
▯ Switch off appliance.
Before you can use the Home Connect functions, you will
need to install the Home Connect app on your
smartphone or tablet PC, register, connect your
appliance once automatically or manually to your home
network, and then connect your mobile device to your
appliance via the Home Connect app.
You can find information about the app on our Home Connect website www.home-connect.com.
The availability of the Home Connect function depends on the availability of Home Connect services in your country. Home Connect services are not available in every country.You can find more information here www.home-connect.com.
Notes
▯ Observe and comply with all safety instructions in
manuals and apps when operating appliances via the
app while you are away from them. You must also
follow the instructions in the Home Connect app.
▯ You cannot use the Home Connect app to change
programs or options while the appliance is operating.
However, you can see any changes made at the
appliance via the app display.
Connecting to your home network automatically
If your router has a WPS function, you can connect the appliance to your home network automatically.
If your router does not have a WPS function, you will need to connect the appliance to your home network manually.
1.
Switch the appliance on.
2.
Press and hold Remote Start for at least 3 seconds.
‘ž£ (connect automatically) will appear on the
display.
3.
Press Start/Pause to connect to the network. | will flash on the display.
The appliance will now try to connect to your home
network.
4.
Activate the WPS function on your home network router within the next 2 minutes.
If the appliance has connected to your home network
successfully, ™©Ÿ (connected) will appear on the display
and | will be lit continuously.
5.
Press Remote Start briefly to exit the Home Connect settings.
Note: If you are not able to establish a connection, check whether your appliance is within range of your home network. Try connecting automatically again or connect your appliance manually.
27
Page 28

Connecting to your home network manually
If your appliance has already been automatically connected to your home network, you can skip the manual connection step.
If your router does not have a WPS function, you will need to connect the appliance to your home network manually.
1.
Switch the appliance on.
2.
Press and hold Remote Start for at least 3 seconds.
‘ž£ (connect automatically) will appear on the
display.
3.
Turn the program selector to position 2.
†‘˜ (connect manually) will appear on the display.
Notes
▯ If a connection could not be established, “§§ (fault)
will appear on the display. Check whether your
appliance is in range of your home network. Try
connecting manually again.
▯ If your smartphone or tablet PC is still connected to
the Home Connect network, you will need to connect
it to your home network first.
Connecting to the Home Connect app
If your appliance is connected to your home network, you can connect it to the Home Connect app.
1.
Switch the appliance on.
2.
Press and hold Remote Start for at least 3 seconds.
‘ž£ (connect automatically) will appear on the
display.
4.
Press Start/Pause to connect to the network. | will flash on the display.
The appliance will now set up its own WiFi network with
the name (SSID) Home Connect. You can access it on
your smartphone or tablet PC.
5.
Call up the Wi-Fi setting on the mobile device.
6.
Connect your smartphone or tablet PC to the Home Connect WiFi network and enter the password (key) “HomeConnect”.
Note: The connection process may take up to 60 seconds.
7.
Once you have connected successfully, open the
Home Connect app on the mobile device.
8.
In the Home Connect app, enter the name (SSID) and password (key) for your home network and then select Transfer to appliance.
If the appliance has connected to your home network
successfully, ™©Ÿ (connected) will appear on the display
and | will be lit continuously.
9.
Press Remote Start briefly to exit the Home Connect settings.
3.
Turn the program selector to position 3.
‘˜˜ (connect to app) will appear on the display.
4.
Press Start/Pause .
The appliance will now connect to your
Home Connect app.
5.
Open the Home Connect app on your smartphone or tablet PC and select Connect to add your new appliance.
Note: If your smartphone or tablet PC is still connected to the Home Connect network, you will need to connect it to your home network first.
6.
If your appliance is not shown automatically, select Appliance search and then Connect an appliance in the Home Connect app.
7.
Carry out the last steps in the Home Connect app to connect your appliance.
If the appliance has connected to your home network
successfully, ™©Ÿ (connected) will appear on the
display.
28
Page 29

8.
Press Remote Start briefly to exit the Home Connect settings.
Note: If a connection could not be established, “§§ (fault) will appear on the display. Check whether your smartphone or tablet PC is in range of your home network and whether it is connected to it. Try connecting to the Home Connect app again.
Activating/deactivating Wi-Fi
You can switch the Home Connect function on your appliance on or off permanently at any time.
1.
Switch the appliance on.
2.
Press and hold Remote Start for at least 3 seconds.
‘ž£ (connect automatically) will appear on the
display.
Resetting your network settings
You can clear the network settings and break the connection to your smartphone or tablet PC by resetting the network settings.
1.
Switch the appliance on.
2.
Press and hold Remote Start for at least 3 seconds.
‘ž£ (connect automatically) will appear on the
display.
3.
Turn the program selector to position 5.
§“à (reset network settings) will appear on the
display.
3.
Turn the program selector to position 4.
’©Ÿ (WiFi function) will appear on the display.
4.
Press Start/Pause .
If ©Ÿ (switched on) appears on the display, the WiFi
function on the appliance has been activated. If
©”” (switched off) appears on the display, the WiFi
function is not active.
5.
Press Remote Start briefly to exit the Home Connect settings.
Notes
▯ If you connect to your home network, Wi-Fi is activated
automatically.
▯ If Wi-Fi is activated, the appliance will not switch itself
off automatically.
▯ If Wi-Fi is switched off on the appliance, it is not
possible to use the Home Connect app to start or
control the appliance remotely.
▯ If Wi-Fi is switched off and your appliance was
previously connected to your home network, this
connection will be re-established automatically when
Wi-Fi is switched back on.
4.
Press Start/Pause .
¢“à (yes) will appear on the display.
5.
Press Start/Pause to confirm.
“Ÿš (end) will appear on the display. The network
settings have now been reset. Your appliance is no
longer connected to your home network or the
Home Connect app.
6.
Press Remote Start briefly to exit the Home Connect settings.
Notes
▯ If the network settings could not be reset, “§§ (fault)
will appear on the display.
▯ If you want to operate the appliance via the
Home Connect app again, you will need to reconnect
it to your home network and to the Home Connect app
either automatically or manually.
29
Page 30

Updating the software
You can update the Home Connect software on your
appliance. As soon as a new update is available,
(update) will appear on the display.
You can install the update directly via the message on the display or, alternatively, you can do this manually.
1.
Switch the appliance on.
2.
Press and hold Remote Start for at least 3 seconds.
‘ž£ (connect automatically) will appear on the
display.
3.
Turn the program selector to position 6.
—˜š (update) will appear on the display.
—˜š
This initial registration prepares the Home Connect functions for use and is only required when you want to use these Home Connect functions for the first time.
Note: Home Connect functions can be used only in conjunction with the Home Connect app. Information on data protection can be accessed in the Home Connect app.
Declaration of Conformity
BSH Home Appliances Group hereby declares that the appliance which features Home Connect functionality is in accordance with the essential requirements and other relevant provisions of the following Directives.
Wi-Fi® Module FCC/IC Statements
Model: COM1
FCC ID: 2AHES-COMGEN1
IC: 21152-COMGEN1
The Home Connect module is a communication device designed to provide communication between appliances and smart devices.
This module is integrated at the factory, under direct control of B/S/H Home Appliances Corporation, and is not user serviceable or upgradable. At least 20cm separation distance should be maintained from device to user.
FCC COMPLIANCE STATEMENT
Start/Pause will flash if a software update is available.
4.
Press Start/Pause .
¢“à (yes) will appear on the display.
5.
Press Start/Pause to confirm.
Update installation will now start. This process may take
several minutes. Do not switch the appliance off while
updates are being installed.
6.
Press Remote Start briefly to exit the Home Connect settings.
Information on data protection
When your appliance is connected to a WLAN network that is connected to the Internet for the first time, your appliance transmits the following categories of data to the Home Connect server (initial registration):
▯ Unique appliance identification (consisting of
appliance codes as well as the MAC address of the
installed WiFi communication module).
▯ Security certificate of the WiFi communication module
(to ensure a secure data connection).
▯ The current software and hardware version of your
domestic appliance.
▯ Status of any previous resetting to factory settings.
9 CAUTION
Changes or modifications not expressly approved
could void your authority to use this equipment.
This device complies with Part 15 of the FCC Rules.
Operation to the following two conditions:
▯ This device may not cause harmful interference and
▯ this device must accept any interference received,
including interference that may cause undesired
operation.
INDUSTRY CANADA STATEMENT
This device complies with Industry Canada licenceexempt RSS standard(s). Operation is subject to the
following two conditions:
▯ This device may not cause interference and
▯ this device must accept any interference, including
interference that may cause undesired operation of the
device.
WiFi is a registered trademark of Wi-Fi Alliance.
30
Page 31

Laundry
Preparing the laundry
NOTICE: Damage to the appliance/fabrics Foreign objects (e.g. coins, paper-clips, needles, nails)
may damage the laundry or components in the washing
machine.
Therefore, note the following tips when preparing your
laundry:
▯ Empty all pockets to ensure no loose debris (coins,
keys, other hard objects) are placed in the washer
drum.
▯ Close any fasteners (such as zippers and hooks) that
could cause laundry to catch or become entangled.
▯ Remove any foreign objects or non-washable parts.
▯ Turn trousers and knitted wear inside out prior to
washing.
▯ Place small items (such as socks and handkerchiefs)
and underwired bras into a mesh bag prior to washing.
▯ When washing laundry to be tumble-dried, use the
correct amount of detergent and textile care products
as specified in the manufacturer's instructions.
Some detergents and textile care products, starch or
softeners may contain chemicals that may become
deposited on the moisture sensors negatively affecting
their function and the drying result.
Sorting the laundry
Sort laundry items according to color, degree of soiling and recommended wash temperature range.
Wash white items separately from colored items. Otherwise, white items may tend to become grey.
Observe laundry care labels
H[WUDKRW KRW ZDUP FROG
Check the care labels on each laundry item prior to washing. Choose an appropriate wash cycle that does not exceed the temperature recommended.
Determining degree of soiling
▯ Light soiling
No visible soiling or stains, but may have absorbed
some odor. This could include light weight summer
clothing such as T-shirts, shirts, or blouses worn only
once. Also to freshen bed linen or guest towels.
▯ Normal soiling
Visible soiling and/or a few light stains. This could
include clothing such as T-shirts, shirts, or blouses that
have been sweated in or worn several times. Also tea
towels, hand towels or bed linen used for up to one
week or more. Curtains without stains that have not
been washed for up to a half year.
▯ Heavy soiling
Visible soiling and stains. This could include kitchen
towels, fabric napkins, baby bibs, children’s outer
clothing or football jerseys and shorts stained with
grass or dirt. It could also include working clothes
such as overalls and jeans and other clothing worn for
outside work and activities.
31
Page 32

Identifying and treating stains
For mild and recent stains the Stains button for food based grease/oils, blood, red wine and grass can be used. For more stubborn and set in stains the below methods can be of help.
Oils and grease: normal body skin oil,
cooking oils/fats, sauces, mineral oil, or
wax (containing fat/oil). Treatment: scrape
residue from fabric. Pretreat. Wash using
hottest water safe for the fabric. For heavy
stains, apply non-flammable dry cleaning
fluid to back of stain, replacing towels
under stain frequently. Rinse thoroughly
and wash using hottest water safe for the
fabric.
Beverages and juices: tea, coffee, red
wine, fruit, vegetables. Treatment: Pretreat
stain. Wash using cold water.
Proteins and carbohydrates: blood, egg,
milk, starch. Treatment: Rinse immediately
in cold water. If stain remains, soak in cold
water with an enzyme prewash.
Soot, dirt, sand (pigments), red clay (such
as soiling of tennis clothing). Brush off residue if present. Pretreat or soak with a
laundry product containing enzymes.
Removing stains
▯ Remove/pretreat stains as soon as possible after they
have occurred.
▯ Dab with a soapy solution. Do not rub.
▯ Select an appropriate wash cycle and wash the item.
Several washing cycles may be required in order to
remove stubborn or dried-in stains.
32
Page 33

Laundry detergents and additives
Adding the correct amount of HE detergent
9 WARNING
To avoid risk of poisoning, keep detergents and
cleaning products out of the reach of children.
Avoid overuse of detergent.
Measure out the detergent according to:
▯ The amount of laundry.
▯ The degree of soiling.
~ Sorting the laundry; Page 31
▯ The water hardness. This information can be obtained
from your local water authority. Soft water requires less
detergent.
Too much detergent
▯ Excessive foam will reduce washing agitation and
cause poor washing and rinsing results.
▯ Not environmentally compatible (wastes detergent and
is not good for the environment).
Too little detergent
▯ Laundry will not be washed clean.
▯ Eventually the laundry will take on a grey and hard
appearance. Greyish-brown grease spots may stain
the laundry, heating elements may begin to calcify.
The fabric care label is important for selecting the correct detergent, temperature and treatment of the laundry.
If desired you can visit the following sites for additional information on detergents and fabric care.
~ www.textileaffairs.com or www.cleanright.eu
▯ Standard detergent with optical brighteners
Suitable for white laundry made from linen or cotton
Program: Cotton / Cold - Extra Hot
▯ Detergent for colors without bleach or optical
brighteners
Suitable for colored laundry made from linen or cotton
Program: Cotton / Cold - Hot
▯ Detergent for colors/delicates without optical
brighteners
Suitable for colored laundry made from easy-care and
synthetic fabrics.
Program: Permanent Press / Cold - Hot
▯ Detergent for delicates
Suitable for delicate, fine fabrics, silk or viscose
Program: Delicates / Cold - Hot
▯ Detergent for woolens
Suitable for wool
Hand Wash/Wool program: Cold - Warm
Saving energy and reduce detergent
For light and normal soiling, you can save energy (lower washing temperature) and detergent.
Saving Soiling/note
Reduced temperature and
detergent
quantity as
per the recommended
dosage
Light e.g.:
▯ Light summer/sports clothing
(worn for a few hours)
▯ T-shirts, shirts, blouses (worn
for up to one day)
▯ Guest bed linen and hand
towels (used for one day)
No visible dirt or stains. Clothing
has taken on some body odor.
Normal e.g.:
▯ T-shirts, shirts, blouses (sweat
Temperature
as per the
care label and
detergent
quantity as
per the recommended
dosage for
heavy soiling
soaked, worn a few times)
▯ Towels, bedding (used for up
to one week)
Visible dirt or a few light stains.
Heavy
Dirt and/or stains clearly visible,
e.g. tea towels, baby items, work
clothing
NOTICE: When measuring the amount of all detergents/ additives/care products and cleaning agents, please always check the manufacturer's instructions and information.
33
Page 34

Program selection table
Programs Max.
Load
up to:
Cotton full load Extra Hot
Towels 1/2
load
Whitest Whites full load Extra Hot
Sanitize 1/2
load
Hand Wash/
Wool
Bulky/
Large Items
Drum Clean empty High Special cycle for cleaning the
Spin/Drain full load High
Rinse full load High
Tips
Do not wash new multicolored laundry together with other laundry.
The cycles are time-controlled for lightly soiled fabrics. If fabrics are heavily soiled, reduce the load.
Rinse cycles use cold water only.
1/3
load
full load
(1 item)
Selectable program
settings,
default settings (bold)
Temperature Spin speed
High Sturdy fabric, cotton of linen
Hot
Warm
Cold
Extra Hot
Hot
Warm
Cold
Hot
Warm
Cold
Extra Hot High
Hot
Warm
Cold
Extra Hot
Hot
Warm
Cold
High
Medium
Low
High
Medium
Low
Medium
Low
Medium
Low
No Spin
High
Medium
Low
Medium
Low
No Spin
Medium
Low
No Spin
Type of laundry Optional program settings;
Information
SpeedPerfect, EcoPerfect,
fabric that withstands very hot
water
Durable, cotton towels;
especially terrycloth type
towels
White sturdy fabric, cotton or
linen fabric that withstands
very hot water
Sturdy fabric, cotton or linen
fabric that withstands very hot
water
Hand and machine washable
wool/wool blend fabrics
NOTICE: Wash large items
separately. Use a detergent
designed for delicates and
follow the instructions on the
item's care label. Use detergent
sparingly.
drum
Extra spin with selectable
speed
Draining of the rinsing water Draining of the rinsing water
Extra rinse with spin Rinse Plus
Rinse Plus, Prewash, Stains
SpeedPerfect, EcoPerfect,
Rinse Plus, Prewash, Stains
Rinse Plus, Prewash, Stains
SpeedPerfect, EcoPerfect,
Rinse Plus, Prewash, Stains
longer wash and rinse with
more water for especially sen-
sitive skin
Especially gentle washing
cycle to avoid shrinkage, long
cycle pauses (clothing rests
in suds and water)
SpeedPerfect, EcoPerfect,
Rinse Plus
without extra spin at “No
Spin”
34
Page 35

Programs Max.
Load
up to:
Selectable program
settings,
default settings (bold)
Type of laundry Optional program settings;
Information
Temperature Spin speed
Quick 30
(approximately
30 minute
cycle)
1/2
load
Hot
Warm
Cold
High
Medium
Low
Easy-care fabrics made of cotton, linen, synthetic fibers or
blended fabrics;
suitable for lightly soiled laundry
SuperQuick 15
(approximately
15 minute
cycle)
Delicates 1/4
1/4
load
load
Hot
Warm
Cold
Hot
Warm
Cold
High
Medium
Low
Medium
Low
No Spin
Extra-short program of approximately 15 minutes, suitable for
small item of lightly soiled laundry
For delicate, washable fabrics,
e.g. made of cotton, satin, synthetic fibres or blended fabrics
(e.g. curtains)
SpeedPerfect, EcoPerfect,
Rinse Plus, Prewash, Stains
bulky items (e.g. comforters)
Perm P Heavy
Soil
Permanent
1/2
load
Hot
Warm
Cold
High
Medium
Low
Cotton, linen synthetic or
blended fabrics
SpeedPerfect, EcoPerfect,
Rinse Plus, Prewash, Stains
Press
Tips
Do not wash new multicolored laundry together with other laundry.
The cycles are time-controlled for lightly soiled fabrics. If fabrics are heavily soiled, reduce the load.
Rinse cycles use cold water only.
Starching
NOTICE: Laundry must not be treated with fabric softener.
Starching is possible in all wash programs if liquid starch is used. Measure starch into compartment M in accordance with the manufacturer's instructions (clean first if necessary).
Dyeing/bleaching
Dye should only be used in normal household quantities. Salt may damage stainless steel. Always follow the dye manufacturer's instructions.
Do not use the washing machine to bleach clothes.
Soaking
1.
Pour soaking agent/detergent into compartment II in accordance with the manufacturer's instructions.
2.
Turn the program selector to Cotton program and select Cold temperature.
3.
Press Start/Pause.
4.
After approximately ten minutes, press Start/Pause.
5.
After the required soaking time, press Start/Pause again to continue or change the program.
NOTICES
▯ Load laundry of the same color.
▯ No additional detergent is required; the soaking
solution is used for washing.
35
Page 36

Optional program settings
At the factory, temperature and spin speed options, and cycle duration ("Finish in" time) are pre-set for all cycles.
After selection of the cycle, these values are displayed in
the display field.
EcoPerfect
Energy optimised washing by reducing the temperature while achieving a washing result that is consistent with the selected program, without the EcoPerfect setting.
Prewash
For heavily soiled washing. Pour 1/3 of normal detergent amount into pre-wash chamber I and remaining 2/3 into main wash chamber II.
Rinse Plus
This feature adds additional rinses to selected program which is helpful for locations with soft water supplies or to generally improve rinsing results. It will increase the program duration.
Remote Start
Briefly pressing the Remote Start button activates or deactivates the Remote start function. Activating the Remote start function enables the appliance to be started remotely via the Home Connect app.
NOTICES
▯ Remote start can only be activated if the appliance
door is closed and the appliance is connected to your
home network.
▯ Remote start will be deactivated in the following
circumstances:
▯ The door is opened.
▯ There is a power failure.
▯ The Remote Start button was briefly pressed again
deactivating it.
▯ The center of the Program Selector was pressed
switching off the appliance.
▯ Once the program has ended.
▯ A program was not started within a 24 hour period
after activating the Remote start function.
▯ Any button was pressed or the program selector
was turned on the control panel.
NOTICE: The cycle duration is included in the set Finish in time.
Here is an example of a 1hr:30min cycle time and an 8 h Finish in time.
8 h is displayed (until the Energy-saving mode activates) and counts down (approximately 6hr:30min) until the washing cycle begins (at 1hr:30min) then the cycle duration 1:30 is displayed and began. Total time approximately 8 hours.
Spin Speed
Before and during the cycle, you can change the spin speed range depending on the cycle progress.
Touch the appropriate button until the desired setting is displayed.
No Spin: This option eliminates the final spin and the load remains saturated with the final rinse water. The pump is activated to remove all residual water.
~ Program selection table; Page 34
Temperature
Before and during the cycle, you can change the default temperature range depending on the cycle progress.
Press the appropriate button until the desired setting is displayed.
The maximum temperature range that can be set depends on the cycle selected.
~ Program selection table; Page 34
SpeedPerfect
For washing in a shorter time with a washing result comparable to that of the standard program.
NOTICE: Do not exceed the maximum load.
~ Program selection table; Page 34
Stains
There are four types of stain to choose from:
Ê
¶
º
·
Oils, food based
Blood
Red wine
Grass
Pressing and holding the Remote Start button for at least 3 seconds enters Home Connect settings.
Finish in
The program end (Finished in) time can be set in one
hour increments to a maximum of 24 h (hours). After
selecting the desired washing program (at the dial) but
before pressing the Start/Pause button, press the Finish
in button until the desired time is displayed, e.g. 8 h.
Press the Start/Pause button to start the washer.
36
The washer adjusts the average washing temperature,
drum movement and soaking time to the specific type of
stain. Hot or cold water, gentle or intensive washing and
long or short soaking ensure that the wash-program
sequence is specially adapted to each type of stain. This
makes sure that stains are treated in the best possible
way.
NOTICE: Pressing and holding the button automatically runs through the set values.
Page 37

Appliance settings
Child lock
You can secure the appliance against inadvertent changing of the set functions. To do this, activate the Child lock after cycle start.
To Activate/Deactivate, press Finish in
approximately 3 seconds. In the display field, you will see
D symbol light indicating the Child lock is active.
the
NOTICE: The Child lock will remain activated after the end of the cycle and the door will remain locked. Even switching the appliance off and on will keep the door locked and will not deactivate the Child lock. You must deactivate Child lock and, if necessary, activate it again.
M and N for
Activating setting mode
In order to change the default appliance settings described below, you will first need to enter or activate setting mode.
#
+
To enter or activate the setting mode:
1.
Switch on the appliance. The indicator lamp of the program on position 1 (() lights up.
2.
Press and hold Temperature button and, at the same time, turn the program selector to position 2 (0).
3.
Release Temperature button.
The setting mode is now activated.
Changing the audible signal volume
You can adjust the volume of audible notification signals
(that indicate that a program has ended, for example)
and audible button signals by turning the program
selector to the following positions:
▯ 2 (0): Audible notification signal volume
selectable values: ‹ = off, ‚ = quiet, ƒ = medium,
„ = loud, … = very loud
▯ 3 (8): Audible button signal volume
selectable values: ‹ = off, ‚ = quiet, ƒ = medium,
„ = loud, … = very loud
1.
Turn the program selector to the required position.
2.
Use the Finish in N or M button to set the volume you require (‹ = off; … = very loud).
Switching the automatic switch-off function on/off
If the appliance is not used for an extended period, it
may automatically switch itself off until a program starts
or when a program has ended in order to save energy. It
can be switched back on again at any time by pressing
the power button
You can switch the appliance's automatic switch-off function on or off as follows:
1.
Turn the program selector to position 4 (@).
2.
Use the Finish in N or M button to switch the
appliance's automatic switch-off function on (
(‹””).
NOTICE: The automatic switch-off function cannot be activated if Wi-Fi is activated.
Switching the Drum Clean reminder on/off
A reminder to clean the drum is indicated by a light adjacent to the Drum Clean program. In order to switch the drum clean reminder on (or off, if desired):
1.
Turn the program selector to position 5 (H).
2.
Use the Finish in N or M button to switch the drum clean reminder on (‹Ÿ) or off (‹””).
#.
‹Ÿ) or off
Exiting setting mode
Once you have applied all the settings, press the power button # to switch off the appliance.
The settings you have selected will be saved and will
take effect the next time the appliance is switched on.
37
Page 38

Cleaning and maintenance
Your appliance is designed to give you years of service. Observe the following instructions to maintain and protect your appliance and keep it in top operating condition.
9 WARNING
RISK OF ELECTRIC SHOCK HAZARD
To avoid risk of electric shock always disconnect
the washer from the power outlet prior to cleaning.
Never clean the washer with a pressure washer.
Cleaning the housing and control panel
9 WARNING
RISK OF EXPLOSION!
To avoid risk of explosion never clean the washer
with flammable solvents.
As required, you may clean the washer housing and control panel.
- Use hot soapy water or a mild (non-abrasive) cleaning agent.
- Dry with a soft towel.
- Remove residue immediately.
- Do not use high pressure spray.
Cleaning the drum
Metallic debris left in the drum can produce rust spots on the drum. Never use steel wool to try to remove these.
Use a chlorine-free cleaning agent and follow the manufacturer’s instructions.
Descaling the washer
Provided that you use correct amounts of detergent with your wash loads, descaling is not necessary. If descaling the washer drum does become necessary, please follow the descaling product manufacturer’s instructions.
Small amounts of descaling agent can be used to remove white spots on the washer drum caused by lime or mineral deposits or small amounts of rust caused by metal objects left in the drum.
NOTICE: Descaling agents contain acids which may attack parts of the washing machine and may discolor the laundry.
Cleaning the detergent dispenser tray
If there is a buildup of residual detergent or additives, or if the softener compartment is not rinsed out well enough, it may be helpful to clean the dispenser.
1.
Open the detergent dispenser tray fully. Press down on the drawer catch (1) and pull the tray (2) from the washer housing.
2.
Remove the insert (3) by grasping it and pulling it upwards from the detergent dispenser tray.
3.
Clean the insert and the detergent dispenser tray by holding it under warm running water. Lightly wipe away any remaining detergent residue.
4.
Attach the insert and slide the detergent dispenser tray back into place and close the tray securely.
Tip: Do not operate the washer without the detergent dispenser tray in place. Always keep the tray completely closed.
Cleaning the water inlet strainers
If the washer water supply slows or stops completely, the water inlet strainer may be blocked. Cleaning is recommended every 6 months in any event to reduce chances of valve blockage in areas using hard water.
Normal water pressure from your home, that remains in
the supply hoses after turning off the taps, will cause a
small amount of water to drip out when you remove the
water supply hose from the back of the washer. Be sure
to close the taps completely before removing the supply
hoses to minimize the amount of water.
38
Page 39

Clean the strainers at the water tap end of the hose
1.
Remove the hose from the tap.
2.
Rinse the strainer under running water. Look at the strainer to see if any visible debris is still present. Rinse again if necessary to remove the debris.
3.
Reconnect the hose to the tap.
Clean the strainers at the washer end of the hose
1.
Remove the hose from the inlet on the back of the washer.
2.
Using narrow pliers, grasp and pull the strainer from the inlet port.
3.
Rinse the strainer under running water.
4.
Reconnect the hose to the back of the washer and turn on the water tap. Check to see if water flows by starting a warm water wash cycle.
NOTICE: Check for leaks to be sure the rubber washers are seated at both ends of the water supply hose and the connections are properly tightened.
Cleaning the drain pump
9 WARNING
RISK OF SCALDING
Risk of hot water injury to skin!
Allow the water to cool down prior to actuating the
emergency door lock release.
You are responsible for ensuring all safety
precautions are followed when draining water from
washer and/or manually opening the washer door.
It may be necessary to clean the washer drain pump if the washer fails to drain (sound of water being pumped from the washer cannot be heard when the washer should be draining and other nearby drains, such as a sink, are draining properly).
The washer pump can become blocked by loose debris (a good reason to check the drum and remove any visible debris after each load). Fabrics that give off large amounts of fluff may also cause blockage.
To access the washer drain pump, the service cover must first be removed (see steps below). With the service cover removed, proceed as follows:
1.
If the washer has not been drained, try to drain it now.
Turn the program selector to the Spin/Drain, select
Spin Speed to No Spin and press the Start/Pause
button. Wait a few moments to let the cycle drain the
water from the drum. If the pump is totally blocked, the
water will be unable to drain and the cycle will end.
2.
Shut off the tap so that no more water flows in and has to be drained.
Switch the appliance off. Unplug the power plug.
3.
Open and remove the service cover.
4.
Loosen the screws and remove the protective film.
39
Page 40

5.
Use the pull-out drain hose located in the pump
access opening to drain the remaining water into a
suitable container (up to 5.3 U.S. gallons/20 liters of
water may be drained). Pull the sealing cap from the
hose and lay the hose over the side of the container
and allow the water to finish draining from the drum.
When finished, replace the sealing cap into the end of
the hose and restore the hose to its storage location.
)
6.
Turn the pump cover counterclockwise to remove it. A
small amount of residual water may flow out when the
cover is removed.
Clean the interior of the pump housing, removing any
debris or foreign objects. Check to be sure the
impeller wheel at the back of the pump housing can
now turn freely.
Remove any lint, debris or detergent residue from the
threads of the pump cover and the pump cover
housing.
Replace the pump cover by screwing tightly into
position. Handle must be vertical.
8.
Snap the service cover in place at the hinges and close it. Wipe up any spilled water.
NOTICE: In order to prevent detergent from flowing unused into the drain during the next wash cycles: pour
0.26 U.S. gallons/1 liter water into the chamber II.
Turn the program selector to the Spin/Drain, select Spin
Speed to No Spin and press the Start/Pause button.
7.
Reinstall the protective film over the pump access using both screws.
40
Page 41

Troubleshooting
Emergency door lock release
In the event of a power interruption the program will continue running when the power supply has been restored.
If the washer door must be opened and the normal door unlock procedures do not work, the emergency door lock release rod can be actuated to open the door.
9 WARNING
RISK OF SCALDING
To avoid risk of scalding, allow water to cool down
prior to activating the emergency door lock release.
The drum may be full of hot water which could
cause burn injury.
9 WARNING
6.
The washing machine door can then be opened.
Pull the emergency release downwards with a tool and
release.
7.
The door can now be opened.
General Troubleshooting
If you encounter a problem, consider the suggestions and instructions below before you call customer service.
RISK OF INJURY
You may injure your hands if you reach into the
drum while it is turning.
Do not reach into the drum when it is turning. Wait
until the drum has stopped turning.
9 CAUTION
WATER DAMAGE AND BURN INJURY
Any escaping water may cause water damage and
burns.
Do not open the washing machine door if water can
be seen through the glass.
1.
Press the center of Program Selector to switch off the appliance. Any running program will then be cancelled. Disconnect the power plug.
2.
Allow the water in the drum to cool off.
3.
Allow the washer drum to come to a stand still (no longer spinning).
4.
Before opening the washer door, perform the drain procedure included in the pump maintenance section.
~ Cleaning the drain pump; Page 39
5.
Loosen screws and remove the protective foil.
9 WARNING
ELECTRIC SHOCK HAZARD
To avoid risk of electric shock, repairs should be
carried out by an authorized technician.
If repairs are necessary and you cannot eliminate the fault with the aid of the table below, follow these steps:
1.
Press the center of Program Selector to switch off the appliance.
2.
Disconnect the appliance from the power outlet.
3.
Turn off the water taps.
4.
Call Customer Service.
~ Customer service; Page 5
NOTICE: The troubleshooting items listed below can help you resolve minor issues with your washer quickly and without the necessity of a service call.
41
Page 42

Determing the Problem
Problem Possible cause(s) Solution(s)
Washer door cannot be
opened.
Door still cannot be
opened, even after
turning the washer off
and back on again.
Wash cycle time is
increased.
The display panel and
indicator lights switch
off, Start/Pause indicator flashes.
The display panel and
Start/Pause indicator
switch off.
Cycle does not start Start/Pause flashes.
Cycle does not start Finish in-time is displayed.
Cycle does not start -
D symbol flashes.
Detergent residue
remains in the detergent dispenser.
Water does not appear
to be filling into the
washer or detergent is
not dispensed from
detergent tray.
Child lock is activated.
A power failure occurred. If a cycle is interrupted by a power failure, it will
Cycle is running, or water level is
too high and/or too hot or the drum
is still spinning.
Electric power cord has become
loose or unplugged.
Appliance switched off before end
of cycle.
Child lock is activated
Door is locked for safety reasons
(high water level, water temperature
too high, drum is spinning).
Your washer utilizes sensors to
monitor certain characteristics of
the wash load. Increases in wash
cycle time could be due to:
The automatic unbalanced load
detection system spins the laundry
several times to ensure even distribution.
Excess suds. Ådisplays at end of
cycle.
Energy-saving mode is activated. Press any button to activate the display.
Automatic switch-off function is
active.
Start/Pause button not pressed? Press the Start/Pause button to start the cycle.
Washer door is not closed properly. Check if laundry is caught in the door. Close the door
A delayed starting time has been
selected and activated.
Child lock is activated.
Dry detergent may have been damp
or lumpy.
Excess liquid detergent may have
been added.
Start/Pause not pressed. Press Start/Pause.
Water taps not turned on. Turn on water taps.
Supply hose kinked or pinched
(reduce flow).
Water supply hose strainers
clogged.
Water pressure too low. Eliminate the cause.
Deactivate Child lock (press Finish in
approximately 3 seconds).
resume when the power is restored. If power is not
restored follow the cautions and instructions for:
~ Emergency door lock release; Page 41
Wait until the cycle ends.
Make sure the electric cord is securely plugged in.
Switch the appliance on.
Deactivate Child lock (press Finish in
approximately 3 seconds).
Run a Spin/Drain program to reduce the water temperature and level.
Solutions are based on the specific reason the wash
time has been extended.
Always load the washer with a mixture of large and
small wash items (easier to distribute in the drum).
Use less detergent.
Press the center of the Program Selector to switch on
the appliance.
until a click is heard. Press the Start/Pause button to
start the cycle.
Wash cycle will begin at proper time to complete at
the selected Finish in-time.
Deactivate Child lock (press Finish in M and N for
approximately 3 seconds).
Clean and dry the detergent dispenser.
See Adding the correct amount of HE detergent to
determine proper detergent usage. ~ Adding the cor-
rect amount of HE detergent; Page 33
Eliminate the cause.
Clean the water inlet strainers.
M and N for
M and N for
42
Page 43

Problem Possible cause(s) Solution(s)
Water cannot be seen
in the drum.
Water has not drained
completely.
Water is coming out
from underneath the
washer.
Foam comes out of the
detergent dispenser
drawer.
Repeated spinning. The Unbalanced Load Detection
No spin took place
(laundry is still wet).
Detergent residue on
the laundry.
System shakes or
shudders when spin
speed increases.
The water level in your high efficiency front load washer is below
the visible part of the drum, this is
normal.
Suds may be excessive (usually
due to too much detergent or nonHE detergent being used).
Pump is blocked. Check and clean the drain pump, water drain hose
Drain hose or drain pipe is blocked. Clean drainage pipe and/or drainage hose.
Water supply hose is leaking: is not
screwed on tight at both ends, or
rubber washer not placed in hose.
Drain hose is leaking. Check the drain hose, be sure that it is on the washer
Too much detergent was used, or a
non-HE detergent was used; pump
was not able to pump out the
increased suds. Ådisplays at end
of cycle.
system is attempting to balance the
load through repeated spin cycles.
Load size too small. Add more laundry.
Large items may have become
entangled in the drum and could
not be distributed by the Unbalanced Load Detection system; spin
cycle therefore canceled for safety
reasons.
Excessive suds: too much detergent was used, or a non-HE detergent was used. Ådisplays at end
of cycle.
No Spin was selected Select a spin speed setting (Low, Medium or High)
Some phosphate free detergents
contain water insoluble ingredients
that may appear as light spots on
the laundry.
The washer drum suspension system shifts during spinning as the
speed increases. This may result in
a slight shaking of the washer
during the spin speed transition.
No action needed.
Use less detergent for future loads. Be sure to use
only high efficiency HE-detergents.
and/or the drain pipe.
Eliminate the cause: tighten the hose (by hand at the
washer end), check for rubber washer in place.
securely with the clamp in place; replace the drain
hose if leaking continues.
Immediate fix: mix 1 tablespoon of fabric softener with
1/2 liter (1 pint) of water and pour this mixture into the
detergent compartment, except if there is waterproof
type textiles in the load then do not use softener to
reduce the foam.
To prevent: use less detergent for future wash loads.
To prevent: always load the washer with a mixture of
large and small wash items (easier to distribute in the
drum).
To prevent: always load the washer with a mixture of
large and small wash items (easier to distribute in the
drum).
Immediate fix: mix 1 tablespoon of fabric softener with
1/2 liter (1 pint) of water and pour this mixture into the
detergent compartment, except if there is waterproof
type textiles in the load then do not use softener to
reduce the foam.
To prevent: use less detergent for future wash loads.
Brush off when laundry is dry or
execute the program Rinse.
Mix small and large laundry items together in the load
to minimize this effect. Check to be sure the washer is
level and all four feet press equally against the floor.
~ Leveling the washer; Page 17
Check that transport bolts have been removed.
~ Remove the transport bolts; Page 14
43
Page 44

Problem Possible cause(s) Solution(s)
| does not appear in
the display panel.
Home Connect is not
working.
Wi-Fi is switched off. To connect to your home network, switch on Wi-Fi.
Wi-Fi is switched on but a connec-
tion to the home network cannot be
established.
Check whether your home network is available or try
to connect to your home network again.
~ Home Connect; Page 27
▯ You can find solutions to problems with Home Con-
nect at www.home-connect.com.
▯ The use of the Home Connect functionality depends
on the availability of the Home Connect Services in
your country. Check here, www.home-connect.com,
to see if the Home Connect services are available in
your area and further information.
Information on the display area
Problem Possible cause(s) Solution(s)
ÿ flashes
r flashes
Ålights up
Door not closed properly or
attempting to lock or unlock.
Cold water tap not turned on. Turn on the cold water tap.
Supply hose for cold water kinked
or pinched closed.
Strainer in water supply hose
clogged.
Cold water pressure too low. Eliminate the cause.
Too much detergent used or non-
HE detergent used.
Check that no laundry is caught between the door
glass and gasket and close door securely. Wait until
door is locked or unlocked.
Eliminate the cause, replace the hose if damage.
Clean the water inlet strainer.
~ Cleaning the water inlet strainers; Page 38
Use less detergent for future loads. Only use HE detergents.
The Drum Clean program indicator flashes
•:Š„, r is shown
“: ‹‹ <-> - ‚‰
“: ‹‹ <-> - ƒ„
Others Turn off machine, wait 5 seconds and turn on again. If
If troubleshooting did not solve your issue contact customer service ~ Customer service; Page 5
Indicates Extra Hot wash temperature has not been used in recent
wash cycles.
Hot water tap not turned on. Confirm hot water hose is correctly connected and
Supply hose for hot water kinked or
pinched closed.
Hot water pressure too low. Eliminate the cause.
Strainer in water supply hose
clogged.
Pump is blocked (obstructed). Clean the washer drain hose and/or the drain pipe.
Water in the base, appliance leaking.
Run a Drum Clean or other program with Extra Hot
temperature option selected and without laundry.
turn on the hot water tap.
Eliminate the cause, replace the hose if damaged.
Clean strainers in supply hoses.
May need to perform pump maintenance to clear
blockage.
~ Cleaning the drain pump; Page 39
Turn off the water tap. Call the customer service!
the the problem persists, call customer service.
44
Page 45

STATEMENT OF LIMITED PRODUCT WARRANTY
Bosch Clothes Washer
What this Warranty Covers & Who it Applies to
The limited warranty provided by BSH Home Appliances Corporation (“Bosch“) in this Statement of Limited Product Warranty applies only to the Bosch appliance sold to you, the first using purchaser, provided that the Product was purchased:
▯ For your normal, household (non-commercial) use,
and has in fact at all times only been used for normal
household purposes.
▯ New at retail (not a display, "as is", or previously
returned model), and not for resale, or commercial
use.
▯ Within the United States or Canada, and has at all
times remained within the country of original purchase.
The warranties stated herein apply only to the first purchaser of the Product and are not transferable.
Please make sure to return your registration card; while not necessary to effectuate warranty coverage, it is the best way for Bosch to notify you in the unlikely event of a safety notice or product recall.
Limitation for Third Party Accessories and Water
Supply Hoses: Third party accessories, including water
supply hoses other than those shipped with your Bosch
washer, and any consequential damages resulting
therefrom, are not covered by this warranty. This
limitation expressly includes the implied warranties of
merchantability and fitness for a particular purpose,
which are also expressly excluded with respect to third
party accessories, including water supply hoses other
than those shipped with your Bosch washer. Use of third
party accessories, including water supply hoses other
than those shipped with your Bosch washer, does not
void this warranty on any other part, and all other
provisions of this warranty remain in effect.
How Long the Warranty Lasts
Bosch warrants that the Product is free from defects in
materials and workmanship for a period of three hundred
sixty-five (365) days from the date of purchase. The
foregoing timeline begins to run upon the date of
purchase, and shall not be stalled, tolled, extended, or
suspended, for any reason whatsoever.
This Product is also warranted to be free from cosmetic
defects in material and workmanship (such as scratches
of stainless steel, paint/porcelain blemishes, chip, dents,
or other damage to the finish) of the Product, for a period
of thirty (30) days from the date of purchase or closing
date for new construction. This cosmetic warranty
excludes slight color variations due to inherent
differences in painted and porcelain parts, as well as
differences caused by kitchen lighting, product location,
or other similar factors. This cosmetic warranty
specifically excludes any display, floor, “As Is”, or “B”
stock appliances.
SCOPE OF EXTENDED LIMITED WARRANTY
Bosch will repair or replace, free of charge, any printed
circuit boards, drive motor or component part of the drive
motor that proves defective under conditions of normal
home use during the first seven hundred thirty (730)
days from the date of purchase, labor charges excluded.
Repair/Replace as Your Exclusive Remedy
During this warranty period, Bosch or one of its
authorized service providers will repair your Product
without charge to you (subject to certain limitations
stated herein) if your Product proves to have been
manufactured with a defect in materials or workmanship.
If reasonable attempts to repair the Product have been
made without success, then Bosch will replace your
Product (upgraded models may be available to you, in
Bosch’s sole discretion, for an additional charge). All
removed parts and components shall become the
property of Bosch at its sole option. All replaced and/or
repaired parts shall assume the identity of the original
part for purposes of this warranty and this warranty shall
not be extended with respect to such parts. Bosch's sole
liability and responsibility hereunder is to repair
manufacturer-defective Product only, using a Boschauthorized service provider during normal business
hours. For safety and property damage concerns, Bosch
highly recommends that you do not attempt to repair the
Product yourself, or use an un-authorized servicer; Bosch
will have no responsibility or liability for repairs or work
performed by a non-authorized servicer. If you choose to
have someone other than an authorized service provider
work on your Product, THIS WARRANTY WILL
AUTOMATICALLY BECOME NULL AND VOID. Authorized
service providers are those persons or companies that
have been specially trained on Bosch products, and who
possess, in Bosch's opinion, a superior reputation for
customer service and technical ability (note that they are
independent entities and are not agents, partners,
affiliates or representatives of Bosch). Notwithstanding
the foregoing, Bosch will not incur any liability, or have
responsibility, for the Product if it is located in a remote
area (more than 100 miles from an authorized service
provider) or is reasonably inaccessible, hazardous,
threatening, or treacherous locale, surroundings, or
environment; in any such event, if you request, Bosch
would still pay for labor and parts and ship the parts to
the nearest authorized service provider, but you would
still be fully liable and responsible for any travel time or
other special charges by the service company, assuming
they agree to make the service call.
Out of Warranty Product
Bosch is under no obligation, at law or otherwise, to
provide you with any concessions, including repairs, prorates, or Product replacement, once this warranty has
expired.
45
Page 46

Warranty Exclusions
The warranty coverage described herein excludes all defects or damage that are not the direct fault of Bosch, including without limitation, one or more of the following:
▯ Use of the Product in anything other than its normal,
customary and intended manner (including without
limitation, any form of commercial use, use or storage
of an indoor product outdoors, use of the Product in
conjunction with air or water-going vessels).
▯ Any party's willful misconduct, negligence, misuse,
abuse, accidents, neglect, improper operation, failure
to maintain, improper or negligent installation,
tampering, failure to follow operating instructions,
mishandling, unauthorized service (including selfperformed "fixing" or exploration of the appliance's
internal workings).
▯ Adjustment, alteration or modification of any kind.
▯ A failure to comply with any applicable state, local,
city, or county electrical, plumbing and/or building
codes, regulations, or laws, including failure to install
the product in strict conformity with local fire and
building codes and regulations.
▯ Ordinary wear and tear, spills of food, liquid, grease
accumulations, or other substances that accumulate
on, in, or around the Product.
▯ Any external, elemental and/or environmental forces
and factors, including without limitation, rain, wind,
sand, floods, fires, mud slides, freezing temperatures,
excessive moisture or extended exposure to humidity,
lightning, power surges, structural failures surrounding
the appliance, and acts of God.
In no event shall Bosch have any liability or responsibility
whatsoever for damage to surrounding property,
including cabinetry, floors, ceilings, and other structures
or objects around the Product. Also excluded from this
warranty are Products on which the serial numbers have
been altered, defaced, or removed; service visits to teach
you how to use the Product, or visits where there is
nothing wrong with the Product; correction of installation
problems (you are solely responsible for any structure
and setting for the Product, including all electrical,
plumbing or other connecting facilities, for proper
foundation/flooring, and for any alterations including
without limitation cabinetry, walls, floors, shelving, etc.);
and resetting of breakers or fuses.
TO THE EXTENT ALLOWED BY LAW, THIS WARRANTY
SETS OUT YOUR EXCLUSIVE REMEDIES WITH
RESPECT TO PRODUCT, WHETHER THE CLAIM ARISES
IN CONTRACT OR TORT (INCLUDING STRICT LIABILITY,
OR NEGLIGENCE) OR OTHERWISE. THIS WARRANTY
IS IN LIEU OF ALL OTHER WARRANTIES, WHETHER
EXPRESS OR IMPLIED. ANY WARRANTY IMPLIED BY
LAW, WHETHER FOR MERCHANTABILITY OR FITNESS
FOR A PARTICULAR PURPOSE, OR OTHERWISE,
SHALL BE EFFECTIVE ONLY FOR THE PERIOD THAT
THIS EXPRESS LIMITED WARRANTY IS EFFECTIVE. IN
NO EVENT WILL THE MANUFACTURER BE LIABLE FOR
CONSEQUENTIAL, SPECIAL, INCIDENTAL, INDIRECT,
"BUSINESS LOSS", AND/OR PUNITIVE DAMAGES,
LOSSES, OR EXPENSES, INCLUDING WITHOUT
LIMITATION TIME AWAY FROM WORK, HOTELS AND/
OR RESTAURANT MEALS, REMODELLING EXPENSES
IN EXCESS OF DIRECT DAMAGES WHICH ARE
DEFINITIVELY CAUSED EXCLUSIVELY BY BOSCH, OR
OTHERWISE. SOME STATES DO NOT ALLOW THE
EXCLUSION OR LIMITATION ON HOW LONG AN
IMPLIED WARRANTY LASTS, SO THE ABOVE
LIMITATIONS MAY NOT APPLY TO YOU. THIS
WARRANTY GIVES YOU SPECIFIC LEGAL RIGHTS, AND
YOU MAY ALSO HAVE OTHER RIGHTS WHICH VARY
FROM STATE TO STATE.
No attempt to alter, modify or amend this warranty shall be effective unless authorized in writing by an officer of BSH.
How to Obtain Warranty Service: To obtain warranty service for your Product, you should contact Bosch Customer Service Department.
BSH Home Appliances Corporation - 1901 Main Street,
Suite 600 / Irvine, CA 92614 / 1-800-944-2904
46
Page 47

Page 48

*9001267174*
9001267174
9709
1901 Main Street, Suite 600 • Irvine, CA 92614 • 1-800-944-2904
www.bosch-home.com • © 2012 BSH Home Appliances Corporation
 Loading...