

Page 1
Dishwashe
r
Lave Vaisselle
en Operating instructions
Guide d’Utilisation fr
8
8
928 157
Page 2

Page 3

Congratulations and thank you from Bosch!
Thank you for selecting a Bosch dishwasher. You have joined the many
consumers who demand quiet and superior performance from their
dishwashers.
This manual was written with your safety and convenience in mind, and
the information contained herein is very important. We highly recommend that you read this manual before using your dishwasher for the
first time.
To learn more about your dishwasher and available accessories, as well
as many other top quality Bosch appliances, visit our web site at:
www.bosch-home.com/us (USA)
or
www.bosch-appliances.ca (Canada)
If you have any questions or comments, please contact us at: 1-800-944-2904.
Table of Contents
Important Safety Instructions........................................................2-3
Dishwasher Components..................................................................4
Dishwasher Setup..........................................................................5-6
Dishware Materials...........................................................................7
Loading the Dishwasher..................................................................7-8
Rack Accessories.........................................................................9-10
Dishwasher Cycles and Options.......................................................11
Wash Cycle Information..................................................................11
Operating the Dishwasher...........................................................12-14
Care and Maintenance.....................................................................15
Self Help....................................................................................16-17
Customer Service............................................................................18
Warranty Information......................................................................19
Page 4

IMPORTANT SAFETY INSTRUCTIONS: Please READ
and SAVE this information
WARNING
Misuse of the dishwasher can result in serious injury or death. Do not use the dishwasher in any way
not covered in this manual or for any purpose other than those explained in the following pages.
Severe product damage and/or injury could result from the use of unqualified service technicians or
non-original replacement parts. All repairs must be performed by a qualified service technician using
only original equipment factory replacement parts.
Electrical shock or fire could result if the electrical supply for the dishwasher covered in this manual is
incorrectly installed or if the dishwasher has been improperly grounded. Do not use the dishwasher
covered in this manual unless you are certain the electrical supply has been correctly installed or the
dishwasher has been properly grounded.
Never use harsh chemicals to clean your dishwasher. Some chloride-containing products can damage
your dishwasher and may present health hazards!
NOTICE
Never use steam cleaning products to clean your dishwasher. The manufacturer will not be liable for
the possible damages or consequences.
It is highly recommended for the end user to become familiar with the procedure to shut off the incoming water supply and the procedure to shut off the incoming power supply. See the Installation Instructions or contact your installer for more information.
2
Page 5

WARNING: To reduce the risk of fire, electrical
shock, or serious injury, observe the following:
1 This dishwasher is provided with Installation Instructions and this Use and Care Manual. Read and
understand all instructions before using the dishwasher.
2 This appliance must be grounded to a metal, permanent wiring system, or an equipment grounding
conductor must be run with the circuit conductors and connected to the equipment grounding terminal or lead on the dishwasher. See the Installation Instructions included with this dishwasher
for more information on electrical requirements.
3 Use this dishwasher only for its intended function, which is the washing of household dishware
and kitchenware.
4 Use only detergents or rinsing agents recommended for use in a dishwasher, and keep them out of
the reach of children.
5 When loading items to be washed:
• Locate sharp items so they are not likely to damage the door seal.
• Load knives and other sharp utensils with their HANDLES UP to reduce the risk of cuttype injuries.
• Do not wash plastic items unless they are marked “dishwasher safe” or the equivalent.
For plastic items not so marked, check the manufacturer’s recommendations.
• Do not operate your dishwasher unless all enclosure panels are in place.
• Do not tamper with or override controls and interlocks.
6 Do not abuse, sit or stand on the door or dish racks of the dishwasher.
7 To reduce risk of injury, do not allow children to play in or on the dishwasher.
8 When children become old enough to operate the appliance, it is the legal responsibility of the par-
ents/legal guardians to ensure the children are instructed in safe practices by qualified persons.
9 Under certain conditions, hydrogen gas may be produced in a hot water system that has not been
used for two weeks or more. Hydrogen gas is explosive. Before using a dishwasher that is connected to a hot water system that has been unused for two weeks or longer, turn on all hot water
faucets and let the water flow from each for several minutes. This will release any accumulated
hydrogen gas. As the gas is explosive, do not smoke or use an open flame during this time.
10 Remove the dishwasher door to the washing compartment when removing an old dishwasher for
service or discarding.
11 To avoid floor damage and possible mold growth, do not allow wet areas to remain around or
under the dishwasher.
12 Protect your dishwasher from the elements. Protect against freezing to avoid possible damage to
the fill valve. Damage caused by freezing is not covered by the warranty.
13 For a cord-connect appliance:
• This appliance must be grounded. In the event of a malfunction or breakdown, ground-
ing will reduce the risk of electric shock by providing a path of least resistance for electric current. This appliance is equipped with a cord having an equipment-grounding
conductor and a grounding plug. The plug must be plugged into an appropriate outlet
that is installed and grounded in accordance with all local codes and ordinances.
• Improper connection of the equipment-grounding conductor can result in risk of elec-
tric shock. Check with a qualified electrician or service representative if you are in
doubt whether the appliance is properly grounded. Do not modify the plug provided
with the appliance, if it will not fit the outlet, have a proper outlet installed by a qualified electrician.
State of California Proposition 65 Warnings:
WARNING: This product contains one or more chemicals known to the State of California to cause cancer.
WARNING: This product contains one or more chemicals known to the State of California to cause birth defects
or other reproductive harm.
3
Page 6
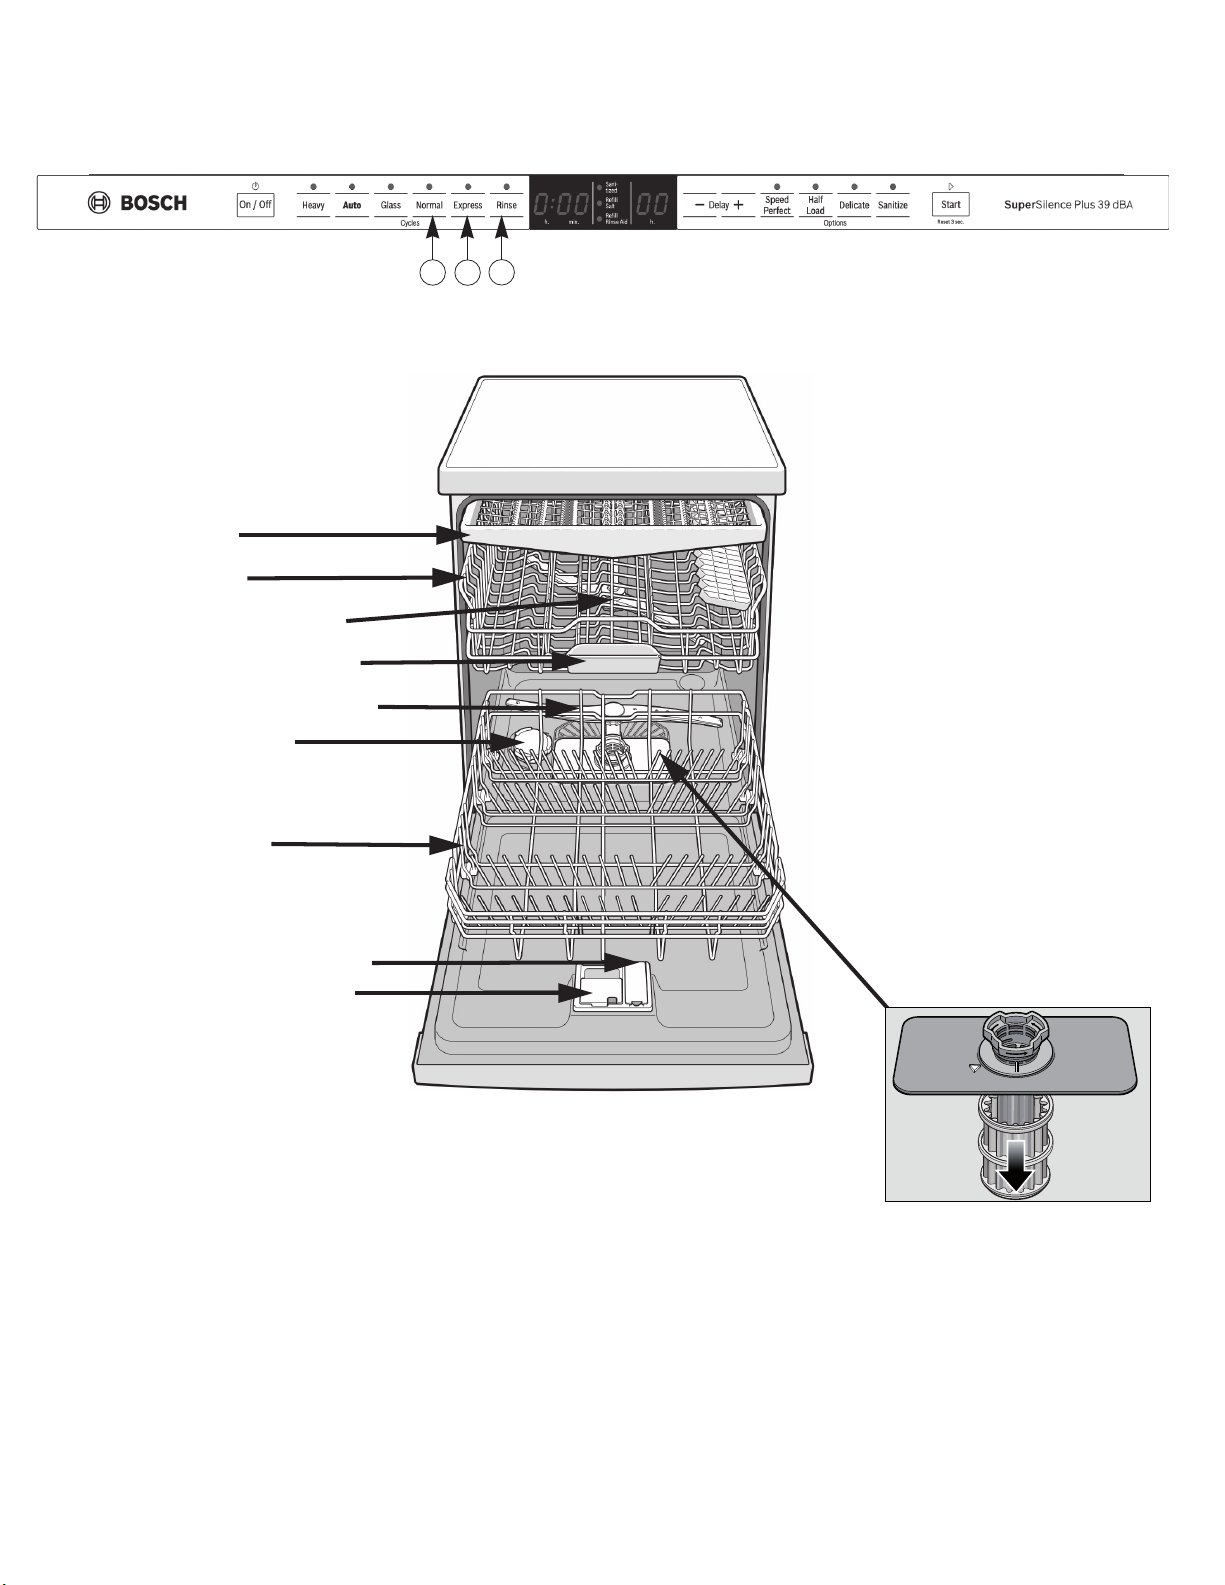
Dishwasher Components
SHX9PT55UC, SHV9PT53UC
A
B
C
3rd Rack
Top rack
Top rack spray arm
Tablet collecting tray
Bottom rack spray arm
Salt container
Bottom rack
Rinse agent dispenser
Detergent dispenser
Filter system
4
Page 7
Dishwasher Setup
Water Softening System
Your dishwasher requires soft water to ensure proper washing results and is equipped with an internal
water softening system. However, if you have a household water softening system, the internal system
provided is not needed.
For the water softening system to function properly, it will need to use the dishwasher water softening
salt. The amount of salt dispensed can be set from “H:00” to “H:07”. Salt is not required at H:00 (this is
the default factory setting). The amount of salt required depends on the degree of hardness of your tap
water. See Table 1.
1 Turn the unit on using the [ON/OFF] button.
2 Hold down the “A” button (see page 4) and press [START] until the display indicates “H:00”.
3 Release both buttons.
4 Press the “C” button to select the desired setting.
5 Save the selected setting by pressing [START].
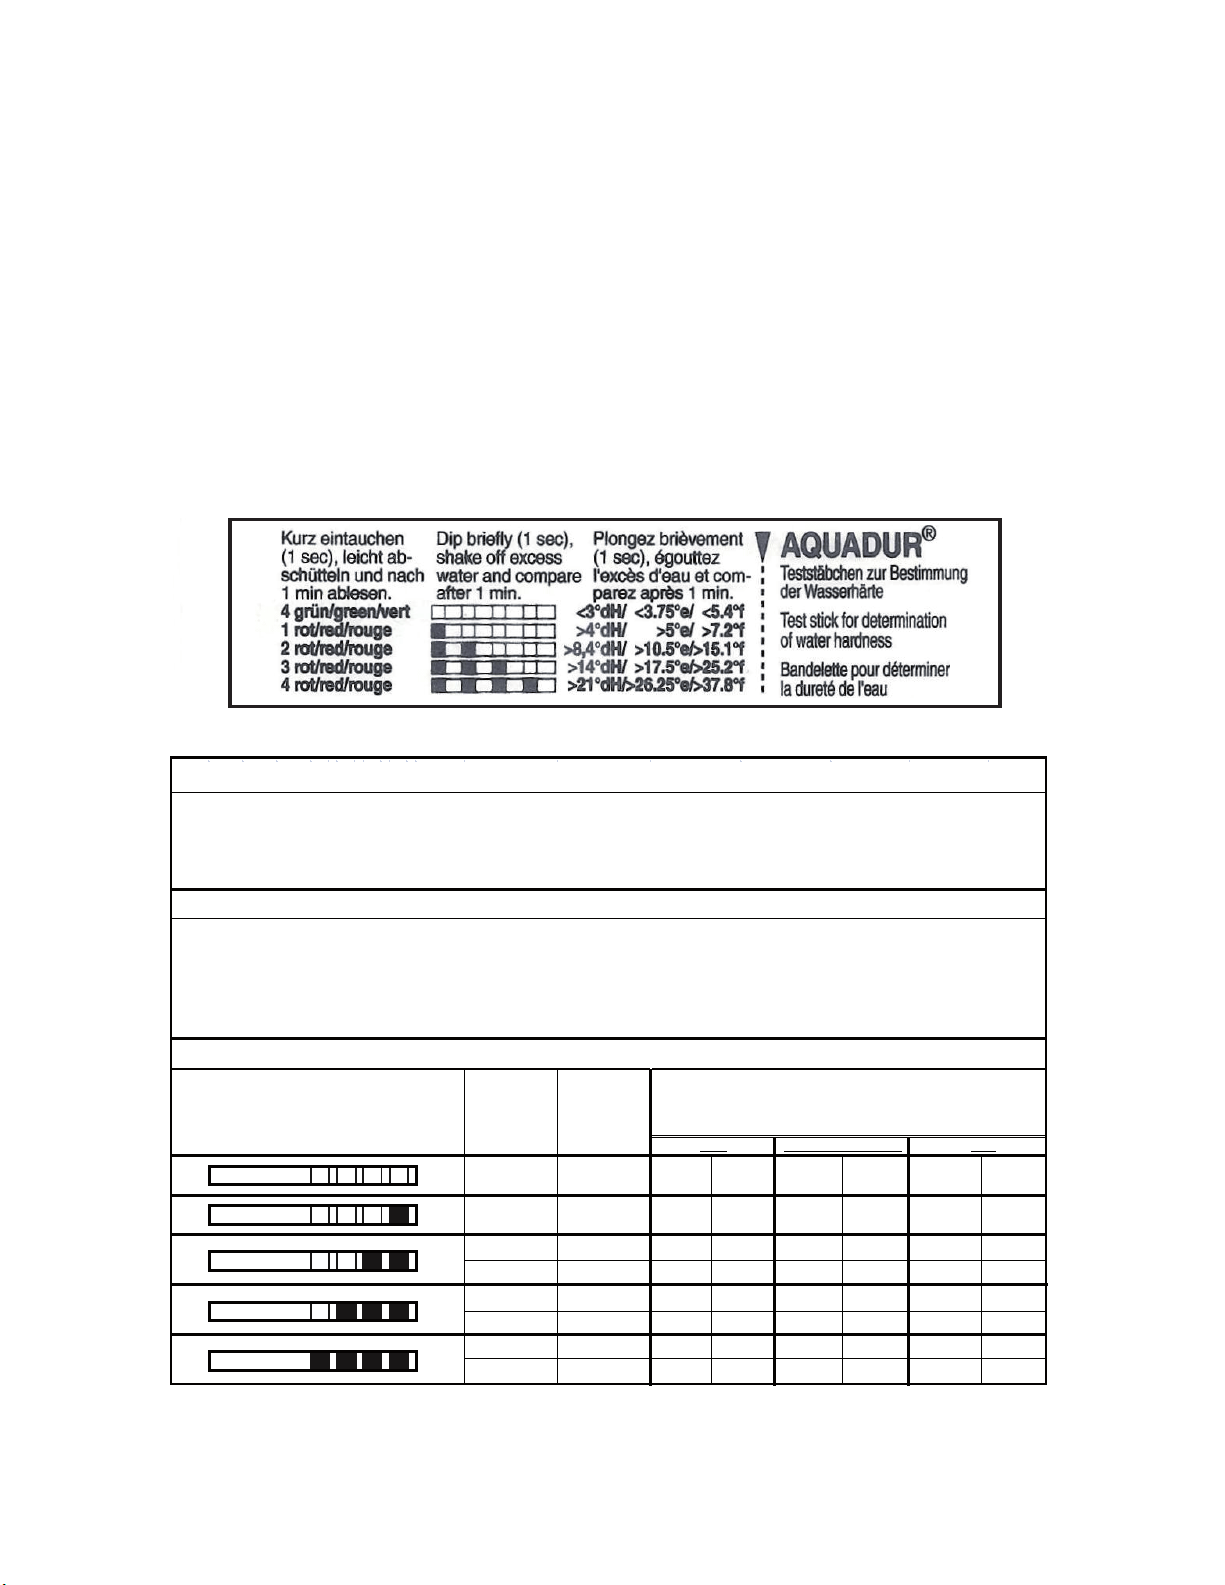
Using the water hardness test strip
Hard Water and your Dishwasher
Your water hardness level directly impacts your dishwasher's performance. Hard water will increase spotting and reduce detergent performance. Some dishwasher models are equipped with a water softener that uses a special salt to adjust the water hardness to obtain optimal
performance. The dishwasher salt is added to the salt chamber located under the lower dishwasher rack. The amount of salt that is dispensed
is based on your home water hardness. The home water hardness can be determined by using the water hardness test strip included in your
manual set (or from your local hardware store). The dishwasher water softener setting must be adjusted to match your water hardness.
Instructions for use of included "Water Hardness Test Strip"
Only use salt designed for automatic dishwashers. Never use household water softener salt or table salt.
Follow the instructions below for the included test strip (If purchasing a different test strip, follow manufacturers ins tructions).
Step 1 - Run the water at the k itc hen sink for 5 minutes .
Step 2 - Dip the end of the test st rip with the colored squares into the tap water for 1 second and shake off exces s water.
Step 3 - After one minute, compare t he test strip to the chart below and determine the Dishwasher W ater Softener setting.
Step 4 - Adjust the dishwasher Wat er Softener setting. Consult your Use and Care manual for details.
Step 5 - If required, add salt to the dishwasher salt chamber as shown.
Adjusting the Water Softener Setting of your Dishwasher (select models)
Using the Test Strip included with your dishwasher
(Purchased Test St rips May have a Different Scale)
Dishwasher
Water Softener
setting
H:00 No 0 116 0 6 0 6
H:01 Y es 117 152 7 8 7 8
H:02 Y es 153 188 9 10 9 10
H:03 Y es 189 223 11 13 11 12
H:04 Y es 224 294 14 17 13 16
H:05 Y es 295 383 18 22 17 21
H:06 Y es 384 544 23 31 22 30
H:07 Y es 545 890 32 52 31 50
Add salt to
dishwasher salt
chamber
Water Hardness Conversion Chart (Only necessary if
you purchase a different Test Strip)
ppm Grains/gallon (gpg) °dH
5
Page 8
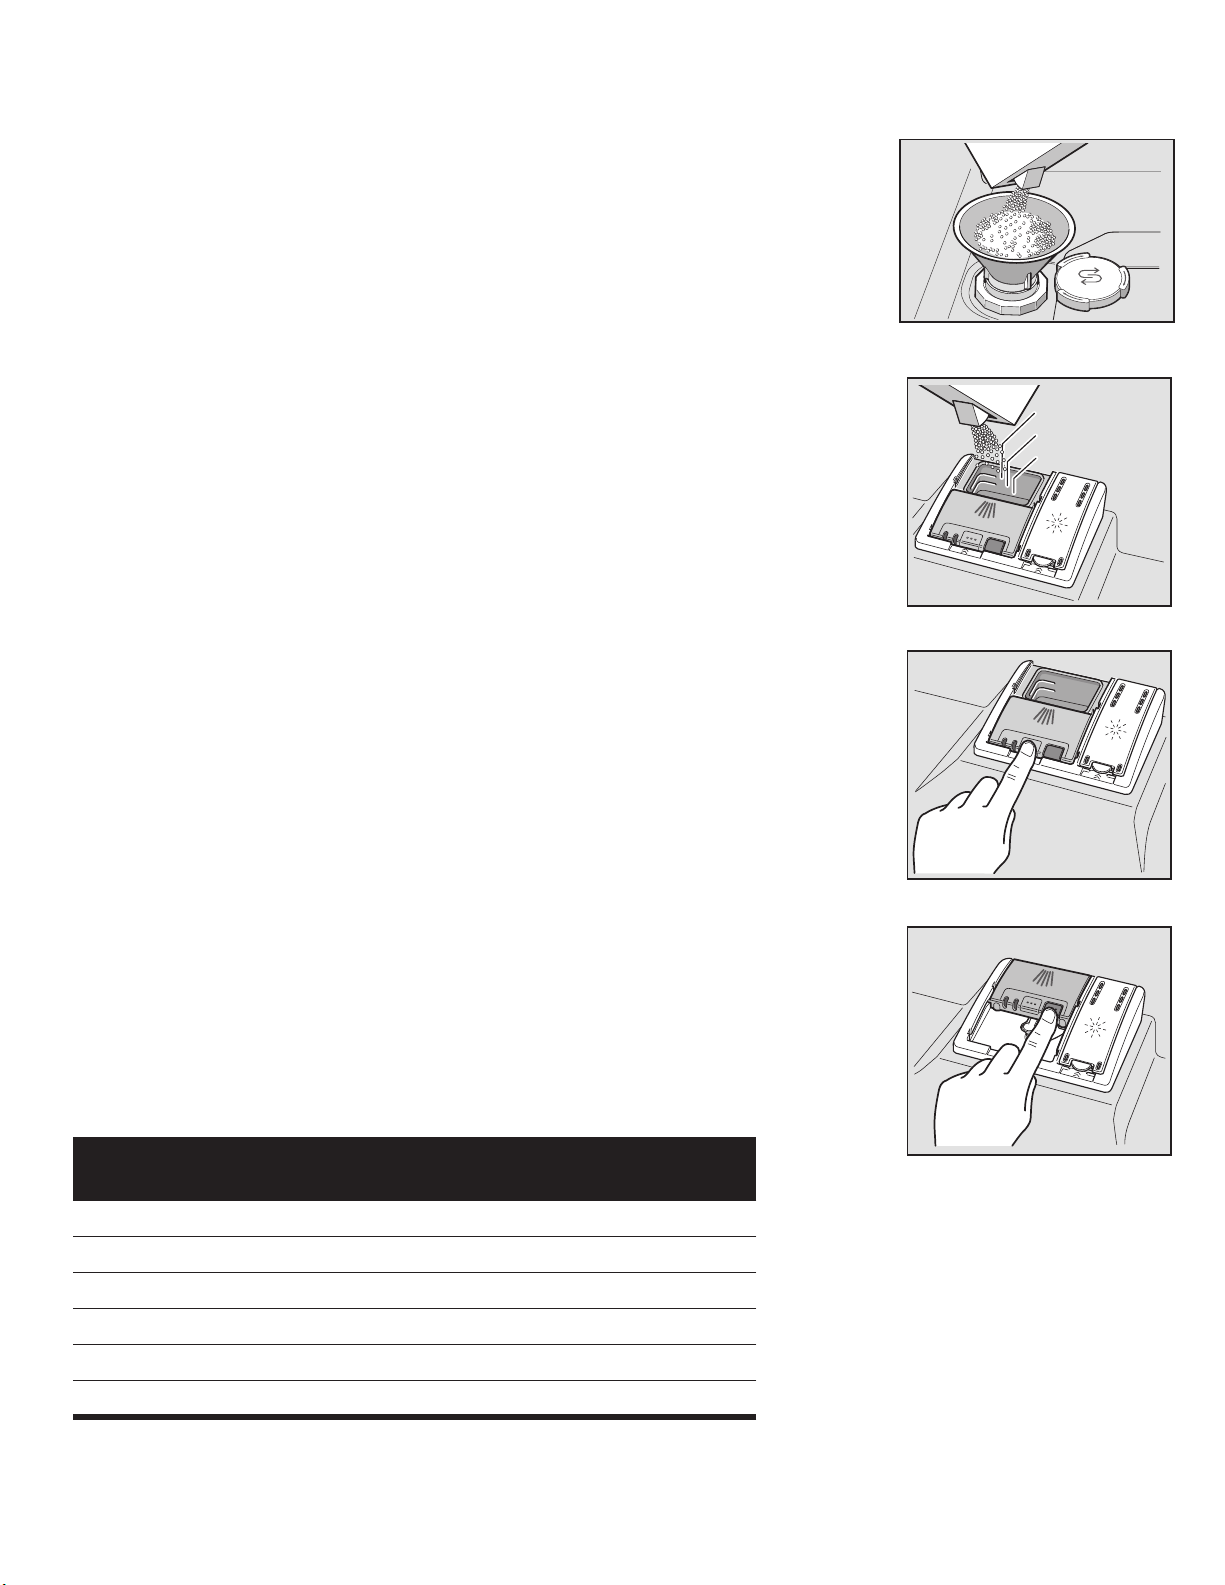
Salt
Refill the salt container, using a funnel to pour, right before turning on the
unit to ensure that salt overflow is immediately washed away. This prevents
corrosion. See Figure 1.
1 Open the screw cap of the salt container.
2 Fill the container with water (only required when turning on the unit for the
first time).
3 Add dishwasher salt until the was is displaced and runs out.
4 Refill with salt as soon as the salt refill indicator is lit.
Notice: Never fill the salt dispenser with detergent. It will destroy the water
softening system. To prevent corrosion, refill with salt and immediately begin
any cycle.
Note: Refill salt only when the “Refill Salt” LED is lit.
Do not use salt tablets or any salt other than dishwasher water softening salt.
For more information about ordering salt please contact Customer Service.
Detergent
Use only detergent specifically designed for dishwashers.
Note: To avoid dishwasher damage, do not use hand dishwashing products in your
dishwasher.
The dishwasher uses less water, therefore, less detergent is required. With
soft water, 1 tablespoon (15ml) of detergent will clean most loads. The detergent dispenser cup has lines that measure detergent (Figure 2) to 1 table-
spoon (15ml) and 1.75 tablespoons (25ml). 3 tablespoons (45ml) of
detergent will completely fill the detergent dispenser.
Note: If you do not know the hardness of your water supply, use 15ml of detergent. Increase the amount if necessary to the least amount required to get your
kitchenware clean.
Figure 1
Figure 2
7EVS0D[
7EVSPO
7EVSPO
Figure 3
Use the measuring lines in the detergent dispenser cup as a guide to measure
the amount of detergent recommended in Table 2.
To Close:
• Place finger as shown in Figure 3.
• Slide door closed and press down firmly until it clicks.
To Open:
• To open the cover, push the button as shown in Figure 4.
• Cover will slide open.
Table 2- Recommended Detergent Amount
Wash Cycle
Heavy 45ml (3tbsp) 45ml (3tbsp) 25-45ml (1.75-3tbsp)
Auto 25-45ml (1.75-3tbsp) 25ml (1.75tbsp) 15-25ml (1-1.75tbsp)
Glass 25ml (1.75tbsp) 15-25ml (1-1.75tbsp) 15ml (1tbsp)
Normal 25-45ml (1.75-3tbsp) 25ml (1.75tbsp) 15-25ml (1-1.75tbsp)
Express 25ml (1.75tbsp) 15-25ml (1-1.75tbsp) 15ml (1tbsp)
Rinse none none none
Hard Water/
Heavy Soil
Medium Water/
Medium Soil
Soft Water/
Little Soil
Figure 4
6
Page 9

Rinse Aid
To achieve proper drying, always use a liquid rinse aid, even if your detergent
contains a rinse aid or drying additive.
Note: The dishwasher indicates low rinse aid by turning on the Refill Rinse Aid LED
in the display. If this light is on, you need to refill the rinse aid dispenser by following the directions below.
Adding Rinse Aid
Add liquid rinse aid to the dispenser until the reservoir is full (see Figure 5).
Wipe up any excess rinse aid that may puddle when the dispenser reservoir is
full. The indicator light will go out a few moments after the dishwasher door is
shut.
See page 12 for how to adjust the amount of rinse aid dispensed.
Figure 5
Dishware Materials
Note: Before using your dishwasher for the first time, check the information in this section. Some items are
not dishwasher safe and should be hand washed; others require special loading.
Recommended
Aluminum: Colored anodized aluminum may fade over time. Minerals in your water may cause the alu-
minum to darken or spot. This can usually be removed with a soap-filled steel wool pad.
China, Crystal, Stoneware: Some hand-painted utensils may discolor, fade or spot. Hand wash these
utensils. Position fragile glassware so that it will not fall over or come in contact with other utensils
during the wash cycle.
Glass: Milk glasses may discolor or become yellow.
Non-stick Coatings: Apply a light coating of vegetable oil to non-stick surfaces after drying.
Plastics: Make sure the plasticware is dishwasher safe.
Stainless Steel, Sterling Silver and Silver Plates: Load these so they do not come in contact with
other metals.
Not Recommended
Acrylic: Crazing, small cracks throughout the acrylic, may occur.
Adhesive-Joined Pieces: Adhesives that join materials such as plastic, wood, bone, steel, copper, tin,
etc. may loosen.
Bone-Handled Utensils: Handles may separate.
Iron: Iron will rust. Hand wash and dry immediately.
Non-Dishware Items: Your dishwasher is intended for use in cleaning ONLY standard household dish-
ware and kitchenware.
Pewter, Brass, Bronze: These items will tarnish. Hand wash and dry immediately.
Tin: Tin will stain. Hand wash and dry immediately.
Wood: Wooden bowls, wooden utensils and utensils with wooden handles can crack, warp and lose
their finish.
Loading the Dishwasher
Do not pre-wash items with loosely attached soiling. Remove all food particles, bones, toothpicks and
excessive grease. Items having burned-on, baked-on or starchy soils may require some pretreatment.
Refer to the Dishware Materials section for more information about dishware suitability.
Load only dishwasher safe items into the dishwasher. Load dishes in the dishwasher racks so the
insides of bowls, pots and pans are facing the spray arms. Avoid nesting and contact points between
dishes. Separate items of dissimilar metals.
7
Page 10
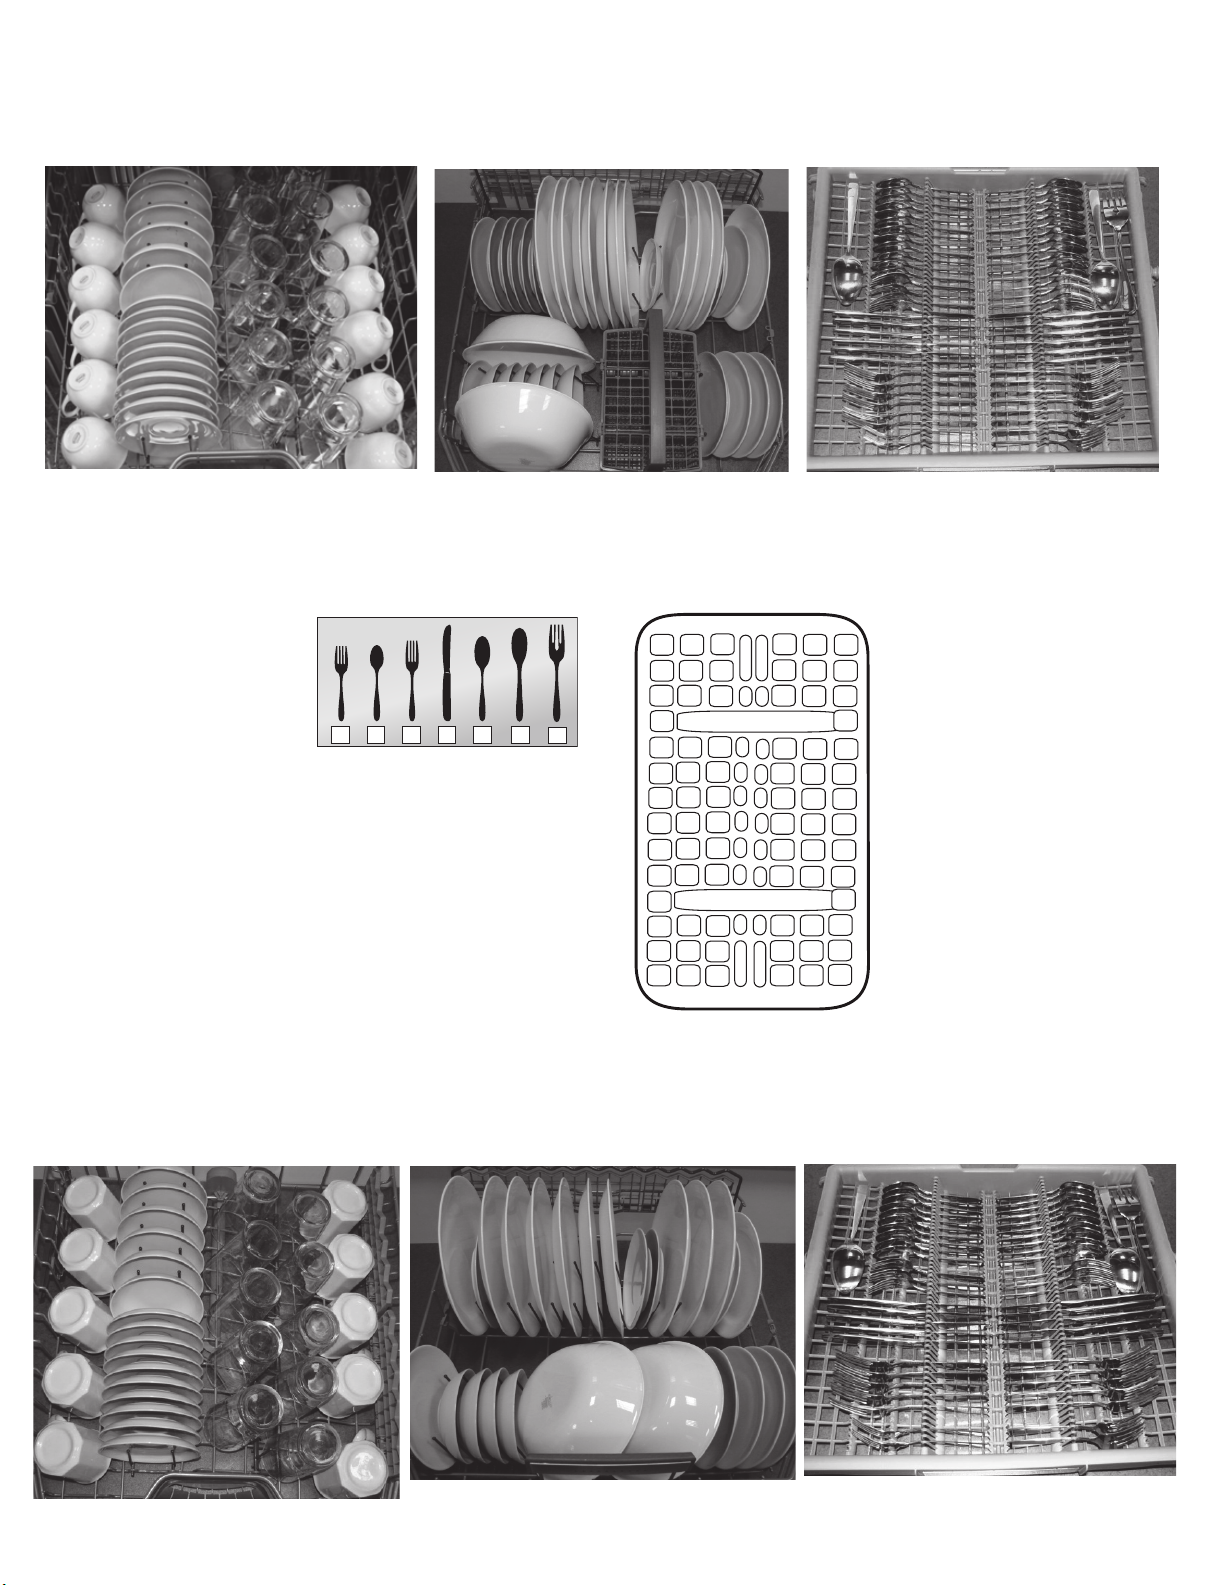
Suggested Loading Pattern for Dishes
Top Rack
Bottom Rack
Silverware Basket
3
6
3
3
44 4
7
111
4
4
3
33
3rd Rack
4
Top Rack
12345
1- Salad fork
2- Teaspoon
3- Dinner fork
4- Knife
5- Tablespoon
6
7
5
5
5
5
5
5
5
5
5
5
5
5
2
2
2
2
1
1
11
22
2
2
2
2
2
2
11
6- Serving spoon
33
6
4
3
7- Serving fork
3
3
3
444
11
1
44
Suggested Loading Pattern for Dishes (10 place settings)
Bottom Rack
3rd Rack
8
Page 11
Rack Accessories
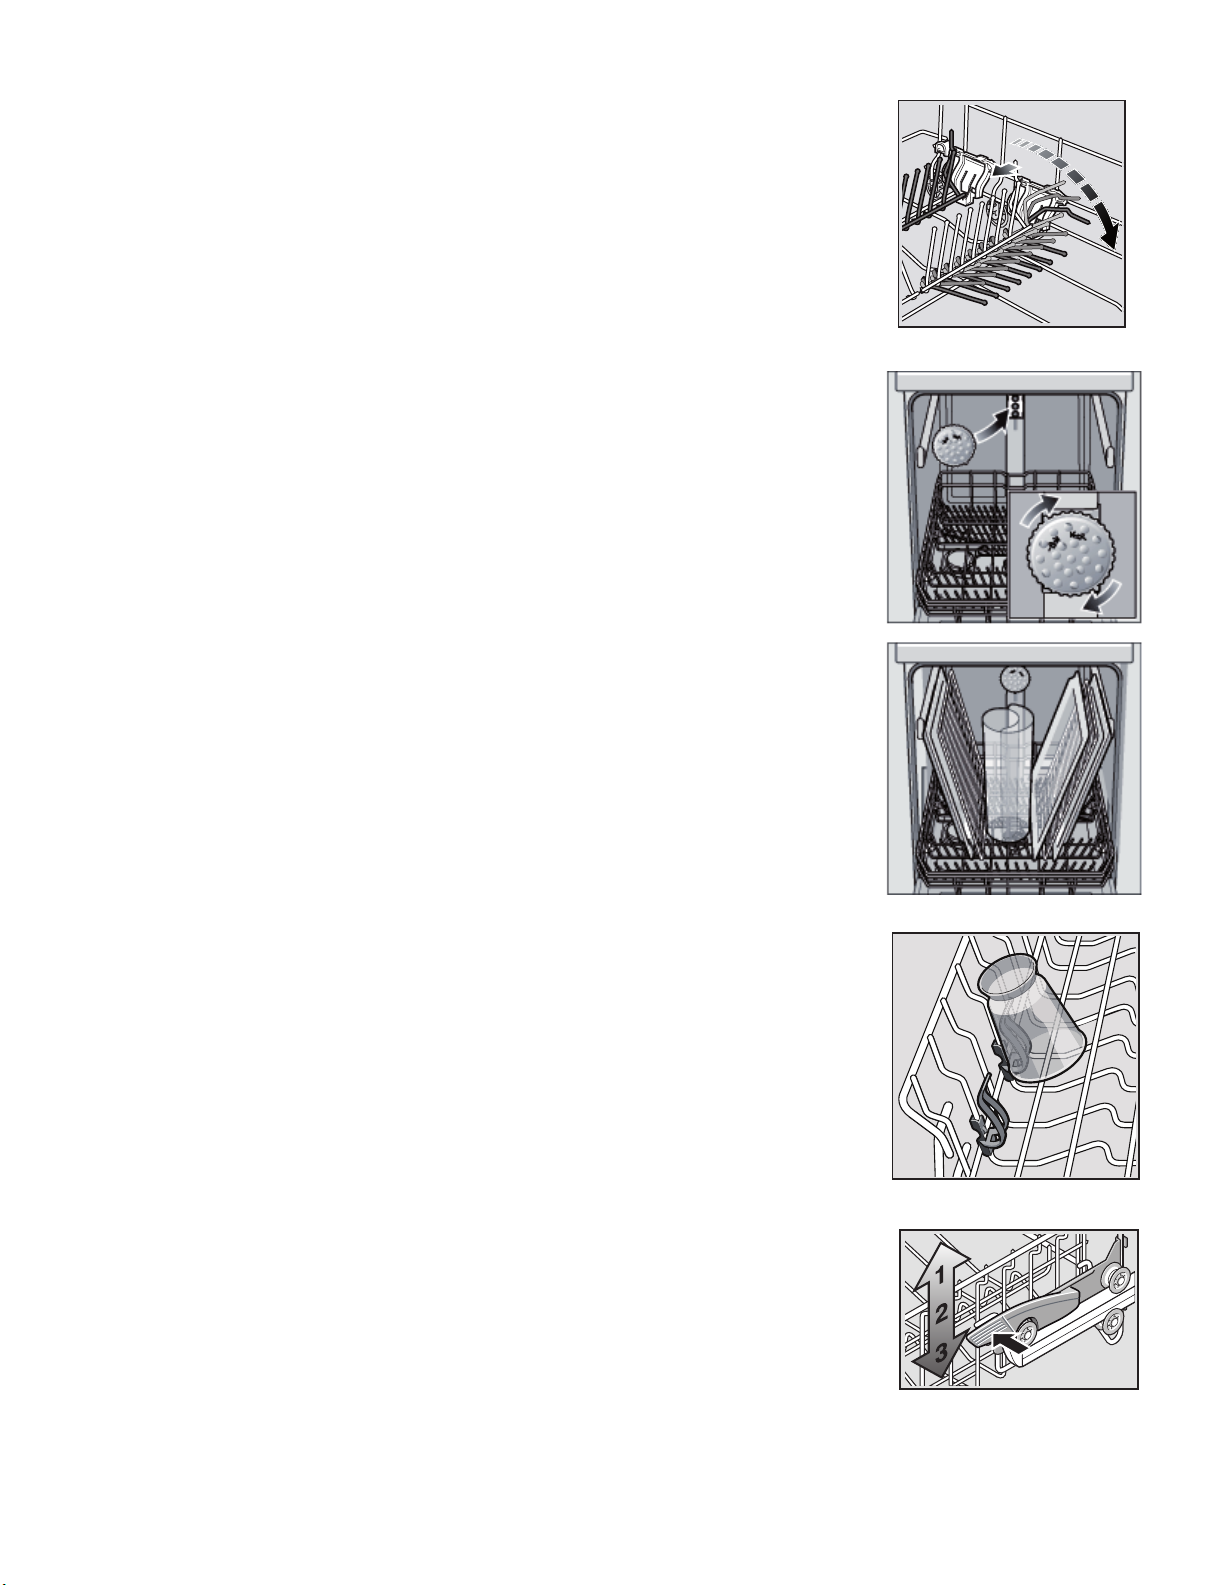
Flip Tines
The racks consist of tines that can be folded down depending on what you
may need to load in the rack. To fold down, grasp the folding tine and release
from notch. Push folding tine downward to desired position as shown in Fig-
ure 6.
Extra Tall Item Sprinkler
If an item is too tall to be placed in the bottom rack even with the top rack
in the raised position, remove the empty top rack by pulling it out of the
dishwasher until it stops. Pull the front of the rack upward and outward
until the rollers are completely free of the roller guides.
Set the top rack aside. Push the roller guides back into the dishwasher.
Insert the Extra Tall Item Sprinkler into the top rack spray outlet and turn
the sprinkler clockwise to lock into position. See Figure 7.
Note: Keep the vent on the tub’s right side clear by placing tall items such as
plastic cutting boards and tall baking sheets on the bottom rack’s left side or
center.
Figure 6
Figure 7
NOTICE
To avoid dishwasher damage, do not reinstall the top rack without removing
the Extra Tall Item Sprinkler.
Plastic Item Clips
Light-weight plastic accessories (cups, lids, etc.) can be held securely by the
plastic item clips. See Figure 8.
3-Step RackMatic®
The height of the upper rack can be adjusted in 3 steps to create more space.
1 Pull the top rack out of the dishwasher until it stops.
2 To lower the rack, push the lever inward then upward.
3 To raise the rack, hold the basket on the sides of the upper rack and lift
up.
Figure 8
Figure 9
Note: Before pushing the top rack into the dishwasher, ensure the rack height is
the same on both sides. If the height is not the same on both sides, the dishwasher door will not shut and the top rack spray arm will not connect to the water inlet.
9
Page 12
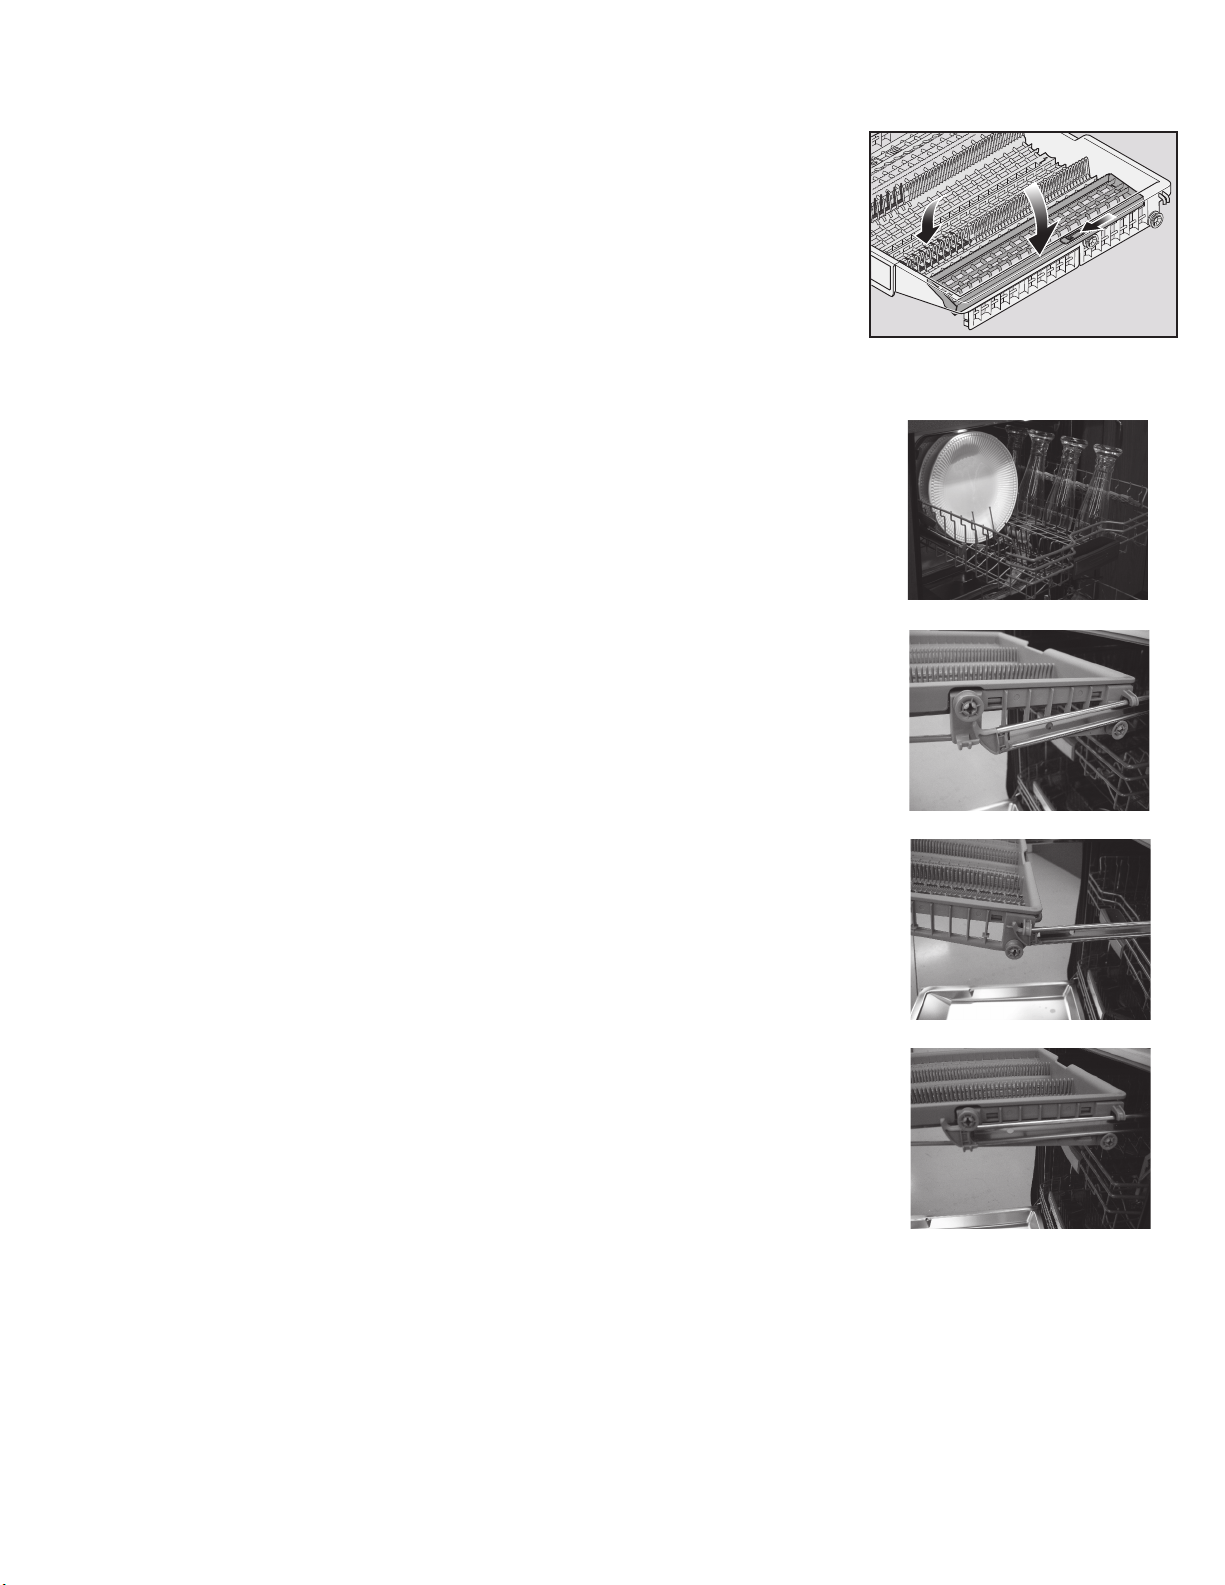
Cutlery Drawer
The cutlery drawer horizontally positions knives, spatulas and other oversized tools for improved cleaning and easier loading and unloading. The
sides of the cutlery drawer can be raised and lowered as shown in Figure
10 to accomodate larger items.
When loading large items such as pilsner glasses or 10” plates in the upper
rack (as seen in Figure 11), the drawer can be removed to allow more room.
Figure 10
Figure 11
To remove:
• Pull empty drawer out of dishwasher until it stops rolling.
• While pulling toward you, lift the front of the drawer upward and outward
(see Figure 12) until the rollers are completely free of the roller guides.
• Place empty drawer in safe place.
To reinstall:
• Pull the roller guides on both sides out of the dishwasher.
• Position drawer hooks on top of the roller guides (see Figure 13).
• While holding one roller guide, slide drawer’s top wheel over the roller
guide stop (see Figure 14).
• Repeat on other side.
• Slide drawer back into dishwasher.
Figure 12
Figure 13
Figure 14
10
Page 13

Dishwasher Cycles and Options
Wash Cycles
Heavy: Best for cleaning items with baked-on food or grease. These dishes would normally require soaking.
Auto: With our most complex soil sensing capability, this cycle is perfect for use with mixed loads of dishware and varying
amounts of food soil. This is the most flexible cycle and is a good choice for everyday use.
Glass: A cycle for lightly soiled dishes, ideal for temperature sensitive items or cutlery. In this cycle the temperature is reduced to
help prevent dishes from becoming damaged. It is especially helpful to reduce a cloudy or etched appearance on glasses.
Note: Some glasses are more prone to etching due to glass manufacturing processes.
Normal: Thoroughly cleans a full load of normally soiled dishes.
Note: The Energy Guide Label was based on this soil sensing cycle with all available options turned off. As prescribed in the energy test procedure, the unit was tested without any Rinse Aid in the Rinse Aid dispenser. A single dose of detergent was used in the Detergent Dispenser, with
no detergent used in the prewash. For models with a 3rd rack, the test was conducted with the upper rack in the middle position.
Express: Cleans lightly soiled dishes and reduces overall wash time. Use this cycle to clean glasses and dessert dishware that may need to be reused at the same event.
Rinse: Allows you to rinse food soil off of a partial load and hold the dishes in the dishwasher until you are ready to
run a full load. Do not use detergent in this cycle.
Wash Cycle Options
Delay: Allows you to delay the start time of your dishwasher up to 24 hours.
Speed Perfect: The Speed Perfect option is available with Heavy, Auto, Eco and Normal cycles.
Half Load: The Half Load option can reduce the energy and water consumption when washing small, lightly soiled loads
that fill approximately half of the dishwasher’s capacity.
Delicate: The Delicate option is available only in the Heavy, Auto and Nomral cycles. This cycle is best used for lightly soiled
items with easy to remove food soils.
Sanitize: The Sanitize feature is available only in the Heavy, Auto and Normal cycles. Select one of these cycles, press the
“Sanitize Option” button and then press Start to activate the Sanitation features. The sanitize LED will light when sanitation
requirements are met. The technical sanitation measures may also improve the drying results.
Note: The dishwasher automatically defaults to Auto Wash when turned off and back on. If you used the sanitize option in your
last cycle, the dishwasher will default to Auto Wash with the Sanitize option selected when you turn it on.
11
Page 14

Wash Cycle Information
The cycle times in this Use and Care Manual are based on normal soil loads and 120°F incoming water and will vary
based on your actual conditions
cycle time 110-135 min 105-129 min 80-85 min 130-135 min 30 min 9 min
.
Table 3 - Wash Cycle Information
Heavy Auto Glass Normal Express Rinse
water consumption 18.6-24.2 L
4.9-6.4 gal
wash temperature 66-71°C
150-160°F
rinse temperature 72°C
162°F
Speed Perfect
cycle time 95-110 min 75-90 min 60-70 min 95-105min n/a n/a
water consumption 16.3-20.5 L
4.3-5.5 gal
Half Load
cycle time 115 min 95-105 min 75-80 min 90-99 min n/a n/a
water consumption 17.9 L
4.8 gal
Delicate
cycle time 105-110 min 90-105 min n/a 100-120 min n/a n/a
water consumption 18.6-24.2 L
4.9-6.4 gal
Sanitize
cycle time 130-150 min 125-150 min n/a 135-155 min n/a n/a
water consumption 18.6-24.2 L
4.9-6.4 gal
13.1-24.5 L
3.5-6.5 gal
53-66°C
127-150°F
70°C
158°F
16.1-20 L
4.3-5.3 gal
10.2-16.5 L
2.7-4.4 gal
13.1-24.5 L
3.5-6.5 gal
13.1-24.5 L
3.5-6.5 gal
9.3-14.5 L
2.5-3.8 gal
45-50°C
113-122°F
62°C
144°F
9.2-12.5 L
2.4-3.3 gal
9.3-12.5 L
2.5-3.3 gal
n/a 8.8-20.8 L
n/a 8.8-20.8 L
16.6-21.1 L
8.8-20.8 L
2.4-5.5 gal
45-55°C
113-131°F
62-69°C
140-156°F
4.4-5.6 gal
10.8-13.9 L
2.8-3.7 gal
2.4-5.5 gal
2.4-5.5 gal
10.5 L
2.8 gal
45°C
113°F
50°C
122°F
n/a n/a
n/a n/a
n/a n/a
n/a n/a
1.1 gal
incoming
incoming
4.1 L
Note: Only sanitizing cycles have been designed to meet the requirements of 6 for soil removal and sanitization efficacy. There is no intention, either directly or indirectly, that all cycles have passed sanitization performance tests.
Operating the Dishwasher
Start the dishwasher
1 Press the [On/Off] button. The LED of the last selected cycle flashes.
2 Select a cycle and desired options.
3 Press [Start].
Cancel a cycle
1 Press and hold the [Start] button for approximately 3 seconds until the display reads “0:01”.
2 Wait about 1 minute while the dishwasher drains.
3 Open the door and press the [On/Off] button.
Interrupt a cycle
1 Press the [On/Off] button to turn the unit off.
2 To resume the cycle, press the On/Off button again.
12
Page 15

Setting the amount of rinse aid
The amount of rinse aid dispensed can be set from “r:00” to “r:06”.
To change the setting:
1 Press the [On/Off] button.
2 Hold down the “A” button (see page 4) and press [Start] until the display indicates “H:00”.
3 Release both buttons.
4 Press the “A” button until the display shows “r:05”.
5 Press the “C” button to select the desired setting.
“r:00” = dispenser is OFF
“r:01” = lowest setting
“r:02” = low setting
“r:03” = medium setting
“r:04” = medium/high setting
“r:05” = high setting
“r:06” = highest setting
6 Press [Start] to save the setting.
Delay Start
You can delay the start of the cycle in one hour increments up to 24 hours.
To set delay start:
1 Press the [On/Off] button.
2 Press the [+] button until the display jumps to “h:01”.
3 Press the [+] or [-] button until the displayed time corresponds with your requirements.
h:01 = 1 hour delay
h:24 = 24 hour delay
4 Press [Start] to activate delay start.
To cancel delay start:
1 Press the [+] or [-] button until “h:00” is indicated on the digital display.
2 Press [Start] to save setting.
Cycle Completion Signal
1 Open the door and press the [On/Off] button.
2 Hold down the “A” button (see page 4) and press [Start] until the display indicates “H:00”.
3 Release both buttons.
4 Press the “A” button until the display shows “b:02”.
5 Press the “C” button to increase or decrease the tone “b:00” = OFF and “b:03” = LOUDEST
6 Press [Start] to save setting and close the door.
Intensive Drying
The final rinse uses a higher temperature which improves the drying results. The running time may
increase slightly.
To turn intensive drying on:
1 Press the [On/Off] button.
2 Hold down the “A” button (see page 4) and press [Start] until the display indicates “H:00”.
3 Release both buttons.
4 Press the “A” button until the display shows “d:00”.
5 Press the “C” button to turn intensive drying on or off. “d:01” = ON and “d:00” = OFF
6 Press [Start] to save setting and close the door.
13
Page 16

Auto Power Off
To save energy, the dishwasher is turned off 1 minute after the wash cycle ends. Auto Power Off can be
adjusted from P:00 to P:02.
To change the factory setting (P:00):
1 Press the [On/Off] button.
2 Hold down the “A” button and press [Start] until the display indicates “H:00”.
3 Release both buttons.
4 Press the “A” button until the display indicates “P:01”.
5 Press the “C” button until the display corresponds with your requirements.
P:00 = dishwasher does not turn off automatically
P:01 = dishwasher turns off automatically after 1 minute
P:02 = dishwasher turns off automatically after 120 minutes (2 hours)
6 Press [Start] to save the setting.
InfoLight
An LED illuminates the floor to indicate the unit is running. If the appliance is installed at eye-level, the LED is not visible.
To change the setting:
1 Open the door and press the [On/Off] button.
2 Hold down the “A” button (see page 4) and press [Start] until the display indicates “H:00”.
3 Release both buttons.
4 Press the “A” button until the display shows “1:01”.
5 Press the “C” button to switch between “1:01” = ON and “1:00” = OFF and press [Start] to save.
Sapphire Glow®
The interior light comes on when the door is opened, even if the unit is powered off.
When the door is closed or slightly ajar, the interior light is off.
To change setting:
1 Open the door and press the ON/OFF button.
2 Hold down the A button and press and hold START until the display indicates “H:00”.
3 Release both buttons. The LED for the A button flashes and display indicates “H:00”.
4 Press the A button until the display shows “P:00” (factory setting or your previous setting).
5 Press the C button to switch between “P:00” = ON and “P:01” and “P:02” = OFF and press START
to save the setting and close the door.
14
Page 17

Care and Maintenance
A regular inspection and maintenance of your machine will help to prevent faults. This saves time and
prevents future problems.
Overall condition of the machine
Never use a steam cleaner to clean your dishwasher. The manufacturer is
not liable for any consequential damage.
Regularly wipe the front of the appliance with a damp cloth - water and a
small amount of liquid soap is adequate. Do not use sponges with a rough
surface or abrasive detergents, as these could scratch the surfaces.
Stainless steel appliances: To prevent corrosion, avoid using sponge cloths.
Clean the outer edges of the inside door panel regularly to remove debris
that may collect from normal loading. If spots begin to appear on the stainless steel, make sure the rinse agent is full and functioning properly.
Filters
The filter system consists of a coarse filter, a flat fine filter and a micro filter. The filters keep large foreign objects in the rinsing water away from the
pump. Foreign objects may occasionally block the filters.
Check the filters for residue by:
• Unscrew the filter cylinder as illustrated in Figure 15-16 and take out the
filter system.
• Remove any residue and clean filters under running water.
• Reinstall filter system in reverse sequence and ensure that the arrow
marks are facing each other after locking it into place.
Figure 15
Figure 16
Figure 17
Spray Arms
Check spray arms for grease and limescale deposits.
If you find such deposits:
• Fill detergent dispenser with detergent and start the appliance without
utensils in the cycle with the highest rinsing temperature (see wash cycle
information table).
• Clean the appliance with detergents/ appliance cleaners which are partic-
ularly suitable for use with dishwashers.
• Unscrew the spray arms and inspect as shown in Figure 17.
Waste water pump
Large food remnants in the rinsing water not retained by the filters may
block the waste water pump. the rinsing water does not get pumped out and
covers the filters.
In this case:
• Disconnect the appliance from the power supply.
• Remove the filters.
• Scoop out standing water - use a sponge if necessary.
• Using a spoon, pry off the pump cover (see Figure 18-19) until it clicks,
then grip the cover and pull upward until it resists and then pull forward.
• Check inner compartment and remove any foreign objects.
• Place cover in the original position, press down and engage.
• Reinstall filters.
Figure 18
Figure 19
&OLFN
15
Page 18

Self Help
Dishwashers may occasionally exhibit problems that are unrelated to a malfunction of the dishwasher itself. The
following information may help you with a dishwasher problem without involving a repair professional.
Problem Cause Action
Dishwasher
does not start
Dishwasher
beeping (end
of cycle signal)
Display does
not illuminate
or console
lights are not
on
Dishwasher
seems to run
a long time
1. Door may not be properly latched
2. Unit may not be turned on
3. Unit not reset or previous cycle not completed
4. Delay start engaged
5. Interruption of electrical power supply to dishwasher or blown fuse.
6. The door may have been closed without first
selecting a cycle
7. Water supply may not be turned on
1. Default factory settings alert the customer that
the cycle is complete by beeping. This feature can
be deactivated if so desired.
1. A fuse may have been blown or circuit breaker
tripped
2. Door not closed or latched
Note: For models with controls on top of the door,
the display only illuminate when the door is opened
and controls are visible.
1. Incoming water is not warm enough
2. Cycle time can vary due to soil and water conditions
3. Rinse agent dispenser is empty
4. Dishwasher connected to cold water supply
Note: Refer to “wash cycle information” section in
this manual for typical cycle lengths
1. Shut the door completely
2. Press the main power switch to turn unit on
3. To reset, refer to “cancelling or changing cycle”
in this manual
4. To reset, refer to “delay start” section in this manual
5. Check circuit breaker
6. Select a cycle and close the door.
7. Check and turn on water supply
1. To adjust the volume or deactivate, refer to the
“cycle completion signal” section in this manual.
1. Check the fuse or circuit breaker box and
replace the fuse or reset the breaker if necessary
2. Ensure door is properly latched and completely
closed
1. Before starting a cycle, run hot water faucet at
the sink closest to the dishwasher
2. Sensors in the dishwasher automatically
increase the cycle time to ensure a good wash
when heavy soil is detected
3. Add rinse agent
4. Verify dishwasher is connected to hot water
supply plumbing
Dishes are not
getting clean
enough
Dishes are not
getting dry
enough
1. Spray arm movement obstructed
2. Spray arm nozzles clogged
3. Improper use of detergents
4. Filters could be clogged
5. Dishes are nested or loaded too close together
6. Selected wash cycle is not suitable for food soil
conditions
1. Rinse agent dispenser is empty
2. Improper loading of dishes
3. Selected cycle does not include drying
Note: Plastic or Teflon do not typically dry as well as
other items due to their inherent properties
1. Ensure that spray arm movement is not blocked
by hand rotating spray arms before starting cycle
2. Remove the spray arms and clean according to
the “care and maintenance” section of the manual
3. Increase or decrease detergent depending on
the water hardness (refer to Table 1)
4. Clean the filters according to the “care and
maintenance” section of the manual
5. Rearrange load such that water spray can reach
all items in the dishwasher - see “loading the
dishwasher” section of the manual
6. Refer to “wash cycle information” section of
the manual
1. Add rinse agent - the use of rinse agent
improves drying
2. Rearrange load to ensure items are not nesting
(see “loading the dishwasher” section of the manual)
3. Rinse and Hold setting does not include drying
Note: Santitize option and Intensive Drying feature also improve drying performance.
16
Page 19

Problem Cause Action
Odor 1. Food debris is present at the bottom of the dish-
washer
2. Food particles are present near the door seal
3. Dishes left in unit too long before running a cycle
4. Residual water is present at the bottom of the
dishwasher
5. Drain hose is obstructed
Dishwasher
not filling with
water
Water leaks 1. Suds
1. Restriction in the water supply system
2. Previous wash cycle was not completed
3. Delay start is active
2. Door seal could be pulled away from track
3. Condensation vent is blocked
4. Improper installation
1. Remove the filters and clean according to the
“care and maintenance” section of the manual
2. Refer to “care and maintenance” section of the
manual
3. Run a Rinse and Hold cycle if you do not intend
to immediately wash the dishes
4. Ensure the unit has completely drained from
the last cycle
5. Remove any obstructions from the drain hose
by calling qualified personnel.
Note: If odor still persists, run the Normal/Regular
cycle until it flushes and interrupt the cycle and
place an 8oz. cup of distilled white vinegar solution on the top rack and then finish the cycle.
1. Ensure that the water supply valve (typically
located under kitchen sink) is open and check
that the water supply line has no kinks or clogs
2. Refer to the “operating the dishwasher” section of the manual.
3. Cancel the delay start or wait until delay start
time completes
1. Wrong type of detergent results in suds and leaks
- use only dishwasher detergents. If suds still persist, add one tablespoon of vegetable oil at the bottom of the dishwasher and run the desired cycle.
2. Ensure the door seal is in the track
3. Ensure that condensation vent is not blocked
4. Have proper installation verified by qualified personnel (water supply, drain system, leveling, plumbing)
Tub stains 1. Stains on the dishwasher interior are due to
water hardness
2. Silverware in contact with tub
Streaks on
glassware or
residue on the
dishes
Fascia panel
discolored or
marked
Noise during
wash cycle
Detergent dispenser cover
will not shut
1. Incorrect rinse agent setting 1. Depending on the hardness of water, adjust the
1. Abrasive cleaner used 1. Use mild detergents with soft damp cloth
1. Dishes may not be arranged properly
1. Improper operation of detergent cover
2. Previous cycle has not been finished or rest or
cycle or interrupted
1. Concentrated lemon juice can reduce the build
up of hard water stains. Run a Regular cycle until
it flushes and interrupt the cycle and then place
an 8oz. cup of the concentrated lemon solution
on the top rack and finish the cycle. this can be
done periodically to avoid build up.
2. Ensure that silverware does not make contact
with the tub while running a cycle.
rinse agent dispenser. Refer to “Adding detergent
and rinse agent” section in the manual
1. Water circulation sound is normal, but if you suspect items are banging into each other or into the
spray arms, refer to the “loading the dishwasher”
section of the manual for optimal arrangement.
1. Refer to “Adding detergent and rinse agent”
section of the manual for instructions on opening
and closing the dispenser
2. Refer to the “operating the dishwasher” section of the manual
Unable to
select desired
cycle
1. Previous cycle has not finished 1. Refer to the “Operating the Dishwasher” section of the manual
17
Page 20

Customer Service
Your Bosch dishwasher requires no special care other than that described in the Care and Maintenance
section of this manual. If you are having a problem with your dishwasher, before calling for service
please refer to the Self Help section of the manual. If service is necessary, contact your dealer or
installer or an authorized service center. Do not attempt to repair the appliance yourself. Any work performed by unauthorized personnel may void the warranty.
If you are having a problem with your Bosch dishwasher and are not pleased with the service you have
received, please take the following steps until the problem is corrected to your satisfaction:
1 Call us at 1-800-944-2904
2 Contact Customer Service from our web site:
www.bosch-home.com/us or www.bosch-appliances.ca
3 Contact your installer or the Bosch Authorized Service Contractor in your area.
Please be sure to include your model information as well as an explanation of the problem and the date
it started.
You will find the model and serial number information on the label located on the edge of the dishwasher door.
Also, please include a daytime phone number where you can be reached.
Please make a copy of your invoice and keep it with this manual. The customer much show proof of
purchase to obtain warranty service.
18
Page 21

Warranty Information
What this Warranty Covers & Who it Applies to: The limited warranty provided by BSH Home Appliances (“Bosch”) in this Statement of Limited
Product Warranty applies only to Bosch dishwashers (“Product”) sold to you, the first using purchaser, provided that the Product was purchased:
(1) for your normal, household (non-commercial) use, and has in fact at all times only been used for normal household purposes; (2) new at retail
(not a display, “as is”, or previously returned model), and not for resale, or commercial use; and (3) within the United States or Canada, and has at
all times remained within the country of original purchase. The warranties stated herein apply only to the first purchaser of the Product and are not
transferable.
• Please make sure to return your registration card; while not necessary to effectuate warranty coverage, it is the best way for Bosch to notify you in
the unlikely event of a safety notice or product recall.
How Long the Warranty Lasts: Bosch warrants that the Product is free from defects in materials and workmanship for a period of three hundred
sixty five (365) days from the date of purchase. The foregoing timeline begins to run upon the date of purchase, and shall not be stalled, tolled,
extended, or suspended, for any reason whatsoever. Labor and shipping costs are included in this basic coverage.
Extended Limited Warranty: Bosch also provides these additional limited warranties:
• 2 Year Limited Warranty: Bosch will repair or replace any component that proves to be defective in materials or workmanship (excludes labor
charges).
• 5 Year Limited Warranty on Electronics: Bosch will repair or replace any Bosch microprocessor or printed circuit board if it proves to be defective
in materials or workmanship (excludes labor charges).
• 5 Year Limited Warranty on Dish Racks: Bosch will replace the upper or lower dish rack (excluding rack components), if the rack proves defective
in materials or workmanship (excludes labor charges).
• Lifetime Warranty against Stainless Steel Rust Through: Bosch will replace your dishwasher with the same model or a current model that is substantially equivalent or better in functionality, if the inner liner should rust through (excludes labor charges).
• Bosch will replace the stainless steel door if the door should rust through (excludes labor charges).
The foregoing timeline begins to run upon the date of purchase, and shall not be stalled, tolled, extended, or suspended, for any reason whatsoever.
Repair/Replace as Your Exclusive Remedy: During this warranty period, Bosch or one of its authorized service providers will repair your Product
without charge to you (subject to certain limitations stated herein) if your Product proves to have been manufactured with a defect in materials or
workmanship. If reasonable attempts to repair the Product have been made without success, then Bosch will replace your Product (upgraded models may be available to you, in Bosch’s sole discretion, for an additional charge). All removed parts and components shall become the property of
Bosch at its sole option. All replaced and/or repaired parts shall assume the identity of the original part for purposes of this warranty and this warranty shall not be extended with respect to such parts. Bosch’s sole liability and responsibility hereunder is to repair manufacturer-defective Product
only, using a Bosch-authorized service provider during normal business hours. For safety and property damage concerns, Bosch highly recommends
that you do not attempt to repair the Product yourself, or use an unauthorized servicer; Bosch will have no responsibility or liability for repairs or
work performed by a non-authorized servicer. If you choose to have someone other than an authorized service provider work on your Product,
WARRANTY WILL AUTOMATICALLY BECOME NULL AND VOID. Authorized service providers are those persons or companies that have been specially
trained on Bosch products, and who possess, in Bosch’s opinion, a superior reputation for customer service and technical ability (note that they are
independent entities and are not agents, partners, affiliates or representatives of Bosch). Notwithstanding the foregoing, Bosch will not incur any
liability, or have responsibility, for the Product if it is located in a remote area (more than 100 miles from an authorized service provider) or is reasonably inaccessible, hazardous, threatening, or treacherous locale, surroundings, or environment; in any such event, if you request, Bosch would
still pay for labor and parts and ship the parts to the nearest authorized service provider, but you would still be fully liable and responsible for any
travel time or other special charges by the service company, assuming they agree to make the service call.
Out of Warranty Product: Bosch is under no obligation, at law or otherwise, to provide you with any concessions, including repairs, pro-rates, or
Product replacement, once this warranty has expired.
Warranty Exclusions: The warranty coverage described herein excludes all defects or damage that are not the direct fault of Bosch, including with-
out limitation, one or more of the following: (1) use of the Product in anything other than its normal, customary and intended manner (including
without limitation, any form of commercial use, use or storage of an indoor product outdoors, use of the Product in conjunction with air or watergoing vessels); (2) any party’s willful misconduct, negligence, misuse, abuse, accidents, neglect, improper operation, failure to maintain, improper
or negligent installation, tampering, failure to follow operating instructions, mishandling, unauthorized service (including self-performed “fixing” or
exploration of the appliance’s internal workings); (3) adjustment, alteration or modification of any kind; (4) a failure to comply with any applicable
state, local, city, or county electrical, plumbing and/or building codes, regulations, or laws, including failure to install the product in strict conformity
with local fire and building codes and regulations; (5) ordinary wear and tear, spills of food, liquid, grease accumulations, or other substances that
accumulate on, in, or around the Product; and (6) any external, elemental and/or environmental forces and factors, including without limitation, rain,
wind, sand, floods, fires, mud slides, freezing temperatures, excessive moisture or extended exposure to humidity, lightning, power surges, structural failures surrounding the appliance, and acts of God. In no event shall Bosch have any liability or responsibility whatsoever for damage to surrounding property, including cabinetry, floors, ceilings, and other structures or objects around the Product. Also excluded from this warranty are
scratches, nicks, minor dents, and cosmetic damages on external surfaces and exposed parts; Products on which the serial numbers have been
altered, defaced, or removed; service visits to teach you how to use the Product, or visits where there is nothing wrong with the Product; correction
of installation problems (you are solely responsible for any structure and setting for the Product, including all electrical, plumbing or other connecting facilities, for proper foundation/flooring, and for any alterations including without limitation cabinetry, walls, floors, shelving, etc.); and resetting
of breakers or fuses.
TO THE EXTENT ALLOWED BY LAW, THIS WARRANTY SETS OUT YOUR EXCLUSIVE REMEDIES WITH RESPECT TO PRODUCT, WHETHER THE CLAIM
ARISES IN CONTRACT OR TORT (INCLUDING STRICT LIABILITY, OR NEGLIGENCE) OR OTHERWISE. THIS WARRANTY IS IN LIEU OF ALL OTHER
WARRANTIES, WHETHER EXPRESS OR IMPLIED. ANY WARRANTY IMPLIED BY LAW, WHETHER FOR MERCHANTABILITY OR FITNESS FOR A PARTICULAR PURPOSE, OR OTHERWISE, SHALL BE EFFECTIVE ONLY FOR THE PERIOD THAT THIS EXPRESS LIMITED WARRANTY IS EFFECTIVE. IN NO
EVENT WILL THE MANUFACTURER BE LIABLE FOR CONSEQUENTIAL, SPECIAL, INCIDENTAL, INDIRECT, “BUSINESS LOSS”, AND/OR PUNITIVE DAMAGES, LOSSES, OR EXPENSES, INCLUDING WITHOUT LIMITATION TIME AWAY FROM WORK, HOTELS AND/OR RESTAURANT MEALS, REMODELLING
EXPENSES IN EXCESS OF DIRECT DAMAGES WHICH ARE DEFINITIVELY CAUSED EXCLUSIVELY BY BOSCH, OR OTHERWISE. SOME STATES DO NOT
ALLOW THE EXCLUSION OR LIMITATION OF INCIDENTAL OR CONSEQUENTIAL DAMAGES, AND SOME STATES DO NOT ALLOW LIMITATIONS ON
HOW LONG AN IMPLIED WARRANTY LASTS, SO THE ABOVE LIMITATIONS MAY NOT APPLY TO YOU. THIS WARRANTY GIVES YOU SPECIFIC LEGAL
RIGHTS, AND YOU MAY ALSO HAVE OTHER RIGHTS WHICH VARY FROM STATE TO STATE. No attempt to alter, modify or amend this warranty shall be
effective unless authorized in writing by an officer of BSH.
How to Obtain Warranty Service: TO OBTAIN WARRANTY SERVICE FOR YOUR PRODUCT, YOU SHOULD CONTACT THE NEAREST BOSCH AUTHORIZED SERVICE CENTER, OR CALL 800-944-2904.
THIS
19
Page 22

20
Page 23

Bosch vous adresse tous ses remerciements et félicitations !
Merci d'avoir choisi un lave-vaisselle Bosch. Vous avez rejoint les nombreux
consommateurs qui exigent un rendement silencieux et exceptionnel de leur
lave-vaisselle.
Ce guide a été rédigé avec votre sécurité et commodité en tête et les informations qu'il contient sont très importantes. Nous vous recommandons fortement de lire ce guide avant d'utiliser le lave-vaisselle pour la première fois.
Pour en savoir plus sur votre lave-vaisselle et les accessoires disponibles, ainsi
que sur les nombreux autres appareils Bosch d'excellente qualité, visitez notre
site Web à l'adresse :
www.bosch-home.com/us (USA)
or
www.bosch-appliances.ca (Canada)
Pour toute question ou commentaire, veuillez communiquer avec nous en téléphonant au 1-800-944-2904.
Table des matières
Consignes de sécurité importantes.................................................2-3
Composants du lave-vaisselle............................................................4
Le programme d'installation...............................................................5-6
Matériaux de lave-vaisselle...............................................................7
Chargement du lave-vaisselle.........................................................7-8
Accessoires des paniers...............................................................9-10
Programmes et options du lave-vaisselle.........................................11
Informations sur les programmes de lavage.....................................11
Fonctionnement du lave-vaisselle...............................................12-14
Nettoyage et entretien....................................................................15
Aide automatique.......................................................................16-17
Service après-vente.........................................................................18
Informations concernant la garantie................................................19
Page 24

Consignes de sécurité importantes: Veuillez
lire et conserver ces informations
AVERTISSEMENT
Une mauvaise utilisation du lave-vaisselle peut entraîner des blessures graves ou la mort. Ne pas
utiliser le lave-vaisselle d'une manière qui n'est pas traitée dans le présent guide ou à des fins autres
que celles qui sont expliquées dans les pages qui suivent.
Des dommages au produit et/ou blessures graves peuvent survenir par suite de l'emploi de techniciens
en entretien et en réparation non qualifiés ou de pièces de rechanges qui ne sont pas d'origine. Toutes
les réparations doivent être effectuées par un technicien en entretien et en réparation qualifié qui
utilise des pièces de rechange du fabricant de l'équipement d'origine.
Un choc électrique ou un incendie peut résulter de l'installation inexacte de l'alimentation électrique
du lave-vaisselle traité dans le présent guide ou d'une mauvaise mise à la terre du lave-vaisselle. Ne pas
utiliser le lave-vaisselle traité dans le présent guide à moins d'être certain que l'alimentation électrique
a été correctement installée ou que le lave-vaisselle a été correctement mis à la terre.
Ne jamais nettoyer votre lave-vaisselle avec des produits chimiques puissants. Certains produits contenant des chlorures peuvent endommager votre lave-vaisselle et poser des risques pour la santé !
AVIS
Ne jamais nettoyer votre lave-vaisselle avec des produits de nettoyage à la vapeur. Le fabricant
n'assume aucune responsabilité pour d'éventuels dommages ou conséquences.
Il est vivement recommandé à l'utilisateur final de se familiariser avec les procédures de fermeture de
l'alimentation d'eau entrante et de coupure de l'alimentation électrique entrante. Reportez-vous aux
instructions d'installation ou communiquez avec votre installateur pour de plus amples renseignements.
2
Page 25

AVERTISSEMENT : Pour réduire le risque
d'incendie, de choc électrique ou de blessure
grave, respectez les consignes suivantes :
1 Ce lave-vaisselle est fourni avec les instructions d'installation et le présent guide d'utilisation et d'entretien.
Lire et comprendre toutes les instructions avant de faire fonctionner le lave-vaisselle.
2 Cet appareil doit être mis à la terre sur une installation de fils à demeure en métal ou un conducteur de pro-
tection doit être relié aux fils conducteurs et raccordé à la borne ou au fil de mise à la terre du lave-vaisselle.
Consulter les instructions d'installation fournies avec ce lave-vaisselle pour de plus amples renseignements
sur les conditions requises pour l'alimentation en électricité.
3 Utiliser uniquement ce lave-vaisselle conformément à l'usage auquel il est destiné, à savoir pour laver la vais-
selle et la batterie de cuisine de ménage.
4 Utiliser uniquement des détergents ou des produits de rinçage recommandés pour l'usage en lave-vaisselle
et les conserver hors de la portée des enfants.
5 Lors du chargement des articles dans le lave-vaisselle :
• Disposer les articles coupants de sorte à ce qu'ils ne puissent pas endommager le joint de
porte.
• Placer les couteaux et autre ustensiles tranchants le MANCHE VERS LE HAUT pour réduire le risque de blessure par coupure.
• Ne pas laver d'articles en plastique à moins qu'ils ne soient identifiés par la mention « lavable au
lave-vaisselle » ou l'équivalent.
• Ne pas faire fonctionner votre lave-vaisselle à moins que tous les panneaux protecteurs ne soient en place.
• Ne pas altérer ni neutraliser les commandes et dispositifs de verrouillage.
6 Ne pas utiliser abusivement, s'asseoir ou se tenir debout sur la porte ou les paniers à vaisselle du lave-vais-
selle.
7 Pour réduire le risque de blessures, empêcher les enfants de jouer à l'intérieur ou sur le lave-vaisselle.
8 Lorsque les enfants sont en âge de faire fonctionner l'appareil, les parents ou tuteurs légaux ont la respon-
sabilité légale de s'assurer qu'ils ont été initiés aux pratiques sécuritaires par des personnes qualifiées.
9 Dans certaines conditions, de l'hydrogène peut se former à l'intérieur d'un système de production d'eau
chaude qui n'a pas été utilisé pendant deux semaines ou plus. L'hydrogène est un gaz explosif. Avant
d'utiliser un lave-vaisselle qui est relié à un système de production d'eau chaude inactif depuis deux
semaines ou plus, ouvrir tous les robinets d'eau chaude et laisser l'eau couler pendant quelques minutes.
Ceci aura pour effet de libérer l'hydrogène accumulé à l'intérieur du système. Ne pas fumer et ne pas utiliser
de flamme nue pendant cette opération.
10 Enlever la porte du compartiment de lavage d'un ancien lave-vaisselle que vous devez déposer pour répara-
tion ou mise au rebut.
11 Afin d'éviter d'endommager le plancher et la formation éventuelle de moisissures, ne laissez aucune trace
d'eau sur le sol adjacent au lave-vaisselle ou sous ce dernier.
12 Protégez votre lave-vaisselle des éléments. Protégez-le contre le gel afin d'éviter les dommages éventuels au
robinet de remplissage. Les dommages causés par le gel ne sont pas couverts par la garantie.
13 Modèles avec cordon d'alimentation :
• Cet appareil doit être mis à la terre. En cas de fonctionnement défectueux ou de panne, la mise
à la terre réduit les risques de choc électrique en fournissant un trajet de moindre résistance au
courant. Cet appareil est équipé d'un cordon d'alimentation avec un conducteur de mise à la
terre d'équipement et une fiche de mise à la terre. Cette fiche doit être branchée sur une prise
appropriée, installée et mise à la terre conformément aux codes et règlements locaux.
• Un mauvais raccordement du conducteur de mise à la terre d'équipement peut entraîner un ris-
que de choc électrique. En cas de doute quant à la mise à la terre adéquate de l'appareil, communiquez avec un électricien ou un technicien en réparation qualifié. Ne pas modifier la fiche
fournie avec l'appareil. Si elle ne rentre pas dans la prise, faites installer une prise adéquate par
un électricien qualifié.
AVERTISSEMENTS DE LA PROPOSITION 65 DE L'ÉTAT DE LA CALIFORNIE :
AVERTISSEMENT : Cet appareil contient un ou plusieurs produits chimiques qui, selon l'État de la Californie, peuvent causer le cancer.
AVERTISSEMENT : Cet appareil contient un ou plusieurs produits chimiques qui, selon l'État de la Californie, peuvent causer des malformations ou d'autres problèmes congénitaux.
3
Page 26

Composants du lave-vaisselle
SHX9PT55UC, SHV9PT53UC
A
B
C
3rd Rack
Panier supérieur
Bras gicleur du
panier supérieur
Collecteur de comprimés
Bras gicleur
Distributeur de sel
Panier inférieur
Distributeur d'agent
de rinçage
Distributeur de
détergent
Système de filtration
4
Page 27

Le programme d'installation
Système adoucisseur d’eau
Le lave-vaisselle a besoin d’eau douce pour obtenir de bons résultats de lavage et est équipé d’un
adoucisseur d’eau interne. Toutefois, si votre habitation est équipée d’un système adoucisseur d’eau,
vous n’aurez pas besoin d’utiliser le système intégré au lave-vaisselle.
La quantité de sel versée peut être ajustée entre H:00 et H:07. Le sel n’est pas requis à H:00 (ceci est
le paramètre usine par défaut - voir tableau 1).
1 Allumer l’appareil en appuyant sur [ON/OFF] (Activer/Désactiver).
2 Maintenir la touche A enfoncée et appuyer et maintenir la touche [START] (Démarrer) enfoncée
jusqu’à ce que l’affichage indique H:00.
3 Relâcher les deux touches.
4 Appuyer sur C pour sélectionner le paramètre souhaité.
5 Sauvegarder le paramètre sélectionné en appuyant sur [START] (Démarrer).
Utilisation d’une bandelette pour tester la dureté de l’eau
L'eau dure et votre lave-vaisselle
Votre niveau de dureté de l'eau a un impact direct sur le rendement de votre lave-vaisselle. De l'eau dure augmentera les taches sur la
vaisselle et réduira l'efficacité du détergent. Certains modèles de lave-vaisselles comprennent un adoucisseur d'eau qui emploie un sel
spécial pour ajuster la dureté de l'eau afin d'obtenir un rendement optimal. Le sel est ajouté dans le compartiment à sel situé sous le panier
inférieur du lave-vaisselle. La quantité de sel ajoutée dépend de la dureté de l'eau à votre domicile. La dureté de l'eau à votre domicile
peut être mesurée à l'aide de la bandelette de test de dureté de l'eau incluse dans votre ensemble de manuel (ou offerte dans une
quincaillerie de votre région). Le réglage d'adoucissement de l'eau du lave-vaisselle doit être ajusté en fonction de la dureté de votre eau.
Instructions pour utiliser la « bandelette de test de dureté de l'eau » incluse
Utilisez seulement du sel conçu pour les lave-vaisselles automatiques. N'utilisez jamais de sel adoucisseur d'eau pour la maison ou du sel de table.
Suivez les instructions ci-dessous pour la bandelette de test incluse (si vous achetez une autre bandelette, suivez les instructions du fabricant).
Étape 1 - Laissez l'eau couler dans l'évier de la cuisine pendant 5 minutes.
Étape 2 - Trempez l'extrémité avec les carrés de couleur de la bandelette de test dans l'eau courante pendant une seconde, puis secouez
l'excédent d'eau.
Étape 3 - Attendez une minute avant de comparer la bandelette de test avec le tableau ci-dessous pour déterminer le niveau de
réglage d'adoucissement de l'eau du lave-vaisselle.
Étape 4 - Ajustez le réglage d'adoucissement de l'eau. Consultez le manuel d'utilisation et d'entretien pour de plus amples renseignements.
Étape 5 - Au besoin, ajoutez du sel dans le compartiment à sel tel qu'illustré dans le manuel d'utilisation et d'entretien.
Ajustement du réglage d'adoucissement de l'eau de votre lave-vaisselle (certains modèles seulement)
À l'aide de la bandelette de test comprise avec
votre lave-vaisselle (les bandelettes de test
achetées peuvent avoir une échelle différente)
Réglage
d'adoucissement
de l'eau du
lave-vaisselle
H:00 0 116 0 6
H:01 117 152 7 8
H:02 153 188 9 10
H:03 189 223 11 13
H:04 224 294 14 17
H:05 295 383 18 22
H:06 384 544 23 31
H:07 545 890 32 52
Ajouter du sel
au compartiment
à sel du
lave-vaisselle
Non
Oui
Oui
Oui
Oui
Oui
Oui
Oui
Tableau de conversion de la dureté de
l'eau (seulement nécessaire si vous
achetez une autre bandelette de test)
ppm
gpg/°dH
5
Page 28

Utilisation du sel
Toujours remplir de sel immédiatement avant de mettre l’appareil en circuit.
Ceci permet de dissoudre le surplus de solution de sel et de ne pas corroder
le réservoir de rinçage. Voir Figure 1.
1 Remplir le réservoir avec de l’eau (seulement requis au moment de la pre-
mière mise en circuit de l’appareil).
2 Ajouter du sel. L’eau est déplacée et s’écoule.
3 Remplir le réservoir de sel dès que ou que le voyant DEL Sel s’allume.
Remarque: Ne remplissez jamais le réservoir de sel avec du détergent. Il va détruire
le système d'adoucissement de l'eau. Pour éviter la corrosion, ajouter du sel et commencer immédiatement un cycle.
Figure 1
Figure 2
Remarque: le sel de recharge que lorsque le «Sel Refill" est allumée.
Ne pas utiliser les comprimés de sel ou tout autre sel de lave-vaisselle de sel adoucissement de l'eau.
Pour plus d'informations sur la commande de sel s'il vous plaît contacter le Service
Client.
Détergent
Utiliser uniquement un détergent spécialement conçu pour les lave-vaisselle.
Pour de meilleurs résultats, utiliser un détergent pour lave-vaisselle en poudre
frais.
lavage de la vaisselle à la main.
Ce lave-vaisselle utilise moins d'eau. Par conséquent, moins de détergent est
nécessaire. Avec de l'eau douce, 1 c. à soupe (15 ml) de détergent nettoie la
plupart des charges. Le godet du distributeur de détergent comporte des lignes graduées pour mesurer le détergent comme suit : 1 c. à soupe (15 ml) et 1
3/4 c. à soupe (25 ml). 3 c. à coupe (45 ml) de détergent rempliront complètement le godet du distributeur de détergent. Voir Figure 2.
Remarque : si vous ne connaissez pas le degré de dureté de l'eau de votre réseau
d'alimentation, utilisez 15 ml de détergent. Augmentez la quantité de détergent au
besoin pour atteindre la quantité minimale nécessaire pour laver correctement
votre vaisselle.
Fermeture
• Placez le doigt comme indiqué à la Figure 3.
• Faites coulisser le couvercle en position fermée et appuyez fermement
jusqu'à ce que vous entendiez un déclic.
Pour éviter d'endommager le lave-vaisselle, ne pas utiliser de détergent pour le
7EVS0D[
7EVSPO
7EVSPO
Figure 3
Figure 4
Ouverture
• Pour ouvrir le couvercle, appuyez sur le bouton comme illustré à la
Figure 4
• Le couvercle s'ouvrira.
Quantité de détergent recommandée
Programme de
lavage
Heavy 45ml (3tbsp) 45ml (3tbsp) 25-45ml (1.75-3tbsp)
Auto 25-45ml (1.75-3tbsp) 25ml (1.75tbsp) 15-25ml (1-1.75tbsp)
Glass 25ml (1.75tbsp) 15-25ml (1-1.75tbsp) 15ml (1tbsp)
Normal 25-45ml (1.75-3tbsp) 25ml (1.75tbsp) 15-25ml (1-1.75tbsp)
Express 25ml (1.75tbsp) 15-25ml (1-1.75tbsp) 15ml (1tbsp)
Rinse none none none
6
Eau dure/
Saletés importantes
Eau moyenne/
Saletés moyennes
Eau douce/
Saletés légères
.
Page 29

Agent de rinçage
Pour obtenir un séchage adéquat, toujours utiliser un agent de rinçage liquide,
même si votre détergent contient déjà un agent de rinçage ou un adjuvant de
séchage.
Remarque : le lave-vaisselle signale un manque de produit de rinçage en allumant
l'indicateur lumineux.
Si ce témoin est allumé, vous devez remplir le distributeur d'agent de rinçage en
suivant les consignes ci-dessous.
Ajout de l'agent de rinçage
Verser le produit de rinçage liquide dans le distributeur comme indiqué jusqu’à
ce que le réservoir soit plein. Essuyer tout débordement de liquide de rinçage
s’écoulant du réservoir une fois plein. Voir Figure 5. Le voyant s'éteindra quelques instants après la fer-
meture de la porte du lave-vaisselle. Voir page 12.
Figure 5
Matériaux de la vaisselle
Remarque : avant d'utiliser votre lave-vaisselle pour la première fois, vérifier les informations figurant dans
cette section. Certains articles ne sont pas lavables au lave-vaisselle et doivent être lavés à la main ; d'autres
nécessitent un chargement spécial.
Matériaux recommandés
Aluminium : l'aluminium anodisé coloré peut s'altérer au fil du temps. Les minéraux présents dans l'eau peuvent
noircir ou tacher l'aluminium. Ceci se nettoie généralement à l'aide d'un tampon de laine d'acier savonneux.
Porcelaine, cristal, faïence : certains ustensiles peints à la main peuvent se décolorer, s'altérer ou se
tacher. Laver ces ustensiles à la main. Placer la verrerie fragile de façon à ce qu'elle ne se renverse pas
ou qu'elle n'entre pas en contact avec d'autres ustensiles pendant le déroulement du programme de
lavage.
Verrerie : le verre laiteux risque de se décolorer ou de jaunir.
Finis anti-adhésifs : appliquer une légère quantité d'huile végétale sur les surfaces anti-adhésives après le
séchage.
Plastique : s'assurer que les articles en plastique sont lavables au lave-vaisselle.
Acier inoxydable, argent fin et métaux argentés : charger ce type d'articles de sorte à ce qu'ils
n'entrent pas en contact avec d'autres métaux.
Non recommandé
Acrylique : des craquelures (petites fissures) peuvent apparaître sur l'acrylique.
Pièces collées : les adhésifs utilisés pour le collage des objets en plastique, bois, os, acier, cuivre, fer
blanc, etc. risquent de ne pas tenir.
Ustensiles avec manches en os : les manches risquent de se décoller.
Fer : le fer se rouille. Laver à la main et sécher immédiatement.
Articles autres que la vaisselle : votre lave-vaisselle est conçu UNIQUEMENT pour le lavage de la vais-
selle et de la batterie de cuisine de ménage standard.
Étain, laiton, bronze : ces matériaux auront tendance à ternir. Laver à la main et sécher immédiatement.
Fer blanc : le fer blanc aura tendance à se tacher. Laver à la main et sécher immédiatement.
Bois : les bols et les ustensiles en bois et les ustensiles avec manches en bois peuvent se fissurer, se
déformer et perdre leur fini.
Chargement du lave-vaisselle
Ne pas laver au préalable les articles comportant des saletés peu adhérentes. Enlever les particules
d'aliments, les os, les cure-dents et la graisse excessive. Il sera peut-être nécessaire de traiter préalablement la vaisselle comportant des saletés brûlées, collées ou farineuses. Consulter la section Matériaux de la vaisselle pour de plus amples renseignements sur l'adaptation de la vaisselle.
7
Page 30

Charger uniquement les articles lavables au lave-vaisselle. Charger la vaisselle dans les paniers de sorte
à orienter l'intérieur des bols, marmites et casseroles vers les bras gicleurs. Éviter que les articles ne
s'emboîtent les uns dans les autres et éviter qu'ils ne se touchent. Séparer les articles de métal différent.
Panier supérieur
Chargement suggéré pour les services de table
Panier inférieur
3rd Rack
Panier à couverts
Panier supérieur
12345
1-
fourchette à salade
cuiller à thé
2-
fourchette de table
3-
4- couteau
cuiller à soupe
5 -
cuiller à servir
6 -
7 -
fourchette de
service
Configuration de chargement supplémentaire
6
7
5
5
5
5
5
5
444
Panier inférieur
3
6
3
3
3
44 4
7
5
5
5
5
5
5
3
3
11
1
111
4
3
2
2
2
2
1
44
33
4
4
33
1
11
22
2
2
2
2
2
2
11
6
4
3
3rd Rack
8
Page 31

Accessoires des paniers
Picots rabattables
Les paniers comportent des picots qui peuvent être repliés en fonction des
articles devant être placés dans le lave-vaisselle. Pour rabattre un picot,
saisissez-le et dégagez-le de l'encoche. Poussez-le vers le bas pour le mettre
dans la position voulue comme indiqué à la Figure 6.
Figure 6
Asperseur pour articles de grande taille
Si un article est trop grand pour être placé dans le panier inférieur, même si le panier supérieur est en position relevée, enlevez le panier supérieur vide en le tirant hors du lave-vaisselle
jusqu'à la butée. Poussez la partie avant du panier vers le haut et l'extérieur jusqu'à ce que
les galets se dégagent complètement des glissières.
Mettez le panier supérieur en réserve. Repoussez les glissières à galets à l'intérieur du
lave-vaisselle. Introduisez l'asperseur pour les articles de grande taille dans la sortie de
pulvérisation et faites pivoter l'asperseur dans le sens horaire pour le mettre en position de blocage. Voir la Figure 7.
Remarque : afin d'éviter d'obstruer l'évent sur le côté droit de la cuve, disposez les grands
articles telles que les planches à découper en plastique et les grandes tôles à biscuits du
côté gauche du panier inférieur, ou au centre.
Attaches pour articles en plastique
Figure 7
Figure 8
Les accessoires légers en plastique (par exemple, les tasses, couvercles)
peuvent être solidement fixés à l’aide d’attaches spécialement conçues pour
ce type d’article. Voir Figure 8.
3-Step RackMatic®
Le panier supérieur peut être relevé ou abaissé pour laisser davantage d'espace aux
articles de grande taille dans l'un ou l'autre des paniers.
1 Tirer le panier supérieur.
2 Pour abaisser le panier, pousser les leviers vers l’intérieur.
Pour lever le panier, maintenir le panier par les côtés du bord supérieur et soulever.
Figure 9
9
Page 32

Panier à utensiles
Figure 10
Le tiroir à accessoires permet de disposer des couteaux, spatules et autres
ustensiles surdimensionnés à l'horizontale pour améliorer le lavage et faciliter le chargement et déchargement de la vaisselle. Les côtés du tiroir à
couverts peuvent être levés et abaissés comme le montre la Figure 10 pour
accueillir les gros articles.
Lors du chargement de grands articles tels que les flûtes à bière ou les assiettes de 10 po dans le panier supérieur (comme indiqué Figure 11), retirez le
tiroir à accessoires pour faire de la place
Retirer du tiroir :
• Tirer le tiroir vide hors du lave-vaisselle jusqu'à ce qu'il s'arrête de rouler.
• En tirant vers soi, inclinez la partie avant du panier vers le haut et l'extérieur (voir Figure 12) jusqu'à ce que les galets se dégagent complètement
des glissières à galets.
• Mettre le tiroir vide en lieu sûr.
Figure 11
Figure 12
Figure 13
Remettre le tiroir en place :
• Tirer les glissières à galets des deux côtés de la cuve du lave-vaisselle vers
l'extérieur.
• Placer les crochets du tiroir sur les glissières à galets (voir Figure 13).
• Tout en maintenant une glissière à galets, faire glisser le galet supérieur du
tiroir par dessus la butée de la glissière à galets (voir Figure 14).
• Répéter l'opération de l'autre côté.
• Replacer le tiroir dans le lave-vaisselle.
10
Figure 14
Page 33

Programmes et options du lave-vaisselle
Programmes de lavage
Heavy (Lavage intense) : donne les meilleurs résultats pour éliminer les aliments collés ou la graisse.
Habituellement, on doit faire tremper cette vaisselle.
Auto (Lavage Automatique) : grâce à notre dispositif très complexe de détection du degré de saleté, ce
programme est idéal pour les charges mixtes avec des quantités de saletés alimentaires variables. Ce programme est le plus souple et un choix excellent pour tous les jours.
Glass: Un programme pour la vaisselle peu sale, température idéale pour les produits sensibles ou couverts. Dans ce
cycle, la température est réduite pour aider à prévenir des plats de devenir endommagé. Il est particulièrement utile
pour réduire un aspect trouble ou gravé sur les lunettes.
Remarque: certains verres s’égratignent plus facilement à cause du processus de fabrication.
Normal (Lavage normal) : permet de laver parfaitement une pleine charge de vaisselle normalement sale.
Note: Le Guide étiquetage énergétique a été basée sur ce programme de détection du sol avec toutes les options disponibles
éteints. Comme le prévoit la procédure de test de l'énergie, l'appareil a été testé sans rinçage dans le distributeur de liquide de rinçage. Une seule dose de détergent a été utilisé dans le distributeur de détergent, sans détergent utilisé dans le prélavage. Pour les
modèles avec un 3ème rack, le test a été réalisé avec le panier supérieur en position médiane.
Express (Lavage rapide) : permet de laver la vaisselle légèrement sale et réduit la durée totale de lavage.
Utiliser ce programme pour laver les verres et les assiettes à dessert devant être réutilisées au cours du
même événement.
Rinse : Vous Permet de rincer la vaisselle vente d'accusation juin Partielle et de la Mettre en attente In the lave-vaisselle JUSQU'A that the chargé Soit Pleine.
Option des programmes de lavage (certains modèles)
Delay Start (Marche différée) : L’on peut retarder la mise en marche de 1 h à 24 h.
SpeedPerfect™: Réduction des temps de cycle jusqu'à 25% tout en maintenant les performances de net-
toyage.
Half Load (Demi-charge) : les programmes de lavage Intense, Intuitif, Normal et Verrerie comportent une option
Demi-charge qui permet de réduire la consommation d'énergie et d'eau lors du lavage d'une petite quantité de vaisselle
légèrement sale qui remplit à peu près la moitié du lave-vaisselle. Pour activer cette option, sélectionner la touche Half
Load (Demi-charge) en plus de l'un des trois programmes cités précédemment.
Delicate : L'option Délicat est uniquement disponible dans les cycles lourds, Auto et Normal. Ce cycle est
utilisé au mieux pour peu sale avec facile d'éliminer les salissures alimentaires.
Sanitize (Désinfection) : La fonction Désinfecter est offerte uniquement avec les programmes de lavage intense, automatique et normal. Appuyer sur la touche « Sanitize Option » (Option désinfection) pour activer les fonctions de désinfection au
cours des programmes automatique et normal. Le voyant Désinfection restera allumé durant un programme de lavage
intense. Les procédés techniques de désinfection peuvent également améliorer les résultats de séchage.
Remarque : le lave-vaisselle passe en mode de lavage automatique par défaut lorsqu'il est éteint puis rallumé. Si
vous avez programmé l'option de désinfection lors du programme précédent, le lave-vaisselle passera en mode
de lavage automatique par défaut avec l'option de désinfection sélectionnée lorsque vous le mettez en marche.
11
Page 34

Informations sur les programmes de lavage
Si la température de l'eau d'alimentation de votre résidence est supérieure à 120 °F (48,8 °C), le temps de chauffage de votre lave-vaisselle peut s'en trouver réduit et le voyant ou symbole « Désinfecté » peut ne pas s'allumer
Tableau 3 - Informations sur les programmes de lavage
Heavy Auto Glass Normal Express Rinse
durée du programme 110-135 min 105-129 min 80-85 min 130-135 min 30 min 9 min
consommation d'eau 18.6-24.2 L
4.9-6.4 gal
température de l'eau 66-71°C
150-160°F
température de rinçage 72°C
162°F
Speed Perfect
cycle time 95-110 min 75-90 min 60-70 min 95-105min n/a n/a
water consumption 16.3-20.5 L
4.3-5.5 gal
Half Load
cycle time 115 min 95-105 min 75-80 min 90-99 min n/a n/a
water consumption 17.9 L
4.8 gal
Delicate
cycle time 105-110 min 90-105 min n/a 100-120 min n/a n/a
water consumption 18.6-24.2 L
4.9-6.4 gal
Sanitize
cycle time 130-150 min 125-150 min n/a 135-155 min n/a n/a
water consumption 18.6-24.2 L
4.9-6.4 gal
13.1-24.5 L
3.5-6.5 gal
53-66°C
127-150°F
70°C
158°F
16.1-20 L
4.3-5.3 gal
10.2-16.5 L
2.7-4.4 gal
13.1-24.5 L
3.5-6.5 gal
13.1-24.5 L
3.5-6.5 gal
9.3-14.5 L
2.5-3.8 gal
45-50°C
113-122°F
62°C
144°F
9.2-12.5 L
2.4-3.3 gal
9.3-12.5 L
2.5-3.3 gal
n/a 8.8-20.8 L
n/a 8.8-20.8 L
16.6-21.1 L
8.8-20.8 L
2.4-5.5 gal
45-55°C
113-131°F
62-69°C
140-156°F
4.4-5.6 gal
10.8-13.9 L
2.8-3.7 gal
2.4-5.5 gal
2.4-5.5 gal
10.5 L
2.8 gal
45°C
113°F
50°C
122°F
n/a n/a
n/a n/a
n/a n/a
n/a n/a
1.1 gal
incoming
incoming
4.1 L
Remarque : seuls les programmes sanitaires sont prévus pour satisfaire aux exigences de niveau 6 en matière d'efficacité d'élimination des saletés et de désinfection. Il n'existe aucune intention, directe ou indirecte, que tous les programmes aient réussi les tests
de performance en désinfection.
Fonctionnement du lave-vaisselle
Démarrez le lave-vaisselle
1 Allumer le lave-vaisselle en appuyant sur [ON/OFF] (Activer/Désactiver). Le voyant DEL du dernier
cycle sélectionné clignote.
2 Vous pouvez sélectionner un cycle différent ou conserver le même cycle.
3 Appuyer sur [START] (Démarrer). Le cycle sélectionné démarre.
Pour annuler un programme
1 Appuyer et maintenir la touche [START] enfoncée pendant environ 4 seconde jusqu’à ce que « 0:01 »
clignote sur l’affichage.
2 Le cycle dure environ 1 minute.
3 Appuyer sur [ON/OFF].
Pour interrompre un programme
1 Appuyer sur [ON/OFF]. Les voyants DEL s’éteignent. Le cycle est sauvegardé.
2 Pour continuer le cycle, appuyer de nouveau sur [ON/OFF].
12
Page 35

Pour définir la quantité d'agent de rinçage
La quantité de produit de rinçage versée peut être ajustée entre « r:00 » et « r:06 ».
Modification du paramètre :
1 Allumer l’appareil en appuyant sur la touche [ON/OFF].
2 Maintenir la touche A enfoncée et appuyer et maintenir la touche [START] enfoncée jusqu’à ce que
l’affichage indique « H:00 ».
3 Relâcher les deux touches.
4 Appuyer sur A jusqu’à ce que l’affichage indique « r:05 ».
5 Appuyer sur C pour sélectionner le paramètre souhaité.
« r:00 » = le distributeur est désactivé
« r:01 » = paramètre le plus faible
« r:02 » = paramètre faible
« r:03 » = paramètre moyen
« r:04 » = paramètre moyen-élevé
« r:05 » = paramètre élevé
« r:06 » = paramètre le plus élevé
6 Sauvegarder le paramètre sélectionné en appuyant sur [START].
Marche différée
L’on peut retarder la mise en marche de 1 h à 24 h.
1 Allumer l’appareil en appuyant sur la touche [ON/OFF].
2 Presser la touche [+]
jusqu’à ce que « h:01 » à l’affichage.
3 Presser la touche [+] ou [–] jusqu’à ce que la durée désirée s’affiche.
« h:01 » = 1 heure
« h:24 » = 24 heures
4 Presser la touche [START], la programmation minutée est activée.
Pour supprimer la programmation:
1 Presser la touche [+] ou [-] jusqu’à ce que « h:00 » à l’affichage.
2 L’on peut changer la sélection de programme en tout temps jusqu’à ce que le programme commence.
Signal de fin de cycle
1 Ouvrir la porte et allumer le lave-vaisselle en appuyant sur [ON/OFF].
2 Maintenir la touche A enfoncée et appuyer et maintenir la touche [START] enfoncée jusqu’à ce que
l’affichage indique « H:00 ».
3 Relâcher les deux touches.
4 Appuyer sur A jusqu’à ce que l’affichage indique « b:02 ».
5 Appuyer sur C pour augmenter ou diminuer la tonalité du signal entre « b:00 » = désactiver et
« b:03 » = maximum.
6 Appuyer sur [START] pour sauvegarder le paramètre.
Séchage Intensif
Le rinçage final utilise une température plus élevée afin d’améliorer les résultats de séchage. La durée
d’exécution peut légèrement augmenter. (Faire attention si les ustensiles sont délicats !)
1 Appuyant sur [ON/OFF].
2 Maintenir la touche A enfoncée et appuyer et maintenir la touche [START] enfoncée jusqu’à ce que
l’affichage indique « H:00 ».
3 Relâcher les deux touches.
4 Appuyer sur A jusqu’à ce que l’affichage indique « d:00 ».
5 Appuyer sur C pour activer le séchage intensif « d:01 » = activer et « d:00 » = désactiver.
6 Appuyer sur [START] pour sauvegarder le paramètre.
13
Page 36

Mise hors tension automatique
Pour économiser l'énergie, le lave-vaisselle est tourné outre de 1 minute après les fins de cycle de
lavage. La mise hors tension automatique peut être ajustée de « P : 00 » « à P : 02 ».
1 Appuyant sur [ON/OFF].
2 Maintenir la touche A enfoncée et appuyer et maintenir la touche [START] enfoncée jusqu’à ce que
l’affichage indique « H:00 ».
3 Relâcher les deux touches.
4 Appuyer sur A jusqu’à ce que l’affichage indique « P:0 ».
5 Appuyer sur C pour sélectionner le paramètre souhaité.
« P:00 » = le lave-vaisselle ne s'éteint pas automatiquement
« P:01 » = le lave-vaisselle s'éteint automatiquement après 1 minute
« P:02 » = le lave-vaisselle s'éteint automatiquement après 120 minutes (2 heures
6 Appuyer sur [START] pour sauvegarder le paramètre.
)
InfoLight
Un voyant DEL illumine le sol pour indiquer que l'appareil est en fonction. Si l'appareil est installé à
hauteur d'oeil, le voyant DEL n'est pas visible.
Modification du paramètre :
1 Ouvrir la porte et appuyez sur la touche [On/Off].
2 Maintenir la touche A enfoncée et appuyer et maintenir la touche [START] enfoncée jusqu’à ce que
l’affichage indique « H:00 ».
3 Relâcher les deux touches.
4 Appuyer sur A jusqu’à ce que l’affichage indique « 1:01 ».
5 Appuyer sur C pour basculer entre « 1:01 » = ON (Activer) et « 1:00 » = OFF (Désactiver) et
appuyer sur [START] pour sauvegarder votre paramètre.
Sapphire Glow®
L'éclairage intérieur s'allume lorsque la porte est ouverte, que l'appareil soit sous tension ou hors tension.
Lorsque la porte est fermée ou entrebâillée, l'éclairage reste éteint.
Modification du paramètre :
1 Ouvrir la porte et allumer en appuyant sur ON/OFF.
2 Maintenir la touche A enfoncée et appuyer et maintenir la touche START enfoncée
jusqu'à ce que l'affichage indique « H:00 ».
3 Relâcher les deux touches. Le voyant DEL A clignote et l'affichage indique « H:00 ».
4 Appuyer sur A jusqu'à ce que l'affichage indique « P:00 ».
5 Appuyer sur C bpour éteindre “pour éteindre « E:00 » ou allumer « E:01 » l'éclairage intérieur.
Appuyer sur START pour sauvegarder le paramètre afin de pouvoir allumer
ou éteindre l'éclairage et fermer la porte.
14
Page 37

Nettoyage et entretien
Certaines parties du lave-vaisselle nécessitent un entretien occasionnel. Les opérations d'entretien sont
faciles à effectuer et permettent d'obtenir continuellement un excellent rendement de votre lave-vaisselle.
Conditions générales
Ne jamais utiliser un nettoyeur à vapeur avec le lave-vaisselle. Le fabricant
n’est pas responsable des dommages encourus.
Essuyer régulièrement le devant de l’appareil avec un chiffon humide (une
solution d’eau et de détergent est adéquate).
Ne pas utiliser d’éponge à surface rugueuse ni de détergent abrasif car ils
peuvent endommager les surfaces.
Figure 15
Appareil en acier inoxydable : pour éviter la corrosion, ne pas utiliser de
chiffon éponge, ni laver plusieurs fois avant d’utiliser l’appareil la première
fois.
Filtres
Les filtres permettent de garder les objets étrangers de l’eau de rinçage
loin de la pompe. Ils peuvent parfois obstruer les filtres.
Vérifier les filtres
• Dévisser le filtre cylindrique tel qu’il est illustré et le sortir voir Figure 15-16.
• Enlever tout résidu et le passer à l’eau courante.
• Réinstaller le système de filtre et s’assurer que les flèches sont à l’opposées l’une de l’autre une fois le système de filtre fermé
Bras gicleurs
Du calcaire ou des contaminants dans l’eau de rinçage peuvent obstruer les
embouts et les roulements des bras gicleurs.
• Vérifier si les embouts des bras gicleurs sont obstrués.
• Dévisser le bras gicleur supérieur. Voir Figure 17.
• Enlever le bras gicleur inférieur.
Pompe d’eau usée
Les résidus d’aliments de l’eau de rinçage non captés par les filtres peuvent
obstruer la pompe à eau usée. L’eau de rinçage ne peut être pompée et recouvre le filtre.
Dans ce cas :
• Débrancher l’appareil de l’alimentation électrique.
• Enlever les filtres.
• Vider l’eau à l’aide d’une éponge, au besoin.
• Avec une cuillère, enlever le couvercle de la pompe, tel qu’il est illustré,
ensuite prendre le couvercle par la languette et tirer vers le haut jusqu’à
résistance, puis le sortir (voir Figure 18-19).
• Vérifier l’intérieur du compartiment et enlever tout objet étranger.
• Remettre le couvercle à sa position d’origine.
• Installer le filtre.
Figure 16
Figure 17
Figure 18
Figure 19
&OLFN
15
Page 38

Aide automatique
Problème Cause Action à prendre
Le lave-vaisselle
ne se met pas en
marche
Le lave-vaisselle
émet un bip
sonore (signal de
fin de programme)
L'afficheur ne
s'allume pas
Le programme
de lavage semble
durer trop longtemps
1. La porte est peut-être mal enclenchée.
2. L'appareil n'est peut-être pas allumé.
3. La machine n'a pas été réinitialisée ou le programme
précédent n'est pas terminé.
4. La mise en marche différée est activée.
5. Interruption de l'alimentation électrique du lave-vaisselle
ou fusible ayant sauté.
6. La porte a peut-être été fermée avant d'avoir choisi le programme.
7. Le robinet d'alimentation en eau n'est peut-être pas
ouvert.
1. Les paramètres usine par défaut avertissent l'utilisateur
que le programme de lavage est terminé en émettant un bip
sonore. Cette fonction peut être désactivée au besoin.
1. Un fusible a peut-être sauté ou le disjoncteur s'est
déclenché.
2. La porte est mal fermée ou mal enclenchée.
Remarque : pour les modèles équipés de commandes situées
sur la partie supérieure de la porte, l'afficheur ne s'allume
que lorsque la porte est ouverte et les commandes sont visibles.
1. IL'eau qui alimente le lave-vaisselle n'est pas assez chaude.
2. La durée du programme peut varier en fonction de la
saleté de la vaisselle et de la qualité de l'eau.
3. Le distributeur de produit de rinçage est vide.
4. Le lave-vaisselle est branché sur une conduite d'eau froide.
Remarque : reportez-vous à la section de ce guide intitulée «
Informations sur les programmes de lavage » pour obtenir la
durée de programme type.
1. Fermez complètement la porte.
2. Appuyez sur le commutateur principal pour allumer la machine.
3. Pour réinitialiser la machine, reportez-vous à la section de ce
guide intitulée « Annulation ou modification du programme ».
4. Pour réinitialiser la machine, reportez-vous à la section de ce
guide intitulée « Mise en marche différée ».
5. Vérifiez le disjoncteur.
6. Sélectionnez un programme et fermez la porte.
7. Vérifiez et ouvrez le robinet d'alimentation en eau.
1. Pour régler le volume sonore ou désactiver cette fonction,
reportez-vous à la section de ce guide intitulée « Signal de fin de
programme ».
1. Vérifiez le fusible ou le boîtier de disjoncteurs et remplacez le
fusible ou réarmez le disjoncteur le cas échéant.
2. Assurez-vous que la porte est correctement enclenchée et
complètement fermée.
1. Avant de démarrer un programme, faites couler le robinet
d'eau chaude de l'évier le plus proche du lave-vaisselle.
2. Les capteurs du lave-vaisselle augmentent automatiquement la
durée du programme pour une vaisselle bien propre en cas de
détection d'une quantité importante de saletés sur la vaisselle.
3. Versez le produit de rinçage dans le distributeur.
4. Vérifiez que le lave-vaisselle est bien raccordé à la tuyauterie
d'arrivée d'eau chaude.
La vaisselle est
mal lavée
La vaisselle n'est
pas bien sèche
Impossible de
sélectionner le
programme
voulu
1. Quelque chose empêche le bras de lavage de tourner.
2. Quelque chose bouche les jets du bras d'aspersion.
3. Mauvaise utilisation des détergents.
4. Les filtres sont peut-être bouchés.
5. Les pièces de vaisselle sont imbriquées les unes dans les
autres ou disposées trop près les unes des autres.
6. Le programme de lavage choisi ne convient pas aux conditions de saleté de la vaisselle.
1. Le distributeur de produit de rinçage est vide. (Le voyant
du produit de rinçage est activé).
2. Mauvais chargement de la vaisselle.
3. Le programme choisi ne comprend pas le séchage.
Remarque : en général, les ustensiles en plastique et en
Téflon ne sèchent pas aussi bien que d'autres ustensiles en
raison des propriétés inhérentes à ces types de matériaux.
1. Le programme précédent n'est pas terminé 1. Reportez-vous à la section de ce guide intitulée « Annulation
1. Assurez-vous que le mouvement de rotation des bras d'aspersion n'est pas bloqué en faisant pivoter ces derniers à la main.
2. Retirez les bras d'aspersion et nettoyez-les en suivant les consignes du paragraphe figurant dans la section de ce guide intitulée « Nettoyage et entretien ».
3. Augmentez ou diminuez la quantité de détergent selon la
dureté de l'eau. Reportez-vous au tableau 1.
4. Nettoyer les filtres. Reportez-vous la section de ce guide intitulée « Nettoyage et entretien ».
5. Changez la disposition de la vaisselle afin que le jet d'eau
puisse asperger correctement toutes les pièces. Reportez-vous
également la section de ce guide intitulée « Chargement de la
vaisselle ».
6. Reportez-vous également à « Programme de lavage » dans la
section de ce guide intitulée « Fonctionnement du lave-vaisselle».
1. Versez le produit de rinçage dans le distributeur. L'utilisation
d'un produit de rinçage améliore le séchage.
2. Changez la disposition de la vaisselle pour veiller à ce que les
articles ne soient pas imbriqués les uns dans les autres.
Reportez-vous également à la section de ce guide intitulée
«Chargement de la vaisselle ».
3. Le paramètre Rinçage et attente ne comprend pas de programme de séchage.
ou modification du programme ».
16
Page 39

Problème Cause Action à prendre
Odeur 1. Des déchets alimentaires se sont accumulés au fond du
lave-vaisselle.
2. Des particules d'aliments se sont accumulées près du joint
d'étanchéité de la porte.
3. La vaisselle est restée trop longtemps dans le lave-vaisselle avant le lancement d'un programme.
4. De l'eau résiduelle s'est accumulée au fond du lave-vaisselle.
5. Le tuyau de vidange est obstrué.
Le lave-vaisselle
ne se remplit pas
d'eau
Fuites d'eau 1. Mousse
1. Obstruction au niveau du réseau d'alimentation en eau.
2. Le programme de lavage précédent n'est pas terminé.
3. La fonction de mise en marche différée est activée.
4. HL'alimentation en eau domestique est coupée
2. Le joint d'étanchéité peut être sorti de la rainure.
3. L'évent de condensation est bloqué.
4. Mauvaise installation.
1. Retirez les filtres et nettoyez-les conformément à la section de
ce guide intitulée « Nettoyage et entretien ».
2. Reportez-vous à « Nettoyage et entretien » dans la section de
ce guide.
3. Si vous n'avez pas l'intention de laver la vaisselle immédiatement, lancez le programme Rinse/Hold (Rinçage/Attente).
4. Assurez-vous que l'opération de vidange du programme précédent est complètement terminée.
5. Pour éliminer les objets pouvant obstruer le tuyau de vidange,
faites appel à un personnel qualifié.
Remarque : si les problèmes d'odeur persistent, lancez le programme
de lavage Normal/Regular (Normal) jusqu'au rinçage puis interrompez
le programme et versez une tasse de 255 ml (8 oz) de vinaigre blanc
distillé sur le panier supérieur. Terminez ensuite le programme.
1. Assurez-vous que le robinet d'arrivée d'eau (en général situé
sous l'évier de la cuisine) est ouvert et vérifiez que la conduite
d'alimentation n'est ni pliée ni bouchée.
2. Reportez-vous à la section de ce guide intitulée « Fonctionnement du lave-vaisselle ».
3. Annulez la mise en marche différée ou attendez que la période
de mise en marche différée soit terminée ou que ce délai expire.
4. Ouvrez l'alimentation en eau domestique
1. Les détergents inadéquats ont tendance à produire de la
mousse et à provoquer des fuites. Utilisez uniquement des détergents pour lave-vaisselle. Si le problème de mousse persiste,
mettez une cuillère à soupe d'huile végétale au fond du lave-vaisselle et lancez le programme voulu.
2. Assurez-vous que le joint d'étanchéité est bien inséré dans la
rainure.
3. Assurez-vous que l'évent de condensation n'est pas bloqué.
4. Faites vérifier l'installation par un personnel qualifié (alimentation en eau, système de vidange, mise à niveau, tuyauterie).
Taches apparaissant dans la cuve
Apparition de
films d'eau sur
les verres ou de
résidus sur la
vaisselle
Le panneau
avant est décoloré ou rayé
Fonctionnement
bruyant pendant
le déroulement
du programme
de lavage
Le couvercle du
distributeur de
détergent ne se
ferme pas
1. Les taches qui se forment à l'intérieur du lave-vaisselle
sont dues à la dureté de l'eau.
2.Les couverts sont en contact avec les parois de la cuve.
1. Mauvais dosage du produit de rinçage. 1. Réglez le distributeur du produit de rinçage en fonction de
1. Vous avez utilisé un produit d'entretien abrasif 1. Utilisez des détergents non abrasifs et un linge humide doux.
1. La vaisselle n'est pas correctement disposée. 1. Les sons correspondant à la circulation de l'eau sont normaux,
1. Mauvais fonctionnement du couvercle du distributeur de
détergent.
2. Le programme précédent n'est pas terminé ; réinitialisation ou interruption du programme.
1. L'emploi de jus de citron concentré peut réduire l'accumulation
de taches d'eau dure. Lancez un programme de lavage normal
jusqu'au rinçage puis interrompez le programme et versez une
tasse de 250 ml (8 oz. liq.) de citron concentré sur le panier
supérieur. Terminez ensuite le programme. Ceci peut être fait périodiquement pour prévenir l'accumulation de taches.
2. Assurez-vous que les couverts n'entrent pas en contact avec les
parois de la cuve pendant le déroulement d'un programme.
la dureté de l'eau. Pour des informations sur le dosage,
reportez-vous à la section de ce guide intitulée « Ajout de
détergent et de produit de rinçage ».
mais si vous soupçonnez que des pièces de vaisselle se cognent
entre elles ou touchent les bras d'aspersion, reportez-vous à la
section du présent guide intitulée « Préparation et chargement
de la vaisselle » pour connaître la disposition optimale de la vaisselle.
1. Reportez-vous à la section de ce guide intitulée « Ajout de
détergent et de produit de rinçage » pour des instructions sur
l'ouverture et la fermeture du distributeur.
2. Reportez-vous à la section de ce guide intitulée « Annulation
ou modification du programme ».
17
Page 40

Service après-vente
Votre lave-vaisselle Bosch ne requiert aucun entretien spécial autre que celui décrit à la section Nettoyage et entretien du présent guide. En cas de problème avec votre lave-vaisselle, avant de faire appel
aux services d'un technicien, reportez-vous à la section Aide automatique du guide. Si un technicien
doit intervenir, communiquer avec votre revendeur ou installateur ou avec un service de réparation
autorisé. Ne pas tenter de réparer soi-même l'appareil. Toute réparation effectuée par un personnel
non autorisé peut être une cause d'annulation de la garantie.
Si votre lave-vaisselle Bosch vous pose un problème et si vous n'êtes pas satisfait du service que vous
avez reçu, veuillez effectuer les démarches suivantes jusqu'à ce que votre problème soit résolu à votre
entière satisfaction :
1 Téléphonez au 1-800-944-2904
2 Communiquez avec le service après-vente à partir de notre site Web :
www.bosch-home.com/us or www.bosch-appliances.ca
3 Communiquez avec l'installateur ou le prestataire de service après-vente agréé de Bosch de votre région.
Assurez-vous d'inclure les informations sur le modèle ainsi qu'une explication du problème et la date à
laquelle il s'est produit.
Vous trouverez le numéro de modèle et le numéro de série sur l'étiquette située sur le bord de la porte
du lave-vaisselle.
D'autre part, si vous nous contactez par écrit, veuillez indiquer le numéro de téléphone où l'on peut
vous joindre durant la journée.
Veuillez faire une copie de votre facture et conservez-la avec ce guide. Le client doit fournir une preuve
d'achat pour bénéficier du service de garantie.
18
Page 41

Informations concernant la garantie
Ce que couvre cette garantie et à qui elle s'applique : la garantie limitée fournie par BSH Home Appliances (« Bosch ») dans cet énoncé de garantie limitée de
produit s'applique uniquement aux lave-vaisselle Bosch (le « produit ») vendus au client, le premier acheteur utilisateur, à la condition que le produit ait été
acheté : (1) Pour votre usage domestique normal (non commercial) et qu'il ait effectivement en tout temps été utilisé uniquement à des fins domestiques normales. (2) À l'état neuf au détail (et non comme un modèle d'exposition, « tel quel » ou ayant déjà été retourné), et non à des fins de revente ou d'utilisation
commerciale. (3) Aux États-Unis ou au Canada, et qu'il soit en tout temps demeuré dans le pays de l'achat initial. Les garanties énoncées aux présentes s'appliquent uniquement à l'acheteur initial du produit et ne sont pas cessibles.
• Assurez-vous de renvoyer la carte d'enregistrement ; bien que cette démarche ne soit pas nécessaire pour que la garantie soit valide, c'est la meilleure façon
de permettre à Bosch de vous avertir dans l'éventualité improbable d'un avis de sécurité ou d'un retrait de produit du marché.
Durée de la garantie : Bosch garantit que le produit est exempt de défauts de matériaux et de fabrication pendant une période de trois cent soixante-cinq
(365) jours à compter de la date d'achat. Le délai précité commence à courir à partir de la date d'achat et ne doit pas, pour quelque raison que ce soit, être différé, faire l'objet de droits, être prolongé ou suspendu. Les frais de main d'œuvre et d'expédition sont compris dans la couverture de base.
Garantie limitée prolongée :Bosch offre également les garanties limitées supplémentaires suivantes :
• Garantie limitée de 2 ans : Bosch réparera ou remplacera tout composant ayant un défaut de matériaux ou de fabrication (excluant les frais de
main-d’œuvre).
• Garantie limitée de cinq (5) ans sur les composant électroniques : Bosch réparera ou remplacera tout microprocesseur ou carte de circuit imprimé Bosch
présentant des défauts de matériaux ou de fabrication (frais de main d'œuvre exclus).
• Garantie limitée de cinq (5) ans sur les paniers à vaisselle : Bosch remplacera les paniers à vaisselle supérieur ou inférieur (à l'exclusion des composants du
panier), si le panier présente des défauts de matière ou de fabrication (frais de main d'œuvre exclus).
• Garantie à vie contre la rouille de l'acier inoxydable : Bosch remplacera votre lave-vaisselle par un modèle identique ou un modèle courant sensiblement équivalent ou supérieur en termes de fonctionnalité, si le revêtement intérieur est perforé par la rouille (frais de main d'œuvre exclus). Bosch remplacera la porte en
acier inoxydable si celle-ci est perforée par la rouille (frais de main d'œuvre exclus).
• Le délai précité commence à courir à partir de la date d'achat et ne doit pas, pour quelque raison que ce soit, être différé, faire l'objet de droits, être prolongé ou suspendu.
La réparation ou le remplacement du produit constitue votre recours exclusif : Pendant la période de la présente garantie, Bosch ou l'un de ses prestataires
de service après-vente agréés réparera votre produit sans frais de votre part (sous réserve de certaines restrictions précisées aux présentes) s'il s'avère que
votre produit a été fabriqué en incorporant un défaut de matériaux ou de fabrication. Si des tentatives raisonnables de réparation du produit ont été effectuées sans succès, Bosch remplacera votre produit (des modèles améliorés peuvent vous être offerts, à la discrétion exclusive de Bosch, moyennant des frais
supplémentaires). Toutes les pièces et tous les composants enlevés deviendront la propriété de Bosch à sa discrétion exclusive. Toutes les pièces remplacées
et/ou réparées devront être similaires à la pièce d'origine aux fins de la présente garantie et cette garantie ne sera pas prolongée eu égard à ces pièces. En
vertu des présentes, Bosch assume la responsabilité et l'obligation exclusives vis-à-vis de la réparation d'un produit comportant un défaut de fabrication
uniquement, en ayant recours à un prestataire de services après-vente agréé de Bosch pendant les heures normales de travail. Par souci de sécurité et pour des
questions de dommages matériels, Bosch vous recommande vivement de ne pas tenter de réparer vous-même le produit ni d'avoir recours à un dépanneur non
agréé ; Bosch ne sera pas responsable et n'assume aucune obligation pour les réparations ou le travail effectués par un dépanneur non agréé. Si vous choisissez de demander à une personne qui n'est pas un prestataire de service après-vente agréé de travailler sur votre produit, LA PRÉSENTE GARANTIE DEVIENDRA
AUTOMATIQUEMENT NULLE ET NON AVENUE. Les prestataires de service après-vente agréés sont des personnes ou des sociétés ayant été spécialement formées sur les produits de Bosch et qui jouissent, de l'avis de Bosch, d'une réputation supérieure en matière de service à la clientèle et de compétences techniques (veuillez noter qu'il s'agit d'entités indépendantes et non de mandataires, d'associés, d'affiliés ou de représentants de Bosch). Nonobstant les
dispositions précédentes, Bosch n'assumera aucune responsabilité ou obligation en ce qui concerne le produit s'il se trouve dans une région éloignée (à plus
de 100 milles d'un prestataire de services après-vente agréé) ou s'il est raisonnablement inaccessible ou s'il se trouve dans un lieu, un milieu ou un environnement dangereux, menaçant ou traître ; auquel cas, sur votre demande, Bosch paiera quand même la main d'œuvre et les pièces et expédiera les pièces au
prestataire de services après-vente agréé le plus proche. Toutefois, vous restez quand même entièrement responsable pour et serez dans l'obligation de payer
les frais de déplacement ou autres frais spéciaux appliqués par la société de services après-vente, dans l'hypothèse où elle accepte de faire le déplacement en
vue d'effectuer la réparation.
Produit qui n'est plus couvert par la garantie : Bosch n'est pas tenue, en droit ou autrement, de vous consentir quoi que ce soit, y compris des réparations,
des tarifs proportionnels ou un remplacement de produit, après l'expiration de la garantie.
Exclusions de la garantie : La couverture de la garantie décrite aux présentes exclut tous les défauts ou dommages qui ne résultent pas d'une faute directe de
Bosch, y compris, sans toutefois s'y limiter, un ou plusieurs des éléments suivants : (1) L'utilisation du produit à toute autre fin que son usage normal, habituel et
prévu (y compris, sans toutefois s'y limiter, toute forme d'usage commercial, l'usage ou l'entreposage à l'extérieur d'un produit devant être utilisé à l'intérieur,
l'utilisation du produit conjointement avec un aéronef ou un bateau). (2) La conduite répréhensible volontaire, la négligence,
abusive, les accidents, la négligence, le fonctionnement abusif, le refus d'entretien, l'installation irrégulière ou négligente, l'altération, le non respect du mode
d'emploi, les fausses manœuvres, les réparations non agréés (y compris la réparation effectuée soi-même ou l'exploration des mécanismes internes de l'appareil) de la part de toute partie. (3) La rectification, l'altération ou la modification, quelle qu'en soit la nature. (4) Le non-respect des codes, règlements ou lois
applicables d'État, locaux, municipaux ou de comté régissant l'électricité, la plomberie et/ou le bâtiment, y compris le manquement à l'obligation d'installer le
produit dans le respect le plus strict des codes et règlements locaux du bâtiment et en matière de prévention des incendies. (5) L'usure normale, le renversement d'aliments, de liquides, les accumulations de graisse ou les autres substances qui s'accumulent sur le produit, à l'intérieur ou autour de celui-ci. (6) Les
forces et facteurs externes, exercés par les éléments et/ou l'environnement, y compris, sans toutefois s'y limiter, la pluie, le vent, le sable, les inondations les
incendies, les glissements de terrain, les températures glaciales, l'humidité excessive ou l'exposition prolongée à l'humidité, la foudre, la surtension électrique,
les défaillances des structures qui entourent l'appareil et les cas de force majeure.
quelque manière que ce soit quant aux dommages occasionnés aux biens environnants, y compris les armoires de rangement, les planchers, les plafonds et les
autres structures ou objets qui se trouvent à proximité du produit. Sont également exclus de la présente garantie les griffures, les encoches, les bosselures et les
dommages touchant l'aspect des surfaces externes et des pièces exposées ; les produits dont les numéros de série ont été modifiés, oblitérés ou enlevés ; les
visites après-vente pour vous enseigner à utiliser le produit, ou les déplacements lorsque le produit ne présente aucun problème ; la résolution de problèmes
d'installation (vous êtes entièrement responsable de toute structure et mise en place du produit, y compris les installations électriques, de plomberie ou autres
installations de raccordement, de la mise en place de fondations ou d'un parquet appropriés, et de toute modification, y compris, sans toutefois s'y limiter, celles
devant être apportées aux armoires de rangement, murs, planchers, rayonnages, etc.) ; ainsi que le réenclenchement des disjoncteurs ou des fusibles.
DANS LA MESURE OÙ LA LOI L'AUTORISE, LA PRÉSENTE GARANTIE STIPULE VOS RECOURS EXCLUSIFS À L'ÉGARD DU PRODUIT, QUE LA RÉCLAMATION SOIT OU NON DE NATURE CONTRACTUELLE OU DÉLICTUELLE (Y COMPRIS LA RESPONSABILITÉ ABSOLUE OU LA NÉGLIGENCE) OU AUTRE. ¤LA
PRÉSENTE GARANTIE REMPLACE TOUTES LES AUTRES GARANTIES, EXPRESSES OU IMPLICITES. TOUTE GARANTIE IMPLICITE EN VERTU DE LA LOI,
QUE CE SOIT À DES FINS DE QUALITÉ MARCHANDE OU D'ADAPTATION À UN USAGE PARTICULIER, OU AUTREMENT, EST EN VIGUEUR UNIQUEMENT
PENDANT LA PÉRIODE AU COURS DE LAQUELLE LA PRÉSENTE GARANTIE LIMITÉE EXPRESSE EST EN VIGUEUR. §LE FABRICANT N'EST AUCUNEMENT
RESPONSABLE DES DOMMAGES, PERTES OU FRAIS CONSÉCUTIFS, PARTICULIERS, ACCESSOIRES, INDIRECTS ET/OU PUNITIFS, DES « PERTES COMMERCIALES », Y COMPRIS, SANS TOUTEFOIS S'Y LIMITER, LE TEMPS D'ABSENCE AU TRAVAIL, L'HÉBERGEMENT À L'HÔTEL ET/OU LES REPAS AU RESTAURANT, LES FRAIS DE REMANIEMENT EN EXCÉDENT DES DOMMAGES DIRECTS QUI SONT CAUSÉS DÉFINITIVEMENT ET EXCLUSIVEMENT PAR
BOSCH, OU AUTREMENT. §CERTAINS ÉTATS NE PERMETTENT PAS L'EXCLUSION OU LA LIMITATION DES DOMMAGES INDIRECTS OU ACCESSOIRES ET
CERTAINS ÉTATS NE PERMETTENT PAS LA LIMITATION DE LA DURÉE D'UNE GARANTIE IMPLICITE, DE SORTE QUE LES RESTRICTIONS STIPULÉES PLUS
HAUT PEUVENT NE PAS S'APPLIQUER À VOUS. LA PRÉSENTE GARANTIE VOUS CONFÈRE DES DROITS LÉGAUX SPÉCIFIQUES ET VOUS POUVEZ AUSSI
AVOIR D'AUTRES DROITS QUI VARIENT D'UN ÉTAT À L'AUTRE. Aucune tentative pour modifier la présente garantie n'aura d'effet à moins d'être autorisée par
écrit par un dirigeant de BSH.
Procédure d'obtention du service prévu par la garantie : POUR BÉNÉFICIER D'UN SERVICE DE GARANTIE POUR VOTRE PRODUIT, COMMUNIQUER AVEC LE CENTRE
DE SERVICE APRÈS-VENTE AGRÉÉ DE BOSCH LE PLUS PROCHE OU TÉLÉPHONEZ AU 800-944-2904.
Bosch ne sera en aucun cas responsable et n'aura aucune obligation de
la mauvaise utilisation, l'utilisation
19
Page 42

20
Page 43

Page 44

BSH reserves the right to change specifications or design without notice. Some models are certified for use in
Canada. BSH is not responsible for products which are transported from the United States for use in Canada.
Check with your local Canadian distributor or dealer.
BSH se réserve le droit de modifier les données techniques ou le design sans préavis. Certains modèles sont
certifiés pour une utilisation au Canada. BSH n’est pas responsable pour les produits transportés des États-
Unis pour une utilisation au Canada. Vérifier auprès d’un marchand ou distributeur canadien.
%6++RPH$SSOLDQFHV&RUSRUDWLRQ
0DLQ6WUHHW
,UYLQH&$
928 157
 Loading...