

Page 1
Dishwasher
en
Operating instructions
Guide d’Utilisation
fr
Lave Vaisselle
9000 752 548 Rev A (9302)
Page 2

1
Page 3

Dear Valued Customer,
Thank you for selecting a Bosch® dishwasher. You have joined the
many consumers who demand quiet and superior performance from
their dishwashers.
This manual was written with your safety and convenience in mind,
and the information contained herein is very important. We highly
recommend that you read this manual before using your dishwasher
for the first time.
To learn more about your dishwasher and available accessories, as
well as many other top quality Bosch appliances, visit our web site at:
www.bosch-home.com/us (USA)
or
www.bosch-home.ca (Canada)
While there, don’t forget to register your new dishwasher by clicking on
the Support tab or filling out the product registration card enclosed
with your new unit.
If you have any questions or comments, please contact us by phone at:
1-800-944-2904
or write us at:
BSH Home Appliances Corporation
1901 Main Street
Irvine, CA 92614
Table of Contents
Important Safety Instructions..............................................3-5
Dishwasher Components.....................................................5-6
Dishware Materials.................................................................7
Loading the Dishwasher.......................................................7-8
Loading the Silverware Basket................................................9
Rack Features.......................................................................10
Adding Detergent and Rinse Aid.......................................11-12
Dishwasher Cycles and Options............................................13
Wash Cycle Information........................................................14
Operating the Dishwasher................................................15-17
Care and Maintenance......................................................18-19
Self Help..........................................................................20-22
Customer Service.................................................................23
Statement of Limited Product Warranty...........................24-25
2
Page 4

IMPORTANT SAFETY INSTRUCTIONS: Please
READ and SAVE this information
WARNING
Misuse of the dishwasher can result in serious injury or death. Do not use
the dishwasher in any way not covered in this manual or for any purpose
other than those explained in the following pages.
Severe product damage and/or injury could result from the use of
unqualified service technicians or non-original replacement parts. All
repairs must be performed by a qualified service technician using only
original equipment factory replacement parts.
Electrical shock or fire could result if the electrical supply for the
dishwasher covered in this manual is incorrectly installed or if the
dishwasher has been improperly grounded. Do not use the dishwasher covered in this manual unless you are certain the electrical
supply has been correctly installed or the dishwasher has been properly grounded.
Never use harsh chemicals to clean your dishwasher. Some chloridecontaining products can damage your dishwasher and may present
health hazards!
Only sanitizing cycles have been designed to meet the requirements
of 6 for soil removal and sanitation efficacy. There is no intention,
either directly or indirectly, to imply that all cycles on a certified
machine have passed the sanitization performance test.
NOTICE
Never use steam cleaning products to clean your dishwasher. The
manufacturer will not be liable for the possible damages or consequences.
It is highly recommended for the end user to become familiar with the
procedure to shut off the incoming water supply and the procedure to
shut off the incoming power supply. See the Installation Instructions or
contact your installer for more information.
NSF/ANSI 184 Certified residential dishwashers are not intended for
licensed food establishments.
3
Page 5

WARNING: To reduce the risk of fire, electrical
shock, or serious injury, observe the following:
1 This dishwasher is provided with Installation Instructions and this
Use and Care Manual. Read and understand all instructions before
using the dishwasher.
2 This appliance must be grounded to a metal, permanent wiring sys-
tem, or an equipment grounding conductor must be run with the
circuit conductors and connected to the equipment grounding terminal or lead on the dishwasher. See the Installation Instructions
included with this dishwasher for more information on electrical
requirements.
3 Use this dishwasher only for its intended function, which is the
washing of household dishware and kitchenware.
4 Use only detergents or rinsing agents recommended for use in a
dishwasher, and keep them out of the reach of children.
5 When loading items to be washed:
• Locate sharp items so they are not likely to damage the door seal.
• Load knives and other sharp utensils with their HANDLES UP
to reduce the risk of cut-type injuries.
• Do not wash plastic items unless they are marked “dishwasher
safe” or the equivalent. For plastic items not so marked, check
the manufacturer’s recommendations.
• Do not operate your dishwasher unless all enclosure panels
are in place.
• Do not tamper with or override controls and interlocks.
6 Do not abuse, sit or stand on the door or dish racks of the dish-
washer.
7 To reduce risk of injury, do not allow children to play in or on the
dishwasher.
8 When children become old enough to operate the appliance, it is
the legal responsibility of the parents/legal guardians to ensure
the children are instructed in safe practices by qualified persons.
9 Under certain conditions, hydrogen gas may be produced in a hot
water system that has not been used for two weeks or more.
Hydrogen gas is explosive. Before using a dishwasher that is connected to a hot water system that has been unused for two weeks
or longer, turn on all hot water faucets and let the water flow from
each for several minutes. This will release any accumulated hydrogen gas. As the gas is explosive, do not smoke or use an open
flame during this time.
10 Remove the dishwasher door to the washing compartment when
removing an old dishwasher for service or discarding.
11 To avoid floor damage and possible mold growth, do not allow
wet areas to remain around or under the dishwasher.
12 Protect your dishwasher from the elements. Protect against freez-
ing to avoid possible damage to the fill valve. Damage caused by
freezing is not covered by the warranty.
4
Page 6

13 This appliance must be grounded. In the event of a malfunction or
breakdown, grounding will reduce the risk of electric shock by
providing a path of least resistance for electric current. This appliance is equipped with a cord having an equipment-grounding conductor.
• Improper connection of the equipment-grounding conductor
can result in risk of electric shock. Check with a qualified electrician or service representative if you are in doubt whether
the appliance is properly grounded.
State of California Proposition 65 Warnings:
WARNING: This product contains one or more chemicals known to the
State of California to cause cancer.
WARNING: This product contains one or more chemicals known to the
State of California to cause birth defects or other reproductive harm.
Dishwasher Components
Wash Cycles
Extra
Shine™
Speed60™
(1 hour)
Adjustable
Basket
Manual Long
Manual Long
Rinse
Child
Lock
Silverware
Basket
Model Heavy Auto Normal
SHX53Tx5UC*
SHV53Tx3UC*
SHP53Tx5UC*
SHE53T5xUC*
SHE53TLxUC*
SHE53TFxUC*
Additional Features
Model Delay
SHX53TL5UC RackMatic® Duo-Flex
SHX53T55UC
SHV53T53UC
SHV53TL3UC RackMatic® Duo-Flex
SHP53T55UC Manual Long
SHP53TL5UC RackMatic® Long
SHE53T5xUC*
SHE53TFxUC*
Speed
Perfect™
Delicate Sanitize
SHE53TLxUC* RackMatic® Long
5
* “x” can be any number or letter
Page 7
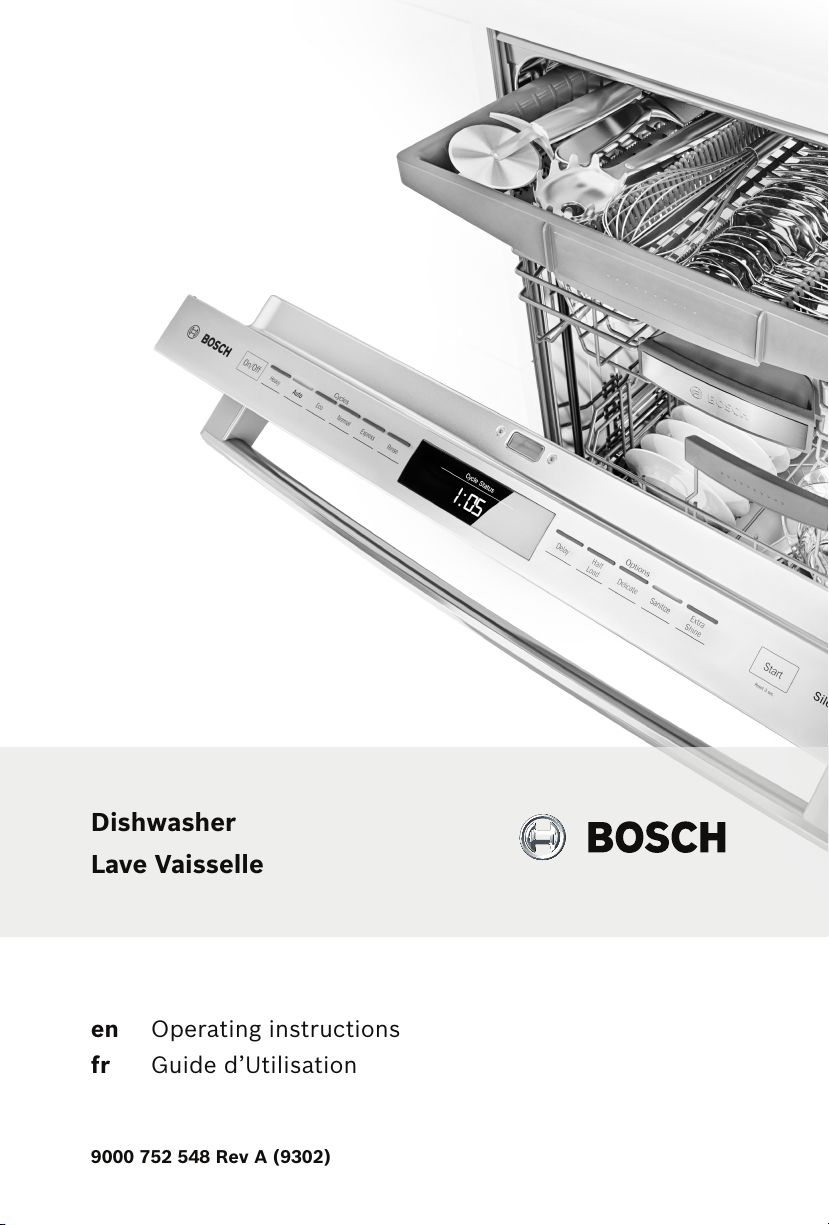
Top rack
Top rack
spray arm
Bottom rack
spray arm
Bottom rack
Detergent
dispenser
Silverware
basket
Filter system
Rinse aid
dispenser
6
Page 8

Dishware Materials
Note: Before using your dishwasher for the first time, check the information in
this section. Some items are not dishwasher safe and should be hand washed;
others require special loading.
Recommended
Aluminum: Colored anodized aluminum may fade over time. Minerals in
your water may cause the aluminum to darken or spot. This can usually be
removed with a soap-filled steel wool pad.
China, Crystal, Stoneware: Some hand-painted utensils may discolor,
fade or spot. Hand wash these utensils. Position fragile glassware so that
it will not topple over or come in contact with other utensils during the
wash cycle.
Glass: Milk glass may discolor or become yellow.
Non-stick Coatings: Apply a light coating of vegetable oil to non-stick sur-
faces after drying.
Plastics: Make sure the plasticware is dishwasher safe.
Stainless Steel, Sterling Silver and Silver Plates: Load these so they do
not come in contact with other metals.
Not Recommended
Acrylic: Crazing or small cracks throughout the acrylic may occur.
Adhesive-Joined Pieces: Adhesives that join materials such as plastic,
wood, bone, steel copper, tin, etc. may loosen.
Bone-Handled Utensils: Handles may separate.
Iron: Iron will rust. Hand wash and dry immediately.
Non-Dishware Items: Your dishwasher is intended for use in cleaning ONLY
standard household dishware and kitchenware.
Pewter, Brass, Bronze: These items will tarnish. Hand wash and dry
immediately.
Tin: Tin will stain. Hand wash and dry immediately.
Wood: Wooden bowls, wooden utensils and utensils with wooden handles
can crack, warp and lose their finish.
Loading the Dishwasher
Do not pre-wash items with loosely attached soiling. Remove all food particles, bones, toothpicks and excessive grease. Items having burned-on, bakedon or starchy soils may require some pretreatment. Refer to the Dishware
Materials section for more information about dishware suitability.
Load only dishwasher safe items. Load dishes in the dishwasher racks so the
insides of bowls, pots and pans are facing the spray arms. Avoid nesting and
contact points between dishes. Separate items of dissimilar metals.
7
Page 9

Loading the Top Rack
Ensure items do not protrude through the bottom of the racks and block
the spray arms.
Note: When pushing the top rack into the dishwasher, push it until it stops
against the back of the tub so the top rack spray arm connects to the water supply at the back of the tub. Do not push racks in using the door.
Loading the Bottom Rack
Place large items in the bottom rack. Load pots, pans and bowls upside
down. Do not block vent with tall baking sheets or cutting boards, etc.
Load these items on the left side of the dishwasher.
NOTICE
To avoid dishwasher damage, do not load the dishwasher with paper products, plastic bags, packing materials or anything other than normal, dishwasher safe dishware and kitchenware.
Suggested Loading Pattern
Top Rack
Bottom Rack
Top Rack
Additional Loading Pattern
Bottom Rack
8
Page 10

Loading the Silverware Basket
Place knives and sharp utensils with their HANDLES UP and forks and
spoons with their handles down. If large or oddly-shaped items are loaded
in the silverware basket, be sure they do not nest together.
WARNING
The sharp points and edges of knives and other sharp utensils can cause
serious injury. Load knives and other sharp utensils with edges down. Do
not allow children to handle or play near knives and sharp utensils.
The Long Silverware Basket
The long silverware basket fits along the side of the lower
rack.
The Duo-Flex Silverware Basket
This basket splits along its length, resulting in two halves
that may be placed in a variety of positions in the lower
rack, greatly increasing the lower rack’s loading versatility. The basket snaps together either back to back or end
to end as shown.
To split the Duo-Flex Silverware Basket
Grasp the basket and slide the two halves in opposite
directions as shown at right and then pull the two halves
apart.
Loading pattern for Long Silverware Basket
4
44 4 444 4447446 62
3 333 3 3 3
33 3 33
11 1 1 1 1
Loading pattern for Duo-Flex Silverware Basket
22
The basket lid may also be snapped to the handle in order to leave the basket open.
9
22
22222
2
22
2
2
222
222 2 2 1 1 1111
222
12345
6
1- salad fork
2- teaspoon
3- dinner fork
4
43
4
43
22
4- knife
5 - tablespoon
6 - serving spoon
7 - serving fork
7
Page 11

Rack Features
Figure 1
Flip Tines
The racks consist of tines that can be folded down
depending on what you may need to load in the
rack. To fold down, grasp the folding tine and
release from notch. Push folding tine downward to
desired position as shown in Figure 1.
Manual Adjustable Upper Rack (model dependent)
Remove the empty upper
rack by pulling it out of the
dishwasher until it can be
lifted upward as show in
Figure 2. Pull the rack up
and out until the rollers are
completely free of the roller
guides.
Reinsert the rack with the
other set of rollers on the
roller guides as shown in
Figure 3
3-Step RackMatic® (model dependent)
The height of the upper rack can be adjusted in 3
steps to create more space. Before lowering or
raising, ensure the rack is completely empty.
1 Pull the top rack out of the dishwasher until
it stops.
2 To lower the rack, push the lever inward.
3 To raise the rack, hold the basket on the sides
of the upper rack and lift up.
Note: Before pushing the top rack into the dishwasher, ensure the rack height
is the same on both sides. If the height is not the same on both sides, the dishwasher door will not shut and the top rack spray arm will not connect to the
water inlet.
Figure 2
.
Figure 3
Figure 4
Figure 5
Cup Shelves (model dependent)
The shelf and the space underneath can
be used for small cups or for larger serving utensils.
&/,&.
10
Page 12
Adding Detergent and Rinse Agent
Detergent
Use only detergent specifically designed for dishwashers. For best
results, use detergent tabs or fresh powdered dish washing detergent.
NOTICE
To avoid dishwasher damage, do not use hand dish washing products in
your dishwasher.
To avoid dishwasher damage, do not use too much detergent if your
water is soft. Using too much detergent with soft water may cause etching in glassware.
This dishwasher uses less water than most, therefore, less detergent is
required. With soft water, 1 tablespoon (15ml) of detergent will clean
most loads. The detergent dispenser cup has lines that measure detergent to 1 tablespoon (15ml) and 1.75 tablespoons (25ml). 3 tablespoons
(45ml) of detergent will completely fill the detergent dispenser.
Note: If you do not know the hardness of your water supply, use 1 tablespoon
(15ml) of detergent. Increase the amount if necessary to the least amount required to get your kitchenware clean.
Use the measuring lines in the detergent dispenser cup as a guide to measure the amount of
detergent recommended in Table 1.
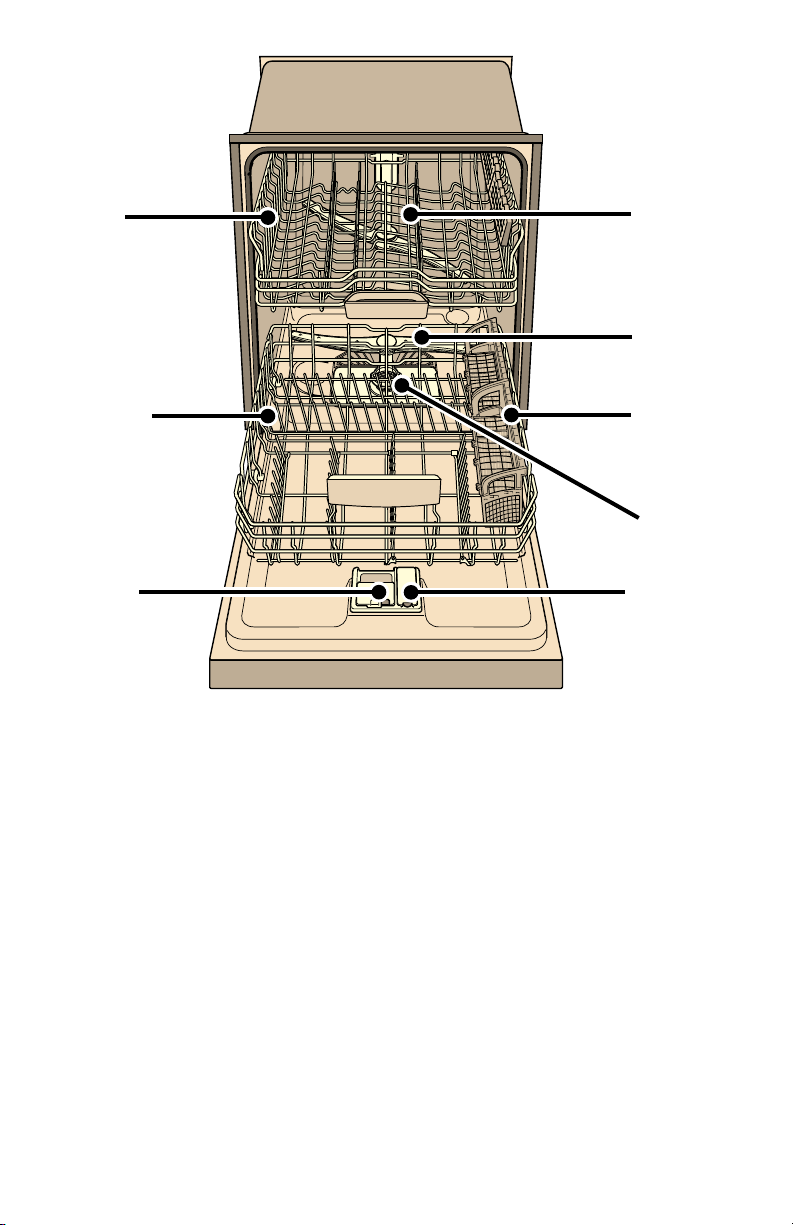
Adding Detergent
• 1 tablespoon (15ml) will clean most loads
(see Figure 6).
• Do not use more than 3 tablespoons
(45ml).
• Do not over fill the detergent dispenser.
• When using detergent tabs, lay them such that
they do not come in contact with the cover.
To Close
• Place finger as shown in Figure 7.
• Slide door closed and press down firmly
until it clicks.
To Open
• To open the cover, push the button as
shown in Figure 8. Cover will slide open.
Figure 6
7EVS0D[
7EVSPO
7EVSPO
Figure 7
Figure 8
11
Page 13
Table 1 - Recommended Detergent Amount
Wash Cycle
Heavy 45ml (3tbsp) 45ml (3tbsp) 25-45ml (1.75-3tbsp)
Auto 25-45ml (1.75-3tbsp) 25ml (1.75tbsp) 15-25ml (1-1.75tbsp)
Normal 25-45ml (1.75-3tbsp) 25ml (1.75tbsp) 15-25ml (1-1.75tbsp)
Speed60™ 25ml (1.75tbsp) 15-25ml (1-1.75tbsp) 15ml (1tbsp)
Rinse None None None
Hard Water/
Heavy Soil
Medium Water/
Medium Soil
Soft Water/
Little Soil
Rinse Aid
Your dishwasher was designed to use rinse aid for best drying results. To
achieve proper drying, always use a liquid rinse aid, even if your detergent contains a rinse aid or drying additive.
Note: The dishwasher indicates low rinse aid by turning on the “Add Rinse
Aid” indicator light. If this light is on, you need to refill the rinse aid dispenser
by following the directions below. If the light is not on, your dishwasher still
has enough Rinse Aid and there is no need to refill it.
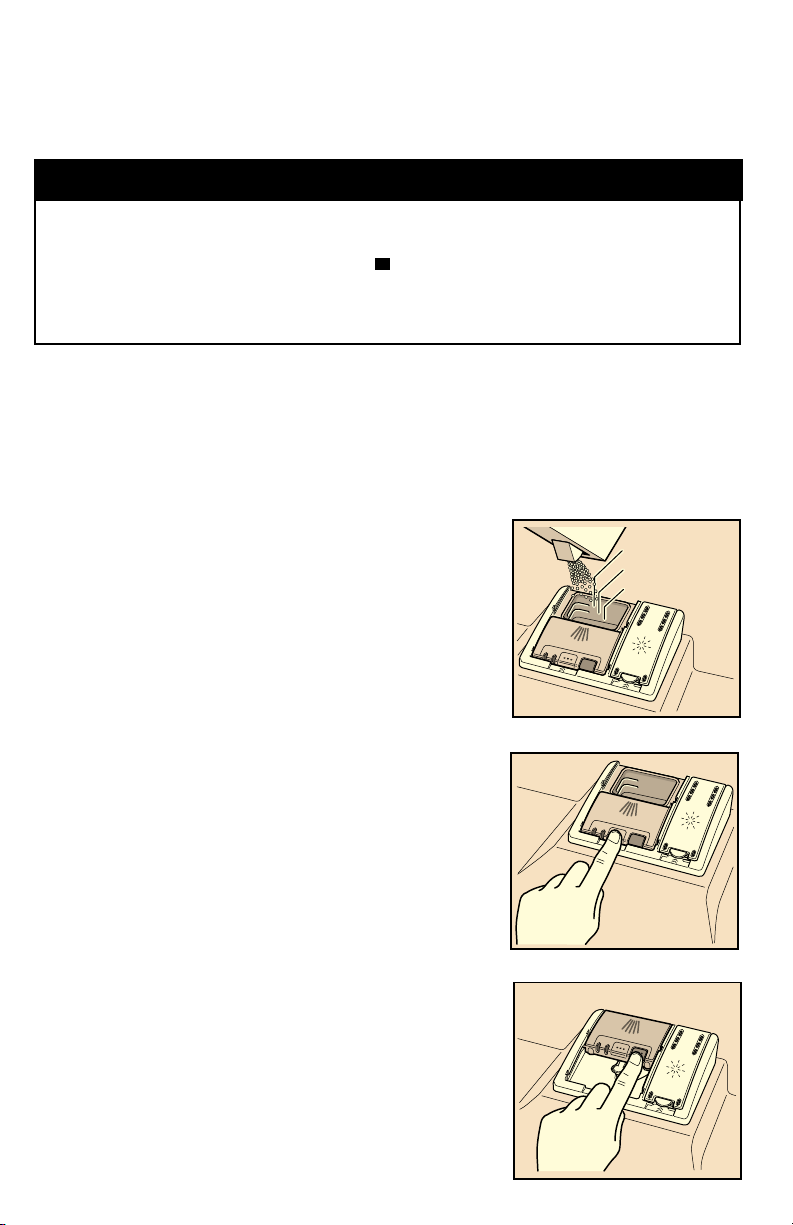
Adding Rinse Aid
Add liquid rinse aid to the dispenser until it is
full (see Figure 9). Wipe up any excess rinse aid
that may puddle when the dispenser reservoir is
full. Lid must be snapped fully closed in order
to seal. The indicator light will go out a few
moments after the dishwasher door is shut.
See below for instructions on how to adjust the
amount of rinse aid dispensed.
Note: Setting the rinse aid to “r:00” may increase
cycle times.
Figure 9
Setting the amount of rinse aid
The amount of rinse aid dispensed can be set from “r:00” to “r:06”.
1 Press the [On/Off] button.
2 Hold down the “A” button (see page 15) and press [Start] until the
display indicates “d:00”. Release both buttons.
3 Press the “A” button until the display shows “r:05”.
4 Press the “C” button to select the desired setting.
“r:00” = dispenser is OFF
“r:01” = lowest setting
“r:02” = low setting
“r:03” = medium setting
5 Press [Start] to save the setting.
“r:04” = medium/high setting
“r:05” = high setting
“r:06” = highest setting
12
Page 14

Dishwasher Cycles and Options
Wash Cycles
Heavy: Best for cleaning items with baked-on food or grease. These
dishes would normally require soaking.
Auto: With our most complex soil sensing capability, this cycle is perfect
for use with mixed loads of dishware and varying amounts of food soil.
This is the most flexible cycle and is a good choice for everyday use.
Normal:
Note: The Energy Guide Label was based on this soil sensing cycle with all
available options turned off. As prescribed in the energy test procedure, the
unit was tested without any Rinse Aid in the Rinse Aid dispenser. A single
dose of detergent was used in the Detergent Dispenser, with no detergent
used in the prewash. The test was conducted with the upper rack in the
upper position (for Manual Adjustable Racks) or the middle position (for
RackMatic Racks). See Appendix A for Energy Test load pattern.
Speed60™*: Cleans freshly soiled dishes with easy to remove soils. This
cycle reduces cycle time while still including drying.
Rinse*: Allows you to rinse food soil off of a partial load and hold the
dishes in the dishwasher until you are ready to run a full load. Do not
use detergent in this cycle.
Wash Cycle Options
Delay Start: Allows you to delay the start time of your dishwasher up to 24
hours.
SpeedPerfect™*
cleaning performance.
Delicate: The Delicate option is available only in the Heavy, Auto and
Normal cycles. This cycle is best used for lightly soiled items with easy
to remove food soils.
Sanitize: The Sanitize feature is available only in the Heavy, Auto and Normal cycles. The Sanitize LED will light when sanitation requirements are
met. The technical sanitation measures may also improve the drying results.
Note: The dishwasher automatically defaults to Auto when turned off and
back on. If you used the sanitize option in your last cycle, the dishwasher will
default to Auto Wash with the Sanitize option selected when you turn it on.
Extra Shine™: Used in combination with a wash cycle (except Rinse), the
Extra Shine option raises the temperature and extends the drying time to
further enhance drying results and provide a brilliant shine.
Thoroughly cleans a full load of normally soiled dishes.
: Reduces cycle time by up to 25% while maintaining
* model dependent
13
Page 15

Wash Cycle Information
Note: To save energy, this dishwasher has EcoSense® where the sensors in the dishwasher automatically adjust the cycle length, temperature and water changes based on
the amount of food soil and the incoming water temperature. The “Smart Control” makes
decisions that can cause the cycle time and water usage to adjust intermittently. Wash
cycle times are based on 120°F water supply. If your household water supply is differ-
ent than 120°F, your dishwasher’s cycle times may be impacted.
Table 2 - Wash Cycle Information
Heavy Auto Normal Speed60™ Rinse
cycle time 110-135 min 105-129 min 130-135 min 60 min 9 min
water
consumption
wash
temperature
rinse
temperature
SpeedPerfect™
cycle time 95-110 min 75-90 min 95-105 min n/a n/a
water
consumption
Delicate
cycle time 105-110 min 90-105 min 100-120 min n/a n/a
water
consumption
Sanitize
cycle time 130-150 min 125-150 min 135-155 min n/a n/a
water
consumption
Extra Shine™
18.6-24.2 L
4.9-6.4 gal
66-71°C
150-160°F
72°C
162°F
16.3-20.5 L
4.3-5.5 gal
18.6-24.2 L
4.9-6.4 gal
18.6-24.2 L
4.9-6.4 gal
13.1-24.5 L
3.5-6.5 gal
53-66°C
127-150°F
67°C
153°F
16.1-20.0 L
4.3-5.3 gal
13.1-24.5 L
3.5-6.5 gal
13.1-24.5 L
3.5-6.5 gal
8.8-20.8 L
2.4-5.5 gal
45-55°C
113-131°F
69°C
156°F
16.6-21.1 L
4.4-5.6 gal
8.8-20.8 L
2.4-5.5 gal
8.8-20.8 L
2.4-5.5 gal
14.3 L
3.8 gal
50°C
122°F
70°C
158°F
n/a n/a
n/a n/a
n/a n/a
incoming
incoming
4.1 L
1.1 gal
cycle time 130-150 min 125-150 min 135-155 min 84 min n/a
water
consumption
18.6-24.2 L
4.9-6.4 gal
13.1-24.5 L
3.5-6.5 gal
8.8-20.8 L
2.4-5.5 gal
14.3 L
3.8 gal
n/a
Note: Only sanitizing cycles have been designed to meet the requirements of 6
for soil removal and sanitization efficacy. There is no intention, either directly
or indirectly, to imply that all cycles have passed sanitization performance
tests.
14
Page 16
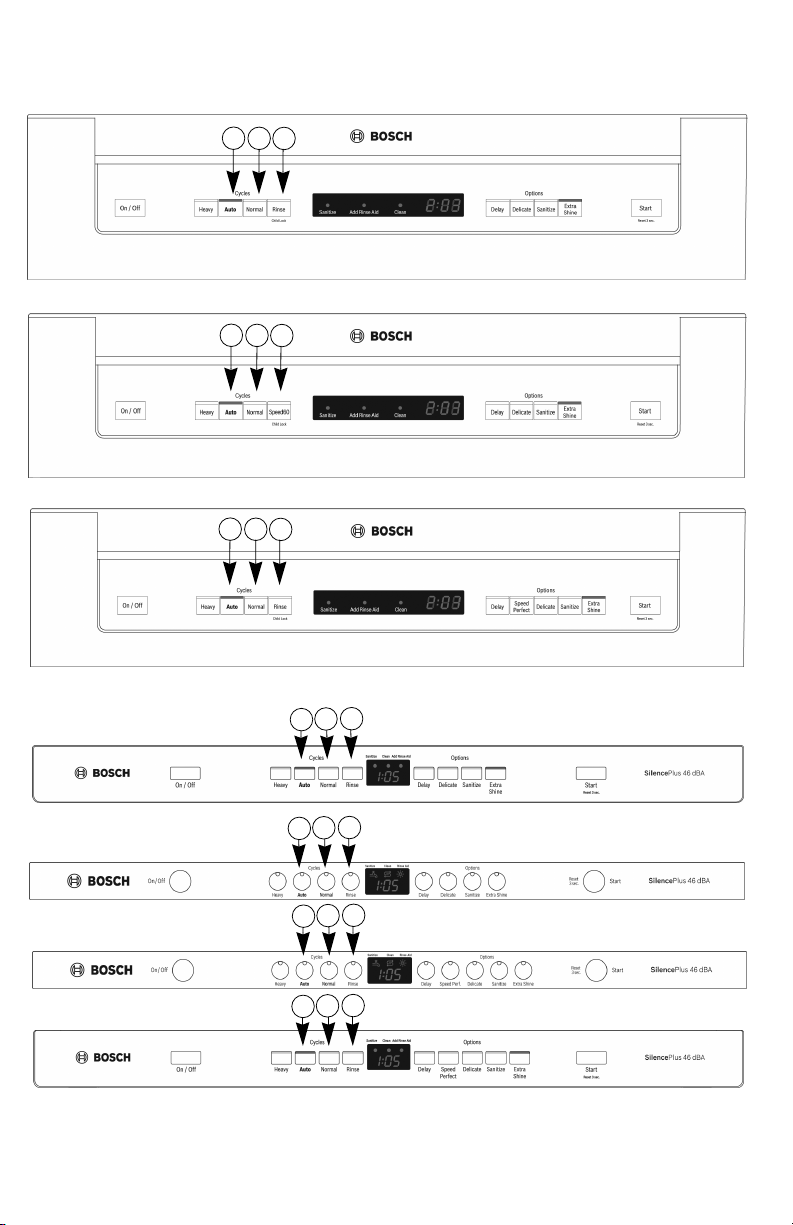
Operating the Dishwasher
SHE53T5xUC*
B
A
C
SHE53TFxUC*
A
C
B
SHE53TLxUC*
B
A
C
SHP53T55UC, SHX53T55UC
A
A
SHV53T53UC
SHV53TL3UC
A
SHX53TL5UC
A
* “x” can be any number or letter
15
B
C
B
C
B
C
B
C
Page 17

NOTE: For models with hidden controls, the door must be opened
before changing settings and closed after changing settings.
NOTICE: Use caution when opening door during a running cycle. Hot
water may splash out. Open door slowly.
Start the dishwasher
1 Press the [On/Off] button.
2 Select a cycle (Auto cycle is preselected) and desired options.
3 Press [Start] and the cycle will begin.
Cancel a cycle
1 Press and hold the [Start] button for approximately 3 seconds until
the display reads “0:01”.
2 Wait about 1 minute while the dishwasher drains and the display
reads “0:00”.
3 Press the [On/Off] button. You may now power the dishwasher
back on and begin new cycle if desired.
Interrupt a cycle
1 Press the [On/Off] button to turn the unit off.
2 To resume the cycle, press the [On/Off] button again.
Cycle Completion Signal
1 Open the door and press the [On/Off] button.
2 Hold down the “A” button (see page 15) and press [Start] until the
display indicates “d:00”. Release both buttons.
3 Press the “A” button until the display shows “b:02”.
4 Press the “C” button to increase or decrease the tone “b:00” = OFF
and “b:03” = LOUDEST
5 Press [Start] to save setting and close the door.
Delay Start
You can delay the start of the cycle in one hour increments up to 24 hours.
1 Press the [On/Off] button and select desired cycle.
2 Press the [Delay] button until the displayed time corresponds with
your requirements.
h:01 = 1 hour delay
h:24 = 24 hour delay
3 Press [Start] to activate delay start. Wash cycle will begin after set
time.
To cancel delay start:
1 Press the [Delay] button until “h:00” is indicated on the digital dis-
play.
2 Press [Start] to save setting.
16
Page 18

Child Lock (model dependent)
1 Start the desired cycle.
2 Hold down the button that says “Child Lock” underneath it for
approximately 4 seconds until the display reads “CL”.
3 The “CL” will be indicated now if any button is pressed and the pro-
gram will not be reset.
To deactivate the child lock:
1 Hold down the “Child Lock” button for approximately 4 seconds until
the display no longer reads “CL”.
Intensive Drying (model dependent)
The final rinse uses a higher temperature which improves the drying
results. The running time may increase slightly.
To turn intensive drying on:
1 Press the [On/Off] button.
2 Hold down the “A” button (see page 15) and press [Start] until the
display indicates “d:00”. Release both buttons.
3 Press the “C” button to turn intensive drying on or off. “d:01” = ON
and “d:00” = OFF
4 Press [Start] to save setting.
Auto Power Off (model dependent)
To save energy, the dishwasher is turned off 1 minute after the wash cycle
ends. Auto Power Off can be adjusted from P:00 to P:02.
To change the factory setting (P:01):
1 Press the [On/Off] button.
2 Hold down the “A” button and press [Start] until the display indi-
cates “d:00”. Release both buttons.
3 Press the “A” button until the display indicates “P:01”.
4 Press the “C” button until the display corresponds with your requirements.
P:00 = dishwasher does not turn off automatically
P:01 (default) = dishwasher turns off automatically after 1 minute
P:02 = dishwasher turns off automatically after 120 minutes (2 hours)
5 Press [Start] to save the setting.
17
Page 19
Care and Maintenance
A regular inspection and maintenance of your machine will help to prevent faults. This saves time and prevents future problems.
Overall condition of the machine
Never use a steam cleaner to clean your dishwasher. The manufacturer is
not liable for any resulting damage.
Regularly wipe the front of the appliance with a damp cloth - water and a
small amount of liquid soap is adequate. Do not use sponges as they
could scratch the surfaces.
Stainless steel appliances: To prevent corrosion, do not use sponges.
Clean the outer edges of the inside door panel regularly to remove debris
that may collect from normal loading. If spots begin to appear on the stainless steel, make sure the rinse agent is full and functioning properly.
WARNING
Use caution when removing parts for cleaning as
some debris may be sharp.
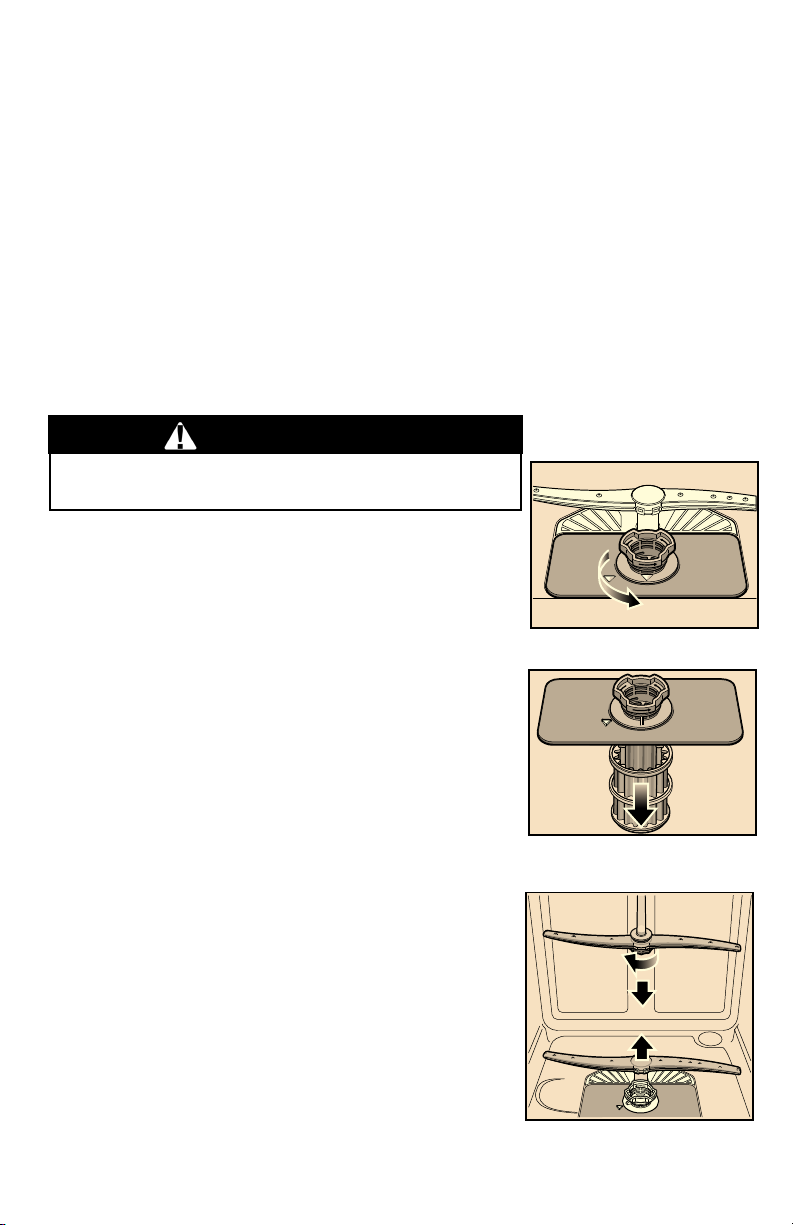
Filters
The filter system consists of a coarse filter, a flat
fine filter and a micro filter. The filters keep large
foreign objects in the rinsing water away from
the pump. Foreign objects may occasionally
block the filters.
Check the filters for residue by:
• Unscrew the filter cylinder as illustrated in Fig-
ure 10-11 and take out the filter system.
• Remove any residue and clean filters under
running water.
• Reinstall filter system in reverse sequence and
ensure that the arrow marks are facing each
other after locking it into place.
Spray Arms
Check spray arms for grease and limescale
deposits.
If you find such deposits:
• Fill detergent dispenser with detergent and
start the appliance without utensils in the
cycle with the highest rinsing temperature
(see wash cycle information table).
• Clean the appliance with detergents/ appliance cleaners which are particularly suitable
for use with dishwashers.
• Unscrew the spray arms and inspect as shown in Figure 12.
Figure 10
Figure 11
Figure 12
18
Page 20

Waste water pump
Large food remnants in the rinsing water not retained by the filters
may block the waste water pump.
Notice: Use caution when removing any blockage as items causing
blockage may be sharp.
In this case:
Figure 13
• Disconnect the appliance from the power supply.
• Remove the filters (Figure 10-11).
• Scoop out standing water - use a sponge if
necessary.
• Using a spoon, pry off the pump cover (see
Figure 13), then grip the cover and pull
upward until it resists and then pull for-
Figure 14
ward.
• Check inner compartment and remove any
foreign objects.
• Place cover in the original position, press down
and engage until it clicks (see Figure 14).
&OLFN
Preparing your unit for vacation
Before leaving for vacation during warmer weather, besides turning off
the main valve, also turn off water supply at the nearest point to the
dishwasher. During colder weather, please follow the instructions for
winterizing your unit below.
Winterizing your unit
If your dishwasher will be unused for an extended period of time in a
location that experiences freezing temperatures (holiday home or
through a vacation period), have your dishwasher winterized by an authorized professional service.
19
Page 21

Self Help
Dishwashers may occasionally exhibit problems that are unrelated to a malfunction of the dishwasher itself. The following information may help you
with a dishwasher problem without involving a repair professional.
Problem Cause Action
Dishwasher
does not
start
Display
does not
illuminate
Dishwasher
seems to
run a long
time
1. Door may not be properly latched
2. Unit may not be turned on
3. Unit not reset or previous cycle not
completed
4. Delay start engaged
5. Interruption of electrical power
supply to dishwasher or blown fuse
6. The door may have been closed
without first selecting a cycle
7. Water supply may not be turned on
1. A fuse may have been blown or circuit breaker tripped
2. Door not closed or latched
Note: For models with controls on top
of the door, the display only illuminates
when the door is opened and controls
are visible.
1. Incoming water is not warm enough
2. Cycle time can vary due to soil and
water conditions
3. Rinse agent dispenser is empty
4. Dishwasher connected to cold
water supply
Note: Refer to “Wash Cycle Information”
section in this manual for typical cycle
lengths.
1. Shut the door completely until you
hear a click
2. Press the main power switch to
turn unit on
3. To reset, refer to “Cancel a Cycle”
in this manual
4. To reset, refer to “Delay Start” in
the “Wash Cycles and Options” section in this manual
5. Check circuit breaker
6. Select a cycle and close the door
7. Check and turn on water supply
1. Check the fuse or circuit breaker
box and replace the fuse or reset the
breaker if necessary
2. Ensure door is properly latched and
completely closed
1. Before starting a cycle, run hot
water faucet at the sink closest to the
dishwasher
2. Sensors in the dishwasher automatically increase the cycle time to
ensure a good wash when heavy soil
is detected
3. Add rinse aid
4. Verify dishwasher is connected to
hot water supply plumbing
Dishes are
not getting
dry enough
1. Rinse agent dispenser is empty
2. Improper loading of dishes
3. Selected cycle does not include
drying
Note: Plastic or Teflon do not typically dry as
well as other items due to their inherent
properties.
1. Add rinse agent - the use of rinse
agent improves drying
2. Rearrange load to ensure items are
not nesting (see “Loading the Dishwasher” section of the manual)
3. Rinse cycle does not include drying
Note: Select models offer an extra heating
option to improve drying performance.
20
Page 22

Problem Cause Action
Dishes are
not getting
clean
enough
Streaks on
glassware
or residue
on the
dishes
Odor 1. Food debris is present at the bottom
1. Spray arm movement obstructed
2. Spray arm nozzles clogged
3. Improper use of detergents
4. Filters could be clogged
5. Dishes are nested or loaded too close
together
6. Selected wash cycle is not suitable for
food soil conditions
1. Incorrect rinse aid setting 1. Depending on the hardness of
of the dishwasher
2. Food particles are present near the
door seal
3. Dishes left in unit too long before running a cycle
4. Residual water is present at the bottom
of the dishwasher
5. Drain hose is obstructed
1. Ensure that spray arm movement is not
blocked by hand rotating spray arms
before starting cycle
2. Remove the spray arms and clean
according to the “Care and Maintenance” section of the manual
3. Increase or decrease detergent
depending on the water hardness (refer
to Table 1)
4. Clean the filters according to the
“Care and Maintenance” section of the
manual
5. Rearrange load such that water spray
can reach all items in the dishwasher see “Loading the Dishwasher” section
of the manual
6. Refer to “Wash Cycle Information” section of the manual.
water, adjust the rinse agent dispenser. Refer to “Adding Detergent
and Rinse Aid” section of the manual
1. Remove the filters and clean according to the “Care and Maintenance” section of the manual
2. Refer to “Care and Maintenance” section of the manual
3. Run a Rinse cycle if you do not intend
to immediately wash the dishes
4. Ensure the unit has completely drained
from the last cycle
5. Remove any obstructions from the
drain hose by calling qualified personnel.
Note: If odor still persists, run the Normal/Regular cycle until it flushes and
interrupt the cycle and place an 8oz.
cup of distilled white vinegar solution
on the top rack and then finish the
cycle.
Dishwasher
not filling
with water
or “Check
water supply” display
lights up
21
1. Restriction in the water supply system
2. Previous wash cycle was not completed
3. Delay start is active
4. Household water supply turned off
1. Ensure that the water supply valve
(typically located under kitchen sink) is
open and check that the water supply
line has no kinks or clogs
2. Refer to the “Operating the Dishwasher” section of the manual
3. Cancel the delay start or wait until
delay start time completes
4. Turn on water supply
Page 23

Problem Cause Action
Fascia panel
discolored
or marked
Water leaks 1. Suds
Tub stains 1. Stains on the dishwasher interior are
Noise during wash
cycle
1. Abrasive cleaner used 1. Use mild detergents with soft damp
2. Door seal could be pulled away
from track
3. Condensation vent is blocked
4. Improper installation
due to water hardness
2. Silverware in contact with tub
1. Dishes may not be arranged properly
2. There may be debris interfering
with the pump
cloth
1. Wrong type of detergent results in
suds and leaks - use only dishwasher
detergents. If suds still persist, add
one tablespoon of vegetable oil at the
bottom of the dishwasher and run the
desired cycle.
2. Ensure the door seal is in the track
3. Ensure that condensation vent is
not blocked
4. Have proper installation verified by
qualified personnel (water supply,
drain system, leveling, plumbing)
1. Concentrated lemon juice can
reduce the build up of hard water
stains. Run Normal cycle until it
flushes and interrupt the cycle and
then place an 8oz. cup of the concentrated lemon solution on the top rack
and finish the cycle. This can be done
periodically to avoid build up.
2. Ensure that silverware does not
make contact with the tub while running a cycle
1. Water circulation sound is normal,
but if you suspect items are banging
into each other or into the spray arms,
refer to the “Loading the Dishwasher”
section of the manual for optimal
arrangement
2. See “Care and Maintenance” section.
Detergent
dispenser
cover will
not shut
Unable to
select
desired
cycle
1. Improper operation of detergent
cover
2. Previous cycle has not been finished or cycle was interrupted
1. Previous cycle has not finished
2. Door is not properly latched
1. Refer to “Adding Detergent and
Rinse Aid” section of the manual for
instructions on opening and closing
the dispenser
2. Refer to the “Operating the Dishwasher” section of the manual
1. Refer to the “Operating the Dishwasher” section of the manual
2. Open and close the door to ensure
it is properly latched
22
Page 24
Customer Service
Your Bosch® dishwasher requires no special care other than that described
in the Care and Maintenance section of this manual. If you are having a
problem with your dishwasher, before calling for service please refer to the
Self Help section of the manual. If service is necessary, contact your dealer
or installer or an authorized service center. Do not attempt to repair the
appliance yourself. Any work performed by unauthorized personnel may
void the warranty.
If you are having a problem with your Bosch dishwasher and are not
pleased with the service you have received, please take the following
steps until the problem is corrected to your satisfaction:
1 Call us at 1-800-944-2904
2 Contact Customer Service from our web site:
www.bosch-home.com/us or www.bosch-home.ca
3 Contact your installer or the Bosch Authorized Service Contrac-
tor in your area.
4 Write us: BSH Home Appliances Corporation
1901 Main Street
Irvine, CA 92614
Please be sure to include your model information as well as an explanation of
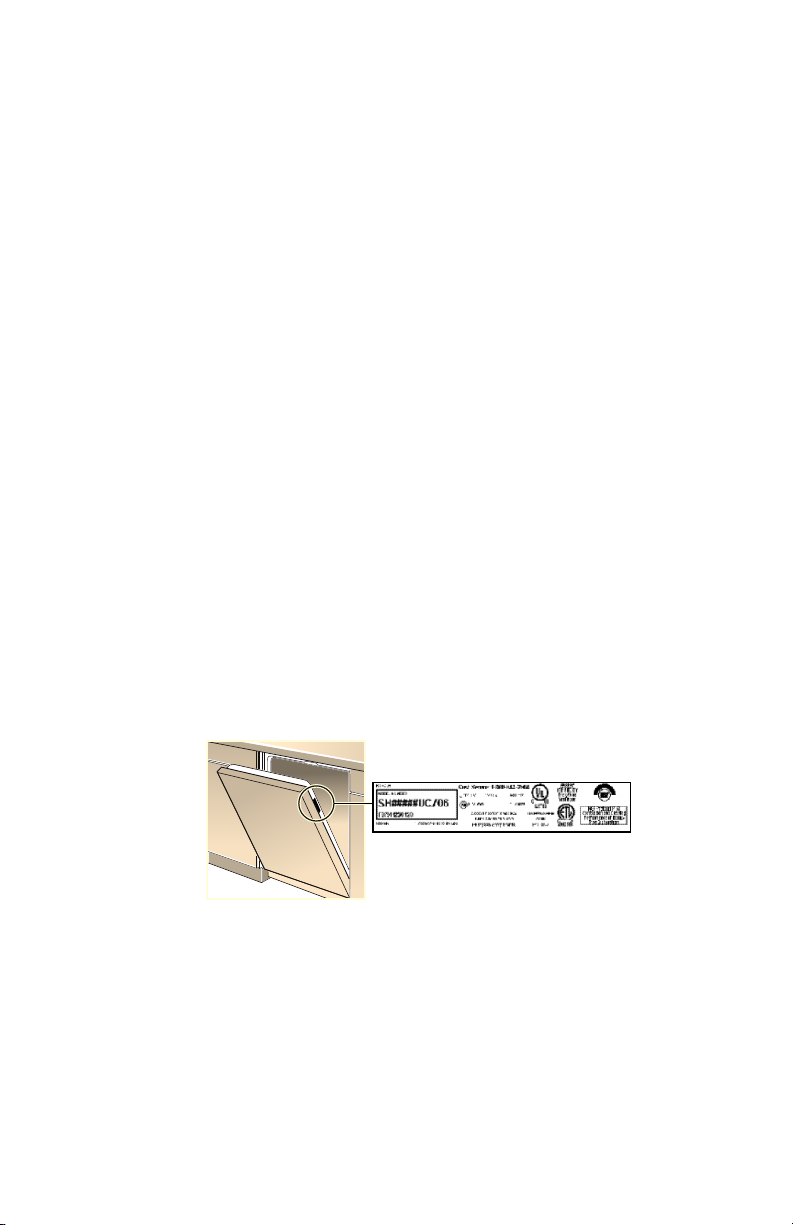
the problem and the date it started. You will find the model and serial number
information on the label located on the edge of the dishwasher door. Please
make a copy of your invoice and keep it with this manual. The customer must
show proof of purchase to obtain warranty service.
23
Page 25

Statement of Limited Product Warranty
What this Warranty Covers & Who it Applies to: The limited warranty provided by BSH
Home Appliances Corporation (BSH) in this Statement of Limited Product Warranty
applies only to the Bosch® dishwasher (“Product”) sold to you, the first using purchaser,
provided that the Product was purchased: (1) for your normal, household (non-commercial) use, and has in fact at all times only been used for normal household purposes; (2)
new at retail (not a display, “as is”, or previously returned model), and not for resale, or
commercial use; and (3) within the United States or Canada, and has at all times remained
within the country of original purchase. The warranties stated herein apply only to the first
purchaser of the Product and are not transferable.
• Please make sure to return your registration card; while not necessary to effectuate warranty coverage, it is the best way for BSH to notify you in the unlikely event of a safety
notice or product recall.
How Long the Warranty Lasts: BSH warrants that the Product is free from defects in
materials and workmanship for a period of three hundred sixty five (365) days from the
date of purchase. The foregoing timeline begins to run upon the date of purchase, and
shall not be stalled, tolled, extended, or suspended, for any reason whatsoever. Labor and
shipping costs are included in this basic coverage.
Extended Limited Warranty: BSH also provides these additional limited warranties:
• 5 Year Limited Warranty on Electronics: BSH will repair or replace any BSH microprocessor or printed circuit board if it proves to be defective in materials or workmanship
(excludes labor charges).
• 5 Year Limited Warranty on Dish Racks: BSH will replace the upper or lower dish rack
(excluding rack components), if the rack proves defective in materials or workmanship
(excludes labor charges).
• Lifetime Warranty against Stainless Steel Rust Through: BSH will replace your dishwasher with the same model or a current model that is substantially equivalent or better in
functionality, if the inner liner should rust through (excludes labor charges).
• BSH will replace the stainless steel door if the door should rust through (excludes labor charges).
The foregoing timeline begins to run upon the date of purchase, and shall not be stalled,
tolled, extended, or suspended, for any reason whatsoever.
Repair/Replace as Your Exclusive Remedy: During this warranty period, BSH or one of its
authorized service providers will repair your Product without charge to you (subject to certain limitations stated herein) if your Product proves to have been manufactured with a
defect in materials or workmanship. If reasonable attempts to repair the Product have been
made without success, then BSH will replace your Product (upgraded models may be available to you, in the sole discretion of BSH, for an additional charge). All removed parts and
components shall become the property of BSH at its sole option. All replaced and/or
repaired parts shall assume the identity of the original part for purposes of this warranty
and this warranty shall not be extended with respect to such parts. BSH’s sole liability and
responsibility hereunder is to repair manufacturer-defective Product only, using a BSHauthorized service provider during normal business hours. For safety and property damage
concerns, BSH highly recommends that you do not attempt to repair the Product yourself,
or use an unauthorized servicer; BSH will have no responsibility or liability for repairs or
work performed by a non-authorized servicer. If you choose to have someone other than an
authorized service provider work on your Product,
BECOME NULL AND VOID. Authorized service providers are those persons or companies
that have been specially trained on BSH products, and who possess, in the opinion of BSH,
a superior reputation for customer service and technical ability (note that they are independent entities and are not agents, partners, affiliates or representatives of BSH). Notwithstanding the foregoing, BSH will not incur any liability, or have responsibility, for the
Product if it is located in a remote area (more than 100 miles from an authorized service
provider) or is reasonably inaccessible, hazardous, threatening, or treacherous locale, surroundings, or environment; in any such event, if you request, BSH would still pay for labor
THIS WARRANTY WILL AUTOMATICALLY
24
Page 26

and parts and ship the parts to the nearest authorized service provider, but you would still
be fully liable and responsible for any travel time or other special charges by the service
company, assuming they agree to make the service call.
Out of Warranty Product: BSH is under no obligation, at law or otherwise, to provide
you with any concessions, including repairs, pro-rates, or Product replacement, once
this warranty has expired.
Warranty Exclusions: The warranty coverage described herein excludes all defects or dam-
age that are not the direct fault of BSH, including without limitation, one or more of the following: (1) use of the Product in anything other than its normal, customary and intended
manner (including without limitation, any form of commercial use, use or storage of an
indoor product outdoors, use of the Product in conjunction with air or water-going vessels);
(2) any party’s willful misconduct, negligence, misuse, abuse, accidents, neglect, improper
operation, failure to maintain, improper or negligent installation, tampering, failure to follow
operating instructions, mishandling, unauthorized service (including self-performed “fixing”
or exploration of the appliance’s internal workings); (3) adjustment, alteration or modification of any kind; (4) a failure to comply with any applicable state, local, city, or county electrical, plumbing and/or building codes, regulations, or laws, including failure to install the
product in strict conformity with local fire and building codes and regulations; (5) ordinary
wear and tear, spills of food, liquid, grease accumulations, or other substances that accumulate on, in, or around the Product; and (6) any external, elemental and/or environmental
forces and factors, including without limitation, rain, wind, sand, floods, fires, mud slides,
freezing temperatures, excessive moisture or extended exposure to humidity, lightning,
power surges, structural failures surrounding the appliance, and acts of God. In no event
shall BSH have any liability or responsibility whatsoever for damage to surrounding property,
including cabinetry, floors, ceilings, and other structures or objects around the Product. Also
excluded from this warranty are scratches, nicks, minor dents, and cosmetic damages on
external surfaces and exposed parts; Products on which the serial numbers have been
altered, defaced, or removed; service visits to teach you how to use the Product, or visits
where there is nothing wrong with the Product; correction of installation problems (you are
solely responsible for any structure and setting for the Product, including all electrical,
plumbing or other connecting facilities, for proper foundation/flooring, and for any alterations including without limitation cabinetry, walls, floors, shelving, etc.); and resetting of
breakers or fuses.
TO THE EXTENT ALLOWED BY LAW, THIS WARRANTY SETS OUT YOUR EXCLUSIVE REMEDIES WITH RESPECT TO PRODUCT, WHETHER THE CLAIM ARISES IN CONTRACT OR TORT
(INCLUDING STRICT LIABILITY, OR NEGLIGENCE) OR OTHERWISE. THIS WARRANTY IS IN
LIEU OF ALL OTHER WARRANTIES, WHETHER EXPRESS OR IMPLIED. ANY WARRANTY
IMPLIED BY LAW, WHETHER FOR MERCHANTABILITY OR FITNESS FOR A PARTICULAR PURPOSE, OR OTHERWISE, SHALL BE EFFECTIVE ONLY FOR THE PERIOD THAT THIS EXPRESS
LIMITED WARRANTY IS EFFECTIVE. IN NO EVENT WILL THE MANUFACTURER BE LIABLE FOR
CONSEQUENTIAL, SPECIAL, INCIDENTAL, INDIRECT, “BUSINESS LOSS”, AND/OR PUNITIVE
DAMAGES, LOSSES, OR EXPENSES, INCLUDING WITHOUT LIMITATION TIME AWAY FROM
WORK, HOTELS AND/OR RESTAURANT MEALS, REMODELLING EXPENSES IN EXCESS OF
DIRECT DAMAGES WHICH ARE DEFINITIVELY CAUSED EXCLUSIVELY BY BSH, OR OTHERWISE. SOME STATES DO NOT ALLOW THE EXCLUSION OR LIMITATION OF INCIDENTAL OR
CONSEQUENTIAL DAMAGES, AND SOME STATES DO NOT ALLOW LIMITATIONS ON HOW
LONG AN IMPLIED WARRANTY LASTS, SO THE ABOVE LIMITATIONS MAY NOT APPLY TO
YOU. THIS WARRANTY GIVES YOU SPECIFIC LEGAL RIGHTS, AND YOU MAY ALSO HAVE
OTHER RIGHTS WHICH VARY FROM STATE TO STATE. No attempt to alter, modify or amend
this warranty shall be effective unless authorized in writing by an officer of BSH Home Appliances Corporation.
How to Obtain Warranty Service: TO OBTAIN WARRANTY SERVICE FOR YOUR PROD-
UCT, YOU SHOULD CONTACT THE NEAREST BSH AUTHORIZED SERVICE CENTER, OR
CALL 1-800-944-2904.
25
Page 27

Page 28

1
Page 29

Très cher client, très chère cliente de Bosch®,
Bienvenue dans la grande famille Bosch® et félicitations pour votre
achat d'un tout nouveau lave-vaisselle Bosch® ! Nos ingénieurs allemands travaillent sans relâche pour concevoir des appareils pratiquement silencieux d'une qualité exceptionnelle qui utilisent efficacement
les ressources nécessaires. Nous savons que vous serez satisfait(e) de
votre achat.
Pour des réponses rapides à des questions fréquentes, veuillez consulter le Guide de référence rapide compris avec ce manuel.
Pour d'autres appareils Bosch® de qualité, visitez notre site Web à
l'adresse :
www.bosch-home.com/us (USA)
or
www.bosch-home.ca (Canada)
Pendant que vous visitez notre site, n'oubliez pas d'enregistrer votre
nouveau lave-vaisselle en cliquant sur le lien du Soutien à la clientèle
ou en remplissant la carte d'enregistrement du produit incluse avec
votre nouvelle unité.
Si vous avez des questions ou des commentaires, veuillez nous con-
tacter au : 1-800-944-2904
ou écrivez-vous à :
BSH Home Appliances Corporation
1901 Main Street
Irvine, CA 92614
Table des matières
Consignes de sécurité importantes......................................3-5
Composants du lave-vaisselle..............................................5-6
Matériaux du lave-vaisselle.....................................................7
Chargement du lave-vaisselle...............................................7-8
Chargement du panier à couverts...........................................9
Accessoires des paniers.......................................................10
Ajout de détergent et d'agent de rinçage..........................11-12
Programmes et options du lave-vaisselle...............................13
Informations sur les programmes de lavage..........................14
Fonctionnement du lave-vaisselle.....................................15-17
Nettoyage et entretien.....................................................18-19
Aide automatique.............................................................20-23
Service après-vente..............................................................24
Informations concernant la garantie.................................25-26
2
Page 30

Consignes de sécurité importantes: Veuillez lire et
conserver ces informations
AVERTISSEMENT
Une mauvaise utilisation du lave-vaisselle peut entraîner des blessures
graves ou la mort. Ne pas utiliser le lave-vaisselle d'une manière qui n'est
pas traitée dans le présent guide ou à des fins autres que celles qui sont
expliquées dans les pages qui suivent.
Des dommages au produit et/ou blessures graves peuvent survenir par suite
de l'emploi de techniciens en entretien et en réparation non qualifiés ou de
pièces de rechanges qui ne sont pas d'origine. Toutes les réparations doivent être effectuées par un technicien en entretien et en réparation qualifié
qui utilise des pièces de rechange du fabricant de l'équipement d'origine.
Un choc électrique ou un incendie peut résulter de l'installation inexacte
de l'alimentation électrique du lave-vaisselle traité dans le présent guide
ou d'une mauvaise mise à la terre du lave-vaisselle. Ne pas utiliser le lavevaisselle traité dans le présent guide à moins d'être certain que l'alimentation électrique a été correctement installée ou que le lave-vaisselle a
été correctement mis à la terre.
Ne jamais nettoyer votre lave-vaisselle avec des produits chimiques puissants. Certains produits contenant des chlorures peuvent endommager
votre lave-vaisselle et poser des risques pour la santé !
Seuls les programmes sanitaires sont prévus pour satisfaire aux exigences de niveau 6 en matière d'efficacité d'élimination des saletés et de
désinfection. Il n'existe aucune intention, directe ou indirecte, que tous
les programmes aient réussi les tests de performance en désinfection.
AVIS
Ne jamais nettoyer votre lave-vaisselle avec des produits de nettoyage à
la vapeur. Le fabricant n'assume aucune responsabilité pour d'éventuels
dommages ou conséquences.
Il est vivement recommandé à l'utilisateur final de se familiariser avec les
procédures de fermeture de l'alimentation d'eau entrante et de coupure
de l'alimentation électrique entrante. Reportez-vous aux instructions
d'installation ou communiquez avec votre installateur pour de plus amples
renseignements.
Les lave-vaisselles certifiés NSF/ANSI 184 ne sont pas conçus pour les
établissements alimentaires autorisés.
3
Page 31

AVERTISSEMENT : Pour réduire le risque
d'incendie, de choc électrique ou de blessure
grave, respectez les consignes suivantes :
1 Ce lave-vaisselle est fourni avec les instructions d'installation et le
présent guide d'utilisation et d'entretien. Lire et comprendre toutes
les instructions avant de faire fonctionner le lave-vaisselle.
2 Cet appareil doit être mis à la terre sur une installation de fils à
demeure en métal ou un conducteur de protection doit être relié aux
fils conducteurs et raccordé à la borne ou au fil de mise à la terre du
lave-vaisselle. Consulter les instructions d'installation fournies avec
ce lave-vaisselle pour de plus amples renseignements sur les conditions requises pour l'alimentation en électricité.
3 Utiliser uniquement ce lave-vaisselle conformément à l'usage
auquel il est destiné, à savoir pour laver la vaisselle et la batterie de
cuisine de ménage.
4 Utiliser uniquement des détergents ou des produits de rinçage
recommandés pour l'usage en lave-vaisselle et les conserver hors
de la portée des enfants.
5 Lors du chargement des articles dans le lave-vaisselle :
• Disposer les articles coupants de sorte à ce qu'ils ne puissent pas
endommager le joint de porte.
• Placer les couteaux et autre ustensiles tranchants le MANCHE
VERS LE HAUT pour réduire le risque de blessure par coupure.
• Ne pas laver d'articles en plastique à moins qu'ils ne soient identifiés
par la mention « lavable au lave-vaisselle » ou l'équivalent.
• Ne pas faire fonctionner votre lave-vaisselle à moins que tous les
panneaux protecteurs ne soient en place.
• Ne pas altérer ni neutraliser les commandes et dispositifs de verrouillage.
6 Ne pas utiliser abusivement, s'asseoir ou se tenir debout sur la porte
ou les paniers à vaisselle du lave-vaisselle.
7 Pour réduire le risque de blessures, empêcher les enfants de jouer
à l'intérieur ou sur le lave-vaisselle.
8 Lorsque les enfants sont en âge de faire fonctionner l'appareil, les par-
ents ou tuteurs légaux ont la responsabilité légale de s'assurer qu'ils ont
été initiés aux pratiques sécuritaires par des personnes qualifiées.
9 Dans certaines conditions, de l'hydrogène peut se former à l'intérieur
d'un système de production d'eau chaude qui n'a pas été utilisé pendant
deux semaines ou plus. L'hydrogène est un gaz explosif. Avant d'utiliser
un lave-vaisselle qui est relié à un système de production d'eau chaude
inactif depuis deux semaines ou plus, ouvrir tous les robinets d'eau
chaude et laisser l'eau couler pendant quelques minutes. Ceci aura pour
effet de libérer l'hydrogène accumulé à l'intérieur du système. Ne pas
fumer et ne pas utiliser de flamme nue pendant cette opération.
10 Enlever la porte du compartiment de lavage d'un ancien lave-vais-
selle que vous devez déposer pour réparation ou mise au rebut.
11 Afin d'éviter d'endommager le plancher et la formation éventuelle
de moisissures, ne laissez aucune trace d'eau sur le sol adjacent
au lave-vaisselle ou sous ce dernier.
4
Page 32

12 Protégez votre lave-vaisselle des éléments. Protégez-le contre le gel
afin d'éviter les dommages éventuels au robinet de remplissage. Les
dommages causés par le gel ne sont pas couverts par la garantie.
13 Cet appareil doit être mis à la terre. En cas de fonctionnement
défectueux ou de panne, la mise à la terre réduit les risques de
choc électrique en fournissant un trajet de moindre résistance au
courant. Cet appareil est équipé d'un cordon d'alimentation avec
un conducteur de mise à la terre d'équipement.
• Un mauvais raccordement du conducteur de mise à la terre d'équipement peut entraîner un risque de choc électrique. En cas de
doute quant à la mise à la terre adéquate de l'appareil, communiquez avec un électricien ou un technicien en réparation qualifié.
AVERTISSEMENTS DE LA PROPOSITION 65 DE L'ÉTAT DE LA CALIFORNIE :
AVERTISSEMENT : Cet appareil contient un ou plusieurs produits chimiques qui, selon l'État
de la Californie, peuvent causer le cancer.
AVERTISSEMENT : Cet appareil contient un ou plusieurs produits chimiques qui, selon l'État
de la Californie, peuvent causer des malformations ou d'autres problèmes congénitaux.
Composants du lave-vaisselle
Programmes de lavage
Modèle Heavy Auto Normal
SHX53Tx5UC*
SHV53Tx3UC*
SHP53Tx5UC*
SHE53T5xUC*
SHE53TLxUC*
SHE53TFxUC*
Caractéristiques supplémentaires
Modèle Delay
SHX53TL5UC RackMatic® Duo-Flex
SHX53T55UC
SHV53T53UC
SHV53TL3UC RackMatic® Duo-Flex
SHP53T55UC Manual Long
SHP53TL5UC RackMatic® Long
SHE53T5xUC*
SHE53TFxUC*
Speed
Perfect™
Delicate Sanitize
Speed60™
Extra
Shine™
(1 hour)
Adjustable
Basket
Manual Long
Manual Long
Rinse
Child
Lock
Silverware
Basket
SHE53TLxUC* RackMatic® Long
5
* "x" peut être n'importe quel chiffre ou une lettre
Page 33

Panier
supérieur
Panier
inférieur
Bras gicleur du
panier supérieur
Panier à
couverts
Système de filtration
Distributeur de
détergent
Distributeur
d'agent
de rinçage
6
Page 34

Matériaux du lave-vaisselle
Remarque : avant d'utiliser votre lave-vaisselle pour la première fois, vérifier les
informations figurant dans cette section. Certains articles ne sont pas lavables
au lave-vaisselle et doivent être lavés à la main ; d'autres nécessitent un
chargement spécial.
Matériaux recommandés
Aluminium : l'aluminium anodisé coloré peut s'altérer au fil du temps. Les
minéraux présents dans l'eau peuvent noircir ou tacher l'aluminium. Ceci se
nettoie généralement à l'aide d'un tampon de laine d'acier savonneux.
Porcelaine, cristal, faïence : certains ustensiles peints à la main peuvent
se décolorer, s'altérer ou se tacher. Laver ces ustensiles à la main. Placer
la verrerie fragile de façon à ce qu'elle ne se renverse pas ou qu'elle
n'entre pas en contact avec d'autres ustensiles pendant le déroulement
du programme de lavage.
Verrerie : le verre laiteux risque de se décolorer ou de jaunir.
Finis anti-adhésifs : appliquer une légère quantité d'huile végétale sur les
surfaces anti-adhésives après le séchage.
Plastique : s'assurer que les articles en plastique sont lavables au lave-vaisselle.
Acier inoxydable, argent fin et métaux argentés : charger ce type d'arti-
cles de sorte à ce qu'ils n'entrent pas en contact avec d'autres métaux.
Non recommandé
Acrylique : des craquelures (petites fissures) peuvent apparaître sur l'acrylique.
Pièces collées : les adhésifs utilisés pour le collage des objets en plas-
tique, bois, os, acier, cuivre, fer blanc, etc. risquent de ne pas tenir.
Ustensiles avec manches en os : les manches risquent de se décoller.
Fer : le fer se rouille. Laver à la main et sécher immédiatement.
Articles autres que la vaisselle : votre lave-vaisselle est conçu UNIQUEMENT
pour le lavage de la vaisselle et de la batterie de cuisine de ménage standard.
Étain, laiton, bronze : ces matériaux auront tendance à ternir. Laver à la
main et sécher immédiatement.
Fer blanc : le fer blanc aura tendance à se tacher. Laver à la main et
sécher immédiatement.
Bois : les bols et les ustensiles en bois et les ustensiles avec manches en
bois peuvent se fissurer, se déformer et perdre leur fini.
Chargement du lave-vaisselle
Ne pas laver au préalable les articles comportant des saletés peu adhérentes. Enlever les particules d'aliments, les os, les cure-dents et la
graisse excessive. Il sera peut-être nécessaire de traiter préalablement
la vaisselle comportant des saletés brûlées, collées ou farineuses.
Consulter la section Matériaux de la vaisselle pour de plus amples renseignements sur l'adaptation de la vaisselle.
Charger uniquement les articles lavables au lave-vaisselle. Charger la vaisselle
dans les paniers de sorte à orienter l'intérieur des bols, marmites et casseroles
vers les bras gicleurs. Éviter que les articles ne s'emboîtent les uns dans les
autres et éviter qu'ils ne se touchent. Séparer les articles de métal différent.
7
Page 35

Chargement du panier supérieur
S'assurer que les articles ne dépassent pas du fond des paniers et qu'ils ne
bloquent pas les bras gicleurs.
Remarque : lorsque vous poussez le panier supérieur à l'intérieur du lave-vaisselle, faites en sorte qu'il bute contre la paroi arrière de la cuve afin que le bras
gicleur du panier supérieur se branche sur la conduite d'alimentation d'eau à
l'arrière de la cuve. Ne pas pousser les paniers avec la porte.
Chargement du panier inférieur
Disposer les articles volumineux dans le panier inférieur. Charger les marmites, casseroles et bols à l'envers. Ne pas bloquer l'évent du lave-vaisselle avec les
grandes tôles à biscuits. Chargez ces articles du côté gauche du lave-vaisselle.
AVIS
Pour éviter d'endommager le lave-vaisselle, ne pas charger d'articles en
papier, sacs en plastique, matériaux d'emballage ou d'articles autres que
la vaisselle et les ustensiles de cuisine normaux lavables au lave-vaisselle.
Configuration de chargement suggérée
Panier supérieur Panier inférieur
Configuration de chargement supplémentaire
Panier supérieur Panier inférieur
8
Page 36

Chargement du panier à couverts
Disposer les couteaux et ustensiles tranchants le MANCHE VERS LE HAUT
et les fourchettes et cuillers le manche vers le bas. Si vous mettez des articles volumineux ou de forme irrégulière dans le panier à couverts, assurezvous qu'ils ne s'emboîtent pas les uns dans les autres.
AVERTISSEMENT
Les pointes et lames tranchantes des couteaux et autres types d'ustensiles
tranchants peuvent occasionner des blessures graves. Ne pas laisser les
enfants manier les couteaux et autres ustensiles tranchants ou jouer à
proximité.
Le panier à couverts long
Le panier à couverts standard s'adapte le coté du panier
inférieur.
Le panier à couverts Duo-Flex
Ce panier se sépare en deux dans le sens de la longueur,
donnant ainsi deux paniers qui peuvent être placés à plusieurs endroits du panier inférieur. Ceci améliore considérablement la souplesse de chargement du panier
inférieur. Les deux parties du panier s'enclenchent dos à
dos ou côte à côte comme indiqué ci-dessous.
Pour séparer le panier à couverts Duo-Flex en deux
parties
Saisissez le panier et faites glisser les deux parties du panier à l'opposé l'une de l'autre, comme indiqué à droite, puis
séparez les deux sections en tirant.
Le panier à couverts Long
4
44 4 444 4447446 62
3 333 3 3 3
33 3 33
11 1 111
2
22
22
22222
2
2
222
222 2 2 1 1 1111
222
Le panier à couverts Duo-Flex
12345
1-
fourchette à salade
2- cuiller à thé
3- fourchette de table
4- couteau
5- cuiller à soupe
6- cuiller à servir
7 - fourchette de
service
6
Le couvercle du panier peut également être enclenché par pression sur l'anse
pour que le panier reste ouvert.
9
7
Page 37

Rack Features
Figure 1
Flip Tines
Les paniers comportent des picots qui peuvent
être repliés en fonction des articles devant être
placés dans le lave-vaisselle. Pour rabattre un
picot, saisissez-le et dégagez-le de l'encoche. Poussez-le vers le bas pour le mettre dans la position
voulue comme indiqué à la Figure 1.
Réglage manuel de la hauteur du panier (certains modèles)
Pour retirer le panier supérieur vide du lave-vaisselle,
tirez dessus jusqu'à ce que
vous puissiez le soulever
comme illustré à la Figure 2.
Soulevez le panier vers le
haut et retirez-le jusqu'à ce
que les roulettes se dégagent complètement du système de guidage.
Remettez en place le panier comportant l'autre jeu de roulettes sur le système de guidage comme illustré à la Figure 3.
3-Step RackMatic® (certains modèles)
Le panier supérieur peut être relevé ou abaissé
pour laisser davantage d'espace aux articles de
grande taille dans l'un ou l'autre des paniers.
1 Tirer le panier supérieur.
2 Pour abaisser le panier, pousser les leviers
vers l’intérieur.
3 Pour lever le panier, maintenir le panier par
les côtés du bord supérieur et soulever.
Figure 2
Figure 3
Figure 4
Tablettes tasse (certains modèles)
La plate-forme et l'espace en dessous
peut être utilisé pour de petites tasses
ou ustensiles de service pour les plus
grands.
Figure 5
&/,&.
10
Page 38

Ajout de détergent et d'agent de rinçage
Détergent
Utiliser uniquement un détergent spécialement conçu pour les lave-vaisselle. Pour de meilleurs résultats, utiliser un détergent pour lave-vaisselle
en poudre frais.
AVIS
Pour éviter d'endommager le lave-vaisselle, ne pas utiliser de détergent
pour le lavage de la vaisselle à la main.
Pour éviter d'endommager le lave-vaisselle, ne pas utiliser trop de détergent si
vous disposez d'une eau douce. Si vous employez une quantité trop importante
de détergent dans une eau douce, vous risqueriez de rayer la verrerie.
Ce lave-vaisselle utilise moins d'eau. Par conséquent, moins de détergent est nécessaire. Avec de l'eau douce, 1 c. à soupe (15 ml) de détergent nettoie la plupart des
charges. Le godet du distributeur de détergent comporte des lignes graduées pour
mesurer le détergent comme suit : 1 c. à soupe (15 ml) et 1.75 c. à soupe (25 ml). 3
c. à coupe (45 ml) de détergent rempliront complètement le godet du distributeur de
détergent.
Remarque : si vous ne connaissez pas le degré de
dureté de l'eau de votre réseau d'alimentation, utilisez 15 ml de détergent. Augmentez la quantité de
détergent au besoin pour atteindre la quantité minimale nécessaire pour laver correctement votre vaisselle.
Utilisez les lignes graduées du godet du distributeur de détergent comme guide pour mesurer la
quantité de détergent recommandée au tableau 1.
Ajout de détergent
• 1 c. à soupe (15 ml) nettoie la plupart des
charges (voir la Figure 6).
• Ne pas utiliser plus de 3 c. à soupe (45 ml).
• Ne pas trop remplir le distributeur de détergent.
• Si vous utilisez des pastilles de détergent,
posez-les à plat pour éviter qu'elles
n'entrent en contact avec le couvercle.
Fermeture
• Placez le doigt comme indiqué à la Figure 7.
• Faites coulisser le couvercle en position fer-
mée et appuyez fermement jusqu'à ce que
vous entendiez un déclic.
Ouverture
• Pour ouvrir le couvercle, appuyez sur le bou-
ton comme illustré à la Figure 8. Le couvercle s'ouvrira.
11
Figure 6
7EVS0D[
7EVSPO
7EVSPO
Figure 7
Figure 8
Page 39

Tableau 1 - Quantité de détergent recommandée
Wash Cycle
Heavy 45ml (3tbsp) 45ml (3tbsp) 25-45ml (1.75-3tbsp)
Auto 25-45ml (1.75-3tbsp) 25ml (1.75tbsp) 15-25ml (1-1.75tbsp)
Normal 25-45ml (1.75-3tbsp) 25ml (1.75tbsp) 15-25ml (1-1.75tbsp)
Speed60™ 25ml (1.75tbsp) 15-25ml (1-1.75tbsp) 15ml (1tbsp)
Rinse None None None
Hard Water/
Heavy Soil
Medium Water/
Medium Soil
Soft Water/
Little Soil
Agent de rinçage
Pour obtenir un séchage adéquat, toujours utiliser un agent de rinçage liquide, même si votre détergent contient déjà un agent de rinçage ou un adjuvant de séchage.
Remarque : le lave-vaisselle signale un manque de produit de rinçage en allumant l'indicateur lumineux. Si ce témoin est allumé, vous devez remplir le distributeur d'agent de rinçage en suivant les consignes ci-dessous.
Ajout de l'agent de rinçage
Verser le produit de rinçage liquide dans le distributeur comme indiqué jusqu’à ce que le réservoir
soit plein. Essuyer tout débordement de liquide de
rinçage s’écoulant du réservoir une fois plein. Voir
Figure 9. Le voyant s'éteindra quelques instants
après la fermeture de la porte du lave-vaisselle.
Pour définir la quantité d'agent de rinçage
La quantité de produit de rinçage versée peut
être ajustée entre « r:00 » et « r:06 ».
Modification du paramètre :
1 Appuyez sur la touche [On/Off].
2 Maintenir la touche A enfoncée et appuyer et maintenir la touche
[START] enfoncée jusqu’à ce que l’affichage indique « H:00 ».
Relâcher les deux touches.
3 Appuyer sur A jusqu’à ce que l’affichage indique « r:05 ».
4 Appuyer sur C pour sélectionner le paramètre souhaité.
« r:00 » = le distributeur est désactivé
« r:01 » = paramètre le plus faible
« r:02 » = paramètre faible
« r:03 » = paramètre moyen
« r:04 » = paramètre moyen-élevé
« r:05 » = paramètre élevé
« r:06 » = paramètre le plus élevé
5 Sauvegarder le paramètre sélectionné en appuyant sur [START].
Figure 9
12
Page 40

Programmes et options du lave-vaisselle
Programmes de lavage
Heavy : donne les meilleurs résultats pour éliminer les aliments collés ou la graisse.
Habituellement, on doit faire tremper cette vaisselle.
Auto : grâce à notre dispositif très complexe de détection du degré de saleté, ce
programme est idéal pour les charges mixtes avec des quantités de saletés alimentaires variables. Ce programme est le plus souple et un choix excellent pour
tous les jours.
Normal : permet de laver parfaitement une pleine charge de vaisselle normalement sale.
Remarque : l'Étiquette du Guide d'Énergie a été établie en fonction de ce programme de
détection de la saleté avec toutes les options disponibles désactivées. Conformément à
la procédure d'essai d'énergie, l'appareil a été testée sans verser un agent de rinçage
dans le distributeur. Une seule dose de détergent a été utilisée dans le distributeur de
détergent et aucun détergent n'a été utilisé pendant la phase de prélavage. L'essai a été
effectué avec le panier supérieur en position abaissée.
Speed60™* : Nettoie fraîchement vaisselle sale faciles à éliminer les salissures. Ce
cycle permet de réduire le temps de cycle tout en incluant le séchage.
Rinse* : Vous permet de rincer la vaisselle sale d'une charge partielle et de la mettre
en attente dans le lave-vaisselle jusqu'à ce que la charge soit pleine.
Option des programmes de lavage
Delay Start : L’on peut retarder la mise en marche de 1 h à 24 h.
SpeedPerfect™*
performances de nettoyage.
Half Load
tent une option Demi-charge qui permet de réduire la consommation d'énergie et
d'eau lors du lavage d'une petite quantité de vaisselle légèrement sale qui remplit à
peu près la moitié du lave-vaisselle. Pour activer cette option, sélectionner la touche
Half Load (Demi-charge) en plus de l'un des trois programmes cités précédemment.
Delicate : L'option Délicat est uniquement disponible dans les cycles lourds,
Auto et Normal. Ce cycle est utilisé au mieux pour peu sale avec facile d'éliminer
les salissures alimentaires.
Sanitize : La fonction Désinfecter est offerte uniquement avec les programmes de
lavage intense, automatique et normal. Appuyer sur la touche « Sanitize Option »
(Option désinfection) pour activer les fonctions de désinfection au cours des programmes automatique et normal. Le voyant Désinfection restera allumé durant un programme de lavage intense. Les procédés techniques de désinfection peuvent
également améliorer les résultats de séchage.
Remarque : le lave-vaisselle passe en mode de lavage automatique par défaut lorsqu'il est
éteint puis rallumé. Si vous avez programmé l'option de désinfection lors du programme précédent, le lave-vaisselle passera en mode de lavage automatique par défaut avec l'option de
désinfection sélectionnée lorsque vous le mettez en marche.
Extra Shine™: Utilisé en combinaison avec un cycle de lavage (sauf Rinse), l'option Extra Brillance élève la température et allonge la durée de séchage pour
améliorer encore les résultats de séchage.
* certains modèles
: Réduit le temps de cycle jusqu'à 25% tout en maintenant les
: les programmes de lavage Intense, Intuitif, Normal et Verrerie compor-
13
Page 41

Informations sur les programmes de lavage
Remarque : afin d'économiser de l'énergie, ce lave-vaisselle est équipé d'un dispositif de contrôle intuitif «
Smart Control » dont les capteurs règlent automatiquement la durée du programme, la température et les
changements d'eau en fonction du degré de saleté et de la température de l'eau entrante. Le dispositif de
contrôle intuitif ajuste la durée du programme et la quantité d'eau utilisée de façon intermittente. Les
durées de programmes de lavage sont fonction d'une température de l'eau d'alimentation de 120 °F
(48,8 °C). Si la température de l'eau d'alimentation de votre résidence est différente de 120 °F (48,8 °C),
le temps de chauffage de votre lave-vaisselle pourraient être touchés.
Tableau 2 - Informations sur les programmes de lavage
Heavy Auto Normal Speed60™ Rinse
durée 110-135 min 105-129 min 130-135 min 60 min 9 min
consommation
d'eau
température de
l'eau
température de
rinçage
SpeedPerfect™
durée 95-110 min 75-90 min 95-105 min n/a n/a
consommation
d'eau
Delicate
durée 105-110 min 90-105 min 100-120 min n/a n/a
consommation
d'eau
Sanitize
durée 130-150 min 125-150 min 135-155 min n/a n/a
consommation
d'eau
Extra Shine™
18.6-24.2 L
4.9-6.4 gal
66-71°C
150-160°F
72°C
162°F
16.3-20.5 L
4.3-5.5 gal
18.6-24.2 L
4.9-6.4 gal
18.6-24.2 L
4.9-6.4 gal
13.1-24.5 L
3.5-6.5 gal
53-66°C
127-150°F
67°C
153°F
16.1-20.0 L
4.3-5.3 gal
13.1-24.5 L
3.5-6.5 gal
13.1-24.5 L
3.5-6.5 gal
8.8-20.8 L
2.4-5.5 gal
45-55°C
113-131°F
69°C
156°F
16.6-21.1 L
4.4-5.6 gal
8.8-20.8 L
2.4-5.5 gal
8.8-20.8 L
2.4-5.5 gal
14.3 L
3.8 gal
50°C
122°F
70°C
158°F
n/a n/a
n/a n/a
n/a n/a
incoming
incoming
4.1 L
1.1 gal
durée 130-150 min 125-150 min 135-155 min 84 min n/a
consommation
d'eau
18.6-24.2 L
4.9-6.4 gal
13.1-24.5 L
3.5-6.5 gal
8.8-20.8 L
2.4-5.5 gal
14.3 L
3.8 gal
n/a
Remarque : seuls les programmes sanitaires sont prévus pour satisfaire aux exigences
de niveau 6 en matière d'efficacité d'élimination des saletés et de désinfection. Il
n'existe aucune intention, directe ou indirecte, que tous les programmes aient réussi
les tests de performance en désinfection.
14
Page 42

Fonctionnement du lave-vaisselle
SHE53T5xUC*
B
A
C
SHE53TFxUC*
B
A
C
SHE53TLxUC*
B
A
C
SHP53T55UC, SHX53T55UC
B
A
C
B
A
C
SHV53T53UC
B
A
C
SHV53TL3UC
B
A
SHX53TL5UC
C
* "x" peut être n'importe quel chiffre ou une lettre
15
Page 43

REMARQUE: Pour les modèles avec commandes cachées, la porte doit
être ouverte avant de modifier les paramètres et fermé après la modification des paramètres.
Démarrez le lave-vaisselle :
1 Appuyez sur la touche [On/Off]. Le voyant DEL du dernier cycle
sélectionné clignote.
2 Sélectionnez un programme et les options voulues.
3 Appuyer sur [Start] et fermez la porte pour que le programme
démarre.
Annuler un cycle
1 Appuyez et maintenez le bouton [Start] pendant environ 3 sec-
ondes jusqu'à ce que l'écran affiche "0:01".
2 Attendez environ 1 minute alors que le lave-vaisselle vidange.
Ouvrez la porte et appuyez sur la touche [On/Off].
Interrompre un cycle
3 Appuyez sur la touche [On/Off] pour éteindre l'appareil.
Pour reprendre le cycle, appuyez sur la touche [On/Off] à nouveau.
Signal de fin de cycle (commandes masquées seulement)
1 Ouvrez la porte et appuyez sur la touche [On/Off].
2 Maintenez enfoncée la touche "A" (voir page 18) et appuyez sur
[Start] jusqu'à ce que l'affichage indique "H: 00". Relâchez les deux
boutons.
3 Appuyez sur le bouton "A" jusqu'à ce que l'écran affiche "b:02".
4 Appuyez sur la touche "C" pour augmenter ou diminuer la tonalité
"b: 00" = OFF et "b: 03" = plus fort et appuyez sur [Start] pour
enregistrer les paramètres et fermer la porte.
Mise en marche différée
Vous pouvez retarder le début du cycle de tranches d'une heure, jusqu'à
24 heures.
Pour régler le délai de commencer:
1 Appuyez sur la touche [On/Off]. Sélectionnez un cycle.
2 Appuyez sur la touche [Delay] jusqu'à ce que l'heure affichée corre-
spond à vos besoins et appuyez sur [Start] pour activer le départ dif-
féré.
h: 01 = 1 heure de retard h: 24 = 24 heures de retard
Pour annuler le départ différé:
1 Appuyez sur la touche [Delay] jusqu'à ce que "h: 00" est indiqué sur
l'affichage numérique.
2 Appuyez sur [Start] pour sauvegarder le réglage.
16
Page 44

Child Lock (certains modèles)
1 Démarrez le programme désiré.
2 Maintenez enfoncé le bouton qui dit "Child Lock" en dessous pen-
dant environ 4 secondes jusqu'à ce que l'affichage indique “CL”.
3 Le “CL” s'affiche désormais si une touche est enfoncée et que le pro-
gramme ne sera pas remis à zéro.
Pour désactiver la sécurité enfants:
1 Maintenez la touche "Verrouillage parental" enfoncée pendant envi-
ron 4 secondes jusqu'à ce que l'écran ne lit plus “CL”.
Séchage intensifs (certains modèles)
Le rinçage final utilise une température plus élevée qui améliore les résultats de séchage. Le temps de marche peut augmenter légèrement.
Pour activer le séchage intensif sur:
1 Appuyez sur la touche [On/Off].
2 Maintenez enfoncée la touche “A” et appuyez sur [Start] jusqu'à ce
que l'écran affiche “d:00”. Relâchez les deux boutons.
3 Appuyez sur la touche “C” pour allumer le séchage intensif sur ou
hors tension. “d:01” = ON et “d:00” = OFF
4 Appuyez sur [Start] pour sauvegarder le réglage.
Auto Power Off (selon le modèle)
Pour économiser l'énergie, le lave-vaisselle est éteint 1 minute après le cycle de lavage se termine. Mise hors tension automatique peut être réglée
de P: 00 à P: 02.
Pour modifier le réglage d'usine (P: 01):
1 Appuyez sur la touche [On/Off]. Maintenez enfoncée la touche "A" et
appuyez sur [Start] jusqu'à ce que l'affichage indique "H: 00".
2 Relâchez les deux boutons.
3 Appuyez sur le bouton "A" jusqu'à ce que l'afficheur indique "P: 01".
4 Appuyez sur la touche
P:00
= lave-vaisselle ne s'éteint pas automatiquement
P:01
= lave-vaisselle s'éteint automatiquement après 1 minute
P:02
= lave-vaisselle s'éteint automatiquement après 120 minutes (2 heures)
5 Appuyez sur [Start] pour sauvegarder le réglage.
"C"
jusqu'à ce que l'écran correspond à vos besoins.
17
Page 45

Nettoyage et entretien
Certaines parties du lave-vaisselle nécessitent un entretien occasionnel.
Les opérations d'entretien sont faciles à effectuer et permettent d'obtenir
continuellement un excellent rendement de votre lave-vaisselle.
Conditions générales
Ne jamais utiliser un nettoyeur à vapeur avec le lave-vaisselle. Le fabricant
n’est pas responsable des dommages encourus.
Essuyer régulièrement le devant de l’appareil avec un chiffon humide
(une solution d’eau et de détergent est adéquate).
Ne pas utiliser d’éponge à surface rugueuse ni de détergent abrasif car ils
peuvent endommager les surfaces.
Appareil en acier inoxydable : pour éviter la
corrosion, ne pas utiliser de chiffon éponge, ni
laver plusieurs fois avant d’utiliser l’appareil la
première fois.
Filtres
Les filtres permettent de garder les objets
étrangers de l’eau de rinçage loin de la pompe.
Ils peuvent parfois obstruer les filtres.
Vérifier les filtres
• Dévisser le filtre cylindrique tel qu’il est illustré et
le sortir voir Figure 10-11.
• Enlever tout résidu et le passer à l’eau cou-
rante.
• Réinstaller le système de filtre et s’assurer que
les flèches sont à l’opposées l’une de l’autre
une fois le système de filtre fermé
Bras gicleurs
Du calcaire ou des contaminants dans l’eau de
rinçage peuvent obstruer les embouts et les
roulements des bras gicleurs.
• Vérifier si les embouts des bras gicleurs sont
obstrués.
• Dévisser le bras gicleur supérieur. Voir Figure 12.
• Enlever le bras gicleur inférieur.
Figure 10
Figure 11
Figure 12
18
Page 46

Pompe d’eau usée
Les résidus d’aliments de l’eau de rinçage non
Figure 13
captés par les filtres peuvent obstruer la
pompe à eau usée. L’eau de rinçage ne peut
être pompée et recouvre le filtre.
Dans ce cas :
• Débrancher l’appareil de l’alimentation électrique.
• Enlever les filtres.
Figure 14
• Vider l’eau à l’aide d’une éponge, au besoin.
• Avec une cuillère, enlever le couvercle de la
pompe, tel qu’il est illustré, ensuite prendre
le couvercle par la languette et tirer vers le
haut jusqu’à résistance, puis le sortir (voir
Figure 13-14).
&OLFN
• Vérifier l’intérieur du compartiment et enlever
tout objet étranger.
• Remettre le couvercle à sa position d’origine.
• Installer le filtre.
Préparation de l'appareil pour les vacances
Avant de partir en vacances pendant un temps plus chaud, en plus de
couper la vanne principale, également désactiver l'approvisionnement
en eau au point le plus proche du lave-vaisselle. Par temps froid, s'il
vous plaît suivez les instructions pour l'hivernage de votre appareil cidessous.
Hivérisation unité
Si votre lave-vaisselle n'est pas utilisé pendant une longue période de
temps dans un endroit dont la température de congélation (maison de
vacances ou une période de vacances), faire hivériser par un service
professionnel agréé.
19
Page 47

Aide automatique
Problème Cause Action à prendre
Le lave-vaisselle ne se
met pas en
marche
Le lave-vaisselle émet
un bip
sonore (signal de fin de
programme)
L'afficheur
ne s'allume
pas
1. La porte est peut-être mal enclenchée.
2. L'appareil n'est peut-être pas allumé.
3. La machine n'a pas été réinitialisée ou
le programme précédent n'est pas terminé.
4. La mise en marche différée est
activée.
5. Interruption de l'alimentation électrique du lave-vaisselle ou fusible ayant
sauté.
6. La porte a peut-être été fermée avant
d'avoir choisi le programme.
7. Le robinet d'alimentation en eau n'est
peut-être pas ouvert.
1. Les paramètres usine par défaut
avertissent l'utilisateur que le programme de lavage est terminé en
émettant un bip sonore. Cette fonction
peut être désactivée au besoin.
1. Un fusible a peut-être sauté ou le
disjoncteur s'est déclenché.
2. La porte est mal fermée ou mal
enclenchée.
Remarque : pour les modèles équipés
de commandes situées sur la partie
supérieure de la porte, l'afficheur ne
s'allume que lorsque la porte est
ouverte et les commandes sont visibles.
1. Fermez complètement la porte.
2. Appuyez sur le commutateur principal pour allumer la machine.
3. Pour réinitialiser la machine,
reportez-vous à la section de ce guide
intitulée « Annulation ou modification
du programme ».
4. Pour réinitialiser la machine,
reportez-vous à la section de ce guide
intitulée « Mise en marche différée ».
5. Vérifiez le disjoncteur.
6. Sélectionnez un programme et fermez la porte.
7. Vérifiez et ouvrez le robinet d'alimentation en eau.
1. Pour régler le volume sonore ou désactiver cette fonction, reportez-vous à
la section de ce guide intitulée « Signal
de fin de programme ».
1. Vérifiez le fusible ou le boîtier de
disjoncteurs et remplacez le fusible
ou réarmez le disjoncteur le cas échéant.
2. Assurez-vous que la porte est correctement enclenchée et complètement fermée.
Le programme de
lavage semble durer
trop longtemps
1. IL'eau qui alimente le lave-vaisselle
n'est pas assez chaude.
2. La durée du programme peut varier
en fonction de la saleté de la vaisselle
et de la qualité de l'eau.
3. Le distributeur de produit de rinçage est vide.
4. Le lave-vaisselle est branché sur une
conduite d'eau froide.
Remarque : reportez-vous à la section
de ce guide intitulée « Informations sur
les programmes de lavage » pour obtenir la durée de programme type.
1. Avant de démarrer un programme,
faites couler le robinet d'eau chaude
de l'évier le plus proche du lave-vaisselle.
2. Les capteurs du lave-vaisselle augmentent automatiquement la durée
du programme pour une vaisselle
bien propre en cas de détection d'une
quantité importante de saletés sur la
vaisselle.
3. Versez le produit de rinçage dans
le distributeur.
4. Vérifiez que le lave-vaisselle est
bien raccordé à la tuyauterie d'arrivée
d'eau chaude.
20
Page 48

Problème Cause Action à prendre
La vaisselle
est mal
lavée
La vaisselle
n'est pas
bien sèche
1. Quelque chose empêche le bras de
lavage de tourner.
2. Quelque chose bouche les jets du
bras d'aspersion.
3. Mauvaise utilisation des détergents.
4. Les filtres sont peut-être bouchés.
5. Les pièces de vaisselle sont imbriquées les unes dans les autres ou disposées trop près les unes des autres.
6. Le programme de lavage choisi ne
convient pas aux conditions de saleté
de la vaisselle.
1. Le distributeur de produit de rinçage est vide. (Le voyant du produit de
rinçage est activé).
2. Mauvais chargement de la vaisselle.
3. Le programme choisi ne comprend
pas le séchage.
Remarque : en général, les ustensiles
en plastique et en Téflon ne sèchent
pas aussi bien que d'autres ustensiles
en raison des propriétés inhérentes à
ces types de matériaux.
1. Assurez-vous que le mouvement de
rotation des bras d'aspersion n'est
pas bloqué en faisant pivoter ces derniers à la main.
2. Retirez les bras d'aspersion et nettoyezles en suivant les consignes du paragraphe figurant dans la section de ce
guide intitulée « Nettoyage et entretien ».
3. Augmentez ou diminuez la quantité
de détergent selon la dureté de l'eau.
Reportez-vous au tableau 1.
4. Nettoyer les filtres. Reportez-vous
la section de ce guide intitulée « Nettoyage et entretien ».
5. Changez la disposition de la vaisselle
afin que le jet d'eau puisse asperger correctement toutes les pièces. Reportezvous également la section de ce guide
intitulée « Chargement de la vaisselle ».
6. Reportez-vous également à « Programme de lavage » dans la section
de ce guide intitulée « Fonctionnement du lave-vaisselle».
1. Versez le produit de rinçage dans le
distributeur. L'utilisation d'un produit de
rinçage améliore le séchage.
2. Changez la disposition de la vaisselle
pour veiller à ce que les articles ne soient pas imbriqués les uns dans les
autres. Reportez-vous également à la
section de ce guide intitulée «Chargement de la vaisselle ».
3. Le paramètre Rinçage et attente ne
comprend pas de programme de
séchage.
Impossible de
sélectionner
le programme voulu
Apparition
de films
d'eau sur les
verres ou de
résidus sur
la vaisselle
Le panneau
avant est
décoloré ou
rayé
21
1. Le programme précédent n'est pas
terminé
1. Mauvais dosage du produit de rinçage.
1. Vous avez utilisé un produit
d'entretien abrasif
1. Reportez-vous à la section de ce
guide intitulée « Annulation ou modification du programme ».
1. Réglez le distributeur du produit
de rinçage en fonction de la dureté
de l'eau. Pour des informations sur le
dosage, reportez-vous à la section de
ce guide intitulée « Ajout de détergent et de produit de rinçage ».
1. Utilisez des détergents non abrasifs et un linge humide doux.
Page 49

Problème Cause Action à prendre
Odeur 1. Des déchets alimentaires se sont
accumulés au fond du lave-vaisselle.
2. Des particules d'aliments se sont
accumulées près du joint d'étanchéité
de la porte.
3. La vaisselle est restée trop longtemps dans le lave-vaisselle avant le
lancement d'un programme.
4. De l'eau résiduelle s'est accumulée
au fond du lave-vaisselle.
5. Le tuyau de vidange est obstrué.
Le lave-vaisselle ne se
remplit pas
d'eau
1. Obstruction au niveau du réseau
d'alimentation en eau.
2. Le programme de lavage précédent
n'est pas terminé.
3. La fonction de mise en marche différée est activée.
4. HL'alimentation en eau domestique
est coupée
1. Retirez les filtres et nettoyez-les conformément à la section de ce guide intitulée
« Nettoyage et entretien ».
2. Reportez-vous à « Nettoyage et
entretien » dans la section de ce guide.
3. Si vous n'avez pas l'intention de
laver la vaisselle immédiatement,
lancez le programme Rinse/Hold .
4. Assurez-vous que l'opération de
vidange du programme précédent est
complètement terminée.
5. Pour éliminer les objets pouvant
obstruer le tuyau de vidange, faites
appel à un personnel qualifié.
1. Assurez-vous que le robinet
d'arrivée d'eau (en général situé sous
l'évier de la cuisine) est ouvert et vérifiez que la conduite d'alimentation
n'est ni pliée ni bouchée.
2. Reportez-vous à la section de ce
guide intitulée « Fonctionnement du
lave-vaisselle ».
3. Annulez la mise en marche différée
ou attendez que la période de mise
en marche différée soit terminée ou
que ce délai expire.
4. Ouvrez l'alimentation en eau domestique
Fuites d'eau 1. Mousse
2. Le joint d'étanchéité peut être sorti
de la rainure.
3. L'évent de condensation est bloqué.
4. Mauvaise installation.
1. Les détergents inadéquats ont tendance à produire de la mousse et à
provoquer des fuites. Utilisez uniquement des détergents pour lave-vaisselle. Si le problème de mousse
persiste, mettez une cuillère à soupe
d'huile végétale au fond du lave-vaisselle et lancez le programme voulu.
2. Assurez-vous que le joint d'étanchéité
est bien inséré dans la rainure.
3. Assurez-vous que l'évent de condensation n'est pas bloqué.
4. Faites vérifier l'installation par un
personnel qualifié (alimentation en
eau, système de vidange, mise à
niveau, tuyauterie).
22
Page 50

Problème Cause Action à prendre
Taches
apparaissant dans la
cuve
Fonctionnement
bruyant pendant le
déroulement du
programme
de lavage
Le couvercle du distributeur de
détergent
ne se ferme
pas
1. Les taches qui se forment à l'intérieur du lave-vaisselle sont dues à la
dureté de l'eau.
2.Les couverts sont en contact avec
les parois de la cuve.
1. La vaisselle n'est pas correctement
disposée.
1. Mauvais fonctionnement du couvercle du distributeur de détergent.
2. Le programme précédent n'est pas
terminé ; réinitialisation ou interruption du programme.
1. L'emploi de jus de citron concentré
peut réduire l'accumulation de taches
d'eau dure. Lancez un programme de
lavage normal jusqu'au rinçage puis
interrompez le programme et versez
une tasse de 250 ml (8 oz. liq.) de citron concentré sur le panier supérieur.
Terminez ensuite le programme. Ceci
peut être fait périodiquement pour
prévenir l'accumulation de taches.
2. Assurez-vous que les couverts
n'entrent pas en contact avec les
parois de la cuve pendant le déroulement d'un programme.
1. Les sons correspondant à la circulation de l'eau sont normaux, mais si
vous soupçonnez que des pièces de
vaisselle se cognent entre elles ou
touchent les bras d'aspersion,
reportez-vous à la section du présent
guide intitulée « Préparation et
chargement de la vaisselle » pour
connaître la disposition optimale de
la vaisselle.
1. Reportez-vous à la section de ce
guide intitulée « Ajout de détergent et
de produit de rinçage » pour des
instructions sur l'ouverture et la fermeture du distributeur.
2. Reportez-vous à la section de ce
guide intitulée « Annulation ou modification du programme ».
23
Page 51

Service après-vente
Votre lave-vaisselle Bosch® ne requiert aucun entretien spécial autre
que celui décrit à la section Nettoyage et entretien du présent guide. En
cas de problème avec votre lave-vaisselle, avant de faire appel aux services d'un technicien, reportez-vous à la section Aide automatique du
guide. Si un technicien doit intervenir, communiquer avec votre revendeur ou installateur ou avec un service de réparation autorisé. Ne pas
tenter de réparer soi-même l'appareil. Toute réparation effectuée par
un personnel non autorisé peut être une cause d'annulation de la
garantie.
Si votre lave-vaisselle Bosch® vous pose un problème et si vous n'êtes
pas satisfait du service que vous avez reçu, veuillez effectuer les
démarches suivantes jusqu'à ce que votre problème soit résolu à votre
entière satisfaction :
1 Téléphonez au 1-800-944-2904
2 Communiquez avec le service après-vente à partir de notre site
Web :www.bosch-home.com/us or www.bosch-appliances.ca
3 Communiquez avec l'installateur ou le prestataire de service après-
vente agréé de Bosch® de votre région.
4 Écrivez à :
BSH Home Appliances Corporation
1901 Main Street
Irvine, CA 92614
S'il vous plaît n'oubliez pas d'inclure vos informations de modèle ainsi que
l'explication du problème et la date à laquelle elle a commencé. Vous trouverez
le modèle et le numéro de série sur l'étiquette située sur le bord de la porte
lave-vaisselle. S'il vous plaît faire une copie de votre facture et de la garder avec
ce manuel. Le client doit présenter une preuve d'achat pour obtenir un service
de garantie.
24
Page 52

Informations concernant la garantie
Ce que couvre cette garantie et à qui elle s'applique : la garantie limitée fournie par BSH Home Appliances
Corporation (BSH) dans cet énoncé de garantie limitée de produit s'applique uniquement aux lave-vaisselle
Bosch® (le « produit ») vendus au client, le premier acheteur utilisateur, à la condition que le produit ait été
acheté : (1) Pour votre usage domestique normal (non commercial) et qu'il ait effectivement en tout temps été
utilisé uniquement à des fins domestiques normales. (2) À l'état neuf au détail (et non comme un modèle
d'exposition, « tel quel » ou ayant déjà été retourné), et non à des fins de revente ou d'utilisation commerciale.
(3) Aux États-Unis ou au Canada, et qu'il soit en tout temps demeuré dans le pays de l'achat initial. Les garanties énoncées aux présentes s'appliquent uniquement à l'acheteur initial du produit et ne sont pas cessibles.
• Assurez-vous de renvoyer la carte d'enregistrement ; bien que cette démarche ne soit pas nécessaire pour
que la garantie soit valide, c'est la meilleure façon de permettre à BSH de vous avertir dans l'éventualité
improbable d'un avis de sécurité ou d'un retrait de produit du marché.
Durée de la garantie : BSH garantit que le produit est exempt de défauts de matériaux et de fabrication pendant une période de trois cent soixante-cinq (365) jours à compter de la date d'achat. Le délai précité commence à courir à partir de la date d'achat et ne doit pas, pour quelque raison que ce soit, être différé, faire
l'objet de droits, être prolongé ou suspendu. Les frais de main d'œuvre et d'expédition sont compris dans la
couverture de base.
Garantie limitée prolongée :BSH offre également les garanties limitées supplémentaires suivantes :
• Garantie limitée de cinq (5) ans sur les composant électroniques : BSH réparera ou remplacera tout microprocesseur ou carte de circuit imprimé BSH présentant des défauts de matériaux ou de fabrication (frais de
main d'œuvre exclus).
• Garantie limitée de cinq (5) ans sur les paniers à vaisselle : BSH remplacera les paniers à vaisselle supérieur
ou inférieur (à l'exclusion des composants du panier), si le panier présente des défauts de matière ou de fabrication (frais de main d'œuvre exclus).
• Garantie à vie contre la rouille de l'acier inoxydable : BSH remplacera votre lave-vaisselle par un modèle identique ou un modèle courant sensiblement équivalent ou supérieur en termes de fonctionnalité, si le revêtement intérieur est perforé par la rouille (frais de main d'œuvre exclus). BSH remplacera la porte en acier
inoxydable si celle-ci est perforée par la rouille (frais de main d'œuvre exclus).
• Le délai précité commence à courir à partir de la date d'achat et ne doit pas, pour quelque raison que ce soit,
être différé, faire l'objet de droits, être prolongé ou suspendu.
La réparation ou le remplacement du produit constitue votre recours exclusif : Pendant la période de la
présente garantie, BSH ou l'un de ses prestataires de service après-vente agréés réparera votre produit sans
frais de votre part (sous réserve de certaines restrictions précisées aux présentes) s'il s'avère que votre
produit a été fabriqué en incorporant un défaut de matériaux ou de fabrication. Si des tentatives raisonnables
de réparation du produit ont été effectuées sans succès, BSH remplacera votre produit (des modèles améliorés peuvent vous être offerts, à la discrétion exclusive de BSH, moyennant des frais supplémentaires). Toutes
les pièces et tous les composants enlevés deviendront la propriété de BSH à sa discrétion exclusive. Toutes
les pièces remplacées et/ou réparées devront être similaires à la pièce d'origine aux fins de la présente garantie et cette garantie ne sera pas prolongée eu égard à ces pièces. En vertu des présentes, BSH assume la
responsabilité et l'obligation exclusives vis-à-vis de la réparation d'un produit comportant un défaut de fabrication uniquement, en ayant recours à un prestataire de services après-vente agréé de BSH pendant les heures
normales de travail. Par souci de sécurité et pour des questions de dommages matériels, BSH vous recommande vivement de ne pas tenter de réparer vous-même le produit ni d'avoir recours à un dépanneur non
agréé ; BSH ne sera pas responsable et n'assume aucune obligation pour les réparations ou le travail effectués
par un dépanneur non agréé. Si vous choisissez de demander à une personne qui n'est pas un prestataire de
service après-vente agréé de travailler sur votre produit, LA PRÉSENTE GARANTIE DEVIENDRA AUTOMATIQUEMENT NULLE ET NON AVENUE. Les prestataires de service après-vente agréés sont des personnes ou des
sociétés ayant été spécialement formées sur les produits de BSH et qui jouissent, de l'avis de BSH, d'une
réputation supérieure en matière de service à la clientèle et de compétences techniques (veuillez noter qu'il
s'agit d'entités indépendantes et non de mandataires, d'associés, d'affiliés ou de représentants de BSH). Nonobstant les dispositions précédentes, BSH n'assumera aucune responsabilité ou obligation en ce qui concerne
le produit s'il se trouve dans une région éloignée (à plus de 100 milles d'un prestataire de services après-vente
agréé) ou s'il est raisonnablement inaccessible ou s'il se trouve dans un lieu, un milieu ou un environnement
dangereux, menaçant ou traître ; auquel cas, sur votre demande, BSH paiera quand même la main d'œuvre et
les pièces et expédiera les pièces au prestataire de services après-vente agréé le plus proche. Toutefois, vous
restez quand même entièrement responsable pour et serez dans l'obligation de payer les frais de déplacement
25
Page 53

ou autres frais spéciaux appliqués par la société de services après-vente, dans l'hypothèse où elle accepte
de faire le déplacement en vue d'effectuer la réparation.
Produit qui n'est plus couvert par la garantie : BSH n'est pas tenue, en droit ou autrement, de vous consentir quoi que ce soit, y compris des réparations, des tarifs proportionnels ou un remplacement de produit,
après l'expiration de la garantie.
Exclusions de la garantie : La couverture de la garantie décrite aux présentes exclut tous les défauts ou dommages qui ne résultent pas d'une faute directe de BSH, y compris, sans toutefois s'y limiter, un ou plusieurs
des éléments suivants : (1) L'utilisation du produit à toute autre fin que son usage normal, habituel et prévu (y
compris, sans toutefois s'y limiter, toute forme d'usage commercial, l'usage ou l'entreposage à l'extérieur d'un
produit devant être utilisé à l'intérieur, l'utilisation du produit conjointement avec un aéronef ou un bateau).
(2) La conduite répréhensible volontaire, la négligence, la mauvaise utilisation, l'utilisation abusive, les accidents, la négligence, le fonctionnement abusif, le refus d'entretien, l'installation irrégulière ou négligente,
l'altération, le non respect du mode d'emploi, les fausses manœuvres, les réparations non agréés (y compris
la réparation effectuée soi-même ou l'exploration des mécanismes internes de l'appareil) de la part de toute
partie. (3) La rectification, l'altération ou la modification, quelle qu'en soit la nature. (4) Le non-respect des
codes, règlements ou lois applicables d'État, locaux, municipaux ou de comté régissant l'électricité, la plomberie et/ou le bâtiment, y compris le manquement à l'obligation d'installer le produit dans le respect le plus
strict des codes et règlements locaux du bâtiment et en matière de prévention des incendies. (5) L'usure normale, le renversement d'aliments, de liquides, les accumulations de graisse ou les autres substances qui
s'accumulent sur le produit, à l'intérieur ou autour de celui-ci. (6) Les forces et facteurs externes, exercés par
les éléments et/ou l'environnement, y compris, sans toutefois s'y limiter, la pluie, le vent, le sable, les inondations les incendies, les glissements de terrain, les températures glaciales, l'humidité excessive ou l'exposition
prolongée à l'humidité, la foudre, la surtension électrique, les défaillances des structures qui entourent
l'appareil et les cas de force majeure. BSH ne sera en aucun cas responsable et n'aura aucune obligation de
quelque manière que ce soit quant aux dommages occasionnés aux biens environnants, y compris les
armoires de rangement, les planchers, les plafonds et les autres structures ou objets qui se trouvent à proximité du produit. Sont également exclus de la présente garantie les griffures, les encoches, les bosselures et
les dommages touchant l'aspect des surfaces externes et des pièces exposées ; les produits dont les
numéros de série ont été modifiés, oblitérés ou enlevés ; les visites après-vente pour vous enseigner à utiliser
le produit, ou les déplacements lorsque le produit ne présente aucun problème ; la résolution de problèmes
d'installation (vous êtes entièrement responsable de toute structure et mise en place du produit, y compris
les installations électriques, de plomberie ou autres installations de raccordement, de la mise en place de
fondations ou d'un parquet appropriés, et de toute modification, y compris, sans toutefois s'y limiter, celles
devant être apportées aux armoires de rangement, murs, planchers, rayonnages, etc.) ; ainsi que le réenclenchement des disjoncteurs ou des fusibles.
DANS LA MESURE OÙ LA LOI L'AUTORISE, LA PRÉSENTE GARANTIE STIPULE VOS RECOURS EXCLUSIFS À L'ÉGARD DU PRODUIT, QUE LA RÉCLAMATION SOIT OU NON DE NATURE CONTRACTUELLE OU
DÉLICTUELLE (Y COMPRIS LA RESPONSABILITÉ ABSOLUE OU LA NÉGLIGENCE) OU AUTRE. ¤LA
PRÉSENTE GARANTIE REMPLACE TOUTES LES AUTRES GARANTIES, EXPRESSES OU IMPLICITES.
TOUTE GARANTIE IMPLICITE EN VERTU DE LA LOI, QUE CE SOIT À DES FINS DE QUALITÉ MARCHANDE
OU D'ADAPTATION À UN USAGE PARTICULIER, OU AUTREMENT, EST EN VIGUEUR UNIQUEMENT PENDANT LA PÉRIODE AU COURS DE LAQUELLE LA PRÉSENTE GARANTIE LIMITÉE EXPRESSE EST EN
VIGUEUR. §LE FABRICANT N'EST AUCUNEMENT RESPONSABLE DES DOMMAGES, PERTES OU FRAIS
CONSÉCUTIFS, PARTICULIERS, ACCESSOIRES, INDIRECTS ET/OU PUNITIFS, DES « PERTES COMMERCIALES », Y COMPRIS, SANS TOUTEFOIS S'Y LIMITER, LE TEMPS D'ABSENCE AU TRAVAIL, L'HÉBERGEMENT À L'HÔTEL ET/OU LES REPAS AU RESTAURANT, LES FRAIS DE REMANIEMENT EN EXCÉDENT
DES DOMMAGES DIRECTS QUI SONT CAUSÉS DÉFINITIVEMENT ET EXCLUSIVEMENT PAR BSH, OU
AUTREMENT. §CERTAINS ÉTATS NE PERMETTENT PAS L'EXCLUSION OU LA LIMITATION DES DOMMAGES INDIRECTS OU ACCESSOIRES ET CERTAINS ÉTATS NE PERMETTENT PAS LA LIMITATION DE LA
DURÉE D'UNE GARANTIE IMPLICITE, DE SORTE QUE LES RESTRICTIONS STIPULÉES PLUS HAUT PEUVENT NE PAS S'APPLIQUER À VOUS. LA PRÉSENTE GARANTIE VOUS CONFÈRE DES DROITS LÉGAUX
SPÉCIFIQUES ET VOUS POUVEZ AUSSI AVOIR D'AUTRES DROITS QUI VARIENT D'UN ÉTAT À L'AUTRE.
Aucune tentative pour modifier la présente garantie n'aura d'effet à moins d'être autorisée par écrit par un
dirigeant de BSH Home Appliances Corporation.
Procédure d'obtention du service prévu par la garantie : POUR BÉNÉFICIER D'UN SERVICE DE GARANTIE POUR VOTRE PRODUIT, COMMUNIQUER AVEC LE CENTRE DE SERVICE APRÈS-VENTE AGRÉÉ DE BSH
LE PLUS PROCHE OU TÉLÉPHONEZ AU 800-944-2904.
26
Page 54

1
Page 55

Estimado y valioso cliente de Bosch®:
¡Bienvenido a la familia de Bosch® y felicitaciones por la compra de su
nueva lavadora de platos Bosch®! Nuestros ingenieros alemanes trabajan de manera incansable para construir máquinas que tengan un funcionamiento prácticamente silencioso, una eficiencia que ahorre
recursos y una calidad óptima. Sabemos que estará conforme.
Para obtener respuestas rápidas a las preguntas frecuentes, consulte
la Guía de referencia rápida que viene con este manual.
Para obtener otros electrodomésticos Bosch® de calidad superior,
visítenos por Internet en:
www.bosch-home.com/us (USA)
or
www.bosch-appliances.ca (Canada)
Cuando esté allí, no olvide registrar su nueva lavadora de platos haciendo clic en la pestaña Customer Support (Asistencia al cliente) o
llenando la tarjeta de registro del producto que se adjunta con su
nueva unidad.
Si tiene alguna pregunta o comentario, comuníquese con nosotros llamando al 1-800-944-2904
o escríbanos a:
BSH Home Appliances Corporation
1901 Main Street
Irvine, CA 92614
Índice
Instrucciones de seguridad importantes..............................3-5
Componentes de la lavadora de platos.................................5-6
Materiales de la lavadora de platos.........................................7
Cómo cargar la lavadora de platos.......................................7-8
Cómo cargar la canasta para cubiertos...................................9
Accesorios para las rejillas...................................................10
Cómo agregar detergente y agente de enjuague................11-12
Ciclos y opciones de la lavadora de platos............................13
Información sobre los ciclos de lavado..................................14
Cómo operar la lavadora de platos...................................15-17
Cuidado y mantenimiento.................................................18-19
Autoayuda.......................................................................20-22
Servicio al cliente.................................................................23
Información sobre la garantía..........................................24-25
2
Page 56

Instrucciones de seguridad importantes: Lea y
guarde esta información
ADVERTENCIA
El uso indebido de la lavadora de platos puede ocasionar lesiones
graves o la muerte. No utilice la lavadora de platos de ninguna manera
que no se encuentre cubierta en este manual ni para ningún fin distinto
de los fines que se explican en las páginas siguientes.
La contratación de técnicos de servicio que no estén capacitados o el
uso de piezas de repuesto que no sean originales podría ocasionar
daños en el producto y/o lesiones graves. Todas las reparaciones
deben ser realizadas por un técnico de servicio capacitado que utilice
únicamente piezas de repuesto originales de fábrica para el equipo.
Si el suministro eléctrico para la lavadora de platos cubierta en este
manual se instala de manera incorrecta o si la lavadora de platos no ha
sido conectada a tierra de manera adecuada, podría ocasionarse una
descarga eléctrica o un incendio. No utilice la lavadora de platos cubierta en este manual, a menos que esté seguro de que el suministro
eléctrico haya sido instalado correctamente o de que la lavadora de
platos haya sido conectada a tierra de manera adecuada.
Nunca utilice productos químicos abrasivos para limpiar su lavadora de
platos. ¡Algunos productos que contienen cloruros pueden dañar su
lavadora de platos y pueden presentar peligros para la salud!
Únicamente los ciclos desinfectantes han sido diseñados para cumplir los
requisitos para el grado 6 respecto de la eficacia de la remoción de la suciedad y de la desinfección. No existe intención alguna, directa ni indirecta,
de que todos los ciclos pasen las pruebas de rendimiento de desinfección.
AVISO
Nunca utilice productos de limpieza por vapor para limpiar su lavadora de platos. El fabricante no será responsable de los posibles daños o consecuencias.
Se recomienda especialmente que el usuario final se familiarice con el procedimiento de corte del suministro de entrada de agua y con el procedimiento de
corte de la fuente de alimentación eléctrica de entrada. Consulte las instrucciones
de instalación o comuníquese con su instalador para obtener más información.
NSF/ANSI 184 certifica los lavaplatos residenciales no se piensa para
los establecimientos autorizados del alimento.
3
Page 57

ADVERTENCIA: Para reducir el riesgo de incendio, descarga eléctrica o lesiones graves, siga
estas indicaciones:
1 Esta lavadora de platos se entrega con Instrucciones de instalación y
con este Manual de uso y cuidado. Lea y comprenda todas las instrucciones antes de usar la lavadora de platos.
2 Este electrodoméstico debe conectarse a un sistema de cableado
metálico y permanente, con conexión a tierra, o se debe instalar un
conductor de conexión a tierra para equipos junto con los conductores
de circuitos, y conectarlo al terminal de conexión a tierra para equipos
o al hilo de conexión a tierra de la lavadora de platos. Consulte las
Instrucciones de instalación que se incluyen con esta lavadora de platos para obtener más información sobre los requisitos eléctricos.
3 Utilice esta lavadora de platos únicamente para la función para la cual fue dis-
eñada, que consiste en lavar la vajilla doméstica y los utensilios de cocina.
4 Utilice únicamente detergentes o agentes de enjuague recomendados para
uso en una lavadora de platos y manténgalos fuera del alcance de los niños.
5 Al cargar los artículos que desea lavar:
• Coloque los artículos filosos de manera tal que no puedan dañar el
sello de la puerta.
• Cargue los cuchillos y otros utensilios filosos con el MANGO HACIA
ARRIBA para reducir el riesgo de tener heridas cortantes.
• No lave artículos de plástico, a menos que incluyan la leyenda “aptos
para lavadora de platos” o una leyenda equivalente. En el caso de los
artículos de plástico que no estén marcados de esa manera, consulte
las recomendaciones del fabricante.
• No opere su lavadora de platos, a menos que todos los paneles de
cierre estén colocados en su lugar.
• No trate de forzar los controles ni de pasar por alto los sistemas de traba.
6 No use la puerta ni las rejillas para platos de la lavadora de platos de
manera indebida, ni se siente ni se pare sobre estas.
7 Para reducir el riesgo de lesiones, no permita que los niños jueguen
dentro de la lavadora de platos ni encima de esta.
8 Cuando los niños tienen la edad adecuada para operar el electrodo-
méstico, es responsabilidad legal de los padres/tutores legales asegurarse de que los niños reciban instrucciones sobre prácticas seguras
por parte de personas capacitadas.
9 En ciertas condiciones, es posible que se produzca gas hidrógeno en un
sistema de agua caliente que no haya sido utilizado durante dos semanas
o más tiempo. El gas hidrógeno es explosivo. Antes de usar una lavadora
de platos que esté conectada a un sistema de agua caliente que haya permanecido sin uso durante dos semanas o más tiempo, abra todos los grifos de agua caliente y deje que fluya el agua de cada uno de los grifos
durante varios minutos. De este modo, se eliminará el gas hidrógeno que
se haya acumulado. Dado que el gas es explosivo, no fume ni use una
llama abierta durante este tiempo.
4
Page 58

10 Al retirar una lavadora de platos vieja para realizar el servicio técnico
o para desecharla, retire la puerta de la lavadora de platos que cierra el
compartimento de lavado.
11 Para evitar daños en el piso y la posible aparición de moho, no per-
mita que las áreas alrededor o debajo de la lavadora de platos permanezcan mojadas.
12 Proteja su lavadora de platos de las condiciones climáticas. Protéjala contra el
congelamiento para evitar posibles daños en la válvula de llenado. Los daños
causados por el congelamiento no están cubiertos por la garantía.
13 Para un electrodoméstico conectado al cable:
• Este electrodoméstico debe estar conectado a tierra. En caso de un mal funcionamiento o una falla, la conexión a tierra reducirá el riesgo de descarga
eléctrica proporcionando una vía de menor resistencia para la corriente eléctrica. Este electrodoméstico viene equipado con un cable con un conductor
de conexión a tierra para equipos y un enchufe con conexión a tierra. El
enchufe debe colocarse en una toma de corriente adecuada que esté instalada y conectada a tierra, de acuerdo con todos los códigos y las ordenanzas
locales.
• La conexión incorrecta del conductor de conexión a tierra del equipo puede
causar una descarga eléctrica. Consulte a un electricista o a un representante
de servicio técnico calificados si tiene alguna duda respecto de si el electrodoméstico está correctamente conectado a tierra. No modifique el enchufe
incluido con el electrodoméstico; si no entra en la toma de corriente, solicite
a un electricista calificado que instale una toma de corriente adecuada.
Estado de California Proposición 65 Advertencia:
ADVERTENCIA: Este producto contiene una o más sustancias químicas que
el Estado de California como causante de cáncer.
ADVERTENCIA: Este producto contiene una o más sustancias químicas que
el Estado de California como causante de defectos de nacimiento u otros
daños reproductivos.
Componentes de la lavadora de platos
Ciclos de lavado
Modelo Heavy Auto Normal
SHX53Tx5UC*
SHV53Tx3UC*
SHP53Tx5UC*
SHE53T5xUC*
SHE53TLxUC*
SHE53TFxUC*
* “x” puede ser cualquier número
5
Speed60™
(1 hour)
Rinse
Page 59

Funciones adicionales
Modelo Delay
SHX53TL5UC RackMatic® Duo-Flex
SHX53T55UC
SHV53T53UC
SHV53TL3UC RackMatic® Duo-Flex
SHP53T55UC Manual Long
SHP53TL5UC RackMatic® Long
SHE53T5xUC*
SHE53TFxUC*
SHE53TLxUC* RackMatic® Long
Speed
Perfect™
Delicate Sanitize
Extra
Shine™
Adjustable
Basket
Manual Long
Manual Long
Child
Lock
* “x” puede ser cualquier número
Rejilla superior
Silverware
Basket
Brazo rociador
Rejilla inferior
Dispensador de
detergente
Brazo rociador
La canasta
para cubiertos
Filter system
Dispensador de
agente
de enjuague
6
Page 60

Materiales de vajilla
Nota: Antes de usar su lavadora de platos por primera vez, consulte la información incluida en esta sección. Algunos artículos no son aptos para lavadora
de platos y deben lavarse a mano; otros requieren una carga especial.
Recomendados
Aluminio: Es posible que el aluminio de color anodizado se opaque con el
tiempo. Los minerales del agua pueden hacer que el aluminio se oscurezca o
se manche. Por lo general, estas manchas pueden quitarse con una esponja de
lana de acero con jabón.
Porcelana, cristal, cerámica de gres: Algunos utensilios pintados a mano
pueden descolorarse, opacarse o mancharse. Lave a mano estos utensilios.
Coloque los utensilios de vidrio frágiles de manera tal que no se caigan ni
entren en contacto con otros utensilios durante el ciclo de lavado.
Vidrio: El vidrio opalino puede descolorarse o ponerse amarillo.
Recubrimientos antiadherentes: Aplique una capa delgada de aceite vegetal
en las superficies antiadherentes después del secado.
Plásticos: Asegúrese de que los utensilios de plástico sean aptos para lavadora de platos.
Acero inoxidable, plata esterlina y objetos bañados en plata: Cargue
estos de manera tal que no entren en contacto con otros metales.
Materiales no recomendados
Acrílico: Puede producirse un agrietamiento o pequeñas rajaduras a lo
largo del acrílico.
Piezas pegadas con adhesivos: Los adhesivos que pegan materiales como
plástico, madera, hueso, acero, cobre, estaño, etc., pueden aflojarse.
Utensilios con mango de hueso: Los mangos pueden separarse.
Hierro: El hierro se oxida. Lave a mano y seque inmediatamente.
Artículos que no sean vajilla: Su lavadora de platos está diseñada para lim-
piar ÚNICAMENTE vajilla y utensilios de cocina domésticos estándares.
Peltre, latón, bronce: Estos artículos pierden lustre. Lave a mano y seque
inmediatamente.
Estaño: El estaño se oxida. Lave a mano y seque inmediatamente.
Madera: Los tazones de madera, los utensilios de madera y los utensilios
con mango de madera pueden rajarse, combarse y perder su acabado.
Cómo cargar la lavadora de platos
No prelave artículos que tengan suciedad poco adherida. Retire todas las
partículas de alimentos, los huesos, los palillos y el exceso de grasa. Los
artículos que tienen suciedad quemada, pegada después de hornear o
endurecida pueden requerir un tratamiento previo. Consulte la sección
Materiales de vajilla para obtener más información sobre la vajilla apta para
este electrodoméstico.
Cargue la lavadora de platos únicamente con artículos aptos para lavadora
de platos. Cargue platos en las rejillas de la lavadora de platos de manera tal
que el interior de los tazones, las cacerolas y las ollas quede mirando hacia
los brazos rociadores. Evite que los platos queden uno dentro de otro y con
puntos de contacto entre sí. Separe los artículos de metales que no sean
similares.
7
Page 61

Cómo cargar la rejilla superior
Asegúrese de que los artículos no sobresalgan a través de la parte inferior de
las rejillas y de que no bloqueen los brazos rociadores.
Nota: Al empujar la rejilla superior dentro de la lavadora de platos, empújela
hasta que se detenga contra la parte trasera de la tina de manera tal que el
brazo rociador de la rejilla superior se conecte al suministro de agua de la parte
trasera de la tina. No empuje las rejillas hacia adentro con la puerta.
Cómo cargar la rejilla inferior
Coloque los artículos grandes en la rejilla inferior. Cargue las cacerolas, las
ollas y los tazones boca abajo.
Cómo descargar la lavadora de platos
Al descargar la lavadora de platos es mejor descargar la rejilla inferior
primero. Luego, descargue la canasta para cubiertos y la rejilla superior.
AVISO
Para evitar daños en la lavadora de platos, no cargue la lavadora de platos con productos de papel, bolsas de plástico, material de embalaje ni ningún otro elemento
que no sea vajilla ni utensilios de cocina normales, aptos para lavadora de platos.
Patrón de carga sugerido
Rejilla superior
Rejilla inferior
Patrón de carga adicional
Rejilla superior
Rejilla inferior
8
Page 62

Cómo cargar la canasta para cubiertos
Coloque los cuchillos y los utensilios filosos con los MANGOS HACIA
ARRIBA, y los tenedores y las cucharas con los mangos hacia abajo. Si es
necesario cargar artículos grandes o de forma irregular en la canasta para
cubiertos, asegúrese de que no queden uno dentro del otro.
ADVERTENCIA
Las puntas y los bordes filosos de los cuchillos y otros utensilios filosos
pueden ocasionar lesiones graves. Cargue los cuchillos y otros utensilios
filosos con los bordes hacia abajo. No permita que los niños manipulen
cuchillos y utensilios filosos ni que jueguen cerca de estos.
Canasta para cubiertos Long
La canasta para cubiertos estándar cabe en el lado de la
rejilla inferior.
Canasta para cubiertos Duo-Flex
Esta canasta se separa a lo largo y queda dividida en dos
mitades, que pueden colocarse en una variedad de posiciones en la rejilla inferior; de esta manera, la versatilidad de
carga de la rejilla inferior aumenta considerablemente. La
canasta se une calzando las partes traseras o los extremos a presión, como se muestra a continuación.
Para separar la canasta para cubiertos Duo-Flex
Tome la canasta y deslice las dos mitades en dirección opuesta, como se muestra a la derecha, y separe las dos mitades.
Canasta para cubiertos Long
4
44 4 444 4447446 62
3 333 3 3 3
33 3 33
11 1 1 1 1
22
22222
2
2
2
22
222
222 2 2 1 1 1111
222
Canasta para cubiertos Duo-Flex
4
43
22
La tapa de la canasta puede engancharse a presión
en el mango para dejar la canasta abierta.
9
4
43
22
12345
1-
tenedor para ensalada
cuchara de té
2-
tenedor
3-
6
4- cuchillo
cucharada
5 -
cuchara para servir
6 -
tenedor para servir
7 -
7
Page 63

Accesorios para las rejillas
Figura 1
Púas abatibles
Las rejillas constan de púas que pueden plegarse
hacia abajo según los artículos que tenga que cargar en la rejilla. Para plegarlas hacia abajo, tome
las púas plegables y extráigalas de la muesca.
Empuje la púa plegable hacia abajo en la posición
deseada como se muestra en la Figura 1.
Ajuste manual de la
Figura 2
Figura 3
altura de la rejilla
(depende del modelo)
Retire la rejilla vacía jalándola hacia afuera de la lavadora de platos hasta que
pueda levantarse, como se
muestra en la Figura 2. Jale
de la rejilla hacia arriba y
hacia afuera hasta que los
rodillos queden completamente fuera de las guías de los rodillos.
Vuelva a insertar la rejilla con el otro juego de rodillos sobre las guías de
los rodillos, como se muestra en la Figura 3.
Figura 4
RackMatic® - (depende del modelo)
La altura de la rejilla superior puede ajustarse en
3 pasos para crear más espacio.
1 Jale la rejilla superior hacia afuera .
2 Para bajar la rejilla, empuje la palanca hacia
adentro y luego hacia arriba.
3 Para elevar la rejilla, sostenga la canasta de
los lados del borde superior y levántela.
Antes de volver a introducir la rejilla, asegúrese de que esté a la misma altura
en ambos lados. De lo contrario, la puerta del electrodoméstico no puede
cerrarse y el brazo rociador superior no se conectará con el circuito de agua.
Figura 5
Cup Shelves (depende del modelo)
El estante y el espacio por debajo se pueden utilizar para tazas pequeñas o más
grandes para utensilios de servir.
&/,&.
10
Page 64

Cómo agregar detergente y agente
de enjuague
Detergente
Figure 6
Utilice solo detergente diseñado específicamente para lavadoras de platos.
Aviso: Para evitar daños en la lavadora de platos,
no utilice productos para lavar platos a mano en su
7EVS0D[
7EVSPO
7EVSPO
lavadora de platos.
Su lavadora de platos utiliza menos agua; por
eso, debe utilizar menos detergente. Con agua
blanda, 1 cucharada (15 ml) de detergente limpia
prácticamente todos los tipos de cargas. El
recipiente del dispensador de detergente tiene
Figure 7
líneas que miden la cantidad de detergente para
1 cucharada (15 ml) y 1.75 cucharadas (25 ml).
Tres cucharadas (45 ml) de detergente llenan
completamente el recipiente del dispensador de
detergente. Consulte la Tabla 2.
Nota: Si no sabe cuál es el nivel de dureza de su
suministro de agua, utilice 15 ml de detergente.
Aumente la cantidad de detergente, si es necesario,
hasta la cantidad mínima necesaria para que su
lavadora de platos y sus utensilios de cocina
Figure 8
queden limpios.
Para cerrar:
• Coloque el dedo como se muestra en la imagen en Figura 7.
• Deslícelo hacia adelante, luego presione
hacia abajo firmemente hasta que escuche
un clic al ubicarse en su lugar.
Para abrir:
• Para abrir la cubierta, empuje el botón como se muestra en la Figura 8.
• La cubierta se abrirá.
Tabla 2 - Cantidad de detergente recomendada
Ciclo de
lavado
Heavy 45ml (3tbsp) 45ml (3tbsp) 25-45ml (1.75-3tbsp)
Auto 25-45ml (1.75-3tbsp) 25ml (1.75tbsp) 15-25ml (1-1.75tbsp)
Normal 25-45ml (1.75-3tbsp) 25ml (1.75tbsp) 15-25ml (1-1.75tbsp)
Speed60™ 25ml (1.75tbsp) 15-25ml (1-1.75tbsp) 15ml (1tbsp)
Rinse None None None
11
Agua dura/mucha
suciedad
Agua media/
suciedad media
Agua blanda/poca
suciedad
Page 65

Agente de enjuague
Para lograr un secado adecuado, utilice siempre un agente de enjuague
líquido, incluso si su detergente contiene un agente de enjuague o un aditivo de secado.
Nota: Su lavadora de platos indica que hay poco agente de enjuague most-
rando iluminando el LED del agente de enjuague. Si esta luz está encendida,
necesita recargar el dispensador de agente de enjuague siguiendo las indicacionesque se encuentran a continuación.
Cómo agregar agente de enjuague
Abra el depósito para el agente de enjuague y
agregue agente de enjuague líquido al dispensador vertiéndolo (consulte la Figura 9). Limpie
cualquier exceso de agente de enjuague que
pueda acumularse cuando el depósito del dispensador esté lleno. La luz indicadora se
apagará algunos minutos después de que se
cierre la puerta de la lavadora de platos.
Programación de la cantidad de agente de enjuague
La cantidad de agente de enjuague dispensada puede programarse
desde “r:00” hasta “r:06”.
Para modificar la programación:
1 Presione el botón [On/Off].
2 Mantenga presionado el botón “A” y presione [START] y manténgalo
presionado hasta que la pantalla indique “H:00”.
3 Suelte ambos botones.
4 Presione “A” hasta que la pantalla indique “r:00”.
5 Presione “C” para seleccionar la programación deseada.
“r:00” = el dispensador está apagado
“r:01” = programación más baja
“r:02” = programación baja
“r:03” = programación media
“r:04” = programación media-alta
“r:05” = programación alta
“r:06” = programación más alta
6 Guarde la programación seleccionada presionando [START].
Figure 9
12
Page 66

Ciclos y opciones de la lavadora de platos
Ciclos de lavado
Heavy: Es el mejor para lavar artículos con comida o grasa pegadas después
de hornear. Para limpiar estos platos, normalmente es necesario dejarlos en
remojo.
Auto: Con nuestra más compleja capacidad de detección de suciedad, este
ciclo es perfecto para utilizarse en el caso de cargas mixtas de vajilla con
diversas cantidades de residuos de alimentos. Este es el ciclo más flexible y es
una buena opción para el uso diario.
Normal: Limpia en profundidad una carga completa de platos con suciedad normal.
Nota: La Guía de etiqueta energética se basa en el ciclo de detección de tierra con
todas las opciones desactivadas. Conforme a lo dispuesto en el procedimiento de
prueba de energía, la unidad fue probada sin enjuague en el depósito del abrillantador. Una sola dosis de detergente se utiliza en el dispensador de detergente, sin
detergente utilizado en el prelavado. La prueba se llevó a cabo con la rejilla superior en la posición superior (para Bastidores ajustables manual) o en la posición
media (para Bastidores RackMatic).
Speed60™*: Limpia recién platos sucios con facilidad para eliminar la suciedad. Este ciclo reduce el tiempo de ciclo, mientras que aún incluyendo el
secado.
Rinse*: Le permite enjuagar restos alimenticios de una carga parcial y mantiene los platos en el lavavajillas hasta que esté listo para realizar una carga
completa. No utilice detergente en este ciclo.
Wash Cycle Options
Delay Start:
de platos hasta 24 horas.
SpeedPerfect™*
mismo tiempo el rendimiento de limpieza.
Delicate: La opción Delicate sólo está disponible en los pesados , Auto y
Normal ciclos. Este ciclo se utiliza mejor para las prendas poco sucias con
fácil quitar manchas de alimentos.
Sanitize: El Desinfectar función sólo está disponible en los pesados , Auto y
Normal ciclos. El LED se iluminará Desinfectar cuando se cumplan los requisitos
de saneamiento. Las medidas de saneamiento técnicas también pueden mejorar
los resultados de secado.
Nota: El lavavajillas automáticamente por defecto Auto Cuando está apagado y vuelva
a encenderla. Si ha utilizado la opción de desinfectar en su último ciclo, el lavavajillas
de forma predeterminada lavado automático con la opción Desinfectar seleccionado
cuando se enciende.
Extra Shine™: Se utiliza en combinación con un ciclo de lavado (excepto Enjuague), la opción Extra Brillo eleva la temperatura y se extiende el tiempo de
secado para mejorar aún más resultados de secado y proporcionar un acabado
brillante.
* depende del modelo
13
Esta opción le permite retrasar el tiempo de inicio de su lavadora
: Reduce el tiempo de ciclo de hasta un 25% manteniendo al
Page 67

Informations sur les programmes de lavage
Nota: Para ahorrar energía, este lavavajillas tiene EcoSense ® donde los sensores en el
lavavajillas ajustar automáticamente la longitud, la temperatura y el agua del ciclo de
cambios en función de la cantidad de restos de alimentos y la temperatura del agua de
entrada. El "Control Inteligente" toma decisiones que pueden hacer que el tiempo de
ciclo y el consumo de agua para ajustar de manera intermitente. Veces el ciclo de lavado
se basan en 120 ° F suministro de agua. Si el suministro de agua en los hogares es dife-
rente a 120 ° F, tiempos de ciclo de su lavavajillas pueden ser afectados.
Tabla 2 - Información sobre los ciclos de lavado
Heavy Auto Normal Speed60™ Rinse
tiempo del ciclo 110-135 min 105-129 min 130-135 min 60 min 9 min
consumo de
agua
temperatura del
lavado
temperatura de
enjuague
SpeedPerfect™
tiempo del ciclo 95-110 min 75-90 min 95-105 min n/a n/a
water
consumption
Delicate
tiempo del ciclo 105-110 min 90-105 min 100-120 min n/a n/a
water
consumption
Sanitize
tiempo del ciclo 130-150 min 125-150 min 135-155 min n/a n/a
water
consumption
18.6-24.2 L
4.9-6.4 gal
66-71°C
150-160°F
72°C
162°F
16.3-20.5 L
4.3-5.5 gal
18.6-24.2 L
4.9-6.4 gal
18.6-24.2 L
4.9-6.4 gal
13.1-24.5 L
3.5-6.5 gal
53-66°C
127-150°F
67°C
153°F
16.1-20.0 L
4.3-5.3 gal
13.1-24.5 L
3.5-6.5 gal
13.1-24.5 L
3.5-6.5 gal
8.8-20.8 L
2.4-5.5 gal
45-55°C
113-131°F
69°C
156°F
16.6-21.1 L
4.4-5.6 gal
8.8-20.8 L
2.4-5.5 gal
8.8-20.8 L
2.4-5.5 gal
14.3 L
3.8 gal
50°C
122°F
70°C
158°F
n/a n/a
n/a n/a
n/a n/a
incoming
incoming
4.1 L
1.1 gal
Extra Shine™
tiempo del ciclo 130-150 min 125-150 min 135-155 min 84 min n/a
water
consumption
Nota: Únicamente los ciclos desinfectantes han sido diseñados para cumplir los requisitos para
el grado 6 respecto de la eficacia de la remoción de la suciedad y de la desinfección. No existe
intención alguna, directa ni indirecta, de que todos los ciclos pasen las pruebas de rendimiento
de desinfección
18.6-24.2 L
4.9-6.4 gal
.
13.1-24.5 L
3.5-6.5 gal
8.8-20.8 L
2.4-5.5 gal
14.3 L
3.8 gal
n/a
14
Page 68

Cómo operar la lavadora de platos
SHE53T5xUC*
B
A
C
SHE53TFxUC*
B
A
C
SHE53TLxUC*
B
A
C
SHP53T55UC, SHX53T55UC
B
A
B
A
SHV53T53UC
B
A
SHV53TL3UC
B
SHX53TL5UC
A
* “x” puede ser cualquier número
15
C
C
C
C
Page 69

NOTA: Para los modelos con controles ocultos, la puerta debe abrirse antes
de cambiar los ajustes y se cierra después de cambiar la configuración.
AVISO: Tenga cuidado al abrir la puerta durante un ciclo de funcionamiento. El agua caliente puede salpicar. Abra la puerta lentamente.
Para poner la lavadora de platos en funcionamiento
1 Encienda la unidad presionado [On/Off]. El LED del último ciclo
seleccionado titila.
2 Ahora puede seleccionar un ciclo de lavado.
3 Presione [Start].
Para cancelar un ciclo
1 Presione y presione [Start] y manténgalo presionado durante,
aproximadamente, 4 segundos hasta que “0:01” titile en la pan-
talla.
2 Cierre la puerta. El ciclo dura aproximadamente 1 minuto.
3 Presione [On/Off].
Interrumpir el ciclo
1 Abra la puerta y presione el botón [On/Off].
2 Para continuar con el programa, vuelva a pulsar el botón [ON/
OFF] y cierre la puerta.
Señal de ciclo completado
1 Encienda la unidad presionando [ON/OFF].
2 Mantenga presionado el botón “A” y presione [START] y manténgalo pre-
sionado hasta que la pantalla indique “H:00”.
3 Suelte ambos botones.
4 Presione “A” hasta que la pantalla indique “b:02”.
5 Presione “C” para aumentar o disminuir el tono “b:00” = apagado y
“b:03” = más fuerte.
6 Presione [START] para guardar la programación.
Inicio con retraso
Le permite retrasar el tiempo de inicio de su lavadora de platos 24 horas.
1 Abra la puerta y presione el botón [On/Off].
2 Presione el botón [Delay] hasta que el tiempo indicado coincida con sus
requerimientos.
h:01 = 1 hora y h:24 = 24 horas
3 Presione el botón [START], la programación del temporizador está acti-
vada.
Para eliminar la programación del temporizador:
1 Presione el botón [+] hasta que el visualizador de programación del tem-
porizador salte a “h:01”.
2 Presione el botón [START] y cierre la puerta.
16
Page 70

Child Lock (depende del modelo)
1 Start the desired cycle.
2 Hold down the button that says “Child Lock” underneath it for
approximately 4 seconds until the display reads “CL”.
3 The “CL” will be indicated now if any button is pressed and the pro-
gram will not be reset.
To deactivate the child lock:
1 Hold down the “Child Lock” button for approximately 4 seconds until
the display no longer reads “CL”.
Secado intensivo (depende del modelo)
El enjuague final utiliza una temperatura mayor que mejora el resultado
del secado.
1 Abra la puerta y presione el botón [On/Off].
2 Mantenga presionado el botón “A” y presione [START] y manténgalo
presionado hasta que la pantalla indique “H:00”.
3 Suelte ambos botones.
4 Presione “A” hasta que la pantalla indique “d:00”.
5 Presione “C” para encender el secado intensivo “d:01” = encendido
y “d:00” = apagado
6 Presione [START] para guardar la programación y cierre la puerta.
Energía auto apagado (depende del modelo)
Para ahorrar energía, el lavaplatos se da vuelta de 1 minuto después de
los extremos del ciclo de la colada. La energía auto apagado se puede ajustar desde P: 00 a P: 02.
Para cambiar el ajuste de la fábrica (P: 01):
1 Abra la puerta y presione el botón [On/Off].
2 Mantenga presionado el botón “A” y presione [START] y manténgalo
presionado hasta que la pantalla indique “H:00”.
3 Suelte ambos botones.
4 Presione “A” hasta que la pantalla indique “P:01”.
5 Presione “C” para seleccionar la programación deseada.
P:00 = el lavaplatos no apaga automáticamente
P:01 = apaga automáticamente después de 1 minuto
P:02 = apaga automáticamente después de 120 minutos (2 horas)
6 Guarde la programación seleccionada presionando [START] y cierre
la puerta.
17
Page 71

Cuidado y mantenimiento
Una inspección y mantenimiento regular de su aparato ayudará a prevenir
fallas. Esto ahorra tiempo y evita problemas.
Condición general de la máquina
Nunca use un sistema de limpieza con vapor para limpiar su lavadora de
platos. El fabricante no se hace responsable de daños consecuenciales.
Limpie el frente del aparato y el tablero regularmente con un paño húmedo; puede usar un poco de agua y líquido. No use esponjas con una
superficie áspera o detergentes abrasivos ya que éstos pueden rayar la
superficie.
Aparatos de acero inoxidable: Para evitar la corrosión evite el uso de
paños con pelusa o lávelos cuidadosamente varias veces antes de usarlos
por primera vez.
Filtros
El sistema de filtración consiste en un filtro de
malla ancha, un filtro fino plano y un microfiltro.
Los filtros mantienen objetos ajenos grandes en
el agua de enjuague lejos de la bomba. Estos
objetos ajenos pueden ocasionalmente tapar los
filtros.
• Desenrosque el cilindro del filtro como se
muestra y saque el sistema de filtración.
Conulte Figuras 10-11.
• Quite los residuos y lave los filtros bajo agua
de grifo.
• Vuelva a instalar el sistema de filtración en el
orden inverso y asegúrese que las marcas de
las flechas queden en lados opuestos después
de cerrar el sistema de filtración.
Figure 10
Figure 11
Brazos rociadores
Revise si las boquillas en los brazos rociadores
están tapadas.
• Desenrosque el brazo rociador superior.
• Quite el brazo rociador inferior. Consulte Figura 12.
Figure 12
18
Page 72

Bomba de aguas residuales
Restos alimenticios grandes en el agua de enjuague que no son retenidos por los filtros pueden tapar la bomba para aguas residuales. El
agua de enjuague no es vaciado y cubre los filtros.
En este caso:
• Desconecte el aparato de la fuente de ali-
Figure 13
mentación.
• Quite los filtros.
• Saque el agua con una taza o use una
esponja si se requiere.
• Utilizando una cuchara, levante la cubierta
de la bomba (como se muestra) hasta que
escucha un clic, luego tome la cubierta por
la pestaña y jálela primero hacia arriba
Figure 14
hasta que se detenga y luego jálela hacia
adelante. Consulte Figuras 13-14.
• Revise el compartimiento interior y quite
todos los objetos ajenos.
• Coloque la cubierta en su posición original,
&OLFN
empújela y ciérrela.
• Instale los filtros.
Preparación de la unidad para las vacaciones
Antes de salir de vacaciones durante el clima más cálido, además de
apagar la válvula principal, también se corte el suministro de agua en el
punto más cercano a la lavavajillas. Si el clima es más frío, por favor,
siga las instrucciones para el invierno su unidad por debajo.
Preparación para el invierno su unidad
Si el lavavajillas vaya a utilizarla durante un periodo prolongado de
tiempo en un lugar expuesto a temperaturas de congelación (casa de
vacaciones o durante un viaje), haga que su lavavajillas para el invierno
por un servicio profesional autorizado.
19
Page 73

Autoayuda
Problem Cause Action
La lavadora
de platos no
se pone en
funcionamiento.
La pantalla
no se ilumina
La lavadora
de platos
parece funcionar
durante un
tiempo prolongado
1. Es posible que la puerta no esté
bien trabada.
2. Es posible que la unidad no esté
encendida.
3. Es posible que la unidad no se haya
reprogramado o que un ciclo anterior
no se haya completado.
4. Está activada la opción de inicio con
retraso.
5. La fuente de alimentación eléctrica
de la lavadora de platos está interrumpida o se ha quemado un fusible.
6. Es posible que la puerta se haya cerrado sin antes seleccionar un ciclo.
7. Es posible que el suministro de agua
no esté abierto.
1. Es posible que se haya quemado un
fusible o que se haya desconectado el
disyuntor.
2. La puerta no está cerrada o trabada.
Nota: En el caso de los modelos con
controles en la parte superior de la
puerta, la pantalla únicamente se ilumina cuando la puerta se abre y los
controles están visibles.
1. El agua de entrada no es lo suficientemente caliente.
2. El tiempo del ciclo puede variar
debido a la suciedad y a las condiciones del agua.
3. El dispensador de agente de
enjuague está vacío.
4. La lavadora de platos está conectada a
un suministro de agua fría.
Nota: Consulte la sección “Información
sobre los ciclos de lavado” incluida en
este manual para conocer la duración
típica de los ciclos.
1. Cierre la puerta por completo.
2. Accione el interruptor de alimentación eléctrica principal para
encender la unidad.
3. Para reprogramar, consulte la sección “Cómo cancelar o cambiar el
ciclo” incluida en este manual.
4. Para reprogramar, consulte la sección "Inicio con retraso" incluida en
este manual.
5. Verifique el disyuntor.
6. Seleccione un ciclo y cierre la
puerta.
7. Verifique el suministro de agua y
ábralo.
1. Verifique el fusible o la caja de
disyuntores y reemplace el fusible o
restablezca el disyuntor, si fuera
necesario.
2. Asegúrese de que la puerta esté
bien trabada y completamente cerrada.
1. Antes de iniciar un ciclo, deje correr el grifo de agua caliente del
fregadero más cercano a la lavadora
de platos.
2. Los sensores que se encuentran
en la lavadora de platos aumentan
automáticamente el tiempo del ciclo
para asegurar un buen lavado
cuando se detecta mucha suciedad.
3. Agregue agente de enjuague.
4. Verifique si la lavadora de platos
está conectada a la tubería del suministro de agua caliente.
Dishes are
not getting
dry enough
1. Rinse agent dispenser is empty
2. Improper loading of dishes
3. Selected cycle does not include drying
Note: Plastic or Teflon do not typically dry as well
as other items due to their inherent properties.
1. Add rinse agent - the use of rinse agent
improves drying
2. Rearrange load to ensure items are not
nesting (see “Loading the Dishwasher”
section of the manual)
3. Rinse cycle does not include drying
Note: Select models offer an extra heating
option to improve drying performance.
20
Page 74

Problem Cause Action
Los platos
no están lo
suficientemente
limpios
Vetas en los
utensilios
de vidrio o
residuos en
los platos
1. El movimiento del brazo rociador
está obstruido.
2. Las boquillas del brazo rociador
están tapadas.
3. Uso inadecuado de detergentes.
4. Los filtros podrían estar tapados.
5. Los platos están unos dentro de
otros o cargados con muy poca distancia entre sí.
6. El ciclo de lavado seleccionado no
es adecuado para las condiciones de
los residuos de alimentos.
1. Programación incorrecta del
agente de enjuague.
1. Asegúrese de que el movimiento
de los brazos rociadores no esté bloqueado girándolos a mano.
2. Retire los brazos rociadores y
límpielos de acuerdo con el punto
de la sección Cuidado y mantenimiento de este manual.
3. Aumente o disminuya la cantidad
de detergente, según el nivel de
dureza del agua. Consulte la tabla 1.
4. Limpie los filtros.
5. Reacomode la carga de manera tal
que el rocío del agua pueda alcanzar
todos los artículos que están en la
lavadora de platos. Consulte también la sección “Cómo cargar la lavadora de platos” de este manual.
6. Consulte la sección “Información
sobre los ciclos de lavado” incluida
en la sección Cómo operar la lavadora de platos de este manual.
1. Según el nivel de dureza del
agua, ajuste el dispensador de
agente de enjuague. Consulte la
sección “Cómo agregar detergente y agente de enjuague”
incluida en este manual para realizar ajustes.
21
Page 75

Problem Cause Action
Olor 1. Hay desechos de alimentos en la
parte inferior de la lavadora de platos.
2. Hay partículas de alimentos cerca
del sello de la puerta.
3. Se dejaron platos demasiado tiempo
en la unidad antes de hacer funcionar
un ciclo.
4. Hay agua residual en la parte inferior
de la lavadora de platos.
5. La manguera de drenaje está obstruida.
La lavadora
de platos
no se está
llenando
con agua.
1. Hay una restricción en el sistema de
suministro de agua.
2. El ciclo de lavado anterior no se
completó.
3. Está activada la opción de inicio con
retraso.
4. El suministro de agua de su hogar
está cerrado
1. Retire los filtros y límpielos de
acuerdo con la sección “Verificar y
limpiar el sistema de filtros” de este
manual.
2. Consulte “Limpiar el empaque de
la puerta y el sello de la puerta” en
la sección Cuidado y mantenimiento
de este manual.
3. Haga funcionar un ciclo de
enjuague y espera si no planea lavar
los platos inmediatamente.
4. Asegúrese de que la unidad haya
drenado completamente después
del último ciclo. Consulte la sección
“Cómo cancelar o cambiar el ciclo”
de este manual.
5. Llame a personal calificado para
que retire cualquier obstrucción en
la manguera de drenaje.
Nota: Si el olor aún persiste, haga
funcionar el ciclo normal/regular
hasta que llegue al ciclo de
enjuague, interrumpa el ciclo y coloque una taza de 8 oz con una solución de vinagre blanco destilado en
la rejilla superior y, luego, deje que
el ciclo termine.
1. Asegúrese de que la válvula de
suministro de agua (por lo general,
ubicada debajo del fregadero de la
cocina) esté abierta y verifique que
la línea de suministro de agua no
esté plegada ni tapada.
2. Consulte la sección “Cómo operar
la lavadora de platos” de este manual.
3. Cancele la opción de inicio con
retraso o espere hasta que se complete (finalice) el tiempo de retraso
del inicio. Consulte la sección "Inicio
con retraso" de este manual.
4. Abra el suministro de agua de su
hogar
El panel con
botones
está decolorado o marcado
1. Se usó un limpiador abrasivo 1. Utilice detergentes suaves con un
paño suave humedecido.
22
Page 76

Servicio al cliente
Su lavadora de platos Bosch no requiere ningún otro cuidado especial además
del que se describe en la sección Cuidado y mantenimiento de este manual. Si
tiene un problema con su lavadora de platos, antes de llamar al servicio técnico, consulte la sección Autoayuda en el manual. Si es necesario realizar el
servicio técnico, comuníquese con su distribuidor o instalador, o con un centro de servicio técnico autorizado. No intente reparar el electrodoméstico por
sus propios medios. Todo trabajo realizado por personal no autorizado puede
invalidar la garantía.
Si tiene un problema con su lavadora de platos Bosch y no está conforme con
el servicio técnico que ha recibido, siga los pasos que aparecen a continuación hasta que se corrija el problema, y usted quede conforme:
1 Llámenos al 1-800-944-2904
2 Comuníquese con Servicio al cliente por medio de nuestro sitio web:
www.bosch-home.com/us or www.bosch-appliances.ca
3 Comuníquese con su instalador o con el contratista de servicio técnico autor-
izado por Bosch de su área.
4 Envíenos una carta: BSH Home Appliances Corporation
1901 Main Street
Irvine, CA 92614
Asegúrese de incluir la información de su modelo, así como una explicación
del problema y la fecha en que este se originó.
Encontrará la información del número de modelo y de serie en la etiqueta que
se encuentra en el borde de la puerta de la lavadora de platos.
Además, si nos envía una carta, incluya un número de teléfono al que podamos
llamarlo durante el día.
Haga una copia de su factura y guárdela con este manual. A fin de recibir el
servicio técnico de la garantía, el cliente debe presentar un comprobante de
compra.
23
Page 77

Información sobre la garantía
Qué cubre esta garantía y a quiénes se aplica: La garantía limitada otorgada por BSH Home Appliances
(“Bosch”) en esta Declaración de Garantía Limitada del Producto se aplica únicamente a las lavadoras de platos Bosch (el “Producto”) que se le ha vendido a usted, el primer comprador usuario, siempre que el Producto
haya sido comprado: (1) para su uso doméstico (no comercial) normal y haya sido utilizado en todo momento
únicamente para fines domésticos normales; (2) nuevo, en una tienda minorista (que no sea un producto de
exhibición, ni un producto vendido "en las condiciones en que se encuentra" ni un modelo devuelto anteriormente) y no esté destinado para reventa ni uso comercial; y (3) dentro de los Estados Unidos o Canadá, y haya
permanecido en todo momento dentro del país de compra original. Las garantías establecidas en el presente
se aplican únicamente al primer comprador del Producto y no son transferibles.
• Asegúrese de devolver su tarjeta de registro; si bien esto no es necesario para hacer efectiva la cobertura de
la garantía, es la mejor manera de que Bosch le notifique en el caso poco probable de que se emita un aviso de
seguridad o se retire del mercado un producto.
Cuánto dura la garantía: Bosch garantiza que el Producto no tiene defectos en los materiales ni en la mano de
obra durante un período de trescientos sesenta y cinco (365) días a partir de la fecha de compra. El período
precedente comienza a regir a partir de la fecha de compra y no se interrumpirá, dejará sin efecto, extenderá ni
se suspenderá por ningún motivo. Los costos de mano de obra y de envío se incluyen en esta cobertura básica.
Garantía limitada extendida: Bosch también otorga las siguientes garantías limitadas adicionales:
• Garantía limitada de 5 años sobre los componentes electrónicos: Bosch reparará o reemplazará cualquier
microprocesador o tablero de circuitos impreso de Bosch que tenga defectos en los materiales o en la mano de
obra (sin incluir los cargos por mano de obra).
• Garantía limitada de 5 años sobre las rejillas para platos: Bosch reemplazará la rejilla para platos superior o
inferior (sin incluir los componentes de las rejillas) si la rejilla tiene defectos en los materiales o en la mano de
obra (sin incluir los cargos por mano de obra).
• Garantía de por vida contra la oxidación del acero inoxidable: Bosch reemplazará su lavadora de platos por
una del mismo modelo o de un modelo actual que tenga una funcionalidad sustancialmente equivalente o
mejor, si el recubrimiento interno se oxidara (sin incluir los cargos por mano de obra). Bosch reemplazará la
puerta de acero inoxidable si la puerta se oxidara (sin incluir los cargos por mano de obra).
• El período precedente comienza a regir a partir de la fecha de compra y no se interrumpirá, dejará sin efecto,
extenderá ni se suspenderá por ningún motivo.
Reparación/Reemplazo como único recurso: Durante el período de esta garantía, Bosch o uno de sus proveedores de servicio técnico autorizados reparará su Producto sin cargo para usted (con sujeción a determinadas limitaciones especificadas en el presente) si se prueba que su Producto ha sido fabricado con un
defecto en los materiales o en la mano de obra. Si se ha intentado de manera razonable reparar el Producto
sin éxito, Bosch reemplazará su Producto (es posible que usted tenga disponibles modelos mejorados, a
entera discreción de Bosch, por un cargo adicional). Todas las piezas y los componentes extraídos serán
propiedad de Bosch, a su entera discreción. Todas las piezas reemplazadas y/o reparadas se considerarán
como la pieza original a los fines de esta garantía, y esta garantía no se extenderá con respecto a dichas piezas. En virtud del presente, la única y exclusiva responsabilidad y obligación de Bosch es reparar únicamente
un Producto que tenga defectos de fábrica, a través de un proveedor de servicio técnico autorizado por
Bosch, durante el horario normal de oficina. Por cuestiones de seguridad y daños materiales, Bosch recomienda especialmente que no intente reparar el Producto usted mismo ni use un centro de servicio técnico
no autorizado; Bosch no tendrá responsabilidad ni obligación alguna por las reparaciones o trabajos realizados por un centro de servicio técnico no autorizado. Si usted opta por que una persona que no sea un proveedor de servicio técnico autorizado trabaje en su Producto, ESTA GARANTÍA SE ANULARÁ
AUTOMÁTICAMENTE. Los proveedores de servicio técnico autorizados son aquellas personas o compañías
que han sido especialmente capacitadas para manejar los productos Bosch y que tienen, según el criterio de
Bosch, una reputación de servicio al cliente y una capacidad técnica superiores (debe tener en cuenta que
son entidades independientes y que no son agentes, socios, afiliados ni representantes de Bosch). Sin perjuicio de lo que antecede, Bosch no tendrá responsabilidad ni obligación alguna por el Producto si este se
encuentra en un área remota (a más de 100 millas de un proveedor de servicio técnico autorizado) o en un
lugar, área circundante o entorno que no sea accesible por medios razonables o que sea peligroso, hostil o
arriesgado; en cualquier caso, a su solicitud, Bosch de todas maneras pagará por la mano de obra y por las
piezas, y enviará dichas piezas al proveedor de servicio técnico autorizado más cercano, pero usted seguirá
siendo totalmente responsable del tiempo de viaje u otros cargos especiales de la compañía de servicio técnico, siempre que esta acepte hacer la visita de servicio técnico.
24
Page 78

Producto fuera de garantía: Bosch no tiene obligación alguna, en virtud de la ley o por otro motivo, de
otorgarle ninguna concesión, incluidas reparaciones, prorrateos o reemplazo del Producto, con posterioridad al vencimiento de esta garantía.
Exclusiones de la garantía: La cobertura de la garantía descrita en el presente excluye todos los defectos o daños que no fueron provocados directamente por Bosch, incluidos, entre otros, uno o más de los
siguientes: (1) uso del Producto de manera distinta del uso normal, habitual y previsto (incluida, entre
otras, cualquier forma de uso comercial, uso o almacenamiento en exteriores de un producto diseñado
para interiores, uso del Producto en aeronaves o embarcaciones); (2) conducta indebida, negligencia,
uso indebido, abuso, accidentes, descuido, operación inadecuada, omisión de mantener, instalación
inadecuada o negligente, adulteración, omisión de seguir las instrucciones de operación, manipulación
inadecuada, servicio técnico no autorizado (incluidos “arreglos” o exploración de los mecanismos internos del electrodoméstico realizados por uno mismo) por parte de cualquier persona; (3) ajuste, alteración o modificación de cualquier tipo; (4) incumplimiento de los códigos, reglamentaciones o leyes
aplicables de electricidad, plomería y/o construcción estatales, locales, municipales o de condado,
incluida la omisión de instalar el producto cumpliendo estrictamente con los códigos y reglamentaciones locales de construcción y protección contra incendios; (5) desgaste habitual, derrames de alimentos, líquidos, acumulaciones de grasa u otras sustancias que se acumulen sobre el Producto, dentro o
alrededor de este; y (6) cualquier fuerza y factor externo, elemental y/o ambiental, incluidos, entre
otros, lluvia, viento, arena, inundaciones, incendios, aludes de lodo, temperaturas bajo cero, humedad
excesiva o exposición prolongada a la humedad, rayos, sobrecargas eléctricas, fallas estructurales alrededor del electrodoméstico y caso fortuito. En ningún caso, Bosch tendrá responsabilidad ni obligación
alguna por los daños ocasionados a los bienes circundantes, incluidos los gabinetes, pisos, techos y
otras estructuras u objetos que se encuentren alrededor del producto. También se excluyen de esta
garantía las rayas, hendiduras, abolladuras menores y daños estéticos en superficies externas y piezas
expuestas; productos en los que los números de serie hayan sido alterados, modificados o eliminados;
visitas de servicio técnico para enseñarle a usar el Producto o visitas en las que se determine que no hay
ningún problema con el Producto; corrección de los problemas de instalación (usted es el único responsable de cualquier estructura y soporte del Producto, incluidas todas las instalaciones de electricidad y
plomería o demás instalaciones de conexión, de la correcta instalación en bases/pisos y de cualquier
alteración, incluidos, entre otros, gabinetes, paredes, pisos, repisas, etc.); y el restablecimiento de
disyuntores o fusibles.
EN LA MEDIDA PERMITIDA POR LEY, ESTA GARANTÍA ESTABLECE SUS RECURSOS EXCLUSIVOS
CON RESPECTO AL PRODUCTO, INDEPENDIENTEMENTE DE QUE LA RECLAMACIÓN SEA CONTRACTUAL O EXTRACONTRACTUAL (INCLUIDA LA RESPONSABILIDAD OBJETIVA O LA NEGLIGENCIA), O
DE CUALQUIER OTRO MODO. ESTA GARANTÍA REEMPLAZA TODAS LAS DEMÁS GARANTÍAS
EXPRESAS O IMPLÍCITAS. LAS GARANTÍAS IMPLÍCITAS POR LEY, YA SEA DE COMERCIABILIDAD O
APTITUD PARA UN FIN ESPECÍFICO, O DE CUALQUIER OTRO TIPO, TENDRÁN VIGENCIA ÚNICAMENTE POR EL PERÍODO DE VIGENCIA DE LA PRESENTE GARANTÍA LIMITADA EXPRESA. EN
NINGÚN CASO, EL FABRICANTE SERÁ RESPONSABLE POR LOS DAÑOS CONSECUENTES, ESPECIALES, INCIDENTALES, INDIRECTOS, POR "PÉRDIDAS COMERCIALES" Y/O DAÑOS PUNITIVOS, PÉRDIDAS O GASTOS, INCLUIDOS, ENTRE OTROS, TIEMPO FUERA DEL TRABAJO, HOTELES Y/O
COMIDAS EN RESTAURANTES, GASTOS DE REMODELACIÓN QUE SUPEREN LOS DAÑOS DIRECTOS,
QUE DEFINITIVAMENTE HAYAN SIDO CAUSADOS DE MANERA EXCLUSIVA POR BOSCH O DE OTRO
MODO. ALGUNOS ESTADOS NO PERMITEN LA EXCLUSIÓN O LIMITACIÓN DE LOS DAÑOS INCIDENTALES O CONSECUENTES, Y ALGUNOS ESTADOS NO PERMITEN LIMITACIONES CON RESPECTO AL
PLAZO DE VIGENCIA DE UNA GARANTÍA IMPLÍCITA; POR LO TANTO, ES POSIBLE QUE LAS LIMITACIONES PRECEDENTES NO SE APLIQUEN. ESTA GARANTÍA LE OTORGA DERECHOS LEGALES
ESPECÍFICOS, Y TAMBIÉN PUEDEN CORRESPONDERLE OTROS DERECHOS QUE PUEDEN VARIAR
SEGÚN EL ESTADO. Ningún intento de alterar, modificar o enmendar la presente garantía entrará en
vigencia, a menos que sea autorizado por escrito por un ejecutivo de BSH. Cómo obtener el servicio técnico de la garantía:PARA OBTENER EL SERVICIO TÉCNICO DE LA GARANTÍA PARA SU PRODUCTO, DEBE
COMUNICARSE CON EL CENTRO DE SERVICIO TÉCNICO AUTORIZADO POR BOSCH MÁS CERCANO,
LLAMAR AL 800-944-2904.
25
Page 79

BSH reserves the right to change specifications or design without notice. Some models are certified for use in
Canada. BSH is not responsible for products which are transported from the United States for use in Canada.
Check with your local Canadian distributor or dealer.
BSH se réserve le droit de modifier les données techniques ou le design sans préavis. Certains modèles sont
certifiés pour une utilisation au Canada. BSH n’est pas responsable pour les produits transportés des États-
Unis pour une utilisation au Canada. Vérifier auprès d’un marchand ou distributeur canadien.
9000 752 548 Rev A
BSH Home Appliances Corporation
1901 Main Street
Irvine, CA 92614
 Loading...