

Page 1

Dishwasher
SGE78C55UC
[en-us] Use and Care Manual
Register your
appliance and join
the Bosch
family of perks:
bosch-home.com/us/
mybosch
Page 2

en-us
Table of contents
1 IMPORTANT SAFETY
INSTRUCTIONS................... 4
1.1 Safety definitions................. 4
1.2 General information............. 4
1.3 Intended use ....................... 5
1.4 Restrictive Use.................... 5
1.5 Grounding instructions ........ 5
1.6 Safe use.............................. 6
1.7 Risk to children ................... 8
1.8 State of California
Proposition 65 Warnings ..... 8
2 Preventing material
damage ................................ 9
3 Environmental protection
and energy-saving .............. 9
3.1 Saving energy ..................... 9
3.2
Zeolith drying ................. 9
3.3 AquaSensor ...................... 10
4 Familiarizing yourself
with your appliance........... 11
4.1 Appliance .......................... 11
4.2 Controls ............................ 13
5 Dishwasher Cycles ........... 15
5.1 Energy Guide .................... 17
5.2
Favorite ........................ 17
6 Options .............................. 18
7 Features............................. 18
7.1 Upper rack ........................ 19
7.2 Lower rack ........................ 19
7.3 Silverware Basket ............. 20
7.4 Silverware drawer ............. 20
7.5 Cup shelf........................... 20
7.6 Flip tines ........................... 21
7.7 Small items holder ............ 21
7.8 Bottle holder...................... 21
7.9 Rack heights ..................... 21
8 Before using for the first
time .................................... 22
8.1 Initial use........................... 22
9 Water softening system.... 22
9.1 Overview of water
hardness settings .............. 22
9.2 Setting the water
softening system ............... 23
9.3 Special Dishwasher Salt.... 23
9.4 Switching off the water
softening system ............... 24
10 Rinse aid system............. 24
10.1 Rinse aid ......................... 24
10.2 Setting the amount of
rinse aid .......................... 25
10.3 Switching the rinse aid
system off........................ 25
11 Detergent ......................... 25
11.1 The correct detergents .... 25
11.2 Incompatible detergents .. 26
11.3 Information on
Detergent ........................ 26
11.4 Adding Detergent ............ 27
11.5 Detergent table................ 27
12 Dishware .......................... 27
12.1 Damage to glass and
dishware.......................... 28
12.2 Loading dishware ............ 28
12.3 Removing dishware......... 29
12.4 Loading patterns ............. 30
13 Basic Operation............... 31
13.1 Protection against
unintentional operation .... 31
13.2 Switching on the
appliance......................... 31
13.3 Setting a cycle................. 31
13.4 Setting options ................ 31
13.5 Setting the electronic
delay time........................ 31
13.6 Starting the wash cycle ... 32
13.7 Activating the button
lock ................................. 32
13.8 Deactivating the button
lock ................................. 32
2
Page 3

en-us
13.9 Interrupting the wash
cycle ............................... 32
13.10 Terminating the wash
cycle ............................. 32
13.11 Switching off the
appliance ...................... 32
14 Basic settings.................. 34
14.1 Overview of the basic
settings ........................... 34
14.2 Changing the basic
settings ........................... 35
15 HomeConnect® ............. 35
15.1 HomeConnect® quick
start................................. 36
15.2 HomeConnect®
settings ........................... 36
15.3
Remote Start ............... 36
15.4 Remote Diagnostics ....... 37
15.5 Software update.............. 37
15.6 Data Protection ............... 37
16 Cleaning and
maintenance.................... 38
16.1 Cleaning the tub.............. 38
16.2 Cleaning agent................ 38
16.3 Tips on appliance care .... 38
16.4
Machine Care ........... 38
16.5 Filter system.................... 40
16.6 Cleaning the spray arms.. 41
20 Technical specifications . 58
20.1 Information regarding
Free and Open Source
Software.......................... 58
21 STATEMENT OF
LIMITED PRODUCT
WARRANTY ..................... 58
21.1 What this warranty
covers & Who it applies
to..................................... 58
21.2 How long the warranty
lasts ................................ 59
21.3 Extended Warranty.......... 59
21.4 Repair/replace as your
exclusive remedy ............ 60
21.5 Out of warranty product... 60
21.6 Warranty exclusions ........ 61
21.7 Obtaining warranty
service............................. 62
21.8 Product information ......... 62
17 Troubleshooting.............. 42
18 Transportation, storage
and disposal.................... 55
18.1 Removing the appliance.. 55
18.2 Vacation and Storage...... 55
18.3 Transporting the
appliance ........................ 55
18.4 Disposal of your old
appliance ........................ 56
19 Customer Service ........... 56
19.1 Model number (E-Nr.),
production number (FD)
and consecutive
numbering (Z-Nr.) ........... 56
19.2 AquaStop® Pledge ......... 56
3
Page 4
en-us
IMPORTANT SAFETY INSTRUCTIONS
READ AND SAVE THESE INSTRUCTIONS
Read all instructions carefully before use. These precautions will reduce
the risk of electrical shock, fire and injury to persons. When using kitchen
appliances, basic safety precautions must be followed including those in
the following pages.
1.1 Safety definitions
Here you can find explanations of the safety signal words used in this
manual.
WARNING
This indicates that death or serious injuries may occur as a result of nonobservance of this warning.
CAUTION
This indicates that minor or moderate injuries may occur as a result of
non-observance of this warning.
NOTICE:
This indicates that damage to the appliance or property may occur as a
result of non-compliance with this advisory.
Note:This alerts you to important information and/or tips.
1.2 General information
To reduce the risk of fire, electrical shock, or serious injury, observe the
following.
¡ This appliance is provided with installation instructions and this use
and care manual. Read and understand all instructions before using
the appliance.
¡ Keep the manual and the product information in a safe place for future
reference or for the next owner.
¡ Do not connect the appliance if it has been damaged in transit.
4
Page 5

en-us
IMPORTANT SAFETY INSTRUCTIONS
READ AND SAVE THESE INSTRUCTIONS
¡ Severe product damage and/or injury could result from the use of un-
qualified service technicians or non-original parts. All repairs must be
performed by an authorized service provider using only original equipment factory replacement parts.
¡ NSF/ANSI 184 Certified residential dishwashers are not intended for li-
censed food establishments.
1.3 Intended use
Only use this appliance:
¡ for cleaning household dishware.
¡ For normal household use and in enclosed spaces in a residential en-
vironment.
¡ Up to an altitude of 8200 ft (2500 m) above sea level.
1.4 Restrictive Use
This appliance is not intended for use by persons (including children) with
reduced physical, sensory or mental capabilities, or lack of experience
and knowledge, unless they have been given supervision or instruction
concerning use of the appliance by a person responsible for their safety.
1.5 Grounding instructions
This appliance must be grounded to a metal, permanent wiring system or
an equipment grounding conductor must be run with the circuit conductors and connected to the equipment grounding terminal or lead on the
dishwasher. See the Installation Instructions included with this dishwasher for more information on electrical requirements.
WARNING
Improper connection of the equipment grounding conductor can result in
risk of electric shock.
▶ This appliance must be grounded. In the event of a malfunction or
breakdown, grounding will reduce the risk of electric shock by providing a path of least resistance for electric current. This appliance is
5
Page 6

en-us
IMPORTANT SAFETY INSTRUCTIONS
READ AND SAVE THESE INSTRUCTIONS
equipped with a cord having an equipment-grounding conductor.
Check with a qualified electrician or authorized service representative
if you are in doubt whether the appliance is properly grounded.
1.6 Safe use
Follow these safety instructions when using the appliance.
WARNING
To reduce the risk of serious injury, observe the following.
▶ Read all instructions before using this dishwasher.
▶ Use this dishwasher only for its intended function, which is the wash-
ing of household dishware and kitchenware rated as dishwasher safe.
▶ Only use detergents or rinsing agents recommended for use in a dish-
washer, and keep them out of the reach of children.
▶ Do not abuse, sit or stand on the door or dish racks of the dishwasher.
WARNING
Under certain conditions, hydrogen gas may be produced in a hot water
system that has not been used for two weeks or more. Hydrogen gas is
explosive.
▶ Before using a dishwasher that is connected to a hot water system that
has been unused for two weeks or longer, turn on all hot water faucets
and let the water flow from each for several minutes. This will release
any accumulated hydrogen gas. As the gas is explosive, do not smoke
or use an open flame during this time.
WARNING
To avoid risk of electric shock, observe the following.
▶ Only use the appliance in enclosed residential space according to the
installation manual.
▶ Never expose the appliance to intense heat or humidity.
▶ Do not use any steam cleaners or high-pressure cleaners to clean this
appliance. If not followed, excess moisture can accumulate.
6
Page 7

en-us
IMPORTANT SAFETY INSTRUCTIONS
READ AND SAVE THESE INSTRUCTIONS
WARNING
The blow opening of the Zeolith container becomes hot and can cause
burns.
▶ Never touch the blow opening of the Zeolith container.
WARNING
To avoid risk of injury, when loading items to be washed, observe the following.
▶ Locate sharp items so they are not likely to damage the door seal.
▶ Load knives and other sharp utensils with their handles up to reduce
the risk of cut-type injuries.
▶ Do not wash plastic items unless they are marked "dishwasher safe"
or the equivalent. For plastic items not so marked, check the manufacturer's recommendations.
▶ Do not operate your dishwasher unless all enclosure panels are in
place.
▶ Do not tamper with or override controls and interlocks.
WARNING
For safe care and operation of your appliance, observe the following.
▶ Follow the safety instructions and directions for use on the detergent
and rinse aid product labels.
▶ Do not use harsh chemicals such as bleach-based products to clean
your dishwasher. Some bleach-based products can damage your dishwasher and may present health hazards!
▶ Always use caution when opening the door during or following a wash
cycle as hot water or steam may escape. Do not fully open the door
until water noises have stopped and steam has subsided.
▶ To avoid floor damage and possible mold growth, do not allow wet ar-
eas to remain around or under the dishwasher.
7
Page 8
en-us
IMPORTANT SAFETY INSTRUCTIONS
READ AND SAVE THESE INSTRUCTIONS
NOTICE:
Water and power shut off
▶ It is highly recommended for the end user to become familiar with the
procedure to shut off the incoming water supply and the procedure to
shut off the incoming power supply. See the installation instructions or
contact your installer for more information.
1.7 Risk to children
Follow these safety instructions if there are children in your home.
WARNING
To reduce risk of injury to children, observe the following.
▶ Do not allow children to play in or on the dishwasher.
▶ When children become old enough to operate the appliance, it is the
responsibility of the parents/legal guardians to ensure the children are
instructed in safe practices by qualified persons.
▶ Remove the dishwasher door to the washing compartment when re-
moving an old dishwasher for service or discarding.
1.8 State of California Proposition 65 Warnings
This product may contain a chemical known to the State of California,
which can cause cancer or reproductive harm. Therefore, the packaging
of your product may bear the following label as required by California:
8
Page 9
Preventing material damage en-us
Preventing material damage
2 Preventing material
damage
Preventing material damage
NOTICE:
Harsh chemicals such as bleachbased products can damage your
dishwasher.
▶ Do not use harsh chemicals
such as bleach-based products
to clean your dishwasher.
Certain cleaning products may
damage the appliance.
▶ Do not use a steam cleaner.
▶ So as not to scratch the finish
on the appliance, do not use
sponges with a rough surface
or abrasive cleaning agents.
Avoid stainless steel polish
▶ Do not use stainless steel pol-
ish on an anti-fingerprint finish
or a black stainless finish.
Escaping water vapor can damage cabinetry.
▶ When the program ends, let the
appliance cool down a bit be-
fore opening the door.
Protect your appliance from the
elements.
▶ Protect against freezing to
avoid possible damage to the
fill valve. Damage caused by
freezing is not covered by the
warranty.
Special salt for dishwashers can
damage the tub due to corrosion.
▶ To make sure that any special
salt that escapes is washed out
of the tub, add the special salt
to the dispenser for special salt
immediately before the pro-
gram starts.
Detergent may damage the water
softening system.
▶ Only fill the dispenser of the
water softening system with
special dishwasher salt.
Environmental protection and energy-saving
3 Environmental
protection and
energy-saving
Environmental protection and energy-saving
3.1 Saving energy
If you follow these instructions,
your appliance will use less power
and water.
Use the Normal program.
a
The Normal program is energyefficient and environmentally
friendly.
→
"Dishwasher Cycles",
Page15
If you do not have much dishware
to wash, use the additional Half
Load option.
a
The program will adjust to a
lower load and consumption
will be reduced.
Zeolith drying automatically helps
to save energy.
a
→
"Zeolith drying ", Page9
3.2 Zeolith drying
The appliance features a Zeolith
container. Zeolith drying lets you
save energy.
Zeolite is a mineral that can store
moisture and energy and then release them again.
During dishwashing energy is
used to heat up the washing water
and dry the mineral.
During the drying phase, moisture
from the interior of the dishwasher
is stored in the mineral and heat is
released. The heat is blown out
1
1
Depending on the appliance specifications
9
Page 10

en-us Environmental protection and energy-saving
into the interior of the dishwasher
with dry air. This speeds up and
improves drying.
Therefore, zeolith drying is very
efficient.
Note:To avoid impairing Zeolith
drying performance, do not position dishware parts directly in front
of the intake opening or the blow
opening of the Zeolith container.
Do not position heat-sensitive
dishware parts directly in front of
the blow opening of the Zeolith
container.
→
"Appliance", Page11
3.3 AquaSensor
The AquaSensor is an optical
measuring device (light barrier)
which measures the turbidity of
the washing water. You can save
water with the AquaSensor.
The operation of the AquaSensor
depends on the selected cycle. If
the soiling level is high, the washing water is drained off and replaced with fresh water. If the soiling level is lower, the washing water is used in the next rinse, so reducing water consumption by 3-6
liters. In the Auto cycles the temperature and run time are additionally adjusted to the level of
soiling.
10
Page 11
Familiarizing yourself with your appliance en-us
1
15
14
13
12
2
3
4
5
6
7
8
9
10
11
1
2
3
4
Familiarizing yourself with your appliance
4 Familiarizing yourself with your appliance
Familiarizing yourself with your appliance
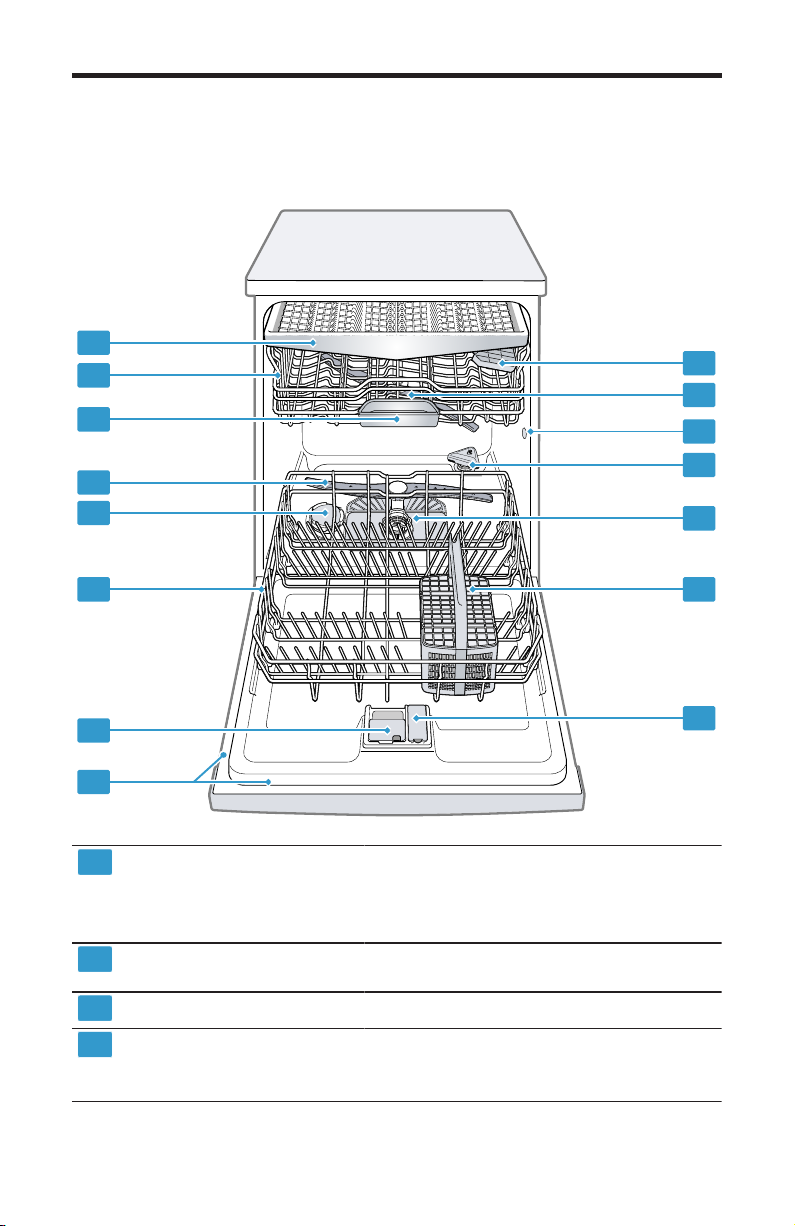
4.1 Appliance
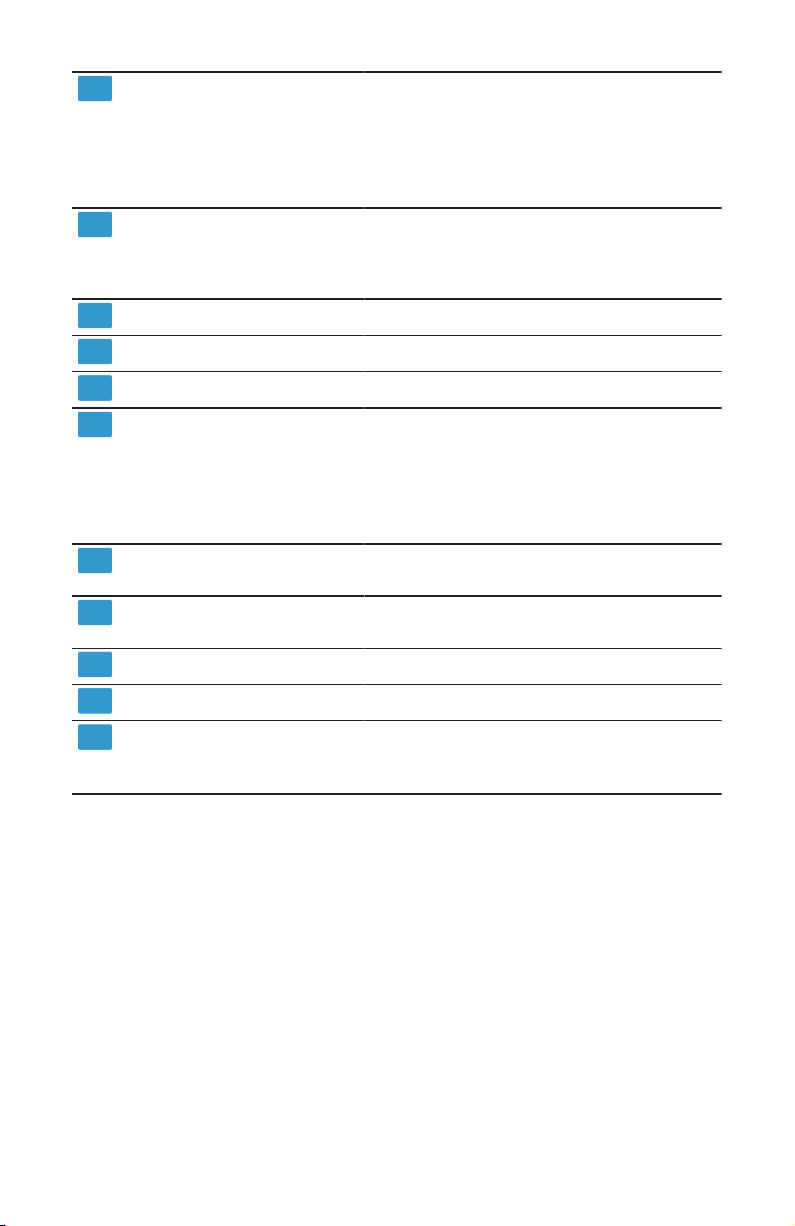
1
Rating plate Rating plate with E number and FD
number →
You will need this data to contact Customer service →
Detergent dispenser Add detergent to the detergent dis-
penser.
Lower rack
Dispenser for special
salt
Depending on the appliance specifications
Lower rack →
Add special salt to the dispenser for
special salt.
→
"Water softening system", Page22
Page56
Page56
Page19
.
.
11
Page 12
en-us Familiarizing yourself with your appliance
5
6
7
8
9
10
11
12
13
14
15
Lower spray arm The lower spray arm washes the dish-
ware in the lower rack.
If the dishware has not been washed
properly, clean the spray arms.
→
"Cleaning the spray arms",
Page41
Detergent tab collecting
tray
Upper rack
During the wash cycle, detergent tabs
automatically drop out of the detergent
dispenser into the tab collecting tray,
where they can dissolve fully.
Upper rack →
Page19
Silverware drawer
Cup shelf
Upper spray arm The upper spray arm washes the dish-
Intake opening of the
Zeolith container
Blow opening of the Zeolith container
Filter system
Silverware basket Silverware basket
Dispenser for rinse aid Rinse aid is added to the dispenser for
1
Depending on the appliance specifications
1
Silverware drawer →
Cup shelf →
ware in the upper rack.
If the dishware has not been washed
properly, clean the spray arms.
→
"Cleaning the spray arms",
Page41
The intake opening is required for Zeolith drying →
The blow opening is required for Zeolith drying →
Filter system →
rinse aid.
→
"Rinse aid system", Page24
Page20
Page9
Page9
Page40
Page20
.
.
12
Page 13
Familiarizing yourself with your appliance en-us
1 2 3 4 5 6 7 8
910111213
1
2
3
4
5
6
7
8
9
10
11
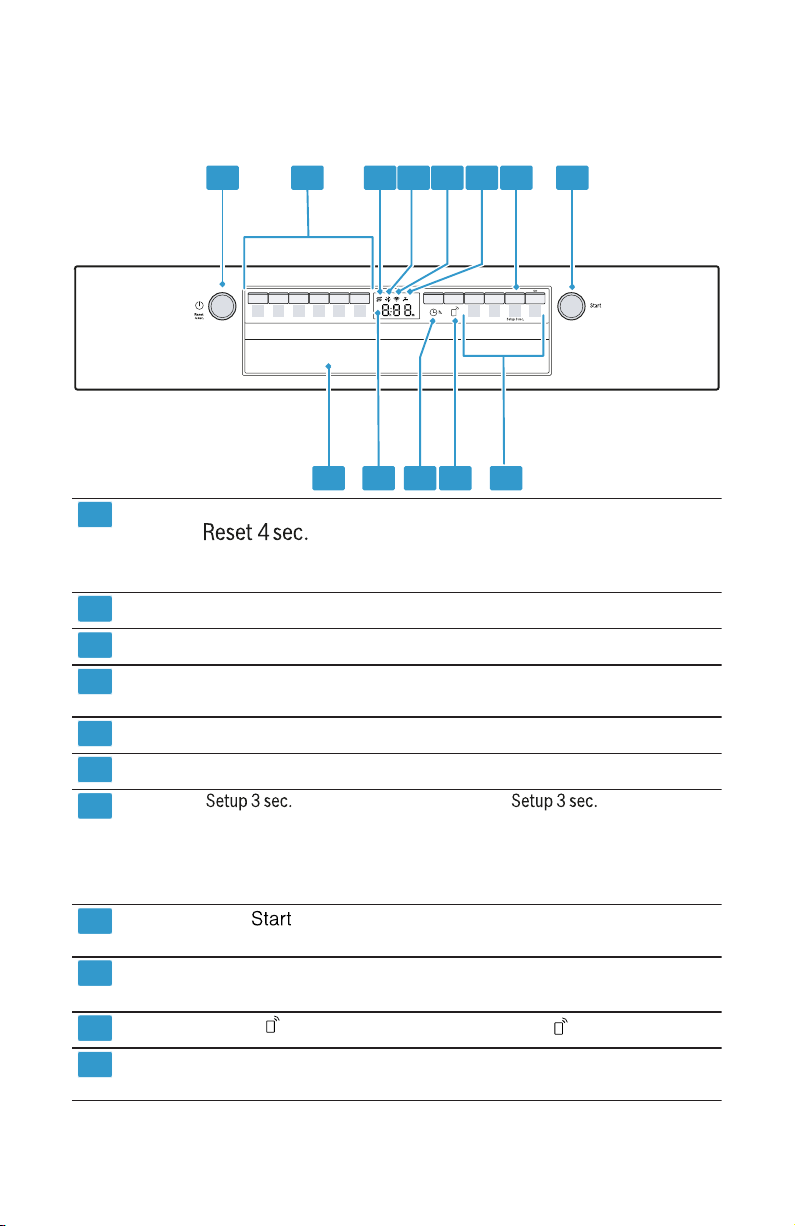
4.2 Controls
You can use the control panel to configure all functions of your appliance and to obtain information about the operating status.
ON/OFF button and reset
button
Cycle buttons
Special salt refill indicator Water softening system
Rinse aid refill indicator Rinse aid system
WLAN display
Water supply display Display for water supply
Button If you press for approx. 3
Start button Starting the wash cycle
Cycle buttons and options
Remote Start
Electronic delay time Setting the electronic delay time
1
Depending on the appliance specifications
Switching on the appliance
Switching off the appliance
Terminating the wash cycle
→
Cycles →
→
Home Connect →
seconds, you can open the basic
settings.
→
Page35
→
Cycles →
Options →
→
→
Page32
Page15
"Adding rinse aid", Page24
Page35
"Changing the basic settings",
Page32
Page15
Page18
"Remote Start ", Page36
Page31
13
Page 14

en-us Familiarizing yourself with your appliance
12
13
Display The display shows information
about the remaining run time or basic settings. You can change the
basic settings via the display and
the setting buttons.
→
"Changing the basic settings",
Page35
Door handle
1
Depending on the appliance specifications
1
Open the appliance door.
14
Page 15

Dishwasher Cycles en-us
Dishwasher Cycles
5 Dishwasher Cycles
Dishwasher Cycles
Below is an overview of the different cycles available on your dishwasher.
The running time may vary depending on the cycle selected. The running
time depends on the water temperature, the quantity of dishware, the
level of dirt and the option selected. The running time will change if the
rinse aid system is switched off or rinse aid needs to be added. The consumption values relate to normal conditions and a water hardness of 16 20 °E. Different influencing factors such as water temperature or pipe
pressure may result in deviations.
Cycle Purpose Cycle sequence Usage
1) Hour/min.
2) Electrical/
kWH
3) Water/gal
Heavy Dishware:
¡ Washing pots
and pans, nonfragile dishware
and silverware
Level of soiling:
¡ Removing stub-
born burned or
dried on food
remnants con-
taining starch
and protein.
Auto Dishware:
¡ Cleaning mixed
dishware and
silverware.
Level of soiling:
¡ Removing com-
mon household
food remnants
lightly dried-on.
Normal Dishware:
¡ Cleaning mixed
dishware and
silverware.
Level of soiling:
¡ Removing com-
mon household
food remnants
lightly dried-on.
Intensive
¡ Pre-Rinse
¡ Cleaning 151 °F –
160 °F
¡ Intermediate rinse
¡ Final rinse 151 °F
¡ Drying
Sensor controlled:
¡ Optimized by sensors
depending on the
soiling of the rinse
water.
Most economical cycle:
¡ Pre-Rinse
¡ Cleaning 127 °F –
136 °F
¡ Intermediate rinse
¡ Final rinse 136 °F
¡ Drying
¡ 1) 2:00-
2:15
¡ 2) 1.100-
1.200
¡ 3) 4.9-6.4
¡ 1) 1:45-
2:15
¡ 2) 0.720-
0.800
¡ 3) 3.4-5.4
Note:The dis-
played cycle
time indicates
an average
value.
¡ 1) 2:10 -
2:20
¡ 2) 0.600 -
0.780
¡ 3) 2.6 -5.6
15
Page 16

en-us Dishwasher Cycles
Cycle Purpose Cycle sequence Usage
1) Hour/min.
2) Electrical/
kWH
3) Water/gal
Delicate Dishware:
¡ Cleaning deli-
cate dishware,
silverware,
temperature-
sensitive plas-
tics, glasses
Particularly gentle:
¡ Pre-Rinse
¡ Cleaning 113 °F -
122 °F
¡ Intermediate rinse
¡ Final rinse 122 °F
¡ Drying
¡ 1) 1:25-
1:35
¡ 2) 0.570-
0.580
¡ 3) 2.5-3.9
and stemware
in the
stemware
holder.
Level of soiling:
¡ Removing com-
mon household
food remnants
lightly dried-on.
Express Dishware:
¡ Cleaning deli-
cate dishware,
silverware,
Time-optimized:
¡ Cleaning 113 °F
¡ Intermediate rinse
¡ Final rinse 124 °F
¡ 1) 0:30
¡ 2) 0.400
¡ 3) 2.7
temperature-
sensitive plas-
tics and
glasses.
Level of soiling:
¡ Removing
lightly adhering
fresh food rem-
nants.
Machine
Care
Only when using
unloaded appliance.
Machine Care 162 °F ¡ 1) 2:00
¡ 2) 1.100
¡ 3) 2.5
Favorite - - ¡ 1) 0:09-
0:09
¡ 2) 0.050-
0.050
¡ 3) 1.2-1.2
16
Page 17
5.1 Energy Guide
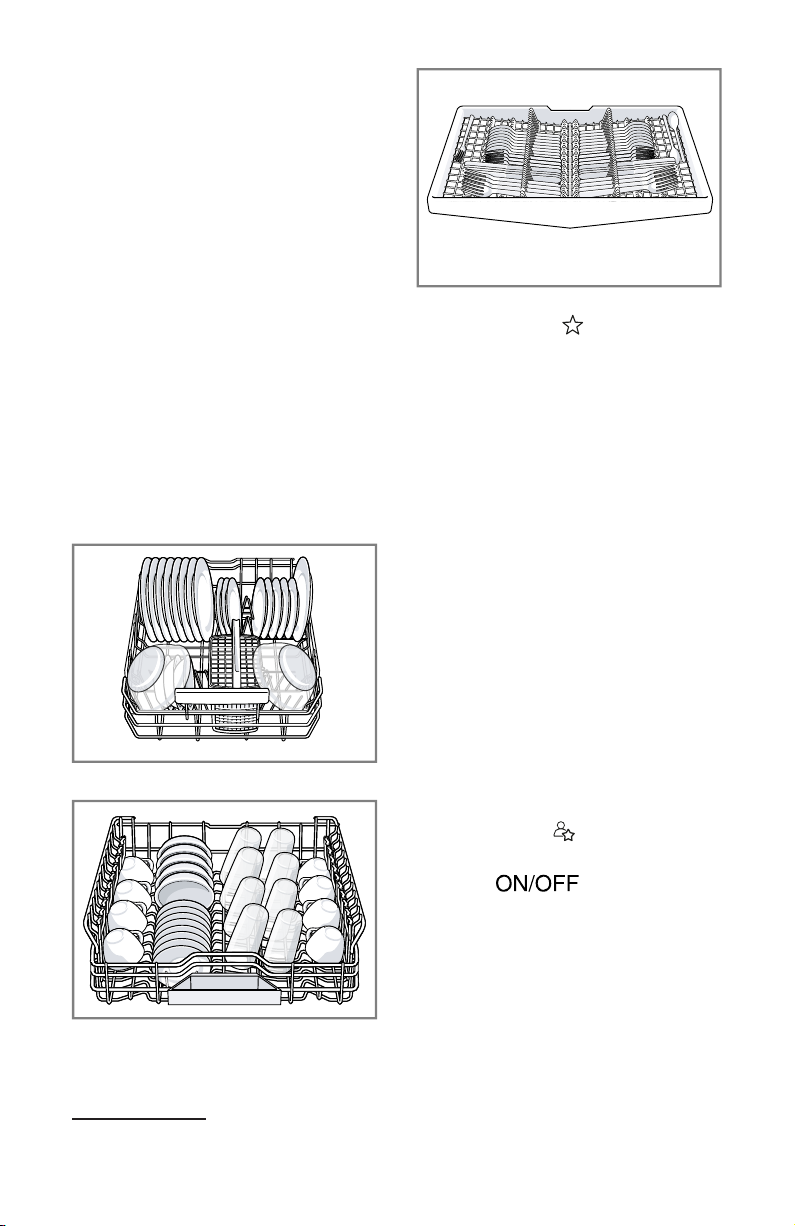
The Energy Guide label was
based on the Normal soil sensing
cycle.
The unit was tested without any
rinse aid (liquid) in the rinse aid
dispenser. A single dose of detergent was inserted into the detergent dispenser, with no detergent
being used in the prewash. The
unit was not subjected to truncated testing per the definitions in
the test procedure. We recommend that dish loads such as the
one in the energy certification test
have the rack position set in the
highest position. Recommended
for daily, regular or typical use to
completely wash a full load of normally soiled dishes.
Lower rack
Upper rack
Dishwasher Cycles en-us
5.2 Favorite
With this function, you can save a
combination of a Cycle and an
Option.
You can save the selected Cycle
and Option combination via the
Home Connect app or on the appliance.
The pre-rinse cycle is pre-programmed to this button and is fine
for all types of dishware. The dishware is rinsed with cold water.
When programs have been downloaded to the appliance, the name
of the program will be displayed in
the app. The display alternately
shows "APP" and the remaining
running time.
Tip:You can use the Home Connect app to download additional
Cycles and Options and save
1
them.
Third rack
1
Depending on the appliance specifications
Save Favorite on the appliance.
1. Press .
2. Press the right cycle button.
3. Press the button for the rele-
vant options.
4. Press Favorite button for 3 sec-
onds.
a The selected cycle and option
will flash.
17
Page 18
en-us Options
a The Favorite button flashes.
a The program combination is
saved.
Tip:To reset the cycle, either use
the Home Connect app or reset
your appliance back to the factory
settings.
→
"Overview of the basic set-
tings", Page34
Options
6 Options
Options
Here is an overview of the different options available on your dishwasher.
Option Use
Crystal
Dry
Half Load
Sanitize
Patented technology
thoroughly dries
dishes and plastics
such as baby bottles
and food storage
containers. Natural
minerals transform
moisture into heat
up to 176F/80C to
get dishes, even
plastics, 60% drier.
Extends drying time.
¡ Switch on with
small loads.
¡ It is recom-
mended adding
less detergent to
the detergent dispenser than for a
full machine load.
¡ The run time is
shortened.
¡ Energy and water
consumption are
reduced.
¡ To ensure a
higher hygiene
status for the appliance and dishware, the temperature is increased
Option Use
and maintained
for an extra-long
period.
¡ Especially suit-
able for cleaning
chopping boards
or baby bottles.
¡ Continuous use of
this option improves the hygiene status.
¡ This will increase
the run time and
energy consumption.
WARNING
Concerning dishware sanitation,
be aware of the following.
▶ Only sanitizing cycles have
been designed to meet the requirements for soil removal and
sanitation efficacy. There is no
intention, either directly or indirectly, to imply that all cycles on
a certified machine have
passed the sanitization performance test.
Features
7 Features
Features
You can find an overview of the
possible features of your appliance and how to use them here.
These features depend on your
appliance model.
18
Page 19
Features en-us
a
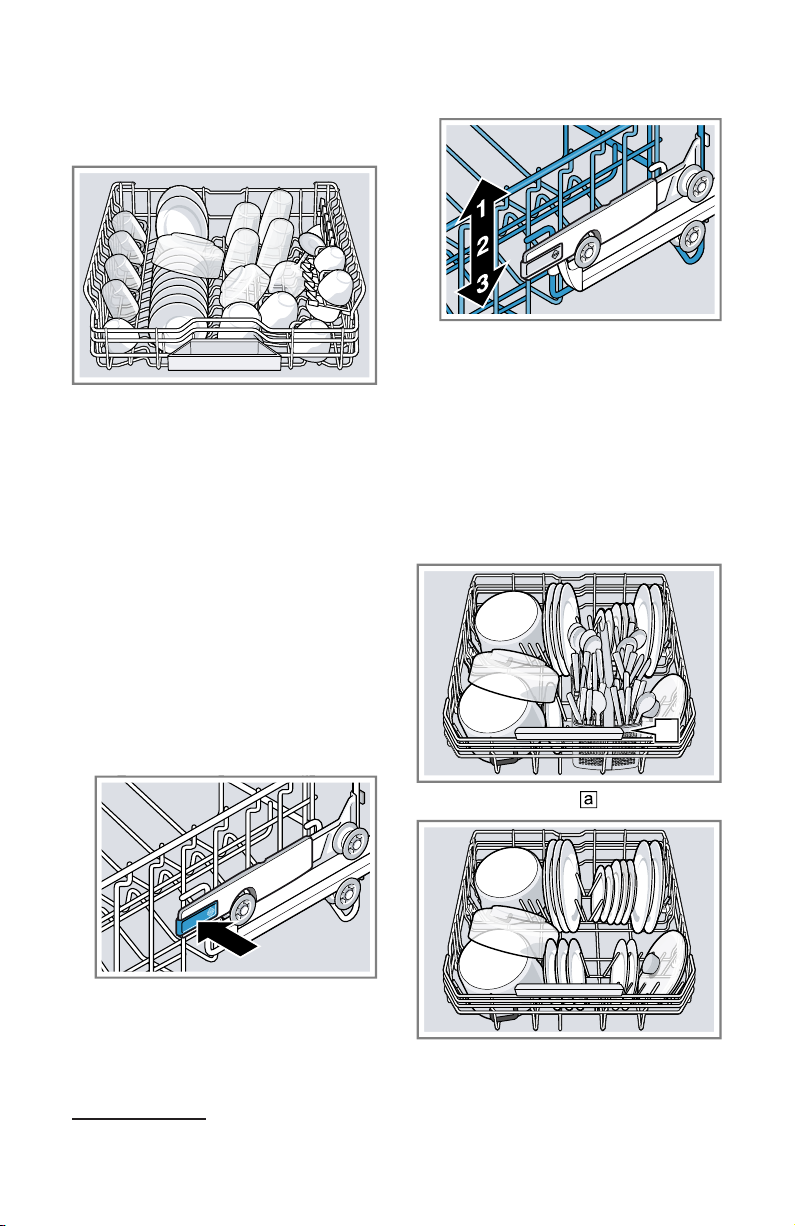
7.1 Upper rack
Arrange cups, glasses, and small
tableware items in the top rack.
You can adjust the height of the
upper rack to make room for
larger items.
Adjusting upper rack with RackMatic®
To wash large items in the racks,
adjust the shelf height of the upper rack.
1. Pull out the upper rack.
2. To prevent the rack from sud-
denly dropping down, hold the
side of the rack by the top
edge.
3. Press in the right and left hand
levers on the outside of the
rack.
4. Raise or lower the rack evenly
to the right level.
Check that the rack is level on
both sides.
5. Release the levers.
a The rack clicks into position.
6. Slide the rack in.
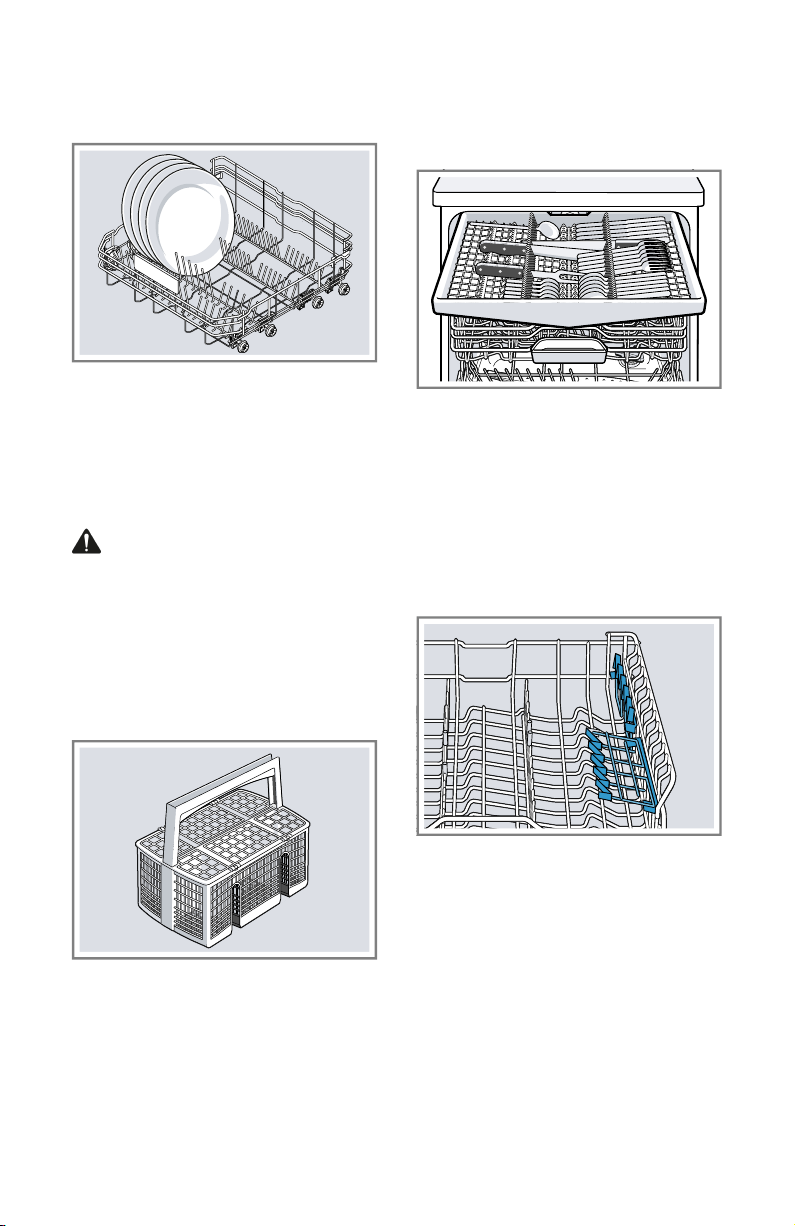
7.2 Lower rack
Arrange pans and plates in the
lower rack.
1
Depending on the appliance specifications
Silverware basket
1
19
Page 20
en-us Features
Large plates up to a diameter of
12inches can be arranged in the
lower rack as shown.
7.3 Silverware Basket
Arrange the silverware in the silverware basket, ensuring that the
items are not nestled together and
with the sharp points down.
WARNING
The sharp points and edges of
knives and other sharp utensils
can cause serious injury.
▶ Load knives and other sharp
utensils with edges down. Do
not allow children to handle or
play near knives and sharp
utensils
7.4 Silverware drawer
Arrange silverware in the silverware drawer.
Arrange silverware with the points
and sharp edges down.
7.5 Cup shelf
Use the cup shelf and the space
underneath for small cups and
glasses or for large items of silverware, e.g. cooking spoons or
serving cutlery.
20
If you do not need the cup shelf,
you can fold it up.
Page 21
Features en-us
1
2
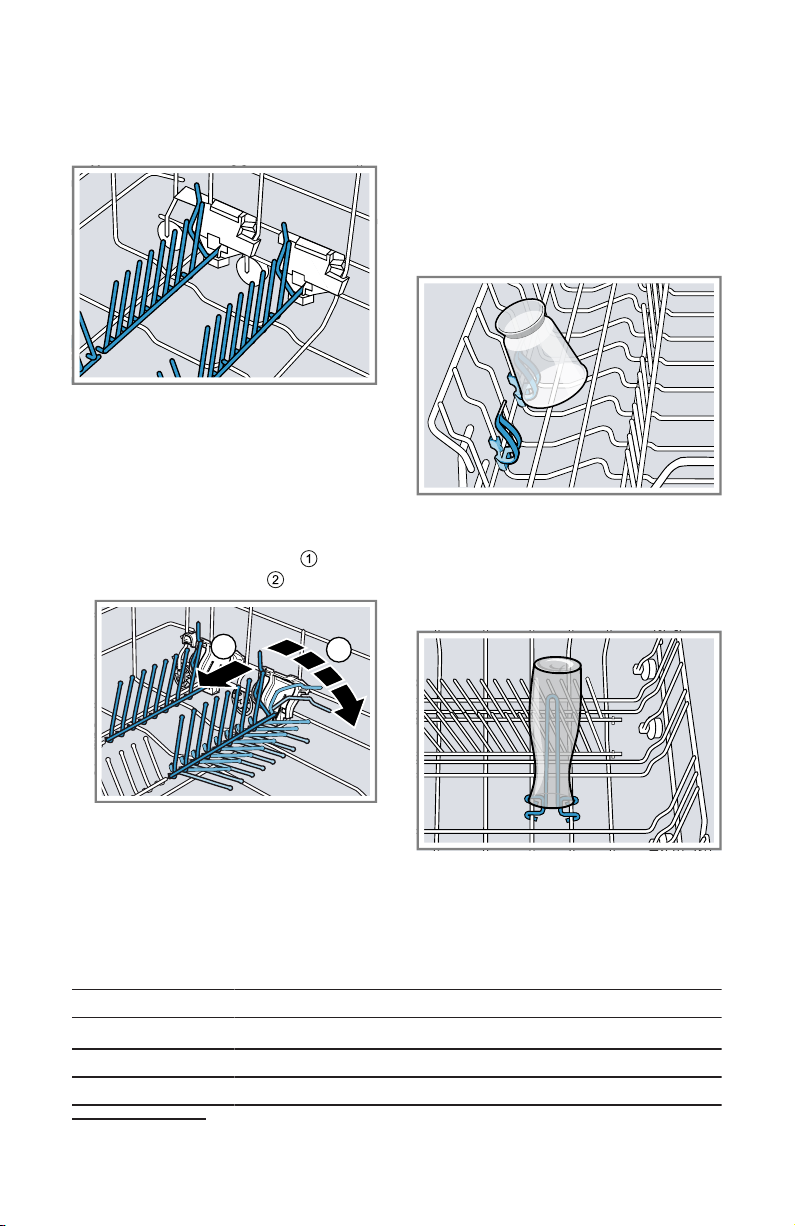
7.6 Flip tines
Use the flip tines to position dishware securely, e.g. plates.
You can fold the tines down to arrange pans, bowls and glasses
1
better.
Folding down the tines
If you do not need the tines, fold
them down.
1. Push the lever forward and
fold down the tines .
1
2. To use the tines again, fold
them back up.
a The tines click into position.
7.7 Small items holder
Use the small items holder to arrange small items of dishware,
e.g. light plastic parts.
7.8 Bottle holder
Use the bottle holder to position
tall narrow items securely, e.g.
bottles or vases.
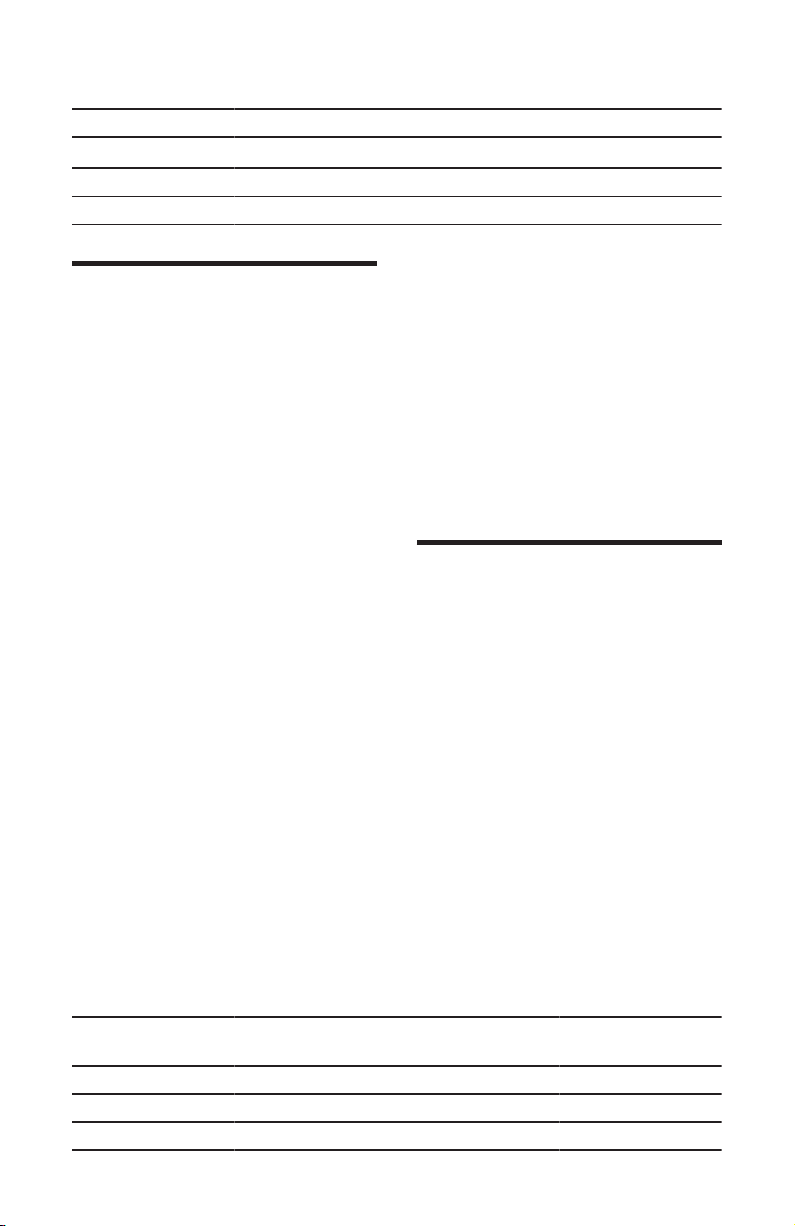
7.9 Rack heights
Set the racks at the right height.
Appliance height 32 inches with silverware basket
Level Upper rack Lower rack
1 max. ø 8.5"
2 max. ø 9.5" 11"
3 max. ø 10.5" 10"
1
Depending on the appliance specifications
12" →
Page19
21
Page 22
en-us Before using for the first time
Appliance height 32 inches with silverware drawer
Level Upper rack Lower rack
1 max. ø 6"
12" →
Page19
2 max. ø 7" 11"
3 max. ø 8" 10"
Before using for the first time
8 Before using for the
first time
Before using for the first time
8.1 Initial use
Before the first use, or after a factory reset, you will need to configure the settings.
Tip:Connect your appliance to a
mobile device. You can conveniently change all settings using
the HomeConnect® app.
→
"HomeConnect® quick start",
Page36
Requirement:The appliance has
been installed and connected.
1. Add special salt.
2.
Add rinse aid. →
3. Switch on the appliance.
4. Set the water softening system.
5. Set the amount of rinse aid.
6. Add detergent.
Page24
7. Start the Program with the
highest cleaning temperature
without dishware.
To remove any marks from water or other residues, we recommend you operate the appliance without dishware before
using it for the first time.
Tip:You can change these settings and other Basic settings at
any time.
Water softening system
9 Water softening
system
Water softening system
Hard water leaves limescale on
dishware as well as the washing
tank, and parts of the appliance
may become blocked.
To ensure good dishwashing results, you can treat the water with
special salt and the water softening system. To avoid damage to
the appliance, water with a hardness above 9°E must be softened.
9.1 Overview of water hardness settings
You can find an overview of the water hardness values that can be selected here.
You can find out how hard your water is from your local water company
or by using a water hardness tester.
Water hardness °E
0 - 8 soft 0 - 1.1 H00
9 - 10 soft 1.2 - 1.4 H01
11 - 12 medium 1.5 - 1.8 H02
22
Hardness
range
mmol/l Setting value
Page 23
Water softening system en-us
Water hardness °E
Hardness
range
mmol/l Setting value
13 - 15 medium 1.9 - 2.1 H03
16 - 20 medium 2.2 - 2.9 H04
21 - 26 hard 3.0 - 3.7 H05
27 - 38 hard 3.8 - 5.4 H06
39 - 62 hard 5.5 - 8.9 H07
Note:Set the water hardness determined on your appliance.
→
"Setting the water softening
system", Page23
With a water hardness of 0 - 8°E
you can dispense with special salt
for dishwashers and switch off the
water softening system.
→
"Switching off the water soften-
ing system", Page24
9.2 Setting the water softening system
Set the water hardness on your
appliance.
1. Determine the water hardness
and the appropriate setting
value.
→
"Overview of water hardness
settings", Page22
2. Press .
3. To open the basic settings,
press for 3 seconds.
a The display shows Hxx.
a The display shows .
4. Press repeatedly until the
right water hardness has been
set.
The value H00 is set at the factory.
5. To save the settings, press
for 3 seconds.
9.3 Special Dishwasher Salt
You can use special dishwasher
salt to soften the water.
Adding dishwasher salt
If the salt refill indicator lights up,
add special dishwasher salt to the
dispenser for salt just before the
cycle starts. The amount of special dishwasher salt required depends on the water hardness. The
higher the water hardness, the
greater the amount of salt required.
NOTICE:
Detergent may damage the water
softening system.
▶ Only fill the dispenser of the
water softening system with
special dishwasher salt.
Special salt for dishwashers can
damage the tub due to corrosion.
▶ To make sure that any special
salt that escapes is washed out
of the tub, add the special salt
to the dispenser for special salt
immediately before the pro-
gram starts.
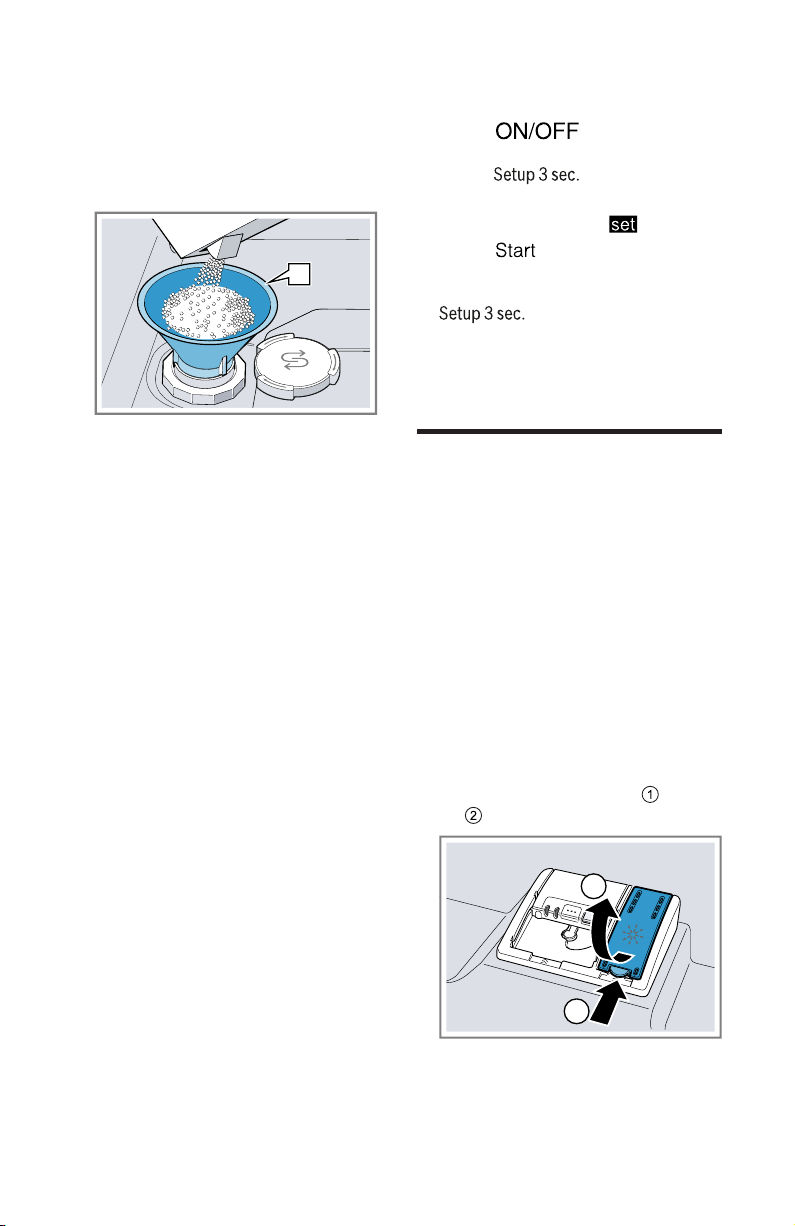
1. Unscrew the lid of the salt dis-
penser and remove.
2. Before the first use: Fill the dis-
penser full with water.
23
Page 24
en-us Rinse aid system
a
1
2
3. Note:Only use special salt
specified for dishwashers.
Do not use salt tablets.
Do not use table salt.
Add the special dishwasher salt
to the dispenser.
Funnel
Fill the dispenser completely
with the salt. The water in the
dispenser is displaced and
forced out.
4. Place the lid back on the dis-
penser and turn to close.
9.4 Switching off the water softening system
If you do not need to use the water softening system, e.g. you already have a whole house water
softening system, you can turn the
system off.
Note
To avoid damage to the
appliance, only switch off the
water softening system in the
following cases:
¡ The water hardness is max.
26°E and you are using combined detergents with salt replacement substances. According to manufacturers, combined
detergents with salt replacement substances can generally
only be used up to a water
hardness of 26°E without
adding special salt.
¡ The water hardness is 0 - 8°E.
You can omit special salt.
1. Press .
2. To open the basic settings,
press for 3 seconds.
a The display shows Hxx.
a The display shows .
3. Press repeatedly until the
display shows H00.
4. To save the settings, press
for 3 seconds.
a The water softening system is
switched off and the salt refill
indicator is deactivated.
Rinse aid system
10 Rinse aid system
Rinse aid system
10.1 Rinse aid
For optimum drying results, use
rinse aid.
Only use rinse aid intended for
household dishwashers.
Adding rinse aid
If the rinse aid refill indicator lights
up, fill the dispenser with rinse
aid. Only use rinse aid intended
for household dishwashers.
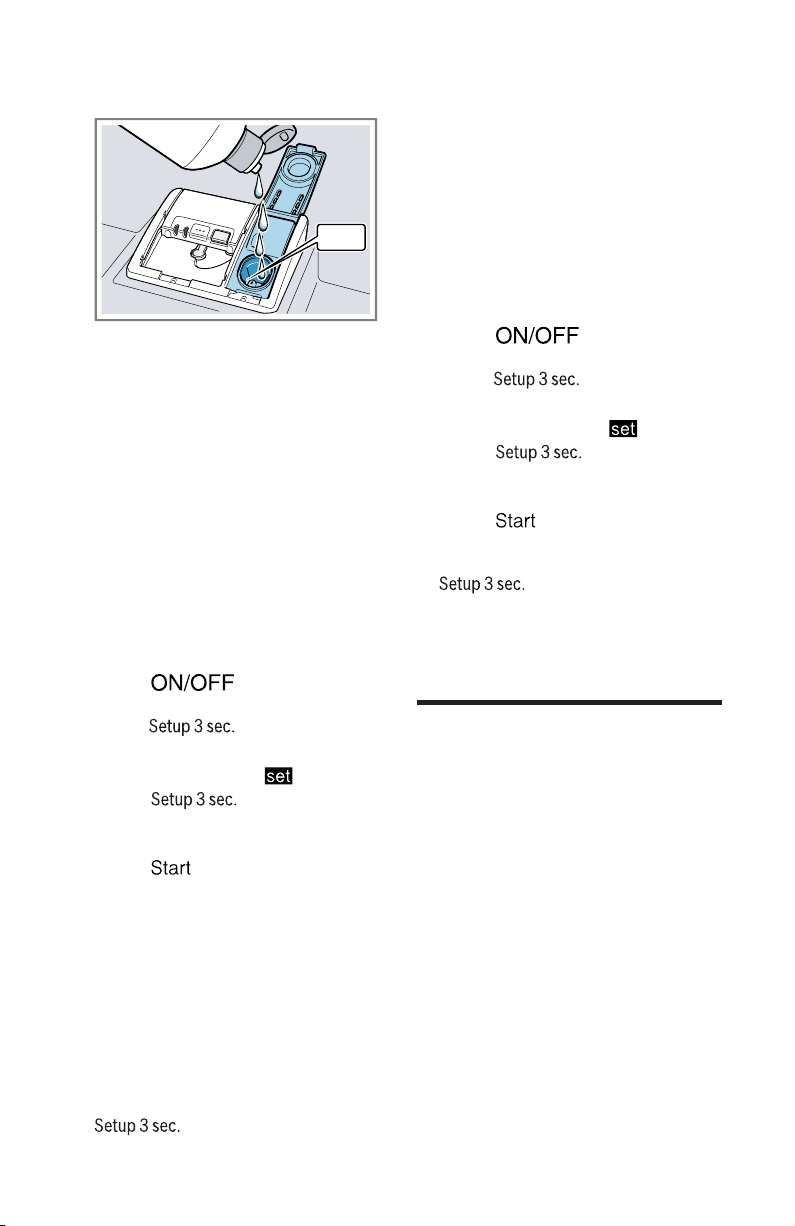
1. Press the catch on the lid of the
dispenser for rinse aid and
lift .
24
Page 25
Detergent en-us
max
2. Add rinse aid up to the max
mark.
3. If rinse aid spills out, remove it
from the tub.
Spilled rinse aid can cause ex-
cessive frothing during the
wash cycle.
4. Close the lid of the dispenser
for rinse aid.
a The lid clicks into position.
10.2 Setting the amount
of rinse aid
If there are streaks or water spots
on dishware, change the amount
of rinse aid.
1. Press .
2. To open the basic settings,
press for 3 seconds.
a The display shows Hxx.
a The display shows .
3. Press repeatedly un-
til the display shows the value
set at the factory r05.
4. Press repeatedly until the
right amount of rinse aid has
been set.
– A low setting adds less rinse
aid during the wash cycle
and reduces streaking on
dishware.
– A higher setting adds more
rinse aid during the wash cycle, reduces water spots and
improves the drying result.
5. To save the settings, press
for 3 seconds.
10.3 Switching the rinse aid system off
If you choose not to use rinse aid,
you can turn the rinse aid system
off.
Tip:Rinse aid within a combination detergent has limited effectiveness. You will generally get
better results using a separate
rinse aid.
1. Press .
2. To open the basic settings,
press for 3 seconds.
a The display shows Hxx.
a The display shows .
3. Press repeatedly un-
til the display shows the value
set at the factory r05.
4. Press repeatedly until the
display shows r00.
5. To save the settings, press
for 3 seconds.
a The rinse aid system is
switched off and the rinse aid
refill indicator is deactivated.
Detergent
11 Detergent
Detergent
Find out which detergents are
suitable for your appliance.
11.1 The correct detergents
Only use detergents that are
made for dishwashers, either basic or combination detergents.
For the best washing and drying
results, use a separate detergent,
then add Special salt and Rinse
aid →
Page24
Modern, powerful detergents
mainly use a low-alkaline formulation with enzymes. Enzymes
break down starch and remove
protein. Oxygen-based bleaching
separately.
25
Page 26

en-us Detergent
agents are generally used to remove colored stains, e.g. tea or
ketchup.
Note:Follow the manufacturer's
instructions for each detergent.
Detergent Description
Tabs Tabs are perfect for
all cleaning functions
and do not need to
be measured out.
However, with
shorter Cycles
→
Powder
detergent
Liquid detergent
Page15
times tabs do not
dissolve entirely and
leave residues of detergent. This may reduce its effectiveness.
Powder detergent is
recommended for
shorter cycles. The
dosage can be adjusted to the level of
soiling.
Liquid detergent
works faster and is
recommended for
shorter cycles without a pre-rinse.
Sometimes liquid
detergent may leak
out despite the detergent dispenser
being closed. This is
not a problem, just
remember the following:
¡ Only choose a cy-
cle without PreRinse.
¡ Do not use the
Delay Start option.
The dosage can be
adjusted to the level
of soiling.
some-
11.2 Incompatible detergents
Do not use a detergent which is
not designated for dishwasher use
or contains chlorine.
Detergent Description
Liquid hand
soap
Detergent containing chlorine
Liquid hand
soap can cause
increased frothing and damage the appliance.
This may leave
chlorine
residue on
dishware.
11.3 Information on Detergent
Follow the instructions on detergents in everyday use.
¡ Detergents marked as "ecologi-
cal" (environmentally friendly)
generally contain lower levels
of active agents or none at all.
The cleaning effect may be reduced.
¡ Adjust the rinse aid and the wa-
ter softening system settings in
accordance with the detergent
or combination detergent in
use.
¡ According to manufacturers,
combination detergents with
salt replacement substances
can only be used up to a certain water hardness, usually 26
°E, without adding special salt.
For the best washing and drying results we recommend using special salt from a water
hardness of 17 °E.
¡ Any rinse aid component of a
combination detergent has limited effectiveness. You will
have better results using a separate rinse aid.
26
Page 27
Dishware en-us
3 tbsp (45 ml)
1.75 tbsp
(25 ml)
1 tbsp (15 ml)
¡ To prevent sticking, only touch
detergents in a water-soluble
pouch with dry hands and only
ever place them in a dry detergent dispenser.
¡ Even if the rinse aid and spe-
cial salt refill indicators light up,
the wash cycles will run properly with combination detergents.
¡ Use tablets with enhanced dry-
ing results.
11.4 Adding Detergent
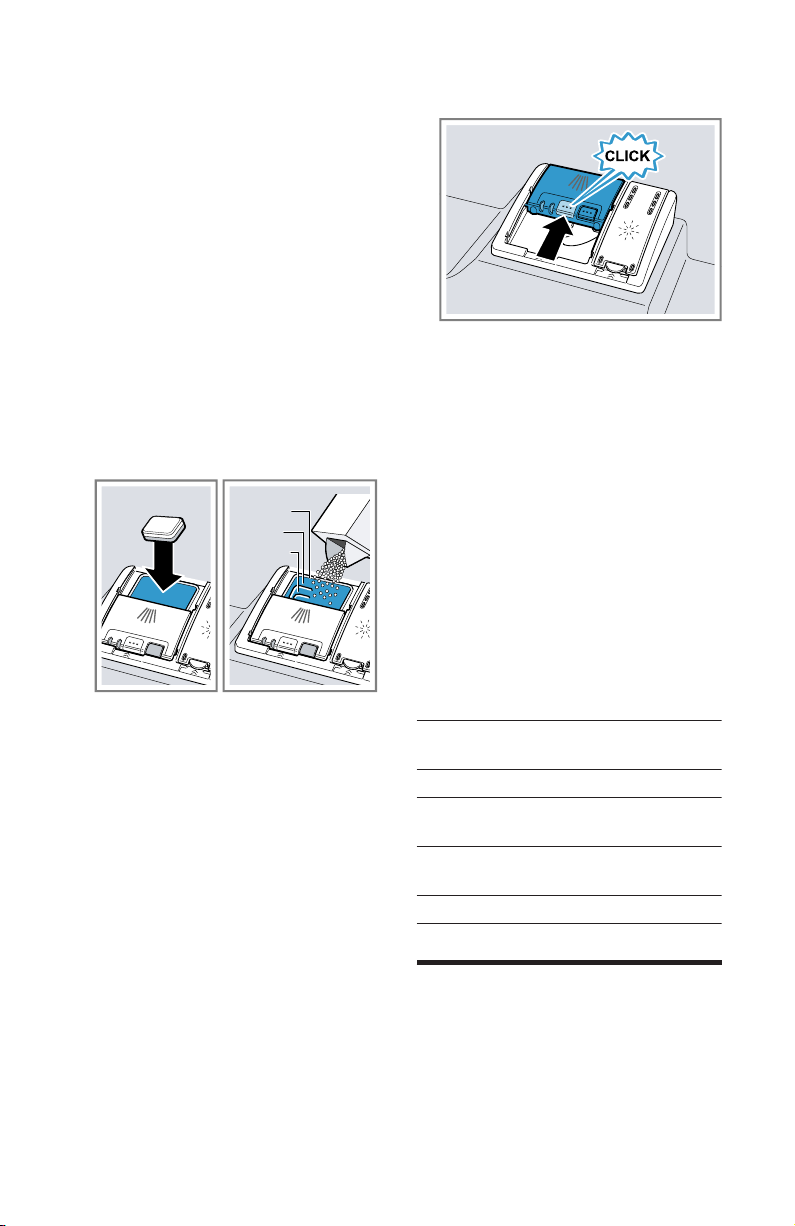
1. To open the detergent dis-
penser, press the locking latch.
2. Add the detergent to the dry
detergent dispenser.
3. Close the lid of the detergent
dispenser.
a The lid clicks into position.
a The detergent dispenser will
open automatically at the optimum time during the cycle.
Powder or liquid detergent will
spread around the washing
tank and dissolve there.
Tablets will fall into the tablet
collecting tray and dissolve in
the right dosage. In order to ensure that tablets can dissolve
evenly, do not place any other
objects in the tablet collecting
tray.
If you are using tablets, one is
enough. Insert the tablets in a
horizontal position.
If you are using powder or liquid detergent, follow the manufacturer's instructions and
quantities for dosage in the detergent dispenser.
1.5 to 1.75 Tbsp (20 ml – 25
ml) detergent is sufficient for
normal soiling. If dishware is
only lightly soiled, slightly less
than the amount of detergent
specified is usually sufficient.
11.5 Detergent table
Detergent amount guidelines
Auto 1.75 Tbsp (25
ml) or 1 tab
Delicate 1 Tbsp (15 ml)
Normal 1.75 Tbsp (25
ml) or 1 tab
Heavy 3 Tbsp (45 ml)
or 1 tab
Express 1 Tbsp (15 ml)
Dishware
12 Dishware
Dishware
Only wash dishware that is suitable for dishwashers.
Note:Decorated glassware and
parts made of aluminum or silver
may fade or discolor with dish-
27
Page 28

en-us Dishware
washing. Delicate types of glass
may turn cloudy after a few wash
cycles.
12.1 Damage to glass and dishware
Only put glasses and china in the
dishwasher if they are labeled
dishwasher-safe. Avoid damage
to glass and dishware.
Cause Recommenda-
tion
The following
types of dishes
are not dishwasher-safe:
¡ Wooden
utensils and
dishes
¡ Decorative
glassware,
antique
dishes and
artistic handmade pottery
¡ Plastic parts
that are not
heat-resistant
¡ Dishes made
from copper
or tin
¡ Dishes
soiled with
ash, wax,
grease or
paint
¡ Very small
items of
dishware
The chemical
composition of
the detergent
causes damage.
Only put dishes
in the dishwasher if they
are labeled
dishwashersafe.
Use a detergent labeled as
gentle to
dishes.
Cause Recommenda-
tion
Highly caustic
alkaline or
highly acidic
cleaning solutions, in particular commercial or industrial
cleaners, are
not safe to use
in the dishwasher with
aluminum.
The water temperature of the
cycle is too
high.
The water temperature of the
cycle is too
high and the
water is too
soft.
If you use
highly caustic
alkaline or
highly acidic
cleaning solutions, in particular commercial or industrial
cleaners, do
not put anything aluminum
in the dishwasher.
Select a cycle
with lower temperatures.
After the cycle
has ended,
take glassware
and silverware
out of the appliance without
delay.
Select a cycle
with lower temperatures.
Use detergent
with glass protection.
Adjust the water hardness
setting on your
dishwasher.
→
"Setting the
water softening
system",
Page23
12.2 Loading dishware
Arrange dishware correctly to optimize the dishwashing result and
prevent damage to both dishware
28
Page 29
Dishware en-us
and the appliance. The noise level
may also vary depending on the
items placed in your dishwasher.
NOTICE:
Avoid dishwasher damage
▶ Do not load the dishwasher
with paper products, plastic
bags, packing materials or anything other than normal, dishwasher safe dishware and
kitchenware.
Tips
¡ Using the appliance allows you
to save energy and water compared to doing dishes by hand.
¡ See our website for examples
of how to load your appliance
efficiently.
¡ To save energy and water, load
the machine with the number of
place settings specified (standard load with dishes and silverware).
¡ For better washing and drying
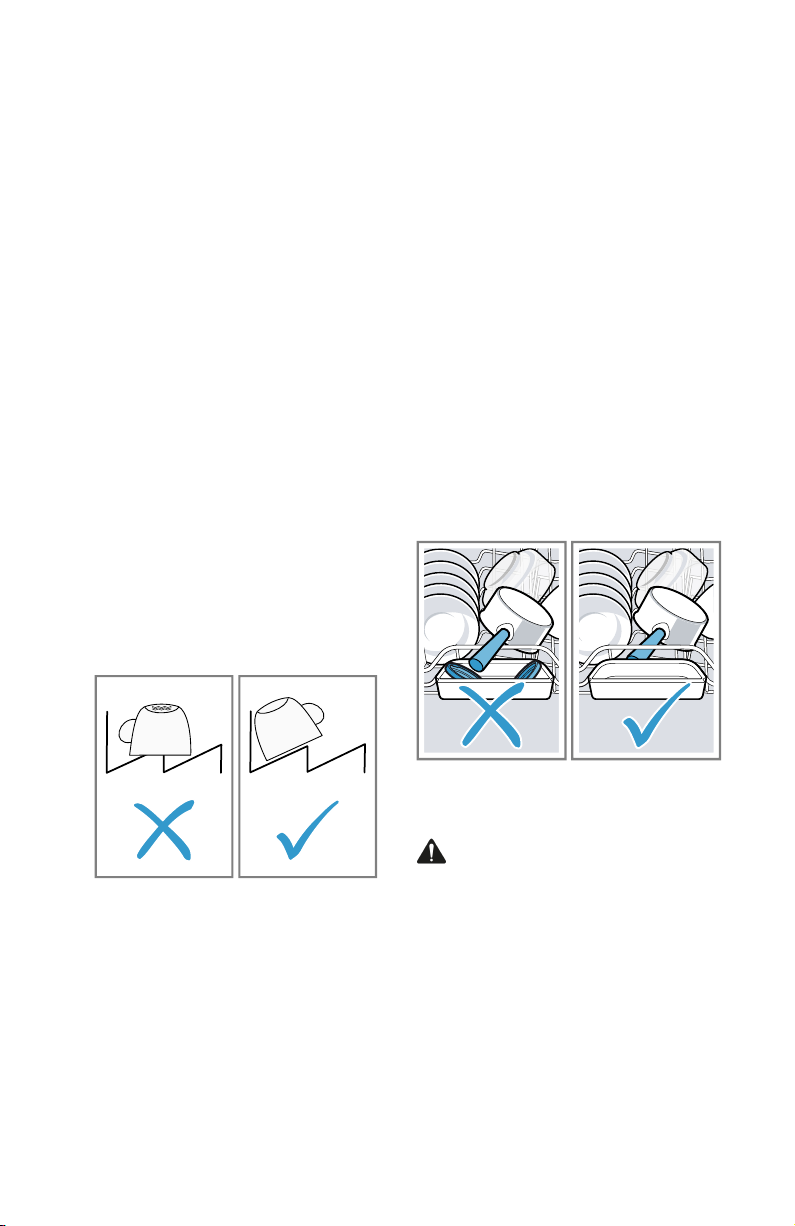
results, position items with
curves or recesses at an angle
so water can run off.
– Put heavily soiled dishware
in the lower rack, e.g. pans.
The more powerful spray jet
ensures that the dishwashing
result will be better.
– To avoid damage to dish-
ware, arrange it so it is stable and cannot tip over.
– To avoid injury, arrange sil-
verware with the points and
sharp edges facing down.
– Position containers with the
openings facing down so no
water can collect in them.
– Do not block the spray arms
- make sure that they can
turn freely.
– Do not place small parts in
the collecting tray and do not
block it with dishware so as
not to obstruct the lid of the
detergent dispenser.
1. Remove large remnants of food
from dishware.
To save resources, do not pre-
rinse dishware under running
water.
2. Observe the following when ar-
ranging dishware:
12.3 Removing dishware
CAUTION
Dishes can be very hot immediately after the cycle ends.
▶ Open the door slightly and al-
low dishes to cool for a few
minutes before unloading.
1. To prevent water dripping onto
dishware, unload it starting at
the bottom and working up.
29
Page 30
en-us Dishware
2. Check the washing tank and
accessories for soiling and
clean if necessary.
→
"Cleaning and maintenance",
Page38
12.4 Loading patterns
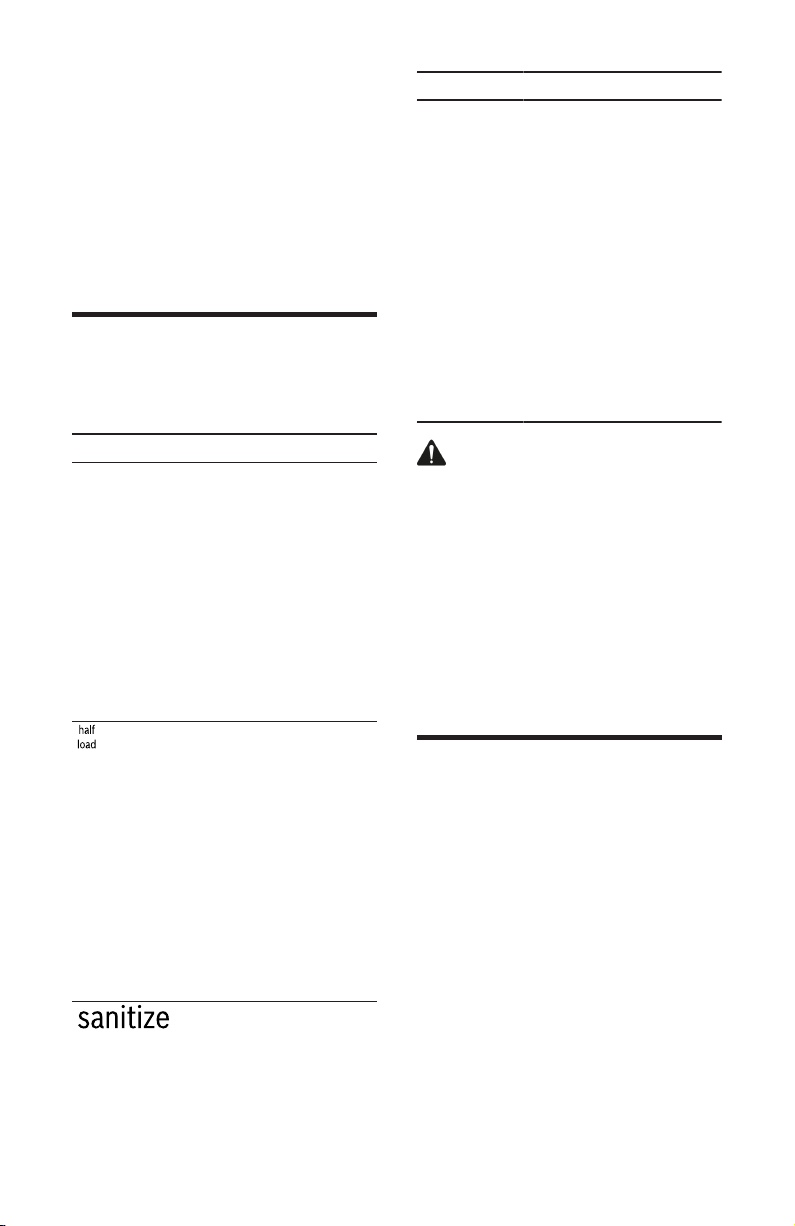
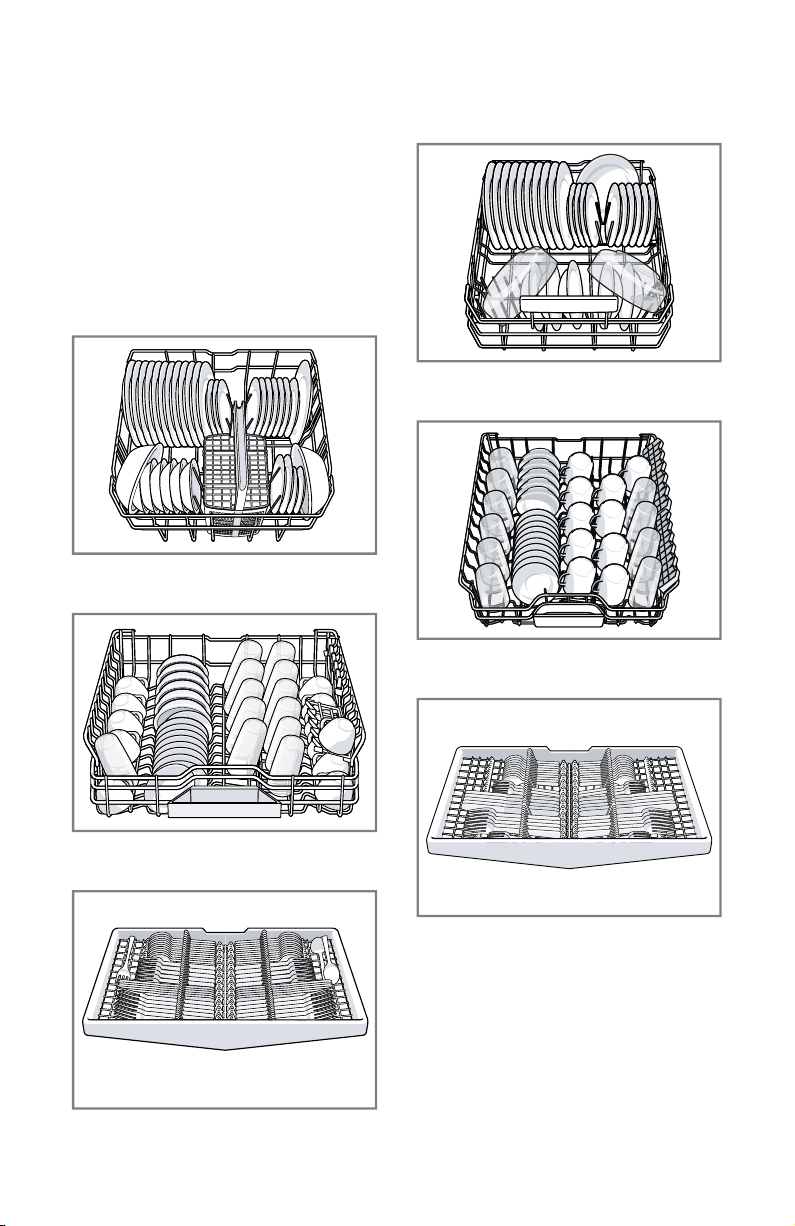
Recommended loading patterns.
12 place settings:
Lower rack
Upper rack
Additional loading patterns for 10
place settings:
Lower rack
Upper rack
Third rack
30
Third rack
Page 31
Basic Operation en-us
Basic Operation
13 Basic Operation
Basic Operation
13.1 Protection against unintentional operation
Your dishwasher has a built in
feature to help prevent unintentional operation, e.g. by children.
After starting the appliance, the
door has to be closed within 4
seconds, otherwise the operation
will be paused. If this occurs, follow the steps below to restart your
dishwasher.
1. For top button controls: Press
and close the door.
2. For front button controls: Close
the door and press .
a The wash cycle will resume.
Notes
¡ Unintentional operation is
activated when:
– Pressing Start to begin a
wash cycle
– Setting Delay time and
pressing Start
– Opening the door while De-
lay time is active
– Opening the door during a
wash cycle.
¡ This feature cannot be deacti-
vated.
13.2 Switching on the appliance
▶ Touch with a short 1
second touch.
The cycle last selected and the
option last selected will be set
by default.
The buttons on the appliance
are touch sensitive and only require a quick, gentle touch.
If you do not perform any actions on the appliance for 10
minutes, it will automatically
switch off.
13.3 Setting a cycle
To adjust the wash cycle to the
soiling level of the dishware, select a suitable program.
▶ Press the right cycle button.
a The cycle is set and the cycle
button flashes.
a The remaining run time of the
cycle appears on the display.
13.4 Setting options
You can set options to complete
the chosen wash program.
Note:The available options depend on which program is selected.
▶ Press the button for the rele-
vant option.
a The option is set and the option
button flashes.
13.5 Setting the electronic delay time
You can delay the start of the
wash cycle by up to 24hours.
1. Press .
a "h:01" appears on the display.
2. Use to set the required
start time for the wash cycle.
3. Press .
a This activates the electronic de-
lay time.
Tip:To deactivate the electronic
delay time, press repeatedly
until "h:00" appears on the display.
31
Page 32
en-us Basic Operation
13.6 Starting the wash cycle
▶ Press .
a The wash cycle has ended
when the display shows
"0h:00m".
Notes
¡ If you want to add more dish-
ware while the appliance is running, do not use the collecting
tray as a handle for the upper
rack. You might touch the partially dissolved tablet.
¡ You can only change a cycle in
progress if you can cancel it
first.
→
"Terminating the wash cy-
cle", Page32
¡ To save energy, the appliance
switches off automatically
10minutes after the end of the
wash cycle. If you open the appliance door immediately after
the wash cycle has ended, the
appliance will switch off after 4
seconds.
13.7 Activating the button lock
The button lock prevents the appliance from being operated accidentally or incorrectly while running.
▶ Press for approx. 3sec-
onds.
a The button lock is activated and
will be automatically deactivated at the end of the cycle.
a flashes on the display
when the appliance is running.
a The button lock remains acti-
vated with a power failure.
13.8 Deactivating the button lock
▶ Press for approx. 3sec-
onds.
13.9 Interrupting the wash cycle
1. Press On/Off.
The program is saved and the
appliance switches off.
2. Press On/Off.
3. Press to resume the wash
cycle.
13.10 Terminating the
wash cycle
To end a cycle early or to switch
from one that has already started,
you will need to cancel it first.
▶ Press for approx.
4seconds.
a All displays light up.
a As soon as the displays are off,
the display shows "0h:01m"
and the residual water is
pumped out.
a The cycle is cancelled and
ends after approx. 1minute.
13.11 Switching off the
appliance
CAUTION
To avoid risk of injury, always use
caution when opening the door
during or following a wash cycle
as hot water or steam may escape.
▶ Do not fully open the door until
water noises have stopped and
steam has subsided.
32
1. Please note the information on
Preventing Material Damage
→
Page9
.
Page 33

2. Press On/Off.
Basic Operation en-us
33
Page 34
en-us Basic settings
Basic settings
14 Basic settings
Basic settings
You can configure the basic settings for your appliance to meet your
needs.
14.1 Overview of the basic settings
The basic settings depend on the features of your appliance.
Basic setting Display
Selection Description
text
W. hardness H00
1
H00 - H07 Set the water softening
system to your water
hardness.
→
"Setting the water soft-
ening system", Page23
Level H00 switches the
water softening system
off.
Rinse aid disp. r05
1
r00 - r06 Set the amount of rinse
aid.
→
"Setting the amount of
rinse aid", Page25
Switch the rinse aid system off with level r00.
Intensive drying d00
1
d00 - d01 The temperature is in-
creased during the final
rinse, which improves the
drying result. This may increase the run time
slightly.
Note:Not suitable for delicate items of dishware.
Switch Intensive drying on
"d01" or off "d00".
Wi-Fi Cn0 Cn0 - Cn1 Switch the wireless net-
work connection on or off.
Level "Cn0" switches the
wireless network connection off.
The basic setting is not
available until you have
connected the appliance
with the HomeConnect®
app.
→
"HomeConnect® ",
Page35
1
Factory setting (may vary according to model)
34
Page 35
HomeConnect® en-us
Basic setting Display
Selection Description
text
Remote Start rc1 rc0 - rc2 Activate or deactivate
→
"Remote Start ",
Page36
.
The following settings are
possible:
¡ With the setting "rc0",
the option is permanently deactivated.
¡ With the setting "rc1",
the option can be selected via the button.
→
"Activating Remote
Start ", Page37
¡ With the setting "rc2",
the option is permanently activated.
The basic setting is not
available until you have
connected the appliance
with the HomeConnect®
app.
→
"HomeConnect® ",
Page35
Factory setting rE Starting with
Restore changed settings
to the factory settings.
YES
Confirming
The settings for initial use
must be configured.
with
1
Factory setting (may vary according to model)
14.2 Changing the basic settings
1. Press .
2. To open the basic settings,
press for 3 seconds.
a The display shows Hxx.
a The display shows .
3. Press repeatedly un-
til the display shows the required setting.
4. Press repeatedly until the
display shows the right value.
You can change one or more
settings.
5. To save the settings, press
for 3 seconds.
HomeConnect®
15 HomeConnect®
HomeConnect®
This appliance is network-capable. Connecting your appliance to
a mobile device lets you control its
functions via the HomeConnect®
app.
The HomeConnect® services are
not available in every country. The
availability of the HomeConnect®
35
Page 36
en-us HomeConnect®
function depends on the availability of HomeConnect® services in
your country. You can find information on this at: www.home-connect.com.
To be able to use HomeConnect®, you must first set up the
connection to the WLAN home
network (Wi-Fi 1) and to the
HomeConnect® app.
The HomeConnect® app guides
you through the entire registration
process. Follow the instructions in
the HomeConnect® app to implement the settings.
Tips
¡ Consult the HomeConnect®
documents supplied.
¡ Follow the instructions in the
HomeConnect® app as well.
Note:Also note the safety information in this instruction manual
and ensure that it is also observed
when operating the appliance using the HomeConnect® app.
15.1 HomeConnect®
quick start
Connect your appliance to a mobile device quickly and easily.
Setting up the
HomeConnect® app
1. Install the HomeConnect® app
on your mobile device.
2. Start the HomeConnect® app
and set up access for
HomeConnect®.
The HomeConnect® app
guides you through the entire
registration process.
Setting upHomeConnect®
Requirements
¡ The HomeConnect®app is in-
stalled on your mobile device.
¡ The appliance receives signals
from the WLAN home network
(Wi-Fi) at its installation location.
¡ The appliance door is closed.
1. Open the HomeConnect® app
and scan the following QR
code.
2. Follow the instructions in the
HomeConnect® app.
15.2 HomeConnect®
settings
Adapt HomeConnect® to your
needs.
You can find the HomeConnect®
settings in the basic settings for
your appliance. Which settings the
display shows will depend on
whether HomeConnect® has
been set up and whether the appliance is connected to your home
network.
15.3 Remote Start
You can use the HomeConnect®
app to start the appliance with
your mobile device.
Tip:If you select "rc2" in the Basic settings →
function, the function is perma-
Page35
of this
1
Wi-Fi is a registered trade mark of the Wi-Fi Alliance.
36
Page 37

HomeConnect® en-us
nently activated, and you can start
your appliance with a mobile device at any time.
Activating Remote Start
When you have selected "rc1" in
the basic settings of this function,
activate the function on your appliance.
Requirements
¡ The appliance is connected to
your WLAN home network.
¡ The appliance is connected to
the HomeConnect® app.
¡ "rc1" is selected in the Basic
settings →
tion.
¡ A program is selected.
▶ Press .
If you open the appliance door,
the function is automatically deactivated.
a button lights up.
Tip:To deactivate the function,
press .
Page35
of this func-
15.4 Remote Diagnostics
The Customer Service can access
your appliance via Remote Diagnostics if you ask them to do so, if
your appliance is connected to the
HomeConnect® server and if Remote Diagnostics is available in
the country where you are using
the appliance.
Tip:Further information and details about the availability of Remote Diagnostics in your country
can be found in the Service/Support section of your local website:
www.home-connect.com.
15.5 Software update
You can use this function to update the software of your appliance, e.g. for optimization, troubleshooting or safety-relevant updates.
The HomeConnect® app informs
you about available software updates.
15.6 Data Protection
Please see the information on
data protection.
The first time your appliance is
registered on a home network
connected to the Internet, your
appliance will transmit the
following types of data to the
HomeConnect® server (initial
registration):
¡ Unique appliance identification
(consisting of appliance codes
as well as the MAC address of
the installed Wi-Fi communication module).
¡ Security certificate of the Wi-Fi
communication module (to ensure a secure data connection).
¡ The current software and hard-
ware version of your appliance.
¡ Status of any previous reset to
factory settings.
This initial registration prepares
the HomeConnect® functions for
use and is only required when you
want to use the HomeConnect®
functions for the first time.
Note:Please note that the
HomeConnect® functions can be
utilized only with the HomeConnect® app. Information on data
protection can be called up in the
HomeConnect® app.
37
Page 38
en-us Cleaning and maintenance
Cleaning and maintenance
16 Cleaning and
maintenance
Cleaning and maintenance
To keep your appliance working
efficiently for a long time, it is important to clean and maintain it
carefully.
16.1 Cleaning the tub
WARNING
Using detergents containing chlorine may result in harm to health.
▶ Never use detergents contain-
ing chlorine.
1. Remove any heavy soiling in
the interior with a damp cloth.
2. Add detergent to the detergent
dispenser.
3. Select the program with the
highest temperature.
4. Start the program without dish-
ware. →
Page32
16.2 Cleaning agent
Only use suitable cleaning agents
to clean your appliance.
→
"Preventing material damage",
Page9
16.3 Tips on appliance care
Follow the tips on appliance care
to make sure your appliance functions properly at all times.
Action Benefit
Regularly wipe
the door seals,
the front of the
dishwasher and
the control
panel using a
damp cloth and
dishwashing
liquid.
If the appliance
is not going to
be used for a
while, leave the
door slightly
ajar.
This ensures
the parts of the
appliance will
remain clean
and hygienic.
This will prevent unpleasant odors.
16.4 Machine Care
Deposits, e.g. from food remnants
and limescale, can cause your appliance to malfunction. To avoid
these problems and reduce odors,
we recommend cleaning your appliance at regular intervals.
Machine Care combined with machine cleaning products will provide the right care for your appliance.
Tip:You can buy our tested and
approved Dishwasher Care and
Machine Cleaner for Dishwashers
online or from customer service.
USA:
38
www.bosch-home.com/us/shopproductlist/dishwashing/cleaningand-care
CA:
www.bosch-home.ca/en/service/
cleaners-and-accessories
Machine Care is a program which
removes various deposits in one
wash cycle. Cleaning takes place
in two phases:
Page 39
Cleaning and maintenance en-us
Phase Removal of Cleaner Placement
1 Grease and
limescale
Liquid machine care
product or machine
descaler in powder
form.
Appliance interior,
e.g. bottle hung in
the silverware basket or powder in the
interior.
2 Food remnants
Machine cleaner Detergent dispenser
and deposits
To ensure optimal cleaning performance, the program doses the
cleaners independently of each
another during the relevant cleaning phase. Therefore, it's important to place the cleaners correctly.
Run Machine Care without dishware if the indicator for Machine
Care lights up on the control panel
or if advised to do so by the display. The indicator will go out after
you have run Machine Care. If
your appliance does not have a
reminder function, we recommend
performing Machine Care every
2months.
RunMachine Care
Notes
¡ Run the Machine Care program
without any dishes in the dishwasher.
¡ Only use machine care prod-
ucts and machine cleaners
specially designed for dishwashers.
¡ Make sure that there are no
aluminum items, e.g. vent hood
grease filters or aluminum
pans, in the interior of the appliance.
¡ If you have not run Machine
Care after 3 wash cycles, the
indicator for Machine Care will
go out automatically.
¡ For optimal cleaning perfor-
mance, ensure the correct
placement of cleaners.
¡ Follow the safety instructions
given on the packagings of the
machine care products and machine cleaners.
1. Remove any heavy soiling in
the interior with a damp cloth.
2. Clean the filters.
3. Place the machine care product
in the appliance interior.
Only use machine care prod-
ucts specially designed for
dishwashers.
4. Pour the machine cleaner into
the detergent dispenser until it
is filled completely.
Do not place any additional machine cleaner in the appliance
interior.
5. Press .
6. Press .
a Machine Care is run.
a Once the wash cycle has
ended, the indicator for Machine Care goes out.
39
Page 40
en-us Cleaning and maintenance
1
2
3
1
2
3
1
2
1
2
16.5 Filter system
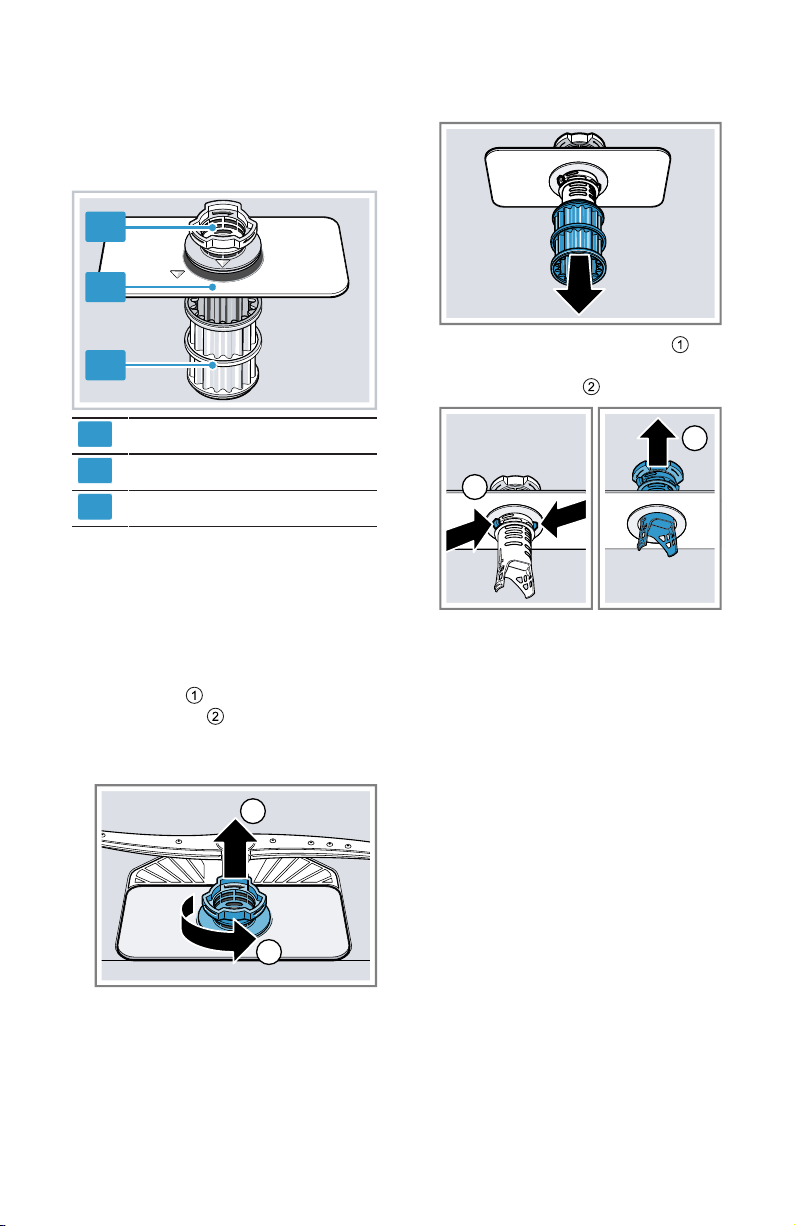
The filter system removes coarse
soiling from the dishwashing cycle.
Micro filter
Fine filter
Coarse filter
Cleaning filters
Debris in the rinsing water can
block the filters.
1. Check the filters for residues
after each dishwashing cycle.
2. Turn the coarse filter counter-
clockwise and take out the
filter system .
‒ Ensure that foreign objects
do not fall into the sump.
3. Pull the micro filter downward
and off.
4. Press the locking catches to-
gether and take the coarse filter
upward and out .
5. Clean the filter elements under
running water.
Carefully remove the rim of de-
bris between the coarse filter
and the fine filter.
6. Put the filter system back to-
gether.
Ensure that the locking catches
on the coarse filter click into position.
40
Page 41
Cleaning and maintenance en-us
1
2
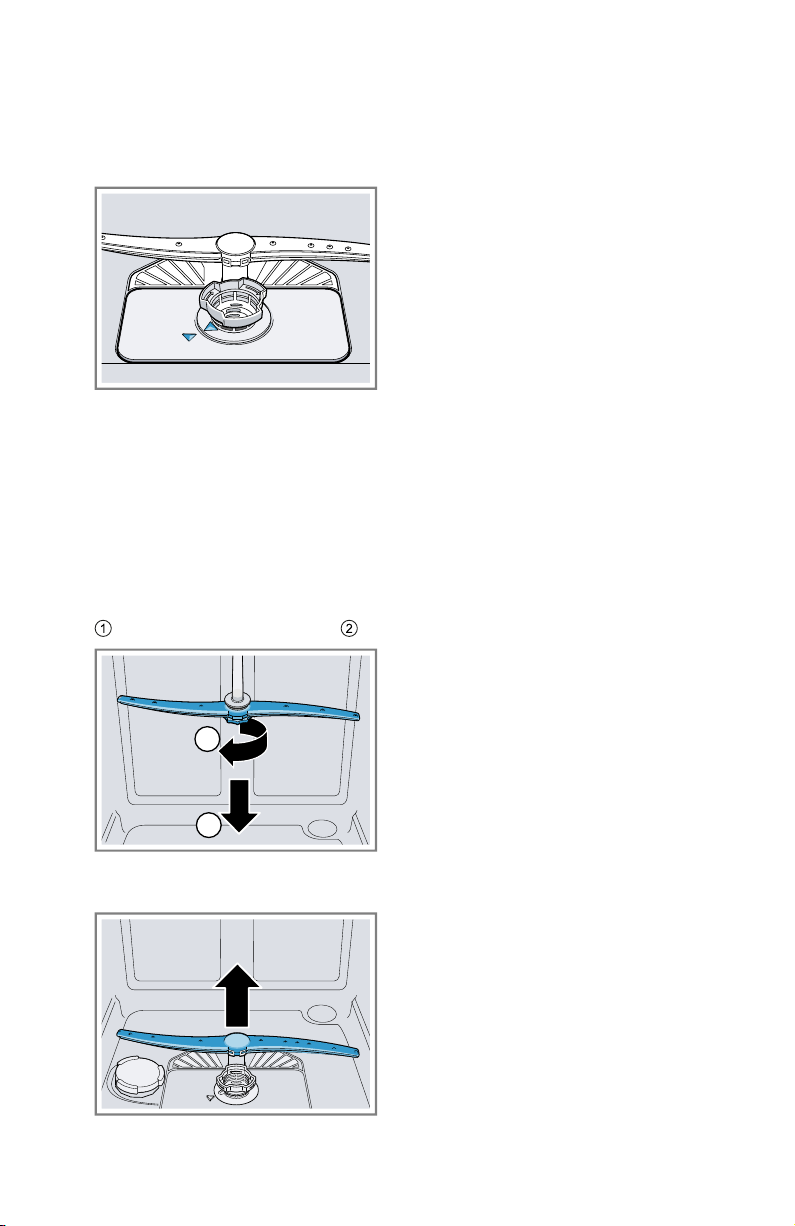
7. Insert the filter system into the
appliance and turn the coarse
filter clockwise.
‒ Ensure that the arrow mark-
ings match up.
16.6 Cleaning the spray arms
Limescale and soiling in the dishwashing water may block the nozzles and bearings on the spray
arms. Clean the spray arms regularly.
1. Unscrew the upper spray arm
and pull down to remove .
3. Check the outlet nozzles on the
spray arms for blockages under
running water and remove any
foreign objects.
4. Insert the lower spray arm.
a The spray arm clicks into posi-
tion.
5. Insert the upper spray arm and
screw firmly in place.
2. Pull up the lower spray arm to
remove.
41
Page 42
en-us Troubleshooting
Troubleshooting
17 Troubleshooting
Troubleshooting
You can eliminate minor issues on
your appliance yourself. Please
read the information on eliminat-
Issue Cause and troubleshooting
E:20-60 lights up alternately.
Appliance has detected that the heating element
is calcified.
1. Descale the appliance.
2. Operate the appliance with the Water softening
system.
E:21-30 lights up alternately.
Intake opening of Zeolith container is covered by
items of dishware.
▶ Rearrange the dishware in the appliance so the
Intake opening of the Zeolith container
→
Page11
E:30-00 lights up alternately.
E:31-00 lights up alternately.
E:32-00 lights up alternately or indicator
for water supply
lights up.
Water protection system is activated.
1. Turn off the water faucet.
2.
Call customer service →
Water protection system is activated.
1. Turn off the water faucet.
2.
Call customer service →
Inlet hose is kinked.
▶ Install the inlet hose without kinks.
Water faucet is turned off.
▶ Turn on the faucet.
Water faucet is clogged or calcified.
▶ Turn on the faucet.
The flow rate must be at least 10 l/min when
the water supply is open.
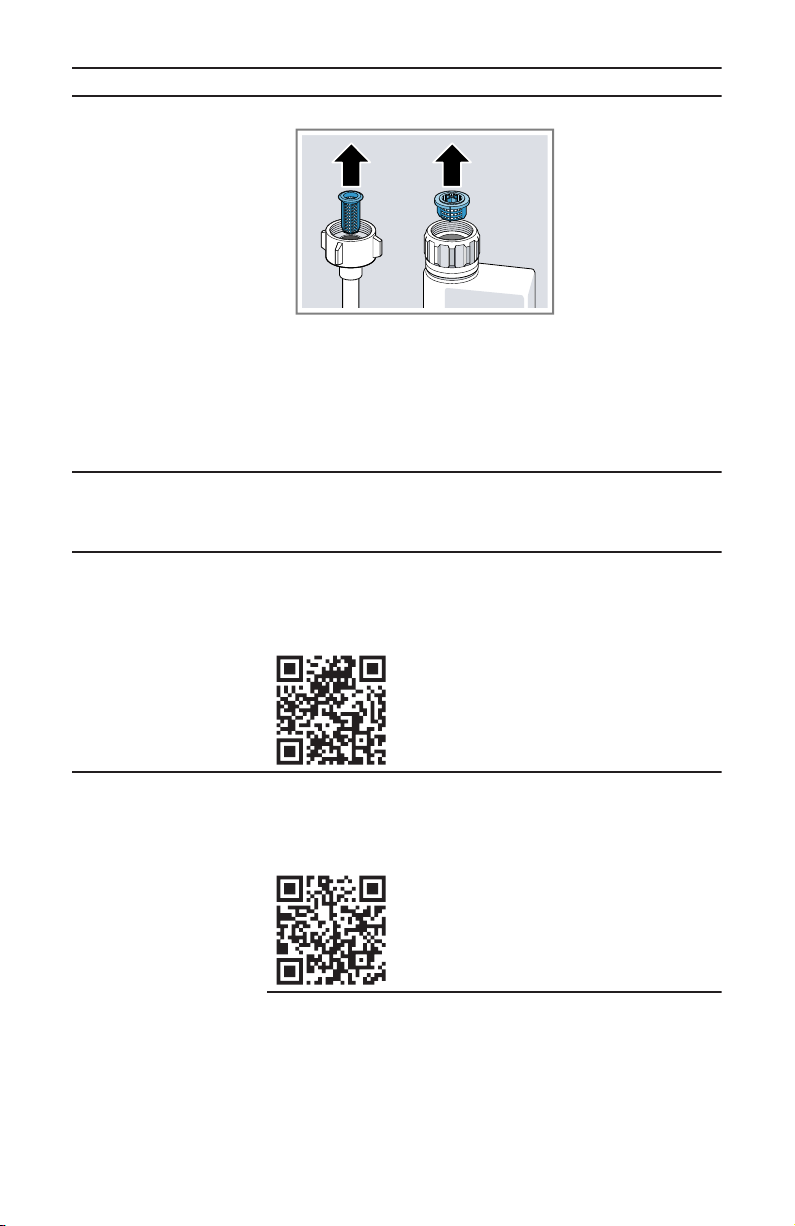
Filters in the water connection of the supply or
AquaStop hose are blocked.
1. Switch off the appliance.
2. Pull out the power cord plug.
3. Turn off the water faucet.
4. Unscrew the water connection.
ing issues before contacting Customer Service. This may avoid unnecessary repair costs.
1
is no longer obstructed.
Page56
Page56
.
.
1
Depending on the appliance specifications
42
Page 43
Issue Cause and troubleshooting
E:32-00 lights up al-
5. Remove the filter from the supply hose.
ternately or indicator
for water supply
lights up.
6. Clean the filter.
7. Reinsert the filter in the supply hose.
8. Screw the water connection back on.
9. Check the water connection for leaks.
10. Restore the power supply.
11. Switch the appliance on.
E:34-00 lights up alternately.
E:61-02 lights up alternately.
Water is continuously running into the appliance.
1. Turn off the water faucet.
2.
Call customer service →
Page56
Not an appliance error. The drain pump cover is
loose or a foreign object is blocking the pump.
▶ Secure the cover of the drain pump so it clicks
into place or clean the drain pump.
Troubleshooting en-us
.
E:61-03 lights up alternately. Water is
not draining.
Not an appliance error. Garbage disposal is still
plugged or the drain hose is kinked.
▶ Check that the garbage disposal plug is re-
moved and that the drain hose is not kinked.
Not an appliance error. The drain pump cover is
loose or a foreign object is blocking the pump.
▶ Secure the cover of the drain pump so it clicks
into place or clean the drain pump.
43
Page 44
en-us Troubleshooting
Issue Cause and troubleshooting
E:61-03 lights up alternately. Water is
not draining.
Not an appliance error. High loop is missing and/
or debris flushed back into drain hose and
blocked it.
▶ Be sure there is a high loop in the drain hose
and that no debris has flushed back into the
hose.
E:90-01 lights up alternately.
Power voltage is too low.
There is no problem with the appliance.
1. Call an electrician.
2. Have the power voltage and electrical installa-
tion checked by an electrician.
E:92-40 lights up alternately.
Filters are soiled or blocked.
▶ Clean the filters.
→
"Cleaning filters", Page40
A different error
code appears in the
display window.
E:01-00 to E:90-10
There is a technical issue.
1. Press .
2. Pull out the power cord plug of the appliance or
switch off the breaker.
3. Wait at least 2minutes.
4. Insert the power cord plug of the appliance in a
power outlet or switch on the breaker.
5. Switch the appliance on.
6. If the problem occurs again:
‒ Press .
‒ Turn off the water faucet.
‒ Pull out the power cord plug.
‒ Contact customer service →
Page56
give the error code.
Dishware is not dry. No rinse aid used or dosage set too low.
1.
44
Add Rinse aid →
2. Set the amount of rinse aid to be dispensed.
→
"Setting the amount of rinse aid", Page25
Page24
.
and
Page 45
Troubleshooting en-us
Issue Cause and troubleshooting
Dishware is not dry. Cycle or cycle option has no drying phase, or dry-
ing phase is too short.
▶
Select a wash cycle with drying. →
Page15
Some option buttons decrease the drying result.
Water collects in recesses of dishware or silverware.
▶ Position dishware at an angle where possible.
The combined detergent used has a poor drying
performance.
1. Use rinse aid to improve drying performance.
2. Use a different combined detergent with a bet-
ter drying performance.
Extra Dry/intensive drying not activated to improve drying performance.
▶ Activate Extra Dry/intensive drying.
Dishware removed too early or drying process not
yet ended.
1. Wait until the program ends.
2. Only remove dishware 30minutes after the
program has ended.
Rinse aid used has a limited drying performance.
▶ Use a name-brand rinse aid.
Eco products may have limited effectiveness.
Silverware is not
dry.
Silverware not arranged properly in the silverware
basket or silverware drawer.
Droplets can form on the contact points of silverware.
1. Arrange silverware individually where possible.
→
Page28
2. Avoid points of contact.
45
Page 46
en-us Troubleshooting
Issue Cause and troubleshooting
Appliance interior
still wet after wash
cycle.
Not an error. Condensation drying creates water
droplets in the tub. This is normal. Moisture in the
air condenses on the inside walls of the appliance, runs off, and is pumped out.
No action required.
Food remnants on
dishware.
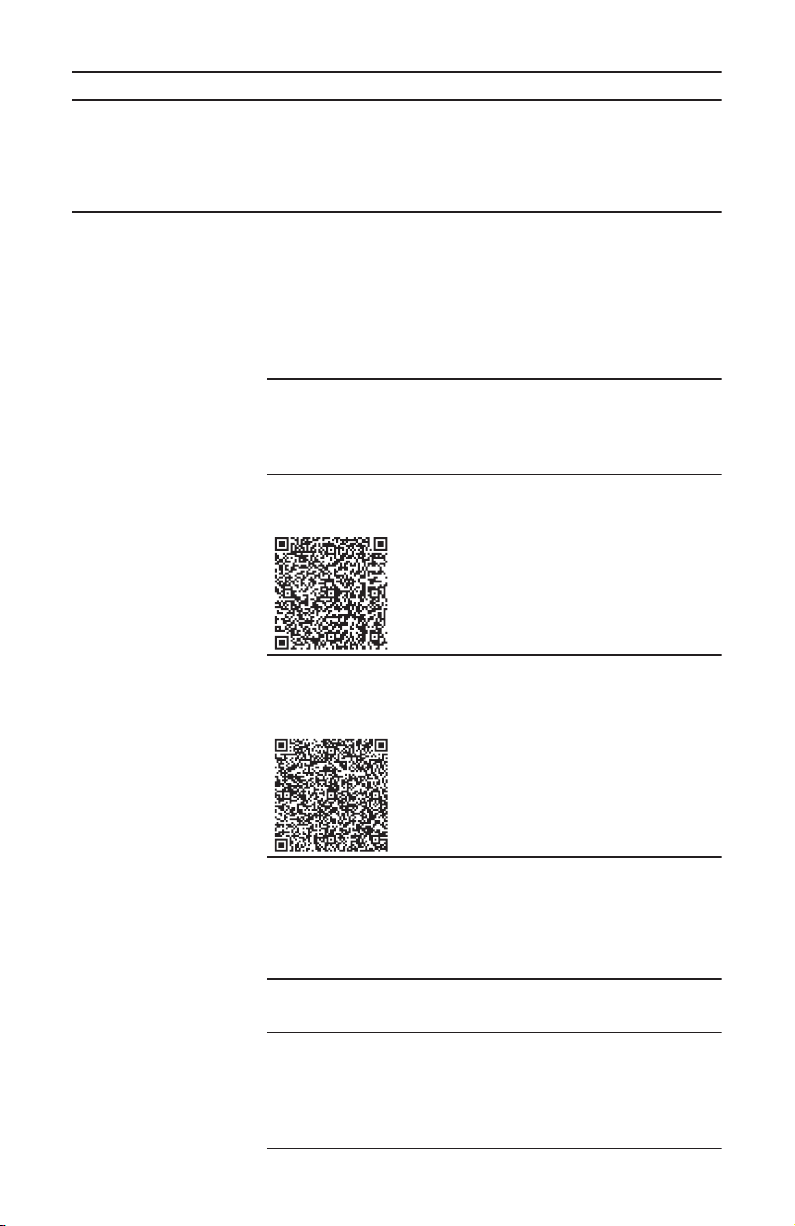
Dishware was placed too close together or rack is
overfilled.
1. Arrange dishware with sufficient space in be-
tween.
The spray jets must reach the surfaces of the
dishware.
2. Avoid points of contact.
Spray arm rotation of the lower spray arm is
blocked.
▶ Arrange dishware so it does not obstruct spray
arm rotation.
Spray arm nozzles are blocked.
▶
Clean the Spray arms →
Page41
.
46
Filters are dirty.
▶ Clean the filters.
→
"Cleaning filters", Page40
Filters are inserted incorrectly and/or not engaged.
1. Insert the filters properly.
→
"Filter system", Page40
2. Twist filters into place.
Selected wash cycle is too light.
▶ Select a more intensive wash program.
Dishware has been precleaned too intensively.
Then the sensors choose a lighter cycle. Stubborn remnants cannot be entirely removed.
▶ Only remove large remnants of food and do not
pre-rinse dishware.
Page 47
Issue Cause and troubleshooting
Food remnants on
dishware.
Tall narrow containers in corner areas are not
rinsed out adequately.
▶ Do not position tall narrow containers at too
great an angle or in corner areas.
Upper rack on right and left not set to same
height.
▶ Set the upper rack on the left and right to the
same height.
→
"Upper rack", Page19
Detergent residue in
the appliance
Lid of the detergent dispenser is blocked by items
of dishware and will not open.
1. Arrange dishware in the upper rack so the tab
collecting tray is not obstructed by dishware.
→
"Loading dishware", Page28
Items of dishware are blocking the dispenser
lid.
2. Do not place dishware or fragrance dispensers
in the tab collecting tray.
The lid of the detergent dispenser is blocked by
the tab and will not open.
▶ Position the tab in the detergent dispenser
crosswise, not vertically.
Tabs are used in the quick or short cycle. There is
not enough time for the tab to dissolve.
▶ Select a more intensive Wash cycle or use
Powder detergent.
Detergent may lose its cleaning or dissolving ability after being stored a long time, or the detergent
is clumped together.
▶ Change your Detergent.
Water spots on
plastic parts.
Droplet formation on plastic surfaces is unavoidable due to the laws of physics. Water spots are
visible after drying.
▶ Select a more intensive program.
▶ Position dishware at an angle.
→
"Loading dishware", Page28
▶ Use rinse aid.
→
"Rinse aid", Page24
▶ Set the water softening system higher.
→
"Setting the water softening system",
Page23
Troubleshooting en-us
47
Page 48
en-us Troubleshooting
Issue Cause and troubleshooting
Wipeable or watersoluble coatings inside the appliance
or on the door.
There is detergent residue. These coatings cannot generally be removed with chemicals.
▶ Change your Detergent.
▶ Scrub the appliance by hand.
White coating is deposited inside the appliance.
1. Adjust the water softening system correctly.
→
"Setting the water softening system",
Page23
In most cases you will need to increase the
setting.
2. If necessary, change your detergent.
Special salt dispenser is not screwed tight.
▶ Screw the special salt dispenser tight.
There are stubborn
white coatings on
the dishware, inside
the appliance or on
the door.
There is detergent residue. These coatings cannot generally be removed with chemicals.
▶ Change your Detergent.
▶ Scrub the appliance by hand.
Hardness range is set incorrectly or the water
hardness is too high.
▶ Set the Water softening system to the water
hardness or add special salt.
3in1/organic/eco detergent is not effective
enough.
▶ Set the Water softening system to the water
hardness and use separate detergents (name
brand, special salt, rinse aid).
Too little detergent is being used.
▶ Increase the amount of detergent used or
change Detergent .
Selected wash cycle is too light.
▶ Select a more intensive wash program.
Tea residue or lipstick marks on dishware.
Dishwashing temperature is too low.
▶ Select a program with a higher dishwashing
temperature.
Too little detergent is being used or is unsuitable.
▶ Use a suitable Detergent and follow the manu-
facturer's instructions for the amount to be
used.
Dishware has been precleaned too intensively.
Then the sensors choose a lighter cycle. Stubborn remnants cannot be entirely removed.
▶ Only remove large remnants of food and do not
pre-rinse dishware.
48
Page 49
Issue Cause and troubleshooting
There are colored
coatings (blue, yellow, brown) inside
the appliance or on
stainless steel dishware that are difficult or impossible to
remove.
The formation of films is due to substances contained in vegetables (cabbage, celery, potatoes,
noodles, etc.) or tap water (manganese).
▶ Clean the appliance.
You can remove coatings with Mechanical
cleaning →
Page38
or a machine cleaning
product. It may not always be possible to completely remove coatings but they are harmless
to health.
The formation of films is due to metal components
on silver or aluminum dishware.
▶ Clean the appliance.
You can remove coatings with Mechanical
cleaning →
Page38
or a machine cleaning
product. It may not always be possible to completely remove coatings but they are harmless
to health.
There are colored
deposits (yellow, orange, brown) that
are ey to remove inside the appliance
(mainly at the bottom).
The formation of films is due to ingredients of
food remnants and tap water (limescale), "soaplike".
1. Check the setting of the water softening sys-
tem.
→
"Setting the water softening system",
Page23
2. Add special salt.
3. If you are using combined detergents (tabs),
activate the water softening system.
Follow the information on detergents.
Plastic parts inside
the appliance are
discolored.
Plastic parts inside the appliance may become
discolored over the life of the dishwasher.
▶ Discoloration may come about and will not im-
pair functioning of the appliance.
Plastic parts are discolored.
Dishwashing temperature is too low.
▶ Select a program with a higher dishwashing
temperature.
Dishware has been precleaned too intensively.
Then the sensors choose a lighter cycle. Stubborn remnants cannot be entirely removed.
▶ Only remove large remnants of food and do not
pre-rinse dishware.
Troubleshooting en-us
49
Page 50
en-us Troubleshooting
Issue Cause and troubleshooting
There are removable streaks on
glasses, glassware
with a metallic appearance and silverware.
Amount of rinse aid to be dispensed is set too
high.
▶ Set the rinse aid system to a lower setting.
→
"Setting the amount of rinse aid", Page25
No rinse aid has been added.
▶ Add rinse aid.
→
"Adding rinse aid", Page24
There is detergent residue in the final rinse. Lid of
detergent dispenser is blocked by dishware and
will not open fully.
1. Arrange dishware in the upper rack so the tab
collecting tray is not obstructed by dishware.
→
"Loading dishware", Page28
Items of dishware are blocking the dispenser
lid.
2. Do not place dishware or fragrance dispensers
in the tab collecting tray.
Dishware has been precleaned too intensively.
Then the sensors choose a lighter cycle. Stubborn remnants cannot be entirely removed.
▶ Only remove large remnants of food and do not
pre-rinse dishware.
Irreversible clouding
of glassware.
Glasses are not dishwasher-proof, only suitable
for dishwashers.
▶ Use dishwasher-proof glasses.
Glasses are usually only suitable for cleaning
in a dishwasher, i.e. long-term wear or longterm changes must be expected.
▶ Avoid a lengthy steam phase (standing time af-
ter wash cycle ends).
▶ Use a program with a lower temperature.
▶ Set the softening system to the water hard-
ness.
→
"Setting the water softening system",
Page23
▶ Use detergent with a glass protection compo-
nent.
Detergent residue is
present in the detergent dispenser or
the tab collecting
tray.
Spray arms were blocked by dishware so detergent was not rinsed out.
▶ Check that the spray arms are not blocked and
can rotate freely.
Detergent dispenser was damp when detergent
was added.
50
Page 51
Issue Cause and troubleshooting
Detergent residue is
present in the deter-
▶ Only add detergent to the detergent dispenser
when dry.
gent dispenser or
the tab collecting
tray.
Excessive formation
of foam occurs.
Hand soap got in the rinse aid dispenser.
▶ Immediately add rinse aid to the dispenser.
→
"Adding rinse aid", Page24
Rinse aid has been spilled.
▶ Remove the rinse aid with a cloth.
Detergent or machine care product used causes
excessive foaming.
▶ Change the brand of detergent.
Connection to home
network is not established.
WLAN display is
flashing.
WLAN on router is not active.
▶ Check the wireless network connection of your
router.
Connection to home network is not available.
▶ Activate the wireless network connection on
your router.
Home Connect cannot be implemented
correctly.
Home Connect set incorrectly.
▶ Please consult the documents supplied for
HomeConnect®.
There is a technical error.
▶ Please consult the information on support in
the documents supplied for HomeConnect®.
Special salt refill indicator lights up.
Insufficient special salt.
▶ Add Special salt.
Sensor does not detect special salt tablets.
▶ Do not use special salt tablets.
Refill indicator for
special salt does not
light up.
Water softening system is switched off.
▶ Set the water softening system.
→
"Setting the water softening system",
Page23
Refill indicator for
rinse aid lights up.
Refill indicator for
rinse aid does not
light up.
No rinse aid.
1.
Add Rinse aid →
2. Set the amount of rinse aid to be dispensed.
→
"Setting the amount of rinse aid", Page25
Page24
Rinse aid system is switched off.
▶ Set the amount of rinse aid.
→
"Setting the amount of rinse aid", Page25
Troubleshooting en-us
.
51
Page 52
en-us Troubleshooting
Issue Cause and troubleshooting
Display flashes. Appliance door is not closed properly.
▶ Close the appliance door.
‒ Arrange the dishware so that no parts
project beyond the rack and prevent the appliance door from closing properly.
All LEDs light up or
flash.
Electronics have detected a fault.
1. Press the main switch button for approx. 4sec-
onds.
→
"Controls", Page13
The appliance is reset and restarted.
2. If the problem occurs again:
‒ Switch off the appliance.
‒ Unplug the power plug or switch off the cir-
cuit breaker in the fuse box.
‒ Wait at least 2minutes.
‒ Switch on the circuit breaker in the fuse box
or plug in the power plug.
‒ Switch on the appliance.
3. If the problem occurs again:
‒ Contact customer service.
→
"Customer Service", Page56
UP appears on the
display.
A software update is available.
▶ Press the remote start button to install the soft-
ware update.
a After a successful software update, "Suc" ap-
pears on the display for a few seconds.
Water is left in the
appliance at the end
of the program.
Filter system or area under the filters is blocked.
1.
Clean the Filters →
2.
Clean the Drain pump →
Page40
Page54
.
Program has not yet ended.
▶ Wait until the program ends or terminate the
program with Reset.
▶
→
"Terminating the wash cycle", Page32
Appliance cannot be
switched on or operated.
Software update is taking place.
▶ Wait until the software update has finished.
Appliance functions have failed.
1. Pull out the power cord plug or switch off the
breaker.
2. Wait at least 2minutes.
3. Connect the appliance to the power supply.
4. Switch the appliance on.
.
52
Page 53
Issue Cause and troubleshooting
Appliance does not
start.
The breaker has tripped.
▶ Check the relevant breaker.
Power cord is not inserted.
1. Check whether the power outlet is working.
2. Check whether the power cord plug is properly
inserted in the power outlet and on the rear of
the appliance.
Appliance door is not closed properly.
▶ Close the appliance door.
Wash cycle starts
up automatically.
Appliance stops during the cycle or cuts
out.
You did not wait until the cycle ended.
▶
→
"Terminating the wash cycle", Page32
Appliance door is not closed properly.
▶ Close the appliance door.
Power and/or water supply has been interrupted.
1. Check the power supply.
2. Check the water supply.
Upper rack is pressing against inner door and
preventing appliance door from being closed securely.
▶ Check whether the rear panel of the appliance
is being pressed in by a power outlet or a hose
holder that has not been removed.
▶ Arrange the dishware so that no parts project
beyond the rack and prevent the appliance
door from closing properly.
Appliance door cannot be closed.
Door lock has been activated.
▶ Close the appliance door with greater force.
Door cannot be closed due to installation method.
▶ Check whether the appliance has been in-
stalled properly.
When closed, the appliance door, its decor or
attached parts should not knock against adjacent cabinets or the worktop.
Lid on the detergent
dispenser cannot be
closed.
Filling valves making knocking noises.
Detergent dispenser or lid are blocked by sticky
detergent residue.
▶ Remove detergent residue.
Caused by the domestic installation. No fault
present in the appliance. Does not affect functioning of the appliance.
▶ Can only be remedied in the home installation.
Troubleshooting en-us
53
Page 54
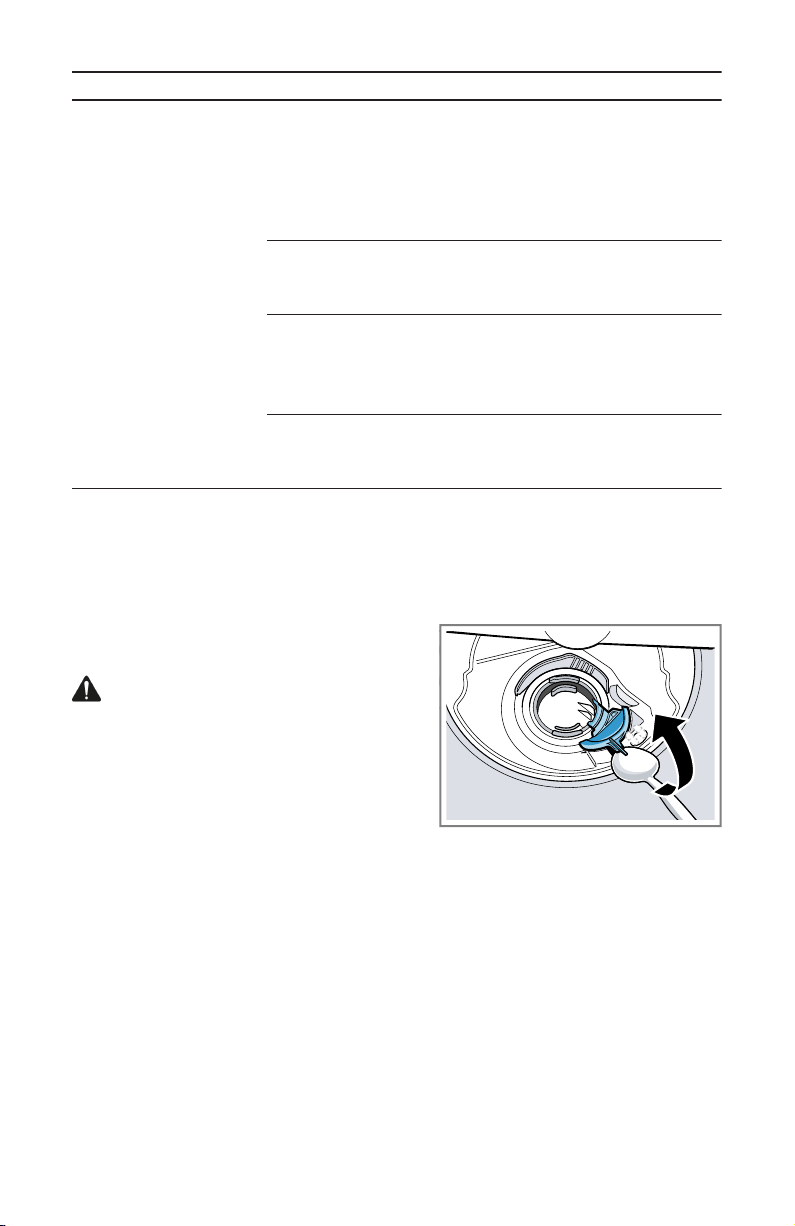
en-us Troubleshooting
Issue Cause and troubleshooting
Noise level varies The noise level can vary, depending on what kind
of dishes are loaded and where they are placed.
▶ Make sure the dishware is loaded in the most
secure way, resting on the tines and not hitting
each other.
→
"Loading dishware", Page28
Spray arm is striking dishes.
▶ Arrange dishware so the spray arms do not
strike dishware.
With a small load the water jets directly strike
against the tub.
▶ Distribute the dishware evenly.
▶ Load the appliance with more dishware.
Light items of dishware move about during the
wash cycle.
▶ Position light items of dishware securely.
17.1 Clean drain pump
Large food remnants or foreign
objects can block the drain pump.
As soon as the dishwashing water
no longer drains properly, the
drain pump must be cleaned.
CAUTION
There may be some sharp debris,
such as glass fragments, blocking
the drain pump.
▶ Use caution when removing
parts for cleaning.
1. Disconnect the appliance from
the power supply.
2. Remove the upper and lower
rack.
3. Remove the filter system.
4. Scoop out any water.
Use a sponge if necessary.
5. Pry the pump cover off using a
spoon and grip it by the crosspiece.
6. Lift the pump cover diagonally
inward and take it out.
a Now you can reach the impeller
with your hand.
7. Remove any food remnants or
foreign objects in the area of
the impeller.
54
Page 55
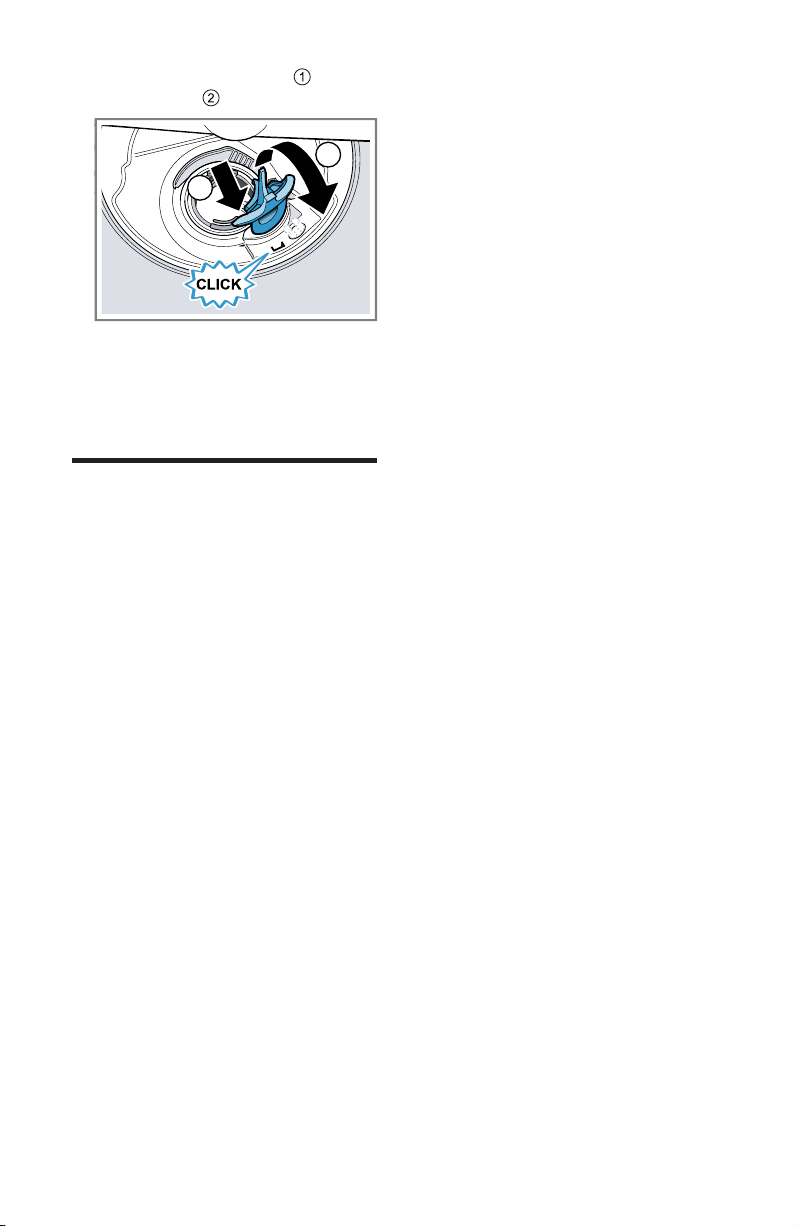
Transportation, storage and disposal en-us
1
2
8. Insert the pump cover and
press down .
a The pump cover clicks into po-
sition.
9. Install the filter system.
10. Insert the upper and lower rack.
Transportation, storage and disposal
18 Transportation,
storage and
disposal
Transportation, storage and disposal
18.1 Removing the appliance
1. Disconnect the appliance from
the power supply.
2. Turn off the water faucet.
3. Detach the drain connection.
4. Detach the water connection.
5. Loosen any screws fastening
the appliance to cabinet parts.
6. Remove the base panel if fitted.
7. Pull the appliance out carefully,
along with the hose behind it.
18.2 Vacation and Storage
NOTICE:
Preparing your unit for vacation
▶ Before leaving for vacation dur-
ing warmer weather, besides
turning off the main valve, also
turn off water supply at the
nearest point to the dish-
washer. During colder weather,
please follow the instructions
for winterizing your unit below.
Winterizing your unit
▶ If your dishwasher will be un-
used for an extended period of
time in a location that experiences freezing temperatures
(vacation home or through a
vacation period), have your
dishwasher winterized by an
authorized service provider.
18.3 Transporting the appliance
To avoid damage to the appliance, empty it before transporting.
Note:Always transport the dishwasher upright to prevent residual
water getting into the machine's
controls and damaging the appliance.
1. Remove dishware from the ap-
pliance.
2. Secure loose parts.
3. Switch on the appliance.
4. Select the cycle with the high-
est temperature.
5.
Start the cycle. →
6. To drain the appliance, termi-
nate the cycle after approx.
4minutes.
→
"Terminating the wash cy-
cle", Page32
7. Switch off the appliance.
8. Turn off the water faucet.
9. To empty the residual water out
of the appliance, detach the
supply hose and let the water
drain out.
Page32
55
Page 56

en-us Customer Service
18.4 Disposal of your old appliance
Environmentally sound disposal
allows valuable raw materials to
be recycled.
WARNING
Avoid a risk of entrapment upon
disposal.
▶ Unplug the appliance from the
power outlet.
▶ Cut the power cord and remove
the door upon discarding the
appliance.
▶ Check your local area for large
appliance recycling programs.
Customer Service
19 Customer Service
Customer Service
With any warranty repair, we will
make sure your appliance is repaired by an authorized service
provider using genuine replacement parts. We use only genuine
replacement parts for all repairs.
Detailed information on the warranty period and terms of warranty
can be found in the Statement of
Limited Product Warranty, from
your retailer, or on our website.
If you contact Customer Service,
you will need the model number
(E-Nr.), the production number
(FD) and the consecutive numbering (Z-Nr.) of your appliance.
USA:
1-800-944-2904
www.bosch-home.com/us/ownersupport/get-support
www.bosch-home.com/us/shop
CA:
1-800-944-2904
www.bosch-home.ca/en/service/
get-support
www.bosch-home.ca/en/service/
cleaners-and-accessories
For assistance with connecting to
HomeConnect®, you can also
view instructions here:
www.home-connect.com/us/en/
help-support/set-up
19.1 Model number (ENr.), production
number (FD) and
consecutive
numbering (Z-Nr.)
You can find the model number
(E-Nr.), the production number
(FD) and the consecutive numbering (Z-Nr.) on the appliance's rating plate.
The rating plate is located inside
the appliance door.
Making a note of your appliance's
details and the Customer Service
telephone number will enable you
to find them again quickly.
19.2 AquaStop® Pledge
In addition to the standard warranty provided by BSH, BSH will
also compensate customers for
damage caused by a specific fault
in the AquaStop system giving
rise to a valid warranty claim.
Compensation will be provided
under the following conditions:
¡ If water damage is caused by a
defect in materials or workmanship in the AquaStop system,
BSH will compensate customers reasonable and verifiable damages.
¡ A condition of all warranty
claims is the appliance with
AquaStop must have been installed and connected correctly
in accordance with all instructions; this also includes a properly installed AquaStop extension (genuine accessories).
The warranty does not cover
56
Page 57

defective feed lines or fittings
leading to the AquaStop connection at the tap.
Customer Service en-us
57
Page 58

en-us Technical specifications
Technical specifications
20 Technical specifications
Technical specifications
Weight Max.: 60kg/132lbs
Voltage 120V, 60Hz
Power rating 1440W
Fuse 12A
Water pressure ¡ Min. 7.25 psi (50 kPa)
¡ Max. 145 psi (1000 kPa)
Inlet rate Min. 2.6gal/min
Water temperature Cold water.
Hot water max.: 140°F/ (60°C)
Load capacity 15place settings
20.1 Information regarding Free and Open Source Software
This product includes software
components that are licensed by
the copyright holders as free or
open source software.
The applicable license information
is stored on your home appliance.
You can also access the applicable license information via your
HomeConnect® app: "Profile ->
Legal information -> License
Information".1 You can download
the license information on the
brand product website. (Please
search on the product website for
your appliance model and additional documents). Alternatively,
you can request the relevant information from ossre[email protected] or BSH Hausgeräte GmbH, Carl-Wery-Str. 34,
81739 Munich, Germany.
The source code will be made
available to you on request.
Please send your request to oss[email protected] or BSH Hausgeräte GmbH, Carl-Wery-Str.34,
81739 Munich, Germany.
Subject: „OSSREQUEST“
The cost of performing your request will be charged to you. This
offer is valid for three years from
the date of purchase or at least as
long as we offer support and
spare parts for the relevant appliance.
STATEMENT OF LIMITED PRODUCT WARRANTY
21 STATEMENT OF
LIMITED
PRODUCT
WARRANTY
STATEMENT OF LIMITED PRODUCT WARRANTY
21.1 What this warranty covers & Who it applies to
The limited warranty provided by
BSH Home Appliances (“Bosch“)
in this Statement of Limited Product Warranty applies only to the
1
Depending on the appliance specifications
58
Page 59

STATEMENT OF LIMITED PRODUCT WARRANTY en-us
Bosch appliance sold to you
(“Product“), provided that the
Product was purchased:
¡ For your normal, household
(non-commercial) use, and has
in fact at all times only been
used for normal household purposes.
¡ New at retail from a BSH au-
thorized dealer or directly from
BSH (not a display, "as is", or
previously returned model), and
not for resale, or commercial
use.
¡ Within the United States or
Canada, and has at all times
remained within the country of
original purchase.
The warranties stated herein apply to the original purchaser of the
product warranted herein and to
each succeeding owner of the
product purchased for ordinary
home use during the term of the
warranty.
Please make sure to register your
Product; while not necessary to
effectuate warranty coverage, it is
the best way for Bosch to notify
you in the unlikely event of a
safety notice or product recall.
21.2 How long the warranty lasts
Bosch warrants that the Product is
free from defects in materials and
workmanship for a period of three
hundred and sixty-five (365) days
from the date of the original delivery. The foregoing timeline begins
to run upon the date of the original
delivery, and shall not be stalled,
tolled, extended, or suspended,
for any reason whatsoever. This
Product is also warranted to be
free from cosmetic defects in material and workmanship (such as
scratches of stainless steel, paint/
porcelain blemishes, chips, dents,
or other damage to the finish) of
the Product, for a period of thirty
(30) days from the date of delivery
or closing date for new construction. This cosmetic warranty excludes slight color variations due
to inherent differences in painted
and porcelain parts, as well as differences caused by kitchen lighting, product location, or other similar factors. This cosmetic warranty specifically excludes any
display, floor, “As Is”, or “B” stock
appliances.
21.3 Extended Warranty
BSH also provides these additional limited warranties:
¡ 5 year limited warranty on elec-
tronics: BSH will repair or replace any BSH microprocessor
or printed circuit board if it
proves to be defective in materials or workmanship (excludes
labor charges).
¡ 5 year limited warranty on dish
racks: BSH will replace the upper or lower dish rack (excluding rack components), if the
rack proves defective in materials or workmanship (excludes
labor charges).
¡ Lifetime warranty against stain-
less steel rust through: BSH will
repair or replace your dishwasher with the same model or
a current model that is substantially equivalent or better in
functionality, if the inner liner
should rust through (excludes
labor charges).
¡ BSH will repair or replace the
stainless steel door if the door
should rust through (excludes
labor charges).
59
Page 60

en-us STATEMENT OF LIMITED PRODUCT WARRANTY
21.4 Repair/replace as your exclusive remedy
During this warranty period,
Bosch or one of its authorized service providers will repair your
Product without charge to you
(subject to certain limitations
stated herein) if your Product
proves to have been manufactured with a defect in materials or
workmanship. If reasonable attempts to repair the Product have
been made without success, then
Bosch will replace your Product
(upgraded models may be available to you, in Bosch’s sole discretion, for an additional charge).
Nothing in this warranty requires
damaged or defective parts to be
replaced with parts of a different
type or design than the original
part. All removed parts and components shall become the property of Bosch at its sole option. All
replaced and/or repaired parts
shall assume the identity of the
original part for purposes of this
warranty and this warranty shall
not be extended with respect to
such parts. Bosch's sole liability
and responsibility hereunder is to
repair manufacturer-defective
Product only, using a Bosch authorized service provider during
normal business hours. For safety
and property damage concerns,
Bosch highly recommends that
you do not attempt to repair the
Product yourself, or use a non-authorized service provider; Bosch
will have no responsibility or liability for damage resulting from repairs or work performed by a nonauthorized service provider. Authorized service providers are
those persons or companies that
have been specially trained on
Bosch products, and who pos-
sess, in Bosch's opinion, a superior reputation for customer service and technical ability (note
that they are independent entities
and are not agents, partners, affiliates or representatives of Bosch).
Nevertheless, taking your product
to be serviced by a repair shop
that is not affiliated with or an authorized dealer of Bosch will not
void this warranty. Also, using
third-party parts will not void this
warranty. Notwithstanding the
foregoing, Bosch will not incur any
liability, or have responsibility, for
the Product if it is located in a remote area (more than 100 miles
from an authorized service
provider) or is reasonably inaccessible, hazardous, threatening,
or treacherous locale, surroundings, or environment; in any such
event, if you request, Bosch would
still pay for labor and parts and
ship the parts to the nearest authorized service provider, but you
would still be fully liable and responsible for any travel time or
other special charges by the service company, assuming they
agree to make the service call.
Further, to the extent you have installed the Product in a difficult-toaccess location or have otherwise
installed temporary or permanent
fixtures that create barriers to accessing or removing the Product,
Bosch will not incur any liability
for, or have responsibility, for work
or costs associated with moving
the Product or otherwise creating
access to the Product in order to
repair or replace it. All such costs
shall be your sole responsibility.
21.5 Out of warranty product
Bosch is under no obligation, at
law or otherwise, to provide you
with any concessions, including
60
Page 61

STATEMENT OF LIMITED PRODUCT WARRANTY en-us
repairs, prorates, or Product replacement, once this warranty has
expired.
21.6 Warranty exclusions
The warranty coverage described
herein excludes all defects or
damage that are not the direct
fault of Bosch, including without
limitation, one or more of the following:
¡ Use of the Product in anything
other than its normal, customary and intended manner (including without limitation, any
form of commercial use, use or
storage of an indoor product
outdoors, use of the Product in
conjunction with air or watergoing vessels).
¡ Any party's willful misconduct,
negligence, misuse, abuse, accidents, neglect, improper operation, failure to maintain, improper or negligent installation,
tampering, failure to follow operating instructions, mishandling, unauthorized service (including selfperformed "fixing" or
exploration of the appliance's
internal workings).
¡ Adjustment, alteration or modi-
fication of any kind.
¡ A failure to comply with any ap-
plicable state, local, city, or
county electrical, plumbing and/
or building codes, regulations,
or laws, including failure to install the product in strict conformity with local fire and building codes and regulations.
¡ Ordinary wear and tear, spills
of food, liquid, grease accumulations, or other substances
that accumulate on, in, or
around the Product.
¡ Any external, elemental and/or
environmental forces and factors, including without limitation, rain, wind, sand, floods,
fires, mud slides, freezing temperatures, excessive moisture
or extended exposure to humidity, lightning, power surges,
structural failures surrounding
the appliance, and acts of God.
¡ Service calls to correct the in-
stallation of your Product, to instruct you how to use your
Product, to replace house fuses
or correct house wiring or
plumbing.
¡ Removal and replacement of
trim or decorative panels that
interfere with servicing the
Product.
¡ Damage or defects caused by
labor or parts installed by any
non-authorized service
provider, unless approved by
Bosch before service is performed.
In no event shall Bosch have any
liability or responsibility whatsoever for damage to surrounding
property, including cabinetry,
floors, ceilings, and other structures or objects around the Product. Also excluded from this warranty are Products, on which the
serial numbers have been altered,
defaced, or removed; service visits to teach you how to use the
Product, or visits where there is
nothing wrong with the Product;
correction of installation problems
(you are solely responsible for any
structure and setting for the Product, including all electrical, plumbing or other connecting facilities,
for proper foundation/flooring, and
for any alterations including without limitation cabinetry, walls,
floors, shelving, etc.); and resetting of breakers or fuses
TO THE EXTENT ALLOWED BY
LAW, THIS WARRANTY SETS
OUT YOUR EXCLUSIVE REMEDIES WITH RESPECT TO
PRODUCT, WHETHER THE
CLAIM ARISES IN CONTRACT
61
Page 62

en-us STATEMENT OF LIMITED PRODUCT WARRANTY
OR TORT (INCLUDING STRICT
LIABILITY, OR NEGLIGENCE)
OR OTHERWISE. THIS WARRANTY IS IN LIEU OF ALL
OTHER WARRANTIES,
WHETHER EXPRESS OR IMPLIED. ANY WARRANTY IMPLIED BY LAW, WHETHER FOR
MERCHANTABILITY OR FITNESS FOR A PARTICULAR
PURPOSE, OR OTHERWISE,
SHALL BE EFFECTIVE ONLY
FOR THE PERIOD THAT THIS
EXPRESS LIMITED WARRANTY
IS EFFECTIVE. IN NO EVENT
WILL THE MANUFACTURER BE
LIABLE FOR CONSEQUENTIAL,
SPECIAL, INCIDENTAL, INDIRECT, "BUSINESS LOSS", AND/
OR PUNITIVE DAMAGES,
LOSSES, OR EXPENSES, INCLUDING WITHOUT LIMITATION TIME AWAY FROM WORK,
HOTELS AND/OR RESTAURANT
MEALS, REMODELLING EXPENSES IN EXCESS OF DIRECT DAMAGES WHICH ARE
DEFINITIVELY CAUSED EXCLUSIVELY BY BOSCH, OR OTHERWISE. SOME STATES DO NOT
ALLOW THE EXCLUSION OR
LIMITATION OF INCIDENTAL
OR CONSEQUENTIAL DAMAGES, AND SOME STATES DO
NOT ALLOW LIMITATIONS ON
HOW LONG AN IMPLIED WARRANTY LASTS, SO THE ABOVE
EXCLUSIONS OR LIMITATIONS
MAY NOT APPLY TO YOU. THIS
WARRANTY GIVES YOU SPECIFIC LEGAL RIGHTS, AND
YOU MAY ALSO HAVE OTHER
RIGHTS WHICH VARY FROM
STATE TO STATE.
No attempt to alter, modify or
amend this warranty shall be effective unless authorized in writing
by an officer of BSH.
21.7 Obtaining warranty service
To obtain warranty service for
your product, you should contact
Bosch Customer Support at
1-800-944-2904 to schedule a repair.
21.8 Product information
For handy reference, copy the information below from the rating
plate. Keep your invoice and/or
delivery documents for warranty
validation.
Model number (E-Nr.)
Production
number
(FD)
Date of delivery
62
Page 63
Page 64
Register your appliance to
enjoy customized benefits.
Thank you for being a Bosch customer!
Simply create a MyBosch account, then register your appliance.
You'll find a variety of customized information in MyBosch such as:
• Discounts for filters, cleaners, accessories & parts
• Easy access to manuals & appliance specifications
• Easy access to part lists
• Customized offer for the Bosch Appliance Service Plan (sent by mail after appliance registration)
Register here:
www.bosch-home.com/us/owner-support/mybosch
Looking for help?
You'll find it here.
No matter what, no matter when: Bosch is here to support you.
We’re here to assist with usage instructions, cleaning tips,
accessories & parts, troubleshooting, and repairs.
Find online resources such as FAQs, how-to-videos, manuals,
warranties and authorized Bosch servicers at:
www.bosch-home.com/us/owner-support/get-support
Contact us:
Please have your Model Number (E-Nr) ready when contacting us.
1-800-944-2904
www.bosch-home.com/us/owner-support/contact-us
BSH Home Appliances Corporation
1901 Main Street, Suite 600
Irvine, CA 92614
USA
www.bosch-home.com
*9001897051*
9001897051 (030914) 650 V1
en-us
1-800-944-2904
© 2023 BSH Home Appliances Corporation
 Loading...