

Bosch Security, Security System System User Manual

Security System
National Security Systems Inc (800)457-1999
User’s Guide

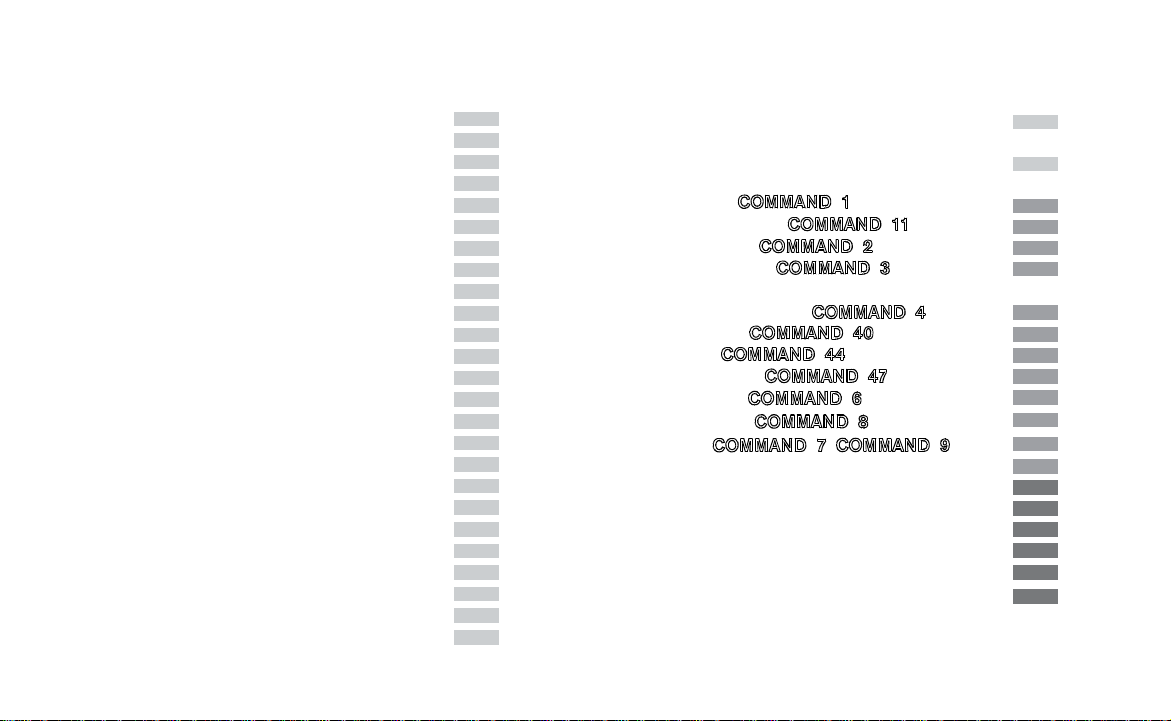
Table of Contents
Introduction
Command Center Function Keys
Security System Basics
Your Custom Display
View Faulted or Bypassed Points
Warning Displays and Tones
Fire Alarms
Burglary Alarms
Fire Trouble Event
Silencing Fire Troubles
Special Fire Trouble Display
Viewing Fire Troubles
Non-Fire Trouble Events
Silencing Non-Fire Trouble Events
Viewing Non-Fire Trouble Events
Special System Trouble Display
Cleared Events Are Not Lost
Entry Delay Tone and Display
Exit Delay Tone and Display
Keystroke Checking Tones
Silencing an Alarm
How Your System Reports Alarms
System Commands & Functions
Turning the System On (Arming)
Turning the System Off (Disarming)
Page Code
Turning the System On (Arming)
Page Code
With a Duress Passcode
Turning the System On (Arming)
With Doors or Windows Open
MASTER ARM ?
MASTER ARM INST ?
PERIMETR INST ?
PERIMETR DELAY ?
Silence the Trouble Sounder &
Clear Trouble Display
VIEW MEMORY ?
WALK TEST ?
RESET SENSORS?
WATCH MODE ?
PERIMETR PART?
Special Alerts ,
Security System Limitations
Fire Safety and Evacuation
Standard Displays
System Trouble Displays
Security System Glossary
Maintenance and Service
How to Clean the Command Center
Alphanumeric Display
Siren/Speaker
4998152977A
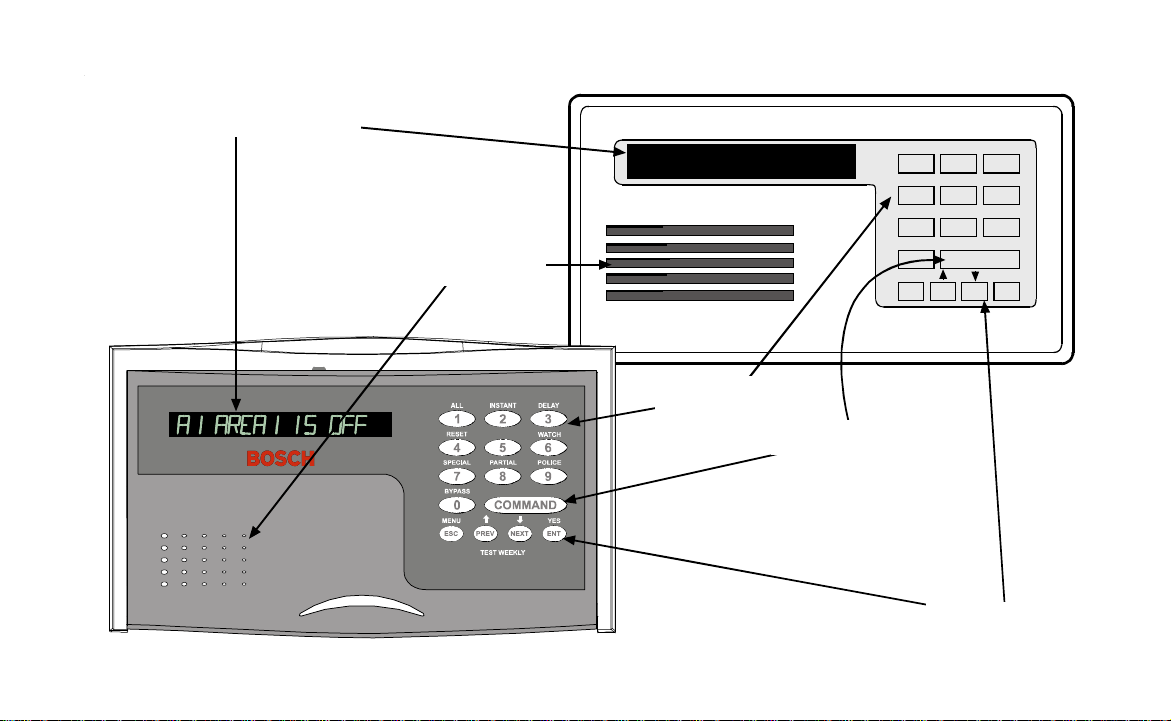
Ai AREA i IS OFF
Digital Keypad
Command Bar
ALL INSTANT DELAY
123
RESET WATCH
456
SPECIAL PARTIAL POLICE
789
BYPASS
COMMAND
0
MENU YES
PREV
ESC
NEXT
ENT
Function Keys

Introduction
Your security system helps to secure life, property, and investments
against fire, theft, and bodily harm. The keypad is an advanced
digital device that offers a variety of features not available with
other systems. Its highly visible, back-lit keypad and built-in
sounder alert you to a number of system events. Stylish design
and ease-of-use make it ideal for property protection.
Your security company can program the system to meet your
individual needs. Your property is given its own English language
description that appears in the keypad display.
About This Users Guide
This users guide covers basic system commands, such as turning
the system on and off. It is designed to be an everyday type of
reference for system users. The functions described in this guide
are programmed by your security company. Some of them might
not be included in your system. Some of the functions covered
might require you to enter your personal passcode.
Throughout this guide the # symbol refers to a variable numerical
quantity, such as the number of points to test or exit delay time.
Messages that appear in the keypad display appear in this guide
LIKE THIS. Keys that you must press appear LIKE THIS.
Using the Command Center
Your security system provides quick access to functions by pressing
the COMMAND bar and one or two additional keys.
Another way to access functions is through the Command Menu.
Access the Command Menu by pressing the MENU key. Pressing
the PREV or NEXT key allows you to scroll up or down through
the list of functions programmed by your security company.
Pressing the ENT key initiates the function displayed. To exit the
Command Menu, press the ESC key. Use the Command Menu
to locate functions you don’t use often or that don’t have a
command number.

Command Center Function Keys
Your keypad has five function keys. These keys are used to control
your system.
COMMAND
Use the COMMAND bar in combination with one or two
numeric keys to perform a function.
ENT/YES
The ENT (Enter)/YES key has two functions. The first is to
complete the entry of your passcode at the command enter. When
ever a function requires that you enter your passcode at the keypad,
first press the digits of the code and then press the ENT key. Your
system does not recognize your passcode until you press ENT.
The second function of the ENT/YES key is to select the menu
item displayed. Some menu items require your personal passcode
be entered before starting the function. Remember to press ENT
after entering your passcode.
ESC/MENU
The ESC (Escape)/MENU key has two functions. First, the ESC/
MENU key is used to enter the Command Menu. Pressing this
key when at idle text takes you to the first item in the menu.
Second, pressing ESC returns to the idle display.
PREV (Previous)
When viewing a list, pressing the PREV key takes you back to the
previously shown item.
NEXT
Press the NEXT key to pass over the present item in a menu or
list.

Security System Basics
What is a Point?
A “point” is a detection device, or group of devices connected to
your security system. Points display individually at the keypad
with custom text. The text can describe a single door, motion
sensor, smoke detector, or an area such as UPSTAIRS or GARAGE.
There are two basic types of points, controlled and 24-hour.
Controlled Points
Controlled points respond to alarm conditions depending upon
whether the system is turned on (armed) or turned off (disarmed).
Controlled points are programmed to respond instantly to alarm
conditions or to provide a delay for you to reach the keypad and
disarm the system. The words A1 # ALARMS appear before the
point text when there is an alarm. There are two types of controlled
points, perimeter points and interior points.
Perimeter Points
These points usually include all exterior doors and windows of
the building.
Interior Points
These points usually include interior forms of burglary detection
devices, such as carpet mats, motion sensors, or inside doors, for
example.

24-Hour Points
24-hour points are always on, even when the burglary system is
disarmed (turned off). There are two types of 24-hour points,
fire points and non-fire points.
Fire Points
Fire points exclusively monitor fire detection devices. They are
always armed and cannot be disarmed. You can clearly distinguish
fire points from other non-fire points at the keypad. When there is
a fire alarm, the text identifying the point as a fire point is displayed;
pressing the PREV key causes the summary display, such as A1 #
FIRE ALARM to appear in the display and pressing NEXT displays
any other points in alarm. Fire alarms have a unique audible
warning signal.
Non-Fire Points
Non-fire points are always armed and cannot be disarmed.

Your Custom Display
“At an idle state” means that the system is not currently performing a function entered by a user. There are three idle states the system
might be in:
• Turned on (Armed)
• Turned off (Disarmed) with no points faulted (doors or windows open) in the area
• Turned off with faulted points (doors or windows open) in the area.
This guide uses the default idle state displays for examples of these idle states. Your security company might program custom text for
the idle displays in your system. The custom text and the default text for the three system idle displays follow.
Custom Displays Default Text / Function
_ _ _ _ _ _ _ _ _ _ _ _ _ _ _ _ AREA_IS ON
Indicates the area is turned on (armed) and ready to detect intruders.
_ _ _ _ _ _ _ _ _ _ _ _ _ _ _ _ AREA _ IS OFF
Indicates the area is turned off (disarmed). 24-hour points remain armed.
_ _ _ _ _ _ _ _ _ _ _ _ _ _ _ _ AREA _ NOT READY
Indicates that the area is turned off, but not ready to arm. Perimeter and/or interior
points are faulted (doors or windows open).

View Faulted or Bypassed Points
To properly arm your system, all the doors and windows in the
system must be in the normal (not faulted) condition. Viewing
the faulted points helps you find faulted points and correct them
so proper arming is possible.
Your keypad offers two ways of displaying faulted and bypassed
point information. The first causes the faulted or bypassed point
information to scroll automatically through the display. The
second allows you to manually scroll through each individual
point description.
To automatically scroll faulted or bypassed points:
1. Ensure your keypad shows idle text.
2. Press any number key. If there are faulted points, AREA 1
## FAULT (## = total number of faulted points) is
displayed first. This display is followed by the point text
descriptions of the faulted points.
If there are bypassed points, AREA 1 ## BYPAS (## = total
number of bypassed points) is displayed, followed by the
point text descriptions of the bypassed points. These
displays scroll at the rate of 2 seconds each. If there are no
faulted or bypassed points, the displays does not appear.
Instead, the display shows NO FAULTS/BYPAS.
3. The display returns to idle text after scrolling through the
faulted and bypassed point information. Press ESC to stop
the display from scrolling.
To manually scroll faulted or bypassed points:
1. Ensure your keypad shows idle text.
2. Press the NEXT key repeatedly to display the faulted and
bypassed point information. If there are no faulted or
bypassed points the displays does not appear. Instead, the
display shows NO FAULTS/BYPAS.
3. You can return to idle text at any time by pressing ESC.

Warning Displays and Tones
Your keypad emits one of several distinct tones and displays custom
text to alert you to system events. Additional bells or sirens might
also be connected to your system. Bells or sirens mounted on the
exterior of your premises alert neighbors to emergencies and
provide an audible guide for police and fire fighters.
Command Center Quiets for Keystrokes
Pressing any key on the keypad lights the keys and quiets any
warning tones. If you don’t press another key within 20 seconds,
the keypad lights go out and the warning tones resume.
Priority of Events
If more than one event occurs, your system sorts them into one
of four groups. The groups (highest priority first) are: Fire Alarms,
Burglary Alarms, Fire Troubles, and Non-Fire Troubles.
The group with the highest priority scrolls first in the keypad’s
display. Descriptions of the tones and displays for each group and
instructions for silencing the tones are included in the descriptions
that follow.

Fire Alarms
Fire alarms are the highest priority events. When a fire point
activates, your keypad emits a pulsating high-pitched fire tone.
Evacuate all occupants and investigate for smoke or fire. Ensure
that all occupants know the difference between the burglary tone
and the fire tone. The tone sounds for the time set by your security
company.
The keypad display shows the point text of the first point that
went into fire alarm. Press the NEXT key to manually display
additional points (if any) that went into alarm. Events scroll from
the oldest to the newest.
Silencing Fire Alarms
Entering a personal passcode with the proper authority level
silences a fire alarm and disarms the system if it is armed. The
system now displays ALARM SILENCED and then the number of
points in alarm (A1 ## FIRE ALARM) and the custom text of all
the points in alarm, in the order of occurrence. Your system can
be programmed so that you cannot silence some fire alarms until
the fire event clears. Entering COMMAND 4 clears the scrolling
point text from the display. The ALARM SILENCED message
continues to scroll as a reminder that it is still possible to view the
text of the points in alarm by using the View Memory function.
See VIEW MEMORY ? (COMMAND 40) for more information.
To clear the event memory and remove the ALARM SILENCED
message from the display, enter a valid passcode and press the
ESC key, or re-arm the area.
If a fire trouble still exists, the display shows FIRE TROUBLE.
To remove this display, the fire point(s) must be returned to
normal. If you wish to review cleared events, use COMMAND
40.

Burglary Alarms
Burglary alarms are the second priority. When a burglary point
activates while your system is armed, your keypad emits a steady
high-pitched burglary tone. The tone sounds for the time set by
your security company.
The keypad display shows the number of burglary points activated
(A1 ## ALARMS) and then custom text for each activated point.
Press NEXT to manually scroll the list if you wish. Events scroll
from the oldest to the newest.
Silencing Burglary Alarms
Entering a personal passcode with the proper authority level
silences a burglary alarm and disarms the system if it is armed.
The system now displays ALARM SILENCED and then the number
of points in alarm (A1 ## ALARMS) and the custom text of all the
points in alarm, in the order of occurrence. Entering COMMAND
4 clears the scrolling point text from the display. The ALARM
SILENCED message continues to scroll as a reminder that it is still
possible to view the text of the points in alarm by using the View
Memory function.
See VIEW MEMORY? (COMMAND 40) for more information.
To clear the event memory and remove the ALARM SILENCED
message from the display, enter a valid passcode and press the
ESC key, or re-arm the area.

Fire Trouble Events
When a fire trouble occurs, your keypad emits three warble tones,
then a pause (repeatedly).
The system displays the number of fire points with troubles (A1
## FIRE TRBLE) and then custom text for each point.
Silencing Fire Troubles
Entering a personal passcode with the proper authority level
silences a fire trouble and disarms the panel if it is armed. If you
wish to clear the scrolling trouble message from the display, enter
COMMAND 4. If you wish to review these cleared troubles, this
can be done by using COMMAND 40.
Special Fire Trouble Display
If you silence the keypad or clear a trouble for a Fire Point from
the display and the fire point remains in trouble, FIRE TROUBLE
appears in the keypad’s display. FIRE TROUBLE remains in the
display until the condition causing the trouble is cleared.
Note: Some fire points, when tripped, displays FIRE TROUBLE
for a preset amount of time. If no other fire activity is
detected, this condition automatically clears. If the
condition remains or another fire detector is tripped, a
fire alarm occurs.
Viewing Fire Troubles
After you enter your passcode, the text of the fire point in trouble
continues to automatically scroll through the display. Press
NEXT to scroll these displays manually if you wish. Events scroll
from oldest to newest.

Non-Fire Trouble Events
When a trouble event such as an AC failure occurs, your keypad
can be programmed to emit three warble tones, then a pause
(repeatedly).
If the system is armed the keypad display shows the number of
non-fire trouble (A1 ## TROUBLES ) and then custom text for
each activated point.
Silencing Non-Fire Trouble Events
Entering a personal passcode with the proper authority level
silences a trouble and disarms the panel if it is armed. If you wish
to clear the scrolling trouble message from the display, enter
COMMAND 4. If you wish to review these cleared troubles, use
COMMAND 40.
Viewing Non-Fire Trouble Events
After you enter your passcode, the text of the activated points
continues to automatically scroll through the display. Press NEXT
to scroll these displays manually if you wish. Events scroll from
oldest to newest. Use COMMAND 4 to clear these messages from
the display.

Special System Trouble Display
SERVC AC FAIL and SERVC BATT LOW are examples of system
trouble displays. These displays appear on all keypads in the
system. All system trouble displays begin with SERVC. See
Standard Displays for a description of each system trouble display.
Entering your passcode or a COMMAND 4 silences a system
trouble tone, but the SERVC display does not clear until the faulted
condition is corrected.
Cleared Events Are Not Lost
If you clear the alarms and troubles from the display, you can
still view all the events that occurred since the last time the system
was armed by using COMMAND 40 (View Event Memory).
Entry Delay Tone and Display
When you enter an armed system through a point programmed
for entry delay, the keypad emits a repeating tweedle tone and
displays DISARM NOW to remind you to turn off your security
system.
If you fail to turn off the security system before the entry delay
time expires, it might sound the burglary tone and might also
send an alarm report to your security company.
Exit Delay Tone and Display
After you arm your system, the keypad emits a repeating beep
tone, displays EXIT NOW, and counts down the exit delay time.

Keystroke Checking Tones
Valid Entry
If you press an appropriate key for the function or entry you
desire, the keypad sounds a muted beep tone, indicating it accepted
your keystroke.
Invalid Entry
A flat buzz tone sounds when you press a key that doesn’t have a
function to execute or when the keypad has no information to
display.
Silencing an Alarm
The audible alarm sounds for a specific period of time before it
automatically shuts off. If an alarm occurs and you want to silence
the siren before the time expires, simply enter your personal
passcode and press ENT.
To SILENCE an alarm:
• Enter your passcode and press ENT.
How Your System Reports Alarms
Your security system can be programmed to automatically
disconnect your telephones when sending reports to your security
company. Once the report is completed, your security system
returns the telephones to normal operation (check with your
security company).
Your system makes repeated attempts to send reports to your
security company. In the event your security system fails to
communicate, the keypad buzzes and displays SERVC COMM
FAIL. Notify your security company of the communications failure.
Note: If your telephone service is interrupted, your security
system cannot send reports to your security company
unless an alternate means of transmitting the reports exists.
 Loading...