

Bosch NGU41.1DB Instruction Manual
[en] Instruction manual .....................................3 [pl] Instrukcja obsługi .................................... 12
Gas hob NGU41.1DB
Płyta gazowa NGU41.1DB

2 Ø = cm

3
Ú Table of contents
[en]Instruction manual
Safety precautions .....................................................................3
Causes of damage......................................................................5
Your new cooker.........................................................................5
General information ............................................................................5
Cooking area .......................................................................................6
Rotary knob for the gas burner........................................................6
Before first use ........................................................................... 6
Cleaning the accessories..................................................................6
Advance cleaning of burner cup and cap .....................................7
Making settings on the hob ....................................................... 7
Lighting the gas burner .....................................................................7
Warnings...............................................................................................7
Cookware and cooking recommendations .............................. 8
Suitable pans .......................................................................................8
Table - Cooking...................................................................................8
Cleaning and maintenance ........................................................ 9
Cleaning ...............................................................................................9
Maintenance ..................................................................................... 10
Trouble shooting ...................................................................... 10
After-sales service ................................................................... 11
E number and FD number ............................................................. 11
Packaging and equipment used ............................................. 11
Environmentally-friendly disposal.................................................. 11
Measures to be noted during transport ...................................... 11
Produktinfo
Additional information on products, accessories, replacement
parts and services can be found at www.bosch-home.com and
in the online shop www.bosch-eshop.com
: Safety precautions
Please read this manual carefully. Please
keep the instruction and installation manual
as well as the appliance certificate in a safe
place for later use or for subsequent
owners.
The manufacturer is exempt from all
responsibility if the requirements of this
manual are not complied with.
This appliance is class 3 type, according to
the EN 30-1-1 regulation for gas
appliances: built-in appliance.
Appliance's type of approval: HI4BH
The graphics in this instruction manual are
given as a guide only.
Do not remove the appliance from its
protective packaging until it is installed in
the unit.
Check the appliance for damage after
unpacking it. Do not connect the appliance
if it has been damaged in transport.
Caution:The use of a gas cooking
appliance results in the production of heat,
moisture and products of combustion in the
room in which it is installed. Ensure that the
kitchen is well ventilated especially when
the appliance is in use: keep natural
ventilation holes open or install a
mechanical ventilation device (mechanical
extractor hood).
Prolonged intensive use of the appliance
may call for additional ventilation, for
example opening of a window, or more
effective ventilation, for example increasing
the level of mechanical ventilation where
present.
This appliance can only be installed in a
well-ventilated place in accordance with
existing regulations and ventilation
specifications. The appliance must not be
connected to a combustion product
removal device.
The place in which the appliance is installed
must have fully-functioning ventilation, in
accordance with the regulations.
This appliance must be installed according
to the installation instructions included.
Only allow a licensed professional to
connect the appliance and to convert the
appliance to a different type of gas. The
appliance must be installed (electric and
gas connections) in accordance with the
instruction and installation manual. An
incorrect connection or incorrect settings
may lead to serious accidents and damage
to the appliance. The appliance
manufacturer accepts no liability for
damage of this kind. The appliance's
warranty becomes void.
This appliance has been designed for home
use only, not for commercial or professional
use. This appliance cannot be installed on
yachts or in caravans. The warranty will only
be valid if the appliance is used for the
purpose for which it was designed.
This appliance is intended for domestic use
and the household environment only. This
appliance must only be used to prepare

4
food and drinks and must never be used as
a heater. Do not leave the appliance
unattended during operation. Only use the
appliance indoors.
This appliance is not intended for operation
with an external clock timer or a remote
control.
Never leave the appliance unattended
during operation.
This appliance may be used by children
8 years old and older and by persons with
reduced physical, sensory or mental
capacity or a lack of experience or
knowledge if they are supervised or they
have been instructed about the safe use of
the appliance and have understood the
associated dangers.
Never let children play with the appliance.
Cleaning and user maintenance must not
be carried out by unsupervised children.
Risk of deflagration!
■
Accumulation of unburned gas in an
enclosed area carries a risk of
deflagration. Do not subject the appliance
to draughts. These might blow out the
burners. Carefully read the instructions
and warnings on the operation of gas
burners.
Risk of fire!
■
Hot oil and fat can ignite very quickly.
Never leave hot fat or oil unattended.
Never use water to put out burning oil or
fat. Switch off the hotplate. Extinguish
flames carefully using a lid, fire blanket or
something similar.
Risk of fire!
■
When gas hotplates are in operation
without any cookware placed on them,
they can build up a lot of heat. The
appliance and the extractor hood above it
may become damaged or be set on fire.
Grease residue in the filter of the extractor
hood may ignite. Only operate the gas
burners with cookware on them.
Risk of fire!
■
The hotplates become very hot. Never
place combustible items on the hob.
Never place objects on the hob.
Risk of fire!
■
The appliance becomes very hot, and
flammable materials can easily catch fire.
Do not store or use any flammable
objects (e.g. aerosol cans, cleaning
agents) under or in the vicinity of the oven.
Do not store any flammable objects inside
or on top of the oven.
Risk of fire!
■
The rear of the appliance becomes very
hot. This may cause damage to the power
cables. Electricity and gas lines must not
come into contact with the rear of the
appliance.
Risk of burns!
■
The hotplates and surrounding area
(particularly the hob surround, if fitted)
become very hot. Never touch the hot
surfaces. Keep children at a safe distance.
Risk of burns!
■
During operation, the surfaces of the
appliance become hot. Do not touch the
surfaces when they are hot. Keep children
away from the appliance.
Risk of burns!
■
The alcoholic vapours may catch fire on
the hot cooking surface. Never prepare
food containing large quantities of drinks
with a high alcohol content. Only use low
percentage alcohol.
Risk of burns!
■
Empty cookware becomes extremely hot
when set on a gas hotplate that is in
operation. Never heat up empty cookware.
Risk of burns!
■
Metal objects on the hob quickly become
very hot. Never place metal objects (such
as knives, forks, spoons and lids) on the
hob.
Risk of burns!
■
If the liquefied gas bottle is not upright,
liquefied propane/butane can enter the
appliance. Intense darting flames may
therefore escape from the burners.
Components may become damaged and
start to leak over time so that gas escapes
uncontrollably. Both can cause burns.
Always use liquefied gas bottles in an
upright position.
Risk of burns!
■
The appliance becomes hot during
operation. Allow the appliance to cool
down before cleaning.
Risk of injury!
■
Incorrect repairs are dangerous. Repairs
may only be carried out, and damaged
power and gas lines replaced, by an aftersales engineer trained by us. If the
appliance is faulty, unplug the mains plug
or switch off the fuse in the fuse box. Shut
off the gas supply. Contact the after-sales
service.
Risk of injury!
■
Faults or damage to the appliance are
dangerous. Never switch on a faulty
appliance. Unplug the appliance from the
mains or switch off the circuit breaker in
the fuse box. Shut off the gas supply.
Contact the after-sales service.
Risk of injury!
■
Unsuitable pan sizes, damaged or
incorrectly positioned pans can cause
serious injury. Observe the instructions
which accompany the cookware.
5
Risk of electric shock!
■
Incorrect repairs are dangerous. Repairs
may only be carried out by one of our
trained after-sales engineers. If the
appliance is faulty, unplug the mains plug
or switch off the fuse in the fuse box.
Contact the after-sales service.
Risk of electric sh ock!
■
The cable insulation on electrical
appliances may melt when touching hot
parts of the appliance. Never bring
electrical appliance cables into contact
with hot parts of the appliance.
Risk of electric sh ock!
■
Penetrating moisture may cause an
electric shock. Do not use any highpressure cleaners or steam cleaners.
Risk of electric sh ock!
■
A defective appliance may cause electric
shock. Never switch on a defective
appliance. Unplug the appliance from the
mains or switch off the circuit breaker in
the fuse box. Contact the after-sales
service.
Do not subject the appliance to draughts.
These might blow out the burners.
Do not tamper with the appliance's interior.
If necessary, call our Technical Assistance
Service.
If one of the control knobs will not turn, do
not force it. Call the Technical Assistance
Service immediately, so that they can repair
or replace it.
Causes of damage
Hob
Caution!
Only use the burners when cookware has been placed on top.
Do not heat up empty pots or pans. The saucepan base will be
damaged.
Caution!
Only use pots and pans with an even base.
Caution!
Place the pot or pan centrally over the burner. This will optimise
transfer of the heat from the burner flame to the pot or ban
base. The handle does not become damaged, and greater
energy savings are guaranteed.
Caution!
Ensure that the hob gas burners are clean and dry at all times.
The burner cup and burner cap must be positioned exactly.
** Option: Only valid for some models.
Caution!
Ensure that the top cover is not closed when the oven is started
up.
Caution!
If you are using the appliance with a gas cylinder, the cylinder
must be stood upright. Using the gas cylinder horizontally can
damage your appliance's interior components and cause a gas
leak.
Your new cooker
Here you will learn about your new cooker. We will explain the
control panel, the hob and the individual operating controls.
You will find information on the cooking compartment and the
accessories.
General information
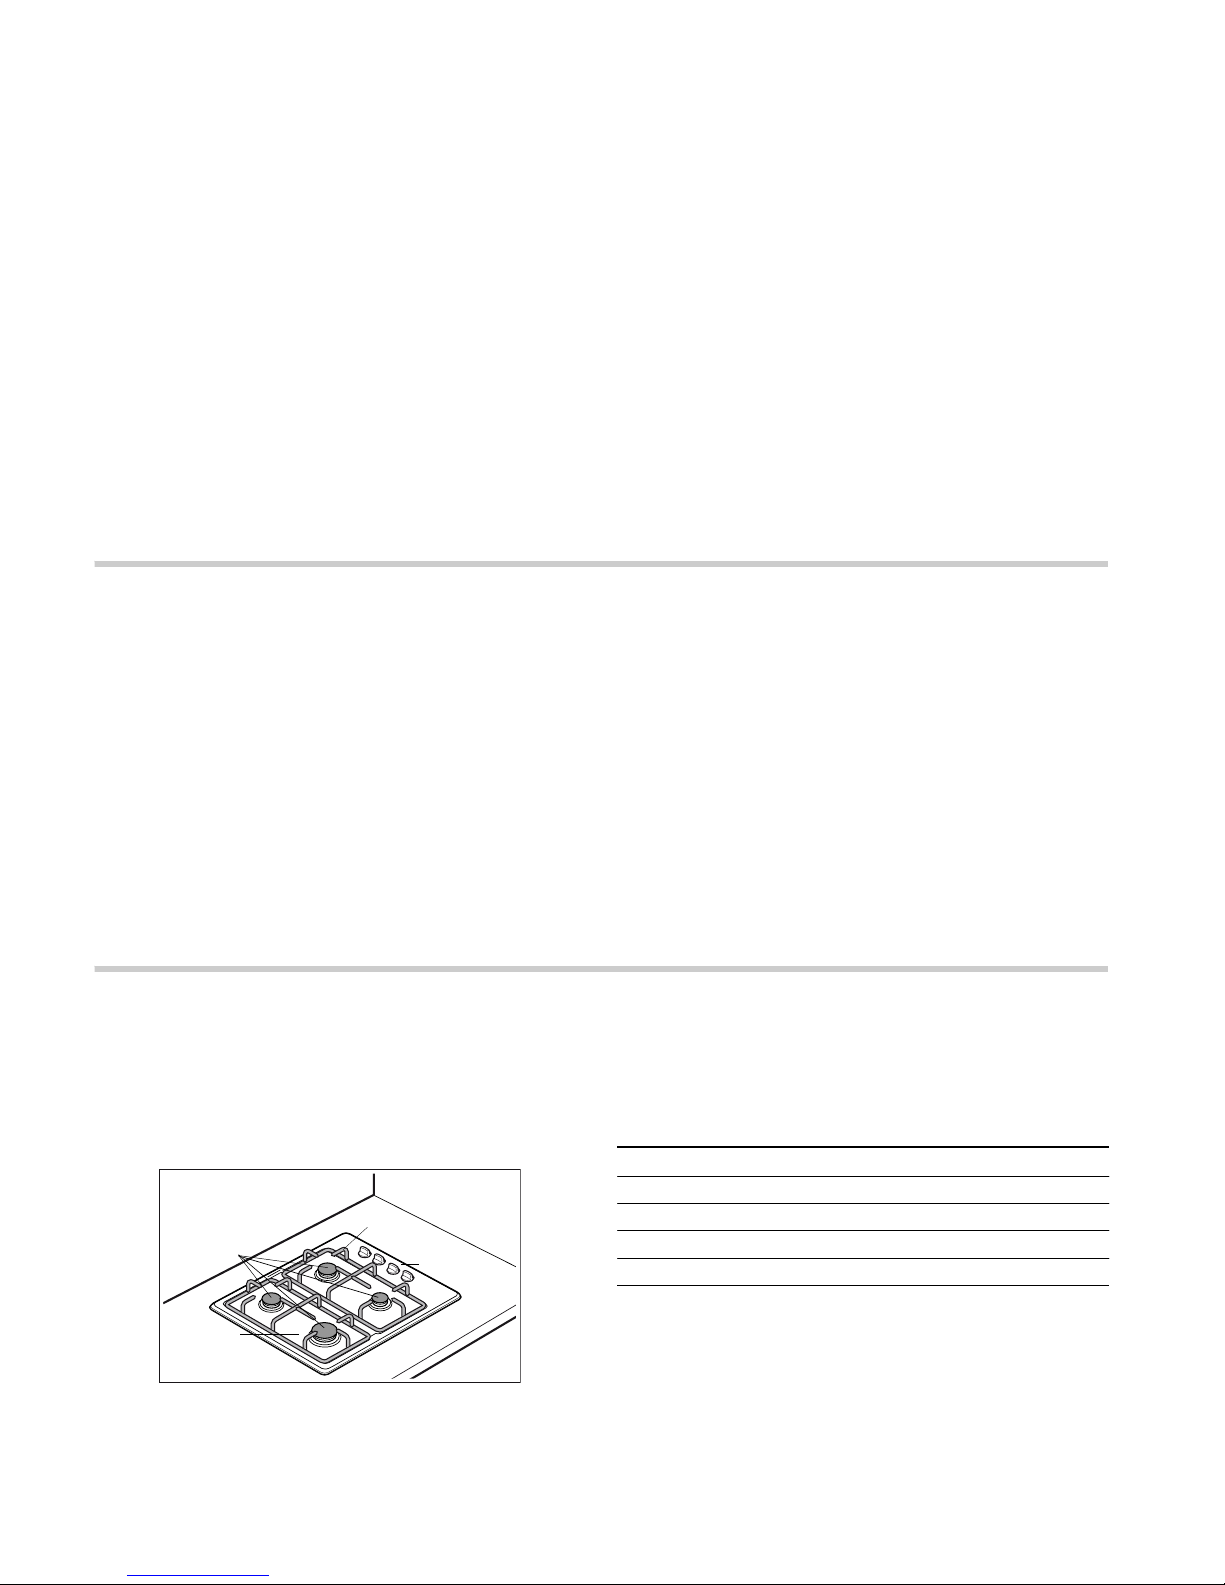
The design depends on the respective appliance model.
Explanations
1 Control panel
2 Steel grids
3 Burner/electric hotplate*
4Hob
* Option
6
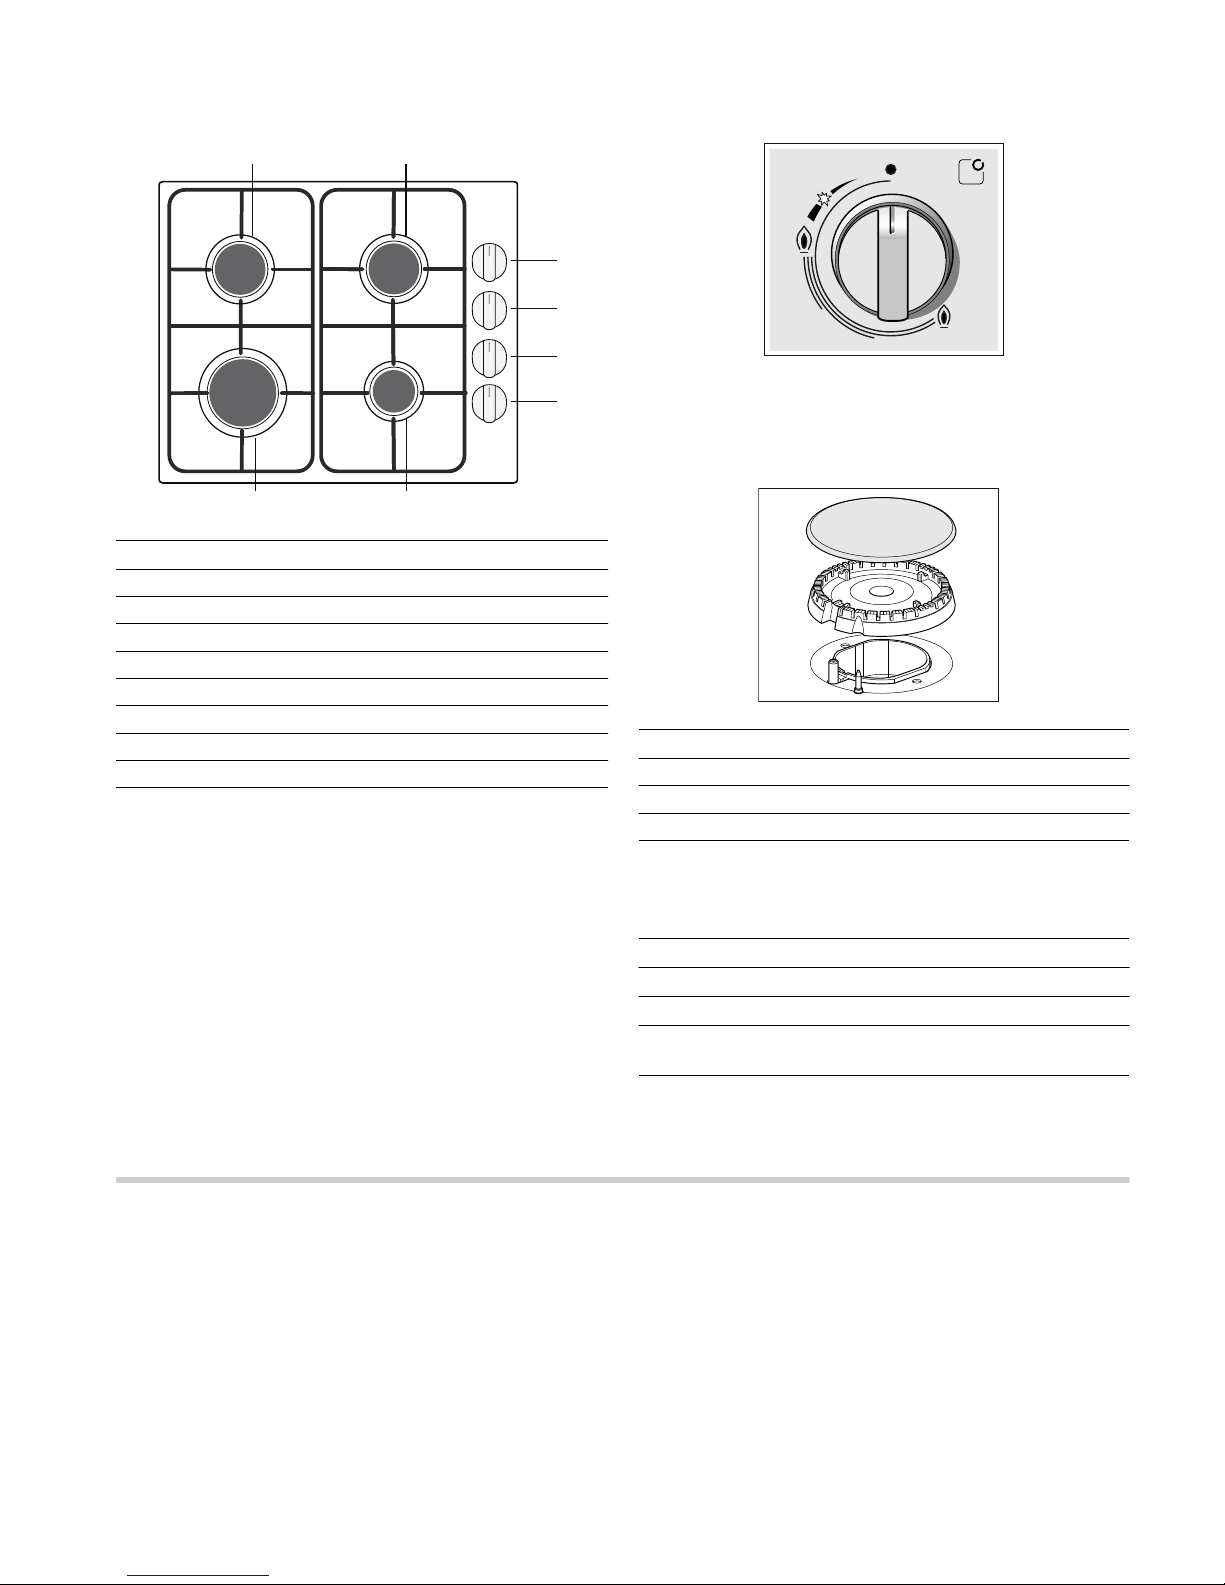
Cooking area
Here is an overview of the control panel. The design depends
on the respective appliance model.
Rotary knob for the gas burner
There are indications to show which burner each control knob
operates.
It is essential to ensure that all the burner parts and pan
supports are correctly installed for the appliance to work
correctly. Do not swap the burner caps around.
Rotary knob for the hotplate
You can adjust the heat setting of the hotplates using the
hotplate rotary knobs.
There is a limit stop at the end of the settings area. Do not turn
the timer beyond this.
Before first use
The things you should note before first use are detailed below.
First read the Safety Precautions section .
Cleaning the accessories
Before you use the accessories for the first time, clean them
thoroughly with hot soapy water and a soft dish cloth.
Explanations
1Economy burner
2Standard burner
3Standard burner
4High output burner
5 Rotary knob for the economy burner
6 Rotary knob for the standard burner
7 Rotary knob for the standard burner
8 Rotary knob for the high-output burner
Hob Power
Economy burner 1 kW
Standard burner 1,75 kW
High output burner 3 kW
Settings Function/gas oven
Ú
Zero position Cooker switched off.
8
Ignition position Ignition position
›
œ
Settings area Large flame = highest setting
Economy flame = lowest setting
7
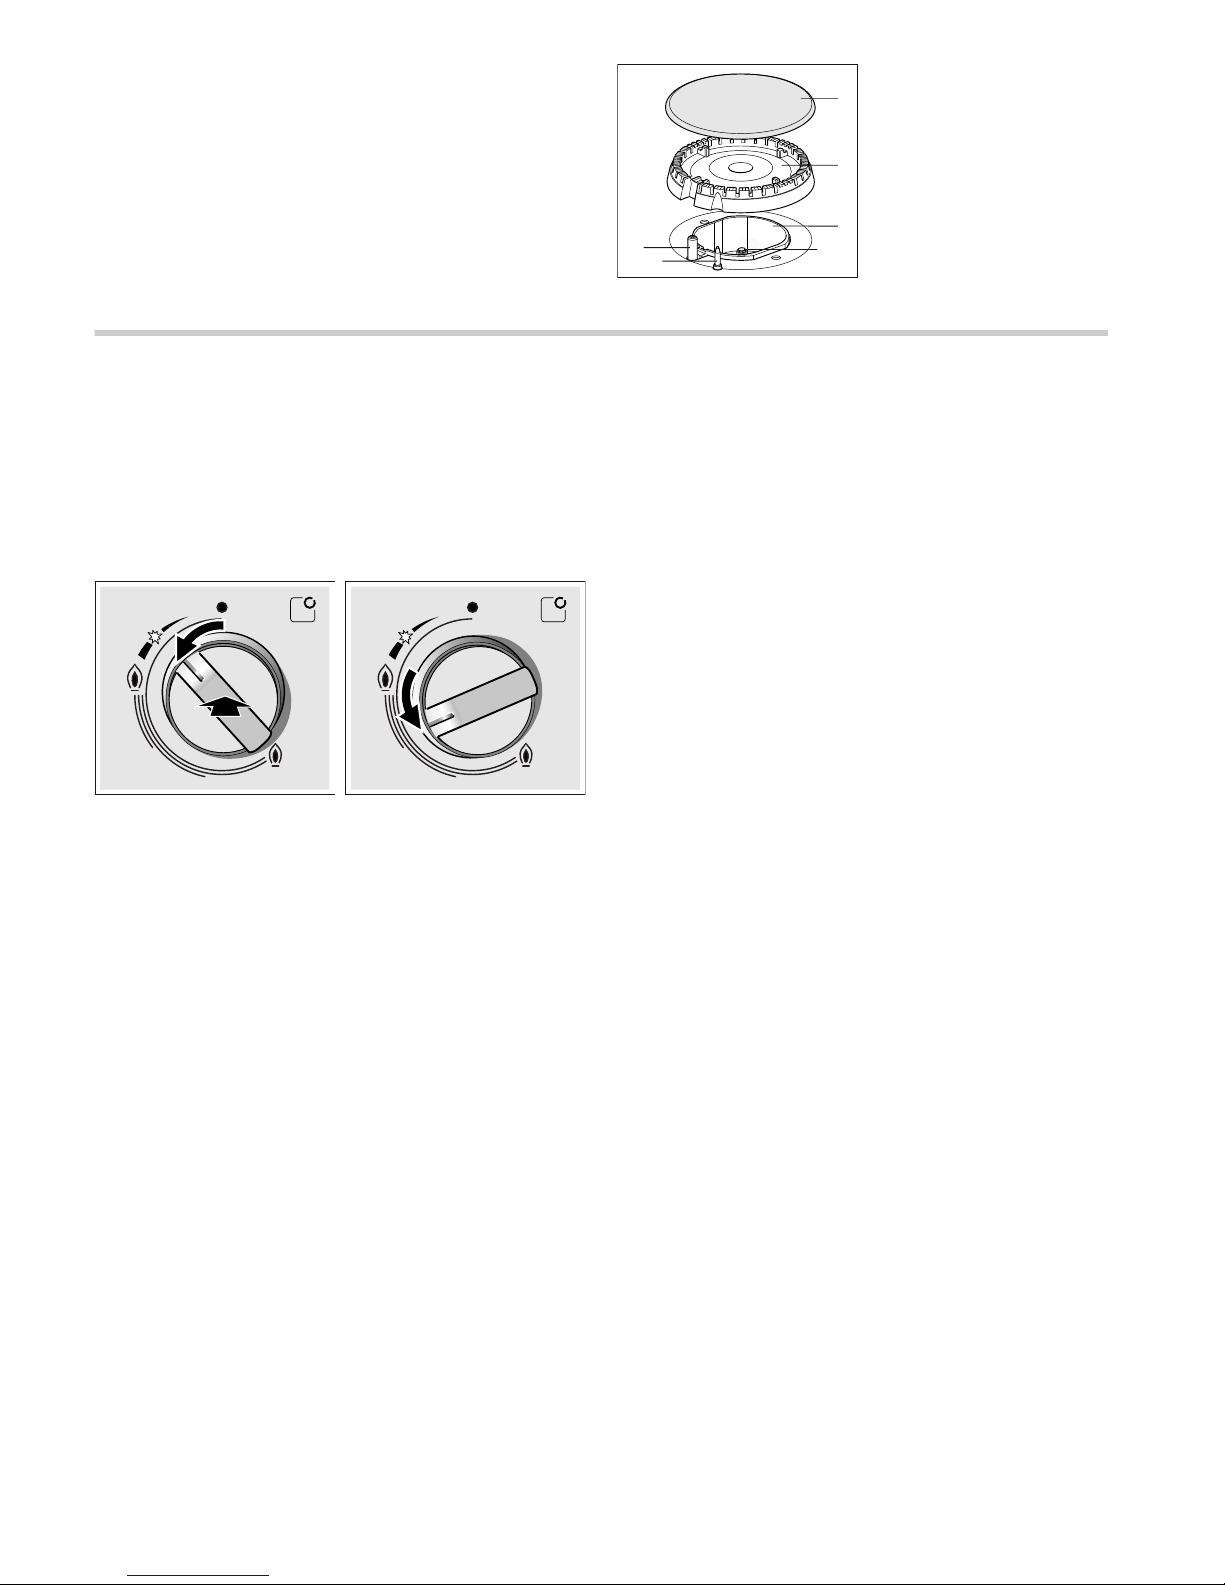
Advance cleaning of burner cup and cap
Clean the burner cap (1) and burner cup (2) with water and
washing-up liquid. Dry the individual parts carefully.
Place the burner cup and cap back on the burner shell (5).
Ensure that the igniter (3) and flame safety pin (4) are not
damaged.
The nozzle (6) must be dry and clean. Always position the
burner cap exactly over the burner cup.
Making settings on the hob
Your hob is equipped with four gas burners. The following
information explains how to light the gas burners and set the
size of flame.
Lighting the gas burner
Always position the burner cap exactly over the burner cup.
Openings on the burner cup must always be unobstructed. All
parts must be dry.
1. Turn the rotary knob for the desired burner anti-clockwise to
the ignition position
8. Ignition begins.
2. Press and hold the rotary knob for approximately 3-5
seconds. The gas burner ignites.
The safety ignition is activated. If the gas flame goes out, the
gas supply is automatically interrupted by the safety ignition
system.
3. Set the desired flame size. Between setting
Ú Off and setting
›, the flame is not stable. Therefore, always choose a setting
between
› large and œ small flame.
4. If the flame goes out again, repeat the process from step 1.
5. To switch off the hotplate: Turn the rotary knob
Ú clockwise to
the Off position.
The ignition device should not be actuated for more than 15
seconds. If the burner does not light within 15 seconds, wait for
at least one minute. Then repeat the ignition process.
: Caution:!
If you turn the rotary knob straight after switching the cooker off,
gas will escape. If you do not turn the knob to the ignition
position
8 ,the gas supply will be interrupted after 90 seconds.
No ignition occurs
If there is a power cut or if the ignition plugs are damp, you can
light the gas burners with a gas lighter or a match.
Warnings
It is normal to hear a soft whistling noise while the burner is
operating.
When first used, it is normal for the burner to give off odours.
This does not pose any risk and does not indicate a
malfunction. They will disappear in time.
An orange-coloured flame is normal. This is caused by the
presence of dust in the atmosphere, spilt liquids, etc.
If the burner flames are accidentally blown out, switch off the
burner operating control knob and do not try to relight it for at
least 1 minute.
A few seconds after the burner is switched off, a sound (thud)
will be produced. This is not a fault - this means that the safety
device is no longer operating.
Keep the burner as clean as possible. If the ignition sparkers
are dirty they will not light properly. Clean them periodically
using a small non-wire brush. Bear in mind that the ignition
sparkers must not suffer any serious impacts.
8
Cookware and cooking recommendations
Suitable pans
Precautions for use
The following advice is intended to help you save energy and
prevent pan damage:
Table - Cooking
Select the right saucepan size for each burner. The diameter of
the pot or pan base should be the same as that of the burner.
Cooking times depend on the type, weight and quality of the
food. Deviations are therefore possible. You yourself can best
judge the optimal cooking time.
Minerals and vitamins are very quickly destroyed during
cooking. Therefore, only use a little water. This will help you
retain vitamins and minerals. Select short cooking times so that
the vegetables remain firm and full of nutrients.
Burner/electric hotplate**
Minimum
saucepan
diameter
Maximum saucepan
diameter
Electric hotplate* 14.5 cm 14.5 cm
High output burner 24 cm 28 cm
Standard burner 18 cm 24 cm
Economy burner 12 cm 18 cm
* Option (for models with an electric hotplate)
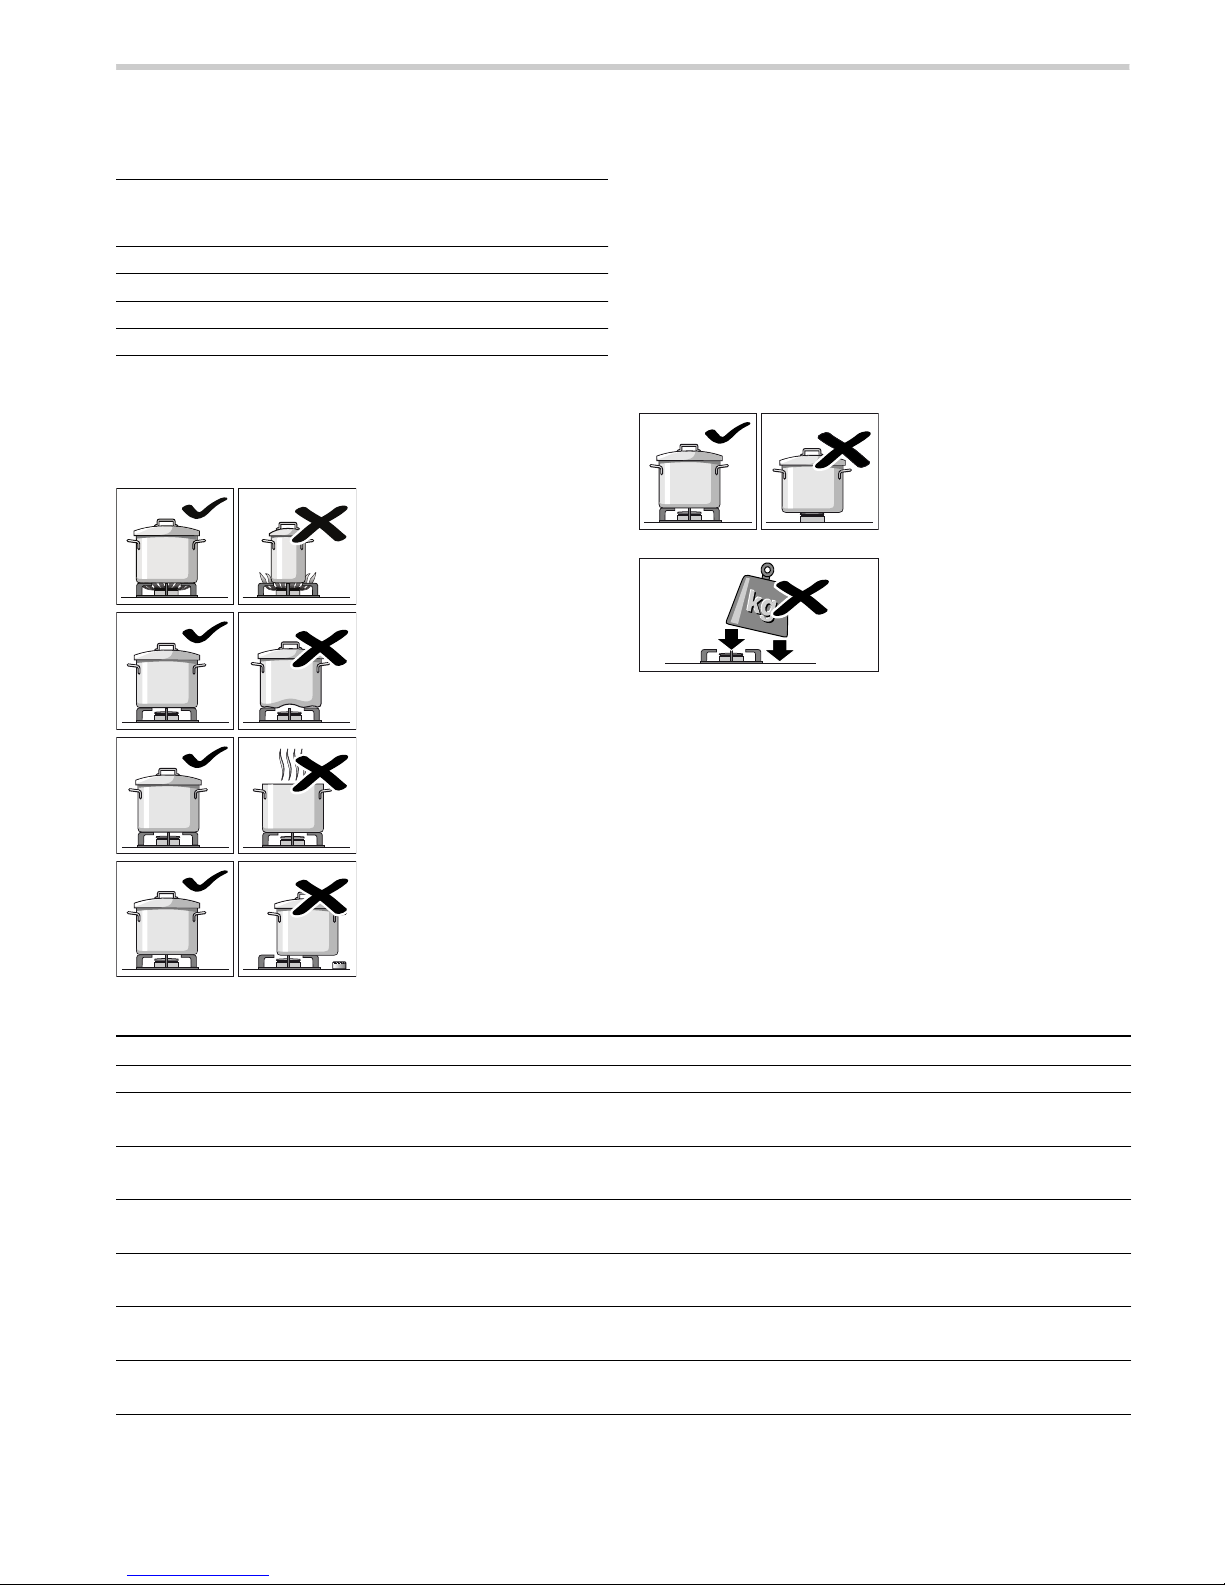
Use pans which are the right
size for each burner.
Do not use small pans on
large burners. The flame must
not touch the sides of the pan.
Do not use damaged pans,
which do not sit evenly on the
hob. Pans may tip over.
Only use pans with a thick, flat
base.
Do not cook without using a lid
and make sure the lid is
properly fitted. This wastes
energy.
Always centre the pan over the
burner, not to one side.
Otherwise it could tip over.
Do not place large pans on the
burners near the control
knobs. These may be
damaged by the very high
temperatures.
Place the pans on the pan
supports, never directly on the
burner.
Make sure that the pan
supports and burner caps are
correctly positioned before
using the appliance.
Pans should be placed on the
hob carefully.
Do not strike the hob and do
not place excessive weight on
it.
Example Dish Burner Heat setting
Melting Chocolate, butter, margarine Economy burner small flame
Heating Stock, tinned vegetables Standard burner
Electric hotplate**
small flame
1
Heating and keeping
warm
Soups Economy burner
Electric hotplate**
small flame
1
Braising* Fish Standard burner
Electric hotplate**
between large and small flame
2
Braising* Potatoes and miscellaneous
vegetables, meat
Standard bu rner
Electric hotplate**
between large and small flame
2
Cooking* Rice, vegetables, meat dishes
(with sauces)
Standard bu rner
Electric hotplate**
Large flame
2-3
Roasting Pancakes, potatoes, schnitzel,
fish fingers
High output burner
Electric hotplate**
between large and small flame
3
* If you are using a saucepan with a cover, turn the flame down as soon as it reaches boiling point.
** Option: For models with an electric hotplate
 Loading...