


Use and care manual .................... 3
Notice d’utilisation .............................. 23
Manual de instrucciones ...................... 45
Cooktop
NET8654UC, NET8054UC
1(78&
'BTU
1SFIFBU
4NBSU
$IFG
1SPHSBNT
5JNFS
$PPL5JNFS
8JQF1SPU
$IJME-PDL
0O0GG
NJONJO MPX NFE NBY
,FFQ
8BSN
1(78&
'BTU
1SFIFBU
4NBSU
$IFG
,FFQ
8BSN
1SPHSBNT
0O0GG
8JQF1SPU
$IJME-PDL
5JNFS
$PPL5JNFS
NJO
NJO
MPX NFE NBY
() = cm

Table of Contents
Use and care manual
IMPORTANT SAFETY INSTRUCTIONS ........................ 4
Fire Safety .............................................................................. 4
Cooking Safety ..................................................................... 4
Burn Prevention .................................................................... 5
Child Safety ........................................................................... 5
Cleaning Safety ..................................................................... 5
Cookware Safety .................................................................. 5
Proper Installation and Maintenance ................................ 6
State of California Proposition 65 Warnings ................... 6
Causes of damage ......................................................... 7
Protecting the environment .......................................... 7
Energy-saving advice ........................................................... 7
Getting familiar with the appliance .............................. 8
Control Panel ........................................................................ 8
The Elements ........................................................................ 8
Residual heat indicator ....................................................... 9
Operation ........................................................................ 9
Main power switch ............................................................... 9
Setting the cooktop .............................................................. 9
PowerStart™ feature ......................................................... 11
AutoChef™ .......................................................................... 12
Cook time ........................................................................... 15
Kitchen timer ...................................................................... 15
Keep Warm function ......................................................... 16
Child lock ............................................................................ 16
Clean Lock .......................................................................... 16
Basic Settings .................................................................... 16
Cleaning and Maintenance ......................................... 17
Daily Cleaning .................................................................... 17
Cleaning guidelines .......................................................... 18
Cleaning charts .................................................................. 18
Maintenance ....................................................................... 19
Service .......................................................................... 19
Troubleshooting ................................................................. 19
Technical service ............................................................... 20
STATEMENT OF LIMITED PRODUCT WARRANTY ... 21
What this Warranty Covers & Who it Applies to .......... 21
How Long the Warranty Lasts ......................................... 21
Repair/Replace as Your Exclusive Remedy ................ 21
Out of Warranty Product .................................................. 21
Warranty Exclusions ......................................................... 21
How to obtain Warranty Service: .................................... 22
Produktinfo.
Additional information on products, accessories,
replacement parts and services can be found at
www.bosch-home.com and in the online shop
www.bosch-eshop.com
3

9 IMPORTANT SAFETY INSTRUCTIONS
READ AND SAVE THESE INSTRUCTIONS
IMPORTANT SAFETY INSTRUCTIONS
READ AND SAVE THESE INSTRUCTIONS
WARNING
When properly cared for, your new appliance has been
designed to be safe and reliable. Read all instructions
carefully before use. These precautions will reduce the
risk of burns, electric shock, fire, and injury to persons.
When using kitchen appliances, basic safety precautions
must be followed, including those in the following pages.
Examine the appliance after unpacking it. In the event of
transport damage, do not plug it in.
Fire Safety
Do not allow aluminum foil, plastic, paper or cloth to
come in contact with a hot surface element, burner or
grate. Do not allow pans to boil dry.
If the cooktop is near a window, forced air vent or fan,
be certain that flammable materials such as window
coverings do not blow over or near the burners or
elements. They could catch on fire.
Always have a working smoke detector near the kitchen.
Never leave the cooktop unattended when in use.
Boilovers cause smoking and greasy spillovers may
ignite.
WARNING
TO REDUCE THE RISK OF A GREASE FIRE:
a.
Never leave surface units unattended at high settings.
Boilovers cause smoking and greasy spillovers that
may ignite. Heat oils slowly on low or medium settings.
b.
Always turn hood ON when cooking at high heat.
c.
Clean ventilating fans frequently. Grease should not be
allowed to accumulate on fan or filter.
d.
Use proper pan size. Always use cookware
appropriate for the size of the surface element.
Do not flambé under the extractor hood or work with a
naked flame. When switched on, the extractor hood
draws flames into the filter. There is a risk of fire due to
deposits on the grease filter!
In the event that personal clothing or hair catches fire,
drop and roll immediately to extinguish flames.
Have an appropriate fire extinguisher available, nearby,
highly visible and easily accessible near the appliance.
Smother flames from food fires other than grease fires
with baking soda. Never use water on cooking fires.
WARNING
TO REDUCE THE RISK OF INJURY TO PERSONS IN THE EVENT OF A GREASE FIRE, OBSERVE THE FOLLOWING:
a.
SMOTHER FLAMES with a close-fitting lid, cookie
sheet, or metal tray, then turn off the burner. BE
CAREFUL TO PREVENT BURNS. If the flames do not
go out immediately, EVACUATE AND CALL THE FIRE
DEPARTMENT.
b.
NEVER PICK UP A FLAMING PAN – You may be
burned.
c.
DO NOT USE WATER, including wet dishcloths or
towels – a violent steam explosion will result.
d.
Use an extinguisher ONLY if:
- You know you have a Class ABC extinguisher, and
you already know how to operate it.
- The fire is small and contained in the area where it
started.
- The fire department is being called.
- You can fight the fire with your back to an exit.
Whenever possible, do not operate the ventilation system
during a cooktop fire. However, do not reach through fire
to turn it off.
Cooking Safety
WARNING
Use this appliance only for its intended use as described
in this manual. NEVER use this appliance as a space
heater to heat or warm the room. Doing so may result in
overheating the appliance. Never use the appliance for
storage.
WARNING
If AutoChef™ is not working properly, overheating may
result causing smoke and damage to the pan.
WHEN COOKING WITH AUTOCHEF™ OBSERVE THE FOLLOWING:
▯ Use a system pan only
▯ Always put the pan in the centre of the heating element
▯ Do not place a lid on the pan
▯ Never leave frying fat unattended
Never use the appliance if liquids or foods have spilled
around the control panel. Always turn off the cooktop
and dry the control panel.
Injury and damage to the appliance may occur if control
elements are not used properly.
If the cooktop turns off automatically and can no longer
be operated, it may turn itself on unintentionally at a later
point. Switch off the circuit breaker in the fuse box.
Contact the after-sales service.
4

9 IMPORTANT SAFETY INSTRUCTIONS
READ AND SAVE THESE INSTRUCTIONS
Burn Prevention
DO NOT TOUCH SURFACE UNITS OR AREAS NEAR
UNITS - Surface units may be hot even though they are
dark in color. Areas near surface units may become hot
enough to cause burns. During and after use, do not
touch, or let clothing, potholders, or other flammable
materials contact surface units or areas near units until
they have had sufficient time to cool. Among these areas
are the cooktop and areas facing the cooktop.
Do not heat or warm unopened food containers. Build-up
of pressure may cause the container to burst and cause
injury.
Always use dry potholders. Moist or damp potholders on
hot surfaces may result in burns from steam. Do not let
potholder touch hot heating elements. Do not use a towel
or other bulky cloth.
Always turn hood ON when cooking at high heat or when
flambeing food (i.e. Crêpes Suzette, Cherries Jubilee,
Peppercorn Beef Flambe).
Use high heat settings on the cooktop only when
necessary. To avoid bubbling and splattering, heat oil
slowly on no more than a low-medium setting. Hot oil is
capable of causing extreme burns and injury.
Never move a pan of hot oil, especially a deep fat fryer.
Wait until it is cool.
Secure all loose garments, etc. before beginning. Tie
long hair so that it does not hang loose, and do not wear
loose fitting clothing or hanging garments, such as ties,
scarves, jewelry, or dangling sleeves.
WARNING
RISK OF BURNS
Metallic objects become hot very quickly on the cooktop.
Never set down metallic objects, such as knives, forks,
spoons and lids on the cooktop.
CAUTION
Items of interest to children should not be stored in an
appliance, in cabinets above an appliance or on the
backsplash. Children climbing on an appliance to reach
items could be seriously injured.
Cleaning Safety
Do not clean the appliance while it is still hot. Some
cleaners produce noxious fumes when applied to a hot
surface. Wet clothes and sponges can cause burns from
steam.
Do not use steam cleaners to clean the appliance.
Cookware Safety
Hold the handle of the pan when stirring or turning food.
This helps prevent spills and movement of the pan.
Use Proper Pan Size.
The use of undersized cookware will expose a portion of
the heating element or burner to direct contact and may
result in ignition of clothing. Select cookware having flat
bottoms large enough to cover the surface heating unit.
This appliance is equipped with one or more surface
units of different size. Proper relationship of cookware to
heating element or burner will also improve efficiency.
Cookware not approved for use with ceramic cooktops
may break with sudden temperature changes. Use only
pans that are appropriate for ceramic cooktops (only
certain types of glass, heatproof glass, ceramic,
earthenware, or other glazed utensils are suitable).
Always position handles of utensils inward so they do not
extend over adjacent work areas, burners, or the edge of
the cooktop. This reduces the risk of fires, spills and
burns.
If the display does not work when a cooking area is
heating up, disconnect the circuit breaker from the fuse
box. Contact an authorized servicer.
Child Safety
When children become old enough to use the appliance,
it is the legal responsibility of the parents or legal
guardians to ensure that they are instructed in safe
practices by qualified persons.
Do not allow anyone to climb, stand, lean, sit, or hang on
any part of an appliance, especially a door, warming
drawer, or storage drawer. This can damage the
appliance, and the unit may tip over, potentially causing
severe injury.
Do not allow children to use this appliance unless closely
supervised by an adult. Children and pets should not be
left alone or unattended in the area where the appliance
is in use. They should never be allowed to play in its
vicinity, whether or not the appliance is in use.
WARNING
RISK OF INJURY
When cooking with a bain-marie, the cooktop and
cooking vessel may crack due to overheating. The
cooking vessel in the bain-marie must not come in direct
contact with the bottom of the pot filled with water. Use
only heat-resistant cookware.
Always keep the cooktop and bases of pots dry. Liquid
between the potbase and the cooktop may build up
steam pressure, causing the pot to jump suddenly and
causing injury.
5

9 IMPORTANT SAFETY INSTRUCTIONS
READ AND SAVE THESE INSTRUCTIONS
Proper Installation and Maintenance
Have the installer show you the location of the circuit
breaker or fuse. Mark it for easy reference.
This appliance must be properly installed and grounded
by a qualified technician. Connect only to properly
grounded outlet. Refer to Installation Instructions for
details.
This appliance is intended for normal family household
use only. It is not approved for outdoor use. See the
Warranty. If you have any questions, contact the
manufacturer.
Do not store or use corrosive chemicals, vapors,
flammables or nonfood products on or near this
appliance. It is specifically designed for use when
heating or cooking food. The use of corrosive chemicals
in heating or cleaning will damage the appliance and
could result in injury.
Do not operate this appliance if it is not working properly,
or if it has been damaged. Contact an authorized
servicer.
WARNING
Do not cook on a broken cooktop. Cleaning solutions
and spillovers may create a risk of electric shock. Switch
off the circuit breaker in the fuse box if the ceramic has
fractures, flaws or cracks. Call an authorized servicer.
Do not repair or replace any part of the appliance unless
specifically recommended in this manual. Refer all
servicing to a factory authorized service center.
To avoid electrical shock hazard, before servicing the
appliance, switch power off at the service panel and lock
the panel to prevent the power from being switched on
accidentally.
State of California Proposition 65 Warnings
WARNING
This product contains chemicals known to the State of
California to cause cancer, birth defects or other
reproductive harm.
6

Causes of damage
▯ Scratches on glass ceramic surface: Cookware with
rough bottoms will scratch the glass ceramic surface.
▯ Salt, sugar and sand: Salt, sugar or grains of sand will
scratch the glass ceramic surface. Never use the
cooktop as a working surface or for setting things
down.
▯ Overheated cookware: Avoid heating pots or pans
that are empty.
▯ Hot cookware: Never set down hot pans and pots on
the control panel or frame. This may cause damage.
Protecting the environment
Energy-saving advice
▯ Always place a fitting lid on cookware. Cooking with
an uncovered pan will result in a four-fold increase in
energy use. Use a glass lid to provide visibility and
avoid having to lift the lid.
▯ Use cookware equipped with a solid, flat bottom.
Curved pan bases increase energy consumption.
▯ The diameter of the pan base must match the size of
the element. If not, energy may be wasted. Note: The
manufacturer normally indicates the pan's upper
diameter. This is normally greater than the diameter of
the pan's base.
▯ Hard and sharp objects: Hard or sharp objects falling
on the cooktop may damage it.
▯ Boiled-over food: Sugar and products containing
sugar may damage the cooktop. Immediately eliminate
spills of these products with a glass scraper.
▯ Foils and plastics: Aluminum foil and plastic will melt
on the hot cooking zones. Stove protective film isn't
suitable for your cooktop.
▯ Unsuitable cleaning agent: Shimmering metallic
discolorations on the glass ceramic surface result from
the use of inappropriate cleaning agents and abrasion
from cookware.
▯ Choose cookware of a size suited to the amount of
food you are going to cook. A large pan that is only
half full will use a lot of energy.
▯ Use a small amount of water when cooking. This
saves energy, and vegetables retain a larger
percentage of their vitamins and minerals.
▯ Select a lower power level.
7
Getting familiar with the appliance
NJO
NJO
MPX NFE NBY
1PXFS
4UBSU
"VUP
$IFG
,FFQ
8BSN
1SPHSBNT
0O0GG
$MFBO-PDL
$IJME-PDL
5JNFS
In this section we describe the control panel, elements
and displays.
Control Panel
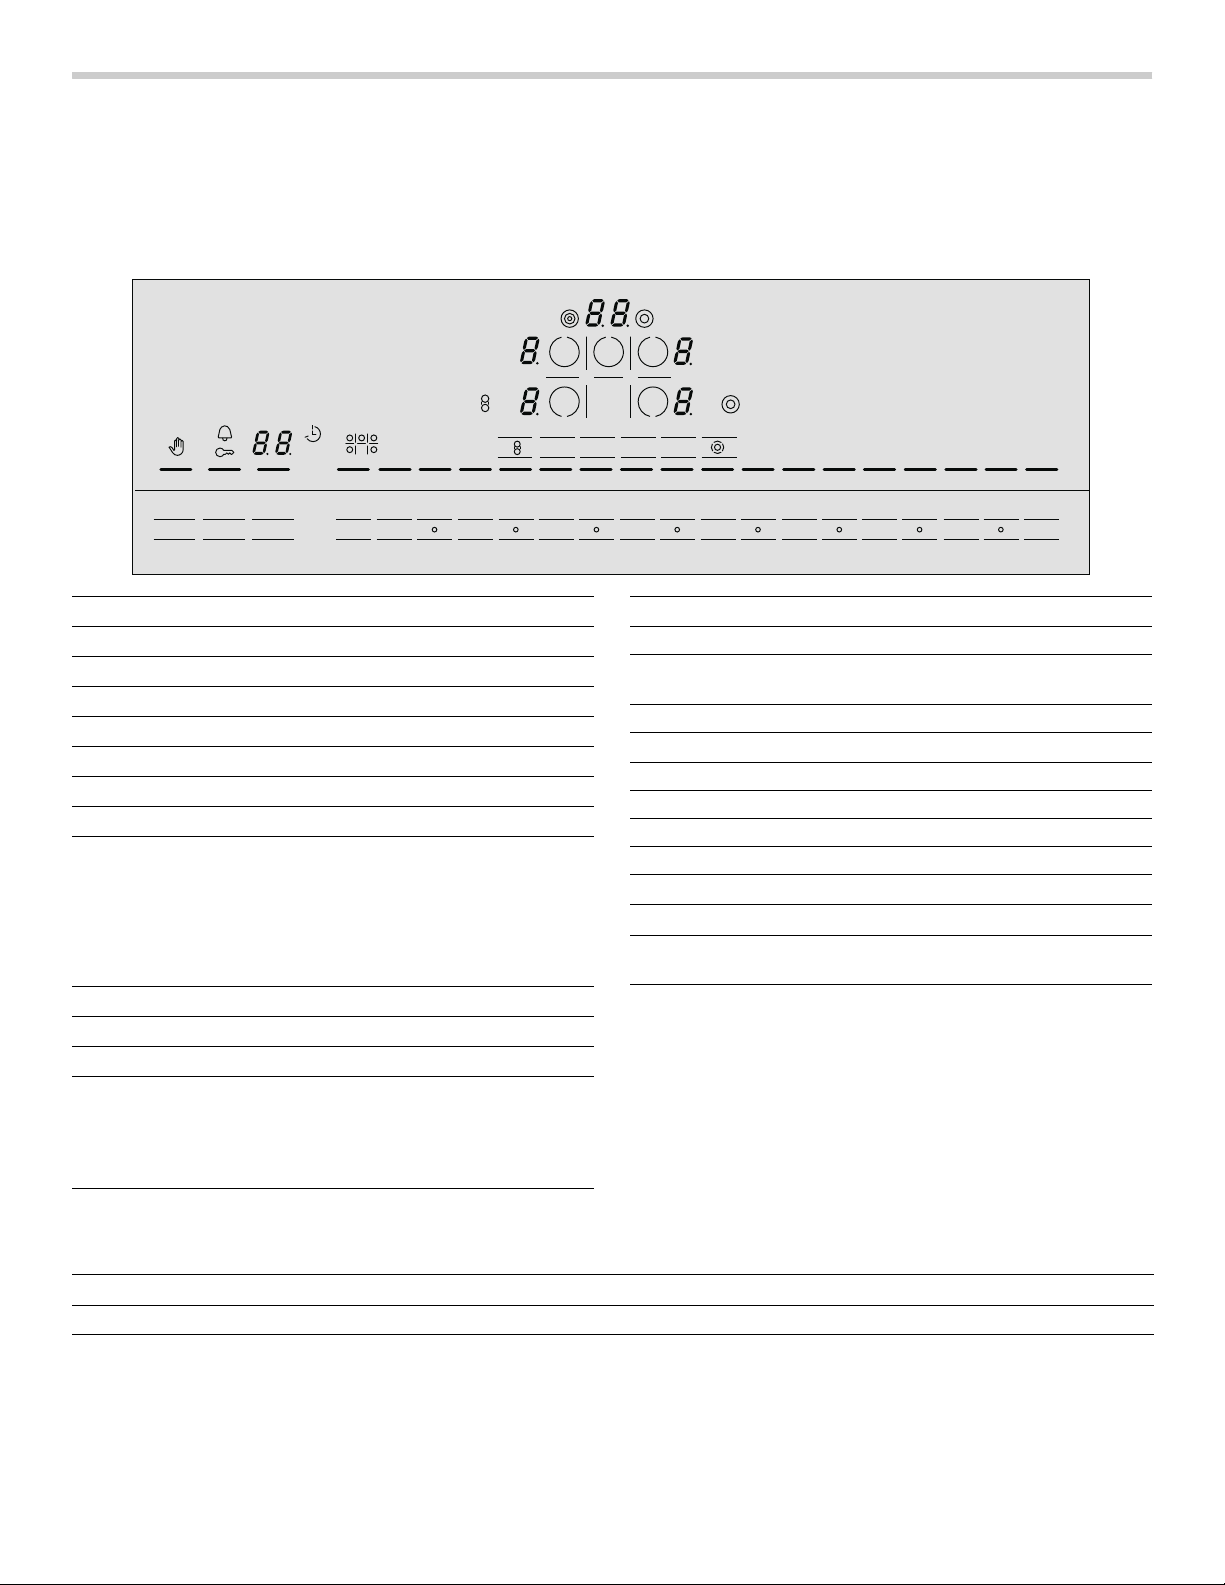
Display icons
>
D
U
‰‰
q
¶
ª
‰.‰ Power level ‹-Š
ð
ò
à
min
low
med
max
Clean Lock on
Child Lock on
Kitchen timer on
Timer value
Timer function
Cook time active for lit element
AutoChef™: Heating up in progress
Ready ‹
Residual heat •/œ
AutoChef™/PowerStart™ function
Keep Warm function –
Dual element
Triple element
Bridge element
Frying levels for AutoChef™
‘
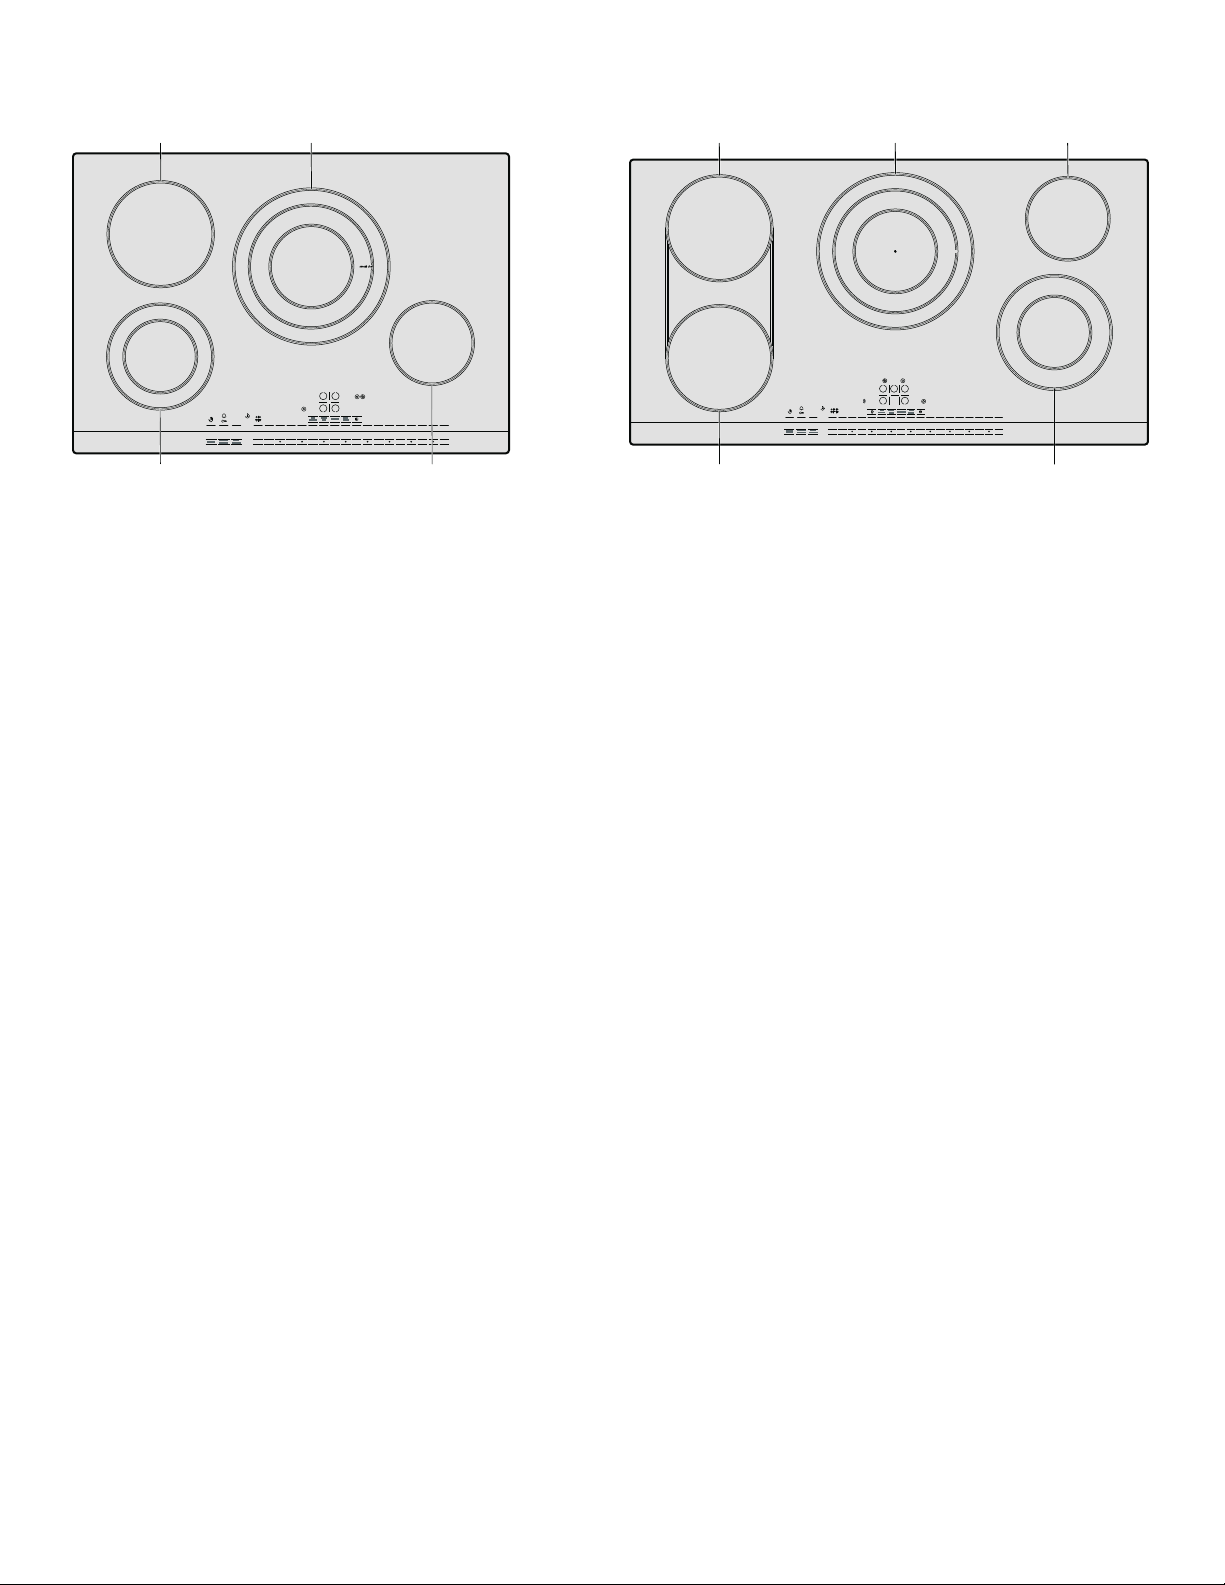
These instructions apply to more than one cooktop, your
appliance might vary slightly.
Page 2 contains a list of models and dimensions.
Touch keys
On/Off Main power switch
Clean Lock/
Cleaning protection / Child safety
Child Lock
Timer Time programming functions
à
Bridge element
PowerStart PowerStart™ function
AutoChef AutoChef™ function
Programs AutoChef™ programs
KeepWarm Keep Warm function
ö
$
Additional heating elements
Select cooking element
0 - 9 Setting temperature level / Frying level /
Timer / Frying program
Touch control zone
When you touch a symbol, the corresponding function
will be activated.
NOTICES
▯ Always keep the touch control zones clean and dry.
Moisture and dirt can affect proper functioning.
▯ If the metal tray is bent or damaged, e.g. it has been
hit by a pan, functionality might be affected.
The Elements
Element Turning on and off
Single element Always use cookware of a suitable size.
$
Dual element The size of these elements can be matched to your pan size. The heat-
ð
ing element must be turned on.
Turning off the outer heating ring: Touch
off.
8
Adding: Touch
ö. The ð display will turn
ö again. The ð display will turn on.

Element Turning on and off
Triple element On this element you can turn the medium and large heating rings off.
ò
The heating element must be turned on.
Turning off the outer heating ring: Touch
off.
Turning off the middle heating ring: Touch
turn off.
When you turn the heating element on again, all of the heating rings will
be on.
Bridge element (NET8654UC only) The Bridge element combines two individual heating elements into one
à
long griddle zone. This configuration is ideal for griddles and large
pans.
Note: : Do not use cookware larger than 17" x 10" (432 x 254 mm).
Turning on the Bridge element: Touch one of the two
selecting the heating element, then touch the
appear; both heating elements are now selected.
plays. Within the next 10 seconds select the desired heat setting (1-9).
The Bridge element and both individual heating elements are now on.
Changing the heat setting: Touch one of the two
selecting the Bridge element, and set the new heat level within the next
10 seconds.
Turning off the Bridge element feature: Touch one of the two
keys for selecting the Bridge element, and select 0 from the number
keys.
‹ appears in both displays. The heating elements will turn off and
the residual heat indicator will appear.
ö. The ò display will turn
ö again. The ð display will
$ touch keys for
à key. The à symbol will
‹ appears in both dis-
$ touch keys for
$ touch
Residual heat indicator
The cooktop is equipped with a residual heat indicator
for each element. It shows you which elements are still
hot. Avoid touching the indicated elements.
If an
• is shown on the display, the element is still hot.
You could use it, for example, to keep a small quantity of
Operation
Main power switch
Use the main switch to turn on the electronic circuitry for
the control panel. The cooktop is now ready to use.
Turning the cooktop on
Touch the On/Off touch key until the indicator above the
main switch and the symbols
turn on.
Turning the cooktop off
Touch the On/Off touch key. The __ indicator goes out.
The cooktop is switched off. The residual heat indicators
will remain on until the elements have cooled off
sufficiently.
Note: The cooktop switches off automatically when all the elements have been switched off for more than 15 seconds.
If residual heat is still present when the cooktop is turned
•/œ will appear in the heating element display.
on,
$ for the heating elements
food warm or to melt a chocolate coating. As the element
continues to cool, the display changes to
goes out once the element has cooled sufficiently.
The residual heat indicator will automatically come on
after a power failure. The display lights up for
approximately 30 minutes.
œ. The display
Setting the cooktop
This section will show you how to set the elements. The
table contains details on the heat settings for a variety of
dishes.
Setting the element
Select the desired heat level using the number keys
1 to 9.
Heat level 1 = minimum power
Heat level 9 = maximum power
Each heat setting has an intermediate level. This level is
indicated by . and is set with the
control zone.
Û keys in the touch
9
Selecting the heat level
The cooktop must be turned on.
1.
Touch the $ touch key for the corresponding element.
The
‹ indicator will appear in the element display and
$ symbol for the selected element will light up
the
brightly.
2.
Within the next 10 seconds touch the desired heat setting (1-9) in the touch control zone.
1PXFS
"VUP
$IFG
4UBSU
1SPHSBNT
,FFQ
8BSN
1PXFS
4UBSU
"VUP
$IFG
1SPHSBNT
,FFQ
8BSN
Settings table
The following table provides some examples. Cooking
times may vary depending on the type of food, its weight
and quality. Deviations are therefore possible.
Changing the heat level
Select the element and touch the number key for the
desired heat level. To select an intermediate level, touch
Û symbol located between the heat level numbers.
the
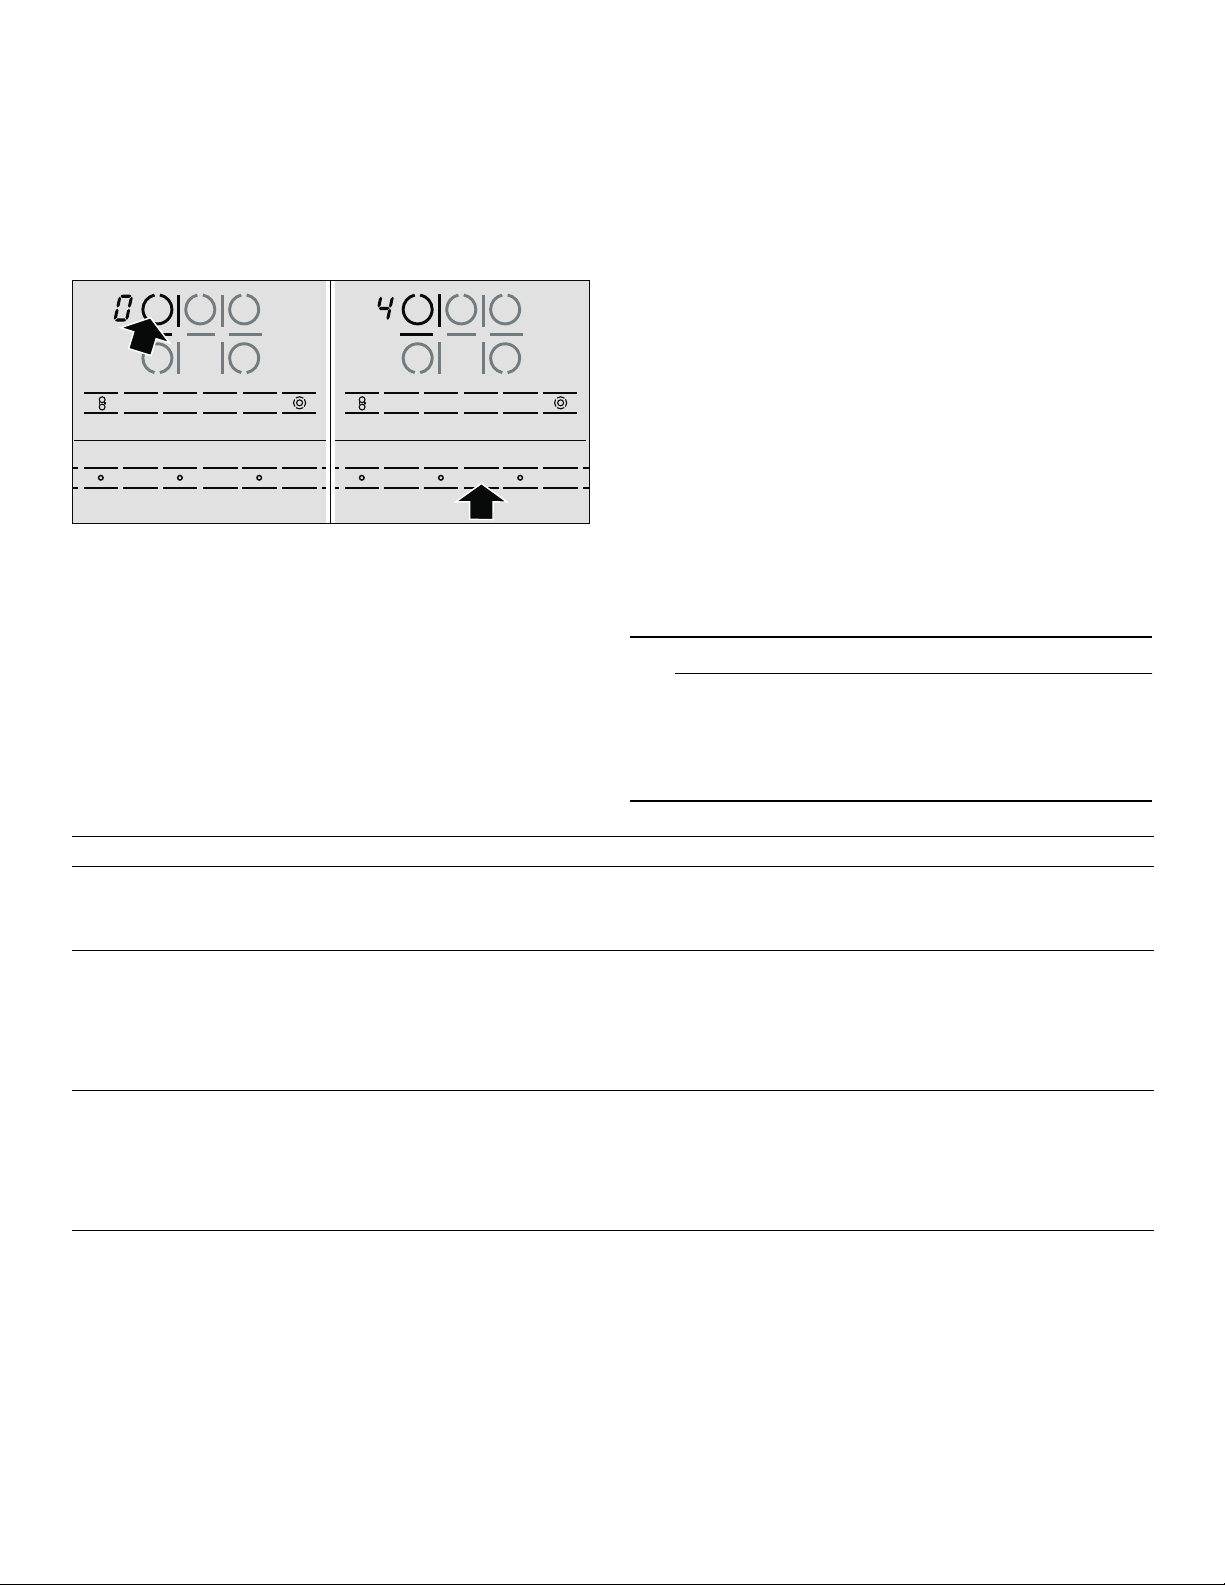
Turning off the element
Select the element and set the heat level to 0. The
element is turned off and the residual heat indicator is
displayed.
Note: The heat is turned on and off to regulate the temperature of the element; this means that the red glow below the element is not always visible. When you select a low heat setting, the element turns off for longer intervals, while at a higher setting these intervals are very short. Even at the highest level, the element turns on and off.
9 CAUTION
During cooking, stews or liquid meals such as
soups, sauces or drinks can heat up too quickly
unnoticed and overflow or spatter. For this reason
we recommend that you stir continuously, gradually
heating the food at a suitable power level.
Power levels
Melting
chocolate 1 - 2
butter 1 - 2
Heating
frozen vegetables (e.g. spinach) 2. - 3.
broth 7 - 8
thick soup 1. - 2.
milk** 1 - 2
Simmering
delicate sauce e.g. Béchamel sauce 4 - 5
spaghetti sauce 2 - 3
pot roast 4 - 5
fish** 4 - 5
Cooking
rice (with double amount of water) 2 - 3
potatoes bolied in thier skins with 1-2 cups of water 4 - 5
boiled potatoes with 1-2 cups of water 4 - 5
fresh vegetables with 1-2 cups of water 2 - 3.
frozen vegetables with 1-2 cups of water 3. - 4.
pasta (2-4 qt. water)* 6 - 7
pudding** 1 - 2
cereals 2 - 3
10

Power levels
Frying
pork chop 5. - 6.
chicken breast 5 - 6
bacon 6 - 7
eggs 5 - 6
fish 5 - 6
pancakes 6 - 7
Deep fat frying** (in 1-2 qt. oil)
deepfrozen foods, e.g. chicken nuggets (0.5 lb per serving) 8 - 9
other e.g. doughnuts (0.5 lb per serving) 4. - 5.
* ongoing cooking without lid
** without lid
PowerStart™ feature
All heating elements are equipped with PowerStart™
circuits. This feature heats up the element using the
highest power and then switches back to the continuous
cooking setting that you have selected.
How long it will take the element to heat up will depend
on the continuous cooking setting that you have
selected.
Cooking table for the PowerStart™ feature
Refer to the following table to see the foods for which
PowerStart™ is suitable. The smaller amount refers to the
smaller heating elements, the larger amount refers to the
Foods for which PowerStart™ is appropriate Quantity Heat setting
Heating
frozen vegetables like spinach 10 oz - 16 oz 2. - 3.PS
broth 2-4 cups 7 - 8 PS
thick soups 2-4 cups 1. - 2. PS
milk* 1-2 cups 1 - 2 PS
Simmering
pot roast 2 lb. 4 - 5 PS
fish 1 lb. - 1.5 lb. 4 - 5 PS
Boiling
rice (with double amount of water) 3/4 cup - 2 cups 2 - 3 PS
potatoes boiled in their skins with 1-2 cups of water 5 - 14 medium potatoes 4 - 5 PS
boiled peeled potatoes with 1-2 cups of water 5 - 14 medium potatoes 4 - 5 PS
fresh vegetables with 1-2 cups of water 1 lb. - 2 lb. 2. - 3. PS
Frying
pork chop 1 - 2 servings 5. - 6. PS
pancakes 5. - 6. PS
* without lid
Setting the PowerStart™ feature
The PowerStart™ feature can only be activated in the fist
30 seconds after the cooktop has been turned on:
1.
Select the continuous cooking setting you want to use for the element.
2.
Touch PowerStart. ‘ and the cooking level alternately appear on the display. PowerStart™ is activated.
Once the food has been cooked briefly, the heating
element automatically switches back to the programmed
cooking level. The
cooking level stays on constantly.
Note: After the PowerStart™ feature has been turned on, the continuous cooking setting can still be changed for a period of 10 seconds.
larger heating elements. The values stated in the table
are guideline values.
‘ indicator disappears and the
11

Tips for using PowerStart™
The PowerStart™ feature does not
bring foods to a boil
It is designed to conserve the food’s nutritional value while using little water for
cooking. Add only about 2 cups of water to the food for the large elements and
about ¾ - 1 cup of water for the small elements.
Cook rice in double the quantity of liquid.
The PowerStart™ feature is not suited for foods that are cooked in a large quan-
tity of water (e.g pasta).
Milk and foods that produce a lot of
Use a tall pot.
froth will boil over
Milk will stick Rinse the pan with cold water before filling it.
When frying, the food may stick to
the pan
AutoChef™
When you are using AutoChef™ to operate the heating
element, a sensor controls the temperature of the pan.
Advantages when frying
The cooking element only heats when it is necessary.
This saves energy. Oil and grease do not overheat.
9 CAUTION
▯ Never leave oil or fat cooking unattended.
▯ Place the pan in the centre of the element. Make
Preheat the frying pan and oil before adding food. Do not turn the food too
soon. Food will separate from the bottom of the pan after cooking a short time.
System pans for AutoChef™
For frying with AutoChef™ use the system pan only.
Otherwise, the controller will not work properly and may
cause your pans to overheat.
You can use the enclosed order form to request a free
system pan.
You can also purchase the system pan in specialised
stores:
HEZ390230
The frying levels provided below are designed for our
system pans.
sure that the base of the pan has the proper
diameter.
▯ Do not cover the pan with a lid. The automatic
regulation will not work. A mash splatter guard
can be used without affecting the automatic
regulation.
▯ Only use fat or oil that is suitable for frying. When
you are using butter, margarine, olive oil or pork
lard, select the min temperature setting.
▯ AutoChef™ is not suitable for boiling.
Frying levels
Power level Temperature Suitable for
max high Steaks medium rare, fried boiled potatoes
med medium-high Veal cutlet, ground meat, thin slices of meat, vegetables
low low - medium Thick pan-fried foods such as pork chop, chicken breast, Hamburger, pancakes
min low Omelets, French Toast, Hash browns, fried food in butter or olive oil
12
Setting the AutoChef™ feature
Select the appropriate frying level from the chart. Place
the system pan in the center of the element. The cooktop
must be on.
1.
Touch AutoChef™. The ‘ lights up on the element display. The frying level options appear on the display menu.
2.
Select the desired frying level using the number keys on the display menu.
AutoChef™ is enabled.
The heating element in the center turns on
automatically. The temperature symbol
ª appears until
the frying temperature is reached. Then a beep
sounds. The temperature symbol
ª disappears.
"VUP
1PXFS
$IFG
4UBSU
1SPHSBNT
8BSN
,FFQ
NJO MPX NFE NBY
AutoChef™ Frying Chart
The following chart lists which frying level is ideal for
particular foods. Frying time may depend on the type,
weight and quality of the food product.
Meat Pork chop, boneless or bone-in (1" thick)
Veal cutlet in breadcrumb (5/8" thick)
Fillet (1" thick)
Cordon bleu
Beef steaks medium rare (
Beef steaks medium or well done (
_" thick)
_" thick)
Chicken breast (1" thick)
Skillet-fried chicken
Sausages e.g. hot dogs (ø
^ - 1X")
Hamburger
Thin slices of meat
Ground meat
Bacon
Fish Fish, fried (whole)
Fish fillet with or without breadcrmbs
Shrimps
Egg dishes Pancakes
Omelettes
Fried eggs
Scrambled eggs
French toast
* Place in cold pan
cf continuous frying
"VUP
1PXFS
$IFG
4UBSU
3.
Add the frying oil to the pan, then add the ingredients.
1SPHSBNT
8BSN
,FFQ
NBYNJO MPX NFE
Turn the food over as usual to avoid burning.
Turning off AutoChef™
Select 0 from the number keys. The heating element will
turn off and the residual heat indicator will appear..
The frying levels provided are designed for the system
pan. Frying levels may vary when using other frying pans.
Frying level Total frying time
from signal
low
med
med
low
max
med
min
min
low
low
med
med
min
low
low/med
med
low
min
min
min
min
10-17 min
6-10 min
6-10 min
15-20 min
8-10 min
8-12 min
20-30 min
25-35 min
8-20 min
6-12 min
7-12 min
6-10 min
5-8 min
15-25 min
10-20 min
4-8 min
cf
cf
2-6 min
2-4 min
cf
13
Potatoes Fried boiled potatoes
"VUP
$IFG
,FFQ
8BSN
1SPHSBNT
"VUP
$IFG
,FFQ
8BSN
1SPHSBNT
1PXFS
4UBSU
1PXFS
4UBSU
Fried raw potatoes
Hash browns
Vegetables Garlic/Onions
Squash, Egg plant
Mushrooms
Stir-fried vegetables
Frozen products
Chicken nuggets, Chicken patties
Cordon bleu
Chicken breast
Fish fillet in bread crumb
Fish sticks
Oven French fries
Stir-fried vegetables
Ready-made
meals
Spring rolls/Eggrolls (
Potato products e.g. fried potatoes
Potato products e.g. hash browns
_-1]" thick)
Pasta (with added water)
Misc. Baked camembert/Baked cheese
Roast almonds, nuts, pine kernel*
* Place in cold pan
cf continuous frying
Frying level Total frying time
from signal
max
low
min
min
low
med
med
med
min
low
low
med
max
min
low
low
min
min
low
min
6-12 min
15-25 min
20-30 min
2-10 min
4-12 min
10-15 min
10-12 min
8-15 min
10-30 min
10-30 min
10-20 min
8-12 min
4-6 min
8-15 min
10-30 min
10-15 min
10-20 min
4-6 min
7-10 min.
3-7 min.
Frying programs
Use the frying programs with a system pan only.
You can use the frying programs to prepare the following
dishes:
Program Dish
˜‚
˜ƒ
˜„
˜…
˜†
˜‡
˜ˆ
˜‰
˜Š
Ground meat
Hamburger, Pork chop
Steak medium rare
Steak medium or well done
Fish
Pancakes, French Toast
Frozen oven French fries
Stir-fried vegetables
Omelette, eggs
Select the desired program
Select the element with the frying sensor.
1.
Touch Programs. The ˜‹ indicator lights up on the element display.
2.
Select the desired frying program using the number keys.
The frying program is activated.
The temperature symbol
ª appears alternating with the
program number until the frying temperature is
reached. A beep sounds. The temperature symbol
disappears.
3.
Add the frying oil and then the food to the pan. Turn the food as usual to avoid burning.
ª
14
Turning off the frying program
Select 0 from the number keys. the heating element will
turn off and the residual heat indicator will appear.
Cook time
0O0GG
5JNFS
"VUP
$IFG
,FFQ
8BSN
1SPHSBNT
NJO
[
$MFBO-PDL
$IJME-PDL
1PXFS
4UBSU
You can use the timer function to set a cook time for any
element. The element will turn off automatically once the
set time has elapsed.
9 CAUTION
▯ When using the timer, always keep an eye on the
cooktop and do not allow anything to boil over or
burn. Boilovers can cause smoke and foods and
oils may catch on fire if left on high temperature
settings.
▯ This function should not be used for long periods
of time, especially at high heat settings.
▯ Make sure the cooktop is turned off with the main
power switch after each use.
Setting the cook time
1.
Select the desired element and power level.
2.
Touch the Timer key twice. The indicator for the
desired element lights up.
lights up on the Timer display.
r and min appear, and ‹‹
Change cook time
Select the element and touch the Timer key twice. Set
the new cook time using the number keys 0 to 9.
Cancelling cook time
Select the desired element and touch the Timer symbol
twice. The min, __ and
0 from the number keys until
r indicators light up. Then select
‹‹ is displayed.
Timer function with AutoChef™
When you cook using AutoChef™, the programmed cook
time begins to count down once the selected element
reaches the set temperature.
Notes
▯ You can set a cook time of up to 99 minutes.
▯ To program a cook time of less than 10 minutes,
always select 0 first before you select the required
value.
▯ After a power outage, the timer function will be
cancelled.
Automatic timer
With this function you may select a cook time for all
elements. Once an element is turned on, the selected
time will begin to count down. The element will
automatically turn off when the cook time has elapsed.
Instructions on activating the automatic timer are found in
the chapter "Basic settings".
Note: The cook time can be changed or cancelled for any element:
Touch the Timer key several times until the
$ indicator
of the required element lights up. Adjust the cook time
with touch keys 1 to 9 or deactivate with 0.
3.
Within the next 10 seconds, set the required time using the number keys.
1PXFS
0O0GG
$MFBO-PDL
$IJME-PDL
5JNFS
"VUP
$IFG
NJO
4UBSU
1SPHSBNT
,FFQ
8BSN
The timer begins to count down.
The element must be selected in order to display the
countdown for the particular heating element.
Once the cook time has elapsed
The element turnes off once the set cook time has
elapsed. You will hear a beep. The indicator
the element display.
‹‹ lights up for 10 seconds on the
‹ appears in
Timer display. The indicators disappear and the beep
stops.
Kitchen timer
The timer can be set for periods of up to 99 minutes. It is
independent of the other settings. You can also use the
kitchen timer when the cooktop is turned off or locked.
This function does not automatically switch off an
element.
Setting the time
1.
Touch the Timer key. ‹‹ appears in the timer display.
The __, min and
2.
Set the required time using the number keys 0 to 9.
After a few seconds, the __ indicator goes out and the
programmed time starts to count down.
Once the time has elapsed
At the end of the programmed time, a beep will sound
and
‹‹ will appear on the timer display. The V indicator
is on. The display turns off after 10 seconds.
Changing the time
Touch the Timer key. The __ and
Change the time using the number keys 0 to 9.
V indicators light up.
V indicators light up.
15

Clearing the time
Touch the Timer key. The __ and
Touch the 0 key until
V indicator goes out.
The
‹‹ appears on the timer display.
V indicators light up.
Keep Warm function
The Keep Warm function is useful for melting chocolate
or butter and for keeping foods warm.
NOTICE: Never set any plastic dishes or containers on the Keep Warm surfaces, they will melt.
Turning on the Keep Warm function
1.
Touch the $ symbol for the desired heating element.
2.
Touch the Keep Warm key. – will appear in the display. The Keep Warm function is now turned on.
Turning off the Keep Warm function
Select the heating element and select 0 from the number
keys.
‹ will appear in the display. The heating element
will turn off. Note: While the Keep Warm function is turned on, the
PowerStart™ feature cannot be activated.
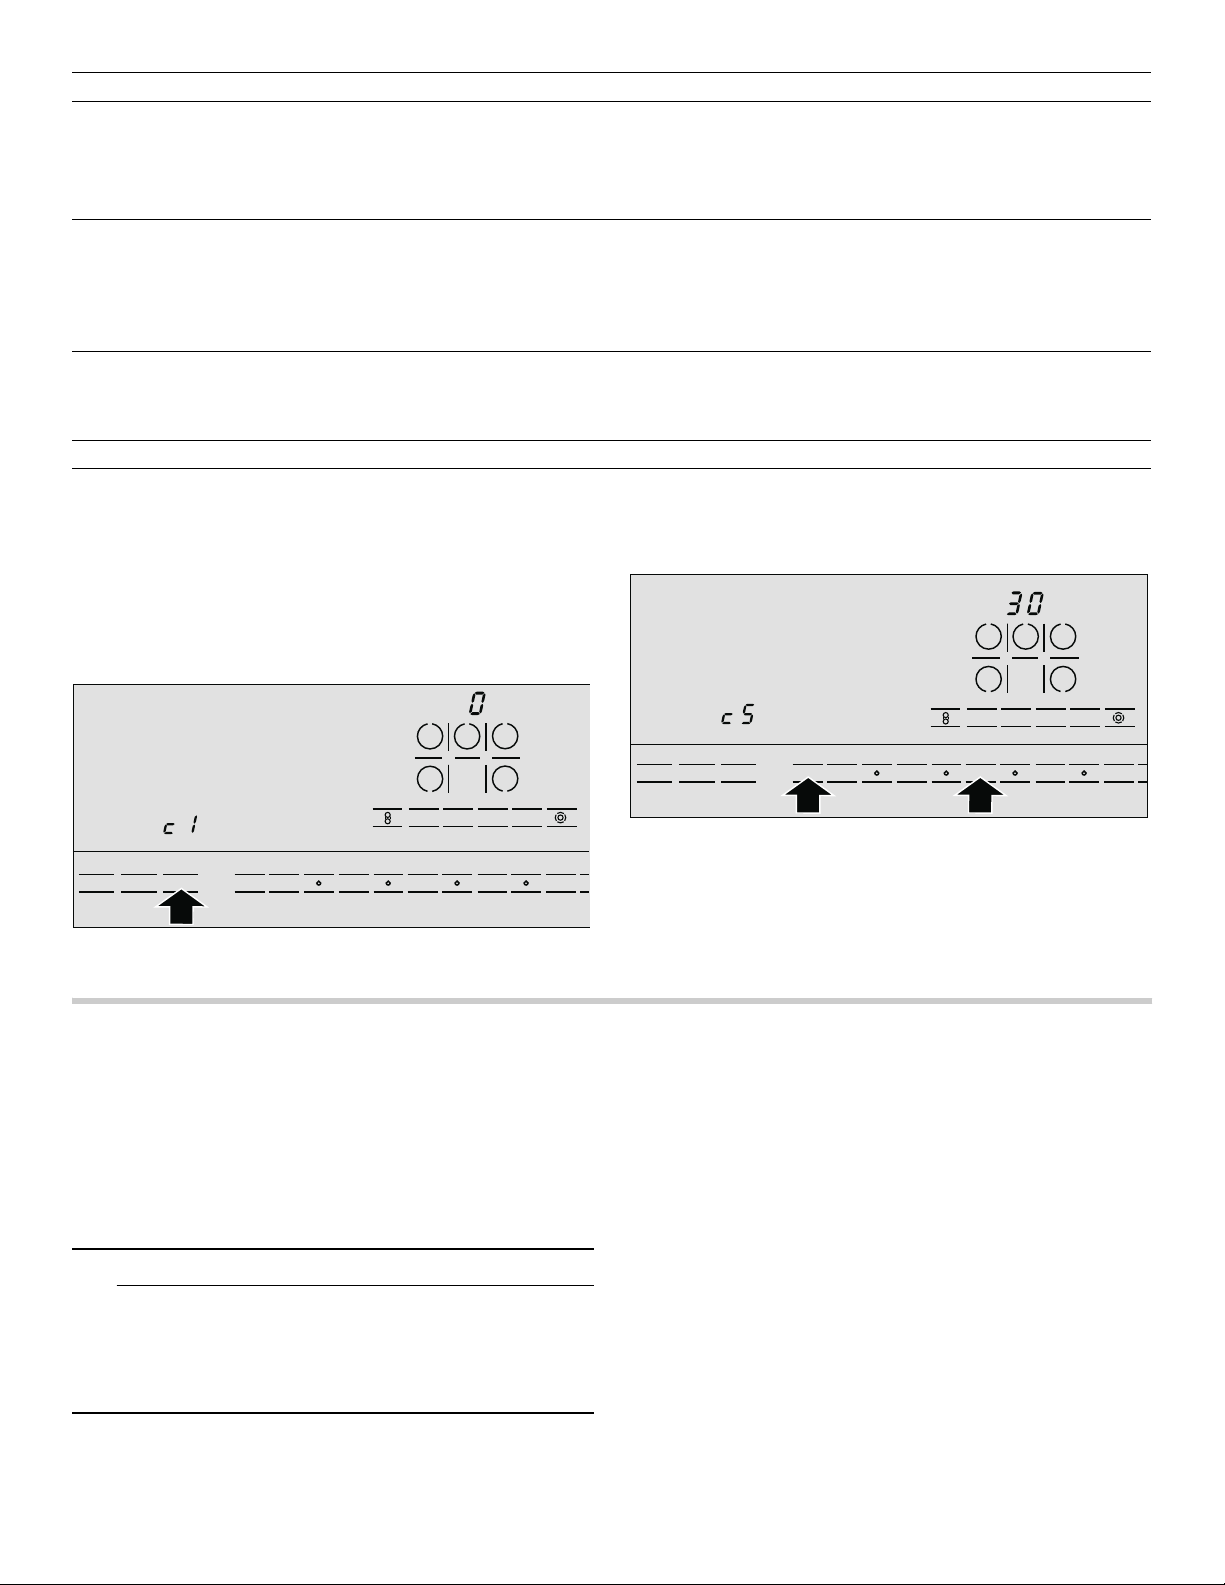
Child lock
You can use the child lock to prevent children from
accidentally turning the cooktop on.
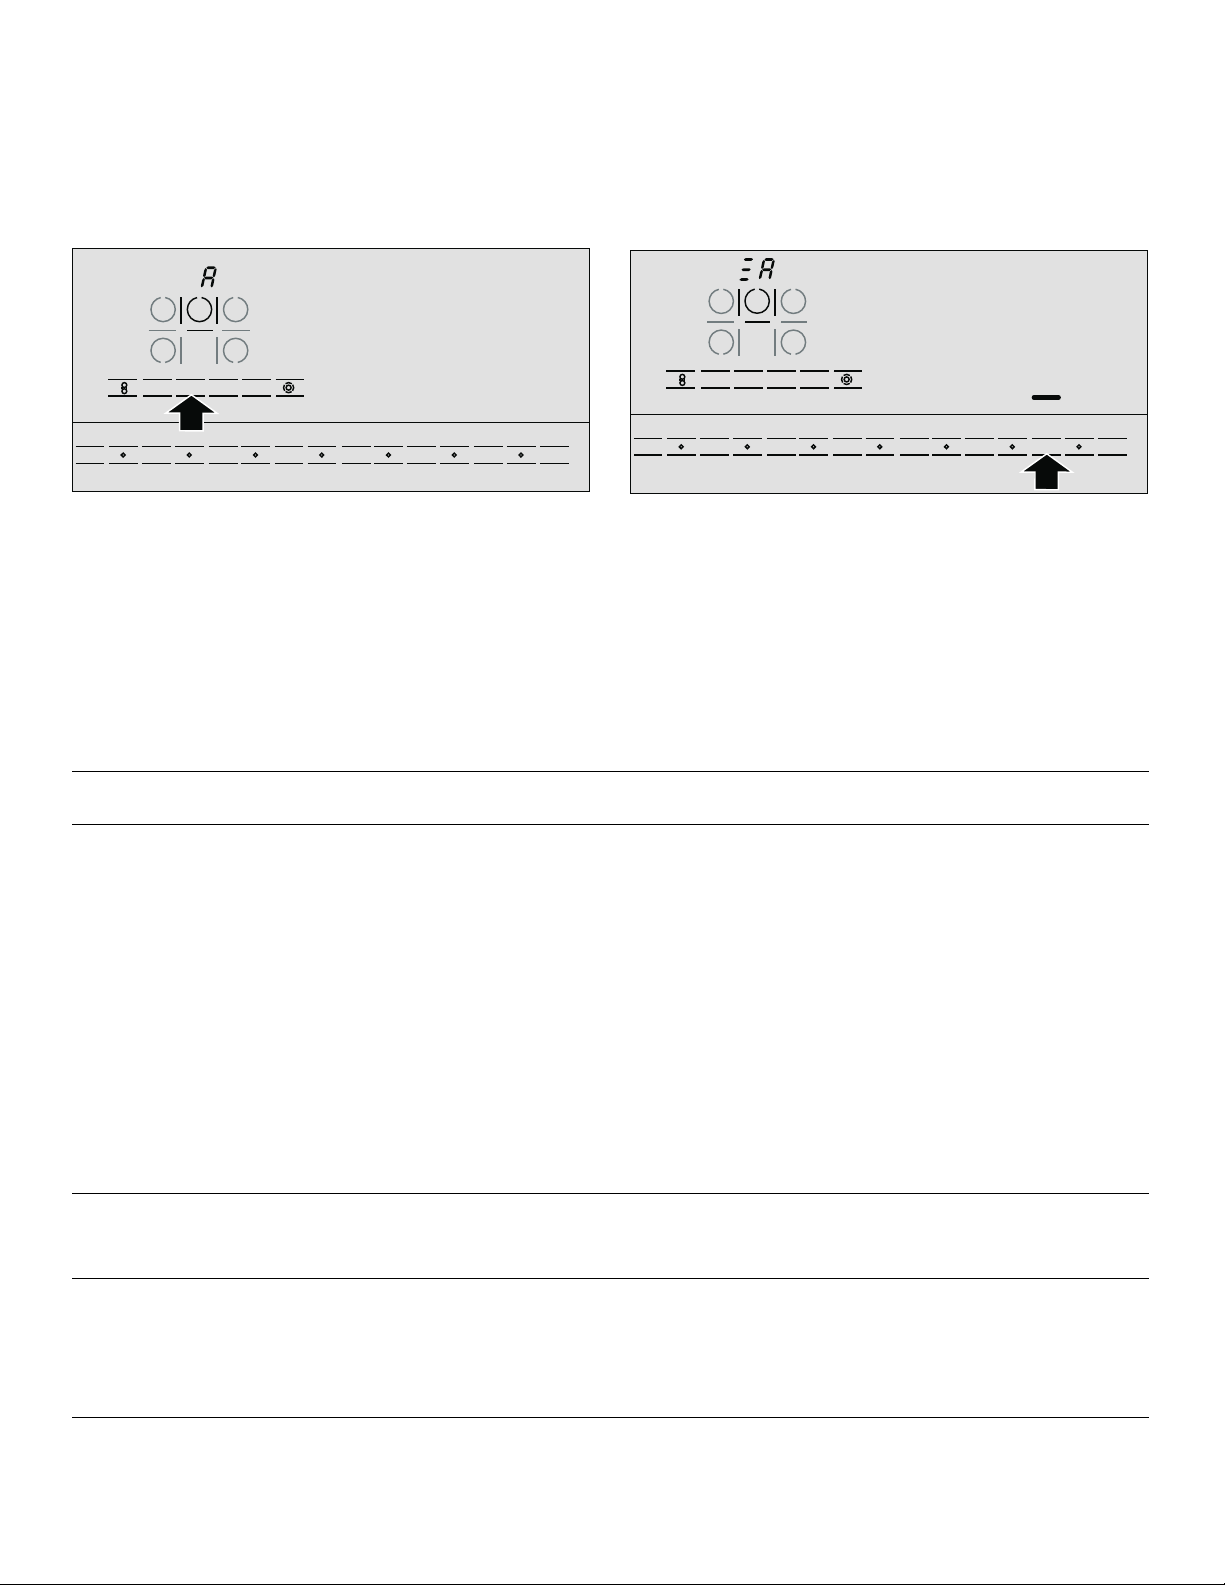
Turning the child lock on
The cooktop must be turned off.
Touch Clean Lock/Child Lock for 4 seconds. The
indicator lights up for 4 seconds. The cooktop is now
locked.
D
Turning the child lock off
Touch Clean Lock/Child Lock for 4 seconds. The safety
panel lock is now canceled.
9 CAUTION
The child lock may be accidentally turned on and off
due to:
▯ water spilled during cleaning
▯ food that has overflowed
▯ objects being placed on the Clean Lock/Child
Lock touch key.
Automatic child lock
With this function, the child lock is automatically activated
whenever you switch off the cooktop.
Turning on and off
See "Basic settings" section.
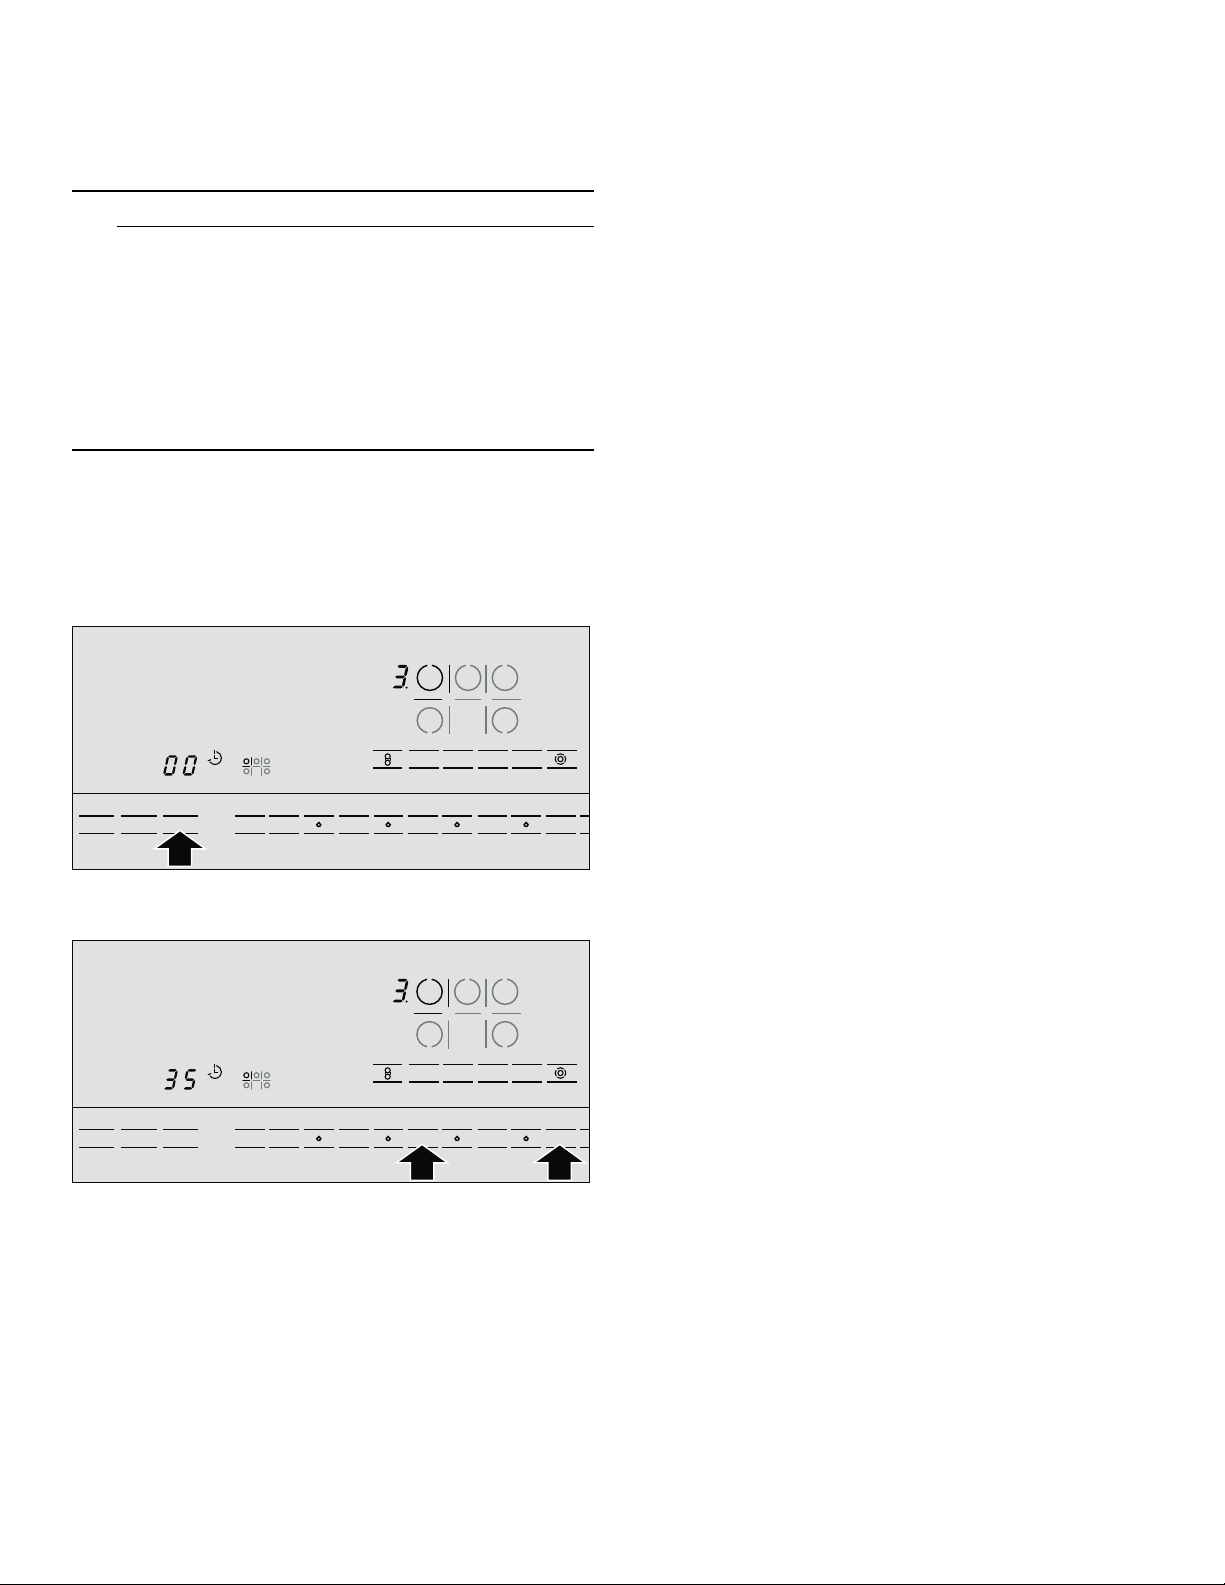
Clean Lock
Cleaning the control panel while the cooktop is on may
change the settings.
In order to avoid this the cooktop has a Clean Lock
function. Touch Clean Lock/Child Lock. The
appears. The control panel is locked for approximately
35 seconds. You can now clean the surface of the
control panel without risk of changing the settings.
After the time has elapsed a beep will sound. The Clean
Lock is deactivated.
The Clean Lock function does not affect the main switch.
You can turn off the cooktop at any time.
>indicator
Basic Settings
The appliance has various basic settings. You can adjust
these settings to the way you usually cook.
Display Function
™‚
™ƒ
™†
™‡
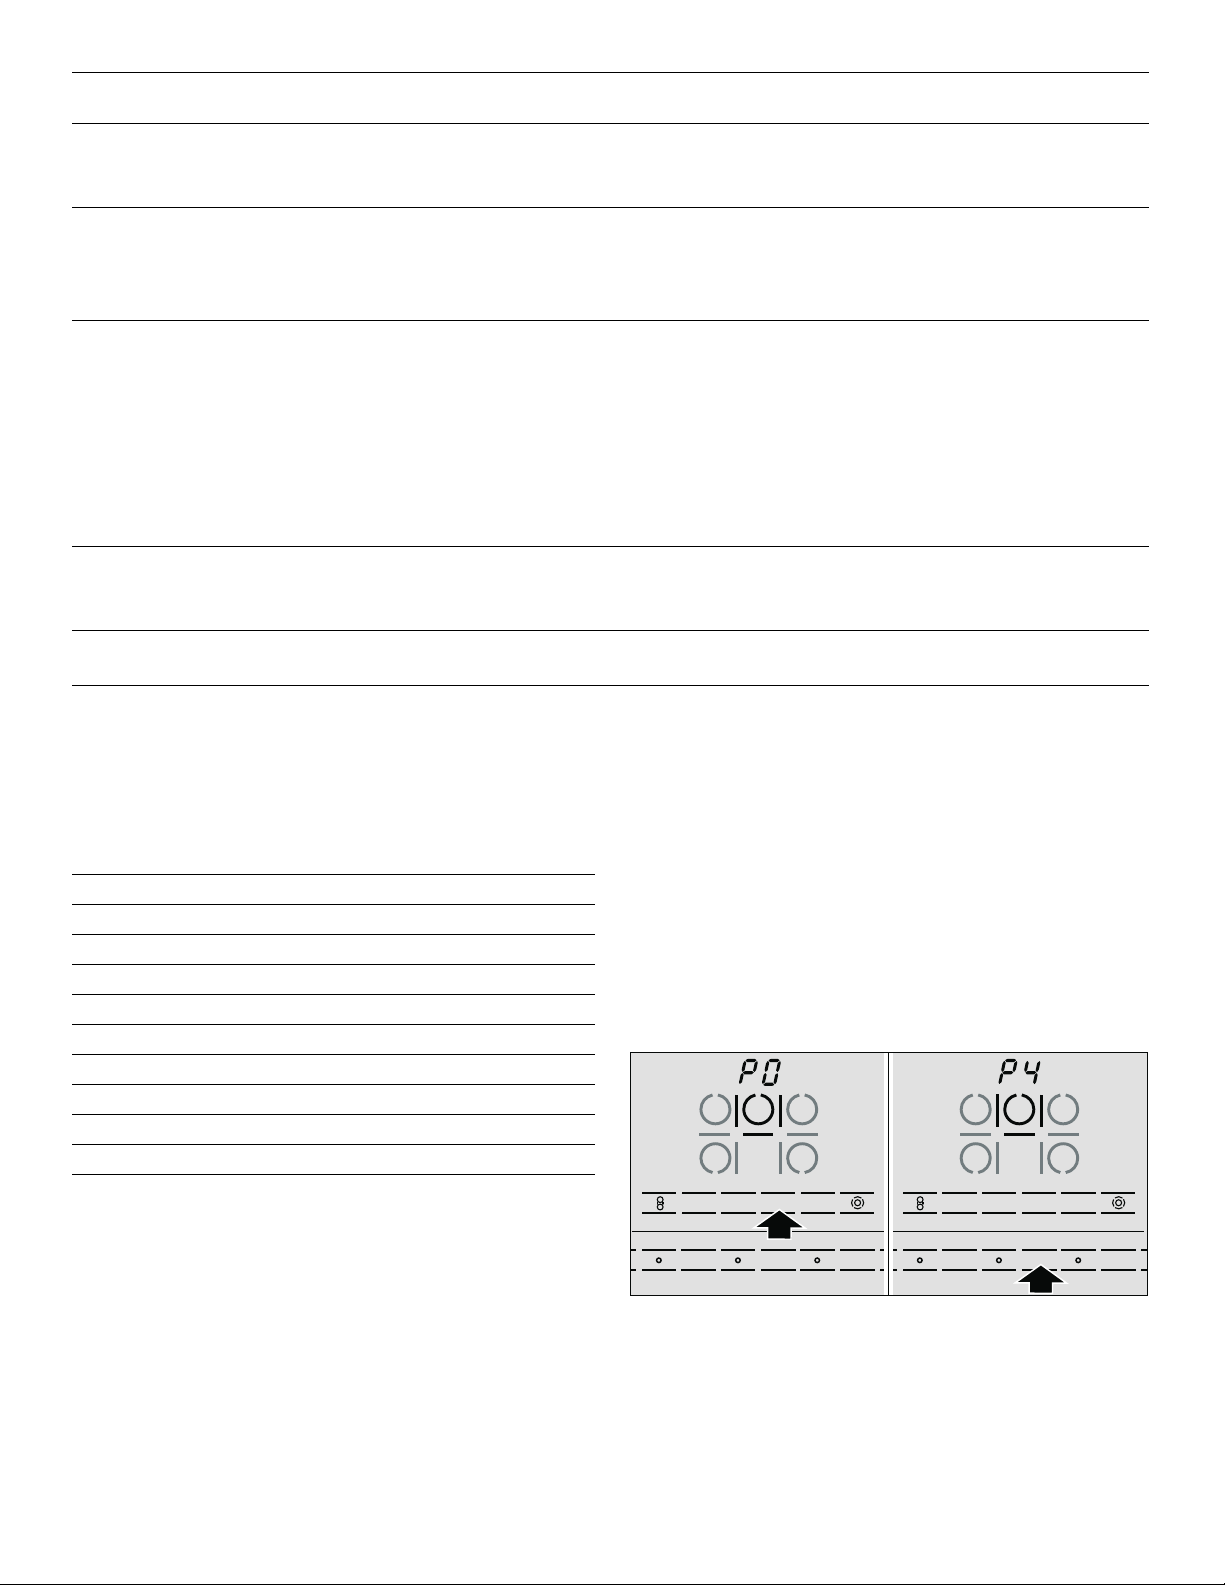
*factory settings
Automatic child lock
‹ Off*
‚ On
Sound signals
‹ Confirmation beep and error signal off
‚ Only error signal on
ƒ All signals on*
Automatic timer
‹ Off*
‚-ŠŠ Automatic shut-off time
Length of timer end signal
‚ 10 seconds*
ƒ 30 seconds
„ 1 minute
16
Display Function
NJO
0O0GG
5JNFS
1PXFS "VUP
$IFG
,FFQ
8BSN
1SPHSBNT
$MFBO-PDL
$IJME-PDL
4UBSU
NJO
0O0GG
"VUP
$IFG
,FFQ
8BSN
1SPHSBNT
5JNFS
$MFBO-PDL
$IJME-PDL
1PXFS
4UBSU
™ˆ
Heating element activation
‹Off
‚On*.
ƒLast setting before turning off the heating element
™Š
Selection time for heating element
‹Unlimited*: You can adjust the settings of the last heating element used at any time without having to
select it again.
‚Restricted: You can adjust the settings for the last heating element used within 10 seconds after
selecting it. After that you will have to reselect the heating element before setting it.
™‹
Reset to basic settings
‹ Off*
‚ Reset the appliance to basic settings
*factory settings
Changing the basic settings
The cooktop should be turned off.
1.
Turn on the cooktop with the main switch.
2.
Within the next 10 seconds, touch the Timer key for 4seconds.
Alternating
™‚ symbol appears on the left display, and
‹ appears on the right display.
Cleaning and Maintenance
3.
Touch the Timer key until the desired indicator appears on the left display.
4.
Select the required setting using the number keys.
5.
Touch the Timer key again for 4 seconds. The setting is activated.
Leaving the basic settings
Turn off the cooktop with the main switch.
Daily Cleaning
Note: Recommended cleaners indicate a type of cleaner
and do not constitute an endorsement of a specific
brand.
Glass ceramic cooktop
9 CAUTION
Do not use any kind of cleaner on the glass while
the surface is hot, use only the razor blade scraper.
The resulting fumes can be hazardous to your
health. Heating the cleaner can chemically attack
and damage the surface.
Clean the surface when it is completely cool with the
following exception: remove dry sugar, sugar syrup,
tomato products and milk immediately with the razor
blade scraper (see special care chart).
Wipe off spatters with a clean, damp sponge or a paper
towel. Rinse and dry. Use white vinegar if smudge
remains; rinse.
Apply a small amount of the glass ceramic cooktop
cleaner. When dry, buff surface with a clean paper towel
or cloth.
Stainless steel side trim
Wipe with the grain when cleaning. For moderate/heavy
soil, use BonAmi® or Soft Scrub® (no bleach).
Wipe using a damp sponge or cloth, rinse and dry.
17

Cleaning guidelines
When using a cleaner, use only a small amount; apply to
a clean paper towel or cloth. Wipe on the surface and
buff with a clean dry towel.
For best results, use cleaners such as glass ceramic
cooktop cleaner, BonAmi®, Soft Scrub® (without
bleach), and white vinegar.
Avoid these cleaners
▯ Glass cleaners which contain ammonia or chlorine
bleach. These ingredients may damage or
permanently stain the cooktop.
▯ Caustic cleaners - cleaners such as Easy Off® may
stain the cooktop surface.
▯ Abrasive cleaners.
▯ Metal scouring pads and scrub sponges such as
Scotch Brite® can scratch and/or leave metal marks.
▯ Soap-filled scouring pads such as SOS® can scratch
the surface.
▯ Powdery cleaners containing chlorine bleach can
permanently stain the cooktop.
▯ Flammable cleaners such as lighter fluid or WD-40.
Cleaning charts
Type of Soil Possible Solution
Dry sugar, sugar syrup, milk or tomato spills. Melted
plastic film or foil. All these items REQUIRE IMMEDIATE
REMOVAL. Failure to remove these immediatly can permanently damage the surface.
Remove these types of spills while the surface is hot
using the razor blade scraper. Use a new, sharp razor in
the scraper. Remove pan and turn off the element. Wearing an oven mitt, hold scraper at 30° angle, using care
not to gouge or scratch the glass. Push soil off the
heated area. After the surface has cooled, remove the
residue and apply the glass ceramic cooktop cleaner.
9 WARNING
RISK OF INJURY
The blade is extremely sharp. Risk of cuts. Protect
the blade when not in use. Replace the blade immediately when any imperfections are found. Follow
manufacturer’s instructions.
Burned-on food soil, dark streaks, and specks Soften by laying a damp paper towel or sponge on top of
soil for 30 minutes. Use a plastic scrubber and glass
ceramic cooktop cleaner or use the razor blade scraper.
Rinse and dry.
Greasy spatters Use a soapy sponge or cloth to remove grease; rinse
thoroughly and dry. Apply glass ceramic cooktop
cleaner.
Metal marks: Iridescent stain Pans with aluminum, copper or stainless steel bases may
leave marks. Treat immediately after surface has cooled
with glass ceramic cooktop cleaner. If this does not
remove the marks, try a mild abrasive (Bon Ami®, Soft
Scrub® without bleach) with a damp paper towel. Rinse
and reapply glass ceramic cooktop cleaner. Failure to
remove metal marks before the next heating makes
removal very difficult.
Hard water spots:
Hot cooking liquids dripped on surface
Minerals in some water can be transferred onto the surface and cause stains. Use undiluted white vinegar, rinse
and dry. Recondition with glass ceramic cooktop cleaner.
Remove boilovers and stains before using the cooktop
again.
Surface scratches:
Small scratches are common and do not affect cooking.
They become smoother and less noticeable with daily use
of the glass ceramic cooktop cleaner.
Apply glass ceramic cooktop cleaner before using to
remove sand-like grains and grit such as salt and seasoning. Scratches can be reduced by using pans with
bases that are smooth, clean, and dry before use. Use
recommended glass ceramic cooktop cleaner daily.
18
NOTICE: Diamond rings may scratch the surface.

Maintenance
This appliance requires no maintenance other than daily
cleaning. For best results, apply cooktop cleaning cream
daily.
Service
Troubleshooting
If you encounter a problem, it often will merely be
something minor. Before you call customer service,
consider the suggestions and instructions below:
Fault Possible cause Measure
Cooktop is not working The electric power supply has been
interrupted.
The appliance has not been correctly connected following the connection diagram.
Electronic system malfunction. Contact the Technical Assistance Service.
“ is flashing on the ele-
ment display
“ flashes on all ele-
ment displays. An
accoustic signal
sounds
The cooktop turns off
by itself
Display
Display
“ and numbers
” and numbers
The touch control zone is wet, very
dirty, food has boiled over, or an
object is lying on top of the touch
control zone.
The main switch has been activated
continuously for more than 5 seconds.
The main switch has been touched
unintentionally.
A fault in the electronic system has
occurred.
A fault has been detected. The following table of error messages lists actions you
9 CAUTION
Repairs should only be done by a trained servicer.
Improper repair of your appliance may result in risk
of severe physical injury or death.
Use other electrical appliances to check if there has
been a power outage. Check to see if there is a problem with the circuit breaker for the electrical installation.
Make sure that the appliance has been connected correctly.
Clean the touch control zone, or remove the object.
Lightly touch the corresponding touch key. The flashing should stop.
Press the power key again. Reset the cooktop.
Press the main switch again. Reset the cooktop.
Turn the appliance off and back on at the fuse or circuit breaker. If the same fault occurs again, disconnect the appliance and call Technical Assistance
Service.
can take to correct the problem
Error messages
Display Fault Measure
”ƒ
”…
The element is too hot and has
turned off.
The touch control zone is too hot. Make sure that cookware is properly positioned on the
Remove the pans from the elements.
when you press the display, if the element has cooled
down sufficiently. Wait a few minutes until the element
has cooled down a bit. If
element is turned back on, the cooktop is still too hot.
Turn off the elements and allow them to cool further.
element, and no hot objects are in contact with the
touch control zone. Wait a few minutes until the touch
control zone has cooled down. If
turn on the appliance, call Technical Assistance Service.
”ƒ disappears
”ƒ appears again after the
”… appears after you
19

”ˆ
0DLQ6WUHHW6XLWH
,UYLQH&$
ZZZERVFKKRPHFRP
”‰
AutoChef™ is defective. Confirm and close the error message by touching any
area on the touch control zone. You can cook without
AutoChef™. Contact Technical Assistance Service.
The element was in continuous use
for too long.
The automatic time limitation has been activated.
Touch any key. You can now turn on the heating element immediately.
Notes
▯ The cooktop regulates the heating element
temperature by turning the heat source on and off; this
means that the reddish glow of the heat source
beneath the heating element may not always be
visible. If you select a low heat setting, the heat source
is frequently off; at higher settings it is seldom off. The
source turns on and off even at the highest settings.
▯ You may hear a quiet hum when the heating elements
are in the heating phase. The heating elements may
glow with different levels of brightness. Depending on
the angle from which you are looking at the heating
element, this glow may be visible over the marked
edge of the heating element. These are technical
characteristics. They have no effect on quality and
function.
▯ Glass ceramic may have uneven areas on the surface
due to the nature of the material itself. Because of the
mirror-like finish on the cooking surface, even
extremely small bubbles less than 1 mm in diameter
may be visible. These bubbles will not have any
adverse effect on the operation of the cooktop nor on
the durability of the glass ceramic cooking surface.
▯ Depending on the countertop that is present in the
kitchen, an uneven gap between the cooktop unit and
the countertop can occur. For this reason, a flexible
seal is provided around the entire cooktop unit.
Technical service
Contact our Technical Service Department if your
appliance needs repair. Our central Customer Service
Center (see below) will also be happy to supply you with
details on a center close to you.
E number and FD number:
When you contact our service, please have the Model(E)
number and the FD number for your appliance available.
You can find the identification plate with these numbers
on the underside of the appliance and in the appliance
booklet.
Questions? Please contact us. We look forward to
hearing from you!
20

STATEMENT OF LIMITED PRODUCT WARRANTY
What this Warranty Covers & Who it Applies to
The limited warranty provided by BSH Home Appliances
in this Statement of Limited Product Warranty applies
only to the Bosch NEM3064UC, NEM3664UC,
NET5054UC, NET5654UC, NET8054UC, NET8654UC
(“Product") sold to you, the first using purchaser,
provided that the Product was purchased:
▯ For your normal, household (non-commercial) use,
and has in fact at all times only been used for normal
household purposes.
▯ New at retail (not a display, "as is", or previously
returned model), and not for resale, or commercial
use.
▯ Within the United States or Canada, and has at all
times remained within the country of original purchase.
The warranties stated herein apply only to the first
purchaser of the Product and are not transferable.
Bosch reserves the right to request proof of purchase at
the time any warranty claim is submitted to confirm that
the Product falls within the scope of this limited product
warranty.
Please make sure to return your registration card; while
not necessary to effectuate warranty coverage, it is the
best way for Bosch to notify you in the unlikely event of a
safety notice or product recall.
How Long the Warranty Lasts
BSH warrants that the Product is free from defects in
materials and workmanship for a period of three hundred
sixty-five (365) days from the date of purchase. The
foregoing timeline begins to run upon the date of
purchase, and shall not be stalled, tolled, extended, or
suspended, for any reason whatsoever.
Repair/Replace as Your Exclusive Remedy
During this warranty period, BSH or one of its authorized
service providers will repair your Product without charge
to you (subject to certain limitations stated herein) if your
Product proves to have been manufactured with a defect
in materials or workmanship. If reasonable attempts to
repair the Product have been made without success,
then BSH will replace your Product (upgraded models
may be available to you, in BSH’s sole discretion, for an
additional charge). All removed parts and components
shall become the property of BSH at its sole option. All
replaced and/or repaired parts shall assume the identity
of the original part for purposes of this warranty and this
warranty shall not be extended with respect to such
parts. BSH's sole liability and responsibility hereunder is
to repair manufacturer-defective Product only, using a
BSH-authorized service provider during normal business
hours. For safety and property damage concerns, BSH
highly recommends that you do not attempt to repair the
Product yourself, or use an un-authorized servicer; BSH
will have no responsibility or liability for repairs or work
performed by a non-authorized servicer. If you choose to
have someone other than an authorized service provider
work on your Product, THIS WARRANTY WILL
AUTOMATICALLY BECOME NULL AND VOID. Authorized
service providers are those persons or companies that
have been specially trained on BSH products, and who
possess, in BSH's opinion, a superior reputation for
customer service and technical ability (note that they are
independent entities and are not agents, partners,
affiliates or representatives of BSH). Notwithstanding the
foregoing, BSH will not incur any liability, or have
responsibility, for the Product if it is located in a remote
area (more than 100 miles from an authorized service
provider) or is reasonably inaccessible, hazardous,
threatening, or treacherous locale, surroundings, or
environment; in any such event, if you request, BSH
would still pay for labor and parts and ship the parts to
the nearest authorized service provider, but you would
still be fully liable and responsible for any travel time or
other special charges by the service company, assuming
they agree to make the service call.
Out of Warranty Product
BSH is under no obligation, at law or otherwise, to
provide you with any concessions, including repairs, prorates, or Product replacement, once this warranty has
expired.
Warranty Exclusions
The warranty coverage described herein excludes all
defects or damage that are not the direct fault of BSH,
including without limitation, one or more of the following:
▯ Use of the Product in anything other than its normal,
customary and intended manner (including without
limitation, any form of commercial use, use or storage
of an indoor product outdoors, use of the Product in
conjunction with air or water-going vessels).
▯ Any party's willful misconduct, negligence, misuse,
abuse, accidents, neglect, improper operation, failure
to maintain, improper or negligent installation,
tampering, failure to follow operating instructions,
mishandling, unauthorized service (including selfperformed "fixing" or exploration of the appliance's
internal workings).
▯ Adjustment, alteration or modification of any kind.
▯ A failure to comply with any applicable state, local,
city, or county electrical, plumbing and/or building
codes, regulations, or laws, including failure to install
the product in strict conformity with local fire and
building codes and regulations.
▯ Ordinary wear and tear, spills of food, liquid, grease
accumulations, or other substances that accumulate
on, in, or around the Product.
▯ Any external, elemental and/or environmental forces
and factors, including without limitation, rain, wind,
sand, floods, fires, mud slides, freezing temperatures,
excessive moisture or extended exposure to humidity,
lightning, power surges, structural failures surrounding
the appliance, and acts of God.
21

In no event shall BSH have any liability or responsibility
whatsoever for damage to surrounding property,
including cabinetry, floors, ceilings, and other structures
or objects around the Product. Also excluded from this
warranty are scratches, nicks, minor dents, and cosmetic
damages on external surfaces and exposed parts;
Products on which the serial numbers have been altered,
defaced, or removed; service visits to teach you how to
use the Product, or visits where there is nothing wrong
with the Product; correction of installation problems (you
are solely responsible for any structure and setting for
the Product, including all electrical, plumbing or other
connecting facilities, for proper foundation/flooring, and
for any alterations including without limitation cabinetry,
walls, floors, shelving, etc.); and resetting of breakers or
fuses.
TO THE EXTENT ALLOWED BY LAW, THIS WARRANTY
SETS OUT YOUR EXCLUSIVE REMEDIES WITH
RESPECT TO PRODUCT, WHETHER THE CLAIM ARISES
IN CONTRACT OR TORT (INCLUDING STRICT LIABILITY,
OR NEGLIGENCE) OR OTHERWISE. THIS WARRANTY
IS IN LIEU OF ALL OTHER WARRANTIES, WHETHER
EXPRESS OR IMPLIED. ANY WARRANTY IMPLIED BY
LAW, WHETHER FOR MERCHANTABILITY OR FITNESS
FOR A PARTICULAR PURPOSE, OR OTHERWISE,
SHALL BE EFFECTIVE ONLY FOR THE PERIOD THAT
THIS EXPRESS LIMITED WARRANTY IS EFFECTIVE. IN
NO EVENT WILL THE MANUFACTURER BE LIABLE FOR
CONSEQUENTIAL, SPECIAL, INCIDENTAL, INDIRECT,
"BUSINESS LOSS", AND/OR PUNITIVE DAMAGES,
LOSSES, OR EXPENSES, INCLUDING WITHOUT
LIMITATION TIME AWAY FROM WORK, HOTELS AND/
OR RESTAURANT MEALS, REMODELLING EXPENSES
IN EXCESS OF DIRECT DAMAGES WHICH ARE
DEFINITIVELY CAUSED EXCLUSIVELY BY BSH, OR
OTHERWISE. SOME STATES DO NOT ALLOW THE
EXCLUSION OR LIMITATION OF INCIDENTAL OR
CONSEQUENTIAL DAMAGES, AND SOME STATES DO
NOT ALLOW LIMITATIONS ON HOW LONG AN IMPLIED
WARRANTY LASTS, SO THE ABOVE LIMITATIONS MAY
NOT APPLY TO YOU. THIS WARRANTY GIVES YOU
SPECIFIC LEGAL RIGHTS, AND YOU MAY ALSO HAVE
OTHER RIGHTS WHICH VARY FROM STATE TO STATE.
No attempt to alter, modify or amend this warranty shall
be effective unless authorized in writing by an officer of
BSH.
How to obtain Warranty Service:
To obtain warranty service for your product, you should
contact the nearest Bosch authorized service center.
BSH Home Appliances - 1901 Main Street, Suite 600,
Irvine, CA 92614 / 800-944-2904
22

Table des Matières
Notice d’utilisation
CONSIGNES DE SÉCURITÉ IMPORTANTES ............. 24
Sécurité-incendie ............................................................... 24
Sécurité de cuisson .......................................................... 24
Prévention des brûlures ................................................... 25
Sécurité des enfants ......................................................... 25
Consignes en matière de nettoyage ............................. 25
Sécurité pour la batterie de cuisine ............................... 26
Installation et entretien corrects ..................................... 26
Avertissements de la Proposition 65
de l’État de la Californie ................................................. 26
Éléments qui peuvent endommager l'appareil ......... 27
Protection de l'environnement ................................... 27
Conseils d’économie l'énergie ....................................... 27
Faire connaissance avec l’appareil ............................ 28
Panneau de commande ................................................... 28
Les Éléments ...................................................................... 29
Indicateur de chaleur résiduelle .................................... 29
Fonctionnement ........................................................... 30
Interrupteur d'alimentation principal ............................. 30
Allumage de la table de cuisson ................................... 30
Fonction PowerStart™ ..................................................... 32
AutoChef™ .......................................................................... 33
Durée de cuisson ............................................................. 36
Minuterie de cuisine ........................................................ 37
Fonction de réchaud ........................................................ 37
Verrouillage à l'épreuve des enfants ............................. 37
Verrouillage de nettoyage ................................................ 37
Réglages de base ........................................................... 38
Nettoyage et entretien ................................................. 39
Nettoyage quotidien .......................................................... 39
Instructions de nettoyage ................................................ 39
Tableau de nettoyage ....................................................... 40
Entretien .............................................................................. 40
Entretien ....................................................................... 41
Dépannage ......................................................................... 41
Service technique .............................................................. 42
ÉNONCÉ DE LA GARANTIE LIMITÉE ........................ 43
Couverture de la garantie : .............................................. 43
Durée de la garantie ......................................................... 43
Réparation ou remplacement comme
solution exclusive .............................................................. 43
Produit hors garantie ....................................................... 43
Exclusions à la garantie ................................................... 43
Comment obtenir un service au titre de la garantie: .. 44
Produktinfo.
Vous trouverez des informations supplementaires
concernant les produits, accessoires, pièces de
rechange et services sur Internet sous : www.bosch-
home.com et la boutique en ligne : www.bosch-
eshop.com
23

9 CONSIGNES DE SÉCURITÉ IMPORTANTES
LIRE ET CONSERVER CES INSTRUCTIONS
CONSIGNES DE SÉCURITÉ IMPORTANTES
LIRE ET CONSERVER CES INSTRUCTIONS
AVERTISSEMENT
Votre nouvel appareil a été conçu pour un
fonctionnement sûr et fiable si vous en prenez bien soin.
Lire attentivement toutes les consignes avant l'emploi.
Ces précautions réduiront les risques de brûlures, de
choc électrique, d'incendie et de lésions corporelles.
Lors de l'utilisation d'un appareil électroménager,
quelques précautions de sécurité élémentaires doivent
être observées, y compris celles qui figurent aux pages
suivantes.
Contrôler l'appareil après l'avoir déballé. Si l'appareil a
été endommagé durant le transport, ne pas le brancher.
Sécurité-incendie
Ne laissez pas le papier d'aluminium, le plastique, le
papier ou les tissus entrer en contact avec un élément
de surface, une grille ou un brûleur chaud. Ne laissez
pas les casseroles chauffer à sec.
Si la table de cuisson est près d'une fenêtre, d'un évent à
air forcé ou d'un ventilateur, s'assurer que les matériaux
inflammables tels les tentures/rideaux ne flottent pas audessus ou près des brûleurs ou éléments. Ils
risqueraient de s'enflammer.
Toujours avoir un détecteur de fumée en état de marche
près de la cuisine.
Ne laissez jamais la table de cuisson sans surveillance
lorsqu'elle est en utilisation. Des débordements causant
de la fumée et des déversements graisseux peuvent
prendre feu.
AVERTISSEMENT
POUR RÉDUIRE LES RISQUES DE FEUX DE GRAISSE :
a.
Ne laissez jamais la surface de cuisson sans
surveillance à des températures élevées. Les
débordements causent de la fumée et les résidus
graisseux peuvent s'enflammer.. Faites chauffer les
huiles lentement à feu doux ou moyen.
b.
Faites toujours fonctionner la hotte lorsque vous
cuisinez à feu vif.
c.
Nettoyez les ventilateurs régulièrement. Ne laissez pas
la graisse s'accumuler sur le ventilateur ou sur le filtre.
d.
Utilisez des casseroles de taille appropriée. Utilisez
toujours des récipients adaptés à la taille de la surface
de cuisson.
Ne flambez jamais sous la hotte aspirante et ne travaillez
jamais avec une flamme nue. Une hotte aspirante en
marche aspire les flammes dans le filtre. Une hotte
aspirante en marche aspire les flammes dans le filtre. Ne
flambez jamais sous la hotte aspirante et ne travaillez
jamais avec une flamme nue. Une hotte aspirante en
marche aspire les flammes dans le filtre. Les dépôts de
graisse sur les filtre risquent alors de s'enflammer!
Si des vêtements s’enflamment, rouler par terre
immédiatement pour éteindre les flammes.
Veillez à avoir à portée de main un extincteur d'incendie
en bon état de marche, placé visiblement près de
l'appareil et facile d'accès.
Étouffez les flammes d'un feu d'aliments autre qu'un feu
de graisse à l'aide de bicarbonate de soude. Ne jamais
utiliser d'eau sur les feux de cuisson.
AVERTISSEMENT
POUR RÉDUIRE LE RISQUE DE LÉSIONS CORPORELLES DANS L'ÉVENTUALITÉ D'UN FEU DE GRAISSE, OBSERVER LES CONSIGNES SUIVANTES :
a.
ÉTOUFFER LES FLAMMES à l'aide d'un couvercle bien
hermétique, d'une tôle à biscuits ou d'un plateau en
métal, puis éteindre l'appareil. FAIRE ATTENTION À NE
PAS SE BRÛLER. Si les flammes ne s'éteignent pas
immédiatement, ÉVACUER LES LIEUX ET FAIRE
APPEL AU SERVICE D'INCENDIE.
b.
NE JAMAIS SAISIR UN RÉCIPIENT QUI BRÛLE. Vous
pourriez vous brûler.
c.
NE PAS UTILISER D'EAU, y compris les chiffons ou
serviettes mouillées. Une violente explosion de vapeur
risque de se produire.
d.
Utiliser un extincteur uniquement si :
- Vous savez que vous possédez un extincteur de
CLASSE ABC, et vous en connaissez déjà le
maniement.
- L'incendie est de petite ampleuret contenu dans la
zone où il s'est déclaré.
- Le service d'incendie est appelé.
- On peut combattre l'incendie le dos tourné vers la
sortie.
Dans la mesure du possible, ne pas faire fonctionner le
système de ventilation lorsqu'un feu se déclenche sur
une table de cuisson. Toutefois, ne pas passer la main à
travers le feu pour mettre le système de ventilation hors
tension.
Sécurité de cuisson
AVERTISSEMENT
Utiliser cet appareil uniquement dans le cadre de
l'utilisation prévue tel que décrit dans ce manuel. NE
JAMAIS utiliser pour chauffer ou réchauffer une pièce.
Ceci pourrait faire surchauffer l'appareil. L'appareil ne
doit jamais servir à entreposer quoi que ce soit.
24

9 CONSIGNES DE SÉCURITÉ IMPORTANTES
LIRE ET CONSERVER CES INSTRUCTIONS
AVERTISSEMENT
Si AutoChef™ ne fonctionne pas correctement, une
surchauffe peut se produire et générer de la fumée ou
endommager la casserole.
LORSQUE VOUS CUISINEZ AVEC AUTOCHEF™, OBSERVEZ LES CONSIGNES SUIVANTES :
▯ Utilisez une casserole adaptée seulement
▯ Placez toujours la casserole au centre de l'élément
chauffant
▯ Ne placez pas de couvercle sur la casserole
▯ Ne laissez jamais de gras de friture sans surveillance
Ne jamais utiliser l’appareil en cas de projections de
liquides ou d’aliments autour du panneau de commande.
Toujours éteindre la plaque de cuisson et sécher le
panneau de commande.
Si les boutons ne sont pas utilisés correctement, des
lésions et des dommages peuvent survenir sur l’appareil.
Si la plaque s’éteint automatiquement et ne peut être
utilisée pendant un certain temps, il est possible qu’elle
se rallume plus tard par inadvertance. Pour éviter que
cela ne se produise, débrancher le coupe-circuit du
disjoncteur automatique. Contacter un technicien agréé.
Prévention des brûlures
NE PAS TOUCHER AUX ÉLÉMENTS DE SURFACE NI
AUX ZONES PRÈS DES ÉLÉMENTS. Les unités de
surface peuvent être chaudes même lorsqu'elles sont de
couleur foncée. Les zones près des unités de surface
peuvent devenir suffisamment chaudes pour causer des
brûlures. Pendant et après l'utilisation, ne pas toucher, ni
laisser vêtements, poignées isolantes ou autres
matériaux inflammables entrer en contact avec les
éléments de surface ni aux zones près des éléments tant
qu'ils n'ont pas refroidi. Citons notamment la table de
cuisson et les surfaces situées près de celle-ci.
Ne pas chauffer ou réchauffer des contenants d'aliments
non ouverts. L'accumulation de pression peut faire
exploser le contenant et provoquer desblessures.
Toujours utiliser des poignées isolantes sèches. Des
poignées mouillées ou humides entrant en contact avec
les surfaceschaudes peuvent provoquer des blessures
par dégagement de vapeur. Ne laissez pas les poignées
toucher les éléments chauffants chauds. Ne pas utiliser
de serviette ni de chiffon volumineux.
Mettre toujours la hotte EN MARCHE pendant la cuisson
à température élevée et au moment de flamber des
aliments (p.ex., crêpes Suzette, cerises jubilée, steak au
poivre flambé).
Utiliser les réglages élevés seulement lorsque
nécessaire. Pour éviter bulles et éclaboussures, chauffer
l'huile lentement à réglage faible ou moyen. L'huile
chaude peut causer des brûlures et blessures
extrêmement graves.
Ne déplacez jamais une poêle contenant de l'huile
chaude, en particulier une bassine à friture. Attendez
qu'elle se soit refroidie.
Attacher les vêtements lâches, etc. avant de commencer.
Attacher les cheveux longs de façon à ce qu'ils ne
pendent pas et ne pas porter de vêtements lâches ou
d'habits ou objets qui pendillent, tels que cravates,
foulards, bijoux ou manches.
AVERTISSEMENT
RISQUE DE BRÛLURE
Les objets en métal chauffent très vite sur la table de
cuisson. Ne jamais poser d'objets en métal sur la table
de cuisson (couteaux, fourchettes, cuillers et
couvercles).
Si l’affichage ne fonctionne pas lorsqu’une zone de
cuisson est en train de chauffer, déconnecter le coupecircuit du disjoncteur automatique. Contacter un
technicien agréé..
Sécurité des enfants
Lorsque les enfants sont assez âgés pour utiliser
l'appareil, il incombe auxparents ou tuteurs légaux de
veiller à ce qu'ils soient formés aux pratiques sécuritaires
par des personnes qualifiées.
Ne permettre à personne de grimper, rester debout,
s'appuyer, s'asseoir ou se pencher sur toute partie d'un
appareil, notamment une porte, un tiroir-réchaud ou un
tiroir de rangement. Ceci peut endommager l'appareil qui
risque de basculer et causer des blessures sérieuses.
Ne pas permettre aux enfants d'utiliser cet appareil sauf
sous la surveillance attentive d'un adulte. Ne pas laisser
les enfants et les animaux seuls ou sans surveillance
lorsque l'appareil est en service. Ne jamais les laisser
jouer aux alentours de l'appareil, que ce dernier soit en
service ou non.
ATT ENTION
Les articles d’intérêt pour les enfants ne doivent pas être
rangés dans un appareil électroménager, dans les
armoires au–dessus de l’appareil ou sur le dosseret. Les
enfants peuvent grimper sur l’appareil pour atteindre ces
objets et se blesser sérieusement.
Consignes en matière de nettoyage
Ne nettoyez pas l'appareil pendant qu'il est encore
chaud. Certains produits nettoyants produisent des
vapeurs nocives lorsqu'ils sont appliqués sur une surface
chaude. Chiffons ou éponges humides peuvent causer
des brûlures par dégagement de vapeur.
Ne pas utiliser de nettoyeur à vapeur pour nettoyer
l'appareil.
25

9 CONSIGNES DE SÉCURITÉ IMPORTANTES
LIRE ET CONSERVER CES INSTRUCTIONS
Sécurité pour la batterie de cuisine
Tenir la poignée de la casserole en brassant ou tournant
les aliments. Ceci l'empêche de bouger et évite les
déversements.
Utiliser des casseroles de taille adéquate.
L'utilisation de casseroles trop petites aura pour effet
d'exposer une partie de l'élément chauffant ou du brûleur
pouvant présenter un risque de contact direct et
d'incendie de vêtements. Sélectionner des ustensiles à
fond plat, suffisamment larges pour couvrir l'élément
chauffant. Cet appareil est doté de surfaces de différents
formats. Un bon rapport ustensile/élément chauffant ou
brûleur permet également d'améliorer le fonctionnement
de l'appareil.
Les ustensiles de cuisson non approuvés pour
l'utilisation avec les tables de cuisson en céramique
peuvent se briser lors d'un changement soudain de
température. Utiliser uniquement des casseroles qui sont
approuvés pour l'utilisation avec les tables de cuisson en
céramique (seuls certains types de verre, la céramique
vitriée à l'épreuve de la chaleur et la faïence peuvent être
utilisés).
Tourner toujours les poignées an qu'elles ne passent pas
au-dessus des zones adjacentes de cuisson ou du bord
de l'appareil. Ceci aide à diminuer le risque d' ignition de
matériaux inammables, de déversements et de brûlures.
spécialement conçu pour être utilisé pendant le
chauffage et la cuisson des aliments. L'emploi de
produits chimiques corrosifs pour chauffer ou nettoyer
l'appareil endommagera ce dernier et peut provoquer
des blessures.
Ne pas se servir de cet appareil s'il ne fonctionne pas
correctement ou s'il est endommagé. Communiquer
avec un réparateur autorisé.
AVERTISSEMENT
Ne pas utiliser la table de cuisson si elle est brisée. Les
solutions de nettoyage et les déversements peuvent
créer des risques de choc électrique. Couper
l’alimentation au boîter de disjoncteurs si la céramique
présente des fissures, fractures ou défaults.
Communiquer avec un réparateur autorisé.
Ne pas réparer ni remplacer toute pièce de l'appareil à
moins que cela ne soit spécifiquement recommandé par
ce manuel. Toute réparation doit être effectuée par un
centre de réparation autorisé par l'usine.
Pour éviter les risques d'électrocution, avant de réparer
l'appareil, mettre l'alimentation hors circuit au niveau du
panneau de service et le verrouiller pour éviter tout mise
en circuit accidentelle.
AVERTISSEMENT
RISQUES DE BLESSURES
Lorsque vous cuisinez avec un bain-marie, la table de
cuisson et le récipient de cuisson peuvent fendre à
cause de la surchauffe. Le récipient de cuisson dans le
bain-marie ne doit pas entrer en contact direct avec le
fond de la casserole remplie d'eau. Utilisez seulement
des ustensiles de cuisine résistants à la chaleur.
Tenir toujours sec la table de cuisson et le dessous des
casseroles. Du liquide entre le dessous d'une casserole
et la table de cuisson peut générer de la vapeur et la
casserole risque de bondir soudain ce qui pourrait
provoquer des blessures.
Installation et entretien corrects
Demandez à l'installateur de vous montrer où se trouve
le disjoncteur ou le fusible. Identifier sa position pour
pouvoir le retrouver facilement.
Cet appareil doit être adéquatement installé et mis à la
terre par un technicien agréé. Branchez l'appareil
uniquement dans une prise correctement reliée à la
terre. Pour plus de détails, reportez-vous à la notice
d'installation.
Cet appareil est destiné uniquement à une utilisation
domestique normale. Il n'est pas homologué pour un
usage en extérieur. Voyez la garantie. Si vous avez des
questions, communiquez avec le fabricant.
Ne pas entreposer ni utiliser de produits chimiques
corrosifs, vapeurs, substances inflammables ou produits
non alimentaires sur ou à proximité de l'appareil. Il a été
Avertissements de la Proposition 65 de l’État de la Californie
AVERTISSEMENT
Ce produit contient des produits chimiques connus de
l’État de la Californie pour causer le cancer, des
anomalies congénitales ou d’autres problèmes de
reproduction.
26

Éléments qui peuvent endommager l'appareil
▯ Égratignures sur les surfaces en céramique : les
dessous rugueux des ustensiles de cuisine peuvent
endommager la céramique.
▯ Sel, sucre et sable : le sel, le sucre et le sable
peuvent égratigner la céramique. N'utilisez jamais la
table de cuisson comme surface de travail ou comme
endroit pour déposer des objets.
▯ Ustensiles de cuisine surchauffés : évitez de faire
chauffer des ustensiles vides.
▯ Ustensiles de cuisine chauds : placez les casseroles
et les chaudrons chauds sur la zone d'opération ou
sur les rebords. Cela peut causer des dommages.
Protection de l'environnement
Conseils d’économie l'énergie
▯ Toujours poser le couvercle correspondant sur les
récipients. En cuisinant sans couvercle, la
consommation d'énergie est multipliée par quatre.
Utiliser un couvercle en verre qui permet de contrôler
la cuisson sans avoir à le soulever.
▯ Utilisez des récipients avec une base épaisse et plate.
Les fonds irréguliers font augmentent la
consommation d'énergie.
▯ Objets durs ou coupants : des objets durs ou
coupants qui tombent sur la plaque chauffante
peuvent l'endommager.
▯ Plats qui débordent : du sucre ou des produits sucrés
peuvent endommager la plaque chauffante. Enlevez
immédiatement ces produits avec un grattoir en verre.
▯ Aluminium et plastique : le papier d'aluminium et les
plats en plastiques vont fondre sur des plaques
chauffantes en fonction. Le papier protecteur pour les
fours ne convient pas à votre table de cuisson.
▯ Nettoyants non appropriés : une décoloration
métallique et chatoyante de la céramique peut être
causée par l'utilisation de nettoyants non appropriés
ou de l'abrasion des ustensiles de cuisine.
▯ Le diamètre de la base des récipients doit concorder
avec la taille de la zone de cuisson. Si ce n'est pas le
cas, il peut y avoir un gaspillage d'énergie. Observez :
En général, le fabriquant indique le diamètre maximal
du récipient. Celui-ci est en général supérieur au
diamètre de la base du récipient.
▯ Choisiz des récipients de taille adaptée à la quantité
d'aliments à préparer. Un récipient de grandes
dimensions et à moitié plein consomme beaucoup
d'énergie.
▯ Faites cuire avec le minimum d'eau. Cela économise
de l’énergie. Dans le cas des légumes, les vitamines
et minéraux sont préservés.
▯ Abaissez à temps le niveau de cuisson.
27

Faire connaissance avec l’appareil
Cette section déctrit le panneau des touches, les
éléments chauffants et les affichages.
Ces instructions s’appliquent à diverses tables de
cuisson.
Panneau de commande
NJO
$MFBO-PDL
$IJME-PDL
5JNFS
‘
0O0GG
Icônes d'affichage
>
D
U
‰‰
q
¶
Verrouillage de nettoyage activé
Verrouillage à l'épreuve des enfants activé
Minuterie de cuisine activée
Temps de la minuterie
Fonction de minuterie
Durée de cuisson active pour l'élément
allumé
ª
AutoChef™ : Réchauffement en cours
‰.‰ Niveau de puissance ‚-Š
Prêt ‹
Chaleur résiduelle •/œ
Fonction AutoChef™/PowerStart™
Fonction de réchaud –
ð
ò
à
min
low
med
max
Élément double
Élément triple
Relier les éléments
Niveaux de friture pour AutoChef™
1PXFS
4UBSU
Voir la page 2 pour une liste des modèles et leurs
dimensions.
"VUP
$IFG
1SPHSBNT
,FFQ
8BSN
NJO
MPX NFE NBY
Touches
On/Off Interrupteur d'alimentation principal
Clean Lock/
Child Lock
Protection pour le nettoyage / sécurité
pour les enfants
Timer Fonctions de programmation du temps
à
Relier les éléments
PowerStart Fonction PowerStart™
AutoChef Fonction AutoChef™
Programs Programmes AutoChef™
KeepWarm Fonction de réchaud
ö
$
Éléments chauffants supplémentaires
Choisir l'élément de cuisson
0 - 9 Régler le niveau de température/le
niveau de friture/ la minuterie/le programme de friture
Surfaces de commande
Lorsque vous touchez un symbole, la fonction respective
sera activée.
AVIS
▯ Conservez toujours les zones des commandes tactiles
propres et sèches. L'humidité et la poussière peuvent
affecter le bon fonctionnement des touches.
▯ Si le plateau métallique est plié ou endommagé, si par
exemple il a été frappé par une casserole, ses
fonctionnalités pourraient être affectées.
28

Les Éléments
Élément Activation et désactivation
Élément simple Utilisez toujours des ustensiles de cuisine de taille appropriée.
$
Élément double La taille de ces éléments peut être ajustée en fonction de la taille de
ð
votre casserole. L'élément chauffant doit être allumé.
Désactiver le rond chauffant externe : Touchez
dra.
Ajouter : Touchez
Élément triple Sur cet élément vous pouvez désactiver les ronds chauffants moyens
ò
et grands. L'élément chauffant doit être allumé.
Désactiver le rond chauffant externe :Touchez
dra.
Désactiver le rond chauffant du milieu :Touchez
Relier les éléments (NET8654UC seule-
à
ment)
L'écran
En réactivant l'élément chauffant, tous les ronds chauffants seront de
nouveau actifs.
Cette fonction combine deux éléments chauffants individuels en une
seule longue plaque. Cette configuration convient parfaitement aux plaques et aux grandes casseroles.
Remarque : : N'utilisez pas d'ustensiles de cuisine d'une dimension
supérieure à 432 x 254 mm (17 x 10 po).
Activer les éléments reliés : Touchez l'une des deux touches
choisir l'élément chauffant, puis touchez la touche
apparaîtra; les deux éléments chauffants sont maintenant sélectionnés.
ð s'éteindra.
ö de nouveau. L'écran ð s'allumera.
‹ apparaîtra sur les deux écrans. Dans les 10 secondes qui suivent,
choisissez le réglage de chaleur souhaité (1-9). Les éléments reliés et
les deux éléments chauffants sont maintenant activés.
Changer le réglage de chaleur : Touchez l'une des deux touches
pour choisir les éléments reliés et réglez le nouveau niveau de chaleur
dans les 10 secondes qui suivent.
Désactiver les éléments reliés : Touchez l'une des deux touches
pour choisir les éléments reliés et choisissez 0 sur les touches numériques.
‹ apparaîtra sur les deux écrans. Les éléments chauffants seront
désactivés et l'indicateur de chaleur résiduelle apparaîtra.
ö. L'écran ð s'étein-
ö. L'écran ð s'étein-
ö de nouveau.
à. Le symbole à
$ pour
$
$
Indicateur de chaleur résiduelle
La table de cuisson comprend un indicateur de chaleur
résiduelle pour chaque élément. Ils vous indiquent quels
éléments sont encore chauds. Évitez de toucher les
éléments indiqués.
Si un
• est affiché à l'écran, l'élément est encore chaud.
Vous pouvez encore l'utiliser, par exemple, pour garder
une petite quantité d'aliments au chaud ou pour faire
fondre du chocolat. À mesure que l'élément se refroidi, le
symbole à l'écran deviendra
lorsque l'élément sera suffisamment refroidi.
L'indicateur de chaleur résiduelle s'activera
automatiquement après une panne de courant. L'écran
restera allumé pendant environ 30 minutes.
œ. L'écran s'éteindra
29

Fonctionnement
Interrupteur d'alimentation principal
Utilisez l'interrupteur principal pour activer les circuits
électroniques du panneau de commande. La table de
cuisson est maintenant prête à être utilisée.
Activation de la table de cuisson.
Touchez la touche On/Off jusqu'à ce que l'indicateur au-
dessus de l'interrupteur principal et les symboles
$ pour
les éléments chauffants s'activent.
Désactivation de la table de cuisson
Touchez la touche On/Off. L'indicateur __ disparaîtra. La
table de cuisson est maintenant désactivée. Les
indicateurs de chaleur résiduelle resteront allumés
jusqu'à ce que les éléments soient suffisamment
refroidis.
Remarque : La table de cuisson s'éteindra automatiquement lorsque tous les éléments sont désactivés pendant plus de 15 secondes.
Si de la chaleur résiduelle est toujours présente lorsque
la table de cuisson est allumée,
•/œ apparaîtront à
l'écran de l'élément chauffant.
Allumage de la table de cuisson
Ce chapitre explique comment procéder au réglage des
éléments chauffants. Le tableau ci-après répertorie les
réglages de chaleur pour différents aliments.
Sélection du niveau de chaleur
La table de cuisson doit être allumée.
1.
Touchez la touche $ de l'élément correspondant.
L'indicateur
symbole
2.
Au cours des 10 prochaines secondes, touchez le
‹ apparaîtra à l'écran de l'élément et le
$ de l'élément sélectionné s'allumera.
réglage de chaleur souhaité (1-9) dans la section des
commandes tactiles.
1PXFS
"VUP
$IFG
4UBSU
1SPHSBNT
,FFQ
8BSN
1PXFS
4UBSU
"VUP
$IFG
1SPHSBNT
,FFQ
8BSN
Changement du niveau de chaleur
Choisissez l'élément et touchez la touche numérique
pour le niveau de chaleur souhaité. Pour choisir un
niveau intermédiaire, touchez le symbole
Û situé entre
les nombres des niveaux de chaleur.
Réglage de l'élément
Choisissez le niveau de chaleur souhaité à l'aide des
touches numériques 1 à 9.
Niveau de chaleur 1 = puissance minimale
Niveau de chaleur 9 = puissance maximale
Chaque réglage de chaleur comprend un niveau
intermédiaire. Ce niveau est indiqué par . et est réglé
avec les touches
Û dans la zone des touches tactiles.
Désactivation de l'élément
Choisissez l'élément et réglez le niveau de chaleur à 0.
L'élément sera désactivé et l'indicateur de chaleur
résiduelle s'allumera.
Remarque : La chaleur est activée et désactivée pour régler la température de l’élément; cela signifie que la lumière rouge sous l’élément n’est pas toujours visible. Lorsque vous séléctionnez un réglage de chauffage bas, l’élément s’éteint aux périodes assez longues, tandis qu’un réglage plus élevé s’éteint à l’occasion. Même à niveau élevé, l’élément s’allume et s’éteint.
30

Tableau des réglages
Le tableau qui suit indique certains exemples. La durée
de cuisson varie en fonction du type d'aliment, de son
poids et de sa qualité. Des variations sont donc
possibles.
9 ATT EN TI ON
Au cours de la cuisson, les ragoûts ou repas
liquides, comme les soupes, sauces ou boissons,
peuvent chauffer très rapidement et déborder ou
causer des dégâts. Pour cette raison, nous vous
recommandons de brasser continuellement la
nourriture afin de la chauffer graduellement à un
niveau de puissance approprié.
Niveaux de puissance
Fondre
chocolat 1 - 2
beurre 1 - 2
Chauffer
légumes congelés (par ex., épinard) 2. - 3.
bouillon 7 - 8
soupe épaisse 1. - 2.
lait** 1 - 2
Mijoter
sauce délicate comme la sauce béchamel 4 - 5
sauce à spaghetti 2 - 3
braisé 4 - 5
poisson** 4 - 5
Cuisson
riz (avec le double de la quantité d'eau) 2 - 3
pommes de terre avec leur pelure bouillies avec 235 à 475 ml (1 ou 2 tasses) d'eau 4 - 5
pommes de terre bouillies avec 235 à 475 ml (1 ou 2 tasses) d'eau 4 - 5
légume frais avec 235 à 475 ml (1 ou 2 tasses) d'eau 2 - 3.
légumes congelés avec 235 à 475 ml (1 ou 2 tasses) d'eau 3. - 4.
pâtes (2 à 4 litres d'eau)* 6 - 7
pouding** 1 - 2
céréales 2 - 3
Frire
côtelette de porc 5. - 6.
poitrine de poulet 5 - 6
bacon 6 - 7
oeufs 5 - 6
poisson 5 - 6
crêpes 6 - 7
Grande friture** (dans 1 ou 2 litres d'huile)
aliments congelés comme les pépites de poulet (225 grammes (0,5 lb) par portion) 8 - 9
autre comme les beignes (225 grammes (0,5 lb) par portion) 4. - 5.
* cuisson progressive sans couvercle
** sans couvercle
31

Fonction PowerStart™
(Préchauffage rapide)
Tous les éléments chauffants sont dotés d’un circuit de
préchauffage rapide. Cette fonction fait chauffer l’élément
en utilisant la puissance maximum jusqu’au réglage de
cuisson que vous avez sélectionné.
La durée du préchauffage de l’élément dépend du
réglage de cuisson que vous avez sélectionné.
Tableau de cuisson pour la fonction PowerStart™
Consultez le tableau suivant pour les types d'aliments qui
conviennent avec la fonction PowerStart™. La quantité la
plus petite correspond aux éléments chauffants plus
petits, tandis que la quantité plus importante correspond
Aliments appropriés pour PowerStart™ Quantité Réglage de chaleur
Chauffer
légumes congelés comme les épinards 300 à 600 g (10 oz à 16 oz) 2. - 3.PS
bouillon 475 à 950 ml (2 à 4 tasses) 7 - 8 PS
soupes épaisses 475 à 950 ml (2 à 4 tasses) 1. - 2. PS
lait* 1 à -2 ml (2 à 4 tasses) 1 - 2 PS
Mijoter
braisé 900 g (2 lb) 4 - 5 PS
poisson 450 à 680 g (1 lb à 1,5 lb) 4 - 5 PS
Bouillir
riz (avec le double de la quantité d'eau) 175 à 475 ml (3/4 de tasse à 2
pommes de terre bouillies avec leur peau et 235 à 475
ml (1 ou 2 tasses) d'eau
pommes de terre épluchées et bouillies avec 235 à 475
ml (1 ou 2 tasses) d'eau
légumes frais avec 235 à 475 ml (1 ou 2 tasses) d'eau 450 g à 900 g (1 lb à 2 lb) 2. - 3. PS
Frire
côtelette de porc 1 - 2 portions 5. - 6. PS
crêpes 5. - 6. PS
* sans couvercle
Réglage de la fonction PowerStart™
La fonction PowerStart™ peut seulement être activée
dans les 30 premières secondes suivant l'activation de la
table de cuisson :
1.
Choisissez le réglage de cuisson continue que vous souhaitez utiliser pour l'élément sélectionné.
2.
Touchez PowerStart. ‘ et le niveau de cuisson apparaîtront en alternance à l'écran. La fonction PowerStart™ est maintenant activée.
Une fois les aliments brièvement cuits, l'élément
chauffant revient automatiquement au niveau de cuisson
programmé. L'indicateur
cuisson demeurera constant.
Remarque : Une fois que la fonction PowerStart™ a été activée, le réglage de cuisson continue peut encore être modifié pour une période de 10 secondes.
aux éléments chauffants plus volumineux. Les valeurs
indiquées dans ce tableau servent de lignes directrices
seulement.
tasses)
5 - 14 pommes de terre moyen-
nes
5 - 14 pommes de terre moyen-
nes
‘ disparaîtra et le niveau de
2 - 3 PS
4 - 5 PS
4 - 5 PS
32

Trucs pour utiliser PowerStart™
La fonction PowerStart™ ne fait
pas bouillir les aliments
Elle est conçue pour préserver la valeur nutritive des aliments tout en consommant un minimum d'eau pour la cuisson. Ajoutez environ 475 ml (2 tasses)
d'eau aux aliments pour les grands éléments et de 175 à 235 ml (¾ - 1 tasse)
d'eau pour les petits éléments.
Faites cuire le riz dans le double de la quantité de liquide.
La fonction PowerStart™ ne convient pas aux aliments qui doivent être cuits
dans une grande quantité d'eau (par ex., les pâtes).
La lait et les aliments qui produisent
Utilisez une casserole à rebords élévés.
beaucoup de mousse pourraient
déborder
Le lait colle Rincez la casserole à l'eau froide avant de la remplir.
Au cours de la friture, les aliments
peuvent coller à la casserole
Faites préchauffer la casserole et l'huile avant d'ajouter les aliments. Ne retour-
nez pas les aliments trop rapidement. Les aliments se sépareront du fond de la
casserole après un court moment de cuisson.
AutoChef™
Lorsque vous utilisez AutoChef™ pour faire fonctionner
l'élément chauffant, un capteur contrôle la température
de la casserole.
Avantages
La zone de cuisson ne chauffe que lorsque cela est
nécessaire. L’utilisateur peut alors économiser de
l’éngergie. L’huile et la graisse ne risquent pas de
surchauffer.
Casseroles adaptées pour AutoChef™
Pour la friture avec AutoChef™, utilisez les casseroles
adaptées seulement. Sinon, le système de contrôle
pourrait ne pas fonctionner adéquatement, ce qui
pourrait causer une surchauffe des casseroles.
Vous pouvez utiliser le formulaire de commande inclus
pour demander une casserole adaptée gratuite.
Vous pouvez également acheter la casserole adaptée
dans les magasins spécialisés :
HEZ390230
9 ATTENTION
▯ Ne laissez jamais d'huile ou de gras cuire sans
Les niveaux de friture indiqués ci-dessous sont en
fonction des casseroles adaptées.
supervision.
▯ Placez la casserole au centre de l'élément.
Assurez-vous que la base de la casserole
possède un diamètre approprié.
▯ Ne placez pas de couvercle sur la casserole. La
régulation automatique ne fonctionnera pas. Un
filet anti-éclaboussures peut être utilisé sans
affecter la régulation automatique.
▯ Utilisez seulement du gras ou de l'huile qui
convient à la friture. Lorsque vous utilisez du
beurre, de la margarine, de l'huile d'olive ou du
lard de porc, choisissez le réglage de
température min.
▯ AutoChef™ ne convient pas pour faire bouillir des
aliments.
Niveaux de friture
Niveau Température Idéal pour
max élevé Steaks á point, pommes de terre bouillies frites
med médium-élevé Escalope de veau, viande hachée, morceaux de viande minces, légumes
low faible - médium Aliments cuits à la poêle : côtelettes de porc, poitrine de poulet, hamburgers,
crêpes
min faible Omelettes, pain perdu, pommes de terre rissolées, aliments frits au beurre ou à
l’huile d’olive
33

Réglage de la fonction AutoChef™
Sélectionnez le niveau de friture approprié du tableau.
Placez la poêle du système au centre de l’élément
chauffant. La surface de cuisson doit être en marche.
1.
Touchez AutoChef™. Les voyants ‘ s'allumeront sur l'écran de l'élément. Les options de niveau de friture apparaîtront sur le menu de l'écran.
2.
Choisissez le niveau de friture souhaité à l'aide des touches numériques sur le menu de l'écran.
AutoChef™ est maintenant activé.
L'élément chauffant du centre s'activera
automatiquement. Le symbole de température
apparaîtra jusqu'à ce que la température de friture
soit atteinte. Un signal sonore sera ensuite émis. Le
symbole de température
ª disparaîtra.
ª
"VUP
1PXFS
$IFG
4UBSU
1SPHSBNT
8BSN
,FFQ
NJO MPX NFE NBY
"VUP
1PXFS
4UBSU
3.
Ajoutez l'huile de friture à la casserole, puis les
1SPHSBNT
$IFG
ingrédients. Faites tourner les aliments comme
d'habitude pour éviter qu'ils ne brûlent.
Désactivation de la fonction AutoChef™
Choisissez 0 sur les touches numériques. Les éléments
chauffants seront désactivés et l'indicateur de chaleur
résiduelle apparaîtra.
Tableau de friture avec AutoChef™
Le tableau qui suit indique le niveau de friture approprié
en fonction de la nourriture choisie. La durée de friture
dépendra du type, du poids et de la qualité de la
Les niveaux de friture indiqués sont en fonction d'une
casserole adaptée. Les niveaux de friture peuvent varier
lorsque vous utilisez d'autres casseroles pour la friture.
nourriture.
Viande Côtelette de porc, avec ou sans os (2,5 cm / 1 po d'épaisseur)
Escalope de veau panée (1,6 cm / 5/8 po d'épaisseur)
Filet (2,5 cm / 1 po d'épaisseur)
Cordon bleu
Steak de boeuf médium saignant (1,9 cm /
Steak de boeuf médium ou bien cuit (1,9 cm /
_ po d'épaisseur)
_ po d'épaisseur)
Poitrine de poulet (2,5 cm / 1 po d'épaisseur)
Poulet frit à la poêle
Saucisses, par ex. hot dogs (ø 1,2 à 2,9 cm /
^ à 1X po)
Hamburger
Minces tranches de viande
Viande hachée
Bacon
Poisson Poisson, frit (entier)
Filet de poisson pané ou non
Crevettes
* À placer dans une casserole froide
fc friture continue
8BSN
,FFQ
Niveau de
friture
low
med
med
low
max
med
min
min
low
low
med
med
min
low
low/med
med
NBYNJO MPX NFE
Temps de friture total à partir
du signal
10 à 17 min
6 à 10 min
6 à 10 min
15 à 20 min
8 à 10 min
8 à 12 min
20 à 30 min
25 à 35 min
8 à 20 min
6 à 12 min
7 à 12 min
6 à 10 min
5 à 8 min
15 à 25 min
10 à 20 min
4 à 8 min
34

Plats avec
des oeufs
Crêpes
Omelettes
Oeufs frits
Oeufs brouillés
Pain doré
Pommes de
terre
Pommes de terre bouillies et frites
Pommes de terre crues et frites
Pommes de terre rissolées
Légumes Ail/oignons
Courge, aubergine
Champignons
Légumes sautés
Produits
congelés
Croquettes et galettes de poulet
Cordon bleu
Poitrine de poulet
Filet de poisson pané
Bâtonnets de poisson
Frites au four
Légumes sautés
Rouleaux de printemps / rouleaux impériaux (1,9 à 3,2 cm /
1
]" d'épaisseur)
Plats préparés
Produits de pommes de terre, par ex. frites
Produits de pommes de terre, par ex. pommes de terre rissolées
Pâtes (avec de l'eau ajoutée)
Divers Camembert cuit/fromage cuit
Amandes rôties, noix, pignons*
* À placer dans une casserole froide
fc friture continue
_ à
Niveau de
friture
low
min
min
min
min
max
low
min
min
low
med
med
med
min
low
low
med
max
min
low
low
min
min
low
min
Temps de friture total à partir
du signal
fc
fc
2 à 6 min
2 à 4 min
fc
6 à 12 min
15 à 25 min
20 à 30 min
2 à 10 min
4 à 12 min
10 à 15 min
10 à 12 min
8 à 15 min
10 à 30 min
10 à 30 min
10 à 20 min
8 à 12 min
4 à 6 min
8 à 15 min
10 à 30 min
10 à 15 min
10 à 20 min
4 à 6 min
7 à 10 min
3 à 7 min
Programmes de friture
Utilisez les programmes de friture uniquement pour une
poêle du système.
Vous pouvez utiliser les programmes de friture pour
préparer les mets suivants :
Programme Mets
˜‚
˜ƒ
˜„
˜…
˜†
˜‡
˜ˆ
˜‰
˜Š
Viande hachée
Hamburger, côtelettes
Steak á point
Steak á point ou bien cuit
Poisson
Crêpes, pain perdu
Frites congelées à cuire au four
Légumes sautés à feu vif
Omelette, oeufs
Sélectionnez le réglage du programme de friture
Sélectionnez l’élément chauffant avec le capteur pour
friture.
1.
Appuyez sur le symbole Programs (Programmes). Le
symbole
2.
Sélectionnez le réglage du programme de friture
˜‹ apparaît à l’écran.
désiré à l’aide des touches numériques.
Le réglage du programme de friture est activé.
Le symbole de température
ª apparaît en alternance
avec le numéro du programme jusqu’à ce que la
température de friture soit atteinte. Puis un bip sonore
se fait entendre. Le symbole de température
ª
disparaît.
1PXFS
"VUP
$IFG
4UBSU
1SPHSBNT
,FFQ
8BSN
1PXFS
4UBSU
"VUP
$IFG
1SPHSBNT
,FFQ
8BSN
35

3.
0O0GG
5JNFS
"VUP
$IFG
,FFQ
8BSN
1SPHSBNT
NJO
[
$MFBO-PDL
$IJME-PDL
1PXFS
4UBSU
0O0GG
5JNFS
"VUP
$IFG
,FFQ
8BSN
1SPHSBNT
NJO
$MFBO-PDL
$IJME-PDL
1PXFS
4UBSU
Ajoutez le gras de friture puis les aliments à la poêle. Retournez les aliments comme d’habitude afin qu’ils ne brûlent pas.
Éteignez le réglage du programme de friture
Sélectionnez la touche numérique 0. L’élément chauffant
s’éteint et le voyant de surface chaude s’affichera.
Durée de cuisson
Vous pouvez utiliser la fonction de minuterie pour établir
une durée de cuisson pour n'importe quel élément. Une
fois la durée de cuisson écoulée, l'élément s'éteindra
automatiquement.
9 ATTENTION
▯ Lorsque la minuterie est en utilisation, gardez
toujours la table de cuisson sous surveillance et
ne laissez rien brûler ou déborder. Des
débordements peuvent causer de la fumée et les
aliments et les huiles peuvent prendre feu s'ils
sont laissés sans surveillance à des températures
élevées.
▯ Cette fonction ne devrait pas être utilisée pour
des durées prolongées, surtout à des
températures élevées.
▯ Assurez-vous d'éteindre la table de cuisson avec
l'interrupteur principal après chaque utilisation.
Réglage de la durée de cuisson
1.
Choisissez l'élément et le niveau de puissance.
2.
Touchez la touche Timer deux fois. L'indicateur pour
l'élément souhaité s'allumera.
‹‹ s'allumera sur l'écran de la minuterie.
3.
Dans les 10 secondes qui suivent, réglez la durée requise à l'aide des touches numériques.
r et min apparaîtront et
L'élément doit avoir été choisi pour afficher le compte à
rebours de l'élément chauffant en question.
Fin de la durée de cuisson
Une fois la durée de cuisson écoulée, l'élément s'éteint.
Vous entendrez un signal sonore. L'indicateur ‹
apparaîtra à l'écran de l'élément.
‹‹ s'allumera pendant
‹
10 secondes sur l'écran de la minuterie. Les indicateurs
disparaîtront et le signal sonore cessera.
Modification de la durée de cuisson
Choisissez l'élément et touchez la touche Timer deux
fois. Réglez ensuite la nouvelle durée de cuisson à l'aide
des touches numériques 0 à 9.
Annulation de la durée de cuisson
Choisissez l'élément souhaité et touchez le symbole
Timer deux fois. Les indicateurs min, __ et
r
s'allumeront. Choisissez ensuite 0 sur les touches
numériques jusqu'à ce
‹‹ s'affiche.
Fonction de minuterie avec AutoChef™
Lorsque vous cuisinez avec AutoChef™, la durée de
cuisson programmée sera lancée lorsque l'élément
choisi aura atteint la température réglée.
Remarques
▯ Vous pouvez régler une durée de cuisson allant
jusqu'à 99 minutes.
▯ Pour programmer une durée de cuisson inférieure à
10 minutes, choisissez d'abord toujours le 0 avant le
chiffre de la durée de cuisson.
▯ La fonction de minuterie sera désactivée après une
panne de courant.
Minuterie automatique
Grâce à cette fonction, vous pouvez choisir une durée de
cuisson pour tous les éléments. Lorsqu'un élément est
activé, le compte à rebours de la durée choisie sera
lancé. Une fois la durée de cuisson écoulée, l'élément
s'éteindra automatiquement.
Les Instructions pour activer la minuterie automatique se
trouvent dans le chapitre des « Réglages de base ».
Remarque : La durée de cuisson peut être modifiée ou annulée pour n'importe quel élément :
Touchez la touche Timer à plusieurs reprises jusqu'à ce
que l'indicateur
$ de l'élément requis s'allume. Ajustez
la durée de cuisson avec les touches 1 à 9 ou
désactivez la fonction avec 0.
La minuterie sera lancée.
36

Minuterie de cuisine
La minuterie peut être programmée pour des périodes
allant jusqu'à 99 minutes. Elle est également
indépendante de tous les autres réglages. Vous pouvez
aussi utiliser la minuterie de cuisine lorsque la table de
cuisson est désactivée ou verrouillée.
Cette fonction n'éteint pas automatiquement un élément.
Réglage du temps
1.
Touchez la touche Timer. ‹‹ apparaîtra à l'écran de
la minuterie. Les indicateurs __, min et
s'allumeront.
2.
Réglez ensuite la durée souhaitée à l'aide des touches numériques 0 à 9.
Après quelques secondes, l'indicateur __ disparaîtra
et le compte à rebours de la durée programmée
commencera.
V
Verrouillage à l'épreuve des enfants
Vous pouvez utiliser le verrouillage à l'épreuve des
enfants pour empêcher les enfants d'activer
accidentellement la table de cuisson.
Activation du verrouillage à l'épreuve des enfants
La table de cuisson doit être éteinte.
Touchez Clean Lock/Child Lock pendant 4 secondes.
L'indicateur
de cuisson est maintenant verrouillée.
Désactivation du verrouillage à l'épreuve des enfants
Touchez Clean Lock/Child Lock pendant 4 secondes.
Le verrouillage du panneau à l'épreuve des enfants est
maintenant désactivé.
9 ATT EN TI ON
D s'allumera pendant 4 secondes. La table
Fin de la durée de cuisson
Une fois la durée de cuisson écoulée, l'élément s'éteint.
Vous entendrez un signal sonore. L'indicateur
apparaîtra à l'écran de l'élément.
10 secondes sur l'écran de la minuterie. Les indicateurs
disparaîtront et le signal sonore arrêtera.
Modification de la minuterie
Touchez la touche Timer. Les indicateurs __ et
s'allumeront. Modifiez la durée à l'aide des touches
numériques 0 à 9.
Annulation de la durée
Touchez la touche Timer. Les indicateurs __ et
s'allumeront. Touchez la touche 0 jusqu'à ce que
apparaisse à l'écran de la minuterie. L'indicateur
disparaîtra.
V s'allumera pendant
‹ ‹
V
U
‹‹
U
Fonction de réchaud
La fonction de réchaud est pratique pour faire fondre du
chocolat ou du beurre ou encore conserver les aliments
au chaud.
AVIS : Ne placez jamais d'assiettes ou de contenants en plastique sur les surfaces de réchaud car ils fonderont.
Activation de la fonction de réchaud
1.
Touchez le symbole $ correspondant à l'élément chauffant désiré.
2.
Touchez la touche Keep Warm. – apparaîtra à l'écran. La fonction de réchaud est maintenant activée.
Désactivation de la fonction de réchaud
Choisissez l'élément chauffant et choisissez 0 sur les
touches numériques.
chauffant est maintenant désactivée.
Remarque : Lorsque la fonction de réchaud est en cours d'utilisation, la fonction PowerStart™ ne peut pas être activée.
‹ apparaîtra à l'écran. L'élément
Le verrouillage à l'épreuve des enfants peut être
accidentellement activé ou désactivé pour les
raisons suivantes :
▯ de l'eau renversée au cours du nettoyage
▯ des aliments qui ont débordé
▯ des objets placés sur la touche Clean Lock/
Child Lock .
Verrouillage automatique du panneau de commande à l’épreuve des enfants
Cette fonction fait automatiquement activer le
verrouillage du panneau de commande à l’épreuve des
enfants à chaque fois que l’on éteint la table de cuisson.
Activation et désactivation
Consultez la section sur les « Réglages de base ».
Verrouillage de nettoyage
Nettoyer le panneau de commande lorsque la table de
cuisson est activée peut modifier les réglages.
Afin d'éviter cette situation, la table de cuisson est munie
de la fonction de verrouillage de nettoyage. Touchez
Clean Lock/Child Lock. L'indicateur
panneau de commande sera verrouillé pendant environ
35 secondes. Vous pouvez maintenant nettoyer la
surface du panneau de commande sans risquer de
changer les réglages.
Une fois la durée écoulée, un signal sonore sera émis.
Le verrouillage de nettoyage est maintenant désactivé.
La fonction de verrouillage de nettoyage n'affecte pas
l'interrupteur principal. Vous pouvez donc désactiver la
table de cuisson à tout moment.
> apparaîtra. Le
37

Réglages de base
Votre appareil comprend divers réglages de base. Vous
pouvez ajuster ces réglages en fonction de votre façon
de cuisiner.
Affichage Fonction
™‚
™ƒ
™†
™‡
™ˆ
™Š
™‹
* réglages par défaut
Verrouillage automatique à l'épreuve des enfants
‹ Désactivé*
‚ Activé
Signaux sonores
‹ Signal de confirmation et signal d'erreur désactivés
‚ Seulement le signal d'erreur est activé
ƒ Tous les signaux sont activés*
Minuterie automatique
‹ Désactivé*
‚-ŠŠ Temps de désactivation automatique
Durée du signal de fin de minuterie
‚ 10 secondes*
ƒ 30 secondes
„ 1 minute
Activation de l'élément chauffant
‹ Désactivé
‚ Activé*
ƒ Dernier réglage avant de désactiver l'élément chauffant
Temps de sélection pour l'élément chauffant
‹ Illimité* : Vous pouvez ajuster les réglages du dernier élément chauffant utilisé à tout moment sans
avoir à le sélectionner de nouveau.
‚ Restreint : Vous pouvez ajuster les réglages du dernier élément chauffant utilisé dans les 10 secon-
des suivant sa sélection. Après ce délai, vous devrez de nouveau choisir l'élément chauffant avant de
pouvoir le régler.
Revenir aux réglages par défaut
‹ Désactivé*
‚ Revenir aux réglages par défaut de l'appareil
Modification des réglages de base
La table de cuisson devrait être éteinte.
1.
Allumez la table de cuisson avec l'interrupteur principal.
38
2.
Au cours des 10 prochaines secondes, touchez la touche Timer pendant 4 secondes.
Les symboles
l'écran de gauche et
™‚ apparaîtront en alternance sur
‹ apparaîtra sur l'écran de
droite.
1PXFS "VUP
NJO
$MFBO-PDL
0O0GG
3.
Touchez la touche Timer jusqu'à ce que l'indicateur
$IJME-PDL
5JNFS
4UBSU
1SPHSBNT
$IFG
souhaité apparaisse à l'écran de gauche.
,FFQ
8BSN

4.
NJO
0O0GG
"VUP
$IFG
,FFQ
8BSN
1SPHSBNT
5JNFS
$MFBO-PDL
$IJME-PDL
1PXFS
4UBSU
Choisissez le réglage souhaité avec les touches numériques.
5.
Touchez la touche Timer de nouveau pendant 4 secondes. Le réglage est activé.
Nettoyage et entretien
Maintien des réglages de base
Éteignez la table de cuisson avec l'interrupteur principal.
Nettoyage quotidien
Remarque : Les recommandations de nettoyants sont
fournies à titre indicatif et n'ont pas valeur de promotion
d'une marque particulière.
Table de cuisson vitrocéramique
9 ATTENTION
N'appliquez pas de nettoyant sur le verre lorsque la
surface est chaude, utilisez seulement le grattoir à
lame de rasoir. Les vapeurs générées à cette
occasion peuvent être nocives pour la santé.
L'échauffement du nettoyant peut provoquer une
attaque chimique de la surface.
Nettoyer la surface lorsqu'elle est parfaitement froide,
sauf dans les cas suivants : enlever immédiatement le
sucre sec, le sirop de sucre, les produits à base de
tomate et le lait au moyen du grattoir à lame de rasoir
(voir le tableau spécial d'entretien).
Essuyer les projections avec une éponge humide propre
ou du papier essuie-tout. Rincer et sécher. Utiliser du
vinaigre blanc s'il reste des taches ; rincer.
Appliquer une petite quantité du nettoyant pour tables de
cuisson en vitrocéramique. Si la surface est sèche, la
polir avec du papier essuie-tout ou un chiffon propre.
Moulures latérales en acier inoxydable
Lors du nettoyage, utiliser une éponge à récurer. Pour
les saletés modérées ou tenaces, utiliser un nettoyant en
poudre doux, tel que BonAmi® ou Soft Scrub® (sanse
chlore).
Essuyer avec une éponge humide ou un linge humide,
rincer et sécher.
Instructions de nettoyage
Utilisez les produits nettoyants en petites quantités ;
appliquez le nettoyant sur un papier essuie-tout ou un
chiffon propre et sec. Passez sur la surface et polissez
avec un chiffon sec et propre.
Pour obtenir les meilleurs résultats, utilisez des
nettoyants pour table de cuisson en vitrocéramique
comme BonAmi®, Soft Scrub®(sans eau de Javel), et
du vinaigre blanc.
Éviter ces nettoyants
▯ Nettoyants à vitres contenant de l'ammoniaque ou un
agent chloré de blanchiment. Ces ingrédients peuvent
endommager ou colorer durablement la table de
cuisson.
▯ Nettoyants caustique - les nettoyants comme Easy
Off® peuvent colorer la surface de la table de cuisson.
▯ Nettoyants abrasifs.
▯ Les tampons à récurer en métal et éponges à laver,
comme Scotch Brite®, peuvent rayer ou laisser des
marques dans le métal.
▯ Les tampons à récurer savonneux, comme SOS®,
peuvent rayer la surface.
▯ Les nettoyants en poudre contenant un agent chloré
de blanchiment peuvent colorer durablement la table
de cuisson.
▯ Les nettoyants inflammables, tels l'essence à briquet
ou WD-40.
39

Tableau de nettoyage
Type de salissures Solution possible
Sucre sec, sirop de sucre, lait ou morceaux de tomates.
Film ou feuille de plastique fondu. Il faut ENLEVER
IMMEDIATEMENT tous ces dépôts. Si vous ne les enlevez pas tout de suite, vous risquez d'endommager durablement la surface.
Aliments brûlés, traînées foncées et taches Ramollir pendant 30 minutes en plaçant un papier
Projections de graisse Utiliser une éponge ou une lavette savonneuse pour
Marques laissées par le métal : Tache chatoyante Les poêles contenant de l'aluminium, du cuivre ou de
Taches d'eau calcaire :
Liquides de cuisson ayant débordé sur la surface
Rayures de surface :
Les petites rayures sont courantes et n'affectent pas la
cuisson. Elles se polissent et sont moins visibles si le nettoyant pour tables de cuisson en vitrocéramique est appliqué quotidiennement.
Enlever ces salissures pendant que la surface est encore
chaude, à l'aide du grattoir à lame de rasoir. Mettre une
lame neuve et bien affûtée dans le grattoir. Enlever la
poêle et éteindre le foyer. Porter des gants de cuisinier,
tenir le grattoir avec un angle de 30°, veiller à ne pas
rayer le verre. Enlever les salissures de la zone chauffée.
Une fois que la surface a refroidi, enlever les résidus et
appliquer un nettoyant pour table de cuisson en vitrocéramique.
9 AVERTISSEMENT
RISQUE DES LÉSIONS
La lame est très aiguisée. Risque de coupures. Pro-
téger la lame quand elle n'est pas utilisée. Remplacer immédiatement la lame si elle présente des
imperfections.
essuie-tout ou une éponge humide sur la salissure. Utiliser un tampon à récurer en plastique et un nettoyant
pour tables de cuisson en vitrocéramique ou bien le grattoir à lame de rasoir. Rincer et sécher.
enlever la graisse ; rincer soigneusement et sécher.
Appliquer un nettoyant pour tables de cuisson en vitrocéramique.
l'inox peuvent laisser des marques. Dans ce cas, il faut
traiter avec un nettoyant pour tables de cuisson en vitrocéramique dès que la surface a refroidi. Si cela ne suffit
pas à enlever les marques, essayer avec un produit
abrasif doux (Bon Ami®, Soft Scrub® sans eau de Ja vel)
et du papier essuie-tout humide. Rincer et réappliquer du
nettoyant pour tables de cuisson en vitrocéramique. Si
vous n'enlevez pas avant la prochaine cuisson les marques laissées par le métal, vous aurez beaucoup de mal
à le faire plus tard.
Les minéraux contenus dans certaines eaux peuvent être
transférés à la surface et générer des taches. Utiliser du
vinaigre blanc non dilué, rincer et sécher. Remettre en
état avec du nettoyant pour tables de cuisson en vitrocéramique. Enlever les traces de débordement et les
taches avant de réutiliser la table de cuisson.
Appliquer un nettoyant pour tables de cuisson en vitrocéramique avant l'utilisation, afin d'éliminer les grains de
sable ou autres (sel et épices). Pour réduire les rayures,
utiliser des poêles à fonds lisses, propres, et les sécher
avant utilisation. Utiliser chaque jour le nettoyant pour
tables de cuisson en vitrocéramique recommandé.
Entretien
Cet appareil ne requiert pas d'autre entretien qu'un
nettoyage quotidien. Pour obtenir les meilleurs résultats,
appliquer chaque jour une crème de nettoyage pour
tables de cuisson.
40
AVIS : : les anneaux en diamant peuvent rayer la surface.

Entretien
Dépannage
Si vous éprouvez un problème, la cause sera
habituellement mineure. Avant de contacter le service à
la clientèle, veuillez songer à suivre les suggestions et
les instructions ci-dessous :
Panne Cause Mesure
La table de cuisson ne
fonctionne pas
“ clignote à l’afficahge
de l’élément chauffant
“ clignote sur tous les
affichages d’élément et
un signal sonsore se
fait entendre
La table de cuisson
s’est éteinte d’ellemême
Afficahge de
chiffres
Affichage de
chiffres
Ҥ et des
” et des
L'alimentation électrique a été coupée.
L'appareil n'a pas été branché correctement en suivant le schéma de
raccordement.
Défaillance du système électronique.
Le panneau des touches de commande est très sale, des aliments
ont bouilli sur sa surface ou il y un
objet sur une touche.
L’interrupteur principal a été activé
de façon continue pendant plus de
5 secondes.
La touche d’alimentation a été
appuyée accidentellement.
Une panne du système électronique
a eu lieu.
L’appareil a détecté une panne. Le tableau des erreurs suivant dresse une liste des
9 ATT EN TI ON
Les réparations devraient être effectuées
uniquement par un réparateur qualifié.
Des réparations inappropriées sur votre appareil
peuvent mener à des risques de blessures graves
ou de décès.
Utilisez d'autres appareils électriques pour vérifier s'il
y a une panne de courant. Vérifiez s'il y a un problème avec le disjoncteur de l'installation électrique.
Assurez-vous que l'appareil a été branché correctement.
Communiquez avec le service d'assistance technique.
Nettoyer la zone des touches de commande en profondeur ou retirer l’objet. s’il y en a un. Appuyer sur la
touche qui semble correspondre au problème. Le clignotement s’arrêtera.
Essuyer en profondeur la zone des touches de commande et enlever tout objet qui y colle. Effectuer de
nouveau les réglages.
Allumer de nouveau l’appareil. Effectuer de nouveau
les réglages.
Couper l’alimentation de l’appareil, puis le mettre sous
tension à l’aide du disjonteur du bâtiment ou à l’aide
des fusibles du boîtier de disjoncteur. Si la situation se
reproduit, communiquer avec le service à la clientèle.
mesures à prendre pour résoudre le problème.
Messages d’erreur
Affichage Problème Mesure
”ƒ
”…
La zone de cuisson est trop chaude
et s’est éteinte.
Une casserole est top près du panneau de commande.
Retirer les récipients des zones de cuisson.
s’éteint en appuyant sur la surface de bouton si la plaque est suffisamment froide. Attendre quelques minutes que les zones de cuisson aient légèrement refroidi.
Si l’indicatio
plaque, éteindre cette dernière et la laisser refroidir
plus longtemps.
S’assurer que la casserole est positionnée correctement sur l’élément. S’assurer qu’aucun objet chaud
n’entre en contact avec la zone des touches de commande. Retirer l’article chaud de la zone des touches
de commande. Attendre quelques minutes pour permettre à la zone des touches de commande de se
refroidir. Si
marche de l’élément, communiquer avec le service à
la clientèle.
”ƒ
”ƒ persiste au moment de rallumer la
”… s’affiche à nouveau après la mise en
41

”ˆ
0DLQ6WUHHW6XLWH
,UYLQH&$
ZZZERVFKKRPHFRP
”‰
Remarques
▯ La table de cuisson est dotée d’un dispositif
d’autorégulation qui allume et éteint la source de
chaleur. Cela signifie que la source de chaleur sous
l’élément, qui dégage un lueur rouge, n’est pas
toujours visible. Lorsque vous sélectionnez un réglage
bas de chaleur, l’élément s’éteint plus souvent tandis
qu’avec un réglage élevé de chaleur, il ne s’éteint
qu’occasionnellement. Même au réglage le plus élevé,
la source de chaleur s’allume et s’éteint.
▯ Un léger bourdonnement se fera peut-être entre
lorsque l’élément est en train de chauffer. La
luminosité de la lueur peut varier d’un élément à
l’autre. Selon la logne de vision, il se peut que la lueur
rouge dépasse le rebord marqué de l’élément
chauffant. Ce sont des caractéristiques techniques.
Elles n’ont pas d’impact sur la qualité ou le
fonctionnement.
▯ En raison des caractéristiques du matériau, certaines
irrégularités peuvent se trouver sur la surface de
vitrocéramique. En raison de la surface douce en
miroir de la table de cuisson, il est possible que des
petites bulles de moins de 1 mm de diamètre soient
visibles. Ces bulles ne nuisent pas à la fonctionnalité
ou à la durabilité de la surface de cuisson en
vitrocéramique.
▯ Selon le type de comptoir de votre cuisine, un petit
intervalle irrégulier peut se former entre la table de
cuisson et le comptoir. C’est pour cette raison qu’un
joint d’étanchéité flexible est placé tout autour de la
table de cuisson.
AutoChef™ est défectueux. Confirmez et fermez le message d'erreur en touchant
L’élément chauffant a été en fonctionnement continue pendant trop
longtemps
n'importe quel endroit sur la zone des commandes
tactiles. Vous pouvez cuisiner sans AutoChef™. Communiquez avec le service d'assistance technique.
L’arrêt automatique a été activé. Toucher un symbole
quelconque. L’élément peut alors être rallumé sans
attendre..
Service technique
Si vous devez réparer l’appareil ménager, contactez
notre département de service technique. Notre principal
centre de service à la clientèle (voir la suite) sera ravi de
vous référer à un centre près de votre domicile.
Numéro E et numéro FD :
Lorsque vous appelez notre service à la clientèle, ayez à
votre disposition le numéro de produit (E) et le numéro
de fabrication (FD) de votre appareil ménager. Ces
numéros figurent sur la plaque d’identification au bas de
l’appareil ménager.
Des question ? Contactez-nous. Nous espérons recevoir
de vos nouvelles très bientôt !
42

ÉNONCÉ DE LA GARANTIE LIMITÉE
Couverture de la garantie :
La garantie limitée fournie par BSH Home Appliances
Bosch (la « Société ») dans le présent énoncé de
garantie limitée s’applique seulement aux Bosch
NEM3064UC, NEM3664UC, NET5054UC, NET5654UC,
NET8054UC, NET8654UC vendu au premier acheteur,
en autant que le produit ait été acheté :
▯ pour une utilisation normale résidentielle (non
commerciale), et qu’en fait en tout temps a été utilisé
pour un usage domestique normal ;
▯ nouveau au détail (non en montre, tel quel ou un
retour), qu’il n’est pas destiné à la revente ni à un
usage commercial et ;
▯ aux États-Unis ou au Canada et qu’il est demeuré en
tout temps dans le pays où l’appareil a été acheté.
Les garanties données ici s’appliquent seulement au
premier acheteur du produit et ne sont pas transférables.
Bosch se réserve le droit de demander une preuve
d’achat au moment de la réclamation sous garantie afin
de confirmer que le produit est à même la période de
garantie limitée.
S’assurer de retourner la carte d’enregistrement,
quoiqu’elle n’est pas nécessaire pour la garantie, c’est la
façon dont Bosch peut vous aviser dans le cas d’un avis
de rappel ou de sécurité du produit.
Durée de la garantie
BSH garantit que le produit ne présente aucun défaut de
matériaux ou de fabrication pour une période trois cent
soixante cinq (365) jours à compter de la date d’achat.
La durée commence à la date d’achat et ne sera pas
allongée, prolongée, interrompue pour quelle que raison
que ce soit.
Réparation ou remplacement comme solution exclusive
Pendant la période de garantie, BSH ou un de ses
centres de service autorisés réparera le produit sans
frais (sujet à certaines limitations indiquées dans le
présent document), si le produit présente un défaut de
fabrication ou de matériaux. Si des tentatives
raisonnables pour réparer le produit sont vaines, alors
BSH remplacera le produit (un modèle supérieur peut
être disponible, à la seule discrétion de BSH, moyennant
des frais additionnels). Toutes les pièces ou les
composants enlevés demeurent la seule propriété de
BSH. Toute pièce et tout composant réparés doit être
identique à la pièce d’origine à des fins de cette garantie
et la garantie ne sera pas prolongée en regard de telles
pièces. La seule responsabilité de BSH est de faire
réparer le produit défectueux par un centre de service
autorisé pendant les heures d’affaires normales. Pour la
sécurité et éviter des dommages à la propriété, BSH
recommande fortement de ne pas réparer le produit soimême, par une personne non qualifié ; BSH ne sera pas
tenu responsable des réparations ou du travail effectué
par une personne non autorisée. Si le consommateur
désire faire réparer par une personne autre qu’une
personne autorisée, CETTE GARANTIE EST
AUTOMATIQUEMENT NULLE ET NON AVENUE. Les
centres de service autorisés sont les personnes ou les
compagnies qui ont été spécialement formées sur les
produits BSH et qui possèdent, selon l’opinion de BSH,
une réputation supérieure pour le service à la clientèle
et la capacité technique (il est à noter qu’elles sont des
entités indépendantes et non des agents, partenaires,
affiliations ou représentants de BSH). Nonobstant ce qui
suit, BSH ne sera pas tenu responsable d’aucune façon
si le produit est situé dans une région éloignée
(supérieure à 100 miles d’un centre de service autorisé)
ou n’est pas accessible de façon raisonnable, dans un
environnement hasardeux, dangereux ; dans une telle
éventualité, à la demande du consommateur, BSH
pourrait payer les frais de main-d’oeuvre et de pièces et
expédier les pièces à un centre de service autorisé le
plus près, mais le consommateur serait entièrement
responsable pour toute durée de déplacement et autres
frais spéciaux encourus par le centre de service, en
autant qu’il accepte l’appel de service.
Produit hors garantie
BSH n’a aucun obligation, par loi ou autre, d’offrir toute
concession, incluant réparation, prorata ou
remplacement de produit une fois la garantie expirée.
Exclusions à la garantie
La couverture de garantie décrite aux présentes exclut
tout défaut ou dommage qui n'est pas une faute directe
de BSH, y compris sans limitation, un ou plusieurs des
cas suivants :
▯ utilisation du produit autre qu’un usage normal,
habituel et de la façon destinée (incluant sans
limitation toute forme d’utilisation commerciale,
d’utilisation ou de rangement d’un produit pour
l’intérieur à l’extérieur, utilisation du produit de concert
avec un transporteur aérien ou marin) ;
▯ mauvaise conduite, négligence, mauvaise utilisation,
abus, accidents, fonctionnement inadéquat, mauvais
entretien, installation inadéquate ou négligente,
altération, manquement d’observer les instructions de
fonctionnement, mauvaise manipulation, service non
autorisé (incluant réparation par le consommateur ou
exploration du fonctionnement interne du produit) ;
▯ ajustement, modification ou altération de toute sorte ;
▯ manquement à la conformité des normes applicables
fédérales, provinciales, municipales ou électrique du
pays, codes de plomberie et/ou de construction,
réglementation ou lois, incluant le manquement
d’installer le produit en stricte conformité avec les
codes et réglementations de construction et
d’incendie locaux ;
▯ usure ordinaire, déversements d’aliments, liquide,
accumulation de graisse ou autres substances
accumulées dans, sur ou autour du produit ;
▯ toute force ou tout facteur externe, élémentaire et/ou
environnemental, incluant sans limitation, pluie, vent,
43

sable, inondation, incendie, coulée de boue, gel,
humidité excessive et exposition prolongée à
l’humidité, foudre, surtension, problème de structure
autour de l’appareil et actes de Dieu.
En aucun cas, BSH ne sera tenu responsable des
dommages survenus à la propriété, incluant les
armoires, planchers, plafonds et autres objets ou
structures autour du produit. Également exclus de la
garantie, égratignures, encoches, enfoncement et
dommages esthétiques sur les surfaces externes ou les
pièces exposées ; produit sur lequel le numéro de série
a été modifié, altéré, effacé, enlevé ; appel de service
pour enseigner le fonctionnement du produit ou les
visites où il n’y a aucun problème avec le produit ;
correction de problèmes d’installation (le consommateur
est seul responsable pour toute structure et tout réglage
du produit, incluant l’électricité, la plomberie et autres
connexions nécessaires, pour un plancher/fondation
appropriée, et pour toute modification incluant, sans
limitation, armoire, mur, plancher, tablette, etc.) et la
remise de coupe-circuit ou remplacement de fusible.
SELON LA PORTÉE PERMISE PAR LA LOI, CETTE
GARANTIE DONNE DES SOLUTIONS EXCLUSIVE
RELATIVEMENT AU PRODUIT, QUE LA RÉCLAMATION
SURVIENNE PAR CONTRAT OU TORT (INCLUANT
RESPONSABILITÉ STRICTE OU NÉGLIGENCE) OU
AUTRE. CETTE GARANTIE EST EN LIEU DE TOUTE
AUTRE GARANTIE, EXPRESSE OU IMPLICITE, TOUTE
GARANTIE PAR LOI, À DES FINS DE
COMMERCIALISATION OU À DES FINS
PARTICULIÈRES, OU AUTRE, SERA EN VIGUEUR
SEULEMENT POUR LA PÉRIODE EFFECTIVE DE LA
GARANTIE LIMITÉE EXPRESSE. EN AUCUN CAS, LE
FABRICANT NE PEUT ÊTRE TENU RESPONSABLE DES
DOMMAGES ACCESSOIRES, SPÉCIAUX, INDIRECTS,
PERTES D’AFFAIRES, ET/OU DOMMAGES PUNITIFS,
PERTES, FRAIS INCLUANT SANS LIMITATION LE
MANQUEMENT AU TRAVAIL, REPAS À L’HÔTEL ET/OU
AU RESTAURANT, FRAIS DE REMODELAGE
SURVENUS À CAUSE DE DOMMAGES DIRECTS
DÉFINITIVEMENT CAUSÉS EXCLUSIVEMENT PAR BSH
OU AUTRE. CERTAINS ÉTATS NE PERMETTENT PAS
L’EXCLUSION OU LA LIMITATION DES DOMMAGES
ACCESSOIRES OU INDIRECTS ET NE PERMETTENT
PAS LA LIMITATION SUR LA DURÉE D’UNE GARANTIE
IMPLICITE, PAR CONSÉQUENT LES LIMITATIONS
SUSMENTIONNÉES PEUVENT NE PAS S’APPLIQUER.
CETTE GARANTIE DONNE DES DROITS SPÉCIFIQUES
ET IL PEUT Y EN AVOIR D’AUTRES QUI VARIENT D’UN
ÉTAT À L’AUTRE.
Aucune tentative de modifier, changer ou amender cette
garantie ne peut être effective sansle consentement écrit
autorisé par un officier de BSH.
Comment obtenir un service au titre de la garantie:
Pour obtenir un service au titre de la garantie pour votre
produit, vous devriez communiquer avec le centre de
service après-vente agréé le plus proche de la Société..
BSH Home Appliances - 1901 Main Street, Suite 600,
Irvine, CA 92614 / 800-944-2904
44

Contenido
Manual de instrucciones
INSTRUCCIONES DE SEGURIDAD IMPORTANTES .. 46
Seguridad para evitar incendios .................................... 46
Seguridad al cocinar ........................................................ 46
Prevención de quemaduras ............................................ 47
Seguridad de los niños .................................................... 47
Seguridad en la limpieza ................................................. 47
Seguridad en los utensilios de cocina .......................... 48
Instalación y mantenimiento adecuados ...................... 48
Advertencias en virtud de la Proposición 65
del estado de California ................................................... 48
Elementos que pueden dañar el electrodoméstico .. 49
Protección medioambiental ........................................ 49
Consejos para ahorrar energía ...................................... 49
Para familiarizarse con la unidad ............................... 50
Panel de control ................................................................ 50
Elementos ........................................................................... 51
Indicador de calor residual ............................................. 51
Operación ..................................................................... 52
Interruptor de alimentación eléctrica principal ............ 52
Para encender la placa .................................................... 52
Función PowerStart™ ....................................................... 53
AutoChef™ .......................................................................... 55
Tiempo de cocción ........................................................... 57
Temporizador de cocina .................................................. 58
Función Keep Warm ......................................................... 58
Bloqueo para niños .......................................................... 59
Clean Lock .......................................................................... 59
Valores básicos ................................................................. 59
Limpieza y mantenimiento .......................................... 60
Limpieza diaria ................................................................... 60
Pautas de limpieza ............................................................ 61
Tablas de limpieza ............................................................ 61
Mantenimiento .................................................................... 62
Servicio técnico ........................................................... 62
Resolución de problemas ............................................... 62
Servicio técnico ................................................................. 64
DECLARACIÓN DE GARANTÍA LIMITADA DEL
PRODUCTO .................................................................. 64
Cobertura de esta garantía y a quiénes se aplica ..... 64
Duración de la garantía ................................................... 64
Reparación/reemplazo como único recurso .............. 64
Producto fuera de garantía ............................................ 65
Exclusiones de la garantía ............................................. 65
Cómo obtener el servicio técnico de la garantía ........ 65
Produktinfo.
Encontrará más información sobre productos,
accesorios, piezas de repuesto y servicios en internet:
www.bosch-home.com y también en la tienda online:
www.bosch-eshop.com
45

9 INSTRUCCIONES DE SEGURIDAD IMPORTANTES
LEA Y CONSERVE ESTAS INSTRUCCIONES
INSTRUCCIONES DE SEGURIDAD IMPORTANTES
LEA Y CONSERVE ESTAS INSTRUCCIONES
AVISO
Su nuevo electrodoméstico ha sido diseñado para ser
seguro y confiable si recibe el cuidado adecuado. Lea
atentamente todas las instrucciones antes de usarlo.
Estas precauciones reducirán el riesgo de quemaduras,
descarga eléctrica, incendio y lesiones a personas. Al
utilizar electrodomésticos de cocina, se deben tomar
precauciones de seguridad básicas, incluidas las que se
encuentran en las páginas siguientes.
Una vez retirado el embalaje, revise el aparato. No lo
conecte si ha sufrido daños durante el transporte.
Seguridad para evitar incendios
No deje que papel de aluminio, plástico, papel ni tela
entren en contacto con un elemento de la superficie, una
hornilla o una rejilla calientes. No deje ollas hirviendo sin
líquido.
Si la placa está cerca de una ventana, una ventilación o
un ventilador de aire forzado, asegúrese de que los
materiales inflamables, como los elementos utilizados
para cubrir una ventana, no se aproximen a las hornillas
o a los elementos ni se extiendan sobre estos. Podrían
prenderse fuego.
Siempre tenga un detector de humo en funcionamiento
cerca de la cocina.
Nunca deje la placa sin vigilancia cuando esté en uso.
Los derrames por hervor causan humo y las
salpicaduras grasosas pueden prenderse fuego.
Tenga un extinguidor de incendio disponible, cerca, en
un área fácilmente visible y accesible, cerca del
electrodoméstico.
Sofoque las llamas provocadas por alimentos que se
prenden fuego, que no sean incendios ocasionados por
grasa, con bicarbonato de sodio. Nunca use agua en
incendios ocasionados al cocinar.
AVISO
PARA REDUCIR EL RIESGO DE LESIONES A PERSONAS EN CASO DE INCENDIO OCASIONADO POR GRASA, SIGA ESTAS INDICACIONES:
a.
SOFOQUE LAS LLAMAS con una tapa que ajuste
correctamente, una placa para galletas u otra bandeja
de metal, luego, apague el electrodoméstico.
ASEGÚRESE DE PREVENIR LAS QUEMADURAS. Si
las llamas no se apagan de inmediato, EVACUE EL
ÁREA Y LLAME AL DEPARTAMENTO DE BOMBEROS.
b.
NUNCA LEVANTE UNA OLLA EN LLAMAS. Puede
quemarse.
c.
NO USE AGUA, ni repasadores o toallas húmedos.
Puede ocasionar una violenta explosión por vapor.
d.
Use un extinguidor sólo si:
- Sabe que tiene un extinguidor CLASE ABC y ya sabe
cómo usarlo.
- El incendio es pequeño y se limita al área donde se
originó.
- Alguien llamó al departamento de bomberos.
- Puede combatir el incendio de espaldas a una
salida.
AVISO
PARA REDUCIR EL RIESGO DE INCENDIO OCASIONADO POR GRASA:
a.
Nunca deje las unidades de la superficie sin vigilancia
en valores altos. Los derrames por hervor producen
humos y salpicaduras grasosas que pueden prenderse
fuego. Caliente los aceites despacio a temperaturas
bajas o medianas.
b.
Siempre encienda la campana al cocinar a una
temperatura alta.
c.
Limpie los ventiladores extractores con frecuencia. No
se debe permitir la acumulación de la grasa en el
ventilador ni en el filtro.
d.
Use el tamaño de cacerola adecuado. Siempre use
utensilios de cocina apropiados para el tamaño del
elemento de la superficie.
No flambee alimentos bajo la campana no decorativa ni
trabaje con la llama abierta. Cuando está encendida, la
campana extractora atrae las llamas hacia el filtro.
¡Siempre existe el riesgo de incendio debido a los
depósitos en el filtro de grasa!
En el caso de que su ropa se prenda fuego, arrójese al
piso y ruede de inmediato para extinguir las llamas.
Si es posible, no ponga el sistema de ventilación en
funcionamiento si hay un incendio en la placa. Pero no
atraviese el fuego con la mano para apagarla.
Seguridad al cocinar
AVISO
Utilice este electrodoméstico únicamente para el fin para
el cual fue diseñado, según se describe en este manual.
NUNCA utilice este electrodoméstico como estufa para
calentar o calefaccionar la habitación. Esto puede hacer
que el electrodoméstico se caliente en exceso. Nunca
utilice el electrodoméstico para almacenar objetos.
46

9 INSTRUCCIONES DE SEGURIDAD IMPORTANTES
LEA Y CONSERVE ESTAS INSTRUCCIONES
AVISO
Si AutoChef™ no está funcionando en forma adecuada,
puede haber calentamiento excesivo, lo que provoca
humo y daños en la olla.
CUANDO COCINE CON AUTOCHEF™, SIGA ESTAS INDICACIONES:
▯ Utilice únicamente una olla del sistema.
▯ Siempre coloque la olla en el centro del elemento de
calentamiento.
▯ No coloque una tapa en la olla.
▯ Nunca deje la grasa para fritura sin supervisión.
No utilizar nunca el aparato si se han derramado líquidos
o alimentos alrededor del panel de control. Apagar
siempre la placa de cocción y secar el panel de control.
Si no se utilizan los controles de manera adecuada
pueden provocarse lesiones y daños al aparato.
Si la placa se desconecta sola y no puede ser utilizada
durante un tiempo suficiente, se podrá desconectar
repentinamente también en el futuro. Para evitarlo,
desconectar el interruptor en la caja de fusibles.
Contactar con un técnico autorizado.
Prevención de quemaduras
NO TOQUE LAS UNIDADES DE LAS SUPERFICIES NI
LAS ÁREAS CERCANAS A LAS UNIDADES. Las
unidades de la superficie pueden estar calientes, aunque
su color sea oscuro. Las áreas cercanas a las unidades
de la superficie pueden calentarse lo suficiente como
para ocasionar quemaduras. Durante el uso y con
posterioridad, no toque las unidades de la superficie o
áreas cercanas a las unidades, ni deje que su ropa,
agarradores ni otros materiales inflamables entren en
contacto con estos hasta que haya transcurrido el
tiempo suficiente para que se enfríen. Entre estas áreas,
se encuentran la placa y las áreas que miran hacia la
placa.
No caliente recipientes de alimentos sin abrir. La
acumulación de presión puede hacer explotar el
recipiente y causar lesiones.
Siempre use agarradores secos. Los agarradores
húmedos o mojados sobre las superficies calientes
pueden ocasionar quemaduras por vapor. No deje que
los agarradores toquen los elementos de calentamiento
que estén calientes. No use toallas ni otros paños
gruesos.
Siempre encienda la campana al cocinar a un valor de
calor alto o al flambear alimentos (p. ej., Crepas Suzette,
cerezas Jubilee, carne flambeada con granos de
pimienta).
Use valores de calor altos en la placa sólo cuando sea
necesario. Para evitar burbujas y salpicaduras, caliente
el aceite despacio, a un valor bajo-mediano, como
máximo. El aceite caliente puede provocar quemaduras
y lesiones de extrema gravedad.
Nunca mueva un recipiente con aceite caliente,
especialmente una freidora. Espere hasta que se haya
enfriado.
Sujétese todas las prendas, etc. antes de comenzar.
Sujétese el cabello largo de manera que no quede
suelto, y no use prendas holgadas o sueltas, como
corbatas, bufandas, joyas o mangas amplias.
AVISO
PELIGRO DE QUEMADURAS
Los objetos metálicos se calientan muy rápido en la
placa de cocción. No deje nunca objetos metálicos,
como cuchillos, tenedores, cucharas o tapas encima de
la placa de cocción.
Si el display no funciona cuando una zona de cocción
está calentándose, desconectar el interruptor en la caja
de fusibles. Contactar con un técnico autorizado.
Seguridad de los niños
Cuando los niños tienen la edad adecuada para utilizar
el electrodoméstico, es responsabilidad legal de los
padres o tutores legales asegurarse de que reciban las
instrucciones sobre prácticas seguras por parte de
personas calificadas.
No deje que nadie se suba, pare, incline, siente o
cuelgue de cualquier parte de un electrodoméstico,
especialmente una puerta, cajón calentador o cajón para
almacenamiento. Esto puede dañar el electrodoméstico,
y la unidad puede caerse y, posiblemente, causar
lesiones graves.
No permita que niños utilicen este electrodoméstico, a
menos que sean supervisados de cerca por un adulto.
Los niños y las mascotas no deben quedar solos o sin
vigilancia en el área donde se utilice el electrodoméstico.
Nunca se les debe permitir jugar cerca del
electrodoméstico, independientemente de que esté en
funcionamiento o no.
ATENCION
Los objetos de interés para niños no deben almacenarse
en un electrodoméstico, en gabinetes sobre un
electrodoméstico ni en la placa antisalpicaduras. Si los
niños se suben a un electrodoméstico para alcanzar
estos objetos, podrían sufrir lesiones graves.
Seguridad en la limpieza
No limpie el electrodoméstico cuando aún esté caliente.
Algunos limpiadores producen emanaciones tóxicas
cuando se aplican en una superficie caliente. Las
esponjas y los paños mojados pueden ocasionar
quemaduras por vapor.
No use limpiadores a vapor para limpiar el aparato.
47

9 INSTRUCCIONES DE SEGURIDAD IMPORTANTES
LEA Y CONSERVE ESTAS INSTRUCCIONES
Seguridad en los utensilios de cocina
Sostenga el mango de la olla cuando revuelva o dé
vuelta los alimentos. Esto ayuda a evitar salpicaduras y a
prevenir el movimiento de la olla.
Utilice el tamaño de olla adecuado.
El uso de utensilios de cocina más pequeños deja
expuesta al contacto directo una parte del elemento de
calentamiento o de la hornilla, y puede ocasionar la
ignición de la ropa. Seleccione utensilios de cocina con
bases planas y lo suficientemente grandes para que
cubran la unidad de calentamiento de la superficie. Este
electrodoméstico está equipado con una o más
unidades de superficie de diferente tamaño. La
proporción correcta del utensilio de cocina con respecto
al elemento de calentamiento o la hornilla también
aumenta la eficiencia.
Los utensilios de cocina no aprobados para uso con
placas de cerámica pueden romperse con los cambios
bruscos de temperatura. Use sólo ollas que sean
apropiadas para placas de cerámica (únicamente
determinados tipos de vidrio, vidrio resistente al calor,
cerámica, loza u otros utensilios vidriados que sean
aptos).
Siempre coloque los mangos de los utensilios hacia
adentro, de manera que no se extiendan sobre las áreas
de trabajo adyacentes ni sobre el borde de la placa.
Esto reduce el riesgo de incendios, derrames y
quemaduras.
AVISO
No almacene ni utilice productos químicos corrosivos,
vapores, materiales inflamables ni productos no
alimenticios sobre este electrodoméstico ni cerca de él.
Está específicamente diseñado para calentar o cocinar
alimentos. El uso de productos químicos corrosivos al
calentar o limpiar dañará el electrodoméstico y podría
causar lesiones.
No utilice este electrodoméstico si no funciona
correctamente o si ha sido dañado. Comuníquese con
un centro de servicio técnico autorizado.
AVISO
No cocine en una placa rota. Las soluciones de limpieza
y los derrames pueden crear un riesgo de descarga
eléctrica. Apague el disyuntor de la caja de fusibles si la
cerámica tiene fracturas, defectos o rajaduras. Llame a
un centro de servicio técnico autorizado.
No repare ni cambie ninguna parte del electrodoméstico,
a menos que se recomiende específicamente en este
manual. Remita todas las reparaciones a un centro de
servicio técnico autorizado por la fábrica.
Para evitar un peligro de descarga eléctrica, antes de
reparar el electrodoméstico, apague la alimentación
eléctrica en el panel de servicio y trabe el panel para
impedir que se encienda accidentalmente.
Advertencias en virtud de la Proposición 65 del estado de California
PELIGRO DE LESIONES
Cuando esté cocinando en baño María, es posible que
la placa y el recipiente de cocción se quiebren debido al
calentamiento excesivo. El recipiente de cocción en
baño María no debe entrar en contacto directo con la
parte inferior de la cacerola llenada con agua. Utilice
solo utensilios de cocina resistentes al calor.
Siempre mantenga la placa y las bases de las cacerolas
secas. El líquido que se encuentra entre la base de la
cacerola y la placa puede acumular presión de vapor,
que puede hacer que la cacerola salte repentinamente y
provoque lesiones.
Instalación y mantenimiento adecuados
Pídale al instalador que le muestre la ubicación del
disyuntor o el fusible. Márquela para recordarla más
fácilmente.
Este electrodoméstico debe ser correctamente instalado
y conectado a tierra por un técnico calificado. Conéctelo
sólo a una toma de corriente eléctrica correctamente
conectada a tierra. Para obtener más información,
consulte las Instrucciones de instalación.
Este electrodoméstico ha sido diseñado para uso
doméstico normal únicamente. No está aprobado para
uso en exteriores. Consulte la garantía. Si tiene alguna
pregunta, comuníquese con el fabricante.
AVISO
Este producto contiene una o más sustancias químicas
que el estado de California sabe que provocan cáncer,
defectos congénitos, u otro daño reproductivo.
48

Elementos que pueden dañar el electrodoméstico
▯ Rayas en las superficies de cerámica: los utensilios
de cocina de base áspera rayan la cerámica.
▯ Sal, azúcar y arena: la sal, el azúcar y la arena rayan
la cerámica. Nunca utilice la placa como una
superficie de trabajo o para apoyar elementos.
▯ Utensilios de cocina sobrecalentados: evite calentar
cacerolas o ollas vacías.
▯ Utensilios de cocina calientes: coloque cacerolas y
ollas calientes en el área operativa o en el borde. Esto
puede causar daños.
▯ Objetos duros y filosos: si caen objetos duros o
filosos en la placa calentadora, esta puede dañarse.
Protección medioambiental
Consejos para ahorrar energía
▯ Coloque siempre en los recipientes la tapa
correspondiente. Al cocinar sin tapa el consumo de
energía se multiplica por cuatro. Utilice una tapa de
cristal para poder tener visibilidad sin necesidad de
levantarla.
▯ Utilice recipientes con la base gruesa y plana. Las
bases curvas aumentan el consumo de energía.
▯ Fuentes que se desbordan: los productos de azúcar
y con azúcar pueden dañar la placa calentadora.
Elimine estos productos inmediatamente con un
raspador de vidrio.
▯ Papel de aluminio y plástico: Las fuentes de papel de
aluminio y plástico se derretirán en las placas
calentadoras calentadas. La película protectora para
estufas no es apta para su placa.
▯ Agentes de limpieza no aptos: puede producirse la
decoloración metálica reluciente de la cerámica por el
uso de agentes de limpieza no aptos y por la abrasión
de los utensilios de cocina.
▯ El diámetro de la base de los recipientes debe
coincidir con el tamaño de la zona de cocción. En
caso contrario puede producirse un derroche de
energía. Observe: El fabricante suele indicar el
diámetro superior del recipiente. Éste es por lo
general superior al diámetro de la base del recipiente.
▯ Seleccione recipientes del tamaño adecuado a la
cantidad de alimento que se vaya a preparar. Un
recipiente de gran dimensión y medio lleno, consume
mucha energía.
▯ Cocine con poca agua. De esta manera, se ahorra
energía y, además, se mantienen las vitaminas y
minerales de la verdura.
▯ Seleccione un nivel de potencia más bajo.
49

Para familiarizarse con la unidad
NJO
NJO
MPX NFE NBY
1PXFS
4UBSU
"VUP
$IFG
,FFQ
8BSN
1SPHSBNT
0O0GG
$MFBO-PDL
$IJME-PDL
5JNFS
En esta sección, se describen el panel de control, los
elementos des calentamiento y las pantallas.
Estas instrucciones se aplican a varia placas.
Panel de control
Íconos que aparecen en la pantalla
>
D
U
‰‰
q
¶
ª
‰.‰ Nivel de potencia ‹-Š
ð
ò
à
min
low
med
max
Bloqueo de limpieza encendido
Bloqueo para niños encendido
Temporizador de cocina encendido
Valor del temporizador
Función del temporizador
Tiempo de cocción activo para el elemento
encendido
AutoChef™: Calentamiento en proceso
Listo ‹
Calor residual •/œ
función AutoChef™/PowerStart™
‘
Función Keep Warm –
Elemento doble
Elemento triple
Elemento puente
Niveles de fritura para AutoChef™
La página 2 contiene una lista de modelos y
dimensiones.
Botones digitales
On/Off Interruptor de alimentación eléctrica prin-
cipal
CleanLock/
ChildLock
Protección de limpieza / Seguridad para
niños
Timer Funciones de programación de tiempo
à
Elemento puente
PowerStart Función PowerStart™ (Precalentar
ráprido)
AutoChef Función AutoChef™
Programs Programas AutoChef™
KeepWarm Función para mantener caliente
ö
$
Elementos de calentamiento adicionales
Seleccionar elemento de cocción
0 - 9 Programar nivel de temperatura / nivel de
fritura / temporizador / programa de fritura
Superficies de mando
Al pulsar un símbolo se activa la función
correspondiente.
AVISO
▯ Siempre mantenga las zonas de control táctil limpias y
secas. La humedad y la suciedad pueden afectar el
funcionamiento adecuado.
▯ Si la bandeja de metal se dobla o se daña, p. ej., es
golpeada por una olla, la funcionalidad puede verse
afectada.
50

Elementos
Elemento Para encender y apagar
Elemento individual Siempre utilice utensilios de cocina de un tamaño apto.
$
Elemento doble Se puede hacer que el tamaño de estos elementos coincida con el
ð
tamaño de su olla. Se debe encender el elemento de calentamiento.
Apagar el anillo de calentamiento exterior: Pulse el símbolo
apagará la pantalla
Agregar: Pulse el símbolo
pantalla
Elemento triple En este elemento, usted puede apagar los anillos de calentamiento
ò
medio y grande. Se debe encender el elemento de calentamiento.
Apagar el anillo de calentamiento exterior:Pulse el símbolo
apagará la pantalla
Apagar el anillo de calentamiento medio:Pulse el símbolo
mente. Se apagará la pantalla
Cuando encienda nuevamente el elemento de calentamiento, todos los
anillos de calentamiento estarán encendidos.
Elemento puente
à
(únicamente NET 8654 UC)
El elemento puente combina dos elementos de calentamiento individuales en una zona larga para planchas. Esta configuración es ideal
para planchas y ollas grandes.
Nota: : No use utensilios de cocina de un diámetro mayor de 17 pulg. x
10 pulg. (432 x 254 mm).
Encender el elemento puente: Pulse uno de los dos botones digitales
ð.
$ para seleccionar el elemento de calentamiento y, luego, pulse la
tecla
à. Aparecerá el símbolo à; ambos elementos de calentamiento
están ahora seleccionados. Aparece el símbolo
En el término de los 10 segundos siguientes, seleccione el valor de
calor deseado (de 1 a 9). El elemento puente y ambos elementos de
calentamiento individuales están ahora encendidos.
Modificar el valor de calor: Pulse uno de los dos botones digitales
para seleccionar el elemento puente y programe el nuevo nivel de calor
en el término de los 10 segundos siguientes.
Apagar la función Bridge element: Pulse uno de los dos botones digitales
$ para seleccionar el elemento puente y seleccione la tecla
numérica 0. Aparece el símbolo
los elementos de calentamiento y aparecerá el indicador de calor residual.
ð.
ö nuevamente. Se encenderá la
ò.
ð.
‹ en ambas pantallas.
‹ en ambas pantallas. Se apagarán
ö. Se
ö. Se
ö nueva-
$
Indicador de calor residual
La placa está equipada con un indicador de calor
residual para cada elemento. Este muestra qué
elementos aún están calientes. Evite tocar los elementos
indicados.
Si aparece una
caliente. Por ejemplo, puede usarlo para mantener
caliente una pequeña cantidad de alimentos o para
derretir cobertura de chocolate. A medida que el
elemento se enfría, la pantalla cambia a
desaparece una vez que el elemento se haya enfriado
en forma suficiente.
El indicador de calor residual se enciende
automáticamente después de un corte de la
alimentación eléctrica. La pantalla se enciende durante,
aproximadamente, 30 minutos.
• en la pantalla, el elemento aún está
œ. La pantalla
51

Operación
Interruptor de alimentación eléctrica principal
Use el interruptor principal para encender el circuito
electrónico del panel de control. Ahora la placa está lista
para su uso.
Encender la placa
Pulse el botón digital On/Off hasta que se enciendan el
indicador que se encuentra arriba del interruptor y los
símbolos
$ de los elementos de calentamiento.
Apagar la placa
Pulse el botón digital On/Off. Desaparece el indicador
__. La placa está apagada. Los indicadores de calor
residual continuarán apareciendo hasta que los
elementos se hayan enfriado lo suficiente.
Nota: La placa se apaga automáticamente cuando todos los elementos hayan estado apagados durante más de 15 segundos.
Si todavía existe calor residual cuando se enciende la
placa, los símbolos
•/œ aparecerán en la pantalla de los
elementos de calentamiento.
Para encender la placa
En este capítulo, aprenderá cómo ajustar los elementos
de calentamiento. La tabla contiene los valores de calor
para diversos alimentos.
Programar el elemento
Seleccione el nivel de calor deseado utilizando las teclas
numéricas del 1 al 9.
Nivel de calor 1 = potencia mínima
Nivel de calor 9 = potencia máxima
Cada valor de calor tiene una posición intermedia. Este
nivel se indica con un . y se programa con las teclas
que aparecen en la zona de control táctil.
Û
Seleccionar el nivel de calor
La placa debe estar encendida.
1.
Pulse el botón digital $ para el elemento
correspondiente. El indicador
pantalla del elemento y el símbolo
‹ aparecerá en la
$ se encenderá
intensamente para el elemento seleccionado.
2.
En el término de los 10 segundos siguientes, pulse el valor de calor deseado (de 1 a 9) en la zona de control táctil.
1PXFS
"VUP
$IFG
4UBSU
1SPHSBNT
,FFQ
8BSN
1PXFS
4UBSU
"VUP
$IFG
1SPHSBNT
,FFQ
8BSN
Modificar el nivel de calor
Seleccione el elemento y pulse la tecla numérica para el
nivel de calor deseado. Para seleccionar un nivel
intermedio, pulse el símbolo
Û que se encuentra entre
los números del nivel de calor.
Apagar el elemento
Seleccione el elemento y programe el nivel de calor en
0. Se apaga el elemento y se muestra el indicador de
calor residual.
Nota: Se enciende y apaga el suministro de calor para regular la temperatura del elemento; esto significa que el brillo rojo debajo del elemento no siempre es visible. Cuando selecciona un valor de calor bajo, el elemento se apaga en intervalos prolongados. Incluso al nivel más alto, el elemento se apaga y se enciende.
Tabla de valores
La siguiente tabla proporciona algunos ejemplos. Los
tiempos de cocción pueden variar según el tipo, el peso
y la calidad de los alimentos. Por lo tanto, es posible que
se produzcan desviaciones.
9 ATENCION
Durante la cocción, los estofados o los platos
líquidos, como sopas, salsas o bebidas, pueden
calentarse muy rápidamente de manera inadvertida
y derramarse o salpicar. Por este motivo, se
recomienda que revuelva en forma continua, a fin
de que los alimentos se calienten en forma gradual
a un nivel de potencia apto.
Niveles de potencia
Derretimiento
Chocolate 1 - 2
Mantequilla 1 - 2
52

Niveles de potencia
Calentado
Verduras congeladas (p. ej., espinaca) 2. - 3.
Caldo 7 - 8
Sopa espesa 1. - 2.
Leche** 1 - 2
Hervor
Salsa delicada: p. ej., salsa Béchamel 4 - 5
Salsa para spaghetti 2 - 3
Estofado 4 - 5
Pescado** 4 - 5
Cocción
Arroz (con doble cantidad de agua) 2 - 3
Papas hervidas con piel, con 1 a 2 tazas de agua 4 - 5
Papas hervidas con 1 a 2 tazas de agua 4 - 5
Verduras frescas, con 1 a 2 tazas de agua 2 - 3.
Verduras congeladas, con 1 a 2 tazas de agua 3. - 4.
Pastas (2 a 4 cuartos de agua)* 6 - 7
Pudín** 1 - 2
Cereales 2 - 3
Frituras
Chuleta de cerdo 5. - 6.
Pechuga de pollo 5 - 6
Tocino 6 - 7
Huevos 5 - 6
Pescado 5 - 6
Pancakes 6 - 7
Alimentos fritos con abundante aceite** (en 1 a 2 cuartos de aceite)
Alimentos congelados; p. ej., nuggets de pollo (0.5 lb por porción) 8 - 9
Otros; p. ej., donas (0.5 lb por porción) 4. - 5.
* Cocción continua sin tapa
** sin tapa
Función PowerStart™
(Precalentar rápido)
Todos los elementos de calentamiento vienen equipados
con circuitos de PowerStart™ (Precalentar rápido). Esta
función va calentando el elemento usando la potencia
más alta y luego vuelve al valor de cocción continua que
haya seleccionado.
El tiempo que el elemento tarde en calentarse
dependerá del valor de cocción continua que haya
selectionado.
Programar la función PowerStart™
La función PowerStart™ solo puede activarse en los
primeros 30 segundos después de haber encendido la
placa:
1.
Seleccione el valor de cocción continuo que desee utilizar para el elemento.
2.
Pulse PowerStart. ‘ y el nivel de cocción aparecen alternativamente en la pantalla. PowerStart™ está activado.
Una vez que los alimentos se hayan cocinado
brevemente, el elemento de calentamiento vuelve, en
forma automática, al nivel de cocción programado. El
indicador
encendido en forma constante.
Nota: Después de haber encendido la función PowerStart™, el valor de cocción continuo todavía se puede cambiar durante un período de 10 segundos.
‘ desaparece y el nivel de cocción permanece
53

Tabla de cocción para la función PowerStart™
Consulte la siguiente tabla para ver los alimentos para
los que es apta la función PowerStart™. La cantidad más
más pequeños y la cantidad más grande a los
elementos de calentamiento más grandes. Los valores
que se mencionan en la tabla son valores orientativos.
pequeña se refiere a los elementos de calentamiento
Alimentos para los que es apropiada PowerStart™ Cantidad Valor de calor
Calentado
Verduras congeladas como espinaca 10 oz a 16 oz 2. a 3.PS
Caldo 2 a 4 tazas 7 a 8 PS
Sopas espesas 2 a 4 tazas 1. a 2. PS
Leche* 1 a 2 tazas 1 a 2 PS
Hervor
Estofado 2 lb 4 a 5 PS
Pescado 1 lb a 1.5 lb 4 a 5 PS
Hervido
Arroz (con doble cantidad de agua) 3/4 de taza a 2 tazas 2 a 3 PS
Papas hervidas con piel, con 1 a 2 tazas de agua 5 a 14 papas medianas 4 a 5 PS
Papas hervidas sin piel, con 1 a 2 tazas de agua 5 a 14 papas medianas 4 a 5 PS
Verduras frescas, con 1 a 2 tazas de agua 1 lb a 2 lb 2. a 3. PS
Frituras
Chuleta de cerdo 1 a 2 porciones 5. - 6. PS
Pancakes 5. - 6. PS
* sin tapa
Consejos para utilizar PowerStart™
La función PowerStart™ no hierve
los alimentos.
Está diseñada para conservar el valor nutricional de los alimentos al utilizar
poca agua para cocinar. Agregue solamente alrededor de 2 tazas de agua a
los alimentos para los elementos grandes y alrededor de ¾ a 1 taza de agua
para los elementos pequeños.
Cocine arroz con el doble de cantidad de líquido.
La función PowerStart™ no es apta para alimentos que se cocinan en una gran
cantidad de agua (p. ej., pastas).
La leche y los alimentos que produ-
Use una cacerola alta.
cen mucha espuma se derramarán
por hervor.
La leche se pegará. Enjuague la olla con agua fría antes de llenarla.
Al freír, es posible que los alimen-
tos se peguen a la olla.
--------
Precaliente la olla y acéitela antes de agregar alimentos. No dé vuelta los ali-
mentos demasiado temprano. Los alimentos se separarán de la parte inferior
de la olla después de cocinarlos durante un período breve.
54

AutoChef™
NJO MPX NFE NBY
"VUP
$IFG
,FFQ
8BSN
1SPHSBNT
1PXFS
4UBSU
"VUP
$IFG
,FFQ
8BSN
1SPHSBNT
NBYNJO MPX NFE
1PXFS
4UBSU
Cuando utiliza AutoChef™ para operar el elemento de
calentamiento, un sensor controla la temperatura de la
olla.
Ventajas al freír
La zona de cocción sólo clienta cuando es necesario. De
este modo se ahorra energía. El aceite y la grasa no se
sobrecalientan.
9 ATENCION
▯ Nunca deje aceite ni grasa cocinándose sin
supervisión.
▯ Coloque la olla en el centro del elemento.
Asegúrese de que la base de la olla tenga el
diámetro adecuado.
▯ No cubra la olla con una tapa. La regulación
automática no funcionará. Se puede utilizar una
protección de malla contra salpicaduras sin
afectar la regulación automática.
▯ Únicamente utilice grasa o aceite aptos para freír.
Cuando utilice mantequilla, margarina, aceite de
oliva o manteca de cerdo, seleccione el valor de
temperatura min.
▯ AutoChef™ no es apto para hervir.
Ollas del sistema para AutoChef™
Para freír con AutoChef™, utilice únicamente la olla del
sistema. De lo contrario, el controlador no funcionará en
forma adecuada y puede causar calentamiento excesivo
en sus ollas.
Usted puede utilizar el formulario de pedidos adjunto
para solicitar una olla del sistema gratuita.
También puede adquirir la olla del sistema en tiendas
especializadas:
HEZ390230
Los niveles de fritura que se proporcionan a
continuación están diseñados para nuestras ollas del
sistema.
Niveles de fritura
Nivel Temperatura Ideal para
max alta Bistecs a punto, papas hervidas fritas
med media - alta Chuleta de ternera, carne molida, rebanadas finas de carne, verduras
low baja - media Alimentos gruesos fritos en olla, como chuleta de cerdo, pechuga de pollo, ham-
burguesa, pancakes
min baja Omelette tostada francesa, croquetas de papa, alimentos fritos en mantequilla o
aceite de oliva
Programar la función AutoChef™
Seleccione el nivel de fritura adecuado del cuadro.
Coloque la freidora del sistema en el centro del
elemento de calentamiento. La placa debe estar
encendida.
1.
Pulse AutoChef™. El símbolo ‘ se enciende en la pantalla del elemento. Las opciones de nivel de fritura aparecen en el menú de la pantalla.
2.
Seleccione el nivel de fritura deseado utilizando las teclas numéricas que aparecen en el menú de la pantalla.
AutoChef™ está activado.
El elemento de calentamiento en el centro se
enciende en forma automática. El símbolo de
temperatura
ª aparece hasta que se alcance la
temperatura de fritura. Luego, se escucha un bip. El
símbolo de temperatura
ª desaparece.
3.
Agregue el aceite para freír a la olla y, luego, agregue los ingredientes. Dé vuelta los alimentos como lo hace habitualmente para que no se quemen.
55

Apagar la función AutoChef ™
Seleccione 0 de las teclas numéricas. Se apagará el
elemento de calentamiento y aparecerá el indicador de
calor residual.
Cuadro de frituras AutoChef™
El siguiente cuadro detalla qué nivel de fritura es ideal
para determinados alimentos. El tiempo de fritura puede
depender del tipo, del peso y de la calidad del producto
alimenticio.
Los niveles de fritura proporcionados están diseñados
para la olla del sistema. Los niveles de fritura pueden
variar al utilizar otras sartenes.
Carne Chuleta de cerdo, sin hueso o con hueso (1 pulg. de grosor)
Chuleta de ternera empanizada (5/8 pulg. de grosor)
Filete (1 pulg. de grosor)
Cordon bleu
Bistecs de carne de res a punto (
Bistecs de carne de res término medio o bien cocidos (
grosor)
Pechuga de pollo (1 pulg. de grosor)
Pollo frito en sartén
Salchichas, p. ej. hot dogs (ø
Hamburguesa
Rebanadas delgadas de carne
Carne molida
Tocino
Pescado Pescado, frito (entero)
Filete de pescado empanizado o sin empanizar
Camarones
Platos con
huevo
Papas Papas hervidas fritas
Verduras Ajo/cebollas
Productos
congelados
* Coloque en una olla fría
cf freído continuo
Pancakes
Omelettes
Huevos fritos
Huevos revueltos
Tostada francesa
Papas crudas fritas
Croquetas de papa
Calabaza, berenjena
Hongos
Verduras salteadas
Nuggets de pollo, medallones de pollo
Cordon bleu
Pechuga de pollo
Filete de pescado empanizado
Bastoncitos de pescado
Papas fritas al horno
Verduras salteadas
Arrolladitos/arrollados primavera (
_ pulg. de grosor)
_ pulg. de
^ - 1X pulg.)
_-1] pulg. de grosor)
Nivel de fritura
low
med
med
low
max
med
min
min
low
low
med
med
min
low
low/med
med
low
min
min
min
min
max
low
min
min
low
med
med
med
min
low
low
med
max
min
low
Tiempo total de
fritura desde la
señal
10 a 17 min
6 a 10 min
6 a 10 min
15 a 20 min
8 a 10 min
8 a 12 min
20 a 30 min
25 a 35 min
8 a 20 min
6 a 12 min
7 a 12 min
6 a 10 min
5 a 8 min
15 a 25 min
10 a 20 min
4 a 8 min
cf
cf
2 a 6 min
2 a 4 min
cf
6 a 12 min
15 a 25 min
20 a 30 min
2 a 10 min
4 a 12 min
10 a 15 min
10 a 12 min
8 a 15 min
10 a 30 min
10 a 30 min
10 a 20 min
8 a 12 min
4 a 6 min
8 a 15 min
10 a 30 min
56

Comidas
preelaboradas
Productos a base de papa, p. ej., papas fritas
Productos a base de papa, p. ej., croquetas
Pastas (con agua agregada)
Varios Camembert horneado/queso horneado
Almendras, nueces, piñones tostados*
* Coloque en una olla fría
cf freído continuo
Nivel de fritura
low
min
min
low
min
Tiempo total de
fritura desde la
señal
10 a 15 min
10 a 20 min
4 a 6 min
7 a 10 min
3 a 7 min
Programas para freír
Use los programas para freír con una freidora del
sistema únicamente.
Puede usar los programas para freír para preparar los
siguientes platos:
Programa Plato
˜‚
˜ƒ
˜„
˜…
˜†
˜‡
˜ˆ
˜‰
˜Š
Carne molida
Hamburguesa, chuleta de cerdo
Bistec a punto
Bistec término medio o bien cocido
Prescado
Pancakes, tostada francesa
Papas fritas para horno congeladas
Verduras salteadas
Omelette, huevos
Seleccionar el valor del programa para freír
Seleccione el elemento de calentamiento con el sensor
para freír.
1.
Presione le símbolo de Programs (Programas). El
símbolo
2.
Seleccione el valor del programa para freír deseado
˜‹ aparece en la pantalla.
con las teclas numéricas.
El valor del programa para freír se activa.
El símbolo de temperatura
ª aparece en forma
alternada con el número de programa hasta que se
alcanza la temperatura de fritura. Luego, se escucha
un bip. El símbolo de temperatura
ª desaparece.
Apagar el valor del programa para freír
Seleccione 0 con las teclas numéricas. El elemento de
calentamiento se apaga, y el indicador de calor residual
aparece.
Tiempo de cocción
Usted puede utilizar la función Timer para programar un
tiempo de cocción para cualquier elemento. El elemento
se apagará en forma automática una vez que haya
transcurrido el tiempo programado.
9 ATENCION
▯ Al utilizar el temporizador, siempre supervise la
placa y no permita que nada se derrame por
hervor ni se queme. Los derrames por hervor
pueden provocar humo, y algunos alimentos y
aceites pueden prenderse fuego si quedan con
valores de alta temperatura.
▯ Esta función no debe utilizarse durante períodos
prolongados, especialmente con valores de alto
calor.
▯ Asegúrese de que la placa esté apagada con el
interruptor de alimentación eléctrica principal
después de cada uso.
Programar el tiempo de cocción
1.
Seleccione el elemento y el nivel de potencia deseados.
2.
Pulse la tecla Timer dos veces. Se enciende el
indicador para el elemento deseado. Aparecen
min y
‹‹ se enciende en la pantalla del temporizador.
r y
1PXFS
4UBSU
"VUP
$IFG
1SPHSBNT
,FFQ
8BSN
1PXFS
4UBSU
"VUP
$IFG
1SPHSBNT
3.
Coloque grasa para freír y luego el alimento en la freidora. Dé vuelta el alimento como lo hace habitualmente para que no se queme.
,FFQ
8BSN
0O0GG
$MFBO-PDL
$IJME-PDL
5JNFS
[
1PXFS
"VUP
NJO
4UBSU
1SPHSBNT
$IFG
,FFQ
8BSN
57

3.
0O0GG
5JNFS
"VUP
$IFG
,FFQ
8BSN
1SPHSBNT
NJO
$MFBO-PDL
$IJME-PDL
1PXFS
4UBSU
En el término de los 10 segundos siguientes, programe el tiempo requerido utilizando las teclas numéricas.
El temporizador comienza la cuenta regresiva.
El elemento debe estar seleccionado, a fin de mostrar la
cuenta regresiva para el elemento de calentamiento
específico.
Una vez transcurrido el tiempo de cocción
El elemento se apaga una vez que haya transcurrido el
tiempo de cocción programado. Usted escuchará un bip.
El indicador
‹ aparece en la pantalla del elemento. ‹‹
se enciende durante 10 segundos en la pantalla del
temporizador. Los indicadores desaparecen y el sonido
del bip se detiene.
Cambiar el tiempo de cocción
Seleccione el elemento y pulse la tecla Timer dos veces.
Programe el nuevo tiempo de cocción utilizando las
teclas numéricas 0 a 9.
Cancelar el tiempo de cocción
Seleccione el elemento deseado y pulse el símbolo
Timer dos veces. Se encienden los indicadores min, __ y
r. Luego, seleccione 0 de las teclas numéricas hasta
que se muestre
Función Timer con AutoChef™
Cuando cocina utilizando AutoChef™, la cuenta
regresiva del tiempo de cocción programado comienza
una vez que el elemento seleccionado alcance la
temperatura programada.
Notas
▯ Usted puede programar un tiempo de cocción de
hasta 99 minutos.
▯ Para programar un tiempo de cocción de menos de
10 minutos, siempre seleccione 0 primero antes de
seleccionar el valor requerido.
▯ Después de un corte de suministro eléctrico, se
cancelará la función del temporizador.
Temporizador automático
Con esta función, se puede seleccionar un tiempo de
cocción para todos los elementos. Una vez que un
elemento esté encendido, comenzará la cuenta regresiva
del tiempo seleccionado. El elemento se apagará
automáticamente una vez que haya transcurrido el
tiempo de cocción.
‹‹.
Las instrucciones sobre cómo activar el temporizador
automático se encuentran en el capítulo “Valores
básicos”.
Nota: El tiempo de cocción puede cambiarse o cancelarse para cualquier elemento:
Pulse la tecla Timer varias veces hasta que se encienda
el indicador
$ del elemento requerido. Ajuste el tiempo
de cocción con las teclas táctiles 1 a 9 o desactive
con 0.
Temporizador de cocina
El temporizador puede programarse por períodos de
hasta 99 minutos. Es independiente de los otros valores.
También puede utilizar el temporizador de cocina
cuando la placa esté apagada o bloqueada.
Esta función no apaga automáticamente un elemento.
Programar el tiempo
1.
Pulse la tecla Timer. ‹‹ aparece en la pantalla del
temporizador. Se encienden los indicadores __, min y
V.
2.
Programe el tiempo requerido utilizando las teclas numéricas 0 a 9.
Después de algunos segundos, se apaga el indicador
__ y comienza la cuenta regresiva del tiempo
programado.
Una vez transcurrido el tiempo de cocción
El elemento se apaga una vez que haya transcurrido el
tiempo de cocción programado. Usted escuchará un bip.
El indicador
‹ ‹ aparece en la pantalla del elemento. V
se enciende durante 10 segundos en la pantalla del
temporizador. Los indicadores desaparecen y el sonido
del bip se detiene.
Cambiar la hora Pulse la tecla Timer. Se encienden los indicadores __ y
V. Cambie la hora utilizando las teclas numéricas 0 a 9.
Borrar el tiempo Pulse la tecla Timer. Se encienden los indicadores __ y
U. Pulse la tecla 0 hasta que ‹‹ aparezca en la pantalla
del temporizador. Desaparece el indicador
U.
Función Keep Warm
La función Keep Warm es útil para derretir chocolate o
mantequilla y para mantener los alimentos calientes.
AVISO: Nunca apoye ningún plato ni recipiente de plástico sobre las superficies de la función Keep Warm; se derretirán.
Encender la función Keep Warm
1.
Pulse el símbolo $ para el elemento de calentamiento deseado.
2.
Pulse la tecla Keep Warm. El símbolo – aparecerá en la pantalla. La función Keep Warm ahora está encendida.
58

Apagar la función Keep Warm
Seleccione el elemento de calentamiento y seleccione la
tecla numérica 0. Aparecerá el símbolo
Se apagará el elemento de calentamiento.
Nota: Mientras se encuentre encendida la función Keep Warm, no se puede activar la función PowerStart™.
‹ en la pantalla.
Apagar el bloqueo para niños
Pulse el botón Clean Lock/Child Lock durante 4
segundos. Se cancela ahora el bloqueo de panel de
seguridad.
9 ATENCION
Bloqueo para niños
Puede usar el bloqueo para niños, a fin de evitar que
estos enciendan la placa de manera accidental.
Encender el bloqueo para niños
La placa debe estar apagada.
Pulse el botón Clean Lock/Child Lock durante
4 segundos. Se enciende el indicador
4 segundos. Ahora, la placa está bloqueada.
D durante
El bloqueo para niños puede encenderse y
apagarse de manera accidental debido a que:
▯ Se haya volcado agua durante la limpieza.
▯ Se hayan derramado alimentos.
▯ Se hayan colocado objetos en el botón digital
Clean Lock/Child Lock .
Bloqueo de panel de seguridad para niños automático
Esta función activa el bloqueo de panel de seguridad
para niños automáticamente cuanda apaga la placa..
Activar y desactivar
Consulte la sección “Ajustes básicos”.
Clean Lock
Limpiar el panel de control mientras la placa está
encendida puede cambiar los valores.
Para evitar esto, la placa cuenta con la función Clean
Lock. Pulse el botón Clean Lock/Child Lock. Aparece el
indicador
aproximadamente, 35 segundos. En ese momento,
puede limpiar la superficie del panel de control sin el
riesgo de modificar los valores.
Después de que haya transcurrido el tiempo, se
escuchará un bip. Se desactiva el bloqueo de limpieza.
La función Clean Lock no afecta al interruptor principal.
Puede apagar la placa en cualquier momento.
>. El panel de control se bloquea durante,
Valores básicos
El electrodoméstico tiene diversos valores básicos.
Puede ajustar estos valores según el modo en el que
cocina habitualmente.
Pantalla Función
™‚
™ƒ
™†
™‡
*valores de fábrica
Bloqueo para niños automático
‹ Apagado*
‚ Encendido
Señales audibles
‹ Bip de confirmación y señal de error apagados
‚ Solo señal de error encendida
ƒ Todas las señales encendidas*
Temporizador automático
‹ Apagado*
‚-ŠŠ Tiempo de apagado automático
Duración de la señal de finalización del temporizador
‚ 10 segundos*
ƒ 30 segundos
„ 1 minuto
59

Pantalla Función
NJO
0O0GG
5JNFS
1PXFS "VUP
$IFG
,FFQ
8BSN
1SPHSBNT
$MFBO-PDL
$IJME-PDL
4UBSU
™ˆ
Activación del elemento de calentamiento
‹ Apagado
‚ Encendido*.
ƒ Último valor antes de apagar el elemento de calentamiento
™Š
Tiempo de selección para el elemento de calentamiento
‹ Ilimitado*: Puede ajustar los valores del último elemento de calentamiento utilizado en cualquier
momento, sin tener que seleccionarlo nuevamente.
‚ Restringido: Puede ajustar los valores para el último elemento de calentamiento utilizado en el tér-
mino de los 10 segundos después de seleccionarlo. Luego, tendrá que seleccionar el elemento de
calentamiento nuevamente antes de programarlo.
™‹
Reprogramar a los valores de fábrica
‹ Apagado*
‚ Reprograme el electrodoméstico a los valores de fábrica
*valores de fábrica
Modificar los valores básicos
Se debe apagar la placa.
1.
Encienda la placa con el interruptor principal.
2.
En el término de los 10 segundos siguientes, pulse la tecla Timerdurante 4 segundos.
En forma alternativa aparece el símbolo
pantalla izquierda y
‹ en la pantalla derecha.
™‚ en la
Limpieza y mantenimiento
3.
Pulse la tecla Timer hasta que el indicador deseado aparezca en la pantalla izquierda.
4.
Seleccione el valor requerido utilizando las teclas numéricas.
"VUP
1PXFS
4UBSU
$IFG
0O0GG
$MFBO-PDL
$IJME-PDL
5JNFS
NJO
5.
Pulse la tecla Timer nuevamente durante 4 segundos.
1SPHSBNT
,FFQ
8BSN
El valor se activa.
Salir de los ajustes básicos
Apague la placa de cocción con el interruptor principal.
Limpieza diaria
Nota: Los productos de limpieza recomendados hacen
referencia a un tipo de limpiador y no significan que sea
obligatorio utilizar una marca específica.
Placa de cocción vitrocerámica
9 ATENCION
No aplique ningún producto de limpieza sobre el
cristal mientras esté caliente. Utilice únicamente la
cuchilla limpiacristales. Los humos que se
generarían pueden ser peligrosos para la salud.
Además, el producto de limpieza caliente puede
agredir y dañar la superficie.
60
Limpie la superficie cuando se haya enfriado
completamente, salvo para la siguiente excepción: limpie
el azúcar caramelizado, el sirope de azúcar, las salsas
de tomate y la leche inmediatamente utilizando la
cuchilla limpiacristales (véase la tabla de cuidados
especiales).
Limpie las salpicaduras con una esponja húmeda limpia
o papel de cocina. Lave y seque. Si la mancha persiste,
utilice vinagre blanco; lave.
Aplique una pequeña cantidad de limpiador para placas
de vitrocerámica. Una vez seco, frote la superficie con un
paño o papel de cocina limpio.

Molduras laterales de acero inoxidable
Use una fibra cuando haga la limpieza. Para suciedad
moderada o abundante, usar un limpiador en polvo tal
como BonAmi® o Soft Scrub® (sin cloro).
Limpiar usandouna esponja húmeda o un trapo,
enjuagar y secar.
Pautas de limpieza
Utilice únicamente pequeñas cantidades de producto de
limpieza; aplíquelo sobre una toallita de papel o un paño
limpios. Frote la superficie y luego púlala con una toallita
de papel seca.
Para obtener los mejores resultados, utilice limpiadores
para placas de vitrocerámica, como por ejemplo
BonAmi® o Soft Scrub® (sin lejía), y vinagre blanco.
Evite estos productos de limpieza
▯ Limpiacristales que contengan amoniaco o lejía de
cloro. Estos ingredientes pueden provocar daños o
manchas irreparables en la placa de cocción.
▯ Limpiadores cáusticos. Productos como Easy Off®
pueden manchar la superficie de la placa de cocción.
▯ Limpiadores abrasivos.
▯ Los estropajos metálicos y los estropajos abrasivos,
como por ejemplo Scotch Brite®, pueden provocar
arañazos y/o dejar marcas metálicas.
▯ Los estropajos con detergente integrado, como
SOS®, pueden rayar la superficie.
▯ Los limpiadores en polvo con lejía de cloro pueden
provocar manchas irreparables en la placa de
cocción.
▯ Limpiadores inflamables, como el líquido de mecheros
o WD-40.
Tablas de limpieza
Tipo de suciedad Posible solución
Azúcar caramelizado, sirope de azúcar, leche o salsas
de tomate. Películas o láminas de plástico fundidas.
Este tipo de suciedades DEBEN LIMPIARSE INMEDIATAMENTE. Si no se limpian inmediatamente, podrían provocar daños permanentes en la superficie.
Limpie este tipo de manchas mientras la superficie todavía esté caliente utilizando la cuchilla limpiacristales. Utilice una cuchilla nueva. Extraiga la sartén y apague el
aparato. Póngase una manopla y sujete la cuchilla en un
ángulo de 30° teniendo cuidado de no rayar o arañar el
cristal. Empuje la suciedad hacia fuera del área térmica.
Cuando la superficie esté fría, limpie los restos de suciedad y aplique un limpiador para placas de vitrocerámica..
9 AVISO
PELIGRO DE LESIONES
La cuchilla está muy afilada. Peligro de daños por
cortes. Proteger la cuchilla cuando no se esté utilizando. Reemplazar inmediatamente la cuchilla
cuando presente desperfectos.
Restos de comida pegados, rayas oscuras y manchas Coloque una toallita de papel o una esponja húmedas
encima de la mancha durante 30 minutos para ablandarla. Utilice un rascador de plástico y limpiador para
placas de vitrocerámica o utilice la cuchilla limpiacristales. Lave y seque.
Salpicaduras grasientas Limpie la grasa con un paño o una esponja con deter-
gente; Lave completamente y seque. Aplique limpiador
para placas de vitrocerámica.
Marcas de metal: manchas iridiscentes Es posible que las sartenes con bases de aluminio,
cobre o acero inoxidable dejen marcas. Trátelas inmediatamente con limpiador para placas de vitrocerámica
cuando la superficie esté fría. Si las marcas no desaparecen, intente utilizar un limpiador abrasivo débil (Bon
Ami®,Soft Scrub® sin lejía) y una toallita de papel
húmeda. Lave y vuelva a aplicar limpiador para placas
de vitrocerámica. Si las marcas metálicas no se limpian
antes de volver a calentar la placa, se volverán muy difíciles de quitar.
61

Tipo de suciedad Posible solución
Manchas profundas de agua:
Derrames de líquidos de cocción calientes sobre la superficie
Arañazos en la superficie:
Los arañazos pequeños son normales y no afectan a la
cocción. El uso diario de un limpiador para placas de vitrocerámica puede suavizarlos y volverlos menos visibles.
Los minerales de algunas aguas pueden penetrar en la
superficie y provocar manchas Utilice vinagre blanco sin
diluir, lave y seque. Vuelva a tratar con limpiador para
placas de vitrocerámica. Limpie los derrames y las manchas antes de volver a utilizar la placa de cocción.
Aplique limpiador para placas de vitrocerámica antes de
utilizar la placa para quitar los granitos y las motas, por
ejemplo de sal y otros condimentos. Para reducir los arañazos, utilice sartenes con una base suave, limpia y
totalmente seca. Utilice el limpiador para placas de vitrocerámica recomendado de manera diaria.
AVISO : : Los anillos de diamante pueden rayar la superficie.
Mantenimiento
Este aparato no requiere más mantenimiento que la
limpieza diaria. Para obtener los mejores resultados,
aplique limpiador para placas de vitrocerámica a diario.
Servicio técnico
Resolución de problemas
Si encuentra un problema, suele ser solo algo menor.
Antes de llamar al servicio a clientes, tenga en cuenta
las sugerencias y las instrucciones que aparecen a
continuación:
Falla Causa Acción
La placa no funciona Se ha interrumpido la alimentación
eléctrica.
El electrodoméstico no se ha
conectado correctamente, de
acuerdo con el diagrama de
conexiones.
Mal funcionamiento del sistema
electrónico.
“titila en la pantalla del
elemento de calentamiento
“ titila en todas las
pantallas de los elementos de calentamiento, y se escucha
una señal acústica
La placa se apagó sola Se presionó accidentalmente el
La zona de control táctil está muy
sucia, se han derramado alimentos
por hervor, o hay un objeto apoyado sobre la zona de valores de
control.
El interruptor principal se utilizó en
forma continua durante más de
cinco segundos.
interruptor principal.
9 ATENCION
Las reparaciones solo deben ser realizadas por un
técnico capacitado.
Si su electrodoméstico es reparado en forma
incorrecta, esto puede causar un riesgo de lesiones
físicas graves o de muerte.
Use otros electrodomésticos para verificar si se ha
producido un corte de alimentación eléctrica. Verifique
si hay un problema con el disyuntor de la instalación
eléctrica.
Asegúrese de que el electrodoméstico se haya conectado correctamente.
Comuníquese con el servicio de asistencia técnica.
Limpie bien la zona de control táctil o retire el objeto
que está apoyado en la zona si es eso lo que podría
estar causando el problema. Pulse la zona de control
táctil que parece ser parte del problema. La indicación
deja de titlar.
Limpie bien la zona de control táctil y retire cualquier
objeto que pueda estar pegado a la zona.
Vuelva a encender la unidad. Ingrese sus valores nuevamente.
62

Pantalla
“ y números
Se ha producido una falla eléctrica. Use el disyuntor del edificio o los diyuntores de su
caja de disyuntores para apagar la unidad y luego volver a encenderla. Si vuelve a aparecer la misma pantalla, llame a servicio a clientes.
Pantalla
” y números
Su unidad ha detectado una falla. La siguiente tabla de fallas enumera las medidas que
puede tomar para corregir el problema.
Mensajes de error
Pantalla Falla Medida
”ƒ
El elemento de calentamiento está
demasiado caliente y se apagó.
Retire cualquier utensilio de cocina de los elementos
de calentamiento.
talla presionando la zona de control táctil, y cuando el
elemento de calentamiento se ha enfriado lo suficiente. Espere algunos minutos hasta que el elemento
de calentamiento se haya enfriado un poco. Si todavía
aparece
calentamiento, el elemento todavía está demasiado
caliente. Apague el elemento de calentamiento y
déjelo enfriar aún más.
”…
Los utensilios de cocina se encuentran demasiado cerca de la zona
de control táctil.
Asegúrese de que sus utensilios de cocina estén colocados correctamente sobre el elemento de calentamiento. Asegúrese de que ningún objeto caliente esté
en contacto con la zona de control táctil. Retire el
objeto de la zona de control táctil. Espere algunos
minutos hasta que la zona de control táctil se haya
enfriado. Si aparece
dad, llame a servicio a clientes.
”ˆ
AutoChef™ tiene un desperfecto. Confirme y cierre el mensaje de error pulsando cual-
quier área de la zona de control táctil. Usted puede
cocinar sin AutoChef™. Comuníquese con el servicio
de asistencia técnica.
”‰
El elemento de calentamiento se
utilizó en forma continua demasiado tiempo.
Se ha activado el tiempo límite automático. Pulse cualquier símbolo. Ahora puede encender el elemento de
calentamiento de inmediato.
”ƒ desaparece si confirma la pan-
”ƒ después de encender el elemento de
”… después de encender la uni-
Notas
▯ La placa regula la temperatura del elemento de
calentamiento encendiendo y apagando la fuente de
calor; este significa que la fuente de calor debajo del
elemento de calentamiento, que libera un brillo rojizo,
no siempre puede estar visible. Si selecciona un valor
de calor bajo, la fuente de calor generalmente está
apagada; a valores más altos, rara vez está apagada.
La fuente se enciende y se apaga incluso al valor más
alto.
▯ Es posible que escuche un ligero zubido cuando los
elementos de calentamiento se encuentren en la fase
de calentamiento. Los elementos de calentamiento
pueden brillar con diferentes niveles de intensidad.
Según el ángulo desde donde esté observando el
elemento de calentamiento, este brillo puede ser
visible sobre el borde marcado del elemento de
calentamiento. Estas son características técnicas. No
tienen efecto alguno sobre la calidad ni el
funcionamiento del electrodoméstico.
▯ Es posible que la vitrocerámica presente áreas
desparejas en la superficie debido a la naturaleza del
mismo material. Debido al acabado espejado de la
superificie de cocción, es posible que hasta las
burbujas más pequeñas, de menos de 1 mm de
diámetro, sean visibles. Estas burbujas no tienen
efecto adverso alguno sobre al operación de la placa
ni la durabilidad de la superficie de cocción de
vitrocerámica.
▯ Según la superficie de trabajo que haya en la cocina,
puede haber una separación asimétrica entre la
unidad de la placa y la superficie de trabajo. Por est
motivo, toda la unidad de la placa tiene a su alrededor
un sello flexible.
63

Servicio técnico
0DLQ6WUHHW6XLWH
,UYLQH&$
ZZZERVFKKRPHFRP
Si necesita reparar el electrodoméstico, llame a nuestro
departamento de Servicio Técnico. Nuestro Centro de
Servicio al Cliente principal (ver a continuación) también
se complacerá en brindarle la información sobre un
centro cercano a su domicilio.
Número de producto (E) y número de fabricación (FD)
Cuando llame a nuestro servicio al cliente, tenga a la
mano el número de producto (E) y el número de serie
(FD) de su electrodoméstico. Puede encontrar la placa
de identificación con estos números en la parte inferior
del electrodoméstico.
¿Preguntas? Comuníquese con nosotros. ¡Esperamos
tener noticias suyas pronto!
DECLARACIÓN DE GARANTÍA LIMITADA DEL PRODUCTO
Cobertura de esta garantía y a quiénes se aplica
La garantía limitada otorgada por BSH Home Appliances
Bosch en esta Declaración de Garantía Limitada del
Producto se aplica únicamente al electrodoméstico
Bosch NEM3064UC, NEM3664UC, NET5054UC,
NET5654UC, NET8054UC, NET8654UC vendido a
usted, el primer comprador usuario, siempre que el
Producto haya sido comprado:
▯ Para uso doméstico (no comercial) normal y haya sido
utilizado en todo momento únicamente para fines
domésticos normales.
▯ Nuevo en una tienda minorista (que no sea un
producto de exhibición, ni un producto vendido "en las
condiciones en que se encuentra" ni un modelo
devuelto anteriormente) y no esté destinado para
reventa ni uso comercial.
▯ Dentro de los Estados Unidos o Canadá, y
permanezca en todo momento dentro del país de
compra original.
Las garantías incluidas en el presente se aplican
únicamente al primer comprador del Producto y no son
transferibles.
Bosch se reserva el derecho de exigir un comprobante
de la compra al momento de presentar una reclamación
de garantía para verificar que el Producto esté cubierto
por esta garantía de producto limitada.
Asegúrese de devolver su tarjeta de registro; si bien no
es necesario para hacer efectiva la cobertura de la
garantía, es la mejor manera para que Bosch le notifique
en el caso poco probable de que se emita un aviso de
seguridad o se retire del mercado un producto.
Duración de la garantía
BSH garantiza que el Producto estará libre de defectos
en los materiales y en la mano de obra por un período
de trescientos sesenta y cinqo (365) días a partir de la
fecha de compra. El período precedente comienza a
regir a partir de la fecha de compra y no se interrumpirá,
dejará sin efecto, extenderá ni suspenderá por ningún
motivo.
64
Reparación/reemplazo como único recurso
Durante el período de esta garantía, BSH o uno de sus
proveedores de servicio técnico autorizados reparará su
Producto sin cargo para usted (con sujeción a
determinadas limitaciones especificadas en el presente)
si se prueba que su Producto ha sido fabricado con un
defecto en los materiales o en la mano de obra. Si se ha
intentado de manera razonable reparar el Producto sin
éxito, BSH reemplazará su Producto (es posible que
usted tenga disponibles modelos mejorados, a entera
discreción de BSH, por un cargo adicional). Todas las
piezas y los componentes extraídos serán propiedad de
BSH, a su entera discreción. Todas las piezas
reemplazadas y/o reparadas se considerarán como la
pieza original a los fines de esta garantía, y esta
garantía no se extenderá con respecto a dichas piezas.
En virtud del presente, la única y exclusiva
responsabilidad y obligación de BSH es únicamente
reparar el Producto defectuoso de fábrica, a través de
un proveedor de servicio técnico autorizado por BSH
durante el horario normal de oficina. Por cuestiones de
seguridad y daños materiales, BSH recomienda
categóricamente que no intente reparar el Producto
usted mismo ni use un centro de servicio técnico no
autorizado; BSH no tendrá responsabilidad ni obligación
alguna por las reparaciones o trabajos realizados por un
centro de servicio técnico no autorizado. Si usted
prefiere que una persona que no es un proveedor de
servicio técnico autorizado trabaje en su Producto,
ESTA GARANTÍA SE ANULARÁ AUTOMÁTICAMENTE.
Los proveedores de servicio técnico autorizados son
aquellas personas o compañías que han sido
especialmente capacitadas para manejar los productos
de BSH y que tienen, según el criterio de BSH, una
reputación superior de servicio al cliente y capacidad
técnica (debe tener en cuenta que son entidades
independientes y no son agentes, socios, afiliados ni
representantes de BSH). Sin perjuicio de lo que
antecede, BSH no tendrá responsabilidad ni obligación
alguna por el Producto que se encuentre en un área
remota (a más de 100 millas de un proveedor de
servicio técnico autorizado) o en un lugar, área

circundante o entorno que no sea accesible por medios
razonables o que sea peligroso, hostil o arriesgado; en
cualquier caso, a su solicitud, BSH de todas maneras
pagará por la mano de obra y las piezas, y enviará las
piezas al proveedor de servicio técnico autorizado más
cercano, pero usted seguirá siendo totalmente
responsable por el tiempo de viaje y demás cargos
especiales de la compañía de servicio técnico,
suponiendo que acepte hacer la visita de servicio
técnico.
Producto fuera de garantía
BSH no tiene obligación alguna, en virtud de la ley o por
otro motivo, de otorgarle ninguna concesión, incluidos
reparaciones, prorrateos o reemplazo del Producto, con
posterioridad al vencimiento de la garantía.
Exclusiones de la garantía
La cobertura de garantía descrita en el presente excluye
todos los defectos o daños que no fueron provocados
directamente por BSH, incluidos, entre otros, alguno de
los siguientes:
▯ Uso del Producto de maneras distintas del uso
normal, habitual y previsto (incluidos, entre otros,
cualquier forma de uso comercial, uso o
almacenamiento en exteriores de un producto
diseñado para interiores, uso del Producto en
aeronaves o embarcaciones).
▯ Conducta indebida, negligencia, uso indebido, abuso,
accidentes, descuido, operación inadecuada, omisión
de mantener, instalación inadecuada o negligente,
adulteración, omisión de seguir las instrucciones de
operación, manipulación inadecuada, servicio técnico
no autorizado (incluidos "arreglos" o exploración de
los mecanismos internos del electrodoméstico
realizados por uno mismo) por parte de cualquier
persona.
▯ Ajuste, alteración o modificación de cualquier tipo.
▯ Incumplimiento de los códigos, reglamentaciones o
leyes de electricidad, plomería y/o construcción
locales, municipales o de condado, incluida la omisión
de instalar el producto cumpliendo estrictamente con
los códigos y reglamentaciones locales de
construcción y protección contra incendios.
▯ Desgaste habitual, derrames de alimentos, líquidos,
acumulaciones de grasa u otras sustancias que se
acumulen sobre, dentro o alrededor del Producto.
▯ Y cualquier fuerza y factor externo, elemental y/o
ambiental, incluidos, entre otros, lluvia, viento, arena,
inundaciones, incendios, aludes de lodo, temperaturas
bajas extremas, humedad excesiva o exposición
prolongada a la humedad, rayos, sobrecargas
eléctricas, fallas estructurales alrededor del
electrodoméstico y caso fortuito.
En ningún caso, BSH tendrá responsabilidad ni
obligación alguna por los daños ocasionados a los
bienes circundantes, incluidos los gabinetes, pisos,
techos y demás estructuras u objetos que se
encuentren alrededor del producto. También se excluyen
de esta garantía las rayas, hendiduras, abolladuras
menores y daños estéticos en superficies externas y
piezas expuestas; productos en los cuales los números
de serie hayan sido alterados, modificados o
eliminados; visitas del servicio técnico para enseñarle a
usar el Producto o visitas en las que se determine que
no hay ningún problema con el Producto; corrección de
los problemas de instalación (usted es el único
responsable de cualquier estructura y soporte del
Producto, incluidas las instalaciones de electricidad y
plomería o demás instalaciones de conexión, de la
correcta instalación en bases/pisos y de cualquier
alteración, incluidos, entre otros, gabinetes, paredes,
pisos, repisas, etc.); y el restablecimiento de disyuntores
o fusibles.
EN LA MEDIDA PERMITIDA POR LA LEY, ESTA
GARANTÍA ESTABLECE SUS RECURSOS EXCLUSIVOS
CON RESPECTO AL PRODUCTO,
INDEPENDIENTEMENTE DE QUE LA RECLAMACIÓN
SEA CONTRACTUAL O EXTRACONTRACTUAL
(INCLUIDA LA RESPONSABILIDAD OBJETIVA O LA
NEGLIGENCIA), O DE CUALQUIER OTRO MODO.
ESTA GARANTÍA REEMPLAZA TODAS LAS DEMÁS
GARANTÍAS EXPRESAS O IMPLÍCITAS. LAS
GARANTÍAS IMPLÍCITAS POR LEY, YA SEA DE
COMERCIABILIDAD O APTITUD PARA UN FIN
ESPECÍFICO, O DE CUALQUIER OTRO TIPO, TENDRÁN
VIGENCIA ÚNICAMENTE POR EL PERÍODO DE
VIGENCIA DE LA PRESENTE GARANTÍA LIMITADA
EXPRESA. EN NINGÚN CASO, EL FABRICANTE SERÁ
RESPONSABLE POR LOS DAÑOS CONSECUENTES,
ESPECIALES, INCIDENTALES, INDIRECTOS, POR
"PÉRDIDAS COMERCIALES" Y/O DAÑOS PUNITIVOS,
PÉRDIDAS O GASTOS, INCLUIDOS, ENTRE OTROS,
TIEMPO FUERA DEL TRABAJO, HOTELES Y/O
COMIDAS EN RESTAURANTES, GASTOS DE
REMODELACIÓN QUE SUPEREN LOS DAÑOS
DIRECTOS, QUE DEFINITIVAMENTE HAYAN SIDO
CAUSADOS DE MANERA EXCLUSIVA POR BSH O DE
OTRO MODO. ALGUNOS ESTADOS NO PERMITEN LA
EXCLUSIÓN O LIMITACIÓN DE DAÑOS INCIDENTALES
O CONSECUENTES, Y ALGUNOS ESTADOS NO
PERMITEN LIMITACIONES CON RESPECTO AL PLAZO
DE VIGENCIA DE UNA GARANTÍA IMPLÍCITA; POR LO
TANTO, ES POSIBLE QUE LAS LIMITACIONES
PRECEDENTES NO SE APLIQUEN. ESTA GARANTÍA
LE OTORGA DERECHOS LEGALES ESPECÍFICOS, Y
TAMBIÉN PUEDEN CORRESPONDERLE OTROS
DERECHOS QUE PUEDEN VARIAR SEGÚN EL
ESTADO.
Ningún intento de alterar, modificar o enmendar la
presente garantía entrará en vigencia, a menos que fuera
autorizado por escrito por un ejecutivo de BSH.
Cómo obtener el servicio técnico de la garantía
Para obtener el servicio técnico de la garantía de su
producto, debe comunicarse con el centro de servicio
autorizado de Bosch más cercano.
BSH Home Appliances - 1901 Main Street, Suite 600,
Irvine, CA 92614 / 800-944-2904
65


9000358947
05/13
1901 Main Street, Suite 600 • Irvine, CA 92614 • 1-800-735-4328
www.bosch-home.com • © 2012 BSH Home Appliances
 Loading...