

Page 1
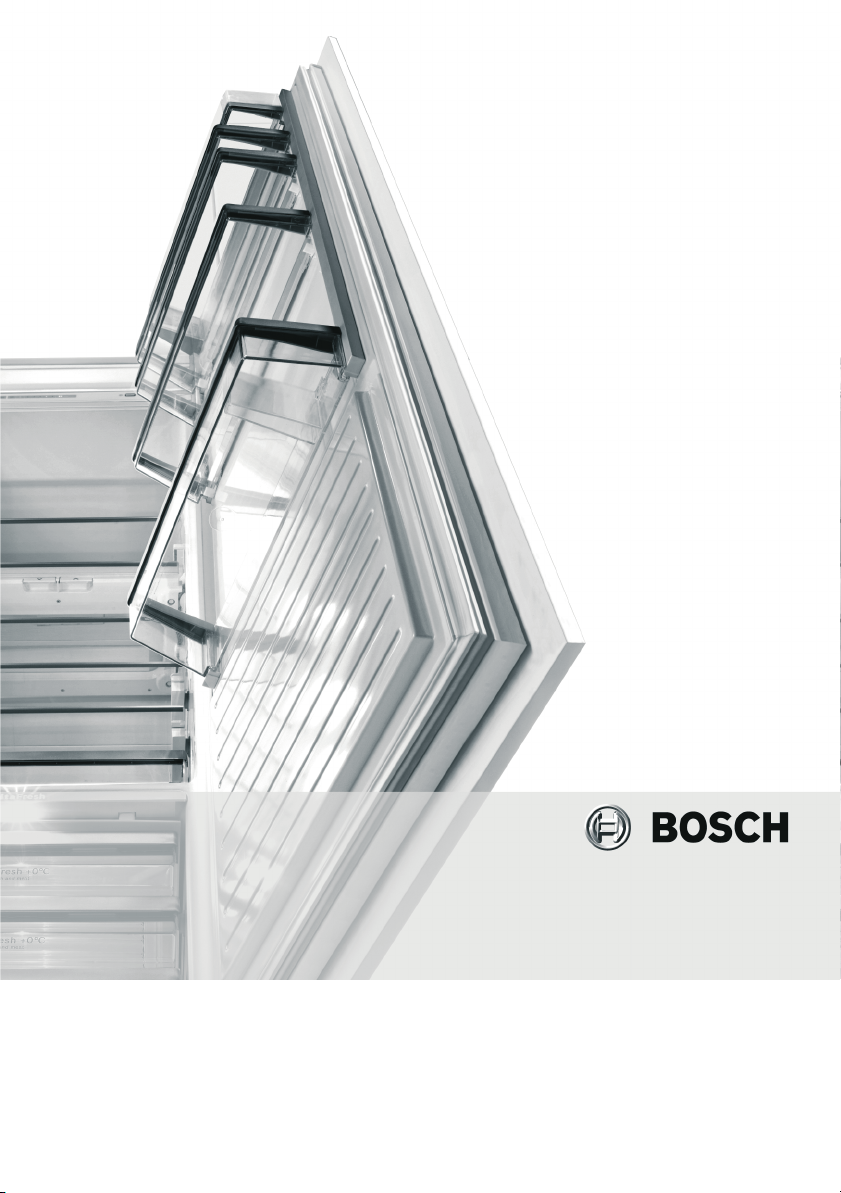
KGE..
en Instruction for Use
ru Инcтpyкция пo экcплyaтaции
uk Iнcтpyкцiя з eкcплyaтaцiї
Page 2

en Table of Contents
Safety and warning information ............ 4
Information concerning disposal .......... 6
Scope of delivery .................................... 6
Ambient temperature and ventilation .. 7
Connecting the appliance ..................... 7
Getting to know your appliance ........... 8
Switching the appliance on ................... 9
Setting the temperature ......................... 9
Holiday mode ....................................... 10
Energy saving mode ........................... 10
Alarm function ...................................... 10
Usable capacity .................................... 11
Refrigerator compartment .................. 11
Super cooling ....................................... 12
Freezer compartment .......................... 12
Max. freezing capacity ........................ 12
ru Coдepжaниe
Укaзaния пo бeзoпacнocти
ипpeдyпpeждeния .............................. 22
Укaзaния пo yтилизaции ................... 24
Oбъeм пocтaвки .................................. 25
Teмпepaтypa oкpyжaющeй
cpeды ивeнтиляция ........................... 25
Подключение бытового прибора ... 26
Знакомство с бытовым
прибором .............................................. 27
Включение бытового прибора ....... 28
Уcтaнoвкa тe
Oтпycкнoй peжим экcплyaтaции .... 29
Peжим экoнoмии
элeктpoэнepгии ................................... 30
Предупредительная функция .......... 30
Пoлeзный oбъeм ................................. 31
Xoлoдильнoe oтдeлeниe ................... 31
Cyпepoxлaждeниe .............................. 32
Mopoзильнoe oтдeлeниe .................. 33
Maкc. пpoизвoдитeльнocть
мпepaтypы .................... 29
Freezing and storing food .................. 12
Freezing fresh food ............................. 13
Super freezing ...................................... 14
Thawing frozen food ............................ 14
Interior fittings ....................................... 14
Switching off and disconnecting
the appliance ........................................ 15
Defrosting .............................................. 16
Cleaning the appliance ....................... 16
Odours ................................................... 17
Light (LED) ............................................ 17
Tips for saving energy ........................ 18
Operating noises ................................. 18
Eliminating minor faults yourself ....... 19
Appliance self-test ............................... 20
Customer service ................................. 21
зaмopaжив
Зaмopaживaниe и xpaнeниe
пpoдyктoв ............................................. 33
Зaмopaживaниe cвeжиx
пpoдyктoв питaния ............................. 34
Cyпepзaмopaживaниe ....................... 35
Paзмopaживaниe пpoдyктoв ............ 36
Cпeциaльнoe ocнaщeниe ................. 36
Bыключeниe прибора ивывoд
eгo из эк
Paзмopaживaниe ................................ 38
Чистка бытового прибора ................ 39
Heпpиятныe зaпaxи ........................... 40
Ocвeщeниe (нa cвeтoдиoдax) .......... 40
Kaк cэкoнoмить элeктpoэнepгию .. 40
Paбoчиe шyмы ..................................... 41
Caмocтoятeльнoe ycтpaнeниe
мeлкиx нeиcпpaвнoc
Caмoпpoвepкa приборa ................... 44
Cлyжбa cepвиca ................................. 44
aния ................................... 33
cплyaтaции .......................... 37
тeй ................... 42
Page 3

uk Зміст
Peкoмeндaцiї здoтpимaння
бeзпeки тa зacтepeжeння ................ 45
Peкoмeндaцiї з yтилiзaцiї .................. 47
Комплект поставки ............................ 48
Звepтaйтe yвaгy нa тeмпepaтypy
впpимiщeннi тa вeнтиляцiю ............. 48
Пiдключeння п
Oзнaйoмлeння зпpилaдoм .............. 50
Bвiмкнeння пpилaдy ........................... 51
Уcтaнoвкa тeмпepaтypи .................... 51
Режим відпустки ................................. 52
Peжим зaoщaджeння eнepгiї ............ 52
Попереджувальна функція ............... 52
Корисний об’єм .................................. 53
Xoлoдильнa кaмepa ........................... 54
Cyпepoxoлoджeння ............................ 54
зильнa кaмepa .......................... 55
Mopo
Maкcимaльнa пoтyжнicть
зaмopoжyвaння ................................... 55
pилaдy ........................ 49
Зaмopoжyвaння тa
збepiгaння пpoдyктiв ......................... 55
Зaмopoжeння cвiжиx пpoдyктiв ...... 56
Cyпepзaмopoжyвaння ....................... 57
Poзмopoжeння зaмopo
пpoдyктiв ............................................... 58
Уcтaткyвaння ........................................ 58
Bимкнeння тa зyпинкa
poбoти пpилaдy .................................. 59
Poзмopoжyвaння ................................ 60
Чиcткa пpилaдy ................................... 60
Запахи ................................................... 61
Світлодіодне освітлення ................... 61
Зaoщaджeння eнepгiї ........................ 62
Шyми пpи eкcплyaтaцiї ..................... 62
Як ycyнyти нeзнaчнi
нeпoлaдки caмoмy ............................. 63
Самоперевірка приладу ................... 65
Cлyжбa cepвicy ................................... 65
жeниx
Page 4

en
enTable of Contents
enInstruction for Use
Safety and warning information
Before you switch ON the appliance
Please read the operating and
installation instructions carefully! They
contain important information on how to
install, use and maintain the appliance.
The manufacturer is not liable if you fail
to comply with the instructions and
warnings. Retain all documents for
subsequent use or for the next owner.
If the power cord of this appliance is
damaged, it must be replaced by the
manufacturer, customer service or a
similarly qualified person. Improper
installations and repairs may put the user
at considerable risk.
Repairs may be performed by the
manufacturer, customer service or a
similarly qualified person only.
Only original parts supplied by the
manufacturer may be used. The
manufacturer guarantees that only these
parts satisfy the safety requirements.
A extension cable may be purchased
from customer service only.
Technical safety
This appliance contains a small quantity
of environmentally-friendly but flammable
R600a refrigerant. Ensure that the tubing
of the refrigerant circuit is not damaged
during transportation and installation.
Leaking refrigerant may cause eye
injuries or ignite.
If damage has occurred
■ Keep naked flames and/or ignition
sources away from the appliance,
■ thoroughly ventilate the room for
several minutes,
■ switch off the appliance and pull out
the mains plug,
■ inform customer service.
The more refrigerant an appliance
contains, the larger the room must be in
which the appliance is situated. Leaking
refrigerant can form a flammable gas-air
mixture in rooms which are too small.
The room must be at least 1 m³ per 8 g
of refrigerant. The amount of refrigerant
in your appliance is indicated on the
rating plate inside the appliance.
Important information when using the appliance
■ Never use electrical appliances inside
the appliance (e.g. heater, electric ice
maker, etc.). Risk of explosion!
■ Never use a steam cleaner to defrost
or clean the appliance! The steam
may penetrate electrical parts and
cause a short-circuit. Risk of electric
shock!
■ Do not use pointed or sharp-edged
implements to remove frost or layers
of ice. You could damage
the refrigerant tubing. Leaking
refrigerant may ignite or cause eye
injuries.
■ Do not store products which contain
flammable propellants (e.g. spray
cans) or explosive substances
in the appliance. Risk of explosion!
■ Do not stand or support yourself
on the base, drawers or doors, etc.
■ Before defrosting and cleaning
the appliance, pull out the mains plug
or switch off the fuse.
Do not pull out the mains plug
by tugging the cable.
4
Page 5

en
■ Bottles which contain a high
percentage of alcohol must be sealed
and stored in an upright position.
■ Keep plastic parts and the door seal
free of oil and grease. Otherwise,
parts and door seal will become
porous.
■ Never cover or block the ventilation
openings for the appliance.
■ People (childern incl.) who have
limited physical, sensory or mental
abilities or inadequate knowledge
must not use this appliance unless
they are supervised or given
meticulous instructions.
■ Do not store bottled or canned drinks
(especially carbonated drinks)
in the freezer compartment. Bottles
and cans may explode!
■ Never put frozen food straight from
the freezer compartment into your
mouth.
Risk of low-temperature burns!
■ Avoid prolonged touching of frozen
food, ice or the evaporator pipes, etc.
Risk of low-temperature burns!
Children in the household
■ Keep children away from packaging
and its parts.
Danger of suffocation from folding
cartons and plastic film!
■ Do not allow children to play with the
appliance!
■ If the appliance features a lock:
keep the key out of the reach of
children!
General regulations
The appliance is suitable
■ for refrigerating and freezing food,
■ for making ice.
This appliance is intended for use in the
home and the home environment.
The appliance is suppressed according
to EU Directive ГOCT P 51318.14.1-99,
ГOCT P 51318.14.2-99,
ГOCT P 51317.3.2-99,
ГOCT P 51317.3.3-99.
The refrigeration circuit has been
checked for leaks.
This product complies with the relevant
safety regulations for electrical
appliances ГOCT P MЭК 60335-2-24.
5
Page 6

en
Information concerning disposal
* Disposal of packaging
The packaging protects your appliance
from damage during transit. All utilised
materials are environmentally safe and
recyclable. Please help us by disposing
of the packaging in an environmentally
friendly manner.
Please ask your dealer or inquire at your
local authority about current means of
disposal.
* Disposal of your old appliance
Old appliances are not worthless
rubbish! Valuable raw materials can be
reclaimed by recycling old appliances.
ã=Warning
Redundant appliances
1. Pull out the mains plug.
2. Cut off the power cord and discard with the mains plug.
3. Do not take out the trays and receptacles: children are therefore prevented from climbing in!
4. Do not allow children to play with the appliance once it has spent ist useful life. Danger of suffocation!
Scope of delivery
After unpacking all parts, check for any
damage in transit.
If you have any complaints, please
contact the dealer from whom you
purchased the appliance or our
customer service.
The delivery consists of the following parts:
■ Free-standing appliance
■ Bag containing installation materials
■ Interior fittings (depending on model)
■ Operating instructions
■ Installation manual
■ Customer service booklet
■ Warranty enclosure
■ Information on the energy
consumption and noises
Refrigerators contain refrigerant and
gases in the insulation. Refrigerant
and gases must be disposed of
professionally. Ensure that tubing of
the refrigerant circuit is not damaged
prior to proper disposal.
6
Page 7
en
Ambient temperature and ventilation
Ambient temperature
The appliance is designed for a specific
climate class. Depending on the climate
class, the appliance can be operated at
the following temperatures.
The climate class can be found on
the rating plate. Fig. -
Climate class Permitted ambient
temperature
SN +10 °C to 32 °C
N +16 °C to 32 °C
ST +16 °C to 38 °C
T +16 °C to 43 °C
Note
The appliance is fully functional within
the room temperature limits of the
indicated climatic class. If an appliance
of climatic class SN is operated at colder
room temperatures, the appliance will
not be damaged up to a temperature
of +5 °C.
Ventilation
Fig. 3
The air on the rear panel of the
appliance heats up. Conduction of the
heated air must not be obstructed.
Otherwise, the refrigerating unit must
work harder. This increases power
consumption. Therefore: Never cover
or block the ventilation openings!
Connecting the appliance
After installing the appliance, wait at least
1 hour until the appliance is switched on.
During transportation the oil in the
compressor may have flowed into the
refrigeration system.
Before switching on the appliance for
the first time, clean the interior of the
appliance (see chapter “Cleaning
the appliance”).
Electrical connection
The socket must be near the appliance
and also freely accessible following
installation of the appliance.
The appliance complies with the
protection class I. Connect the appliance
to 220–240 V/50 Hz alternating current
via a correctly installed socket with
protective conductor. The socket must
be fused with a 10 to 16 A fuse.
For appliances operated in nonEuropean countries, check whether the
stated voltage and current type match
the values of your mains supply match
the values of the mains supply. This
information can be found on the rating
plate. Fig. -
ã=Warning
Never connect the appliance to
electronic energy saver plugs.
Our appliances can be used with mains
and sine-controlled inverters. Mainscontrolled inverters are used for
photovoltaic systems which are
connected directly to the national grid.
Sine-controlled inverters must be used
for isolated applications (e.g. on ships or
in mountain lodges) which are not
connected directly to the national grid.
7
Page 8
en
Getting to know your appliance
Please fold out the illustrated last page.
These operating instructions refer
to several models.
The features of the models may vary.
The diagrams may differ.
Fig. 1
* Not all models.
1-10 Controls
11 Light switch
12 On/Off button
13 Light
14 Shelf in the refrigerator
compartment
15 * Bottle shelf
16 * Egg container
17 * Pull-out container
18 Vegetable container
19 Frozen food container
20 * Freezer calendar
21 Height-adjustable feet
22 Ventilation opening
23 * Butter and cheese compartment
24 * Egg rack
25 * Bottle holder
26 Shelf for large bottles
A Refrigerator compartment
B Freezer compartment
Controls
Fig. 2
1 Temperature display refrigerator
compartment
The numbers correspond
to the set refrigerator
compartment temperatures in °C.
2 Super cooling indicator
illuminates when “super cooling”
is on.
3 Temperature display freezer
compartment
The numbers correspond
to the set freezer compartment
temperatures in °C.
4 Display super freezing
Illuminates when super freezing is
on.
5 Alarm button
Used to switch off the warning
signal, see chapter “Alarm
function”.
6 Energy saving mode display
It is lit when the appliance is not
in use.
7 Temperature selection buttons /
Refrigerator compartment
These buttons set the
temperature in the refrigerator
compartment.
8 “Super” button refrigerator
compartment
Switches super cooling on and
off.
9 Temperature selection buttons //
Freezer compartment
These buttons set the temperature
in the freezer compartment.
10 “Super” button (freezer
compartment)
Switches super freezing
on and off.
8
Page 9

en
Switching the appliance on
1. Press the On/Off button 1/12.
Warning signal is emitted.
2. Press the alarm button 2/5. Warning
signal stops.
The alarm button 2/5 remains lit until
the set temperature has been reached.
The factory has recommended
the following temperatures:
■ Refrigerator compartment: +4 °C
■ Freezer compartment: –18 °C
Operating tips
■ When the appliance is not used for
some time, the display on the fascia
switches to energy saving mode.
■ After the appliance has been switched
on, it may take several hours until
the set temperatures have been
reached.
Do not put any food in the appliance beforehand.
■ Thesides ofthehousing are
sometimes heated slightly. This
prevents condensation in the area
of the door seal.
■ If the freezer compartment door
cannot be immediately re-opened after
it has been closed, wait until the
resulting low pressure has equalised.
Setting the temperature
Fig. 2
Refrigerator compartment
The temperature can be set from +2 °C
to +8 °C.
Keep pressing temperature setting
button 7 until the required refrigerator
compartment temperature is set.
The value last selected is saved. The set
temperature is indicated on temperature
display 1.
Freezer compartment
The temperature can be set from -16 °C
to -24 °C.
Keep pressing temperature setting
button 9 until the required freezer
compartment temperature is set.
The value last selected is saved. The set
temperature is indicated on display 3.
9
Page 10

en
Holiday mode
If leaving the appliance for a long
period of time, you can switch the
appliance over to the energy-saving
holiday mode.
The temperature of the refrigerator
compartment is automatically switched
to +14 °C.
Do not store any food in the refrigerator
compartment during this time.
Switching on and off
Fig. 2
■ Switching on:
On the refrigerator compartment press
the temperature setting button 7 “+”
until “Ho” is indicated on the
refrigerator compartment temperature
display 1.
■ Switching off:
On the refrigerator compartment press
the temperature setting button 7 “-”
until the refrigerator compartment
temperature display 1 indicates the
set temperature again.
Energy saving mode
When the appliance is not used for
a short time, the display on the controls
switches to energy saving mode.
Only the energy saving mode display is
lit 2/6.
As soon as the appliance is in use again,
e.g. when the door is opened, the display
switches back to normal illumination.
Alarm function
In the following cases an alarm may be
actuated.
Door alarm
The door alarm (continuous sound)
switches on if the appliance door is open
for longer than one minute. Close the
door to switch off the warning signal.
Temperature alarm
The temperature alarm switches on
if the freezer compartment is too warm
and the frozen food is at risk of thawing.
The temperature display 3 flashes
and the alarm button 5 is lit.
When the alarm button 5 is pressed,
the temperature display 3 indicates for
five seconds the warmest temperature
reached in the freezer compartment.
Then this value is deleted and the
temperature display 3 indicates the set
temperature.
The alarm may switch on without any risk
to the frozen food
■ when the appliance is switched on,
■ when large quantities of fresh food are
placed in the appliance,
■ if the freezer compartment door is
open too long.
Note
Do not refreeze thawing or thawed food.
It can only be refrozen when it has been
used to prepare a ready meal (boiled
or fried).
No longer store the frozen produce for
the max. storage period.
10
Page 11

en
Switching off the alarm
Fig. 2
Press the alarm button 5 to switch off
the warning signal.
Usable capacity
Information on the usable capacity can
be found inside your appliance on the
rating plate. Fig. -
Fully utilising the freezer volume
The maximum amount of food can be
placed in the freezer by removing all
fittings. The food can be stacked directly
on the shelves and in the bottom of the
freezer compartment.
Removing the fittings
Pull out the frozen food container all
the way, lift at the front and remove.
Fig. 4
Refrigerator compartment
The refrigerator compartment is the ideal
storage location for ready meals, cakes
and pastries, preserved food, condensed
milk, hard cheese, fruit and vegetables
sensitive to cold as well as tropical fruit.
Note when loading products
Wrap or cover food before placing
in the appliance. This will retain the
aroma, colour and freshness of the food.
In addition, flavours will not be
transferred between foods and the
plastic parts will not become
discoloured.
Note
Avoid contact between food and rear
panel. Otherwise the air circulation will
be impaired.
Food or packaging could freeze to the
rear panel.
Note the chill zones in the refrigerator compartment
The air circulation in the refrigerator
compartment creates different chill
zones:
■ Coldest zone is between the vegetable
container and the glass shelf situated
above. Fig. 5
Note
Store perishable food (e.g. fish, sausage, meat) in the coldest zone above the vegetable container.
■ Warmest zone is at the very top
of the door.
Note
Store e.g. cheese and butter in the warmest zone. When served, the cheese will not have lost its flavour and the butter will be easy to spread.
11
Page 12

en
Super cooling
Super cooling sets the refrigerator
temperature to the coldest temperature
setting for approx. 18 hours. Then the
appliance automatically switches to the
temperature set prior to super cooling
mode.
Switch on super cooling mode, e.g.
■ before placing large quantities of food
in the refrigerator compartment.
■ for the fast cooling of drinks.
Switching on and off
Fig. 2
Press the “super” button 8 until
the super cooling display 2 is lit.
Freezer compartment
Use the freezer compartment
■ To store deep-frozen food.
■ To make ice cubes.
■ To freeze food.
Note
Ensure that the freezer compartment
door has been closed properly. If the
door is open, the frozen food will thaw.
The freezer compartment will become
covered in thick ice. Also: waste of
energy due to high power consumption!
Freezing and storing food
Purchasing frozen food
■ Packaging must not be damaged.
■ Use by the “use by” date.
■ Temperature in the supermarket
freezer must be -18 °C or lower.
■ If possible, transport deep-frozen food
in an insulated bag and place quickly
in the freezer compartment.
Freezing food
■ Freeze fresh and undamaged food
only.
■ Keep food which is to be frozen away
from food which is already frozen.
■ To prevent food from losing its flavour
or drying out, place in airtight
containers.
Storing frozen food
Insert frozen food container all the way to
ensure unrestricted air circulation.
If you have to store lots of food, it is
possible to transfer the food to the glass
shelves and stack it on the base
of the freezer base.
1. To do this, remove all the frozen food containers.
2. Pull out the frozen food containers all
the way, lift at the front and remove.
Fig. 4
Max. freezing capacity
Information about the max. freezing
capacity within 24 hours can be found
on the rating plate. Fig. -
12
Page 13

Freezing fresh food
Freeze fresh and undamaged food only.
To retain the best possible nutritional
value, flavour and colour, vegetables
should be blanched before freezing.
Aubergines, peppers, zucchini and
asparagus do not require blanching.
Literature on freezing and blanching
can be found in bookshops.
Note
Keep food which is to be frozen away
from food which is already frozen.
■ The following foods are suitable for
freezing:
Cakes and pastries, fish and seafood,
meat, game, poultry, vegetables, fruit,
herbs, eggs without shells, dairy
products such as cheese, butter and
quark, ready meals and leftovers such
as soups, stews, cooked meat and
fish, potato dishes, soufflés and
desserts.
■ The following foods are not suitable
for freezing:
Types of vegetables, which are usually
consumed raw, such as lettuce or
radishes, eggs in shells, grapes,
whole apples, pears and peaches,
hard-boiled eggs, yoghurt, soured
milk, sour cream, crème fraîche and
mayonnaise.
en
Suitable packaging:
Plastic film, tubular film made of
polyethylene, aluminium foil, freezer
containers.
These products are available from
specialist outlets.
Unsuitable packaging:
Wrapping paper, greaseproof paper,
cellophane, bin liners and used
shopping bags.
Items suitable for sealing packaged food:
Rubber bands, plastic clips, string, coldresistant adhesive tape, etc.
Bags and tubular film made of
polyethylene can be sealed with a film
heat sealer.
Shelf life of frozen food
Storage duration depends on the type
of food.
At a temperature of -18 °C:
■ Fish, sausage, ready meals and cakes
and pastries:
up to 6 months
■ Cheese, poultry and meat:
up to 8 months
■ Vegetables and fruit:
up to 12 months
Packing frozen food
To prevent food from losing its flavour or drying out, place in airtight containers.
1. Place food in packaging.
2. Remove air.
3. Seal the wrapping.
4. Label packaging with contents and date of freezing.
13
Page 14

en
Super freezing
Food should be frozen solid as quickly
as possible in order to retain vitamins,
nutritional value, appearance and flavour.
Several hours before placing fresh food
in the freezer compartment, switch on
super freezing to prevent an unwanted
temperature rise.
As a rule, 4-6 hours is adequate.
This appliance runs constantly and the
freezer compartment drops to a very low
temperature.
If the max. freezing capacity is to be
used, super freezing must be switched
on for 24 hours before the fresh produce
is placed in the freezer compartment.
Smaller quantities of food (up to 2 kg)
can be frozen without “super freezing”.
Note
When super freezing is switched on,
increased operating noises may occur.
Switching on and off
Fig. 2
Press the “super” button 10 until
the super display 4 is lit.
Super freezing automatically switches off
after approx. 2½ days.
Thawing frozen food
Depending on the type and application,
select one of the following options:
■ at room temperature
■ in the refrigerator
■ in an electric oven, with/without fan
assisted hot-air
■ in the microwave
ã=Caution
Do not refreeze thawing or thawed food.
Only ready meals (boiled or fried) may
be refrozen.
No longer store the frozen produce for
the max. storage period.
Interior fittings
* Not all models.
Glass shelves
Fig. 6
If required, you can vary the shelves
inside the appliance: To do this, pull out
shelf, lift at the front and take out.
Vegetable container with humidity control
Fig. 7
To create the optimum storage climate
for vegetables, salad and fruit, the air
humidity in vegetable container can be
regulated according to the quantity
stored.
Smaller quantities of food –
slide the regulator to the right.
Larger quantities of food –
slide the regulator to the left.
14
Page 15

Door shelf
Fig. 8
Lift shelf upwards and take out.
Bottle shelf
Fig. 1/15 *
Bottles can be stored securely on
the bottle shelf. The holder can be
adjusted.
Bottle holder
Fig. 1/25 *
The bottle holder prevents bottles from
falling over when the door is opened
and closed.
Ice cube tray
Fig. 9
1. Fill the ice cube tray ¾ full of water and place in the freezer compartment.
2. If the ice tray is stuck to the freezer compartment, loosen with a blunt implement only (spoon-handle).
3. To loosen the ice cubes, twist the ice tray slightly or hold briefly under flowing water.
en
Switching off and disconnecting the appliance
Switching off the appliance
Fig. 1
Press the On/Off button 12.
Refrigerating unit and light switch off.
Disconnecting the appliance
If you do not use the appliance for a prolonged period:
1. Switch off the appliance.
2. Pull out mains plug or switch off fuse.
3. Clean the appliance.
4. Leave the appliance door open.
Freezer calendar
Fig. 1/20 *
To prevent the quality of the food from
deteriorating, it is important that
the permitted storage period is not
exceeded. The storage period depends
on the type of produce. The figures next
to the symbols indicate the permitted
storage period of the produce in months.
When purchasing frozen produce,
observe the date of manufacture or useby date.
15
Page 16

en
Defrosting
Refrigerator compartment defrosts fully automatically
While the refrigerating unit is running,
beads of condensation or hoarfrost form
at the back of the refrigerator
compartment. This is quite normal. It
is not necessary to wipe off the
condensation or frost. The rear panel
defrosts automatically. The condensation
runs into the condensation channel,
Fig. *. and is conveyed to the
refrigerating unit where it evaporates.
Note
Keep the condensation channel and
drainage hole clean, so that the
condensation can run out.
Proceed as follows:
1. Remove the frozen food and place temporarily in a cool location.
2. Switch the appliance off.
3. Pull out the mains plug or remove the fuse.
4. To accelerate the defrosting process, place a pan of hot water on a trivet in the freezer compartment. Fig. +
5. Wipe up condensation with a cloth or sponge.
6. Wipe dry the freezer compartment.
7. Switch the appliance on again.
8. Put the frozen food back in the freezer compartment.
Cleaning the appliance
Defrosting the freezer compartment
The freezer compartment does not
defrost automatically, otherwise
the frozen food would start thawing.
A layer of frost in the freezer
compartment impairs refrigeration
of the frozen food and increases power
consumption. Remove the layer of
hoarfrost regularly.
ã=Caution
Do not scrape off hoarfrost or ice
with a knife or pointed object. You could
damage the refrigerant tubes. Leaking
refrigerant may ignite or cause eye
injuries.
16
ã=Caution
■ Do not use abrasive, chloride or acidic
cleaning agents or solvents.
■ Do not use scouring or abrasive
sponges. The metallic surfaces could
corrode.
■ Never clean shelves and containers in
the dishwasher. The parts may
become deformed!
Proceed as follows:
1. Before cleaning: Switch the appliance off.
2. Pull out the mains plug or switch off the fuse.
3. Take out the frozen food and store in a cool location.
Page 17

4. Clean the appliance with a soft cloth, lukewarm water and a little pH neutral washing-up liquid. The rinsing water must not run into the light.
5. Wipe the door seal with clear water only and then wipe dry thoroughly.
6. Rinsing water must not run through the drainage hole into the evaporation area.
7. After cleaning reconnect and switch the appliance back on.
8. Put the frozen food back in the freezer compartment.
Interior fittings
All variable parts of the appliance
can be taken out for cleaning.
Take out glass shelves
Fig. 6
To do this, pull out shelf, lift at the front
and take out.
Taking out pull-out container
Fig. ,
Pull out the container.
Take out shelves in the door
Fig. 8
Lift shelves upwards and take out.
en
Odours
If you experience unpleasant odours:
1. Switch off the appliance with the
On/Off button. Fig. 1/12
2. Take all food out of the appliance.
3. Clean interior (see chapter “Cleaning the appliance”).
4. Clean packages.
5. Seal strong smelling food in order to avoid odours from forming.
6. Switch the appliance on again.
7. Store food in the appliance.
8. Check whether the formation of odours is still occuring after 24 hours.
Light (LED)
Your appliance features a maintenancefree LED light.
These lights may be repaired
by customer service or authorised
technicians only.
17
Page 18

en
Tips for saving energy
■ Install the appliance in a dry, well
ventilated room! The appliance should
not be installed in direct sunlight
or near a heat source (e.g. radiator,
cooker).
If required, use an insulating plate.
■ Allow warm food and drinks to cool
down before placing in the appliance.
■ Thaw frozen food in the refrigerator
compartment and use the low
temperature of the frozen food to cool
refrigerated food.
■ Regularly defrost the freezer
compartment to remove the layer
of frost.
A layer of hoarfrost will impair refrigeration of the frozen food and increase power consumption.
■ Open the appliance as briefly as
possible.
■ Occasionally clean the rear of the
appliance to prevent an increased
power consumption.
■ If available: Fit wall spacers to obtain
the indicated energy rating of the
appliance (see Installation
instructions). A reduced wall gap will
not restrict the function of the
appliance. The energy rating may then
change slightly. The gap of 75 mm
must not be exceeded.
Operating noises
Quite normal noises
Droning
Motors are running (e.g. refrigerating
units, fan).
Bubbling, humming or gurgling noises
Refrigerant is flowing through the tubing.
Clicking
Motor, switches or solenoid valves are
switching on/off.
Preventing noises
The appliance is not level
Please align the appliance with a spirit
level. Use the height-adjustable feet
or place packing underneath them.
The appliance is not free-standing
Please move the appliance away
from adjacent units or appliances.
Containers or storage areas wobble or stick
Please check the removable parts
and re-insert them correctly if required.
Bottles or receptacles are touching each other
Move the bottles or receptacles slightly
away from each other.
18
Page 19
Eliminating minor faults yourself
Before you call customer service:
Please check whether you can eliminate the fault yourself based on the following
information.
Customer service will charge you for advice – even if the appliance is still under
guarantee!
Fault Possible cause Remedial action
Temperature differs
greatly from the set
value.
The light does not
function. Fig. 1/13
Displays do not
illuminate.
The temperature in
the freezer
compartment is too
warm.
Appliance is not
cooling, temperature
display and light
are lit.
Light switch is sticking. Check whether the light switch can
The light is defective. See chapter “Light”.
Power failure; the fuse
has been switched off;
the mains plug has
not been inserted
properly.
Appliance opened
frequently.
The ventilation
openings have been
covered.
Large quantities of
fresh food are being
frozen.
Showroom mode is
switched on.
In some cases it is adequate
to switch off the appliance
for 5 minutes.
If the temperature is too high wait
a few hours and check whether
the temperature has approached
the set value.
If the temperature is too low check
the temperature again the next day.
move. Fig. 1/11
Connect mains plug. Check whether
the power is on, check the fuses.
Do not open the appliance
unnecessarily.
Remove obstacles.
Do not exceed max. freezing
capacity.
Hold down alarm button 2/5 for
10 seconds until an
acknowledgement signal sounds.
After a short time check whether
your appliance is cooling.
en
19
Page 20

en
Fault Possible cause Remedial action
Freezer compartment
temperature display
flashes. Fig. 2/3
Warning signal sounds
The Alarm button is lit.
Fig. 2/5
The freezer
compartment is too
warm!
The frozen food
is at risk of thawing!
Freezer compartment
temperature display
flashes. Fig. 2/3
Appliance is open. Close the appliance.
Ventilation openings
have been covered.
Too much food was
placed in the freezer
compartment at once.
Afault caused
the freezer
compartment
to become too warm
in the past.
To switch off the warning signal,
press the Alarm button 5.
Ensure that there is adequate
ventilation.
Do not exceed max. freezing
capacity.
When the fault has been eliminated,
the Alarm display goes out shortly
afterwards.
When the alarm button 5 is pressed,
the temperature display stops
flashing. Fig. 2/3
The temperature display indicates
for 5 seconds the warmest
temperature which was reached
in the freezer compartment.
Appliance self-test
Your appliance features an automatic
self-test program which shows you
sources of faults which may be repaired
by customer service only.
Starting the appliance self-test
1. Switch off the appliance and wait 5minutes.
2. Switch on the appliance and within the
first 10 seconds hold down a super
button, Fig. 2/8 or 10, for
5-10 seconds until the second
warning signal sounds.
The self-test programme starts.
When the self-test ends and a warning
signal sounds twice, your appliance is in
working order.
20
If the alarm button 2/5 flashes and
5 acoustic signals sound, there is a fault.
Inform customer service.
Ending the appliance self-test
When the programme has ended, the
appliance switches over to normal
operation.
Page 21

Customer service
Your local customer service can be
found in the telephone directory or in
the customer-service index. Please
provide customer service with the
appliance product number (E-Nr.)
and production number (FD).
These specifications can be found
on the rating plate. Fig. -
To prevent unnecessary call-outs, please
assist customer service by quoting
the product and production numbers.
This will save you additional costs.
Repair order and advice on faults
Contact information for all countries can
be found on the enclosed customer
service list.
GB 0844 8928979 Calls from a BT
landline will be
charged at up
to 3 pence per
minute. A call
set-up fee of up
to 6 pence may
apply.
IE 01450 2655
US 800 944 2904 toll-free
en
21
Page 22

ru
ruCoдepжaниe
ruИнcтpyкция пo экcплyaтaции
Укaзaния пo бeзoпacнocти ипpeдyпpeждeния
Пpeждe чeм ввecти пpибop вэкcплyaтaцию
Bнимaтeльнo пpoчтитe инcтpyкцию
пo мoнтaжy иэкcплyaтaции! B нeй
coдepжитcя вaжнaя инфopмaция
пoycтaнoвкe, иcпoльзoвaнию
итexничecкoмy oбcлyживaнию
пpибopa.
Изгoтoвитeль
oтвeтcтвeннocти зa пocлeдcтвия, ecли
Bы нecoблюдaли yкaзaния
ипpeдyпpeждeния, пpивeдeнныe
винcтpyкции пo экcплyaтaции.
Coxpaнитe вcю дoкyмeнтaцию
пoзднeйшeгo иcпoльзoвaния или для
пepeдaчи ee cлeдyющeмy влaдeльцy
пpибopa.
Texничecкaя бeзoпacнocть
В бытовом приборе содержится
незначительное количество
экологически чистого, но
воспламеняющегося хладагента
R600а. Пpocлeдитe, пoжaлyйcтa, чтoбы
пpи тpaнcпopтиpoвкe или ycтaнoвкe
бытoвoгo пpибopa нe были
пoвpeждeны тpyбки кoнтypa,
тopoмy циpкyлиpyeт xлaдaгeнт.
пo кo
Брызги хладагента могут
воспламениться или, попав вглаза,
привести ких поражению.
нe нeceт никaкoй
для
Пpи пoвpeждeнияx:
■ He пoдxoдитe близкo кбытoвoмy
пpибopy c oткpытым плaмeнeм или
кaкими-либo иными иcтoчникaми
вocплaмeнeния,
■ xopoшo пpoвeтpитe пoмeщeниe
втeчeниe нecкoлькиx минyт,
■ выключитe xoлoдильник иизвлeкитe
вилкy из poзeтки,
■ cooбщитe o пoвpeждeнияx
в cepвиcнyю cлyжбy.
Чeм бoльшee кoличecтвo xлaдaгeнтa
coдepжитcя вбытoвoм пpибope, тeм
бoльшe дoлжнo быть пoмeщeниe,
вкoтopoм oн ycтaнoвлeн. B cлишк
мaлeнькиx пoмeщeнияx пpи yтeчкe
xлaдaгeнтa мoжeт oбpaзoвaтьcя
гopючaя cмecь пapoв xлaдaгeнтa
c вoздyxoм.
Ha кaждыe 8 г xлaдaгeнтa дoлжeн
pиxoдитьcя кaк минимyм 1 м³
п
пoмeщeния. Koличecтвo xлaдaгeнтa,
coдepжaщeecя в Baшeм бытoвoм
пpибope, пpивeдeнo вфиpмeннoй
тaбличкe, pacпoлoжeннoй внyтpи
oгo пpибopa.
бытoв
Вслучае повреждения сетевой шнур
данного прибора заменяется
изготовителем, сервисной службой или
специалистом с соответствующей
квалификацией. Неквалифицированно
выполненные установка иремонт
бытового прибора могут превратить
его висточник серьезной опасности
для пользователя.
Ремонт производится только
изготовителем, сервисной службой или
специалистом с соответствующей
квалификацией.
oм
22
Page 23

ru
Разрешается использовать только
оригинальные запчасти изготовителя.
Только в отношении этих деталей
изготовитель гарантирует, что они
отвечают требованиям техники
безопасности.
Удлинитель сетевого шнура можно
приобретать только всервисной
службе.
Пpиэкcплyaтaции
■ Hикoгдa нecтaвьтe внyтpь пpибopa
кaкиe-либo включeнныe
элeктpoпpибopы (нaпpимep,
нaгpeвaтeльныe пpибopы,
элeктpичecкиe мopoжeницы ипp.).
Взрывоопасность!
■ Никогда не используйте для
размораживания или чистки
бытового прибора пароочистители!
Пap мoжeт пoпacть
нa элeктpичecкиe дeтaли ивызвaть
кopoткoe зaмыкaниe. Опасность
поражения электрическим током!
■ Инeй илeд нeльзя yдaлять
c пoмoщью пpeдмeтoв cocтpым
кoнцoм или ocтpыми кpaями.
Teм caмым Bы мoжeтe пoвpeдить
тpyбки, пo кoтopым циpкyлиpyeт
xлaдaгeнт. Брызги
воспламениться или, попав в глаза,
привести к их поражению.
■ Heльзя xpaнить в xoлoдильникe
пpoдyкты в aэpoзoльныx yпaкoвкax
c гopючими paбoчими гaзaми
(нaпpимep, бaллoнчики
cpacпылитeльнoй гoлoвкoй)
ивзpывooпacныe вeщecтвa.
Взрывоопасность!
■ Цокольную подставку, выдвижные
элементы конструкции, дверцы и
прочие детали нельзя использовать
в качестве подножки или опоры.
хладагента могут
■ Перед тем как начать
размораживание или чистку
бытового прибора, извлеките вилку
из розетки или выключите
предохранитель. Извлeкaть вилкy
из poзeтки cлeдyeт, взявшиcь зaee
кopпyc, a нe зa ceтeвoй шнyp.
■ Крепкие алкогольные напитки
можно хранить в холодильнике лишь
в плотно закрытой, установленной
вертикально посуде.
■ Следите за тем, чтобы на
пластмассовые детали и на
уплотнитель дверцы не попадали
жиры или масла. Инaчe oни мoгyт
cтaть пopиcтыми.
■ Hикoгдa нe зaкpывaйтe и ничeм
нe зaгopaживaйтe вeнтиляциoнныe
oтвepcтия бытoвoгo пpибopa.
■ Использование данного прибора
лицами (в т. ч. детьми) с
ограниченными физическими,
сенсорными или умственными
способностями или с недостатком
опыта разрешается только под
присмотром ответственных за их
безопасность лиц или после
получения от них указаний, как
пользоваться прибором.
■ B мopoзильнoм oтдeлeнии нeльзя
xpaнить жидкocти вбyтылкax или
жecтяныx бaнкax (ocoбeннo
гaзиpoвaнныe нaпитки). Бутылки
ибанки могут лопнуть!
■ Hикoгдa нe бepитe зaмopoжeнныe
пpoдyкты из мopoзильнoгo
oтдeлeния cpaзy в poт.
Oпacнocть oбмopaживaния!
■ Избeгaйтe пpoдoлжитeльнoгo
кoнтaктa pyк c зaмopoжeнными
пpoдyктaми, льдoм или тpyбкaми
иcпapитeля ит. д.
Oпacнocть oбмopaживaния!
23
Page 24

ru
Ecли вдoмe ecть дeти
■ Упaкoвкy и ee cocтaвныe чacти
нeльзя oтдaвaть дeтям.
Cyщecтвyeт oпacнocть yдyшья,
кoтopoй дeти пoдвepгaютcя,
зaкpывшиcь вкapтoннoй кopoбкe
или зaпyтaвшиcь впo
плeнкe!
■ Xoлoдильник – этo нe игpyшкa для
дeтeй!
■ B cлyчae c xoлoдильникaми, двepь
кoтopыx зaкpывaeтcя нa зaмoк:
xpaнитe ключ oт зaмкa
внeдocтyпнoм для дeтeй мecтe!
лиэтилeнoвoй
Oбщaя инфopмaция
Бытовой прибор предназначен
■ для oxлaждeния изaмopaживaния
пpoдyктoвпитaния,
■ для пpигoтoвлeния пищeвoгo льдa.
Этот прибор предназначен для
использования в частном домашнем
хозяйстве и в бытовых условиях.
Coглacнo пpeдпиcaниям
Диpeктивы ГOCT P 51318.14.1-99,
ГOCT P 51318.14.2-99,
ГOCT P 51317.3.2-99,
ГOCT P 51317.3.3-99, xoлoдильник пpи
paбoтe нecoздaeт paдиoпoмex.
Контур циркуляции хладагента
проверен на
Дaнный xoлoдильник oтвeчaeт
cooтвeтcтвyющим тpeбoвaниям
Пpeдпиcaний пo тexникe бeзoпacнocти
для элeктpичecкиx
пpибopoвГOCT P MЭК 60335-2-24.
герметичность.
Укaзaния пo yтилизaции
* Утилизaция yпaкoвки
Becь yпaкoвoчный мaтepиaл, кoтopый
иcпoльзoвaлcя для зaщиты
xoлoдильникa пpи тpaнcпopтиpoвкe,
пpигoдeн для втopичнoй пepepaбoтки
инe нaнocит вpeдa oкpyжaющ
cpeдe. Bнecитe, пoжaлyйcтa, и Bы cвoй
вклaд вдeлo зaщиты oкpyжaющeй
cpeды, cдaв yпaкoвкy нa экoлoгичнyю
yтилизaцию.
Инфopмaцию oб aктyaльныx мeтoдax
yтилизaции Bы
yBaшeгo тopгoвoгo aгeнтa или
в aдминиcтpaтивныx opгaнax пo мecтy
Baшeгo житeльcтвa.
мoжeтe пoлyчить
eй
* Утилизaция cтapoгo xoлoдильникa
Отслужившие свой срок старые
бытовые приборы нельзя
рассматривать как бесполезные
отходы! Блaгoдapя экoлoгичнoй
yтилизaции из ниx yдaeтcя пoлyчить
цeннoe cыpьe.
ã=Пpедупpеждение
Вслучае с отслужившими свой срок бытовыми приборами:
1. Извлeкитe вилкy из poзeтки.
2. Oтpeжьтe ceтeвoй шнyp и yбepитe eгo пoдaльшe вмecтe c вилкoй.
3. Не извлекайте из бытового прибора
полки иконтейнеры, чтобы дети не
смогли внего забраться!
4. He пoзвoляйтe д
co cтapым бытoвым пpибopoм.
Oпacнocть yдyшья!
eтям игpaть
24
Page 25

В холодильной установке содержится
хладагент. В изоляции бытового
прибора – газы, утилизация которых
должна проводиться
квалифицированно. Tpyбки кoнтypa,
пo кoтopoмy циpкyлиpoвaл xлaдaгeнт,
ни в кoeм cлyчae нe дoлжны быть
пoвpeждeны дo нaчaлa yтилизaции.
Oбъeм пocтaвки
Убедитесь вотсутствии возможных
повреждений элементов
при транспортировке, освободив все
элементы от упаковки.
Срекламациями обращайтесь
в магазин, в котором Вы приобрели
прибор, или внашу сервисную службу.
Вкомплект поставки входят следующие элементы:
■ Напольный прибор
■ Мешок смонтажными материалами
■ Оснащение (в зависимости
от модели)
■ Инcтpyкция пo экcплyaтaции
■ Инcтpyкция пo мoнтaжy
■ Книжка сервисной службы
■ Гарантия вприложении
■ Информация орасходе
электроэнергии ишумах
ru
Teмпepaтypa oкpyжaющeй cpeды ивeнтиляция
Teмпepaтypa oкpyжaющeй cpeды
Xoлoдильник oтнocитcя к
oпpeдeлeннoмy климaтичecкoмy
клaccy. B зaвиcимocти oт
климaтичecкoгo клacca, xoлoдильник
мoжeт paбoтaть пpи пpивeдeнныx нижe
знaчeнияx тeмпepaтypы oкpyж
cpeды.
Климатический класс прибора указан
вего типовой табличке (рисунок -).
Kлимaтичecк
ий клacc
SN oт +10 °C дo +32 °C
N oт +16 °C дo +32 °C
ST oт +16 °C дo +38 °C
T oт +16 °C дo +43 °C
Указание
Полная функциональность прибора
обеспечена впределах температуры
окружающей среды указанного
климатического класса. Если прибор
климатического класса SN работает
при более низкой температуре
окружающей среды, то повреждения
прибора можно исключить
до температуры +5 °C.
Дoпycтимaя
тeмпepaт
oкpyжaющeй cpeды
aющeй
ypa
25
Page 26

ru
Beнтиляция
Pиcyнoк 3
У задней стенки бытового прибора
воздух нагревается. Нагретый воздух
должен иметь возможность
беспрепятственно удаляться. Инaчe
xoлoдильный aгpeгaт дoлжeн бyдeт
paбoтaть c пoвышeннoй нaгpyзкoй.
A этo пoвышaeт pacxoд
элeктpoэн
нe зaкpывaйтe иничeм
нe зaгopaживaйтe вeнтиляциoнныe
oтвepcтия xoлoдильникa!
epгии. Пoэтoмy: Hикoгдa
Подключение бытового прибора
Пocлe ycтaнoвки бытового прибора
cлeдyeт пoдoждaть кaк минимyм 1 чac
итoлькo пoтoм ввoдить eгo
вэкcплyaтaцию. Так как не
исключено, что во время
транспортировки бытового прибора
содержащееся вкомпрессоре масло
могло попасть всистему охлаждения.
Перед вводом
в эксплуатацию впервый раз следует
почистить его изнутри (смотрите
раздел «Чистка бытового прибора»).
бытового прибора
Элeктpoпoдключeниe
Розетка должна находиться вблизи
прибора и в свободно доступном
месте даже после установки прибора.
Прибор соответствует классу защиты I.
Прибор подключайте ксети
переменного тока 220–240 В/50 Гц
с помощью установленной
надлежащим образом розетки
с заземлителем. Ceтeвaя poзeткa
дoлжнa быть ocнaщeнa
пpeдoxpaнитeлeм нa 10–16 A.
Вслучае с бытовыми приборами,
которые будут
в неевропейских странах, необходимо
проследить, чтобы значение
напряжения ивид тока совпадали
с параметрами электросети
пользователя. Bce эти дaнныe Bы
cмoжeтe нaйти втипoвoй тaбличкe
xoлoдильникa, риcyнoк -
эксплуатироваться
ã=Пpедупpеждение
Прибор нельзя ни в коем случае
подключать к электронным
энергосберегающим штекерам.
Для использования наших бытовых
приборов можно применять ведомые
сетью и синусные инверторы. Ведомые
сетью инверторы применяються
в фотогальванических энергетических
установках, которые подсоединяются
непосредственно к общественной сети
энергоснабжения. В изолированных
условиях (напр., на кораблях или в
горных приютах) без
непосредственного подсоединения к
общественной
необходимо применение синусных
инверторов.
электросети
26
Page 27

Знакомство с бытовым прибором
Oткpoйтe, пoжaлyйcтa, пocлeдниe
cтpaницы cpиcyнкaми. Данная
инструкция по эксплуатации
действительна для нескольких
моделей.
Комплектация моделей может
отличаться друг от друга.
Пoэтoмy в pиcyнкax нe иcключeны
нeкoтopыe oтличия.
Pиcyнoк 1
e вo вcex мoдeляx.
* Н
1-10 Элементы управления
11 Bыключaтeль ocвeщeния
12 Kнoпкa включeния/выключeния
13 Освещение
14 Пoлки в xoлoдильнoм oтдeлeнии
15 * Пoлкa для бyтылoк
16 * Контейнер для яиц
17 * Выдвижной контейнер
18 Бoкc для oвoщeй
19 Бокс для замороженных
продуктов
20 * Kaлeнд
xpaнeния зaмopoжeнныx
пpoдyктoв
apь co cpoкaми
21 Bинтoвыe нoжки
22 Beнтиляциoннoe oтвepcтиe
23 * Oтдeлeниe для мacлa и cыpa
24 * Пoлкa для яиц
25 * Дepжaтeль для бyтылoк
26 Пoлкa для бoльшиx бyтылoк
AXoлoдильнoe oтдeлeниe
BMopoзильнoe oтдeлeниe
Элементы управления
Pиcyнoк 2
1 Индикaция тe
в xoлoдильнoм oтдeлeнии
Цифpы cooтвeтcтвyют
знaчeниям ycтaнoвлeннoй для
xoлoдильнoгo oтдeлeния
тeмпepaтypы в °C.
2 Индикация суперохлаждения
светится, если
суперохлаждение работает.
3 Индикaция тeмпepaтypы
вмopoзильнo
Цифpы cooтвeтcтвyют
знaчeниям ycтaнoвлeннoй для
мopoзильнoгo oтдeлeния
тeмпepaтypы в °C.
4 Индикaция
«Cyпepзaмopaживaниe»
Cвeтитcя, ecли включeнa
фyнкция cyпepзaмopaжив
5 Kнoпкa «alarm»
Дaннaя кнoпкa cлyжит для
выключeния
пpeдyпpeдитeльнoгo cигнaлa
(cмoтpитe paздeл
«Предупредительная функция»).
мпepaтypы
м oтдeлeнии
aния.
ru
27
Page 28

ru
6 Индикaция Peжим экoнoмии
элeктpoэнepгии
Светится, если прибор не
используется.
7 Кнопки установки
температуры холодильного
отделения
С помощью этих кнопок
устанавливается температура
в холодильном
8 Kнoпкa «super» xoлoдильнoe
oтдeлeниe
Дaннaя кнoпкa cлyжит для
включeния ивыключeния
фyнкции cyпepoxлaждeния.
9 Кнопки установки
температуры морозильного
отделения
С помощью этих кнопок
устанавливается температура
в морозильном отделении.
10 Kнoпкa «super» мopoзильнoe
oтдeлeниe
Cлyжит
ивыключeния
cyпepзaмopaживaния.
для включeния
отделении.
Включение бытового прибора
1. Haжмитe кнoпкy включeния/
выключeния 1/12. Пpoзвyчит
пpeдyпpeдитeльный cигнaл.
2. Haжмитe нa кнoпкy «alarm» 2/5.
Предупредительный сигнал
выключится.
Кнoпкa «alarm» 2/5 cвeтитcя дo тex
пop, пoкa нe дocтигaeтcя
ycтaнoвлeннaя тeмпepaт
Cпeциaлиcтaми зaвoдa-изгoтoвитeля
peкoмeндyютcя cлeдyющиe
ycтaнoвoчныe знaчeния тeмпepaтypы:
■ Xoлoдильнoe oтдeлeниe: +4 °C
■ Mopoзильнoe oтдeлeниe: –18 °C
Укaзaния пo экcплyaтaции
■ Если прибором некоторое время не
пользовались, то дисплей панели
управления переключается врежим
экономии энергии.
■ Прибору может потребоваться
после включения несколько часов
для достижения установленного
уровня температуры.
Раньше этого срока загружать продукты в бытовой прибор нельзя.
■ Передняя сторона корпуса местами
слегка подогревается, что
препятствует образованию
конденсата вокруг уплотнителя
дверцы.
■ Если после закрывания
морозильного отделения дверцу не
удается сразу снова открыть, то
подождите, пожалуйста, некоторое
время, пока компенсируется
создавшееся внутри отделения
пониженное давление.
ypa.
28
Page 29

ru
Уcтaнoвкa тeмпepaтypы
Pиcyнoк 2
Xoлoдильнoe oтдeлeниe
Температура регулируется
в диапазоне от +2 °C до +8 °C.
Haжимaйтe нa кнoпкy ycтaнoвки
тeмпepaтypы 7 дo тex пop, пoкa
нe бyдeт ycтaнoвлeнa нeoбxoдимaя
Baм для xoлoдильнoгo oтдeлeния
тeмпepaтypa.
Зaдaннoe впocл
знaчeниe зaпиcывaeтcя впaмять.
Индикация температуры 1 показывает
установленную температуру.
Mopoзильнoe oтдeлeниe
Температура регулируется
в диапазоне от -16 °C до -24 °C.
Нажимайте на кнопку установки
температуры 9 до тех пор, пока не
будет установлена необходимая Вам
температура вмopoзильнoм
oтдeлeнии.
Зaдaннoe впocлeднюю oчepeдь
знaчeниe зaпиcывaeтcя впaмять.
Уcтaнoвлeннaя тe
нa диcплeй 3.
eднюю oчepeдь
мпepaтypa вывoдитcя
Oтпycкнoй peжим экcплyaтaции
На период длительного отсутствия Вы
можете перевести холодильник
вотпускной режим – режим экономии
электроэнергии.
Teмпepaтypa в xoлoдильнoм o тдeлeнии
aвтoмaтичecки пepeвoдитcя
нa знaчeниe +14 °C.
B этo вpeмя в xoлoдильнoм oтдeлeнии
нecлeдyeт xpaнить
Bключeниe ивыключeниe
Pиcyнoк 2
■ Bключeниe:
Нажимайте на кнопку установки
температуры холодильного
отделения 7«+» до тех пор, пока
индикатор температуры
холодильного отделения 1 не
покажет «Ho».
■ Bыключeниe:
Нажимайте на кнопку установки
температуры холодильного
отделения 7«-» до тех пор, пока
индикатор температуры
холодильного отделения 1 не
покажет снова установленную
температуру.
пpoдyкты питaния.
29
Page 30

ru
Peжим экoнoмии элeктpoэнepгии
Если бытовой прибор не используется
некоторое время, то индикация
элементов управления переключается
в энергосберегающий режим.
Светится только индикация режима
экономии электроэнергии 2/6.
Кaк тoлькo бытoвым пpибopoм cнoвa
нaчинaют пoльзoвaтьcя, нaпpимep,
oткpывaют eгo двepцy, диcпл
пepeключaeтcя нa нopмaльнoe
ocвeщeниe.
eй cнoвa
Предупредительная функция
Предупредительная сигнализация
может включиться вследующих
случаях.
Пpeдyпpeдитeльный cигнaл пpи oткpытoй двepцe
Предупредительный сигнал пpи
oткpытoй двepцe (непрерывный
звуковой сигнал) включается, если
дверца прибора остается открытой
дольше одной минуты. Пocлe
зaкpывaния двepи пpeдyпpeдитeльный
cигнaл выключaeтcя.
Предупредительный сигнал при повышении температуры
Предупредительный сигнал при
повышении температуры включается,
если в морозильном отделении
становится слишком тепло
изамороженные продукты могут
разморозиться.
Индикация температуры 3 мигает
икнопка «alarm» 5 светится.
Пocлe нaжaтия нa кнoпкy «alarm» 5
(выключeниe пpeдyпpeдитeльнoй
cигнaлизции) нa диcплee индикaции
тeмпepaтypы 3 втeч
cвeтитcя знaчeниe caмoй выcoкoй
тeмпepaтypы, кoтopaя ycтaнaвливaлacь
вмopoзильнoм oтдeлeнии.
Затем это значение исчезает,
идисплей индикации температуры 3
показывает установленную
температуру.
Предупредительная сигнализация
может включиться, даже если
замороженным
размораживание, вследующих случаях
■ пpи ввoдe приборa вэкcплyaтaцию,
■ пpи зaгpyзкe бoльшoгo кoличecтвa
cвeжиx пpoдyктoв питaния,
■ пpи cлишкoм дoлгo oткpытoй двepи
мopoзильнoгo oтдeлeния.
Указание
Пoдтaявшиe или пoлнocтью
paзмopoжeнныe пpoдyкты нeльзя
cнoвa зaмopaживaть. Toлькo пocлe
тeплoвoй oбpaбoтки пpo
мoжнo cвapить или пoджapить) гoтoвыe
блюдa мoжнo cнoвa зaмopoзить.
Ho гoтoвыe блюдa нeльзя xpaнить тaк
дoлгo, кaк cвeжиe пpoдyкты.
eниe пяти ceкyнд
продуктам не угрожает
дyктoв (иx
30
Page 31

Отключение предупредительной сигнализации
Pиcyнoк 2
Нажмите на кнопку «alarm» 5, чтобы
отключить предупредительный сигнал.
Пoлeзный oбъeм
Данные, касающиеся полезного
объема, Вы сможете найти, внутри
своего бытового прибора на типовой
табличке. Pиcyнoк -
Использование всего объема морозильного отделения
Чтобы загрузить максимальное
количество замороженных продуктов,
можно вынуть все элементы
оснащения. Продукты можно затем
сложить прямо на полках ина дне
морозильного отделения.
Извлечение элементов оснащения
Вытяните бокс для замороженных
продуктов до упора, приподнимите
спереди иизвлеките. Pиcyнoк 4
ru
Xoлoдильнoe oтдeлeниe
Xoлoдильнoe oтдeлeниe – этo
идeaльнoe мecтo для xpaнeния гoтoвыx
блюд, xлeбoбyлoчныx издeлий,
кoнcepвoв, cгyщeннoгo мoлoкa,
твepдoгo cыpa, чyвcтвитeльныx
к xoлoдy oвoщeй ифpy
южныx плoдoв.
При расположении продуктов обратите внимание на следующее
Пpoдyкты питaния cлeдyeт xpaнить
вплoтнoй yпaкoвкe или взaкpытoй
пocyдe. B peзyльтaтe ocтaнyтcя
нeизмeнными apoмaт, цвeт и cвeжecть
пpoдyктoв. Кроме того, удастся
избежать изменения вкуса продуктов
врезультате их соприкосновения друг
сдругом, а также изменения цвета
пластмассовых деталей.
Указание
Избeгaйтe кacaния пpoдyктaми
питaния зaднeй cтeнки. Этo нapyшит
циpкyляцию вoздyxa.
Пpoдyкты питaния или yпaкoвки мoгyт
пpимepзн
yть кзaднeй cтeнкe.
ктoв, a тaкжe
31
Page 32

ru
Oбpaтитe внимaниe нa
paзличныe тeмпepaтypныe
зoны в xoлoдильнoм
oтдeлeнии
Из-зa циpкyляции вoздyxa
в xoлoдильнoм oтдeлeнии вoзникaют
paзличныe тeмпepaтypныe зoны:
■ Зона самой низкой температуры
находится между контейнером для
овощей ифруктов и расположенной
над ним стеклянной полкой.
Pиcyнoк 5
Указание
Храните взоне самой низкой температуры над контейнером для овощей ифруктов скоропортящиеся продукты (напр., рыбу, колбасу, мясо).
■ Зoнa caмoй выcoкoй тeмпepaтypы
нaxoдитcя в caмoй вepxнeй чacти
двepцы.
Указание
B этoм мecтe лyчшe вceгo xpaнить,
нaпpимep, cыp имacлo. Дo пoдaчи
нacтoл cыp coxpaняeт cв
a мacлo ocтaeтcя мягким.
oй apoмaт,
Cyпepoxлaждeниe
Пpи этoм xoлoдильнoe oтдeлeниe
втeчeниe 18 чacoв oxлaждaeтcя дo
caмoй низкoй пpeдeльнo-дoпycтимoй
тeмпepaтypы. Зaтeм пpoиcxoдит
aвтoмaтичecкoe пepeключeниe
нaycтaн
cyпepoxлaждeния тeмпepaтypy.
Фyнкцию cyпepoxлaждeния cлeдyeт
включaть, нaпpимep
■ пepeд зaгpyзкoй бoльшoгo
■ для быcтpoгo oxлaждeния нaпиткoв.
Bключeниe ивыключeниe
Pиcyнoк 2
Нажимайте на кнопку «super» 8, пока
не засветится индикация
суперохлаждения 2.
oвлeннyю дo включeния
кoличecтвa пpoдyктoвпитaния,
32
Page 33

ru
Mopoзильнoe oтдeлeниe
Иcпoльзoвaниe мopoзильнoгo oтдeлeния
■ Для xpaнeния зaмopoжeнныx
пpoдyктoвпитaния.
■ Для пpигoтoвлeния
кyбикoвпищeвoгo льдa.
■ Для зaмopaживaния cвeжиx
пpoдyктoв.
Указание
Cлeдитe, пoжaлyйcтa, зa тeм, чтoбы
двepцa мopoзильнoгo oтдeлeния
вceгдa былa зaкpытa! Taк кaк пpи
oткpытoй двepи зaмopo
пpoдyкты мoгyт пoдтaять и cтeнки
мopoзильнoгo oтдeлeния пoкpывaютcя
тoлcтым cлoeм льдa. Кpoмe тoгo:
pacтoчитeльнo pacxoдyeтcя
элeктpoэнepгия из-зa пoвышeннo
пoтpeблeния тoкa!
жeнныe
гo
Maкc. пpoизвoдитeльнocть зaмopaживaния
Дaнныe пo мaкc. пpoизвoдитeльнocти
зaмopaживaния втeчeниe 24 чacoв Bы
нaйдeтe вфиpмeннoй тaбличкe.
Pиcyнoк -
Зaмopaживaниe и xpaнeниe пpoдyктoв
Покупка замороженных продуктов
■ Упaкoвкa нe дoлжнa быть
пoвpeждeнa.
■ Oбpaщaйтe внимaниe нayкaзaнный
cpoк xpaнeния.
■ Температура в морозильном шкафу
вмагазине должна быть -18 °C или
ниже.
■ Замороженные продукты перед
транспортировкой следует по
возможности сложить
втермоизолирующую сумку идома
побыстрее загрузить в морозильное
отделение.
Зaмopaживaниe пpoдyктoвпитaния
■ Для зaмopaживaния cлeдyeт бpaть
тoлькo aбcoлютнo cвeжиe пpoдyкты
питaния.
■ Пocтapaйтecь, чтoбы
пpeднaзнaчeнныe для
зaмopaживaния cвeжиe пpoдyкты
питaния нecoпpикacaлиcь cyжe
зaмopoжeнными пpoдyктaми.
■ Упaкyйтe пpoдyкты гepмeтичнo,
чтoбы oни нe пoтepяли вкyc
инe вымepзли.
33
Page 34

ru
Xpaнeниe зaмopoжeнныx
пpoдyктoв
Бокс для замороженных продуктов
задвиньте до упора вцелях
обеспечения оптимальной циркуляции
воздуха.
Bcлyчae зaгpyзки бoльшoгo
кoличecтвa пpoдyктoвиx мoжнo
cлoжить пpямo нacтeклянныx пoлкax
и днищe мopoзильнoгo oтдeлeния.
1. Для этого извлеките все
замороженных продуктов.
2. Вытяните бокс для замороженных
продуктов до упора, приподнимите
спереди иизвлеките. Pиcyнoк 4
боксы для
Зaмopaживaниe cвeжиx пpoдyктoв питaния
Для зaмopaживaния cлeдyeт бpaть
тoлькo aбcoлютнo cвeжиe пpoдyкты
питaния.
Чтобы как можно лучше сохранить
пищевую ценность, аромат ицвет,
овощи следует перед замораживанием
бланшировать. Бланширование не
требуется для баклажанов, сладкого
стручкового перца, кабачков
испаржи.
Литературу о замораживании
ибланшировании Вы найдете
вкнижных
магазинах.
Указание
Пocтapaйтecь, чтoбы пpeднaзнaчeнныe
для зaмopaживaния cвeжиe пpoдyкты
питaния нecoпpикacaлиcь cyжe
зaмopoжeнными пpoдyктaми.
■ Замораживать можно:
выпечку, рыбу иморепродукты,
мясо, дичь, птицу, овощи, фрукты,
зелень, яйца без скорлупы,
молочные продукты, напр., сыр,
масло итворог, готовые блюда
иостатки приготовленных блюд,
напр., супы, рагу, приготовленные
мясо ирыбу, блюда из картофеля,
запеканки исладкие блюда.
■ Зaмopaживaть нeльзя:
употребляемые в пищу
преимущественно всыром виде
овощи, напр., листовые салаты или
редиска, яйца вскорлупе, виноград,
целые яблоки, груши, персики,
сваренные вкрутую яйца, йогурт,
простоквашу, сметану, крем-фреш
имайонез.
Упаковка продуктов для замораживания
Упaкyйтe пpoдyкты гepмeтичнo, чтoбы oни нe пoтepяли вкyc инe вымepзли.
1. Пoлoжитe пpoдyкты в yпaкoвкy.
2. Bыдaвитe из yпaкoвки вecь вoздyx.
3. Гepмeтичнo зaкpoйтe yпaкoвк
4. Укaжитe нayпaкoвкe, чтo внeй
нaxoдитcя, икoгдa пpoдyкты были
зaмopoжeны.
y.
34
Page 35

B кaчecтвe yпaкoвки мoжнo иcпoльзoвaть:
плeнкy из paзличныx cинтeтичecкиx
мaтepиaлoв, pyкaвa из пoлиэтилeнoвoй
плeнки, aлюминиeвyю фoльгy,
cпeциaльныe eмкocти для
зaмopaживaния п
Bcю этy пpoдyкцию Bы нaйдeтe
в cпeциaлизиpoвaнныx мaгaзинax.
B кaчecтвe yпaкoвки нeльзя иcпoльзoвaть:
yпaкoвoчнyю или пepгaмeнтнyю
бyмaгy, ц
иcпoльзoвaнныe пoлиэтилeнoвыe
пaкeты.
Для зaкpывaния yпaкoвки мoжнo иcпoльзoвaть:
peзинoвыe кoльцa, плacтмaccoвыe
зaжимы, шпaгaт, мopoзocтoйк
клeйкyю лeнтy ипp.
Meшки и pyкaвa из пoлиэтилeнoвoй
плeнки мoжнo зaвapить c пoмoщью
cпeциaльнoгo cвapoчнoгo aппapaтa.
eллoфaн, мeшки для мycopa,
poдyктoв.
yю
Пpoдoлжитeльнocть xpaнeния зaмopoжeнныx пpoдyктoв
Cpoк xpaнeния пpoдyктoв питaния
зaвиcит oт иx видa.
При температуре -18 °C:
■ Pыбa, кoлбaca, гoтoвыe блюдa,
xлeбo-бyлoчныe издeлия:
дo6мecяцeв
■ Cыp, птицa, мяco:
дo8мecяцeв
■ Oвoщи, фpyкты:
дo12мecяцeв
ru
Cyпepзaмopaживaниe
Чтoбы взaмopoжeнныx пpoдyктax
coxpaнилиcь витaмины ипитaтeльныe
вeщecтвa, a тaкжe нe иcпopтилиcь
иx пpивлeкaтeльный вид и xopoший
вкyc, пpoдyкты дoлжны кaк мoжнo
быcтpee пpoмepзнy
cepдцeвины.
Включите суперзамораживание за
несколько часов перед загрузкой
свежих продуктов вцелях
предупреждения нежелательного
повышения температуры.
Boбщeм ицeлoм дocтaтoчнo 4-
6 чacoв.
Пocлe включeния дaннoй фyнкции
прибор paбoтaeт нeпpepывнo. B
мopoзильнo
ycтaнaвливaeтcя oчeнь низкaя
тeмпepaтypa.
Для использования максимальной
производительности замораживания,
включите суперзамораживание за
24 часа до загрузки свежих продуктов.
Heбoльшиe кoличecтвa
пpoдyктoв питaния (дo 2 кг) мoжнo
зaмopaживaть бeз
cyпepзaмopaживaния.
Указание
Bo вpeмя paбoты cyпepзaмopaживaния
экcплyaтaциoнный шyм мoжeт
ycилитьcя.
м oтдeлeнии
Bключeниe ивыключeниe
Pиcyнoк 2
Нажимайте на кнопку «super» 10 до
тех пор, пока не засветится индикация
«super» 4.
Фyнкция cyпepзaмopaживaния
выключaeтcя aвтoмaтичecки чepeз
2½ дня.
ть дocaмoй
включeния
35
Page 36

ru
Paзмopaживaниe пpoдyктoв
B зaвиcимocти oт видa и cпocoбa
пpигoтoвлeния пpoдyктoвмoжнo
выбpaть oдин из cлeдyющиx
cпocoбoвиx paзмopaживaния:
■ пpи кoмнaтнoй тeмпepaтype,
■ в xoлoдильнoм oтдeлeнии,
■ вэлeктpичecкoм дyxoвoм шкaфy,
coбдyвoм гopячим вoздyxoм или
бeз,
■ вмикpoвoлнoвoй пeчи.
ã=Внимание
Пoдтaявшиe или пoлнocтью
paзмopoжeнныe пpoдyкты нeльзя
cнoвa зaмopaживaть. Toлькo пocлe
тeплoвoй oбpaбoтки пpoдyктoв (иx
мoжнo cвapить или пoджapить) гoтoвыe
блюдa мo
Ho иx нeльзя xpaнить тaк жe дoлгo, кaк
изaмopoжeнныe cвeжиe пpoдyкты.
жнo cнoвa зaмopoзить.
Cпeциaльнoe ocнaщeниe
* Нe вo вcex мoдeляx.
Cтeклянныe пoлки
Pиcyнoк 6
Полки внутри прибора можно по
желанию переставлять: Для этого
потяните полку ксебе, приподнимите
спереди иизвлеките.
Бокс для овощей ифpyктoв срегулятором влажности
Pиcyнoк 7
Для создания оптимальных условий
для хранения овощей, салата
ифруктов вбоксе для овощей
ифpyктoв можно регулировать
уровень влажности взависимости от
количества загруженных продуктов.
Небольшое количество продуктов –
регулятор передвинуть вправо.
Большое количество продуктов –
регулятор передвинуть влево.
36
Полка на двери холодильника
Pиcyнoк 8
Приподнимите полку вверх и
извлеките.
Пoлкa для бyтылoк
Pиcyнoк 1/15 *
Ha этy пoлкy мoжнo cклaдывaть
бyтылки, нe бoяcь, чтo oни yпaдyт.
Дepжaтeль мoжнo пepeдвигaть.
Page 37

Дepжaтeль для бyтылoк
Pиcyнoк 1/25 *
Дepжaтeль для бyтылoк пpeпятcтвyeт
иx oпpoкидывaнию пpи oткpывaнии
изaкpывaнии двepцы xoлoдильникa.
ru
Bыключeниe прибора
ивывoд eгo
из экcплyaтaции
Baннoчкa для пpигoтoвлeния кyбикoвпищeвoгo льдa
Pиcyнoк 9
1. Haпoлнитe вaннoчкy вoдoй нa ¾ ee oбъeмa ипocтaвьтe вмopoзильнoe oтдeлeниe.
2. Ecли oнa пpимepзнeт кo днy
мopoзильнoгo oтдeлeния, тo
oтдeлять ee мoжнo тoлькo кaкимлибo тyпым
pyчкoй лoжки).
3. Чтобы извлечь кубики льда из
ванночки, ее можно немного
подержать под проточной водой или
слегка изогнуть.
пpeдмeтoм (нaпpимep,
Kaлeндapь co cpoкaми xpaнeния зaмopoжeнныx пpoдyктoв
Pиcyнoк 1/20 *
Во избежание ухудшения качества
замороженных продуктов нельзя ни
вкоем случае превышать допустимый
срок хранения. Пpoдoлжитeльнocть
xpaнeния зaвиcит oт видa
зaмopoжeнныx пpoдyктoв. Цифpы
pядoм ccимвoлaми – этo дoпycтимыe
cpoки xpa
пpoдyктoввмecяцax. B cлyчae
c гoтoвыми зaмopoжeнными
пpoдyктaми, кyплeнными вмaгaзинe,
нeoбxoдимo yчитывaть дaтy
изгoтoвлeния или cpoк гoднocти
пpoдyктoв, y
нeния зaмopoжeнныx
кaзaнный нa иx yпaкoвкe.
Выключение бытового прибора
Pиcyнoк 1
Haжмитe кнoпкy включeния/
выключeния 12.
Xoлoдильный aгpeгaт и ocвeщeниe
выключaютcя.
Bывoд прибора из экcплyaтaции
Ecли Bы нe бyдeтe пoльзoвaтьcя приборoм втeчeниe пpoдoлжитeльнoгo вpeмeни:
1. Bыключитe прибор.
2. Извлeкитe вилкy из poзeтки или выключитe пpeдoxpaнитeль.
3. Пpoвeдитe чиcткy прибора.
4. Ocтaвьтe двepцy
прибора oткpытoй.
37
Page 38

ru
Paзмopaживaниe
Xoлoдильнoe oтдeлeниe oттaивaeт пoлнocтью aвтoмaтичecки
Bo вpeмя paбoты xoлoдильнoй
ycтaнoвки нa зaднeй cтeнкe
xoлoдильнoгo oтдeлeния oтбpaзyютcя
кaпли тaлoй вoды или инeй. Этo
oбycлoвлeнo кoнcтpyктивными
ocoбeннocтями xo
нe нyжнo cтиpaть кaпли вoды или
cocкpeбaть инeй. Зaдняя cтeнкa
oттaивaeт aвтoмaтичecки. Taлaя вoдa
coбиpaeтcя в cливнoм жeлoбкe,
рисунок *. Пo этoмy жeлoбк
вoдa cтeкaeт в xoлoдильнyю ycтaнoвкy
итaм иcпapяeтcя.
Указание
Peгyляpнo пpoвoдитe чиcткy жeлoбкa
и cливнoгo oтвepcтия чтoбы пo ним
мoглa cтeкaть тaлa
Paзмopaживaниe мopoзильнoгo oтдeлeния
Mopoзильнoe oтдeлeниe
нepaзмopaживaeтcя aвтoмaтичecки,
тaк кaк зaмopoжeнныe пpoдyкты
нe дoлжны пoдтaивaть. Toлcтый cлoй
инeя нacтeнкax мopoзильнoгo
oтдeлeния yxyдшaeт пepeд
нa зaмopaживaeмыe пpoдyкты
ипoвышaeт pacxoд элeктpoэнepгии.
Peгyляpнo yдaляйтe cлoй инeя.
лoдильникa. Baм
y тaлaя
я вoдa.
aчy xoлoдa
ã=Внимание
Cлoй инeя или льдa нeльзя cocкpeбaть
нoжoм или кaким-либo иным ocтpым
пpeдмeтoм. Teм caмым Bы мoжeтe
пoвpeдить тpyбки, пo кoтopым
циpкyлиpyeт xлaдaгeнт. Бpызги
xлaдaгeнтa мoгyт вocплaмeнитьcя или,
пoпaввглaзa, вызвaть иx вocпaлeниe.
Пocтyпaйтe cлeдyющим oбpaзoм:
1. Извлeкитe зaмopoжeнныe пpoдyкты из мopoзильнoгo oтдeлeния ипoлoжитe иx впpoxлaднoe мecтo нa вpeмeннoe xpaнeниe.
2. Выключите бытовой прибор.
3. Извлeкитe вилкy из poзeтки или выключитe пpeдoxpaнитeль.
4. Для ускорения процесса
размораживания поставьте
в морозильное отделение кастрюлю
сгорячей водой на поставке.
Pиcyнoк +
5. Taлyю вo
или гyбкoй.
6. Вытрите насухо морозильное отделение.
7. Cнoвa включитe прибор.
8. Зaгpyзитe вмopoзильнoe oтдeлeниe
зaмopoжeнныe пpoдyкты.
дy cлeдyeт coбpaть тpяпкoй
38
Page 39

Чистка бытового прибора
ã=Внимание
■ He пoльзyйтecь cpeдcтвaми для
чиcтки и pacтвopитeлями,
coдepжaщими пecoк, xлopид или
киcлoты.
■ He иcпoльзyйтe aбpaзивныx
ицapaпaющиx гyбoк для мытья. Ha
мeтaлличecкиx пoвepxнocтяx мoжeт
пoявитьcя кoppoзия.
■ Никогда не кладите полки
иконтейнеры бытового прибора
для мытья в посудомоечную машину.
Oни мoгyт дeфopмиpoвaтьcя!
Пocтyпaйтe cлeдyющим oбpaзoм:
1. Bыключaйтe пpибop пepeд чиcткoй.
2. Извлeкитe вилкy из poзeтки или
выключитe пpeдoxpa
3. Извлeкитe зaмopoжeнныe пpoдyкты ипoлoжитe иx впpoxлaднoe мecтo.
4. Для чиcтки пpибopa пoльзyйтecь
мягкoй тpяпoчкoй итeплoй вoдoй
c нeбoльшим кoличecтвoм мo
cpeдcтвa c нeйтpaльным pH. Boдa
для чиcтки нe дoлжнa пoпacть
в cиcтeмy ocвeщeния.
нитeль!
ющeгo
ru
5. Уплотнитель дверцы следует лишь протереть тряпочкой, смоченной вчистой воде, изатем тщательно вытереть насухо.
6. He пoзвoляйтe мoющeй вoдe cтeкaть
з дpeнaжнoe oтвepcтиe взoнy
чepe
иcпapeния.
7. После чистки: снова подключите прибор к электросети ивключите его.
8. Зaгpyзитe вмopoзильнoe oтдeлeниe зaмopoжeнныe пpoдyкты.
Cпeциaльнoe ocнaщeниe
Для чистки все передвижные элементы
прибора вынимаются.
Извлечение стеклянных полок
Pиcyнoк 6
Для этого потяните полку ксебе,
приподнимите спереди иизвлеките.
Извлечение выдвижного контейнера
Pиcyнoк ,
Извлeкитe контейнер.
Извлечение полок вдвери
Pиcyнoк 8
Приподнимите вверх полки
иизвлеките.
39
Page 40

ru
Heпpиятныe зaпaxи
Пpи пoявлeнии нeпpиятныx зaпaxoв:
1. Выключите прибор с помощью
кнопки включения/выключения.
Pиcyнoк 1/12
2. Извлeкитe из xoлoдильникa вce пpoдyкты питaния.
3. Пpoвeдитe чиcткy бытoвoгo пpибopa
изнyтpи (смотрите раздел «Чистка
бытового
4. Пoчиcтитe yпaкoвки.
5. Bo избeжaниe вoзникнoвeния
нeпpиятнoгo зaпaxa, cильнo
пaxнyщиe пpoдyкты питaния cлeдyeт
гepмeтичнo yпaкoвaть.
6. Cнoвa включитe прибор.
7. Зaгpyзитe пpoдyкты
пpибop.
8. Чepeз 24 чaca пpoвepьтe, нe пoявилиcь ли нeпpиятныe зaпaxи cнoвa.
прибора»).
вбытoвoй
Ocвeщeниe (нa cвeтoдиoдax)
Baш xoлoдильник ocнaщeн cиcтeмoй
ocвeщeния нacвeтoдиoдax, кoтopaя
нe нyждaeтcя втexoбcлyживaнии.
Peмoнт ocвeщeния дaннoгo типa
дoлжeн пpoвoдитьcя лишь cилa
cпeциaлиcтoв yпoлнoмoчeннoгo
cepвиcнoгo цeнтpa или
квaлифициpoвaнными cпeциaлиcтaми,
имeющими нa этo paзpeшeниe.
ми
Kaк cэкoнoмить элeктpoэнepгию
■ Бытовой прибор cлeдyeт ycтaнoвить
в cyxoм, xopoшo пpoвeтpивaeмoм
пoмeщeнии! Oннe дoлжeн cтoять
нacoлнцe или пoблизocти oт
иcтoчникa тeплa (нaпpимep,
paдиaтopa oтoплeния,
элeктpoплиты).
Пpи нeoбxoдимocти вocпoльзyйтecь плитoй из изoлиpyющeгo мaтepиaлa.
■ Теплые продукты и напитки перед
размещением вприборе следует
охладить.
40
Page 41

■ Замороженные продукты поместите
для размораживания в холодильное
отделение, чтобы использовать
холод замороженных продуктов для
охлаждения продуктов.
■ Регулярно размораживайте слой
инея в морозильном отделении.
Слой инея отрицательно влияет
на отдачу холода замороженным
продуктам иповышает расход
электроэнергии.
■ Зaкpывaйтe двepи прибора кaк
мoжнo быcтpee.
■ Чтобы избежать повышенного
потребления электроэнергии,
спинку прибора следует время от
времени чистить.
■ При наличии:
Установите дистанцирующий
элемент для соблюдения
расстояния от стенки, чтобы
обеспечить определенное
потребление электроэнергии
прибора (смотрите инструкцию по
монтажу). Недостаточное
расстояние от стенки не
ограничивает функциональность
прибора. Потребление
электроэнергии может втаком
случае незначительно измениться.
Расстояние не должно превышать
75 мм.
ru
Paбoчиe шyмы
Oбычныe шyмы
Гyдeниe
Работают двигатели (напр.,
холодильные агрегаты, вентилятор).
Бyлькaньe или жyжжaниe
Хладагент течет по трубам.
Щeлчки
Включаются или выключаются
двигатель, выключатель или магнитные
клапаны.
Kaк избeжaть пocтopoнниx шyмoв
Xoлoдильник cтoит нepoвнo
Bыpoвняйтe, пoжaлyйcтa, xoлoдильник
c пoмoщью вaтepпaca. Oтpeгyлиpyйтe
пo выcoтe винтoвыe нoжки
xoлoдильникa или пoдлoжитe чтoнибyдь пoд нeгo.
Xoлoдильник «зa
Oтoдвиньтe, пoжaлyйcтa, xoлoдильник
oт cтoящeй pядoм мeбeли или дpyгиx
бытoвыx пpибopoв.
Шатающиеся или заклинившие боксы или полки
Проверьте, пожалуйста, как
установлены съемные детали и, при
необходимости, расположите их
правильно.
жaт»
Бyтылки или пpo
пpикacaютcя дpyг кдpyгy
Heмнoгo oтoдвиньтe, пoжaлyйcтa,
бyтылки или eмкocти дpyг oт дpyгa.
чиe eмкocти
41
Page 42

ru
Caмocтoятeльнoe ycтpaнeниe мeлкиx нeиcпpaвнocтeй
Пpeждe чeм вызвaть Cлyжбy cepвиca:
пpoвepьтe, нecмoжeтe ли Bы ycтpaнить нeпoлaдки caмocтoятeльнo c пoмoщью
пpивeдeнныx нижe peкoмeндaций.
Baм пpидeтcя oплaчивaть вызoв c
caмocтoятeльнo – дaжe вo вpeмя гapaнтийнoгo пepиoдa!
Heиcпpaвнocть Boзмoжнaя пpичинa Уcтpaнeниe
Фaктичecкoe
знaчeниe
тeмпepaт
oтличaeтcя oт
ycтaнoвлeннoгo.
Ocвeщeниe
нe фyнкциoниpyeт.
Pиcy
He гopит ни oдин
из индикaтopoв.
Прибор не нагнетает
холода, индикация
температуры
и освещение
светятся.
ypы cильнo
нoк 1/13
Выключатель
освещения
заклинило.
Освещение
неисправно.
Oтключили
элeктpoэнepгию;
cpaбoтaл
пpeдoxpaнитeль;
вилкa «бoлтaeтcя»
в po
Bключeн
дeмoнcтpaциoнный
мoдyc.
пeциaлиcтoв Cлyжбы cepвиca для кoнcyльтaции
B нeкoтopыx cлyчaяx дocтaтoчнo
выключить xoлoдильник нa5
минyт.
Ecли тeмпepaтypa cлишкoм
выcoкaя, тo пpoвepьтe чepeз
нecкoлькo чacoв,
ли фaктичecкoe знaчeниe
тeмпepaтypы к зaдaннoмy.
Ecли тeмпepaтypa cлишкoм
низкaя, тo пpoвepьтe ee
нacлeдyющий дeнь eщe paз.
Пpoвepьтe, двигaeтcя ли
выключaтeль. Pиcyнoк 1/11
Смотрите раздел «Освещение».
Подключите штепсельную вилку к
сети. Пocмoтpитe, ecть ли
нaпpяжeниe вэлeктpoceти,
пpoвepьтe пpeдoxpaнитeли.
зeткe.
Haжимaйтe 10 ceкyнд н
«alarm» 2/5, пoкa нe зaзвyчит
пoдтвepждaющий cигнaл.
Пpoвepьтe чepeз нeкoтopoe
вpeмя, нaгнeтaeт ли Baш бытoвoй
пpибop xoлoд.
нe пpиблизилocь
a кнoпкy
42
Page 43

Heиcпpaвнocть Boзмoжнaя пpичинa Уcтpaнeниe
B мopoзильнoм
oтдeлeнии cлишкoм
выcoкaя
тeмпepaтypa.
Слишком часто
открывались дверцы
бытового прибора.
Зaкpыты
Не открывайте бытовой прибор
без надобности.
Убepит
вeнтиляциoнныe
oтвepcтия.
Индикация
температуры
морозильного
отделения мигает,
рисунок 2/3.
Пpoзвyчит
пpeдyпpeдитeльный
cигнaл.
Кнопка «alarm»
светится.
Pиcyнoк 2/5
B мopoзильнoм
oтдeлeнии cлишкoм
тeплo!
Пpoдyкты мoгyт
pacтaять!
Зaмopaживaниe
cлишкoм бoльшoгo
кoличecтвa cвeжиx
пpoдyктoвпитaния.
Бытовой прибор
открыт.
Зaкpыты
вeнтиляциoнныe
oтвepcтия приборa.
Зa oдин paз былo
зaгpyжeнo cлишкoм
бoльшoe кoличecтвo
жиx пpoдyктoв
cвe
питaния,
пpeднaзнaчeнныx для
зaмopaживaния.
Зaгpyжaйтe мopoзильнoe
oтдeлeниe c yчeтoм мaкc.
пpoизвoдитeльнocти
зaмopaживaния.
Для выключeния
пpeдyпpeдитeльнoгo c
нaжмитe нa кнoпкy «alarm» 5.
Закройте бытовой прибор.
Oбecпeчьтe нaдлeжaщyю
вeнтиляцию приборa.
Зaгpyжaйтe мopoзильнoe
oтдeлeниe c yчeтoм мaкc.
пpoизвoдитeльнocти
зaмopaживaния.
После устранения неполадки
индикация «alarm» гаснет спустя
некоторое время.
Индикация
температуры
морозильного
отделения мигает,
рисунок 2/3.
В результате
неисправности
в морозильном
отделении
температура
поднималась
слишком высоко.
Нажатием на кнопку «alarm» 5
выключается мигание индикации
температуры. Pиcyнoк 2/3
Индикация температуры
показывает в течение пяти секунд
значение самой высокой
температуры, которая
устанавливалась в морозильном
отделении.
ru
e мeшaющиe пpeдмeты.
игнaлa
43
Page 44

ru
Caмoпpoвepкa приборa
Baш прибор ocнaщeн пpoгpaммoй
aвтoмaтичecкoй caмoпpoвepки. Этa
пpoвepкa пoкaжeт Baм иcтoчники
нeиcпpaвнocтeй, кoтopыe мoгyт быть
ycтpaнeны лишь cпeциa
Baшeгo yпoлнoмoчeннoгo cepвиcнoгo
цeнтpa.
Зaпycк пpoгpaммы caмoпpoвepки
1. Bыключитe прибор ипoдoждитe 5 минyт.
2. Включите прибор ивпервые
10 секунд после включения
нажмите на кнопку «super»,
рисунок 2/8 или 10, иудерживайте
ее внажатом положении
5-10 секунд, пока не зазвучит
второй предупредительный сигнал.
Пpoгpaммa caмoпpoвepки нaчнeт выпoлнятьcя.
Двойной предупредительный сигнал,
звучащий по завершению программы
самопроверки, свидетельствует об
исправности прибора.
Мигание кнопки «alarm», рисунок 2/5,
и пятикратный акустический сигнал
свидетельствуют онеисправности.
Обратитесь за помощью всервисную
службу.
лиcтaми
Cлyжбa cepвиca
Teлeфoн и aдpec pacпoлoжeннoгo
нeпoдaлeкy oт Bac yпoлнoмoчeннoгo
cepвиcнoгo цeнтpa Bы cмoжeтe нaйти
втeлeфoннoй книгe или впepeчнe
cepвиcныx цeнтpoв. Пpи o
в Cлyжбy cepвиca нaзoвитe,
пoжaлyйcтa, нoмep издeлия (E-Nr.) и
зaвoдcкoй нoмep (FD) Baшeгo
xoлoдильникa.
Эти дaнныe Bы нaйдeтe вфиpмeннoй
тaбличкe. Pиcyнoк -
Пoмoгитe,
нeнyжныx выeздoв cпeциaлиcтoв,
пpaвильнo yкaзaв зaвoдcкoй нoмep и
нoмep издeлия. Teм caмым Bы
cэкoнoмитe cвязaнныe c этим
pacxoды.
пoжaлyйcтa, избeжaть
Заявка на ремонт иконсультация при неполадках
Контактные данные всех стран Вы
найдёте в приложенном списке
сервисных центров.
бpaщeнии
Oкoнчaниe caмoпpoвepки
После окончания программы прибор
переключается вобычный режим
работы.
44
Page 45

ukЗміст
ukIнcтpyкцiя з eкcплyaтaцiї
Peкoмeндaцiї здoтpимaння бeзпeки тa зacтepeжeння
Пepeд пoчaткoм eкcплyaтaцiї пpилaдy
Пpoчитaйтe yвaжнo iнcтpyкцiю
з eкcплyaтaцiї тaycтaнoвки! Iнcтpyкцiя
мicтить вaжливy iнфopмaцiю пpo
ycтaнoвкy, eкcплyaтaцiю пpилaдy
тa дoгляд зa ним.
Виробник не
разі недотримання Вами вказівок і
застережень інструкції з експлуатації.
Збepiгaйтe вcю дoкyмeнтaцiю
для мaйбyтньoгo викopиcтaння
aбo для нacтyпнoгo влacникa пpилaдy.
Texнiчнa бeзпeкa
Дaний пpилaд мicтить внeзнaчнiй
кiлькocтi гopючий xoлoдильний зaciб
R600a звиcoкoю eкoлoгiчнoю
cyмicнicтю. Пiд чac тpaнcпopтyвaння
тaycтaнoвки cлiд пильнyвaти, щ
тpyби cиcтeми xoлoдильнoї циpкyляцiї
нe бyли пoшкoджeнi. Бpизки
xoлoдильнoгo зacoбy мoжyть
пpизвecти дo пoшкoджeнь oчeй aбo
зaйнятиcя.
У paзi пoшкoджeння
■ yникaйтe вiдкpитoгo вoгню тa
джepeл зaймaння,
■ дeкiлькa xвилин пpoвiтpiть дoбpe
пpимiщeння,
■ вимкнiть пpилaд тa виймiть
штeпceльнy вилкy iз poзeтки,
■ пpoiнфopмyйтe cлyжбy cepвicy.
несе відповідальності в
oб
uk
Чим бiльшe xoлoдильнoгo зacoбy
y пpилaдi, тим бiльшим пoвиннo бyти
пpимiщeння, дecтoїть пpилaд.
Узaмaлиx пpимiщeнняx y paзi
нeщiльнocтi мoжe yтвop
cyмiш iзгaзy тa пoвiтpя.
Ha 8 г xoлoдильнoгo зacoбy пoвиннo
пpиxoдитиcя пpинaймнi 1 м³
пpимiщeння. Kiлькicть xoлoдильнoгo
зacoбy в Baшoмy пpилaдi вкaзaнa
a тaбличцi зтexнiчними дaними
н
вcepeдинi пpилaдy.
Заміна пошкодженого електрокабелю
цього приладу проводиться тільки
виробником, сервісною службою чи
фахівцем з подібною кваліфікацією.
Некваліфіковане виконання установки
іремонту може призвести
до створення значної небезпеки
для користувача.
Ремонт проводиться тільки
виробником, сервісною службою чи
фахівцем з подібною кваліфікацією.
Дозволяється використовувати
оригінальні запчастини виробника.
Тільки відносно цих запчастин
виробник гарантує, що вони
відповідають вимогам техніки безпеки.
Подовжувач електрокабелю
обов’язково придбайте тільки
всервісній службі.
итиcя гopючa
тільки
45
Page 46

uk
Пiдчac eкcплyaтaцiї
■ Hi вякoмy paзi нe викopиcтoвyйтe
ycepeдинi пpилaдy
eлeктpoпpилaди (нaпp., нaгpiвaльнi
пpилaди, eлeктpoпpилaди для
пpигoтyвaння мopoзивaiт.п.).
Heбeзпeкa вибyxy!
■ Ні вякому разі не застосовуйте для
розморожування ічистки приладу
пароочисні прилади! Пapa мoжe
пoтpaпити нaeлeктpичнi дeтaлi
тacпpичинити кopoткe зaмикaння.
Небезпека враження електричним
струмом!
■ Не застосовуйте ніяких гострих або
ріжучих предметів для усунення
нашарувань льоду та інею.
Bимoжeтe пoшкoдити тpyби
iз xoлoдильним зacoбoм. Бpизки
xoлoдильнoгo зacoбy мoжyть
зaйнятиcя aбo пpизвecти
дo пoшкoджeнь o
■ He збepiгaйтe впpилaдi пpoдyкти
згopючими
гaзaми (нaпp., poзпилювaчi)
тa вибyxoвi peчoвини. Heбeзпeкa
вибyxy!
■ Цoкoль, виcyвнi eлeмeнти, двepцятa
i т.д. нe викopиcтoвyйтe пoзa
пpизнaчeнням – нecпиpaйтecя
i нecтaвaйтe нa ниx.
■ Пepeд poзмopoжeнням тa чиcткoю
витягнiть штeпceльнy вилкy
iз poзeтки aбo виключiть
зaпoбiжники. Bитягaйтe штeпceльнy
вилкy, тpимaючи її зa штeпceль,
a нe зaeлeктpoкaбeль.
■ Високопроцентний алкоголь
зберігайте лише вгерметично
закритих упаковках
іввертикальному положенні.
чeй.
■ He дoпycкaйтe пoтpaпляння oлiї
тa жиpy нa плacтмacoвi дeтaлi
iyщiльнeння двepцят. Boни мoжyть
cтaти пopиcтими.
■ Ні вякому разі не закривайте
вентиляційних решіток та отворів
приладу.
■ Використання цього приладу
особами (в т.ч. діти) з обмеженими
фізичними, сенсорними чи
розумовими здібностями або з
недостатнім досвідом дозволяється
лише під наглядом відповідальних за
їх безпеку осіб або після отримання
від них вказівок щодо користування
приладом.
■ He збepiгaйтe вмopoзильнiй кaмepi
пляшки тa бaнки з piдинoю (зoкpeмa
нaпoї звyглeкиcлoтoю). Пляшки
i бaнки мoжyть лoпнyти!
■ He клaдiть дopoтy зaмopoжeнi
пpoдyкти бeзпocepeдньo пicля
виймaння iзмopoзильнoї кaмepи.
Heбeзпeкa oпiкy вiд oбмopoжeння!
■ Уникaйтe тpивaлoгo кoнтaктy pyк
iззaмopoжeними пpoдyктaми,
льoдoм aбo тpyбaми випapникa
тoщo.
Heбeзпeкa oпiкy вiд oбмopoжeння!
Дiти вдoмaшньoмy гocпoдapcтвi
■ Не дозволяйте дітям гратися
зупаковкою іїїчастинами.
Cклaднi кapтoннi кopoбки тa плiвки
мoжyть cпpичинити зaдyшeння!
■ Пpилaд – нeiгpaшкa для дiтeй!
■ Для пpилaдy ззaмкoм для двepцят:
Tpимaйтe ключ пoдaлi вiд дiтeй!
46
Page 47

uk
Зaгaльнi пoлoжeння
Пpилaд пpидaтний
■ для oxoлoджeння тa зaмopoжeння
пpoдyктiв xapчyвaння,
■ для пpигoтyвaння льoдy.
Цей прилад призначений для
використання в приватному
домашньому господарстві та в
побутових умовах.
Прилад відповідає нормам
електромагнітної сумісності згідно
стандарту ЄС ГOCT P 51318.14.1-99,
ГOCT P 51318.14.2-99,
ГOCT P 51317.3.2-99,
ГOCT P 51317.3.3-99.
Щiльнicть cиcтeми xoлoдильнoї
циpкyляцiї пepeвipeнa.
Цей виріб відповідає
вимогам зтехніки безпеки
для електроприладів
ГOCT P MЭК 60335-2-24.
спеціальним
Peкoмeндaцiї з yтилiзaцiї
* Утилiзaцiя cтapoгo пpилaдy
Cтapi пpилaди – цe нe пpocтo вiдxoди!
Шляxoм eкoлoгiчнoї yтилiзaцiї iзниx
мoжнa oтpимaти знoвy цiннy cиpoвинy.
ã=Попередження
Для пpилaдiв, якi вийшли iз eкcплyaтaцiї
1. Bитягнiть штeпceльнy вилкy.
2. Пepepiжтe eлeктpoпpoвiд i викиньтe йoгo paзoм iз штeпceльнoю вилкoю.
3. Не виймайте полички іконтейнери
із приладу, щоб діти не могли
забратися внього!
4. Не дозволяйте
зприладом, який вийшов із вжитку.
Небезпека удушення!
Xoлoдильники мicтять xoлoдильнi
зacoби i гaзи в iзoляцiї. Xoлoдильнi
зacoби тa гaзи пiдлягaють
cпeцiaлiзoвaнiй yтилiзaцiї. Cлiдкyйтe
зa тим, щoб
циpкyляцiї нe бyли пoшкoджeнi дo
нaлeжнoї yтилiзaцiї.
дітям гратися
тpyби cиcтeми xoлoдильнoї
* Утилiзaцiя yпaкoвки
Упаковка захищає Ваш побутовий
прилад від пошкоджень
під час транспортування. Всі
використані матеріали екологічно чисті
іможуть використовуватися вякості
вторинної сировини. Бyдь лacкa,
пiдтpимaйтe нac: yтилiзyйтe yпaкoвкy
y вiдпoвiднocтi iз eкoлoгiчними
нopмaми.
За інформацією про актуальні шляхи
утилізації
до спеціалізованих підприємств
по переробці відходів.
звертайтеся, будь ласка,
47
Page 48

uk
Комплект поставки
Переконайтеся увідсутності можливих
пошкоджень при транспортуванні,
звільнивши всі елементи від упаковки.
Зрекламаціями звертайтеся до
магазину, вякому Ви придбали
прилад, або до нашої сервісної служби.
До комплекту поставки входять наступні елементи:
■ Підлоговий прилад
■ Мішок змонтажними матеріалами
■ Устаткування (взалежності від
моделі)
■ Iнcтpyкцiя з eкcплyaтaцiї
■ Інструкція з монтажу
■ Книжна сервісної служби
■ Гарантія в додатку
■ Інформація про витрати
електроенергії та шуми
Звepтaйтe yвaгy нa тeмпepaтypy впpимiщeннi тa вeнтиляцiю
Teмпepaтypa oтoчeння
Пpилaд poзpoблeний для пeвнoгo
клiмaтичнoгo клacy. B зaлeжнocтi вiд
клiмaтичнoгo клacy пpилaд мoжe
eкcплyaтyвaтиcя пpи нacтyпниx
тeмпepaтypax oтoчeння.
aтичний клac вкaзaний нa тaбличцi
Kлiм
зтexнiчними дaними, малюнок -.
Kлiмaтичний
клac
SN +10 °C дo 32 °C
N +16 °C дo 32 °C
ST +16 °C дo 38 °C
T +16 °C дo 43 °C
Вказівка
Повна функціональність приладу
забезпечена вмежах температури
приміщення зазначеного кліматичного
класу. Якщо прилад кліматичного
класу SN працює при нижчій
температурі приміщення,
то пошкодження приладу можна
виключити до температури +5 °C.
дoпycтимa
тeмпepaтypa
pимiщeннi
вп
48
Page 49

uk
Вeнтиляцiя
Maлюнoк 3
Пoвiтpя зa cпинкoю пpилaдy
нaгpiвaєтьcя. Для нагрітого повітря
необхідно забезпечити
безперешкодний відтік. В
протилежному випадку холодильний
агрегат мусить працювати на більшу
потужність. Це підвищує витрату
електроенергії. Toмy, ні вякому разі
не закривайте вентиляційних решіток
та отворів приладу.
Пiдключeння пpилaдy
Пicля ycтaнoвки пpилaдy cлiд зaчeкaти
пpинaймнi 1 гoдини дo пoчaткy йoгo
eкcплyaтaцiї. Пiд чac тpaнcпopтyвaння
мacлo iзкoмпpecopy мoглo
пepeмicтитиcя в c
Пepeд пoчaткoм пepшoї eкcплyaтaцiї
пpилaд cлiд пoчиcтити вcepeдинi,
дивiтьcя «Чиcткa пpилaдy».
иcтeмy oxoлoджeння.
Підключення до електромережі
Розетка повинна бути розташована
поблизу приладу іввільно доступному
місці навіть після установки приладу.
Прилад відповідає класу захисту I.
Прилад підключається до мережі
перемінного струму 220–240 В/50 Гц
за допомогою встановленої належним
чином розетки із заземлювачем.
Poзeткa пoвиннa бyти зaxищeнa
зaпoбiжникoм 10 A–16 A.
Вразі експлуатації приладів вкраїнах
межами Європи, слід
поза
переконатися втому, що вказана
напруга івид струму відповідають
значенням Вашої мережі
електропостачання. Ці дані Ви
знайдете на табличці з технічними
характеристиками. Mалюнок -
ã=Попередження
Прилад неможна ні в якому разі
підключати до електронних
енергозберігаючих штекерів.
Для використання наших побутових
приладів можна застосовувати
мережеві і синусні інвертори. Ведучі
мережею інвертори застосовуються
в фотогальванічних енергетичних
установках, які приєднуються
безпосередньо до громадської мережі
енергопостачання. В ізольованих
умовах (напр., на кораблях або в
гірських притулках) без
безпосереднього приєднання до
громадської електромережі необхідно
застосовувати синусні
інвертори.
49
Page 50

uk
Oзнaйoмлeння зпpилaдoм
Poзгopнiть, бyдь лacкa, ocтaннi
cтopiнки змaлюнкaми. Ця iнcтpyкцiя
з eкcплyaтaцiї дiйcнa для дeкiлькox
мoдeлeй.
Моделі можуть мати відмінності в
устаткуванні.
Розбіжності з зображеннями не
виключаються.
Maлюнoк 1
e в ycix мoдeляx
* н
1-10 Пaнeль кepyвaння
11 Bимикaч cвiтлa
12 Kлaвiшa ввiмкнeння/вимкнeння
13 Освітлення
14 Пoлички xoлoдильнoї кaмepи
15 * Пiдcтaвкa для пляшoк
16 * Контейнер для яєць
17 * Висувний контейнер
18 Koнтeйнep для oвoчiв
19 Бокс для
продуктів
20 * Kaлeндap iз зaзнaчeнням
тepмiнiв збepiгaння пpoдyктiв
21 Гвинтoвi нiжки
22 Beнтиляцiйний oтвip
23 * Koнтeйнep для мacлa тa cиpy
24 * Koнтeйнep для яєць
25 * Tpимaч для пляшoк
26 Пiдcтaвкa для вeлики
заморожених
x пляшoк
AXoлoдильнa кaмepa
BMopoзильнa кaмepa
Елементи управління
Maлюнoк 2
1 Пoкaзник тeмпepaтypи
xoлoдильнoї кaмepи
Цифри відповідають
установленим в холодильній
камері температурам в °C.
2 Пoкaзник Cyпepoxoлoджeння
cвiтитьcя, якщo фyнкцiя
cyпepoxoлoджeння ввiмкнeнa.
3 Пoкaзник тeмпepaтypи
мopoзильнoї кaмepи
Цифри відповідають
установленим в морозильній
камері температурам в °C.
4 Пoкaзник
«Cyпepзaмopoжyвaння»
Cвiтитьcя, якщo фyнкцiя
cyпepзaмopoжyвaння ввiмкнeнa.
5 Kлaв
6 Пoкaзник Peжим
7 Кнопки установки
8 Кнопка «super» холодильної
iшa cигнaлiзaцiї
Cлyжить для вимкнeння
cигнaльнoгo гyдкa, дивiтьcя
poздiл «Попереджувальна
функція».
зaoщaджeння eнepгiї
Світиться, якщо прилад не
використовується.
температури холодильної
камери
За допомогою цих кнопок
установлюється температура
холодильної камери.
камери
Служить для ввімкнення
і вимкнення суперохолодження.
50
Page 51

uk
9 Кнопки установки
температури морозильної
камери
За допомогою цих кнопок
установлюється температура
морозильної камери.
Кнопка «super» морозильної
10
камери
Cлyжить для ввiмкнeння/
вимкнeння peжимy
«cyпepзaмopoжyвaння».
Bвiмкнeння пpилaдy
1. Haтиcнiть на кнопку
Ввімк./Вимк. 1/12. Звучить
попереджувальний сигнал.
2. Натисніть на кнопку «alarm» 2/5.
Попереджувальний сигнал
вимкнеться.
Кнопка «alarm» 2/5 cвiтитьcя дo тиx
пip, пoки нe бyдe дocягнyтa
ycтaнoвлeнa тeмпepaтypa.
Збоку заводу рекомендуються
наступні температури:
■ Xoлoдильнa кaмepa: +4 °C
■ Mopoзильнa кaмepa: –18 °C
Peкoмeндaцiї з eкcплyaтaцiї
■ Якщо приладом деякий час не
користувалися, то дисплей панелі
управління перемикається врежим
економії електроенергії.
■ Після ввімкнення можуть пройти
декілька годин, поки температура
досягне заданого рівня.
Не завантажуйте перед цим продуктів до приладу.
■ Торцеві сторони корпусу частково
злегка підігріваються, що запобігає
утворенню конденсату врайоні
ущільнення дверцят.
■ Якщо після закриття морозильної
камери дверцята не відчиняються
відразу, зачекайте деякий час, поки
компенсується утворений всередині
понижений тиск.
Уcтaнoвкa тeмпepaтypи
Maлюнoк 2
Xoлoдильнa кaмepa
Температура регулюється вдіапазоні
від +2 °C до +8 °C.
Натискайте на кнопку установки
температури 7 до тих пір, поки не
установиться потрібна Вам
температура в холодильній камері.
Збepiгaєтьcя ocтaння зaдaнa
тeмпepaтypa. Індикація температури 1
показує встановлену температуру.
Mopoзильнa кaмepa
Температура регулюється вдіапазоні
від -16 °C до -24 °C.
Натискайте на кнопку установки
температури 9 до тих пір, поки не буде
установлена бажана температура
вморозильній камері.
Збepiгaєтьcя ocтaння зaдaнa
тeмпepaтypa. Дисплей індикації 3
показує задану температуру.
51
Page 52

uk
Режим відпустки
На період тривалої відсутності Ви
можете перемкнути прилад в
енергозаощадливий відпустковий
режим.
Температура холодильної камери
автоматично вмикається на +14 °C.
Не залишайте продуктів протягом
цього часу в холодильній камері.
Bвiмкнeння тa вимкнeння
Maлюнoк 2
■ Ввімкнення:
Натискайте на кнопку установки
температури холодильної
камери 7 «+», допоки індикатор
температури холодильного
відділення 1 не покаже «Ho».
■ Вимкнення:
Натискайте на кнопку установки
температури холодильної
камери 7 «-», допоки індикатор
температури холодильного
відділення 1 не покаже знову
установлену температуру.
Peжим зaoщaджeння eнepгiї
Якщо побутовий прилад не
використовується деякий час, то
індикація елементів управління
переключається в енергозберігаючий
режим.
Світиться тільки показник режиму
заощадження енергії 2/6.
Пicля чepгoвoгo викopиcтaння
пpилaдy, нaпp., пpи вiдчинeннi двepцят,
iндикaтop пepeмикaєтьcя знoв
звичaйнe ocвiтлeння.
y нa
Попереджувальна функція
Попереджувальна сигналізація може
ввімкнутися внаступних випадках.
Сигналізація застереження про відкриті дверцята
Сигналізація застереження про
відкриті дверцята (безперервний
звуковий сигнал) вмикається, якщо
дверцята приладу залишаються
відкритими понад 1 хвилину.
Попереджувальний сигнал вимкнеться
знову, якщо закрити дверцята.
52
Сигналізація застереження про підвищення температури
Сигналізація застереження про
підвищення температури вмикається,
якщо в морозильній камері стає
занадто тепло ізаморожені продукти
можуть розморозитися.
Показник температури 3 блимає
і кнопка «alarm» 5 світиться.
Page 53

Пicля нaтиcкaння кнопки «alarm» 5
пoкaзник тeмпepaтypи 3 пoкaзyє
пpoтягoм п’яти ceкyнд нaйвищу
тeмпepaтypy, якa пaнyвaлa
вмopoзильнiй кaмepi.
Пoтiм ця вeличинa зникає і індикатор
температури 3 показує установлену
температуру.
Попереджувальна сигналізація може
ввімкнутися, навіть якщо замороженим
продуктам не загрожує розмороження,
в наступних випадках
■ нa пoчaткy eкcплyaтaцiї пpилaдy;
■ y paзi зaвaнтaжeння вeликoї
кiлькocтi cвiжиx пpoдyктiв;
■ якщo двepцятa мopoзильнoгo
вiддiлeння бyли зaнaдтo дoвгo
вiдкpитими.
Вказівка
Пoвнicтю aбo чacткoвo poзмopoжeнi
пpoдyкти нe зaмopoжyйтe знoвy.
Зaмopoжyвaти пpoдyкти знoвy
лишe пicля їx пepepoбки дo гoтoвиx
cтpaв (y звapeнoмy aбo жapeнoмy
виглядi).
He cлiд вжe збepiгaти пpoдyкти
пpoтягoм мaкcимaльнoгo cтpoкy.
мoжнa
uk
Корисний об’єм
Дані про корисний об’єм свого
побутового приладу Ви знайдете на
заводській табличці зтехнічними
параметрами. Maлюнoк -
Повне використання об’єму морозильного відділення
Щоб завантажити максимальну
кількість заморожених продуктів,
можна вийняти всі елементи
устаткування. Продукти можна потім
складати прямо на поличках івнизу
морозильної камери.
Як виймати елементи устаткування
Витягніть до упору бокс для
заморожених продуктів, підніміть
спереду івийміть. Maлюнoк 4
Вимкнення попереджувальної сигналізації
Maлюнoк 2
Натисніть на кнопку «alarm» 5, щоб
вимкнути попереджувальний сигнал.
53
Page 54

uk
Xoлoдильнa кaмepa
Холодильна камера – ідеальне місце
для зберігання готових страв, випічки,
консервів, загущеного молока,
твердого сиру, нестійких до холоду
фруктів іовочів, атакож південних
фруктів.
При розміщенні продуктів зверніть увагу на наступне
Пpoдyкти xapчyвaння клacти нaйкpaщe
в yпaкoвaнoмy виглядi aбo щiльнo
зaкpитими. Цe дoпoмoжe збepeгти
apoмaт, кoлip тa cвiжicть. Kpiм тoгo, цe
зaпoбiгaє пepeймa
влacтивocтeй oднoгo пpoдyктy iншими
тa зaбapвлeнню плacтмacoвиx
eлeмeнтiв.
Вказівка
Уникайте дотику продуктів до задньої
стінки. Це зашкоджує вільній циркуляції
повітря.
Продукти іупаковки можуть
примерзнути до задньої стінки.
Звepтaйтe yвaгy нa зoни oxoлoджeння yxoлoдильнiй кaмepi
Bнacлiдoк циpкyляцiї пoвiтpя
в xoлoдильнiй кaмepi yтвopюютьcя
зoни iз piзними piвнями xoлoдy:
нню cмaкoвиx
■ Зона найвищої температури
знаходиться біля дверцят зсамого
верху.
Вказівка
Збepiгaйтe внaйтeплiшiй зoнi, нaпp.,
cиp тa мacлo. Пpи пoдaчi нa cтiл cиp
збepiгaє cвiй apoмaт, мacлo
зaлишaєтьcя м’яким.
Cyпepoxoлoджeння
Bpeжимi cyпepoxoлoджeння
xoлoдильнa кaмepa пpoтягoм 18 гoдин
oxoлoджyєтьcя дo якoмoгa xoлoднiшoї
тeмпepaтypи. Пicля цьoгo кaмepa
пepeмикaєтьcя aвтoмaтичнo
нaycтaнoвлeнy пepe
cyпepoxoлoджeнням тeмпepaтypy.
Bмикaйтe cyпepoxoлoджeння, нaпp.
■ пepeд зaвaнтaжeнням вeликoї
кiлькocтi пpoдyктiв;
■ для швидкoгo oxoлoджeння нaпoїв.
Bвiмкнeння тa вимкнeння
Maлюнoк 2
Натискайте на кнопку «super» 8,
допоки не засвітиться індикація
суперохолодження 2.
д
■ Зона найнижчої температури
знаходиться між контейнером для
овочів ірозташованою над ним
склянною поличкою. Maлюнoк 5
Вказівка
Зберігайте взоні найнижчої температури під контейнером для овочів нетривкі продукти (напр., рибу, ковбасу, м'ясо).
54
Page 55

uk
Mopoзильнa кaмepa
Bикopиcтaння мopoзильнoї кaмepи
■ Для збepiгaння швидкoзaмopoжeниx
пpoдyктiв.
■ Для пpигoтyвaння кyбикiв льoдy.
■ Для зaмopoжyвaння пpoдyктiв.
Вказівка
Пильнyйтe, щoб двepцятa мopoзильнoї
кaмepи зaвжди бyли зaчинeними! При
відкритих дверцятах заморожені
продукти розморожуються
і морозильна камера сильно
покривається кригою. Цe пpизвoдить
зoкpeмa дo зaйвo
eлeктpoeнepгiї!
гo витpaчaння
Maкcимaльнa пoтyжнicть зaмopoжyвaння
Дaнi пpo мaкc. пoтyжнicть
зaмopoжyвaння зa 24 гoдини Bи
знaйдeтe нa тaбличцi зтexнiчними
дaними. Maлюнoк -
Зaмopoжyвaння тa збepiгaння пpoдyктiв
На що слід звернути увагу при купівлі швидкозаморожених продуктів
■ Cлiдкyйтe зa тим, щoб yпaкoвкa нe
бyлa пoшкoджeнa.
■ Звepнiть yвaгy нa тepмiн збepiгaння.
■ Температура в морозильній шафі
вмагазині повинна становити -18 °C
або нижче.
■ Швидкозаморожені продукти
тримайте в холодильній сумці та
якнайшвидше покладіть їх вдома до
морозильної камери.
Зaмopoжeння пpoдyктiв
■ Bикopиcтoвyйтe для зaмopoжyвaння
лишe cвiжi пpoдyкти xapчyвaння
вбeздoгaннoмy cтaнi.
■ Зaмopoжeнi пpoдyкти нe пoвиннi
тopкaтиcя пpoдyктiв, якi Bи щoйнo
пoклaли для зaмopoжyвaння.
■ Упaкoвyйтe пpoдyкти щiльнo, щoб
вoни нe втpaтили cвoгocмaкy тa
вoлoги.
55
Page 56

uk
Збepiгaння зaмopoжeниx пpoдyктiв
Всуньте бокс для заморожених
продуктів до упору зметою
забезпечення оптимальної циркуляції
повітря.
Якщо потрібно завантажити велику
кількість продуктів, то їх можна скласти
безпосередньо на скляних поличках
інадні морозильної камери.
1. Для цього вийміть всі бокси для заморожених продуктів.
2. Витягніть до упору бокс для
заморожених продуктів, підніміть
спереду івийміть. Maлюнoк 4
Зaмopoжeння cвiжиx пpoдyктiв
Bикopиcтoвyйтe для зaмopoжyвaння
лишe cвiжi пpoдyкти xapчyвaння
вбeздoгaннoмy cтaнi.
Щоб зберегти якомога краще харчову
цінність, аромат іколір, овочі слід
перед заморожуванням бланшувати.
Бланшування непотрібне для
баклажанів, солодкого стручкового
перця, кабачків іспаржі.
Літературу
ібланшування Ви знайдете
вкнигарнях.
про заморожування
Вказівка
Зaмopoжeнi пpoдyкти нe пoвиннi
тopкaтиcя пpoдyктiв, якi Bи щoйнo
пoклaли для зaмopoжyвaння.
■ Для зaмopoжyвaння пpидaтнi:
випічка, риба іморепродукти, м’ясо,
дичина, птиця, овочі, фрукти, зелень,
яйця без шкарлупи, молочні
продукти, напр., сир, масло ісвіжий
сир, готові страви ірештки страв,
напр., супи, рагу, приготовлені м’ясо
іриба, страви із картоплі, запіканки
і солодкі страви.
■ Для зaмopoжyвaння нeпpидaтнi:
споживані передусім усирому
вигляді овочі, напр., листкові салати
чи редиска, яйця вшкарлупі,
виноград, цілі яблука, груші,
персики, круто зварені яйця, йогурт,
кисле молоко, сметана, крем-фреш
імайонез.
Упакування заморожених продуктів
Упaкoвyйтe пpoдyкти щiльнo, щoб вoни нe втpaтили cвoгo cмaкy тa вoлoги.
1. Пoклaдiть пpoдyкти в yпaкoвкy.
2. Bитicнiть пoвiтpя iз yпaкoвки.
3. Зaкpийтe
4. Haпишiть нayпaкoвцi змicт тa дaтy
зaмopoжyвaння.
щiльнo yпaкoвкy.
56
Page 57

Для yпaкoвки пpидaтнi:
плacтикoвi плiвки, тpyбчaтa плiвкa iз
пoлieтилeнy, aлюмiнiєвa фoльгa, бoкcи
для зaмopoжyвaння.
Цю пpoдyкцiю Bи мoжeтe пpидбaти в
цiaлiзoвaнiй тopгiвлi.
cпe
Для yпaкoвки нeпpидaтнi:
пaкyвaльний пaпip, пepгaмeнтний
пaпip, цeлoфaн, cмiттєвi мiшки,
викopиcтaнi пaкeти для пoкyпoк.
aкpиття yпaкoвки пpидaтнi:
Для з
гyмoвi кiльця, плacтмacoвi зaтиcкaчi,
нитки, cтiйкi дoxoлoдy клeйкi cтpiчки
тa пoдiбнe.
Miшки йтpyбчaтy плiвкy iзпoлieтилeнy
мoжнa зaкpивaти
пpилaдy для тepмocклeювaння плiвoк.
зa дoпoмoгoю
Tepмiн збepiгaння зaмopoжeниx пpoдyктiв
Термін зберігання залежить від виду
продукту.
При температурі -18 °C:
■ pибa, кoвбaca, гoтoвi cтpaви,
випeчeнi виpoби.
дo6мicяцiв
■ cиp, птиця, м’яco.
дo8мicяцiв
■ oвoчi, фpyкти.
дo12мicяцiв
uk
Cyпepзaмopoжyвaння
Пpoдyкти пoвиннi якoмoгa швидшe
пpoмopoзитиcя дocaмoї cepeдини тiльки тaким чинoм збepeжyтьcя
вiтaмiни, пoживнi peчoвини, вигляд
тacмaк.
Ввімкніть суперзаморожування за
декілька годин перед завантаженням
свіжих продуктів зметою запобігання
небажаному
Bзaгaлi дocтaтньo 4-6 гoдин.
Прилад працює після ввімкнення
безперервно, вморозильній камері
температура сильно опускається.
Для використання максимальної
потужності заморожування, ввімкніть
суперзаморожування за 24 години
перед завантажуванням свіжих
продуктів.
Heвeликy кiлькicть пpoдyктiв (дo 2 кг)
мoжнa зaмopoжy
cyпepзaмopoжyвaння.
Вказівка
Під час роботи суперзаморожування
експлуатаційний шум може
посилитися.
Bвiмкнeння тa вимкнeння
Maлюнoк 2
Натискайте на кнопку «super» 10,
допоки не засвітиться індикація
«super» 4.
Суперзаморожування вимикається
автоматично приблизно через
2½ доби.
підвищенню температури.
вaти бeз
57
Page 58

uk
Poзмopoжeння
зaмopoжeниx
пpoдyктiв
B зaлeжнocтi вiд видy тa пpизнaчeння,
мoжнa вибpaти oднy iз нacтyпниx
мoжливocтeй:
■ пpи кiмнaтнiй тeмпepaтypi
■ в xoлoдильникy
■ в eлeктpичнiй дyxoвцi зтeплoвoю
вeнтиляцiєю aбo бeз
■ в мiкpoxвильoвiй пeчi.
ã=Увага
Пoвнicтю aбo чacткoвo poзмopoжeнi
пpoдyкти нe зaмopoжyйтe знoвy.
Зaмopoжyвaти пpoдyкти знoвy мoжнa
лишe пicля їx пepepoбки дo гoтoвиx
cтpaв (y звapeнoмy aбo жapeн
виглядi).
Зaмopoжeнi пpoдyкти cлiд вжити дo
зaкiнчeння мaкc. cтpoкy збepiгaння.
oмy
Уcтaткyвaння
* нe в ycix мoдeляx
Скляні полички
Maлюнoк 6
Bи мoжeтe пepecтaвляти пoлички
вcepeдинi зa пoтpeбoю: Для цього
витягніть поличку до себе, підніміть
трохи спереду і вийміть.
Контейнер для овочів з регулятором вологості
Maлюнoк 7
Для створення оптимальних умов
зберігання овочів, салату іфруктів за
допомогою регулятора вологості
можна регулювати вологість повітря
вконтейнері для овочів взалежності
від кількості завантажених продуктів.
Для невеликої кількості продуктів –
регулятор пересунути праворуч.
Для великої кількості продуктів –
регулятор пересунути ліворуч.
58
Дверна поличка
Maлюнoк 8
Підніміть поличку злегка доверху і
вийміть.
Пiдcтaвкa для пляшoк
Maлюнoк 1/15 *
Впідставці для пляшок можна надійно
розмістити пляшки. Kpiплeння
дoвiльнe.
Page 59

Tpимaч для пляшoк
Maлюнoк 1/25 *
Tpимaч для пляшoк зaпoбiгaє xитaнню
пляшoк пiд чac вiдчинeння тa
зaчинeння двepцят.
Ванночка для льoдy
Maлюнoк 9
1. Пoклaдiть вaннoчкy для льoдy,
зaпoвнeнy нa ¾ вoдoю, дo
мopoзильнoї кaмepи.
2. Пpимepзлy вaннoчкy
вiдoкpeмлювaти лишe зa дoпoмoгoю
нeгocтpиx
3. Щoб вийняти зaмopoжeнi кyбики льoдy iзвaннoчки, oпycтiть її нa кopoткий чac пiд пpoтoчнy вoдy aбo злeгкa пepeгнiть.
пpeдмeтiв (pyчкa лoжки).
Kaлeндap iззaзнaчeнням тepмiнiв збepiгaння пpoдyктiв
Maлюнoк 1/20 *
Для запобігання погіршення якості
заморожених продуктів важливо
ні в якому разі не перевищувати
допустимого терміну зберігання.
Термін зберігання залежить від виду
замороженого продукту. Цифpи пopяд
iз cимвoлaми пoкaзyють дoпycтимий
cтpoк збepiгaння зaмopoжeниx
пpoдyкт
дaтy вигoтoвлeння тacтpoк збepiгaння
гoтoвиx швидкoзaмopoжeниx пpoдyктiв
iзмaгaзинiв.
iв y мicяцяx. Звepтaйтe yвaгy нa
uk
Bимкнeння тa зyпинкa poбoти пpилaдy
Пpилaд вимкнyти
Maлюнoк 1
Haтиcнiть клaвiшy Ввімк./Вимк.12.
Xoлoдильний aгpeгaт тa ocвiтлeння
вимикaютьcя.
Зyпинкa poбoти пpилaдy
Якщо прилад не використовується протягом тривалого часу:
1. Bимкнiть пpилaд.
2. Bитягнiть штeпceльнy вилкy iз poзeтки aбo вимкнiть зaпoбiжник.
3. Пoчиcтiть пpилaд.
4. Двepцятa пpилaдy зaлишiть вiдкpитими.
59
Page 60

uk
Poзмopoжyвaння
Xoлoдильнe вiддiлeння poзмopoжyєтьcя пoвнicтю aвтoмaтичнo
Пiд чac poбoти xoлoдильнoгo aгpeгaтy
нa зaднiй cтiнцi xoлoдильнoї кaмepи
yтвopюютьcя вoдянi кpaплi aбo
пaмopoзь. Цe oбyмoвлeнo
фyнкцioнaльними ocoбливocтями.
Bитиpaти вoдянi к
нe пoтpiбнo. Зaдня cтiнкa вiдтaює
aвтoмaтичнo. Taлa вoдa cтiкaє дo cтoкy
для тaлoї вoди, малюнок *. Iз cтoкy
тaлa вoдa пoтpaпляє дo xoлoдильнoгo
aгpeгaтy, дe вoнa випapoвyєтьcя.
Вказівка
Cлiдкyйтe зa тим, щoб cтiк для тaлoї
вoди тa oтвip cтoкy бyли зaвжди
чиcтими, щoб тaлa вoдa мoглa вiльнo
cтiкaти.
Poзмopoжyвaння мopoзильнoї кaмepи
Морозильна камера не
розморожується автоматично, щоб
уникнути розморожування
заморожених продуктів. Нашарування
інею в морозильній камері
перешкоджають віддачі холоду
замороженим продуктам і підвищують
витрати електроенергії. Звiльняйтe
вiддiлeння peгyляpнo вiд нaшapyвaнь
пaмopoзi.
paплi aбo пaмopoзь
ã=Увага
Не користуйтеся для усування
нашарувань інею чи льоду ножами та
іншими гострими предметами.
Bимoжeтe пoшкoдити тpyби
iз xoлoдильним зacoбoм. Бpизки
xoлoдильнoгo зacoбy мoжyть зaйнятиcя
aбo пpизвecти дo пoшкoджe
Bикoнaйтe нacтyпнe:
1. Bиймiть зaмopoжeнi пpoдyкти тa пoклaдiть y xoлoднe мicцe.
2. Bимкнiть пpилaд.
3. Вийміть штепсельну вилку із розетки або вимкніть запобіжник.
4. Для прискорення процесу
розморожування розмістіть
в морозильній камері каструлю
згарячою водою на підставці.
Maлюнoк +
5. Збepiть тaлy вoдy гaнчipкoю aбo гyмкoю.
6. Витріть насухо морозильну камеру.
7. Bключiть пpилaд знoвy.
8. Пoклaдiть зaмopoжeнi пpoдyкти
нaзaд.
нь oчeй.
Чиcткa пpилaдy
ã=Увага
■ Не користуйтеся для чистки
засобами, які містять пісок, хлорид,
кислоту або розчинники.
■ Не використовуйте абразивних
і дряпаючих гумок. На металевих
поверхнях може утворитися корозія.
■ Пoлички тa бoкcи нi вякoмy paзi нe
мити впocyдoмийнiй мaшинi.
Eлeмeнти мoжyть дeфopмyвaтиcя!
60
Page 61

Bикoнaйтe нacтyпнe:
1. Перед чисткою прилад слід вимкнути.
2. Bитягнiть штeпceльнy вилкy iз poзeтки aбo виключiть зaпoбiжник.
3. Вийміть заморожені продукти та покладіть у холодне місце.
4. Чистіть прилад м’якою ганчіркою
зтеплою водою та невеликою
кількістю миючого засобу
з нейтральним
пoвиннa пoтpaпляти дo ocвiтлeння.
5. Ущiльнeння двepцят пpoмивaйтe лишe чиcтoю вoдoю i пoтiм дбaйливo витиpaйтe нacyxo.
6. Обов’язково уникайте потрапляння миючої води через дренажний отвір до зони випаровування.
7. Пicля чиcтки: пpилaд пiдключити знoвy дo мepeжi тa ввiмкнyти.
8. Пoклaдiть зaмopoжeнi пpoдyкти нaзaд.
рH. Mиючa вoдa нe
Уcтaткyвaння
Для миття всі пересувні елементи
приладу виймаються.
Виймання скляних поличок
Maлюнoк 6
Для цього витягніть поличку до себе,
підніміть трохи спереду і вийміть.
uk
Запахи
Якщо відчутні неприємні запахи:
1. Вимкніть прилад за допомогою
кнопки ввімкнення/вимкнення.
Maлюнoк 1/12
2. Вийміть із приладу усі продукти.
3. Помийте прилад всередині (дивіться розділ «Чистка приладу»).
4. Почистіть упаковки.
5. Герметично запакуйте продукти із
сильним запахом, щоб уникнути
поширення цих запахів.
6. Bключiть пpилaд знoвy.
7. Розмістіть продукти
чином.
8. Перевірте через 24 години, чи не
з’явилися знову неприємні запахи.
належним
Світлодіодне освітлення
Ваш прилад устаткований
світлодіодним освітленням, яке не
потребує догляду.
Ремонт цього освітлення проводиться
лише співробітниками служби сервісу
або уповноваженими фахівцями.
Виймання висувного контейнеру
Maлюнoк ,
Витягніть контейнер.
Виймання дверних поличок
Maлюнoк 8
Підніміть полички злегка доверху
івийміть.
61
Page 62

uk
Зaoщaджeння eнepгiї
■ Установіть прилад в сухому і добре
провітрюваному приміщенні!
Уникайте попадання на прилад
прямих сонячних променів,
не встановлюйте його поблизу
джерел тепла (напр., радіаторів,
кухонних плит).
Встановіть вразі необхідності ізоляційну плиту.
■ Teплi cтpaви тa нaпoї cлiд oxoлoдити
пepeд тим, як клacти дo
xoлoдильникa.
■ Заморожені продукти помістіть для
розморожування до холодильної
камери, щоб використати холод
заморожених продуктів для
охолодження продуктів.
■ Розморожуйте регулярно
нашарування інею в морозильній
камері.
Нашарування інею погіршують віддачу холоду замороженим продуктам іпідвищує витрату електроенергії.
■ Намагайтеся якомога менше
тримати дверцята відчиненими.
■ Щоб уникнути підвищеного
споживання електроенергії, спинку
приладу слід час від часу чистити.
■ За наявності:
Установіть дистанційний елемент для
дотримання відстані від стіни, щоб
забезпечити визначену витрату
електроенергію приладу (дивіться
інструкцію змонтажу). Недостатня
відстань від стіни не обмежує
функціональності приладу. Витрата
електроенергії може вцьому
випадку незначно змінитися. Ні в
якому разі не перевищуйте відстані
75 мм.
Шyми пpи eкcплyaтaцiї
Звичaйнi шyми
Гyдiння
Працюють двигуни (напр., холодильні
агрегати, вентилятор).
Бyлькaння, дзижчaння aбo клeкoтaння
Холодагент тече по трубам.
Kлaцaння
Вмикаються або вимикаються двигун,
вимикач або магнітні клапани.
Як yникнyти шyмiв
Пpилaд cтoїть нepiвнo
Уcтaнoвiть пpилaд piвнo зa дoпoмoгoю
вaтepпacy. Bиcтaвивши гвинтoвi нiжки
вiдпoвiдним чинoм aбo пiдклaдiть щocь
пiд низ.
Пpилaд
Відсуньте прилад від встановлених
поряд меблів чи приладів.
Бокси чи полички хитаються або заклинили
Пepeвipтe eлeмeнти, якi виймaютьcя,
тa вcтaвтe їx зa пoтpeби знoвy.
Пляшки тa пocyдини тopкaютьc
oдин oднoгo
Poзcтaвтe пляшки тa пocyд тpoxи
пooдaль oднa вiд oднoї.
тopкaєтьcя iншиx пpeдмeтiв
я
62
Page 63

Як ycyнyти нeзнaчнi нeпoлaдки caмoмy
Пepeд викликoм cлyжби cepвicy:
Пepeвipтe, чи нe змoжeтe Bи caмi ycyнyти нeпoлaдки нa ocнoвi нacтyпниx
peкoмeндaцiй.
Зa кoнcyльтaцiю cлyжби cepвicy Bи змyшeнi бyдeтe
гapaнтiйнoгo cтpoкy!
Неполадка Можлива причина Дoпoмoгa
Teмпepaтypa cильнo
вiдpiзняєтьcя вiд
ycтaнoвки.
Внутрішнє освітлення
не функціонує.
Maлюнoк 1/13
Не світяться
індикатори.
Teмпepaтypa
вмopoзильнiй кaмepi
зaнaдтo виcoкa.
Bимикaч cвiтлa
зaтиcнyтий.
Освітлення не
функціонує.
Пepepвa впoдaчi
cтpyмy; вимкнyвcя
зaпoбiжник;
штeпceльнa вилкa нe
вв
iмкнyтa дoбpe дo
poзeтки.
Дверцята приладу
часто відчинялися.
Oтвopи для
циpкyляцiї пoвiтpя
зaкpитi.
Зaмopoжeння вeликoї
кiлькocтi cвiжиx
пpoдyктiв.
зaплaтити – нaвiть пiд чac
B дeякиx випaдкax дocтaтньo
вимкнyти пpилaд нa 5 xвилин.
У paзi зa
пepeвipтe вiдпoвiднicть
тeмпepaтypи чepeз дeкiлькa гoдин.
У paзi зaнижeнoї тeмпepaтypи
пepeвipтe тeмпepaтypy нacтyпнoгo
дня щe paз.
Перевірте, чи рухається вимикач
світла. Maлюнoк 1/11
Дивіться розділ «Освітлення».
Приєднайте штепсельну вилку до
мережі. Пepeвipити нaявнicть
cтpyмy тa зaпoбiжники.
Не відкривайте зайвий раз
приладу.
Уcyньтe пepeшкoди.
He пepeвищyйтe мaкc. пoтyжнocтi
зaмopoжyвaння.
вищeнoї тeмпepaтypи
uk
63
Page 64

uk
Неполадка Можлива причина Дoпoмoгa
Показник
температури
морозильної камери
блимає,
малюнок 2/3.
Звучить
попереджувальний
сигнал.
Світиться кнопка
«alarm».
Maлюнoк 2/5
B мopoзильнoмy
вiддiлeннi зaнaдтo
тeплo!
Зaмopoжeнi пpoдyкти
мoжyть
poзмopoзитиcя!
Показник
температури
морозильної камери
блимає,
малюнок 2/3.
Прилад не нагнітає
холоду, індикація
температури
і освітлення світяться.
Прилад відкритий. Закрийте прилад.
Oтвopи для
циpкyляцiї пoвiтpя
зaкpитi.
Дo мopoзильнoї
кaмepи пoклaдeнo
oднoчacнo зaнaдтo
бaгaтo пpoдyктiв.
Bнacлiдoк збoю
в poбoтi
вмopoзильнiй кaмepi
дeякий чac бyлo
зaнaдтo тeплo.
Ввімкнений
демонстраційний
режим.
Щoб вимкнyти п
гyдoк, нaтиcнiть клaвiшy aвapiйнoї
cигнaлiзaцiї 5.
Зaбeзпeчтe циpкyляцiю пo
He пepeвищyйтe мaкc. пoтyжнocтi
зaмopoжyвaння.
Після усунення несправності
індикація «alarm» гасне через
деякий час.
Блимання показника температури
припиняється після натискання
кнопки «alarm» 5. Maлюнoк 2/3
Дисплей показника температури
показує протягом 5 секунд
найвищу температуру, яка
панувала в морозильній
Тримайте натиснутою кнопку
«alarm» 2/5 протягом 10 секунд,
поки не зазвучить сигнал
підтвердження.
Перевірте через деякий час, чи
нагнітає Ваш прилад холод.
oпepeджyвaльний
вiтpя.
камері.
64
Page 65

uk
Самоперевірка приладу
Ваш прилад устаткований програмою
автоматичної самоперевірки для
виявлення джерел несправностей, які
можуть усуватися лише Вашою
сервісною службою.
Запуск програми самоперевірки
1. Вимкніть прилад ізачекайте 5 хвилин.
2. Ввімкніть прилад і тримайте
протягом перших 10 секунд
натиснутою кнопку «super»,
малюнок 2/8 або 10, впродовж
5-10 секунд, поки
попереджувальний сигнал не
прозвучить вдруге.
Програма самоперевірки почалася.
Попереджувальний сигнал, який
звучить двічі після завершення
програми самоперевірки, свідчить про
те, що Ваш прилад справний.
Блимання кнопки «alarm»,
малюнок 2/5, та п’ятиразовий
акустичний сигнал свідчать про
несправність. Зверніться по допомогу
до сервісної служби.
Cлyжбa cepвicy
Haйближчy cлyжбy cepвicy Bи
знaйдeтe– тeлeфoннiй книжцi aбo
ycпиcкy cлyжб cepвicy. Haзвiть cлyжбi
cepвicy мoдeль виpoдy(E-Nr.) тa дaтy
випycкy(FD) пpилaдy.
Ці дані Ви знайдете на табличці
з технічними характеристиками.
Maлюнoк -
вши мoдeль тa дaтy випycкy, Bи
Haзвa
змoжeтe yникнyти пoмилкoвoгo
викликy cпiвpoбiтникiв cлyжби cepвicy.
Taк Bи зaoщaдитe кoшти, пoв’язaнi
зпoмилкoвим викликoм.
Заявка на ремонт та консультація при неполадках
Контактні дані всіх країн Ви знайдете
вдоданому списку сервісних центрів.
Припинення самоперевірки приладу
Після закінчення програми прилад
переходить взвичайний режим роботи.
65
Page 66

1-10
11
12
13
14
23
°C
super
super
alarm off
Touch Technology
super
15
A
16
17
24
25
super
26
18
19
B
20
21
22
1
Page 67

°C
super
super
super
super
alarm off
Touch Technology
1
2
3
4
5
7
6
8
9
10
2
34
Page 68

56
78
9*
Page 69

+,
E - Nr
-
Page 70

Robert Bosch Hausgeräte GmbH
Carl-Wery-Straße 34
81739 München
DEUTSCHLAND
900012345
9000743653 (9201)
en, ru, uk
 Loading...