BOSCH KA58NA45 User Manual [fr]

1

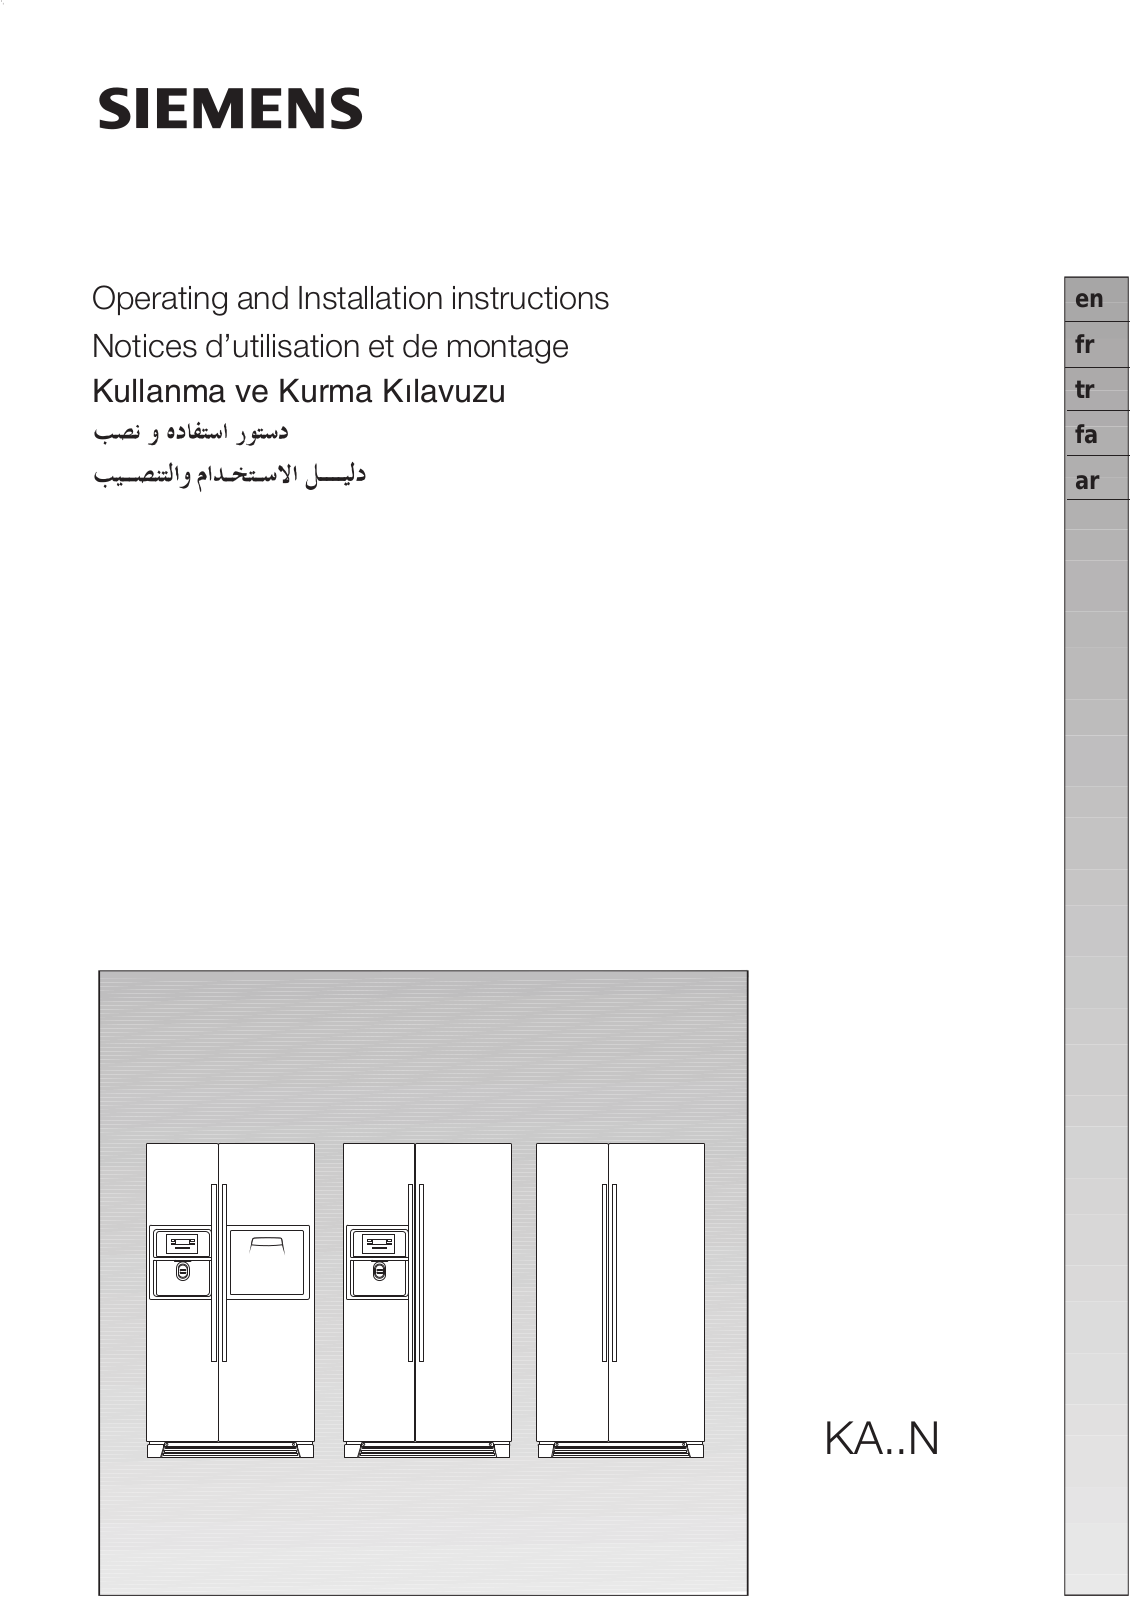
Operating and Installation instructions

Notices d'utilisation et de montage

Kullanma ve Kurma Kžlavuzu

en

fr

tr

fa

ar

KA..N

en . . . . . . . . . . . . . . . . . . . . . . . .. .. .. .. .. .. .. .. .. .. .. .. .. .. ..3.. .

. .. .. .. .. . .


fr . . . . . . . . . . . . . . . . . . . . . . . . .

. .

.

.

.

. . . . . . . . 23. . . . . . . . .


tr . . . . . . . . . . . . . . . . . . . . . . . . .

. .

.

.

.

.. .. .. .. .. .. .. .. 43.. ..

.. . . . . . . .


fa . . . . .

. . .

. .

. .

. . . .

. . . .

.

.

.

. . . . . . . . . . . . . . . . . . . . . . . . fa .1. . . . .

. . . . . . . . . . . .


ar . . . . .

. . .

. .

. .

. . . .

. . . .

.

.

.

.. .. .. .. .. .. .. .. .. .. .. .. .. ..ar..1..

.. .. .. .. .. . .


2

en Table of Contents

Congratulations . . . . . . . . . . . . . . . . . . . . . . . . . . . . . . . . . . . . . . 4. . . . . . . . . . .

Safety and warning information. . . . . . . . . . . . . . . . . . . . . . . . . .

. . . . . . . . . . . . . . . . . .

.

.4 . . . . . . . . . . .

Information concerning disposal. . . . . . . . . . . . . . . . . . .

. . . . . . . . . . .

.

.5 . . . . . . . . . . .

Your new appliance. . . . . . . . . . . . . . . . . . . . . . . . . . . . . . . . . . .

. .6 . . . . . . . . . . .

Installation . . . . . . . . . . . . . . . . . . . . . . . . . . . . . . . . . . . . . . . . . . . . . . . . . . . . . . . .8. . . .

. . . . . . . . . . . . . . . . .

Connecting

the appliance. . . . . . . . . . . . . . . . . . . . . .

. . . . . . . . . .

.

. 8. . . . . . . . . . .

Switching

on

the appliance. . . . . . . . . . . . . . . . . . . . .

. . . . . . . . . . . . . . . . .

. . . .8. . . .

. . . . . . . . . . .

Setting the temperature. . . . . . . . . . . . . . . . . . . . . . . . . . . .

. . . . . . . . . . . . . . . . . . . . .

. . . .8 . . . . . . . . . . .

Switching

off

and disconnecting the appliance. . . . . . . . . . . . .

. . . . . . . . . . .

.

.9 . . . . . . . . . . .

Functions . . . . . . . . . . . . . . . . . . . . . . . . . . . . . . . . . .

. . . . . . . . . . . . . . . . . . . . .

. . . .9. . . .

. . . . . . . . . . . . .

Variable interior design. . . . . . . . . . . . . . . . . . . . . . . . . . . . . . .

. . . . . . . . . . . . . . . . . .

.

. 9. . . . . . . . . . .

Fridge . . . . . . . . . . . . . . . . . . . . . . . . . . . . . . . . . . . . . .

. . . . . . . . . . . . . . . . . . . . . . .

10. . . . . .

. . . . . . . . .

Freezer compartment. . . . . . . . . . . . . . . . . . . . . . . .

. . . . . . . . . .

. 11. . . . . . . . . . . .

Freezing and storing food. . . . . . . . . . . . . . . . . . . . . .

. . . . . . . . . .

.

11. . . . . . . . . . . .

Automatic ice and water dispenser. . . . . . . . . . . . . . . . . .

. . . . . . . . . . . . . . . .

12. . . . .

. . . . . . . . .

Water filter. . . . . . . . . . . . . . . . . . . . . . . . . . . .

. . . . . . . . . . . . . .

13. . . . . . . . . . . . .

How to save energy. . . . . . . . . . . . . . . . . . . . . . . .

. . . . . . . . . . . . . . . . . . . . . .

15. . . . . .

. . . . . . . . . . . . . .

Operating noises. . . . . . . . . . . . . . . . . . . . . . . . . .

. . . . . . . . . . . 15. . . . . . . . . . . .

Defrosting . . . . . . . . . . . . . . . . . . . . . . . . . . . . . . . . . . . . . . .

.

15. . . . . . . . . . . .

Cleaning the appliance. . . . . . . . . . . . . . . . . . . . . . .

. . . . . . . . . . . 15. . . . . . . . . . .

Eliminating minor faults yourself. . . . . . . . . . . . . . . . . . . . . . . . . . . . . .

.

16. . . . . . . . . . . .

Changing the bulb. . . . . . . . . . . . . . . . . . . . . . . . .

. . . . . . . . . . . . . . . . . . . .

. .

18. . . . . . .

. . . . . . . . . . . . .

Calling customer service. . . . . . . . . . . . . . . . . . . . . . . . . . . . . . . . .

.

18. . . . . . . . . .

Installation

instructions. . . . . . . . . . . . . . . . . . . . . . .

. . . . . . . . . . .

.

19. . . . . . . . . .

3

en


S Do not store bottled or canned drinks


Congratulations


Safety

and

warning


(especially carbonated drinks) in the


freezer

compartment.


Bottles

and

With the purchase of your new fridge0information


cans may

explode!


S Do


not

put

an

ice

lolly

or

ice

cube

freezer


you

have

opted for

a modern,

Before

you


switch

ON


high0quality

domestic

appliance.


directly

from


the

freezer

compartment

Your fridge0freezer

is

distinguished by

the appliance


into

your

mouthRisk.

of burnsfrom


very

low

temperatures!


its economical

energy

consumption.

Please


read the operating and


S Never touch


frozen

food

with

wet

Each

appliance

which

leaves

our

installation

instructions

carefully.


They contain

important

information on


hands.

Your

hands

could

freeze

to

factory


is inspected thoroughly

to


how to install, use and maintain the


the

food. Risk of injury!


ensure

that

it

functions properly and


is in perfect

condition.


appliance.


S

Do


not

scrape off hoarfrost

or

stuck

If you


have

any

questions

3


Keep

all

documentation

for

subsequent

frozen food

with

a

knife

or

pointed


particularlyuse

or

for the

next owner.


object.

You could damage

the

refrige0

concerning

installation

and connection


rant

tubing.

Leaking

refrigerant

may

of the


appliance 3 please do not hesi0


tate to

contact

our customer

service.

Technical


safety


cause eye injuries.


Further

information and a selection of

!

Warning


Children

in

the

household


our products can

be

found

on our

S Only

customer


service

may change

S Do


not

allow

children

to

play

with the

home


page.


the

power

cord

and

carry

out any


appliance!


other

repairs.


Improper

installations


Please


read

these

operating


S If the appliance features

a

lock,

keep


and


instructions

as

well as the

installation

repairs may put the user at con0


siderable

risk.


the


key

out


of

the

reach of

children.

instructions and all information en0


closed with the appliance and follow

Important

information

General

requirements


accordingly.


Retain


all documents

for subsequent

when

using

the

applianceThe

appliance


is

suitable


use or

for

the

next

owner.


S Never

use

electrical

appliances insideS for


refrigerating food,


the

appliance

(e. g. heaters,

electric


ice makers,

etc.).

Risk

of

explosion! S for


freezing

food,


S NEVER use a steam cleaner to

S for


making

ice.


defrost or clean the appliance.

This

appliance


is intended for use in th


Steam may

come

into

contact with

home

and

the

home

environment.


electrical

components

and

cause

The

appliance


is

suppressed

according


a short0circuit

or

an

electric shock.


to EU Directive

2004/108/EC.


S Do not store products which containThe refrigerant circuit has been tested


flammable

propellants

(e. g. spray

for leaks.


cans) or explosive substances in


the appliance.


Explosion

hazard!


S Do not stand or support

yourself on


the

base,

drawers

or

doors, etc.


S Before defrosting and cleaning the


appliance, pull out the mains plug or


switch

off

the

fuse.


Do not pull out the mains plug by


tugging

the

cable.


S Bottles which contain a high per0


centage of alcohol must be sealed


and

stored

in

an

upright

position.


S Keep plastic parts and

the door seal


free

of

oil

and

grease.

Otherwise,


parts and door seal will become porous.

S Never cover or block the ventilation openings for the appliance.

S Persons with limited physical, sensory or mental abilities or insufficient knowledge must only use this appliance under supervision or after receiving extensive instructions.

4

en

Information concerning disposal

x Disposal of packaging

The packaging protects your appliance from damage during transit.

All packaging materials are environ0 mentally friendly and recyclable. Please contribute to a better environment by disposing of packaging materials in an environmentally0friendly manner.

Please

ask your dealer or inquire at

your local authority about current

means

of disposal.

!Warning

Keep children away from packaging and its parts. Danger of suffocation from folding cartons and plastic film!

x Disposal of your old appliance

Old appliances are not worthless rubbish! Valuable raw materials can be reclaimed by recycling old appliances.


This appliance

has

been identified


in accordance

with

the


European directive

2002/96/EG


on Waste

Electrical


and Electronic


Equipment

3

WEEE).


The directive specifies the frame0


work for an EU0wide valid return


and recycling

of old appliances.


! Warning


Redundant

appliances:


1. Pull out

the mains

plug.

2.Cut off the power cord and discard with the mains plug.

Refrigerators contain refrigerants and the insulation contains gases. Refrigerant and gases must be dis0

posed of properly. Ensure that tubing of the refrigerant circuit is not damaged prior to proper disposal.

5

en

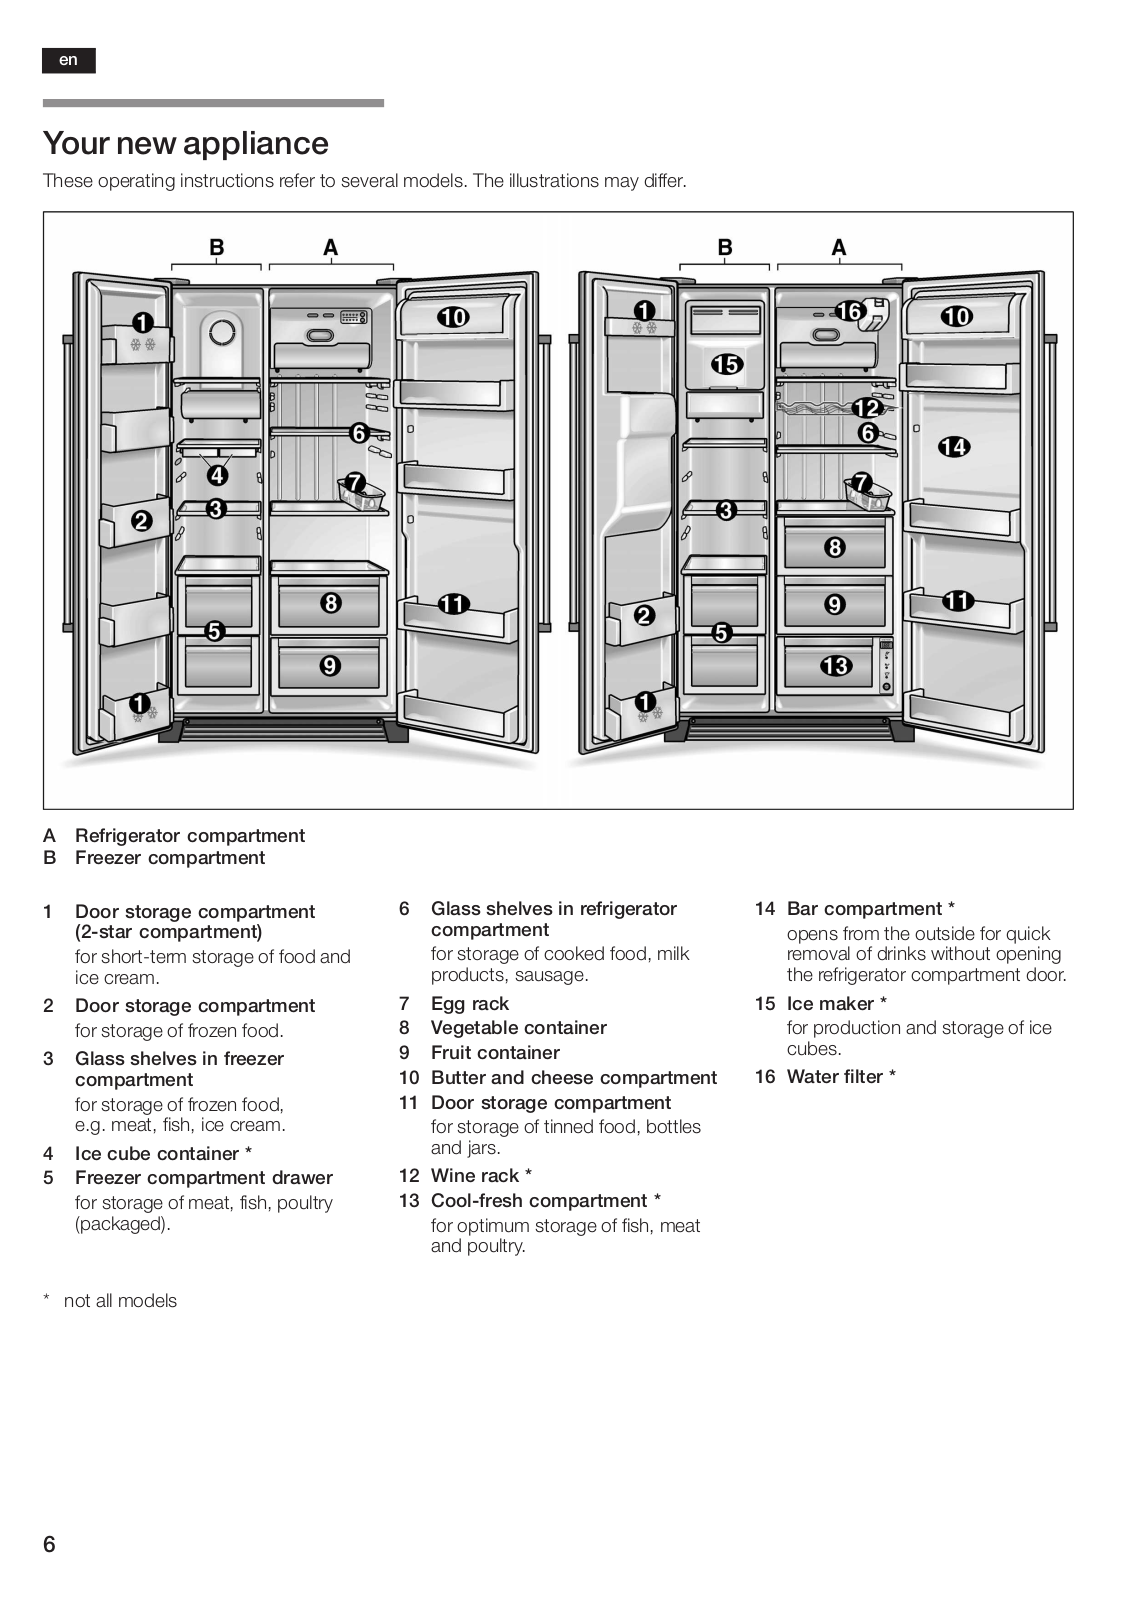
Your new appliance

These operating instructions refer to several models. The illustrations may differ.

A

Refrigerator

compartment


B

Freezer

compartment


1

Door

storage

compartment

6

Glass

shelves

in refrigerator

14

Bar

compartment *


(21star

compartment)


compartment


opens from the outside for quick


for

short0term storage

of

food and

for storage of cooked food, milk


removal of drinks without opening


ice

cream.


products,

sausage.


the refrigerator

compartment door.

2

Door

storage

compartment

7

Egg

rack


15

Ice

maker *


for

storage

of

frozen

food.

8

Vegetable container


for production and storage of ice

3

Glass

shelves in

freezer

9

Fruit

container


cubes.


cheese compartment16

Water filter

*


compartment


10

Butter

and


for storage of frozen food,

11

Door

storage

compartment


e.g. meat,

fish,

ice

cream.


for storage of tinned food, bottles


4

Ice cube

container

*


and jars.


5

Freezer

compartment

drawer

12

Wine

rack

*


for storage of meat, fish, poultry

13

Cool1fresh

compartment *


(packaged).


for optimum storage of fish, meat


and poultry.


*

not

all

models


6

en

Note

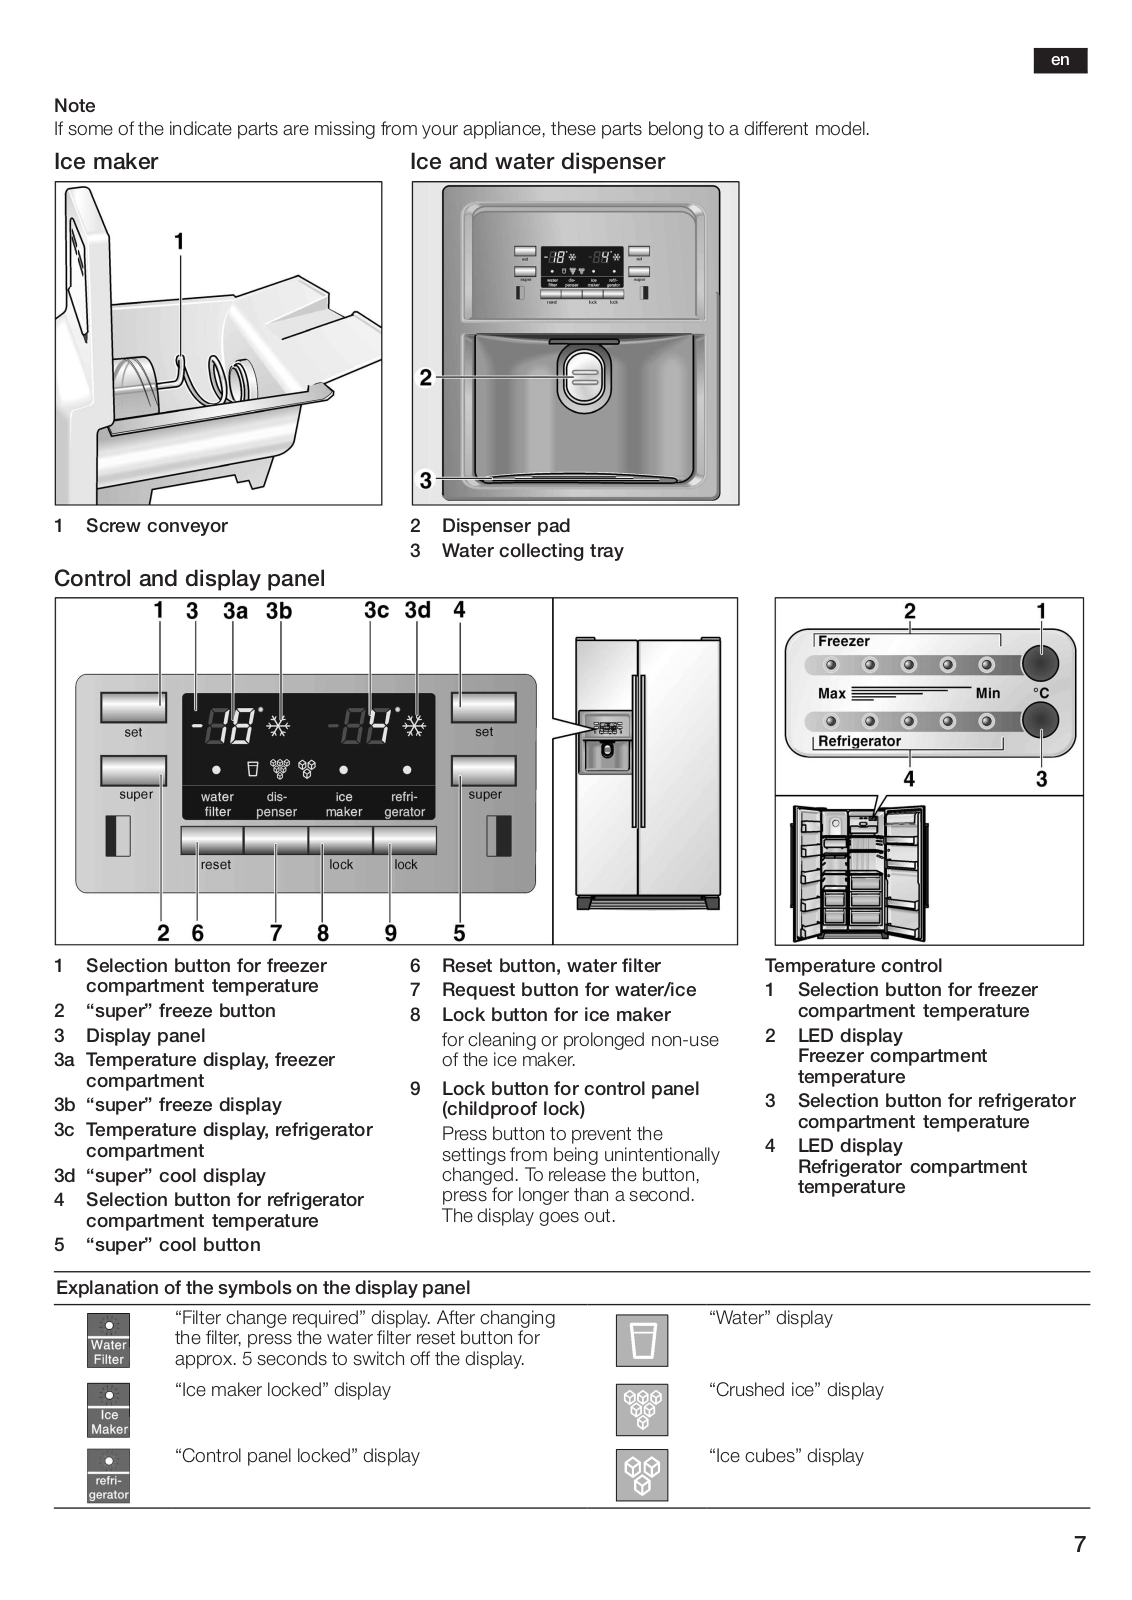
If some of the indicate parts are missing from your appliance, these parts belong to a different model.

Ice maker

Ice and water dispenser

1 Screw

conveyor

2

Dispenser pad


3

Water collecting tray

Control

and display

panel


1

Selection

button

for

freezer

6

Reset

button,

water

filter

Temperature

control


compartment

temperature

7

Request

button

for

water/ice

1

Selection

button

for

freezer


2

•super"

freeze

button


8

Lock

button

for


ice

maker


compartment

temperature

3

Display

panel


for

cleaning


or

prolonged non0use

2

LED

display


3a

Temperature

display,

freezer


of

the

ice

maker.


Freezer

compartment


compartment


9

Lock button for control panel


temperature


3b

•super"


freeze

display

3

Selection

button

for

refrigerator


(childproof

lock)


3c

Temperature

display,

refrigerator


Press

button

to


prevent

the


compartment

temperature


4

LED

display


compartment


settings from


being

unintentionally


Refrigerator

compartment

3d

•super"


cool


display


changed. To

release

the

button,


temperature


4

Selection

button

for

refrigerator


press

for

longer


than

a

second.


The display

goes

out.


compartment

temperature


5•super" cool button

Explanation of the symbols on the display panel

•Filter change required" display. After

changing

•Water"

display

the filter, press the water filter reset button for


approx. 5 seconds to

switch off the

display.


•Ice maker locked" display


•Crushed

ice" display

•Control panel locked"

display


•Ice cubes" display

7

en

Installation


Connecting

the


Switching

on


Installation

location


appliance


the appliance


After setting up the appliance,

wait

forS Insert

the

mains plug

into

a

socket.

Install

the

appliance

in


a dry, well venti0


lated room. The installation location

at least one hour before starting the


The

appliance

begins

to

cool

down as

appliance

up. The

oil

contained

in

the


is

connected

to

the power

should

neither be

exposed

to direct

compressor may have been displaced


soon as it

sunlight

nor

near

a

heat source,

e.g.


supply.

When

the doors

are

open, the

a

the

refrigeration system

during


into


interior

lights

come on.


cooker,

radiator,

etc.

If installation

near transport.


a heat

source is unavoidable, use

a


Note:


suitable insulating plate or observe theClean the inside of the appliance before


following

minimum

distances

to a heat

it is

first

used

(see •Cleaning").


The

preset

temperatures

(factory

source:


The

socket

should

be

freely


settings) are reached after approx. 2 to


accessible.


Do

not put any food in the

-

3 cm

to

an

electric

cooker.


Connect the appliance to a


3 hours.


current


appliance

beforehand.


-

30 cm

to

an

oil or


220I0I240V / 50 Hz

alternating


solid0fuel cooker.


a correctly

installed

socket.To

change


the set temperatures 3> see


supply via


The

socket

must be

protected

by

a


•Setting

the

temperature".


The floor on

which

the appliance

is

fuse


to


be installed must be rigid. If required,with

a rating of

10 A

to 16 A.


reinforce

the

floor.


In the case of appliances operated

out0


The appliance is

very

heavy, for


side Europe, check whether the voltage


empty


the


weight

see

the

following table.


and

type

of current specified on the


ra0


Setting


ting plate conform to the values of yourtemperature


Basic

model


104

kg


electricity grid. The rating plate

is at


the


Model

with

dispenser


113

kg


bottom left

inside

the

appliance. If the


with

control


power cord needs to be replaced,

this


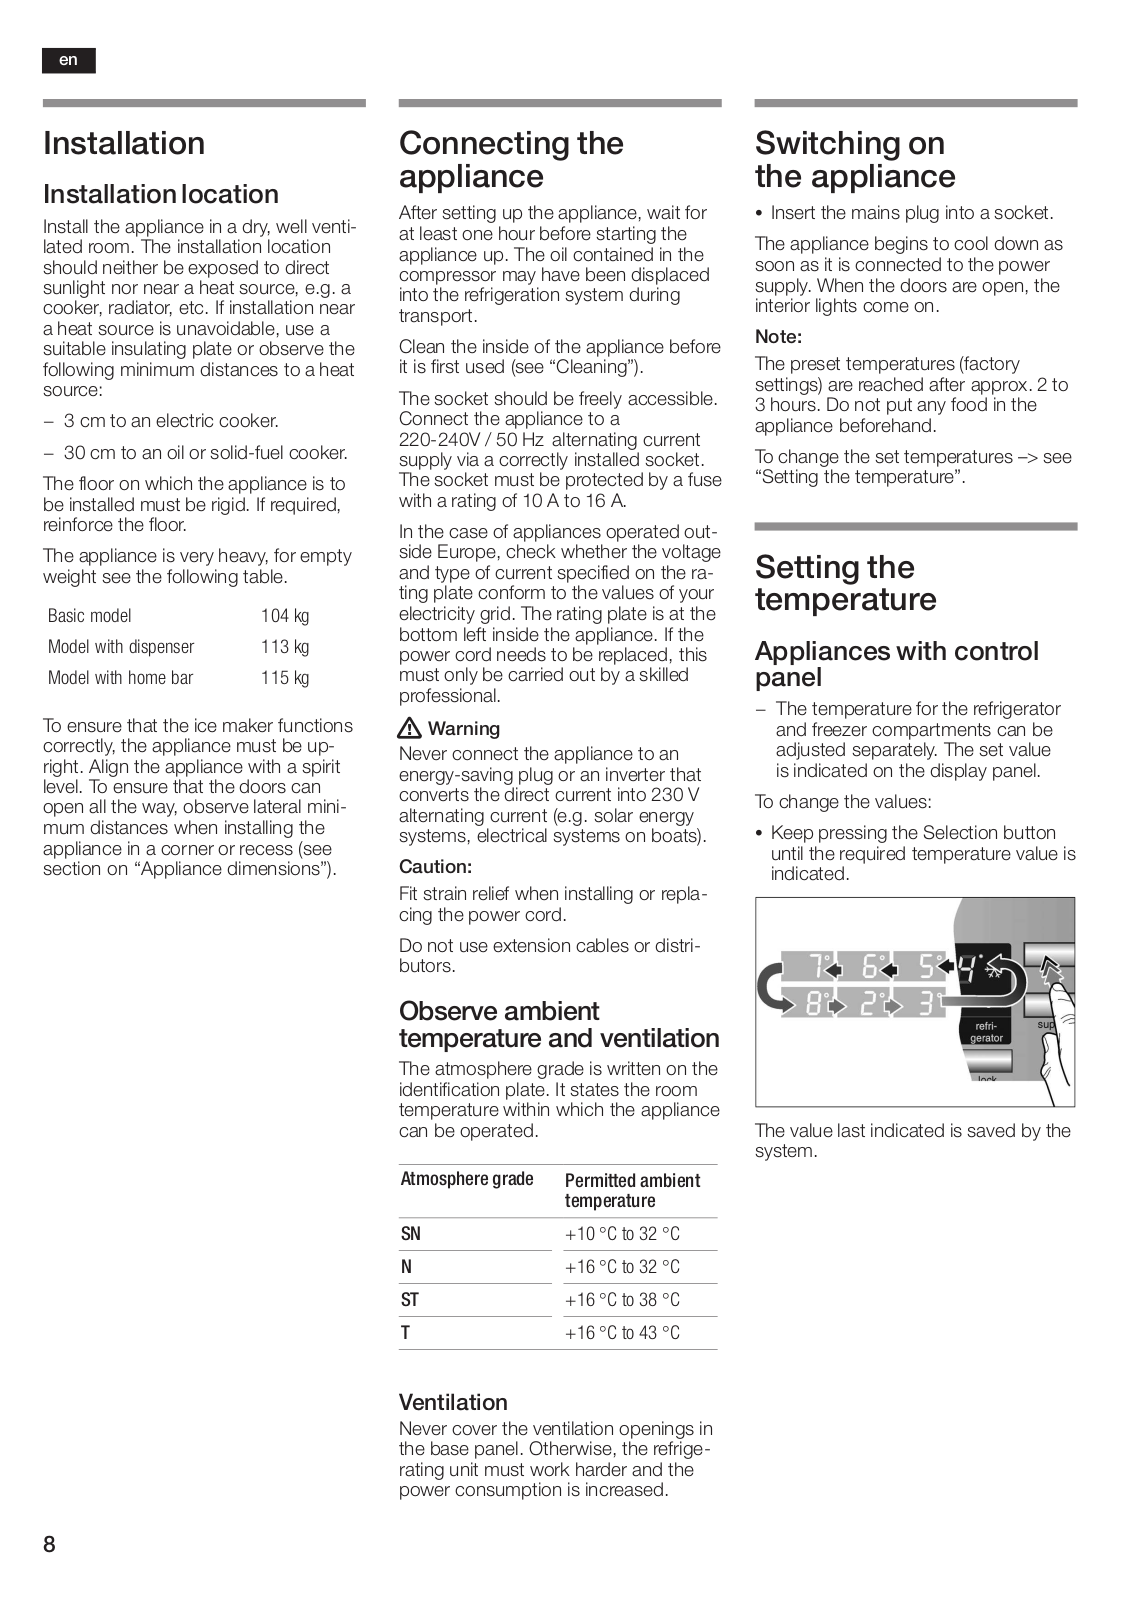
Appliances

Model

with

home

bar


115

kg


must only be carried out by a

skilledpanel


professional.


-

The

temperature for

the

refrigerator

To ensure that the ice maker functions!


Warning


and freezer compartments can be

correctly, the appliance must be

up0

Never connect the appliance to

an


adjusted


separately.

The set

value

right. Align the appliance with a

spiritenergy0saving plug or an inverter that


is indicated

on

the

display

panel.

level. To

ensure

that

the doors can

converts the direct current into

230 V


To

change


the

values:


open

all

the

way,

observe


lateral mini0


mum

distances

when installing the

alternating current (e.g.I solar energy


systems,

electrical

systems on boats). S Keep pressing the Selection button

appliance in

a

corner

or recess

(see


until the

required temperature

value is

section

on

•Appliance

dimensions").

Caution:


indicated.


Fit strain

relief when installing or repla0


cing

the

power

cord.


Do not use extension cables or distri0 butors.

Observe ambient temperature and ventilation

The atmosphere grade is written on identification plate. It states the room temperature within which the appliance can be operated.

The value last indicated is saved by th system.

Atmosphere grade Permitted ambient temperature

SN

N

ST

T

+10 °C to 32°C

+16 °C to 32°C

+16 °C to 38°C

+16 °C to 43°C

Ventilation

Never cover the ventilation openings in the base panel. Otherwise, the refrige0 rating unit must work harder and the power consumption is increased.

8

9
Once the appliance is being used again, e.g. if the door is opened or button is pressed, the display reverts to normal illuminating power.

en

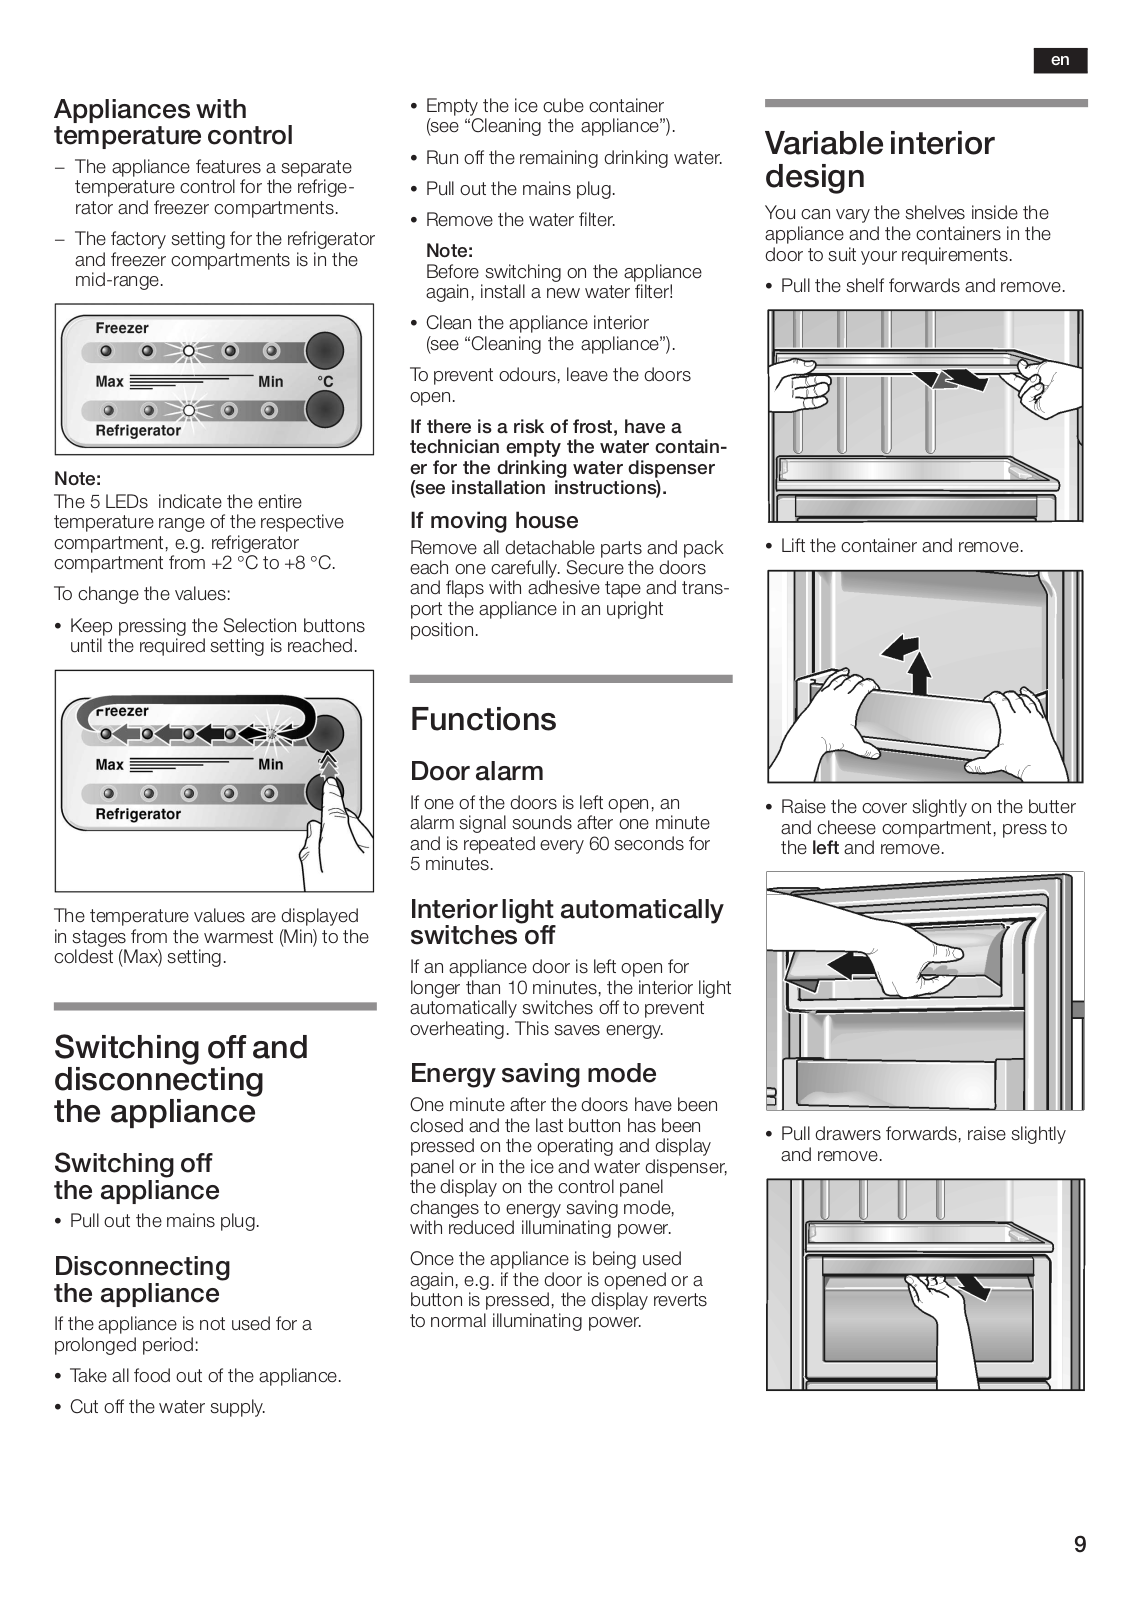
Appliances

with


S Empty

the

ice

cube container


temperature

control


(see •Cleaning

the

appliance").

Variable

interior


-

The

appliance features

a

separate

S Run

off

the remaining drinking water.


temperature

control

for

the

refrige0

S Pull

out

the

mains

plug.


design


rator

and freezer

compartments.

S Remove

the

water

filter.


You can vary

the shelves inside

the


appliance and the containers in the

-

The

factory setting


for

the

refrigerator


and

freezer

compartments is

in the

Note:


door

to suit your requirements.


Before

switching on the appliance


mid0range.


S Pull the shelf forwards and remove.


again,

install

a

new water filter!


S Clean the appliance interior


(see •Cleaning

the

appliance").


To prevent odours, leave the doors


open.


If there is a risk of frost, have a


technician

empty

the water

contain1


Note:


er

for

the drinking water dispenser


(see installation


instructions).


The

5 LEDs

indicate

the

entire


temperature range

of

the

respective

If

moving

house


compartment,

e.g.

refrigerator


Remove


S


compartment

from

+2°C

to

+8°C.


all detachable parts and pack Lift the container and remove.


each one

carefully.

Secure

the

doors


To

change the

values:


and

flaps

with

adhesive

tape

and trans0


port

the

appliance

in

an

upright


S Keep pressing the Selection


buttons position.


until

the required

setting

is

reached.


Functions


Door

alarm


If one

of

the

doors

is

left

open, an S Raise the cover slightly on

the

butter


alarm signal


sounds

after


one

minute

and

cheese

compartment,

press


to


and

is

repeated

every 60 seconds for

the left and

remove.


5 minutes.


The

temperature

values

are

displayed

Interior

light

automatically


in stages from

the

warmest

(Min) to

the


off


coldest

(Max)

setting.


switches


If an appliance door is left open for


longer

than

10 minutes,

the

interior light


automatically switches off to prevent


Switching

off

and

overheating.

This

saves

energy.


Energy

saving

mode


disconnecting


the appliance


One minute after the doors have been


closed

and

the

last

button

has been

S Pull

drawers

forwards, raise slightly


Switching

off


pressed

on

the

operating

and

display

and

remove.


panel

or

in

the

ice

and


water dispenser,


the appliance


the

display


on

the

control

panel


S Pull out the mains

plug.


changes

to

energy

saving


mode,


with reduced

illuminating

power.


Disconnecting the appliance

If the appliance is not used for a prolonged period:

S Take all food out of the appliance.

S Cut off the water supply.

The •purchase freshness" is important for the shelf0life of your food.
In principle the following applies:
the fresher the food is placed in the •cool0fresh" compartment, the longer it will keep. When buying food, always note the degree of freshness.
•Cool1fresh" compartment

en


Bar

compartment

Fridge


(not

all models)


The refrigerator

compartment

tempera0

To remove drinks, etc. from the

ture can be set

from°C+2to

+8°C.

refrigerator compartment, it is not

necessary to open the door.

We recommend

a

setting of°C.+4


Using the refrigerator compartment

For storage of cakes and pastries, ready meals, tinned food, condensed milk, hard cheese, fruit and vegetables sensitive to the cold: tropical fruit,

e.g. mandarins, bananas, pineapples, melons, avocados, papayas, passion fruit, aubergines, also fruit which requires further ripening, tomatoes, cucumbers, green tomatoes, potatoes.

Foods not suitable for the •cool1fresh" compartment:

-Fruit and vegetables sensitive to the cold (tropical fruit, avocados,

papayas, passion fruit, aubergines, cucumbers, peppers, lettuce)

-Ripening fruit (green tomatoes, bananas)

-Potatoes

-Hard cheese

When buying food, please note:

When


storing

food,


(not

all

models)


comply

with


the

following:The

temperature in

this compartment


Storage

times

(at°C):0

-

Allow

warm

food and

drinks

to

cool


at almost°C0.

This provides


down

outside

the

appliance.


is kept


Depending on the initial quality


optimum storage conditions for fresh


Sausage,

cold

cuts, meat,up to

-

To

prevent

food from

losing

its

food.


flavour


offal, fish, fresh

milk,

curds7 days


or

drying

out,

place

in

airtight

For

optimum storage of food:


containers.


Small

pieces

of

meat,

friedup to


S Using

the

Selection button,

select

the


mushrooms,

10 days

-

Avoid


contact

of

oil

and

fat

with the


food


sausage,


lettuce, leafy

vegetables


plastic

parts

and

door

seal.


appropriate


(vegetables/fish/meat).


Large

pieces

of

meat,

up to

-

Store

high0percentage

alcohol

tightly


The

selection is

indicated

by a lit

LEDready

meals


15 days


closed

and standing

up,

do


not

storeand

temperature.


Smoked

or cured sausage,up to


any

explosive

substances

in

the


cabbage


20 days


appliance.

Explosion hazard!


Large

pieces

of

heat0

up to

•Super"

cooling


treated

meat,

beef, game,30 days

Function for rapid cooling of food or


pulses


drinks which are to be stored in the


refrigerator

compartment.


The refrigerator compartment

is

cooled


as cold as possible in •super" cooling


mode.


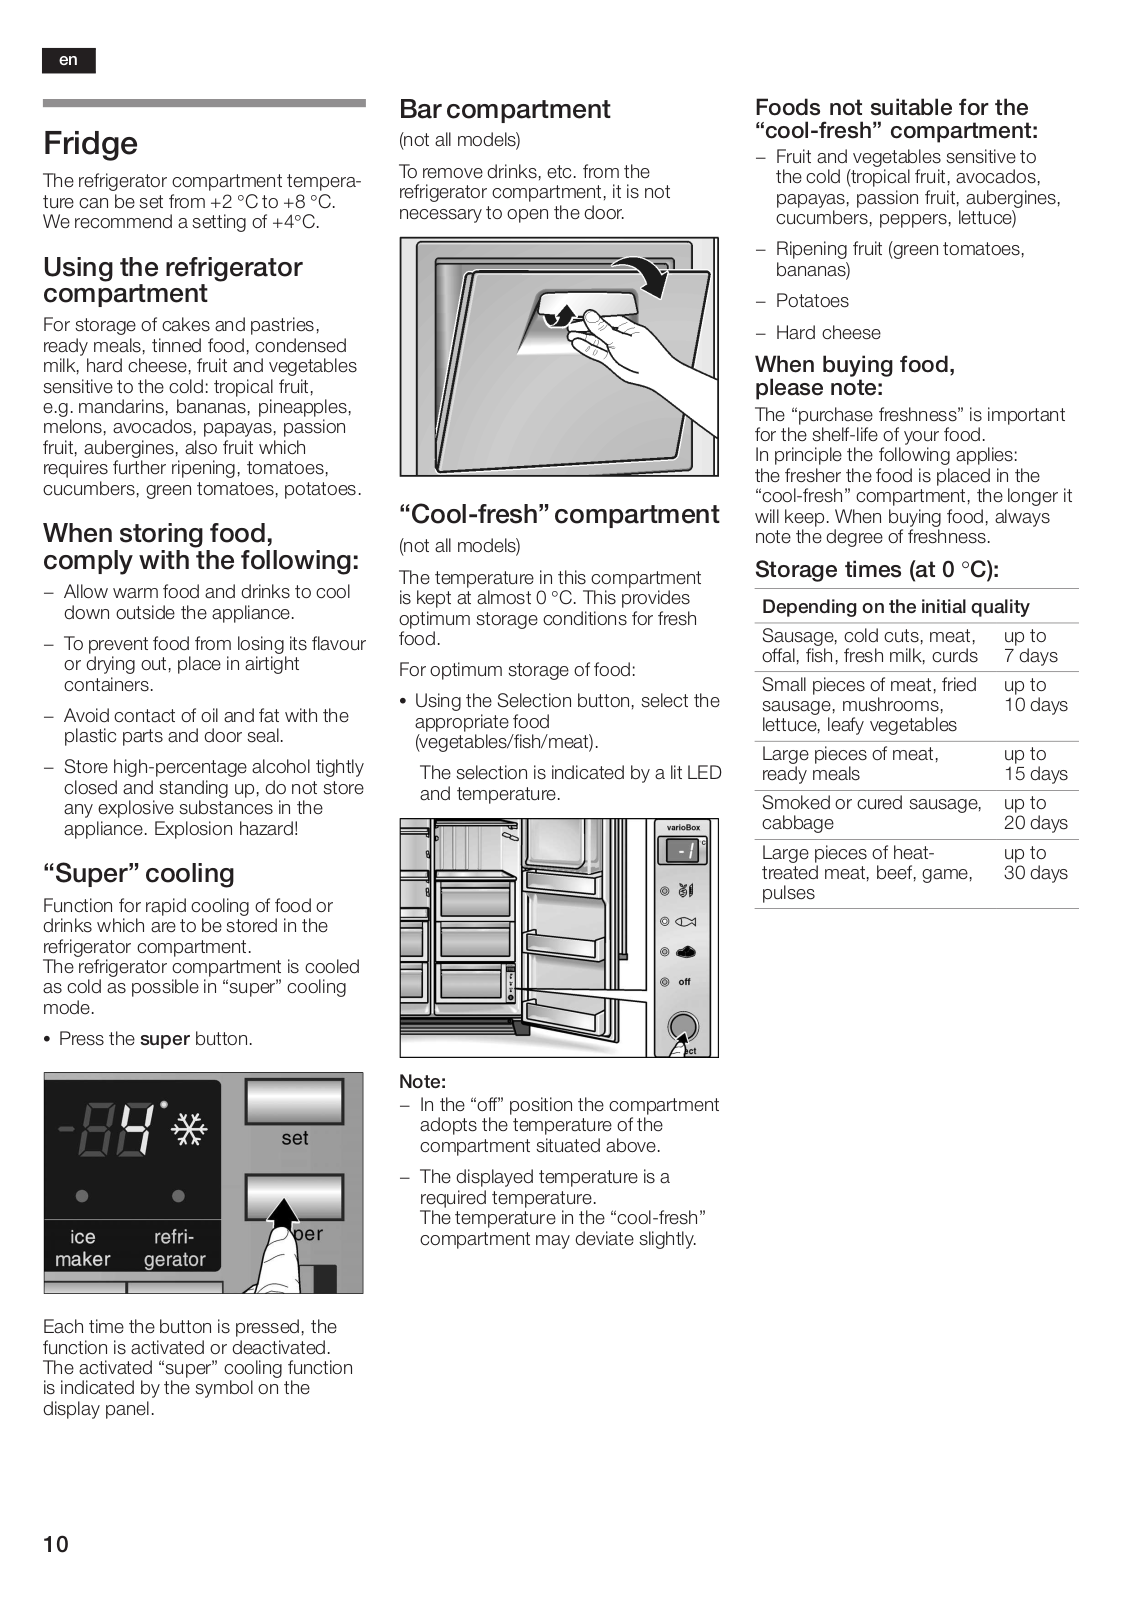
S Press thesuper button.

Note:

-In the •off" position the compartment adopts the temperature of the compartment situated above.

-The displayed temperature is a required temperature.

The temperature in the •cool0fresh" compartment may deviate slightly.

Each time the button is pressed, the function is activated or deactivated. The activated •super" cooling function is indicated by the symbol on the display panel.

10

11
Wrapping paper,greaseproof paper, cellophane, refuse bags and used shopping bags.
No longer store the frozen produce for the max. storage period.
The following products are not suitable for wrapping food:
Freeze fresh, undamaged food only.
Vegetables and up to 12 months To prevent food from losing its flavour or
fruit drying out, wrap the food in airtight film
or place in containers. In order to retain
the vitamins, nutritional value, appear0 Thawing frozen food
ance and flavour food should be frozen
Depending on the type of food and as quickly as possible. Do not exceed
the max. freezing capacity. intended use, frozen produce can be thawed as follows:
Cheese, poultry and meat
up to 8 months
Freezing food yourself
Use the freezer compartment - for storing deep0frozen food. - to freeze food.
- to make ice cubes.
The freezer compartment temperature can be set from °316Cto -22°C.
We recommend a setting of °-C18.

en

Freezer compartment Freezing and storing food

Storing deep1frozen food

When purchasing deep0frozen food, comply with the following:

S Check that the packaging is not damaged.

The following products are suitable for wrapping food:

Plastic film, polyethylene blown film, aluminium foil and freezer tins. These products can be purchased from a specialist outlet.

The following products are suitable for sealing the wrapped food:

Rubber bands, plastic clips, string, cold0resistant adhesive tape or similar.

Note:


S

Check the sell0by

date.


Bags and polyethylene blown film can


Ensure

that

the

freezer

compartment S

The temperature of the supermarket be sealed with a

film sealer.


door is always closed. If the door is

freezer should be

-°18C or

lower.


If not,

the

storage

life

of

the

food

isFreezing

capacity


open,

the

frozen

food

will

thaw.


The freezer

compartment

will

become

reduced.


You can freeze up to 10 kg of food


covered in

thick

ice.


Purchase

deep0frozen

food last.


S


within

24

hours.


Also: Energy will be lost due to high

Wrap

in

newspaper or place in a

cold


power

consumption.


bag

and

take home.


Storage

duration

of

the


At home

immediately

place


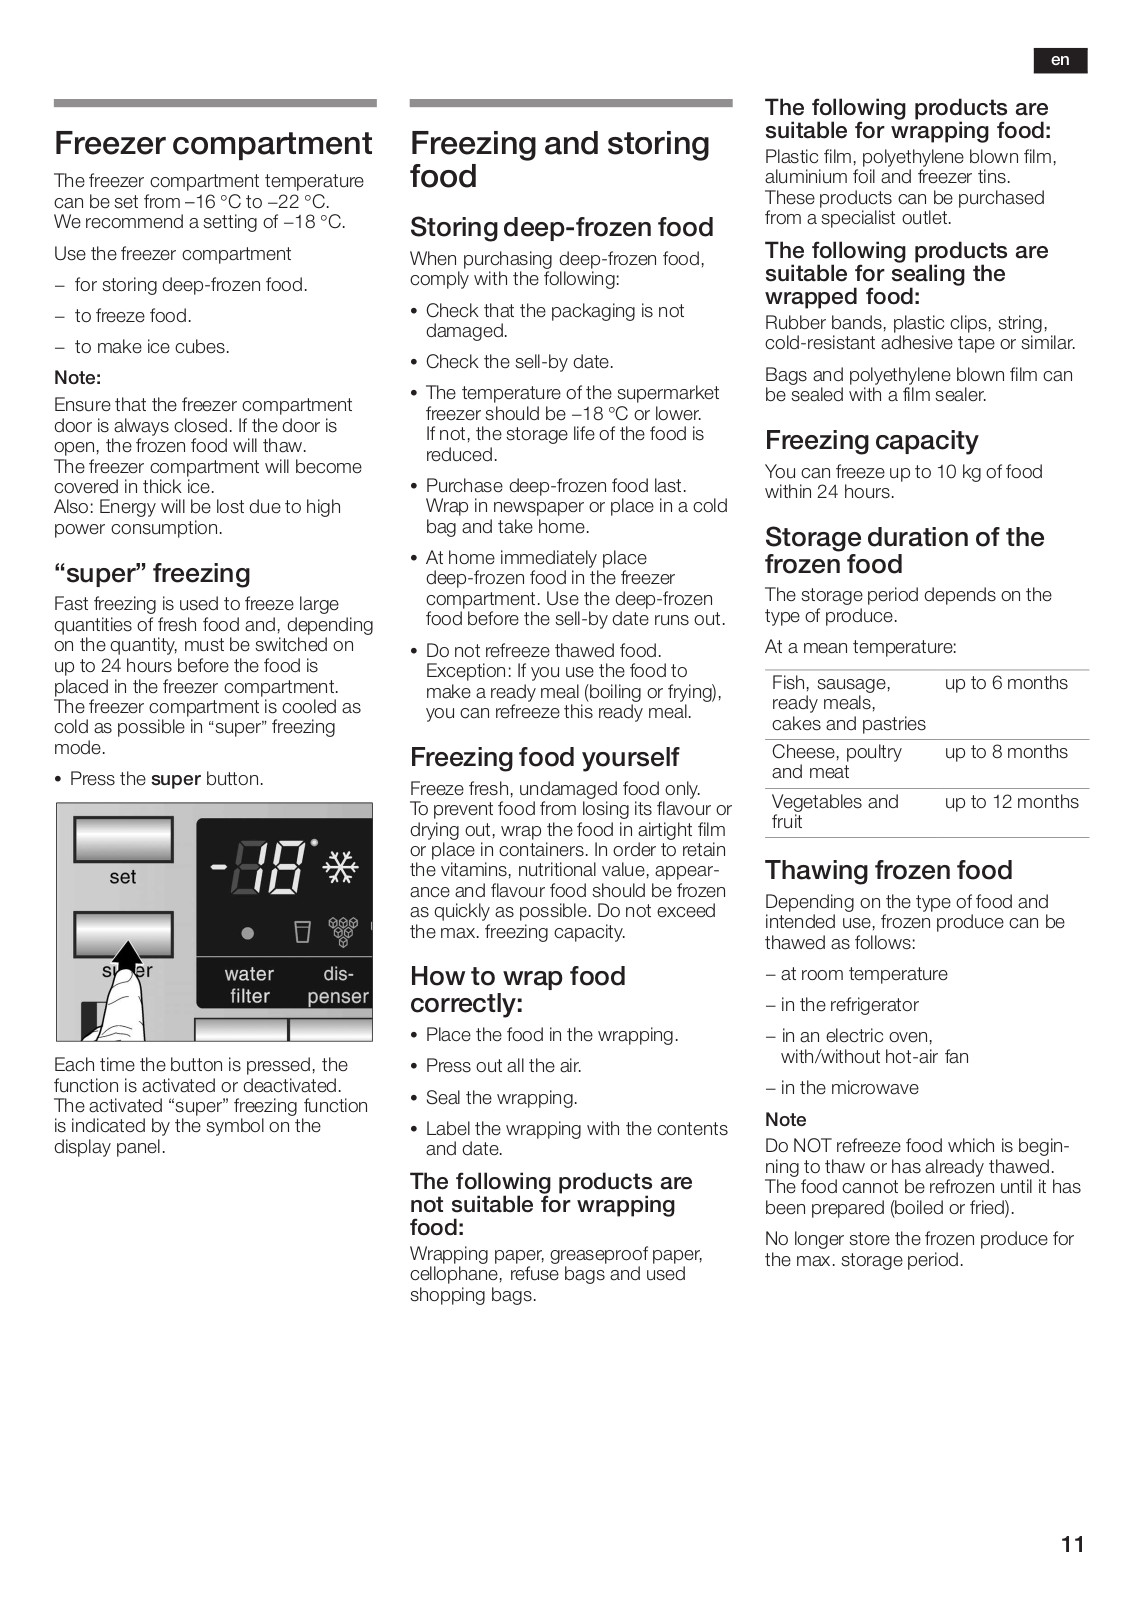
•super"


freezing


S


frozen

food


deep0frozen food in the freezer


The

storage

period

depends

on the

Fast freezing

is

used to freeze large

compartment.

Use

the

deep0frozen


type

of produce.


quantities of

fresh food

and, depending food

before

the

sell0by

date

runs


out.


on the

quantity,

must be switched onS

Do not refreeze

thawed

food.


At a


mean

temperature:


up to

24

hours

before

the

food is

Exception:

If

you

use

the

food

to


Fish,

sausage,

up to

6 months

placed in the freezer compartment.


make

a ready

meal (boiling

or


frying),


The freezer

compartment

is

cooled as

you can

refreeze

this

ready

meal.


ready

meals,


cold as possible superin"

freezing


cakes

and

pastries


mode.

S Press thesuper button.


How

to


wrap

food

-

at

room temperature


correctly:


-

in

the

refrigerator


S

Place

the

food in

the wrapping.

-

in

an

electric oven,

Each time the button

is pressed, the S

Press

out


all the air.


with/without hot0air fan


function is activated or deactivated.

S

Seal

the

wrapping.


-

in

the

microwave

The activated •super"

freezing function


Note


is indicated by the symbol on the


Label

the


wrapping


S


with the contents


display panel.


and

date.


Do NOT refreeze food which is begin0


ning

to thaw or has already thawed.


The

food cannot be refrozen until it h


been

prepared (boiled or fried).

12
When using the ice maker for the first time, do not use the first 30040 ice cubes for reasons of hygiene.

en

Making

ice cubes

Operating the

ice

maker

Dispensing water

(Appliances

without ice maker)

When the freezer

compartment

has

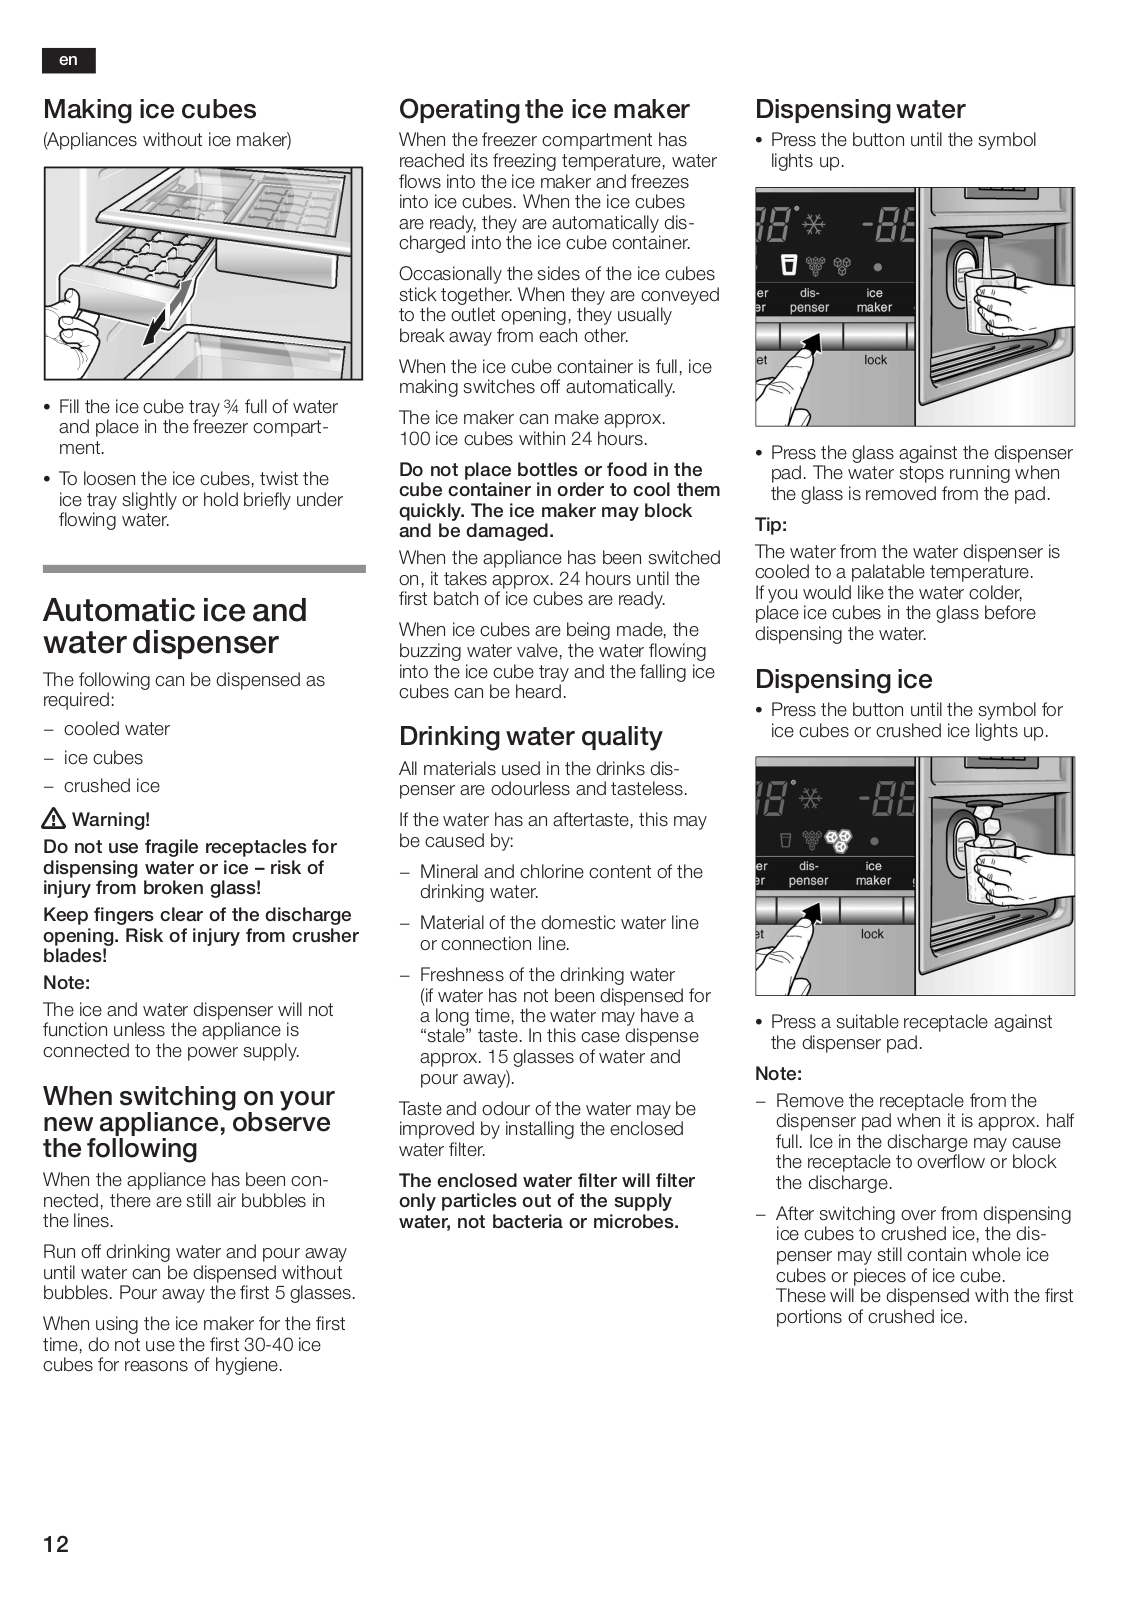
S Press the button until the symbol


reached its freezing temperature, water lights up.


flows into the ice

maker and

freezes


into ice cubes. When the ice

cubes


are ready,

they are

automatically

dis0


charged

into the

ice

cube

container.


Occasionally the sides of the ice cubes stick together. When they are conveyed to the outlet opening, they usually break away from each other.


When the ice cube container is full,


making

switches

off

automatically.


S Fill

the

ice

cube

tray ¾

full of water

ice maker can make approx.


and

place

in

the freezer

compart0

The


100 ice

cubes within

24 hours.


ment.


S Press the glass against the dispenser


Do

not

place

bottles

or

food in

the

S To

loosen

the

ice

cubes,

twist the


pad. The water stops running when

cube container

in

order

to

cool

them

ice tray

slightly

or

hold briefly under

quickly.

The ice

maker

may

block

the glass is removed from the pad.


flowing

water.


and

be

damaged.


Tip:


Automatic ice and water dispenser

The following can be dispensed as required:

-cooled water

-ice cubes

-crushed ice

When


The water

from

the water dispenser is

the appliance has been switched


on, it

takes

approx. 24 hours

until the

cooled

to

a

palatable

temperature.

first batch of ice cubes are

ready.

If you

would

like

the

water

colder,

place ice cubes

in the

glass

before


When ice cubes are being made, thedispensing the water.


buzzing water valve, the water flowing


into the ice

cube tray

and

the falling

ice


ice


cubes

can

be heard.


Dispensing


S Press the button until

the

symbol for


Drinking

water

quality

ice cubes

or crushed ice lights up.


All materials used in the drinks dis0 penser are odourless and tasteless.

!

Warning!


If

the

water

has an

aftertaste,

this


Do not use fragile receptacles for

be

caused

by:


dispensing water or ice G risk of

- Mineral

and chlorine content of the


injury

from broken


glass!


drinking

water.


Keep

fingers

clear

of

the

discharge

Material

of the domestic water line


-


opening. Risk of injury from crusher

or connection

line.


blades!


Note:


-

Freshness

of

the

drinking

water


(if water

has

not been

dispensed

for


The

ice

and

water

dispenser

will not


a

long

time,

the

water

may

have

a

Press a

suitable receptacle

against

function

unless the

appliance

is


•stale"

taste.

In this

case

dispense

S


the dispenser pad.


connected to

the power

supply.


approx. 15 glasses

of

water and


Note:


When

switching

on

your


pour

away).


- Remove the receptacle from the

new


appliance,

observe

Taste and odour of the water may be

dispenser pad when it is

approx. half


improved

by installing

the

enclosed


the


following


water


filter.


full. Ice

in the

discharge

may cause


the receptacle

to overflow

or block

When the appliance has been con0


The

enclosed

water

filter

will

filter

the discharge.


nected,

there

are still

air bubbles in

only

particles

out

of

the

supply

-

After switching

over from

dispensing

the lines.


water,

not

bacteria

or

microbes.


ice cubes to crushed ice, the dis0

Run off drinking water and pour away


penser may still contain whole ice

until water can be dispensed without


cubes or pieces of ice cube.

bubbles.

Pour

away

the

first

5 glasses.


These will

be dispensed with the first


portions

of crushed ice.


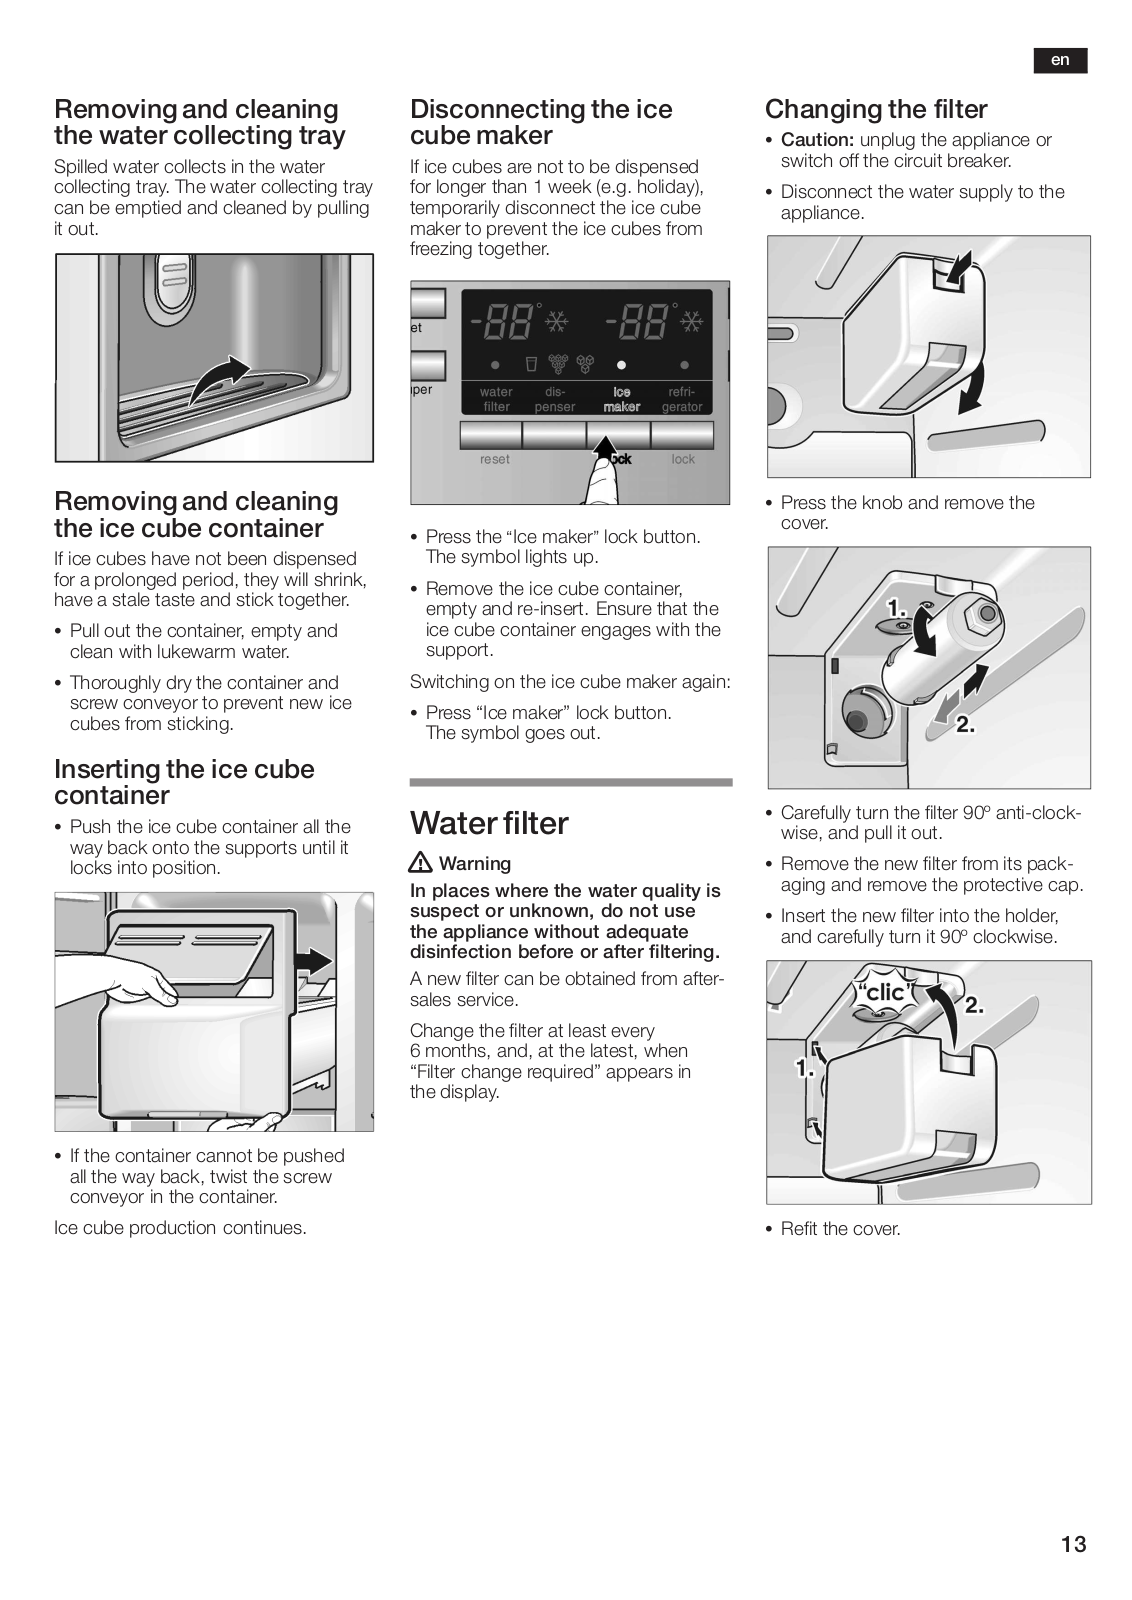
S Pull out the container, empty and clean with lukewarm water.
S Thoroughly dry the container and screw conveyor to prevent new ice cubes from sticking.
Inserting the ice cube container


en


Removing

and

cleaning

Disconnecting the

ice


Changing

the filter

the water

collecting

tray

cube maker


S Caution: unplug the appliance or

Spilled water collects in the water

If ice cubes are not to

be dispensed switch off the circuit breaker.

collecting

tray.

The water collecting

trayfor longer

than 1 week

(e.g. holiday),

S Disconnect

the water supply to the

can be

emptied and

cleaned

by pullingtemporarily

disconnect

the

ice cube

appliance.


it out.


maker to

prevent the

ice

cubes

from


freezing together.

Removing

and

cleaning


S Press the knob and remove the

the

ice

cube

container


cover.


S

Press theIce maker" lock button.

If

ice

cubes have not been dispensed

The symbol

lights up.

for

a

prolonged

period,

they

will

shrink,

Remove the ice cube container,

have

a stale

taste and

stick

together.

S


empty and

re0insert. Ensure that the

ice cube container engages with the support.

Switching on the ice cube maker again:

S Press •Ice maker" lock button.

The symbol goes out.

S Push

the

ice cube container all

theWater

filter


way back onto the supports until it


locks

into

position.

! Warning


In places where the water quality


suspect

or

unknown,

do

not use


the appliance

without

adequate


disinfection

before

or

after

filtering.


A new filter can be obtained from


sales service.


Change

the

filter

at

least

every


6 months,

and, at

the

latest,

when


•Filter change required" appears in


the display.


S If the

container cannot be pushed


all the

way back, twist the screw


conveyor

in the container.


S Carefully turn the filter 90º anti0clock0


wise,

and pull it

out.


S

Remove the new

filter

from its

pack0

isaging

and remove

the

protective

cap.

S

Insert the new filter into

the holder,


and

carefully turn

it 90º

clockwise.

Ice cube production continues.

S Refit the cover.

13


en


Information

concerning

Do

not install

the water

filter

if

theIf no ice has been removed for a

the water

filter


water pressure is greater

than


lengthy

period:

Empty

the ice

box


0.86 MPa

(8.6

bar).


and

discard any ice

produced

over


-

After

use, the

water system is

sub0

If the waterpressure is greater than

the

next 24 hours.


ject

to

lowpressure.

Proceed

with

0.55 MPa

(5.5

bar),pressurea


-

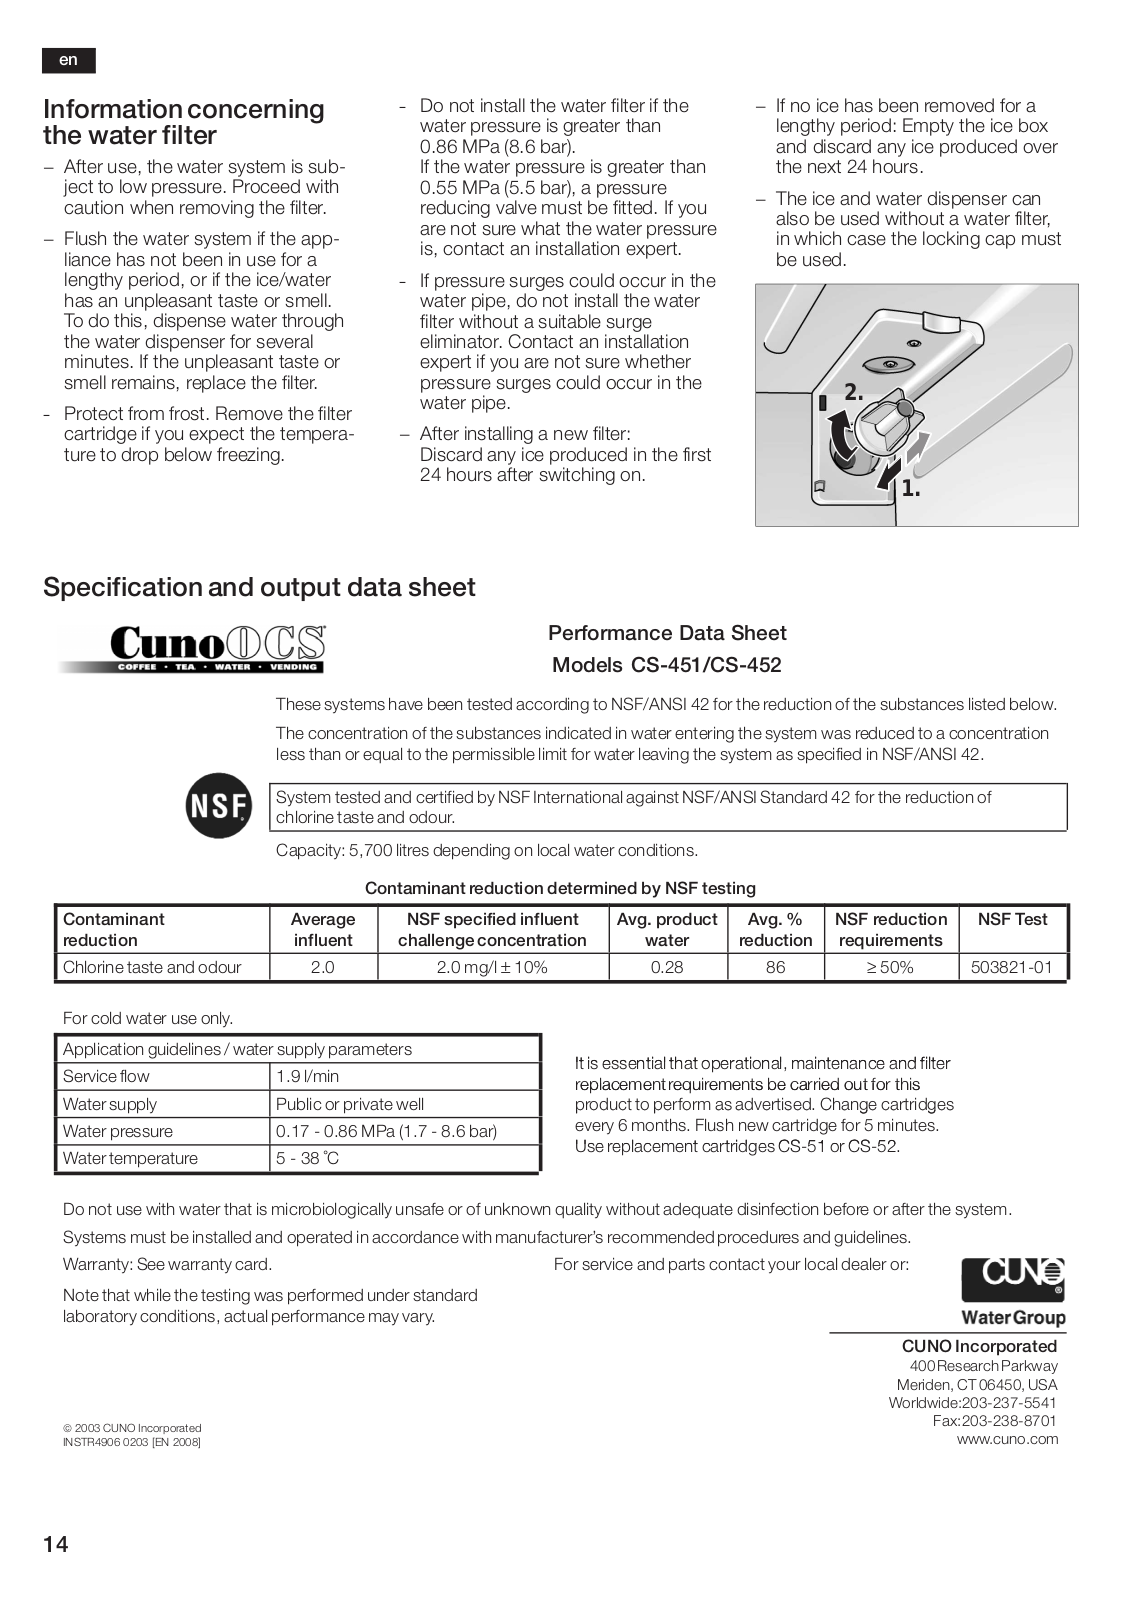
The ice and water dispenser can


caution

when

removing

the

filter.


reducing

valve

must

be

fitted.

If

you

also

be

used

without

a

water

filter,

-

Flush the water system

if

the

app0

are

not sure what

the waterpressure


in which

case

the locking

cap

must

is,

contact an

installation expert.


liance has not been in use for a


be

used.


lengthy

period, or

if the ice/water

If pressure

surges could

occur

in

the


has an

unpleasant

taste

or

smell.

water pipe, do

not

install the

water


To do this, dispense water

through

filter without a suitable surge


the water dispenser for several


eliminator.

Contact an installation


minutes. If the unpleasant taste or

expert if you are not sure whether


smell

remains,

replace the

filter.


pressure

surges could occur

in

the


2.


water pipe.


Protect

from frost.

Remove

the

filter


cartridge if you expect the tempera0-

After installing a new filter:


ture

to

drop

below freezing.


Discard any ice

produced

in

the

first


24 hours

after

switching

on.


1.


Specification and output

data

sheet


Performance Data Sheet


Models

CS1451/CS1452


These systems have been tested according to

NSF/ANSI 42 for the reduction of

the substances listed


The concentration of the substances indicated

in water entering the system was reduced to a concen


less than or equal to the permissible limit for

water leaving the system as specified in NSF/ANSI 42.


System tested and certified by NSF International against NSF/ANSI Standard 42

for the reduction of


chlorine

taste

and odour.


Capacity:

5,700 litres

depending on local

water

conditions.


Contaminant reduction determined by NSF testing

Contaminant


Average

NSF specified influent

Avg. product

Avg. %

NSF

reduction

NSF Test

reduction


influent

challenge concentration

water

reduction

requirements


Chlorine

taste

and

odour

2.0

2.0 mg/l± 10%

0.28

86

50%

503821001

For cold

water

use

only.


Application guidelines / water supply parameters

Service

flow

1.9

l/min


Water

supply

Public

or

private

well


Water

pressure

0.17

0

0.86 MPa

(1.7 0 8.6 bar)


Water

temperature

5 0

38

°C


It isisessentialthatthatoperationoperational,m intenmaintenanceand filterand filter replacement requirements be carried out for this

product to perform as advertised. Change cartridges every 6 months. Flush new cartridge for 5 minutes. Use replacementcartridgesCS CS051or CSor52CS052.

Do not use with water that is microbiologically unsafe or of unknown quality without adequate disinfection before or after the s

Systems must be installed and operated in accordance with manufacturer's recommended procedures and guidelines.

Warranty: See warranty card.

For service and parts contact your local dealer or:

Note that while the testing was performed under standard laboratory conditions, actual performance may vary.

2003 CUNO Incorporated

INSTR4906 0203 [EN 2008]

CUNO Incorporated

400 Research Parkway

Meriden, CT 06450, USA

Worldwide:203023705541

Fax: 203023808701

www.cuno.com

14


en


How


to

save

energy Operating


noises


Defrosting


S Install the appliance in a cool, well

Normal

noises


Defrosting

is

actuated

automatically.

ventilated room,

but not

in

direct


The

water

which

occurs during de0

sunlight

and

not

near

a

heat sourceHumming


- refrigerating unit


is


frosting

runs

down to

the evaporation

(radiator,

cooker,

etc.).

If

required,


running. The fan in the circulating

air tray

on

the

rear

panel

in the refrigerat

use an

insulating

plate.


system

is

running.


and

evaporates automatically.


S Allow warm food and drinks to coolBubbling,


gurglingor whirring


down

before

placing

in

the

appliance!

-


refrigerant

is flowing

through


noises


S When

thawing frozen

food,

place it

the tubing.

Water

flowing

into

the

ice


in the

refrigerator

compartment.

maker.


Cleaning

the


The low

temperature of the

frozen

Clicking -

motor


is

switching


on or

off.


products cools the food in

the

Solenoid

valve

on

the

water


appliance


connection


refrigerator.


is opening

or

closing.


S Attention:

Pull

out the mains plug o

S Open

and close

the

door

as briefly Rumbling


3 ready ice cubes from

the switch off the fuse!


as possible.


ice maker

are

falling

into

the

ice

cubeS Clean

the door seal with water only


container.


and then

dry thoroughly.


Noises


which

can

be


S Clean the appliance with tepid rinsing


water. The rinsing water must not dr


easily

rectified


onto

the

fascia

or light.


The

appliance


is

not

level


Do not place the cold glass shelves


directly from the freezer compartment


Please align the appliance with a spirit


level. Use the height0adjustable feet orinto hot water.


place

something

under the feet.


Never clean

the

shelves or containers


The

appliance


is

touching


in the

dishwasher. The parts may warp.


S After

cleaning: insert the mains plug


adjacent

units


or

appliances


Please move the appliance away from or switch on the fuse.


adjacent

units

or

appliances.


!

Warning!


Drawers,

baskets

or

storage


Never

touch frozen food with wet


areas

are

loose

or

sticking


hands.

Your

hands could freeze


Please

check

the

removable

parts


to the

food.

Risk of

injury!


and,


if required,

reinsert

them.


Never use a steam cleaner to clean t


Receptacles

are

touching


appliance.

The steam may come into


contact

with

live parts in the appliance


each

other


and cause a short0circuit or electric


Please move bottles or receptacles


shock.

Steam may damage the plastic


away from

each


other.


surfaces.


15

The ventilation openings have beenRemove obstacles. covered.
Temperature has been set too lowSelect. a warmer temperature (see •Setting the temperature").
Appliance has no refrigerating Power failure; the fuse has beenCheck whether the power is on, the fuse must capacity. The interior light is notswitched off; the mains plug has switched on.
functioning. not been inserted properly.
The refrigerating unit is switchingAppliance door opened frequently.Do not open the door unnecessarily.
on more frequently and for
longer. Large quantities of fresh food areDo not exceed max. freezing capacity. being frozen.

en

Eliminating minor faults yourself

Before you call customer service:

Please check whether you can eliminate the fault yourself based on the following information. Customer service will charge you for advice, even if the appliance is still under guarantee!

Refrigerator and

freezer compartments


Fault


Possible cause


Remedial action


The temperature in the refrigerator or freezer compartment is too cold.

The frozen food is frozen solid.

Loosen

frozen

food with a blunt object.

Do not

use a

knife or pointed object.

There is a

thick layer of frost in

the freezer

compartment.

Always ensure that the appliance door is closed.

The interior light is not

The

bulb is

defective.


Replace bulb (see •Changing the bulb").

functioning.


Light

switch

is sticking.


Check whether it can be moved.


The freezer compartment is noThe freezer compartment

door

Take

frozen food out of the appliance, insulate

longer reaching the selected

was open too

long. The

evaporatorthoroughly and place in a cool location.

temperature.

(refrigeration

generator)

is

covered After approx. 12 hours the ice in the refrigerating


in such a

thick layer

of

ice thatsystthem has thawed. Switch on the appliance


fully

automatic defrosting

system

again

and put back the frozen food.


is no

longer

able to defrost this

Note!


amount of

ice.


To prevent loss of refrigeration, do not open the


refrigerator compartment door unnecessarily


often.


If the

fault cannot be rectified by means of the


above

information, please call customer service.


Water

and ice dispenser


Fault


Possible cause


Remedial

action


Despite

prolonged operating

Tap turned off.


Turn

tap

on.


time, ice cubes are not being


Water supply

is interrupted.


Inform plumber.


dispensed.

Water pressure

too low.


Ice maker is

locked. The

symbolPressis

•Ice

maker"

lock button.


lit on the display panel.


Freezer compartment too

warm.


Lower temperature in the freezer compartment


(see

•Setting the

temperature").

Ice cubes are in the ice cubeIce cubes are frozen together. container but are not being

dispensed.

Ice cubes are jammed in the outlet of the ice cube container or in the ice crusher.

Remove and empty the ice cube container.

Remove the ice cube container and rotate the screw conveyor by hand. Loosen any jammed chunks of ice with a wooden chopstick.

16


en


Fault


Possible

cause


Remedial

action


Ice

cubes

are

watery.


Ice cubes have melted 3 power Remove

the ice

cube maker, empty and rub dry


failure or the freezer compartment


door

was

not

closed properly.


Ice

cubes

are

evaporating.


Cold air flowing over the ice cubes is causing


shrinkage,

particularly if consumption is low.


This is

normal.


The flap on the ice cube


Ice cubes are preventing the flapRemove ice cubes.

dispenser is not closing properlyfrom.

closing.


Ice cubes are sticking in the


Limescaleice

from the water may

beMoisten

a

cloth

with vinegar and wipe out the

cube tray.


forming in

the

trays.


trays.

If

limescale is thick, always clean the trays


when cleaning the refrigerator compartment.


Ice cubes are not the same

sizeThe appliance is not level.


Align the appliance with a spirit level and with t

and there

is water

in the ice

cube


height0adjustable

rollers or feet (see Installation

container.


instructions).


Water dispenser is

not


Tap

turned off.


Turn tap


on.


functioning.


Water supply

is interrupted.


Inform

plumber.


Water pressure

too low.


Freezer compartment too warm.


Lower temperature in the freezer compartment


(see •Setting the

temperature").


17

en

Changing the bulb

Changing the bulb inside the appliance

S Attention: Pull out the mains plug switch off the fuse!

S Loosen 2 screws under the cover and remove the cover.

S Change the bulb. Replacement bulb max. 25 W,

2200240 V AC, E14 lampholder.

S Attach the cover.

Changing the bulb on the


ice and

water

dispenser

Calling

customer


S Attention: Pull out the mains plug or


switch

off

the

fuse!


service


S

Prise

out

the

cover


Your local customer service can

be


with a screwdriver.


found in the telephone directory

or in


the customer0service index.


Please provide

customer service

with


the appliance product number (E0Nr.)


and production number (FD).


This information can be found on the product label.

S Change the bulb. Replacement bulb max. W,15

2200240 V AC, E14 lampholder.

To prevent unnecessary call0outs, please assist customer service by quoting the product and production numbers. This will save you additional costs.

S Attach the cover.

18

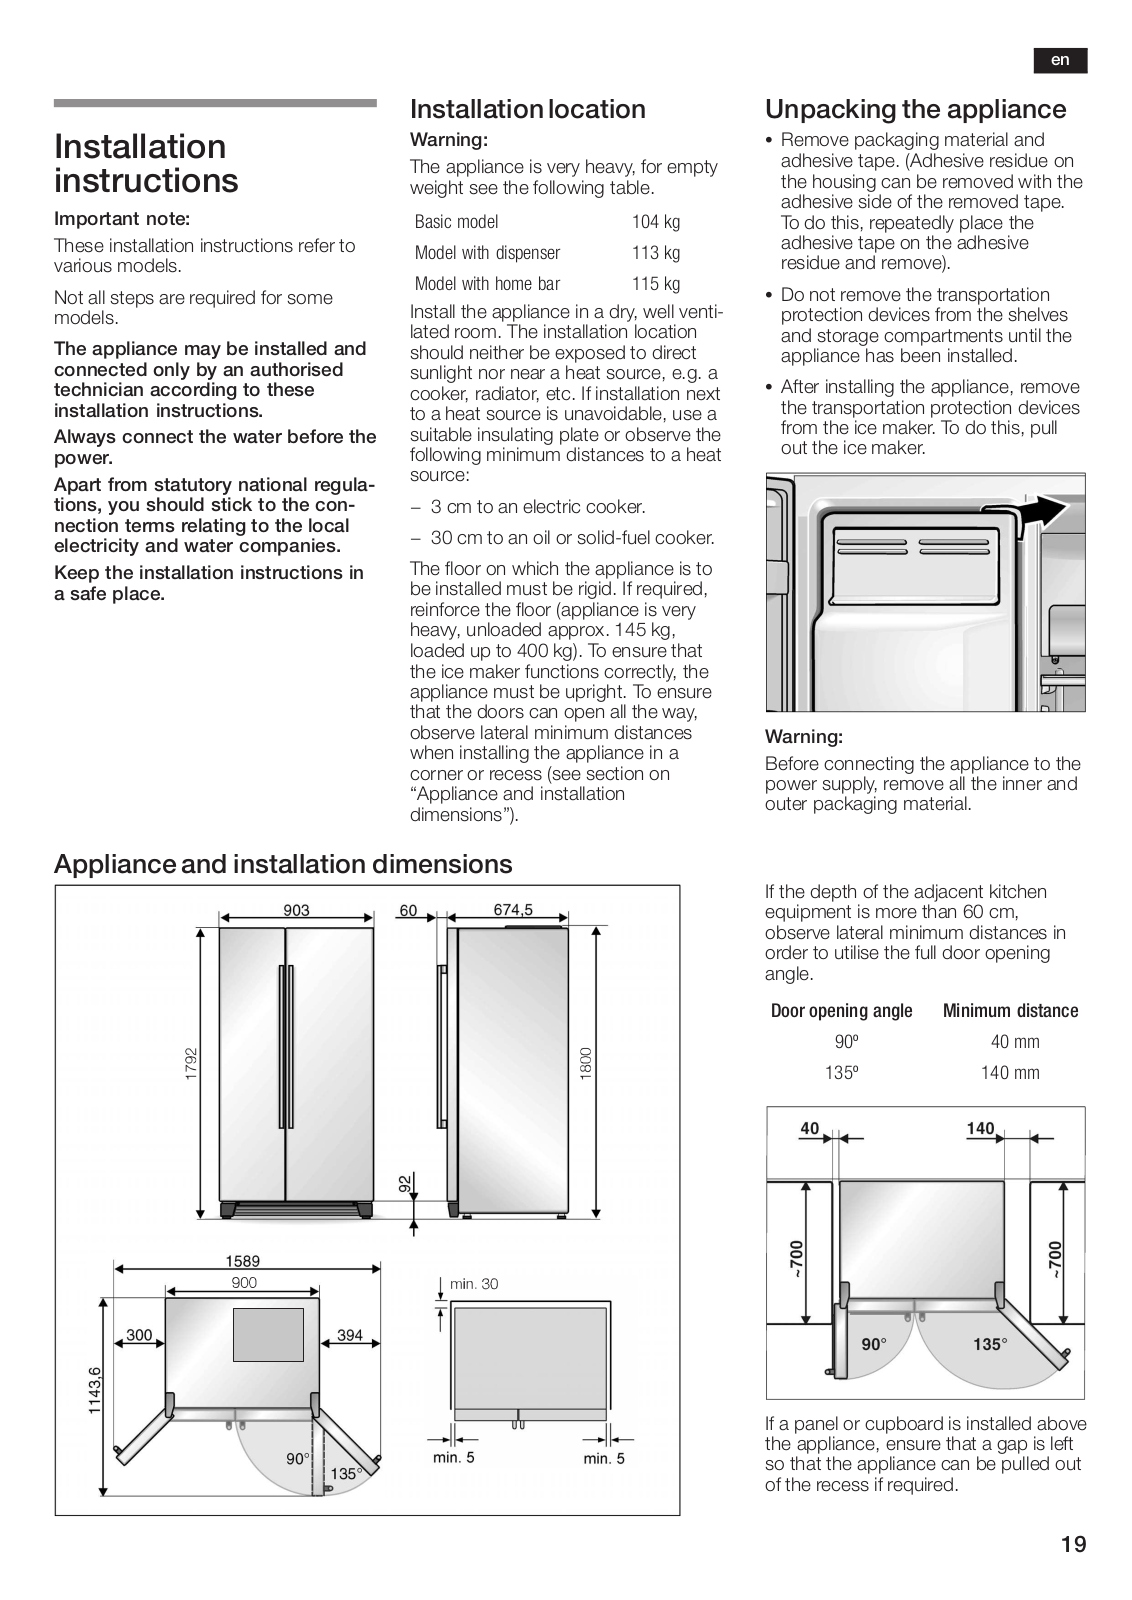
If a panel or cupboard is installed abo the appliance, ensure that a gap is le so that the appliance can be pulled o of the recess if required.
19
135º
140 mm
90º
40 mm
Door opening angle
Minimum distance
If the depth of the adjacent kitchen equipment is more than 60 cm, observe lateral minimum distances in order to utilise the full door opening angle.
Not all steps are required for some models.
These installation instructions refer to various models.


en


Installation location

Unpacking the appliance

Installation instructions

Important note:

Warning:


S Remove packaging material and

The appliance is

very

heavy, for

empty adhesive

tape. (Adhesive residue on

weight

see

the

following table.

the housing can be removed with th

adhesive

side of the removed tape.


Basic

model


104

kg

To do this, repeatedly place the

Model

with

dispenser

113

kg

adhesive tape on the adhesive

residue

and remove).


Model

with

home

bar

115

kg

S Do not

remove the transportation


Install the

appliance

in a dry,

well venti0


lated room. The installation location


protection devices from the shelves

The

appliance

may

be

installed


and

storage compartments until the

and


appliance

has

been installed.

connected

only

by an

authorised

should neither be exposed to direct


sunlight

nor

near a

heat source,

e.g.


a


technician

according

to

these

cooker,

radiator,

etc.

If installation

next S

After

installing

the appliance, remove

installation

instructions.


to a heat source is

unavoidable,

use


athe transportation protection devices


suitable insulating plate or observe the

from

the

ice

makerTo. do this, pull

Always connect the water before the


out

the

ice maker.

power.


following minimum distances to a heat


source:


Apart from statutory national regula1


tions,

you

should stick to the con1- 3 cm to an electric cooker.


nection

terms

relating

to the local - 30 cm

to

an

oil or solid0fuel cooker


electricity

and

water

companies.


Keep

the

installation

instructions

in The

floor

on

which

the appliance

is


a safe

place.


be

installed

must be

rigid. If

required,


reinforce the floor (appliance is very


heavy,

unloaded

approx. 145 kg,


loaded up to 400 Tokg).ensure that


the ice maker functions correctly, the


appliance must be uprightTo. ensure


that the doors can open all the way,


observe

lateral

minimum distances


Warning:


when installing

the appliance

in a

Before connecting the appliance to the


corner

or

recess (see section

on


power supply, remove all the inner and


•Appliance

and

installation


outer

packaging

material.


dimensions").


Appliance and installation dimensions

en

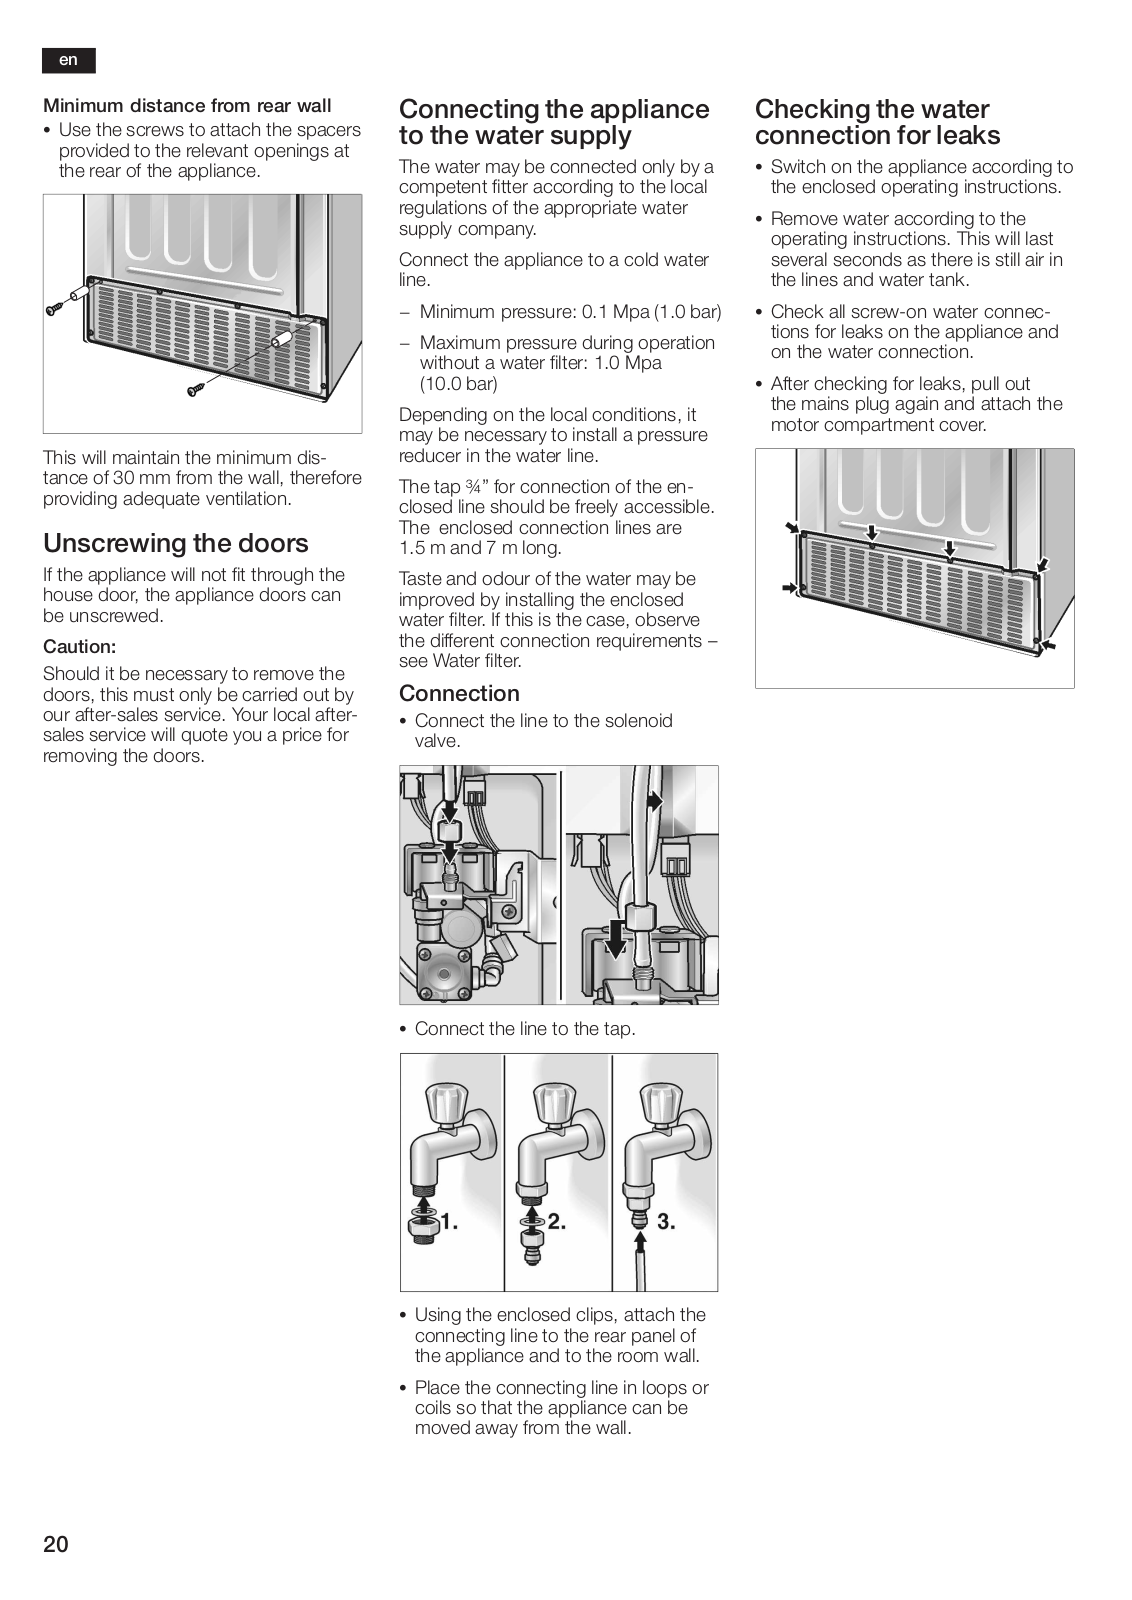
Minimum

distance

from

rear

wall

Connecting

the

appliance

Checking

the

water


S Use the screws to attach the spacers


provided

to

the

relevant

openings atto

the

water

supply

connection

for

leaks


the

rear

of

the

appliance.


The

water

may

be

connected only byS Switcha on the

appliance

according to


competent

fitter

according to

the local

the enclosed

operating instructions.


regulations

of

the appropriate

water

S Remove water according to the


supply company.


operating instructions. This will last


Connect the

appliance

to a

cold water several seconds as

there is still air in


line.


the lines

and

water tank.


- Minimum pressure:

0.1 Mpa

(1.0 bar)

S Check

all

screw0on

water

connec0


- Maximum pressure

during operation

tions

for

leaks

on

the appliance

and


on the water

connection.


without a water filter: 1.0 Mpa


(10.0 bar)


S After

checking

for

leaks,

pull out


Depending on

the

local conditions, it

the mains

plug

again and

attach

the


motor

compartment

cover.


may be necessary to installpressurea


This will

maintain

the

minimum

dis0

reducer in

the water

line.


tance

of

30

mm

from

the wall,

therefore

tap ¾" for connection of the en0


providing

adequate

ventilation.


The


closed line

should

be

freely

accessible


Unscrewing

the

doors


The

enclosed

connection lines are


1.5 m and

7

m

long.


If the

appliance will

not

fit through the


house

door,

the

appliance doors

can

Taste and odour of the water may be


improved by

installing

the enclosed


be unscrewed.


water filter.

If

this is the case, observe


Caution:


the

different connection requirements 3


Should it be necessary to remove thesee Water filter.


doors,

this must

only

be

carried

out

Connectionby


our after0sales service.

Your local

after0


S Connect the line to the solenoid


sales service will quote you a price forvalve.


removing

the

doors.


S Connect the line to the tap.

S Using the enclosed clips, attach the connecting line to the rear panel of the appliance and to the room wall.

S Place

the connecting

line in loops or

coils so that the appliance can be

moved

away from the

wall.

20

BOSCH KA58NA45 User Manual

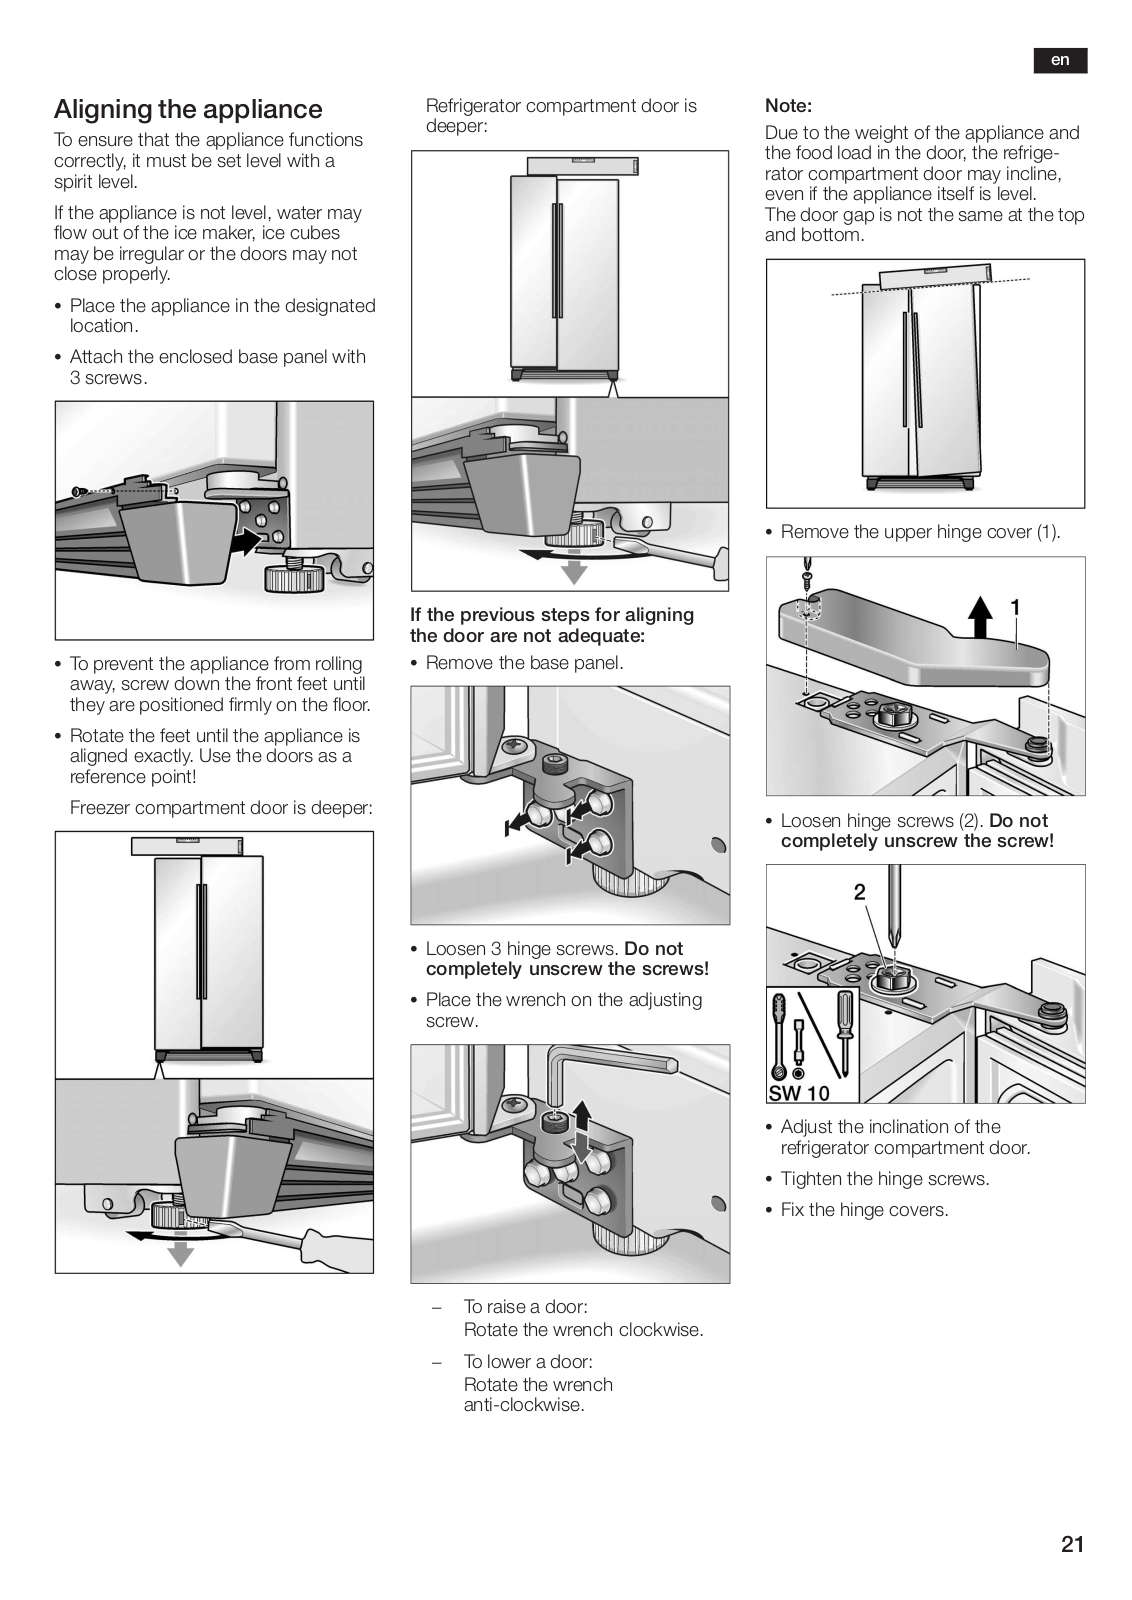
Aligning

the

appliance

Refrigerator compartment door is

To ensure that the appliance functions deeper:

correctly, it

must

be set level

with

a

spirit

level.


If the

appliance

is

not level,

water


flow out of

the ice maker, ice cubes

may be irregular or the doors may

close

properly.


S Place the appliance in the designated

location.


S Attach the

enclosed base panel

with

3 screws.


If the previous steps for aligning


the door

are

not

adequate:

S To prevent the appliance

from

rollingS Remove

the

base

panel.

away, screw down the front feet

until


they are positioned firmly

on

the

floor


S Rotate the feet until the appliance is aligned exactly. Use the doors as a reference point!

Freezer compartment door is deeper:

S Loosen 3 hinge screwsDo. not completely unscrew the screws!

S Place the wrench on the adjusting screw.


en


Note:


Due

to the weight of the appliance an

the

food load in the door, the refrige0

rator compartment door may incline,

even

if

the appliance

itself is

level.

The door

gap is not

the same

at the

and

bottom.


S Remove the upper hinge cover (1).

S Loosen hinge screws (2)Do. not completely unscrew the screw!

S Adjust

the

inclination of

the


refrigerator

compartment

door.

S

Tighten

the

hinge screws.

S

Fix the

hinge covers.


-To raise a door:

Rotate the wrench clockwise.

-To lower a door:

Rotate the wrench anti0clockwise.

21

en

Switching on the appliance

Switch on the appliance according to the enclosed operating instructions.

Disconnecting the appliance

Disconnect the appliance according to the enclosed operating instructions.

If the appliance is to be disconnected or stored at temperatures below

freezing point, empty the water tank for the drinking water dispenser.

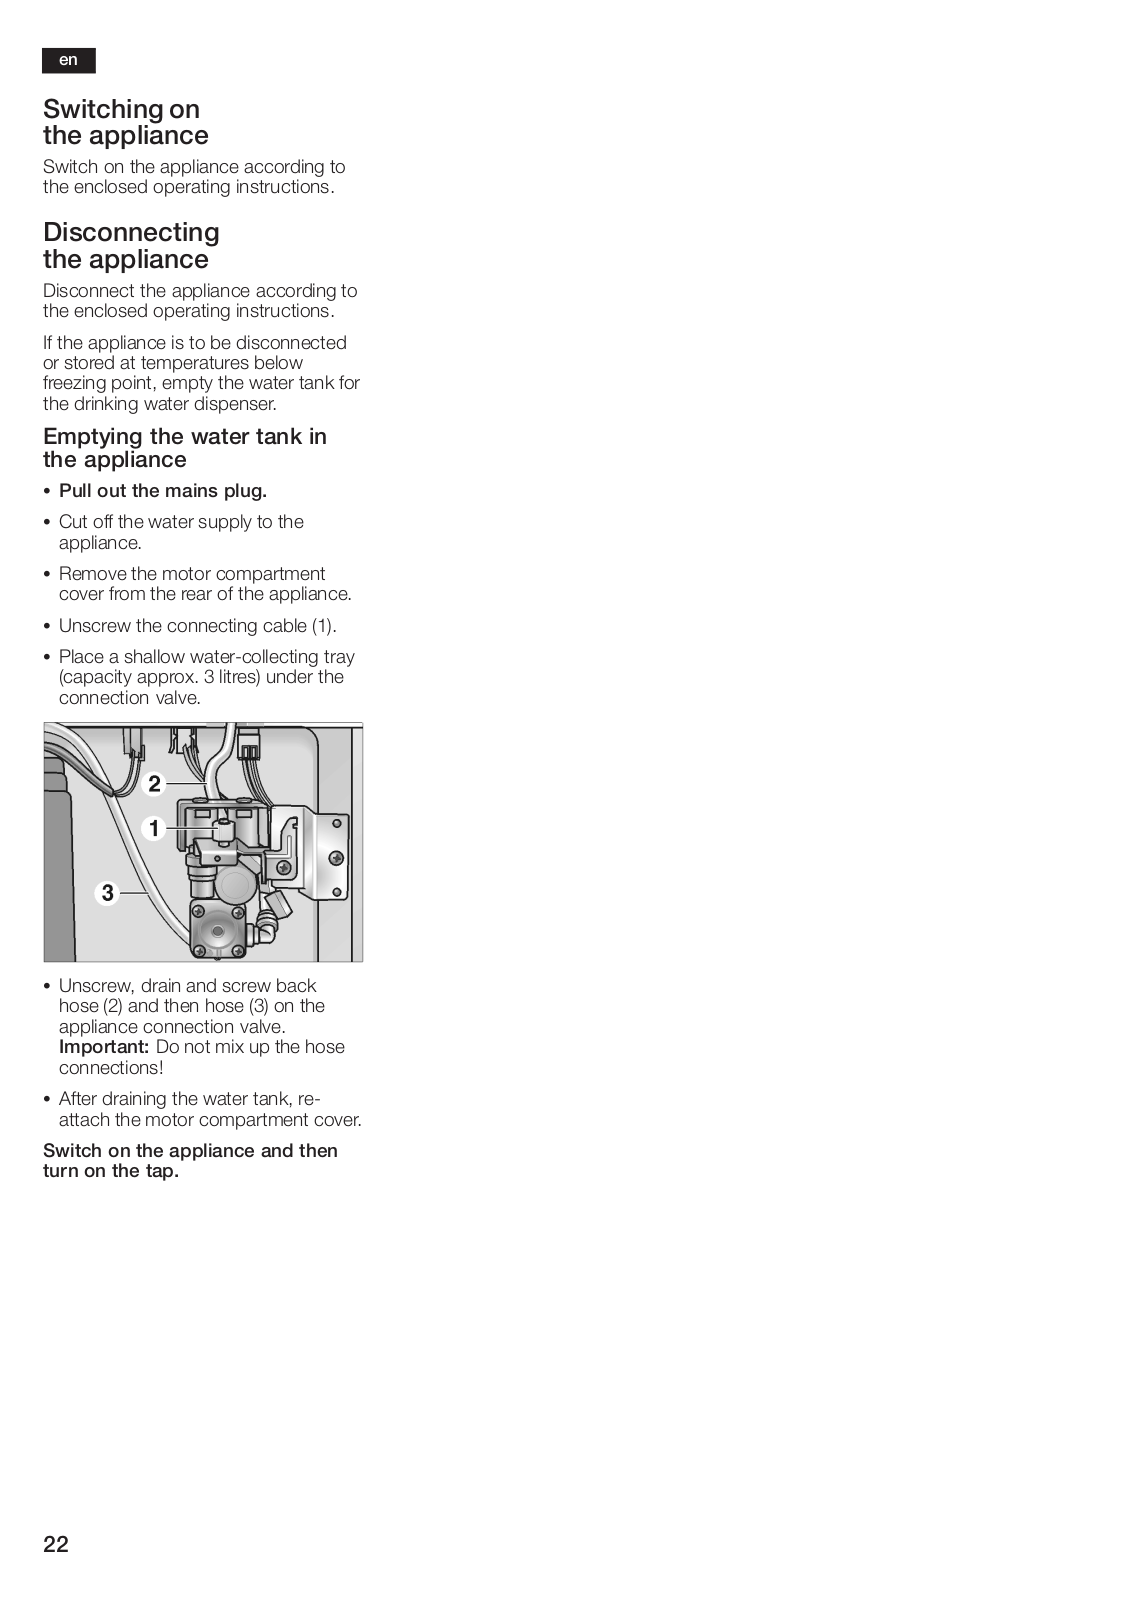
Emptying the water tank in the appliance

S Pull

out

the

mains

plug.

S Cut off the water supply to the

appliance.


S Remove the motor compartment

cover

from the rear

of

the appliance.

S Unscrew

the

connecting

cable (1).

S Place a shallow water0collecting tray (capacity approx. 3 litres) under the connection valve.

S Unscrew, drain and screw back hose (2) and then hose (3) on the appliance connection valve. Important: Do not mix up the hose connections!

S After draining the water tank,re0

attach the motor compartment cover.

Switch on the appliance and then turn on the tap.

22

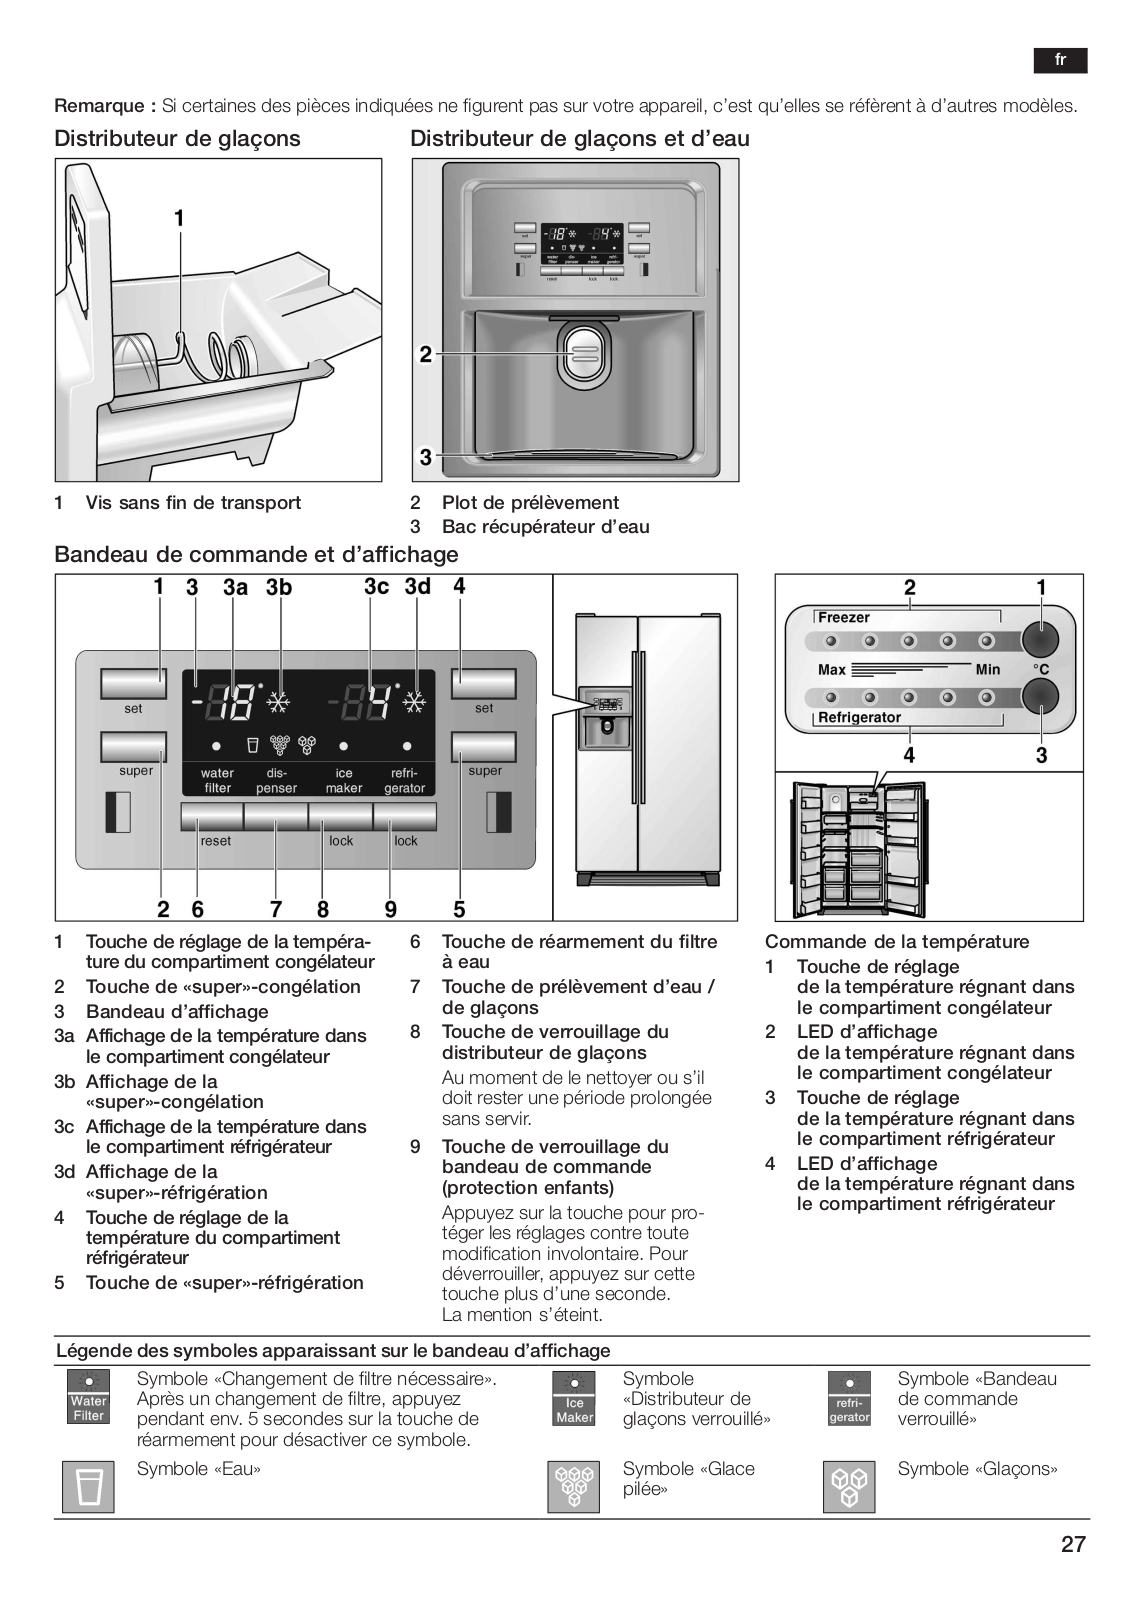
fr Table des matières

Félicitations . . . . . . . . . . . . . . . . . . . . . . . . . . . .

.

.

.

.

. . . .

. .

.

24. . . . . . . . . . . .

Consignes

de

sécurité

et avertissements. . . . . . . . . . . . . . . .

.

.

.

.

. . . . . . . . . . . . 24. . . . .

. . . . . . . . .

Conseils

pour

la

mise au rebut. . . . . . . . . . . . . . . . . . . .

.

. . . . . . . . . . . . . . . . . . . . 25. . . . . .

. . . . . . . . . . . . .

Votre nouvel appareil. . . . . . . . . . . . . . . . . . . . . . . .

. . . . . . . . . . . . . . . . . . . . . . 26. . . . . . .

. . . . . . . . . . . . .

Installation . . . . . . . . . . . . . . . . . . . . . . . . . . . . . . .

. . . . . . . . . . . . . . . . . . . . . . . 28. . . . . . .

. . . . . . . . . . . . . . . .

Branchement

de l'appareil . . . . . . . . . . . . . . . . . . . . .

.

.

.

.

. . . . .

.

.

. 28. . . . . . . . . . . .

Enclenchement

de l'appareil. . . . . . . . . . . . . . . . . . . . .

.

.

.

.

. . . . . . . . . . .

. . . 28. . . . . . .

. . . . . . . . .

Réglage de la température. . . . . . . . . . . . . . . . . . . . .

.

.

. .

. .

. . . . . . . . . . . .

. . . 28. . . . . . .

. . . . . . . . . . . .

Arrêt

et

remisage

de l'appareil. . . . . . . . . . . . . . . . . . . .

. .

. .

. .

. .

. . . . . . . . . . . .

. . . 29. . . . . . .

. . . . . . . . . . .

Fonctions . . . . . . . . . . . . . . . . . . . . . . . . . . . . . . . .

. .

. .

. .

. .

. . . . . . . . . . . .

. . . 29. . . . . . .

. . . . . . . . . . . . . . . .

Agencement

variable du compartiment

intérieur. . . . . . . . . . . . .

.

.

.

.

. . . .

. .

. 29. . . . . . . . . .

Compartiment réfrigérateur. . . . . . . . . . . . . . . . . . . . .

.

. .

. .

. .

. . . . . . . . . . . .

. . . 30. . . . . . .

. . . . . . . . . . . . .

Compartiment

congélateur. . . . . . . . . . . . . . . . . . . . .

.

.

.

.

. . . . .

.

.

. 31. . . . . . . . . . . .

Congélation et rangement. . . . . . . . . . . . . . . . . . . . . .

.

.

.

. . . . . . . . . .

. . . . . . 31. . . . . . .

. . . . . . . . . .

Distributeur


automatique

de glaçons et

d'eau. . . . . . . . . . . . . .

.

.

.

.

. . . . .

. . . . . . 32. . . . .

. . . . . . . . .

Filtre à eau. . . . . . . . . . . . . . . . . . . . . . . . . . . . . . . . . . . . . . .

. . . . . . . . . . . . . . .

. . . .

33. . . . . . . . . . . .

Economies


d'énergie. . . . . . . . . . . . . . . . . . . . . . . .

.

. . . . . . . . . . . . . .

. . . . . . 35. . . . . . .

. . . . . . . . . . . .

Bruits

de

fonctionnement. . . . . . . . . . . . . . . . . . . . . . . . .

. . . . . . . . . . . . . . . . .

. . . . . . 35. . . . . . .

. . . . . . . . .

Si vous dégivrez l'appareil. . . . . . . . . . . . . . . . . . . . . .

. . . . . . . . . . . . . . . .

. . . . . . 35. . . . . . .

. . . . . . . . . . . . .

Nettoyage de l'appareil. . . . . . . . . . . . . . . . . . . . . . .

.

.

. . . . . . . . . . . .

. . . . . . 35. . . . . . .

. . . . . . . . . . .

Remédier soi même aux petites pannes. . . . . . . . . . . . . . . .

.

.

.

.

. . . .

. .

.

36. . . . . . . . . . . .

Changement

d'ampoule. . . . . . . . . . . . . . . . . . . . . .

.

.

.

.

. . . . .

.

.

. 38. . . . . . . . . . .

Appeler le service après0vente. . . . . . . . . . . . . . . . . . . . . . . . . .

. .

. .

. .

. .

. . . . . . .

. . . . . 38. . . . . . . . . . . .

Instructions


d'installation. . . . . . . . . . . . . . . . . . . . . .

.

.

.

. .

. . . . . . . . . . . . . . . 39. . . . . . .

. . . . . . . . . . .

23

fr
Félicitations
Avec l'achat de ce réfrigérateur0 congélateur, vous venez d'opter pour un appareil électroménager moderne et de haute qualité.

Consignes de sécurité et avertissements

Avant de mettre l'appareil en service

S L'huile et la graisse ne doivent pas

entrer en

contact avec

les

parties

en matières

plastiques et

le

joint de

porte. (Ces derniers pourraient sinon devenir poreux.)

S Ne recouvrez et n'obstruez jamais les orifices de ventilation de l'appareil.

Ce

réfrigérateur0congélateur

se


Veuillez

lire

attentivement et

entière0

S

Les personnes souffrant de déficien0

distingue


par une

consommation

ment les

informations

figurant

dans les

ces physiques, sensorielles ou intel0

économique

d'électricité.


notices

d'utilisation

et de montage.


lectuelles ou dont l'expérience et les

Chaque

appareil subit,

avant


Elle contiennent

desremarques


connaissances

sont insuffisantes,

ne

de quitter


concernant


l'installation,


peuvent utiliser l'appareil que sous la


importantes


notre

usine,

des

contrôles

fonctionnels l'utilisation

et

l'entretien

de l'appareil.


surveillance

d'une

tierce

personne ou

destinés

à

vérifier

qu'il

se

trouve dans


la

documentation


à l'aide


d'une

notice

plus

exhaustive.

un

état

impeccable.


Conservez toute


pour pouvoir

la

consulter

à

nouveau


Dans

le

compartiment

congélateur,


S

Si vous

souhaitez

demander

des

ultérieurement


ou

si

l'appareil

doit


ne

stockez

pas

de

boissons,


précisions,

notamment en

ce

qui

changer

un

jour

de

propriétaire.


gazeuses

en

particulier,

en

bouteilles

concerne

l'installation

et

le

raccorde0


ou

en boîtes

car

elles

éclateraient.

ment de l'appareil, notre service

Sécurité


technique


Les

bouteilles

et

les

boîtes

risque0

après0vente

se

tient

à

votre

disposition.


raient

d'éclater

!


!


Pour

obtenir des

informations

avan0


Attention


S

Ne

portez

pas

directement

à

la

bou0

cées

et

découvrir

un choix de nos


S

Le

changement de cordon d'alimen0


che

les


esquimaux

ou

les

glaçons qui

produits,

rendez0vous

à

notre


adresse

tation

et

d'autres réparations sont


sortent

du

compartiment

congélateur

d'internet.


exclusivement

réservées au

service


(risque

de


brûluresdû à

la tempéra0


Veuillez

lire

la

présente

notice


après0vente.


Les

installations

et


ture

très

basse).


d'utilisation,

les

instructions

d'instal0


réparations

inexpertes


peuvent en0

S

Ne

touchez

pas

les

aliments

con0


gendrer

des

risques

considérables

lation

ainsi

que toutes

les

informations


gelés

avec

les

mains

mouillées

car

accompagnant

votre

appareil,

et les


pour

l'utilisateur.


elles

risqueraient

de

rester

collées.


respecter.


Pendant


l'utilisation


Risque

de

blessures.


Rangez

soigneusement

ces docu0


Ne

tentez

jamais de

racler

le

givre


S

ments

pour

les consulter

à nouveau


N'utilisez

jamais

d'appareils

élec0

S


ou la

glace

avec

un

couteau.


plus

tard,

ou

pour

les

remettre au

futurtriques

à

l'intérieur

de

l'appareil


Vous risqueriez

d'endommager

les


nouveau

propriétaire

de

l'appareil.


(par. ex. des

appareils

de chauffage,


tuyaux

de

fluide

réfrigérant.

Ce

fluide,


sorbetières

électriques,

etc.).


en

fuyant,

pourrait

vous

blesser

aux


Risque d'explosion


!


yeux.


S

Ne dégivrez ni ne nettoyez jamais


l'appareil

avec

un

nettoyeur

à vapeur.


enfants

et

l'appareil


La

vapeur

pourrait

atteindre

des


Les


S

L'appareil

n'est

pas

un

jouet,

éloignez


pièces

électroconductrices

etpro0


les

enfants.


voquer un court0circuit ou vous faire


électrocuter.


S

Si l'appareil

est

équipé

d'une


S

Ne stockez


dans

l'appareil

ni produits serrure :


rangez

la

clé

hors

de

portée


contenant des gaz propulseurs in0


des

enfants.


flammables

(par ex. bombesaéro0


Dispositions

générales


sols)

ni

produits

explosifs.


Risque d'explosion


!


L'appareil

convient

pour

:


S

Ne vous servez pas des socles,

S

Réfrigérer

des

produits

alimentaires.


clayettes et portes comme marche0


pieds

ou

pour

vous

appuyer.


S

A congeler des produits alimentaires.


S

Pour dégivrer et nettoyer l'appareil,

S

Préparer

des

glaçons.


débranchez

la

fiche

mâle

de la

prise


est

destiné

à une

utilisation


de courant ou

retirez

le

fusible

/

Cet appareil


domestique,

c'est0à0dire

une

utilisation


désarmez

le

disjoncteur.


à l'intérieur de votre domicile ou des


Pour

débrancher

l'appareil, tirez

sur


pièces

attenantes.


la fiche mâle et non pas sur son

L'appareil

a

été

antiparasité conformé0


cordon.


S

Stockez

les


boissons


fortement

alco0ment

à

la

directive

UE 2004/108/EC.


Le circuit frigorifique a subi un contrôle


olisées en position verticale dans des


récipients

bien

fermés.


d'étanchéité.


24

fr

Conseils pour la mise au rebut

x Mise au rebut de l'emballage

L'emballage protège votre appareil

contre les dégâts qu'il pourrait subir en cours de transport. Tous les matériaux qui le constituent sont compatibles

avec l'environnement et recyclables. Aidez0nous à recycler l'emballage en respectant l'environnement.

Pour savoir comment vous débarrasser de l'emballage, veuillez consulter votre revendeur ou les services administratifs de votre mairie.

!Attention

Ne permettez jamais aux enfants de jouer avec l'emballage et ses pièces constitutives. Ils risquent de s'étouffer avec les cartons pliants et les feuilles de plastique !

x Mise au rebut de l'ancien appareil

Les appareils usagés ne sont pas des déchets sans valeur. Leur élimination dans le respect de l'environnement permet d'en récupérer de précieuses matières premières.

Cet appareil a été labélisé en

conformité avec la directive

communautaire européenne 2002/96/CE visant les appareils électriques et électroniques usagés (waste electrical and electronic equipment 3 WEEE).

La directive définit le cadre pour une reprise et une récupération des appareils usagés applicables dans les pays de la CE.

!Attention

Avant

de mettre

au rebut l'appareil

qui

ne sert plus

:


1. Débranchez

la

fiche mâle de la

prise

de

courant.


2. Sectionnez le cordon d'alimentation puis enlevez0le avec la fiche mâle.

Les appareils frigorifiques contiennent des fluides frigorigènes et des gaz iso0

lants qui

nécessitent

une

mise

au rebut

adéquate.

Veillez à ce que les tuyaux

du circuit

frigorifique

de

votre

appareil

ne soient pas endommagés jusqu'à

son élimination dans les règles de l'art. Jusqu'à l'enlèvement de l'appareil,

veillez

bien à

ce

que son circuit frigori0

fique

ne soit

pas

endommagé.

25

fr

Votre nouvel appareil

La présente notice d'utilisation vaut pour plusieurs modèles. Selon le modèle, l'appareil peut différer du contenu de illustrations.

A

Compartiment

réfrigérateur


B

Compartiment

congélateur


1

Support

en

contre1porte

6

Clayettes

en

verre

du


14

Minibar

*


(compartiment

21étoiles)


compartiment


réfrigérateur


Il s'ouvre de l'extérieur pour pré0


Pour

ranger

brièvement des


Pour ranger des aliments cuits,


lever rapidement

des boissons


produits

et


glaces alimentaires.


produits laitiers,

la charcuterie.


sans devoir ouvrir la porte du

2

Supports


en

contre1porte

7

Balconnet

à


Rufs


compartiment

réfrigérateur.


15

Distributeur

de

glaçons *


Pour

ranger

des

produits

8

Bac

à

légumes


Pour confectionner et conserver


alimentaires


congelés.


9

Bac

à

fruits


3

Clayettes


en

verre

du

10

Casier à beurre et à fromage


les glaçons.


16

Filtre à

eau *


compartiment

congélateur

11

Supports

en


contre1porte


Pour ranger des produits congelés


Pour

ranger

des conserves,


comme

par

ex.

la viande,


de la viande

et


des bocaux.


le poisson,

les

glaces

alimentaires.

12

Clayettes

à

bouteilles

de

vin

*


4

Bac

à

glaçons

*


13

Compartiment

fraîcheur

*


5

Tiroir

du


compartiment


Pour

ranger

de façon optimale


congélateur


le poisson,

la

viande

rouge

et


Pour

ranger

la

viande

rouge,


de volaille.


le poisson,

et la

volaille (emballés).


*

selon

le

modèle


26

Appuyez sur la touche pourpro0 téger les réglages contre toute modification involontaire. Pour déverrouiller, appuyez sur cette touche plus d'une seconde. La mention s'éteint.

fr

Remarque :Si certaines des pièces indiquées ne figurent pas sur votre appareil, c'estréfèrentqu'ellesà sed'autres modèles.

Distributeur de glaçons

Distributeur de glaçons et d'eau

1 Vis sans fin de transport

2

Plot de prélèvement

3

Bac

récupérateur d'eau

Bandeau de commande et d'affichage

1Touche de réglage de la tempéra1 ture du compartiment congélateur

2 Touche de «super»1congélation

3Bandeau d'affichage

3a Affichage de la température dans le compartiment congélateur

3b Affichage de la «super»1congélation

3c Affichage de la température dans le compartiment réfrigérateur

3d Affichage de la «super»1réfrigération

4Touche de réglage de la température du compartiment réfrigérateur

5 Touche de «super»1réfrigération

6

Touche

de

réarmement

du filtre Commande

de

la

température


à eau


1

Touche

de

réglage


7

Touche

de

prélèvement

d'eau

/

de la température

régnant dans


de glaçons


le compartiment

congélateur

8

Touche

de

verrouillage

du

2

LED d'affichage


distributeur

de glaçons


de la température

régnant dans


Au moment

de le nettoyer ou s'il

le compartiment

congélateur


doit rester une période prolongée 3

Touche

de

réglage


sans servir.


de la température

régnant dans

9

Touche

de

verrouillage

du


le compartiment

réfrigérateur

4

LED d'affichage


bandeau

de commande


(protection

enfants)


de la température

régnant dans


le compartiment

réfrigérateur

Légende des symboles apparaissant sur le bandeau d'affichage

Symbole «Changement de filtre nécessaire».

Symbole


Symbole

«Bandeau

Après un changement de filtre, appuyez

«Distributeur de

de commande

pendant env. 5 secondes sur la touche de

glaçons

verrouillé»

verrouillé»


réarmement pour désactiver ce symbole.


Symbole «Eau»

Symbole

«Glace

Symbole

«Glaçons»


pilée»


27

La catégorie climatique de l'appareil figure sur sa plaque signalétique. Elle indique les températures ambian0
tes dans lesquelles l'appareil peut fonc0 tionner.
S Appuyez sur la touche de réglage jusqu'à ce que la température voulue s'affiche.
Contrôler la température ambiante et l'aération
Pour modifier les valeurs :
N'utilisez ni rallonges, ni multiprises.
La température des compartiments réfrigérateur et congélateur est réglable séparément. La valeur réglée s'affiche sur le bandeau.
Appareils à bandeau de commande
Afin que le distributeur de glaçons onduleurs qui convertissent le courant température continu en courant alternatif de 230 V
fonctionne impeccablement, l'appareil (par exemple installations solaires, doit se trouver parfaitement à la verti0réseaux marins).
cale. Pour horizontaliser, utilisez un
niveau à bulle. Si l'appareil a été installéAttention :
dans une niche ou dans un coin de la - Lors du montage ou du remplacement
pièce, maintenez un écart minimum du cordon d'alimentation, montez un pour pouvoir ouvrir les portes jusqu'à dispositif anti0arrachement.
la butée (voir les dimensions de l'appareil).
fr

Aération

Installation


Branchement


de


Ne recouvrez en aucun cas les orifices


d'entrée

et

de

sortie

d'air

situées

contre

Lieu

d'installation


l'appareil


le bandeau

du

socle.

Dans le cas

con0


Après

l'installation

de

l'appareil,


traire, le groupe frigorifique fonctionne


plus longtemps,

ce

qui

hausse

la

con0

Un

local

sec

et

aérable convient pourattendez

au

moins

1 heure avant

de

le


de courant.


installer

l'appareil.

Veillez à

ce que


sommation


remettre en marche. Au cours du trans0


l'emplacement

ne

soit

pas

directementport, il peut arriver que le fluide contenu


exposé

aux

rayons

solaires

et

qu'il ne


se

trouve

pas

à

proximité


dans le compresseur se déplace dans


d'une source


Enclenchement


de chaleur (par ex. une cuisinière, unle circuit frigorifique.


radiateur,

etc.).

Si l'installation

près

Avant

lapremière

mise

en

service,


de l'appareil


d'une

source


de chaleur

est

inévitable, nettoyez

l'intérieur

de

l'appareil (voir


utilisez

un panneau

isolant

approprié

Nettoyage).


S Branchez

la

fiche

mâle

dans

une

ou respectez

les

distances

minimales


La prise doit être facilement

accessible. prise

de

courant.


suivantes par rapport à la

source de


Branchez

l'appareil

sur


une

prise

instal0


chaleur

:


lée

selon

les

normes

(2200240 VI/I50 HzAprès

le

raccordement

au

secteur,


- 3

cm

par

rapport

à

une

cuisinière

alternatif).

La

prise

doit

être

protégée


l'appareil

commence

réfrigérerà.


électrique,


par

un fusible

de

10 A

à

16 A.


Les éclairages

intérieurs

s'allument


lorsque vous

ouvrez

les

portes.


- 30 cm

par

rapport

à

un


Si vous utilisez l'appareil dans un pays


appareil de

européen,

contrôlez

que

la


Remarque:


chauffage

au fuel

ou

au

charbon.

non

tension


Le

sol

sur le

lieu

d'installation


et le

type de

courant


indiqués sur laL'appareil

atteint

en

2I0I3

heures

les

ne doit


signalétique

correspondent

aux


températures

préréglées (réglages


pas

s'affaisser.

Renforcez0le


le

cas

plaque


caractéristiques

du

réseau

électrique


usine).

Pendant

cette

période, ne


échéant.


local. La plaque signalétique se trouverangez pas de produits alimentaires


L'appareil est très lourd. Pour connaîtreen

bas à gauche

de

l'appareil.

Tout


dans

l'appareil.


son poids à vide, reportez0vous au

remplacement

éventuel

du

câble

d'ali0


Pour modifier les températures pré0


tableau

suivant.


mentation secteur ne doit être réalisé


réglées, ->

reportez0vous


à la rubrique


que

par

un

technicien


dûment formé. «Réglage

de la température».


Version

de

base


104

kg


!

Avertissement


Version

à

distributeur


113

kg


L'appareil

ne

doit

en

aucun

cas

être


Version

à

minibar


115

kg


branché sur

des prises

électroniques


Réglage


de


la


à économie d'énergie ni

sur

des


Catégorie


Température ambiante


climatique


admissible


SN


+10 °C

à

32°C


N


+16 °C

à

32°C


Le

système mémorise la valeur affichée

ST


+16 °C

à

38°C


en

dernier.

T


+16 °C

à

43°C


28

S Fermez l'arrivée d'eau.
Pour éviter l'apparition de mauvaises odeurs, laissez les portes ouvertes.
S'il y a un risque de gel, chargez spécialiste de vidanger le réservoir d'eau affecté au distributeur d'eau (voir les instructions d'installation).
S Nettoyez l'intérieur de l'appareil (voir «Nettoyage de l'appareil»).

Appareils

à

commande

S Videz le

bac

à glaçons

de la température


(voir «Nettoyage

de

l'appareil»).

commande S Prélevez

l'eau

potable restante.

- L'appareil dispose d'une

de température séparée

pour

le

S Débranchez

la

fiche mâle de la

compartiment


réfrigérateur

et

le

prise de

courant.


compartiment


congélateur.


S Sortez le filtre

à

eau.


- Le compartiment réfrigérateur

et

Remarque :


le compartiment congélateur ont,


Lors de

la

remise

en service,

à la fabrication,

été réglés

sur

une

incorporez

un filtre à eau neuf.

température

moyenne.


Remarque :

fr

Agencement variable du compartiment intérieur

Vous pouvez modifier à volonté l'agen0 cement des clayettes dans le comparti0 ment et des bacs en contreporte :

S Tirez la clayette à vous puis extrayez0la.

Les 5 LED couvrent toute la

plage de Remarque

importante

en

cas

températures du

compartiment corre0

de déménagement


spondant. Ainsi

par exemple,

elles vont

Enlevez toutes les pièces facilement

de +2°C à +8°C

pour le compartiment

amovibles et

emballez chacune

d'elles S Soulevez le bac puis sortez0le.

fraîcheur.


soigneusement. Transportez

l'appareil


Pour modifier les valeurs :


à la verticale après avoir sécurisé les

S Appuyez sur touches de réglage

portes et les

trappes avec

du

ruban

adhésif.


jusqu'à ce que le réglage

souhaité


soit atteint.

Fonctions

Alarme

relative à

la porte


S Soulevez

légèrement

le

couvercle

Si vous laissez une porte de l'appareil

du casier

à

beurre

et

à fromage,

ouverte, un

signal

d'alarme

retentit au

bout d'une

minute

pendant

cinq minu0

appuyez

à

gauchepuis

retirez0le.


tes. Il se désactive une minute puis


réactive 5 minutes et

ainsi de suite.


Les

valeurs

de

température

s'affichent Coupure

automatique


par

paliers,

du

réglage

le

plus

chaud de l'éclairage

intérieur


(Min)

au

réglage

le

plus

froid

(Max).

Si une porte

est restée ouverte plus


10 minutes, l'éclairage

intérieur s'éteint


automatiquement pour


empêcher toute


Arrêt

et

remisage


surchauffe. Ceci permet aussi d'écono0


miser de l'énergie.


de l'appareil


Mode

économie

d'énergie S Tirez les tiroirs

à vous, soulevez0les


Coupure


de

l'appareil


Une minute

après

la

fermeture des

légèrement puis

sortez0les.


S Débranchez

la

fiche mâle

de

la


portes et

le

dernier

actionnement


prise


de la

zone de

commande


de

courant.


d'une touche


et d'affichage ou du distributeur de


Remisage

de

l'appareil


glaçons et d'eau, l'affichage du ban0


deau de

commande

bascule

en mode


Si l'appareil

doit

rester longtemps


économie

d'énergie

et

n'est

éclairé que


sans


servir :


faiblement.


S Sortez

tous

les produits

alimentaires

Dès que l'appareil est à nouveau utilisé


de

l'appareil.


(ouverture

de

porte

ou

actionnement


touche),

l'affichage

s'éclaire à

nouveau


normalement.

29

- Les huiles et graisses n'entrent Pour stocker les produits alimentaires pas en contact avec les pièces en de façon optimale :
plastique et le joint de la porte.
Viande en petits morce0 jusqu'à aux, saucisses à griller, 10 jours champignons, salades,
légumes à feuilles
Saucisses, charcuterie en jusqu'à tranches, viande rouge, 7 jours abats, poisson, lait frais,
Dans ce compartiment, la température fromage blanc est maintenue proche de°C.0
Ceci offre des conditions de stockage optimales aux produits frais.
(selon le modèle)
Compartiment fraîcheur

fr


Chaque fois

que vous appuyez

sur

Produits

non1adaptés

au


Compartiment


la touche,

la

fonction

s'active

ou

se

compartiment

fraîcheur

:


désactive.

La

fonction

activée

super0

- Fruits

et

légumes

craignant

le froid

réfrigérateur


réfrigération est

signalée par

le

sym0


bole correspondant sur

le bandeau

(agrumes,

avocats,


papayes,

fruits


de la

passion,

aubergines,

concom0

La

température

du

compartiment

d'affichage.


bres,

poivrons)


réfrigérateur est

réglable entre °C+2


Minibar


- Fruits finissant de mûrir


et +8 °C.

Nous

vous

recommandons


de

régler la température

sur +4 ºC.

(selon le

modèle)


(tomates vertes,

bananes)


- Pommes

de

terre


Utilisation

du

comparti1

Il permet

de

retirer rapidement des


ment

réfrigérateur


boissons

et assimilées présentes dans - Fromage dur


le compartiment

réfrigérateur sans

Attention

lors

de

l'achat


Vous

pouvez ranger

les pâtisseries,

devoir ouvrir

la

porte

de ce

dernier.

de produits

alimentaires

:


plats précuisinés, conserves, lait con0


C'est la fraîcheur des produits alimen0

densé, le fromage dur, les fruits et


légumes craignant le froid, les agrumes


taires le

jour

de

leur

achat

qui déter0

dont par ex. les mandarines ; les


mine leur durée de conservation.

bananes,

ananas,

melons,

avocats,


Principe fondamental : plus les produits

papayes, fruits de la passion, auber0


arrivent frais dans le compartiment fraî0

gines,

laisser aussi

les fruits finir de


cheur et plus ils se conserveront long0

mûrir

;

rangez

également

dans ce tiroir


temps. Lors de vos achats, vérifiez

les

tomates, concombres,

tomates


toujours le degré de fraîcheur des

vertes,

pommes


de

terre.


produits.


Consignes

de

rangement


Durées

de

stockage

°C):0


suivant

la

qualité

de départ

à

respecter

:


-Placez les produits à décongeler

dans le compartiment réfrigérateur.

-L'air ne doit pas pénétrer dans

l'emballage

pour

que

les

aliments

ne perdent

pas

leur

goût

ni ne

sèchent pas.


- Conserver

les alcools

concentrés

uniquement

fermés

et

placés


debout. De

plus,

ne

jamais

ranger

de matières

explosives

dans


l'appareil. Risque d'explosion

!

«super»1réfrigération

Cette fonction sertréfrigérerà rapide0 ment les produits alimentaires ou les boissons qui doivent séjourner dans le compartiment réfrigérateur. Lorsque la fonction de super0réfrigération est active, la température baisse le plus fortement possible dans le comparti0 ment réfrigérateur.

S Appuyez sur la touchesuper.


Viande

en

gros

morceaux,jusqu'à

S A l'aide de la touche de sélection,

plats pré0cuisinés


15 jours


choisissez le produit voulu (légume / Charcuterie

fumée

ou

jusqu'à

poisson / viande).


salée,

choux


20 jours

La sélection est confirmée par

Viande

en

gros

morceaux,jusqu'à

viande

de bbuf,

de gibier30 jours

l'allumage de la LED et l'affichage

après

traitement

à

la


de la température

correspondante.


chaleur, légumes

secs


Remarque :

-Sur la position «off», ce compar0 timent prend la température du

compartiment d'en face.

-La température affichée est une température de consigne. Celle qui règne réellement dans le compar0 timent fraîcheur peut en différer légèrement.

30

Loading...
+ 73 hidden pages